1
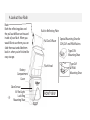
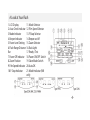
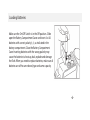
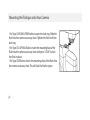
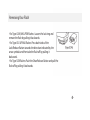
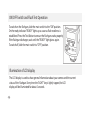
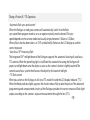
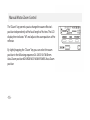
DSLR AF Flash Pro 648 Power Zoom
INSTRUCTION MANUAL
VIV-PRO-648
Introduction
Thank you for purchasing the VIV-PRO-648 digital power zoom flash gun.
Your electronic flash is innovatively designed for both digital cameras and film
cameras with features that are leading photography into the digital era.
Advanced technology is used in your flash to control the correct amount of
light output. Please take a few minutes to read the instruction manual before
using.
-1-
Compatibility
Check to see which item number you have purchased to see compatiility
Digital TTL / Auto Focus flash for:
PRO-648-CAN - Canon Digital E-TTL, E-TTL II cameras & E-TTL film cameras
PRO-648-NIK - Nikon Digital TTL, i-TTL cameras & TTL, i-TTL film cameras
PRO-648-OLY - Olympus Digital TTL cameras
PRO-648-PANA - Panasonic Digital TTL cameras
PRO-648-PEN - Pentax Digital P-TTL & film cameras
PRO-648-SON - Sony Alpha & Konica Minolta Digital ADI, D Lenses cameras & TTL film cameras
Features
• LCD Display
• Auto and manual zoom from 24-28-35-50-70-85mm
• Red focus assist beam for low light focusing
• TTL metering
• Automatic shutter speed setting
• 5 levels of power ratio 1/1, 1/2, 1/4, 1/8, and 1/16
• Flash readiness indication in viewfinder
• Front and rear curtain synchronization
• Red eye reduction (Type NIK, OLY, PANA &PEN)
• Built-in slave function
• Built-in reflecting plate and diffuser
• Power saving function
-2-
A Look at Your Flash
Note:
Both the reflecting plate and
the pull out diffuser are housed
inside of your flash. When you
would like to use them, you can
slide them out and slide them
back in when you’re finished for
easy storage.
Battery
Compartment
Cover
-3-
Slave Sensor
AF Red Light
Lock Ring
Mounting Shoe
Built in Reflecting Plate
Pull Out Diffuser
Special Mounting Shoe for
SON, OLY and PANA flashes
Type SON
Mounting Shoe
Flash Head
FRONT VIEW
Type OLY
& PANA
Mounting Shoe
A Look at Your Flash
1. LCD Display
2. Auto Check Indicator
3. Mode Indicator
4. Beeper Indicator
5. Power Level Setting
6. Flash Range Distance
Bar
7. Power Off Indicator
8. Zoom Position
9. Film Speed Indicator
10. F-Stop Indicator
11. Mode Selector
12. Film Speed Selector
13. F/Stop Selector
14. Beeper on/off
15. Zoom Selector
16. Back Light
17. Ready / Test
18. Power ON/OFF Switch
19. Slave Mode Switch
20. Auto OK
21. Mode Indicator (NIK
only)
-4-
Specifications
Guide Number (ISO 100): (50(m)/164ft) at 85mm position
Motor zooming reflector: 24 - 28 - 35 - 50 - 70 - 85mm
4x 1.5V AA size alkaline batteries
Power Source:
1/1,000 - 1/20,000 second
Flash Duration:
0.5 - 9 seconds
Recycling Time:
80 times with fresh alkaline batteries
Number of Flashes:
Daylight
Color Temperature:
Approx. 72 x 100 x 125 mm
Dimensions:
Approx. 270 grams (w/o batteries)
Net Weight:
* Specifications are subject to change without further notice.
* For Minolta Dynax 3 and 5, select WL from the functional dial to the on position before using
PRO-648-SON.
-5-
Loading Batteries
Make sure the On/Off Switch is in the Off position. Slide
open the Battery Compartment Cover and insert 4 x AA
batteries with correct polarity(-,+), as indicated in the
battery compartment. Close the Battery Compartment
Cover. Inserting batteries with the wrong polarity may
cause the batteries to heat up, leak, explode and damage
the flash. When you need to replace batteries, make sure all
batteries are of the same brand, type and same capacity.
-6-
Mounting the Flashgun onto Your Camera
• For Type CAN, NIK & PEN flashes: Loosen the lock ring. Slide the
flash into the camera accessory shoe. Tighten the flash with the
lock ring.
• For Type OLY & PANA flashes: Insert the mounting foot of the
flash into the camera accessory shoe and press "LOCK" to lock
the flash in place.
• For Type SON flashes: Insert the mounting foot of the flash into
the camera accessory shoe. This will lock the flash in place.
-7-
Removing Your Flash
• For Type CAN, NIK & PEN flashes : Loosen the lock ring and
remove the flash by pulling it backwards.
• For Type OLY & PANA flashes: Press both sides of the
Lock/Release Button towards the direction indicated by the
arrow symbols and then take the flash off by pulling it
backwards.
• For Type SON flashes: Push the Shoe Release Button and pull the
flash off by pulling it backwards.
-8-
ON/OFF Switch and Flash Test Operation
To switch on the flashgun, slide the main switch to the "ON" position.
On the ready indicator "READY" lights up as soon as flash readiness is
established. Press the Test Button to ensure the flashgun works properly.
If the flashgun discharges, wait until the "READY" light glows again.
To switch off, slide the main switch to "OFF" position.
Illumination of LCD display
The LCD display is used to show general information about your camera and the current
status of the flashgun. Every time the "LIGHT" key is lightly tapped, the LCD
display will be illuminated for about 5 seconds.
-9-
Taking a Picture AF / TTL Operation
• Automatic flash sync speed control
When the flashgun is ready, your camera will automatically switch it to the flash
sync speed from program mode or or to an aperture-priority mode selected. The sync
speed depends on the camera model and usually ranges between 1/30sec to 1/250sec.
When a flash shot has been taken, an "OK" symbol briefly flashes on the LCD display to confirm
correct exposure.
• Auto-focus "AF" measuring flash
The integrated "AF" red light beam of the flashgun supports the automatic focusing of auto-focus
TTL cameras. When the prevailing light is insufficient for automatic focusing, the flashgun will
project a red light beam onto the object as soon as the camera's shutter is lightly touched. The
camera's auto-focus system then focuses the object by this beam of red light.
• TTL flash control
When you switch on the flashgun, it will set at TTL mode first and the LCD display indicates "TTL".
When the Ready indicator lights up, press the shutter release fully to take the picture. The advanced
programming and computerized circuitry of the fllashgun provides the correct amount of flash light
output according to the camera's exposure measurement through the lens (TTL).
-10-
Taking a Picture AF / TTL Operation
-11-
If you need to change the mode, simply press the mode selector.
For Canon type flashes, this flashgun's ETTL indicator will light while
connected with ETTL cameras.
For Nikon type flashes, this flashgun's LCD Display will show TTL, I-TTL
and BL in different ways while connected to different camera models.
Please refer to your camera's manual.
• Manual flash mode at full light output
To use the flashgun at full light output in the manual mode, the mode
selector must be set to the M (Manual) position. The LCD display
indicates M (Manual). A full-power flash will then be fired each time
the flashgun is triggered. The LCD display automatically shows the
flash-to-subject distance required for a correct exposure.
An adaptation to the individual shooting situation can be achieved by
changing the lens diaphragm or the focal length (on the camera). 5
level "Power Ratios" of 1/1, 1/2, 1/4, 1/8 and 1/16 could be selected by
slightly tapping the Mode selector when it is at the manual position.
For Nikon D40 and D40X owners: The flash can support an ISO speed
up to 800 in full auto mode. It may not perform as expected at higher
speeds.
Front and Rear Curtain Synchronization
Front and rear curtain synchronization is supported, to use simply set into Front or Rear mode
when using.
For Pentax, you could select the synchronization mode as front curtain (
) or rear curtain
(
). The flashgun will fire according to the mode selected to match with the camera shutter.
Canon, Sony Alpha, Konica Minolta, Nikon, Olympus and Panasonic cameras control front or
rear-curtain synchronization, therefore settings for the flashgun are not required.
Note: The rear curtain synchronization is only possible on cameras with this feature.
See your camera’s instruction manual for details.
-12-
Bounced and Swiveled Flash
Photos shot with full frontal flash are easily recognized by their
harsh, dense shadows.This is often associated with a sharp drop of
the foreground to the background. This phenomenon can be
avoided with bounced and swiveled flashes. Diffused light will
produce a soft and uniform shadow when the reflector is turned
vertically at a 90º angle. Select white or reflective surfaces to
bounce the light off. Otherwise your pictures will come with an
unnatural color cast similar to that of the reflecting surface. When
swiveling the reflector ensure that no direct light from the reflector
reaches the subject. When using bouncing or swiveling flash, the zooming position will be
locked in 50mm, except with Manual mode.
• Reflecting plate and diffuser
The flashgun has a built-in reflecting plate and diffuser. You can slide out the reflecting
plate or diffuser from the top of the flash head. Bouncing the flash head and using the
reflecting plate can produce better looking pictures. The diffuser can reduce
strong light to create soft effects.
-13-
Power Zooming
• Automatic motor zoom control
If you are using a zoom lens, which transmit its focal length to the
camera, the camera will pass on this information to the flashgun.
The flashgun then automatically adjusts its zoom position to comply
with the focal length of the lens. Automatic motor zooming reflector
control is only possible with cameras permitting digital data
transmission to the flalshgun.
The LC D display on the flashgun indicates zooming positions of 24-28-35-50-70-85mm.
When the flashgun is switched on, the activated zoom position is set at 35mm. As soon
as the camera's shutter is lightly touched, the focal length of the flashgun is
automatically adapted to the focal length of the lens.
Whenever the flash head is not at a normal position (facing to the front), such as in bounced or
swiveled at different positions, the zoom position will be at 50mm as indicated by the LCD
display with a brief flash in auto mode.
-14-
Manual Motor Zoom Control
The "Zoom" key permits you to change the zoom reflector's
position independently of the focal length of the lens. The LCD
display then indicates "M" and adjusts the zoom position of the
reflector.
By slightly tapping the "Zoom" key you can select the zoom
position in the following sequence: 24-28-35-50-70-85mm.
Auto Zoom position M24 M28 M35 M50 M70 M85 Auto Zoom
position
-15-
Slave Function
This flashgun can perform as a wireless slave by switching the Slave Mode Switch to S position. The
flashgun will automatically switch to M mode with power ratio 1:1. When the sensor detects the
external flash fire, the flash will synchronize to the fire. The amount of light output can be controlled
by selecting the power ratio from 1/1 to 1/16. If multiple flashes are set as slaves, you must consider
the light amount to get the correct exposure. When the slave mode is on, the power saving mode will
not function.
Power Saving Function
The flashgun will automatically be switched to power saving mode 3 minutes after:
• the flashgun was switched on
• the last flash was fired
The LCD Display will show an "OFF" signal. To reactivate the flashgun, simply press any
buttons underneath the LCD display panel or switch the main switch off and on again.
The flashgun is not completely switched off, however its power consumption is
drastically reduced. If you are not going to use your flashgun any longer, set the main
switch to "OFF"
-16-
Warning
-17-
• The flash unit does not function on camcorders.
• Misfiring sometimes occurs when the power switch is turned on and off
continuously. If it happens, power off the flash unit for few seconds before
switching it on again. The flash unit will then work as normal.
• Do not leave or store the flash unit in temperature exceed 40°C. This
might adversely affect the internal structure or performance of the
flash unit. Particularly, do not leave the flash unit in the automobiles
during summer.
• Remove the batteries if you do not intend to use the flash unit for a
long period of time.
• The flash unit is not water-resistant. Rain and humid weather may
cause irreparable damages to the flash.
• The flash unit is composed of very delicated electronic parts. It should be
protected against shocks, falls or other improper handling.
• The flash unit contains a high voltage condenser. Do not try to open the
housing or repair the flash.
• Do not clean the surface of flash unit by any petrol, detergent solution or
strong solvents. These solvents may cause damages to the flash.
Limited Five Year Warranty
Vivitar warrants this quality product to be free of defects in material and workmanship for a
period of five years from the date of purchase. During the period, Vivitar will repair or replace
the product at no charge for parts or labor.
TIME PERIOD OF THIS WARRANTY
The time period of this warranty starts from the date of the original purchase and expires on the
fifth anniversary date of purchase.
WHAT IS NOT COVERED BY THIS WARRANTY
No express or implied warranty is made for any defects in this product which result from
accident, abuse, misuse, failure to operate the product in accordance with relevant instructions,
neglect, immersion in or exposure to chemicals or liquids, extremes of climate, fungus, excessive
wear and tear/cosmetic damage and defects resulting from other extraneous causes such as
unauthorised disassembly, repair or modification.
This warranty shall not extend to any incidental or consequential damages arising from the
purchase, use or inability to use this product even if Vivitar has been advised of such damages.
The laws of some countries and some States thereof do not allow the limitation of incidental or
consequential damages, so the above limitation or exclusion may apply to you.
-18-
WHAT TO DO WHEN SERVICE IS NEEDED
STEP 1. Package the product and relevant accessories carefully, using ample padding materials and a sturdy
mailing container to prevent damage in transit.
STEP 2. Include in package:
a) Evidence of date and place of original purchase (for example, a copy of your sales receipt).
b) Detailed description of your problem.
c) When possible, a sample evidencing the problem.
(in the U.K.)
STEP 3. Return item (insured) to: (in the U.S.):
Sakar UK
Vivitar
Attn: Technical Support 2D Siskin Parkway East
CV3 4PE, UK
195 Carter Drive
Edison NJ 08817
When service is complete, the product will be returned to you shipping prepaid. In the event the product is
deemed to be not faulty or the defect is a result in wear and tear, Vivitar may levy a handling charge for the
return ofthe product. This warranty gives you specific legal rights. You may also have other rights which vary
from country and State to State thereof. For more information visit our website www.vivitar.com
TECHNICAL SUPPORT
For technical support issues please visit our website at www.vivitar.com. You can find manuals, software and FAQ’s
at the website. Can’t find what you are looking for? E-mail us at [email protected] and one of our technical
support team members will answer your questions. For phone support in the US please call 1-800-592-9541, in the
call 0800 917 4831. If you would like to call from anywhere else, please visit www.vivitar.com for your local toll
-19-UK
free number.