1
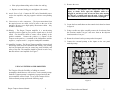
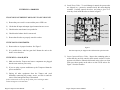
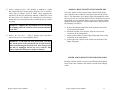
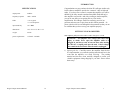
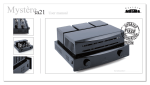
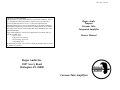
Issue date : 9/11/00
THE ROGUE AUDIO MISSION .........
At Rogue Audio we design and manufacture vacuum tube amplifiers. There is
fierce competition in this market and we will only survive by delivering a
superior product and superior service - we have the engineering and
managerial talent to do so. Our core competencies are electrical, mechanical
and production engineering, along with an overarching passion for excellence.
These skills will be used to create products that offer outstanding value in the
high-end marketplace.
Rogue Audio amplifiers will always be engineered to provide the four key
/elements of audio value:
•
superior sonics
•
high quality and reliability
•
an outstanding appearance
•
an affordable price
Our philosophy is simple - We will never design any amplifier that we would
not purchase for ourselves.
Rogue Audio
Tempest
Vacuum Tube
Integrated Amplifier
Owners Manual
Rogue Audio Inc.
2827 Avery Road
Slatington, PA 18080
Vacuum Tube Amplifiers
LIMITED WARRANTY
Warranty Period
This product has been manufactured under the highest standards of quality and
workmanship. Rogue Audio Inc. (hereinafter “Rogue Audio”) warrants this product
against defects in material or workmanship as follows:
TABLE OF CONTENTS
With the exception of vacuum tubes, Rogue Audio warrants to the consumer all
parts of this product against defects in material and workmanship for a period of
three years from the date of retail purchase. Rogue Audio warrants the vacuum tubes
for a period of six months from the date of retail purchase. Any defective parts will
be replaced free of charge, excluding shipping and handling.
1) Introduction
1
2) Setting up your amplifier
1
3) Using an external preamplifier
6
Proof of purchase in the form of a bill of sale or recited invoice, which indicates
that the product is within the warranty period, must be presented to obtain warranty
service. Rogue Audio suggests that the purchaser retain the dealers bill of sale as
evidence of the date of retail purchase.
4) Operating your power amplifier
8
What’s Not Covered
5) Maintenance
9
6) If there’s a problem
10
7) Adding an Eighty-Eight amp
11
8) Owner/Warranty Registration Form
11
9) Specifications
12
This warranty does not cover cosmetic damage or any damage that results from
product misuse, product abuse, installation error, connection to an improper voltage
supply, accident, improper maintenance, alterations, modifications not authorized in
writing by Rogue Audio, lightening, power surges, or acts of God. Use of any other
than Rogue Audio factory parts may void this warranty.
This warranty does not cover the cost of parts and labor, which would be otherwise
provided without charge under this warranty, obtained from any source other than
Rogue Audio.
This warranty applies only to consumer use of this product and does not cover any
product that is used in any trade or business, or in an industrial or commercial
application.
This warranty is valid only in the United States.
10) Warranty
13
YOUR RIGHTS
ROGUE AUDIO LIMITS ITS OBLIGATIONS UNDER ANY IMPLIED
WARRANTIES UNDER STATE LAWS TO A PERIOD NOT TO EXCEED THE
WARRANTY PERIOD. SOME STATES DO NOT ALLOW LIMITATIONS ON
HOW LONG AN IMPLIED WARRANTY LASTS, AND SOME STATES DO NOT
ALLOW THE EXCLUSION OR LIMITATION OF INCIDENTAL OR
CONSEQUENTIAL DAMAGES, SO THE ABOVE LIMITATIONS OR
EXCLUSIONS MAY NOT APPLY TO YOU. THIS WARRANTY GIVES
YOU SPECIFIC LEGAL RIGHTS, AND YOU MAY HAVE OTHER
RIGHTS, WHICH MAY VARY FROM STATE TO STATE.
To Obtain Service
To obtain service, you must contact Rogue Audio and obtain a return authorization
number. The product must be delivered to Rogue Audio in its original packaging
prepaid at the following address:
Rogue Audio Inc.
675 Route 209
Sciota, PA 18354
Rogue Tempest Owners Manual
13
INTRODUCTION
SPECIFICATIONS
output power
60 WPC
frequency response
10Hz - 20 kHz
THD
< 0.1% typical
< 1% at rated power
input sensitivity
1.0 V RMS
dimensions
18 ¼” W x 15 ¾” D x 7” H
weight
60 Lbs
power requirements
115/230V - 50/60Hz
Congratulations on your purchase decision! We at Rogue Audio truly
believe that our amplifiers provide the “smartest” value in high-end
audio. If you have never owned a vacuum tube amplifier you will be
thrilled by the silky-smooth sound and incredible detail that only a
tube amplifier can provide. And with your Rogue Audio amplifier,
you can be sure that you are getting the very best in tube
amplification. We at Rogue Audio are extremely proud of our
products and want you to enjoy them to their fullest potential. So
please, take the time to read through this short manual so that you can
be confident that you have set up your amplifier properly.
SETTING UP YOUR AMPLIFIER
tools required: phillips head screwdriver and a clean glove or cloth.
WARNING - This amplifier uses voltages that could cause
injury or death. Never open the amplifier while it is
plugged in, and always wait at least one hour after turning
the unit off to unplug and open the unit. Lethal voltages
can remain in the electronics after the unit is unplugged.
1) Opening the box - Carefully remove the amplifier from the box.
It is important that you retain the packing material and box in the
event that the amplifier ever needs servicing. The packing
material and box have been carefully designed to protect your
valuable equipment during shipping so you don’t want to throw
them away!
Rogue Tempest Owners Manual
12
Rogue Tempest Owners Manual
1
2)
Remove Shipping Pallet - The amplifier is attached to a pallet
that supports the main chassis during shipping. This is critical to
ensure that no damage occurs in transit. After removing the
amplifier from the box and packing material, CAREFULLY turn
the unit upon its side. Remove the 4 thumbscrews and washers.
Retain these screws and pallet in the event that the unit ever needs
servicing.
WARNING : Shipping this unit without correctly attaching
the shipping pallet can result in serious structural damage
to the unit.
3) Remove the Top Cover - Using a phillips head screwdriver,
remove the top cover of the amplifier chassis.
WARNING - If the unit has been powered up, you must
turn off the power at the switch and wait at least one hour
before disconnecting the electrical cord. After doing so, the
unit may be unplugged and the top cover removed. This
time is required for dangerous voltages to dissipate.
ADDING A ROGUE EIGHTY-EIGHT POWER AMP
One of the features of the Tempest is that a Rogue Eighty-Eight
power amplifier can be added at a later date to increase the system
power. It is important to use a Rogue Eighty-Eight amplifier so that
the power levels are equivalent between the two amplifiers for a given
input signal. It is also required that the speakers are capable of being
biamped (Separate inputs for tweeters and woofers) The procedure
for biamping is as follows:
1) Remove the shorting connection on the speakers between the
tweeter and woofer inputs.
2) Attach the Speaker wires from the Tempest to the tweeter
connectors on the loudspeakers.
3) Attach speaker cables from the Eighty-Eight amp to the woofer
connectors on the loudspeakers.
4) Connect the active outputs of the Tempest to the inputs of the
Eighty-Eight amp.
OWNER AND WARRANTY REGISTRATION FORM
Included with this manual is an Owner and Warranty Registration
Form. Please take a minute to fill out this card and return it Rogue
Audio.
Rogue Tempest Owners Manual
2
Rogue Tempest Owners Manual
11
4) Install Power Tubes - To avoid damage in transit, the power tubes
are shipped in a protective container inside the main shipping
container. Carefully unpack the tubes, and using a glove or a
clean dry cloth, install the tubes as shown in figure 1.
IF THERE IS A PROBLEM
IF SOUND IS NOT PRESENT OR IS ONLY IN ONE CHANNEL
1) Ensure that power cord is secure and the power LED is on
KT88
KT88
3) Check that the mute button is not pushed in.
12AU7
12AU7
4) Check that the balance knob is not turned.
12AX7
12AX7
5) Ensure that all tubes are properly seated in sockets.
12AU7
12AU7
2) .Check that all input and output signal connections are secure.
IF THE SOUND IS DISTORTED
1) Ensure tubes are in proper locations. See Figure 3.
Figure 3
2) It is possible that a tube has gone bad. Return the unit to the
dealer to test the tubes.
IF THERE IS A 50/60 Hz HUM
1) Make sure that the Tempest and source components are plugged
into the same outlet or power strip.
Note that amps may be shipped with a different but equivalent tube
5) Inspect Input and Driver Tubes - Inspect the remaining tubes to
ensure that they are fully seated in their ceramic sockets. If a tube
appears to be tilted or otherwise dislocated, using a glove or clean
cloth, press down gently on the tube to re-seat it in its socket. See
Figure 3 for tube locations.
2) If you are using a power conditioner try the Tempest without the
power conditioner.
3) Unplug all other equipment from the Tempes and work
backwards connecting the preamp, source, etc back in until the
source of the hum/ground loop is determined
If these solutions do not clear up the problem, please call Rogue Audio
Technical Support at 570-992-9901.
Rogue Tempest Owners Manual
10
Rogue Tempest Owners Manual
3
6) Select Mode - The Rogue Tempest features a user selectable
option of either Triode or Ultra-Linear operating modes. Some
listeners prefer pure triode operation, however, it does limit the
power output of the amplifier to approximately 40 watts per
channel. Ultra-Linear operation offers the amplifier’s full rated
output power of 60 watts per channel. The user is encouraged to
try both modes and determine their own preference.
WARNING - If the unit has been powered up, you must
turn off the power at the switch and wait at least one hour
before disconnecting the electrical cord. After doing so, the
unit may be unplugged and the top cover removed. This
time is required for dangerous voltages to dissipate.
MAINTENANCE
The Rogue Tempest has been designed to provide many years of
enjoyable and reliable service. The greatest care has been taken to
select vacuum tubes that provide superior sound and ensure long life.
However, at some point in time, the tubes will wear out. The factoryinstalled tubes should last thousands of hours. Should it become
necessary to replace a tube, follow the instructions listed below.
Replace Tubes by :
1) Turn off power at switch.
2) Wait one hour for dangerous voltages to dissipate.
3) Unplug power cord from wall socket.
4) Remove the top cover. See figure 2.
To switch modes, use a nonconductive screwdriver to flip the 4
switches shown in Figure 2 to the chosen settings. The unit is
shipped from the factory in Ultra-Linear mode.
5)
Caution - Always ensure that all 4 switches are set alike, in
either UL or Triode Mode
6) Obtain and insert a new set of tubes. It is recommended that a
new set of tubes be obtained from Rogue. If tubes are obtained
from another source, follow the diagram in figure 3 for tube type.
Using a glove or clean dry cloth, carefully remove the tubes from
their sockets - DO NOT TOUCH ANY OTHER ELECTRICAL
COMPONENTS.
7) Insert new tubes in sockets using a glove or cloth. See figure 3 for
locations.
No other items in the unit are designed to be user serviceable.
Ultra-Linear /
Triode Switch
4 Places
Rogue Tempest Owners Manual
4
WARNING - This amplifier uses voltages that could cause
injury or death. Never open the amplifier while it is
plugged in, and always wait at least one hour after turning
the unit off to unplug and open the unit. Lethal voltages
can remain in the electronics after the unit is unplugged
Rogue Tempest Owners Manual
9
OPERATING YOUR TEMPEST
1) Delays- Note that the Tempest is equipped with a slow turn-on
feature that protects other equipment from dangerous transients at
turn-on as well as significantly prolonging tube life.
2) Powering up the system - First turn on the amplifier by pushing in
the “power” button. The red LED will light showing that the unit
is powered up. After approximately 10 seconds the outputs will
disconnect from ground. After another 10 seconds, the control
section will be unmuted and the Tempest is ready to play music.
Note : This unit will not play for approximately 20 seconds
after power on while tubes warm up.
3) Switches and Controls - The Tempest is equipped with volume,
balance, source, power, mute, and an optional remote volume .
•
•
•
•
•
Volume – adjust gain from 0 to 23Volts out
Balance - left and right channel attenuation
Source - selects source material (CD, phono, tape, tuner, aux, preamp)
Power - on/off operation
Mute - mutes output
Remote Volume Control - The Tempest is optionally equipped with an
analog remote volume control feature. The volume may be
adjusted manually using the knob on the front panel, or by using
the remote control provided.
7) Matching Speaker Impedance - The Rogue Tempest provides
options for either 4 ohm or 8 ohm speakers. The impedance
selected will depend on the speakers used. Consult either the
owner’s manual for your speaker or your local dealer to
determine the correct choice. To switch impedance setting, refer
to Figure 3. Note - the amplifier is factory set for 8-ohm
speakers.
⇒ Using a 5/16” wrench, remove the outermost nut from the
red binding post.
⇒ Remove the wire and lug marked 8 ohm from the binding
post. Leave the wire and lug marked feedback in place.
Warning -Never remove the lugs marked feedback or
ground from the binding posts. Doing so could cause
permanent damage to the unit
⇒ Remove the polyurethane tubing from the unused 4-ohm
wire and lug.
⇒ Place 4-ohm wire and lug onto red binding post.
4 Ohm
Wire
Binding
Post
4) Breaking in the amplifier - As with many high-quality audio
amplifiers, the sound of the Rogue Tempest amplifier will
improve during the first 50 to 100 hours of use. This time is
required for components to “burn in.” No special techniques are
required other than standard operation.
Note: This unit will not sound its best until the tubes have
warmed up. This will take approximately 5-10 minutes
Rogue Tempest Owners Manual
8
Feedback
Wire
8 Ohm
Wire
Figure 3
Rogue Tempest Owners Manual
5
⇒ Place polyurethane tubing on the 8-ohm wire and lug.
⇒ Replace nut onto binding post and tighten with wrench.
8) Attach Power Cord - Connect the IEC end of detachable power
cord to the amplifier, and plug opposite end into corresponding
outlet.
9) Connections to other components -. The input connections from
the musical source are made via RCA jacks on the rear of the
amplifier. Be sure to use high quality interconnect cables - they
do make a difference.
10) Polarity - The Rogue Tempest amplifier is a non-inverting
amplifier (positive signal in gives positive signal out) so, for best
sound, care should be taken to ensure correct polarity at the
speaker terminals. Connect the positive (+) outputs of the
Tempest to the positive (+) terminals of the loudspeakers and the
negative (-) outputs to the (-) negative loudspeaker terminals.
11) Amplifier Location - The Rogue Tempest amplifier is an enclosed
tube design with forced air ventilation and cooling. This cooling
has been designed and tested to ensure long term reliability and
safety of the unit. The amplifier should be placed in such a way
that this airflow is not impeded. See Figure 7.
1) Remove the cover
WARNING - This amplifier uses voltages that could cause
injury or death. Never open the amplifier while it is
plugged in, and always wait at least one hour after turning
the unit off to unplug and open the unit. Lethal voltages
can remain in the electronics after the unit is unplugged
2) Locate the four small shunts on the control circuit board as shown
in figure 4.
3) Using a needle nose pliers carefully remove the four shunts from
the locations marked “int pre” and move them to the adjacent
locations marked “ext pre.”
4) Rotate the selector knob to preamp on the front panel.
5) Connect the external preamp to the inputs on the rear panel
marked preamp.
External /
Internal
Preamp
Shunts
USING AN EXTERNAL PREAMPLIFIER
The Tempest offers the flexibility of adding an external
preamplifier should the user wish to do so. In the external preamp
mode the Tempest preamp is completely bypassed and only the
power amplifier section is used. To set up the Tempest for use
with an external preamp perform the following steps.
Figure 4
Rogue Tempest Owners Manual
6
Rogue Tempest Owners Manual
7
OPERATING YOUR TEMPEST
1) Delays- Note that the Tempest is equipped with a slow turn-on
feature that protects other equipment from dangerous transients at
turn-on as well as significantly prolonging tube life.
2) Powering up the system - First turn on the amplifier by pushing in
the “power” button. The red LED will light showing that the unit
is powered up. After approximately 10 seconds the outputs will
disconnect from ground. After another 10 seconds, the control
section will be unmuted and the Tempest is ready to play music.
Note : This unit will not play for approximately 20 seconds
after power on while tubes warm up.
3) Switches and Controls - The Tempest is equipped with volume,
balance, source, power, mute, and an optional remote volume .
•
•
•
•
•
Volume – adjust gain from 0 to 23Volts out
Balance - left and right channel attenuation
Source - selects source material (CD, phono, tape, tuner, aux, preamp)
Power - on/off operation
Mute - mutes output
Remote Volume Control - The Tempest is optionally equipped with an
analog remote volume control feature. The volume may be
adjusted manually using the knob on the front panel, or by using
the remote control provided.
7) Matching Speaker Impedance - The Rogue Tempest provides
options for either 4 ohm or 8 ohm speakers. The impedance
selected will depend on the speakers used. Consult either the
owner’s manual for your speaker or your local dealer to
determine the correct choice. To switch impedance setting, refer
to Figure 3. Note - the amplifier is factory set for 8-ohm
speakers.
⇒ Using a 5/16” wrench, remove the outermost nut from the
red binding post.
⇒ Remove the wire and lug marked 8 ohm from the binding
post. Leave the wire and lug marked feedback in place.
Warning -Never remove the lugs marked feedback or
ground from the binding posts. Doing so could cause
permanent damage to the unit
⇒ Remove the polyurethane tubing from the unused 4-ohm
wire and lug.
⇒ Place 4-ohm wire and lug onto red binding post.
4 Ohm
Wire
Binding
Post
4) Breaking in the amplifier - As with many high-quality audio
amplifiers, the sound of the Rogue Tempest amplifier will
improve during the first 50 to 100 hours of use. This time is
required for components to “burn in.” No special techniques are
required other than standard operation.
Note: This unit will not sound its best until the tubes have
warmed up. This will take approximately 5-10 minutes
Rogue Tempest Owners Manual
8
Feedback
Wire
8 Ohm
Wire
Figure 3
Rogue Tempest Owners Manual
5
6) Select Mode - The Rogue Tempest features a user selectable
option of either Triode or Ultra-Linear operating modes. Some
listeners prefer pure triode operation, however, it does limit the
power output of the amplifier to approximately 40 watts per
channel. Ultra-Linear operation offers the amplifier’s full rated
output power of 60 watts per channel. The user is encouraged to
try both modes and determine their own preference.
WARNING - If the unit has been powered up, you must
turn off the power at the switch and wait at least one hour
before disconnecting the electrical cord. After doing so, the
unit may be unplugged and the top cover removed. This
time is required for dangerous voltages to dissipate.
MAINTENANCE
The Rogue Tempest has been designed to provide many years of
enjoyable and reliable service. The greatest care has been taken to
select vacuum tubes that provide superior sound and ensure long life.
However, at some point in time, the tubes will wear out. The factoryinstalled tubes should last thousands of hours. Should it become
necessary to replace a tube, follow the instructions listed below.
Replace Tubes by :
1) Turn off power at switch.
2) Wait one hour for dangerous voltages to dissipate.
3) Unplug power cord from wall socket.
4) Remove the top cover. See figure 2.
To switch modes, use a nonconductive screwdriver to flip the 4
switches shown in Figure 2 to the chosen settings. The unit is
shipped from the factory in Ultra-Linear mode.
5)
Caution - Always ensure that all 4 switches are set alike, in
either UL or Triode Mode
6) Obtain and insert a new set of tubes. It is recommended that a
new set of tubes be obtained from Rogue. If tubes are obtained
from another source, follow the diagram in figure 3 for tube type.
Using a glove or clean dry cloth, carefully remove the tubes from
their sockets - DO NOT TOUCH ANY OTHER ELECTRICAL
COMPONENTS.
7) Insert new tubes in sockets using a glove or cloth. See figure 3 for
locations.
No other items in the unit are designed to be user serviceable.
Ultra-Linear /
Triode Switch
4 Places
Rogue Tempest Owners Manual
4
WARNING - This amplifier uses voltages that could cause
injury or death. Never open the amplifier while it is
plugged in, and always wait at least one hour after turning
the unit off to unplug and open the unit. Lethal voltages
can remain in the electronics after the unit is unplugged
Rogue Tempest Owners Manual
9
4) Install Power Tubes - To avoid damage in transit, the power tubes
are shipped in a protective container inside the main shipping
container. Carefully unpack the tubes, and using a glove or a
clean dry cloth, install the tubes as shown in figure 1.
IF THERE IS A PROBLEM
IF SOUND IS NOT PRESENT OR IS ONLY IN ONE CHANNEL
1) Ensure that power cord is secure and the power LED is on
KT88
KT88
3) Check that the mute button is not pushed in.
12AU7
12AU7
4) Check that the balance knob is not turned.
12AX7
12AX7
5) Ensure that all tubes are properly seated in sockets.
12AU7
12AU7
2) .Check that all input and output signal connections are secure.
IF THE SOUND IS DISTORTED
1) Ensure tubes are in proper locations. See Figure 3.
Figure 3
2) It is possible that a tube has gone bad. Return the unit to the
dealer to test the tubes.
IF THERE IS A 50/60 Hz HUM
1) Make sure that the Tempest and source components are plugged
into the same outlet or power strip.
Note that amps may be shipped with a different but equivalent tube
5) Inspect Input and Driver Tubes - Inspect the remaining tubes to
ensure that they are fully seated in their ceramic sockets. If a tube
appears to be tilted or otherwise dislocated, using a glove or clean
cloth, press down gently on the tube to re-seat it in its socket. See
Figure 3 for tube locations.
2) If you are using a power conditioner try the Tempest without the
power conditioner.
3) Unplug all other equipment from the Tempes and work
backwards connecting the preamp, source, etc back in until the
source of the hum/ground loop is determined
If these solutions do not clear up the problem, please call Rogue Audio
Technical Support at 570-992-9901.
Rogue Tempest Owners Manual
10
Rogue Tempest Owners Manual
3
2)
Remove Shipping Pallet - The amplifier is attached to a pallet
that supports the main chassis during shipping. This is critical to
ensure that no damage occurs in transit. After removing the
amplifier from the box and packing material, CAREFULLY turn
the unit upon its side. Remove the 4 thumbscrews and washers.
Retain these screws and pallet in the event that the unit ever needs
servicing.
WARNING : Shipping this unit without correctly attaching
the shipping pallet can result in serious structural damage
to the unit.
3) Remove the Top Cover - Using a phillips head screwdriver,
remove the top cover of the amplifier chassis.
WARNING - If the unit has been powered up, you must
turn off the power at the switch and wait at least one hour
before disconnecting the electrical cord. After doing so, the
unit may be unplugged and the top cover removed. This
time is required for dangerous voltages to dissipate.
ADDING A ROGUE EIGHTY-EIGHT POWER AMP
One of the features of the Tempest is that a Rogue Eighty-Eight
power amplifier can be added at a later date to increase the system
power. It is important to use a Rogue Eighty-Eight amplifier so that
the power levels are equivalent between the two amplifiers for a given
input signal. It is also required that the speakers are capable of being
biamped (Separate inputs for tweeters and woofers) The procedure
for biamping is as follows:
1) Remove the shorting connection on the speakers between the
tweeter and woofer inputs.
2) Attach the Speaker wires from the Tempest to the tweeter
connectors on the loudspeakers.
3) Attach speaker cables from the Eighty-Eight amp to the woofer
connectors on the loudspeakers.
4) Connect the active outputs of the Tempest to the inputs of the
Eighty-Eight amp.
OWNER AND WARRANTY REGISTRATION FORM
Included with this manual is an Owner and Warranty Registration
Form. Please take a minute to fill out this card and return it Rogue
Audio.
Rogue Tempest Owners Manual
2
Rogue Tempest Owners Manual
11
INTRODUCTION
SPECIFICATIONS
output power
60 WPC
frequency response
10Hz - 20 kHz
THD
< 0.1% typical
< 1% at rated power
input sensitivity
1.0 V RMS
dimensions
18 ¼” W x 15 ¾” D x 7” H
weight
60 Lbs
power requirements
115/230V - 50/60Hz
Congratulations on your purchase decision! We at Rogue Audio truly
believe that our amplifiers provide the “smartest” value in high-end
audio. If you have never owned a vacuum tube amplifier you will be
thrilled by the silky-smooth sound and incredible detail that only a
tube amplifier can provide. And with your Rogue Audio amplifier,
you can be sure that you are getting the very best in tube
amplification. We at Rogue Audio are extremely proud of our
products and want you to enjoy them to their fullest potential. So
please, take the time to read through this short manual so that you can
be confident that you have set up your amplifier properly.
SETTING UP YOUR AMPLIFIER
tools required: phillips head screwdriver and a clean glove or cloth.
WARNING - This amplifier uses voltages that could cause
injury or death. Never open the amplifier while it is
plugged in, and always wait at least one hour after turning
the unit off to unplug and open the unit. Lethal voltages
can remain in the electronics after the unit is unplugged.
1) Opening the box - Carefully remove the amplifier from the box.
It is important that you retain the packing material and box in the
event that the amplifier ever needs servicing. The packing
material and box have been carefully designed to protect your
valuable equipment during shipping so you don’t want to throw
them away!
Rogue Tempest Owners Manual
12
Rogue Tempest Owners Manual
1
LIMITED WARRANTY
Warranty Period
This product has been manufactured under the highest standards of quality and
workmanship. Rogue Audio Inc. (hereinafter “Rogue Audio”) warrants this product
against defects in material or workmanship as follows:
TABLE OF CONTENTS
With the exception of vacuum tubes, Rogue Audio warrants to the consumer all
parts of this product against defects in material and workmanship for a period of
three years from the date of retail purchase. Rogue Audio warrants the vacuum tubes
for a period of six months from the date of retail purchase. Any defective parts will
be replaced free of charge, excluding shipping and handling.
1) Introduction
1
2) Setting up your amplifier
1
3) Using an external preamplifier
6
Proof of purchase in the form of a bill of sale or recited invoice, which indicates
that the product is within the warranty period, must be presented to obtain warranty
service. Rogue Audio suggests that the purchaser retain the dealers bill of sale as
evidence of the date of retail purchase.
4) Operating your power amplifier
8
What’s Not Covered
5) Maintenance
9
6) If there’s a problem
10
7) Adding an Eighty-Eight amp
11
8) Owner/Warranty Registration Form
11
9) Specifications
12
This warranty does not cover cosmetic damage or any damage that results from
product misuse, product abuse, installation error, connection to an improper voltage
supply, accident, improper maintenance, alterations, modifications not authorized in
writing by Rogue Audio, lightening, power surges, or acts of God. Use of any other
than Rogue Audio factory parts may void this warranty.
This warranty does not cover the cost of parts and labor, which would be otherwise
provided without charge under this warranty, obtained from any source other than
Rogue Audio.
This warranty applies only to consumer use of this product and does not cover any
product that is used in any trade or business, or in an industrial or commercial
application.
This warranty is valid only in the United States.
10) Warranty
13
YOUR RIGHTS
ROGUE AUDIO LIMITS ITS OBLIGATIONS UNDER ANY IMPLIED
WARRANTIES UNDER STATE LAWS TO A PERIOD NOT TO EXCEED THE
WARRANTY PERIOD. SOME STATES DO NOT ALLOW LIMITATIONS ON
HOW LONG AN IMPLIED WARRANTY LASTS, AND SOME STATES DO NOT
ALLOW THE EXCLUSION OR LIMITATION OF INCIDENTAL OR
CONSEQUENTIAL DAMAGES, SO THE ABOVE LIMITATIONS OR
EXCLUSIONS MAY NOT APPLY TO YOU. THIS WARRANTY GIVES
YOU SPECIFIC LEGAL RIGHTS, AND YOU MAY HAVE OTHER
RIGHTS, WHICH MAY VARY FROM STATE TO STATE.
To Obtain Service
To obtain service, you must contact Rogue Audio and obtain a return authorization
number. The product must be delivered to Rogue Audio in its original packaging
prepaid at the following address:
Rogue Audio Inc.
675 Route 209
Sciota, PA 18354
Rogue Tempest Owners Manual
13
Issue date : 9/11/00
THE ROGUE AUDIO MISSION .........
At Rogue Audio we design and manufacture vacuum tube amplifiers. There is
fierce competition in this market and we will only survive by delivering a
superior product and superior service - we have the engineering and
managerial talent to do so. Our core competencies are electrical, mechanical
and production engineering, along with an overarching passion for excellence.
These skills will be used to create products that offer outstanding value in the
high-end marketplace.
Rogue Audio amplifiers will always be engineered to provide the four key
/elements of audio value:
•
superior sonics
•
high quality and reliability
•
an outstanding appearance
•
an affordable price
Our philosophy is simple - We will never design any amplifier that we would
not purchase for ourselves.
Rogue Audio
Tempest
Vacuum Tube
Integrated Amplifier
Owners Manual
Rogue Audio Inc.
2827 Avery Road
Slatington, PA 18080
Vacuum Tube Amplifiers