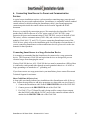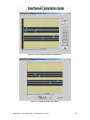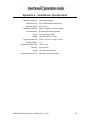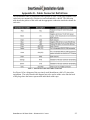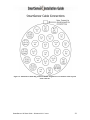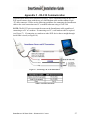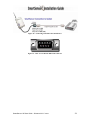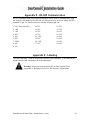
1
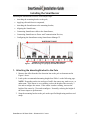
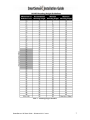
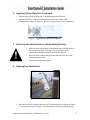
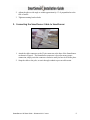
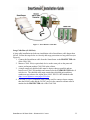
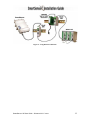
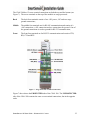
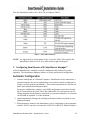
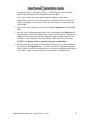
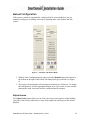
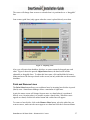
SmartSensor 105
Installation Guide
Wavetronix LLC
380 S. Technology Ct.
Lindon, Utah 84042 USA
Voice: (801) 764-0277
Fax: (801) 764-0208
Web: www.wavetronix.com
E-mail: [email protected]
© 2007 Wavetronix LLC. All Rights Reserved.
SmartSensor, SmartSensor Manager, Click!, Wavetronix, and all associated logos are trademarks of Wavetronix LLC. All other
product or brand names as they appear are trademarks or registered trademarks of their respective holders.
Protected by U.S. Patent Nos. 6,556,916 and 6,693,557. Other U.S. and international patents pending.
The Company shall not be liable for any errors contained herein or for any damages arising out of or related to this document or the
information contained therein, even if the Company has been advised of the possibility of such damages.
This document is intended for informational and instructional purposes only. The Company reserves the right to make changes in the
specifications and other information contained in this document without prior notification.
SmartSensor 105 User Guide – Wavetronix LLC 9/20/07
Contents
Typographical Conventions ................................................................................................3
Product Notifications ...........................................................................................................3
Introduction..........................................................................................................................5
Unpacking the Sensor ..........................................................................................................5
Installing the SmartSensor..................................................................................................6
1. Attaching the Mounting Bracket to the Pole.....................................................................6
2. Applying Silicon Dielectric Compound............................................................................8
3. Attaching the SmartSensor to the Mounting Bracket .......................................................8
4. Aligning the SmartSensor .................................................................................................8
5. Connecting the SmartSensor Cable to SmartSensor.........................................................9
6. Connecting SmartSensor to Power and Communication Devices..................................10
7. Configuring SmartSensor with SmartSensor Manager™...............................................14
Automatic Configuration .....................................................................................................14
Manual Configuration..........................................................................................................16
Appendix A – Product Data ..............................................................................................24
Appendix B – Cable Connector Definitions.....................................................................25
Appendix C – RS-232 Communication ............................................................................27
Appendix D – RS-485 Communication ............................................................................29
Appendix E – Labeling ......................................................................................................29
Appendix F – Old Cable Connector Definitions .............................................................30
Appendix G – Cable Lengths ............................................................................................35
SmartSensor 105 User Guide – Wavetronix LLC 9/20/07
- 2-
Typographical Conventions
Before you start using this guide, it is important to understand the terms and
typographical conventions used in the documentation.
Bold Text
Bolded text represents items you must select, such as menu options,
command buttons, or items in a list.
Product Notifications
Symbol Legend
The lightning bolt within an equilateral triangle symbol is intended to alert
the user to the risk of electric shock.
The exclamation point within an equilateral triangle is intended to alert the
user to the presence of important installation, operating, and maintenance
instructions.
FCC Part 15 Compliance
This device complies with Part 15 of the Federal Communications
Commission (FCC) rules which states that operation is subject to the
following two conditions: (1) this device may not cause harmful
interference, and (2) this device must accept any interference received,
including interference that may cause undesirable operation. FCC
compliance statements for applicable optional modules are to be found in
the module specifications. Unauthorized changes or modifications not
expressly approved by the party responsible for compliance with the FCC
rules could void the user’s authority to operate this equipment.
NOTE: Do not shorten supplied cable less than manufacturer’s
recommended length. Sensor cable must be at least 2 m long to maintain
FCC compliance.
SmartSensor 105 User Guide – Wavetronix LLC 9/20/07
- 3-
Risk of Electrical Shock
An authorized electrical technician should perform installation and
operation of this unit. Persons other than authorized and approved electrical
technicians should NOT attempt to connect this unit to a power supply
and/or traffic control cabinet, as there is a serious risk of electrical shock
through unsafe handling of the power source. Extreme caution should be
used when connecting this unit to an active power supply.
Technical Service
Do not attempt to service or repair this unit. This unit does not contain any
components and/or parts serviceable in the field. Any attempt to open this
unit, except as expressly written and directed by Wavetronix, will void the
customer warranty. Wavetronix is not liable for any bodily harm or damage
caused if service is attempted or if the back cover of the SmartSensor unit is
opened. Refer all service questions to Wavetronix or an authorized
distributor.
Installation Safety Precaution
Caution should be used when installing any sensor on or around active
roadways. Serious injury can result when installation is performed using
methods that are not in accordance with authorized local safety policy and
procedures. Always maintain an appropriate awareness of the traffic
conditions and safety procedures as they relate to specific locations and
installations.
SmartSensor 105 User Guide – Wavetronix LLC 9/20/07
- 4-
Introduction
The Wavetronix SmartSensor utilizes patented Digital Wave Radar™ technology to
detect lane occupancy, traffic volume and average speed in up to eight lanes of traffic
simultaneously. Classified as Frequency Modulated Continuous Wave (FMCW) radar,
SmartSensor collects data using a 10.525 GHz (X-band) operating radio frequency.
The installation and configuration process is quick and easy. Once installed,
SmartSensor configures automatically, requires little or no on-site maintenance and may
be remotely reconfigured. This installation guide provides the step-by-step process for
installing and configuring SmartSensor, including mounting and alignment guidelines
and instructions for both automatic and manual sensor configurations. Any questions
about the information in this guide should be directed to Wavetronix or your distributor.
Unpacking the Sensor
A typical sensor package contains the following items:
10.525 GHz SmartSensor Radar Traffic Sensor
SmartSensor Mounting Kit
Installation Guide
SmartSensor Manager Software
Check the packing slip for actual contents. If any of these items are missing,
note the serial number located on the back of the sensor and contact your
distributor.
Additional products may be purchased through your distributor. The following optional
items are not included unless specifically ordered (check packing list for actual
inventory):
SmartSensor Cable with Connector
Click! 172/174 contact closure adapter
Click! 200 surge protector
Click! 201 1 Amp AC-to-DC converter
Click! 202 2 Amp AC-to-DC converter
Click! 300 RS-232-to-RS-485 adapter
Click! 301 Ethernet to serial adapter
Click! 400 900 MHz Spread Spectrum Radio
Click! 401 Serial-to-802.11b Converter Module
SmartSensor 105 User Guide – Wavetronix LLC 9/20/07
- 5-
Installing the SmartSensor
Installing the SmartSensor involves seven simple steps:
1.
Attaching the mounting bracket to the pole;
2.
Applying silicon dielectric compound;
3.
Attaching the SmartSensor to the mounting bracket;
4.
Aligning the SmartSensor;
5.
Connecting SmartSensor cable to the SmartSensor;
6.
Connecting SmartSensor to Power and Communication Devices;
7.
Configuring the SmartSensor using SmartSensor Manager™.
Figure 1 – Detection range of a properly mounted SmartSensor
1. Attaching the Mounting Bracket to the Pole
1. Measure the offset from the first detection lane to the pole as demonstrated in
Figure 1 above.
2. Look up the recommended mounting height from Table 1 on the following page.
NOTE: Depending on the site and type of traffic the sensor may tend to over- or
undercount. If the sensor is over-counting, reduce the height of the sensor by 3
feet and reconfigure the sensor. If the sensor is under-counting, increase the
height of the sensor by 3 feet and reconfigure. Normally, reducing the height of
the sensor improves performance.
3. Strap the mounting bracket to the pole at the specified height using stainless steel
straps.
SmartSensor 105 User Guide – Wavetronix LLC 9/20/07
- 6-
Table 1 – Mounting Height Guidelines
SmartSensor 105 User Guide – Wavetronix LLC 9/20/07
- 7-
2. Applying Silicon Dielectric Compound
1. Take the tube of Silicon Dielectric Compound and tear off the tab.
2. Squeeze about 25% of the silicon into the connector at the base of the
SmartSensor as shown in Figure 2. Be sure to wipe off any excess compound.
Figure 2 – Applying Silicon Dielectric Compound
3. Attaching the SmartSensor to the Mounting Bracket
1. Align the bolts on the back of the SmartSensor with the holes in
the mounting bracket. The large 25-pin connector on the
SmartSensor should be pointing towards the ground.
2. Place the lock washers onto the bolts after the bolts are in the
mounting bracket holes.
3. Thread on the nuts and tighten.
4. Aligning the SmartSensor
Figure 3 – Aiming the SmartSensor
1. Aim the front of the sensor at the center of the detection area as shown in Figure
3. You may also refer to Figure 1 as an illustration of where to aim the sensor.
SmartSensor 105 User Guide – Wavetronix LLC 9/20/07
- 8-
2. Adjust the side-to-side angle to within approximately ±2° of perpendicular to the
flow of traffic.
3. Tighten mounting bracket bolts.
5. Connecting the SmartSensor Cable to SmartSensor
Figure 4 – Attached Cable
1. Attach the cable connector to the 25-pin connector at the base of the SmartSensor
as shown in Figure 4. The SmartSensor connector is keyed to ensure proper
connection; simply twist the connector clockwise until you hear it click into place.
2. Strap the cable to the pole, or run it through conduit to prevent cable strain.
SmartSensor 105 User Guide – Wavetronix LLC 9/20/07
- 9-
6. Connecting SmartSensor to Power and Communication
Devices
A typical sensor installation requires a pole-mount box containing surge protection and
connections for power and communications. SmartSensor is compatible with all standard
control cabinets; a table describing the SmartSensor cable’s pin-out and appropriate
connection points inside the control cabinet can be found in Appendix B of this
document.
However, to simplify the connection process, Wavetronix has developed the Click!™
product family which offers an AC to DC power supply (Click! 201/202); surge
protection for power and communications (Click! 200/204); a series of modems (Click!
300 series); wireless communications (Click! 400); and a series of contact closure
modules (Click! 100, 172, and 174). If you are connecting SmartSensor to any of the
Click! devices, please refer to the installation guide for each product for instructions; if
you are connecting SmartSensor to other manufacturer devices, please refer to the user
manuals for those products.
Connecting SmartSensor to a Surge Protection Device
It is strongly recommended that the SmartSensor be connected to a surge protection
device. The Wavetronix Click! 200 and equivalent devices are designed to prevent
electrical surges from damaging the sensor.
If using Click! 200 devices, ALL Click! 200 devices must be mounted on a DIN rail that
is connected to earth ground either through an earth grounded chassis or a 16 AWG or
larger grounding wire attached to a 7’ grounding rod.
If you choose not to use surge protection in your installation, please contact Wavetronix
Technical Support for assistance.
Short Cable Run (40 feet or less)
A short cable run usually indicates any installation with a SmartSensor cable 40 feet or
less. Follow the steps below to add surge protection on a short cable run (see Figure 5):
1. Connect the SmartSensor cable to the UNPROTECTED side of the Click! 200.
2. Connect power to the PROTECTED side of the Click! 200.
3. If a Click! 172 or 174 Input file card is being used for contact closure outputs,
then the RS-485 cable and the 24 VDC power in the controller cabinet must be
attached to the PROTECTED side of the Click! 200.
SmartSensor 105 User Guide – Wavetronix LLC 9/20/07
-10-
Figure 5 – Short Distance Cable Run
Long Cable Run (41-100 feet)
A long cable installation includes any installation with a SmartSensor cable longer than
40 feet. Follow the steps below to correctly add surge protection to a long cable run (see
Figure 6):
1. Connect the SmartSensor cable from the SmartSensor to the PROTECTED side
of the Click! 200.
2. Mount a Click! 200 (or equivalent) device on the same pole as the protected
sensor, and mount another Click! 200 in the cabinet.
3. A single unspliced, shielded cable must be kept as short as possible and run
between two Click! 200 modules and connected to the UNPROTECTED side of
each device. The shielded cable must contain three shielded pairs and three
conductors equivalent to the Alpha Wire 6010C 3PR 22 AWG shielded cable
(http://www.alphawire.com/pages/228.cfm).
4. If a Click! 172 or 174 input file card is being used for contact closure outputs,
then the RS-485 cable and the 24 VDC power in the controller cabinet must be
attached to the PROTECTED side of the Click! 200.
SmartSensor 105 User Guide – Wavetronix LLC 9/20/07
-11-
Figure 6 – Long Distance Cable Run
SmartSensor 105 User Guide – Wavetronix LLC 9/20/07
-12-
The Click! 200 has 12 screw terminal connections on both the top and the bottom (see
Figure 7). The screw terminals on the top of the module are surge protected:
Back
The back four terminals consist of one +DC power, -DC and two surge
ground connections;
Middle
The middle four terminals are for RS-485 communication and consist of a
+485 connection, a -485 connection and two connections for ground. One of
the ground connections is used as ground for RS-232 communication;
Front
The front four terminals are for RS-232 communication and consist of TD,
RD, CTS and RTS.
Figure 7 – Surge Protected Terminal Connections
Figure 7 above shows the PROTECTED side of the Click! 200. The UNPROTECTED
side of the Click! 200 contains the same screw terminal connections, but in the opposite
order.
SmartSensor 105 User Guide – Wavetronix LLC 9/20/07
-13-
Wire the SmartSensor cable to the Click! 200 according to Table 2:
Table 2 – Click! 200 Connections
NOTE: See Appendix F for a description of how to wire the Click! 200 using the old
SmartSensor cable as well as for a cable connector pin-out diagram.
7. Configuring SmartSensor with SmartSensor Manager™
After the SmartSensor is installed, it must be configured to the roadway for proper
operation. The SmartSensor Manager software is used to perform this configuration.
Automatic Configuration
1. Connect SmartSensor to a Personal Computer. SmartSensor can be connected to a
personal computer for on-site configuration; it can also be remotely configured via
wired or wireless modems and Ethernet. These connection options are described in
detail in the SmartSensor Manager manual.
For on-site configuration, connect a 9-pin (DB9) null-modem serial cable from the
RS-232 connector on the Click! 200 to the standard RS-232 serial port on your PC.
Wiring diagrams which illustrate connections to a personal computer or to a modem
can be found in Appendix C of this document.
2. Launch SmartSensor Manager by clicking on the shortcut that was placed on your
Windows desktop.
3. When prompted, connect to the SmartSensor you are configuring by the appropriate
method: Serial Connection (if connected via RS-232 or RS-485); Modem (requires
SmartSensor 105 User Guide – Wavetronix LLC 9/20/07
-14-
a telephone number); or Ethernet (requires a TCP/IP address). Select the radio
button of the appropriate connection method and click OK.
If you select Serial Connection and SmartSensor Manager cannot find a
SmartSensor connected to the serial port, then a “SmartSensor was not detected…”
window will appear on your screen. Check the serial and power connections and
click on OK.
4. When a successful connection is made, select Lane Configuration from the Edit
menu.
5. Once the Lane Configuration page opens, click on the button labeled Restart and,
when prompted, confirm the configuration “restart” by clicking Yes. SmartSensor
Manager will automatically begin detecting and configuring lanes, and the screen
will show a visual depiction of the lanes and the vehicle detections in real-time.
NOTE: Free-flowing traffic is required for proper configuration.
6. After the lanes have been detected and configured correctly, save the configuration
by clicking on the Finished button. The time required for configuration depends
on the volume of traffic present in the lanes, but a typical configuration takes only a
few minutes. Light or sporadic traffic may result in slower configurations.
SmartSensor 105 User Guide – Wavetronix LLC 9/20/07
-15-
Manual Configuration
If the sensor is unable to automatically configure itself to your satisfaction, you can
manually configure it by adding, removing or adjusting lanes, lane dividers and lane
centers.
Figure 8 – Automatic and Manual Modes
1. With the Lane Configuration page open, select the Manual button; the buttons in
the toolbar on the right of the screen will change from gray to black (see Figure
8).
2. The newly activated buttons will remain pressed when you click them. To change
the configuration, click the appropriate button, move your cursor over the window
showing the roads, lanes and vehicles, and then make the changes:
Adjust Lanes
The Adjust Lanes button allows you to click your mouse cursor on any visible shoulder
(gray line), lane divider (white line), or lane center (pink line) and drag it to the desired
position.
SmartSensor 105 User Guide – Wavetronix LLC 9/20/07
-16-
The cursor will change from an arrow to a hand when it is positioned over a “draggable”
line.
Lane centers (pink lines) only appear when the cursor is placed directly over them.
Figure 9 – Adjusting Lanes
Also, you will notice that shoulders, dividers, or centers cannot be dragged past each
other. Figure 9 shows the pressed Adjust Lanes button, the hand cursor and the
adjustable or draggable lines. To adjust this lane center, click and hold the left mouse
button and move the line up or down on the screen, but only within the area between the
shoulders.
Paint and Remove Lines
The Paint Lines button allows you to add new lanes by inserting lane dividers in paved
(black) areas. SmartSensor Manager allows a maximum of eight lanes.
Again, the mouse cursor will change from an arrow to a hand when it is positioned
directly over a location where it is possible to paint a lane divider. When the cursor
appears as a hand, click the left mouse button and a white line will appear.
To remove a lane divider, click on the Remove Lines button, select the white line you
want to remove, make sure the cursor appears as a hand and click the left mouse button.
SmartSensor 105 User Guide – Wavetronix LLC 9/20/07
-17-
Remove Lane
The Remove Lane button allows users to remove entire lanes by moving the mouse
cursor arrow to the desired lane. When the arrow changes to a hand, click the left mouse
button and the selected lane will disappear.
Construct and Remove Road
To insert a new road, click on the Construct Roads button and select a location
anywhere in the background (khaki colored) area. Make sure the cursor appears as a
hand and then click the left mouse button to draw the road.
Because new roads are initially drawn with an upper shoulder line, a centerline and a
lower shoulder line, you will usually need to adjust your road to the desired width using
the Adjust Lanes function.
To remove an entire road, including all lanes, click on the Remove Roads button, select
the road you want to remove, and click the left mouse button.
Construct and Remove Barrier
Constructing a barrier or median is essentially the act of dividing a single road into two
separate roads. SmartSensor Manager defines a barrier or median as two adjacent
shoulder lines or two shoulder lines with only background (khaki colored) areas in
between them.
To construct a barrier or median, click on the Construct Barriers button and move the
cursor to the paved area where you want to insert the barrier. When the cursor changes
from an arrow to a hand, click on the left mouse button and the barrier will appear.
Initially, the new barrier is only two shoulder lines wide. To widen the barrier, use the
Adjust Lanes feature as explained earlier.
You may also remove a barrier, or convert two roads into a single road, by clicking on
the Remove Barrier button and selecting the barrier you wish to delete.
Reverse Direction
Once the configuration process has been completed, you will notice that SmartSensor
Manager shows all detected vehicles moving in the same direction. The Reverse
Direction button enables you to change the direction of travel depicted in SmartSensor
Manager so that each lane reflects the actual direction traveled by detected vehicles.
SmartSensor 105 User Guide – Wavetronix LLC 9/20/07
-18-
To do this, press the Reverse Direction button and move the cursor over the lane you
wish to change. Once the cursor is in place, the cursor will again change from an arrow
to a hand and a tiny arrow will appear below the hand to indicate the current direction of
that lane.
Figure 10 – Reversing Direction
Click the left mouse button, and the tiny arrow will reverse direction to verify the change
has occurred (see Figure 10). Using the Reverse Direction button only affects the
SmartSensor Manager display and is useful for verifying performance.
Edit Lane Names
By default, the SmartSensor identifies the lanes it configures as lane 1 up to lane 8, where
lane 1 is the lane located closest to the sensor. However, you may wish to assign lane
numbers differently.
SmartSensor 105 User Guide – Wavetronix LLC 9/20/07
-19-
Figure 11 – Editing Lane Names
To do this, click on the Edit Lane Name button and an Edit Lane Names window will
appear (see Figure 11). Highlight the current lane name by double clicking on it with the
mouse, and then type in the lane’s new alpha-numeric identification of up to eight
characters. Lane names can also be changed by going to Sensor Settings and clicking on
the Data Collection tab.
Saving the Configuration
Figure 12 – Update, Undo, and Restart Buttons
Once all manual configurations are completed, the changes must be updated in the
SmartSensor’s flash memory. Update all manual changes by clicking the Update button
located below the manual tool buttons (see Figure 12). The process of updating the
configuration takes only seconds and lane changes won’t take effect until after the sensor
has been updated. Once the process is completed, SmartSensor Manager will remain on
the Lane Configuration page so that any manual changes made may be viewed and easily
changed if needed.
SmartSensor 105 User Guide – Wavetronix LLC 9/20/07
-20-
Undoing Manual Changes
Unsaved changes may be undone without repeating the manual configuration process.
Click on the Undo button found below the manual tool buttons (see Figure 12). This tool
retrieves the last saved configuration from the SmartSensor, effectively undoing any
unsaved changes that were made.
Restarting Lane Configurations
To completely erase the SmartSensor’s current configuration and restart the Lane
Configuration routine, change from Manual back to Automatic mode by clicking on the
Automatic button and then clicking on the Restart button located near the Update and
Undo buttons below the Manual toolbar (see Figure 12).
This erases all manual changes that have been made, and the SmartSensor Manager will
automatically reconfigure the road for you.
Figure 13 – Confirmation of Restart
After clicking on the Restart button, a window will be displayed asking whether you
want to proceed (see Figure 13). Click on Yes to continue or on No to quit this
procedure.
Exiting the Lane Configuration Page
Once all automatic and manual configurations have been completed, you may perform a
final save and exit the Lane Configuration page by clicking on the Finished button
located at the bottom right of the screen.
SmartSensor 105 User Guide – Wavetronix LLC 9/20/07
-21-
Figure 14 – Lane Configuration Page in Manual Mode
Figure 15 – Traffic/Event Data View Mode
SmartSensor 105 User Guide – Wavetronix LLC 9/20/07
-22-
A window will appear indicating that the changes are being saved to the SmartSensor.
After the changes have been saved, SmartSensor Manager will automatically change
from Lane Configuration to Traffic/Event Data View mode. Figures 14 and 15 illustrate
the differences between these two modes.
Configuration Summary
After completing the steps listed above and having read over some of the configuration
basics, the SmartSensor should now be installed and configured correctly.
SmartSensor will immediately begin detecting vehicles and providing speed, volume and
occupancy data in real-time. For more detailed information regarding the configuration
of the SmartSensor, refer to the SmartSensor Manager User’s Manual. Your
SmartSensor distributor can also provide additional assistance.
SmartSensor 105 User Guide – Wavetronix LLC 9/20/07
-23-
Appendix A – SmartSensor Specifications
Operating Frequency:
10.525 GHz (X-band)
Detection Zones:
Up to 8 traffic lanes simultaneously
Detection Range:
60 m (197 ft.)
Measured Quantities:
Communications:
Speed, occupancy, volume, presence
RS-232 and RS-485 connection
Power:
7.5 watts @ 10-30 VDC
Weight:
Less than 5 lbs. Or 2.27 kg
Physical Dimensions:
Zone Resolution:
Ambient Operating Temp:
Humidity:
Shock:
Transmitted Power at 3m:
32 cm x 23 cm x 7.6 cm (H x W x D)
3m
-34C to +74C
Up to 95% RH
10 g 10ms half sine wave
Less than 2 mW @ 10.525Ghz
SmartSensor 105 User Guide – Wavetronix LLC 9/20/07
-24-
Appendix B – Cable Connector Definitions
The SmartSensor cable is comprised of three groups of wires. Each group contains colorcoded wires accompanied by a drain wire and surrounded by a shield. The following
table details the pin out of the cable and the appropriate connection inside the cabinet for
each wire:
Table 3 – SmartSensor Cable and Cabinet Connection
See Figure 16 for a diagram of the previously used SmartSensor cable’s 25-pin socket
assignment. The codes listed in the diagram are to be used to solder wires into the back
of the plug where the letters represent the individual solder cups.
SmartSensor 105 User Guide – Wavetronix LLC 9/20/07
-25-
Figure 16 - SmartSensor SS105 Plug Connector Socket Assignment as seen from the solder cup side
of the connector.
SmartSensor 105 User Guide – Wavetronix LLC 9/20/07
-26-
Appendix C – RS-232 Communication
Communication between the SmartSensor and PC can be established using the RS-232
DTE specifications, along with the use of a Null Modem cable and the standard 9-pin
“D” male connector. Please use the following guidelines for connecting the SmartSensor
cable to the serial connection on a PC or modem when not using a Click! 200.
NOTE: The RS-232 pin outs remain the same on the SmartSensor cable regardless of
connecting to a PC or a modem. If connecting to a PC, a null modem cable is required
(see Figure 17). If connecting to a modem or other DCE device then a straight through
serial cable is used (see Figure 18).
Figure 17 – Connecting a PC to the SmartSensor
Table 4 – RS-232 Connections
SmartSensor 105 User Guide – Wavetronix LLC 9/20/07
-27-
Figure 18 – Connecting a Modem to the SmartSensor
Figure 19 – Rear view of RS-232 DB9 serial connector
SmartSensor 105 User Guide – Wavetronix LLC 9/20/07
-28-
Appendix D – RS-485 Communication
RS-485 communication between the SmartSensor and PC may be established by using
the SeaLink +485 model #2102 RS-485 to USB converter by SeaLevel, along with the
standard 25-pin “D” female connector with the following pin out:
1: No Connection (N/C)
2: -485
3: -485
4: N/C
5: N/C
6: N/C
7: GND
8: N/C
9: N/C
10: N/C
11: N/C
12: N/C
13: N/C
14: +485
15: N/C
16: +485
17: N/C
18: N/C
19: N/C
20: N/C
21: N/C
22: N/C
23: N/C
24: N/C
25: N/C
Appendix E – Labeling
The following label, visible to all persons exposed to the transmitter, is provided on the
product unless SAR compliance can be demonstrated:
Warning: All persons must beat least 20 cm from antenna when
transmitter is operating to meet FCC RF exposure requirements.
SmartSensor 105 User Guide – Wavetronix LLC 9/20/07
-29-
Appendix F – Old Cable Connector Definitions
The previously used SmartSensor cable is comprised of six twisted pairs of wire. Each
pair is comprised of a black and a red wire, accompanied by a drain wire and surrounded
by a shield. A numeric label (1 through 6) identifies each pair of black and red wires.
The following table details the pin out of the cable and the appropriate connection inside
the cabinet for each wire:
Table 5 – Cabinet Connection
Use the illustration below if you are using the old SmartSensor cable:
SmartSensor 105 User Guide – Wavetronix LLC 9/20/07
-30-
Figure 20 - Click! 200 Wiring (Old)
See Figure 21 for a diagram of the previously used SmartSensor cable’s 25-pin socket
assignment. The codes listed in the diagram are to be used to solder wires into the back
of the plug where the letters represent the individual solder cups.
SmartSensor 105 User Guide – Wavetronix LLC 9/20/07
-31-
Figure 21 – Old SmartSensor SS105 Plug Connector Socket Assignment as seen from the
solder cup side of the connector.
SmartSensor 105 User Guide – Wavetronix LLC 9/20/07
-32-
Communication between the SmartSensor and PC can be established using the RS-232
DTE specifications, along with the use of a Null Modem cable and the standard 9-pin
“D” male connector. Please use the following guidelines for connecting the SmartSensor
cable to the serial connection on a PC or modem when not using a Click! 200.
NOTE: The RS-232 pin outs remain the same on the SmartSensor cable regardless of
connecting to a PC or a modem. If connecting to a PC, a null modem cable is required
(see Figure 22). If connecting to a modem or other DCE device then a straight through
serial cable is used (see Figure 23).
Figure 22 – Connecting a PC to the SmartSensor (OLD)
Table 6 – RS-232 Connections (Old Cable)
Figure 23 - Connecting a Modem to the SmartSensor
The table below shows the individual wiring of both the new and old SmartSensor cables
and how they correspond.
SmartSensor 105 User Guide – Wavetronix LLC 9/20/07
-33-
Table 7 – Belden 9331 (Old Cable) Conversions
SmartSensor 105 User Guide – Wavetronix LLC 9/20/07
-34-
Appendix G – Cable Lengths
The following recommendations allow the user to provide reliable power to the
SmartSensor. The SmartSensor cable’s red and black wires provide a 20 AWG wire pair.
The other pairs on the SmartSensor cable are 22 AWG and are normally used for
communication.
SmartSensor Cable
Old SmartSensor Cable
Alternate Power Cables
Cable
Gauge
20 AWG
Additional 22 AWG
22 AWG
Additional 22 AWG
14 AWG
12 AWG
10 AWG
8 AWG
6 AWG
Pairs
1-Pair
Each Pair
1st Pair
Each Pair
1-Pair
1-Pair
1-Pair
1-Pair
1-Pair
Power
24 V
12 V
600 ft
110 ft
Add 400 ft
Add 75 ft
400 ft
75 ft
Add 400 ft
Add 75 ft
2500 ft
450 ft
3900 ft
700 ft
6000 ft
1050 ft
9900 ft
1750 ft
14,000 ft
2500 ft
Table 8 - Maximum Cable Length for Power (ft)
If the cable length is longer than 600 feet when operating at 24 V, it is possible to
increase the maximum cable length by wiring a pair of lines normally used for RS-232
communications with the red and black wires.
If the cable length is 200 feet or greater you cannot reliably use RS-232 communications.
To add 400 feet and achieve a maximum cable length of 1000 feet, connect the orange
wire (normally RTS) to the red wire and the brown wire (normally CTS) to the black
wire.
If your cable run is longer than 1000 feet, it is possible to sacrifice additional
communication pairs to increase the maximum cable length for power. However, you
may desire to communicate to the sensor over two independent channels, in which case
you will need to consider an alternate cable for power. The AWG for wire pairs that
achieve a 2000 ft maximum cable length or greater at 12 and 24 V are listed in Table 8.
To achieve reliable wired communications, the selected baud rate must be compatible
with the length of the cable run. The table below shows the cable length
recommendations for wired communications (see Table 9):
RS-485
RS-232
115.2
300 ft
40 ft
Baud Rate (Kbps)
57.6
38.4
19.2
600 ft
800 ft
1000 ft
60 ft
100 ft
140 ft
9.6
2000 ft
200 ft
Table 9 - Maximum Cable Length for Wired Communications (ft)
To provide two independent communication channels with a homerun cable length over
200 ft, convert the RS-232 data into RS-485 using a Click! 304 in a pole-mount cabinet
SmartSensor 105 User Guide – Wavetronix LLC 9/20/07
-35-
mounted next to the sensor. In this case, the homerun connection establishes one RS-485
channel over the normal white/blue wire pair and another RS-485 channel over the
yellow/violet wire pair. An additional Click! 304 is needed to convert the data sent over
the yellow/violet wire pair back to RS-232 before connecting to surge protection.
If you elect to use an alternate cable for power, you may also want to select an alternate
cable for RS-485 communications. Some options include the Belden 3105A (Paired –
EIA Industrial RS-485 PLTC/CM) or Alpha Wire 6010C 3PR 22 AWG.
There are many reliable options available for wired power and communications
connections (see Table 10).
Length (ft)
0 – 200
Cable
SmartSensor cable
200 – 1000 SmartSensor cable
1000 – 1400 SmartSensor cable
Alternate power and communications
1000 – 2000
cable
Communication
Channel 1
Channel 2
Native RS-485
Native RS-232
Click! conversion of
Native RS-485
RS-232 to RS-485
Native RS-485
NA
Click! conversion of
Native RS-485
RS-232 to RS-485
Table 10 – Cable Length Options
SmartSensor 105 User Guide – Wavetronix LLC 9/20/07
-36-