1
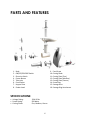
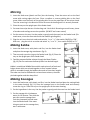
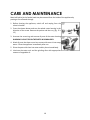
MEAT GRINDER INSTRUCTION MANUAL Model: MCSMG500W THANK YOU FOR PURCHASING A MAGIC CHEF PRODUCT. PLEASE READ ALL INSTRUCTIONS CAREFULLY BEFORE USING THE PRODUCT. CONTENTS SAFETY INSTRUCTIONS …………………………………..…………….……………………………………………………… 3 IMPORTANT SAFEGUARDS ………………….…………………………………………………………………………….… 4 PARTS AND FEATURES …..........…………………………………………………………………….……………………... 6 BEFORE USE ………………………….…………………………………………………………………………………………….. 7 OPERATING INSTRUCTIONS ….…………………………………………………………………………..…………………. 8 CARE AND MAINTENANCE …..………………………….………………………………………………………………... 10 WARRANTY ………………………….…………………………………………………………………………………………... 11 2 What You Need to Know About Safety Instructions Warning and Important Safety Instructions appearing in this manual are not meant to cover all possible conditions and situations that may occur. Common sense, caution and care must be exercised when installing, maintaining, or operating appliance. Always contact your dealer, distributor, service agent or manufacturer about problems or conditions you do not understand. SAVE THESE INSTRUCTIONS FOR HOUSEHOLD USE ONLY 3 IMPORTANT SAFEGUARDS When using electrical appliances, basic precautions should always be followed, including the following: 1. READ ALL INSTRUCTIONS BEFORE USING. 2. Check if the voltage indicated on the appliance is compatible to the electrical outlet voltage prior to connecting this appliance. 3. Do not use any accessories or parts that are not authorized by the manufacturer. Your Warranty will be void if such accessories or parts are used. 4. Do not use this appliance if any part of it is damaged. 5. If the power cord of this appliance is damaged, the damaged cord must be replaced by the manufacture or an authorized service center. 6. Thoroughly clean all parts of this appliance before your first use. 7. Never use you finger or an object to push ingredients or food down the feed tube while this appliance is running. Only the enclosed pusher is to be used for this purpose. 8. Keep this appliance out of the reach of children. 9. Never operate this appliance unattended. 10. Switch this appliance to OFF and unplug it before detaching or installing any accessories. 11. Do not remove any parts until the unit is completely stopped. 12. Never immerse the motor unit in water or any other liquid. Use only a moist cloth to clean the motor unit. 13. Do not attempt to grind bones, nuts or other hard items. 14. Never reach into the cutter housing. Always use the pusher provided. 15. Never operate this appliance for more than 3 continuous minutes. 16. This appliance is not intended for use by persons (including children) with reduced physical, sensory or mental capabilities, or lack of experience and knowledge, unless they have been given supervision or instruction concerning use of this appliance by a person responsible for their safety. 17. If this appliance locks or is locked, please press reverse button (R) until the food particle is dislodged in the cutter housing. 4 Notes on the Cord Plug This appliance has a polarized plug. To reduce the risk of electric shock, this plug is intended to fit into a polarized outlet only in one way. If the plug does not fit fully into an electrical outlet, reverse the plug. If it still does not fit, contact a qualified electrician. Do not attempt to modify the plug in any way. A. A shorter power-supply cord (or detached power-supply cord) is provided to reduce the risk resulting from being entangled in or tripping over a longer cord. B. Longer detachable power-supply cords or extension cords are available and may be used if care is exercised in their use. C. If a long detachable power-supply cords or extension cord is used: 1. The marked electrical rating of the detachable power-supply cord or extension cord should be at least equal or great than the electrical rating of the appliance. 2. If the appliance is a grounded type, the extension cord should be a grounding-type 3-wire cord. 3. The longer cord should be arranged so that it will not drape over the counter top or table top where it can be pulled on by children or tripped over. WARNING: To protect against electric shock, fire, and injury to person(s), do not immerse main cord, plug, or unit in water or any other liquid. CAUTION: Do not use an extension cord with this appliance. If necessary, an extension cord must have compatible rating for power and voltage. Do not modify the plug and extension cord with this appliance; including 3 prong grounded plug. 5 PARTS AND FEATURES 1. 2. 3. 4. 5. 6. 7. 8. Body ON/OFF/REVERSE Switch Direction Switch Fasten Button Tube Inlet Food Pusher Hopper Plate Feeder head 9. Feed Screw 10. Cutting Blade 11. Cutting Plate (Fine) 12. Cutting Plate (Medium) 13. Cutting Plate (Coarse) 14. Screw Ring 15. Sausage Horn 16. Sausage Ring Attachment SPECIFICATIONS: • Voltage Rating: • Power Rating: • Cutting Plates: 120V 60 Hz 500 Watts Fine, Medium, Coarse 6 BEFORE USE NOTE: This appliance is equipped with a thermostat system which will detect overheating and automatically shut off the power supply to the appliance. If you appliance suddenly stops operating: 1. Press the switch button to OFF. 2. Pull the main plug out of the electrical outlet. 3. Let the Meat Grinder cool down for 60 minutes. 4. Resume using the Meat Grinder Please contact your dealer of an authorized service center if the unit frequently shuts down or stops operating. 1. Carefully unpack the Meat Grinder and clean it as instructed in CARE AND MAINTENANCE. 2. Place the Meat Grinder on a stable and level surface for operation. 3. Make sure the Meat Grinder is in the OFF position. 4. Insert the plug into an electrical outlet. 5. Place a bowl or plate underneath the Meat Grinder tube for catching food. 6. Switch the Meat Grinder ON. It must always be ON before adding food. 7. Place food on the hopper plate and use the pusher to feed food through the opening. 7 OPERATING INSTRUCTIONS Assembling NOTE: Always place the unit on a firm, level, and secure place. The air passage at the bottom and the side of the motor housing should be kept free and clear. 1. Press the fasten button and hold the head to insert it into the inlet; the head must be slanted. 2. Then, rotate the feeder head counterclockwise so that the head is secured tightly. 3. Place the feed screw into the head with long end first; turn slightly to feed the screw until it is set into the housing. 4. Place the cutting blade onto the feed screw with the blade facing the front. Unless the blade is fitted properly, the meat and/or food will not grind. 5. Place the desired cutting plate on top of the blade. 6. Support the center of the cutting plate with a finger while securely screwing the screw ring. Do not over tighten. 7. Place the hopper plate securely on the head. 8 Mincing 1. Insert the feed screw (plastic end first) into the housing. Place the cutter unit on the feed screw with cutting edges the front. Place a medium or coarse grinding disc on the feed screw. Make sure the notch of the grinding disc fits on the projections of the mincer head. Turn the screw ring in the direction of the arrow on the housing until it is securely fastened. 2. Place the tray on the upright part of the feeder head. 3. Cut meat into strips that are 4 inches long and 1 inch thick. Removing as much bones, pieces of tendons and cartilage as much as possible. (DO NOT use frozen meats!) 4. Put the meat on the tray. Use the pusher to gently push the meat into the feeder head. (For steak tartar, mince the meat twice with the medium grinding disc.) 5. Plug the unit in an electrical outlet and switch/ to "", then switch ON/0/R to "ON." After use,plug the unit in an outlet and switch / to "" ,then switch ON/0/R to "R." Making Kebbe 1. Insert the feed screw, with plastic end first, into the feeder head and place the sausage ring attachment. (fig. 8) 2. Then securely screw the ring on the feeder head. (fig. 9) Place the tray on the upright part of the feeder head. 3. Feed the prepared kebbe mixture through the Meat Grinder. (fig. 10) Cut the continuous hollow cylinder into desired length. Kebbe is a traditional Middle Eastern dish made primarily of lamb and bulgur wheat which are minced together to form a paste mixture which is extruded through the kebbe maker and cut into short lengths. The tubes can then be stuffed with a minced meat mixture, the ends pinched together and then deep fried. Making Sausages 1. Insert the feed screw, with plastic end first, into the feeder head and place the cutting blade in the cutter housing. (fig. 11) Place the sausage horn on the feeder head and securely screw the ring on. Place the tray on the upright part of the cutter housing. 2. Put the ingredients in the tray. Use the pusher to gently push the meat into the feeder head. 3. Put the sausage skin in lukewarm water for 10 minutes. Then slide the wet skin onto the sausage horn. Push the (seasoned) minced meat into the feeder head. If the meat skin gets stuck on the sausage horn, wet it with water. 9 CARE AND MAINTENANCE Meat left behind in the feeder head may be removed from the inside of the appliance by passing a slice of bread through. 1. Before cleaning the appliance, switch off and unplug from the electrical outlet. 2. Press the release button and turn the whole cutter housing in the direction of the arrow. Remove the pusher and the tray. (fig. 12 + 13) 3. Unscrew the screw ring and remove all parts of the cutter housing. WARNING: DO NOT CLEAN THE PARTS IN DISHWASHER. 4. Wash all parts that have come into contact with meat in hot soapy water. Clean the appliance immediately after use. 5. Rinse the parts with clear hot water and dry them immediately. 6. Lubricate the cutter unit and the grinding discs with appropriate amount of vegetable oil. 10 LIMITED WARRANTY Unless otherwise prohibited, MC Appliance Corporation warrants each MEAT GRINDER MSCMG500W to be free from defects in material and workmanship and agrees to remedy any such defect or to furnish a new part(s) (at the company’s option) of the unit that fails during the warranty period. A copy of the dated sales receipt or invoice is required to receive warranty service or a refund. This warranty covers an appliance in use within the continental United States, Puerto Rico and Hawaii. The warranty does not cover the following: Damages due to shipping or improper installation. Damages due to misuse or abuse. Content losses due to failure of the unit. Repairs performed by unauthorized service agents. Service calls that do not involve defects in material and workmanship such as instruction on proper use of the product or improper installation. Failure of this product if used for other than for its intended purpose. Disposal costs for any failed unit not returned to our factory. Any delivery costs incurred as the result of a unit that fails to perform as specified. This warranty is in lieu of any and all warranties expressed or implied and no representative or person is authorized to assume for us any other liability in connection with the sale of this product. Under no circumstances is the consumer permitted to return this unit to the factory without prior written consent from MC Appliance Corporation. Model Parts & Labor Type of Service MSCMG500W One-Year Carry-In For Service or Assistance please call 888-775-0202 Or visit us on the web at www.magicchef.com to request warranty service 11