1
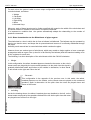
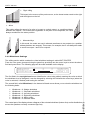
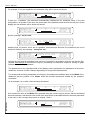
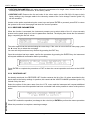
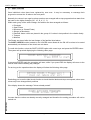
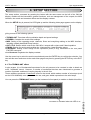
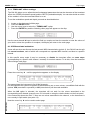
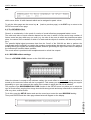
WICKS CM-100
Pipe Organ Module
INTRODUCTION
Dear Customer,
Thank you for choosing the WICKS CM-100 sound module. The Company, a world leader in the
construction of fine classical organs, has installed in the CM-1000 the latest and most sophisticated
technology dedicated to the high fidelity reproduction of pipe organ sounds, with impressive flexibility and
remakable quality of timbre.
After years of research exploring musical synthesis techniques, our Research and Development unit, is
the FIRST in the world to create the sounds of a pipe organ by using the "physical modeling technology"
upon which the ACCUPIPE is based.
Instead of using "sound samples" from pipe organs (previously the standard method) this revolutionary
sound generation system involves the real-time calculation of the waveform generated by a precise
mathematical model based on the sound emission physics of
a pipe organ, incorporating the principal physical parameters
ie. construction geometry, materials used, and pertaining air
pressure, etc.
The fact that the simple reproduction of memorized "sound"
has been disregarded, permits the achievement of
unimaginable realism, with the level of detail previously only
created by a traditional pipe organ.
For example, the mathematical model allows the production of
a different sound for each key since it provides the virtual
reproduction of the original instrument by assigning a different
pipe to each note, similar to a pipe organ.
Furthermore, it will generate a different sound for each
consecutive pressure of the same note, thus simulating the
precise condition of the air volume inside the pipe as it is
pressed.
The CM-100 also permits the "physical" editing of the sounds produced, by adjusting the parameters just as the organ builder constructs the pipes. If however, "editing" is not your forte, you may choose your
sound from a library of 176 different pre-programmed pipe organ voices already in the module's memory.
ENGLISH
Page 1
WICKS CM-100
Pipe Organ Module
WARNINGS
Switching on and off
When switching the module on and off, make sure that the audio amplification system is switched off first:
this will prevent signal peaks which may damage speaker components and people's hearing.
Connecting and preventing interference
For the connections to your sound system, see sections 1.3 and 1.4
Use quality cables and remember to check their condition regularly. Do not install too close to radio
equipment, cell-phones, or devices which may generate interference. Also check that the installation site
is not subject to industrial interference, strong RFI or power blackouts.
Protection and maintenance
When transporting the instrument, protect it by using the original packaging or a suitably padded bag.
Avoid prolonged exposure to direct sunlight, intense heat sources, strong vibrations and especially damp
or dusty environments or rain, since they may cause malfunctions, deterioration and even electric
shocks.
If the instrument is to be unused for some time, protect it from dust and disconnect the power supply
cable. Any dust which does collect on the module can be removed "dry" by using a soft cloth or a brush.
Never use methylated spirits, acetone or solvents of any kind.
In case of malfunction
All the settings which can be made by the user are easily accessible on the outside of the instrument.
The instrument has no internal parts which may be replaced or adjusted in any way by customers. In
case of malfunction, contact only an authorised service centre.
ENGLISH
Notes about the instruction manual
Read all the information provided in this manual carefully. You will avoid wasting time and will obtain the
best performance from your instrument. Some illustrations and display pages are purely guideline and
may differ from the model you have purchased.
While the instrument's essential characteristics remain the same, the manufacturer reserves the right to
make any modifications to parts, details or accessories considered appropriate to improve the product or
for requirements of a construction or commercial nature, at any time and without undertaking to update
this publication immediately.
Disclaimer
The manufacturer and its authorised dealers do not accept any liability with regard to the use or application of the products
described in this documentation, and cannot be held responsible for any damage incurred by the client further to improper use
of, or modifications to, the instrument.
Any references to names, products and companies are for the sole purpose of illustrating the use of the products described
herein. Any names, logos and brands referred to belong to their respective owners.
© 2005. All rights reserved; the reproduction of any part of this manual, in any form, without the manufacturer's specific written
permission is forbidden.
Page 2
WICKS CM-100
Pipe Organ Module
1. CONTROLS AND CONNECTIONS
1.1 Description of the front panel
o VOICE key: Selection key used to access the menus for modifying everything relating to the voice, such
as the timbre parameters, replacement of voices in the stops, the levels of each voice, and so on.
o SETUP key: Press this key to access the menu for modifying the CM-100's general parameters, such
as the MIDI channel, tremulant, reverb, etc. settings.
o DEMO mode: In DEMO mode you can play back eight short pieces of music (which the instrument
plays without any assistance from you) to demonstrate the instrument's timbre qualities: to access this
mode, press the VOICE and SETUP keys simultaneously.
o DATA rotary encoder: The data input device. Once you have selected the parameter for modification
using the cursor keys, you can adjust its value by turning this knob. Turn the encoder clockwise to
increase the value, or anticlockwise to decrease.
o CURSOR S,T, W, X keys: these buttons allow you to move the cursor around the video page on the
display and select the various parameters for modification. What's more, the S and T buttons have
LEDs which come on to indicate the availability of a video page before and/or after the one displayed.
Press the relative button to display the video page you require.
o ENTER key: button which confirms the selection of a function, a value or a procedure.
o EXIT key: button for exiting the current video page or function. Pressing this key also aborts any
procedures in progress (where permitted).
o VOLUME trimmer: regulates the instrument's general volume.
o SET key: Press this key to enable the saving of VOICE MEMORIES (see next point).
Page 3
ENGLISH
o REVERB trimmer: regulates the level of the Reverb effect. When the trimmer is turned to the minimum
(lowest) setting, the effect is disabled.
WICKS CM-100
Pipe Organ Module
o VOICES MEMORY keys (from 1 to 8). Press these keys for easy recall of 8 stop (voice) setups saved
earlier by the user. The CM-100 offers a total of 64 memories divided into 8 banks of 8 memories
each. For more information about use of the voice memories, see chapter 4.
o CANCEL key. "Clear" button: press this key to switch off all the voices which may be on.
o WHOLE / SPLIT key. Sets the sound module's operating mode. When the key LED is off, the CM-100
is set in WHOLE mode, in which all the voices respond to the same MIDI channel (single manual
mode). Press the key to switch on the LED and activate SPLIT (multi-manual) mode, in which the
instrument is able to respond to more than one MIDI channel, each channel associated to one or more
voices. Press the key again to switch off the LED and revert to whole mode. See chapter 3 for more
informations.
o TREMULANT key: activates (LED on) and deactivates the tremulant effect.
ENGLISH
o VOICE REGISTERS (1 to 12) . Press these keys to switch the single voice on (press the lower part)
or off (by pressing the upper part). Note that, as CM-100 is a fully programmable device, the voices
installed (and therefore the labels of the keys) may change.
Page 4
WICKS CM-100
Pipe Organ Module
1.2 Description of the rear panel
POWER ON: On/off switch
o AC INPUT connector: connect the power supply lead supplied with the instrument to this connector.
The CM-100 is able to operate on power supply voltages from 90 to 250 Volts AC.
o OUTPUTS connectors (from 1 to 6). Line outputs from which the audio signal can be collected to be
sent to amplified sound diffusion systems, or any amplification system of any kind. For the best instru
ment audio performance and for high-fidelity reproduction of the acoustic panorama generated by the
windchests, it is absolutely essential to connect the outputs consecutively, always starting from output
number 1. For the same reason, it is very important to take care when positioning the Loudspeaker,
as described in point 1.4 of this manual.
o PHONES connector: jack 5” 1/4 socket to which a headphone set (not supplied) can be connected. It
is important to use good quality headphones, with impedance of at least 16 Ohm
o EXP. PED connector: use this jack socket to connect an expression pedal (not supplied) to the CM100. To assure good results, use linear response expression pedals having impedance of 22 Kohm,
and fitted with stereo jack connector. For calibration operations, use the "EXP.PEDAL" settings (system
environment)
o MIDI (IN, OUT and THRU) connectors: five-pin DIN connectors for connection of instruments with MIDI
interface. The IN connector allows reception of MIDI data generated by remote MIDI sources, the OUT
connector transmits the MIDI messages generated by the CM-100, and the THRU connector transmits
exactly the MIDI data received by the IN connector.
o RS-232 connector. Serial connector for connecting the CM-100 to a computer running the “Organ
Editor” Software
ENGLISH
Page 5
WICKS CM-100
Pipe Organ Module
1.3 Connections
Connect the power supply lead supplied with the instrument to the CM-100's A.C. input connector (rear
panel). Then connect the other end of the lead to the mains plug.
Now connect the Loudspeaker boxes (or the amplification system) to the OUTPUTS connectors on the
CM-100's rear panel.
If you have two diffusers (system recommended minimum) connect them to outputs 1 (left diffuser) and
2 (right diffuser). If you have more than two loudspeaker boxes, read the next point carefully.
ENGLISH
If you wish to listen to the instrument using headphones, connect them to the Phones output provided.
Remember that connecting the headphones does not cut out any diffusers connected.
Now use a MIDI cable to connect the MIDI OUT connector of your organ (or keyboard) to the CM-100's
MIDI IN connector.
Page 6
WICKS CM-100
Pipe Organ Module
The fundamental connections have been made and the CM-100 is ready to be switched on.
However, the interfacing options available do not end here: the instrument can be included in complex
MIDI networks or connected to sequencers, computers or other devices.
1.4 Positioning the loudspeaker boxes
As mentioned in point 1.2, one of the key features of the CM-100 is the implementation of special
algorithms that reproduce the acoustic panorama generated by the windchests of a pipe organ.
To ensure that this reproduction is of the highest possible fidelity, it is of fundamental importance for the
loudspeaker boxes to be connected and placed correctly, as shown below
2 boxes configuration or connection to the organ’s amplification (ouputs 1 and 2)
- 3 boxes configuration (outputs 1,2 and 3)
ENGLISH
Page 7
WICKS CM-100
Pipe Organ Module
- 4 boxes configuration (outputs 1, 2, 3 and 4)
- 5 boxes configuration (outputs 1, 2, 3, 4 and 5)
ENGLISH
- 6 boxes configuration (outputs 1, 2, 3, 4, 5 and 6)
Page 8
WICKS CM-100
Pipe Organ Module
The CM-100 offers a number of setup parameters for each output, as well as a range of windchest
customisation possibilities: refer to the next chapters for more informations
2. MAIN PAGE and DEMO MODE
2.1 Main Page
After making all the necessary connections, switch on the instrument by pressing the POWER ON button
on the rear panel.
The instrument will display the initial page, which carries the name of the instrument and the release of
the operating system (Op.System) currently installed in the form of two numbers separated by a dot.
PIPE ORGAN VOICES MODULE
Accupipe Technology
Op.System
1.10
After a few moments, the display will automatically switch to the main page.
M.BANK:1 ENSEMBLE:2
TEMPERAMENT:Equal
TRANSP.:+1 TUNE:
0
STATUS:Finish1
containing the following parameters:
o M. BANK (Memory Bank) : this parameter can be used to select one of the eight memory banks, each
of which contains 8 different voice memories (buttons underneath the stops).
As well as providing a total of 64 memories, this function is especially important if the instrument is
used by more than one organist, since each of them will be able to save his or her own settings in a
different Memory Bank.
o ENSEMBLE: this parameter can be used to set eight levels of natural differences in pitch which occur
in reality between one organ pipe and another: in other words, it is possible to accentuate the "tuning
error" that occurs in the organ's pipes due to wear over time and variations in temperature. The values
range from - (pipes perfectly tuned) to 8 (maximum pitch instability).
o TRANSP. (Transposer): sets the transposition of the instrument's key within a range of +5/-6 semitones. Set on 0 for no transposition.
o TUNE: allows adjustment of the fine tuning of the instrument within a range of +/- 50 cents (hundredths
of a semitone).
o TEMPERAMENT: this parameter allows the selection of a series of historic temperaments of different
eras and national origins. You can choose from EQUAL, a temperament with perfect tuning, then
WERCKMEISTER, KIRNBERGER, KELLNER, VALLOTTI, CHAUMONT, MEANTONE and
PYTHAGOREAN
Page 9
ENGLISH
o STATUS: the status parameter allows you to select 4 memories containing all the instrument's settings,
known as "Finishes". These 4 finishes, known as "Finish1", "Finish2", "Finish3" and “Finish4” allow you
to save all the instrument's main performance and timbre parameters, such as the pitch, temperament,
voice parameters, and so on. When a parameter is modified, it will automatically be saved in the current
finish: to confirm that it has been saved, two asterisks (*) will appear on either side of the name of the
finish. For more information about the use and saving of the finishes and restoration of the original
finishes, see chaper 4.5
WICKS CM-100
Pipe Organ Module
The procedure for modifying these parameters is easy and intuitive:
Use the cursor S,T, W, X keys to locate on the value of the parameter you wish to modify (the field will
start to flash), then turn the encoder to enter the value you require.
Remember that turning the encoder clockwise increases the value, while turning it anticlockwise
decreases the value.
The instrument will adopt the value entered and automatically save it in the current finish.
A BRIEF NOTE ON TEMPERAMENTS
In the "natural" tuning system, based on the acoustic phenomenon of harmonic sounds, two important musical
intervals, the major third and the perfect fifth, cannot be made to coexist in the "pure" state (i.e. beat-free).
Therefore, over the centuries a variety of compromise solutions known as TEMPERAMENTS have been
invented and realised. These give priority to one or the other interval by modifying them in various ways.
In the ancient world and the Middle Ages, until the last few decades of the 17th Century, the "Pythagorean"
tuning system, in which the fifths were retained perfectly pure, was in use. The resulting major third was
particularly unattractive in sound, and was therefore treated as a dissonance. However, the music of the time
was mainly monodic, and the early forms of vocal and instrumental polyphony made a great deal of use of the
interval of a fifth. With the early Renaissance, and the start of the great flowering of vocal polyphony, the
interval of a major third gradually came to be heard as consonant and not dissonant. The instruments with fixed
tuning, such as the organ and harpsichord, gradually adapted to this situation by adopting a system of
temperament known as "Meantone", which gave the major third priority over the fifth. This temperament is
particularly important because it was the temperament in normal use in Europe in the 16th and 17th Centuries,
until the early 18th Century. Here are the six temperaments available on the CM-100
WERCKMEISTER: This temperament, invented by the organist and musical theorist Andreas Werckmeister, is
recommended for performing the German musical repertoire of the late 1600s
KIRNBERGER:This temperament, developed by Johann Philipp Kirnberger, pupil of J.S. Bach, is suitable for
playing the German Baroque composers and the works of Bach.
KELLNER:Herbert Anton Kellner, born in Prague in 1938, studied physics, mathematics and astronomy at the
University of Vienna. In 1975, his research enabled him to identify the unequal temperament of the same name,
used by Bach for his "Well-Tempered Clavier". Suitable for 18th Century German music and the music of Bach
in particular.
VALLOTTI: This Italian temperament invented by Francescantonio Vallotti was later taken up in England by
Thomas Young. It can be used effectively for the Italian 18th Century repertoire, and also for the English
repertoire of the same period.
CHAUMONT (1696) :It is based on six pure major thirds: D-F# / E-G# / F-A / G-B / A-C# / C-E (the last one
slightly diminished). It can be used mainly for French music composed between the end of the 17th and the
beginning of the 18th Century.
ENGLISH
MEANTONE:
- 8 pure major thirds: E flat - G / B flat - D / F - A / C - E / G - B / D - F # / A - C# / E - G.
- 4 unusable major thirds (diminished fourths): B - D# / F# - A# / C# - E# / A flat - C.
- 1 fifth known as the "wolf" (very dissonant extended fifth): A flat - E flat.
- Highly irregular chromatic scale (meaning that chromatic compositions are given a very distinctive voice)
- Keys usable with this temperament: C maj. / D maj. / G maj. / A maj. / B flat maj. and the relative minors.
PYTHAGOREAN: In this temperament, all the fifths are natural except for the "wolf" fifth, in the interval A flat
- E flat, which is greatly diminished.
It dates from the Middle Ages up to the 15th century, and can therefore be used for compositions of that
period.
.
Page 10
WICKS CM-100
Pipe Organ Module
2.2 Display Messages
INFO MESSAGE: LINE OUTs NOT CONNECTED
press EXIT
The CM-100 has detected that there are no loudspeaker boxes connected to the outputs: you can only
listen to the instrument using the headphones. Press EXIT to return to the main page
WARNING: LINE OUTs HAVE TO BE CONNECTED
CONTIGUOSLY (1 to 6)
press EXIT
The system has detected that the loudspeakers have not been connected correctly, so some outputs
might not work or might malfunction.Check the connections and make sure that they have been made
as described in point 1.4. Press EXIT to exit
2.3 Listening to the Demo songs
In the CM-100 DEMO mode you can play back a number of short pieces of music, which the instrument
plays itself to demonstrate its timbre qualities (demo songs).
To access the DEMO mode, locate on the main page and press the VOICE and SETUP keys
simultaneously. The following video page will appear on the instrument's display:
Select DEMO song with VOICE MEMORY Keys:
There is one demo track associated to each of the VOICE MEMORY keys: simply press the key of the
demo you wish to hear and it will start to play.
The display will indicate that the selection has been made by showing the word PLAYING followed by
the name of the song and the progress bar.
Select DEMO song with VOICE MEMORY Keys:
PLAYING: Pescetti_Presto
[²²²²²/
]
At the end of the piece, the instrument returns to the demo song selection video page.
You can stop the demo at any moment by pressing the EXIT key or pressing the demo song selection
key again.
N.B. The instrument automatically sets the timbre suitable for performance of the demo
song selected: however, this setup can be changed while the song is playing using the
stops on the front panel.
To exit the DEMO mode, press the VOICE and SETUP keys simultaneously, or the EXIT button: in both
cases the instrument will return to the main video page
ENGLISH
Page 11
WICKS CM-100
Pipe Organ Module
The association between the VOICE MEMORY keys and the demo songs is as follows
key
key
key
key
key
key
key
key
1:
2:
3:
4:
5:
6:
7:
8:
Johann Gottfried Walther - Allegro (from Concerto in F maj.)
Johann Pachelbel - Von der Geburt Christi
Domenico Zipoli - Allegretto in G min
Johann Gottfried Walther - Schmücke dich, o liebe Seele
Gio Batta Pescetti - Presto (from Sonata in C min.)
Johann Pachelbel Alle Menschen müssen sterben (Choral und Variation)
Robert Führer - Andantino in G maj
Johann Gottfried Walther - Erschienen ist der Herrliche Tag.
3. VOICE SECTION
The Voice menu contains all the functions which modify the voices of the CM-100. When the VOICE
button on the left of the instrument's display is pressed, its LED lights up and the following video page
appears on the display:
[EDIT]
[CHANGE]
[VOLUME]
[OUT ROUTER]
[V.F.S.]
[LABEL CHECK]
[SORT VOICES]
giving access to the various voice modification sections which, in detail, are:
o EDIT : regulates the sound generation parameters for each individual voice.
o CHANGE: replaces the voices currently active on the expander's 12 stops
o VOLUME: regulates the volume of the voices
o OUT ROUTER: selects the type of windchest to be applied to the individual voice and its
characteristics.
o V.F.S.: voices factory settings. Used to restore the voice's parameters to their original values (set in the
factory)
o LABEL CHECK: allows you to check which voice has been assigned to each of the 12 stops on the
front panel
o VOICE SORT: starts the procedure for automatic sorting of the voices in the stops.
Use the cursor keys to select the section required and press ENTER. You can exit this menu and return
to the main menu page at any time by pressing the VOICE key (the LED of which is on) or the ESC key
3.1 VOICE edit
As already mentioned, the EDIT section of the voice menu gives the user access to the main timbre
parameters of the current voice to allow him to adjust it to his needs.
Press the ENTER key with the EDIT option selected to display a list of the voices currently installed in
the 12 stops. The stop currently selected flashes
ENGLISH
Ctrbomb32
Schawm4
Bombard16
Waldhrn16
Bombarde8
Cornopea8
Then use the CURSOR keys again to select the voice you wish to modify; you can also do this by
pressing the stop of your choice on the front panel.
Page 12
WICKS CM-100
Pipe Organ Module
Once the selection has been confirmed with ENTER, the display will show the relative parameter
modification page, which will differ depending on the type of voice selected. The stop which contains the
voice being modified will flash.
3.1.1 Editing the Bourdons, Principals, S trings and Flutes
If the voice selected for modification belongs to the Principals, Bourdons or flutes family, the following
page will appear on the display:
Gedackt16
Volume: 0
Character: 0
Attack:0
Noise: 0
ReleaseDet:0
Making available the following fields:
o Voice being edited: The first field in the top corner of the display shows the name of the voice being
edited: it can be changed by simply selecting the field (cursor keys) and turning the encoder.
The voice can be also be selected by pressing the rocker switch of the stop containing the voice
required
o CHARACTER: this parameter modifies the level of the harmonics of the selected voice, but without
changing the level of the first harmonic. Changing this value makes the sound more "open" and
immediate (positive values) or more "closed" and dark (negative values)
o NOISE: This parameter regulates the amount of air noise in the chosen voice. Note that thanks to the
special physical model algorithm, the value will not be evenly distributed but will have a more or less
noticeable effect on the voice depending on the pipe's footage, its characteristics and the note played
o VOLUME general level of the voice
Gedackt16
Character: 0
Noise: 0
Volume:
0
Attack:0
ReleaseDet:0
o ATTACK: adjusts the voice's attack time, i.e. the time it takes to reach the maximum volume value, on
a scale of 8 values. Set 0 for the minimum attack time and 8 for the maximum time.
Note that the scale of 8 values cannot be associated to fixed time values, since this parameter depends
on the type of voice being modified and the Time Tracking of the keyboard, which means that attack
times are shorter in the upper than in the lower part.
o RELEASE DETUNE: adjusts the variation in tuning when the note is released compared to the value
with the note pressed, on a scale of 8 values. Here again, fixed values of hundredths of a semitone
cannot be associated to the values shown on the screen, since the modification depends on the voice
and the part of the keyboard being played.
Set 0 for the minimum change in tuning and 8 for the maximum change.
To select the field required use the CURSOR keys, remembering that a field is selected when its value
flashes; once the field has been selected its value can be adjusted by turning the encoder.
When the modification is complete you can return to the VOICE mode main menu page by pressing the
EXIT key.
3.1.2 Editing Reeds
Page 13
ENGLISH
If the voice being edited belongs to the REEDS family, the display will show this page
WICKS CM-100
Pipe Organ Module
Oboe8A
Volume: 0
Character: 0
Attack:4
Noise:-3
FreqSkew:4
The parameters are basically the same as described above, except for the FREQUENCY SKEW field,
which regulates the amount of the typical detuning skew the reeds cause when the note is released.
Although their names are the same, the effects and properties of the other fields vary because the
physical model applied to the sound generation changes: for example, you will notice that in reed
instruments the character will also affect the first harmonic and its effects will differ in the case of bass or
treble footage. The same applies to the noise, which has effects and timbre of a completely different kind
when applied to the reeds.
The procedure for using the section is the same: use the cursor keys to select the field for modification
and the encoder to enter the appropriate value.
Press EXIT to return to the VOICE mode main page, then the EXIT key again or the VOICE key to exit
this page.
3.1.3 Editing Mixtures
The page for editing a voice in the mixtures family is as follows:
Mixture
Volume: 0
Harm.base:1 1/3
Character: 0
Ranks:4 Attack:0 ReleaseDet:0
The new fields which appear in this page, typical of the "physical" conformation of a mixture voice, relate
to the HARM.BASE (Harmonic Base), which sets the basic harmonic on which the mixture voice is
created, in a range of values from 2 1/3’, 2, 1 1/3’ 1'.
As you will know, this organ voice is created by the action of several pipes arranged in ranks: the RANKS
field in this page allows you to set the number of virtual ranks on the basis of which the CM-100 will
calculate the mixture voice. The noise (air noise) parameter does not appear because the specific
"physical conformation" of the pipes which generate these voices mean that it is negligible.
As usual, use the cursor keys to select the field for modification and turn the encoder to enter the value
you consider appropriate. When the modification is complete you can return to the VOICE mode main
menu page by pressing the EXIT key.
3.1.4 Editing Detuned voices
When a detuned voice is selected for modification, the parameter editing video page will be as follows
ENGLISH
Schwebng8
Character: 0
Detune:+3 Volume: 0 Attack:0
Containing the following user fields:
Page 14
Noise: 0
ReleaseD:0
VISCOUNT CM-100
Pipe Organ Module
o Voice being edited. This is the voice being modified: it can be changed by simply selecting the field
(cursor keys) and turning the encoder, or by pressing the stop rocker key.
o CHARACTER: changing this value makes the sound more "open" and immediate (positive values) or
more "closed" and dark (negative values)
o NOISE: This parameter regulates the amount of air noise in a range of 8 possible settings.
o DETUNE: The field used to set the amount of "detuning" to be applied to the voice: the higher the
value, the greater the "beating" effect the voice will acquire when used with other voices.
With a setting of 0 the voice is perfectly tuned with the other voices and the beating typical of "detuned"
voices will therefore not be audible
o VOLUME: General level of the voice
o ATTACK: adjusts the voice's attack time, that means the time it takes to reach the maximum volume
value. Set 0 for the minimum attack time and 8 for the maximum time.
o RELEASE DETUNE: adjusts the variation in tuning when the note is released compared to the value
with the note pressed, on a scale of 8 values. Set 0 for the minimum change in tuning and 8 for the
maximum change.
3.1.5 Editing Cornets
The last variant added to the voice editing page concerns the cornet voices
Kornett
Volume: 0
Ranks:3
Attack:4
Character: 0
ReleaseDet:0
As the above video page shows, the function for editing the physical parameters of the cornet voices (like
the mistures) does not include the noise parameter because of the unique construction and physical
features of this family of stops.
The noise parameter is replaced by the RANKS field (already discussed with regard to the mixture
editing function) which sets the number of virtual pipes the instrument will use to construct the cornet
sound.
As usual, use the CURSOR keys to select the field you wish to modify; after this, you will be able to adjust
its value by turning the encoder.
When the modification is complete you can return to the VOICE mode main menu page by pressing the
EXIT key.
3.1.5 Keyboard Tracking
From each of the voice editing pages examined so far, pressing the illuminated CURSOR T button gives
access to the second page for editing and displaying the KEYBOARD TRACKING parameter:
Page 15
Low: 0
High: 0
ENGLISH
Gedackt16
Keyb.Scaling
WICKS CM-100
Pipe Organ Module
This parameter allows you to set the scaling of the voice's volume for the upper and lower parts of the
manual.
These two zones are fundamental in providing the right timbre and often their volume has to be slightly
reduced or increased compared to the central part of the manual.
The setting parameters are therefore the following:
o LOW: regulates the attenuation (negative values) or increase (positive values) of the volume in the low
part of the manual.
o HIGH: regulates the attenuation (negative values) or increase (positive values) of the volume in the
high part of the manual.
As usual, use the cursor keys to select the field you wish to modify and turn the encoder to enter the
correct value for it.
cursor key to return to the previous
At the end of the operation press EXIT to exit the function or the
editing page.
3.2 VOICE CHANGE
As already mentioned at the beginning of this manual, the CM-100 has a library of 176 organ voices
which the user can freely assign to each of the 12 stops on the instrument's front panel.
Once the voice has been assigned to a stop, it will remain in the memory until the next time it is changed.
Now let us take a detailed look at how to carry out the procedure for changing a stop's voice:
Starting from the main page, press the VOICE key. The video page with the function's menu will appear
on the display
[EDIT]
[CHANGE]
[VOLUME]
[OUT ROUTER]
[V.F.S.]
[LABEL CHECK]
[SORT VOICES]
Use the cursor keys to select the CHANGE menu option, which will start to flash. Press ENTER and the
display will show the list of voices currently installed on the 12 stops: the stop currently selected will flash
Ctrbomb32
Schawm4
Bombard16
Waldhrn16
Bombarde8
Cornopea8
Then use the cursor keys to select the voice you wish to replace; you can also do this by pressing the
stop of your choice on the front panel.
If the selection is confirmed by pressing ENTER, the display will show
Replace:CtBourd32
With:Principals press ENTER to continue
ENGLISH
For greater convenience, the CM-100's voice library has been subdivided into families, each containing
the voices belonging to a specific type of organ pipe: these include the Principals, Bourdons, Reeds, etc.
So on the current page, turn the encoder to select the family you require and press ENTER to confirm.
(or exit to go back)
Page 16
WICKS CM-100
Pipe Organ Module
Replace:CtBourd32
With:CtPrinc32
Press ENTER to replace
You can now turn the encoder to select the voice of your choice, contained in the family you choose in
the step before. Note that the name of the voices is shown in abbreviated form: the appendix to this
manual contains the name of the voice in full, its acronym, the family to which it belongs and the
consecutive number consigned to it.
Remember that when you are selecting a voice, the instrument allows you to listen to it in advance: if you
play the master instrument, you will hear the timbre of the voice currently on the display, before it is
definitively memorised.
In the usual way, when you press ENTER the new voice selected will replace the one present in the
selected stop. To confirm this has taken place, the display will show the following video page
WARNING!
Tab 1 now is CtPrinc32
- Please change the label -
reminding you that you have to physically change the label on the stop, because its contents have been
changed.
Then press EXIT to scroll back to the previous pages and make a new selection or return to the main
operating page.
3.3 Regulating the voice VOLUME
The VOICES VOLUME function allows you to adjust the volume of each individual voice in a range from
-9 dB to +6 dB. Each modification is saved immediately and is audible in real time, making it easier for
the user to obtain the setting required.
To recall this function, select the VOLUME option from the VOICES menu; the display will show:
:
Gedackt16: 0
HohlFlot8:+3
Prinzip8A: 0
Oktave4A :-1
Schwebng8: 0
SptzFlot4: 0
To set the new value (expressed in dB on the display), locate the cursor on the voice required using the
CURSOR buttons or its register on the panel, and use the VALUE encoder to make the setting.
Once you have made all the changes you require, press EXIT to return to display of the VOICES menu.
The volume level here set is the same you’ll find in the EDIT section, describe at the point 3.1 of this
manual
3.4 OUT ROUTER function
All this is achieved by setting the channelling of the audio signals, i.e. the way in which they are
distributed, on the rear outputs
Page 17
ENGLISH
One of the Acupipe technology major innovations is the capability for simulating the position of the windchests and the arrangement of the pipes inside them, for every voice.
WICKS CM-100
Pipe Organ Module
For each voice, the system is able to set an output configuration which reflects the layout of the pipes in
real wind-chests, as follows:
Wedge
Chromatic
Left Wing
Right Wing
Mono
Alternate Keys
Moreover, each of these layouts can be further specified with regard to the width of the wind-chest and
its central location in relation to the number of outputs connected.
It is important to underline that the system automatically adapts the channelling to the number of
speakers connected.
3.4.1 Short introduction to the W indchest of pipe organs
The wind-chest is a box in which the air from a bellows is distributed. The bellows may be operated by
hand or an electric motor, and keeps the air pressurised and ensures it is uniformly distributed through
the pipes.
Normally, each manual has its own wind-chest which contains the pipes.
However, there are various types of wind-chest, which may contain a single register or have a cascade
arrangement with an organ valve (a box full of air filled by the bellows) with the branches leading off to
all the registers for each note.
The following is a short description of the wind-chests which the CM-100 simulates:
Wedge
In this configuration, the tallest, broadest pipes are located in the centre, so the voice's
lowest notes are played by the most central speakers. As the pitch rises the signal is
gradually distributed further and further to the outside, in alternation; in other words,
C will sound on the right and C# on the left.
Chromatic
This configuration is the opposite of the previous one; in this mode, the tallest,
broadest pipes are on the outside, so the lowest notes are played on the outermost
speakers, again in alternation. As the pitch rises the notes are played closer and
closer to the centre.
Left Wing
ENGLISH
As the the drawing shows, the tallest, broadest pipes are installed on the left, so the
lowest notes are played by the speakers furthest to the left. As the pitch rises the notes
are played more and more to the right.
Page 18
WICKS CM-100
Pipe Organ Module
Right Wing
This layout is the reverse of the previous one, so the lowest notes sound on the right
and the highest on the left.
Mono
This setting allows the sound of a voice to be sent to a single output, or a position midway
between two outputs. This means that regardless of the point on the keyboard, the voice
always sounds from the same position..
Alternate Keys
In this mode, the notes are sent in alternate semitones to two outputs (or a position
midway between two outputs). This means, for example, that C can always be made
to sound on output 1 and C# on output 4.
3.4.2 W indchest Settings
The editing section which contains the virtual windchest settings is called OUT ROUTER.
From the voice menu (accessed using the panel key provided) use the cursor keys to select the above
field and press Enter. The following page will be made available on the display:
Gedackt16
Windchest:0
1
2
3
Width:15
Center: 8
The first field in the top right-hand corner identifies the voice being edited, meaning the voice to which
the windchest is to be assigned: it can be changed by selecting the field with the cursor keys (when the
voice is selected, it flashes) and turning the encoder.
The second field, called Windchest, in the bottom left-hand corner allows you to select the windchest on
the following basis:
Windchest
Windchest
Windchest
Windchest
Windchest
Windchest
=
=
=
=
=
=
0: Wedge windchest
1: Chromatic windchest
2: Left wing windchest
3: Right wing windchest
4: Mono output
5: Alternate notes
Page 19
ENGLISH
The central part of the display shows a diagram of the selected windchest (bottom line) and its distribution
across the speakers currently connected (top line)
WICKS CM-100
Pipe Organ Module
For example, if only two speakers are connected, they will be shown as follows:
Gedackt16
Windchest:0
1
2
Width:15
Center: 8
If there are 3 speakers, the instrument automatically redistributes the windchest effect in the new
configuration, so speaker 2 will carry the central part of the panorama and the third the left part. On the
display the new situation will be shown as follows:
Gedackt16
Windchest:0
1
2
3
Width:15
Center: 8
and the message "no line outs”
Gedackt16
Windchest:0
no line out
Width:15
Center: 8
indicates that, at present, there are no speakers connected and therefore the windchest will not be
activated. Similarly, the message " wrong line out":
Gedackt16
Windchest:0
wrong line out
Width:15
Center: 8
informs the user that the speakers have not been connected in accordance with the rule that the first
speaker must always be connected to output 1 proceeding in consecutive sequence, leaving no gaps
between two connected speakers.
The parameters on the right-hand side of the display are the parameters for adjustment of the active
windchest, and their function changes depending on its physical characteristics.
For central peak and wing windchests (all versions), the parameters available relate to the Width of the
windchest and the position of its Centre within the acoustic panorama created by the speakers
connected.
As an example, let us take a left-hand wing windchest
Gedackt16
Windchest:2
1
2
3
Width:15
Center: 8
ENGLISH
If we reduce the value of the Width field (selected using the cursor keys) we will see that the windchest
becomes narrower, and therefore the sound of the stop will be re-allocated within the acoustic panorama:
in this case, it will no longer be present on outputs 1 and 3.
Gedackt16
Windchest:2
1
2
Page 20
3
Width: 9
Center: 8
WICKS CM-100
Pipe Organ Module
The Center parameter allows a narrow windchest (i.e. one which does not cover the whole acoustic
panorama) to be placed more to the left or right, with the centre of the windchest itself as reference. In
this case, the display shows the new position of the windchest and its distribution across the outputs
currently in use after each adjustment
Gedackt16
Windchest:2
1
2
3
Width: 9
Center:11
If a mono setting has been selected, the only parameter available is Position, allowing the user to
choose the single speaker to which the sound of the chosen voice is to be directed:
Gedackt16
Windchest:4
1
2
3
Position
8
while,if the active windchest setup is "Alternate Notes", the parameters available will be the ones relating
to the position within the acoustic panorama of the reference notes C and C#
Gedackt16
Windchest:5
1
2
3
Alt.C-C#
1 - 15
IMPORTANT NOTE:
Windchest effects cannot be reproduced unless at least two speakers are connected.
If the instrument detects that only one speaker is connected, it will automatically switch all the
active windchest settings to the mono setup, and the user will be unable to change this
Gedackt16
Windchest:4
1
Position
1
3.5 V.F.S.
Sometimes, after several voice timbre or arrangement modification sessions, it may be necessary to
reset all the changes made and return one or more voices to their original state, as set by the constructor
when the instrument was delivered.
To allow, this, the CM-100 provides the user with a specific voice menu function called V.F.S. (which
stands for Voice Factory Settings)
From the voice menu, accessed by pressing the relative key on the right of the display, use the cursor
keys to select the V.F.S. function and press ENTER.
The display will show the following video page:
Prompting you to choose from the following options:
Page 21
[RESTORE LIST]
ENGLISH
VOICE FACTORY SETTINGS
[RESTORE PARAMETERS]
WICKS CM-100
Pipe Organ Module
o RESTORE PARAMETERS: this option allows the parameters of a single voice, chosen from the 12
currently active on the instrument, to the factory values
o RESTORE LIST. Restores the list and order of the voices active on the CM-100's 12 stops to their
factory settings. Any changes made to the voices by means of the "voice change" function (point 3.2)
will be cancelled
Locate on the option required using the cursor keys and press ENTER to proceed; press ESC to return
the system to the voice menu page and abort the current operation
3.5.1 REST ORE PARAMETERS
When the function is accessed, the instrument prompts you to select which of the 12 voices currently
present on the panel stops is to have its parameters restored. The display then shows the first selection
page, comprising the first six voices
Gedackt16
HohlFlot8
Prinzip8A
Oktave4A
Schwebng8
SptzFlot4
The voice required can be selected using the cursor keys. If the voice is not on the first video page, press
the
cursor key to select the next page.
You can exit the procedure at any moment by pressing the EXIT key.
Once the selection has been made, confirm the procedure by pressing the ENTER key: the instrument
will request additional confirmation before proceeding
Restore original voice parameters in:
Prinzip8A
- press ENTER to confirm -
Press ENTER to complete the procedure or EXIT to abort the current operation and return to the VOICE
menu
3.5.2 REST ORE LIST
As already mentioned, the RESTORE LIST function restores the list of the 12 voices associated to the
panel stops to the factory settings. In practice, this cancels all the VOICE CHANGE operations (point 3.2)
carried out by the user.
Select the option of the same name from the V.F.S. menu and the instrument will request additional
authorisation since once this operation has been concluded it will not be possible to return to the previous
status
Restore original VOICE LIST
- press ENTER to confirm -
ENGLISH
Press ESC to abort the operation (no change to the voice list) or ENTER to perform the restore procedure
When the procedure is complete a warning message
Page 22
WICKS CM-100
Pipe Organ Module
WARNING: Factory voices list has been
restored - Please check labels
will remind you that some voices have changed their positions, so presumably the labels on the stops
will not correspond to the voices they refer to. The label check function, described in the previous
section, will help you to solve this problem.
Press EXIT to return to the voice menu
3.6 LABEL CHECK
After having changed or sorted the voices, it could happen that the name plates of the tabs do not
correspond to the voices recalled.
Therefore please verify this and in case it does not correspond, please change the name plates. The
LABEL CHECK function is available for this purpose. To recall this function, select the LABEL CHECK
option in the VOICES menu and press ENTER.
The display then shows the progression of the voices currently assigned to the 12 tabs, three on each
video page
1>Gedackt16
2>Prinzip8A
3>Schwebng8
Use the cursor keys
and
to scroll pages.
In case the display shows the message:
1>Gedackt16
2>Prinzip8A
3>Flote8
Change labels and press ENTER when done
it will mean that the voice has been changed and that it is necessary to replace the name plate. The Led
of the rocker tab also will blink to let you recognize wich plate needs to be changed.
Once the name plate has been changed (by following the procedures described on the next chapeter),
press the ENTER key to confirm that plates have been changed.
Press EXIT to leave the functions ad return to the VOICE menu
3.6.2 Changing name plates
To change the lables of the stops, ensuring that the name of the stop is the same as that of the voice
loaded in the memory, just remove them with your fingers or using a small screwdriver (as shown below)
and fit the correct one.
The procedure is very easy as the plastic plates are just pressed into the stop.
ENGLISH
Page 23
WICKS CM-100
Pipe Organ Module
3.7 SORT VOICES
Once individual voices have been replaced by new ones
progression across the 12 tabs on the front panel.
it may be necessary to rearrange their
Normally, the voices in an organ’s various sections are arranged with a stop progression that starts from
the lower to the higher footages (32’, 16’, 8’, 4’, 2’, 1’).
Within each group of the same footage, the families are then arranged as follows:
Principals
Open Flutes
Bourdons (or Closed Flutes)
Strings (or Mordents)
Detuned: these voices are placed in the group of 8' voices in last position in the relative family
Trumpet
Mixtures
The Reeds are placed after the last footage of the families listed above.
The SORT VOICES function located on the VOICES menu allows all the CM-100’s voices to be sorted
automatically on the basis of the criteria set out above.
To recall this function, select the SORT VOICES option with cursor keys and press the ENTER button.
The system will proceed displaying the following video page:
VOICES AUTO-SORT PROCEDURE
Press ENTER to start
If you press ENTER again the procedure will start, while if you press ESC the display will return to the
VOICE menu without making any changes.
For as long as the operation takes the display will show the following video page
SORTING VOICES * Please wait *
- check out labels afer sort -
Reminding you to use the label check function to check that the labels and stops correspond, since some
voices may have changed their positions
If the display shows the message "Voices already sorted"
VOICES AUTO-SORT PROCEDURE
- Voices already sorted -
ENGLISH
it means that the voices are already correctly arranged and therefore the sorting procedure will not be
carried out
Page 24
WICKS CM-100
Pipe Organ Module
4. SETUP SECTION
The setup section, accessed by pressing the button with the same name on the left of the CM-100
display, contains all the instrument's general functions, such as management of the outputs, the MIDI
interface, the reverb and tremulant effects and the display contrast.
When the SETUP key is pressed, its LED lights up and the following video page appears on the display:
[TREMULANT] [REVERB] [MIDI]
[OUTS CTRL]
[FINISH] [EXP. PEDAL]
LCD contrast: 6
giving access to the following options
o TREMULANT: Tremulant effect modulation depth and speed settings
o REVERB: Contains the reverb effect settings
o MIDI: Setting of the operating mode, channels, filters and everything relating to the MIDI interface,
including a handy data Bulk Dump function
o OUT CTLS: Section which controls the CM-100's 6 outputs with volume and 5-band equalizer
o FINISH: Section for saving and recalling the 4 instrument's 4 tonal finishing setups
o EXP.PEDAL: Setting of the Range of the expression pedal (if any) connected to the rear panel
EXP.PED connector
o Lcd Contrast: Regulates the display contrast.
Use the cursor key to select the section required and press the ENTER key to confirm the selection. You
can exit this menu and return to the main menu page at any time by pressing the SETUP key or the EXIT
key
4.1 The TREMULANT effect
In pipe organs, it is of fundamental importance for the air pressure to be constant in order to obtain an
even, "sustained" sound. However, a number of mechanical devices were introduced to generate a
number of periodic variations of varying intensity in the air flow.
These variations produced a "tremulous" effect on the sound, which made a number of solo stops (such
as the VOX HUMANA) more pleasant on the ear, and gave added expression to the wind stops.
You can press the TREMULANT button (on the instrument's front panel) to enable or disable this effect.
Page 25
ENGLISH
The effect is activated when the LED is on.
WICKS CM-100
Module
Pipe Organ
4.1.1 TEMULANT effect settings
The CM-100 allows you to adjust the two fundamental parameters that set the character of the tremulant
effect: the SPEED (modulation speed) and the DEPTH (modulation depth). You can also decide on which
of the module's voices the tremulant effect is to act.
To set the modulation speed and depth, proceed as described below:
Locate on the instrument's Main page
Press the SETUP button
Use the cursor keys to select the "TREMULANT" option
Press the ENTER key and the following video page will appear on the disp
TREMULANT DEPTH:13
TREMULANT SPEED:14
Use the cursor
and
keys to select the field you require and turn the encoder to enter the values of
your choice: when the operation is complete, the display wll return to the main page
4.1.2 Differentiated activation
As we will see when we discuss the instrument's MIDI characteristics (point 4.3), the CM-100 can be split
into several sections, each of which will correspond to a separate MIDI channel, and thus to a specific
manual.
In this specific setup mode it may be necessary to disable the tremulant effect on some stops
(corresponding to a specific midi channel / manual) for musical reasons. To do this, from the tremulant
effect settings main page
TREMULANT DEPTH:13
TREMULANT SPEED:14
Press the cursor key
until the page below appears on the display
TREMULANT TO MIDI CHANNELS IN SPLIT MODE
1>YES
2>YES
3>NO
4> 5> 6> -
The page shows the instrument's first 6 Midi channels.
For the channels the system recognises as associated to one or more voices, a modifiable field with the
options YES (tremulant in operation) or NO (tremulant off) will be made available.
When the NO option is selected, the tremulant will not work for the voices associated to the
corresponding midi channel (manual) even if it is turned on using the relative button on the front panel
If the instrument shows the field "-" there are no voices associated to the channel, or the instrument is
not currently in Split mode (see point 4.3).
ENGLISH
Now the cursor key
can be used to select page
TREMULANT TO MIDI CHANNELS IN SPLIT MODE
7> 8> 9> 10> 11> 12> -
Page 26
WICKS CM-100
Pipe Organ Module
and
TREMULANT TO MIDI CHANNELS IN SPLIT MODE
13> 14> 15> -
which cover all the 16 midi channels which can be assigned to panel voices.
To exit the video page use the cursor key
SETUP area main menu page
(back to previous page) or the EXIT key to return to the
4.2 The REVERB effect
Reverb, or reverberation, is the result of a series of sound reflections propagated inside a room.
The order and value of each reflection depend on the room in which it occurs and a large number of
factors come into play within any one room (e.g. the size of the room in which the phenomenon takes
place, the nature of the materials of which it is made and the objects it contains, the listener's position,
etc.).
The powerful digital signal processors that form the "heart" of the CM-100 are able to perform the
complicated task of artificially re-creating the complex reverberations that naturally occur in the types of
building where pipe organs are normally installed, and thus generating the right reverb effect to complete
the instrument's excellent timbre qualities.
The reverb effect is provided in the headphones and on all six line outputs.
4.2.1 REVERB effect settings
There is a REVERB LEVEL trimmer on the CM-100 front panel
When the trimmer is turned to the minimum setting, the reverb effect is deactivated; as the trimmer is
turned up, the amount of effect will rise in proportion. This means you can make the setting you require
depending on your own taste and the needs of the context in which the CM-100 is installed.
The purpose of the REVERBERATION TYPE function in the SETUP menu is to allow you to select the
type of reverb effect, ranging from a large church with strong reverb and many reflections to a small room
with very short, muffled reverb.
To do this, press the SETUP button and use the cursor keys to start the word REVERB flashing.
Then press ENTER and the video page shown below will appear on the display.
Page 27
ENGLISH
REVERBERATION type:Cathedral
WICKS CM-100
Module
Pipe Organ
The possible selections are:
CATHEDRAL
BASILICA
GOTHIC CHURCH
BAROQUE CHURCH
ROMANIC CHURCH
MODERN CHURCH
PARISH
CAPPELLA
Use the encoder to select the type of reverb and press EXIT to save the selection and return to display
of the SET-UP menu.
4.3 MIDI
The MIDI (Musical Instrument Digital Interface) interface allows instruments of different makes and kinds
to communicate with each other, using this very specific protocol of codes. This allows the creation of
systems of MIDI instruments, offering much greater versatility and control than is possible with single
instruments. To make this communication possible, all MIDI instruments have two or three 5-pin DIN
connectors called:
o MIDI IN: The connector through which the instrument receives the MIDI data transmitted by other units.
o MIDI OUT: The connector through which the instrument sends the MIDI data it has generated to other
units.
o MIDI THRU: This connector, not always provided on all instruments, is used for connecting several
units in series, since it transmits the MIDI data exactly as they are received by the respective MIDI IN
port.
Most instruments equipped with MIDI interface transmit MIDI messages which specify, for example,
which note has been played and with what dynamic, by means of the MIDI OUT connector. If this
connector is connected to the MIDI IN connector of another MIDI instrument, such as an expander, the
second instrument will respond exactly to the notes played on the transmitter instrument.
The same type of information transfer is used for recording MIDI sequences. A computer or a sequencer
can be used to record the MIDI data generated by the transmitter instrument. If these recorded data are
sent back to the instrument, it automatically repeats the recorded performance.
MIDI is able to transmit a multitude of digital data by means of just one cable, and thus just one
connector. this is thanks to the MIDI channels. There are 16 MIDI channels, and in a similar way as for
radio communications in which two stations can only communicate if they are tuned to the same
frequency (or channel), two MIDI instruments connected together are only able to communicate if the
transmitter instrument channel is the same as the receiver instrument channel.
ENGLISH
MIDI messages subdivide into channel messages and system messages. The following is a short
description of these messages:
NOTE ON
This message is transmitted when a note is pressed on the keyboard. Each Note On message contains
the following information:
Note On: when a key has been struck;
Note Number: the key which has been pressed, and therefore the relative note played;
Velocity: note dynamic (i.e. the force applied when the key was struck).
Note messages are expressed as a number from 0 to 127, with middle C represented by number
60.
Page 28
WICKS CM-100
Pipe Organ Module
NOTE OFF
This message is transmitted when a key struck previously is released.
When it is received, the sound of the note relating to the key is switched off.
PROGRAM CHANGE
This message is used to select the programs or sounds of the receiver instrument.
CONTROL CHANGE
These are control messages (often associated to trimmers or pedals) used to add expression to the
performance, allowing you to set (and control in real time if necessary) voice parameters such as
volume (CC n.7) or the position of the expression pedals (CC n.11), etc.
SYSTEM EXCLUSIVE
These messages can only be interpreted by an instrument made by the same producer as the
transmitter device (in some cases only by the same model). They mainly relate to the instrument's
sound generation and programming parameters.
The CM-100 uses these messages to control all the internal parameters and for switching the
voices on and off.
REAL TIME
These messages are used for the real-time control of specific modules or functions of a connected
instrument. These messages include the Start, Stop, Pause/Continue and Clock commands
Since it is a sound module, the CM-100 needs to be connected to a "controlling" or "master" instrument,
which will send it the data necessary for your performance, such as the notes to be played, the volume,
the expression and other data.
If the "master" instrument is a Wicks church organ, remote control of the switch-on and switch-off of the
individual voice stops will also be possible.
First connect the MIDI OUT connector of your master instrument (organ, keyboard or computer) to the
CM-100's MIDI IN data input port. Use good quality MIDI cables no more than 15 metres long.
Page 29
ENGLISH
Once the connection has been made, the two instruments have to be "tuned" to the same MIDI channel
so that the data exchange can take place correctly.
WICKS CM-100
Module
Pipe Organ
4.3.1 The WHOLE and SPLIT modes
The CM-100 sound module has two different modes for the reception of MIDI messages, called WHOLE
and SPLIT. They are selected using a special button on the instrument's front panel.
In the WHOLE (or "single manual") mode, the whole of the instrument responds to the MIDI commands
resident on a single channel. This is the standard mode of most sound modules, and is particularly useful
when the CM-100 is controlled using a keyboard, or using organs with more than one manual when only
one manual is assigned to control the module.
With the SPLIT mode selected, on the other hand, the CM-100 will be able to give different responses
to several midi channels at a time, each of them with its own stop setup (settable by the user) .
For example, with SPLIT mode the user can have stops 1, 2 and 3 responding to the MIDI 1 channel,
while stop 4 responds to the MIDI 3 channel and the other stops to the MIDI 5 channel. In the final
analysis, in SPLIT mode each stop can be assigned its own channel.
Obviously, this mode is particularly useful when the CM-100 is to be controlled using organs which have
several manuals, each of them with its own stop setup.
4.3.2 Setting the MIDI Reception Channel in WHOLE Mode
First, make sure that the LED of the WHOLE/SPLIT button on the CM front panel is off; otherwise, press
the button of the same name to switch it off.
Then press the SETUP button: the key LED comes on and the video page shown below will appear on
the display.
[TREMULANT] [REVERB] [MIDI]
[OUTS CTRL]
[FINISH] [EXP. PEDAL]
LCD contrast: 6
Use the CURSOR keys to select the MIDI field (the field is selected when the word MIDI is flashing), then
press the ENTER key to confirm the selection.
The display will show the options of the menu selected
[WHOLE MODE]
[SPLIT MODE]
[BULK DUMP] [CAPTURE VOICE ID]
[FILTERS]
Press ENTER to select the WHOLE MODE option.
The display will show the page for setting of the transmission (TX) and reception (RX) channels.
CHANNEL SELECT
Rx:1
TX: 1
ENGLISH
Use the cursor keys to select the RX option. Turn the encoder to select the channel required in a range
from 1 to 15, taking care that the value set is the same as the master instrument transmission channel.
If the ALL option is selected, the instrument will respond to any MIDI channel.
Page 30
WICKS CM-100
Pipe Organ Module
Once the settings have been made, press EXIT to return to the MIDI menu: the settings will automatically
be saved, and will be retained even if the instrument is switched off. From the MIDI menu, you may return
to the main page by pressing EXIT twice.
4.3.3 Setting the MIDI Reception Channel in SPLIT Mode
Press the WHOLE/SPLIT key to enable the multi-channel mode: when it is enabled, the LED of the key
is constantly on.
The procedure for setting the reception channels is similar to that described in point 3.3: from the main
page, press the SETUP key
then use the cursor keys to select the MIDI menu (the menu option is selected when it is flashing) and
press ENTER
Using the cursor keys, select the SPLIT MODE option and press ENTER
CtBourd32> 1
HohlFlot8> 1
Gedackt16> 1
Octave4A > 1
Schwebng8> 1
SptzFlot4> 2
The video page contains the names of all the stops, in accordance with the instrument's current setup,
followed by the value of the midi channel associated to each of them.
With the usual procedure, use the CURSOR keys to select the value to be changed, and then modify it
using the encoder.
Note that:
When a stop is selected for modification, both its value on the display and the light in the rocker
Tab switch on the panel flash
A stop can be selected for modification by pressing its key directly on the panel.
and
buttons indicates the availability of a video page before
Illumination of the LEDs of the
or after the one currently displayed, respectively. Press the relative button to select it.
Once the settings have been made, simply press EXIT to return to the MIDI menu: the settings made will
automatically be enabled and saved. Then press EXIT to return to the SETUP video page, which can be
exited by pressing the same key.
Operation with Couplers
Page 31
ENGLISH
The manual couplers are a particularly interesting feature. We have seen that in split mode it is possible
to set a specific midi channel for each voice, meaning that the voices will respond to manuals different
from those of the master organ. When two manuals are coupled together on the master organ, the CM100 expects to receive the information on both the coupled channels simultaneously, to allow it to
combine the stops. Some models of classical organ do not double-up the channels with the coupler
active, and in this case the CM-100 does not implement the function.
To deal with this problem, we have created a page allowing you to link the midi channel and the master
organ manual.
WICKS CM-100
Module
Pipe Organ
Press the cursor key
from the second split mode modification page and the display will show
MIDI CHANNEL
PEDAL
4
CHOIR
3
GREAT
2
SWELL
1
Where you can tell the CM-100 which midi channel corresponds to each manual, allowing it to obtain the
couplings from other messages instead of from the channel.
So after you have set the split mode channels you should enter this additional information to ensure
perfect symbiosis between the expander and its master instrument.
4.3.4 Setting the MIDI FILTERS
A MIDI FILTER is a special function which allows a specific message to be cut out on all the MIDI
channels (if it is a channelled message) in transmission and/or reception.
For example, the note receive filter allows you not to accept MIDI notes on the MIDI IN port on all the
MIDI channels received by the instrument.
To set up the MIDI filters select the FILTERS field in the MIDI submenu. The following video page
appears:
MIDI FILTER
RECEIVER
Note
NO
CC
NO
PC
NO
SysEx
NO
Real
NO
This setting page is dedicate to the incoming MIDI messages (receiver) and the filters available for this
section, shown on the top line of the display are,
o
o
o
o
o
Note: Note Messages
CC: Control Change (control messages)
PG: Program Change (messages for selecting voices memories)
SysEx: System Exclusive (system exclusive messages)
Real: Real Time messages ( Active Sensing).
The bottom line contains the filter setting fields. Once they have been selected with the aid of the and
cursor keys, you can set them with the values YES or NO as you prefer, by turning the encoder.
Remember that YES means FILTER ON, so the message will NOT be accepted.
Press the cursor
for access to other types of incoming MIDI message which can be filtered
MIDI FILTER
RECEIVER
Voices TremPar Coupler
NO
NO
YES
ENGLISH
These are, in detail
o VOICES: Incoming filter on the System Exclusive messages used to activate the voices
o TREMPAR : Filter on the System Exclusive messages used to control the Tremulant parameters
(speed and depth)
o COUPLER: Activation of the MIDI filter on the Coupler control and activation messages
As usual, the
encoder
and
cursor keys can be used to select the field required and adjust its status with the
Page 32
WICKS CM-100
Pipe Organ Module
The last page of the filter menu allows you to enable the filters for the Control Change (CC) and System
Exclusive (Sys) messages the instrument transmits on the MIDI OUT port, that means for the
messages generated (and note received) by the CM-100
MIDI FILTER
TRANSMITTER
CC
NO
To exit press the EXIT key or press the
Sysex
NO
cursor key to select the previous pages.
4.3.5 MIDI BULK DUMP
The BULK DUMP function allows the contents of the instrument’s internal memory to be sent on the MIDI
OUT port in the form of system exclusive messages (Sys. Ex.).
These data can be recorded in a computer or sequencer, thus allowing the user to create himself one or
more programming files and then reload them into the instrument when necessary. All this enables both
the creation of backup copies of data and the formation of real programming files containing the user
“finishing” (see chapter 4.5) resident in the instrument’s internal memory.
To select the Bulk Dump function press the SETUP button (if not already selected ) and choose the MIDI
option. The CM-100’s display will show:
[WHOLE MODE]
[SPLIT MODE]
[BULK DUMP] [CAPTURE VOICE ID]
[FILTERS]
Now, using the cursor buttons, choose the BULK DUMP option and press the ENTER key.
The video page that will appear will allow you to choose which finishing, of the four available, have to be
sent to the MIDI OUT port in the form of sys-ex messages, to let you record them and create a back-up
copy of your settings.
:
Bulk Dump:Finish1
Press ENTER to start or EXIT to abort
After making the appropriate selections, connect the CM-100 MIDI OUT connector to the MIDI IN
connector of the unit which is to receive the data and switch the latter to record mode.
Then press ENTER key and the CM-100 will start to send the data; the display will inform you about the
dump progress until the message "Bulk Dump completed" appears on the display, at which point the
procedure can be considered complete.
:
Bulk Dump
Bull Dump Progress[²²²²²²
]
To reload the data, connect the MIDI OUT port of the device containing the bulk dump data to the
intrument’s MIDI IN and start playback. The CM-100display will show, while receiving data, a message
confirming the operation in progress.
Page 33
ENGLISH
Warning: The user must absolutely never attempt to modify the contents of the
exclusive code file using file editors; even an apparently tiny variation of just one
letter or number will mean that the CM-100 wil be unable to recognize the file, and
all the data it contains will be irreparably lost.
WICKS CM-100
Module
Pipe Organ
4.3.6 CAPTURE VOICE ID
The 12 voice stops can be switched on and off in remote mode using special System Exclusive MIDI
codes which contain the voice's identification and can control its status.
The classical organs in the large Wicks range have their own Exclusive coding with which the CM-100 is
totally compatible; this means that you can use a Wicks console as master instrument and control the
sound setups in remote mode without taking your hands off the organ.
However, it may occur that the voice currently active on the CM-100 stops is not present on the master
instrument, or special circumstances may mean that a specific expander voice has to be activated in
correspondence with a different organ stop.
The CAPTURE ID function allows the user to capture the voice switch-on code emitted by the master
instrument and assign it to any stop on the panel. To do this, from the MIDI menu
[WHOLE MODE]
[SPLIT MODE]
[BULK DUMP] [CAPTURE VOICE ID]
[FILTERS]
then select the CAPTURE VOICE ID option and press ENTER.
The instrument will first ask you to select which of the twelve voices associated to stops is to house the
new on/off command
Gedackt16
HohlFlot8
Prinzip8A
Oktave4A
Schwebng8
SptzFlot4
Using the cursor keys select the voice you wish and press ENTER.
If, as example, the chosen voice is Gedackt 16, as soon as the selection has been made the instrument
will prompt you to send the code to be captured to its MIDI IN input
CAPTURE ID FOR LOCAL REGISTER Gedackt16
Please, push REMOTE REGISTER
If the instruments are connected correctly, you have only to press the remote organ stop, as if you were
activating the voice: the code generated by this action will be transmitted to the CM-100, which in this
special operating mode will associate it to the chosen register.
To confirm this the display will show
CAPTURE ID FOR LOCAL REGISTER Gedackt16
ID CAPTURED!
please, press EXIT
Now press EXIT to exit.
ENGLISH
From now on the new Midi code - Stop association is ready for use in all instrument operating
environments
If the code captured is already associated to another active voice, a special error message will appear
on the display
Page 34
WICKS CM-100
Pipe Organ Module
CAPTURE ID FOR LOCAL REGISTER Gedackt16
ID ALREADY USED by Tab
9,
press EXIT
N.B. The CAPTURE ID function can only be used with WICKS classical organs.
The function will not be completed if the organ is by a different constructor.
4.4 OUTS CTRL
Another important feature of the acupipe technology is the presence of audio parameters allowing
control of the signal present on each output connector on the rear panel.
The adjustment of each output's audio parameters allows even more realistic, accurate simulation of the
original wind-chests. Moreover, the possibility of real-time control of the acoustic response of each
speaker connected, at any moment, guarantees an extremely quick, effective sound setup.
Each output has its own volume and equalization controls; these parameters are all found in the OUTS
CTRL (that stands for CONTROLS) function, that you can select in the SETUP menu with the aid of the
usual cursor buttons. By pressing ENTER the display will show the following page
VOLUME
[dB]
Output:
1
+3
2
0
3
-6
4
+
5
+8
6
+8
The fisrt video page contains the individual levels of the 6 outputs located in the real panel, identified
by the numbers on the top line of the video page.
The bottom line contains the Volume value (reported in dB) actually set for each of them: use the cursor
and buttons to move select the desired output and the encoder to make the appropriate setting.
To have access to the EQUALIZER settings page, simply press the cursor
settings page: tha display will show:
buttom from the volume
Out1
100 315 1K 3.1K 10K
Equalizer
0
0
0
0
0
This video page allows you to set up the 5-band graphic equalizers available for each individual output.
The first field in the top right-hand corner indicates the output for which the equalisation values are
being displayed: use the encoder to choose select the desired one among the 6 available.
Out2
100 315 1K 3.1K 10K
Equalizer +4
+1
-2
+4
-4
and
buttons to locate the cursor in the adjustment fields (bottom line) of the five
Now use the
operating bands for which the signal gain / attenuation can be set in a range of values from +8 dB to -8
dB.
Page 35
ENGLISH
A graphic indication of the equalizer being adjusted is also displayed on the right of the screen, in real
time.
WICKS CM-100
Module
Pipe Organ
4.5 FINISHING
A tonal finishing memory is a special memory area which stores all the settings made on the instrument,
from tuning through to the parameters of the individual voices and the midi reception channel.
Each finishing setup is actually a very detailed snapshot of your instrument. The only exception is for the
voices assigned to the 12 stops, which are not memorised and are a global parameter, common to all the
instrument's sections.
There are four finishing memories available, and they can be recalled directly from the instrument's main
page through the value of te STATUS field
M.BANK:1 ENSEMBLE:2
TEMPERAMENT:Equal
TRANSP.: 0 TUNE:
0
STATUS: FINISH1
All the settings made on the instrument are automatically saved in the current tonal finishing shown in
the Status field. When the settings of a finishing setup have been changed from the factory settings, two
asterisks appear beside the Finish name
M.BANK:1 ENSEMBLE:2
TEMPERAMENT:Equal
TRANSP.:+1 TUNE:
0
STATUS:*FINISH1*
To recall the contents of a finishing setup saved previously, select the STATUS field using the cursor keys
and turn the encoder.
4.5.1 ST ORE Finshing
As already stated in the previous point, the instrument's tonal finishing setups are saved in real time and
all changes made are automatically stored in the instrument. However, it may be necessary to store the
finishing setup in a "permanent" memory in the instrument.
This is done on the user's request, and creates a copy of the setup which is protected against accidental
modification.
From the setup section main menu page
[TREMULANT] [REVERB] [MIDI]
[OUTS CTRL]
[FINISH] [EXP. PEDAL]
LCD contrast: 6
Use the cursor keys to locate on the FINISH field and press ENTER
ENGLISH
ORGAN FINISHING
Store to
location:1
press ENTER to continue
The Store function allows you to save the current finishing setup (the one currently selected on the main
page) on one of the instrument's "mass" memory locations, to create a copy which can be recalled as
necessary.
Use the cursor key to select the Location field (its number flashes) and turn the encoder to select the
location required and press ENTER. A confirmation prompt page will appear on the display
Page 36
WICKS CM-100
Pipe Organ Module
ORGAN FINISHING
Store to
location:1
Press ENTER to Store
If the selection is correct, press ENTER to proceed.
You can press EXIT to abort the operation and return to the previous menu.
4.5.2 RECALL FINISHING
The Finishing recall function allows you to download the data stored previously in a backup location into
the active finishing setup.
If you need to restore your finishing setup to a known condition, select the finish function and use the
cursor keys to make the Store to field flash.
Turn the encoder and the field will change to Recall from.
ORGAN FINISHING
Recall from
location:2
press ENTER to continue
Move the cursor to the right and select the memory location containing the data saved previously, then
press ENTER.
Once again, a confirmation prompt will ask you to press the ENTER key to proceed (EXIT if you wish to
abort the operation)
ORGAN FINISHING
Recall from
location:2
Press ENTER to recall
When the operation is complete, the instrument will automatically return to the finishing setting video
page with the current finishing setup loaded with the data saved earlier.
Press EXIT to exit and return to the setup menu, then the EXIT key again to return to the main menu
page.
4.7 DISPLAY CONTRAST
The cm-100's display has a contrast adjustment function allowing the maximum visibility to be obtained
for the organist's performing angle.
The setting can be made directly from the SETUP menu by locating the cursor on the Lcd contrast field
and setting the value using the Whis encoder.
[TREMULANT] [REVERB] [MIDI]
[OUTS CTRL]
[FINISH] [EXP. PEDAL]
LCD contrast: 4
Page 37
ENGLISH
The contrast value will be automatically saved. Press EXIT or SETUP buttons to retrun to the
instrument’s main menu
WICKS CM-100
Module
Pipe Organ
5. FACTORY SETTINGS
The Factory Settings procedure allows you to restore the factory settings of all the instrument's internal
parameters (voices inclueded), deleting all the changes made by the user.
To perform the Factory Settings procedure, switch the instrument on while keeping the Voice memory
1, 2 and 3 keys pressed, until the display shows the following video page
RESTORING FACTORY SETTINGS
PLEASE WAIT
Release the keys. After a few moments, the message confirming that the factory settings have been
loaded will be displayed.
FACTORY SETTINGS RESTORED
ENGLISH
The instrument will automatically be rebooted.
Page 38