1
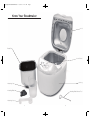
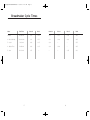
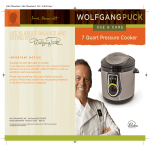
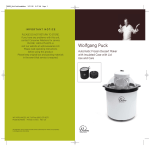
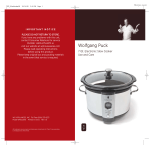
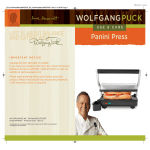
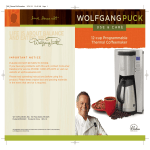
HSN_CompactBreadmakerManual
10/29/10
4:23 PM
Page 1
USE & CARE
LIFE IS ABOUT BALANCE
AND EATING WELL
I M P O R TA N T N OT I C E
PLEASE DO NOT RETURN TO STORE.
If you have any problems with this unit, contact
Consumer Relations for service PHONE: 1-800-2758273 or visit our website at wphousewares.com
Please read operating instructions before using
this product. Please keep original box and packing
materials in the event that service is required.
W.P. APPLIANCES, INC. Toll Free (800) 275-8273
Model BBME0015 Printed in China REV 4.0
All trademarks, service marks and trade names (collectively the “Marks”) are proprietary
to Wolfgang Puck World Wide.
1LB Breadmaker with
Gift Boxes
HSN_CompactBreadmakerManual
10/29/10
4:23 PM
Page 1
IMPORTANT SAFEGUARDS
When using electrical appliances, basic safety precautions should always
be followed, including the following:
1
Read all instructions carefully.
2
To protect against electrical shock, do not immerse cord, plug, or
any other part of this bread maker, in water or other liquid.
3
Close supervision is necessary when any appliance is used by or
near children.
4
Unplug from outlet when not in use and before cleaning. Allow to
cool before putting on or taking off parts.
5
Do not use or operate the appliance with a damaged cord or plug,
or after the appliance malfunctions or has been damaged in any
manner. Return appliance to the nearest authorized service facility
for examination, repair or adjustment.
6
The use of accessory attachments not recommended or sold by the
manufacturer may cause injuries.
7
Do not use outdoors.
8
Do not let the power supply cord hang over the edge of table or
counter, or touch hot surfaces.
9
Do not place the appliance on or near hot gas or electric burners, or
in a heated oven.
Additional Safety Information
SHORT POWER CORD
A short power-supply cord is provided to reduce the hazards resulting
from entanglement or tripping over a longer cord. An extension cord
may be used with care; however, be sure the marked electrical rating
is at least as great as the electrical rating of this appliance. The extension
cord should be positioned such that it does not drape over the counter
or tabletop where it can be pulled on by children or tripped over. The
electrical rating of this appliance is listed on the bottom panel of
the unit.
POLARIZED PLUG
This appliance has a polarized plug (one blade is wider than the other).
To reduce the risk of electric shock, this plug will fit in a polarized outlet
only one way. If the plug does not fit fully in the outlet, reverse the plug.
If it still does not fit, contact a qualified electrician. Do not attempt to
modify the plug in any way.
10 Extreme caution must be used when moving an appliance
containing hot oil or other hot liquids or content.
11
To disconnect, turn any control “off”, then remove plug from wall
outlet. Grip plug and pull from wall outlet. Never pull on the cord.
12 Do not use the Breadmaker for other than intended use.
13 Avoid contacting moving parts during operation.
14 To reduce risk of electric shock, cook only in removable container.
15 Use extreme caution when removing hot container with food.
16 Do not clean with scouring pads. Pieces can break off the pad an
touch electrical parts, creating a risk of electric shock.
17 Do not store in breadmaker any material, other than manufacturers
recommended accessories nor insert any utensils, as they may
create risk of fire or electric shock.
18 Do not touch hot surfaces. Use handles or knobs and/or potholders.
SAVE THESE INSTRUCTIONS
HOUSEHOLD USE ONLY
1
2
HSN_CompactBreadmakerManual
10/29/10
4:23 PM
Page 3
Table of Contents
Wolfgang Puck,
owner of the famous
Spago restaurants
and one of the most
influential chef-restauranteurs in America, is
credited with reviving
California’s rich culinary
heritage. His cooking
innovations, a result of
blending fresh California ingredients with his classical French techniques,
are enjoyed by world leaders, stars and fellow chefs alike. He established
other trend-setting restaurants like Postrio, Chinois on Main in Santa
Monica, Trattoria del Lupo, Cut, and his latest creation, Jai, an Asian
fusion restaurant in San Diego. Home chefs can also share Mr. Puck’s
talents through his cookbooks, cutlery, cookware and, of course, through
his appliances!
3
Important Safeguards
1
Additional Safety Information
2
About Wolfgang Puck
3
Know Your Breadmaker
5
Know Your Control Panel
7
About Your Breadmaker
8
Before Your First Use
9
Setting Descriptions
10
Using Your Breadmaker
11
Slicing and Storing Bread
14
Care and Cleaning
15
Gift Box Assembly Instructions
16
Breadmaker Cycle Times
17
Troubleshooting
19
Recipes
21
Limited Warranty
34
HSN_CompactBreadmakerManual
10/29/10
4:23 PM
Page 5
Know Your Breadmaker
Lid
Bread Pan
Control Panel
Housing
Measuring Cup
Kneading Blade
Kneading Blade Removal Tool
Measuring Spoon
5
6
HSN_CompactBreadmakerManual
10/29/10
4:23 PM
Page 7
Know Your Control Panel
There are four LED lights
under the indicator cover
There are five LED lights under the
indicator cover
About Your Breadmaker
•
The Breadmaker makes 1lb loaves of bread
•
The single paddle bread pan makes traditional shaped bread.
•
The Breadmaker has 5 pre-programmed settings, Basic, Whole
Wheat, Quick, Gluten Free, and Jam
•
The Fruit and Nut Beep signals when it is time to add extra ingredients such as fruits, nuts, or chips. It will maintain ingredients shape
and texture rather than be chopped up by the kneading blade.
•
The viewing window allows you to watch the bread making process.
•
The breadmaker will automatically switch to KEEP WARM at the end
of the baking process for up to 60 minutes.
•
The Breadmaker is designed with a cool–touch exterior.
•
The Breadmaker has POWER LOSS MEMORY, which resumes the
cycle where it left off when as long as the power is not out longer
than 15 minutes.
•
Do not cover the Breadmaker with towels or other materials that will
prevent steam from escaping. Some steam from vents is normal.
•
Do not place any objects on top of the Breadmaker.
•
Unplug the unit and wait until it cools, then remove any spilled
ingredients or crumbs from the baking chamber of the Breadmaker
by wiping with a damp sponge or cloth. See Care and Cleaning,
page 14.
IMPORTANT: Always add ingredients in the order they are specified in
the recipe. For best results, accurate measuring of ingredients is vital.
Do not put larger quantities than recommended into the baking pan as
it may produce poor results and may damage the Breadmaker. To clear
a program after you have started it, push the START/STOP button until
you hear a beep and then you can enter another program.
This button is used to choose
the program
The button is used to start
and stop the program
7
8
HSN_CompactBreadmakerManual
10/29/10
4:23 PM
Page 9
Before Your First Use
Enjoy using your Wolfgang Puck Breadmaker. Before your first use,
please take a few minutes to read this Instruction Manual and keep it
handy for reference. Please pay particular attention to the safety
instructions we have provided for your protection.
Carefully unpack the Breadmaker and remove all packaging materials.
Clean your breadmaker and parts according to the Care & Cleaning
section of this manual. Plug the cord into a 120-volt AC outlet. The cord
length of this Breadmaker was selected to reduce the possibility of
tangling or tripping over a longer cord. If more cord is needed, use a
UL certified extension cord rated no less than 15 amperes and 120 volts.
The longer cord should be arranged so that it will not drape over the
countertop where it can be pulled on by children or tripped over.
Setting Descriptions
BASIC
This setting is used for breads that primarily use white flour, although
some recipes may include small amounts of whole grain flour. This is
the best setting to use when experimenting with different bread recipes
in your Breadmaker.
WHOLE WHEAT (also MULTI-GRAIN)
This setting is used for recipes with significant amounts of whole wheat,
rye flour or bran. It begins with a rest period during which the flours or
grains absorb the liquid ingredients. Soaking causes the flour or grain to
soften and helps ingredients to combine well. The settings have an extra
rise cycle to allow heavy wheat and grains to expand. Generally, whole
wheat and multi-grain breads are shorter and denser than Basic breads.
QUICK
These breads have the shortest mixing time and are always leavened
with baking powder or baking soda. Use for banana breads, coffee cakes
and pound cakes.
GLUTEN FREE
This setting is used for kneading, rising, and baking gluten-free bread
using gluten-free flours in place of standard bread flour.
JAM
Use this setting for making jam from fresh fruits.
KEEP WARM (automatic at end of baking cycle – no button to press)
Bread can be automatically kept warm for up to 60 minutes after
baking. When the breadmaker is in the Keep Warm cycle the four LED
lights under the Start/Stop button will blink. To cancel the Keep Warm
cycle press the START/STOP button for 3-5 seconds.
9
10
HSN_CompactBreadmakerManual
10/29/10
4:23 PM
Page 11
Using Your Breadmaker
Figure 1
Figure 2
These are instructions for bread baking onlynot the JAM cycle. The bread settings in this
unit will combine ingredients, knead, and make
bread from start to finish automatically.
Breadmaker Tip: After 5 minutes of kneading, open the lid of the
breadmaker and check the dough consistency. The dough should form a
soft, tacky ball. If too dry, add liquid. If too wet, add flour. Additional
liquid or flour should be added in 1/2 - 1 tablespoon increments.
The recipes included with this booklet have
been thoroughly tested to ensure best results.
Recipes have been created especially for this
breadmaker and may not produce acceptable
results in other similar bread making machines.
4
1
5
Close the lid. Connect the plug to a 120-volt AC-only outlet. You will
hear a short beep.
6
Choose the correct setting for your recipe by pressing the MENU
button. Each time MENU is pressed you will hear a beep and the
corresponding LED light will illuminate.
Open the lid and remove the baking pan by
turning slightly counter-clockwise and then
up and out (see Figure 1). It is important to
remove the baking pan from the unit when
putting ingredients into the pan. This will
prevent accidentally spilling ingredients into
the baking chamber.
WARNING: Place your Breadmaker where it is level, stable, and secure.
Ingredients spilled in baking chamber can cause fire when ignited by the
heating element.
2
Attach the kneading blade onto the shaft inside the baking pan by
lining up the flat side of the blade with the flat side of the shaft. Push
the blade firmly onto the shafts .
NOTE: Be sure to set the kneading blade firmly in place to prevent the
blade from coming off during operation, which may affect the kneading
or mixing. Be sure the shaft is clean of any residue (i.e. dough). This will
ensure the kneading blade will fully fit into place and prevent the blade
from sticking to the shaft.
3
Using Your Breadmaker
cont.
Note: If the baking pan is not installed properly or firmly clicked into
place, the kneading blades will not operate.
Note: The Whole Wheat settings begin with a rest period during which
the flour or grains absorb the liquid ingredients. Soaking causes the flour
or grain to soften and helps ingredients to combine well. There is no
blade action during this period.
7
Press the START/STOP button to begin. To cancel a program once
you have started it, press the START/STOP button for 3 - 5 seconds
until you hear a beep. You can now reprogram the machine.
8
The Breadmaker is designed with a KEEP WARM feature that
automatically begins when the bake time is completed. This will
continue for up to 60 minutes after baking is complete. During this
time, the Breadmaker’s heating elements will remain on at low power
to keep the bread warm. You may remove the baking pan at any
time during the KEEP WARM cycle. To turn off the KEEP WARM
feature before the 60 minutes are up, simply press the START/STOP
button for 3-5 seconds until you hear a beep. UNPLUG THE UNIT
WHEN FINISHED. Never leave the unit plugged in when not in use.
9
The Breadmaker has a convenient viewing window so that you
may watch the progress of the bread as it is mixed, kneaded, and
baked. Occasionally, some moisture may form in the window during
baking. You may lift the lid to look inside during mixing and
kneading stages. However, DO NOT OPEN THE LID DURING THE
BAKING CYCLE, (approximately the last hour) as this may cause
the bread to collapse.
Select a recipe from the recipe section of this booklet. When
following the recipes:
a. Measure ingredients carefully and accurately. To measure liquids,
use a see-through liquid measuring cup and check the
measurement at eye level. When measuring dry ingredients,
use a standard dry measuring cup and level the ingredients with
a straightedge knife. Slightly inaccurate measurement can make
a difference in results. Use standard measuring spoons and level
off with a straightedge knife.
b. Always add ingredients into the baking pan in the order listed.
Place the baking pan back into the unit with the pan at a slight
angle. Press the pan down and turn slightly clockwise to lock into
place. (see Figure 2)
c. Always add yeast last. Be careful not to mix the yeast with any of
the wet ingredients, especially when using the delay time
function feature. Otherwise, the bread may not rise properly.
11
12
HSN_CompactBreadmakerManual
10/29/10
4:23 PM
Page 13
Using Your Breadmaker
cont.
10 To remove the bread from the baking pan, use pot holders or oven
mitts and pull up on the side handle. Place the bread pan on a wire
cooling rack for 10 - 15 minutes. Turn the pan upside down and shake
the bread out and place the bread onto a wire cooling rack. You can
remove the bread from the bread pan immediately after the baking
cycle; however, it will require more effort to remove it. If you have
difficulty removing bread from the baking pan, slide a flat rubber or
plastic spatula along the sides of the pan to loosen the loaf. Turn the
pan over and shake the loaf out.
Caution: The baking pan has a nonstick finish so the bread should come
out easily. Do not use metal utensils to remove bread as they may
scratch the nonstick surface.
11
Slicing and Storing Bread
For best results, place bread on a wire rack and allow to cool 15 to 30
minutes before slicing. Use an electric knife or serrated bread knife for
even slices.
Store unused bread tightly covered (re-closable plastic bags or plastic
containers work well) at room temperature for up to three days. For
longer storage (up to one month), place bread in a tightly covered
container in the freezer. Since homemade bread has no preservatives,
it tends to dry out and become stale faster than commercially
made bread.
Leftover slightly hardened bread may be cut into 1/2–inch or 1-inch
cubes and used in recipes to make croutons, bread pudding, or stuffing.
Allow the bread to cool before slicing. If the kneading blade remains
in the bottom of the baking pan, fill the baking pan with hot water to
loosen it . If the kneading blade remains in the bottom of the bread,
use the blade removal tool to remove. Do not use a knife or any
other sharp metal object as it will scratch the nonstick coating on
the kneading blade.
Caution: Always check to see where the kneading blade is when
removing a baked loaf of bread. If it remains stuck in the bread, you
may damage it by cutting into it while slicing.
Tip: Fill pan with warm water immediately after removing bread to
prevent blade from sticking to shaft.
13
14
HSN_CompactBreadmakerManual
10/29/10
4:23 PM
Page 15
Care and Cleaning
CAUTION: To prevent electrical shock, unplug the unit before cleaning.
Allow the Breadmaker to cool before cleaning. Do not immerse or splash
either the body or lid in any liquid as this may cause damage and/or
electric shock.
For best performance and maintenance, clean the Breadmaker after
each use as follows:
Gift Box Assembly Instructions
1
2
Outer Body, Lid, and Baking Chamber
Wipe the lid and outer body of the unit with a damp cloth or slightly
damp sponge. Use a damp sponge or cloth to wipe out any flour,
crumbs, or other materials from the baking chamber. Dry thoroughly.
3
Baking Pan and Kneading Blade
Both the baking pan and kneading blade have nonstick surfaces.
Do not use any harsh cleansers, abrasive materials, or utensils that may
scratch the surfaces. Over time, the nonstick surface may change in
appearance due to moisture and steam. This is normal and has no
effect on its use or quality.
Remove the baking pan and kneading blade from the baking chamber
before cleaning. Wash both in warm soapy water and dry thoroughly. If
the kneading blade get stuck, fill the baking pan with hot water and soak
for 30 minutes or until they loosen and can be removed easily. If the hole
in the kneading blade becomes clogged, carefully clean it out with a
wooden or plastic toothpick.
CAUTION: Never use any of the following to clean your Breadmaker:
Paint Thinner, Benzene, Steel Wool Pads, Polishing Powder or Chemical
Dust cloths. DO NOT place any part or parts of the bread maker in the
dishwasher.
4
5
STORING THE UNIT
Be sure to dry all parts before storing including the viewing window.
Close the lid, and do not store anything on top of the Breadmaker.
6
1
Place white box bottom on table
with scalloped side down
2
Bend side tabs into box
3
Close bottom box flap
4
Place red cover on table with
scalloped side down
5
Bend side tabs into box
6
Fold top cover into box
7
Place bottom white box on table with
scalloped side up, bend scalloped sides
of white box in (do not bed scalloped sides
of red box) Place red box cover onto box
The assembly instructions for the small box
are the same for large box. Tissue paper is
provided to place in bottom of box if so
desired. Decorative ribbon provided can be
placed around box.
7
15
16
HSN_CompactBreadmakerManual
10/29/10
4:23 PM
Page 17
Breadmaker Cycle Times
Menu
Total Time
Knead 1
Rise 1
1. Basic
2 hr 45 min
0:10
2. Whole Wheat
3 hrs 28 min
Knead 2
Rise 2
Rise 3
Bake
0:25
0:10
0:35
0:45
0:40
0:10
0:35
0:10
0:48
0:60
0:45
1 hr 9 min
0:09
0:03
0:02
--
--
0:55
4. Gluten Free
1 hr 49 min
0:09
0:05
0:02
0:48
--
0:45
5. Jam
1 hr 20 min
0:15
--
--
--
0:45
0:20
3. Quick
17
18
HSN_CompactBreadmakerManual
10/29/10
4:23 PM
Page 19
Troubleshooting
Problem
Cause
Solution
Smoke appears from the
ventilation hole during the
baking process
During initial use special protective
oils are burning off the heating
element, or ingredients have
spilled onto the heating elements
in the bottom of the chamber
After first use all protective substances will have burned off the heating
elements and require no maintenance. If ingredients have spilled onto
the heating elements, unplug your Breadmaker and allow it to
completely cook. Wash the heating element off with a damp cloth (no
soap) and allow to dry thoroughly
Bottom crust is too thick
and chewy
Breadmaker was kept in the bread
machine too long after completion
of the bread making cycle and
keep warm cycle has elapsed.
Do not allow bread to stay in the Breadmaker more than I hour after
completion of the bread making cycle
It is difficult to remove the bread
from the pan
Kneading blade is stuck to the
bread pan
Allow the Bread Pan to sit on a cooling rack for 10 - 15 minutes
before attempting to remove the bread. After removing the bread
put hot soapy water in the pan and allow to sit for 10 minutes to loosen
the kneading blades from the shaft. Always ensure that your Bread Pan
shaft and kneading blades are completely clean before baking a new
loaf of bread
Ingredients have not stirred evenly
and the loaf of bread is not baked
properly
Several issues can cause this
to occur. The wrong MENU cycle
was used for the type of bread
you are making, during the baking
and rising cycles the lid was
opened continuously, or left open,
or the ingredients was placed in
the pan in the wrong order, or
wrong volume
Select the proper MENU function, Do not open the cover excessively,
keep the cover closed during the bread making process, always use
liquid ingredients first, then dry. Ensure that you are measuring the
ingredients accurately.
Motor is making noise but the
bread is not kneading
Kneading blade is not in the Bread
Pan, the Bread Pan is not properly
placed into the housing, or too
much dough has been added to
the pan
Ensure the kneading blade has been properly placed onto the shaft
before adding ingredients, ensure that the Bread Pan is properly locked
into place in the housing, never exceed the recommended amount of
flour in the Bread Pan
Bread has risen over the pan and
is pushing the lid open
Too much yeast, flour, or water
was added to the batch, or the
temperature is too high
Check the recipe measurements, always allow the machine to cool down
at least 15 minutes in between batches
Bread size is too small or bread is
not rising
No yeast, or not enough yeast was
added to the pan, yeast is expired,
water temperature is too high
Ensure that the ingredients are measured properly and that the yeast
has not expired
19
20
HSN_CompactBreadmakerManual
10/29/10
4:23 PM
Page 21
Easy White Sandwich Bread
Makes 1 Loaf
INGREDIENTS
1/2 cup room temperature water
1/4 teaspoon apple cider vinegar
1 1/2 teaspoons granulated sugar
1 1/2 teaspoons kosher salt
2 teaspoons vegetable oil
1 1/3 cups unbleached bread flour
1 1/4 teaspoons bread machine yeast
METHOD
Recipes
21
1
Combine ingredients in the Bread Pan in order listed; close lid.
2
Press BASIC.
3
Press START.
4
Allow finished bread to cool for 10 minutes before removing
from pan.
Recipe courtesy Marian Getz, Wolfgang Puck Pastry Chef
22
HSN_CompactBreadmakerManual
10/29/10
4:23 PM
Page 23
All-American Wheat Bread
Chocolate Yeast Bread
Makes 1 Loaf
Makes 1 Loaf
INGREDIENTS
INGREDIENTS
1/3 cup room temperature water
1 tablespoon olive oil
1 tablespoon honey
1 large egg
1 tablespoon powdered milk
1 1/2 teaspoons kosher salt
1/3 cup 100% whole wheat flour
1 cup unbleached bread flour
3/4 teaspoon bread machine yeast
1/4 cup water, at room temperature
2 tablespoons unsalted butter, melted
2 tablespoons granulated sugar
1 large egg
1 teaspoon vanilla extract
1/2 teaspoon butter vanilla extract
2 tablespoons powdered milk
1 teaspoon kosher salt
3 tablespoons good quality cocoa
1 1/3 cups unbleached bread flour
3/4 teaspoon bread machine yeast
METHOD
1
Combine ingredients in Bread Pan in order listed; close lid.
2
Choose WHOLE WHEAT.
3
Press START.
4
Allow finished bread to rest for 10 minutes before removing
from pan.
METHOD
1
Combine ingredients in the Bread Pan in order listed; close lid.
2
Press QUICK.
3
Press START.
4
Allow finished loaf to cool for 10 minutes before removing from pan.
Recipe courtesy Marian Getz, Wolfgang Puck Pastry Chef
Recipe courtesy Marian Getz, Wolfgang Puck Pastry Chef
23
24
HSN_CompactBreadmakerManual
10/29/10
4:23 PM
Page 25
Hawaiian Quick Bread
Gingerbread Cake
Makes 1 Loaf
Makes 4-6 servings
INGREDIENTS
INGREDIENTS
1/3 cup room temperature water
1/2 teaspoon vanilla extract
1/2 teaspoon fresh lemon zest
1/2 teaspoon fresh orange zest
1 large egg
2 tablespoons unsalted butter, melted
2 tablespoons powdered milk
1 teaspoon kosher salt
2 tablespoons granulated sugar
1 1/3 cups unbleached bread flour
1 teaspoon bread machine yeast
1/3 cup buttermilk
1/4 cup unsalted butter, melted
1/3 cup molasses
1 large egg
1/3 cup light brown sugar, packed
1/4 teaspoon baking soda
1 teaspoon each ground ginger, cinnamon and clove
3/4 cup unbleached all purpose flour
1/2 teaspoon kosher salt
METHOD
1
Combine ingredients in the Bread Pan in order listed; close lid.
2
Press BASIC.
3
Press START.
4
Allow finished bread to rest for 10 minutes before removing
from pan.
Recipe courtesy Marian Getz, Wolfgang Puck Pastry Chef
25
METHOD
1
Combine ingredients in the Bread Pan in order listed; close lid.
2
Press QUICK.
3
Press START.
4
After 5 minutes of mixing check to see that ingredients are
well combined.
5
Allow finished cake to rest in pan for 10 minutes before removing.
Recipe courtesy Marian Getz, Wolfgang Puck Pastry Chef
26
HSN_CompactBreadmakerManual
10/29/10
4:23 PM
Page 27
Brownies
Gluten Free Buttercrust Bread
Makes 6 brownies
Makes 1 Loaf
INGREDIENTS
INGREDIENTS
1/2 cup unsalted butter, melted
1 cup granulated sugar
2 large eggs
1/4 teaspoon kosher salt
1/2 teaspoon vanilla extract
1/4 cup good quality cocoa
1/2 cup unbleached all purpose flour
3/4 cup room temperature water
1/2 teaspoon apple cider vinegar
2 tablespoons unsalted butter, melted
2 large eggs
3 tablespoons powdered milk
2 tablespoons granulated sugar
1/2 cup corn starch
6 tablespoons garfava flour,
a mixture of garbanzo bean and fava bean flours
1/8 cup sorghum flour
1/2 cup tapioca starch flour
1 1/2 teaspoons xanthan gum
1 1/2 teaspoons unflavored gelatin
1 1/2 teaspoon kosher salt
1 tablespoon bread machine yeast
METHOD
1
Combine ingredients in the Bread Pan in order listed; close lid.
2
Press QUICK.
3
Press START.
4
After 5 minutes check to see that all ingredients are mixed in.
5
Let rest for 10 minutes after baking before removing from pan.
Recipe courtesy Marian Getz, Wolfgang Puck Pastry Chef
METHOD
1
Add first 4 ingredients to the Bread Pan.
2
Whisk remaining ingredients together in a medium bowl using a
hand whisk. This is important because the xanthan gum and gelatin
need to be evenly distributed with the flours or they will clump and
cause hard lumps in the finished bread.
3
Pour batter into Bread Pan and close lid.
4
Press GLUTEN FREE.
5
Press START.
6
Allow finished bread to rest for 10 minutes before removing
from pan.
Recipe courtesy Marian Getz, Wolfgang Puck Pastry Chef
27
28
HSN_CompactBreadmakerManual
10/29/10
4:23 PM
Page 29
Gluten Free Garlic-Herb Bread
Gluten Free Brownies
Makes 1 Loaf
Makes 6 brownies
INGREDIENTS
INGREDIENTS
1/2 cup plus 1 tablespoon water
1/8 cup olive oil
1 teaspoon cider vinegar
2 large eggs
2 teaspoons tamari
3 cloves garlic, chopped
1/4 cup yellow onion, chopped
1 tablespoon fresh rosemary, chopped
1 teaspoon fresh thyme, chopped
5 - 6 fresh basil leaves, torn
1 1/2 teaspoons kosher salt
1 cup brown rice flour
2 1/2 tablespoons potato starch flour
2 1/2 tablespoons tapioca starch flour
2 1/2 tablespoons garfava flour,
a mixture of garbanzo bean and fava bean flour
1 tablespoon powdered egg whites
1 tablespoon granulated sugar
1 teaspoon xanthan gum
1 teaspoon unflavored gelatin
2 teaspoons bread machine yeast
1/2 cup unsalted butter, melted
1 cup granulated sugar
2 large eggs
1/8 teaspoon kosher salt
1/2 teaspoon vanilla extract
1/4 cup good quality cocoa
1/8 cup sweet rice flour
2 1/2 tablespoons tapioca flour
2 1/2 tablespoons cornstarch
1 teaspoon potato flour
1/4 teaspoon unflavored gelatin
1/4 teaspoon xanthan gum
METHOD
1
Add first 5 ingredients to the Bread Pan.
2
Prepare vegetables and set aside.
3
Whisk remaining dry ingredients together in a medium bowl
using a hand whisk. This is important because the xanthan gum and
gelatin need to be evenly distributed with the flours or they will
clump and cause lumps in the finished bread. Add this mixture to
the Bread Pan.
4
Add vegetables to the Bread Pan; close lid.
5
Press GLUTEN FREE.
6
Press START.
7
Allow finished bread to rest for 10 minutes before removing
from pan.
METHOD
1
Add first 5 ingredients to the Bread Pan.
2
Whisk remaining ingredients together in a medium bowl using a
hand whisk. This is important because the xanthan gum and gelatin
need to be evenly distributed with the flours or they will clump and
cause hard lumps in the finished bread.
3
Pour flour mixture into Bread Pan; close lid.
4
Press QUICK.
5
Press START.
6
Let finished brownies rest for 10 minutes before removing from pan.
Recipe courtesy Marian Getz, Wolfgang Puck Pastry Chef
Recipe courtesy Marian Getz, Wolfgang Puck Pastry Chef
29
30
HSN_CompactBreadmakerManual
10/29/10
4:23 PM
Page 31
Cantaloupe Jelly
Cherry Jam
Makes about 3 cups
Makes about 3 cups
INGREDIENTS
INGREDIENTS
1 1/2 cups pureed fresh cantaloupe
3 cups granulated sugar
1 1/2 teaspoons citric acid or 2 tablespoons fresh lemon juice
2 pouches (3 ounces each) liquid fruit pectin
1 1/2 cups pureed fresh tart red cherries (not dark cherries)
3 cups granulated sugar
1 1/2 teaspoons citric acid or 2 tablespoons fresh lemon juice
2 pouches (3 ounces each) liquid fruit pectin
METHOD
METHOD
1
Combine ingredients in the Bread Pan in order listed; close lid.
1
Combine ingredients in the Bread Pan in order listed; close lid.
2
Press JAM.
2
Press JAM.
3
Press START.
3
Press START.
4
When jam is finished store in jars and refrigerate for up to 3 months
or freeze for up to 1 year.
4
When jam is finished store in jars and refrigerate for up to 3 months
or freeze for up to 1 year.
Recipe courtesy Marian Getz, Wolfgang Puck Pastry Chef
31
Recipe courtesy Marian Getz, Wolfgang Puck Pastry Chef
32
HSN_CompactBreadmakerManual
10/29/10
4:23 PM
Page 33
Pineapple Jam
Makes about 3 cups
INGREDIENTS
1 1/2 cups pureed fresh pineapple
3 cups granulated sugar
1 1/2 teaspoons citric acid or 2 tablespoons fresh lemon juice
2 pouches (3 ounces each) liquid fruit pectin
METHOD
1
Combine ingredients in the Bread Pan in order listed; close lid.
2
Stir to combine; close lid.
3
Press JAM.
4
Press START.
5
When jam is finished store in jars or containers and refrigerate for up
to 3 months or freeze for up to 1 year.
Recipe courtesy Marian Getz, Wolfgang Puck Pastry Chef
Limited Warranty
This warranty covers all defects in workmanship or materials in the
mechanical and electrical parts, arising under normal usage and care, in
this product for a period of 12 months from the date of purchase
provided you are able to present a valid proof-of-purchase. A valid
proof-of-purchase is a receipt specifying item, date purchased, and
cost of item. A gift receipt with date of purchase and item is also an
acceptable proof-of-purchase. Product is intended for household use only.
Any commercial use voids the warranty.
This warranty covers the original retail purchaser or gift recipient. During
the applicable warranty period within normal household use,we will
repair or replace, at our discretion, any mechanical or electrical part
which proves defective, or replace unit with a comparable model.
To obtain service under the terms of this warranty,
call Toll Free (800) 275-8273.
THIS LIMITED WARRANTY COVERS UNITS PURCHASED AND USED
WITHIN THE UNITED STATES AND DOES NOT COVER:
•
•
•
•
Damages from improper installation.
Defects other than manufacturing defects.
Damages from misuse, abuse, accident, alteration, lack of proper
care and maintenance, or incorrect current or voltage.
Damage from service by other than an authorized dealer or
service center.
This warranty gives you special legal rights and you may also have other
rights to which you are entitled which may vary from state to state.
33
34