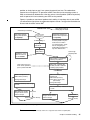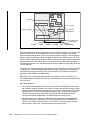
1
Front cover IBM System z Personal Development Tool Volume 3 Additional Topics System z Development Tool Full z/OS usage Linux base Bill Ogden ibm.com/redbooks . International Technical Support Organization IBM System z Personal Development Tool: Volume 3 Additional Topics June 2013 SG24-7723-05 Note: Before using this information and the product it supports, read the information in “Notices” on page vii. Sixth Edition (June 2013) This edition applies to the IBM 1090 (also known as zPDT) release that is available at the time of publication. © Copyright International Business Machines Corporation 2009, 2013. All rights reserved. Note to U.S. Government Users Restricted Rights -- Use, duplication or disclosure restricted by GSA ADP Schedule Contract with IBM Corp. Contents Notices . . . . . . . . . . . . . . . . . . . . . . . . . . . . . . . . . . . . . . . . . . . . . . . . . . . . . . . . . . . . . . . . . vii Trademarks . . . . . . . . . . . . . . . . . . . . . . . . . . . . . . . . . . . . . . . . . . . . . . . . . . . . . . . . . . . . . viii Preface . . . . . . . . . . . . . . . . . . . . . . . . . . . . . . . . . . . . . . . . . . . . . . . . . . . . . . . . . . . . . . . . . ix The author . . . . . . . . . . . . . . . . . . . . . . . . . . . . . . . . . . . . . . . . . . . . . . . . . . . . . . . . . . . . . . . ix Now you can become a published author, too! . . . . . . . . . . . . . . . . . . . . . . . . . . . . . . . . . . . ix Comments welcome. . . . . . . . . . . . . . . . . . . . . . . . . . . . . . . . . . . . . . . . . . . . . . . . . . . . . . . . .x Stay connected to IBM Redbooks . . . . . . . . . . . . . . . . . . . . . . . . . . . . . . . . . . . . . . . . . . . . . .x Chapter 1. General usage . . . . . . . . . . . . . . . . . . . . . . . . . . . . . . . . . . . . . . . . . . . . . . . . . . 1 1.1 Token dates and times . . . . . . . . . . . . . . . . . . . . . . . . . . . . . . . . . . . . . . . . . . . . . . . . . . 2 1.2 crontab entries . . . . . . . . . . . . . . . . . . . . . . . . . . . . . . . . . . . . . . . . . . . . . . . . . . . . . . . . 2 1.3 Sparse files . . . . . . . . . . . . . . . . . . . . . . . . . . . . . . . . . . . . . . . . . . . . . . . . . . . . . . . . . . . 3 1.4 Security exposures . . . . . . . . . . . . . . . . . . . . . . . . . . . . . . . . . . . . . . . . . . . . . . . . . . . . . 3 1.4.1 Reducing root usage . . . . . . . . . . . . . . . . . . . . . . . . . . . . . . . . . . . . . . . . . . . . . . . . 3 1.4.2 Linux suid usage . . . . . . . . . . . . . . . . . . . . . . . . . . . . . . . . . . . . . . . . . . . . . . . . . . . 4 1.4.3 1090 log files . . . . . . . . . . . . . . . . . . . . . . . . . . . . . . . . . . . . . . . . . . . . . . . . . . . . . . 4 1.4.4 Token server monitoring . . . . . . . . . . . . . . . . . . . . . . . . . . . . . . . . . . . . . . . . . . . . . 4 1.4.5 License server controls . . . . . . . . . . . . . . . . . . . . . . . . . . . . . . . . . . . . . . . . . . . . . . 5 1.5 z1090instcheck . . . . . . . . . . . . . . . . . . . . . . . . . . . . . . . . . . . . . . . . . . . . . . . . . . . . . . . . 5 1.6 CPs, processors, threads, and tokens . . . . . . . . . . . . . . . . . . . . . . . . . . . . . . . . . . . . . . 6 1.7 CKD versioning . . . . . . . . . . . . . . . . . . . . . . . . . . . . . . . . . . . . . . . . . . . . . . . . . . . . . . . . 8 1.8 1090 messages . . . . . . . . . . . . . . . . . . . . . . . . . . . . . . . . . . . . . . . . . . . . . . . . . . . . . . . . 9 1.9 TCP/UDP ports . . . . . . . . . . . . . . . . . . . . . . . . . . . . . . . . . . . . . . . . . . . . . . . . . . . . . . . 10 1.10 Dual boot . . . . . . . . . . . . . . . . . . . . . . . . . . . . . . . . . . . . . . . . . . . . . . . . . . . . . . . . . . . 10 1.11 Remote operation . . . . . . . . . . . . . . . . . . . . . . . . . . . . . . . . . . . . . . . . . . . . . . . . . . . . 12 1.12 x3270 cursor position . . . . . . . . . . . . . . . . . . . . . . . . . . . . . . . . . . . . . . . . . . . . . . . . . 12 1.13 Devices, memory, msgmni, ulimit . . . . . . . . . . . . . . . . . . . . . . . . . . . . . . . . . . . . . . . . 12 1.14 Startup scripts . . . . . . . . . . . . . . . . . . . . . . . . . . . . . . . . . . . . . . . . . . . . . . . . . . . . . . . 13 Chapter 2. Tapes (SCSI and awstape) . . . . . . . . . . . . . . . . . . . . . . . . . . . . . . . . . . . . . . . 2.1 SCSI tape drives . . . . . . . . . . . . . . . . . . . . . . . . . . . . . . . . . . . . . . . . . . . . . . . . . . . . . . 2.1.1 The awsscsi device manager . . . . . . . . . . . . . . . . . . . . . . . . . . . . . . . . . . . . . . . . 2.2 Drives and interfaces . . . . . . . . . . . . . . . . . . . . . . . . . . . . . . . . . . . . . . . . . . . . . . . . . . 2.2.1 Specific hardware tested. . . . . . . . . . . . . . . . . . . . . . . . . . . . . . . . . . . . . . . . . . . . 2.3 SCSI utilities . . . . . . . . . . . . . . . . . . . . . . . . . . . . . . . . . . . . . . . . . . . . . . . . . . . . . . . . . 2.4 awstape utilities . . . . . . . . . . . . . . . . . . . . . . . . . . . . . . . . . . . . . . . . . . . . . . . . . . . . . . . 2.5 Practical advice . . . . . . . . . . . . . . . . . . . . . . . . . . . . . . . . . . . . . . . . . . . . . . . . . . . . . . . 15 16 16 18 19 20 20 21 Chapter 3. z/OS notes . . . . . . . . . . . . . . . . . . . . . . . . . . . . . . . . . . . . . . . . . . . . . . . . . . . . 3.1 IEBCOPY problems . . . . . . . . . . . . . . . . . . . . . . . . . . . . . . . . . . . . . . . . . . . . . . . . . . . 3.2 z/OS CP and memory display . . . . . . . . . . . . . . . . . . . . . . . . . . . . . . . . . . . . . . . . . . . . 3.3 z/OS spin loop timeouts . . . . . . . . . . . . . . . . . . . . . . . . . . . . . . . . . . . . . . . . . . . . . . . . 3.4 Larger panel . . . . . . . . . . . . . . . . . . . . . . . . . . . . . . . . . . . . . . . . . . . . . . . . . . . . . . . . . 3.5 z/OS disk space . . . . . . . . . . . . . . . . . . . . . . . . . . . . . . . . . . . . . . . . . . . . . . . . . . . . . . 3.6 Java and WebSphere Application Server startup . . . . . . . . . . . . . . . . . . . . . . . . . . . . . 3.7 Standalone z/OS dump . . . . . . . . . . . . . . . . . . . . . . . . . . . . . . . . . . . . . . . . . . . . . . . . . 3.7.1 Generating a standalone dump program . . . . . . . . . . . . . . . . . . . . . . . . . . . . . . . 3.7.2 Taking a standalone z/OS dump. . . . . . . . . . . . . . . . . . . . . . . . . . . . . . . . . . . . . . 23 24 24 24 25 25 25 29 29 30 © Copyright IBM Corp. 2009, 2013. All rights reserved. iii 3.8 Moving 3390 volumes . . . . . . . . . . . . . . . . . . . . . . . . . . . . . . . . . . . . . . . . . . . . . . . . . . 3.8.1 Create a source dump . . . . . . . . . . . . . . . . . . . . . . . . . . . . . . . . . . . . . . . . . . . . . 3.8.2 Send dump to Linux . . . . . . . . . . . . . . . . . . . . . . . . . . . . . . . . . . . . . . . . . . . . . . . 3.8.3 Receive dump . . . . . . . . . . . . . . . . . . . . . . . . . . . . . . . . . . . . . . . . . . . . . . . . . . . . 3.8.4 Standalone restore . . . . . . . . . . . . . . . . . . . . . . . . . . . . . . . . . . . . . . . . . . . . . . . . 3.9 IODF Changes with zPDT . . . . . . . . . . . . . . . . . . . . . . . . . . . . . . . . . . . . . . . . . . . . . . . 3.10 Local printing . . . . . . . . . . . . . . . . . . . . . . . . . . . . . . . . . . . . . . . . . . . . . . . . . . . . . . . . 3.10.1 Setup. . . . . . . . . . . . . . . . . . . . . . . . . . . . . . . . . . . . . . . . . . . . . . . . . . . . . . . . . . 3.10.2 Operational technique . . . . . . . . . . . . . . . . . . . . . . . . . . . . . . . . . . . . . . . . . . . . . 3.11 Enabling TSO users for OMVS . . . . . . . . . . . . . . . . . . . . . . . . . . . . . . . . . . . . . . . . . . 3.12 SYS1.LOGREC full . . . . . . . . . . . . . . . . . . . . . . . . . . . . . . . . . . . . . . . . . . . . . . . . . . . 3.13 Lost MVS console . . . . . . . . . . . . . . . . . . . . . . . . . . . . . . . . . . . . . . . . . . . . . . . . . . . . 3.14 Unable to start ISPF . . . . . . . . . . . . . . . . . . . . . . . . . . . . . . . . . . . . . . . . . . . . . . . . . . 3.15 Health Checker . . . . . . . . . . . . . . . . . . . . . . . . . . . . . . . . . . . . . . . . . . . . . . . . . . . . . . 3.16 RMF-III . . . . . . . . . . . . . . . . . . . . . . . . . . . . . . . . . . . . . . . . . . . . . . . . . . . . . . . . . . . . 3.17 Compressing PARMLIB . . . . . . . . . . . . . . . . . . . . . . . . . . . . . . . . . . . . . . . . . . . . . . . 3.18 Burning 3390 volumes on CD . . . . . . . . . . . . . . . . . . . . . . . . . . . . . . . . . . . . . . . . . . . 3.19 Delete logstreams . . . . . . . . . . . . . . . . . . . . . . . . . . . . . . . . . . . . . . . . . . . . . . . . . . . . 3.20 Disabled waits . . . . . . . . . . . . . . . . . . . . . . . . . . . . . . . . . . . . . . . . . . . . . . . . . . . . . . . 30 32 33 33 34 38 40 41 43 44 45 45 46 47 47 47 48 48 48 Chapter 4. z/VM notes . . . . . . . . . . . . . . . . . . . . . . . . . . . . . . . . . . . . . . . . . . . . . . . . . . . . 4.1 Installing the AD-CD z/VM 6.2 system . . . . . . . . . . . . . . . . . . . . . . . . . . . . . . . . . . . . . 4.1.1 1090 devmap . . . . . . . . . . . . . . . . . . . . . . . . . . . . . . . . . . . . . . . . . . . . . . . . . . . . 4.2 IPL and logon . . . . . . . . . . . . . . . . . . . . . . . . . . . . . . . . . . . . . . . . . . . . . . . . . . . . . . . . 4.3 CMS . . . . . . . . . . . . . . . . . . . . . . . . . . . . . . . . . . . . . . . . . . . . . . . . . . . . . . . . . . . . . . . 4.3.1 User MAINT . . . . . . . . . . . . . . . . . . . . . . . . . . . . . . . . . . . . . . . . . . . . . . . . . . . . . 4.4 Minidisks and files . . . . . . . . . . . . . . . . . . . . . . . . . . . . . . . . . . . . . . . . . . . . . . . . . . . . . 4.4.1 Inspecting your disks . . . . . . . . . . . . . . . . . . . . . . . . . . . . . . . . . . . . . . . . . . . . . . 4.4.2 XEDIT . . . . . . . . . . . . . . . . . . . . . . . . . . . . . . . . . . . . . . . . . . . . . . . . . . . . . . . . . . 4.5 z/VM directory . . . . . . . . . . . . . . . . . . . . . . . . . . . . . . . . . . . . . . . . . . . . . . . . . . . . . . . . 4.6 Spool contents . . . . . . . . . . . . . . . . . . . . . . . . . . . . . . . . . . . . . . . . . . . . . . . . . . . . . . . 4.7 Simple system queries . . . . . . . . . . . . . . . . . . . . . . . . . . . . . . . . . . . . . . . . . . . . . . . . . 4.8 zIIPs and zAAPs . . . . . . . . . . . . . . . . . . . . . . . . . . . . . . . . . . . . . . . . . . . . . . . . . . . . . . 4.9 Paging . . . . . . . . . . . . . . . . . . . . . . . . . . . . . . . . . . . . . . . . . . . . . . . . . . . . . . . . . . . . . . 53 54 54 55 58 58 59 61 63 64 67 69 70 71 Chapter 5. z/VSE notes . . . . . . . . . . . . . . . . . . . . . . . . . . . . . . . . . . . . . . . . . . . . . . . . . . . 73 iv Chapter 6. Multiple zPDT instances . . . . . . . . . . . . . . . . . . . . . . . . . . . . . . . . . . . . . . . . 6.1 Multiple instances or guests . . . . . . . . . . . . . . . . . . . . . . . . . . . . . . . . . . . . . . . . . . . . . 6.2 Multiple guests in one instance . . . . . . . . . . . . . . . . . . . . . . . . . . . . . . . . . . . . . . . . . . . 6.3 Independent instances . . . . . . . . . . . . . . . . . . . . . . . . . . . . . . . . . . . . . . . . . . . . . . . . . 6.4 Instances with shared I/O . . . . . . . . . . . . . . . . . . . . . . . . . . . . . . . . . . . . . . . . . . . . . . . 6.5 Additional shared functions . . . . . . . . . . . . . . . . . . . . . . . . . . . . . . . . . . . . . . . . . . . . . . 75 76 76 77 79 83 Chapter 7. Using awscmd. . . . . . . . . . . . . . . . . . . . . . . . . . . . . . . . . . . . . . . . . . . . . . . . . 7.1 Sample z/VM script . . . . . . . . . . . . . . . . . . . . . . . . . . . . . . . . . . . . . . . . . . . . . . . . . . . . 7.2 z/OS usage . . . . . . . . . . . . . . . . . . . . . . . . . . . . . . . . . . . . . . . . . . . . . . . . . . . . . . . . . . 7.2.1 Sample z/OS program for awscmd . . . . . . . . . . . . . . . . . . . . . . . . . . . . . . . . . . . . 85 86 87 88 Chapter 8. Problem handling . . . . . . . . . . . . . . . . . . . . . . . . . . . . . . . . . . . . . . . . . . . . . . 8.1 Problems starting a zPDT operation . . . . . . . . . . . . . . . . . . . . . . . . . . . . . . . . . . . . . . . 8.2 Problems during a zPDT operation . . . . . . . . . . . . . . . . . . . . . . . . . . . . . . . . . . . . . . . . 8.3 Core images . . . . . . . . . . . . . . . . . . . . . . . . . . . . . . . . . . . . . . . . . . . . . . . . . . . . . . . . . 8.4 Emulated volume problems. . . . . . . . . . . . . . . . . . . . . . . . . . . . . . . . . . . . . . . . . . . . . . 95 96 96 98 98 IBM System z Personal Development Tool: Volume 3 Additional Topics 8.5 Linux monitoring . . . . . . . . . . . . . . . . . . . . . . . . . . . . . . . . . . . . . . . . . . . . . . . . . . . . . . 99 Chapter 9. Linux for System z . . . . . . . . . . . . . . . . . . . . . . . . . . . . . . . . . . . . . . . . . . . . 101 Chapter 10. LAN notes . . . . . . . . . . . . . . . . . . . . . . . . . . . . . . . . . . . . . . . . . . . . . . . . . . 10.1 OSA CHPIDs. . . . . . . . . . . . . . . . . . . . . . . . . . . . . . . . . . . . . . . . . . . . . . . . . . . . . . . 10.2 Non-QDIO operation . . . . . . . . . . . . . . . . . . . . . . . . . . . . . . . . . . . . . . . . . . . . . . . . . 10.3 More complete QDIO example . . . . . . . . . . . . . . . . . . . . . . . . . . . . . . . . . . . . . . . . . 10.4 Large or jumbo usage . . . . . . . . . . . . . . . . . . . . . . . . . . . . . . . . . . . . . . . . . . . . . . . . 10.5 VLAN usage . . . . . . . . . . . . . . . . . . . . . . . . . . . . . . . . . . . . . . . . . . . . . . . . . . . . . . . 10.6 Performance . . . . . . . . . . . . . . . . . . . . . . . . . . . . . . . . . . . . . . . . . . . . . . . . . . . . . . . 10.7 Local routers and DHCP . . . . . . . . . . . . . . . . . . . . . . . . . . . . . . . . . . . . . . . . . . . . . 10.8 Shared Ethernet adapters . . . . . . . . . . . . . . . . . . . . . . . . . . . . . . . . . . . . . . . . . . . . . 10.9 Base Linux LAN notes. . . . . . . . . . . . . . . . . . . . . . . . . . . . . . . . . . . . . . . . . . . . . . . . 10.10 Ethernet SNA . . . . . . . . . . . . . . . . . . . . . . . . . . . . . . . . . . . . . . . . . . . . . . . . . . . . . 103 103 105 106 108 108 108 108 109 111 112 Chapter 11. DASD volume migration. . . . . . . . . . . . . . . . . . . . . . . . . . . . . . . . . . . . . . . 11.1 Warnings . . . . . . . . . . . . . . . . . . . . . . . . . . . . . . . . . . . . . . . . . . . . . . . . . . . . . . . . . . 11.2 Operational characteristics of the migration utility. . . . . . . . . . . . . . . . . . . . . . . . . . . 11.3 Installation of the migration utility for z/OS . . . . . . . . . . . . . . . . . . . . . . . . . . . . . . . . 11.3.1 Server installation . . . . . . . . . . . . . . . . . . . . . . . . . . . . . . . . . . . . . . . . . . . . . . . 11.3.2 RACF requirements . . . . . . . . . . . . . . . . . . . . . . . . . . . . . . . . . . . . . . . . . . . . . 11.4 Operation of the server under z/OS . . . . . . . . . . . . . . . . . . . . . . . . . . . . . . . . . . . . . 11.5 Installation of the server under z/VM. . . . . . . . . . . . . . . . . . . . . . . . . . . . . . . . . . . . . 11.6 Operation of server under z/VM . . . . . . . . . . . . . . . . . . . . . . . . . . . . . . . . . . . . . . . . 11.7 The client commands . . . . . . . . . . . . . . . . . . . . . . . . . . . . . . . . . . . . . . . . . . . . . . . . 11.8 Additional notes. . . . . . . . . . . . . . . . . . . . . . . . . . . . . . . . . . . . . . . . . . . . . . . . . . . . . 113 114 114 115 116 117 118 118 119 119 120 Chapter 12. Channel-to-channel . . . . . . . . . . . . . . . . . . . . . . . . . . . . . . . . . . . . . . . . . . 12.1 z/OS usage example . . . . . . . . . . . . . . . . . . . . . . . . . . . . . . . . . . . . . . . . . . . . . . . . . 12.2 Multiple instances and z/VM . . . . . . . . . . . . . . . . . . . . . . . . . . . . . . . . . . . . . . . . . . . 12.2.1 Devmaps . . . . . . . . . . . . . . . . . . . . . . . . . . . . . . . . . . . . . . . . . . . . . . . . . . . . . . 123 125 127 127 Chapter 13. Cryptographic adapter . . . . . . . . . . . . . . . . . . . . . . . . . . . . . . . . . . . . . . . . 13.1 Background information . . . . . . . . . . . . . . . . . . . . . . . . . . . . . . . . . . . . . . . . . . . . . . 13.2 Devmap specification . . . . . . . . . . . . . . . . . . . . . . . . . . . . . . . . . . . . . . . . . . . . . . . . 13.3 Initial ICSF startup. . . . . . . . . . . . . . . . . . . . . . . . . . . . . . . . . . . . . . . . . . . . . . . . . . . 13.4 Operational notes . . . . . . . . . . . . . . . . . . . . . . . . . . . . . . . . . . . . . . . . . . . . . . . . . . . 13.4.1 Multiple zPDT instances . . . . . . . . . . . . . . . . . . . . . . . . . . . . . . . . . . . . . . . . . . 13.4.2 Coprocessor control commands . . . . . . . . . . . . . . . . . . . . . . . . . . . . . . . . . . . . 13.4.3 New z/OS releases . . . . . . . . . . . . . . . . . . . . . . . . . . . . . . . . . . . . . . . . . . . . . . 13.4.4 Programming with ICSF . . . . . . . . . . . . . . . . . . . . . . . . . . . . . . . . . . . . . . . . . . 13.4.5 z/VM usage . . . . . . . . . . . . . . . . . . . . . . . . . . . . . . . . . . . . . . . . . . . . . . . . . . . . 131 132 132 133 136 137 138 139 139 141 Chapter 14. License and serial number servers. . . . . . . . . . . . . . . . . . . . . . . . . . . . . . 14.1 Methodology . . . . . . . . . . . . . . . . . . . . . . . . . . . . . . . . . . . . . . . . . . . . . . . . . . . . . . . 14.2 Installation and configuration . . . . . . . . . . . . . . . . . . . . . . . . . . . . . . . . . . . . . . . . . . 14.2.1 Client configuration . . . . . . . . . . . . . . . . . . . . . . . . . . . . . . . . . . . . . . . . . . . . . . 14.2.2 Remote server configurations . . . . . . . . . . . . . . . . . . . . . . . . . . . . . . . . . . . . . . 14.3 Notes . . . . . . . . . . . . . . . . . . . . . . . . . . . . . . . . . . . . . . . . . . . . . . . . . . . . . . . . . . . . . 14.4 Scenarios . . . . . . . . . . . . . . . . . . . . . . . . . . . . . . . . . . . . . . . . . . . . . . . . . . . . . . . . . 14.4.1 Display hostname assignments . . . . . . . . . . . . . . . . . . . . . . . . . . . . . . . . . . . . 14.4.2 Clones . . . . . . . . . . . . . . . . . . . . . . . . . . . . . . . . . . . . . . . . . . . . . . . . . . . . . . . . 14.4.3 Security . . . . . . . . . . . . . . . . . . . . . . . . . . . . . . . . . . . . . . . . . . . . . . . . . . . . . . . 143 144 147 147 148 149 150 152 152 153 Contents v 14.4.4 Resetting everything . . . . . . . . . . . . . . . . . . . . . . . . . . . . . . . . . . . . . . . . . . . . . 154 14.4.5 SafeNet module restarts . . . . . . . . . . . . . . . . . . . . . . . . . . . . . . . . . . . . . . . . . . 154 14.5 Glossary . . . . . . . . . . . . . . . . . . . . . . . . . . . . . . . . . . . . . . . . . . . . . . . . . . . . . . . . . . 154 Chapter 15. Virtualization . . . . . . . . . . . . . . . . . . . . . . . . . . . . . . . . . . . . . . . . . . . . . . . . 15.1 VMWare . . . . . . . . . . . . . . . . . . . . . . . . . . . . . . . . . . . . . . . . . . . . . . . . . . . . . . . . . . 15.1.1 Usage notes . . . . . . . . . . . . . . . . . . . . . . . . . . . . . . . . . . . . . . . . . . . . . . . . . . . 15.2 System z zBX . . . . . . . . . . . . . . . . . . . . . . . . . . . . . . . . . . . . . . . . . . . . . . . . . . . . . . 15.3 Security and control . . . . . . . . . . . . . . . . . . . . . . . . . . . . . . . . . . . . . . . . . . . . . . . . . 15.4 Performance . . . . . . . . . . . . . . . . . . . . . . . . . . . . . . . . . . . . . . . . . . . . . . . . . . . . . . . 15.4.1 Open notes . . . . . . . . . . . . . . . . . . . . . . . . . . . . . . . . . . . . . . . . . . . . . . . . . . . . 157 159 160 162 163 164 165 Related publications . . . . . . . . . . . . . . . . . . . . . . . . . . . . . . . . . . . . . . . . . . . . . . . . . . . . IBM Redbooks . . . . . . . . . . . . . . . . . . . . . . . . . . . . . . . . . . . . . . . . . . . . . . . . . . . . . . . . . . Other publications . . . . . . . . . . . . . . . . . . . . . . . . . . . . . . . . . . . . . . . . . . . . . . . . . . . . . . . How to get Redbooks . . . . . . . . . . . . . . . . . . . . . . . . . . . . . . . . . . . . . . . . . . . . . . . . . . . . . Help from IBM . . . . . . . . . . . . . . . . . . . . . . . . . . . . . . . . . . . . . . . . . . . . . . . . . . . . . . . . . . 167 167 167 167 167 Index . . . . . . . . . . . . . . . . . . . . . . . . . . . . . . . . . . . . . . . . . . . . . . . . . . . . . . . . . . . . . . . . . 169 vi IBM System z Personal Development Tool: Volume 3 Additional Topics Notices This information was developed for products and services offered in the U.S.A. IBM may not offer the products, services, or features discussed in this document in other countries. Consult your local IBM representative for information on the products and services currently available in your area. Any reference to an IBM product, program, or service is not intended to state or imply that only that IBM product, program, or service may be used. Any functionally equivalent product, program, or service that does not infringe any IBM intellectual property right may be used instead. However, it is the user's responsibility to evaluate and verify the operation of any non-IBM product, program, or service. IBM may have patents or pending patent applications covering subject matter described in this document. The furnishing of this document does not give you any license to these patents. You can send license inquiries, in writing, to: IBM Director of Licensing, IBM Corporation, North Castle Drive, Armonk, NY 10504-1785 U.S.A. The following paragraph does not apply to the United Kingdom or any other country where such provisions are inconsistent with local law: INTERNATIONAL BUSINESS MACHINES CORPORATION PROVIDES THIS PUBLICATION "AS IS" WITHOUT WARRANTY OF ANY KIND, EITHER EXPRESS OR IMPLIED, INCLUDING, BUT NOT LIMITED TO, THE IMPLIED WARRANTIES OF NON-INFRINGEMENT, MERCHANTABILITY OR FITNESS FOR A PARTICULAR PURPOSE. Some states do not allow disclaimer of express or implied warranties in certain transactions, therefore, this statement may not apply to you. This information could include technical inaccuracies or typographical errors. Changes are periodically made to the information herein; these changes will be incorporated in new editions of the publication. IBM may make improvements and/or changes in the product(s) and/or the program(s) described in this publication at any time without notice. Any references in this information to non-IBM Web sites are provided for convenience only and do not in any manner serve as an endorsement of those Web sites. The materials at those Web sites are not part of the materials for this IBM product and use of those Web sites is at your own risk. IBM may use or distribute any of the information you supply in any way it believes appropriate without incurring any obligation to you. Information concerning non-IBM products was obtained from the suppliers of those products, their published announcements or other publicly available sources. IBM has not tested those products and cannot confirm the accuracy of performance, compatibility or any other claims related to non-IBM products. Questions on the capabilities of non-IBM products should be addressed to the suppliers of those products. This information contains examples of data and reports used in daily business operations. To illustrate them as completely as possible, the examples include the names of individuals, companies, brands, and products. All of these names are fictitious and any similarity to the names and addresses used by an actual business enterprise is entirely coincidental. COPYRIGHT LICENSE: This information contains sample application programs in source language, which illustrate programming techniques on various operating platforms. You may copy, modify, and distribute these sample programs in any form without payment to IBM, for the purposes of developing, using, marketing or distributing application programs conforming to the application programming interface for the operating platform for which the sample programs are written. These examples have not been thoroughly tested under all conditions. IBM, therefore, cannot guarantee or imply reliability, serviceability, or function of these programs. © Copyright IBM Corp. 2009, 2013. All rights reserved. vii Trademarks IBM, the IBM logo, and ibm.com are trademarks or registered trademarks of International Business Machines Corporation in the United States, other countries, or both. These and other IBM trademarked terms are marked on their first occurrence in this information with the appropriate symbol (® or ™), indicating US registered or common law trademarks owned by IBM at the time this information was published. Such trademarks may also be registered or common law trademarks in other countries. A current list of IBM trademarks is available on the Web at http://www.ibm.com/legal/copytrade.shtml The following terms are trademarks of the International Business Machines Corporation in the United States, other countries, or both: CICS® ESCON® GDDM® IBM® MVS™ OS/390® PartnerWorld® PR/SM™ RACF® Redbooks® Redbooks (logo) System z® VTAM® WebSphere® ® z/Architecture® z/OS® z/VM® z/VSE™ zSeries® The following terms are trademarks of other companies: Intel, Intel logo, Intel Inside logo, and Intel Centrino logo are trademarks or registered trademarks of Intel Corporation or its subsidiaries in the United States and other countries. LTO, the LTO Logo and the Ultrium logo are trademarks of HP, IBM Corp. and Quantum in the U.S. and other countries. Microsoft, Windows, and the Windows logo are trademarks of Microsoft Corporation in the United States, other countries, or both. Java, and all Java-based trademarks and logos are trademarks or registered trademarks of Oracle and/or its affiliates. UNIX is a registered trademark of The Open Group in the United States and other countries. AppArmor, SUSE, the Novell logo, and the N logo are registered trademarks of Novell, Inc. in the United States and other countries. Red Hat, and the Shadowman logo are trademarks or registered trademarks of Red Hat, Inc. in the U.S. and other countries. Intel, Intel logo, Intel Inside logo, and Intel Centrino logo are trademarks or registered trademarks of Intel Corporation or its subsidiaries in the United States, other countries, or both. Linux is a trademark of Linus Torvalds in the United States, other countries, or both. Other company, product, or service names may be trademarks or service marks of others. viii IBM System z Personal Development Tool: Volume 3 Additional Topics Preface This IBM® Redbooks® publication introduces the IBM System z® Personal Development Tool (zPDT), which runs on an underlying Linux system based on an Intel processor. zPDT provides a System z system on a PC capable of running current System z operating systems, including emulation of selected System z I/O devices and control units. It is intended as a development, demonstration, and learning platform; it is not designed as a production system. This book, discussing more advanced topics, is the last of three volumes. The first volume introduces zPDT and provides reference material for zPDT commands and device managers. The second volume describes the installation of zPDT (including the underlying Linux, and a particular z/OS® distribution) and basic usage patterns. The third volume discusses more advanced topics that may not interest all zPDT users. The IBM order numbers for the three volumes are SG24-7721, SG24-7722, and SG24-7723. The systems discussed in these volumes are complex, with elements of Linux (for the underlying PC machine), z/Architecture® (for the core zPDT elements), System z I/O functions (for emulated I/O devices), and z/OS (providing the System z application interface), and possibly with other System z operating systems. We assume the reader is familiar with the general concepts and terminology of System z hardware and software elements and with basic PC Linux characteristics. The author This series of IBM Redbook publications was produced by the zPDT development team, with assistance from many other people. Bill Ogden is a retired Senior Technical Staff Member at the International Technical Support Organization, Poughkeepsie. He enjoys working with new mainframe users and entry-level systems. Thanks to the following people for their contributions to this project: Keith VanBenschoten, IBM Poughkeepsie, was very helpful in establishing installation and startup processes for the 1090 and in providing test systems. Theodore Bohizic, IBM Poughkeepsie, helped us understand command, design, and internal details. Now you can become a published author, too! Join us for a two- to six-week residency program! Help write a book dealing with specific products or solutions, while getting hands-on experience with leading-edge technologies. You will have the opportunity to team with IBM technical professionals, Business Partners, and Clients. Your efforts will help increase product acceptance and customer satisfaction. As a bonus, you will develop a network of contacts in IBM development labs, and increase your productivity and marketability. © Copyright IBM Corp. 2009, 2013. All rights reserved. ix Find out more about the residency program, browse the residency index, and apply online at: ibm.com/redbooks/residencies.html Comments welcome Your comments are important to us! We want our books to be as helpful as possible. Send us your comments about this book or other IBM Redbooks publications in one of the following ways: Use the online Contact us review Redbooks form found at: ibm.com/redbooks Send your comments in an e-mail to: [email protected] Mail your comments to: IBM Corporation, International Technical Support Organization Dept. HYTD Mail Station P099 2455 South Road Poughkeepsie, NY 12601-5400 Stay connected to IBM Redbooks Find us on Facebook: http://www.facebook.com/IBMRedbooks Follow us on twitter: http://twitter.com/ibmredbooks Look for us on LinkedIn: http://www.linkedin.com/groups?home=&gid=2130806 Explore new Redbooks publications, residencies, and workshops with the IBM Redbooks weekly newsletter: https://www.redbooks.ibm.com/Redbooks.nsf/subscribe?OpenForm Stay current on recent Redbooks publications with RSS Feeds: http://www.redbooks.ibm.com/rss.html x IBM System z Personal Development Tool: Volume 3 Additional Topics 1 Chapter 1. General usage This chapter contains a variety of topics, in no particular order. This information is not required for basic 1090 operation but it is helpful for better understanding the 1090 and for more advanced uses. © Copyright IBM Corp. 2009, 2013. All rights reserved. 1 1.1 Token dates and times The 1090 and 1091 tokens remember the latest date and time that it sees from the underlying Linux system. It uses the Linux “software clock” for this purpose, without any time zone adjustment. The token must never see the date or time move backwards. If this happens, a time cheat message is produced and zPDT does not start. For example, if you set the PC date ahead several months (perhaps to test an expiration function in the application you are developing) and you use zPDT with this advanced date, you cannot then return to the correct date and use the same token. If you inadvertently used an incorrect (future) date with the token, and you now find the token unusable with the correct date, you should contact the business partner that furnished the token. If you must temporarily change the PC clock (when not using zPDT), remove the token before doing this and reset the clock to the current time before connecting the token again. If you move a token among multiple PCs, you should take care that the hardware time-of-day clocks are close to each other on all the machines.1 The settod command provided with zPDT provides a way to test software using different dates; this does not change the value of the PC hardware clock or the Linux software clock. A network time server can create problems for zPDT if it causes the Linux TOD to appear to move backwards. (This is more likely to happen over a span of several boots and zPDT runs.) When Linux first starts, it sets the Linux TOD clock (“software clock”) from the BIOS clock. Later attempted synchronization with a network time server might cause this software clock to move slower than the BIOS clock. If the zPDT token is connected it will record this time, which is behind the BIOS clock. A subsequent boot and token connection may then see a “backwards” time and this produces the “time cheat” messages that cause zPDT to stop.The circumstances that create a time cheat problem are fairly rare and this should not be a problem for most users. PC BIOS clocks sometimes are not all that accurate, especially when a lot of heavy processing is taking place. It might be a good idea to check your BIOS TOD (doing this during PC startup, not under Linux). 1.2 crontab entries zPDT places entries in the Linux cron tables, at root level. You can see these as follows: $ su (change to root) # crontab -l (list crontab entries for root) @reboot /usr/z1090/bin/safenet_daemons_restart reboot > /dev/null */11 * * * * /usr/z1090/bin/safenet_daemons_restart > /dev/null # exit (leave root) Do not change or delete these entries. You may use cron functions for other purposes. 1 2 This is a technical statement. Your zPDT license agreement may restrict this usage. IBM System z Personal Development Tool: Volume 3 Additional Topics 1.3 Sparse files Earlier releases of zPDT (and the alcckd utility, in particular) created Linux sparse files. A sparse file typically has a larger logical size than physical size. In a sparse file, only the disk sectors that are changed are actually stored on disk. Other sectors logically contain zeros but do not occupy space on the disk. Starting with release E41.33 (known as “GA 2.2”) alcckd no longer creates sparse files. The new version takes longer to create a CKD volume because it completely writes all the tracks for the volume. While it is unlikely, a few users may have sparse files (for an emulated 3390 volume) created under an early release of zPDT. These will work correctly, although the actual disk space used may be misleading if the volume has not been fully written. Previous versions of alcckd provided a parameter, -z, that would prevent sparse allocation. This parameter is no longer meaningful. The creation of a sparse file is mostly transparent to users, but it had a few side effects: It could cause disk space to be overcommitted. We might create 20 new 3390-3 volumes (about 250 MB each at the time of creation in sparse format), checking each time to see if there is sufficient free space on the drive. When we later write data to these volumes, causing them to expand, they could overflow the available space on the drive. That is, the sparse files might cause a future failure due to lack of disk space. A sparse file is expanded when data is written. This takes time for Linux disk allocation functions. Writing a large System z data set might cause so much Linux overhead that z/OS encounters timeout errors on the emulated drive. As a sparse file grows, the new sectors may be intermixed with other growing volumes and produce a highly fragmented file. This can have minor performance effects. The current operation of alcckd should be transparent to most users, except for the longer time to create a new 3380/3390 emulated volume. 1.4 Security exposures While most zPDT usage occurs in environments where base Linux security is not a significant concern, the following items may be of concern to some users. 1.4.1 Reducing root usage Once zPDT is installed, only two functions normally require running as root. These are the SecureUpdateUtility command and the clientconfig command. This root usage may be avoided by taking the following steps: 1. Select a userid (not root) who will be allowed to use the SecureUpdateUtility command. 2. As root (probably when installing zPDT) issue the command: # SecureUpdate_authority -a <userid> (specify your selected userid) This command is issued only once. To remove a userid from the authorized list issue: # SecureUpdate_authority -d <userid> 3. Thereafter, use the zpdtSecureUpdate command while operating as the selected userid. This command automatically switches to the /usr/z1090/bin directory and executes the Chapter 1. General usage 3 SecureUpdateUtility command as root. The parameters for zpdtSecureUpdate are the same as for SecureUpdateUtility. 4. Select a userid (not root) who will be allowed to use the clientconfig command and issue the following command as root: # clientconfig_authority -a <userid> A userid may be removed from the authorized list by using a -d flag instead of -a. 5. Thereafter the indicated userid can use the clientconfig command. As a practical matter, the same userid may be selected for both functions. The ability to bypass root usage with these commands does not alter the operation of the SecureUpdateUtility or clientconfig commands if used by root in the normal way. 1.4.2 Linux suid usage The zPDT system software operates as a normal Linux application with one exception. The eDMosa module (that provides the emulated OSA function) operates with Linux root privileges. That is, it uses “suid” permission to operate as root, and the permissions are “world” executable. While we have no indication that this has happened, it might be possible for a non-zPDT Linux user to execute eDMosa and, in some way, use this to compromise the base Linux system. The suid module is also visible to programs that scan Linux for “unapproved” suid files. You can remove the “world” executable permission, as follows: 1. Select (or create) a Linux group for use only by zPDT functions. The installation instructions in the second volume of this series (SG24-7722) suggest creating a group named zpdt, although the specific name is not important. You can use the GUI administrative functions of your Linux to add the group (and associate selected userids with the group). 2. Change the ownership of eDMosa to this group. For example, # chgrp zpdt /usr/z1090/bin/eDMosa 3. Change the permissions for eDMosa, # chmod 4750 /usr/z1090/bin/eDMosa 4. Remember that any Linux userid that is to be used to start zPDT must be a member of the new group. Other userids should not be members of this group. 1.4.3 1090 log files In earlier zPDT releases some zPDT log files and directory (in a subdirectory of the home directory of the Linux user who started zPDT) were world accessible. This has been changed in the current releases. 1.4.4 Token server monitoring The token software used with zPDT has a web monitoring function. This is not relevant to normal zPDT operation, but might be construed as an exposure. You can disable this monitor function as follows: # cd /opt/safenet_sentinel/common_files/sentinel_keys_server # cp -p sntlconfigsrvr.xml sntlconfigsrvr.xml.orig (make backup) # (edit sntlconfigsrve.xml, find <ConfigureLicenseMonitorPort> 4 IBM System z Personal Development Tool: Volume 3 Additional Topics and change 7002 to 0) # ./loadserv restart 1.4.5 License server controls A number of controls are available to manage access to a remote zPDT license server. These are explained in “Security” on page 153. 1.5 z1090instcheck The z1090instcheck command should be run after the zPDT software is installed and Linux configuration changes are completed. It should be run again after any Linux updates. Here is an example of the output from z1090instcheck: 1. SUSE os level at 11.4 which is greater the minimum level OK 2. SUSE kernel.shmmax of 18000000000 is greater than min. *NOTE* shmmax should be greater than 1.1 times the sum of z memory (as specified in your devmap) for ALL your 1090 instances. 3. SUSE (kernel.shmall * PAGE_SIZE) is 4722366482869644165120 which is greater/equal to kernel.shmmax which is OK 4. SUSE kernel.msgmni is 512 which is OK 5. SUSE kernel.msgmax is 65536 which is OK 6. SUSE kernel.msgmnb is 65536 which is OK 7. SUSE net.core.rmem_default is 1048576 which is OK 8. SUSE net.core.rmem_max is 1048576 which is OK 9. SUSE kernel.core_uses_pid is 1 which is OK 10. SUSE kernel.core_pattern is core-%e-%p-%t which is OK 11. SUSE ulimited -c is set to unlimited OK 12. SUSE ulimited -d is set to unlimited OK 13. SUSE rpm libstdc++45-32bit-(x86_64) is installed OK 14. SUSE sntl-sud-7.5.2-0.i386 rpm is greater than required OK 15. SUSE zpdt-shk-server-1.3.1.2-0.i586 rpm is equal to required level OK 16. SUSE dmidecode-2.11-15.1.x86_64 rpm is greater than required OK 17. SUSE rpm beagle is not installed which is OK 18. SUSE rpm zmd is not installed which is OK Running uimcheck ... The UIM client is configured in remote mode. Local Host Name....... w510.itso.ibm.com Local Serial Number... 32683 Local machine UUID.... 81402112-2551-CB11-A1F3-D9473378A894 Remote server......... 192.168.0.2 Remote server port.... 9451 Details are: Line 1verifies that you are using SUSE (or Red Hat) and that it is at an acceptable level. Lines 2 and 3 check kernel controls for virtual shared memory. The values shown here are examples. The shmmax value should be at least as large as stated in the note. The shmall Chapter 1. General usage 5 value shown is typical of a 64-bit Linux distribution. However, some distributions have this number set much smaller and you may receive a warning message for this line. Line 4 (msgmni) is appropriate for a reasonable number of zPDT I/O devices. See 1.13, “Devices, memory, msgmni, ulimit” on page 12 for more information. Lines 5 and 6 are needed for OSA operation. The exact values are not important but should be larger than the default sizes in most distributions. Lines 7 and 8 reflect values recommended for heavy OSA usage, or larger frames. Lines 9, 10, and 11 reflect parameters for core image files. These are potentially important if zPDT problems are encountered. Line 12 should be set as shown. Lines 11 and 12 are for the token modules and verify that the correct levels are present. The levels distributed with zPDT should not be replaced with other versions, even if the other versions have later levels. Line 13 verifies that 32-bit support is installed with Linux. This is needed by the token modules. Line 16 reflects a module that might be useful for debugging. It is not critical. Lines 17 and 18 address applications that have caused zPDT problems in the past. Additional checks may be added to later versions of z1090instcheck. Note that some checks are absolute while others look for values in a range thought to be appropriate. Your output from z1090instcheck may differ slightly from what is shown here as minor details may change with zPDT updates or new Linux distributions. 1.6 CPs, processors, threads, and tokens The L01 model of the 1090 provides one CP. The L03 model provides up to three CPs. 1091 tokens typically provide three CPs, but this is variable. Each can be used as a normal CP or as a zIIP, zAAP, or IFL. The model number determines the maximum number of CPs or zIIPs or zAAPs or IFLs for the token—and the model number is determined by the USB hardware key (token). This discussion refers to CPs, but also applies to zIIPs, zAAPs, and IFLs. The CPs of an L03 may be used in a single instance (that is, three CPs available to a single copy of z/OS) or in three instances (each with a single CP) or some combination of these.2 The System z CPs (or zIIPs, or zAAPs, or IFLs) are the logical product of the 1090 system. Tokens with one, two, or three licenses are considered standard zPDT tokens. Tokens with more licenses may be available under special zPDT license arrangements (typically as part of RDzUT or RD&T products). Operationally, a 1090/1091 license is a 1090/1091 license; it makes no difference whether it originates from a single standard token, multiple standard tokens, or a larger non-standard token, or whether it is from local tokens or a remote license server. A 1090 system (as available to qualified PartnerWorld® ISVs, IBM internal use, and other users) may use multiple tokens, and have up to eight CPs (or a mix of speciality processors) in one zPDT instance. A 1091 system (as used by RDzUT and RD&T) may use multiple tokens and have more than three CPs (or mixes) in a zPDT instance only with additional license features. There is not a one-to-one correspondence between logical CPs and underlying processors (cores) on the base hardware. Each zPDT CP is represented by a Linux process on the 2 6 Multiple instances are something like multiple LPARs, but without some of the auxiliary facilities of LPARs. IBM System z Personal Development Tool: Volume 3 Additional Topics underlying system, and this process has multiple threads.3 One thread is used for the primary operation of the CP. Other threads may help prepare System z instructions for the primary thread. If multiple processors (cores) are available on the underlying system, then multiple threads of a CP process may run in parallel. Stated another way, multiple PC cores might contribute to the operation of a single CP, resulting in CP performance better than what could be produced by a single PC processor core. Additional PC processor cores are also used for other processes, such as I/O for the 1090, x3270 sessions, and the normal Linux background tasks. Considering a W500 mobile computer with two processor cores and a 1090 L01 license, one core is usually consumed for the CP process.4 The second processor is partly used for I/O and so forth, and partly used to help prepare instructions for the CP process. Except for the special case of an L01 zPDT used on a single-core PC, a PC must have at least one more core than the number of CPs (or CPs+zIIPS+zAAPs) in the largest zPDT instance. The internal operation of the 1090 is complex and not documented. We cannot offer specific tuning information to attempt to optimize the CP/processor core mix. It may be possible to construct workloads that perform worse with “extra” cores available, and it is possible to construct other workloads that perform twice as well as they would with a single PC processor core. With typical workloads, over a reasonable time period, the availability of “extra” PC processors (cores) contributes to the performance of a CP. At this time, the availability of more than twice as many PC processor cores as CPs appears to provide no additional performance improvement. That is, using a four-processor PC to run one CP does not appear to offer much advantage over a two-processor PC. What little advantage might be seen is probably due to Linux background tasks using the additional processors. When zPDT operation starts, the awsstart command processes the devmap. The devmap specifies the number of CPs to start5 (it defaults to one CP). The awsstart program requests the specified number of licenses from the USB hardware key or a license server. Earlier zPDT releases supported a configuration in which the number of CPs could equal the number of cores; in particular, using two CPs in one instance (possibly with one converted to a zIIP or zAAP) was possible on a two-core PC. Due to Linux changes, this is no longer supported and may produce extremely poor performance if used. Several potential configurations are explored in Figure 1-1. 3 4 5 A thread is a dispatchable unit for Linux. It is something like a task for z/OS. A particular CPU is not dedicated to CP operation. CPUs are subject to normal Linux dispatching. The CPU dispatched to the primary CP thread might change due to Linux dispatching. In trivial cases on a dual core machine, we have noticed that Linux appears to switch which CPU is dispatched to the primary CP thread every second or so. This is an overview; the internal details for processing the 1090 license are not described. Chapter 1. General usage 7 1090: CP 1090: CP CP PC core PC core One 1090 instance. One CP defined. 1090: CP 1090: CP 1090: CP PC core PC core Invalid. More CPs in one Two instances. Valid instance than cores. but underpowered. PC core One instance. SMP. PC core PC core 1090: CP zIIP PC core 1090: CP PC core Two instances, including one SMP (A zIIP counts as a CP). 1090: CP CP zAAP PC core Three instances. Valid but severely underpowered. Not supported in Version 1 Release 3 or later. You must have at least one more core than the number of CPs in the largest instance, except in the one CP/one core case. 1090: CP CP PC core 1090: CP 1090: CP 1090: CP CP PC core One instance. SMP. Good power. PC core PC core 1090: CP PC core PC core Two instances. SMP. Good power. Figure 1-1 CP, processor, and instances The rules, implied in Figure 1-1, are these: Your 1090 model number (assuming a standard token: L01, L02, or L03) must be greater than or equal to the number of (CPs + zIIPs +zAAPs + IFLs) in your total configuration. You must have fewer (CPs + zIIPs + zAAPs + IFLs) in a single instance than there are processors in your underlying PC hardware. 1.7 CKD versioning A function is available to allow an emulated 3390 (or 3380) volume to be “reset” to a selected point in time. This function is known as CKD versioning. The usage is as follows: A command is issued for selected emulated volumes (which might be all the emulated volumes in your configuration) to enable versioning. This must be done when zPDT is not active.6 zPDT is started, an operating system is IPLed, and the volumes are used in the normal way. At a later time (when zPDT is not running), commands are issued to either commit whatever changes were made to the volumes, or restore the volumes to the exact content it had when CKD versioning was enabled for it. A typical use might be for a demonstration or benchmark run. After the demonstration or benchmark run is completed, the volumes can be restored to their original state. A CKD-emulated volume can be considered to have two versions. Version zero is the original state of the volume and version one is a volume that has been changed after versioning was 6 8 zPDT can be active if the selected volumes are not in the active devmap. IBM System z Personal Development Tool: Volume 3 Additional Topics enabled. Only one restore version is possible for changed volumes. That is, multiple concurrent generations of versions are not possible. The commands associated with CKD versioning are: $ $ $ $ $ alcckd alcckd alcckd alcckd alcckd /z/WORK01 /z/WORK01 /z/WORK01 /z/WORK01 /z/WORK01 -ve -vr -vc -vi -vd enable versioning for the indicated volume restore volume to original content commit the changes to the volume inquire about the versioning status of the volume disable versioning (if no changes have been made) These examples use an emulated volume stored in /z/WORK01. You would specify the name of the Linux file containing your volume, of course. When changes are made to a track of a version-enabled volume, the original track contents are saved at the end of the emulated volume file. Only one “original track” is saved; subsequent changes to the track simply update the track within the emulated volume. If the volume is restored, the original track(s) replace the changed track(s). If the changes are committed, the original tracks are discarded. Restoring or committing a volume results in a volume that is not enabled for versioning. It can be enabled again with the -ve option. The version-enabled status of a volume is carried over subsequent zPDT starts and stops, and subsequent operating system IPLs. The version-enabled status remains until the volume is restored or committed. The Linux file size for the emulated volume grows as additional “original tracks” are stored. In an extreme case, where every track on the volume is changed, the Linux file will grow to twice its original size. In typical cases, relatively few tracks on a volume are changed through normal usage and the Linux file growth is minor. Restoring or committing changes causes the Linux file to return to its original size. If versioning has been enabled for a volume, but there have been no changes to the volume, then the -vd option can be used to disable versioning. If there have been changes to the volume (causing the versioning function to start operation) then the -vd option is rejected. At this point you must use -vr (to restore the volume to the original state) or -vc (to commit the changes) to disable the versioning function. The -vi (inquiry) option displays the current versioning state of the volume and, if versioning is active, displays the number of CKD tracks that have been versioned. 1.8 1090 messages Messages issued by zPDT have unique message numbers. The msgInfo command can be used to obtain more information about a message. An example of usage might be as follows: $ awsckmap AWSCHK200I AWSCHK204I AWSCHK208I aprof1 (check my devmap) Checking DEVMAP file 'aprof9' ... Processed 204 records from DEVMAP /home/ibmsys1/aprof1 Check complete, 0 errors, 0 warnings detected. $ msgInfo AWSCHK208I AWSINF010I Format: AWSINF013I AWSCHK208I Check complete, %d error%s, %d warnings detected. AWSINF013I AWSINF011I Description: AWSINF013I The DEVMAP check is complete. Chapter 1. General usage 9 AWSINF013I AWSINF012I Action: AWSINF013I Informational message only. No corrective action needed but AWSINF013I if errors are present the DEVMAP cannot be used to start system. All message numbers are in the form of AWScccnnns, where: ccc is the component code issuing the message. nnn is the message number within the component. s is the message severity (Debug, Information, Warning, Error, Severe, Terminal) The message code specified on the msgInfo command can omit the AWS prefix and the severity code. For example, msgInfo chk208 is sufficient. There is also an environment variable named Z1090_MSG to control message formatting. It may be set to FULL (the default), CODE (which will only print the message number and no text), TEXT (which prints the message text and no code) and SHORT (which drops the AWS prefix on the message number). 1.9 TCP/UDP ports The zPDT token device is accessed through TCP/UDP and requires a port number. A well known port number has been assigned for this device; this is Linux port 9450. This may be changed, as noted in “License and serial number servers” on page 143. By default, the Unique Identity Manager (UIM) function uses Linux port 9451; this is only meaningful when using a remote license manager. If you use the awsctc device manager, be aware that it uses Linux port 3088 by default. The aws3274 device manager (for “local” 3270 connections) typically uses Linux port 3270. The migration tool (see “DASD volume migration” on page 113) uses port 3990 by default. When using these ports for connections outside your base Linux machine, you must ensure that any firewall permits use of these ports. 1.10 Dual boot There is no explicit zPDT support for dual boot systems; a dual boot system should be transparent to zPDT operation. There are many ways to produce a dual boot system. Providing a base system for zPDT, whether it uses a dual boot setup or not, is up to the user. The following discussion describes one method, based on an earlier SUSE Linux release and Windows XP. We started with a ThinkPad containing Microsoft Windows XP installed in a partition that used the whole disk. (The internal disk was nominally 100 GB.) We needed to shrink the Windows partition to make room for our Linux partitions. Our first step was to obtain the PowerQuest Partition Magic product. Our version was resident on two diskettes. Partition Magic displayed a single hard disk partition with the following characteristics: Partition *:WindowsXP Type NTFS Size MB 95393.0 Used MB 11627.8 Unused MB 83765.0 We used the option Operations Resize/Move as follows: 10 IBM System z Personal Development Tool: Volume 3 Additional Topics Status Active Pri/Log Primary Freespace Before: 0.0 MB New Size : 95393.0 MB Free Space After: <Apply> <Yes> <--change to 30000 This changed the Windows partition to 30 GB, which would still provide over 18 GB of free space within the partition. The operation took several minutes and we received error messages during the operation: Error #1627 Upcase table incorrect, File 10 (128) <OK> Continue Error #1627 Upcase table incorrect, File 10 (128) <OK> Continue The errors did not appear to create a problem. When the operation finished, Partition Magic displayed the following: Partition *:WindowsXP *: Type NTFS unalloc Size MB 29,996.3 65,397.0 Used MB 11625.8 0.0 Unused MB 18,370.5 0.0 Status Active None Pri/Log Primary Primary We then rebooted Windows (twice) to allow it to update tables and verify that it still worked. At this point we had 65 GB available for Linux, the 1090, and System z emulated volumes. We installed openSUSE Linux, and we selected Partitioning and Base Partition on this Proposal during installation. We created a partition table as follows: Device /dev/sda /dev/sda1 /dev/sda2 /dev/sda5 /dev/sda6 /dev/sda7 Size 93.1GB 29.3GB 63.8GB 2.0GB 8.0GB 53.8GB F F F F Type HTS.... HPFS/NTFS Extended Swap ext3 ext3 Mount .................... /windows/C / /z Take care, of course, not to delete or format the Windows partition while creating your own Linux partitions. The three partitions we created (sda5, sda6, sda7) correspond to the partition descriptions in Volume 2. We then continued the Linux installation in the usual manner. After that was completed, we rebooted the ThinkPad. During startup, grub displayed the following menu: SUSE Linux Windows Failsafe -- SUSE Linux (default selection) If no selection is made within 8 seconds, Linux was booted by default. You can change this (running under Linux) as follows: # gedit /boot/grub/menu.lst # Modified by YaST2...... color white/blue black/light-gray default 0 timeout 8 ... ### Don’t change this comment... title SUSE Linux ... root ... kernel ... Chapter 1. General usage 11 initrd ... ... title Windows ... title Failsafe -- SUSE Linux ... Change the default number to 1 if you want to boot Windows by default. Change the timeout value (which is in seconds) to a larger number if you want more time to make the selection after booting the PC. Later Linux distributions have slightly changed the /boot partition and the menu.lst file (or equivalent) may have moved. 1.11 Remote operation A zPDT system (including z/OS) may be operated remotely, using a Linux command window (telnet or VNC or ssh) and TN3270e sessions connected to the base Linux on the zPDT system. No special techniques or setups are required. As with local operation, it is important to have the TN3270e session for the z/OS console connected before IPLing z/OS. Security considerations in your environment determine whether simple telnet or the more secure ssh should be used for the Linux command windows used to control zPDT. 1.12 x3270 cursor position The 3270 cursor in an x3270 cursor window may be positioned incorrectly if the window is clicked to activate it. We used two methods to partly bypass this inconvenience when using gnome 2: Click the top title bar of the x3270 window. This activates it (and raises or redraws it, if needed) without moving the 3270 cursor in the window. On slightly older SUSE releases, go to Computer Control Center Windows and check the option “Select windows when the mouse moves over them.” This option is most helpful when the x3270 window is not partly overlaid by another window. On slightly older Red Hat releases, go to System Preferences Windows and check the option to select a window when the mouse moves over it. Unfortunately, some current gnome 3 versions appear to have no way to control this action. 1.13 Devices, memory, msgmni, ulimit The current version of zPDT has a maximum of 1024 emulated I/O devices. There is an interaction between the actual number of I/O devices and the amount of memory available for System z usage.7 Each defined I/O device requires approximately 300 KB of shared virtual memory in the Linux address spaces. In most cases, where the number of defined I/O devices is small8, this is not a significant memory component. However, when the number of emulated I/O devices grows into the hundreds, the amount of shared memory consumed becomes significant. 7 8 12 This discussion is primarily for 32-bit Linux systems. By “small” we mean numbers in the general range of 25 to 50 I/O devices. For example, a devmap with 40 devices will cause about 10 MB of shared virtual memory to be used for I/O device support. IBM System z Personal Development Tool: Volume 3 Additional Topics There is also an interaction between the number of emulated I/O devices and the kernel.msgmni value. Our installation instructions set this value to 512, which is suitable for smaller systems. If you have more than, say, 64 emulated I/O devices defined in a devmap, then use the following formula: kernel.msgmni = (350 + 3 * number-of-I/O-devices) This is not an exact formula, but it should produce safe values. Also, if you have more than approximately 128 emulated I/O devices you should use ulimit -m and -v statements mentioned in Volume 2. 1.14 Startup scripts We created several trivial startup scripts for our z/OS 1090 system, such as the following: $ gedit start00 cd /home/ibmsys1 awsstart aprof1 sleep 4 echo 1090 started x3270 -port 3270 mstcon@localhost & sleep 2 x3270 -port 3270 tso@localhost & sleep 2 ipl a80 parm 0a8200 sleep 2 echo IPL issued We could then start our system with a single ./start00 command. These scripts (differing only in the IPL parm data) were trivial and could be enhanced in many ways. Be certain to allow sufficient time for the 3270 sessions to start before executing the IPL command. An alternative to a Linux startup script is to embed Linux commands in the zPDT device map. The method for doing this is explained as part of the [system] documentation in Chapter 4 of the first book in this series (SG24-7721). Chapter 1. General usage 13 14 IBM System z Personal Development Tool: Volume 3 Additional Topics 2 Chapter 2. Tapes (SCSI and awstape) Tape drive usage (for real SCSI tape drives and for emulated tape drives using awstape formats) is important to many developers. The 1090 offers a number of options in this area. © Copyright IBM Corp. 2009, 2013. All rights reserved. 15 2.1 SCSI tape drives In general, zPDT supports the use of SCSI tape drives. However, not all SCSI tape drives may be usable. The usability depends on the exact tape drive model, the firmware level, the firmware options selected, and the exact SCSI adapter (and firmware level) that is used. IBM has tested a number of tape drives, but cannot guarantee that your tape drive will work. We strongly suggest that you work with your zPDT supplier to understand your SCSI tape drive circumstances. SCSI tape drives may be used in two ways: The awsscsi device manager allows SCSI tape drives to be used by System z programs. Several Linux utilities that directly use SCSI tape drives are provided with zPDT. These utilities are normally used when zPDT is not active. These utilities are not associated with devmaps or a device manager. 2.1.1 The awsscsi device manager Selected SCSI tape drives may be used as “real” tape drives during 1090 operation. The awsscsi device manager is used and allows the SCSI tape drive to appear as a 3420, 3480, or 3490 device. A typical devmap definition might be: [manager] name awsscsi 7000 device 581 3490 3490 /dev/sg5 The 7000 in this example is the arbitrary CUNUMBR operand. This example defines a tape drive at address (device number) 581. If z/OS is being used, then the current z/OS IODF must have a corresponding device (3490) defined for this address. (z/VM detects devices dynamically and would find a 3490 at this address.) Please note that the appearance to software (as a 3490 in the example above) may have no direct relation to the actual SCSI device type. In this case /dev/sg5 might be a DLT drive, for example, that has no physical characteristics of a 3490 drive.1 The Linux device for the SCSI tape drive can be changed with the awsmount command. For example, $ awsmount 580 -u /dev/sg5 $ awsmount 580 -m /dev/sg3 (disassociate sg5) (mount different drive) The last operand of the device statement (/dev/sg5 in the example) denotes the SCSI device to be used. Determining this operand is a bit complicated. Linux can address a SCSI tape drive in three ways: /dev/stN /dev/nstN /dev/sgN (where N starts at 0 and is incremented as needed) The /dev/stN and /dev/nstN interfaces are for sequential tape devices. The first tape drive on a Linux system would be /dev/st0; a second tape drive would be /dev/st1, and so forth. The two forms, /dev/stN and /dev/nstN, differ only in whether a rewind is performed when the device is closed.2 The /dev/stN and /dev/nstN interfaces are used with the zPDT stand-alone 1 2 16 IBM did not formally test DLT drives. The /dev/stN device automatically rewinds (whatever this may mean for the actual device) when the device is closed. The /dev/nstN devices do not provide an automatic rewind. IBM System z Personal Development Tool: Volume 3 Additional Topics tape utility functions, such as scsi2tape, tape2scsi, and also by Linux utilities such as tar and mt. The /dev/stN and /dev/nstN interfaces are not used with the awsscsi device manager. The /dev/sgN devices are general SCSI devices and the awsscsi device manager uses the /dev/sgN interfaces.3 Unfortunately, the N value for a given device is typically not the same in the stN and the sgN forms. All Linux SCSI devices are assigned sgN numbers, and Linux treats many of its normal devices as SCSI (even if they are not really hardware SCSI devices).4 The first (and only) tape drive on a Linux system would be /dev/st0 but it might be /dev/sg7, for example. The easiest way to determine what the sg device number represents is to list /proc/scsi/scsi. For example: $ cat /proc/scsi/scsi Attached devices: Host: scsi0 Channel: 00 Id: 00 Lun: 00 Vendor: IBM Model: root Type: Direct-Access Host: scsi2 Channel: 00 Id: 00 Lun: 00 Vendor: IBM Model: 03592E05 Type: Sequential-Access (this is sg0) Rev: V1.0 ANSI SCSI revision: 02 (this is sg1) Rev: 1C91 ANSI SCSI revision: 03 This example shows two SCSI devices (a disk and a tape) which would correspond to /dev/sg0 and /dev/sg1. In this case, /dev/sg1 is the device you would specify for the awsscsi device manager, but any Linux utility would use /dev/st0 or /dev/nst0 for the same tape drive. The devices listed in /proc/scsi/scsi are in sgN order; sg0 is first, sg1 is second, sg2 is third, and so forth. There is another issue with both /dev/stN and /dev/sgN devices: the permission bits must allow usage by zPDT. Some Linux systems allow general user access to /dev/stN devices by default; no Linux systems allow general access to /dev/sgN devices by default. You must change the permissions to allow general access to your device. For example: $ ls -al /dev/sg* crw-r----- 1 root disk crw-rw---- 1 root tape $ su (enter root password) # chmod 666 /dev/sg1 # exit $ ls -al /dev/sg* crw-r----- 1 root disk crw-rw-rw-+1 root tape 21, 0 2008-09-03 14:44 /dev/sg0 23, 0,2008-99-03 14:44 /dev/sg1 21, 0 2008-09-03 14:44 /dev/sg0 23, 0,2008-99-03 14:44 /dev/sg1 In this example, we changed the permissions for /dev/sg1 so that everyone (including zPDT) can read and write to it. This change (by manually entering chmod) is lost when Linux is rebooted, but is suitable for many situations. Always verify the correct sgN number first, by listing /proc/scsi/scsi. A more permanent change can be made by modifying Linux boot functions. Unfortunately, there are two problems with this: 3 4 The reason is that the /dev/stN interface does not accept the full SCSI command set that is needed for some tape operations. The /dev/sgN interface allows all SCSI tape commands to be passed to the tape drive. The sg numbers are assigned in ascending order by bus and by device on the bus. However, since Linux treats a number of non-SCSI devices as though they were SCSI, these bus and device numbers are difficult to predict in advance. Chapter 2. Tapes (SCSI and awstape) 17 The method of modifying Linux boot functions differs with different Linux distributions. For example, we might change /etc/rc.local, or /etc/rc.d/rc.local, or /etc/init.d/boot.local, or some other file, depending on the exact Linux distribution. We can easily make a general change for stN and nstN devices, but we cannot easily make a general change for sgN devices. We should not change the permissions to allow universal access to all /dev/sgN devices; this would allow easy destruction of our Linux system. We could place the following lines in /etc/init.d/boot.local (assuming our particular Linux uses this file): chmod 666 /dev/st[0-9] chmod 666 /dev/nst[0-9] chmod 666 /dev/sg7 change all tape devices change all tape devices change particular SCSI device Do not use chmod 666 /dev/sg[0-9] because this would allow anyone to directly access all the SCSI devices in your system. Unfortunately, the sgN numbers are dynamically assigned during Linux boot processing and depend on what devices are found (powered up) during boot. Unless you always have exactly the same devices powered up when you boot Linux, you cannot safely predict the sgN number of a given device. Block counts There has been a little confusion about zPDT usage of SCSI-attached 3592 tape drives.The current zPDT SCSI device manager regards SCSI-attached tape drives as IBM 3490 units. This means the actual device controls and sense information are transformed to appear as a 3490. IBM 3490 tape drives provide a block counter. This counter is 22 bits; the largest count it can hold is approxmately 4 million. If you write to a SCSI-attached tape drive (under zPDT) you will receive an end-of-media indication after writing approximately 4 million blocks. At this point z/OS will perform EOV functions and call for a new tape cartridge (depending on your JCL, of course). The remaining tape media in the first cartridge is not used, but the system works correctly otherwise. If you read a 3490 cartridge written by another system (that was not emulating a 3490 drive) the cartridge may contain more than 4 million blocks. This should work correctly provided the zPDT System z program does not read the block count from the tape. If it does, and if the tape position is past the 4 million block point, the System z program will indicate a block count error. What happens at that point depends on the design of the particular application program. A tape cartridge with more than approximately 4 million blocks is not fully compatible with 3490 emulation. 2.2 Drives and interfaces There is a wide range of possibilities for SCSI drives and interfaces. The only SCSI tape drives used during development were the Fujitsu 3490E drive, the IBM 3580 LTO drives, and the IBM TS1120 drives. Although such usage is untested by IBM, other SCSI tape drives, such as DLT units, may operate correctly. A key consideration for traditional (“parallel” interface) SCSI tape drives is the hardware interface. These interfaces include HVD (high voltage differential), LVD (low voltage differential), and single-ended (narrow or wide). The tape drive interface must match the SCSI adapter interface in your PC, and the underlying Linux must work correctly with the tape drive. 18 IBM System z Personal Development Tool: Volume 3 Additional Topics 2.2.1 Specific hardware tested IBM testing involved the following SCSI drives: IBM 3592-E05 TS1120 fibre channel attached SCSI tape drive. The drive was at firmware level 1C91, as determined by the itdtinst1.2LinuxX86 and itdtinst4.1.0.026LinuxX86_64 tools from IBM. Fujitsu M2488E parallel SCSI tape drives, whose media cartridge is compatible with IBM 3480 and 3490 drives. These drives were at firmware level 7.C.01 or 7.xG.01 as determined through the drives control panel. IBM LTO-3 3580 parallel SCSI tape drive. This was at firmware level 5BG4 as determined by the itdtinst1.2LinuxX86 from IBM. These drives were tested with IBM System X servers x3650-M1 (7979), x3650-M2 (7947), and x3500-M2 (7939). The following adapters were used: Emulex Corporation Zephyr-X LightPulse Fibre Channel Host Adapter (rev 02). This was at Emulex LightPulse x86 BIOS Version 1.71A0, firmware ZS2.50A, as displayed during the BIOS startup. The Linux device drivers (provided in the Linux distribution) were determined by using the command dmesg | grep Emulex: – RHEL 5.3 (64-bits): Emulex LightPluse Fibre Channel SCSI driver 8.2.0.33.3p. – openSUSE 11.1 (64-bits): Emulex LightPluse Fibre Channel SCSI driver 8.2.8.7. – SLES 11 (64-bits): Emulex LightPluse Fibre Channel SCSI driver 8.2.8.14. Q Logic Corporation ISP2432-based 4Gb Fibre Channel to PCI Express HBA (rev 03). This was at BIOS revision 1.28, as displayed during BIOS startup. The firmware level was 4.04.05 [IP][Multi-ID][84XX] as determined by the ql-hba-snapshot.sh tool from Qlogic. The Linux device drivers (provided in the Linux distribution) were determined by using the command dmesg | grep Qlogic: – RHEL 5.3 (64-bits): Qlogic Fibre Channel HBA Driver 8.02.00.06.05.03-k. – openSUSE 11.1 (64.bits): Qlogic Fibre Channel HBA Driver 8.02.01.02.11.0-k9. Adaptec ASC-29320ALP U320 (rev 10) parallel SCSI adapter, at Adaptec SCSI Card 29320LPE Flash BIOS v4.31.2S1 as displayed during BIOS startup. Block size You probably want to use variable block sizes with SCSI tape drives. You can check for this with these commands: $ su # mt -f/dev/st0 status (switch to root; may not be necessary) If the indicated tape block size is 0 bytes, then the drive is set for variable block sizes. If not, enter the following command: # mt -f/dev/st0 setblk 0 Notice that we use the /dev/stN devices rather than the /dev/sgN devices for these commands. The Linux drivers for Emulex and Qlogic both defaulted to a maximum block size of 32K. Block sizes larger than 32 K are typically not used by application programs; however, large block sizes may be used by backup programs (such as ADRDSSU for z/OS) or by virtual tape managers. Chapter 2. Tapes (SCSI and awstape) 19 The following Linux commands were used to set def_reserved_size to 65536: $ su (change to root) # rmmod sg (removes the sg module) # /sbin/modprobe sg def_reserved_size=65536 (loads the sg module with the default reserved size up to 64k) # cat /proc/scsi/sg/def_reserved_size (displays the current setting for def_reserved_size) # exit (leave root) This change allowed both cards to use 64k reserved buffer size for data transfers. Note that these commands do not make a permanent change. A Linux reboot puts the default size back to 32768. 2.3 SCSI utilities Two zPDT utilities can work directly with SCSI tape drives,5 assuming the Linux system has access to the SCSI adapter. Awstape files (in Linux) can be moved to and from SCSI tape devices using the scsi2tape and tape2scsi commands. $ scsi2tape /dev/st0 /z/my/TAPE23 $ tape2scsi /my/tapes/111111 /dev/st0 $ scsi2tape -c /dev/st0 /z/mytape2 copy SCSI tape to awstape file write SCSI tape from awstape file compress the awstape file The two commands mentioned here are typically used when zPDT is not active.6 Linux can provide basic tape utility functions through the mt package. This package is not required for zPDT, but may be useful in other ways. The package is normally not installed by default. On older Linux distributions it was found, as follows: For RHEL 5.3, install mt-st-0.9b-2.2.2 (or a later version). For openSUSE 11.1, install cpio-2.9-75.45 (or a later version). On more recent Linux distributions you may need to search for it. Once installed, you can use the man mt command to obtain basic documentation. 2.4 awstape utilities zPDT users often build a substantial “tape” library on disk, all in awstape format. The tapeCheck command may be used to verify that a file (which corresponds to a tape volume) is in the correct awstape format. $ tapeCheck /z/TAPE01 verify format of awstape file The tape2file command copies an awstape file to a simple byte stream in a Linux file, removing the awstape control blocks within the file. $ tape2file /z/mytape /tmp/filex The card2tape command copies a Linux text file (in ASCII or EBCDIC) to an awstape file as 80-byte records, using the same conversion conventions as the awsrdr device manager: $ card2tape /tmp/myLinux.stuff /z/tape01 5 6 20 copy without translation In principle, any SCSI tape device that can be used by Linux may be used, although only a small set of drive types are officially supported by zPDT. If the SCSI devices are not in the active devmap, these utilities can be safely used while zPDT is active. IBM System z Personal Development Tool: Volume 3 Additional Topics $ card2tape -a /tmp/myLinux.xyz /z/tape01 force translate ASCII to EBCDIC The tape2tape command copies an emulated tape volume (awstape file in Linux) to another emulated tape volume (another awstape file in Linux): $ tape2tape /tmp/old.tape /z/new.tape $ tape2tape -i -s /tmp/old.tape scan and summarize tape content $ tape2tape -c /tmp/old.tape /mine/new.tape copy and compress The -s flag (scan flag) prevents creation of an output file. The -i flag displays a summary of the contents of the input tape. This command is normally used to compress or uncompress an awstape volume, or to scan the content. A simple copy of an emulated tape volume (without any additional processing) is easily done with the Linux cp command. The tapePrint command lists the contents of an emulated tape volume. Data is displayed in hex and character format. The characters are assumed to be EBCDIC unless the -a flag is used. $ tapePrint /tmp/my.awstape.file $ tapePrint -a /tmp/my.awstape.file | more Both the card2tape and tape2tape commands can produce compressed awstape files. 2.5 Practical advice Most SCSI tape drives do not use vacuum columns to help manage tape start/stop times. Instead they use slower mechanical methods to manage physical tape movement, which means that starting and stopping the tape cannot be done in typical “tape gap” intervals. The net effect is usually this: If the program (including the operating system elements) issues tape read (or write) commands quickly enough, the tape drive will run the tape at full speed. If the program (including the operating system elements) does not issue reads (or writes) quickly enough, the tape drive will stop after the current data block. The next read (or write) may cause the tape drive to “backhitch” (that is, back up the tape for a distance) and then start forward movement. This is done to ensure the tape is “up to speed” for the next read or write operation. This backhitch movement can greatly reduce the effective data speed of the drive. Not all drives encounter this; other factors such as internal buffering may help avoid it. You can typically hear the effects of a tape drive doing a backhitch for every data block. If you encounter this situation, an alternative approach is to use the zPDT SCSI utilities, such as scsi2tape, to copy the SCSI tape to an awstape emulated tape volume. The SCSI utilities are fast and should not encounter any backhitching. Your application could then process the emulated tape volume copy instead of the real SCSI tape volume. This may result in much faster processing of your tape data. Chapter 2. Tapes (SCSI and awstape) 21 22 IBM System z Personal Development Tool: Volume 3 Additional Topics 3 Chapter 3. z/OS notes This chapter is not intended as a general z/OS guide, or as a guide to the AD-CD systems. However, a few common questions or problems are discussed here. © Copyright IBM Corp. 2009, 2013. All rights reserved. 23 3.1 IEBCOPY problems A new version of IEBCOPY was provided with z/OS 1.13. Unfortunately, this version was not compatible with older 3990 control units as emulated by zPDT. The result was that an IEBCOPY compress operation would sometimes corrupt a partitioned data set, making it unusable. z/OS PTF UA67459 corrects the IEBCOPY problem. z/OS 1.13 also contains a copy of the older IEBCOPY version, which works correctly with zPDT. The problem may be bypassed by using the older IEBCOPY program. It is located in SYS1.LINKLIB under the name IEBCOPYO. You can make this older version your standard version by doing the following: Use ISPF option 3.4 to list the members of SYS1.LINKLIB. Use the line command “R” to rename IEBCOPY to IEBCOPYX. Use the line command “R” to rename IEBCOPYO to IEBCOPY. Issue MVS the command F LLA,REFRESH. At the time of writing we did not know whether PTF UA67459 will be integrated in z/OS 2.1, or whether the IEBCOPYO program will be included with z/OS 2.1. 3.2 z/OS CP and memory display The d m=cpu command should display the following information: d m=cpu ID CPU SERIAL 00 + 000971090 CPC SI = 1090.306.IBM.02.000000000000097 d m=stor REAL STORAGE STATUS ONLINE-NOT RECONFIGURABLE 0M-3500M where 1090 is the System z machine type and 97 is the System z serial number assigned by our 1090 USB hardware key. Each 1090 hardware key assigns a different System z serial number.1 3.3 z/OS spin loop timeouts A a z/OS spinloop may time out and produce an S071 ABEND. This is because the default timeout is set for a faster “real” processor. You can change this time value by creating or altering member EXSPATxx in PARMLIB: member EXSPAT00 SPINRCVY ABEND SPINTIME=60 In the z/OS 1.13 AD-CD system we created ADCD.Z113.PARMLIB member EXSPAT00 and then issued the MVS™ console command SET EXS=00 to immediately activate the member. It 1 24 Or the serial number may be provided by a UIM server. IBM System z Personal Development Tool: Volume 3 Additional Topics will be picked up automatically at IPL time. The 60 second value shown here is arbitrary, but should be safe. We suggest this not be done unless you experience spinloop problems. 3.4 Larger panel The x3270 terminal emulator can be started with an optional parameter, as follows: $ x3270 -port 3270 -oversize 133x60 localhost & This produces a 3270 window with 133 columns and 60 lines. (Other sizes may be specified; this is simply an example.) Basic TSO does not use the “extra” window space. ISPF can use it if max is specified for the window format in the ISPF option 0 panel. (ISPF does not use the extra width unless a data set being displayed or edited has records that can use the extra width.) 3.5 z/OS disk space Some z/OS functions assume certain disk allocations. For example, logger files may be placed on the xxSYS1 volume. z/OS also places SVC dumps on this volume; a number of these dumps can exhaust the free space on the volume. You can look for data sets with names such as SYS1.ADCD.DMPnnnnn and delete them (assuming you are not working on a problem that involves these dumps). The exact data set name pattern for SVC dumps is sent in the appropriate COMMNDxx member in PARMLIB. For anything beyond trivial z/OS usage, we suggest that at least one more 3390 volume should be defined and mounted as a STORAGE volume. An MVS command may then direct SVC dumps to this new volume; the command would be similar to DUMPDS ADD,VOL=(volser). 3.6 Java and WebSphere Application Server startup The IBM Java Virtual Machine (JVM) for zSeries® is designed and optimized for best throughput performance on large mainframes. zPDT is sufficiently different in capabilities and characteristics from traditional System z hardware so that certain Java applications may not perform at their best without some tweaking of the JVM. This has been found especially true for startup and installation types of workloads. Startup time improvements of 30-40% have been seen on certain applications.2 Be aware that, with the z/OS AD-CD system, some IPL options include Java in their configuration and others do not.3 If you cannot find java on your system, you may not have used an IPL option that loads it. This chapter provides some tips for improving the performance of Java-based applications. They may or may not be useful in your particular Java use-case. A specific example is given for tweaking the startup performance of IBM WebSphere Application Server v6.1. 2 3 Mitch Johnson (IBM USA) has investigated ways to improve IBM WebSphere® Application Server startup times on smaller System z machines, including the 1090. This section is based on his work. This is in the BPXPRMxx member of PARMLIB. Chapter 3. z/OS notes 25 About Java versions The exact version of Java that your application uses greatly affects how you can go about tweaking it. If you have Java installed, you can check the version on your system by running the java executable from an OMVS prompt: $ (cd to the directory with the Java bin files4) $ (if Java is in your search path there is no need to cd to it) $ java -version Java(TM) SE Runtime Environment (build pxz6460sr6-20090729_05(SR6)) IBM J9 VM (build 2.6, JRE 1.6.0 IBM J9 2.6 Linux s390x-64 20090731_039920 (JIT enabled, AOT enabled) J9VM - 20090731_039920 JIT - dev_20090804_1730 GC - R26_head_20090731_1122_B39896 J9CL - 20090715_1250) JCL - 20090727_01 The tips presented in this section apply specifically to the current IBM J9 Java Virtual Machine. The older Classic or Sovereign JVMs are not relevant. Unless you are using a JVM bundled with a middleware application, you should try to install and use the latest version of the IBM JVM, because it is likely to give you the best performance. Also, note that many Java-based middleware applications ship with their own copies of the JVM. As a first step you will have to determine exactly which JVM is being invoked by your application. Furthermore, you may have to locate either the startup script or the JVM options file that the middleware may be using. Unfortunately, this varies from application to application and cannot be generally documented. General principles The JVM used with z/OS is tuned for large systems and maximum throughput, rather than being tuned for a quick startup. It does not perform too well on zPDT as far as startup performance is concerned; startup of a GUI-based application may seem quite sluggish. The primary way to improve this is by telling the JVM to optimize for startup performance rather than throughput. In a nutshell, the most important change is to provide the '-Xquickstart' option to the JVM. This can be done in two ways. JVM command line If you can locate the command line being used by your program to invoke the JVM, you can simply add this option near the start of the JVM command statement. This command line may be present in the start-up script of the application. For example, $ java -Xquickstart <other JVM options> MyProgram <program options> This is the best method to provide the option. However, it may not be trivial to locate the exact startup script that launches your application and the location of the JVM command inside it. Environment variable If you cannot locate the JVM command line responsible for running your application, you can achieve a similar effect by setting an environment variable. Note that this environment variable must be set inside the OS (zOS, Linux for System z) running inside zPDT. 4 26 In an earlier AD-CD system we found a set of Java executables in /usr/lpp/java/J6.0/bin. This was after IPLing our AD system with the BC parameter. This detail tends to change with every AD-CD release. IBM System z Personal Development Tool: Volume 3 Additional Topics Using the shell, you can run the following command before launching your application: $ export IBM_JAVA_OPTIONS="-Xquickstart" Or you can add this option to the default shell profile on a system-wide basis by adding the following line to /etc/profile: export IBM_JAVA_OPTIONS="-Xquickstart" While this is a good setting to set system-wide, we suggest that you use this mechanism in addition to customizing the startup script or JVM command line for your application. Certain Java startup jobs may not inherit the bash profile environment variables while others may override the value being specified in the IBM_JAVA_OPTIONS. wsadmin tool The wsadmin tool is used the configure and administer application servers, application deployment, and server run-time operations. The details of usage may change among various WebSphere releases. The following suggestion is based on an older WebSphere release (6.1) but may be adapted to later releases. To improve wsadmin performance on zPDT, edit the wsadmin.sh script located in the /usr/lpp/zWebSphere/V6R1M0/bin directory by adding the -Xquickstart option for the z/OS platform. (If you use the jython script described later you do not need to make the individual option and configuration changes noted here.) case $PLATFORM in AIX) PERF_JVM_OPTIONS="-Xms256m Linux) PERF_JVM_OPTIONS="-Xms256m SunOS) PERF_JVM_OPTIONS="-Xms256m HP-UX) PERF_JVM_OPTIONS="-Xms256m OS/390) PERF_JVM_OPTIONS="-Xms256m esac -Xmx256m -Xquickstart" ;; -Xmx256m -Xj9 -Xquickstart" ;; -Xmx256m -XX:PermSize=40m" ;; -Xmx256m -XX:PermSize=40m" ;; -Xmx256m -Xquickstart" ;; WebSphere address spaces The WebSphere Application Server runs in multiple address spaces with a separate JVM in each address space. There is one control region, zero or one adjunct region, and at least one servant region. For an earlier release (6.1) the Java properties of these address spaces can be tweaked by editing files control.jvm.options, adjunct.jvm.options and servant.jvm.options in the /u/WebSphere/V6R1/ADCD.ADCD.BBOS001 and adding the "-Xquickstart" option: ... -Dosgi.configuration.area=/u/WebSphere/V6R1/AppServer/profiles/default/configur ation -Xquickstart -Dserver.root=/u/WebSphere/V6R1/AppServer/profiles/default ... Note that if the admin console is used to modify and save the configuration, the changes to the properties files will be overwritten. Chapter 3. z/OS notes 27 The jython script You can make these changes permanent by creating the following script, in ASCII, in /u/ibmuser/jvmprop.py5: ############################################################################### # Script to set JVM generic arguments to # -Xjit:optLevel=cold,disableInterpreterProfiling # to improve startup performance of WebSphere on zPDT images. # # Author: Mitch Johnson # Organization: IBM Advanced Technical Skills ############################################################################### import java.lang.System as sys lineSeparator = sys.getProperty(‘line.separator’) global AdminApp, AdminConfig cell=AdminConfig.list(“Cell”) node=AdminConfig.list(“Node”,cell) serverList=AdminConfig.list(“Server”,node).split(lineSeparator) for server in serverList: serverName=AdminConfig.showAttribute(server,”name”) print “Updating genericJVMArguments for server: “ + serverName objID=AdminConfig.getid(“/Server:” + serverName + “/”) jvmList=AdminConfig.list(“JavaVirtualMachine”,objID).split(lineSeparator) for jvm in jvmList: print “Updating JVM generic arguments for “ + jvm AdminConfig.modify(jvm, [[“genericJvmArguments”,”-Xquickstart -Xverify:none -Xjit:optLevel=cold,disableInterpreterProfiling”]] ) print AdminConfig.queryChanges() print AdminConfig.save() print “Changes saved” Remember: the above script must be entered in ASCII. During the configuration of an instance of WebSphere on z/OS the system programmer specifies an HFS directory where the configuration files reside. We use /u/WebSphere/V6R1 in this example. The WebSphere configuration process populates this structure with the customized configuration and symbolic links to the WebSphere product code in /usr/lpp/zWebSphere. The jython script shown above does not connect to an active WebSphere instance; instead, it makes changes to the configuration files relative to the directory in which its execution begins. Therefore, our example assumes that the configuration files are located in directory /u/WebSphere/V6R1. Go to directory /u/WebSphere/V6R1/AppServer/bin and enter the following command: ./wsadmin.sh -conntype none -f /u/ibmuser/jvmprop.py -lan jython 5 28 Another convenient directory could be used; the location of the script is not critical. IBM System z Personal Development Tool: Volume 3 Additional Topics This command may take several seconds to execute. It updates each server’s genericJVMArgument value. References The following two URLs may be used to obtain more JVM information related to startup performance and diagnostic techniques: IBM Java 5 Diagnostic Guide http://publib.boulder.ibm.com/infocenter/javasdk/v5r0/index.jsp CICS® and JVM Startup Time http://publib.boulder.ibm.com/infocenter/cicsts/v2r2/index.jsp%3Ftopic%3D/com.i bm.cics.ts22.doc/dfhpj/dfhpj93.htm 3.7 Standalone z/OS dump The z/OS “standalone dump” (SAD) is a program that is IPLed from tape or disk. It does not run under z/OS. However, it assumes that z/OS is present in System z memory at the time the standalone dump is IPLed. The standalone dump program is sensitive to the release of z/OS that is being used and should match the z/OS release. That is, a new version of the standalone dump program should be generated whenever a new release of z/OS is installed. This section describes a simplified use of standalone dump based on the AD z/OS system release 1.12. The dump program itself is placed on an IPLable disk volume and the dump output is directed to another disk volume. Disk volumes Two disk volumes are referenced here. One is for the dump program itself, which is relatively small (about 100 tracks). This volume also contains IPL text to start the standalone dump program. This volume must be mounted as PRIVATE to run the dump generation job, but can be in any mount status when IPLing the dump program. The other volume is for the dump itself. A standalone dump can be large: hundreds of cylinders up to many thousands of cylinders. In our example we assume a suitable volume is mounted at address AC0. Before using the standalone dump program, you must create the dump output data set on this volume using an IPCS utility function. 3.7.1 Generating a standalone dump program The following job generates the standalone dump program and writes it on volume LOCAL1. You later IPL it from this volume when you want to take a standalone dump. //SADBILL JOB 1,OGDEN,MSGCLASS=X,REGION=40M // EXEC PGM=AMDSAOSG //SYSLIB DD SYS1.MACLIB,DISP=SHR // DD SYS1.MODGEN,DISP=SHR //DSFSYSIN DD DSN=&DSFSYSIN,DISP=(,PASS), // SPACE=(80,(4,1)),UNIT=SYSDA //TRK0TEXT DD DSN=&TRK0TEXT,DISP=(,PASS), // SPACE=(4096,(2,1)),UNIT=SYSDA //GENPRINT DD SYSOUT=* //GENPARMS DD * AMDSADMP IPL=D3390,VOLSER=LOCAL1,CONSOLE=(700,3279), X Chapter 3. z/OS notes 29 OUTPUT=DAC0 /* //PUTIPL EXEC PGM=ICKDSF //IPLDEV DD DISP=OLD,UNIT=3390, // VOL=(PRIVATE,RETAIN,SER=LOCAL1) //TRK0TEXT DD DSN=&TRK0TEXT,DISP=(OLD,DELETE) //SYSIN DD DSN=&DSFSYSIN,DISP=(OLD,DELETE) //SYSPRINT DD SYSOUT=* Check the JES2 output when the job ends to ensure that it completed correctly. This is a somewhat unusual job. If there are error messages (perhaps about PUTIPL SYSIN problems or a message from ICKDSF) you must delete the dump program data set (on volume LOCAL1 in this example, and it will have data set name SYS1.PAGEDUMP.VLOCAL1) before trying the job again. The format of the GENPARMS input should conform to basic assembly language rules, with the continuation indicator in column 72 and the continued text starting in column 16. If you have already written IPL text on the dump program volume (LOCAL1 in this example), there will be an operator message and reply before the IPL text is replaced. 3.7.2 Taking a standalone z/OS dump We assume you have been running z/OS and need to take a standalone dump for some reason: $ stop $ ipl AB3 (stop the CP) (assume volume LOCAL1 is mounted at this address) Wait about 10 seconds and press Enter on the 3270 console at address 700. AMD083I AMDSADMP: STAND-ALONE DUMP INITIALIZED. IPLDEV: 0580 LOADP: AMD001A SPECIFY OUTPUT DEVICE ADDRESS (1): (press Enter) AMD101I OUTPUT DEVICE: 0AC0 SENSE ID DATA: FF 3490 10 3490 40 BLOCKSIZE: 29,120 AMD011A TITLE=my dump stuff AMD005I DUMPING OF READ STORAGE NOW IN PROGRESS AMD005I DUMPING OF PAGE FRAME TABLE COMPLETED etc AMD029D REPLY W TO WAIT AFTER NEXT FULL SCREEN, ELSE REPLY N; REPLY=w etc 3.8 Moving 3390 volumes The following text describes a generic method of moving 3390 volumes between z/OS systems (including z/OS on zPDT). Another method, using a client/server application provided with zPDT, is described in Chapter 11, “DASD volume migration” on page 113. zPDT-emulated DASD volumes can be transferred to other systems in several ways. Sending a volume to another zPDT system is especially easy. The Linux file that holds the emulated 3390 volume can simply be copied. Optionally, the copy could be compressed (with gzip, for example) for transmission. The transmission could be by ftp, by a USB thumb drive, by burning a CD or DVD, or by various other means. The key element is that a large Linux binary file is being transferred. 30 IBM System z Personal Development Tool: Volume 3 Additional Topics Moving an emulated 3390 volume to (or from) a non-zPDT system is a little more complex, because it must be handled in a System z format instead of a Linux format. The traditional method is to dump the volume to tape (using the ADRDSSU program) and then restore the tape on the target system. This method can also be used with emulated tapes (in awstape format), provided that both the sending and receiving systems can use this format. This section describes another method for moving a volume from z/OS on a zPDT system to a non-zPDT system. This example assumes the target system cannot use awstape format (otherwise we would use the easier method of creating a dump tape in awstape format). We assume there is a network connection between the zPDT Linux base system and the target z/OS system. Intermediate ftp node (optional) Source z/OS system ADRDSSU program (DUMP) Whole volume XMIT program Data set OGDEN.OUT.DUMP ftp Data set OGDEN.XMIT.DUMP /tmp/xmit/dump ftp RECEIVE program Data set OGDEN.XMITR.DUMP ADRDSSU program (RESTORE) Data set OGDEN.UNXMIT.DUMP Whole volume Target z/OS system Figure 3-1 Overview of our example Preparation We need z/OS disk space to hold a 3390 volume dump and to hold a reformatted volume dump. These can be large data sets. You may have sufficient space on existing z/OS volumes; we elected to create three new volumes for holding large temporary data sets. We did this using normal zPDT techniques. First we created three new emulated 3390 volumes using the alcckd command (done while zPDT is not operational). The placement (/z), model (3390-3), and names of the files (TEMPnn) are all arbitrary. $ alcckd /z/TEMP01 -d3390-3 $ alcckd /z/TEMP02 -d3390-3 $ alcckd /z/TEMP03 -d3390-3 We then added these volumes to our devmap. The addresses specified (AA0, AA1, and AA2) are unused address that are known as 3390 devices for our z/OS. (That is, z/OS has these addresses specified as 3390 devices in the IODF it uses during IPL. The AAx addresses are suitable for the default IODF in the z/OS AD systems.) [manager] name awsckd 0001 .... .... device AA0 3390 3990 /z/TEMP01 device AA1 3390 3990 /z/TEMP02 Chapter 3. z/OS notes 31 device AA2 3390 3990 /z/TEMP03 We then started zPDT and IPLed z/OS. During z/OS startup the new devices are recognized as uninitialized volumes and are varied offline. When z/OS was ready, we ran a job to initialize the volumes: //BILL123 JOB 1,OGDEN,MSGCLASS=X // EXEC PGM=ICKDSF,REGION=40M //SYSPRINT DD SYSOUT=* //SYSIN DD * INIT UNIT(AA0) NOVALIDATE NVFY VOLID(TEMP01) PURGE VTOC(0,1,05) INIT UNIT(AA1) NOVALIDATE NVFY VOLID(TEMP02) PURGE VTOC(0,1,05) INIT UNIT(AA2) NOVALIDATE NVFY VOLID(TEMP03) PURGE VTOC(0,1,05) /* The z/OS operator must reply U to a ICK003D message for each volume. The volsers (TEMP01, and so forth) are the same as the Linux file names; this is not required but is a good practice. After the volumes are initialized, they can be varied online to z/OS, using the MVS console: vary aa0-aa2,online 3.8.1 Create a source dump A normal ADRDSSU job is used to dump the source volume. Our example uses WAS001 as the volser of the source volume: //BILL456 JOB 1,OGDEN,MSGCLASS=X // PGM=ADRDSSU,REGION=40M //SYSPRINT DD SYSOUT=* //IN DD UNIT=3390,VOL=SER=WAS001,DISP=SHR //OUT DD UNIT=3390,VOL=SER=TEMP01,DISP=(NEW,CATLG), // DSN=OGDEN.OUT.DUMP,SPACE=(CYL,(200,200)) //SYSIN DD * DUMP INDD(IN) OUTDD(OUT) ADMINISTRATOR COMPRESS OPTIMIZE(4) /* The space specified in the output DD statement may need to be adjusted, depending on the contents of the source volume. We next created another data set with specific DCB attributes.6 (This step could be done using ISPF 3.2 functions, but we used a batch job to provide better documentation.) //BILL567 JOB 1,OGDEN,MSGCLASS=X // PGM=IEFBR14 //MAKEIT DD UNIT=3390,VOL=SER=TEMP02,DISP=(NEW,CATLG), // DSN=OGDEN.XMIT.DUMP,SPACE=(CYL,(200,200)), // DCB=(LRECL=80,RECFM=FB,BLKSIZE=3120) We then used the TSO xmit command to reformat the dump: xmit x.y ds('ogden.out.dump') outdsn('ogden.xmit.dump') This command can take considerable time if a full volume is being processed. The result of all this is a volume dump in a format known to z/OS, but also in a format (fixed block) that can be 6 32 These DCB attributes are used by XMIT. IBM System z Personal Development Tool: Volume 3 Additional Topics handled by ftp. The x.y positional operand is needed in xmit, but is meaningless in this example. Note that the terse program could be used instead of xmit. It is important to understand the reason for the xmit step. In the general case, ftp does not understand the block and record structure of a z/OS file (such as the ADRDSSU output file). This information is lost during ftp and the resulting file is not usable. The xmit program changes the ADRDSSU dump file into a fixed block/fixed record format. The general ftp process does not understand this either. However, if the ftp’ed file is stored in the receiving z/OS with the same fixed block/LRECL size, the file is usable. Some ftp situations allow additional parameters such that the original block/record characteristics of a file are retained and the xmit step could be skipped. This can be done in a z/OS to z/OS ftp transfer. The method presented in this section assumes the more general case in which the ftp transfer does not retain the original block/record information. 3.8.2 Send dump to Linux We then sent the xmit-formatted dump to Linux, using an ftp connection from Linux to z/OS. We used the zPDT tunnel facility for the connection in our example, but any TCP/IP connection to z/OS could be used. The IP address for z/OS is 10.1.1.2 in this example: $ ftp 10.1.1.2 Name (10.1.1.2:ibmsys1): ibmuser Password: xxxxxx Remote system type is MVS ftp> cd 'ogden' ftp> lcd /tmp ftp> bin ftp> get 'xmit.dump' ftp> bye This example has the ftp connection initiated from the Linux side. It could be done from the z/OS side, provided the Linux system has an ftp server running. The dump is now in /tmp/xmit.dump as a normal (large) Linux file. It can be transmitted elsewhere using any technique suitable for a large Linux file. It could be compressed (using gzip, for example.) At this point the dump (OGDEN.OUT.DUMP) and the reformatted dump (OGDEN.XMIT.DUMP) on the source z/OS system can be deleted if disk space is a concern. You can skip this intermediate Linux step if there is a direct ftp connection between the source z/OS system and the target z/OS system. 3.8.3 Receive dump There are fewer complications if two data sets are preallocated on the receiving z/OS system. One data set is the target of an ftp transfer from Linux (or some other source) and the other is for the output of the TSO RECEIVE function. This last data set is then the input to a RESTORE job. //BILL678 JOB 1,OGDEN,MSGCLASS=X // PGM=IEFBR14 //D1 DD UNIT=3390,VOL=SER=TEMP01,DISP=(NEW,CATLG), // SPACE=(CYL,(200,200)),DSN=OGDEN.XMITR.DUMP, // DCB=(LRECL=80,RECFM=FB,BLKSIZE=3120) //D2 DD UNIT=3390,VOL=SER=TEMP02,DISP=(NEW,CATLG), // SPACE=(CYL,(200,200)),DSN=OGDEN.UNXMIT.DUMP Chapter 3. z/OS notes 33 The dump file can be sent from Linux to z/OS using ftp. (If the file was compressed (in Linux) it must be uncompressed before sending it to z/OS.) Our example uses IP address 10.1.1.2 for z/OS because, for demonstration purposes, we used the same zPDT z/OS system that we used to create the dump volume. In practice, this is likely to be a different z/OS system that might not be in a zPDT environment. $ ftp 10.1.1.2 Name (10.1.1.2:ibmsys1): ibmuser Password: xxxxxx Remote system type is MVS ftp> cd 'ogden' ftp> lcd /tmp ftp> bin ftp> put xmit.dump xmitr.dump ftp> bye We then used TSO to reformat the dump into the original format created by ADRDSSU: receive indsn('ogden.xmitr.dump') (reply to the prompt with) DSN('ogden.unxmit.dump') Finally, the volume can be restored in z/OS: //BILL890 JOB 1,OGDEN,MSGCLASS=X // PGM=ADRDSSU,REGION=40M //SYSPRINT DD SYSOUT=* //IN DD UNIT=3390,DSN=OGDEN.UNXMIT.DUMP,DISP=SHR //OUT DD UNIT=3390,VOL=SER=TEMP03,DISP=OLD //SYSIN DD * RESTORE INDDNAME(IN) OUTDDNAME(OUT) PURGE ADMINISTRATOR COPYVOLID /* You might not want the COPYVOLID parameter in this job, depending on your circumstances. You cannot have two disk volumes with the same volser online to z/OS at the same time. If you do not specify COPYVOLID then the existing volser (TEMP03 in the example) is retained. If you specify COPYVOLID and a volume with this volser is already online, the restored volume is taken offline after the restore operation is complete. (In our example, the restored volser would be WAS001.) Comments Many variations are possible in this general process. For example, some of the z/OS preallocation of data sets can be skipped if your ftp supports site and locsite subcommands. While perhaps a bit longer than absolutely necessary, we think the process shown here should work in almost any situation. With minor changes it can be used in the other direction, to copy a volume from a non-zPDT machine to z/OS on zPDT. This process can be used to port an older version of z/OS from a non-1090 system to a 1090. 3.8.4 Standalone restore This section describes a method of porting a single z/OS volume from an external system than can create awstape volumes7 to a 1090 environment that has no System z software installed. The single z/OS volume used in this example is the one-volume z/OS system that is distributed with the AD package. Although the process we describe here is not required for 7 34 This could be a system with native awstape capabilities, or a system with an informal utility program to convert a sequential file (the dump data set) into awstape format. Such informal utilities are not part of the 1090 package. IBM System z Personal Development Tool: Volume 3 Additional Topics normal 1090 use, we describe it in considerable detail because portions may be useful in unusual circumstances. There are several phases involved: Prepare standalone versions of ICKDSF and the ADRDSSU restore program on an existing z/OS system that can write emulated tape volumes in awstape format. Dump the selected z/OS volume to an awstape file, using the ADRDSSU program. Note that the first two phases can be run on much older OS/390® or z/OS versions, on a variety of machines. Use gzip (or a compatible program) to compress the dump file. This is needed if the transport medium is a CD because the dump file will not fit on a CD unless it is compressed. (If the transport method is FTP or DVD then this step could be skipped.) Burn a CD/DVD containing the two standalone System z programs (each in awstape format) and the gzipped dump file. Take this CD/DVD to the Linux 1090 system. Create the necessary 1090 devmap. Copy the three CD/DVD files to Linux and unzip the dump file. Use a 1090 utility to create an emulated 3390 volume. Start 1090 operation and a 3270 session, IPL the standalone ICKDSF program, and initialize the emulated 3390 volume. IPL the standalone restore program and restore the dump volume. IPL the one-volume z/OS to verify that the process worked. Build the CD We created a CD on an external system that was capable of writing awstape files. This system had unit 560 defined as an emulated tape drive. Three z/OS jobs were involved, as follows: //BILL1 JOB 1,OGDEN,MSGCLASS=X //* CREATE STAND-ALONE ICKDSF // EXEC PGM=IEBGENER //SYSPRINT DD SYSOUT=* //SYSIN DD DUMMY,DCB=BLKSIZE=80 //SYSUT1 DD DSNAME=SYS1.SAMPLIB(ICKSADSF),DISP=SHR //SYSUT2 DD UNIT=560,LABEL=(1,NL),VOL=SER=SAINIT,DISP=(,KEEP), // DCB=(RECFM=F,LRECL=80,BLKSIZE=80) //BILL2 JOB 1,OGDEN,MSGCLASS=X //* CREATE STAND-ALONE RESTORE // EXEC PGM=ADRDSSU,PARM='UTILMSG=YES' //SYSPRINT DD SYSOUT=* //SAMODS DD DSN=SYS1.SADRYLIB,DISP=SHR //TAPEDD DD UNIT=560,LABEL=(1,NL),VOL=SER=SAREST,DISP=(,KEEP), // DCB=(DSORG=PS,RECFM=U,BLKSIZE=32760,LRECL=32760) //SYSIN DD * BUILDSA INDD(SAMODS) OUTDD(TAPEDD) IPL(TAPE) /* //BILL3 JOB 1,OGDEN,MSGCLASS=X // EXEC PGM=ADRDSSU //SYSPRINT DD SYSOUT=* //IN DD UNIT=3390,VOL=SER=SARES1,DISP=SHR Chapter 3. z/OS notes 35 //OUT DD UNIT=560,VOL=SER=DUMP01,DISP=(,KEEP),LABEL=(1,NL) //SYSIN DD * DUMP INDD(IN) OUTDD(OUT) ALLDATA(*) ALLEXCP ADMINISTRATOR COMPRESS OPTIMIZE(4) /* These jobs created three awstape files (emulated tape volumes) on the initial z/OS system. We then compressed the large file containing the dump, using the command: $ gzip -c /tapes/DUMP01 > DUMP01.gz Finally, we used a standard program to burn the three files (containing the two small standalone programs and the compressed DUMP01 file) to a CD. We then took the CD to the 1090 machine. (A CD is not really required, of course. We could simply FTP the files to Linux on the 1090 machine if a suitable network is available.) The CD burning program we used created a CD title of “CDROM.” We also noted that the one-volume z/OS system recognizes a suitable 3390 address (device number) for the system residence as A8F, expects to find a z/OS console at address 700, and can use a local 3270 TSO terminal at address 701. Linux directories We used the following arrangement on the 1090 machine: Our userid was ibmsys1; it was a member of group ibmsys. Our home directory was /home/ibmsys1. Directory /z was created to hold System z emulated disks and tapes. It is a separate file system (partition) that was created when Linux was installed and has ample free space. Read the CD We copied the standalone programs from the CD and uncompressed the dump tape: $ $ $ $ $ $ cd /z ls /media/CDROM (verify CD is readable) cp /media/CDROM/SAINIT /z/SAINIT (DASDI program) cp /media/CDROM/SAREST /z/SARESTOR (restore program) gunzip -c /media/CDROM/TAPE01 > /z/TAPE01 (dump tape) ls -al (verify files are on disk) SAINIT 1108042 bytes SARESTOR 232648 bytes TAPE01 956763522 bytes (you may close the CD window and remove the CD) Create 1090 files We created the new emulated disk volume on the 1090 system: $ alcckd /z/SARES1 -d3390-3 (resulting volume 2.8 GB) We created and checked /ibmsys1/aprofi.txt for the devmap: $ cd /home/ibmsys1 $ gedit aprofi.txt [system] memory 400m 3270port 3270 (or use your favorite text editor) [manager] name aws3274 1 36 IBM System z Personal Development Tool: Volume 3 Additional Topics device 0700 3279 3274 L700 device 0701 3279 3274 L701 [manager] name awstape 4 device 0580 3480 2803 /z/SAINIT device 0581 3480 2803 /z/SARESTOR device 0582 3480 2803 /z/TAPE01 [manager] name awsckd 8 device 0a8F 3390 3990 /z/SARES1 $ awsckmap devmap.txt (verify there are no errors) Run standalone programs We started the 1090 operation: $ cd /home/ibmsys1 $ awsstart aprofi.txt We then created a 3270 session: $ x3270 -port 3270 localhost & We IPLed the SAINIT program: $ ipl 0580 (wait a few seconds and press Enter on the 3270 screen) (message CLEAR SCREEN WHEN READY should appear) (Alt-c performs the Clear Screen function for an unmodified x3270) ICK005E DEFINE INPUT DEVICE, REPLY ‘DDDD,CUU’ or ‘CONSOLE’ console ICK005E DEFINE OUTPUT DEVICE, REPLY ‘DDDD,CUU’ or ‘CONSOLE’ console ENTER INPUT/COMMAND init unit(0a8f) devtyp(3390) volid(SARES1) nvfy vtoc(1,1,14) (displays device information) ENTER INPUT/COMMAND: u (clear screen, using Alt-c, as needed) (wait for FUNCTION COMPLETED, HIGHEST CONDITION CODE WAS 0) We IPLed the SARESTOR program: $ ipl 581 (wait a few seconds and press Enter on the 3270 screen) (message CLEAR SCREEN WHEN READY should appear) ADRY005E DEFINE INPUT DEVICE, REPLY ‘DDDD,CUU’ or ‘CONSOLE’ console ADRY005E DEFINE OUTPUT DEVICE, REPLY ‘DDDD,CUU’ or ‘CONSOLE’ console ENTER INPUT/COMMAND: restore frmdv(tape) frmadr(0582) toadr(0a8f) noverify ...REPLY y TO ALTER VOLUME CONTENTS, ELSE N y (long pause for restore operation; several minutes. Disk light blinks.) (clear screen when requested) Chapter 3. z/OS notes 37 (ignore progress messages such as NEXT TRACK TO WRITE) (wait for FUNCTION COMPLETED, HIGHEST CONDITION CODE WAS 0) IPL z/OS We started another 3270 session (for TSO): $ x3270 -port 3270 localhost & And then we IPLed the one-volume z/OS system that we just restored: $ ipl 0a8f parm 0a8fsa (use the indicated IPL parameter) 3.9 IODF Changes with zPDT For a larger System z, IODF and IOCDS creation are almost always done at the same time, working with HCD. This typically starts as follows: HCD (usually started from an ISPF panel) 1. Define, modify, or view configuration data 3. Processors 4. Control Units 5. I/O Devices The HCD functions verify that an allowable configuration is specified. That is, the processor (type and model), CHPIDs, and I/O devices must all be mutually allowable. This is a useful check for a larger System z, but it creates problems for zPDT. A zPDT system does not use an IOCDS and does not understand many hardware CHPID details. Furthermore, typical zPDT configurations are simply not compatible with the normal HCD verification and processing we would use with a larger System z. At the time of writing, I/O device configuration for a z/OS system on zPDT consists of a software only IODF generation, followed by the creation of a matching devmap. Many z/OS users are not immediately familiar with a software only IODF and we provide an overview of the topic here. Once started, it is considerably simpler than a “normal” IODF. Assume we want to add 15 OSA devices starting at address 410 and an OSAD device at address 41F. Using the IODF99 that is provided with the current z/OS AD-CD system8, we would proceed as follows: HCD (started via ISPF menu item M.4) 1. Define, modify, or view configuration data I/O DEFINITION FILE 'SYS1.IODF99' 1. Operating System Characteristics / OS390 (select configuration named 'OS390') 7. Work with attached devices (This should produce a list of current devices) F11 - Add At this point you should have a panel that wants you to enter a new work IODF name. We entered the name SYS1.IODF77.WORK and volser ZCSYS1 in this panel. The data set name should follow this pattern (although the 77 portion of the name is arbitrary) and the volser should be the volume that is specified in the IPL parameter (ZCSYS1 in the z/OS 1.12 AD system). This is followed by a panel to add devices to the new work IODF. We entered the following: 8 38 This example is based on the z/OS 1.12 AD-CD system, but later releases should be similar. IBM System z Personal Development Tool: Volume 3 Additional Topics Specify or revise the following values. Device number. . . . Number of devices . Device type. . . . . Serial number. . . . Description. . . . . Volume serial number Connected to CUs . . . . . 410 + (0000 - FFFF) . . . 15 . . . OSA + . . . . . . . . . ______ (for DASD) ____ ____ ____ ____ ____ ____ ____ ____ Press Enter and again select (with a / character) the OS390 configuration. Select option 1 (to connect or change the new I/O devices). This is followed by a panel allowing you to alter default device parameters; you should take the default options unless you have a particular reason for changing them. This is followed by a panel to associate esoteric names with the new devices; you might use this for DASD or tape devices but probably not for any other types of devices. Press Enter and then select (with a / character) the OS390 configuration again. Press F3 to return to the device list, and you should now see 410,15 in the list. Again select F11 (to add devices) and add a single OSAD device at address 41F, following the same steps used for the 15 OSA devices. When your new I/O devices have been added to the list, use F3 three times to return to the initial HCD menu. You then need to process your new IODF file. 2. Activate or process configuration data I/O DEFINITION FILE 'SYS1.IODF77.WORK' 1. Build production I/O definition file (This may produce some warning messages, usually about esoteric tokens. Ignore these messages. F3 to exit the warning panel.) Command ==> Date & Time . . . . . . : 2008-07-14 13:14:51 User . . . . . . . . . .: IBMUSER I/O Definition file. . .: SYS1.IODF77.WORK Change reference number.: 00018 ****** ************************TOP OF DATA ************************** ....... ****** ************************BOTTOM OF DATA *********************** Press F3 to exit this panel. The next panel allows you to name the new production IODF file: Specify the following values, and chose how to continue. Work IODF name . . . . . . : 'SYS1.IODF77.WORK' Production IODF name . .: 'SYS1.IODF77' Continue using as current IODF: 1 1. The work IODF in use at present 2. The new production IODF specified above (not valid for zPDT) The next panel allows you to specify or revise these values; press Enter. This should produce the message PRODUCTION IODF SYS1.IODF77 CREATED. Use F3 several times to exit from HCD. To use the new IODF you must alter one or more of the LOADxx members in SYS1.IPLPARM to refer to the new IODF. For example, edit member LOAD00 in SYS1.IPLPARM: IODF SYSCAT 99 SYS1 <--change this line Z9SYS1113CCATALOG.Z19.MASTER Chapter 3. z/OS notes 39 SYSPARM IEASYM NUCLST PARMLIB PARMLIB PARMLIB NUCLEUS SYSPLEX 00 00 00 USER.PARMLIB ADCD.Z112.PARMLIB SYS1.PARMLIB 1 ADCDPL Z9SYS1 Z9RES1 Z9RES1 Change the 99 in the first line to 77 (or whatever number you used for your IODF). The format of this statement is odd, but it results in the name SYS1.IODF77. Be certain to place your changed characters in the same columns as the original characters. Do not change anything else in the LOADxx member unless you are certain about your actions. The new IODF is now ready to use the next time you IPL z/OS with the parameter: $ ipl 0a80 0a82xx Assuming you are satisfied with the results, you will probably want to change all the LOADxx members that you use. You must also change your devmap to use the new devices you added to your z/OS system. (Note: At the time of writing, we have no information about the use of OSAD in the zPDT environment.) 3.10 Local printing There is often less need for hard copy printed output in today’s working environments, but it is sometimes needed. There are a variety of ways to approach this. The following material describes only one of these ways. This discussion assumes you are using a recent version of the AD-CD z/OS system. Background Basic z/OS printing is closely related to the hardware available on the original S/360 machines. The most common printer at that time was the IBM 1403. It printed lines with 120 characters (or 132 characters, with an optional feature) and was normally set to print 6 lines per inch on fan-fold paper that was 11 inches long. This meant a full page held 66 lines. In practice, many programs counted output lines and skipped to a new page after 60 or 61 lines. Much of the utility software with the system, such as JCL processors, assemblers, compilers, system report programs, and so forth were designed to fit these pages. That is, they printed lines of up to 120 characters (sometimes up to 132 characters) with about 60 lines per page. This default convention is still with us today. Later hardware replaced the line printers (such as the 1403) with laser printers. These were devices such as the IBM 3800, 3820, 3825, 3900, and so forth. These could accept a variety of paper sizes, but were most commonly used with “letter size” paper.9 With proper programming, these printers can produce sophisticated output using many fonts and graphics components. However, the system utilities (compilers, for example) continued to produce listings in “1403 format.” Software for these laser printers can accept this 1403-format data and list it. These listings typically are two-sided, landscape mode, and contain up to 66 lines of 132 characters on each page. 9 40 The “letter size” (or A4 elsewhere) paper could be cut sheets or fanfold paper, depending on exactly which printer is being used. IBM System z Personal Development Tool: Volume 3 Additional Topics Real 1403 printers are historical items, but there are many uses for pseudo-1403 devices. z/OS and JES2 still support 1403 printers and the 1090 can emulate 1403 printers. This is all that is needed for printed output from utilities, compilers, and many existing applications. Using a PC printer Our goal was to use a common PC laser printer and have utility output produced in the format just described: landscape mode, 66 lines per page, 132 characters per line. If the PC printer provides duplex printing (printing on both sides of the paper), this would be used. The flow is illustrated in Example 3-2. Our tests used a Lexmark OptraS1250 and Optra L printers (both with duplex printing features). We have not tried the techniques described here with other printers, but we expect the same or similar techniques could be used. However, remember that z/OS printed output typically contains separator pages, JCL listings and messages, and so forth; the smallest job usually has multiple pages of printed output. This may not be suitable for use with a small inkjet printer. We assume the use of a fairly heavy-duty laser printer for z/OS printing. Application Printer 132x66 sysout lpr command JES2 Spool prt00e shell script 1403 emulator Linux file Figure 3-2 General flow for printing 3.10.1 Setup We need to provide an appropriate setup for Linux, the 1090 devmap, a shell script, and JES2. Linux setup We first configured our (very old) Lexmark Optra S1250 for Linux. This printer has a parallel input; our computer had no parallel ports. We purchased a USB-to-parallel cable and this provided the needed connectivity. We used YAST (running under openSUSE) to configure the printer.10 A print queue named optras1250 was created automatically by YAST. We verified that the printer worked by using commands such as: $ lpr /home/ibmsys1/prof12 (to print one of our devmaps) Devmap setup We added the appropriate 1403 definition to the 1090 devmap: [manager] name awsprt 4321 --windows device 00E 1403 2821 /tmp/1403a The --windows option is needed to place CR/LF characters in the output; without this option, NL characters are used and a PC printer may not be happy with NL characters. The output file name (/tmp/1403a in the example) is arbitrary. In our case, we did not expect much printed output and /tmp seemed a reasonable place to put it. The output file may also be assigned or changed with the awsmount command. 10 Red Hat Linux has a different configuration process, but the end results are about the same. Chapter 3. z/OS notes 41 Shell script We created a shell script named prt00E (the name is arbitrary) and placed it in our home directory (/home/ibmsys1, in our case). The shell script contained the following: CTL=”\033\105\033\050\163\060\160\061\066\056\066\067\150\070\056\166 \060\163\060\142\124\033\046\154\061\157\061\163\065\056\064\143 \055\061\060\060\060\132” CTL2=”\014\033\105” (/bin/echo -ne $CTL; cat /tmp/1403a; /bin/echo -ne $CTL2) | lpr -P optras1250 The CTL and CTL2 definition constants are printer control characters, written in octal.11 The octal format was the most convenient for use in a shell script. If you have good script writing skills you can do this several ways. The particular control characters shown here are for the Lexmark printers we mentioned. Your printer may require different controls. If you are printing to the default Linux printer you do not need the -P parameter (and queue name) of the lpr command. The logic in the shell script is simple. It sends data (via a pipe and lpr) to the queue we defined earlier. It sends the CTL string (using echo), then sends the print data from the output file we named in the devmap or awsmount command (using cat), and then sends the CTL2 string (using echo) to flush the printer buffer and reset the printer. The CTL control string (for our Lexmark printers) resets the printer, switches to a fixed font, sets a small type size pitch, changes to 8 lines/inch, uses a Courier font, uses landscape, duplex printing, uses 5.4/48 line height, and a small line offset to better center the data. The only unique requirement is that the format must use exactly 66 lines per page in order to synchronize with the pages produced by the 1403 emulator. In the following strings \033 is the ESC character that is used to begin printer command strings, and this is shown as a bold-face E in the character equivalents of the string. The octal constants are the equivalent of the characters shown and the CTL string could be written with characters (except for the ESC byte). The CTL commands are: OCTAL constant....... \033\105 \033\050\163\060\160 \061\066\056\066\067\150 \070\056\166 \060\163\060\142\124 \033\046\154\061\157 \061\163 \065\056\064\143 \055\061\060\060\060\132 Characters EE E(s0p 16.67h 8.v 0s0bT E&l1o ls 5.4c -1000Z Comment Reset printer Use a fixed font, with 16.67 inch character pitch with 8 lines/inch characteristics using upright, medium Courier Use landscape format with duplex printing, long edge 5.4/48 inch line height line offset The CTL2 commands are: \014\033\105 Force last page, reset printer The CTL string was produced after some experimentation. It works for our printers, but it may contain unnecessary elements. Notice that we hard-coded the file name (/tmp/1403a) in the shell script; more skilled users may want to make this a command-line variable. JES2 setup Normal z/OS printing flows through JES2 and printers must be known to JES2. Recent AD-CD systems do not have a printer defined for JES2; we need to define a 1403 at address 00E for JES2. (We use device number 00E because it is the traditional address for a 1403 11 42 CTL is shown as three lines here, but it is actually created as one long line containing 38 octal constants. IBM System z Personal Development Tool: Volume 3 Additional Topics printer and because it is already defined in the AD-CD IODF.) Edit AD-CD PARMLIB member JES2PARM to contain the following line: PRT(1) WS=(W,R,Q,PMD,LIM/F,T,C,P),UNIT=00E,CLASS=C If you scroll through the existing JES2PARM (in the AD-CD system) you will find commented lines similar to this. You can insert a new line, as shown, or convert the commented lines into active lines.12 The print class (CLASS=C) is arbitrary; we selected class C because nothing defaults to this class. We added the printer definition to JES2 and re-IPLed z/OS. (There are various ways to do the same thing without the re-IPL.) We verified that the printer was online (d u,,,00E,1) and then issued a JES2 command to start it ($SPRT1). Use a $SPRT1 command as the response to requests to mount forms and so forth. 3.10.2 Operational technique We then ran jobs that sent output to SYSOUT=C. For example, //OGDEN1 JOB 1,OGDEN,MSGCLASS=C // EXEC PGM=IEBGENER //SYSPRINT DD SYSOUT=* //SYSIN DD DUMMY //SYSUT1 DD DSN=ADCD.Z113.PARMLIB(IEASYS00),DISP=SHR //SYSUT2 DD SYSOUT=* After submitting this job, you should notice z/OS console messages about jobs sent to PRT1. If JES2 requests a setup function for the printer, reply $SPRT1. If the emulated printer is started (for JES2), the printed output is immediately sent to the “printer.” As described here, this is file /tmp/1403a in Linux. Additional output (from multiple jobs) is simply added to the file. The emulated printer cannot distinguish where one job ends and the next begins; the JES2 separator pages are needed for this. At some point you can stop the JES2 printer ($PPRT1) and print the accumulated output under Linux. (You do not need to stop the JES2 printer if you are certain no additional output will be sent to it.) You should disconnect the output file (/tmp/1403a) from the emulated printer: $ awsmount 00E -u You then run the shell script: $ cd /home/ibmsys1 $ ./prt00E (Directory containing the shell script) (Execute the shell script) The printer should begin printing output. Notice that the output includes all the job separator pages produced by JES2. When it finishes, you can use awsmount to provide an empty output file for the emulated printer: $ rm /tmp/1403a $ touch /tmp/1403a $ awsmount 00E -m /tmp/1403a (Delete the old output file) (Start a new output file; same name) (Connect new output file) We deleted the output file (assuming we do not want to print the same jobs again). We then recreated the same file (because the name is hard-coded in the shell script) and “mounted” it on the emulated printer, ready for more output. If you stopped the JES2 printer, you need to start it again ($SPRT1). 12 If you convert the commented lines into active lines, be especially careful with the /*....*/ comment indicators; be certain you remove matching pairs. Chapter 3. z/OS notes 43 3.11 Enabling TSO users for OMVS Current releases of the z/OS AD system provide “built-in” userids such as ADCDA, ADCDB, ADCDC, and so forth. For some releases these userids are not enabled for Unix System Services (also known as OMVS). You can enable these userids with the steps described here. Logon to TSO as ibmuser or adcdmst. These two userids have RACF® SPECIAL authority. Issue the following command from the TSO READY prompt or from ISPF option 6: alg test omvs(gid(100)) For current AD systems, the ADCDx userids are in RACF group TEST. This command assigns Unix System Services group ID 100 to the RACF group named test. OMVS users must be a member of a valid OMVS group and this command creates the needed OMVS group. Group ID 100 is arbitrary and could be any unassigned group number. Next, issue a TSO command such as the following: alu adcde omvs(uid(105) program(/bin/sh) home(/u/adcde)) In this example, we are enabling userid adcde for OMVS usage; this could be any one of the existing userids in the AD system. We are assigning uid 105 for this user. This number is arbitrary, provided it does not duplicate an existing OMVS uid number in your system. For simplicity, we often assign OMVS uids using this pattern: USER adcda adcdb adcdc adcdd etc UID 101 102 103 104 etc There is no requirement to use this pattern, but it is a convenient way to avoid duplicating numeric uids for the built-in users in the AD system.13 The last step is to invoke OMVS, using a userid that is already valid for OMVS. This step is easier if the userid is a superuser (with numeric uid 0). Users ibmuser and adcdmst have this characteristic in recent AD releases. From the OMVS prompt issue commands such as: mkdir /u/adcde This command creates a Unix System Services home directory for user adcde. A home directory is needed in order to log into Unix System Services with the OMVS command. Once the user is enabled for Unix System Services functions, one of the following methods can be used to begin using Unix System Services: 1. Log on to TSO (using a 3270 emulator) and enter an omvs command from the READY prompt or from ISPF option 6. This produces a common UNIX shell environment, adapted to 3270 terminals. 2. Log on to TSO (using a 3270 emulator) and enter an ish command from ISPF option 6. This produces a UNIX shell that is unique to z/OS and 3270 terminals. 3. Assuming you have connectivity to z/OS TCP/IP from your PC Linux system, you can use a command (from a Linux command window) such as telnet 10.1.1.2 1023 to connect directly to Unix System Services. The IP address in the command (10.1.1.2 in this 13 44 z/OS can also provide automatic UID numbers for Unix System Services users, but this may require additional setup that is beyond the scope of these brief instructions. IBM System z Personal Development Tool: Volume 3 Additional Topics example) must be the IP address of your z/OS TCP/IP. (It is not the IP address of the base Linux in your zPDT system.) Port 1023 in the AD system is used for connection to Unix System Services. This method of accessing Unix System Services is not adapted to 3270 terminals. It uses a basic UNIX-style terminal and vi, for example, can be used in this mode. 3.12 SYS1.LOGREC full Maintaining SYS1.LOGREC is a normal z/OS system programmer’s task. There is nothing unique to the 1090 or the AD distribution. Production installations, using larger System z machines, often keep ordered histories of LOGREC data and study any new material in LOGREC. It includes data about hardware and software failures, IPL statistics, volume usage statistics, and so forth. Most 1090 users simply ignore SYS1.LOGREC until they receive messages that it is full. These messages do no harm, but it is a good idea to clear LOGREC when such messages are received. There is at least one job in the AD libraries to do this, but the job name (and library name) may change from time to time. The following is a job to clear SYS1.LOGREC. The particular format shown here is quite old and should be used exactly as shown. //BILLCL JOB 1,OGDEN,MSGCLASS=X // EXEC PGM=IFCEREP1,PARM='CARD' //SERLOG DD DISP=SHR,DSN=SYS1.LOGREC //DIRECTWK DD UNIT=SYSDA,SPACE=(CYL,5,,CONTIG) //EREPPT DD SYSOUT=*,DCB=BLKSIZE=133 //ACCDEV DD DUMMY //TOURIST DD SYSOUT=*,DCB=BLKSIZE=133 //SYSIN DD * SYSUM ACC=Y ZERO=Y /* You may find slightly different jobs that perform the same function and any of these should be acceptable. Never attempt to “clear” SYS1.LOGREC by simply deleting and reallocating it, or by removing records with a text editor. Note that you can edit IEASYSxx members (in PARMLIB) to say LOGREC=IGNORE to avoid the LOGREC full problems. 3.13 Lost MVS console MVS does not like to lose its operator console (and this is not unique to zPDT operation!). If you accidently close the TN3270e session that contains the MVS operator console, you might try the following recovery. First, simply try to re-establish the session. This may be easier if the MVS console has an LU name in the devmap. For example, $ x3270 -port 3270 mstcon@localhost & Depending on exactly what was happening when the console was lost, the TN3270e connection to the aws3174 device manager may still be active and you cannot make a “new” Chapter 3. z/OS notes 45 connection to it. You can force the console session to completely disconnect by this command in a Linux window: $ awsmount 700 -d (assuming your MVS console is address 700) You might then be able to connect the TN3270e session to address 700. You need to have the TN3270e session connected before proceeding with additional recovery. When MVS lost the console it may have started issuing messages in the Linux window used to start zPDT. These are “HMC hardware console” messages. You can attempt to reactivate the MVS console on 700 (assuming you have a TN3270e connection to 700) as follows: $ $ $ $ $ $ oprmsg oprmsg oprmsg oprmsg oprmsg oprmsg v v v v v v 'cn(*),activate' 700,offline 700,offline,force 700,online 700,console 'cn(*),deactivate' (activate the "hardware console" for commands) (if the simple vary offline fails) (optional) This may not always work. Also, it may produce a console in 3270-2 (24 lines) mode, but this is better than no console. The single quotes shown in the commands may be needed to prevent the Linux shell from directly using the parenthesis characters in the commands. 3.14 Unable to start ISPF When logging onto TSO, the following message is sometimes seen when attempting to start ISPF: %%% UNABLE TO ALLOCATE OR CREATE ISPF PROFILE DATASET ISPF003 FOLLOWING FILE WAS NOT PREALLOCATED ISPPROF The most common reason for this problem is that the required ISPF profile data set was uncataloged for some reason. The most common reason is attempting to use the same profile data set from two different z/OS instances, such as in a Parallel Sysplex environment. Crashing z/OS at just the wrong moment might also do this. You need to recatalog the profile data set. Assuming you are logging on as IBMUSER, the data set you want (in all recent AD-CD releases) is IBMUSER.ISPF.ISPPROF. You can logon with another userid (ADCDMST is convenient for this purpose) and recatalog the data set. The easiest way to recatalog the data set is to list the volume (ZDSYS1 or SCSYS1, for example) using ISPF 3.4 and to use a C line command to catalog the data set. (The “C” is entered at the beginning of the line for that data set in the ISPF 3.4 display.) Another solution, after ISPF fails to start, is to preallocate the data set and then start ISPF again. The TSO command to do this is: READY alloc da('ibmuser.ispf.ispprof') f(ispprof) shr vol(zcsys1) unit(3390) READY ispf (start ISPF again) You need to use the volser that matches your current system, of course. 46 IBM System z Personal Development Tool: Volume 3 Additional Topics 3.15 Health Checker The z/OS Health Checker has been included in recent AD-CD releases, but may not be configured for operation. A quick configuration (z/OS 1.12) involves the following steps; later z/OS releases may use similar steps if the Health Checker is not already configured: Edit SYS1.SAMPLIB(HZSALLCP) and change the DSN operand (in the DD statement) to something like DSN=SYS1.ADCD.HZSPDATA. A VOL=SER= parameter may be added although the data set involved is not very large. Complete the JOB statement and run this job. Create this member in a PROCLIB, such as USER.PROCLIB: //HZSPROC PROC HZSPRM=’00’ //HZSSTEP EXEC PGM=HZSINIT,REGION=0K,TIME=NOLIMIT, // PARM=’SET PARMLIB=&HZSPRM’ //HZSDATA DD DISP=OLD,DSN=SYS1.ADCD.HZSPDATA Edit ADCD PARMLIB member ISFPRM00 and add a CK parameter to the list of authorizations allowed for systems programmers. (Remember the comma!) Enter the following commands in the ISPF option 6 display: RDEFINE XFACILIT HZS.* UACC(READ) SETROPTS RACLIST(XFACILIT) REFRESH RDEFINE STARTED HZSPROC STDATA(USER(START1) GROUP(SYS1) TRUSTED(YES)) SETROPTS RACLIST(STARTED) REFRESH From the MVS operator console, stop the SDSF server (P SDSF) and start it again (S SDSF). From the MVS operator console, start the Health Checker (S HZSPROC). This will probably produce considerable output on the MVS console. It can be ignored unless there is an obvious error message about the HZSPROC start. Go to the SDSF primary panel and enter the CK command. This should display output from the Health Checker. Remember to stop it (P HZSPROC) when stopping z/OS. You might add the stop command to the SHUTDOWN scripts in the ADCD PARMLIB. 3.16 RMF-III Recent releases of the AD system may not start RMF-III correctly, with a failure finding a module. This can be corrected by adding GDDM®.SADMMOD to the link list. (Consider adding it to all the PRODxx members in PARMLIB.) 3.17 Compressing PARMLIB We typically make many PARMLIB changes (usually to the current ADCD PARMLIB) while adjusting the AD system to our individual needs.14 We then need to compress PARMLIB to recover space and prevent unexpected expansion into multiple extents. With recent AD-CD releases, a simple compress (using the Z option in the ISPF 3.4 panel) fails because the PARMIB is being used by another job. Pressing PF1 twice (when this error message is 14 This is not a good practice, but it is very common. A better method is to (1) copy the target PARMLIB member to USER.PARMLIB, and (2) make the changes there. USER.PARMLIB is concatenated before the normal ADCD PARMLIB. Chapter 3. z/OS notes 47 received) displays the name of the conflicting job(s). The conflict may be from zFS. The following MVS console command: f omvs,stoppfs=zfs stops zFS and permits compression of the PARMLIB. This should be done when there are no Unix System Services users, of course. 3.18 Burning 3390 volumes on CD If we wanted to preserve a 3390 volume on CD (or DVD), we could use the following command to make a compressed copy: $ gzip -c /z/Z5RES1 > /z/Z5RES1.gz We could then burn the compressed file on CD or DVD by using a normal Linux CD/DVD burning application. 3.19 Delete logstreams The default location for log streams (for the AD-CD system) is the ZCSYS1 volume (or the equivalent, for other releases). These streams can sometimes grow to fill the volume. A typical job for deleting a log stream is as follows: //BILL1 JOB 1,OGDEN,MSGCLASS=X // EXEC PGM=IXCMIAPU //SYSPRINT DD SYSOUT=* //SYSIN DD * DATA TYPE(LOGR) REPORT(YES) DELETE LOGSTREAM NAME(WAS.ERROR.LOG) /* 3.20 Disabled waits You may sometimes see a message in your zPDT Linux window such as: Warning! Disabled Wait CPU 0 $ d psw <--you may issue this command PSW for CPU 0 000A0000 00000xxx (24/32 bit mode) PSW FOR cpu 0 00020000 00000000 00000000 00000XXX (64-bit mode) When you receive such a message, you may issue a command to display the PSW. The last three characters of the PSW should contain a wait state code; an extended code may be also present in other characters of the PSW. The following list provides abbreviated information about standard wait state codes. Please see the System Codes manual for more complete information about each code. Note that some wait states are restartable; again, see the System Codes manual for more information. Partial list (see the notes at the end of the list) 002 003 004 005 006 48 - During IPL, an I/O operation was not initiated (1) IPL cannot continue; subchannel is not operational for IPL or IODF device (1) During initialization, I/O not initiated (1) I/O interruption during IPL and unit check (2) I/O error during IPL processing; SYSRES or IODF volume (2) IBM System z Personal Development Tool: Volume 3 Additional Topics 007 009 00A 00B 00D 00E 00F 013 014 017 019 01B 01C 020 022 023 025 02E 030 031 032 033 035 037 038 039 03A 03B 03C 03D 03E 03F 040 044 045 046 04A 050 051 052 053 054 055 056 059 05A 05C 05D 05E 060 061 062 063 064 065 06F 070 071 072 073 - During initialization console not available (3) System build error. (z/OS problem; should be rare) Cannot find SYS1.LINKLIB or SYS1.CSSLIB in catalog (4) Master scheduler abended (4) Master scheduler abended (4) Problem on SYSRES volume (SYS1.NUCLEUS) (2) IPL volume does not contain IPL text (5) Error during NIP (6) Recursive program checks (6) Unit check during IPL (2,5) IPL program in error (6) SLIP requests wait (7) Recursive abend in FRR (8) Reconfiguration initialization failed (9) Page fault - devices quiesced or not ready (10) Trace initialization failed (11) Duplicate entry point in nucleus (6) ASM detected too many I/O errors (10) ABEND during NIP (6) No UCB for SYSRES (1, 2) NIP module missing (6) I/O error in BLDL during NIP (6) Could not find entry point in nucleus (6) DSCB for SVCLIB, PARMLIB, LINKLIB could not be read (12) Not enough main storage (11) DASD mount conflict (1,13) Error building LPA (6) Required module is not in LPA (6, 14) ASM found not enough paging storage (15) Error building page tables (11) Not enough page slots to back master scheduler initialization (15) NIP function invoked incorrectly (6) ABEND during NIP (6) Machine check during NIP (6) (Try IPLing again, at least once!) NIP could not initialize RTM (6) Program check during NIP (6) TOD clock in error (16) Alternate CPU recovery (ACR) entered recursively (16, 6) ACR had error (software) (6) ACR error (hardware) (16) PC or PC/AUTH failed (17) Error in member loaded into nucleus (6,14) IPL cannot find necessary member in SYS1.NUCLEUS (14) NIP error (6) Unidentified return code for BLDL during NIP (6) ACR tried to remove last CP (16) NIP cannot find catalog pointer in nucleus (18,12) During NIP, could not find DSCB for catalog (12) Error reading master catalog (2) ASM detected errors in page tables (6) TOD clock errors during STCK instruction (16) Channel path error (16) NIP storage problem. SQA too small? (4) NIP error and RTM not initialized (6) NIP issued type 3 or 4 SVC before they were available (6) I/O problem - unusual (1,2,10,13) NIP: insufficient contiguous main storage (6,11) System or operator initialized a restart No more workspace for IPL (6,11) IPL program waiting for I/O or external interrupt (16) Chapter 3. z/OS notes 49 074 - IPL program contains a logic error (6) 075 - IPL program could not load a module (4,14,6) 076 - IPL found non-fullword relocatable address constant (6) 077 - SVC entry point cannot be resolved (6) 078 - Master catalog could not be opened (2,4,6) 07B - Required processor facility not available (19) 07C - Initialization error, configuration problem. (18,1,see Codes manual) 07D - IEASYSxx PARMLIB member is bad; in error (4) 07E - Unable to obtain LSQA storage for SVC (11,6) 081 - SYS1.NUCLEUS occupies more than one extent 082 - System joining sysplex needs maintenance 083 - Incorrect address in PSA (16) 084 - RTM error (17,6) 085 - ASM warm start problem (1,10,20) 087 - System removed from sysplex (normal situation) 088 - IPL: error in LOADxx or NUCLSTxx (18,4,6) 089 - NIP found an error in a UCB (6) 08A - WTO error going to wait state 08C - WLM has recurring error (6) 08E - SYSEVENT error (6) 08F - Failure rebuilding work queues (6) 09x - SPINLOOP problem (See Codes manual for more information) 0A1 - Excessive SPINLOOP unresolved (21) 0A2 - XCF encountered cross system problem 0A3 - Unable to join global GRS 0A4 - ETR problem 0A5 - HCD problem (remember: zPDT does not support dynamic reconfiguration) 0A7 - Insufficient ESQA or ECSA storage (11) 0B0 - Could not recognize IODF specified in LOADxx (18,1) 0B1 - LOADxx member problem (18,1) 0B2 - No devices in IODF (18, or you created a bad IODF) 0B3 - Incorrect information in IPL parameter 0B4 - UIM specified unidentified device number (22) 0E0 - SIGNAL failed during NIP (16) 0E1 - SIGP STOP failed because processor was not operational (16) 0E3 - Insufficient virtual storage to initialize CSA (4) 0E8 - During NIP, the machine check handler failed (6) 101 - Program in supervisor state requested too much SQA (6) 102 - Program in supervisor state requested more pages of SQA than available (6) 104 - While provessing ABEND SVC, program check occurred recursively (6) 110 - System detected hot I/O from device other than DASD (16; note MVS console messages) 111 - System detected hot I/O on DASD device (16, note MVS console messages) 112 - System detected hot I/O on reserved DASD (16, note MVS console messages) 113 - Failure during channel path recovery (16) 114 - Previous error affected SMP operation. See manual. 115 - DASD containing paging dataset is unavailable. (10) 116 - During restart, detected missing interrupt for paging device (16) 11A - Error during SVC 26 (6) 201 - Failure while creating COMMTASK (6) 202 - During system initialization, creation of console communications failed (6) 204 - Error during allocation (6) 205 - Attempted to load a module that was not in LINKST (6) 206 - Sysplex initialization operator message prompt 5C7 - Error during processor or system termination (6) A00 - DAT error for system address space (16,6) A01 - Error on only online processor (16) A18 - Unsolicited Device end on paging volume; AVR failed. (complex) A19 - Can no longer perform I/O (16) A1E - Time-of-day clock failed (16) 50 IBM System z Personal Development Tool: Volume 3 Additional Topics A1F - Processor controller not available; TOD sync cannot occur (16) A20 - System found page in FLPA that is not fixed (6) A21 - Segment table entry for MLPA, PLPA, FLPA, or xFLPA is incorrect (6) A22 - Error (probably hot I/O) invoked disabled console communication facility (see manual) A23 - Program check during machine check handling on only online processor (16) A24 - Loop while running machine check handler on only online processor (6,16) A26 - Machine check on only online processor; interruption code incorrect (16) A27 - Problems during machine check interruption handling A28 - DAT-off machine check handler cannot start DAT-on machine check handler (6,16) A29 - Problems stopping processor after program or machine check (6) A2A - System detected LPA page that is not on paging data set (6) A2B - Error in extended storage (16) A70 - Console unavailable during NIP (3) A71 - Reconfiguration problem (9; see codes manual) A7A - Service processor interface failed (16,9) B01-B1D Wait states used by the 3203/3211 utility B20-B24 Wait states used by the stand-alone IOCP program CCC - Wait state generated by QUISECE command D0D - SMF had resource shortage (too much SMF output requested? Memory too small?) E02 - Should never happen (16) EC7 - Severe error in Unix System Services (6) FFx - Non-IBM program created a wait state The suggested actions provided by the following notes assume you are using z/OS (probably the AD-CD system) in a normal manner. That is, we assume that: You have not modified the system. You are not working with authorized programs or code. You have not installed middleware that operates as authorized code. You are not actively disrupting the hosting Linux environment for zPDT. 1. Check that your devmap contains the necessary volumes and that they are at addresses supported by the IODF of your z/OS system. For example, with the AD system have your 3390 volumes addresses in the range A80 -AEF. Restart zPDT and try again. If necessary, verify your emulated 3390 volumes (using an alcckd xxxx -rs command.) 2. Verify that your IODF points to the correct volumes for SYSRES and the IODF volume. With the typical AD system these are addresses A80 and A82. Possibly these volumes are corrupted. Verify your emulated 3390 volumes (using an alcckd xxxx -rs command), restart zPDT and try to IPL again. 3. z/OS wants a NIP console. This is address 700 in existing AD systems. Be certain a 3270 session is connected to this address (or whatever NIP console address is specified for your z/OS system). Also be certain the Linux window you used to start zPDT is open, as this could provide an alternate, limited NIP console function in some cases. If a 3270 session at address 700 is available, try to IPL again. 4. Have you altered a working system? Changed key PROCLIB members? Changed the catalog line in the LOADxx member in SYS1IPLPARM? This is not recoverable. You must IPL another z/OS system (or restore volumes for this z/OS.) 5. Did you IPL the correct volume? Verify your devmap and try again. 6. Internal z/OS problem. Probably not your fault unless the volume is corrupted. Try IPLing z/OS again. You may need to IPL another z/OS system or restore volumes for this z/OS system. 7. Someone set a SLIP trap. This is probably a user-caused wait and whoever set the SLIP trap should know how to proceed. System can be restarted. 8. Typically a system error, but could be an error in a software product. Try IPLing z/OS again, possibly without starting recently installed middleware. Chapter 3. z/OS notes 51 9. You attempted a reconfiguration option that is not available for zPDT. 10.Possible devmap or PC disk error or emulated 3390 corruption error. Stop zPDT and verify 3390 emulated volume formats with alcckd xxxx -rs commands. 11.Have you defined enough memory for your System z? Try increasing the memory size in your devmap and restart zPDT. (Consult zPDT documentation to understand the maximum System z memory definition recommended for your configuration.) Most zPDT users run z/OS with at least 800 MB System z memory defined. 12.Did you IPL the correct volume? Has someone deleted data sets on this volume? Has someone deleted system data sets? 13.Check your devmap carefully. Are two 3390 definitions pointing to the same file? Verify that the 3390 devmap entries point to the correct Linux files. Fix your devmap and restart zPDT. 14.Has someone deleted members in any system libraries? This is probably not recoverable. You need to IPL another z/OS system and possibly repair this z/OS system. 15.You may have started a large program (such as WAS) and you do not have enough space in your paging data sets. You might add paging data sets. 16.Restart zPDT. If the error persists, contact the zPDT support team. 17.Probably due to bugs in a software product. Were you starting a new product when this happened? Not recoverable. ReIPL and try again. 18.Has anyone modified SYS1.IPLPARM? Are you using a new LOADxx member in this library? If so, the new member has an incorrect catalog line. IPL with a “standard” load parameter (to use a “standard” LOADxx member). 19.See the zPDT documentation for information about what facilities and functions are available through zPDT. If you are unable to resolve the problem, contact the zPDT support team. 20.Try a cold start (CLPA). 21.Try restarting zPDT with fewer processors defined in your devmap. Contact zPDT support if the problem persists with fewer devmap processors defined than you have real processors in your PC. 22.Check your devmap. Devmap and IODF must have compatible device addresses. Are you attempting to use an unsupported device? 52 IBM System z Personal Development Tool: Volume 3 Additional Topics 4 Chapter 4. z/VM notes z/VM 6.2 is available in an AD-CD format for authorized, licensed users of zPDT. For zPDT users with 1090 tokens a separate license agreement may be required. For users with 1091 tokens a separate priced feature may be required. Consult your zPDT supplier for additional information. The details in this chapter are based on an early version of the AD-CD z/VM 6.2 system and there may be minor differences in the final version of the system. Attention: This whole chapter has been rewritten. Text change bars were not used because there was no point in marking the whole chapter. © Copyright IBM Corp. 2009, 2013. All rights reserved. 53 4.1 Installing the AD-CD z/VM 6.2 system Eight 3390-3 volumes are used for the AD-CD z/VM 6.2 system. Depending on your zPDT supplier these might be downloaded or available on DVDs. The volumes are: M01RES 620RL1 620RL2 M01P01 M01S01 M01W01 VMCOM1 VMCOM2 As with other AD-CD System z volumes, these volumes are packaged as gzipped files and are expanded into usable form with a gunzip command. For example, $ gunzip -c m01res.gz > /z/M01RES This example assumes that the gz file is in the current Linux directory and the target directory for the volume is in the /z directory. These locations are arbitrary and you must adapt the commands to your situation. AD-CD distribution files often have lowercase names (m01res.gz). Our examples expand the files with uppercase names (M01RES), but this is not required. We do it to help distinguish emulated 3390 volumes in the directory. 4.1.1 1090 devmap We created a devmap named devmapvm that defines a minimal z/VM system. We normally used gedit or leafpad to edit devmaps but you may use any convenient editor. The devmapvm file is as follows: [system] memory 8000m 3270port 3270 processors 3 [manager] name aws3274 0002 device 0700 3279 3274 device 0701 3279 3274 device 0702 3279 3274 (We usually define at least 10 3270 sessions) [manager] name awsckd 0101 device 0200 3390 3990 /z/M01RES device 0201 3390 3990 /z/620RL1 device 0202 3390 3990 /z/620RL2 device 0203 3390 3990 /z/M01W01 device 0204 3390 3990 /z/M01S01 device 0205 3390 3990 /z/M01P01 device 0206 3390 3990 /z/VMCOM1 (You need the address of VMCOM1 later) device 0207 3390 3990 /z/VMCOM2 (Other disks, LAN interfaces, tape drives might also be defined) The addresses (disks at 0200, for example) are quite arbitrary, but we use these addresses in all our examples. We placed the local 3270 terminals at 700 because we want to use an expanded version of this devmap with both z/OS, z/VM, and z/OS under z/VM. 54 IBM System z Personal Development Tool: Volume 3 Additional Topics 4.2 IPL and logon We used the following zPDT command to IPL this system: $ ipl 200 parm 0700 The 0700 is the address of a 3270 terminal. The initial IPL may produce the stand-alone loader panel shown in Figure 4-1 or it may go directly to the OPERATOR session, depending on z/VM customization. If the stand-alone loader panel is displayed, the IPL parameters (shown in Figure 4-1) may need to be changed. The pdvol parameter must point to the address of the VMCOM1 volume and the cons parameter is the address of a local 3270. STAND ALONE PROGRAM LOADER: z/VM VERSION 6 RELEASE 1.0 DEVICE NUMBER: 0200 MINIDISK OFFSET: 00000000 EXTENT: 1 MODULE NAME: CPLOAD LOAD ORIGIN: 1000 --------------------------------IPL PARAMETERS-------------------------------fn=SYSTEM ft=CONFIG pdnum=1 pdvol=0206 cons=0700 -----------------------------------COMMENTS----------------------------------9= FILELIST 10= LOAD 11= TOGGLE EXTENT/OFFSET Figure 4-1 Stand Alone loader After changing any Stand Alone loader IPL parameters, press PF10 to load z/VM. The local 3270 you specified (0700) is automatically logged on as user OPERATOR. The initial panel should look something like Figure 4-2 on page 56. Note: The standard z/VM 6.2 contains slightly different IPL parameters. We changed these by logging onto MAINT620 and entering the following command: SALIPL 123 (EXTENT 1 IPLPARMS fn=SYSTEM ft=CONFIG pdnum=1 pdvol=0206 cons=0700 This command changed the default IPL parameters (in the Stand Alone loader) to the values indicated.1 User MAINT cannot be logged on when using this command. 1 Thanks to Bruce Hayden for helping with this. Chapter 4. z/VM notes 55 10:13:24 z/VM V6 R2.0 SERVICE LEVEL 1201 (64-BIT) 10:13:24 SYSTEM NUCLEUS CREATED ON 2012-09-29 AT 23:55:42, LOADED FROM M01RES 10:13:24 10:13:24 **************************************************************** 10:13:24 * LICENSED MATERIALS - PROPERTY OF IBM* * 10:13:24 * * 10:13:24 * 5741-A07 (C) COPYRIGHT IBM CORP. 1983, 2011. ALL RIGHTS * 10:13:24 * RESERVED. US GOVERNMENT USERS RESTRICTED RIGHTS - USE, * 10:13:24 * DUPLICATION OR DISCLOSURE RESTRICTED BY GSA ADP SCHEDULE * 10:13:24 * CONTRACT WITH IBM CORP. * 10:13:24 * * 10:13:24 * * TRADEMARK OF INTERNATIONAL BUSINESS MACHINES. * 10:13:24 **************************************************************** 10:13:24 10:13:24 **************************************************************** 10:13:24 * IBM z/VM Single System Image Feature is enabled and active. 10:13:24 **************************************************************** 10:13:24 10:13:24 HCPZCO6718I Using parm disk 1 on volume VMCOM1 (device 0206). 10:13:24 HCPZCO6718I Parm disk resides on cylinders 1 through 120. 10:13:24 HCPMLM3016I Management by the Unified Resource Manager is not available for this system. 10:13:24 The directory on volume M01RES at address 0200 has been brought online. 10:13:25 HCPWRS2513I 10:13:25 HCPWRS2513I Spool files available 50 10:13:25 HCPWRS2512I Spooling initialization is complete. 10:13:25 DASD 0204 dump unit CP IPL pages 36364 10:13:29 HCPAAU2700I System gateway SSI1 identified. 10:13:29 HCPNET3010I Virtual machine network device configuration changes are pe rmitted 10:13:29 HCPPLM1697I The state of SSI system SSI1 has changed from DOWN to JOINE D 10:13:29 HCPPLM1698I The mode of the SSI cluster is STABLE 10:13:29 z/VM Version 6 Release 2.0, Service Level 1201 (64-bit), 10:13:29 built on IBM Virtualization Technology 10:13:29 There is no logmsg data 10:13:29 FILES: 0005 RDR, NO PRT, NO PUN 10:13:29 LOGON AT 10:13:29 EST TUESDAY 03/05/13 10:13:29 GRAF 0700 LOGON AS OPERATOR USERS = 1 10:13:29 HCPIOP952I 10000M system storage 10:13:29 FILES: 0000021 RDR, 0000001 PRT, NO PUN MORE... SSI1 Figure 4-2 Initial OPERATOR display The MORE... at the bottom of the panel indicates that you should clear the panel.2 You may need to clear it several times until all the initial OPERATOR messages are displayed. At this point you should have the z/VM logon display on any other active 3270 sessions, as shown in Figure 4-3 on page 57.3 If the logon display is not present, try entering an ENABLE ALL command in the OPERATOR session. 2 3 56 zPDT users of x3270 often set the PAUSE key to perform a 3270 clear operation. If this is not done, then Alt-c may perform the clear function with some emulator setups. Your display might not have the zPDT Parallel Sysplex Base notation. See the SG24-7859 document for more information about the zPDT Parallel Sysplex starter system. IBM System z Personal Development Tool: Volume 3 Additional Topics z/VM ONLINE / VV VVV MM MM VV VVV MMM MMM ZZZZZZ / VV VVV MMMM MMMM ZZ / VV VVV MM MM MM MM ZZ / VV VVV MM MMM MM ZZ / VVVVV MM M MM ZZ / VVV MM MM ZZZZZZ / V MM MM / zPDT Parallel Sysplex Base built on IBM Virtualization Technology Fill in your USERID and PASSWORD and press ENTER (Your password will not appear when you type it) USERID ===> PASSWORD ===> COMMAND ===> RUNNING SSI1 Figure 4-3 z/VM logon display The z/VM logon panel is commonly used in two ways. The most basic way is to enter a z/VM userid and password. An alternate usage is to enter DIAL xxxx in the command line, where xxxx is the name of a running z/VM guest that accepts 3270 connections. No userid or password is needed when using a DIAL command. You can disconnect from the OPERATOR session by entering a DISC command. This is not the same as logging off from the session. A disconnected session continues to run, but without the terminal. You can log back into the session. For the operator session, the userid is OPERATOR and the password is OPERATOR. Many z/VM userids initially have their password the same as the userid. Once your system is installed you can change these to more secure passwords, if that is a concern. Shutdown To stop z/VM issue the SHUTDOWN command in the OPERATOR session or in another session that has sufficient privileges. Attention: The remainder of this chapter is for almost-new z/VM users. We make no attempt to provide a z/VM primer or to cover many details. The following material can be regarded as “reminders” for some of the more basic details. Chapter 4. z/VM notes 57 4.3 CMS CMS is the Conversational Monitor System. It is a small, single-user operating system. Every user running CMS is running a separate CMS in a separate virtual machine.4 CMS is a special-case operating system that runs only under z/VM. z/VM administration is done through CMS. The READY prompts you see on the windows are indicators that CMS is running in a virtual machine. It is possible to use CMS for application development and as a base for user applications. This usage is not described here. Nevertheless, basic CMS usage is required for almost any administrative activity for a z/VM system. Once z/VM is IPLed and you log on to a userid, you need to IPL CMS within that userid (assuming you want to use CMS). This CMS IPL can be automatic (when you log on to the userid) or it can be done manually with an IPL CMS or IPL 190 command. The automatic IPL is enabled by a line in the z/VM directory entry for the userid. A RUNNING indicator in the lower right corner of the 3270 panel is an indicator that CMS is running. Each CMS user has his/her own copy of CMS; it is a single-user operating system. (In practice, there is a single copy of CMS in shared virtual memory.) CMS has a large set of functions and commands. The basic z/VM Control Program (CP) also has a large set of commands. In general, both sets of commands can be entered on the CMS command line. In a few cases, CP commands must be prefixed by the letters CP or #CP followed by a space and then the command. When you log onto z/VM, your virtual machine is in one of three environments: It has IPLed CMS and you may enter CMS and CP commands. It has IPLed another operating system, such as z/OS, and is under the control of that operating system. It has not IPLed anything. Only CP commands may be entered. When using CMS (or interacting directly with CP, if CMS has not been started) the 3270 session is in a pseudo-3215 mode. This is a typewriter-like interface, with a command line at the bottom of the panel. Some CMS functions, such as XEDIT, provide a full-panel interface similar to IPSF. 4.3.1 User MAINT z/VM has a predefined userid, MAINT (password MAINT). Most basic z/VM administration is performed while using this userid and working through CMS.5 Logging onto MAINT should produce the window shown in Figure 4-4 on page 59. 4 5 58 Actually, only one copy of CMS exists. It uses shared virtual memory so that it appears to exist in the virtual memory of each user who IPLs CMS. Starting with z/VM 6.2 some administration is done through userid MAINT620. IBM System z Personal Development Tool: Volume 3 Additional Topics LOGON MAINT z/VM Version 6 Release 2.0, Service Level 1201 (64-bit), built on IBM Virtualization Technology There is no logmsg data FILES: 0013 RDR, NO PRT, NO PUN LOGON AT 10:15:22 EST TUESDAY 03/05/13 z/VM V6.2.0 2012-09-29 23:41 DMSACP723I B (5E5) R/O DMSACP723I D (51D) R/O DMSACP723I E (551) R/O ****************************************************************** THE MAINT620 USER ID **MUST** BE USED INSTEAD OF MAINT WHEN INSTALLING SERVICE. ****************************************************************** PRESS ENTER TO CONTINUE Ready; T=0.03/0.06 10:15:42 RUNNING SSI1 Figure 4-4 Logon to MAINT In a large production operation, MAINT would be used sparingly.6 In our small sandbox z/VM systems, we use MAINT frequently. Among other things, MAINT can edit the z/VM directory and activate a new copy. The directory is where z/VM users are defined, along with details of each user’s virtual machine. An example of directory updating is presented later. Note that the terms z/VM users, userids, and virtual machines are used interchangeably. 4.4 Minidisks and files z/VM works with three types of disk volumes: CP-owned volumes. These contain the minidisks needed to run z/VM, or contain paging space, spool space, or temporary space. They may also contain user minidisks. User-owned volumes. These typically contain minidisks but not those used by the operating system. Other disks. These can be used as standard (non z/VM) volumes or as whole-pack minidisks. The z/OS volumes we sometimes use under z/VM are normally defined as whole-pack minidisks. The whole-volume minidisk concept is needed for sharing volumes among multiple z/VM virtual machines, such as multiple z/OS systems. 6 MAINT is quite similar to IBMUSER in an initial z/OS installation and is somewhat like root in a Linux system. These user IDs have all the necessary authority to further customize and manage the systems. In production operations, various authorities are delegated to other user IDs, and the MAINT and IBMUSER IDs are seldom used. In small sandbox systems, MAINT, IBMUSER, and root are often directly used, even when not strictly necessary. Chapter 4. z/VM notes 59 A minidisk is a contiguous range of 3390 cylinders7 that is seen by a z/VM user as a complete disk volume (typically with a small number of cylinders). There are three common formats for a minidisk: CMS, which includes all the z/VM control files and user files z/OS, which includes a label, VTOC, and the usual z/OS types of data sets Linux for System z A minidisk is created by defining it in the z/VM directory. You are responsible for formatting your own minidisks. For CMS this is done with a format 191 a command, for example. For z/OS, the ICKDSF utility is used. A minidisk has a virtual address, such as 190, that is assigned in the z/VM directory. Some minidisk addresses have predefined or conventional meanings. For example, address 190 contains many CMS modules (and is read-only for most users). Most CMS users have a 191 minidisk, which is their default CMS work disk. There are other well-known minidisk addresses used by multiple users. Otherwise, a minidisk address is simply a hexadecimal number (usually three digits) that you select. To access a minidisk under CMS, an access mode letter must be established. For example, if you have minidisk 456 defined in your directory entry, you might enter the CMS command acc 456 z to access the minidisk as the z disk. Your 191 disk (which is almost always defined for a CMS user) is your default “a” disk. For some functions, your minidisks are searched in order, a, b, c, and so forth. The mode letter (the “disk letter”) is not a fixed value. You might use acc 456 r the next time you log on and access your 456 minidisk as your “r” disk. A CMS user identifies a file with three qualifiers: a file name, a file type, and a mode (which is usually just the drive letter for the minidisk containing the file). MYDATA TEXT A1 | | | | | +---File mode (fm) (The notation fn, ft, fm is common) | +--------File type (ft) +---------------File name (fn) The first part of the name (MYDATA) is completely arbitrary and should be meaningful to you. The second part (TEXT) can be arbitrary, but some applications attach meaning to this part of a file name. For example, if the second part of the name is EXEC, it is assumed to contain commands for a command interpreter such as REXX. The third part (A1) has a disk letter (A) and might have a file mode number (1 in the example here) that can be: 0 - This makes the file private. Other users with read-only access to your minidisk will not see this file. Users with read-write access will see it. 1 - This is the default file mode number for read-write files. 2 and 5- These function like number 1 and can be used to subset files. 3 - Files with this number are automatically erased when they are read. 4 - These files are in a simulated MVS format (not used in any of our examples). 6 - This indicates the file should be updated in place, with appropriate programming. For practical purposes, you can omit the mode number and let it default to 1. This is suitable for almost all purposes. 7 60 Geometry other than 3390 can be used, but 3390s are the most common. IBM System z Personal Development Tool: Volume 3 Additional Topics 4.4.1 Inspecting your disks Assuming you are logged onto z/VM as MAINT or as another userid, you can use q da all and q disk commands as shown in Figure 4-5. q da all DASD 0200 CP OWNED M01RES 90 DASD 0201 CP SYSTEM 620RL1 12 DASD 0202 CP SYSTEM 620RL2 5 DASD 0203 CP SYSTEM M01W01 11 DASD 0204 CP OWNED M01S01 1 DASD 0205 CP OWNED M01P01 0 DASD 0206 CP OWNED VMCOM1 13 DASD 0207 CP SYSTEM VMCOM2 3 DASD 0A80 HDRES1 , DASD 0A81 HDRES2 DASD 0A84 HDUSS2 , DASD 0A85 HDPRD1 DASD 0A90 HDPAGA , DASD 0A91 HDPAGB DASD 0A94 HDSYS2 , DASD 0A95 WORK01 An offline DASD was not found. Ready; T=0.01/0.01 10:19:15 q disk LABEL VDEV M STAT CYL TYPE BLKSZ MNT191 191 A R/W 175 3390 4096 MNT5E5 5E5 B R/O 18 3390 4096 MNT2CC 2CC C R/W 10 3390 4096 MNT51D 51D D R/O 26 3390 4096 PMT551 551 E R/O 40 3390 4096 MNT190 190 S R/O 207 3390 4096 MNT19E 19E Y/S R/O 500 3390 4096 Ready; T=0.01/0.01 10:19:19 , , , , DASD DASD DASD DASD FILES 5 131 3 305 7 694 1125 0A82 0A86 0A92 0A9C HDSYS1 HDPRD2 HDPAGY SARES1 , , , , DASD DASD DASD DASD 0A83 0A87 0A93 0A9F BLKS USED-(%) BLKS LEFT 21-01 31479 1265-39 1975 110-06 1690 1763-38 2917 92-01 7108 17493-47 19767 29764-33 60236 RUNNING HDUSS1 HDPRD3 HDPAGZ CF0001 BLK TOTAL 31500 3240 1800 4680 7200 37260 90000 SSI1 Figure 4-5 Inspecting the disks The q dasd all command displays all the physical DASD volumes connected to z/VM. If they are in a z/VM format, more information is displayed. In the example here, volumes at addresses 200-207 are in formats recognized by z/VM. Volumes at addresses A80-A9F have standard labels but are not in z/VM formats. The q disk command displays this user’s minidisks. In this example, the user is MAINT and he owns the seven minidisks listed. A minidisk label (MNT191 for the first minidisk) is not important, but might be meaningful to the user. The VDEV value is the address of the minidisk. The mode letters (A, B, C, D, E, S, S=Y/S) were probably established by the user PROFILE file that is automatically executed when the user logs onto the system. The meanings of the other fields are fairly obvious. The CP-owned disks contain a mixture of paging space, temporary disk space (TDISK), spool space, directory space (DRCT), minidisks, and unused space. The q alloc all and q alloc map commands can display this information, as in Figure 4-6 on page 62. Chapter 4. z/VM notes 61 Ready; T=0.01/0.01 10:21:44 q alloc all DASD 0200 M01RES 3390 CKD-ECKD (UNITS IN CYLINDERS) TDISK TOTAL=00000000000 INUSE=00000000000 AVAIL=00000000000 PAGE TOTAL=00000000000 INUSE=00000000000 AVAIL=00000000000 SPOOL TOTAL=00000000000 INUSE=00000000000 AVAIL=00000000000 DRCT TOTAL=00000000020 INUSE=00000000001 AVAIL=00000000019, ACTIVE DASD 0206 VMCOM1 3390 CKD-ECKD (UNITS IN CYLINDERS) TDISK TOTAL=00000000000 INUSE=00000000000 AVAIL=00000000000 PAGE TOTAL=00000000000 INUSE=00000000000 AVAIL=00000000000 SPOOL TOTAL=00000000000 INUSE=00000000000 AVAIL=00000000000 DRCT TOTAL=00000000000 INUSE=00000000000 AVAIL=00000000000 DASD 0204 M01S01 3390 CKD-ECKD (UNITS IN CYLINDERS) TDISK TOTAL=00000000000 INUSE=00000000000 AVAIL=00000000000 PAGE TOTAL=00000000000 INUSE=00000000000 AVAIL=00000000000 SPOOL TOTAL=00000003337 INUSE=00000000259 AVAIL=00000003078 DRCT TOTAL=00000000000 INUSE=00000000000 AVAIL=00000000000 DASD 0205 M01P01 3390 CKD-ECKD (UNITS IN CYLINDERS) TDISK TOTAL=00000000000 INUSE=00000000000 AVAIL=00000000000 PAGE TOTAL=00000003337 INUSE=00000000001 AVAIL=00000003336 SPOOL TOTAL=00000000000 INUSE=00000000000 AVAIL=00000000000 DRCT TOTAL=00000000000 INUSE=00000000000 AVAIL=00000000000 IPL NUCLEUS ACTIVE ON VOLUME M01RES Ready; T=0.01/0.01 10:21:50 q alloc map EXTENT EXTENT % ALLOCATION VOLID RDEV START END TOTAL IN USE HIGH USED TYPE ------ ---- ---------- ---------- ------ ------ ------ ---- ------------M01RES 0200 1 20 20 1 1 5% DRCT ACTIVE M01S01 0204 1 3337 600660 45962 63367 7% SPOOL M01P01 0205 1 3337 600660 1 10 1% PAGE Ready; T=0.01/0.01 10:22:27 RUNNING SSI1 Figure 4-6 CP-owned disks You can list the files on a minidisk with a command such as filelist * * a. This example says to list all file names (first asterisk) and all file types (second asterisk) on the minidisk currently accessed as drive a. An example is shown in Figure 4-7. MAINT FILELIST A0 V 169 Trunc=169 Size=5 Line=1 Col=1 Alt=0 Cmd Filename Filetype Fm Format Lrecl Records Blocks Date Time x USER DISKMAP A1 F 100 360 9 2/26/13 9:13:57 SETUP $LINKS A1 V 26 33 1 9/27/12 17:09:13 PROFILE EXEC A1 V 72 32 1 9/23/11 12:38:14 SYN SYNONYM A1 F 80 1 1 1/15/03 9:46:33 PROFILE XEDIT A1 V 45 17 1 11/18/98 12:26:20 1= Help 7= Backward 2= Refresh 3= Quit 4= Sort(type) 5= Sort(date) 6= Sort(size) 8= Forward 9= FL /n 10= 11= XEDIT/LIST 12= Cursor ====> X E D I T Figure 4-7 FILELIST command 62 IBM System z Personal Development Tool: Volume 3 Additional Topics 1 File The output from filelist is in a full-panel format that can be scrolled with PF8 and PF7. PF3 is used to exit from the command. This format is very useful because CMS commands can be entered in the first column of a line and the file named in that line becomes the operand of the CMS command. Two common commands are browse and x (or xedit). When a new CMS disk exists (perhaps with a new z/VM userid), it must be formatted for CMS use. Assuming the new disk is my 191 disk (the default “A” disk for a CMS user). At my first logon I could use this dialog: ipl CMS (if not automatically IPLed at logon) format 191 a Format will erse all files on disk A (191). Do you wish to continue? Enter 1 (YES) or 0 (NO). 1 Enter disk label: Bill91 (the label is arbitrary; 6 characters) FOrmatting disk A 10 cylinders formatted on A (191) Another user’s minidisk You might want to access another user’s minidisk, assuming it is not password protected. If user JOE has minidisk 456 defined, you might do the following: link joe 456 456 acc 456 j filelist * * j (link to joe’s 456 as my own 456) (access it as my j disk) (see what files are on the minidisk) There are two minor problems with this method. What if I already have a minidisk defined at address 456?8 What if I am already using file mode j? Another method is: vmlink joe 456 (use the vmlink command instead) DMSVML2060I JOE 456 linked as 0120 file mode z Ready filelist * * z In this case z/VM selected an unused address (0120) and an unused file mode (z) for you. When you are finished with JOE’s 456 minidisk you can: rel z det 120 (free file mode z) (detach the address, using the address I see) 4.4.2 XEDIT XEDIT is the normal CMS editor. Most z/VM administration and customization is done by editing CMS files. New z/VM users who are familiar with ISPF will find XEDIT easy to use once a few differences are mastered. You can create new CMS files with XEDIT simply by naming it. For example, x newfile stuff a will create a new file named newfile stuff and place it on your “a” disk (assuming you save the file before exiting from XEDIT). Important XEDIT commands (on the command line) are: file - Save the current file qquit - Exit without saving the current file /xxx/ - locate the next line containing characters xxx +nn - Scroll forward nn lines 8 You could use a different address, such as LINK JOE 456 789, but you then need to determine whether you already have a 789 disk. This is a trivial problem for most users, who have very few minidisks defined, but it could be a significant problem for a complex user. Chapter 4. z/VM notes 63 -nn - Scroll backward nn lines top - Scroll to beginning of the file bottom - Scroll to the end of the file nulls on or nulls off - Select 3270 nulls/blanks usage The default PF key definitions include the following: PF1 - Help PF2 - Insert a blank line after the line with the cursor PF3 - Quit (if no changes were made); exit from Help function PF4 - Tab to columns 5, 10, 15, and so forth PF7 - Scroll backward PF8 - Scroll forward PF9 - Split or Join, depending on the cursor location PF10 - Scroll right 10 columns PF11 - Scroll left 10 columns PF12 - Issue a file command A few of the XEDIT line commands (overtyping the ===== field on the window) are: d or dnn - delete one or nn lines i or inn - insert one or nn lines “ or “nn - (double quite marks) repeat the line one or nn times dd followed by dd in a later line - delete the indicated block of lines cc followed by cc in a later line - copy the indicated block. The target is noted with p (prior to this line) or f (following this line). “” followed by “” in another line - (two double quotes) repeat the indicated block of lines XEDIT has many more commands and facilities than mentioned here, but these few commands may be sufficient for initial use. 4.5 z/VM directory z/VM users and minidisks are defined in the z/VM directory. There are two forms of the directory: the source file9 and the active directory. A special command reads the source file and creates (or updates) the active directory. Changing the source directory has no effect until the command is executed to create a new active directory. If you log on as MAINT, you can access the source directory with one of these commands: browse user direct c x user direct c (browse it) (edit it)) If you review Figure 4-5 on page 61 you will note that MAINT’s “C” drive is his minidisk 2CC. z/VM offers the DIRMAINT tool that should be used for large z/VM systems with many complex directory entries. For very small z/VM systems, such as a sandbox zPDT system, we can “manually” work with the directory. We suggest you browse the directory on your z/VM system to obtain a general look at it. The directory for z/VM 6.2 is more complex than in earlier z/VM releases. A quick look includes the following: The PROFILE stanzas define lines that may be included in user definitions by using an INCLUDE statement. Skip over sections such as USER $DIRECT$ NOLOG. These help produce a clean disk map. 9 64 There could be multiple source files, but we ignore this detail here. IBM System z Personal Development Tool: Volume 3 Additional Topics The first real user definition is for MAINT. The first line of this section begins with the keyword IDENTITY. This is a new keyword that is significant for multiple linked z/VM systems (new with release 6.2). In a simple environment, the IDENTITY statement is equivalent to a USER statement. Ignore the SUBCONFIG statements, but observe that many statements are “commented out” by an asterisk in the first column. LINK statements refer to a minidisk owned by another user. For example, in MAINT’s directory definitions: LINK PMAINT 2CC 2CC MR means that the minidisk at address 2CC in user PMAINT’s definitions is used at address 2CC in this user’s virtual machine. A simple user definition might be added as shown in Figure 4-8 (these lines would be added to the directory between two existing user entries, or at the end). * *************************************************** * * USER BILL IS TO DEMONSTRATE A SIMPLE VM USERID * USER BILL W2WO 128M 128M G MACH ESA CPU 0 IPL 190 SPOOL 00C 2540 READER * SPOOL 00D 1403 A CONSOLE 009 3215 T LINK MAINT 0190 0190 RR LINK MAINT 019D 019D RR LINK MAINT 019E 019E RR LINK TCPMAINT 592 592 RR MDISK 191 3390 1667 10 VMCOM2 MR * *************************************************** Figure 4-8 Simple user definition In this example, the userid is BILL and the password is W2WO. The virtual machine is 128 MB, which is more than ample for CMS. The IPL statement causes an automatic IPL of CMS when user BILL logs onto z/VM. The SPOOL statements are probably not used for simple situations but are traditional. A console is needed and 009 is a traditional address. The LINK statements point to other users’ minidisks (all in read-only mode). The MDISK statement defines a new minidisk at BILL’s address 191. (This is the traditional address for the “A” disk.) This statement notes that the device is a 3390 with volser VMCOM2, with the minidisk starting on cylinder 1667 and it is 10 cylinders long. The MR operand specifies basic read/write access. How was the cylinder number (1667) obtained? A command is used to map all the minidisks defined in the directory; new minidisks then can be defined on free cylinders. (On a larger, production z/VM system all this is usually done by the DIRMAINT program.) The following command (run by MAINT) runs the diskmap program against the file user direct c, which is the directory source file: diskmap user direct c Chapter 4. z/VM notes 65 The output of the program is the file user diskmap a. This may be browsed, as follows: browse user diskmap a Inspecting this output, we found that volume VMCOM2 had no minidisks defined after cylinder 1666. We added the MDISK statement for user BILL and ran the mapdisk program again, as seen in Figure 4-9 on page 67. Note the last line of the output, which verifies that we placed BILL’s 191 minidisk where we wanted it. After updating the user direct c file, activate this new directory; this builds a new working directory for z/VM. The command is: directxa user direct c Be certain to look for any error messages. Attempting to manage absolute cylinder addresses and ranges when defining minidisks can appear messy and crude. It is. This is why higher-level tools such as DIRMAINT exist. However, using these tools requires additional skills. A very small z/VM, with only a few simple added users, can be readily managed by directly editing the z/VM directory. A few guidelines include: Do not change the minidisk definitions (or paging, spooling, temporary disk space, or directory space) for the system volumes, with the exception that you can add a few small minidisks in empty space on volumes such as VMCOM2. Use the diskmap program frequently and look for overlap or gap flags. Incorrect cylinder specifications can overlap two minidisks, usually resulting in corruption of both. Never allocate a minidisk on cylinder zero. (This restriction does not apply to full-volume minidisks.) Another document in this zPDT series of documents (Volume 4: Coupling and Parallel Sysplex, SG24-7859) contains examples of userids and full-volume minidisks suitable for running z/OS under z/VM. 66 IBM System z Personal Development Tool: Volume 3 Additional Topics USER ===> VOLUME VMCOM2 DISKMAP A1 F 100 9BLK 13/02/26 213/360 BROWSE USERID $ALLOC$ VMSERVP 6VMLEN20 6VMLEN20 6VMLEN20 4OSASF40 4OSASF40 6VMDIR20 6VMDIR20 6VMDIR20 6VMDIR20 6VMDIR20 6VMDIR20 6VMDIR20 6VMDIR20 6VMDIR20 6VMDIR20 6VMDIR20 6VMDIR20 DIRMAINT DIRMAINT DIRMAINT DIRMAINT DIRMAINT DIRMAINT DIRMAINT DIRMAINT DIRMAINT DIRMAINT 5684042J 5684042J 5684042J 5684042J 5684042J 5684042J 5684042J 5684042J BILL CUU A01 311 4D2 49E 49B 2D2 300 191 2B2 2C2 2C4 2D2 29D 29E 2B1 491 492 41F 11F 1AA 1FA 1DE 2AA 155 1DF 1DB 2DF 2DB 15D 191 2A2 2A6 2B2 2C2 2D2 29D 29E 191 DEVTYPE 3390 3390 3390 3390 3390 3390 3390 3390 3390 3390 3390 3390 3390 3390 3390 3390 3390 3390 3390 3390 3390 3390 3390 3390 3390 3390 3390 3390 3390 3390 3390 3390 3390 3390 3390 3390 3390 3390 START 00000 00001 00401 00501 00751 01151 01301 01324 01333 01346 01348 01349 01399 01408 01409 01419 01449 01464 01480 01488 01497 01509 01529 01538 01550 01562 01574 01586 01598 01607 01616 01618 01620 01628 01630 01650 01652 01667 END 00000 00400 00500 00750 01150 01300 01323 01332 01345 01347 01348 01398 01407 01408 01418 01448 01463 01479 01487 01496 01508 01528 01537 01549 01561 01573 01585 01597 01606 01615 01617 01619 01627 01629 01649 01651 01666 01676 SIZE 00001 00400 00100 00250 00400 00150 00023 00009 00013 00002 00001 00050 00009 00001 00010 00030 00015 00016 00008 00009 00012 00020 00009 00012 00012 00012 00012 00012 00009 00009 00002 00002 00008 00002 00020 00002 00015 00010 Figure 4-9 Mapdisk output 4.6 Spool contents z/VM can emulate card reader, line printer, and card punches for users. While the equivalent “real” devices are no longer used, these virtual devices can be useful. In general, simple usage of z/VM as a base for running multiple z/OS guests will not involve these devices. However, various internal z/VM services (such as TCP/IP) write logs to the virtual printer or send messages and logs as input to the virtual card reader. You may want to review this information. In the fullness of time (probably a long time), these could fill the spool space provided with the distributed z/VM 6.2 system. Chapter 4. z/VM notes 67 One way to view the contents of the virtual card reader and printer queue is with the commands: q rdr q prt q pun (although there are seldom any virtual punch files) with output similar to that shown in Figure 4-10. Ready; T=0.03/0.08 10:27:04 q rdr OWNERID FILE CLASS RECORDS MAINT 0027 T CON 00000022 PMAINT 0005 T CON 00000075 MAINT 0022 T CON 00000020 MAINT 0019 T CON 00000078 MAINT 0020 T CON 00000048 MAINT 0021 T CON 00000048 OPERATOR 0020 T CON 00000122 OPERATOR 0024 T CON 00000103 MAINT 0028 T CON 00000048 MAINT 0029 T CON 00000048 OPERATOR 0023 T CON 00000106 MAINT 0025 T CON 00000038 MAINT 0026 T CON 00000038 OPERATOR 0022 T CON 00000079 MAINT 0023 T CON 00000038 MAINT 0024 T CON 00000038 OPERATOR 0021 T CON 00000097 MAINT 0030 T CON 00000053 MAINT 0031 T CON 00000053 OPERATNS 0001 D SYS 00000000 OPERATNS 0002 D SYS 00000000 Ready; T=0.01/0.01 10:27:08 q prt OWNERID FILE CLASS RECORDS OPERATOR 0025 T CON 00000077 DTCVSW1 0018 T CON 00000038 DTCVSW2 0018 T CON 00000038 MAINT 0032 T CON 00000123 Ready; T=0.01/0.01 10:27:14 CPY 001 001 001 001 001 001 001 001 001 001 001 001 001 001 001 001 001 001 001 001 001 HOLD NONE NONE NONE NONE NONE NONE NONE NONE NONE NONE NONE NONE NONE NONE NONE NONE NONE NONE NONE NONE NONE USERFORM STANDARD STANDARD STANDARD STANDARD STANDARD STANDARD STANDARD STANDARD STANDARD STANDARD STANDARD STANDARD STANDARD STANDARD STANDARD STANDARD STANDARD STANDARD STANDARD OPERFORM STANDARD STANDARD STANDARD STANDARD STANDARD STANDARD STANDARD STANDARD STANDARD STANDARD STANDARD STANDARD STANDARD STANDARD STANDARD STANDARD STANDARD STANDARD STANDARD DEST OFF OFF OFF OFF OFF OFF OFF OFF OFF OFF OFF OFF OFF OFF OFF OFF OFF OFF OFF KEEP OFF OFF OFF OFF OFF OFF OFF OFF OFF OFF OFF OFF OFF OFF OFF OFF OFF OFF OFF OFF OFF MSG OFF OFF OFF OFF OFF OFF OFF OFF OFF OFF OFF OFF OFF OFF OFF OFF OFF OFF OFF OFF OFF CPY 001 001 001 001 HOLD NONE NONE NONE NONE USERFORM STANDARD STANDARD STANDARD STANDARD OPERFORM STANDARD STANDARD STANDARD STANDARD DEST OFF OFF OFF OFF KEEP OFF OFF OFF OFF MSG OFF OFF OFF OFF RUNNING SSI1 Figure 4-10 Spooled files The first column indicates the z/VM userid that owns the file. You can list the spooled rdr files that you own with the rdrlist command, as shown in Figure 4-11 on page 69. 68 IBM System z Personal Development Tool: Volume 3 Additional Topics MAINT RDRLIST A0 V 164 Cmd Filename Filetype Class * (none) (none) CON T (none) (none) CON T discardnone) (none) CON T = (none) (none) CON T = (none) (none) CON T = (none) (none) CON T (none) (none) CON T (none) (none) CON T (none) (none) CON T (none) (none) CON T (none) (none) CON T (none) (none) CON T (none) (none) CON T 1= Help 2= Refresh 7= Backward 8= Forward Trunc=164 Size=13 User at Node DTCVSW1 SSI1 DTCVSW2 SSI1 MAINT SSI1 DTCVSW1 SSI1 DTCVSW2 SSI1 MAINT SSI1 DTCVSW2 SSI1 DTCVSW1 SSI1 DTCVSW2 SSI1 DTCVSW1 SSI1 MAINT SSI1 DTCVSW2 SSI1 DTCVSW1 SSI1 3= Quit 9= Receive Line=1 Col=1 Alt=2 Hold Records Date NONE 48 2/26 NONE 48 2/26 NONE 78 2/26 NONE 38 2/28 NONE 38 2/28 NONE 20 2/28 NONE 38 2/28 NONE 38 2/28 NONE 48 2/28 NONE 48 2/28 NONE 22 3/01 NONE 53 3/02 NONE 53 3/02 Time 8:49:33 8:49:33 8:50:17 9:22:37 9:22:37 10:33:32 13:44:20 13:44:20 13:48:54 13:48:54 9:16:02 12:29:22 12:29:22 4= Sort(type) 5= Sort(date) 6= Sort(user) 10= 11= Peek 12= Cursor ====> X E D I T 1 File Figure 4-11 Display from the rdrlist command The rdrlist display is quite useful. By moving the cursor to one of the lines and pressing PF11 you can peek (view) the contents of the file. You can discard files by using the discard line command; entering equal signs on other lines indicates they are to have the same treatment as the command (the discard command in this case). Unfortunately, there is no equivalent prtlist command. You can transfer a spool file from another owner to your own rdr, where you can view (peek) it and/or discard it. For example: cp transfer operator rdr 20 to * rdr would transfer OPERATOR’s reader file number 20 (the file number from the q rdr command) to the current (asterisk) user’s reader. On a larger scale, the following commands may be used by an authorized user (such as MAINT) to purge many or all spooled files: purge purge purge purge purge purge <userid> rdr >file number> <userid> rdr ALL <userid> prt <file number> <userid> prt ALL system rdr ALL system prt ALL (purge (purge (purge (purge (purge (purge a specific rdr spool file) all the user’s rdr files) a specific prt spool file) all the user’s prt files) all the rdr files in spool) all the prt files in spool) The <userid> may be an asterisk, in which case the command applies to the current user. The <file number> is usually taken from the q rdr or q prt commands. 4.7 Simple system queries A number of simple query, display, and access commands may be useful: q disk - list your minidisks. Chapter 4. z/VM notes 69 q q q q q q q q q q q q da all - list the “real” online disks. alloc all - list page, spool, temporary disks, and directory usage. alloc map - lists percentage use for page and spool disks. system - another way to list system disks. accessed - list minidisks I have accessed. links 120 - list userids who have links to my 120 disk. pf - list Program Function Key assignments. stor - how much System z storage? n - which userids are logged on? all - what disks and terminals are online? rdr - list the files in your virtual reader. prt - list files in your virtual print queue. set pf12 retrieve - make PF12 function as a retrieve key. force userid - terminate a user immediately. rdrlist - list files in your virtual reader. – Use PF11 to peek at any of these files. – Use discard to delete a particular file. purge system rdr all - purge all reader files in the z/VM system. – purge joe rdr 1234 - purge particular reader file belonging to userid joe. – purge joe rdr all - purge all joe’s reader files. purge system prt all - purge all printer files in the z/VM system. link joe 456 456 - link to joe’s 456 disk as my 456 disk. acc 456 j - access my 456 disk as CMS drive j. filelist * * a - list the files on your a disk. rel j - release a CMS drive assignment det 456 - detach disk 456 from my userid vmlink joe 345 - a combined link and acc function. format 191 a - format a new minidisk. directxa user direct c - activate an updated z/VM directory. ind - how busy is the system? diskmap user direct c - create a minidisk map based in directory user direct c. browse user diskmap a - inspect a file 4.8 zIIPs and zAAPs A zPDT system can provide a zIIP or zAAP in place of a CP, but this reduces the number of CPs available. z/VM can provide simulated zIIPs or zAAPs, working only with CPs in the base zPDT system. Furthermore, z/VM can provide more logical CPs, zIIPs, and zAAPs than there are CPs present in the base 1090 system. The definition of a z/VM guest, in the z/VM directory, can contain statements such as the following: MACH ESA 5 CPU 0 BASE CPU 1 TYPE zIIP CPU 2 TYPE zAAP (allow up to 5 logical processors) The three logical processors (one CP, one zIIP, one zAAP) can be used even if the base zPDT definition has only a single CP (a 1090-L01, for example). Of course, there are performance implications if the number of logical processors greatly exceeds the number of “real” System z processors, but this may be acceptable for development and testing situations. 70 IBM System z Personal Development Tool: Volume 3 Additional Topics 4.9 Paging If you run z/OS (or another System z operating system) under z/VM on a zPDT base machine, remember that you have three levels of paging: The base Linux system pages whenever virtual memory usage exceeds the available real memory. Our advice to have at least 1 GB more real memory than your defined for System z memory size. This is intended to minimize Linux paging. A Linux page fault in the primary 1090 CP process causes the CP to pause until the page fault is resolved. z/VM pages when its requirement for virtual memory exceeds the defined System z memory (which is actually base Linux virtual memory). Each z/VM guest (whether a CMS user or a whole z/OS system) resides in z/VM virtual memory. z/VM systems on larger machines, running multiple significant guests, tend to page rather heavily. z/OS (or another System z operating system) pages when its need for real memory (which is actually z/VM virtual memory10) exceeds whatever size was defined in the z/VM directory for the z/OS guest. A zPDT system based on a mobile computer has limited I/O bandwidth to its disk, and that bandwidth is best used for running applications rather than for paging. Our advice is to consider your memory usage carefully when planning to use z/VM for multiple guests. 10 While conceptually true (ignoring V=R and similar environments), the implementation details depend on the level of assists enabled through the SIE instruction. Chapter 4. z/VM notes 71 72 IBM System z Personal Development Tool: Volume 3 Additional Topics 5 Chapter 5. z/VSE notes z/VSE is available (for properly licensed users) as an AD-CD download for zPDT. We suggest using this download instead of installing z/VSE from the standard DVD distribution media. Consult your z/PDT provider for information about licensing and downloading. At the time of writing, z/VSE was not available for RDz (1091) users. © Copyright IBM Corp. 2009, 2013. All rights reserved. 73 74 IBM System z Personal Development Tool: Volume 3 Additional Topics 6 Chapter 6. Multiple zPDT instances zPDT supports both guest operations (under z/VM) and multiple instances of zPDT. Both are ways to run multiple z/OS or other operating systems. See additional notes elsewhere about multiple instances using LANs (in Chapter 10, “LAN notes” on page 103) and using cryptographic adapter functions (in Chapter 13, “Cryptographic adapter” on page 131). In this chapter we present basic information about the use of multiple zPDT instances. Practical operation with multiple instances can become complex. You may need to work with your zPDT provider to clarify usage of more complex configurations. © Copyright IBM Corp. 2009, 2013. All rights reserved. 75 6.1 Multiple instances or guests We strongly suggest that you use a single zPDT instance, as described in this series of documents, to become familiar with basic zPDT operation. Also, you cannot exceed the number of zPDT licenses in your token(s). The same number of token licenses applies whether the zPDT CPs are in a single instance or spread over multiple instances. Multiple instances means running more than one copy of zPDT. Each instance must run under a different Linux userid. This can be accomplished by logins through telnet (or ssh) or by careful use of su commands from different windows on the Linux desktop. The .bashrc file of each userid must have the appropriate export statements. Each instance must have its own devmap. The use of TCP/IP interfaces is an essential part of this discussion. For this reason we combine a discussion of multiple zPDT instances with the use of guests under z/VM in a single instance. Our examples use OSD (QDIO) interfaces for TCP/IP. It is possible to use OSE interfaces (non-QDIO) for TCP/IP; however, in the case of multiple instances using OSE (through a single emulated OSA) you must configure the OSA Address Table (OAT) using the OSA/SF utility. 6.2 Multiple guests in one instance A typical z/VM configuration is outlined in Figure 6-1. z/VM itself typically “owns” all the 3270 sessions. Guests (z/OS, CMS) acquire a 3270 when a user logs on to the guest or uses a dial command. Ethernet adapter Linux awsosa awsosa Tunnel Linux TCP/IP aws3274 CP z/VM Local x3270 sessions aws3274 emulates multiple local 3270s. z/VM typically "owns" the 3270s and allows guests to use them via the "dial" function or via logon. z/OS guest TCP/IP z/OS guest TCP/IP zPDT Instance awsosa supports multiple TCP/IP stacks. It can connect to z/VM and the guests. This instance has one CP. Figure 6-1 Guests in a single zPDT instance Each guest (under z/VM) can access a LAN interface. The awsosa device manager can handle up to 16 of these “stacks”. An awsosa device manager using a tunnel to Linux can be used, as shown in the illustration. Each z/VM guest would use different IP addresses on each OSA interface. Alternatively, not shown in the illustration, z/VM could establish an internal 76 IBM System z Personal Development Tool: Volume 3 Additional Topics VSWITCH for guest use. Using the IP address patterns from our other examples, we might have the following addresses in Figure 6-1: 192.168.0.60 Linux IP address for the Ethernet adapter 192.168.0.60 port 3270 address for external TN3270e connections to aws3274 10.1.1.1 Linux IP address for the tunnel interface 192.168.0.61 z/VM IP address for Ethernet 10.1.1.2 z/VM IP address for the tunnel interface 192.168.0.62 z/OS #1 address for Ethernet 10.1.1.3 z/OS #1 address for the tunnel interface 192.168.0.63 z/OS #2 address for Ethernet 10.1.1.4 z/OS #2 address for the tunnel interface 127.0.0.1 localhost connection for local x3270 sessions 6.3 Independent instances We can have two independent instances, meaning that emulated I/O devices are not shared between the instances. In common terms, there is no shared DASD (or any other shared device). CHPID=F1 CHPID=F0 Ethernet adapter Ethernet adapter Linux awsosa awsosa awsosa Tunnel Linux TCP/IP aws3274 CP CP zAAP z/OS-profSB z/OS-aprof1 TCP/IP TCP/IP aws3274 Local x3270 sessions Local x3270 sessions zPDT Instance zPDT Instance Emulated DASD Tunnel supports a single connection. It could be either z/OS instance. Figure 6-2 Independent instances We assume an L03 license (and a base Linux machine with two or more processors) and we have assigned two CPs (a CP and a zAAP) to one instance and one CP to the other instance. Notice that different port numbers are needed in the 3270port statements in the devmaps. Emulated device addresses (device numbers) are independent between the instances and both might use the same addresses, as described here. Each emulated OSA requires its own Ethernet adapter and two adapters are needed in this case. Two emulated OSAs cannot share an Ethernet adapter. We arbitrarily assigned a tunnel interface to one of the instances.1 This example suggests LCS (non-QDIO) mode for both instances, but they could both be QDIO or a mixture of LCS and QDIO.2 Chapter 6. Multiple zPDT instances 77 Simplified devmaps, matching Figure 6-2, might be as follows: (file /home/ibmsys1/aprof1) [system] memory 800m 3270port 3270 processors 2 cp zaap # emulated zSeries to have 800 MB memory # tn3270e connections specify this port # one CP and one zAAP [manager] name awsckd 0001 # define a single 3390 disk device 0a80 3390 3990 /z/SARES1 [manager] name aws3274 0003 device 0700 3279 3274 mstcon device 0701 3279 3274 tso # define two local 3270s [manager] name awsosa 00C0 --path=F0 --pathtype=OSE device E20 osa osa --unitadd=0 device E21 osa osa --unitadd=1 [manager] name awsosa 00A0 --path A0 --pathtype=OSE --tunnel_intf=y device E22 osa osa --unitadd=0 device E23 osa osa --unitadd=1 (file /home/ibmsys2/profSB) [system] memory 1000m 3270port 3271 processors 1 # emulated zSeries to have 1GB memory # tn3270e connections specify this port [manager] name awsckd 0001 # define a single 3390 disk device 0a80 3390 3990 /z/SA9999 device 0200 3390 3990 /z/VMBASE [manager] name aws3274 0003 device 0700 3279 3274 L700 device 0701 3279 3274 L701 # define two local 3270s [manager] name awsosa 0123 --path=F1 --pathtype=OSE device E20 osa osa --unitadd=0 device E21 osa osa --unitadd=1 Startup for these instances, working from the Linux desktop, might go as follows: (login as root; open a terminal window) # xhost + allow multiple users to start x3270 1 2 78 Starting with the 1090 release available in February 2010, multiple tunnel interfaces may be defined. Since each instance has its own OSA, the user is not required to do OAT configuration if he uses the default OAT definitions. IBM System z Personal Development Tool: Volume 3 Additional Topics # su ibmsys1 $ cd /home/ibmsys1 $ awsstart aprof1 (startup messages) $ x3270 -port 3270 mstcon:localhost & $ x3270 -port 3270 tso:localhost & $ ipl a80 parm 0a8200 (open another terminal window) # su ibmsys2 $ cd /home/ibmsys2 $ awsstart profSB (startup messages) $ x3270 -port 3271 localhost & $ x3270 -port 3271 localhost & $ ipl 200 working ibmsys1 working working working as ibmsys1 instance as ibmsys1 as ibmsys1 as ibmsys1, IPL z/OS working ibmsys2 working working working as ibmsys2 instance as ibmsys2 as ibmsys2 as ibmsys2, IPL VM Each instance is started with its own devmap. Each devmap must specify a different port address for local 3270 connections. Each instance must specify different emulated disk volumes. Attempting to share an emulated disk volume in this situation (by specifying the same Linux file for the emulated volume) will result in corrupted data on the volume. The use of xhost + presents a security exposure; you should tailor this command to suit your security environment 6.4 Instances with shared I/O It is possible for multiple instances to share certain devices, such as emulated DASD and emulated OSA. Also, a single pool of 3270 devices can be used and accessed via a common Linux port number, although this option has more complex side effects. The most common use of a shared configuration is to provide shared DASD among the instances. Please note that zPDT does not support the VMAC function of z/OS. The only virtual mac supported is generated on z/VM with the layer-2 vswitch. A configuration with shared I/O devices requires a group controller; see Figure 6-3. The group controller is similar to another zPDT instance, but without an associated CP or memory. The group controller must have its own Linux userid, its own devmap, and be started with its own awsstart command. It must be started before other instances are started. As a basic concept, the I/O devices defined in the group controller’s devmap are inherited and shared by the other instances. Chapter 6. Multiple zPDT instances 79 Ethernet adapter Linux awsosa awsosa Linux TCP/IP aws3274 Group Controller Shared DASD Tunnel Local x3270 sessions Shared aws3274 ibmgroup CP aws3274 CP z/OS z/OS TCP/IP TCP/IP ibmsys1 ibmsys2 zPDT Instance zPDT Instance Local x3270 sessions aws3274 Local x3270 sessions Private aws3274 Private DASD Figure 6-3 Shared emulated I/O The Linux userid associated with the group controller must have the proper path information set in the .bashrc file, just like that for the userids associated with each instance. All the userids involved (the group controller and the instances) must be in the same Linux group; this is group ibmsys in our examples. All the emulated volume files must be readable and writable (possibly via the groupid) by all the userids involved.3 For our example, assume we have three userids defined (ibmgroup, ibmsys1, and ibmsys2) and all are in group ibmsys. We could define three devmaps, as follows: /home/ibmgroup/group1 [system] members ibmsys1 ibmsys2 [manager] name awsckd 8765 device A80 3390 3990 device A81 3390 3990 device A82 3390 3990 device A83 3390 3990 device A84 3390 3990 device A90 3390 3990 # userids for the instances /z/Z9RES1 /z/Z9RES2 /z/Z9SYS1 /z/Z9RES3 /z/Z9USS1 /z/SARES1 [manager] name awsosa 1223 path=F0 --pathtype=OSD device 400 osa osa --unitadd=0 device 401 osa osa --unitadd=1 3 80 This is controlled by normal Linux permission settings for each file. For example, the command chmod g+w /z/* could be used to make all the files in directory /z writable by members of the current group. IBM System z Personal Development Tool: Volume 3 Additional Topics device device device device device device 402 403 404 405 406 407 osa osa osa osa osa osa osa osa osa osa osa osa --unitadd=2 --unitadd=3 --unitadd=4 --unitadd=5 --unitadd=6 --unitadd=7 /home/ibmsys1/aprof1 [system] memory 800m 3270port 3270 processors 1 group ibmgroup #userid of the group controller [manager] name aws3274 4455 device 0700 3279 3274 mstcon device 0701 3279 3274 /home/ibmsys2/aprofSB [system] memory 1000m 3270port 3271 processors 2 group ibmgroup #userid of the group controller [manager] name aws3274 5544 device 0700 3279 3274 mstcon device 0701 3279 3274 Notice the two new devmap statements in this example. Both are in the [system] stanzas: members name1 name2 is used in the group controller definitions and specifies the Linux userid associated with each instance in the group. group cntlname is used in each instance and specifies the Linux userid associated with the group controller. TN3270e sessions are directed to the desired instance by using the appropriate 3270port number: $ x3270 -port 3270 localhost & $ x3270 -port 3271 localhost & connects to the ibmsys1 instance connects to the ibmsys2 instance There is no need to coordinate device numbers or unit addresses among multiple instances using shared OSA. For example, each instance might use an OSA interface at addresses 400-403. Each instance might start unit addresses (specified in the devmap) at address zero. (Multiple guests under z/VM, in a single instance, must manage the addresses properly. Do not confuse multiple guests under z/VM with multiple instances.) Only DASD (CKD or FBA) and OSA can be shared. Additional devices, such as tape drives, can be included in the group controller devmap. These additional device definitions are inherited by all instances, but each instance uses the definitions as though they were part of the devmap for that instance. Notice that the two instances in the previous example have different 3270port addresses; we elected to not use shared 3270 definitions in this example.4 Chapter 6. Multiple zPDT instances 81 No DASD is defined for the instances in this example; the instances will share the DASD defined for the group controller. Note that all sharing instances use the same addresses (device numbers) for the shared devices. There is no provision to have different addresses (for different instances) for the same shared device. If a zPDT instance operates under the group controller, then any OSA devices might be shared devices, managed by the group controller, or each instance may have a private OSA.5 If the OSA is used in OSE (non-QDIO mode) then the OAT definitions must be customized with the names of the instance members (specified as “MEMBER names”) and the IP address(es) for each instance. Standard operating rules still apply, of course. We cannot IPL the same z/OS system into two instances at the same time.6 In our small example, we have two z/OS systems (the second one is on the SARES1 volume provided with the AD-CD package). In the absence of shared ENQ functions7, you must manage any active data set sharing. The 1090 correctly emulates disk RESERVE and RELEASE functions and these protect VTOC and catalog updates in the normal z/OS manner. Startup for our controller and two instances, working from the Linux desktop, might go as follows: (login as root; open a terminal window) # xhost + allow multiple users to start x3270 # su ibmgroup work as group controller $ cd /home/ibmgroup $ awsstart group1 start group controller (startup messages) (open another terminal window) # su ibmsys1 $ cd /home/ibmsys1 $ awsstart aprof1 working as ibmsys1 (startup messages) ibmsys1 instance $ x3270 -port 3270 mstcon@localhost & working as ibmsys1 $ x3270 -port 3270 tso@localhost & working as ibmsys1 $ ipl a80 parm 0a8200 working as ibmsys1, IPL z/OS (open another terminal window) # su ibmsys2 $ cd /home/ibmsys2 $ awsstart profSB working as ibmsys2 (startup messages) ibmsys2 instance $ x3270 -port 3271 mstcon@localhost & working as ibmsys2 $ x3270 -port 3271 tso@localhost & working as ibmsys2 $ ipl a90 parm 0a90sa working as ibmsys2, IPL z/OS In this example, we used a different terminal window to start the group controller and each z/OS instance. This allows us to send commands (such as awsstop) to the appropriate application later. 4 5 6 7 82 An example using a single 3270 port number is given later in the text. zPDT releases prior to 39.16 could not have multiple OSA tunnel devices; this limitation was removed with release 39.16 and later releases. This statement ignores situations where the use of different PARMLIB members allows the same z/OS to be IPLed in multiple LPARs or instances. This involves separate paging, spooling, and various VSAM data sets for each LPAR/instance. The z/OS AD system used for many of our examples is not set up for this type of usage. Sharing ENQ/DEQ functions is typically done the GRS functions of a sysplex configuration. We do not have a sysplex here and there are no global ENQ/DEQ controls. IBM System z Personal Development Tool: Volume 3 Additional Topics 6.5 Additional shared functions The previous section outlines the key shared device usage rules, as they apply to DASD and OSA devices. The group controller can also include a shared aws3270 function and passive definitions that are inherited by all instances. Shared aws3270 options The group controller devmap can include aws3270 definitions such as the following: /home/ibmgroup/group1 [system] 3270port 3270 members ibmsys1 ibmsys2 [manager] name aws3270 1234 device 700 3279 3274 mstcon device 701 3279 3274 device 702 3270 3274 In this case the group controller has specified a port address for TN3270e connections. Each instance inherits the complete set of 3270 device definitions (700, 701, 702) but not the 3270port address. That is, each instance has a 3270 at address 700, 701, and so forth. If a user starts a TN3270e session connected to the 3270port number on Linux, he has several options: $ $ $ $ x3270 x3270 x3270 x3270 -port -port -port -port 3270 3270 3270 3270 localhost & ibmsys1@localhost & ibmsys2.701@localhost & ibmsys1.mstcon@localhost & Example Example Example Example 1 2 3 4 In Example 1 the desired instance is not specified. In this case, the group controller will display a selection menu (on the new 3270 session) and you must indicate which instance you want and, optionally, which terminal in that instance.8 This selection menu is illustrated in Figure 6-4. In Example 2, the first available 3270 in the ibmsys1 instance is assigned. (The instance name corresponds to the userid that started the instance.) Examples 3 and 4 specify both an instance name and the 3270 device identifier. *** Welcome to the zPDT selection menu *** Please select the member to connect from the list below or type in the member and/or LU name and depress ENTER Selection => __ 1) IBMSYS1 2) IBMSYS2 (0 to disconnect) MEMBER:________ LU:________ Figure 6-4 Selection menu with two instances running As a reminder, you can specify a different 3270port number and aws3274 device definitions in each instance. In this case the shared aws3274 conditions do not apply. You could specify a 3270port number and aws3274 devices in the group controller and also specify aws3274 devices in each instance (but without a 3270port number in the instances). In this case all the 8 If a specific terminal within the instance is not specified (by address, or by LU name) then the first available 3270 in that instance is used. Chapter 6. Multiple zPDT instances 83 3270 devices (from the controller list that is inherited by all instances, and from the unique list in each instance) can be accessed from the selection menu. Yet another option exists for accessing shared aws3274 functions. This involves an inetd service that automatically detects which 1090 instances are running and constructs a selection menu based on this information. The inetd setup varies with different Linux distributions. Inherited devices The group controller devmap can include definitions for device managers other than awsckd, awsfba, awsosa, and aws3270. For example, it might contain the following: /home/ibmgroup/group1 [system] membersibmsys1 ibmsys2 [manager] name awstape 4444 device 580 3480 3480 device 581 3480 3480 In this case each instance (ibmsys1 and ibmsys2) will have emulated 3480 tape drives at addresses 580 and 581. There is no connection between these drives in the two instances. It is exactly as though the awstape stanza appeared in the devmaps for each instance. The sole purpose is to remove the necessity for defining these devices for each instance. This is not very meaningful for a small device list as shown here, but might be more meaningful for longer lists. 84 IBM System z Personal Development Tool: Volume 3 Additional Topics 7 Chapter 7. Using awscmd The awscmd device manager provides a “device” that appears to System z software as a tape drive. Its function is to send commands (and data) to the underlying Linux and then receive the output from the Linux command. Any Linux command may be sent, including those that could destroy the Linux system. Obviously, this device manager should be used with care and may not be appropriate for a zPDT environment that can be accessed by untrusted users. Configuration is similar to other device managers: [manager] name awscmd 20 device 560 3480 3480 device 561 3480 3480 The CUNUMBR (which is 20 in this example) is an arbitrary hexadecimal number (up to four hex digits) that cannot duplicate the CUNUMBR used with any other device manager. We show two devices here, but typically only one is needed. The device type can be 3420, 3422, 3480, 3490, or 3590; these are the tape device types emulated by zPDT. The device number (560, 561) should match a corresponding device type in your z/OS IODF. (Any device number may be used with z/VM.) The intended operation is as follows: 1. A rewind is issued to the device. 2. The desired Linux command (expressed in EBCDIC) is written to the device. 3. Any stdin data to be used by the Linux command is written to the device. 4. EBCDIC to ASCII translation is done automatically. 5. A tape mark is written to the device. 6. At this point, the awscmd device manager submits the command (and data) to Linux through a shell that does not appear on the Linux window. The current Linux directory for the command is the directory that was used to start zPDT. 7. When the awscmd function completes there are four files on the pseudo-tape device: – The command file that was submitted to Linux (with redirection operands that were automatically added by awscmd) © Copyright IBM Corp. 2009, 2013. All rights reserved. 85 – The stdout data from the Linux command – The stderr data from the Linux command – The return code (converted to characters) from the Linux command 8. The output (on the pseudo-tape) has been converted to EBCDIC. 9. Two tape marks are at the end of the pseudo-tape. Restrictions The command you send to Linux cannot include any redirection (< or > characters), asynchronous indicator (& character), or pipe (“|” or vertical bar character). The pseudo-tape device will appear to be busy while Linux is executing the command. Any Linux command that creates substantial delays (of many seconds) may cause I/O timeout errors to be generated in z/OS. At the time of writing, some characters did not survive the EBCDIC to ASCII conversion when included in SYSIN data. These were the tilde(~), caret (^), colon(:), double quote(“), less-than(<), greater-than(>), and question mark(?). This restriction may change in later versions of awscmd. 7.1 Sample z/VM script The following REXX script assumes that the awscmd device is attached to the CMS user as device 28F: /* CMS REXX script to execute a Linux command */ /* */ /* format: */ /* oscmd Linux-command (tape-address */ /* */ /* The tape-address is optional; defaults to 28F */ /* */ Trace off; Parse arg cmd '(' tDev; if (length(tDev) = 0) then tDev = 28F; /* Write the Linux command string to the tape */ “tape rew (“ tDev; “pipe var cmd | tape” tDev; “tape wtm (“ eDev; /* Read the stdout file from the tape */ “tape rew (“ tDev; “tape fsf (“ tDev; /* skip over input file */ say “STDOUT output------” “pipe tape” tDev “| console”; /* Read the stderr file from the tape */ “say “STDERR output ------” “pipe tape” tDev “| console” /* Read the return code from the tape */ “pipe tape” tDev “| console” /* end this script */ return(0); This script could be used from z/VM as follows: att 280 * 28f 86 (attach the awscmd pseudo device) IBM System z Personal Development Tool: Volume 3 Additional Topics TAPE 0280 ATTACHED TO ZVMTEST 028F Ready; oscmd ls -al STDOUT output------total 21699469 drwxrwxr-x 2 zvmtest zvmtest 4096 Aug 7 drwdr-xr-x 8 zvmtest zvmtest 4096 Aug 7 -rw-rw-r-- 1 zvmtest zvmtest 2846431232 Jul 8 -rw-rw-r-- 1 zvmtest zvmtest 2846431232 Jul 8 (etc to list all the entries in the current STDERR output---COMMAND return code ---0 Ready; 20:51 20:37 09:58 10:08 Linux . .. 530OPT.ckd 530PAG.ckd directory) 7.2 z/OS usage Using the awscmd device with z/OS is more challenging than using it with z/VM for several reasons: Tape drives are not readily manipulated by TSO users. z/OS wants to check tape volumes for labels, even if you specify a no-label tape volume. For practical purposes, an assembly program must be written to utilize the awscmd functions. You can write your own program. You may want to examine the sample program we have provided in 7.2.1, “Sample z/OS program for awscmd” on page 88. This program looks for a PARM field on the EXEC JCL statement and sends this as the command to Linux. If no PARM field is present, it opens DDname SYSIN and sends the first line as the Linux command and sends any additional lines as stdin for the Linux command. Output from the awscmd function is printed on DDNAME SYSPRINT. A JCL DD statement is needed to allocate the pseudo-tape drive for awscmd. Our example uses address 580 for the pseudo-tape because this is a known 3480 address for our z/OS system. Our devmap contains: [manager] name awscmd 20 device 560 3480 3480 Our sample program requires that an MVS initiator be enabled for BLP processing. This can be done by changing the JES2 startup parameters or (for the duration of an IPL) by entering the following command on the MVS console: $T JOBCLASS(A),BLP=YES (you might want to use jobclass other than A) We then mount a tape on the pseudo-tape drive for continued use. This avoids having to respond to a mount message every time the sample program is run. The MVS command: MOUNT 560,VOL=(NL,123456) followed by the zPDT command: $ ready 560 provides the necessary setup. Chapter 7. Using awscmd 87 An example of using the sample program might be: //OGDEN22 JOB 1,OGDEN,MSGCLASS=X,MSGLEVEL=(0,0) // EXEC PGM=AWSCMDX,PARM='ls -al ' //STEPLIB DD DSN=OGDEN.LIB.LOAD,DISP=SHR //TAPE DD UNIT=(560,,DEFER),VOL=SER=123456,LABEL=(1,BLP),DSN=X //SYSPRINT DD SYSOUT=* The output (viewed from JES2 spool using SDSF) contains the usual JES2 messages and a SYSOUT data set like the following: COMMAND: ls -al 1>/tmp/AWSCMD-xxx-out.txt 2>/tmp/etc.xxetc </tmp/AWSCMD.xxxetc STDOUT: total 21699469 STDOUT: drwxrwxr-x 2 ibmsys1 ibmsys1 4096 Aug 1 20:01 . STDOUT: drwdr-xr-x 4 ibmsys1 ibmsys1 4096 Aug 1 20:02 .. STDOUT: -rw-rw-r-- 1 ibmsys1 ibmsys1 2846431232 Aug 8 09:58 WORK01 STDOUT: -rw-rw-r-- 1 ibmsys1 ibmsys1 2846431232 Aug 8 10:08 WORK02 (etc to list all the entries in the current Linux directory) STDERR: RTNCDE: 0 The Linux command that is actually executed contains redirection operators that are automatically added by awscmd. You can see these operators in the output listing; they are only suggested in the sample output shown here. A second example, using SYSIN data to create a new Linux file, could be: //OGDEN22 JOB 1,OGDEN,MSGCLASS=X,MSGLEVEL=(0,0) // EXEC PGM=AWSCMDX //STEPLIB DD DSN=OGDEN.LIB.LOAD,DISP=SHR //TAPE DD UNIT=(560,,DEFER),VOL=SER=123456,LABEL=(1,BLP),DSN=X //SYSPRINT DD SYSOUT=* //SYSIN DD * tee my.new.file This is a line of data for the new file This is another line of data And yet another /* This example would create Linux file my.new.file (in the Linux directory used to start zPDT) with the indicated lines in the file. A fully-qualified Linux file name could be used with either of the examples. The output for the second example would list all the data lines with the COMMAND output and then list them again for STDOUT output. (This is because the tee command writes all the stdin data to stdout. The tee command appends the new data if the specified file already exists.) 7.2.1 Sample z/OS program for awscmd The following listing is for a z/OS batch program, AWSCMDX, that exploits the awscmd command processor to send a command to the underlying Linux and receive the results. This sample program is simple-minded in many respects and is not intended to illustrate the best programming techniques, but it should be fairly readable. Errors result in WTO messages; this is a poor design for significant applications but it should be reasonable for many zPDT environments. The program includes a two-second wait before reading the results of the Linux command. This wait is not necessary and can be removed. (The 88 IBM System z Personal Development Tool: Volume 3 Additional Topics pseudo-tape device remains busy with the preceeding WTM operation until the Linux command completes.) The TSO test environment options (in the compile and link steps) are not required. //OGDEN90 JOB 1,OGDEN,MSGCLASS=X // EXEC ASMACLG,PARM.C='NOXREF,TEST',PARM.L='NOLIST,NOMAP,TEST' //* PARM.G='ls -al ' //C.SYSIN DD * PRINT NOGEN * * SEND COMMAND TO LINUX VIA AWSCMD, READ THE RESULT * JES2 MUST ALLOW BLP FOR THE JOB CLASS THAT IS USED * * $T JOBCLASS(A),BLP=YES CAN BE USED FOR TEMPORARY CHANGES * * MOUNT 580,VOL=(NL,123456) * awsmount 580 -o /z/123456 * * *//TAPE DD UNIT=(580,,DEFER),LABEL=(1,BLP),VOL=SER=XXXXXX,DSN=X *//SYSPRINT DD SYSOUT=* (OUTPUT FROM LINUX) * AWSCMDX CSECT STM 14,12,12(13) SAVE CALLER’S REGISTERS LR 12,15 USE ENTRY-POINT BASE REGISTER USING AWSCMDX,12 ST 13,SAVEAREA+4 CALLER’S SAVEAREA ADDRESS LA 2,SAVEAREA MY SAVEAREA ADDRESS ST 2,8(13) STORE A(MY SAVE AREA) IN CALLER LR 13,2 MY SAVEAREA IN R13 LR 11,12 SECOND BASE REGISTER A 11,=F'4096' USING AWSCMDX+4096,11 NOT REALLY NEEDED * CHECK PARM DATA L 1,0(1) GET ADDRESS OF PARM FIELD LH 2,0(1) GET LENGTH OF PARM FIELD LTR 2,2 CHECK IT BZ NOPARM BRANCH IF LENGTH = ZERO BCTR 2,0 SUBTRACT 1 FROM LENGTH EX 2,MOVPARM MOVE PARM TO MY WORK AREA B A GO USE PARM DATA * TRY SYSIN FOR THE INPUT DATA NOPARM OPEN (SYSIN,(INPUT)) TM SYSIN+48,X'10' DID OPEN WORK? BZ NOINPUT IF NOT, BRANCH MVI PARMFLG,X'FF' REMEMBER TO USE SYSIN * OPEN PSEUDO-TAPE DEVICE AND SYSPRINT A OPEN STAPEO ASSUME BLP ON DD STATEMENT TM STAPEO+48,X'10' DID OPEN WORK? BZ ERR10 IF NOT, BRANCH A10 OPEN (PRINT,(OUTPUT)) TM PRINT+48,X'10' DID OPEN WORK? BZ ERR11 * REWIND THE PSEUDO TAPE B MVI SECB,X'00' ZERO MY ECB Chapter 7. Using awscmd 89 LA 1,SCCREW ADDRESS of CCW(S) ST 1,SIOB+16 PLACE IN IOB EXCP SIOB REWIND TAPE WAIT ECB=SECB WAIT FOR IT TM SECB,X'20' COMPLETED OK? BZ ERR1 IF NOT, BRANCH * PREPARE TO WRITE THE COMMAND RECORD C CLI PARMFLG,X'00' USING PARM DATA? BE C2 IF SO, BRANCH C1 GET SYSIN,BUFFER READ RECORD FROM SYSIN * BACKSCAN TO REMOVE TRAILING BLANKS C2 LA 3,BUFFER+99 MAX 100 BYTES C3 CLI 0(3),C' ' A BLANK? BNE C4 IF NOT, BRANCH S 3,=F'1' BACK UP 1 IN BUFFER B C3 LOOP UNTIL NON-BLANK FOUND C4 LA 4,BUFFER A(BEGINNING OF BUFFER) LA 3,1(3) ADJUST FOR LAST CHARACTER SR 3,4 A(LAST NON-BLANK) - A(BEGINNING) BP C5 IF POSITIVE, BRANCH LA 3,1 IF NOT, MAKE LENGTH = 1 BYTE C5 STH 3,SCCWRITE+6 CHANGE CCW LENGTH FIELD MVI SECB,X'00' ECB LA 1,SCCWRITE CCW ST 1,SIOB+16 IN IOB EXCP SIOB WRITE RECORD WAIT ECB=SECB WAIT TM SECB,X'20' OK? BZ ERR2 IF NOT, BRANCH CLI PARMFLG,X'00' USING PARM DATA? BE D IF SO, BRANCH MVC BUFFER(132),BLANKS B C1 LOOP TO GET ALL SYSIN DATA * WRITE A TAPE MARK D MVI SECB,X'00' ECB LA 1,SCCWTM CCW ST 1,SIOB+16 IN IOB EXCP SIOB WRITE TAPE MARK WAIT ECB=SECB WAIT TM SECB,X'20' OK? BZ ERR3 IF NOT, BRANCH B EE * * WAIT AN ARBITRARY TWO SECONDS (CAN BE REMOVED) * EE STIMER WAIT,BINTVL=SEC2 * * REWIND THE TAPE E MVI SECB,X'00' ZERO ECB LA 1,SCCREW CCW ST 1,SIOB+16 IN IOB EXCP SIOB REWIND TAPE WAIT ECB=SECB WAIT TM SECB,X'20' OK? BZ ERR4 IF NOT, BRANCH 90 IBM System z Personal Development Tool: Volume 3 Additional Topics * READ FIRST FILE F MVC BUFFER2(80),BLANKS MVC BUFFER2+0080(80),BLANKS MVC BUFFER2+0160(80),BLANKS MVI SECB,X'00' ZERO THE ECB LA 1,SCCREAD ADDRESS of CCW(S) ST 1,SIOB+16 PLACE IN IOB EXCP SIOB READ WAIT ECB=SECB WAIT FOR IT TM SECB,X'20' COMPLETED OK? BO F1 IF YES, BRANCH TM SIOB+12,X'01' TAPE MARK? BO G IF YES, BRANCH B ERR5 F1 MVC BUFFER(132),BLANKS MVC BUFFER(09),=C'COMMAND: ' MVC BUFFER+09(132),BUFFER2 PUT PRINT,BUFFER B F LOOP UNTIL ALL RECORDS READ * READ SECOND FILE G MVC BUFFER2(80),BLANKS MVC BUFFER2+0080(80),BLANKS MVC BUFFER2+0160(80),BLANKS MVI SECB,X'00' ZERO THE ECB LA 1,SCCREAD ADDRESS of CCW(S) ST 1,SIOB+16 PLACE IN IOB EXCP SIOB READ WAIT ECB=SECB WAIT FOR IT TM SECB,X'20' COMPLETED OK? BO G1 IF YES, BRANCH TM SIOB+12,X'01' TAPE MARK? BO H IF YES, BRANCH B ERR5 G1 MVC BUFFER(132),BLANKS MVC BUFFER(09),=C'STDOUT: ' MVC BUFFER+09(132),BUFFER2 PUT PRINT,BUFFER B G LOOP UNTIL ALL RECORDS READ * READ THIRD FILE H MVC BUFFER2(80),BLANKS MVC BUFFER2+0080(80),BLANKS MVC BUFFER2+0160(80),BLANKS MVI SECB,X'00' ZERO THE ECB LA 1,SCCREAD ADDRESS of CCW(S) ST 1,SIOB+16 PLACE IN IOB EXCP SIOB READ WAIT ECB=SECB WAIT FOR IT TM SECB,X'20' COMPLETED OK? BO H1 IF YES, BRANCH TM SIOB+12,X'01' TAPE MARK? BO J IF YES, BRANCH B ERR5 H1 MVC BUFFER(132),BLANKS MVC BUFFER(09),=C'STDERR: ' MVC BUFFER+09(132),BUFFER2 Chapter 7. Using awscmd 91 PUT PRINT,BUFFER B H LOOP UNTIL ALL RECORDS READ * READ FOURTH FILE J MVC BUFFER2(80),BLANKS MVC BUFFER2+0080(80),BLANKS MVC BUFFER2+0160(80),BLANKS MVI SECB,X'00' ZERO THE ECB LA 1,SCCREAD ADDRESS of CCW(S) ST 1,SIOB+16 PLACE IN IOB EXCP SIOB READ WAIT ECB=SECB WAIT FOR IT TM SECB,X'20' COMPLETED OK? BO J1 IF YES, BRANCH TM SIOB+12,X'01' TAPE MARK? BO K IF YES, BRANCH B ERR5 J1 MVC BUFFER(132),BLANKS MVC BUFFER(09),=C'RTNCDE: ' MVC BUFFER+09(132),BUFFER2 PUT PRINT,BUFFER B J LOOP UNTIL ALL RECORDS READ * K SR 1,1 NOP * CLOSE CLOSE (STAPEO,,PRINT) RETURN L 13,4(13) GET A(CALLER’S SAVE AREA) LM 14,12,12(13) RESTORE CALLER’S REGISTERS SR 15,15 SET RETURN CODE BR 14 EXIT * * ERRORS AND MESSAGES * ERR1 MVC BUFFER(132),BLANKS MVC BUFFER(21),=C'Initial rewind failed' PUT PRINT,BUFFER B CLOSE ERR2 MVC BUFFER(132),BLANKS MVC BUFFER(12),=C'Write failed' PUT PRINT,BUFFER B CLOSE ERR3 MVC BUFFER(132),BLANKS MVC BUFFER(22),=C'Write tape mark failed' PUT PRINT,BUFFER B CLOSE ERR4 MVC BUFFER(132),BLANKS MVC BUFFER(20),=C'Second rewind failed' PUT PRINT,BUFFER B CLOSE ERR5 MVC BUFFER(132),BLANKS MVC BUFFER(17),=C'Read failed ' PUT PRINT,BUFFER B CLOSE ERR10 WTO 'NO TAPE DD STATEMENT' B RETURN ERR11 WTO 'NO SYSPRINT DD STATEMENT' 92 IBM System z Personal Development Tool: Volume 3 Additional Topics B CLOSE NOINPUT WTO 'NO PARAMETER OR SYSIN FOUND' B RETURN * * CONSTANTS, WORK AREAS * SAVEAREA DC 18F'0' SEC2 DC F'200' TWO SECONDS STAPEO DCB DSORG=PS,MACRF=(E),DDNAME=TAPE PRINT DCB DSORG=PS,DDNAME=SYSPRINT,MACRF=(PM),LRECL=132, BLKSIZE=13200,RECFM=FB SYSIN DCB DSORG=PS,DDNAME=SYSIN,MACRF=(GM),LRECL=80, RECFM=FB,EODAD=D DS D'0' SCCWRITE DC X'01',AL3(BUFFER),X'20',AL3(100) SCCWTM DC X'1F',AL3(0),X'20',AL3(1) SCCREW DC X'07',AL3(BLANKS),X'20',AL3(1) SCCREAD DC X'02',AL3(BUFFER2),X'20',AL3(3200) SECB DC F'0' SIOB DC X'42000000' DC A(SECB) A(ECB) DC 2F'0' CSW DC A(0) A(CCW) DC A(STAPEO) A(DCB) DC 2F'0' * PARM DC CL100' ' PARM CAN BE UP 100 CHARACTERS PARMFLG DC X'00' 00=PARM, FF=SYSIN MOVPARM MVC BUFFER(0),2(1) USED BY EX INSTRUCTION BLANKS DC CL132' ' BUFFER DC CL132' ' LTORG BUFFER2 DS CL4000' ' END /* //*.SYSLMOD DD DISP=OLD,DSN=OGDEN.LIB.LOAD(AWSCMDX) //G.TAPE DD UNIT=(560,,DEFER),LABEL=(1,BLP),VOL=SER=123456,DSN=X //G.SYSPRINT DD SYSOUT=* //G.SYSIN DD * tee xfile2 This is a line This is line 2 This is line 3 /* X X Chapter 7. Using awscmd 93 94 IBM System z Personal Development Tool: Volume 3 Additional Topics 8 Chapter 8. Problem handling There are several aspects to zPDT problem handling, including the following: Problems starting a zPDT operation Problems during a zPDT operation Problems with emulated device files Problems with the underlying Linux system Problems with the System z operating system and applications This chapter uses the term zPDT service provider. This may be an IBM Business Partner or some other zPDT provider that offers service. Not all zPDT users may have such service providers, and some of the information in this chapter may not apply in these cases. The underlying Linux system, and whatever System z operating system and applications are being used, are not part of the zPDT and are not part of any zPDT support activity. zPDT support includes only the direct zPDT components. As a practical matter, there may be some overlap between Linux issues and zPDT problems, and you may need assistance from your zPDT service provider to isolate the problem. © Copyright IBM Corp. 2009, 2013. All rights reserved. 95 8.1 Problems starting a zPDT operation These problems are most commonly related to devmap errors, and are often due to errors in Linux file names in the devmap. The solution is to check the devmap carefully, remembering that file names are case sensitive in Linux. Problems obtaining a license (from the zPDT token) are typically due to an expired or unactivated token. Messages about Time Cheat errors indicate a more serious problem. These are typically caused either by (1) moving a token between multiple PCs that do not have their time-of-day clocks closely synchronized, or (2) manipulation of the clock in the PC. See “Token dates and times” on page 2 for additional discussions about this. The zPDT system uses a number of Linux shared storage (virtual memory) areas. These are normally freed when zPDT is ended with an awsstop command. A failure or incorrect handling during zPDT startup or operation might result in these shared storage areas not being released. This can prevent zPDT from being started again. There are Linux commands to individually free shared storage areas, but this requires multiple detailed steps.1 Rebooting Linux is a primitive but effective way to solve this particular situation. 8.2 Problems during a zPDT operation The zPDT system maintains a number of logs and traces during operation. The zPDT programs may detect a problem and capture the logs or traces at the time of the problem. You can also capture logs and traces with a snapdump command2. This command may be used when there is no indication from zPDT that a problem exists, but you detect a problem and may want to work with your zPDT service provider3 to resolve it. It is important to remember that this discussion is solely about zPDT operation. The snapdump data is not meaningful for addressing other problems, such as a problem with the System z operating system or System z applications. A snapdump function typically creates a megabyte of data in /home/ibmsys1/z1090/logs, contained in various files. You may take as many snapdumps as you wish, remembering that each one takes space in the logs directory. Your zPDT service provider might want several, or one, or none of these dumps. Files in the logs directory created by snapdump are retained until you remove them. Most other log and trace files in this directory are automatically deleted by zPDT when appropriate. However, over time there may be a buildup of unwanted files in the logs directory. Assuming you are not working on an outstanding zPDT problem, you can simply delete all the files in the logs directory (doing this when zPDT is not running). An easy way to do this is to use the --clean option of the awsstart command. Again assuming you are not working with a zPDT problem, you might use the --clean option every time you perform an awsstart. Conversely, you would not use the --clean option while you are working on a problem; some of the older log and trace files might be wanted at a later time. The senderrdata command is used to package snapdump data into a tar file, which is typically a little less than a megabyte. This file can be sent to IBM, via your zPDT service 1 2 3 96 The Linux ipcrm command can be used to remove shared resources that have been orphaned. The snapdump command is valid only while zPDT is operational. IBM internal users would communicate through the z1090 forum instead of through a zPDT service provider. Other users, without a defined service provider, might use another zPDT forum. IBM System z Personal Development Tool: Volume 3 Additional Topics provider, or simply kept on your Linux system for potential use later. The senderrdata command can manage the FTP operation to IBM. These files (on the receiving system at IBM) are automatically deleted after a few days unless a formal problem (PMR or equivalent) event is opened; this can be done by your zPDT service provider. Figure 8-1 provides an overview of problem data handling. If snapdump data is sent to IBM (as outlined in the figure) then the senderrdata option to create a configuration file should also be used and the results sent to IBM.4 Clean option erases all existing logs and traces awsstart xxxxx clean /home/ibmsys1/z1090/logs User detects problem during 1090 operation $ snapdump 1090 detects problem and performs internal equivalent of a snapdump Logs/traces $ rassummary -s A severe problem may also create Linux core files in your home directory. These are not managed by the senderrdata command or by any other 1090 function. Any snapdumps? Note the ID. Working on a 1090 problem? Consider the --clean option the next time you use awsstart No Look through snapdump titles Yes Date and time in a snapdump matches your problem? Must work through your zPDT service provider to open a problem with IBM Want to open a problem with the zPDT provider or add data for existing open problem? $ senderrdata Option 5: configuration file PMR number (if known) warning about lsvpd *File to transfer/dump: 999...tar.gz 1 to FTP 1 Enter Attempts to FTP to IBM hangs if cannot connect. Cntl-C to escape. yes to save Saves file in home directory Option 3 FTP/dump snapdata snapdump ID PMR number (if known) branch office, country code (leave blank) warning about lsvpd *File to transfer/dump: 999999.99...tar.gz 1 to FTP 1 Attempts to FTP to IBM hangs if cannot connect. Cntl-C to escape. Enter yes to save Saves file in /tmp END Figure 8-1 Problem data capture and reporting 4 Later 1090 versions may automatically combine the configuration data with the snapdump data. Chapter 8. Problem handling 97 If a problem incident is opened through your IBM Business Partner, you may be requested to send additional files. In general, once a problem incident is opened, you should not delete anything from the logs directory. If device managers fail they automatically create a trace file and are automatically restarted. This restart will not occur more than three times per minute. If a fourth failure occurs within the same minute the device manager is not restarted and the devices it controls become not operational for the remainder of that 1090 session. The 1090 limits the size of the logs and traces and should never create more than about 30 MB per emulated device (and there is normally much less than this). 8.3 Core images Severe problems may cause core image files to be created. If these are created by the 1090, they should go into the log subdirectory and be cleaned up with --clean option of awsstart. If you are actively working on a problem with IBM, these files may be useful. Otherwise they should be deleted because they can be rather large and might create a disk space problem. Consistent dumps (“core images”) when the 1090 is started can occur if you have a relatively large number of emulated I/O devices (more than 100, for example) and you have not considered memory management adjustments. See 1.13, “Devices, memory, msgmni, ulimit” on page 12 for more information. The snapdump command is used when the 1090 is running. If you are unable to start the 1090 (with the awsstart command) or the 1090 ends immediately (before a snapdump can be taken), the problem may have created a core image file. In this case, the core image may help with problem analysis and should be preserved while the problem is under investigation. 8.4 Emulated volume problems An emulated 3390 volume is a single Linux file that was created with the alcckd command. Three variations of this command are useful for problem handling: $ alcckd /z/WORK03 -rs $ alcckd /z/WORK03 -rf $ alcckd /z/WORK03 -r scan emulated volume for format errors replace bad track with zeros display volser and size The -rs function scans the emulated volume and verifies that it is in the correct 1090 emulation format.5 The -rf function replaces improperly formatted tracks with a properly formatted track containing zeros. The original contents of the track are lost, but the functionality of the volume is maintained. Assuming that your emulated 3390 volumes are in the /z directory and there are no other file types in this directory, you could verify the format of all the volumes with the following Linux shell commands: $ cd /z (location of emulated ckd, and nothing else) $ for i in *; do alcckd $i -rs; done The ckdPrint command can be used to examine the contents of an emulated CKD volume. This command prompts for the beginning cylinder and head numbers and the ending cylinder 5 98 Only the emulation format is checked. There is no check for data content or operating system metadata (label, VTOC, and such). IBM System z Personal Development Tool: Volume 3 Additional Topics and head numbers. These numbers are in decimal. The following example lists the records on cylinder 0, head 0 of volume Z9SYS1: $ ckdPrint /z/Z9SYS1 DeviceType 3390, Cylinders-3339, Trks/Cyl-15, TrkSize-56832 Input extent in decimal - CC-low HH-low CC-high HH-high 00 00 00 00 .... .... The tapeCheck command may be used to verify the format of an awstape file. That is, this command reads the awstape file and verifies that the awstape control blocks are logically correct. Special problem-related commands The senderrdata command provides a menu of options: 1. 2. 3. 4. 5. 6. 7. 8. 9. rassummary (uses the Linux less command) rassummary -s (for an overview of snapdump incidents) FTP/dump snapdump data FTP/dump PE directed files (used only at IBM request) Create configuration information file Logs Directory maintenance FTP/dump rassummary created files FTP/dump all files in logs directory snapdump The dump options in this menu mean that a tar file is created, containing the selected files, and the tar file is saved in /tmp. The dump option (to create a tar file) is especially useful if the 1090 machine is not connected to the Internet. A number of 1090 commands are intended to be used only at the direction of IBM support personnel and they will supply the specific commands and operands to be used. This category includes the following commands: $ $ $ $ $ $ awslog doOSAcmd dreg dshrmem printlog printtrace (including --logsize and --logcount operands) (various subcommands) (shared resource registery) (shared memory) (only for some .gz logs) (only for some .gz traces) The contents and formats of the various log and trace files are not documented and are intended only for diagnostic use. Our experience is that these files are not useful for solving general user-level problems. 8.5 Linux monitoring Some monitoring of Linux statistics may be helpful. The vmstat command is useful and causes very little interference with other processes in Linux. $ vmstat 3 4 (4 samples at intervals of 3 seconds) procs -----------memory------------ ---swap--- -----io----- --system-- ----cpu---r b swpd free buff cache si so bi bo in cs us sy id wa 2 0 0 397600 101936 2398160 0 0 109 52 154 350 14 2 81 3 Chapter 8. Problem handling 99 r = number of Linux processes waiting for run time b = number of Linux processes sleeping swpd = amount of swap space used (KB) free = amount of idle memory (KB) buff = amount of memory used as buffers (KB) cache = amount of memory used as cache (KB) si, so = Linux paging activity in KB/second bi, bo = I/O activity in blocks/second in = interrupts per second cs = context switches per second us = percent of CPU time in user mode sy = percent of CPU time in kernel mode id = percent of CPU time idle wa = percent of CPU time waiting for I/O Important data from vmstat includes the Linux swap rates (si, so); any number here can degrade 1090 performance. If the 1090 suffers a page fault, then the whole System z CP operation must wait for the page fault to be resolved. The wa statistic (CPU percentage waiting for I/0) provides an indirect indication of I/O overload. The top command provides data about individual Linux processes. We are most interested in the emily process (which is the name of the Linux process representing the CP), but information about various device manager processes can be useful in spotting bottlenecks. Enter q from the keyboard to terminate the top command. $ top top - 11:14:14 up 1:24, 3 users, load avg: 1.26, 1.15, 1.02 tasks: 128 total, 1 running, 121 sleeping, 6 stopped, 0 zombies CPU(s): 49.9% us, 0.2% sy, 0.0% ni, 49.7% id, 0.0% wa 0.0% hi, 0.0% si mem: 3111660k total, 2719204k used, 392456k free, 105356k buffers swap: 2104504k total, 0k used, 2104504k free, 2397740k cached PID USER PR 7040 ibmsys1 25 7051 ibmsys1 16 NI Virt RES SHR 0 1549m 1.5g 1.5g 0 1510m 36m 36m S %CPU %MEM TIME COMMAND S 100 49.6 35:41.2 emily S 0 1.2 0:03.1 awsckd The Xosview program provided with openSUSE Linux, if installed, can be started from System Monitor XOsview. It provides a very dynamic display of individual processor usage, memory usage, paging, and so forth. This program uses X11 graphics and creates more overhead than vmstat or top. If you are concerned about paging exposures on your system, we suggest that XOsview be started before starting the 1090. The XOsview program, by default, uses a split line to display PC processor activity. Half of the line indicates instantaneous activity and the other half of the line shows an average rate with a decay factor averaged over several seconds. The decay presentation may be removed as follows: # cd /usr/lib/X11/app-defaults # gedit XOsview Change *cpuDecay from True to False. 100 IBM System z Personal Development Tool: Volume 3 Additional Topics 9 Chapter 9. Linux for System z Linux for System z is not an IBM product and is not distributed by IBM. Several Linux products and distributions can be considered under the generic name of “Linux for System z.” There is no equivalent of an AD-CD available for Linux for System z. Both Red Hat Enterprise Linux (RHEL 6.4) for System z and SUSE Linux Enterprise Server (SLES 11 with SP 2) for System z have been tested and used with the current release of zPDT. A variety of installation procedures may be used for both products; we do not attempt to cover the various techniques in this series of zPDT documentation. We do note that the zPDT ipl_dvd command may be relevant if your Linux for System z distribution is on a DVD and the DVD is configured for direct installation. © Copyright IBM Corp. 2009, 2013. All rights reserved. 101 102 IBM System z Personal Development Tool: Volume 3 Additional Topics 10 Chapter 10. LAN notes A basic LAN setup, for TCP/IP using QDIO interfaces, is covered in the second volume in this document series. This chapter discusses additional options and usage notes. 10.1 OSA CHPIDs Important: Starting with zPDT Version 1 Release 3, the find_io command detects all LAN interfaces known to Linux, regardless of whether the interface is up, down, or running. Previous zPDT releases detected only interfaces that were not down. This change may result in different default path names from previous releases, and require corresponding devmap changes to path identifiers. LAN interfaces (other than tap) should be configured and tested on the base Linux system before attempting to use one or more interfaces for OSA Express emulation. The Ethernet adapters used by awsosa are identified by the path parameter in the devmap and, optionally, in conjunction with an interface name. The find_io command displays the current Ethernet device configuration as seen by zPDT. A default path is assigned for most interfaces. (This is to provide compatibility with earlier zPDT versions that did not allow an interface named to be specified in the device map). An example of the results of issuing a find_io command is as follows: $ find_io Path -----F0 F1 F8 F9 * A0 A1 A2 Interface Current Name State ----- ---------------eth0 UP, RUNNING eth1 UP, RUNNING wlan0 UP, NOT-RUNNING pan0 DOWN br0 UP, RUNNING tap0 DOWN tap1 DOWN tap2 DOWN © Copyright IBM Corp. 2009, 2013. All rights reserved. MAC Address ----------------00:26:2d:f7:3b:4e 00:12:0e:4b:eb:0d 00:23:15:17:1f:24 36:e6:26:4e:1c:b4 a2:ac:36:48:19:d2 02:a0:a0:a0:a0:a0 02:a1:a1:a1:a1:a1 02:a2:a2:a2:a2:a2 IPv4 IPv6 Address Address -------------- -------------9.56.64.36 fe80::226:2dff:fef7:3b4e%eth0 9.56.64.18 fe80::212:eff:fe4b:eb0d%eth1 * * * * * fe80::a0ac:36ff:fe48:19d2%br0 * * * * * * 103 A default path may not be shown for all the listed interfaces. The rules are: Every OSA definition in the device map must have a unique path specified. The path names displayed by find_io are the default values and are used if an interface is not specified in the OSA definition. The default paths A0-A8 are used only for tap (tunnel) interfaces. Path A0 corresponds to tap0, A1 corresponds to tap1, and so forth. The default paths F0-FF are assigned for other interfaces. A maximum of 16 defaults paths are assigned for other interfaces. If more than 16 other interfaces exist, they must be specified with interface names in the device map. The Ethernet interface names are listed in alphabetical order, with exceptions. Nomenclature such as ethx, em[1,2,3,4], and p<slot>p<port> cause the motherboard interfaces to be listed first. Wireless interfaces with names wlan[0,1,2,...] are assigned after the other interfaces. If there are fewer than eight other interfaces the wireless path assignments begin with F8. Interface names br[x] and virbr[x] are listed but not assigned default paths because these interfaces are not generally used for OSA Express emulation. Interfaces for pan[x] are listed and assigned default path names but have not been investigated or tested for zPDT usage. Linux alias addresses are not listed and are not relevant for zPDT OSA usage. The other find_io information (status, MAC address, IP addresses) are informational. Note that the IP addresses are those used by the hosting Linux machine. z/OS (or another System z operating system) running within a zPDT instance would use different IP addresses for these interfaces. The devmap name statements for OSA devices might look like one of the following: name name name name awsosa awsosa awsosa awsosa 0013 0023 0033 0043 --path=A0 --path=F0 --path=FF --path=E6 --pathtype=OSD --tunnel_intf=y --pathtype=OSD --pathtype=OSD --interface=wlan0 --pathtype=OSD --interface=eth0 Notes corresponding to these examples are: The first example is a normal tunnel definition, and would use interface tap0, which corresponds to default path A0. The second example uses path F0 and this would correspond to whatever interface find_io shows is associated with default path F0. The third example uses the --interface parameter to associate a Linux interface (wlan0) with an arbitrary two-byte hexadecimal path name (FF). (This arbitrary path name must not conflict with other path names in the device map.) The forth example illustrates that any path can be assigned to an interface. Only one path may be assigned to an interface. The MAC addresses for tap devices are arbitrary and not generally meaningful. The IP address used during OSA Express emulation is set by the TCP/IP PROFILE parameter for z/OS, or the equivalent when using a different System z operating system. These addresses are not shown by find_io because they are not known to Linux. OSA operation through a tunnel may have more parameters in the awsosa name statement: name awsosa 50 --pathA0 --pathtype=OSD --tunnel_intf=y --tunnel_ip=10.1.1.1 --tunnel_mask=255.255.255.0 The --tunnel_ip and --tunnel_mask defaults are as follows CHPID A0 104 LinuxName tap0 default IP address 10.1.1.1 default IP mask 255.255.255.0 IBM System z Personal Development Tool: Volume 3 Additional Topics A1 tap1 10.1.2.1 A2 tap2 10.1.3.1 A3 tap3 10.1.4.1 and so forth through AF and tap15.1 255.255.255.0 255.255.255.0 255.255.255.0 In general, the multiple tunnel interfaces are intended for use with multiple zPDT instances. The same tunnel interface cannot be shared by multiple zPDT instances. The third factor in the default IP address for the tap devices is the second digit of the path name plus one. The default IP address for the tap devices (such as 10.1.1.1) is the IP address at the Linux end of the tunnel. The IP address at the z/OS end could be anything, but generally should be on the same subnet. We typically use addresses such as 10.1.1.1 (Linux end) with 10.1.1.2 (z/OS end). The awsosa device manager can emulate QDIO or non-QDIO operation. The mode is selected by the TYPE parameter in the devmap. Type OSD specifies QDIO operation and type OSE specifies non-QDIO operation. Non-QDIO operation is often noted as LCS operation or 3172 operation, although these descriptions are not exactly correct. Non-QDIO operation can involve TCP/IP or SNA (or both), although SNA usage is not supported with the 1090. 10.2 Non-QDIO operation When using the non-QDIO interface to the emulated OSA-Express2 function, the key parameters might look like the following: Devmap [manager] name awsosa 22 --path=F0 --pathtype=OSE device E20 osa osa --unitadd=0 device E21 osa osa --unitadd=1 z/OS TCP/IP Profile DEVICE LCS1 LCS E20 AUTORESTART LINK ETH1 ETHERNET 0 LCS1 HOME 192.168.0.61 ETH1 ... BEGINRoutes ; Destination Subnet Mask FirstHop ROUTE 192.168.0.0 255.255.255.0 = ROUTE DEFAULT 192.168.0.1 ENDRoutes ... START LCS1 Link Size ETH1 MTU 1492 ETH1 MTU DEFAULTSIZE This example assumes that z/OS contains an appropriate CTC or OSA definition for addresses E20 and E21.2 Different addresses could be used, of course, but they must match the IODF in your z/OS system. The HOME address and ROUTE statements in the example are just examples, of course. The GATEWAY statements could be used instead of the ROUTE 1 2 The path names are expressed in hex and the Linux interface names have decimal suffixes. LAN operation in LCS mode can use CTC definitions in the z/OS IODF. This is a carryover from earlier LAN implementations. Chapter 10. LAN notes 105 statements. The --unitadd parameter is used in the devmap because the default OSA unit addresses3 would be 20 and 21 (using the two low-order digits of the device number) and we want unit addresses 0 and 1.4 10.3 More complete QDIO example We used the find_io command to determine that our Ethernet adapter was eth0, and that it was assigned as CHPID F0. The tunnel interface is always CHPID A0. We elected to use the QDIO mode for both OSA interfaces. We used the following devmap: [system] memory 3600m 3270port 3270 processors 2 [manager] name aws3274 0002 device 0700 3279 3274 device 0701 3279 3274 device 0702 3279 3274 device 0703 3279 3274 mstcon tso tso tso [manager] name awsckd device 0A80 device 0A81 device 0A82 device 0A83 device 0A84 device 0A85 device 0A86 device 0A95 device 0A96 /z/ZCRES1 /z/ZCRES2 /z/ZCSYS1 /z/ZCUSS1 /z/ZCPRD1 /z/ZCPRD2 /z/ZCPRD3 /z/WORK01 /z/WORK02 0001 3390 3390 3390 3390 3390 3390 3390 3390 3390 3990 3990 3990 3990 3990 3990 3990 3990 3990 #local volumes, not part of AD [manager] name awsosa 0013 --path=A0 --pathtype=OSD --tunnel_intf=y device 400 osa osa device 401 osa osa device 402 osa osa [manager] name awsosa 0003 --path=F0 --pathtype=OSD device 404 osa osa device 405 osa osa device 406 osa osa [manager] name awstape 004 device 581 3490 3490 [manager] 3 4 106 This unit address is the (emulated) hardware address within the (emulated) OSA control unit. It is not the device number (“address” in common terminology). The default OAT used by OSA requires unit addresses 0 and 1 for TCP/IP when in OSE mode. IBM System z Personal Development Tool: Volume 3 Additional Topics name awscmd 1000 device 580 3490 3490 The following lines are in VTAMLST member OSATRL1: OSATRE1 VBUILD TYPE=TRL OSATRL1E TRLE LNCTL=MPC,READ=(0400),WRITE=(0401),DATAPATH=(0402), PORTNAME=PORTA,MPCLEVEL=QDIO OSATRL2E TRLE LNCTL=MPC,READ=(0404),WRITE=(0405),DATAPATH=(0406), PORTNAME=PORTB,MPCLEVEL=QDIO X X We used the following TCP/IP profile in z/OS: ARPAGE 5 DATASETPREFIX TCPIP AUTOLOG 5 FTPD JOBNAME FTPD1 PORTMAP ENDAUTOLOG ; FTP Server ; Portmap Server PORT 7 UDP MISCSERV ; Miscellaneous Server (there follows a long list of standar service ports) SACONFIG DISABLED DEVICE PORTA MPCIPA LINK ETH1 IPAQENET PORTA HOME 10.1.1.2 ETH1 DEVICE PORTB MPCIPA LINK ETH2 IPAQENET PORTB HOME 192.168.1.62 BEGINRoutes ; Destination Subnet Mask ROUTE 192.168.1.0 255.255.255.0 ROUTE 10.0.0.0 255.0.0.0 ROUTE DEFAULT ENDRoutes First Hop = = 192.168.1.1 Link Size ETH2 MTU 1492 ETH1 MTU 1492 ETH1 MTU DEFAULTSIZE ITRACE OFF IPCONFIG NODATAGRAMFWD TCPCONFIG RESTRICTLOWPORTS UDPCONFIG RESTRICTLOWPORTS START PORTA START PORTB Chapter 10. LAN notes 107 10.4 Large or jumbo usage The current zPDT OSA emulation does not support large or jumbo packets. The largest MTU size that should be specified in a TCP/IP profile definition is 1500 bytes. Also, the large send option provided with some TCP/IP implementations (such as z/OS) may not be used with this release of zPDT OSA. Note that large or jumbo packets are not the same as the large send function. 10.5 VLAN usage z/PDT OSA emulation supports VLAN usage provided the underlying Linux NIC card or NIC driver do not impose their own VLAN control. VLAN works properly in the systems IBM uses for tests, but may not work in all systems. Unfortunately, documentation at this level of detail may be difficult to find for some NIC adapters and drivers. 10.6 Performance Recent Linux releases attempt to use TCP/IP offload functions. These are not usable with OSA emulation. The effect is that OSA performance is poor, especially with FTP. The following Linux command may improve performance: # ethtool -K eth0 rx off As shown, this must be entered as root. The eth0 operand must be adjusted for your system. For example, it might be em1 or something similar. 10.7 Local routers and DHCP In most cases the 1090 user has a single network Ethernet cable interface available, probably connected to a router somewhere external to the user. This external network interface typically expects a DHCP client, and this presents two problems: The System z operating system (z/OS, for example) might not operate as a DHCP client. That is, it may want a fixed IP address. In general, network-connected users do not have fixed IP addresses. The 1090 machine may have multiple LAN adapters, requiring multiple network connections. The second book in this series describes a number of ways to connect z/OS (or other System z operating systems) to larger networks. Another option is to use a small router, as shown in Figure 10-1. 108 IBM System z Personal Development Tool: Volume 3 Additional Topics Fixed IP addresses DHCP address 1090 machine Router with NAT function Multiple LAN adapters, if needed Other PCs for x3270 or PCOM sessions LAN connection "in the office wall" Figure 10-1 Small hub or router usage The Network Address Translation function in the router allows your machine to work with fixed IP addresses (provided by the NAT router).5 These are typically in the 192.168.xxx.xxx range. The router, in turn, works with variable DHCP addresses provided by your external network. If NAT is not required, the router in the illustration can be changed to a simple hub. (The hub option assumes the LAN connection can operate with a hub; this is not always the case and you may need help from your network administrators to determine the best configuration.) We specified the base router IP address (192.168.0.1) as the default gateway address in our TCP/IP definitions (for both Linux and z/OS). For a multiuser system we connected additional PCs to the router (which supplied its own range of DHCP addresses, if requested). The additional PCs can connect to aws3270 (using the Linux IP address and port 3270) or to OSA (using the IP address assigned, specified in the z/OS TCP/IP PROFILE). Most routers can be configured to pass incoming port connections to specific local IP addresses. This requires some work with the router software, but allows the handling of incoming connections to z/OS (coming from a DHCP-based external network). 10.8 Shared Ethernet adapters Scenario 4, in the LAN descriptions in the second volume of these books, uses a single “real” Ethernet adapter (eth0, in the base Linux) for both Linux and z/OS. Some users find this confusing. Figure 10-2 on page 110 illustrates this usage in more detail. 5 The router might also function as a DHCP server, providing DHCP addresses in a portion of its address range. Chapter 10. LAN notes 109 ftp TSO VTAM System z ftp Telnet server Device managers TCP/IP IOS PC system aws3274 awsosa x3270 Different IP addresses Linux TCP/IP Linux One Ethernet port for everything ftp user Telnet TN3270e Browser Telnet TN3270e ftp Figure 10-2 Shared Ethernet adapter The awsosa device manager is independent from Linux TCP/IP, although it can use the same Ethernet adapter. Up to 16 TCP/IP stacks (in z/OS or z/VM) can connect to the awsosa device manager. Each of these TCP/IP stacks defines its own IP address. The configuration shown in Figure 10-2 would have two IP addresses, one for Linux TCP/IP and one for z/OS TCP/IP. These IP addresses are unrelated. External routing rules typically require that both IP addresses be on the same subnet, but this rule is external to the 1090. (Many examples in this documentation series use 192.168.0.60 for the Linux IP address and 192.168.0.61 for the z/OS IP address.) The system in this illustration provides two paths for a user to connect to z/OS TSO. One path is through Linux TCP/IP and the aws3274 device manager. The other path is through the awsosa device manager and z/OS TCP/IP. (In this illustration, the awsosa port could be operating in either QDIO or non-QDIO mode.) Note that there is no connection between OSA and the base Linux in this situation. It is a Linux design oddity that the two users of the physical Ethernet interface cannot communicate with each other. Note these differences: The first path mentioned does not involve z/OS TCP/IP. The TN3270e client connects to the IP address used by the base Linux system. The client also specifies the port number assigned to the aws3274 device manager; this is port 3270 in our examples. z/OS accepts the connection as a coax-attached local 3270 terminal and is unaware that the client is actually connected via Linux TCP/IP. For this operation the z/OS OSA and TCP/IP functions need not be implemented. The MVS console must use this path. The second path uses a different IP address for OSA connections (assigned by z/OS PROFILE statements, or equivalent). z/OS TCP/IP internally passes TN3270e client connections to VTAM and thence to TSO. z/OS TCP/IP can also manage ftp sessions, telnet sessions, and so forth. The MVS console cannot use this path. 110 IBM System z Personal Development Tool: Volume 3 Additional Topics Figure 10-3 extends this concept to include a tunnel connection between z/OS and the base Linux. ftp TSO VTAM System z Telnet server IOS TCP/IP PC system x3270 aws3274 ftp Note that only a single Ethernet port is used here. awsosa awsosa Device managers Different IP addresses Tunnel Linux TCP/IP Linux One Ethernet port ftp user Telnet Browser Telnet ftp Figure 10-3 Shared Ethernet and tunnel The tunnel environment allows connections between Linux TCP/IP applications (such as ftp, telnet, and x3270) and OSA TCP/IP applications6 (such as ftp, the TN3270e server that is part of z/OS communications manager, and so forth). The tunnel environment creates a virtual adapter similar to an Ethernet adapter. This virtual adapter is assigned its own IP address on both the Linux and OSA side, as illustrated in Figure 10-3. We strongly advise that the tunnel IP addresses (for the Linux side and the OSA side) be on a subnet separate from any other IP addresses involved in the system. We emphasize this in our documentation by using 10.x.x.x addresses for the tunnel and 192.168.x.x addresses for other connections. 10.9 Base Linux LAN notes Messages such as the following: SFW2-INext-DROP-DEFLT IN=tap0 OUT= MAC= SRC=10.1.1.1 ...... may be seen in the Linux log (with a dmesg command). These messages are related to the use of multicasting when looking for a DNS name server. The source address indicated in the message (10.1.1.1) is associated with a tunnel (tap) device in typical zPDT operation and is unlikely to find a DNS server. These messages do no harm. If your Linux system has no need to find a DNS server (on any LAN interface) you can eliminate the messages by editing /etc/host.conf and changing multi on to multi off. 6 A more exact statement would reference TCP/IP applications within an operating system that is using the OSA-Express2 interface, of course. In our examples this would be z/OS applications (such as the TN3270e server) using the z/OS TCP/IP stack that interfaces to OSA-Express2. We abbreviate this detail by simply referring to an OSA application. Chapter 10. LAN notes 111 10.10 Ethernet SNA IBM does not support Ethernet SNA operation. This means that problems or defects will not be addressed by IBM if you attempt to use SNA operation over Ethernet. However, we note that some 1090 users have worked with Ethernet SNA successfully. If you attempt this, note the following: The default OAT for the awsOSA device manager in LCS mode has TCP/IP at unit addresses 0 and 1. It has SNA only at unit address 2. There is no OSAD device (for use with OSA/SF) in current z/OS AD-CD systems. While SNA performance may be acceptable for simple testing, it is unlikely to be acceptable for heavier usage. 112 IBM System z Personal Development Tool: Volume 3 Additional Topics 11 Chapter 11. DASD volume migration The zPDT package includes a client-server utility for moving 3380/3390 volumes from a remote z/OS or z/VM system to zPDT. The server portion of this utility runs under z/OS or z/VM on the remote System z. This is typically a large System z, but it could be another zPDT system. The client portion runs on the base Linux on your zPDT machine.1 The client and server are connected via TCP/IP. This utility is especially useful when transferring many volumes to a zPDT system. The server portion (on the remote z/OS or z/VM) reads all the tracks on a selected volume and sends them to the client (on the local base Linux). The client transforms it into the emulated 3380/3390 format used by zPDT and writes it as a Linux file. You then use this file as an emulated volume under zPDT. One volume is processed for each client command that is sent to the server; you can create a Linux script with multiple invocations. The server portion (on z/OS) requires specific RACF authorizations. It can copy active volumes, although the usefulness of the copy might be questionable, depending on the volume activity at the time. The z/VM version requires that the server users have access to the full volumes being sent. The speed of the copies depends on the TCP/IP bandwidth between the client and server, and the contents of each track. A considerable amount of data is involved on a typical 3390 volume; the transmission may take some time. A conceptual overview is shown in Figure 11-1 on page 114. 1 zPDT need not be operational while this utility is being used. Due to expected LAN and disk activity, it is probably better to use the migration utility when zPDT is not active. © Copyright IBM Corp. 2009, 2013. All rights reserved. 113 Typical z/OS system (could be z/VM instead) etc zPDT probably not active Linux system (with zPDT installed) etc VTAM TCP/IP Client program etc Batch initiator TCP/IP connection Server program TSO File for emulated volume Linux z/OS 3390 volumes Source system Target system Figure 11-1 Volume migration overview (z/OS version) 11.1 Warnings There are limitations on simply copying and using volumes from a z/OS system (and also from a z/VM system, with slightly different details). These limitations are not related to zPDT or to the migration utility described in this chapter. A z/OS disk volume is not necessarily a stand-alone entity, depending on what is on the volume. In particular, if the volume contains VSAM data sets of any type (including catalogs) then the volume contents are usable only if the complete VSAM metadata is available. Volume AAA may contain a VSAM data set that is cataloged on volume BBB. The VSAM information on volume AAA (including metadata in the VVDS) must be synchronized with the catalog information on volume BBB. In this simple example, migrating (copying) both volumes might suffice, provided the catalog on volume BBB is later properly connected to the master catalog on the target system. In general, volumes that do not contain VSAM data sets (or VVDS material) are safer to migrate in a stand-alone fashion. Migrating all the volumes of a z/OS system should be safe because this would include all the relevant catalogs and VSAM data volumes. A second warning is related to the migration utility described in this chapter. No enqueue functions are used by this utility. Transferring an active volume is probably not a good idea. If the volume is active, it might have logical errors when the transferred copy is used (for example, the VTOC might not reflect an additional extent that was allocated after the tracks containing the VTOC were sent or the contents of a z/VM minidisk on the volume might be changing as the associated tracks are copied). With a z/VM system, the VM directory must be synchronized with any DASD volumes containing minidisks. 11.2 Operational characteristics of the migration utility The following characteristics of this utility are important: 114 IBM System z Personal Development Tool: Volume 3 Additional Topics Complete volumes (3380 or 3390) are transferred. This includes IPL text, volume labels, VTOC, and unallocated space. The logical contents of the volume are not examined. Data sets on the volume are not recognized. The utility simply copies and transfers all the tracks on the volume. It does not check whether the tracks are allocated (VTOC or VM equivalents) or in use (ENQ) or linked to a specific catalog (for VSAM, for example). A read track CCW is used to read the data on each track of a CKD volume. The amount of data on each track is variable. This means the time to transmit a volume is variable, depending on how much data is on each track. Track data is not compressed for transmission. The source z/OS or z/VM (where the server component runs) is typically a large System z, but this is not required. It could be a zPDT system. The receiving Linux side must be a Linux system with zPDT installed (but probably not active). The received copy of the source disk volume is stored in the awsckd (or awsfba or awstape for z/VM) format used by zPDT. Specific RACF definitions are required for the source z/OS side. These definitions can protect the utility from misuse. The utility server program must reside in an authorized library for z/OS. The utility server program is typically started as a batch job. It automatically terminates after 15 minutes of inactivity. The utility client program is run as a normal Linux command. It is possible to create a script file with multiple transfer commands, so that multiple volumes may be transferred in an unattended manner. TCP/IP port 3990 is used by default. The port number may be changed when starting the server and client. Both 3380 and 3390 volumes, any size, may be migrated. This includes 3390 EAVs (“large volumes”). In practice, this utility is likely to run unattended because copying multiple volumes can take considerable time. We suggest you first try a single volume and monitor the operation while it is running. Only one transfer may be active for the server. It is possible to run multiple servers in parallel (with different IP port numbers for each) but the usefulness of this is questionable. The z/OS version is only for the migration of CKD DASD volumes. The z/VM version can migrate CKD and FBA DASD volumes. 11.3 Installation of the migration utility for z/OS A number of steps are required to install the migration utility. They are: 1. Upload the server module and install it in an authorized z/OS library. (The server module is provided in the /usr/z1090/bin directory that contains all the zPDT executables. It is an unloaded PDS member that has been processed by the TSO XMIT command.) 2. Provide the required RACF definitions. 3. Determine whether TCP/IP port 3990 (on the z/OS side and the Linux side) has been assigned for other purposes and ensure that the port can pass through any firewalls. 4. Create a batch job to run the server. Chapter 11. DASD volume migration 115 11.3.1 Server installation File /usr/z1090/bin/ZOSSERV.XMIT must first be uploaded to a z/OS data set with DCB characteristics RECFM=FB, LRECL=80, BLKSIZE=3120. This XMIT file contains an unloaded PDS load library with one member. You can begin restoring this material by preallocating two data sets with the following job: //OGDEN77 JOB 1,BILL,MSGCLASS=X // EXEC PGM=IEFBR14 //A DD DISP=(NEW,CATLG),UNIT=3390,VOL=SER=ZBSYS1,SPACE=(TRK,5), // DCB=(RECFM=FB,LRECL=80,BLKSIZE=3120,DSORG=PS), // DSN=IBMUSER.SEQ.HOLDING //B DD DISP=(NEW,CATLG),UNIT=3390,VOL=SER=ZBSYS1,SPACE=(TRK,(3,3,3)), // DCB=(LRECL=0,BLKSIZE=32760,RECFM=U),DSN=IBMUSER.PDS.HOLDING (The volser and DSNs are arbitrary. An experienced z/OS system programmer can handle this upload and installation in multiple ways. We present a basic example here. You can, for example, use ISPF to create these two holding data sets.) After the receiving data set is ready, use binary mode and either IND$FILE or FTP to transfer /usr/z1090/bin/ZOSSERV.XMIT to IBMUSER.SEQ.HOLDING. It is a relatively small file. Be certain to use a binary transfer. After the module has been uploaded to the sequential holding data set, issue the following TSO commands (using the appropriate data set names, of course): RECEIVE INDATASET('IBMUSER.SEQ.HOLDING') INMR901I DATASET ...... INMR906A Enter restore parameter or 'DELETE' or 'END' + DATASET('IBMUSER.PDS.HOLDING') INMR001I Restore successful .... The name of the executable module, once restored, is ZPDTMSRV. You must select an authorized library (preferably on the LNKLST) to contain the server module. You must have authority to update this library. We use USER.LINKLIB as an example of an authorized library in the LNKLST, but your source system is probably different. Userid IBMUSER typically has update authority for all system libraries and we use this userid in our example. Again, your source system may be different. You need to copy member ZPDTMSRV from your temporary PDS to your authorized library. The easiest way to do this is by using ISPF option 3.3. In the first panel (of ISPF 3.3), select: Option=====> c .... (“from” data set name) Name. . . . . . . ‘IBMUSER.PDS.HOLDING’ (press Enter) (“to” data set name) Name. . . . . . .’USER.LINKLIB’ (press Enter) . ZPDTMSRV (overtype the period with the letter S and Enter) This completes the server installation. The holding data sets can be deleted. 116 IBM System z Personal Development Tool: Volume 3 Additional Topics 11.3.2 RACF requirements Important: Consult with the RACF administrator for your source z/OS system before making any RACF changes. This is especially important if the DASDVOL class is active in the installation. The server program requires RACF class DASDVOL to be active and the server program must have at least READ access to all volsers to be transferred. You must determine whether the DASDVOL class is active and used on the system where you install the migration utility server. You can do this by logging onto TSO with a userid having RACF SPECIAL authority and issuing these TSO commands from a READY prompt or ISPF option 6: SETROPTS LIST RLIST DASDVOL * (check the list of active classes) (see if any profiles are defined) If these checks are negative, you can assume that the DASDVOL class is not being used. DASDVOL not already in use The next step is to decide whether only certain volumes should be subject to use by this migration utility or whether all volumes might be accessed for migration. If you elect to potentially allow migration of all volumes, enter these TSO commands: SETROPTS CLASSACT(DASDVOL) SETROPTS RACLIST(DASDVOL) RDEFINE DASDVOL ** UACC(ALTER) SETROPTS RACLIST(DASDVOL) REFRESH (activate the DASDVOL class) (optional, but recommended here) (allow universal alter access) (if you RACLISTed the class) Be aware that the DASDVOL class is used only by a selected group of utility programs, such as dump/restore. Allowing UACC(ALTER) does not open all your data sets to access by all users. Whatever RACF data set protection you have in place (via ADDSD and PERMIT commands) is still effective. This is all the RACF setup required if DASDVOL was not initially active and if you want to allow the migration server to access any volume. If you want to limit the volumes subject to migration, you should work with an experienced RACF administrator. The general technique is to restrict global access to DASDVOL (perhaps with a UACC(NONE) condition) and then issue PERMIT commands to cover the volumes you want to migrate. For example: PERMIT VOL123 CLASS(DASDVOL) ID(IBMUSER) UACC(READ) PERMIT ADCD* CLASS(DASDVOL) ID(IBMUSER) UACC(READ) SETROPTS RACLIST(DASDVOL)REFRESH (if you RACLISTed DASDVOL) In this example, volser VOL123 and any volser beginning with ADCD can be accessed by the migration utility. The use of the DASDVOL class may have side effects on other utility programs. If DASDVOL was not active before your migration activities, you may want to deactivate it when the migration activities are completed: SETROPTS NORACLIST(DASDVOL) SETROPTS NOCLASSACT(DASDVOL) Chapter 11. DASD volume migration 117 DASDVOL already in use If you find that the DASDVOL class is active on your source system, we strongly suggest that you discuss the situation with the system programmers managing the source system. Your requirements are simple: you (meaning the userid who will run the migration server program) need DASDVOL READ access to whatever volsers you intend to migrate. TCP/IP port By default, the migration programs use TCP/IP port 3990, but this can be changed. You can look at the TCP/IP PROFILE on the z/OS system to see whether port 3990 is reserved for another application. However, another application could dynamically acquire the port. There is no easy way to prevent this. We suggest specifying a different port number only if there are error messages when you try to start the migration server or client. Someone must also verify that whatever firewalls are active will allow port 3990 communication. 11.4 Operation of the server under z/OS The server should not be started until you are ready to use it. It automatically terminates after ten minutes of inactivity. The following JCL could be used to start the server: //MIGSERV JOB 1,OGDEN,MSGCLASS=X,TIME=1440 //ZPDTMIG EXEC PGM=ZPDTMSRV,REGION=0M,PARM='3990' //SYSUDUMP DD SYSOUT=* //SYSPRINT DD SYSOUT=* //SYSTCPD DD DISP=SHR,DSN=ADCD.Z111.TCPPARM(TCPDATA) Notes: The PARM field is not needed if you use the default port number (which is 3990). The TIME=1440 parameter is suggested because transmitting a full volume (or several volumes) can take considerable time. ( It is typically much less than 1440 minutes!) The SYSTCPD statement must point to the DATA used by the z/OS TCP/IP stack. You must determine the correct data set name for your z/OS system. One way to do this is to examine the procedure used to start TCP/IP on your system. If your authorized library is not in LNKLST, you will need a JOBLIB or STEPLIB statement that references only authorized libraries.. The user submitting this job must have a userid that has at least READ access to the appropriate volsers in DASDVOL. This job must be submitted by a userid who has at least READ access to the required volumes in the RACF DASDVOL class. 11.5 Installation of the server under z/VM The z/VM system must be Release 5.4 or later. The ZVMSERV.XMIT file is located with other zPDT binary material in /usr/z1090/bin on the zPDT system. This must be uploaded in BINARY, FIXED LRECL 80 format to a CMS user’s A disk. (This file essentially contains a card deck.) After this is complete, do the following from CMS: 1. Issue the command CP SPOOL PUN. 118 IBM System z Personal Development Tool: Volume 3 Additional Topics 2. Issue the command PUNCH ZVMSERV XMIT A (NOH 3. Issue the command RDRLIST. 4. Beside the file in your RDRLIST, issue the command RECEIVE. This should result in the reconstructed executable file on your CMS A disk. This completes the server installation. 11.6 Operation of server under z/VM Your z/VM must have TCP/IP active and connected to the appropriate network. The CMS user running the migration utility must have access to the volumes to be migrated. The CMS user starts the utility by issuing a ZVMSERV command; a single operand specifies the TCP/IP port number and this defaults to port 3990. When started, the server should indicate that it is waiting for a client connection. The server will time out after 10 minutes without a client connection. If a z/VM mini-disk is migrated, it will appear as a small 3390 volume on the receiving system. That is, it will no longer be a mini-disk on a larger z/VM volume. 11.7 The client commands There are three client commands: hckd2ckd - used with both z/OS and z/VM to migrate a CKD DASD volume. hfba2fba - used only with z/VM to migrate a FBA DASD volume. htape2tape - used only with z/VM to migrate a tape volume to a zPDT awstape volume. This general syntax of the client commands (entered on the Linux client machine, using a normal Linux command window) is: hxxx2xxx host[:port] outfile [-n ][-v xxxxxx][-u aaaa] [--norestart][--volser xxxxxx][--unit aaaa] [-e eof-count] [-n] [--eof eof-count] host is the TCP/IP name of the system with the matching server program. This may be a dotted-decimal address or a name that can be resolved by Linux TCP/IP. :port is a TCP/IP port number to be used by both the client and server program. It defaults to 3990. outfile is a file name (on the current Linux) system where the migrated volume is placed (in awsckd, awsfba, or awstape format). -n or --norestart indicates that a previous incomplete volume transmission is not to be restarted where it ended; the complete indicated volume is to be sent again. This applies only to hckd2ckd. -n (for htape2tape) means the awstape output is not to be compressed. -v or --volser indicates the 3380/3390 volume (on the remote z/OS system) that is to be copied (migrated). Chapter 11. DASD volume migration 119 -u or --unit indicates the address (device number) of the volume that is to be copied (migrated). -e or --eof indicates the number of consecutive tape marks that will indicate the end of the input tape. This is used only with z/VM tapes. The default is two tapemarks. Either the -u or -v parameter must be supplied for DASD, but not both; the -u parameter would normally be used for tapes. Once the server is started on the z/OS or z/VM system, the client may be started on the Linux system. Remember that zPDT need not be operational for this. (We generally recommend that it should not be operational, because the migration utility can place a heavy load on the LAN interface.) Examples of commands that could be used to run the client are as follows: $ hckd2ckd 192.168.0.99 /z/VOL123 -v VOL123 $ hckd2ckd BIG.ZOS.ADDR:4990 /z/VOL678 -u A8F $ hckd2ckd 192.168.0.99:4990 /z/host.WORK23 -v WORK23 --norestart The first operand is the IP address of the z/OS system where the server is running. This may be in dotted-decimal form or as a name that the Linux system can resolve. The TCP/IP port number can be changed as shown in the examples, where we use port 4990 in two cases. (The server must have been started using the same port number, of course.) The second operand is the Linux file name used to store the migrated volume. Either the -v or -u parameter must be specified. The -v parameter is a volser and the -u parameter is a device address (device number) on the server system; these determine which volume is to be processed. 11.8 Additional notes The migration of a tape volume results in a compressed awstape output file. The -n option will produce an uncompressed awstape output file. Devmap After a volume has been migrated to Linux, you can add it to your devmap and access it from zPDT. You should also check the permission bits for the file. (The zPDT system must have read/write access to it.) Our examples are in terms of z/OS volumes, but the volume could be for z/VM, z/VSE, or Linux for System z. Labelled tapes The migration utility (z/VM version) does not inspect tape labels; they are simply treated as files. By default, the migration function stops when two adjacent tape marks are encountered. This can have two side effects: A null file in a labelled multifile volume can produce two adjacent tape marks that do not indicate the end of the tape. You must manually handle this situation. (Imbedded null files on tape are considered bad practice; this situation should be rare.) A multivolume labelled tape data set has only a single tape mark at the end of the first volume(s); the last volume is terminated by two tape marks. You can handle this by using the default termination indicator (two tape marks). This will produce an error message at the end of each of the initial volume(s); the error can be ignored. 120 IBM System z Personal Development Tool: Volume 3 Additional Topics Linux volumes We discovered an interesting situation when migrating Linux for System z volumes. Our particular experience was with SLES-10 SP1 (for System z), but it may apply to other distributions. When installing this distribution there are a number of fstab options that can be selected for controlling disk volume mounts. These include mounting by device name, volume label, UUID, device ID, or device path. The default is to mount by device ID. This produces a boot parameter list (and fstab) something like this: parameters='root=/dev/disk/by-id/ccw-IBM.750000000M1881.2c23.1c-part1' This disk identification is unique to the original disk drive and is useless when the volume is copied or migrated to another disk. In this situation, the migrated Linux volumes could not be booted. This identification is best changed when installing Linux by selecting the use of a volume label (for example, LABEL=rootfs) or device name (for example, /dev/dadda1) when initially creating the disk partitions. The naming can be changed later by carefully editing /etc/zipl.conf and /etc/fstab. In any event, the naming should be changed before migrating the volumes. Multiple TCP/IP stacks A z/OS system with multiple TCP/IP stacks presents an additional complication. In this situation, an additional step is needed in the server job: //MIGSERV JOB 1,OGDEN,MSGCLASS=X,TIME=1440 //STEP0 EXEC PGM=BPXTCAFF,PARM='TCP342' //* //ZPDTMIG EXEC PGM=ZPDTMSRV,REGION=0M,PARM='3990' //SYSUDUMP DD SYSOUT=* //SYSPRINT DD SYSOUT=* //SYSTCPD DD DISP=SHR,DSN=ADCD.Z111.TCPPARM(TCPDATA) The BPXTCAFF program is used to associate a specific TCP/IP stack with the current address space. The PARM value is the job name used to start the desired TCP/IP stack. Typical client usage A typical use of the client might be as follows: $ hckd2ckd AWSHTC015W AWSHTC090I AWSHTC091I AWSHTC095I AWSHTC096I AWSHTC097I AWSHTC098I 192.168.0.81 /z/ZBRES1 -v ZBRES1 No port specified, defaulted to 3990 Host name : 192.168.0.81:3990 Restart : No Vol-Ser : ZBRES1 Output : /z/ZBRES1 Transferring 3990 vooume of 3339 cylinders Cylinder nnnn ... We found that transferring a fairly full 3390-3 volume on a private 100 Mbps LAN took approximately 11 minutes. This consumed roughly 150 processor seconds on the source z/OS system (which was a zPDT system on a moderate-performance PC). When the migration is complete, the cylinder number displayed will be one less than the actual number of cylinders transferred. Also, there may be a delay (perhaps up to 30 seconds) between the last message and the time the command ends. Both these conditions are normal. Chapter 11. DASD volume migration 121 Migrating a list of volumes Using gedit or another editor, you could create a Linux file named, for example, mig: (contents of the mig file) hckd2ckd hckd2ckd hckd2ckd hckd2ckd hckd2ckd 192.168.0.81 192.168.9.01 192.168.9.01 192.168.9.01 192.168.9.01 /z/ZOS111/ZBRES1 -v ZBRES1 /z/ZOS111/ZBRES2 -v ZBRES2 /z/ZOS111/ZBSYS1 -v ZBSYS1 /z/ZOS111/ZBUSS1 -v ZBUSS1 /z/ZOS111/backup/MYVOL1xx -v MYVOL1 You could start the server program on the z/OS host and then execute the commands in your mig file: $ ./mig (execute the commands in file named mig) This will transfer all the volumes listed without any further manual intervention. 122 IBM System z Personal Development Tool: Volume 3 Additional Topics 12 Chapter 12. Channel-to-channel The awsctc device manager provides channel-to-channel (CTC) functions using TCP/IP communication paths. As shown in Figure 12-1, the connection can be within the same zPDT instance, between zPDT instances on the same machine, or between zPDT instances on different machines. Among other functions, CTC can be used by z/OS for GRS “rings”, NJE connections, TCP/IP connections, and so forth. zPDT zPDT awsctc zPDT awsctc awsctc zPDT Linux awsctc zPDT Linux Linux Linux Figure 12-1 CTC links for zPDT The awsctc device manager emulates IBM 3088-4 (or 3088-8) control units and devices.1 The 3088 is an older product that provided the “middle” function for connecting two channels to each other. Each channel saw the 3088 as a control unit that provided a number of devices (each of which was a connection path). Modern systems have this control unit function integrated with the channels, and physical 3088 boxes are no longer used. However, the logical function has not changed. The devmap stanza for awsctc appears as follows: 1 These are parallel channel control units. ESCON® CTC operation is not emulated. © Copyright IBM Corp. 2009, 2013. All rights reserved. 123 [manager] name awsctc 75 device E40 3088 3088 ctc://otherhost:3088/E42 device E41 3088 3088 ctc://192.168.0.70:3088/E43 The last parameter of the device statement contains three elements: A TCP/IP address (in dotted decimal form or as a name that can be resolved by Linux) Following a colon, a TCP/IP port number that is to be used on both the local and other system. The same port number is used on both ends of the connection.2 Following a slash, the device number (address) of the corresponding CTC device on the remote system. To specify this you must know how the devmap is defined on the other system. An example of a simple connection between two zPDT instances in two different machines is shown in Figure 12-2. zPDT Linux awsctc LAN awsctc 192.168.0.60 zPDT 192.168.0.100 Linux [manager] name awsctc 100 device E40 3088 3088 ctc://192.168.0.100:3088/E40 [manager] name awsctc 100 device E40 3088 3088 ctc://192.168.0.60:3088/E40 Figure 12-2 Simple two-system CTC definition In this example, two separate zPDT instances are shown. Because they are separate instances, the CUNUMBR (100 in the example) can be the same in both definitions (but there is no requirement to do this, of course). Both instances elected to use the same device number (E40) for the CTC device, although there is no requirement to do this. Both ends of the connection must specify the same port number (3088 in the example). Each definition specifies the IP address of the other base Linux system. Devmap notes The "ctc://" is optional, but if a protocol is specified it must be "ctc". "Well known" port numbers below 1024 cannot be used; the port number must be between 1024 and 65535. The IP address string cannot be specified via an awsmount command. Each CTC address must be defined. A real 3088 has multiple device numbers defined in blocks of 8, 16, 32, or 64 devices. For example, a 3088-4 would have 16 devices starting at a specified address. The emulated CTC does not do this. Each specific device number must be defined. 2 124 We use port 3088 for these examples because it is easy to remember. There is nothing special about this port number. IBM System z Personal Development Tool: Volume 3 Additional Topics A CTC connection within the same zPDT instance might be defined as follows: [manager] name awsctc 300 device E40 3088 3088 ctc://localhost:3088/E42 device E42 3088 3088 ctc://localhost:3088/E40 Note that the two device statements refer to each other’s device number. Status display The AWSSTAT command may be used to display the status of the CTC device. When the device's peer is not yet available, the status flip flops between Connecting and Accepting. Once the peer is available, the status changes to either Connected or Accepted. The accepted side is considered the A side for protocol conflict resolution. This generally does not make any difference to the user. Once data begins to flow, the Accepted/Connected is shortened to A or C and the number of send/receive bytes is displayed. 12.1 z/OS usage example Configurations using CTC can be complex. We have taken a basic NJE example, as shown in Figure 12-3. z/OS System AAA z/OS System BBB zPDT zPDT CTC connection (TCP/IP link) z/OS Linux 192.168.0.62 192.168.0.3 192.168.0.81 z/OS Linux 192.168.0.2 Figure 12-3 Trivial NJE setup The JES2PARM data for system AAA might include the following: NJEDEF DELAY=360,LINENUM=2,JRNUM=2,JTNUM=2,NODENUM=2,OWNNODE=1, PATH=1,RESTTOL=100,RESTMAX=8000000,RESTNODE=100,SRNUM=2, STNUM=2,MAILMSG=YES,TIMETOL=1440 LINE(1) UNIT=E40,TRANSPAR=YES NODE(1) NAME=AAA,PATHMGR=NO NODE(2) NAME=BBB,PATHMGR=NO CONNECT NODEA=AAA,NODEB=BBB The JESPARM data for system BBB might include the following: NJEDEF DELAY=360,LINENUM=2,JRNUM=2,JTNUM=2,NODENUM=2,OWNNODE=2, PATH=1,RESTTOL=100,RESTMAX=8000000,RESTNODE=100,SRNUM=2, STNUM=2,MAILMSG=YES,TIMETOL=1440 LINE1 UNIT=E40,TRANSPAR=YES NODE(1) NAME=AAA,PATHMGR=NO NODE(2) NAME=BBB,PATHMGR=NO Chapter 12. Channel-to-channel 125 CONNECT NODEA=AAA,NODEB=BBB These examples assume that device number E40 is defined in z/OS as a CTC device. (This is true for current z/OS AD-CD systems.) Be careful to place the IP address of the remote Linux system (and not the remote z/OS system) in the devmaps. The devmap for system AAA might contain the following stanza: [manager] name awsctc 300 device E40 3088 3088 ctc://192.168.0.2:3088/E40 The devmap for system BBB might contain the following stanza: [manager] name awsctc 300 device E40 3088 3088 ctc://192.168.0.3:3088/E40 The status of the CTC connection can be monitored with the awsstat command: $ awsstat E40 (use the correct device number, of course) The device status usually starts as connecting or accepting, and later switches to connected or accepted. This may take some time. After the connection is accepted and used, the status displays byte counts, such as C-160/162. We found it best to wait until the CTC link is established before IPLing z/OS. The link can be checked with the awsstat E40 command (using the correct device number for your CTC, of course). This normally takes only a few seconds, but can take longer in rare cases. We then needed to issue commands on each JES2 system to make the connection operational: $S N,LINE1 $S LINE1 (sometimes needed) A job submitted on system AAA could be directed to system BBB for execution by the following JCL: //MYJOB JOB 1,OGDEN,MSGCLASS=X,USER=IBMUSER // XMIT DEST=BBB //MYJOB2 JOB 1,OGDEN.MSGCLASS=X,USER=IBMUSER //STEP1 EXEC PGM=IEFBR14 Notice the two JOB statements in this example. The first is needed to “introduce” the XMIT statement into the job stream. The XMIT statement sends everything after it to the indicated node, including the second JOB statement. The first JOB statement (before the XMIT) is not sent to the remote node. The following JES2 commands can be useful when working with this NJE connection: $DCONNECT $S LINE(1) $S N,LINE1 $D NODE(*) $D LINE $D DESTID(*) $D PATH(*) $P LINE(1) $E LINE(1) $D NJEDEF $N,D=BBB,’$D NJEDEF’ 126 (very useful status display) (discover dynamic connections) (stop line) (reset line) (display NJE definitions) (send JES2 command to other node) IBM System z Personal Development Tool: Volume 3 Additional Topics A JES2 cold start may be necessary to enable NJE changes to JES2PARM. You need to stop the line, $P LINE(1), when stopping JES2. If the $P is not effective, try $E LINE(1) followed by $P LINE(1). 12.2 Multiple instances and z/VM The following material outlines several uses of CTC connections with two instances of z/VM.3 This material is intended as a general overview and does not provide complete step-by-step instructions for implementation and usage. It is very unlikely that all the links shown in this example would be present in any practical system. 12.2.1 Devmaps Three devmaps are needed for these examples. One is for a group controller (for shared devices) and two are for the z/VM instances. Many of the choices are arbitrary. Group controller (ibmgroup) [system] members ibmsys1 ibmsys2 3270port 3270 [adjunct-processors] crypto 1 crypto 2 [manager] name aws3274 0002 device 0020 3279 3274 device 0021 3279 3274 [manager] name awsosa device 0E00 device 0E01 device 0E02 # not needed for the CTC examples # included to illustrate shared crypto # more devices could be included 0009 --path=A0 --pathtype=OSD --tunnel_intf=y osa osa osa osa osa osa ibmsys1 instance [system] memory 1024m processors 1 group ibmgroup [adjunct-processors] domain 0 1 domain 1 1 [manager] name awsckd device 1000 device 1001 device 1002 3 #not needed for CTC; included as an example 0001 3390 3990 /z1/540res 3390 3990 /z1/540spl 3390 3990 /z1/540pag #unshared disks Thanks to Bruce Hayden, of the Washington Systems Center, for this material. Chapter 12. Channel-to-channel 127 device 1003 3390 3990 /z1/540w01 device 1004 3390 3990 /z1/540w02 [manager] name awsctc 0075 device 700 3088 3088 device 700 3088 3088 device 710 3088 3088 device 720 3088 3088 device 740 3088 3088 ctc://localhost:3700/700 ctc://localhost:3701/701 ctc://localhost:3710/710 ctc://localhost:3720/720 ctc://localhost:3740/740 #for #for #for #for #for TCPIP TCPIP TSAF ISLINK RSCS ibmsys2 instance [system] memory 1024m processors 1 group ibmgroup [adjunct-processors] domain 3 2 domain 4 2 [manager] name awsckd device 1000 device 1001 device 1002 device 1003 device 1004 0001 3390 3390 3390 3390 3390 3990 3990 3990 3990 3990 #not needed for CTC; included as an example [manager] name awsctc 0075 device 700 3088 3088 device 700 3088 3088 device 710 3088 3088 device 720 3088 3088 device 740 3088 3088 /z2/540res /z2/540spl /z2/540pag /z2/540w01 /z2/540w02 #unshared disks ctc://localhost:3700/700 ctc://localhost:3701/701 ctc://localhost:3710/710 ctc://localhost:3720/720 ctc://localhost:3740/740 #for #for #for #for #for TCPIP TCPIP TSAF ISLINK RSCS Description Notice that each instance has its own copy of the z/VM disks; they are in separate directories, /z1 and /z2. ISLINK An ISLINK creates an ISFC (Inter-System Facility for Communications) connection. It is the easiest link because it involves only CP commands and does not require a virtual machine or userid. The VM system identifiers of the two connected systems must be different. Using the devmaps shown above, the following commands (issued by MAINT, for example) activate the link: CP ACTIVATE ISLINK 0720 CP ACTIVATE ISLINK 0720 (command on ibmsys1) (command on ibmsys2) This should result in the message HCPALN2702I Link 0720 came up. The command Q ISLINK can be used to display the status of the connection. 128 IBM System z Personal Development Tool: Volume 3 Additional Topics TSAF TSAF is an older function and probably would not be used if IFSC is available. To try it, use commands such as the following (issued by MAINT on both systems): CP XAUTOLOG TSAFVM CP ATT 0710 TSAFVM Then log onto TSAFVM and enter ADD LINK 0710 on both sides. The status of the links can be displayed with Q LINKS ALL. RSCS RSCS can be more complicated. The RSCS product is not enabled by default. You can check this with the command Q PRODUCT STATE ENABLED. If RSCS is not in the list, it can be enabled (using MAINT) by the command SERVICE RSCS ENABLE followed by PUT2PROD. A configuration file is needed on each system. The configuration files are placed on the RSCS 191 disk with the name RSCSTCP CONFIG. An example for each system might be as follows: (for ibmsys1) LOCAL IBMSYS1 * RSCS LINKDEFINE IBMSYS2 TYPE NJE LINE 740 QUEUE PRI NODE IBMSYS2 PARM IBMSYS2 STREAMS=2 MAXU=2 MAXD=10 LISTPROC=NO TA=1 TAPARM='TH=100' AUTH AUTH * OPERATOR * * MAINT * CP CP (for ibmsys2) LOCAL IBMSYS2 * RSCS LINKDEFINE IBMSYS1 TYPE NJE LINE 740 QUEUE PRI NODE IBMSYS1 PARM IBMSYS1 STREAMS=2 MAXU=2 MAXD=10 LISTPROC=NO TA=1 TAPARM='TH=100' AUTH AUTH * OPERATOR * * MAINT * CP CP After the configuration files are available, start RSCS with the command XAUTOLOG GCS (issued on both systems). After RSCS starts issue the command SMSG RSCS START IBMSYS1 on ibmsys2 and SMSG RSCS START IBMSYS2 on ibmsys1. The status of the RSCS connection can be displayed with SMSG RSCS Q SY. TCP/IP TCP/IP requires a pair of CTC links, one for read and one for write. The easiest way to set up TCPIP for z/VM is with the IPWIZARD. With this you must assign hostnames and domain names; in an isolated environment these can be arbitrary names. For an isolated environment with only two nodes the gateway address does not matter; you might use 10.1.1.1.4 Use CTC0 as the interface name and address 0700 (from our sample devmap). We assigned IP address 10.1.1.2 to ibmsys1 and 10.1.1.3 to ibmsys2, and used a mask of 255.255.255.0. The configuration dialog includes positional parameters to indicate which device to use as the read channel and which to use as the write channel; this parameter could be 0 on ibmsys1 and 1 on ibmsys2. The status of TCPIP can be checked by: VMLINK TCPMAINT 592 NETSTAT DEVL You can force TCPIP to restart with the following: 4 Remember that the default address of the tunnel connection to the base Linux is 10.1.1.1. This default is used in the sample devmap. Chapter 12. Channel-to-channel 129 FORCE TCPIP XAUTOLOG TCPIP 130 IBM System z Personal Development Tool: Volume 3 Additional Topics 13 Chapter 13. Cryptographic adapter A 1090 system can emulate several cryptographic adapters as CEX3C devices.1 Each of the CEX3C emulated adapters runs as separate Linux processes and, if sufficient base processors are available to permit these threads to be dispatched in parallel by Linux, can run asynchronously with the 1090 CPs. CEX3C includes the following: DES (56, 112, 168 bits), with encryption, decryption, MAC, and key management. PIN processing (for credit cards). AES (128, 192, and 256 bits), with encryption, decryption, and key management. ECC (Brainpool p-160 to p-512, Prime p-192 to p-521), including digital signatures. SHA-1, SHA-224, SHA-256, SHA-384, SHA-512 (all for hashing). MD5 (for hashing). RSA (up to 4096 bits), for digital signatures, key generation, and key management. Do not confuse a cryptographic adapter with the cryptographic instructions that are always available with a zPDT system. These are the KM, KMC, KIMD, KLMD, and KMAC instructions that provide a number of fundamental cryptographic operations. Also, note that the terms cryptographic adapter and cryptographic coprocessor are used synonymously in this document. The cryptographic instructions may be coded directly in a program or used through ICSF programming interfaces. For practical purposes, the cryptographic coprocessor facilities are available only through ICSF programming interfaces. TKE systems, which are personal computers with unique software and an appropriate cryptographic adapter, are not used with zPDT. 1 Previous zPDT releases emulated CEX2C devices. © Copyright IBM Corp. 2009, 2013. All rights reserved. 131 13.1 Background information A cryptographic coprocessor is represented by an adjunct-processor (AP) process in zPDT. A System z CP sends and receives work entries through coprocessor queues that are known as domains. The accelerator mode of a cryptographic coprocessor is not provided for zPDT. Each cryptographic coprocessor has 16 domains; each z/OS instance uses a different domain (this is specified in the ICSF parameters). If multiple coprocessors are defined, then z/OS uses the same domain in each coprocessor. If multiple coprocessors are defined, z/OS can dispatch requests to all of them (using the same domain number in each processor). With zPDT, the cryptographic coprocessor keys (and other state information) are stored in the ~/z1090/srdis directory. There is a separate subdirectory for each defined coprocessor. The subdirectory name is simply the coprocessor number. For example, ~/z1090/srdis/5 would contain the data for coprocessor number 5. These directories are created automatically by zPDT. Any tampering with this information can produce unpredictable results. However, a complete coprocessor subdirectory may be deleted as a way of reinitializing (zeroing) that coprocessor. (The ap_zeroize command, described later, is the recommended way to reinitialize a coprocessor.) It is important to understand that zPDT cryptographic functions are intended for development purposes and not for security. While the format of the key data in ~/z1090/srdis is not documented, it is certainly not secure in any cryptographic sense. 13.2 Devmap specification The zPDT specification for cryptographic adapters is part of the devmap and consists only of a simple adjunct-processors stanza: [system] memory 4000m 3270port 3270 processors 1 [adjunct-processors] crypto 0 crypto 1 #(more than one cryptographic adapter is possible) [manager] name ......... The zPDT architecture allows up to 16 or 64 cryptographic coprocessors, depending on the overall configuration.2 z/OS allows a maximum of 16. 2 132 A zPDT group controller instance may have up to 64 coprocessors defined, otherwise the limit is 16. IBM System z Personal Development Tool: Volume 3 Additional Topics 13.3 Initial ICSF startup For practical purposes, the ICSF software functions are needed to initialize cryptographic adapters. Following is a brief outline of the steps we took to customize and use the ICSF panels on a z/OS AD-CD 1.12 system. The use of the AD-CD system PARMLIB and PROCLIB is not required, of course, and you should adjust these names for your needs. Note that the CEX3C cyptographic adapters require ICSF at level HCR7770 or later. This corresponds to the z/OS AD-CD release 1.12 or later. Earlier levels of z/OS may require the fix for APAR OA29838 to be applied. This APAR causes the CEX3C devices to appear as CES2C devices to the operating system and ICSF. 1. Create key storage data sets: – Edit SYS1.SAMPLIB(CSFCKDS). • • • Complete the JOB statement. Find the VOLUME(XXXXXX) parameter and change it to VOLUME (ZCSYS1).3 Submit the job for execution and check the results. – Edit SYS1.SAMPLIB(CSFPKDS). • Make the same changes and run the job. – Edit SYS1.SAMPLIB(CSFTKDS). This data set is optional.4 • Make the same changes and run the job. 2. Copy SYS1.SAMPLIB(CSFPRM00) to ADCD.Z112.PARMLIB(CSFPRM00). – Edit this member to verify that it is as follows: CKDSN(CSF.CSFCKDS) PKDSN(CSF.CSFPKDS) COMPAT(NO) DOMAIN(0) SSM(NO) KEYAUTH(NO) CHECKAUTH(NO) TRACEENTRY(1000) USERPARM(USERPARM) REASONCODES(ICSF) <-- You may need to add this line 3. Copy SYS1.SAMPLIB(CSF) to ADCD.Z112.PROCLIB(CSF). – Edit it as follows: //CSF PROC //CSF EXEC PGM=CSFMAIN,REGION=8M,TIME=1440 //CSFPARM DD DSN=ADCD.Z112.PARMLIB(CSFPRM00),DISP=SHR 4. Edit the ADCD PARMLIB member IKJTSO00 and add the following: AUTHPGM NAMES( CSFDAUTH CSFDPKDS AUTHTSF NAMES 3 4 /* AUTHORIZED PROGRAM NAMES */ + ... /*THIS WAS ALREADY IN OUR AD-CD SYSTEM */ + /*WE ADDED THIS ONE */ + /*PROGRAMS...... */ + ZBSYS1 is the volume of the AD-CD z/OS 1.11 system that contains system-related VSAM data sets. The use of this particular volume is not required. If you plan to carry over your cryptographic configuration to future releases of z/OS, then you should place these data sets on a local volume. It is not used in our basic setup and operation instructions, but may be used for more advanced cryptographic functions. These VSAM data sets are small; we included this one for completeness. Chapter 13. Cryptographic adapter 133 .... CSFDAUTH CSFDPKDS /*THIS WAS ALREADY IN OUR AD-CD SYSTEM */ + /*WE ADDED THIS ONE */ + Be certain to copy the plus signs at the end of each line! 5. On the MVS console enter the command S CSF. You should see CSF start. It will have a number of error messages but should eventually say ICSF INITIALIZATION COMPLETE. Later, when you stop z/OS, you may need to add a P CSF command to your shutdown script (or enter it manually). 6. Go to ISPF option 6 and enter the command @ICSF. This should produce the first ICSF panel, similar to that shown in Figure 13-1. HCR7770 -------------- Integrated Cryptographic Service Facility-------------OPTION ===> Enter the number of the desired option. 1 2 3 4 5 6 7 8 9 COPROCESSOR MGMT MASTER KEY MGMT OPSTAT ADMINCNTL UTILITY PPINIT TKE KGUP UDX MGMT - Management of Cryptographic Coprocessors Master key set or change, CKDS/PKDS Processing Installation options Administrative Control Functions ICSF Utilities Pass Phrase Master Key/CKDS Initialization TKE Master and Operational Key processing Key Generator Utility processes Management of User Defined Extensions Licensed Materials - Property of IBM 5694-A01 Copyright IBM Corp. 1989, 2009. All rights reserved. US Government Users Restricted Rights - Use, duplication or disclosure restricted by GSA ADP Schedule Contract with IBM Corp. Press ENTER to go to the selected option. Press END to exit to the previous menu. Figure 13-1 First ICSF panel On this panel, select option 1. This should produce a display similar to Figure 13-2. This panel verifies that the coprocessor is active. ------------------------- ICSF Coprocessor Management -------- Row 1 to 1 of 1 COMMAND ===> SCROLL ===> PAGE Select the coprocessors to be processed and press ENTER. Action characters are: A, D, E, K, R and S. See the help panel for details. COPROCESSOR SERIAL NUMBER STATUS ---------------------------. E00 42-00740 ONLINE ******************************* Bottom of data ******************************** Figure 13-2 Verify that the cryptographic coprocessor is online 134 IBM System z Personal Development Tool: Volume 3 Additional Topics Use F3 to return to the first ICSF panel and select option 6. This option allows you to enter a pass phrase that is then automatically used to initialize the basic coprocessor master keys. (An alternative method for initializing master keys is to use multiple other functions on the ICSF panels. Unless you are familiar with cryptographic coprocessor management, we suggest that you use the simple pass phrase initialization process we describe here.) Complete the pass phrase panel as shown in Figure 13-3 (using your own pass phrase, of course). You need to enter your pass phrase, two data set names, and a character to select the Initialize system option. After executing the panel function, you should see the PKA SERVICES ARE ENABLED message in the upper right corner. ---------------- ICSF - Pass Phrase MK/CKDS/PKDS Init COMMAND ===> PKA SERVICES ARE ENABLED Enter your pass phrase (16 to 64 characters) ===> Bill’s secret pass phrase_______________________________________ Select one of the initialization actions then press ENTER to process. X Initialize system - Load the AES, DES and asymmetric master keys to all coprocessors and initialize the CKDS and PKDS. CKDS ===> 'CSF.CSFCKDS' PKDS ===> 'CSF.CSFPKDS' _ Reinitialize system - Load the AES, DES and asymmetric master keys to all coprocessors and make the specified CKDS and PKDS the current key data sets. CKDS ===> PKDS ===> _ Add coprocessors - Initialize additional online coprocessors with the same AES, DES and asymmetric master keys. _ Add AES MK - Add the AES master key to all active coprocessors and the current CKDS. Press ENTER to process. Press END to exit to the previous menu. Figure 13-3 Pass phrase panel When we exited from this panel we received an 047 ABEND. (This was in the AD-CD z/OS 1.10S, 1.11, and 1.12 systems.) However, the CKDS function appeared to have been completed correctly. APAR OA30025 may address this problem, but we did not apply it. We assume this problem will be resolved in future z/OS releases.5 Return to the first ICSF panel and select option 1 again. Overtype the initial period in front of the E00 coprocessor name with the letter S and press Enter. This should produce a display similar to that shown in Figure 13-4 on page 136. 5 On some z/OS releases we received a VSAM ABEND on the PKDS dataset when we executed the initialization shown, but the CKDS functions appeared to operate correctly. We did not further investigate the problem. Chapter 13. Cryptographic adapter 135 ---------------------- ICSF - Coprocessor Hardware Status --------------------COMMAND ===> SCROLL ===> CRYPTO DOMAIN: 0 REGISTER STATUS COPROCESSOR E00 Crypto Serial Number Status DES Master Key New Master Key register Verification pattern Hash pattern Old Master Key Verification Hash pattern Current Master Verification Hash pattern : : : : register : pattern : : : Key register : pattern : : : AES Master Key New Master Key register Verification pattern Old Master Key register Verification pattern Current Master Key register Verification pattern Asymmetric-Keys Master Key New Master Key register Hash pattern Old Master Key Hash pattern Current Master Hash pattern : 42-00740 : ACTIVE EMPTY EMPTY VALID 2D7BDF2F5A7ADF9C 071B3CB4761DCDE4 E1D3675B90E977C7 : : : : : : EMPTY : : : register : : : Key register : : : EMPTY EMPTY VALID BCB28DF1FA0FC8EF EMPTY VALID 9197A99AD60F87AF 1E2FD4EB0F59B932 Press ENTER to refresh the hardware status display. Press END to exit to the previous menu. Figure 13-4 Coprocessor status This completes the basic cryptographic coprocessor setup. We suggest you do not experiment with option 2 (MASTER KEY MGMT) functions unless you know what you are doing. 13.4 Operational notes You must start CSF (on the MVS console) in order to use cryptographic functions through ICSF; this is normally the MVS command S CSF. When stopping z/OS you must issue a corresponding stop command such as P CSF. These commands could be added to the various VTAMAPPL startup/shutdown scripts in the z/OS AD-CD system. 136 IBM System z Personal Development Tool: Volume 3 Additional Topics You can easily verify CSF operation by going to omvs and issuing the following command: od -An -N4 -td /dev/random If CSF (or the emulated cryptographic coprocessor) is not working, the result is an internal error message. If these functions are working, a random number is displayed. The zPDT cryptographic coprocessor emulation functions are intended for use by developers who require these functions. It should be clearly understood that these emulated functions are not intended to produce a secure system or to function as a secure peer when dealing with private data. The zPDT system stores the coprocessor internal data in the ~/z1090/srdis directory. There is a subdirectory here for each defined coprocessor; the master keys and other functional data are stored in the subdirectory. The data formats in these records are not documented, but they should not be considered cryptographically secure. If you used a pass phrase for initialization, you should record the exact characters used (including upper or lower case, spaces, and punctuation). You would need this to recreate the same master keys if you reinitialize the cryptographic functions or want to create duplicate keys on another System z. 13.4.1 Multiple zPDT instances zPDT may have multiple instances in operation. These instances may have shared facilities, such as shared DASD. If shared facilities are used, then a zPDT controller instance6 must be present as described in Chapter 6, “Multiple zPDT instances” on page 75. Coprocessors defined in the controller instance may be shared by all zPDT instances. A maximum of 16 coprocessors may be present in a “normal” zPDT instance. A maximum of 64 coprocessors may be defined for a controller instance. An additional devmap statement: domain <member name> a y #(a is a coprocessor number, y is a domain number) is used in the devmap of a zPDT instance that is using coprocessors defined in the controller instance. The member name is required if the domain statement appears in the controller instance; it is used if the domain statement is in an operational instance devmap. The domain number (y in the statement above) can be a single number, a list of numbers separated by commas, or a range of numbers separated by a dash. The angle brackets around the member name are not part of the syntax; they indicate an optional parameter here. Remember that the domain numbers must be specified in the ICSF startup parameters and will be different for each z/OS instance/ Three shared cryptographic coprocessors, used by three zPDT instances, might be defined as follows: #-------------- controller instance ---------------------[system] #no processor is defined for the controller ... ... [adjunct-processors] crypto 0 crypto 1 crypto 2 6 Very briefly, a controller instance is a zPDT instance (with a separate devmap and started with an awsstart command) that does not contain any System z processors. Chapter 13. Cryptographic adapter 137 #------------- 1090 instance 1 --------------------------[system] processors 1 ... [adjunct-processors] domain 0 1 domain 1 1 domain 2 1 #------------- 1090 instance 2 --------------------------[system] processors 1 ... [adjunct-processors] domain 0 2 #All the domain statements domain 1 2 #could be in the controller domain 2 2 #devmap instead. Your choice. #------------- 1090 instance 3 --------------------------[system] processors 1 ... [adjunct-processors] domain 0 3 #If the domain statements are in the domain 1 3 #controller devmap, they need the relevant domain 2 3 #member name as the first parameter. Notice that each 1090 instance has a different domain number specified in the domain statements. In this example the domain numbers are the same as the instance numbers, but this is just a coincidence. 13.4.2 Coprocessor control commands A number of commands are included for specialized management of the cryptographic coprocessors. These commands are issued from a Linux terminal window. zPDT must be operational for these commands to be used. They are not needed for normal system usage and we suggest you do not experiment with them unless you have a fairly good understanding of what you are doing. In the following commands the n variable is the cryptographic coprocessor number and the y variable is a domain number. Briefly, the commands are: $ ap_zeroize -a n -d y $ ap_zeroize -a n -i This command reinitializes (zeros) all the data, such as keys, that is retained by the coprocessor. In the syntax shown here, n is a crypto adapter number and y is a domain name. The first version of the command affects only the specified domain. The second version (with the -i operand) zeros the whole adapter. Either -i or -d y must be specified (with an appropriate domain number for y). $ ap_query $ ap_query -a n This command queries basic status and domain information. With no operand it lists the coprocessors available to the System z. With an operand, it lists which domains are used by the indicated coprocessor. 138 IBM System z Personal Development Tool: Volume 3 Additional Topics $ ap_create -a n This command creates a new (emulated) cryptographic coprocessor. $ ap_destroy -a n This command removes the indicated coprocessor process if it is not connected to a CP process. $ $ $ $ ap_von -a n ap_von -a n -d y ap_voff -a n ap_voff -a n -d y These commands vary online or vary offline connections between coprocessors and their processing queues. The optional y operand specifies a domain number. $ ap_vpd -a n This command lists vital product data for the indicated coprocessor. When a zPDT instance is started (while processing the devmap) an ap_create is issued for that instance. If this is a stand-alone zPDT instance, ap_von commands are issued for all domains. (It is not issued for a controller instance.) If this is a zPDT instance using shared coprocessor resources, ap_von commands are issued for the coprocessors and domains specified in the devmap. The “real” cryptographic coprocessors on large System z machines have similar control functions, but they are performed in different ways. Do not attempt to use these commands, as listed here, on larger machines. 13.4.3 New z/OS releases The coprocessor master keys, stored in the Linux srdis subdirectory, must be consistent with the data in the CSF.CSFCKDS and CSF.CSFPKDS data sets in z/OS. If you install a new z/OS release and create new z/OS data sets (while keeping older master keys for the coprocessor functions) then CSF initialization will fail. For long-term cryptographic usage, you should place the CSF.CSFCKDS and CSF.CSFPKDS data sets on local volumes that will be used with all the releases of z/OS that you might want to invoke. If you have mismatched master keys and z/OS data sets, you need to zeroize the appropriate coprocessor and domains and then enter a new pass phrase to start over. This, of course, invalidates any existing lower-level keys. If you plan to work with encrypted data (as opposed to simply developing programs that use encryption functions) you need to carefully plan backups for the coprocessor data (in the srdis subdirectory) and the z/OS data sets used by CSF. The 1090 functions have no special way to recover lost encryption keys. 13.4.4 Programming with ICSF Following is a trivial program that uses the cryptographic coprocessor (via an ICSF programming interface) to obtain random numbers: //OGDENYZ JOB 1,OGDEN,MSGCLASS=X Chapter 13. Cryptographic adapter 139 //A EXEC ASMACLG,PARM.C=’NOXREF’,PARM.L=’NOLIST,NOMAP’ //C.SYSIN DD * PRINT NOGEN ICSFAA CSECT ICSFAA AMODE 31 ICSFAA RMODE 24 STM 14,12,12(13) SAVE CALLER’S REGISTERS LR 12,15 USE ENTRY-POINT BASE REGISTER USING ICSFAA,12 LR 2,13 GET A(CALLER’S SAVEAREA) LA 13,SAVEAREA GET A(MY SAVEAREA) USING SAVEAREA,13 MORE ‘USING’ SPACE ST 2,SAVEAREA+4 CHAIN OLD TO NEW ST 13,8(2) CHAIN NEW TO OLD * * OPEN FILES AND CHECK RESULTS * A1 OPEN (PRINTD,(OUTPUT)) TM PRINTD+48,X’10’ CHECK SYSPRINT OPEN STATUS BZ ERROR1 * * GET RANDOM NUMBERS AND PRINT THEM * LA 7,20 GET 20 RANDOM NUMBERS LOOP1 CALL CSNBRNG,(RETC,REASC,EXDL,EXD,FORM,RANNUM) CLC RETC(4),SZEROS BNE ERROR2 LA 1,RANNUM WHERE TO START HEX CONVERSION BAL 10,AHEXLINE MVC PRINTLNE(80),SBLANKS MVC PRINTLNE(21),=C’RANDOM NUMBER (HEX) =’ MVC PRINTLNE+22(16),SWOUT PUT PRINTD,PRINTLNE BCT 7,LOOP1 CLOSEALL CLOSE (PRINTD) RETURN L 13,4(13) GET A(CALLER’S SAVE AREA) LM 14,12,12(13) RESTORE CALLER’S REGISTERS SR 15,15 SET RETURN CODE BR 14 EXIT * * SIMPLE ERROR HANDLING. * ERROR1 WTO ‘UNABLE TO OPEN SYSPRINT DD STATEMENT’ B RETURN * ERROR2 WTO ‘NON-ZERO RETURN CODE’ B RETURN * PRINTD DCB DSORG=PS,MACRF=(PM),DDNAME=SYSPRINT,LRECL=80, RECFM=FB,BLKSIZE=8000 * VARIOUS WORK AREAS AND CONSTANTS PRINTLNE DC CL80’ ‘ RETC DC F’0’ RETURN CODE (ICSF) REASC DC F’0’ REASON CODE (ICSF) EXDL DC F’0’ EXIT DATA LENGTH (ICSF) 140 IBM System z Personal Development Tool: Volume 3 Additional Topics X EXD FORM RANNUM * DC DC DC CL4’ ‘ CL8’RANDOM 2F’0’ ‘ EXIT DATA (ICSF) RULE FORM RANDON NUMBER DROP 12 DC 18F’0’ DC D’0’ WORK AREAS FOR UTILITY ROUTINES DC D’0’ WORK AREA DC D’0’ SPILL FROM SW2 UNPK INSTRUCTION DC CL80’ ‘ OUTPUT AREA DC CL80’ ‘ SOURCE OF BLANKS DC 2F’0’ SOURCE OF ZEROS DC 8F’0’ LOCAL REGISTER SAVE AREA SPACE *---------------------------------------------------------------* FORMAT 32 BYTES OF STORAGE INTO HEX. * INPUT: R1 CONTAINS ADDRESS OF DATA. OUTPUT: 72 BYTES IN SWOUT *--------------------------------------------------------------AHEXLINE STM 1,6,ASCNDECS SAVE CALLER’S REGS LA 2,8 8 WORDS OUTPUT LA 3,SWOUT A(OUTPUT) MVC SWOUT(80),SBLANKS AHEXLINF BAL 5,AHEXLINZ CONVERT 4 BYTES LA 3,9(3) OUTPUT POINTER LA 1,4(1) INPUT POINTER BCT 2,AHEXLINF LOOP LM 1,6,ASCNDECS BR 10 RETURN TO CALLER * AHEXLINZ MVC SW1(4),0(1) MVI SW1+4,X’00’ UNPK SW2(9),SW1(5) TR SW2(8),AHEXTR-240 MVC 0(8,3),SW2 BR 5 AHEXTR DC C’0123456789ABCDEF’ SPACE LTORG END /* //L.SYSLIB DD DISP=SHR,DSN=SYS1.MACLIB // DD DISP=SHR,DSN=CSF.SCSFMOD0 //G.SYSPRINT DD SYSOUT=* SAVEAREA SW1 SW2 SPILL SWOUT SBLANKS SZEROS ASCNDECS 13.4.5 z/VM usage Cryptographic coprocessors are defined for z/VM guests as shown in the following example: USER USERJOE 999999 512M 16E BDEG ACCOUNT ABC123 ABC123 CRYPTO DOMAIN 13 14 15 (domains to be used) CRYPTO APDED 1 3 (coprocessors to be dedicated for use) OPTION TODENABLE MAINTCCW MACHINE ESA 64 Chapter 13. Cryptographic adapter 141 CPU 0 BASE CPU 1 IPL 190 PARM AUTOCR etc 142 IBM System z Personal Development Tool: Volume 3 Additional Topics 14 Chapter 14. License and serial number servers Important: If you have a simple zPDT system, with a single token connected to a USB port on your base Linux system, you can ignore this chapter. For more complex environments (including the use of multiple tokens) you should read this chapter carefully. Functions described in this chapter apply to zPDT release 41.46 and later. A zPDT system must have a license supplied by a 1090 or 1091 token.1 In a simple configuration, a local token is installed in a USB port on the base machine running zPDT. In this case (one token installed in a local USB port) the token supplies both the zPDT license and the serial number used for the System z CPs.2 For a number of reasons, this simple local token usage is not always appropriate: Due to security concerns, some PCs no longer have usable USB ports. The physical distribution of tokens may present a problem. Rack-mounted “blade” PCs may not have normal, dedicated USB ports. A token in a work location can easily “walk away.” In virtual environments the dedicated use of a USB port may be a problem. If multiple tokens are used, or are changed, the CP serial numbers become unpredictable. The consistency of the System z serial numbers may be important for some software licenses (for System z software) and may be important for some System z operating systems. Recognizing these concerns, an alternative token and serial number environment that provides enterprise-wide management is available for zPDT systems. Briefly, this alternative environment has a license server (which has physical tokens connected to USB ports) and a unique identifier manager (UIM) server. The license server can be accessed (TCP/IP) by each client PC running zPDT and the zPDT license is supplied 1 2 The tokens identified as 1091 tokens are for RDzUT customers. The material in this chapter applies to both 1090 and 1091 tokens. This statement assumes that the local zPDT system has never been connected to a remote license server, and has never used multiple local tokens. © Copyright IBM Corp. 2009, 2013. All rights reserved. 143 this way. The client machine does not have a token and does not need a USB port. A client machine must have access to the license server as long as zPDT is operational on the client. Likewise, the client machine has access to a UIM server that supplies consistent serial numbers for the System z CPs. All zPDT systems have the client functionality but, by default, it is not configured for remote operation. If a token is installed zPDT will operate normally (with a local token). If the remote client function is configured, then zPDT will attempt to connect to servers to obtain a zPDT license and serial number. The owner of the client machine must do some minor configuration work (editing a small file3) in order to enable license server and UIM server operation; a command is provided to simplify this editing. Before doing this, the server networking environment (IP address, domain name, firewall controls, appropriate tokens for the server) must be arranged. The remote license and UIM servers are normally on a single remote system. However, the two servers could be on separate machines. One or both could be on the same machine as the client, but would still be considered remote servers in the context described here. 14.1 Methodology System z CECs have unique serial numbers, allowing software to identify the machine and LPAR. Some operating systems verify that the machine IPLed has the same serial number as the machine that last used that copy of the operating system and may react differently if there is a mismatch. Some software products are licensed by machine serial number. A simple zPDT system has a simple unique serial number design. The serial number of the token becomes the serial number of the System z created by zPDT. The conceptual operation is shown in Figure 14-1. Simple local zPDT system Linux Token License server License zPDT Serial number Serial number from token The token serial number is stored in the local UIM database the first time the zPDT system is started. Thereafter, it is used from the UIM database. Local UIM function Local UIM database Figure 14-1 Simple local operation If multiple tokens are used then it is unpredictable which token the license server uses to obtain a license. 3 144 The configuration file may be edited directly or the clientconfig command may be used to perform the editing. We strongly recommend using clientconfig instead of attempting to directly edit the XML file. IBM System z Personal Development Tool: Volume 3 Additional Topics When a central license server is used (or if multiple tokens are used) there needs to be a method of assigning unique serial numbers that do not change when once assigned. The general concept is shown in Figure 14-2 on page 145. TCP/IP Linux server machine Linux client machine Tokens License server function 9450 License and heartbeat zPDT instance zPDT instance Global identifier management 9451 service All processor IDs Other unique IDs ID repository Safenet config Serial number Instance IDs Local identifier management service (UIM) Serials UIM repository Safenet config Figure 14-2 General server concept The basic idea is to have a remote Unique Identification Manager (UIM) and SafeNet license server. There are two modes of operation, local and remote. In local mode both the license server and the UIM function run in the same machine as the client (as shown in Figure 14-1), but are generally invisible to the user. In remote mode, the license server and UIM server program are in a remote machine which can serve licenses and serial numbers to a multitude of nodes via TCP/IP. Not identified in the figure are the configuration or control files: CLIENT: /etc/z1090/uim/uimclient.db (holds local serial number(s)) /usr/z1090/bin/sntlconfig.xml (points to remote servers, etc) SERVER: ~/UIMserver/uimserver.db (+ logs) (in home directory of uim program) /opt/safenet_sentinel/common_files/sentinel_keys_server/sntlconfigsrvr.xml Each Linux zPDT instance is assigned a unique serial number, either by a local token or by a UIM server. Every zPDT instance (running under a Linux user ID) will have an LPAR ID assigned to it. The combination of serial number and LPAR ID become part of the CPUID. The CPUID is the information provided by the System z instruction Store CPU ID (STIDP). There are several notes for these figures: The two server functions are typically in the same server machine. They could be in separate machines or partly in the client machine, although this would be unusual. The default port number for the zPDT license server is 9450 and the default port number for the UIM server is one greater than the license server port number. These are configurable. Once a zPDT instance is started (on a client) the identity management access to the UIM server is no longer needed. Chapter 14. License and serial number servers 145 Once a zPDT instance is started (on a client) the license access must be maintained for the life of the zPDT instance. If the access is dropped, the zPDT instance will stop. (If the access is recovered, zPDT will start again.) The server(s) must be identified by resolvable domain names or by IP addresses. This is easy if they have direct, fixed IP address or domain names. It is not easy if DHCP-assigned addresses or NAT functions or VLAN4 networks are involved. Skilled network planning is required for any but the simplest environments. Firewalls between the servers and clients must allow the required IP and port access. A client machine may be changed to a stand-alone machine (with token) by changing a configuration file, and vice versa. (Such reconfigurations are done when zPDT is not running.) In normal operation, a client machine always has the same System z serial number. This number, once assigned via a local or remote function, might not be related to any physical token number. The token license server and the unique identifier manager (UIM) server are separate functions. However, the configuration information for both servers is placed in the same client configuration file. Any configuration changes should be made when zPDT is not operational. The rules for obtaining a zPDT license are straight forward. The client configuration points either to localhost or to a remote license server. The indicated source must have an appropriate token to provide a zPDT license. The rules for zPDT serial numbers are more complex. The goal is to always have the same unique serial number for a given zPDT instance. The following general rules are used to determine the System z serial number for a zPDT instance. The term UIM serial number5 means a serial number generated and assigned by a UIM server. If a single local token is used (and no previous serial has been assigned): – The first zPDT startup will take the System z serial number from the token. This serial number is then written in the local UIM database. – Subsequent zPDT startups must use the same token. • If a different token is used, the uimreset -l command must be issued first (before zPDT is started). • Or, the RANDOM parameter may be specified in the XML configuration file. This allows any token to be used with an existing serial number in the local UIM database. (The clientconfig command may be used to change this parameter.) If a single local token is used and if a UIM serial number is present in the local UIM database (due to a previous connection to a UIM server) then the UIM serial number is used and the local token serial number is ignored. (The local token still supplies the zPDT license unless a remote license server is configured.) If multiple local tokens are present (and no previous serial number exists in the local UIM database) the serial number of one of the tokens is accepted and stored in the client UIM database. This stored serial number is used subsequently, without further reference to the serial numbers of the tokens. In this case the RANDOM option must be specified in the local XML configuration file. If the client is configured for a remote UIM server: – If no serial number is known for the client system, the UIM server generates a random serial number and sends it to the client UIM database. 4 5 146 VLAN usage is not possible with all NIC adapters. See the notes in “VLAN usage” on page 108. The term random serial number is also used for serial numbers created by a UIM server. Once such a serial number is generated and assigned to a client, it used consistently. The “random” term applies only to the initial generation of a serial number by a UIM server and indicates the serial is not related to a specific token serial number. IBM System z Personal Development Tool: Volume 3 Additional Topics – If the local client UIM database contains a valid serial number that does not conflict with another client’s serial number (as stored in the UIM server database) that serial number is used. • If the client serial number (in the client UIM database) conflicts with a serial number in the UIM server database, the client operation fails. In this case, the client system may use the uimreset -l command to remove the serial number in the local UIM database. If the client changes to a local configuration after previously using a remote configuration the previously assigned serial number (from the remote server and stored in the local UIM database) is used. The local token serial number is ignored. 14.2 Installation and configuration All client and server functions (for both license server and UIM server) are included and installed in the zPDT installation package. Whether or not the remote functions (license server and/or UIM server) are used depends on configuration file options. 14.2.1 Client configuration Client operation is determined by settings in file /usr/z1090/bin/sntlconfig.xml. We reference this file as the XML file. The general syntax is as follows:6 <SentinelConfiguration> <SentinelKeys> <ContactServer>localhost</ContactServer> <ServerPort>9540</ServerPort> <Protocol>SP_TCP_PROTOCOL</Protocol> </SentinelKeys> <UniqueIdentificationManager> <UIMContactServer></UIMContactServer> <UIMServerPort></UIMServerPort> <UIMProtocol></UIMProtocol> <UIMLocalSerialMethod></UIMLocalSerialMethod> </UniqueIdentificationManager> </SentinelConfiguration> Do not modify this file directly. Instead, use the clientconfig command to make changes.7 It produces a display similar to the following: License ContactServer.....localhost License PortNumber .......9450 License IPv6 _ UIM ContactServer.........__________________ UIM PortNumber ...........____ UIM IPv6.................._ UIM Local Serial Random..._ Factory Reset............._ 6 7 (default localhost) (default 9450) (y or blank) (default is blank) (Defaults to 9451, if used ) (y or blank)) (y or blank) (Enter “y” to reset file) The actual XML file may have different spacing and more comments than shown here. This does not affect its meaning. You must operate as root to modify the file or to use the clientconfig command. Chapter 14. License and serial number servers 147 Parameters are changed by simply overtyping them. Remember that configurations for two separate functions (license server and UIM server) are specified here. The general rules are these: The License ContactServer must be localhost (to specify that no remote license server is being used) or the address (IP address or domain address) of a zPDT token license server. One of these options must be specified. The default License PortNumber number for a license server is 9450. You may change this, but it must also be changed in the server configuration (described later). If the License ContactServer is not localhost (that is, a remote license server is being used), the UIM ContactServer is assumed to be at the same address as the license server. The UIM ContactServer value is specified only if a UIM server is used and is on a different server machine than the license server. In a simple environment, with no UIM server, this line must be blank (or omitted or commented in the XML file). If used, the hostname could be localhost (if a UIM server is running on the client machine) or the address (IP or domain name) of a remote UIM server. The default UIM PortNumber is one greater than the ServerPort. The default is 9451. This line is irrelevant if the UIM ContactServer line is omitted. The UIM Local Serial Random specification is needed if multiple tokens are used on a local client or if different tokens are used at different times. This parameter is either “y” or leave blank. The License IPv6 and UIM IPv6 specifications are “y” or blank. The default is to use IPv4 for TCP/IP connections. If the Factory Reset option is set to “y”, all other parameters are ignored and the XML file is restored to the original values shipped with zPDT. Remember that changes to the configuration file are not dynamic. They take effect only when zPDT is started. By default, the clientconfig command operates on the sntlconfig.xml file located in directory /usr/z1090/bin. The file name (sntlconfig.xml) is constant, but you may specify an alternate directory location as an operand: # clientconfig /my/special/directory/ 14.2.2 Remote server configurations Both the license server and UIM server are included in the standard zPDT package. The license server runs as a daemon and is automatically started when Linux is booted. (This is true even for local token usage.) Both servers are TCP/IP clients and your network configuration (including firewalls) must allow connectivity to the servers. The default port numbers are 9450 (license server) and 9451 (UIM server). UIM server The remote UIM server must initially be started manually; thereafter it is typically managed by cron. It must not run as root. It runs under a normal Linux userid and places its database in the home directory of that userid. It also places small log files in the home directory. For this reason, the same Linux userid (not root) should always be used to run the UIM server. Two commands are associated with running the UIM server: $ uimserverstart 148 (start the UIM server) IBM System z Personal Development Tool: Volume 3 Additional Topics $ uimserverstop (stop the UIM server) The uimserverstart command, in addition to starting the server, places entries in the Linux cron files such that the UIM server is restarted automatically (after 10 minutes) if it fails. It is also started automatically during a Linux reboot. The uimserverstop command stops the server and removes these cron entries. No other configuration is needed for the UIM server. You must not edit the UIM database file file that is created in a subdirectory of the home directory of the userid running the UIM server. License server One (or more) 1090 or 1091 tokens must be installed in the license server before it can be used. The license server configuration file is located in: /opt/safenet-sentinel/common_files/sentinel_key_server/sntlconfigsrvr.xml This file typically does not require any additional configuration. If you want to change the license server port number, you can edit and change this file. You would then need to restart the server: # cd /opt/safenet_sentinel/common_files/sentinel_keys_server # ./loadserv restart Several security functions may be specified in the sntlconfigsrve.xml file. These are described later. 14.3 Notes The coordination of zPDT startup and remote server activity may cause a delay between the time the awsstart command displays “All configured subsystems started” and the time the “zPDTA license obtained” message is produced. An ipl command is not effective until the license is obtained. A parameter of the awsstart command may be used to bypass the delay when a local token is used: $ awsstart devmap_name --localtoken (the --localtoken option bypasses delays) The --localtoken option requires the use of a local token to supply the zPDT license. (The serial number is taken from the local UIM database, where it may have been previously assigned by a UIM server or by the local UIM function.) Commands associated with the UIM function are: # uimreset [-l] [-r] (must be run by root) This command clears the serial number in the local UIM database [-l] or in both the remote and local UIM database [-r]. # uimserverstart # uimserverstop (cannot be run by root) (cannot be run by root) These commands start and stop a UIM server. A UIM server can run under any userid on the server machine. These commands are not normally used in a purely local client environment. # clientconfig $ uimcheck (described earlier; must be run by root) (may be used by any userid) Chapter 14. License and serial number servers 149 The uimcheck command should be used if there is any question about the state of the serial number on a zPDT machine. Any user may issue this command. Do not run SecureUpdateUtility from a client zPDT machine when using a remote license server. This utility cannot affect the tokens in the remote license server, but will attempt to access a token in the local PC. You may run SecureUpdateUtility in the license server, to update the tokens in the server. The administrator of a SafeNet license server is responsible for ensuring the license keys do not expire while in use. The situation in which multiple tokens are installed (in a license server) and the licenses in one token expire can be complex. Clients see license expiration warning messages starting a month before the license expires. However, if multiple tokens are present it is not predictable which token will furnish the license(s) for a zPDT startup. The license expiration date displayed by the token command (in a client machine) may not reflect the effective expiration date of all the active token(s) in a license server. The token command (when zPDT is running) produces additional information, for example: $ token CPU 0, zPDTA (1090) available and working. Serial 6186(0x182A) Lic=88570(0x159FA) EXP=4/15/2012 In this example, the zPDT license was obtained from token 0x159FA (decimal 88570) and the CP serial number used by zPDT is 0x182A. There is no indication of whether a license server and UIM server are being used. Since the serial number and license number are different, we know that at some point the serial number was obtained from a license server. However, it is possible that the token is in the local client but that the serial number previously obtained from a UIM server is still being used. This fulfills the goal of using a consistent serial number once it is assigned. When zPDT is installed, a new Linux group is created named zpdth. This is used to isolate execution of certain zPDT modules and should not be used for other purposes. Disk changes Changing the Linux disk (HDD) changes the identifier that is part of the identification used by UIM. You may need to reset the local serial number (uimreset -l) or the remote serial number (uimreset -r) after changing the hard disk. Cloning zPDT If you clone a zPDT system, you must delete the files in /usr/z1090/uim on the new system. This is because the UUID of the new system differs from that of the old system. zPDT will build new uim files when the new system is started. 14.4 Scenarios Local to remote server Consider systems A and B (each using a different PC for zPDT). System A has a zPDT token with serial number 12345. The system A owner installs token 12345 in his PC and starts zPDT. When this is done, serial 12345 is recorded in the local system A UIM database. (This assumes there was no prior conflicting information in the local UIM database.) System A may be used in this configuration indefinitely (until the token license expires), with no reference to license or UIM servers. 150 IBM System z Personal Development Tool: Volume 3 Additional Topics The token is taken from system A for some reason, and the system A owner now wants to use remote license and UIM servers. With zPDT not running and working as root, he uses the clientconfig command to change the License ContactServer value in the client configuration file and restarts zPDT. The remote UIM server sees that system A has serial number 12345 recorded in its local UIM database. The server checks whether this serial number is assigned to any other system. If there are no conflicts, the server records serial 12345 in the server database as belonging to system A. Separately, the remote license manager serves a zPDT license based on a token present in the license server machine, but the serial number of that token is not relevant. Thus far, system A has retained a consistent serial number (12345) when switching from a local token to remote token/UIM servers. It will have this serial number every time zPDT8 is used. Someone has given token 12345 to the owner of system B. He installs and uses it locally (with no connection to the remote license/UIM servers). At this point both A and B have the same zPDT serial number. There is no way to avoid this. If the system B owner then connects to the license/UIM servers, the UIM server will see serial 12345 in B’s local UIM database and terminate the zPDT instance because 12345 has already been assigned to system A. The problem is that A and B both want to use the same serial number (12345) and the UIM server has it assigned to A. There are two ways to resolve this: – The system B owner can issue uimreset -l to clear the serial number in the local UIM database. He can then connect to the remote servers and receive a new random serial number. – Or, the system A owner can issue uimreset -r to clear his serial number from both the local and remote UIM databases. The next time system A zPDT starts, it will request a new random serial number from the server. System B can then use the 12345 serial that is stored in its local UIM database. Temporarily switch from server to local Assume a laptop zPDT system is normally used with remote a license and UIM servers. You want to take the system home overnight, and the servers cannot be accessed from home. If a token is available, you could start zPDT with the local option: $ awsstart devmap_name --localtoken In this case there is no need to use the clientconfig command to change the configuration file. The --localtoken option overrides the configuration file. The user must, of course, have a token to supply a license. In this case the serial number stored in the local UIM database is used and the serial number of the temporary token is ignored. Remote server to local Assume a system owner has been using a remote license and UIM server. To change to a local token, he used the clientconfig command to change the LicenseContactServer value to localhost. This has the following effects: It changes the ContactServer line in the XML file to localhost. It effectively removes the UIMContactServer stanza from the XML file. The absence of this stanza indicates that no UIM server is to be used. 8 To be more precise, we should say “every time this same zPDT instance is used”. Multiple zPDT instances (on the same machine) must run under different Linux userids. The serial number for each of the instances will use the “LPAR” portion of the serial number to differentiate the instances. Chapter 14. License and serial number servers 151 In this case, zPDT looks in the local UIM database for a serial number. If one is present, it is used. If the local UIM database does not exist (or if the uimreset command was used), the serial number of the local token is placed in the local UIM database and then used by zPDT. Using zPDT on the license/UIM server Suppose we want to run zPDT on the same machine that is running the license and UIM servers. In this case we use the clientconfig command to specify License ContactServer as localhost and UIM ContactServer as localhost. This has the following effects: The presence of the UIMContactServer stanza means that a UIM server must be available on the indicated system (which is localhost in this example). Before starting zPDT on this system the user must issue a uimserverstart command. Some thought should be given to the Linux userid that issues the uimserverstart command. The same userid should always be used for this command because the UIM server database is created in the home directory of this Linux userid. No special setup is needed for the license server. Any zPDT system (meaning the SafeNet server that is installed with zPDT) can act as a license server. Switch tokens In this case, token 12345 has been used with a newly-installed zPDT system. When zPDT is first started, this serial number is written in the local UIM database. If a different token is used on a subsequent startup, the zPDT startup fails. A uimreset -l command is needed to remove serial 12345 from the UIM database; after that, a new token may be used. However, if the serial number in the local UIM database was assigned by a UIM server (or if the RANDOM parameter was used with the clientconfig command) then any local tokens may be used; the operational serial number will be taken from the local UIM database. The key point is that zPDT recognizes the difference between a UIMserver-assigned serial number (which can be used with any token) and a locally installed serial number (taken from a local token). A locally-installed serial number must match the token being used (unless the RANDOM option is set). 14.4.1 Display hostname assignments You can display the zPDT serial number assignments by pointing your browser to your UIM server (http://uimserveraddress:9451). (Port 9451 is the default UIM port, as described previously). The display is similar to what is shown in Table 14-1. Table 14-1 Processor serial numbers on zPDT UIM server [email protected] Serial Host UUID Year Day 2099 d2x2.pok.ibm.com E6D96D01-493E-11CB-AD29-B8F42F7F8461 2012 009 14.4.2 Clones If you are cloning9 zPDT systems, be certain to remove the contents of the /usr/z1090/uim/ directory before creating the clone. When zPDT is started on the clone it will create the files based on the licenses available for the clone. 9 152 That is, if you have completely installed a zPDT system (including your customized System z operating systems, your particular LAN details, and so forth) and you intend to send complete copies of the installation (including Linux, zPDT, System z volumes) to other locations. IBM System z Personal Development Tool: Volume 3 Additional Topics 14.4.3 Security There are security aspects involving license server usage that should be understood. The SafeNet license server may have three lists of IP addresses (or domain names or ranges of IP addresses): The Authorized User List determines which systems can use a web interface to manage the SafeNet license server. The default list contains only one address: 127.0.0.1, which is the local host and is always allowed whether specified or not. The Allowed Site Address list determines which clients may obtain zPDT licenses from this server. If the list is empty (the default) then any client may obtain a license from this server. The Blocked Site Address list specifies client addresses that may not obtain a license from this server. If the list is empty (the default) then no client addresses are blocked. Each list is limited to 32 entries. These lists are in the sntlconfigsrve.xml file in /opt/safenet-sentinel/common_files/sentinel_key_server/ and may be edited there. They can also be managed by pointing a browser to port 7002 on the machine running the SafeNet license server, for example: http://localhost:7002 (if working on the server machine) If a different machine is used to access the server web interface, then the IP address of that machine must be listed in the Authorized User List. We strongly suggest using the browser method because directly editing this XML file is prone to introducing syntax errors that cause the license server to fail (without error messages). List entries might take any of the following forms: 127.0.0.1 my.local.domain.com 10.1.1.2-10.3.255.254 (a simple IP address) (a domain name) (a range of IP addresses) Be certain to click the update button on the web page after keying updates to the lists. You must then restart the SafeNet server: # cd /opt/safenet_sentinel/common_files/sentinel_keys_server # ./loadserv restart These lists provide one way to secure usage of a zPDT license server. Other methods, such as restricted router interfaces or non-routable IP addresses, may be more appropriate. Firewalls Working with the zPDT default port numbers, a firewall on a license and UIM server must allow connections to ports 9450 and 9451. One solution is to simply disable the firewall on the license server. Another solution is to enable the firewall and open the required ports with commands such as: # iptables -I INPUT -p tcp --dport 9450 -j ACCEPT # iptables -I INPUT -p tcp --dport 9451 -j ACCEPT These commands would need to be entered (from a root userid) after the server Linux system is booted. Network management skills are needed to properly implement the server functions. Chapter 14. License and serial number servers 153 14.4.4 Resetting everything You can usually remove the local UIM serial numbers with the uimreset -l command. You can remove both the local UIM serial numbers and corresponding entries in the UIM server database with the uimreset -r command. If the local UIM database is corrupted, the uimreset command may fail. In this rare case you can delete the files in directory /usr/z1090/uim. However, the previous UIM serial for that client will still be provided by a UIM server (if the client XML file is configured for connection to the server, of course). In this case, the uimreset -r command may be used to remove the relevant entry from the UIM server database if that is desired. The UIM server may be reinitialized by removing everything in the UIMserver subdirectory in the home directory of the Linux userid that runs the UIM server. This is a drastic step, of course, and should not be done in normal operational environments. If the UIMserver directory is cleared, some of the entries will be restored by future client connections in which the client still has previous UIM local data. The client configuration file may be restored to its original state (which does not reference any remote servers) by using the Factory Reset option with the clientconfig command. 14.4.5 SafeNet module restarts There are two SafeNet functions involved with zPDT. One is the license server that we discuss in this chapter. The other is a daemon (“token driver”) that communicates with tokens (in USB ports). After zPDT is installed, both these functions are started automatically when Linux is booted. Changing the license server XML files requires restarting the license server. It should not be necessary to restart the token driver except in unusual situations. The commands to restart each function are: $ su (change to root) # cd /opt/safenet_sentinel/common_files/sentinel_usb_daemon # ./load_daemon.sh restart (or status or stop or start) # cd /opt/safenet_sentinel/common_files/sentinel_keys_server # ./loadserv restart (or status or stop or start) 14.5 Glossary The license server and UIM server and functions can be confusing. The glossary presented here may help the reader through some of the confusion. zPDT - The basic product. Also known as a 1090 or 1091 or part of a complete RDzUT package. SafeNet - The company that provides the USB keys and the software that directly supports them. This includes the USB driver, the license manager, and a web interface to the license manager. SafeNet Sentinel Key - The USB “token” from the SafeNet company. This token provides zPDT license information. Token - Another term for a SafeNet Sentinel Key. The terms token, key, SafeNet key, and Sentinel key are used interchangeably. 154 IBM System z Personal Development Tool: Volume 3 Additional Topics License - A logical function that enables one System z CP for a zPDT system. Multiple CPs require multiple licenses. The token functions provide licenses. License Monitor - A web browser interface that displays information about Sentinel Keys and clients using them. It is accessed at port 7002 on a Linux system running a license server. License Server - A network-accessible service that manages and dispenses zPDT licenses from a token. It operates as a Linux daemon and is automatically started (after zPDT is installed) when Linux is booted. A “local” zPDT installation internally accesses the license server via internal TCP/IP. Remote license servers are accessed via network TCP/IP. USB Server - A driver provided by SafeNet to access tokens on USB ports. It operates as a Linux daemon and is installed when zPDT is installed. Server Configuration File - A file (in XML format) used by the Sentinel Key Server to obtain networking and logging parameters. It is located at: /opt/safenet_sentinel/common_files/sentinel_keys_server/Sntlconfigsrvr.xml Client Configuration File - A file (in XML format) used by zPDT to obtain parameters to access both a License Server and (possibly) a UIM server. It is located at: /usr/z1090/bin/sntlconfig.xml Heartbeat - The periodic accessing by zPDT of the license(s) managed by a license server. If the heartbeat is missed, the zPDT license is revoked. Time Cheat - The Sentinel Key (token) records the current date and time each time the key is accessed. If the Linux system clock contains a time earlier that the last recorded time in the token, the license is unusable. Token Serial Number - The license information in the token contains a unique serial number assigned by IBM. This serial number may be used as the basis for the System z CP serial number in some cases. UIM or Unique Identification Manager - This is a server (or local function of zPDT) that helps maintain unique enterprise-wide System z serial numbers for zPDT systems. The license server and the UIM server (or local function) are separate but parallel functions. Identification - A serial number and instance number, as stored by the System z STIDP instruction. (The instance number is similar to an LPAR number on a larger System z.) Serial Number - A value between 1 and 65535 (four hex digits). The serial number is assigned by the UIM function to the base Linux and used by zPDT to provide the System z serial number. Instance Number - A number between 1 and 255 assigned to each zPDT instance on a base Linux machine. Each zPDT instance must operate under a different Linux userid and the instance number is assigned to the userid. The instance number is used in the same manner as the LPAR number on a larger System z. Data Base - A file containing UIM information. The files are not directly editable. There are two types of databases. One exists in every Linux zPDT machine, and the other exists in a UIM server (if this is used). The local database (on a zPDT client) is located at: /usr/z1090/uim/uimclient.db UIM Server - A centralized service that maintains unique zPDT serial numbers for multiple zPDT machines within an enterprise. Clients access the server through TCP/IP. The server runs under a normal Linux userid (and not under root). UIM Client - Each Linux machine running zPDT has a client function. In a local operation, a remote UIM server might not be involved. The UIM client could operate solely from the local UIM database. Chapter 14. License and serial number servers 155 Random serial number - This is a serial number that is unique, but is not tied to a token serial number. The UIM server generates and assigns these numbers. A random serial number can be used (by zPDT) with a license from any token. Serial numbers assigned from a token - In some cases (such as a “simple local system”) the System z serial number used by zPDT is taken from the token. UUID - This is a universally unique identifier. It is obtained from the Intel-compatible machine BIOS. It is used to uniquely associate a UIM serial number with a particular machine. Checksum - A value in the UIM database that may be used to verify the authenticity of the data in the database. (It also prevents you from directly editing the database information.) Local Mode - A situation in which a remote license server and a UIM server are not used. zPDT obtains its serial number from the local UIM database. The client configuration XML file specifies localhost as the Contact Server. (In local mode, the serial number may be a previously assigned number from a server or from a token. If an existing serial number is not present, the serial number is taken from the local token.) Remote Mode - The zPDT instance obtains licenses and UIM identification from a remote license server and UIM server. Local to Remote - This is a situation in which the serial number (in the local client database) was previously obtained from a local token, but zPDT is now configured to run with remote servers. If the remote license server determines that the serial number is valid and not being used elsewhere, that serial number is used. Remote to Local - This is a situation in which the serial number was previously assigned by a UIM server (and stored in the local client UIM database) and zPDT is now being used without remote servers. In this case the previously assigned serial number is used and the serial number of the local token (which must be present to provide a license) is ignored. clientconfig - This is a program (Linux command) that can be used to change parameters in the client XML file. RDz license server - An RDz license server has no relation to zPDT license servers. It provides controlled access to multiple IBM software products and might be used in conjunction with zPDT license servers. 156 IBM System z Personal Development Tool: Volume 3 Additional Topics 15 Chapter 15. Virtualization zPDT may be used in a virtual environment. Two environments have been tested for zPDT usage: VMWare products, all at the version 5.1.0 level: – VSphere Enterprise (a server allowing more than 8 (virtual) cores per guest) – ESXi Essentials (a server with a maximum of 8 (virtual) cores per guest) – VSphere VCenter (a controller with extended features and functions) – VSphere VCenter Client (a basic controller) Many of the tests were run on an IBM 3650-M04 server with 16 cores and 128 GB memory. Typically, four zPDT guests were run. The most typical configurations were: – Four to eight (virtual) cores per guest, with three zPDT System z CPs defined. Typical zPDT memory specification was 8-16 GB. – Twelve (virtual) cores per guest, with up to eight zPDT System z CPs defined. KVM as used on IBM zBX components. We used four different guest memory sizes (8, 16, 32, and 64 GB) to observe throughput differences when running our test job streams. Both RHEL 6.3 and SLES 11 (SP2) were used. Other virtual environments may operate correctly, but have not been tried by zPDT development and no assistance is available for other environments. In particular, the VMWare Player (operating under Microsoft Windows) has not been investigated and no support is available for this configuration.1 Important: The zPDT level used for all the activities mentioned in this chapter was the GA4 level plus a fixpack (GA4.1), which is z1090 45.24 or later. Earlier zPDT levels were not tested. SLES 11 (SP2) and RHEL 6.3 were used for testing. Other Linux levels (and Fedora or openSUSE) may work correctly, but were not tested and might be used at your own risk. 1 This does not mean that it fails. We simply did not investigate it and cannot offer any support for using it with zPDT. © Copyright IBM Corp. 2009, 2013. All rights reserved. 157 Many options are available in a virtual environment. In some cases it is reasonable to substantially overcommit a virtual server; that is, to run virtual guests that (in total) could consume more memory or more processor cycles or more I/O activity than are actually available. This is typically done when the system administrator knows that the actual workloads are such that the overcommitment has no undesirable effects. zPDT (running z/OS) is typically a “heavy” workload. We strongly advise that you do not run zPDT in substantially overcommitted virtual environments. Among other effects, a substantially overcommitted virtual server might cause delays that trigger z/OS missing interrupt handler activity. Another danger might be cascading page faults, where the virtual machine hipervisor and the guest Linux running zPDT and z/OS might all be paging due to several levels of overcommitted memory. As a general rule, you (the zPDT owner, user, and/or administrator) must obtain the necessary skills to install, configure, and use your virtual server. We do not attempt to document or provide instructions for installing and managing the virtual server environment. License servers The tested environments normally used remote zPDT licenses and UIM servers. This may not be necessary for smaller VMWare configurations where a separate USB port (for a token) could be assigned to each virtual guest zPDT. A single zPDT token (connected to a USB port on the VMWare server) cannot be shared by multiple virtual machines. In general, the first virtual machine started (that specifies USB usage) will occupy the USB interface to the token. Disk configurations Servers in the category discussed here may have two disk configurations (or a mixture of the two): The simplest configuration uses “standard” internal disks in the server. These are likely to be SCSI devices in a larger server, or SATA devices in a smaller server. – We expect that SCSI devices, with multiple SCSI adapters and suitable connections, would provide better I/O performance, but we made no attempt to measure or quantify this effect. Typically, the SCSI devices would be configured for RAID operation. Our 3650-M04 used a RAID-5 configuration with 6x900 GB drives (one of which was a hot spare). Typically, SATA drives are not in a RAID configuration. – USB disk drives could be used but are unlikely to provide the performance needed for multiple z/OS guests on the server. We did not try USB drives in our virtual servers. Larger, more complex server environments use SAN disk configurations, with Fibre channel interfaces. The disk environment in the SAN typically uses multiple RAID configurations, with multiple Fibre channel interfaces. Our zBX configuration always used a SAN configuration. Our initial VMWare system used an internal SATA drive. Our primary VMWare configuration used two SCSI RAID “banks” in the server. At the time of writing we were investigating SAN connections. Our zBX system connected to a SAN through two Fibre channel interfaces. (There is no practical way to use “local” disks with a zBX system.) Setting up a SAN environment can be complex and is outside the scope of this document. (See Building an Ensemble Using IBM zEnterprise Unified Resource Manager, SG24-7921 for more information about setting up a zBX environment.) Throughout this document we assume that server disks are available (hopefully in a RAID configuration) and ignore the complexities that may be involved in creating the disk configuration. At the zPDT level, we see only Linux interfaces for disks; zPDT is unaware of any lower-level details. 158 IBM System z Personal Development Tool: Volume 3 Additional Topics It is possible to configure logical disk drives to be shared among multiple virtual guest machines. Do not do this unless you are absolutely certain you know what you are doing! Linux (which we assume is the basic operating system on all the virtual machines) does not routinely support shared disks.2 (To better understand the considerations, think about the disk cache that is so important for Linux performance.) 15.1 VMWare Again, we stress that you must obtain the necessary skills to install and use VMWare. Figure 15-1 illustrates a basic VMWare configuration that was used for initial zPDT testing. VMware server Linux1 guest Windows Control Point vCenter client Console vncserver zPDT Linux2 guest 192.168.0.50 192.168.0.2 vncserver NIC zPDT 192.168.0.60 Windows or Linux 192.168.0.199 Router/hub VNC viewer NIC 192.168.0.3 VMware hypervisor Datastore NIC NIC Could be used to access the Control Point remotely x3270 x3270 NIC 192.168.0.198 Linux 192.168.0.4 License server Linux (or Windows with PCOM, etc.) zPDT z/OS users UIM server This could be a guest within the VMware server Figure 15-1 Simple VMWare configuration In this configuration we have a VMWare server3 with two virtual machines (Linux1 and Linux2). The VMWare hipervisor has its own IP address (192.168.0.199). Each virtual guest has an IP address for a (virtual) NIC. The console on the VMWare server is used for the most basic hipervisor configuration (such as assigning an IP address); it is not used to manage virtual machines that run on the server. In our most basic configuration, only a single NIC existed on the server and was shared by VMWare and all guests.4 2 3 4 Read-only (logical) disks might be used, but not if they contain emulated 3390 z/OS volumes. z/OS does not support read-only volumes. We initially used ESXi Essentials, but later changed to VSphere Enterprise on one of our test machines. In later configurations we assigned a separate NIC to each Linux guest. Our 3650-M04 machines had at least four NICs. With our test workloads the use of a single shared NIC presented no problems. Chapter 15. Virtualization 159 An application named vSphere VCenter or vSphere VCenter Client (both run on Microsoft Windows5) must be downloaded (from VMWare) and used to define and manage virtual machines on the server.6 This is a requirement; it is not possible to manage the virtual machines by using the console on the server. The vCenter application (either the full or Client version) is used to define virtual machines (Linux1 and Linux2 in our example) and to operate them. Among other functions, vCenter provides a virtual console for each virtual machine. This virtual console may be used to manage the guest systems. For example, if the guest is SLES the virtual console is used to run YaST. The virtual console may be used for all the functions that the physical console performs on a “real” system. vCenter is used to logically “power on” each virtual guest, which results in booting the operating system on that guest. Additionally, the guest systems may start a vncserver and be managed by vncviewer applications on external systems. How well this works depends on the qualities of the particular vnc components involved. Assuming acceptable vnc operation, this interface may be used to manage individual guest systems. zPDT (under the guest Linux systems) works with TN3270 interfaces and these connections are illustrated in Figure 15-1 on page 159. vCenter is required to start (boot) a guest system; this cannot be done through vnc. vCenter controls all the virtual machines, and some care must be exercised in using it. Once booted, a guest could be managed through either vCenter (via the console function) or through vnc or through simple ssh or telnet windows. 15.1.1 Usage notes Following are a few notes we made during our initial VMWare usage. (The author had no previous VMWare experience, so these notes may or may not be useful to others.) By default (accepted during installation) VMWare treats the server disks as a datastore. With a single server disk,7 it was named datastore1. VMWare itself is installed on the disk (so as to be bootable) and the remaining space is datastore1. The default VMWare userid is root and a password must be set. The userid and password are needed to connect the vCenter application. The password must be at least seven characters. After booting VMWare on the server, a small amount of customization is possible by using the F2 key. – We used the Configure Management Network option as follows: Hostname: localhost IP address: 192.168.0.199 (vmnic0 interface) Subnet mask: 255.255.255.0 Defalt Gateway: 192.168.0.1 VLAN not used DNS not set – We then restarted the management network and eventually connected to the vCenter Client. 5 6 7 160 An optional form of vSphere vClient that is already embedded in a base Linux system may be downloaded from VMWare as a complete virtual package. This can negate the need for a Microsoft Windows environment. vSphere vCenter is a priced product that offers many advanced tuning and reporting mechanisms. vSphere vCenter Client is a free offering from VMWare that offers lesser functionality. For our purposes, we used the Client version. Which might be a large RAID array. IBM System z Personal Development Tool: Volume 3 Additional Topics vCenter provides a graphical interface for defining virtual machines. It is quite simple to use: – Assign each virtual machine a name (we used Linux1 and Linux 2). – Place the virtual machine on a datastore. A later option allows you to specify the amount of datastore disk space to be assigned to the virtual machine. – Select a NIC. Ours was named NIC1 on the VMnetwork, and used an E1000 (virtual) interface.8 – After the guest machine is defined, you can use the Resource Allocation tab to assign a memory size for the virtual machine. – Viewing the summary tab (for the virtual machine) and clicking on the various line options allows you to boot to the (virtual) BIOS and assign boot delays (expressed in milliseconds). We were able to install Linux guest machines working from both iso DVD images and bootable DVD installation disks. Contrary to frequent advice, we did not find that iso images were required. – When using a Linux iso DVD we copied it to the datastore (using vCenter options). – When using a bootable Linux DVD we placed it in the VMWare DVD drive and used it there. (It could also be transparently used from the vCenter DVD drive). – Booting from a DVD (in bootable format) required a few steps: • We changed the (virtual) BIOS of the guest to include a DVD drive first in the boot list. (There is a vCenter option to start the virtual BIOS when the guest is powered up.) • We set a 9000 millisecond delay during bootup, to allow us to “attach” the real DVD drive to the guest machine. Four options allowed the attachment in bootable-for-iso format, using either the host (server) DVD drive or the vCenter DVD drive. • These functions (booting to the virtual BIOS, setting a boot delay, and attaching a DVD drive to the guest) are all done through the vCenter client. • Once the Linux disk booted we proceeded with a normal Linux installation, working through the vCenter virtual console for the guest machine. This included defining an Ethernet interface with an IP address. (We used 192.168.0.50 for our first virtual machine.) vCenter displays an option to Power On the virtual machine. (This option exists in several vCenter tabs; we found the Summary tab was the most convenient to use.) The Power On function boots the virtual machine. A small icon above the main vCenter display area allows you to assign a DVD drive to the virtual machine. (The DVD drive can be on the vClient machine or on the VMWare server; the actual location is transparent to the virtual machine.) If this assignment is done after Power On and before booting is started (during a delay interval) and if the (virtual) BIOS is set to try the DVD drive first, the virtual machine will boot from the DVD. The same icon may be used after the guest is booted if you want to use a DVD. The delay element is needed only if you want to boot from the DVD. A similar icon is available to attach a USB interface to a virtual machine. 8 You can manage and assign multiple hardware NICs. This takes a little more practice with the vCenter controls. We found that routing everything through a single fast NIC was completely satisfactory for our usage. Chapter 15. Virtualization 161 Linux administration can be done using the vClient virtual console or through vnc. The vClient virtual console is convenient. Mouse usage is slightly unusual. When the mouse pointer is in the virtual console area, it works as expected. However, you must use the Ctrl-Alt keys to “release” the mouse pointer to work outside the virtual console window. Our first Linux guest and a remote Linux system were openSUSE 11.2 systems. (Note that openSUSE is not one of the supported and tested levels for zPDT on VMWare; however, it provided a convenient base for initial usage. We later switched this machine to SLES 11 SP2.) We sometimes used a remote Linux as a vnc viewer (using TightVNC, which was included with both systems): – On the virtual guest (using the vSphere vCenter client virtual console) we issued vncserver followed by vncserver -kill :1 (or vncserver -kill :2). (Note the space before the last operand.) We then edited ~/.vnc/xstartup to appear as follows: #xrb .... #xsetroot #xterm #twm& /etc/x11/xinit/xinitrc & /usr/bin/gnome & We then issued the vncserver command again. – On the remote Linux system we issued a vncviewer 192.168.0.50 command. This produced a graphic window for the Linux1 system. In our case the window did not include the full Linux1 console (as seen in the vSphere virtual console). It also produced a pop-up window on the vSphere virtual console. At this point we were using the vSphere virtual console for Linux1 administration and did not further debug the minor vnc problems. Shutting down Linux (using the vCenter virtual console) results in a logical Power Off situation for the virtual guest. A vClient Power On function for that guest is then needed to boot Linux again. We assume you could run vCenter on multiple Windows systems, providing multiple control points. We did not try this configuration. The current VMWare releases (5.1) do not support SCSI-attached tape drives. 15.2 System z zBX Our zBX configuration is shown in Figure 15-2 on page 163. We configured four guests, named VS1 - VS4. Two were RHEL and two were SLES. Two internal VLAN networks were defined; these are used in a way similar to hipersockets on a System z machine. One VLAN network was defined for external connections. The zPDT license server was on this network and an OpenVPN server that translated internal IP addresses to external addresses. The Linux guests were loaded starting with an iso image. This was initially read from the HCD DVD drive. The Linux guests were configured by (virtual console) and later managed by vnc connections to the Linux guest. 162 IBM System z Personal Development Tool: Volume 3 Additional Topics 9.xxx.xxx.xxx External network OpenVPN 192.168.50.1 Server 192.168.50.2 WWPNs SAN VLAN 50 192.168.50.0/24 WWPNs Linux (guest) Linux (guest) Linux (guest) Linux (guest) VS1 VS2 VS3 VS4 192.168.50.10 192.168.51.10 192.168.52.10 192.168.50.20 192.168.51.20 192.168.52.20 192.168.50.30 192.168.51.30 192.168.52.30 192.168.50.40 192.168.51.40 192.168.52.40 RHEL SLES RHEL SLES LUNs 4 x 200 GB 4 x 800 GB zPDT Token and UIM Servers 8 GB 16 GB VLAN 51 192.168.51.0/24 32 GB 64 GB VLAN 52 192.168.52.0/24 zBX slot 12 (x86 blade) Figure 15-2 zBX configuration Each of our guest systems had a 200 GB and an 800 GB disk drive. We placed zPDT emulated 3390 volumes on the 800 GB drive. This arrangement is not required; a guest could use a single logical drive. The 192.168.50.xx IP addresses were intended for external connections. The other IP ranges (192.168.51.xx and 192.168.52.xx) were for cross communication between the guests. SCSI tape drives are not supported with a zBX system. Extensive information about configuring zBX systems can be found in Building an Ensemble Using IBM zEnterprise Unified Resource Manager, SG24-7921. 15.3 Security and control Both VMWare and zBX require careful consideration for their control points: vCenter for VMWare and an HMC for zBX. These control points provide controls for all the virtual machines and there might be concerns about the number of people with this level of authority. This becomes an issue when booting a virtual machine. Before booting, the virtual machine is in a logical Power Off state and this can be changed to a Power On state (which starts the booting process) only through one of the control points. If a user of a virtual machine performs a shutdown operation (resulting in a logical Power Off), then a control point must be used to Power On and reboot that virtual machine. However, the user of a virtual machine can restart the machine (resulting in a reboot without the Power Off function) without needing control point access. Chapter 15. Virtualization 163 Also, control point functions are needed to temporarily attach real DVD drives or USB sockets to a virtual machine. Access to vClient is controlled by a password. Very little training is required to use vClient for basic operations; once introduced, the graphic controls are easy to use. The exposure is that a user can control multiple virtual machines. Access to an HMC is more complex and substantial training may be needed to use it. HMC interfaces may be subsetted and given separate userids and passwords, but this requires some skill to set up and maintain. General HMC access is usually very limited in a major System z installation. 15.4 Performance We found z/OS guests under VMWare to have performance ranging from excellent to unacceptable, depending on the nature of the workload and whether the server was overcommitted in some way. A virtualized environment, whether VMWare or zBX, cannot create more machine capacity than what exists in the underlying hardware. The key consideration is the nature of the workloads. The focus in these documents is z/OS, but this does not imply any particular workload under z/OS. A z/OS system with many TSO users (mostly editing source code or doing occasional compilations) might be considered lightly loaded, whereas another z/OS system with only a few users running large DB2 jobs might be quite heavily loaded. You cannot draw any conclusions about performance unless you can realistically define your workloads. Our notable points included: If the z/OS workloads tended to drive z/OS to 100% CP usage, then overcommitment of server cores resulted in poor performance. This was easier to identify on a small server with only four cores. If we created two virtual guests, each with three virtual cores (making six virtual cores, where there were only four real cores) our z/OS workloads ran several times slower than if we used only four virtual cores for the same workload. Performance degradation was not linear. Once the processors were overcommitted (with near 100% utilization by z/OS workloads) performance dropped dramatically. z/OS jobs with heavy I/O ran considerably slower than in a non-virtual environment, even with no overcommitment of cores. Some MIH9 messages were seen, but z/OS recovered from these. Light z/OS loads, such as TSO usage with occasional compilations, ran very well across multiple virtual machines. We did not overcommit memory. This is possible with VMWare, but we avoided it. Such overcommitting of memory could result in paging at the VMWare level and we assumed this would degrade overall performance. It is not possible to overcommit memory with zBX systems. Except for very light workloads, most z/OS jobs (in virtual machines) ran a little slower than in non-virtual environments. This was expected and accepted. What was unexpected (although reasonable) was the apparent processor time (TCB + SRB times) for z/OS jobs was longer than in a non-virtual environment. That is, the apparent System z instructions ran slower, and thus needed more System z processor time. This might be significant in a situation where processor time (as reported by SMF) is important for some reason. 9 164 MIH is Missing Interrupt Handler. This is a z/OS function that can be triggered by very slow (or backlogged) I/O operations. IBM System z Personal Development Tool: Volume 3 Additional Topics Each virtual machine (for zPDT) had a base Linux. As usual, the Linux disk cache is a critical performance factor. Using the vCenter monitoring facilities we noted that the complete virtual machine memory was heavily used. We suggest that giving more memory to each virtual machine than you might provide in a non-virtual environment (without overcommitting memory) may improve performance. In effect, this allows more buffering of I/O to the real disks on the server. 15.4.1 Open notes We strongly suggest disabling hiperthreading for “normal” zPDT usage, as stated several times in this series of documents. The basic problem is that if a z/OS CP is spinning and another System z CP that is attempting to resolve the spin loop are both dispatched on the two “halves” of a hiperthreaded core, then there can be a deadlock for those two System z CPs until some external action causes the core to be dispatched in a different way. In a small system (perhaps two cores, hiperthreaded into four apparent cores) this deadlocking can be very apparent. In a larger server, such as might be used in a virtualized environment, the problem is much less apparent but may still lead to decreased performance for z/OS. The frequent redispatching of cores in a virtual environment tends to hide such temporary deadlock problems. zBX has hiperthreading enabled; we could not disable it. We did normally disable it on the servers used for VMWare, but experimented with it enabled. We did not observe any obvious problems with hiperthreading enabled, but we did not make detailed performance experiments to quantify degredation (if any) due to hiperthreading. The zBX environment incorporates a VLAN function that, at first level, is invisible to the guest systems. VMWare can do the same, and this is probably the typical configuration.10 We did not experiment with multiple levels of VLANs or usage of z/OS VLANs. Simple LAN usage worked well with both zBX and VMWare. Complex LAN configurations may require more thought. 10 VMWare can also assign physical network adapters to individual guests, bypassing any VMWare internal VLAN and routing operations. Chapter 15. Virtualization 165 166 IBM System z Personal Development Tool: Volume 3 Additional Topics Related publications The publications listed in this section are considered particularly suitable for a more detailed discussion of the topics covered in this book. IBM Redbooks For information about ordering these publications, see “How to get Redbooks” on page 167. Note that some of the documents referenced here may be available in softcopy only. IBM System z Personal Development Tool Volume 2 Installation and Use, SG24-7722 IBM System z Personal Development Tool Volume 1 Introduction and Reference, SG24-7721 IBM System z Personal Development Tool Volume 4 Coupling and Parallel Sysplex, SG24-7859 Introduction to the New Mainframe: z/VM Basics, SG24-7316 Building an Ensemble Using IBM zEnterprise Unified Resource Manager, SG24-7921 Other publications System z Personal Development Tool User’s Guide and Reference, G229-1101 How to get Redbooks You can search for, view, or download Redbooks, Redpapers, Technotes, draft publications and Additional materials, as well as order hardcopy Redbooks, at this Web site: ibm.com/redbooks Help from IBM IBM Support and downloads ibm.com/support IBM Global Services ibm.com/services © Copyright IBM Corp. 2009, 2013. All rights reserved. 167 168 IBM System z Personal Development Tool: Volume 3 Additional Topics Index Symbols /etc/z1090.d/uimd.db 145 /usr/z1090/bin/sntlconfig.xml 145, 147 $SPRT1 command 43 Numerics 1090 messages 9 1091 system 6 1091 token 143 1403 printer 41 3390 volume, moving 30 A acc command 70 Adaptec ASC-29320ALP U320 19 ADRDSSU job 32 ADRDSSU restore program 35 ADRDSSU, utility program 19 alcckd command, diagnosis 98 alias addresses 104 Allowed Site Address 153 Authorized User List 153 aws2scsi command 20 awscmd device manager 85 awslog command 99 awsmount command 41 awsmount, SCSI tapes 16 awsprt usage 41 awsscsi device manager 16 awsstart command 7 awsstart, problems 96 AWSTAPE file 35 awstape utilities 20 B BIOS clock 2 Block counts, 3490 18 block size, SCSI 19 Blocked Site Address 153 BLP processing 87 BPXTCAFF program 121 browse command 70 C card2tape 21 card2tape command 20 CKD versioning 8 ckdPrint command 98 client, migration 113 clientconfig command 3, 147, 154 clientconfig_authority command 4 cloning zPDT systems 152 © Copyright IBM Corp. 2009, 2013. All rights reserved. command acc 70 alcckd 98 aws2scsi 20 awslog 99 awsstart 7 browse 70 card2tape 20 ckdPrint 98 directxa 70 discard 70 diskmap 70 doOSAcmd 99 dreg 99 dshrmem 99 filelist 70 find_io 106 format 70 gzip 36 ind 70 link 70 peek 70 printlog 99 printtrace 99 purge system prt all 70 purge system rdr all 70 q accessed 70 q all 70 q alloc all 70 q alloc map 70 q da all 70 q disk 69 q links 120 70 q n 70 q pf 70 q prt 70 q stor 70 q system 70 rassummary 97 receive 34 rel 70 scsi2tape 20 senderrdata 96 tape2file 20 tapeCheck 99 tapeheck 20 top 100 vmlink 70 vmstat 99 xmit 32 compressing PARMLIB 47 core image files 98 core images, startup 98 CPs, CPUs, threads, tokens 6 CPs, maximum number 6 169 crontab entries 2 Customized Offerings Driver (COD) 48 HZSALLCP job 47 I D DASDVOL, RACF class 117 def_reserved_size, SCSI 20 det command 70 devmap, z/VM 54 devmapvm devmap 54 DHCP 108 DHCP and local router 108 DHCP client 108 DHCP-assigned addresses 146 directxa command 70 disabled waits, z/OS 48 discard command 70 disk changes 150 diskmap command 70 doOSAcmd command 99 dreg command 99 dshrmem command 99 dual boot, example 10 dumps, z/OS, disk space 25 I/O devices, number 13 IBM 3592-E05 TS1120 19 IBM 3650-M04 server 157 IBM LTO-3 3580 19 ICKDSF 35 IEBCOPY problems 24 ind command 70 IODF changes 38 ipl_dvd command 101 iptables 153 ISPF, starting 46 J Java and WAS startup 25 JES2 print 43 JES2 setup 42 K kernel.msgmni 13 key server port number 149 E eDMosa module 4 emulated I/O devices, maximum 12 Emulex Corporation Zephyr-X 19 ESXi Essentials 157 Ethernet adapters, shared 109 Ethernet SNA 112 ethtool command 108 F Factory Reset option 154 filelist command 70 find_io command 103, 106 firewall 153 firewall, license server 153 firewalls 146 force userid 70 format command 70 fragmented file 3 fstab options 121 FTP performance 108 Fujitsu M2488E 19 L Lexmark printers 41 License ContactServer 148 License IPv6 148 License PortNumber 148 license server 143, 146 License servers, virtual environment 158 link command 70 link list, addition 47 Linux monitoring 99 Linux TOD clock 2 load_daemon.sh 154 loadserv 154 local option 149 Local Routers 108 local token 146 log files, permissions 4 logs/traces 96 logstreams, deleting 48 lpr 42 M G grub, booting 11 gzip command 36 H HCD, usage 38 hckd2ckd command 119–120 Health Checker 47 hfba2fba command 119 htape2tape command 119 170 memory, used for I/O devices 12 message numbers, 1090 9 messages, 1090 9 migration, DASD volume 113 modprobe 20 msgmni, value 12 mt package for Linux 20 MVS console, lost 45 IBM System z Personal Development Tool: Volume 3 Additional Topics N NAT functions 146 network time server 2 non-QDIO 105 O OAT, multiple instances 76 OMVS, enabling usage 44 oprmsg usage 46 OSA notes 10 oversize parameter, x3270 25 P paging, with z/VM 71 Partition Magic 10 partitioning 11 path parameter 103 PC printer 41 peek command 70 port 3088 10 port 3270 10 port 3990 10, 118 port 9450, for token 10 port 9451 10 port number (IP) 145 PowerQuest Partition Magic 10 printing 40 printlog command 99 printtrace command 99 purge system prt all command 70 purge system rdr all command 70 Q q accessed command 70 q all command 70 q alloc all command 70 q alloc map command 70 q da all command 70 q disk command 69 q links 120 command 70 Q Logic Corporation ISP2432 19 q n command 70 q pf command 70 q prt command 70 q rdr 70 q stor command 70 q system command 70 QDIO or non-QDIO operation 105 R RANDOM option 146, 152 rassummary command 97 rdrlist 70 RDzUT 6 receive command 34 Redbooks Web site 167 Contact us x rel command 70 remote operation 12 RHEL 6.3 157 RMF-III, starting 47 routers 108 S S071 ABEND 24 SafeNet module restarts 154 SafeNet server 144 safenet-sentinel 149, 153 SAN environment 158 SCSI block size 19 SCSI def_reserved_size 20 SCSI tape drives 16, 18 SCSI tape, block counts 18 scsi2tape 21 scsi2tape command 20 SecureUpdate_authority command 3 SecureUpdateUtility 150 SecureUpdateUtility command 3 security exposure 3 security, license server 153 selection menu, 3270 83 senderrdata command 96, 99 serial number, changes 150 serial number, for zPDT 144 server, migration 113 set pf12 retrieve 70 settod command 2 shell script, printing 42 SLES 11 (SP2) 157 SLES-10 SP1 (for System z) 121 SNA operation 112 snapdump 96 sntlconfig.xml 147 sparse file 3 spin loop timeouts 24 stand-alone dump 29 SVC dumps, space 25 SYS1.LOGREC full 45 SYS1.SAMPLIB for Health Checker 47 T tape drives, SCSI 18 tape2file 20 tape2file command 20 tape2scsi 20 tape2tape 21 tapeCheck 20 tapeCheck command 99 tapeheck command 20 tapePrint 21 TCP/IP port 3990 115 threads, Linux 7 time cheat message 2 time cheat messages 2 timeout errors 3 TKE system 131 Index 171 token command 150 token port number 10 token, dates 2 tokens, multiple 6 top command 100 tunnel environment, for OSA 111 zIIP 6 ZOSSERV.XMIT file 116 zpdth group 150 ZPDTMSRV module 116 zpdtSecureUpdate command 3 U UIM 146 UIM ContactServer 148 UIM IPv6 148 UIM Local Serial Random 148 UIM PortNumber 148 UIM serial number 146 UIM server 143 uimcheck command 149–150 uimreset command 147 uimreset -l command 146 uimreset -r command 154 ulimit -m and -v 13 ulimit, memory 12 unique identifier manager 143, 146 USB hardware keys, multiple 7 USB port, not used 143 V VLAN networks 146 VMAC support 79 vmlink command 70 vmstat command 99 VMWare Player 157 VMWare products 157 Volume migration 113 VSphere Enterprise 157 vswitch support 79 W WebSphere Application Server startup 25 Windows partition 11 Windows XP 10 wsadmin tool 27 X x3270 cursor position 12 x3270 oversize parameter 25 xmit command 32 xml file 147 XOsview program 100 Xquickstart option 26 Z z/OS CP and memory display 24 z/OS operator console, lost 45 z1090instcheck command 5 zAAP 6 zBX components 157 zFS, in AD-CD system 48 172 IBM System z Personal Development Tool: Volume 3 Additional Topics IBM System z Personal Development Tool: Volume 3 Additional Topics IBM System z Personal Development Tool: Volume 3 Additional Topics IBM System z Personal Development Tool: Volume 3 Additional Topics IBM System z Personal Development Tool: Volume 3 Additional Topics (0.2”spine) 0.17”<->0.473” 90<->249 pages IBM System z Personal Development Tool: Volume 3 Additional Topics IBM System z Personal Development Tool: Volume 3 Additional Topics Back cover ® IBM System z Personal Development Tool Volume 3 Additional Topics System z Development Tool Full z/OS usage Linux base This IBM Redbooks publication introduces the IBM System z Personal Development Tool (zPDT), which runs on an underlying Linux system based on an Intel processor. zPDT provides a System z system on a PC capable of running current System z operating systems, including emulation of selected System z I/O devices and control units. It is intended as a development, demonstration, and learning platform; it is not designed as a production system. This book, discussing more advanced topics, is the last of three volumes. The first volume introduces zPDT and provides reference material for zPDT commands and device managers. The second volume describes the installation of zPDT (including the underlying Linux, and a particular z/OS distribution) and basic usage patterns. The third volume discusses more advanced topics that may not interest all zPDT users. The IBM order numbers for the three volumes are SG24-7721, SG24-7722, and SG24-7723. The systems discussed in these volumes are complex, with elements of Linux (for the underlying PC machine), z/Architecture (for the core zPDT elements), System z I/O functions (for emulated I/O devices), and z/OS (providing the System z application interface), and possibly with other System z operating systems. We assume the reader is familiar with the general concepts and terminology of System z hardware and software elements and with basic PC Linux characteristics. SG24-7723-05 ISBN 0738438316 ® INTERNATIONAL TECHNICAL SUPPORT ORGANIZATION BUILDING TECHNICAL INFORMATION BASED ON PRACTICAL EXPERIENCE IBM Redbooks are developed by the IBM International Technical Support Organization. Experts from IBM, Customers and Partners from around the world create timely technical information based on realistic scenarios. Specific recommendations are provided to help you implement IT solutions more effectively in your environment. For more information: ibm.com/redbooks