1
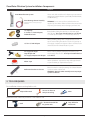
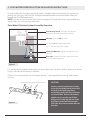
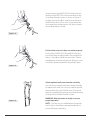
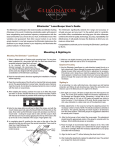
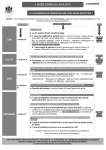
Prior to installing
the Zuvo Water
Filtration System,
record the serial
number located
on the lower back
of the unit.
Zuvo Water
Filtration System
Installation Guide
The Zuvo™ Water Filtration System is designed to connect to a separate, dedicated Zuvo Beverage Faucet
mounted on your sink top. Installation is straightforward and most “do-it-yourself” types will find it relatively
easy. If you are uncomfortable working with or around plumbing, enlist the help of a licensed plumber.
1. UNPACKING AND INSPECTION
Unpack all pieces and insure that you have all components listed below. If any parts are missing contact
Zuvo Water or your Zuvo Water dealer.
Wall mount bracket
(mount vertically only)
Zuvo Beverage Faucet
(type and finish may vary)
3/8" Supply EZ
angle stop adapter
OR
3/8" Supply
compression adapter
Spout
1/2" Pipe tap with
rubber seals
Chrome washer
Teflon tape
Clamp washer
Mounting screw (2)
Nut
1/4 C x 1/4 MIP adapter
On/Off lever
Faucet body
Rubber gasket
Zuvo Water Filtration System
Figure 1
Page 1
Zuvo Water Filtration System Installation Components
ItemPurpose
Zuvo Water Filtration System
Zuvo Water Filtration System
Above sink, dedicated faucet for dispensing water treated
with the Zuvo Water Filtration System. RED, WHITE/YELLOW,
and BLUE tubing
Zuvo Beverage Faucet Assembly
Actual appearance varies by faucet type
and finish
WARNING: Do not use any faucet other than the one
supplied by Zuvo Water. Failure to follow these instructions
may void your warranty and/or damage your Zuvo unit.
1/2" Pipe Tap
(1/2" MSJ x 1/2" MSJ Adapter)
with Rubber Seals
Brass plumbing fitting that attaches to cold water supply
shut off valve. Use if your shutoff valve has 1/2" thread.
1/2" Male Slip Joint (MSJ) x 1/2" Female Slip Joint (FSJ)
1/4" C x 1/4" MIP Adapter
Plastic plumbing fitting with 1/4" pipe thread and 1/4"
quick connect fitting that attaches to the 1/2" pipe tap or
3/8" supply compression adapter to allow cold water to be
diverted to the Zuvo Water Filtration System.
3/8" Supply EZ Angle
Stop Adapter OR
3/8" Supply Compression Adapter
Plastic or brass plumbing fitting that attaches to cold
water supply shut off valve. Use if your shutoff valve has
3/8" thread
Teflon® Tape
Teflon® “plumber’s” tape used to wrap male pipe threads
to prevent leaking in tapered thread joints
Wall mount bracket and screws
Plastic bracket for securely mounting Zuvo Water Filtration
System to under-counter wall
WARNING: Mount bracket vertically to ensure proper
system installation.
2. TOOLS REQUIRED
For installation into an existing hole in sink
Adjustable wrench
Scissors or shears to
trim plastic tubing
Pliers
Additional tools necessary to drill a 1-inch hole in sink
Drill
1" diamond core drill bit
for granite sinks
Page 2
Step drill bit for
metal sinks
3. ZUVO WATER FILTRATION SYSTEM INSTALLATION INSTRUCTIONS
Prior to installing the Zuvo Beverage Faucet, select a suitable under-counter location for mounting or
placing your Zuvo unit. The Zuvo unit should be mounted/located no more than about 3 feet from
beneath the Zuvo Beverage Faucet.
NOTE: If you do not have a Ground Fault Circuit Interrupter (GFCI) and outlet that is not controlled by a
switch under your sink, consult an electrician.
Zuvo Water Filtration System Assembly Overview
Zuvo Beverage Faucet – Re-routes cold tap water
through the Zuvo unit and back out the faucet.
RED Tube – Delivers cold tap water
1/2" pipe tap or 3/8" supply adapter with
1/4"C x 1/4" MIP compression adapter
WHITE/ YELLOW Tube – Delivers cold tap water (in) to
Zuvo unit
BLUE Tube – Delivers clean water (out) from Zuvo unit
back to Zuvo Beverage Faucet
Figure 2
It is possible that a capped hole already exists on the lip of your sink for an auxiliary dispenser or faucet.
Using it will make for the easiest installation.
If there isn‘t an existing hole, you will need to drill the 1" hole required for the faucet. Hole location
will vary.
Use existing capped hole or drill new hole
CAUTION!
If you have a granite, porcelain enamel, stainless
steel or other non-metallic sink and need to drill a
hole for the for the Zuvo Beverage Faucet,
consider hiring a professional, licensed contractor
to perform this work. However, with commonly
available tools you can do this yourself. When
drilling a hole in a metal sink, make sure to plug
the drill into a Ground Fault Circuit Interrupter
(GFCI) outlet. Do not come into contact with water
at any time.
Figure 3
Page 3
When drilling a new hole, ensure you have proper
clearance beneath your sink (for the attachment of
retaining nut, etc.).
Make sure that the under-counter location you
have selected for your Zuvo Water Filtration
System is within 3 feet of the Zuvo Beverage
Faucet.
Insert the Zuvo Beverage Faucet spout into the faucet
body.
Unscrew and remove the nut and slotted washer
from the faucet assembly. Leave the decorative
chrome washer and rubber gasket on the stem of the
faucet assembly.
Feed the RED, WHITE/ YELLOW, BLUE tubing through
the hole and position the faucet.
Figure 4
From beneath the counter, first slide the slotted
washer then the hex nut over the tubing up to the
base of the faucet. Hand-tighten the nut to hold the
faucet in position while you complete the installation.
4. PREPARATION OF THE ZUVO WATER FILTRATION SYSTEM
The required tube attachments and couplers for the
installation are depicted in Figure 5.
Figure 5
Page 4
5. 1/2" PIPE TAP OR 3/8" SUPPLY COMPRESSION ADAPTOR
Turn off cold water supply shutoff valve
Cold water supply
Turn off the cold water supply by turning the shut off
valve handle all the way to the right.
Test your faucet to ensure there is no cold water flow.
Place a bucket or pan on the floor under the cold
water supply in the event that a small amount of
water drains down from the sink.
Figure 6
Cold water supply
Move cold water supply line (riser) away from
shutoff valve
Typically, there is a flexible hose with a 3/8" or 1/2"
thread fitting that connects the cold water supply
line from your faucet to the cold water shutoff valve.
Remove this at the junction of the cold water shutoff
valve. An adjustable wrench is likely required to
remove the compression nut.
Figure 7
Wrap Teflon® tape firmly around threads on
1/4" C x 1/4" MIP adapter (4-5 times). Thread the
adapter into the 1/2" pipe tap until firmly seated.
or
Note: if your parts kit came with the black 3/8" supply
EZ angle stop adapter skip to next step.
Figure 8
Cold water supply
Attach 1/2" -or- 3/8" adapter to cold water supply
shutoff
Depending on your shutoff valve thread size, install
the 1/2" pipe tap or the 3/8" supply adapter on the
cold water shutoff valve.
or
Figure 9
NOTE: When installing the 1/2" pipe tap, you will
need to use the flat rubber washer in the female
threads and you may need to use the cone washer on
the side with the male threads if your riser does not
have a rubber seal.
Page 5
Cold water supply
Reconnect the flexible hose to the 1/2" pipe tap or
the 3/8" supply adapter. Use adjustable wrench to
tighten nut securely.
Figure 10
Cold water supply
Using scissors, trim the RED tubing, coming from the
Zuvo Beverage Faucet, to the desired length
AVOID CUTTING THE TUBE TOO SHORT!
Insert the RED tubing into the 1/4" MIP adapter or
1/4" side outlet on the EZ adapter until fully seated.
Figure 11
Pull RED tubing firmly to ensure that tubing does not
come free.
6. PLUMBING CONNECTIONS
The basic interconnections for the separate faucet
installation are shown in Figure 12.
NOTE: The plastic tubing connections used in this
installation are a self-locking, self-sealing type. All that is
required to make the connections is to insert the tubing
fully into each fitting. If you need to remove the
tubing, hold the lock-ring against the flange and pull
the tubing away from the fitting.
It is recommended that you leave enough tubing
length so that the entire Zuvo Water Filtration System
can be removed from your under counter cabinet –
without disturbing established plumbing connections
when it comes time to replace the filter.
Figure 12
Page 6
Simply connect the WHITE/YELLOW tube from the
faucet to the WHITE/YELLOW tube conector on the
Zuvo Water Filtration System as shown in Figure 13.
Similarly, connect the BLUE tube from the faucet to
the BLUE tube on the Zuvo unit. Ensure both tubes
are inserted into the connectors until they stop and
cannot be pushed in further.
Figure 13
Pull on tubes to be sure they are seated properly
Firmly pull on WHITE/ YELLOW and BLUE tubing to
ensure that they are tightly held in the compression
fittings. The tubing should not come free. If either
tube detaches from the compression fitting, re-insert
it until fully seated and perform the pull test again.
Figure 14
Attach optional wall mount bracket vertically
Use two screws to attach wall mount bracket vertically
to cabinet wall under sink. You may need to pre-drill
the two holes with a #32 drill bit (max). Ensure that
bracket is attached high enough to provide clearance
to hang the Zuvo Water Filtration System.
Figure 15
WARNING: Mount bracket vertically to ensure
proper operation.
NOTE: Once the unit is installed below the counter,
out-of-sight, it should be inspected periodically to
ensure the lamp is operating.
Page 7
7. PLUMBING CHECKOUT
Open the cold water shutoff valve and visually verify that no water is leaking from around the threads of the
1/2" pipe tap, the 3/8" supply adapter or the 1/4" compression adapter and RED tubing.
After you are certain there are no leaks, fix the position of the Zuvo Beverage Faucet by tightening the hex nut
at the bottom.
8. SYSTEM CHECKOUT
Ensure that the Zuvo Water Filtration System is plugged into an electrical outlet.
NOTE: Do not use an outlet that is intended for a garbage disposal as power to this outlet is controlled by a
switch.
Ensure that the faucet arm is fully inserted into the faucet base. The 2 o-ring seals on the bottom of the arm
should form a snug fit in the faucet base, but allow the arm to swivel.
The Zuvo Water Filtration System can be turned on by pressing down and holding the faucet lever or
by flipping the lever up. (NOTE: Varies by faucet type.)
Depending on faucet model, flip the lever on the faucet base upward or turn lever down. This should light up
the UV lamp and initiate water flow through the Zuvo Water Filtration System. You should observe a swirling
upward motion of water as well as a constant stream of bubbles when the unit is on. If there is no flow, close
the faucet lever and check to make sure the cold water supply is open, then retry lifting the faucet lever to
turn on the system. If water is filling from the top of the Zuvo unit rather than swirling up from the bottom,
you have crossed the BLUE and WHITE/ YELLOW tubing attachments. You need to disconnect and reverse these.
IMPORTANT
After first installing your Zuvo Water Filtration System or when changing the filter, always allow water to
flow through the device for five (5) minutes before drinking or using water.
Note: it is a normal part of the Zuvo Water Filtration System operation for the UV lamp to remain on for
about 20 – 30 seconds after use.
CONGRATULATIONS! YOUR INSTALLATION IS COMPLETE.
Zuvo Water LLC
404 Villa Street
Mountain View CA 94041
Tel: 866.686.8142
[email protected]
zuvowater.com
© Copyright 2011. Zuvo™ and the Zuvo logo are trademarks of Zuvo Water LLC. The Zuvo Water Filtration System is protected by U.S. patents #6,461,520, #7,033,502, #5, 266, 215, #5,540, 848, DES
Page 8
357,058, and other U.S. and foreign patents pending. All rights reserved. M031.v4 03/11