1
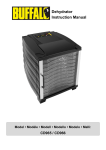
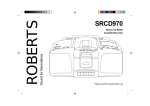
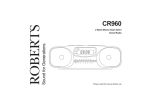
Sound for Generations
ROBERTS
CD965
Personal
Compact Disc Player
Please read this manual before use
1. Door open button
Controls
2. Skip/Search reverse button
3. Skip/Search forward button
4. Mode button
5. Repeat/Enter button
6. Recharge indicator
7. Liquid crystal display
8. Lock switch
9. Deep bass boost switch
10. Stop button
11. Play/Pause button
12. CD compartment door
12
1
2
11
3
4
5
6
7
8
9
1
10
Controls (cont.)
13. Volume control
14. Headphone sockets
15. Line output socket
17
16. Battery compartment
17. DC socket
13
14
15
16
Display window
If you need any further advice, please
2
call our Technical Helpline on
0181 758 0338 (Mon-Fri)
Operation using the AC adaptor (included)
Plug the adaptor into a 13A mains outlet. Plug the lead from the adaptor
into the DC socket (17) located on the rear of the CD965.
Operation using rechargeable batteries (included)
Open the battery compartment and insert the rechargeable Ni-Cad
batteries into the compartment, taking care to observe correct polarities
as shown.
The rechargeable batteries should be charged for 15 hours before they
are used for the first time or if the CD965 has not been used for a long
period.
Note: Correct type of
rechargeable battery has
plastic sleeve cut back 3mm
to allow charging terminal to
make contact with battery.
Standard
rechargeable
batteries will not be recharged
when used with CD965.
Rechargeable batteries
suitable for use with CD965
are available from the address
shown on the rear of this
manual.
The AC adaptor included with the CD965 will fully recharge the batteries
in 15 hours. Plug the adaptor into a 13A mains outlet. Plug the lead from
the adaptor into the DC socket (17) located on the rear of the CD965.
During charging the Recharge indicator (6) will light up.
The mains adaptor should be disconnected from the mains supply and
from the DC socket (17) after charging.
DO NOT CHARGE CONTINUOUSLY FOR MORE THAN 24 HOURS.
DOING SO CAN CAUSE THE RECHARGEABLE BATTERIES TO
DETERIORATE.
Should the operating time after a full charge decrease drastically,
purchase a new set of rechargeable batteries. Be sure to use the correct
type of rechargeable battery N620AA (620mAh) or equivalent.
Operation using non-rechargeable batteries (not
included)
Open the battery compartment and insert 2 x LR6 (AA ) or equivalent size
batteries into the compartment, taking care to observe correct polarities
as shown. Note: When the CD965 is to be operated using nonrechargeable batteries, always unplug the AC adaptor from the mains
outlet and from the DC socket (17).
We would recommend for economy, that the CD965 is used via the
Mains adaptor whenever possible with battery operation for
occasional or stand-by use only.
3
Lock switch
The CD965 is fitted with a lock switch to prevent unintentional operation
whilst travelling. For normal operation slide the Lock switch (8) to the left.
To prevent operation whilst travelling slide the lock switch to the right
hand ‘lock’ position.
1
Playing a disc
14
Connect the earphones supplied with the CD965 to one of the earphone
sockets (14). Press the CD door open button (1). Set the volume control
(13) to minimum.
13
Insert a CD onto the spindle with the label facing upwards. Close the CD
compartment door ensuring it latches shut.
Slide the lock switch (8) to the left hand position. Press the Play/Pause
button (11), the total number of tracks and playing time will be displayed
and the disc will start playing. After a few seconds the display will change
to show the number and time remaining for the current track. Adjust the
volume control (13) to the required sound level.
11
Pausing during CD play
Whilst the CD is playing, press the Play/Pause button (11) to pause play.
The disc will continue rotating but play will stop and the track time shown
in the LCD will flash. To resume play, press the Play/Pause button (11).
11
Stopping CD play
To stop CD play, press the stop button (10). The disc will stop rotating and
the display will revert to showing the total number of tracks and time.
10
If you need any further advice, please
4
call our Technical Helpline on
0181 758 0338 (Mon-Fri)
Skip function
Whilst the CD is playing, press either the Skip/Search forward (3) or Skip/
Search reverse (2) buttons to change to the desired track.
Search function
3
Whilst the CD is playing, press and hold either the Skip/Search forward
(3) or Skip/Search reverse (2) buttons. Release the button when the
desired part of the track is reached.
2
Playing a single track
Press the Play/Pause button (11) to start the disc playing. Repeatedly
press the Play Mode button (4) until the track number begins to flash in
the display. Select the desired track using the Skip/Search forward (3) or
Skip/Search reverse (2) buttons. The CD965 will play the selected track,
and then switch off.
Repeating the entire disc
Press the Play/Pause button (11) to start the disc playing. Press the
Repeat/Enter button (5) until the word ‘REPEAT’ shows in the display.
The CD965 will now continue to repeat the disc until the stop button (10)
is pressed.
3
2
4
Repeating a single track
5
Press the Play/Pause button (11) to start the disc playing. Repeatedly
press the Play Mode button (4) until the track number begins to flash in
the display. Select the desired track using the Skip/Search forward (3) or
Skip/Search reverse (2) buttons. Press the Repeat/Enter button (5) until
the word ‘REPEAT’ shows in the display. The CD965 will now continue
to repeat the selected track until the stop button (10) is pressed.
10
5
Programmed play
With programmed play you can program up to 22 tracks on a disc in any
order you chose. Press the Play/Pause button (11) to start the disc
playing. Repeatedly press the Play Mode button (4) until the programme
symbol ‘PGM’ begins to flash in the display. Use the Skip/Search buttons
(2) and (3) to select the desired track. Press the Repeat/Enter button (5)
to store the selected track and move to the next memory location, use the
Skip/Search buttons to select the next track in the program. Press the
Repeat/Enter button (5) to store the track and move to the next memory
location. Repeat the above steps until you have completed your program.
Press the Play/Pause button (11) to commence play of the selected
tracks. When all tracks in the program have been played the CD965 will
switch off automatically.
3
2
4
11
5
10
Intro play
When intro play is selected the CD965 will play the first 10 seconds of
each track on the disc. Press the Play/Pause button (11) to start the disc
playing. Repeatedly press the Play Mode button (4) until the word ‘Intr’
appears in the display. Press the Play/Pause button (11) to commence
intro play. The CD965 will switch off after the last track is played.
Random play
When random play is selected the CD965 will play all the tracks on the
disc in random order. Press the Play/Pause button (11) to start the disc
playing. Repeatedly press the Play Mode button (4) until the word ‘RND’
appears in the display. The CD965 will now play all tracks on the disc in
random order. The CD965 will switch off after the last track is played.
4
11
10
If you need any further advice, please
6
call our Technical Helpline on
0181 758 0338 (Mon-Fri)
Deep bass boost switch
Setting the Deep Bass Boost switch (9) to the "On" position will enhance
bass sounds.
CD line output socket
A line output socket (25) located on the right hand side of the CD965
enables the output of the CD player to be played through an audio system.
Before connecting the CD965 ensure that the power to your audio system
is switched off. Connect the line output socket to the CD or AUX input
sockets of your audio system using a the lead supplied with the CD965.
Headphone sockets
The CD965 is fitted with 2 headphone sockets (14) allowing 2 pairs of
headphones or earphones to be used simultaneously.
7
Product Care
Do not expose the CD965 to extremes of temperature. The product
should be kept in a warm environment free from dust and damp. For
external cleaning use only a soft, clean cloth. Use a damp cloth to clean
the plastic cabinet. A mild soap will help to remove grease or oil. Never
use strong detergents or spray cleaners, abrasive powders, thinners or
solvents on the machine, as these may cause damage the finish.
CD Player Maintenance
The player mechanism is fitted with self-lubricating bearings, and must
not be oiled or greased.
Cleaning compact discs
While CDs do not ‘scratch’ the way vinyl records do, they are not
indestructible. Although the music tracks on the disc are covered with a
protective layer, it is still advisable to treat the disc carefully. As long as
you always pick up discs by the edge, and put them back in their holders
immediately after use, cleaning will not normally be necessary. However,
should fingerprints, dust or dirt appear, you can wipe them off with a soft,
lint-free cloth. Wipe the disc in a straight line from centre to edge. If the
disc is heavily soiled use a commercially available CD cleaner. Detergent
or abrasive cleaning agents must never be used. Never write on the disc
label – this can cause irreparable damage to the disc.
If you need any further advice, please
8
call our Technical Helpline on
0181 758 0338 (Mon-Fri)
Audio
Specifications
Power Requirements
Mains (AC adaptor)
Batteries (Ni-Cad)
Batteries (Dry)
AC 230 volts, 50Hz
only
D/A conversion
1-bit DAC four times oversampling
Frequency response
20-20,000Hz
2 x N620AA or equivalent.
No. of channels
2
(battery life approx. 1.5 hours)
Output level
Line output : 0.7Vrms (47k ohms)
Headphone: 20mW (32 ohms)
2 x IEC LR6 (AA size) or equivalent.
Deep bass boost
(battery life approx. 3 hours)
+10dB
General
Pick-up
Material : GaAIAs
Size
133mm(W) x 28.5mm(H) x 155mm(D)
Wavelength
λ =780nM
Weight
Approx. 290g excluding batteries.
Emission duration
Continuous
Laser output
<44.6µW
Error correction
Cross-interleave Reed-Solomon code
Laser Diode
The Company reserves the right to amend the specification without notice.
9
Guarantee
This instrument is guaranteed for twelve months from the date of delivery to the original owner against failure due to faulty workmanship or component
breakdown, subject to the procedure stated below. Should any component or part fail during this guarantee period it will be repaired or replaced free of
charge.
The guarantee does not cover:
1. Damage resulting from incorrect use.
2. Consequential damage.
3. Product with removed or defaced serial numbers.
Procedure:
Any claim under this guarantee should be made through the dealer from whom the instrument was purchased. It is likely that your Roberts dealer will be
able to attend to any defect quickly and efficiently but should it be necessary the dealer will return the instrument to the company’s service department
for attention. In the event that it is not possible to return the instrument to the Roberts dealer from whom it was purchased, please contact Roberts Radio
Technical Services department at the address shown below before taking further action.
These statements do not affect the statutory rights of a consumer.
Imported by:ROBERTS RADIO LIMITED
PO BOX 130
MEXBOROUGH
SOUTH YORKSHIRE
S64 8YT
ROBERTS RADIO TECHNICAL SERVICES DEPARTMENT
97-99 Worton Road
Isleworth Middlesex
TW7 6EG
Technical Helpline :- 0181 758 0338
Issue 1