1
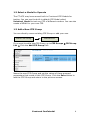
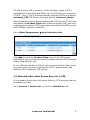
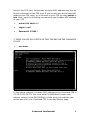
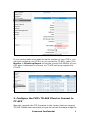
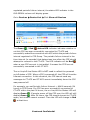
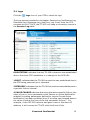
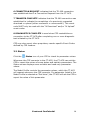
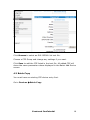
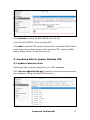
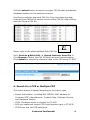
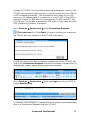
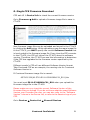
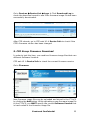
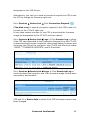
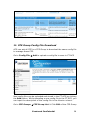
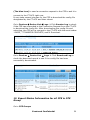
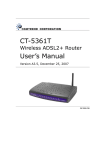
CT-ACS
Quick Test / Demonstration
Procedure
October 18, 2010, Version A2.0
Comtrend Confidential
0
Preface
This manual provides information about the features, functions and
operation of the CT-ACS (Comtrend TR-069 Auto-Configuration
Server).
Copyright
Copyright©2010 Comtrend Corporation. All rights reserved. The
information contained herein is proprietary to Comtrend Corporation.
No part of this document may be translated, transcribed, reproduced,
in any form, or by any means without prior written consent of
Comtrend Corporation.
NOTE: This document is subject to change without notice.
Contact us
The reader is presumed to have a basic understanding of TR-069 (CPE
WAN Management Protocol). For manual revisions, software upgrades,
technical support, etc., visit Comtrend Corporation at:
http://www.comtrend.com
Technical support
If you experience difficulties with your software or require other
technical assistance, please e-mail us at [email protected]
Comtrend Confidential
1
TABLE OF CONTENTS
INTRODUCTION........................................................................ 3
1. ADD A NEW CPE GROUP AND A NEW DEVICE ENTRY......................... 3
1.1 Login to CT-ACS admin Web User Interface ..................... 3
1.2 Select a Model to Operate ............................................. 4
1.3 Add a New CPE Group................................................... 4
1.4 Zero-Touch CPE Auto Activation ..................................... 5
1.5 Manually Add a New Device Entry for a CPE ..................... 6
2. CONFIGURE THE CPE’S TR-069 CLIENT TO CONNECT TO CT-ACS ........ 9
3. CONFIRM CPE TO ACS CONNECTIONS ....................................... 11
3.1 Logs......................................................................... 13
3.2 Status ...................................................................... 14
4. ADD MULTIPLE CPE ACCOUNTS ............................................... 15
4.1 Batch Add ................................................................. 15
4.2 Batch Copy ............................................................... 16
5. USE BATCH EDIT TO UPDATE MULTIPLE CPE ................................ 17
5.1 Update Customer Data................................................ 17
6. SEARCH FOR A CPE OR MULTIPLE CPE....................................... 18
6.1 Device Search ........................................................... 19
7. SEND A CONNECTION REQUEST TO A CPE ................................... 19
8. SINGLE CPE FIRMWARE DOWNLOAD ......................................... 21
9. CPE GROUP FIRMWARE DOWNLOAD .......................................... 23
10. SINGLE CPE CONFIG FILE DOWNLOAD ..................................... 26
11. CPE GROUP CONFIG FILE DOWNLOAD ..................................... 28
12. EXPORT STATUS INFORMATION FOR ALL CPE IN CPE GROUP ............ 30
13. ENABLE AUTOMATIC REPORTING FOR A CPE GROUP ...................... 31
Comtrend Confidential
2
Introduction
This document shows you how to configure a Comtrend CPE to
connect to the CT-ACS. It also explains how to use the CT-ACS to
perform other management functions.
1. Add a New CPE Group and a New Device Entry
1.1 Login to CT-ACS admin Web User Interface
The URL of the Comtrend ACS administrative web site is:
http://xxx.xxx.xxx.xxx/ACS/
xxx.xxx.xxx.xxx represents the IP address of the CT-ACS.
Default Login ID: admin
Default Password: 8888
Comtrend Confidential
3
1.2 Select a Model to Operate
The CT-ACS may have several built-in Comtrend CPE Models for
testing. You can use the built-in default CPE Model called
Universal_Model to test any CPE of different vendors. You can also
create a Model for your own CPE.
1.3 Add a New CPE Group
You can directly use an existing CPE Group or add your own.
Add a CPE Group
Add Devices
If you want to add a new CPE Group, go to CPE Groups
List
Click the Add CPE Group Link.
CPE Group
Name the new CPE Group and set the values of these grouped
parameters that reside in this CPE Group. Click the Save button to
add the CPE Group and return to the previous screen.
Comtrend Confidential
4
1.4 Zero-Touch CPE Auto Activation
Check System -> Preferences ->
If Device Auto Activation and Default Device Activation are both
enabled, CPE account (OUI-SERIAL) will be automatically added to
Comtrend Confidential
5
CT-ACS to allow CPE to connect. In this situation, when a CPE is
installed for the first time and WAN is up, the CPE will try to connect to
CT-ACS. Then, CT-ACS will automatically add this CPE to the default
Universal_CPE CPE Group under the default “Universal_Model”.
When there are multiple Models and multiple CPE Groups, CT-ACS can
also detect the Product Class value of the connecting CPE, and use it
to decide which certain CPE Group under which Model the CPE account
(OUI-SERIAL) should be added to.
Go to Model Management
Auto Activation List
Click Add to input the Product Class value of the CPE whose
OUI-SERIAL entry will be automatically added into the CPE Group and
Model designated by you.
If your different Models of CPE all use the same Product Class value,
you cannot use this way to distinguish CPE or automatically add
different CPE to different CPE Groups.
1.5 Manually Add a New Device Entry for a CPE
If you disable Device Auto Activation function, CPE accounts need to
be added manually.
Go to Devices
Device List -> Click the Add Device link.
Comtrend Confidential
6
Input the base MAC address of your Comtrend CPE in the
OUI-SERIAL field. Choose the CPE Group you just added to the
CT-ACS. Set the parameter values specific to your CPE. Click the Save
button.
Whenever a CPE connects to an ACS, the CPE will include a unique
serial number (OUI-SERIAL) in CPE’s TR-069 Inform messages sent to
ACS. When you add a device entry for a CPE to allow the CPE to
connect to the CT-ACS, you must input the correct unique serial
number of your CPE in the OUI-SERIAL field.
By default, the OUI-SERIAL is the base MAC address of the
Comtrend CPE. Some custom firmware may use another value as the
OUI-SERIAL. For example, use Comtrend’s S/N that is located on the
Comtrend Confidential
7
back of the CPE case. Sometimes the base MAC address may not be
found on the back of the CPE case. If you are not sure which base MAC
address your CPE owns, try to connect to your CPE by using telnet or
ssh. Next, input the following commands to get the base MAC address
of your CPE.
telnet 192.168.1.1*
Login: root*
Password: 12345*
* THESE VALUES MAY DIFFER AS THEY DEPEND ON THE FIRMWARE
IN USE.
lan show
In the above example, the base MAC address of the Comtrend CPE is
00:1D:20:FF:FA:D3. You must enter 001d20fffad3 (lower case,
without colons) in the OUI-SERIAL column when you add the new
device entry for your Comtrend CPE in the Add Device page.
Comtrend Confidential
8
If you cannot make sure what the serial number of your CPE is, you
can first configure your CPE to try to connect to CT-ACS. Later, click
Monitor
Event Log Report to find the correct OUI-SERIAL of your
CPE when it attempts to connect to CT-ACS but being rejected by
CT-ACS.
2. Configure the CPE’s TR-069 Client to Connect to
CT-ACS
Manually upgrade the CPE firmware to the version that can support
TR-069. Please make sure that you get the correct firmware image file
Comtrend Confidential
9
from Comtrend. Untested firmware may not work well with ACS. If
you cannot make sure that your firmware image can work with ACS,
please contact Comtrend before doing the tests.
CPE web UI
Management
Upgrade Software
Select the
firmware file that supports TR-069
Update Software
Reboot
Factory Reset
CPE web UI
Management
Settings
Restore Default Settings
Reboot
Restore Default
Enable TR-069 Client
CPE web UI
Management
TR-069 Client
Inform: Enable
(Enable the following periodic Inform Interval setting. If it is disabled,
CPE will only connect to ACS after CPE reboots. CPE will not
automatically connect to ACS periodically.)
Inform Interval:
300
(It means that CPE will retry to establish a TR-069 HTTP connection to
ACS every 300 seconds.)
ACS URL: http://xxx.xxx.xxx.xxx/cpe/
(xxx.xxx.xxx.xxx represents the IP address of the CT-ACS.)
ACS User Name:
admin
ACS Password: admin
Display SOAP messages on serial console: Disable
Connection Request Authentication: Checked
Connection Request User Name:
admin
Connection Request Password: admin
Click Save/Apply.
Comtrend Confidential
10
Configure the WAN Interface
CPE web UI
Advanced Setup
WAN
Add
Save/Reboot
After the CPE reboots, it will automatically connect to the CT-ACS for
the first time. Then, the CT-ACS will configure the CPE by using the
parameter values that you just set on the CT-ACS.
If your CPE fails to connect to the CT-ACS, please do the following
steps:
1. Make sure that all TR-069 settings (ACS URL, ACS username, ACS
password, etc.) are correctly configured in the CPE. If not,
re-configure the correct TR-069 settings and save & reboot the CPE.
2. Go to Monitor -> Event Log Report. Check the messages to see if
there is a CPE trying to connect to CT-ACS but keeps getting the
“OUI-SERIAL not found” error logs. It means that the OUI-SERIAL of
your CPE is not correctly added in Devices | Device List, so CT-ACS
rejected this CPE’s connections.
3. Confirm CPE to ACS Connections
If the CPE successfully has connected to the CT-ACS within the
Comtrend Confidential
11
regulated periodic Inform interval, the status LED indicator in the
OUI-SERIAL column will display green.
Go to Devices
Device List
Click Show all Devices
The Green
/ Red
status LED indicator indicates whether or
not this CPE has ever successfully connected to CT-ACS and
successfully ended the connection with ACS within the periodic Inform
interval regulated in CPE Group. The periodic Inform interval is the
time interval (in seconds) that determines how often the CPE should
attempt to connect to the CT-ACS. The LED indicator will be Red
when a new CPE account is just added. It means the CPE has not
successfully connected to the CT-ACS.
The on-line/off-line Status LED is NOT used to reflect the powered
on/off status of CPE. When a CPE is powered off, the CPE will lose the
Internet connection. In this situation, the CPE cannot send any
messages to CT-ACS and CT-ACS cannot immediately know the CPE
was powered off.
For example, you set Periodic Inform Interval = 86400 seconds (24
hours) in CPE Group. If a CPE has ever successfully connected to
CT-ACS within the past 24 hours, the on-line/off-line Status LED will
. If people power off the CPE now, the LED will still
display Green
. After 24 hours, the CPE should connect to CT-ACS
display Green
again, but modem cannot connect. Then the LED will change to Red
at that time.
Comtrend Confidential
12
3.1 Logs
Click the
Logs icon of your CPE to check its logs.
The Logs screen includes five log tables: Session Log, Notification Log,
Download Log, Bootstrap Log, and Error Log. Every time the CPE
connects to the CT-ACS, the CT-ACS will keep a connection record in
the Session Log table.
0 BOOTSTRAP indicates that the TR-069 connection was established
due to first-time CPE installation or a change to the ACS URL.
1 BOOT indicates that the TR-069 connection was established due to
the CPE being powered up or rebooted.
2 PERIODIC indicates that the TR-069 connection was established on
a periodic Inform interval.
4 VALUE CHANGE indicates that since the last successful Inform, the
value of one or more parameters with Passive or Active Notification
enabled (including parameters defined to require Forced Active
Notification) has been modified (even if its value has changed back to
the value it had at the time of the last successful Inform). For
example, if the CPE DSL retrains and gets a new or the same IP
address, it will connect to CT-ACS with this Event Code.
Comtrend Confidential
13
6 CONNECTION REQUEST indicates that the TR-069 connection
was established due to a Connection Request from the CT-ACS.
7 TRANSFER COMPLETE indicates that the TR-069 connection was
established to indicate the completion of a previously requested
download or upload (either successful or unsuccessful). This event
code MUST only be used with the “M Download” and/or “M Upload”
event codes.
8 DIAGNOSTICS COMPLETE is used when CPE reestablishes a
connection to the CT-ACS after completing one or more diagnostic
test initiated by the CT-ACS.
CPE may also report other proprietary vendor-specific Event Codes
defined by CPE vendors.
3.2 Status
Click the
Status icon of your CPE to check its parameter values.
Whenever the CPE connects to the CT-ACS, the CT-ACS can ask the
CPE to report the values of some status and statistic parameters. The
Status screen displays some writable and read-only parameter
values.
The Model Profile controls the parameter values, which the CT-ACS
will request whenever the CPE connects. If a parameter listed in the
Model Profile is selected as “Get Value”, the CT-ACS will ask the CPE to
report the value of this parameter.
Comtrend Confidential
14
4. Add Multiple CPE Accounts
There are 5 ways to add CPE accounts to CT-ACS:
Devices -> Add Device -> Add a CPE one by one.
Devices -> Add Device -> Batch Add Device.
Devices -> Batch Copy.
Zero-Touch Auto Activation.
Write your API clients to add CPE to CT-ACS.
Batch Add and Batch Copy can simultaneously add multiple CPE
accounts to CT-ACS. Which way is better depends on your needs.
Before using the Batch function to add multiple CPE, you must first
create a text file that includes the OUI-SERIAL list of the added CPE.
Each line includes an OUI-SERIAL of a CPE.
OUI-SERIAL.txt
Please refer to the attached Batch Add/Copy text file.
4.1 Batch Add
Go to Devices
Add Deice
Batch Add Device
Comtrend Confidential
15
Click Browse to select an OUI-SERIAL list text file.
Choose a CPE Group and change any settings if you want.
Click Save to add the CPE listed in the text file. All added CPE will
share the same parameter values displayed in the Batch Add Device
screen.
4.2 Batch Copy
You must have an existing CPE device entry first.
Go to Devices
Batch Copy
Comtrend Confidential
16
Click Browse to select an OUI-SERIAL list text file.
Input the OUI-SERIAL of the existing CPE.
Click Add to add the CPE listed in the text file. All added CPE will have
exact the same configurations as the existing CPE, including WAN
Setup, Static Route, Virtual Servers, etc.
5. Use Batch Edit to Update Multiple CPE
5.1 Update Customer Data
Get/Export the customer data from your CRM database.
Go to Devices Batch Edit
Choose the columns whose values will
be updated by using the Batch Edit function.
Comtrend Confidential
17
Click the submit button to export an empty CSV file that includes the
database headers for the selected columns.
Use Excel to edit the exported CSV file. Copy and paste the data
exported from CRM to the correct column of the CSV file. After editing,
save the file as a CSV file.
CustomerData.csv
Please refer to the attached Batch Edit CSV file.
Go to Devices
Batch Edit -> Upload Customer Data File
Click Browse to select the CSV file that has been finished editing.
Click Submit to upload the customer data in the CSV file to CT-ACS.
6. Search for a CPE or Multiple CPE
The search button is labeled according to the search type:
Device Information, including OUI-SERIAL (MAC address for
Comtrend CPE), Manufacturer, Product Class, Software Version,
and Hardware Version.
CPE’s IP address when it connects to CT-ACS.
S/N (any additional unique CPE Serial Number input in CT-ACS).
CPE Group that the CPE belongs to.
Comtrend Confidential
18
CPE Notes input by CT-ACS operators.
Last Connection Time: the time when CPE last connected to CT-ACS.
Device Added Time: the time when the device entry is added to
CT-ACS.
Customer data, including customer ID, name, phone number,
e-mail, address, city, state/province, ZIP/postal code, and country.
6.1 Device Search
If you are already located in the CPE Model that your CPE belongs to,
you can directly use the Search function in Devices
Device List
screen.
When you run the search function, you do not need to input the full
string as the searched keywords. For example, you are located in the
Model CT-5316T, and you want to search a CT-5361T CPE whose
customer ID is 563108. You can Click ID, input only 08, and click ID
Search to get the search result. The search result will list all CPE that
contain the searched keywords.
7. Send a Connection Request to a CPE
If a CPE is routable from CT-ACS, CT-ACS at any time may issue a
Connection Request to the CPE causing the CPE to immediately
Comtrend Confidential
19
contact to CT-ACS. The Connection Request mechanism relies on the
CT-ACS having had at least one prior communication with the CPE via
a CPE-initiated interaction. This mechanism also relies on the CPE
having an IP address that is routable from the CT-ACS. If the CPE is
behind a firewall or NAT device lying between CT-ACS and CPE, the
CT-ACS may not be able to access the CPE at all. In this case, only the
CPE connection initiation is possible.
Go to Devices
Device List
(The blue icon)
Click Connection Request
Click Send, to send a connection request to
the CPE to ask it to connect to the CT-ACS right away.
If CPE can respond to the connection request sent from CT-ACS, the
LED in the Connection Request Column will display in green color to
indicate the instant status of the connection request.
Go to Devices
Device List
Check Session Log.
Click the Logs icon of your CPE
"6 CONNECTION REQUEST" indicates that the session was established
due to a Connection Request from the CT-ACS.
Comtrend Confidential
20
8. Single CPE Firmware Download
CPE web UI
Device Info to check the current firmware version
Go to Firmware
CT-ACS
Add to upload a firmware image file to save in
New firmware image files can be uploaded and stored in the CT-ACS
by clicking the Add button. While uploading a new firmware image file
to the CT-ACS, you MUST specify the correct Software Version that
is hard-coded in the firmware image file. Every time the CPE connects
to the CT-ACS, the CPE will inform the CT-ACS about its software
version. Therefore, the CT-ACS can use this information to determine
if the CPE has upgraded to the firmware version specified by the
CT-ACS.
Different vendor’s CPE will use different Software Version format.
Take Comtrend CPE as an example, the naming rule for Comtrend
Software Version is:
If Comtrend firmware image file is named:
657003-320(AI-5710-E011-S310GMN-C01_R01).bin
You must input E011-S310GMN-C01_R01 when you upload the
firmware image file to the CT-ACS.
Please make sure you input the correct Software Version of the
firmware files you upload. If you do not know what the exact Software
Version your firmware file uses, you can also refer to the “Software
Version” column in the Device List, or refer to the Session Logs of your
CPE.
Go to Devices
Device List
Show all Devices
Comtrend Confidential
21
Firmware LED in the Software Version column
The left Gray
indicates that the CPE Group, which the CPE belongs to, is not
designated to use a firmware image file.
The left Gray
Firmware LED is click-able to ask a specific CPE to
change its firmware image file. When it is clicked, a pop-up menu will
show up. You must select an uploaded firmware image file from the
available firmware list.
You can send a Connection Request to the CPE to ask the CPE to
connect immediately to the CT-ACS to download the designated
firmware image file.
Alternatively, you can Submit the firmware update task in schedule.
The CT-ACS will ask the CPE to download the firmware image file when
the CPE connects to the CT-ACS later.
Try to send a connection request to a CPE to ask the CPE to change its
firmware right now. It may take several minutes for the CPE to
download the firmware image file specified by the CT-ACS and then
reboot.
Go to Devices
Device List
Logs
Click Session Log to check
if the CPE has responded to the Connection Request from the CT-ACS
to download the firmware image file. After downloading firmware and
rebooting, the CPE will re-connect to the CT-ACS with the event codes:
1 BOOT, 7 TRANSFER COMPLETE, and M Download.
Comtrend Confidential
22
Go to Devices
Device List
Logs
Click Download Log to
check the download record to see if the firmware image file has been
successfully downloaded.
After CPE reboots, go to CPE web UI
Device Info to check if the
CPE’s firmware version has been changed.
9. CPE Group Firmware Download
In order to test this item, you need two firmware image files that own
different Software Versions.
CPE web UI
Device Info to check the current firmware version
Go to Firmware
New firmware image files can be uploaded and stored in the CT-ACS
by clicking the Add button. While uploading a new firmware image file
to the CT-ACS, you MUST specify the correct Software Version that
is hard-coded in the firmware image file.
Comtrend Confidential
23
Different vendor’s CPE will use different Software Version format.
Take Comtrend CPE as an example, the naming rule for Comtrend
Software Version is:
If Comtrend firmware image file is named:
657003-320(AI-5710-E011-S310GMN-C01_R01).bin
You have to input E011-S310GMN-C01_R01 when you upload the
firmware image file to the CT-ACS.
Attention: Wrong Software Version input on the CT-ACS will cause
the CT-ACS to have the CPE download the firmware image file
repeatedly. If you do not know what the exact Software Version your
firmware file uses, you can also refer to the “Software Version”
column in the Device List, or refer to the Session Logs of your CPE.
Go to CPE Groups
CPE Group List
Click Edit of the CPE Group
Edit CPE Group
Select another firmware image file that is not
currently used in the CPE.
Save
All CPE will automatically connect to the CT-ACS periodically. When a
CPE, which belongs to this CPE Group, connects to the CT-ACS,
CT-ACS will ask the CPE to download the firmware image file
Comtrend Confidential
24
designated in the CPE Group.
Alternatively, you can try to send a connection request to a CPE to ask
the CPE to change its firmware right now.
Go to Devices
Device List
Click Connection Request
(The blue icon) to send a connection request to the CPE to ask it to
connect to the CT-ACS right now.
It may take several minutes for the CPE to download the firmware
image file designated by the CT-ACS and then reboot.
Go to Devices
Device List
Logs
Click Session Log to check
if the CPE has responded to the Connection Request from the CT-ACS
to download the firmware image file. After downloading firmware and
rebooting, the CPE will re-connect to the CT-ACS with the event codes:
1 BOOT, 7 TRANSFER COMPLETE, and M Download.
Go to Devices
Device List
Logs
Click Download Log to
check the download record to see if the firmware image file has been
successfully downloaded.
CPE web UI
Device Info to check if the CPE’s firmware version has
been changed.
Comtrend Confidential
25
10. Single CPE Config File Download
ACS can also use the configuration file to change CPE settings.
Go to Config File
Add to upload a config file to save in CT-ACS
New config files can be uploaded and stored in the CT-ACS by clicking
the Add button. While uploading a new config file to the CT-ACS, you
can input the description of the config file in the Version column.
Go to Devices
Device List
Show all Devices
The right Gray
Config File LED in the Software Version column
indicates that the CPE Group, which the CPE belongs to, is not
designated to use a config file.
The right Gray
Config File LED is click-able to ask a specific CPE
to download the config file. When it is clicked, a pop-up menu will
show up. You must select an uploaded config file from the available
config file list.
Comtrend Confidential
26
You can send a Connection Request to the CPE to ask the CPE to
connect immediately to the CT-ACS to download the designated config
file.
Alternatively, you can Submit the config file download task in
schedule. The CT-ACS will ask the CPE to download the config file
when the CPE connects to the CT-ACS later.
Try to send a connection request to a CPE to ask the CPE to download
the config file right now. It may take several minutes for the CPE to
download the config file specified by the CT-ACS and then reboot.
Go to Devices
Device List
Logs
Click Session Log to check
if the CPE has responded to the Connection Request from the CT-ACS
to download the config file. After downloading the config file and
rebooting, the CPE will re-connect to the CT-ACS with the event codes:
1 BOOT, 7 TRANSFER COMPLETE, and M Download.
Go to Devices
Device List
Logs
Click Download Log to
check the download record to see if the config file has been
successfully downloaded.
Comtrend Confidential
27
11. CPE Group Config File Download
ACS can ask all CPE in a CPE Group to download the same config file
to manage these CPE.
Go to Config File
Add to upload a config file to save in CT-ACS
New config files can be uploaded and stored in the CT-ACS by clicking
the Add button. While uploading a new config file to the CT-ACS, you
can input the description of the config file in the Version column.
Go to CPE Groups
CPE Group List
Click Edit of the CPE Group
Comtrend Confidential
28
Edit CPE Group
Group.
Save
Select the uploaded config file for CPE in this CPE
All CPE will automatically connect to the CT-ACS periodically. When a
CPE, which belongs to this CPE Group, connects to the CT-ACS,
CT-ACS will ask the CPE to download the config file designated in the
CPE Group.
Alternatively, you can try to send a connection request to a CPE to ask
the CPE to download the config file right now.
Go to Devices
Device List
Click Connection Request
Comtrend Confidential
29
(The blue icon) to send a connection request to the CPE to ask it to
connect to the CT-ACS right now.
It may take several minutes for the CPE to download the config file
designated by the CT-ACS and then reboot.
Go to Devices
Device List
Logs
Click Session Log to check
if the CPE has responded to the Connection Request from the CT-ACS
to download the config file. After downloading the config file and
rebooting, the CPE will re-connect to the CT-ACS with the event codes:
1 BOOT, 7 TRANSFER COMPLETE, and M Download.
Go to Devices
Device List
Logs
Click Download Log to
check the download record to see if the config file has been
successfully downloaded.
12. Export Status Information for all CPE in CPE
Group
Go to CPE Groups
Comtrend Confidential
30
icon in the CPE Group Name column, to export the status
Click the
information of all CPE that belong to this specific CPE Group to save as
a CSV file locally.
13. Enable Automatic Reporting for a CPE Group
Go to CPE Groups
The Green
/ Gray
LED indicator in the CPE Group Name
column indicates whether the Automatic Reporting feature of a
specific CPE Group is enabled or not.
If the LED is
, it means that the Automatic Reporting Feature of the
specific CPE Group is already enabled. The
icon is click-able. Click
icon to change it to
, to disable the Automatic Reporting
the
feature.
If the LED is
, it means that the Automatic Reporting feature of the
specific CPE Group is disabled. The
icon is click-able. Click the
, to enable the Automatic Reporting feature.
icon to change it to
You must select which parameter values will be included in the CSV
report.
Comtrend Confidential
31
By default, the CSV file will be automatically generated and updated
hourly.
Later, connect to http://xxx.xxx.xxx.xxx/report/ to check the
CSV report.
Comtrend Confidential
32
Comtrend Confidential
33