1
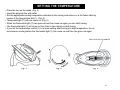
FOR THE WAY YOU LIVE
2-IN-1 Cordless/Corded Iron
Model EP485
USE AND CARE INSTRUCTIONS
Congratulations! You are the owner of the 2-IN-1 Cordless/Corded Iron. To fully enjoy
the advantages of your appliance, please take a few minutes to read all the “Use &
Care Instructions” and keep the instructions handy for easy reference. Please review
the product warranty and mail the owner registration form.
EURO-PRO Operating LLC: 21 Lawrence Paquette Industrial Drive, Champlain, New York 12919
4400 Bois Franc, St. Laurent, Quebec H4S 1A7
Tel.: 1 (800) 798-7398
IMPORTANT SAFEGUARDS
When using your iron, basic safety precautions should always be followed, including the following:
1. Read all instructions before using the iron.
2. Use iron only for its intended use.
3. To protect against a risk of electrical shock, do not immerse iron or stand in water or other liquids.
4. The iron thermostat should always be turned to its lowest position before plugging or unplugging from
outlet. Never yank cord to disconnect from outlet, instead grasp plug and pull to disconnect.
5. Do not allow cord to touch hot surfaces. Let iron cool completely before putting away.
6. Do not put vinegar or other descaling agents into the water reservoir.
7. Do not use chemically descaled water.
8. The cordset should not be allowed to touch the soleplate when it is hot.
9. Always disconnect iron from electrical outlet when filling iron with water or emptying and when not in use.
10. Do not operate iron with a damaged cord or if the iron has been dropped or damaged. To avoid the
risk of electrical shock, do not disassemble the iron. Send it to an authorized EURO-PRO Operating LLC service
center for examination and repair. Incorrect reassembly can cause a risk of electric shock when iron is used.
11. Close supervision is necessary for any appliance used by or near children. Do not leave iron
unattended while connected or on an ironing board.
12. Burns can occur from touching hot metal parts, hot water or steam. Use caution when you turn a
steam iron upside down as there may be hot water in the reservoir.
Never direct steam at any person, especially when using the iron in a vertical position. The steam is
very hot and can cause burns.
13. The use of accessory attachments not recommended by EURO-PRO Operating LLC may result in fire,
electrical shock or personal injury.
14. Do not operate in the presence of explosive and/or flammable fumes.
15. Do not use iron outdoors.
16. This product is for household use only.
Rev. 06/01B
FOR HOUSEHOLD USE ONLY
SAVE THESE INSTRUCTIONS
2
SPECIAL INSTRUCTIONS
1. To avoid a circuit overload, do not operate another high-wattage appliance on the same circuit.
2. If an extension is absolutely necessary, a 15-ampere rated cord with a polarized plug should be used.
Cords rated for less amperage may overheat. Care should be taken to arrange the cord so that it
cannot be pulled on or tripped over.
POLARIZED PLUG
This appliance has a polarized plug (one blade is wider than the other). As
a safety feature, this plug will fit into a polarized outlet only one way. If the
plug does not fit fully into the outlet, reverse the plug. If it still does not fit,
contact a qualified electrician. Do no attempt to defeat this safety feature.
SAVE THESE INSTRUCTIONS
3
2-IN-1 CORDLESS/CORDED IRON
1.
2.
3.
4.
5.
6.
7.
8.
Temperature Control Dial
Variable Steam Control
Spray Button
Spray Nozzle
Burst of Steam Button
Water Filling Inlet Cover
Thermostat Light
Water Level Window
9. Stainless Steel Sole Plate
10. Soft Hand Grip
11. Power Base (unit)
12. Stand
13. 3 Position Switch
13A. Lock Position
13B. Cordless Position
13C. Cord Position
14. Auto-Off Light
4
BEFORE FIRST USE
Remove any labels, stickers or tags which may be attached to the body or soleplate of the iron before using the iron.
Read all instructions for use carefully. Always follow the Important Safeguards.
IMPORTANT
The first time an iron is used, some odor and small white particles may come out of the steam vents.
This is perfectly normal and will cease to occur after the iron has been in use for a short while.
Before you start using your iron, follow the instructions in the manual and do the following in
order to eliminate any odor and small white residue particles and to ensure optimum steam
performance.
Fill the iron with regular tap water.
Set the temperature control dial at its highest and steam control at ‘0’.
When the thermostat light goes off to indicate that the iron has reached the selected temperature,
set the steam control at MAX.
Keep the iron in a horizontal position and allow it to steam until the water runs out.
Press the steam burst button to eliminate white residue particles.
Repeat this procedure through 2 or 3 fillings of water.
5
CONNECTING THE IRON TO THE POWER SUPPLY
• Make sure that the variable steam control dial is set at ‘0’.
• Place the iron upright on the heel rest or on the stand (12).
• Select the required temperature setting on the temperature control dial.
• The red thermostat light (7) will come on indicating that the iron is heating up.
• When the red light goes out, the set temperature has been reached and the iron is ready to use.
• The thermostat light (7) will go on & off as the thermostat is switching the heating element
on & off to maintain the selected temperature.
6
CHOOSING THE IRONING TEMPERATURE
Set the temperature dial according to the type of fabric .
•
Synthetics
(low temperature)
• • Silk, Wool
(medium temperature)
• • • Cotton, Linen
(high temperature)
Temperature Control Dial
Variable Steam Control
Please note: Before starting to iron delicate fabrics, it is best to first test the temperature of the iron on a hem or an inside seam.
TO SELECT IRON TEMPERATURE, LINE UP TEMPERATURE SELECTED ON DIAL WITH THE RED TRIANGLE ON THE WATER TANK.
FABRIC TABLE
INSTRUCTIONS
ON LABEL
FABRIC
TEMPERATURE
CONTROL
SYNTHETIC
FIBERS, e.g.
acryl, viscose
polyamide (nylon)
polyester
MIN
SILK
WOOL
••
•MAX
••
COTTON
LINEN
Please note that
•
STEAM
CONTROL
BURST OF
STEAM
SPRAY
0
MINIMUM STEAM
MAXIMUM STEAM
on the label means ‘THIS ARTICLE CANNOT BE IRONED!”
7
FILLING WITH WATER
• You can fill this iron with normal tap water.
• Remove the main plug from the wall outlet before filling the iron with water.
• Set the variable steam control (2) to position 0 (no steam).
• Set the 3-position switch (13) to position “cordless” (13B) and take the cordless iron from the
stand. (see fig. 1)
• Place the iron horizontally and open the Water Filling Inlet Cover (6). Pour water into the water
filling inlet (6) to a maximum of approximately 8 oz. (230ml). Use the water bottle with the spout for
this purpose. (see fig. 2)
• Close the water filling inlet cover (6).
Cordless Position
To Iron Without
A Cord
Fig. 1
Fig. 2
8
IRONING WITH STEAM
• Make sure iron is unplugged from power source.
• Set the variable steam control to ‘0’.
• Fill the iron with water following the instructions for filling.
• Plug the cord into a 120 Volt AC electrical outlet.
• Set the temperature control dial within the steam area i.e. ‘•••’.
• Make sure that the iron has reached the selected temperature with the variable steam control set at ‘0’.
IMPORTANT: Do not open the steam control until the thermostat light goes off to indicate that the
selected temperature within the steam range has been reached. If you move the
variable steam control up from ‘0’ before the correct temperature is reached, the iron
will drip water.
• The variable steam control offers a few different settings:
PLEASE NOTE:
For maximum steam the temperature control dial
should be set at ••• . The temperature control
should be set at the beginning only for very
delicate fabrics requiring very gentle steam (setting •).
• Steam is produced as soon as the iron is held in a horizontal position.
• Steam will stop coming out when the iron is put on its heel in a vertical position or by
turning the steam control dial to ‘0’.
9
SETTING THE TEMPERATURE
• Place the iron on the stand. (Fig. 3)
• Insert the plug into the wall outlet.
• Set the appropriate ironing temperature indicated in the ironing instructions or in the fabric table by
means of the temperature dial (1). (Fig. 4)
• Thermostat light (7) will now come on. (Fig. 5)
• When the thermostat light (7) has gone out and has come on again you can start ironing.
• The thermostat light (7) will come on from time to time during corded ironing.
• If you set the temperature control (1) to a lower setting after ironing at a high temperature, do not
recommence ironing before the thermostat light (7) has come on and then has gone out again.
RED LIGHT WILL ILLUMINATE
Fig. 3
Fig. 4
Fig. 5
10
CORDED IRONING
• Set the 3-position switch (13) to position 13C. (Fig. 6)
• Take the iron with the power unit ( 11) from the stand. (Fig. 7)
• Either place iron on heel rest or on the stand (12) when you interrupt ironing.
Fig. 6
Fig. 7
CORDLESS IRONING
• Set the 3-position switch (13) to position 13B. (Fig. 8)
• Take the iron without the power base (11) from the stand. (Fig. 9)
• Always place the iron on the stand (12) when you interrupt ironing.
• For optimal ironing performance, the iron should be replaced to the stand
for heating up to the set temperature. As soon as the soleplate has
regained the set temperature, the thermostat light (7) will go off.
• When cordless steam ironing for a considerable amount of time, the
soleplate might cool down more than required. For that reason, we advise
you to always use the iron in the corded mode if you intend to steam iron
for a considerable time.
Fig. 8
Fig. 9
11
WATER SPRAY
• Use the spray button to add moisture to stubborn wrinkles.
• First make sure that there is water in the tank.
• Press the spray button (3) slowly to get a jet spray. (Fig. 10)
• Press the spray button strongly and quickly to get a mist.
• Please note: If spray does not come out when you press the spray button,
cover the spray opening with your finger and press a few times.
Fig. 10
IRONING WITH STEAM
• As indicated on the temperature control dial (1) and the fabric table, steam
ironing is only possible at the higher ironing temperature settings: •• for
moderate or ••• for maximum steam.
• With conventional steam irons, water may leak from the soleplate if too low a
temperature has been selected. However, your new steam iron has an “AntiDrip” feature which will automatically stop the iron from steaming at too low a
temperature. When this happens, you will hear a “Click”. Set the temperature
control dial (1) to the advised position. Steaming will restart when the
appropriate temperature has been reached.
• Ensure that there is enough water in the water reservoir.
• Place the iron on its stand (12) and set the temperature control dial (1) to the
required position within the “steam area” (•• for moderate or ••• for maximum
steam). (Fig. 11)
• After the thermostat light (7) has gone out and has come on again, you may
start ironing.
• Slide the variable steam control (2) to the required position. (Fig. 12)
Fig. 11
Fig. 12
12
TO EMPTY THE IRON
• Always empty iron after each usage.
• After using the iron, turn the variable steam control to ‘0’ and the temperature control dial to ‘minimum’.
• Unplug the iron from the power source.
• Set variable steam control to ‘MAX’.
• Open the water inlet cover and turn the iron up-side down over the sink with the tip pointing downward and
allow the water to flow from the opening.
• Set variable steam control to ‘0’.
• Allow iron to cool on the iron rest before storing.
WARNING: Use caution when you turn the iron up-side down - there may be hot water in the
reservoir. Burns can occur from touching hot metal parts, hot water or steam.
ELECTRONIC AUTOMATIC SHUT-OFF
Your EURO-PRO 2-in-1 Cordless/Corded Iron is equipped with an electronic auto shut-off. The electronic
auto-off switches the iron off if it has been standing unmoved for approximately 8 minutes. A red light will
flash when the iron switches itself off. To switch the iron back on again,shake the iron.
CAUTION: Do not use the auto shut-off feature as a substitute for turning the iron off and
unplugging the iron when not in use.
Red light will flash
when iron switches
itself off
13
SELF-CLEANING
It is important to apply “Self-Cleaning” at least every two weeks to remove scale, etc. The harder the water the more the
iron should be self-cleaned.
or
In order to remove calcium and built-up particles, the self-cleaning system should be run at least once a month.
• Set the variable steam control (2) to position “0”.
• Open the water filling inlet cover (6) and fill the water reservoir up to the Max indication.
• Close the water filling inlet cover (6) and place the iron on its stand (12). Plug unit into wall outlet and wait until
the iron heats up and the thermostat light (7) goes off and then comes on again.
• Set the 3-position switch to the cordless position (13B) and remove the iron from the stand (12) with the power
base (11).
• Hold the iron horizontally over the sink and slide the variable steam control button (2) to the “Self-Clean” zone.
(Fig. 13)
• Boiling water and steam will now be ejected from the holes in the soleplate (9). The impurities and scale are
washed away with it.
• Move the iron back and forth as this happens.
• Slide the variable steam control button (2) to the “0” position after one minute or when the water reservoir is empty.
• Place the iron back on its stand (12) to cool down.
Self-Clean
Zone
Fig. 13
14
ATTACHING IRON TO THE IRONING BOARD
Your iron is equipped with a clamp that can be used to attach the iron stand (12) to your ironing board (or
any other suitable surface). (Fig. 14.)
• Rotate the clamp 90°, so that it points down.
• Place the iron stand (12) next to the edge of the table with the clamp on the bottom.
• Turn the wing nut clockwise and then tighten it to the ironing board or table.
• Reverse the process when finished ironing to remove the iron from the ironing board or table.
IRONING BOARD
Fig. 14
SCREW
CLAMP
WING
NUT
15
CLEANING, STORAGE & MAINTENANCE
• Always turn the variable steam control to ‘0’ after you have emptied the water tank.
• Allow iron to cool down.
• Always store the iron on the metal iron rest or in an upright position on it’s heel rest to
protect the soleplate.
• From time to time clean the exterior with a damp cloth and wipe dry.
• If you use spray starch, wipe the soleplate occasionally with a soft damp cloth to prevent the
forming of a deposit.
• If the iron has not been used for a few weeks, hold the iron horizontally and allow it to steam for
2 minutes before ironing.
WARNING: The anti-drip function reduces water dripping and water stains. It does
not prevent water dripping or water stains if you press the steam burst
button too often or if temperature is too low. The amount of water
droplets will eventually decrease after iron is used for 2 to 3 tankfuls of
steaming and ironing.
16
Iron Troubleshooting
Problem
Iron does not heat
Potential Reasons & Solutions
• Iron should be plugged into a 120V AC electrical outlet only.
Make sure that the plug is securely in the socket.
• Thermostat set too low. Turn to higher setting.
Thermostat ready light
goes On and Off
Some odor or small particles come
out of steam vents of new iron
Iron does not steam
Water droplets coming
from steam vents
• This is normal. The light goes On and Off as the thermostat is switching
the heating element On and Off to maintain the selected temperature.
• This is normal. Follow instructions for first use and allow iron to steam through 2-3
fillings & press the steam burst button occasionally to eliminate small white particles.
• Water tank may be empty or water level is very low. Add water.
• Make sure that the temperature control dial and the variable steam control are correctly
set. For maximum steam, (setting ‘Max’ on steam control), temperature control dial
should be set on ‘•••’.
• Always allow the iron to reach the selected temperature with the steam setting at ‘0’.
Make sure the temperature control dial is set in the correct steam area and the steam
control is not on ‘0’. For more steam, turn temperature dial to higher setting. e.g. ‘•••’
and the steam control to ‘Max’.
• If temperature setting and steam control setting are correct and there is no steam, gently
tap the soleplate on the ironing board a few times. Move the variable steam control from
‘0’ to ‘Max’ a few times.
• Iron may not be hot enough. Set thermostat to the ‘max’ position. Always allow iron
sufficient time to heat up (thermostat light goes off) before activating the variable steam
control.
• Overuse of steam burst. Allow more time between each burst.
• Iron may have been overfilled. Turn iron off,empty water and follow instructions for filling.
• Steam performance may be low if iron requires seasoning. Use regular tap water for 1or 2
tanks until steam performance improves.
17
IMPORTANT SERVICE INFORMATION
In the event that your iron fails to operate properly or if your iron needs servicing
DO NOT RETURN IT TO THE STORE
First check the troubleshooting guide on the back of this page and make sure that you have followed all the
instructions in the operating manual. If your iron still does not operate properly, send your iron, postage
prepaid, together with $9.50 to cover the cost of return shipping & handling and a copy of your sales
receipt to:
In U.S.
Warranty Dept.
EURO-PRO Operating LLC
In Canada:
21 Lawrence Paquette Ind. Dr.
Champlain, N. Y. 12919
Tel: (800) 798-7398
EURO-PRO Operating LLC
4400 Bois Franc
St. Laurent, Quebec H4S 1A7
If the warranty period has expired, please send your iron postage pre-paid to the Service Dept. of EURO-PRO
Operating LLC at the above address. You will be advised of the cost of repair before any servicing is done unless
you enclose a note indicating that you would like us to proceed with the repairs and return the iron to you C.O.D.
DO NOT FORGET TO ENCLOSE YOUR NAME, ADDRESS, TELEPHONE NUMBER AND COPY OF
SALES RECEIPT.
18
ONE YEAR LIMITED WARRANTY
EURO-PRO Operating LLC warrants this product to be free from defects in material and workmanship for a period of one (1) year from the date of purchase. The
liability of EURO-PRO Operating LLC is limited solely to the repair or replacement of the product at EURO-PRO’s option. This warranty does not cover damage
caused by misuse, negligence, use on improper current or voltage, use contrary to operating instructions or disassembly, repair or alteration by any person other than
an authorized EURO-PRO Operating LLC service station.
Product repair or replacement, at our option, is your sole remedy. This warranty excludes all other legal and/or conventional warranties. The responsibility of EUROPRO Operating LLC, if any, is limited to the specific obligations expressly assumed by it under the terms of the limited warranty. In no event is EURO-PRO Operating
LLC liable for incidental or consequential damages of any nature whatsoever. Some States do not permit the exclusion or limitation of incidental or consequential
damages, so the above may not apply to you. This warranty gives you specific legal rights which vary from state to state.
If you have a claim under this warranty or if you require service
DO NOT RETURN THIS PRODUCT TO THE STORE!
Send the product , postage prepaid to our factory service center: US: Warranty Department
EURO-PRO Operating LLC
21 Lawrence Paquette Ind. Dr.
Champlain, N. Y. 12919
CANADA: Warranty Department
EURO-PRO Operating LLC
4400 Bois Franc
St. Laurent, QC H4S 1A7
Please include a copy of your sales receipt, $9.50 to cover the cost of return shipping & handling and a letter explaining the nature of your difficulty. Do not
forget to enclose your name, address and telephone number.
If the warranty period has expired, please send your iron postage pre-paid to: US: Service Dept
CANADA: Service Dept.
EURO-PRO Operating LLC
EURO-PRO Operating LLC
21 Lawrence Paquette Ind. Dr.
4400 Bois Franc
Champlain, N.Y. 12919
St. Laurent, QC H4S 1A7
You will be advised of the cost of repair before any servicing is done unless you enclose a note indicating that you would like us to proceed with the
repairs and return the iron to you C.O.D.
PRODUCT REGISTRATION CARD
Please complete and return within ten (10) days of purchase. The registration will enable us to contact you in the event a product defect is
discovered. By returning this card you acknowledge to have read and understood the instructions for use, and warnings set forth in the
accompanying instructions.
RETURN TO: EURO-PRO Operating LLC, 21 LAWRENCE PAQUETTE INDUSTRIAL DRIVE, CHAMPLAIN, N.Y. 12919
IN CANADA: EURO-PRO Operating LLC, 4400 BOIS FRANC, ST. LAURENT, QUE., H4S 1A7
PURCHASER: …………………………………………………………………………….…………………………………………………………………
ADDRESS: …………………………………………………………………………………………………………………………………….…………….
EP485
DATE OF PURCHASE: ……………………………….…….. MODEL: ………………...…………. SERIAL NO: ……………………..…………….
NAME AND ADDRESS OF STORE: ……………………………………………………………………………………………………………….……..