1
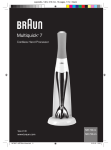
INSTRUCTIONS/WARRANTY
MODEL: RHSB 025
MULIT PURPOSE STICK BLENDER
If blending ‘solid’ or ‘sticky’ ingredients, please use your blender for
no longer than 30 seconds at a time. After blending for 30 seconds, switch your
blender off for 10-15 minutes to avoid damaging the motor. If blending ‘liquid’
ingredients,please use your blender for no longer than a minute at a time. After
blending for a minute, switch your blender off for 10-15 minutes to avoid
damaging the motor. We suggest these usage times to help keep your product
working for years to come.”
15. Never attempt to open any part or dismantle the controls.
Responsibility for failure cannot be accepted if this instruction has
been ignored.
16. This product is intended for household use only. Industrial or
commercial use invalidates the warranty.
17.Use only original parts provided.
18.Switch OFF and remove the plug from the power outlet when:
assembling, disassembling, cleaning and storing.
19.Use only attachments or accessories sold by the manufacturer.
20.Do not attempt to repair or disassemble the appliance. There are
no user serviceable parts.
21.Never use for extended periods of time. The stick blender does its
work in seconds.
22.Do not use beaker or any other type of container if is cracked or
chipped.
23.When blending hot liquids, be careful they do not splatter by
ensuring the blending arm placed into the mixer before starting
use. Begin processing at a low speed.
SAVE THESE INSTRUCTIONS
THIS APPLIANCE IS FOR HOUSEHOLD USE ONLY
PARTS NAME AND LOCATION
A. ON/OFF Button
B. Motor body
C. Variable Speed control
D. Blending arm and blade
E. 600ml Beaker
E
NOTE: Before first use clean all components. Rinse blender arm under
cool water and rinse beaker in the same way. DO NOT IMMERSE OR
ALLOW WATER TO TOUCH THE STICK BLANDER MOTOR.
3
PREPARATION FOR USE
Should the need arise to change the fitted/moulded plug, follow these
instructions:
Mains (AC) Operation
This unit is designed to operate on 230V current only. Connecting
to other power sources may damage the unit.
Connect three-pin plug as follows:
The wires in this mains lead are coloured in accordance with the
following code: Green/Yellow = Earth Blue = Neutral
Brown = Live
NOTE: This appliance is a class two product and as such does not have
an Earth wire. Please follow the above instructions leaving out the
connection for the Earth wire.
USING YOUR STICK BLENDER
The stick blender is perfectly suited for preparing dips, sauces, soups,
mayonnaise and baby food as well for mixing drinks and smoothies.
1. Take the stick blender out of the box and take off any protective
wrappings.
REMEMBER NOT TO LEAVE PROTECTIVE PACKAGING LYING AROUND,
AS IT COULD BE DANGEROUS AROUND INFANTS.
2. Before first use, the blending arm should be cleaned with moist
cloth or rinsed under the tap. Make sure the unit is unplugged
before doing this.
3. Attached the blending arm onto the motor body in a clockwise
position by aligning drawings at the back of the motor body, until a
‘click’ sound is heard and the two parts are locked together.
4. Ensure the stick blender is unplugged and the speed control is set
to “0”.
5. Put the ingredients into the mixing bowl provided or a different
durable bowl, which is sufficiently tall and wide to avoid splashing.
6. Plug the unit into the mains power supply.
7. Dip the blending arm with blade as deep as possible into the
mixer.
4
SUGGESTIONS FOR USE
Move the blending arm gently around the mixture to ensure
uniform results.
If you want to clean the sides and base of the utensil/container
with a hand-held utensil, first switch the machine OFF.
To avoid unnecessary splashing, immerse the blending arm into
mixture before switching the appliance ON.
The speed can be adjusted at any time. First, release the ON/OFF
button, and then adjust the speed. For thicker mixtures, a low
speed is recommended. For fine consistency, use the high-speed
settings.
CLEANING
NOTE: Use extreme care when handling the blade at the bottom of the
blending arm. Do not touch the blade with your fingers. The blade is very
sharp and can cause injury.
Make sure the unit is unplugged from the main power supply.
Disconnect the blending tool from the motor.
It is much easier to clean the accessories directly after their use.
Wash in warm, soapy water, rinse and dry well.
The beaker must be washed with luke warm water.
The body of the stick blender can be cleaned with a damp cloth,
and must immediately be buffed with a dry cloth.
The blending arm can be washed in warm soapy water or can be
washed in the dishwasher.
To remove stubborn spots, wipe the surfaces with a piece of cloth
slightly dampened in soapy water or a mild non-abrasive cleaner.
Follow with a clean damp cloth.
When processing foods with colour (e.g. carrots), the parts of the
appliance may become discoloured. Wipe these parts with
vegetable oil before placing them in the dishwasher.
Do not use any abrasive cleaning material to clean any part of the
stick blender, as it will harm the exterior.
Store in a cool dry place.
CAUTION: The stick blender motor should never be submerged in water
or held under a running tap. To clean, simply wipe with a damp cloth
and dry thoroughly.
6
RECIPES
STRAWBERRY SHAKE
½ Cup vanilla ice cream
½ Cup milk
½ Cup fresh strawberries (Other type of fruit can be used such as:
peaches, pineapple, banana)
1 ½ Tablespoons powdered sugar
1. Attach the blending arm to the motor body
2. Place ingredients into the mixing bowl.
3. Blend on the HIGH speed for 25-30 seconds.
Makes one shake
MAYONNAISE
200-250 ml oil
1 egg (yolk and white)
1 tbsp. lemon juice or vinegar
Salt and pepper to taste
Put all ingredients into the beaker according to the above-mentioned
order. Introduce the stick blender to the base of the beaker. Pressing the
On/Off switch, keep the stick blender in this position until the oil
emulsifies, Then, without switching off, slowly move it up and down until
the mayonnaise is well combined.
BUTTERNUT SQUASH & APPLE SOUP WITH CHESTNUTS
To speed preparation, this recipe calls for prepared butternut squash puree. A
garnish of lightly sweetened whipped cream and chopped roasted chestnuts
adds richness and texture to the soup. For tips on roasting chestnuts, click on
the link at right.
2 Tbs. unsalted butter
1 yellow onion, thinly sliced
2 Golden Delicious apples, peeled, cored and
thinly sliced
1 jar (32 oz.) butternut squash puree
2 1/2 to 3 cups chicken stock
1 large bay leaf
2 tsp. salt, plus more, to taste
1/2 cup heavy cream
7
Freshly ground pepper, to taste
1/2 cup heavy cream, whipped until just
thickened (optional)
12 fresh chestnuts, roasted, peeled and
roughly chopped
In a small stockpot over medium heat, melt the butter. Add the onion
and apples and cook, stirring occasionally, until softened, about 10
minutes. Stir in the butternut squash puree, 2 1/2 cups of the stock, the
bay leaf and the 2 tsp. salt. Bring to a simmer, reduce the heat to
medium-low and cook, stirring occasionally, about 30 minutes. Remove
the bay leaf and discard.
Using an stick blender, puree the soup in the pot until smooth. Pour
through a fine-mesh sieve set over a clean stockpot. Stir in the cream
and add more stock to reach the desired consistency. Season with salt
and pepper. Reheat the soup gently to serving temperature.
Ladle the soup into warmed bowls. Garnish each serving with a swirl of
whipped cream and sprinkle with chestnuts. Serve immediately. Serves 6.
BUTTERNUT SQUASH SOUP WITH HAZELNUT AND CREAM
Be sure to toast and skin the hazelnuts before adding them to the cream. Toasting
brings out the rich flavor of the nuts and loosens the skins, which can taste
bitter. Place the nuts in a dry fry pan over medium heat and toast, shaking the
pan or stirring occasionally, until the nuts are fragrant, 10 to 15 minutes. Or
spread the nuts in a single layer on a baking sheet and toast in a 325°F oven,
stirring occasionally, for 10 to 15 minutes. While the nuts are still warm, wrap
them in a kitchen towel and rub vigorously to remove the skins. It’s OK if a few
bits of skin still cling to the nuts.
1/3 cup heavy cream
2 Tbs. finely chopped toasted hazelnuts
Salt and freshly ground pepper, to taste
2 Tbs. unsalted butter
1 yellow onion, chopped
2 cups unsalted chicken stock, warmed,
plus more as needed
1 jar (17 oz.) butternut squash puree
8
Freshly grated nutmeg, to taste
In a saucepan over medium heat, warm the cream until steam starts to
rise. Remove from the heat, add the hazelnuts and let cool. Season with
salt and pepper. Refrigerate for 1 hour.
In a soup pot over medium heat, melt the butter. Add the onion and
sauté, stirring occasionally, until tender and translucent, 4 to 6 minutes.
Add the 2 cups stock and the squash puree and bring to a simmer,
stirring, then reduce the heat to medium-low. Cook, stirring, for 12 to 15
minutes. Using a stick blender or , puree the soup, adding more stock if
the soup is too thick. Season with salt, pepper and nutmeg.
Whisk the hazelnut cream until lightly foamy. Ladle the soup into
warmed bowls and top each serving with the hazelnut cream. Serves 4.
ASPARAGUS SOUP
For an ultra smooth soup, strain it through a fine sieve, or a conical
strainer that is a favorite in restaurant kitchens. A pestle is used to push
the food through the fine-mesh perforations of the sieve.
1 1/2lb. asparagus
4 Tbs. (1/2 stick) plus 2 tsp. unsalted butter
1 yellow onion, diced
3 garlic cloves, minced
1/4 cup dry vermouth
3 cups chicken stock, plus more as needed
Salt and freshly ground pepper, to taste
3/4 cup heavy cream
Snap off the tough stem ends from the asparagus spears. Cut the tips
off 8 of the spears into 2-inch lengths. Set the tips aside. Chop the
remaining asparagus into 1-inch pieces.
In a heavy soup pot over medium heat, melt the 4 Tbs. (1⁄2 stick)
9
butter. Add the onion and garlic and sauté, stirring occasionally, until
tender and translucent, 3 to 4 minutes. Add the vermouth and cook
until most of the liquid has evaporated. Add the chopped asparagus
and the 3 cups stock. Season with salt and pepper. Bring to a simmer,
then reduce the heat to medium-low. Cover and cook until the
asparagus is tender, about 20 minutes.
Using an stick blender, puree the soup until smooth, about 2 minutes.
Pass the soup through a fine sieve into a clean saucepan. Stir in the
cream plus more stock if needed to reach the desired consistency.
Season with salt and pepper. Set the pan over low heat and reheat the
soup to serving temperature.
In a small sauté pan over medium heat, melt the 2 tsp. butter. Add
the reserved asparagus tips and cook until just tender, about 2
minutes. Ladle the soup into warmed bowls, garnish with the
asparagus tips and serve immediately. Serves 4.
PROBLEM SOLVING
There are no user serviceable parts in this appliance. If the appliance is
not operating correctly, please check that:
1 You have followed the instructions correctly.
2. The unit has been wired correctly and the wall socket is
switched on.
3. You did not run the machine for longer then 30 seconds. As
this would cause the motor to overheat.
4. Is the blending arm securely locked in place onto the motor
body.
5. The mains power supply is ON.
6. You have not operated the unit for longer periods than
specified time, causing the motor to overheat.
If the appliance still does not work:
In the first instance, consult your retailer for possible repair or
replacement. If your retailer fails to solve your problem and you need to
return the appliance, make sure that:
1. The unit is packed carefully, complete in its original packaging.
2. Proof of purchase is attached.
3. Give the reason why you are returning it.
If the supply cord is damaged, it must be replaced by the manufacturer
or its service agents in order to avoid a hazard.
10
SERVICE
If service becomes necessary within the warranty period, the appliance
should be returned to an approved Amalgamated Appliances Pty Ltd
Service Centre. Servicing outside the warranty period is still available
however this will be chargeable.
PLEASE AFFIX YOUR PROOF OF PURCHASE/RECEIPT HERE
IN THE EVENT OF A CLAIM UNDER WARRANTY THIS RECEIPT
MUST BE PRODUCED.
WARRANTY
Amalgamated Appliances (Pty) Limited (“the Supplier”) warrants to
the original purchaser of this product (“the Customer”) that this
product will be free of defects in material and workmanship which
under normal, personal, family or household purpose manifest
themselves within a period of 365 days from the date of purchase or
in respect of commercial or professional purposes, manifest
themselves within a period of 90 days from the date of purchase.
Any claim in terms of the warranty must be supported by a proof of
purchase. If such proof is not available, then notwithstanding
anything to the contrary herein, the Supplier’s normal charge for
service and/or spares will be payable by the Customer upon
collection of the repaired product. If a claim is made in terms of
the aforesaid warranty within the first 7 days from the date of
purchase, the faulty product will be exchanged (provided that the
product is in its original packaging with all accessories). Failing
return of the product within 7 days, the Supplier’s liability shall be
limited on return to the Supplier of the product or parts thereof, to
the replacement or repair (in the sole discretion of the Supplier, or
its duly authorised service dealer) of the product to eliminate any
defect in workmanship or materials found to be due exclusively to
any acts or omissions on the parts of the Suppliers, of which defects
the Supplier shall have been notified in writing by the Customer
within the aforesaid warranty period. The warranty provided herein
and the obligations of the Supplier as aforesaid are in lieu of, and
the Customer waives, all other warranties, guarantees, conditions or
liabilities, express or implied, arising by law or otherwise, including
without limitation, any obligation of the Supplier in respect of any
injury, loss or damage (direct, indirect or consequential) arising out
of the use of, or inability to use, this product and whether or not
11
occasioned by the Supplier’s negligence (gross or otherwise) or any
act or omission on its part. The warranty does not include and will
not be construed to cover products damaged as a result of disaster,
misuse, abuse or any non-authorised modification of the product.
The warranty does not include replacement of light bulbs, heater
bars, paper bags or any glass, plastic bowl or jug or other
expendables. During the warranty period the product should be
taken to a service centre of the Supplier or one of its duly
authorised service agents.
The Supplier neither assumes nor
authorises any other person to assume for it, any additional liability
in connection with the sale or servicing of its products.
AMALGAMATED APPLIANCES (PTY) LTD.
29, HERONMERE ROAD JOHANNESBURG PO BOX 39186 BOOYSENS,
2016
TEL NO. (011) 490 9000
FAX NO. (011) 490 9399
CAPE TOWN
DURBAN
TEL NO. (021) 535-0600
TEL NO. (031) 792-6000
Win prizes on line: www.russellhobbs.co.za
12