1
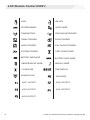
PROFESSIONAL
SERIES
ca 1552
Owner’s Guide
Deluxe Vehicle Security and
Keyless Entry System with 2 Way
Confirming LCD Remote Control
IMPORTANT NOTE: The operation of the Security and Convenience System as described in this manual is
applicable to most vehicles. However, due to the configuration of some vehicles, some functions AND/OR
SAFETY PRECAUTIONS may not apply. Please see your installing dealer for more information.
ca1552. 2011 Audiovox Electronics Corporation. All rights reserved.
1
Table of Contents
Using Your Remote Control ............................................................... 3
Arming the Security System ............................................................ 3
Passive Arming Bypass ................................................................... 3
Bypassing the Shock Sensor .......................................................... 3
Hidden Alarm Function ...................................................................... 3
Disarming the Security System ........................................................ 3
Two Stage Door Unlock (optional) ................................................... 4
Activating Trunk Release (optional) ................................................ 4
Activating Optional AUX 1 (optional) ............................................... 4
Entering AUX Mode and Activating Additional AUX Outputs .......... 4
Using the Progressive Car Finder Feature ...................................... 5
Using the Personal Protection Alarm ............................................... 5
Programmed Transmitter Notification .............................................. 5
Valet Mode ........................................................................................ 5
Eliminating Arm / Disarm Notification Chirps .................................... 5
Manually Overriding the Security System ....................................... 6
Car Jack Mode .................................................................................. 6
LED and Siren/Horn Indications ......................................................... 7
Additional 2-Way LCD Remote Control Functions ........................ 8
LCD Remote Control ICON’s ............................................................ 10
Transmitter Button Functions ......................................................... 11
Replacing Remote Control Batteries ............................................. 13
Warranty Information ......................................................................... 14
2
ca1552. 2011 Audiovox Electronics Corporation. All rights reserved.
Using Your Remote Control
Arming the Security System
To arm the system, exit the vehicle, close all doors, then press the button. The
parking lights will flash 2 times, indicating the system is armed, has locked the
doors (if equipped and connected) and activated the starter disable feature. The
LED status indicator will blink steadily, once per second.
NOTE: The system is equipped with a feature called Silent Choice. If enabled, the
system requires a second press of the
button to activate an audible arming
response from the vehicle.
Passive Arming Bypass
If passive arming is enabled on your system, while the system is disarmed, press
+
, the system will respond with 1 chirp and the LED will turn on. The
security system will remain in this temporally bypassed state for as long as you
wish. To exit passive bypass, press the
or button and the system will return
to normal status.
Bypassing The Shock Sensor
To arm the system and ignore the shock sensor press
button, then within 5
seconds press
+
, the system will respond with 1 long chirp.
NOTE: The system will only change the shock sensor setting for one arm cycle
and will be defaulted back to normal operation the next time the system is armed.
Hidden Alarm Function
Press the
button first, within 3 seconds press the
button to activate the
hidden alarm function. The security system will arm with “Hidden Alarm Function”
in which the siren / horn will be silenced if the system is triggered.
Disarming the Security System
To disarm the system press the button. The parking lights will flash 1 time,
indicating the system is disarmed and has unlocked the doors (if equipped and
connected).
NOTE: The system is equipped with a feature called Silent Choice. If enabled, the
system requires a second press of the button to activate an audible disarming
response from the vehicle. If your system is set up for 2 step unlock, a third press
of unlock will activate the audible response.
*Throughout this manual, ‘press’ refers to pressing for less than 1 second; ‘press and hold’ refers to pressing for more
than 2 seconds.
ca1552. 2011 Audiovox Electronics Corporation. All rights reserved.
3
Two Stage Door Unlock (Optional)
If this feature is enabled on your system, pressing the
button one time will
unlock only the driver’s door. Press again within three seconds to unlock the
remaining doors.
Activating the Trunk Release Feature (Optional)
If this feature is enabled on your system, pressing and holding the
seconds will open the vehicle’s trunk or hatch.
button for 3
Activating Optional AUX 1 (Optional)
and buttons
If this feature is enabled on your system, pressing the
simultaneously will activate an optional feature. This feature can be programmed for
a wide range of functions like power window or sunroof automation, please consult
your installing dealer to determine the functionality of your system.
Entering AUX Mode and Activating the Additional AUX 2 - 5 Outputs
(Optional)
To access the additional AUX outputs, AUX 2, AUX 3, AUX 4, and AUX 5, you must
first enter the transmitters AUX Mode. This will “shift” the functions of the transmitter
buttons from their standard operation to control of the AUX outputs.
AUX Mode - 1 Way transmitter: Press and Hold
and
for 2
seconds, the transmitter LED will flash 1 time. AUX Mode will remain active
for 15 seconds. AUX Mode will exit after 15 seconds of inactivity or by
pressing
and
again for 2 seconds, the transmitter LED will flash 2
times to confirm exit.
AUX Mode - 2 Way transmitter: Press and Hold
for 2 seconds, the
transmitter LCD screen will display “AU”. AUX Mode will remain active
for 15 seconds. AUX Mode will exit after 15 seconds of inactivity or by
pressing
again for 2 seconds.
Activating outputs while in AUX Mode:
4
AUX 2: Press and Hold
for 3 seconds.
AUX 3: Press and Hold
for 3 seconds.
AUX 4: Press and Hold
for 3 seconds.
AUX 5: Press and Hold
for 3 seconds.
ca1552. 2011 Audiovox Electronics Corporation. All rights reserved.
Using the Progressive Car Finder Feature
Press the
button to locate your vehicle. The system will sound 5 times at low
volume, increasing in volume each time the button is pressed.
Using the Personal Protection Alarm (Panic)
Press and hold the
button for 3 seconds to activate the personal protection alarm.
During panic mode, the normal function of the transmitter buttons will be suspended.
The transmitter’s and buttons can be used to lock and unlock the door (if the
option is installed). To stop the alarm, press and hold the
button on the transmitter
again for 3 seconds. The system will automatically stop after 30 seconds.
Programmed Transmitter Notification
As a security precaution each time the vehicle’s ignition is turn on the status LED
light with flash the number of transmitters programmed into the system. This helps
to identify unauthorized transmitters from accessing your vehicle. If you believe an
unauthorized transmitter has been programmed to your system, contact your
installing dealer for assistance.
Valet Mode
When valet mode is activated the status LED will light solid, and all security
functions will be disabled. To enter or exit valet mode simply follow the 4 steps
outlined below:
1.
Turn the vehicle’s ignition ON.
2.
Push and hold the programming/valet button.
3.
The LED will turn on solid when valet mode is active
4.
Release the programming/valet button.
Eliminating Arm / Disarm Notification Chirps
System ARM/DISARM chirps can be toggled ON or OFF without entering the
programming feature banks.
1.
Turn the ignition ON then OFF.
2.
Press and release the valet/programming button 3 times. The system
will respond with 1 chirp for ON or 2 chirps for OFF.
ca1552. 2011 Audiovox Electronics Corporation. All rights reserved.
5
Manually Overriding the Security System
Your system can be disarmed without the use of the transmitter. This is
necessary, since you will need the ability to operate your vehicle if the transmitter
is lost or its battery fails. To by-pass the alarm system;
1.
Open the vehicle door. The alarm will sound.
2.
Turn the ignition key to the ON position.
3.
Within 10 seconds, press and release the valet push button switch.
The alarm system will stop sounding and enter the (by-passed) mode. You can
now start and operate the vehicle normally.
Car Jack Mode
This feature must be turned on in system programming, please consult your
installing dealer.
Triggering Car Jack mode: While the ignition is ON and press and hold + for 2
seconds, the parking lights will flash 1 time and the system will act as follows;
1.
50 seconds after being triggered the siren will chirp for 15 seconds,
during this 15 seconds you will be alerted to push the valet button to
turn off Car Jack mode. If Car Jack mode is not turned off at this time it
will advance to the next step.
2.
Following the 15 second chirps (total time now 65 seconds) the siren
will go into full sound and the parking lights will start flashing.
3.
90 seconds after trigger in, addition to the siren and parking lights, the
system will activate the starter kill. THE SYSTEM WILL REMAIN IN THIS
STATE UNTIL THE BATTERY IS DEPLETED.
OVERRIDE THE SYSTEM TO TURN OFF CAR JACK MODE: Turn the ignition OFF
then ON and press the valet button within 10 seconds.
6
ca1552. 2011 Audiovox Electronics Corporation. All rights reserved.
LED and Siren/Horn Indications
LED Display Indications
LED
Function
OFF
DISARMED
SLOW FLASH
ARMED
FAST FLASH
PASSIVE ARMING
ON (SOLID)
VALET MODE
2 FLASH... PAUSE
ZONE 2 TRIGGER, HOOD/TRUNK
3 FLASH... PAUSE
ZONE 3 TRIGGER, DOOR
4 FLASH... PAUSE
ZONE 4 TRIGGER, SHOCK
5 FLASH... PAUSE
ZONE 5 TRIGGER, IGNITION
Siren/Horn Indications
Chirps
Function
1
DISARM
2
ARM
3
DOOR AJAR UPON ARMING
4
DISARM / TRIGGERED
5
CAR LOCATOR
Parking Light Flash Indications
Flashes
Function
1
DISARM
2
ARM
3
DISARM / TRIGGERED
5
CAR LOCATOR
ca1552. 2011 Audiovox Electronics Corporation. All rights reserved.
7
Additional 2-Way LCD Remote Control Functions
Check Vehicle Status
Press and release
2 times then press
display the current status of the vehicle.
within 3 seconds, the transmitter will
Display Illumination
Press and hold the
seconds.
button for 1 second. The display will illuminate for 5
Melody / Vibration Mode
To have the remote control vibrate, play a melody tone or both each time it receives
a response from the vehicle press and release
then press and hold for 2
seconds.
Button Beeps
To toggle button beeps on or off press and release
seconds.
then press and hold
for 2
Battery Save Mode
While in POWER SAVE MODE the 2-way LCD transmitter will NOT look for any
incoming signals from the main unit until a button is pressed. The LCD screen will
display SAVE to indicate that power save mode is ON. To enter power save mode
press and hold for 5 seconds.
Clear Flashing Icons and Melody Sound
Press the button 3 times within 3 seconds. This will clear the melody sound and
flashing icons on the LCD screen.
Stopping LCD Trigger Melody
To stop the alarm trigger melody if the system has been triggered WITHOUT
disarming the system, press any button one time only, this will not send a
command to the vehicle at this time and the alarm will continue to sound.
8
ca1552. 2011 Audiovox Electronics Corporation. All rights reserved.
Button Lock
Press and release
then press hold the for 2 seconds to toggle the button lock
on or off. When the button lock is active, the remote control will beep/vibrate 2
times when a button is pressed indicating it is locked.
Illumination
Press and release
2 times then press and hold for 2 seconds to toggle
illumination on or off. When on, the display will illuminate when it receives or
sends a command.
2 Car Mode
To control a second security system enter 2 car mode by pressing then press
and together for 3 seconds. When the
icon appears on the transmitter’s LCD
screen it will control the second security system. Use the same method to exit 2
car mode and resume control of the original vehicle’s security system.
NOTE: A second security system must be installed and the LCD transmitter must be
learned to it before this feature will operate the additional system.
Parking Meter Countdown
The parking meter countdown timer has 6 preset times, to access the preset times
then press and hold
for 2 seconds,
and begin countdown press and release
each additional press of
will increase the countdown time.
Adjusting the Clock and Timer Settings
The clock, alarm clock and programmable countdown timer are accessed through
the Function Menu. Press and hold for 3 seconds to access the function menu,
once you have accessed the feature menu press and release to scroll through
each feature and follow the steps below to adjust the settings for each. Press and
hold for 2 seconds to exit the menu.
Clock Hour
Press
to increase or
to decrease
Clock Minute
Press
to increase or
to decrease
Alarm Clock Hour
Press
to increase or
to decrease
Alarm Clock Minute
Press
to increase or
Alarm Clock ON / OFF
Press
to turn ON or
Countdown Timer Hour
Press
to increase or
Countdown Timer Minute
Press
to increase or
Countdown Timer ON / OFF Press
ca1552. 2011 Audiovox Electronics Corporation. All rights reserved.
to turn ON or
to decrease
to turn OFF
to decrease
to decrease
to turn OFF
9
LCD Remote Control ICON’s
LOCK
UNLOCK
SYSTEM ARMED
VALET MODE
TRANSMITTING
IGNITION ON/TRIGGER
TRUNK TRIGGER
DOOR TRIGGER
HOOD TRIGGER
FULL SHOCK TRIGGER
SYSTEM TRIGGER
TIME COUNT DOWN
BATTERY INDICATOR
BATTERY SAVE MODE
VIBRATE/SILENT MODE
MELODY MODE
2 CAR MODE
TIME DISPLAY
ALARM CLOCK
AUX MODE
AUX 1 OUTPUT
AUX 2 OUTPUT
AUX 3 OUTPUT
AUX 4 OUTPUT
AUX 5 OUTPUT
10
ca1552. 2011 Audiovox Electronics Corporation. All rights reserved.
Transmitter Button Functions
1 Way
Transmitter
Lock
Lock
Unlock
Car Find /
Panic
Trunk
X
Operation Method
Press and Release
Unlock
X
Press and Release
2 Step Unlock
X
Press and Release 2 times
Trunk
X
Push and Hold (3 Sec)
Car Finder
X
Press and Release
Panic
X
Push and Hold (3 Sec)
AUX 1
X
X
Push and Hold (3 Sec)
Shock Bypass
X
X
Press and Release Lock then
Press Lock + Car Find
Hidden Alarm
X
X
Press and Release Car Fnd then
Press Lock
X
Press and Release
Passive Arming
Bypass
X
AUX 2, 3, 4, 5 - Access in AUX Mode
Enter AUX Mode
AUX 2
AUX 3
AUX 4
X
X
X
Press and Hold Find + Trunk
Transmitter LED flashes 1 time
Push and Hold (3 Sec)
X
Push and Hold (3 Sec)
X
AUX 5
ca1552. 2011 Audiovox Electronics Corporation. All rights reserved.
Push and Hold (3 Sec)
X
Push and Hold (3 Sec)
11
2 Way
Transmitter
Lock
Lock
Unlock
Car Find /
Panic
Trunk
Function Operation Method
X
Press and Release
Unlock
X
Press and Release
2 Step Unlock
X
Press and Release 2 times
Trunk
X
Push and Hold (3 Sec)
Car Finder
X
Press and Release
Panic
X
Push and Hold (3 Sec)
AUX 1
X
X
Push and Hold (3 Sec)
Shock Bypass
X
X
Press and Release Lock then
Press Lock + Car Find
Hidden Alarm
X
X
Press and Release Car Fnd then
Press Lock
Passive Arming
Bypass
X
X
Press and Release
Menu
X
Press and Release
AUX 2, 3, 4, 5 - Access in AUX Mode
Enter AUX Mode
AUX 2
AUX 3
AUX 4
AUX 5
12
X
X
Press and Hold F for 2 seconds
LCD displays AU
Push and Hold (3 Sec)
X
Push and Hold (3 Sec)
X
Push and Hold (3 Sec)
X
Push and Hold (3 Sec)
ca1552. 2011 Audiovox Electronics Corporation. All rights reserved.
Replacing Remote Control Batteries
1 Way 4 Button Remote Control
The batteries (model CR2016) inside each remote control should last
approximately 1 year under normal use. When the batteries become
weak you will notice the remote control range (the distance from the
vehicle the remote control will work) deteriorate and the small LED on the
remote control will dim. To replace the remote control batteries:
1.
Remove 3 screws and disassemble the halves of the remote
control.
2.
Remove the old batteries, observing the +/- symbols on the
batteries and replace with new CR2016 batteries.
3.
Reassemble the halves of the remote control and install the 3
screws.
4.
Test operation of the remote control.
2 Way LCD Remote Control
The CR2450 battery inside the 2-way LCD remote control should last
approximately 6 months under normal use. When the batteries become
weak you will notice the remote control range (the distance from the
vehicle the remote control will work) deteriorate and the BATTERY icon on
the LCD remote control will show.
1.
Gently slide the battery cover off of the remote control.
2.
Remove the old CR2450 battery, observing the +/- symbols on
the battery, and replace with a new CR2450 battery.
3.
Gently slide the battery cover on to the back of the remote
control.
4.
Test operation of the remote control.
ca1552. 2011 Audiovox Electronics Corporation. All rights reserved.
13
Code Systems, Inc. Limited Lifetime Warranty
Code Systems Inc. (“CODE”) warrants to the ORIGINAL PURCHASER of this CODE
vehicle security product (the “Product”), purchased from an authorized CODE dealer, that (except as
provided below) should this Product under normal use and conditions, be proven defective in
material or workmanship DURING THE LIFETIME OF THE VEHICLE IN WHICH IT WAS ORIGINALLY INSTALLED, such defect(s) will be repaired or replaced (at CODE’s option) without charge for
parts directly related to repairs of the defect(s).
Switches, indicator lights, and transmitter cases are similarly warranted to the original
purchaser for a period of one (1) year from the date of purchase of the Product.
CODE accessories, sold separately, are covered by the applicable warranty accompanying the accessory.
This warranty is non-transferable, non-assignable and is voided when: (1) the Product is
removed from the vehicle in which it was originally installed; or (2) the vehicle in which the Product
was originally installed is transferred to another party.
This warranty does not apply to any product damaged by accident, physical or electrical
abuse, improper installation, alteration, or use contrary to its intended function, fire, flood, or other
natural acts.
In order for the Product to be repaired or replaced under the terms of this warranty, the
defective Product must be returned to an authorized CODE dealer and accompanied by a copy of
the retail sales receipt. The date of purchase and year, make and model of the vehicle in which the
Product was originally installed must be clearly indicated on the sales receipt.
This warranty is exclusive and CODE MAKES NO OTHER WARRANTIES EXPRESSED
OR IMPLIED. ANY IMPLIED WARRANTIES, INCLUDING ANY IMPLIED WARRANTY OF MERCHANTABILITY AND FITNESS FOR A PARTICULAR PURPOSE, SHALL BE LIMITED TO THE
DURATION OF THIS WRITTEN WARRANTY. IN NO CASE SHALL CODE BE LIABLE FOR ANY
CONSEQUENTIAL OR INCIDENTAL DAMAGES FOR BREACH OF THIS OR ANY OTHER WARRANTY, EXPRESS OR IMPLIED, WHATSOEVER.
CODE does not warrant that the Product cannot be compromised or circumvented. THE EXTENT OF
CODE’S LIABILITY UNDER THIS WARRANTY IS LIMITED TO THE REPAIR OR REPLACEMENT
PROVIDED ABOVE AND, IN NO EVENT SHALL CODE’S LIABILITY EXCEED THE PURCHASE
PRICE PAID BY THE ORIGINAL PURCHASER OF THE PRODUCT WITHOUT INSTALLATION
LABOR.
Some states do not allow the exclusion or limitation of incidental or consequential
damages, so the above limitation may not apply to you. This warranty gives you specific legal
rights and you may also have other rights which vary from state to state
14
ca1552. 2011 Audiovox Electronics Corporation. All rights reserved.
ca1552. 2011 Audiovox Electronics Corporation. All rights reserved.
15
Audiovox Electronics Corporation.
Customer Service 1-800-421-3209
WWW.CODE-ALARM.COM
FCC COMPLIANCE
This device complies with Part 15 of the FCC rules and with RSS-210 of
Industry Canada. Operation is subject to the following two conditions:
1. This device may not cause harmful interference, and
2. This device must accept any interference received, including any interference
that may cause undesired operation.
Warning!
Changes or modifications not expressly approved by the party responsible for
compliance could void the user’s authority to operate the equipment.
16
ca1552. 2011 Audiovox Electronics Corporation. All rights reserved.