1
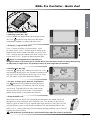
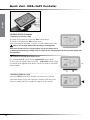
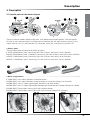
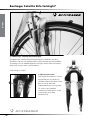
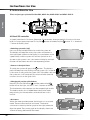
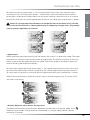
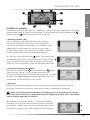
Electric bicycle
Owner’s Manual
ENGLISH
This Electric bicycle manual is additional to the manual provided with your bicycle.
It treats those aspects in which the Electric bicycle differs from the non-electric bikes.
DE UTSCH
ENGLISH
© Trek Bicycle retains all rights to this Owner’s Manual.
No texts, details, or illustrations from this Manual may be reproduced or distributed,
or become the subject of unauthorized use for commercial purposes, nor may they be made
available to others. Additional manuals for using the Electric bicycle may be ordered as separate
items from Trek Bicycle. Nevertheless, should you discover any errors, we would be grateful if you
would bring them to our attention.
3
Table of contents
General
Congratulationsonyournewelectricbicycle!
1.Quickstart
ENGLISH
1.1.
1.2.
1.3.
1.4.
1.5.
1.6.
1.7.
BionXG2Controller
RIDE+ProController
RIDE+EASYController
RIDE+EASYIIController
Charging
RackBattery(RIDE+R250,RIDE+R320)
DowntubeBattery(RIDE+C320,RIDE+C420)
6
7
8
9
10
11
12
2.Description
13
3.40KM/H‘FastElectricBike’
17
4.InstructionsforUse
18
2.1. Specificpartsfortheelectricbicycle
2.2. Assistance–Regeneration
2.3. BontragerSatelliteEliteForkLight
3.1. Legalrules
3.2. Differencesinequipment
3.3. Instructionforuse
4.1. BionXG2controller
4.2. RIDE+Procontroller
4.3. RIDE+EASYController
4.4. RIDE+EASYIIController
4.5. RearRackBattery-pack
4.6. DowntubeBattery-pack
4.7. ChargingtheBattery-pack
4.8. Batterycare
4.9. Suggestionsforuse
4.10.Programming(bikeswith‘BionXG2’and‘RIDE+Pro’controlleronly)
13
15
16
17
17
17
18
21
24
26
28
29
30
32
32
33
5. Maintenance
34
6.Technicaldescription
37
7.Problemsolving
38
8.Limitedwarranty
39
5.1. Cleaning
5.2. Removalandrefittingofwheelsforbikeswitharearwheelmotor
5.3. Removalandrefittingofwheelsforbikeswithafrontwheelmotor
6.1.
6.2.
6.3.
6.4.
Bikespecifics
Batterypacks
Minimumandmaximumtemperaturesforbattery-pack
Powersupply
7.1. Driveproblems
7.2. Chargingproblems
7.3. Displayproblems
4
4
5
6
34
34
35
37
37
37
37
38
38
38
Congratulations
Congratulationsonyournewelectricbicycle!
ENGLISH
Your electric bicycle is a bike with electric pedal assistance.
This means that you can pedal it as a normal bike, or that the bike can assist you in your pedaling.
The electric bicycle will assist you when you are pedaling. The amount of assistance depends on
the force you exert on the pedals.
RIDE+ bicycles come in two classes: Pedelecs and Fast Electric Bikes.
• Pedelecs assist up to a speed of 25 km/h. This class is legally considered a bicycle.
• Fast Electric Bikes assist at higher speeds. This class is legally considered a lightweight moped.
Thismanualcoversthefollowingbikes,bothpedelecsandfastclass
•
•
•
•
Derailleur/Roller brake,
Derailleur/Rim (Magura, V-brake) or disc brake.
Internal gear hub/Roller brake
Internal gear hub/ Rim (Magura, V-brake) or disc brake.
The electric bicycle differs only slightly from a non-electric bike.
Thefollowingpartsarespecifictoanelectricbicycle
• The battery-pack in the rear rack or on the down tube,
• The motor in the rear- or front wheel hub,
• The controller on the handlebars or on the clamp in front of the handlebars.
5
Quick start - BionX G2 Controller
1.Quickstart
ENGLISH
This manual has all the information that you’ll
need to get the best from your electric bicycle.
We strongly recommend that you read it through.
However, for quick use of the bike, please read
the Quick Start guide for the type of controller
and battery on your bicycle.
1.1BionXG2Controller
• Switching system On / Off
Push any of the two upper buttons to switch the system
‘on’. Push
button to switch the system off. When
switched on, the bike is in cycle mode (zero assist).
• Assistance/ Regeneration Level
Push ‘+’ button once for assistance level 1, again for
higher levels. Push ‘-’ button to go to a lower level.
Regeneration levels can be controlled in a similar way.
Push ‘-’ button once for regeneration level 1, again for a
higher level. Push ‘+’ button to reduce regeneration.
Notice: It is strongly advised to ride away in a
straight line when an assistance level is selected. Never
select assistance level 3 or 4 during maneuvering or riding away in a tight corner. The powerful reaction
of motor might take you unawares.
• Switching lights On / Off
Press the
button for 2 seconds to switch On / Off the
display light, and, if present, the front and rear lights.
• See time, average speed, odometer, trip distance
Use
button to change computer functions (Order of
appearance: trip distance, odometer, average speed, time
of day). To prevent loss of riding information, please
make sure that the system is switched off before the
controller is removed from the bike.
• Using the remote
Some bikes have the controller positioned on a middle clamp, which means that
the controller can more easily be operated with a remote. This device can be used
to select a higher or lower assist or regeneration level without removing your hands
off the handlebars. The red throttle button on the BionX remote is a convenient
help to move the bike without pedaling (up to 4 km/h) walking next to the e-bike.
Caution:Beware of unintended use of the throttle button when the system is switched on.
6
ENGLISH
RIDE+ Pro Controller - Quick start
1.2RIDE+ProController
• Switching system On / Off
Push any of the two upper buttons to switch the system
‘on’. Push
button to switch the system off. When
switched on, the bike is in cycle mode (zero assist).
• Assistance / Regeneration Level
Push ‘+’ button once for assistance level 1, again
for higher levels. Push ‘-’ button to go to a lower level.
Regeneration levels can be controlled in a similar way.
Push ‘-’ button once for regeneration level 1, again for a
higher level. Push ‘+’ button to reduce regeneration.
Notice: It is strongly advised to ride away in a
straight line when an assistance level is selected. Never select assistance level 3 or 4 during maneuvering
or riding away in a tight corner. The powerful reaction of motor might take you unawares.
• Switching lights On / Off
Press the
button for 2 seconds to switch On / Off
the Controller display light, and, if present, the front and
rear lights. Once activated, the text ‘Light On’ or ‘Light
Off’ will appear in the lower field of the display.
• See time, average speed, odometer, trip distance
Use
button to change bike computer functions
(Order of appearance: trip distance, odometer, average
speed, time). To prevent loss of riding information,
please make sure that the system is switched off
before the controller is removed from the bike.
• Using the RIDE+ Link
Most bikes with the ‘RIDE+ Pro’ controller positioned on the middle clamp are
equipped (or can be equipped) with the RIDE+ Link. This device can be used to
select a higher or lower assist or regeneration level and to turn the lights On/Off
without removing your hands off the handlebars.The red throttle button on the
RIDE+ Link is a convenient help to move the bike without pedaling (up to 4 km/h)
walking next to the e-bike.
Caution:Beware of unintended use of the throttle button when the system is switched on.
7
Quick start - RIDE+ EASY Controller
ENGLISH
1.3RIDE+EASYController
• Switching system On / Off
To switch the system on, push the ‘Side’ button once.
To switch it off, push the ‘Side’ button again.
After switching on, the bike is always in cycle mode (zero assist).
Notice: It is strongly advised to ride away in a straight line
when an assistance level is selected. Never select assistance level 3
or 4 during maneuvering or riding away in a tight corner. The powerful reaction of motor might take
you unawares.
• Assistance Level/(Regeneration) Level
For assistance level 1, push the ‘+ (right hand)’ button once.
Push it again for higher levels.Push the ‘- (left hand)’ button to go
to a lower level. Regeneration levels are not installed as standard
the controller.
• Switching Lights On / Off
Press the ‘Side’ button for 2 seconds to switch On / Off the
Controller display light, and if present, the front and rear lights.
Once activated, the light symbol will appear on the screen.
8
on
ENGLISH
RIDE+ EASY II Controller - Quick start
1.4RIDE+EASYIIController
• Switching system On / Off
To switch the system on, push the ‘Side’ button once. To switch it
off, push the ‘Side’ button again. After switching on, the bike is
always in cycle mode (zero assist). To prevent loss of riding
information, please make sure that the system is switched off
before the controller is removed from the bike.
Notice: It is strongly advised to ride away in a straight line when an assistance level is selected.
Never select assistance level 3 or 4 during maneuvering or riding away in a tight corner. The powerful
reaction of motor might take you unawares.
• Assistance /(Regeneration) Level
Push ‘+’ button once for assistance level 1, again for higher levels.
Push ‘-’ button to go to a lower level. Regeneration levels are not
installed as standard on the controller.
• Switching lights On /Off
Press the ‘Side’ button for 2 seconds to switch On / Off the
Controller display light, and if present, the front and rear lights.
Once activated, the light symbol
will appear on the screen.
• See total distance/ trip distance
Push ‘-’ button for 5 seconds to switch between total distance and
trip distance.
9
Quick start - Charging
1.5Charging
• Power supply
The charging process is the same for rack batteries (39-cell and 30-cell) and batteries mounted
on the down tube (39-cell and 52-cell). All batteries can be charged using the power supply.
ENGLISH
RIDE+R250
RIDE+R320
RIDE+R320
RIDE+C320andRIDE+C420
• Charging the battery-pack:
1. Turn the system off.
2. Connect the connector of the power supply to the charging port of
the battery and connect the power supply to the power outlet.
Warning: Replace a damaged power cable immediately to prevent an electric shock.
3. The battery will emit beeps and then the charging port will turn
orange. When the battery is full, the charging port will turn green.
To stop charging, just disconnect both connectors.
GREEN/ORANGE
GREEN/ORANGE
GREEN/ORANGE
10
Rack Battery - Quick start
1.6.RackBattery(RIDE+R250,RIDE+R320)
1.
2.
3.
4.
ENGLISH
• Removing the battery-pack
Insert the key in the lock, twist the key clockwise (1,2). Now slide the battery-pack rearwards out of
the rear rack (3,4). After you remove the battery, don’t forget to take the keys out of the lock.
• Replacing the battery-pack
Slide the battery-pack into the rack, electrical-contact side first (1). Carefully push all the way
forward, also through a slightly higher resistance at the end (2,3). Now turn the key of the lock
counter clockwise until the battery is locked and take the key out of the lock (4). Do not ride the
bike with the lock open.
1.
2.
3.
4.
11
Quick start - Down Tube Battery
1.7DowntubeBattery(RIDE+C320,RIDE+C420)
ENGLISH
• Removing the battery-pack
Insert the key in the lock, twist the key clockwise until the lock springs out (1,2). When the lock
springs out, the lever of the battery will be released. Now take the key from the lock and pull the
lever of the battery so that it slides upwards - parallel to the down tube - until it releases from the
rail (3). When the battery is not on the bike, always use the protective cover on the contacts on the
frame to protect the electrical system from water (5).
1.
4.
2.
3.
5.
Contacts at the bottom side of the down tube
• Replacing the battery-pack
Position the battery over the down tube (with some space between the seat tube and the lower end
of the battery) (1). Now, slide the battery-pack down onto the rail (2). Use the lever to lower the
battery carefully during the last phase of sliding, so that the connectors engage (3). Be sure that
the connector at the bottom of the battery and the connector on the docking engage properly.
When the battery is fully in place, push the lock in until it clicks (4). Do not ride the bike with the
lock open.
12
1.
2.
3.
4.
Description
2.Description
2.1.Specificpartsfortheelectricbicycle
3
4
3
5
4
5
1
ENGLISH
1
2
2
There are several models of electric bicycles, with different equipment options. Find the options
that are on your electric bicycle. In the pictures of the bikes you will see the battery-pack (1), the
motor ‘front or rear’ (2), the controller (3), the brake switch (4), and the wiring harness (5).
• Battery-packs
There are four types of batteries for RIDE+ bicycles:
1 ‘RIDE+ R250 Battery-pack’, containing 30 Li-Mn (Lithium-Ion) cells, 4.8 Ah, 250 Wh.
2 ‘RIDE+ R320 Battery-pack’ (2 editions), containing 39 Li-Mn (Lithium-Ion) cells, 6.6 Ah, 320 Wh.
3 ‘RIDE+ C320 Battery-pack’, containing 39 Li-Mn (Lithium-Ion) cells, 6.6 Ah, 320 Wh
4 ‘RIDE+ C420 Battery-pack’, containing 52 Li-Mn (Lithium-Ion) cells, 8.8 Ah, 420 Wh
1
2
2
3
4
• Motor configurations
1 250W RIDE+ rear motor, derailleur and roller brakes
2 250W RIDE+ rear motor, derailleur and disc brakes or rim brakes (Magura or V-brake)
3 250W RIDE+ rear SL motor (lightweight), derailleur and roller brakes
4 250W RIDE+ rear SL motor (lightweight), derailleur and disc brakes or rim brakes (Magura or V-brake)
5 250W RIDE+ Front motor, Internal gear hub and roller brakes
6 250W RIDE+ Front motor, Internal gear hub and rim brakes (Magura or V-brake)
1
2
3
4
5
6
13
Description
ENGLISH
• Controllers
1 BionX G2 controller: controls all functions: on/off, the four assist levels, the four regenerative
levels and lights on/off. It also functions as a bicycle computer, measuring speed and distance,
and shows the battery level.
2 RIDE+ Pro controller: controls all functions: on/off, the four assist levels, the four regenerative
levels and lights on/off. It also functions as a bicycle computer, measuring speed and distance,
and shows the battery level. All the information can be provided in different languages (see
‘programming’)
3 RIDE+ Easy Controller: controls all functions: on/off, the four assist levels, and Lights on/off.
4 RIDE+ Easy II Controller: controls all functions: on/off, the four assist levels, Lights on/off, and trip
and total distance.
1
2
3
4
• Brake Switches
1 The right hand brake lever of cable-activated brakes contains a switch that cuts off the power to
the motor, and switches the motor to generation mode as soon as the right hand brake lever is
pulled.
2 On bikes with hydraulic brakes (Magura), the switch is also located in the right hand brake lever,
or a (similar) switch is placed in the hydraulic brake line (disc brake).
1
2
• Wiring Harness
The wiring harness links controller, brake switch, battery-pack and motor. It runs through the frame
and is linked to the battery-pack via the docking station in the rear rack or via the docking station
on the down tube.
14
Assistance – Regeneration
2.2Assistance–Regeneration
ENGLISH
The systems with the BionX G2 controller, RIDE+ Pro controller, RIDE+ EASY controller and RIDE+
EASYII controller have four levels of assistance. When the system is set to assistance, the electric
motor drives the rear wheel and assists you in your pedaling.
Additionally, the systems with the BionX G2 Controller and RIDE+ Pro Controller have four levels of
regeneration. The systems with the RIDE+ Easy Controller and RIDE+ Easy II Controller do not have
regenerating by default. On systems with these Controllers, regenerating can be activated by the
dealer. When the system is set to regeneration, the electric motor is used as a dynamo and
generates electricity for charging the battery-pack. Going downhill, you can reduce your speed by
regulating the amount level of regeneration as the created resistance acts as a motor brake.
Though, that generation mode is not a substitute for using brakes to control speed or stop.
The tables below give an indication of the effort that is compensated in the different assistance and
regeneration levels. The real percentages of compensated effort depend on the software settings of
the bike.
Assistance
Effort
Compensation
withBatt.R320,
C320andC420
Effort
Compensation
withBatt.R250
1
25%
25%
Flat ground
2
50%
50%
Uphill slopes, headwind
3
100%
80%
Hill, strong headwind
4
200%
150%
Very steep hill
Regenerative
braking
Recharge
Recharge
Situation
Very steep descent,
braking
Regeneration
Effort
Compensation
withBatt.R320,
C320andC420s
Effort
Compensation
withBatt.R250
Recharge
Situation
-1
-25%
-25%
Recharge
Mild downhill, tailwind
-2
-50%
-50%
Recharge
Downhill, tailwind
-3
-100%
-100%
Recharge
Descent
-4
-200%
-200%
Recharge
Steep descent
15
Bontrager Satellite Elite ForkLight*
ENGLISH
2.3BontragerSatelliteEliteForkLight*
The Bontrager Satellite Elite ForkLight comes in different versions.
The RIDE+ version can be operated via the controller on the handlebar.
The energy that is needed to power the lights comes from the battery.
Both lights always work simultaneously.
*Depending on model.
C
16
• Adjusting the beams
The height of the beams can be
adjusted by turning knobs ‘C’
(on both sides of the fork). Both
beams can be adjusted
independently by turning knob
‘C’ with a cross-headed
screwdriver. Both beams at the
same height gives best
performance.
40 km/h ‘Fast Electric Bike’
3.40km/h‘FastElectricBike’
ENGLISH
The ’40 km/h fast electric bike’ is an electric bicycle of which the assistance does not stop at
25 km/h but at 40 km/h. This higher assist speed makes it the perfect electric bicycle for people
who like riding faster than 25 km/h. Note, though, that the actual maximum speed that you can
reach depends first and foremost on how strongly you pedal.
3.1Legalrules
Legally, the 40 km/h fast electric bike is no longer considered being a ‘bicycle’ but a ‘lightweight
moped’. It has type approval as such.
NOTE, For these bicycles third party insurance is mandatory.
In most countries, wearing a helmet is not mandatory. However, we strongly recommend to
always wear a helmet for your own safety.
Since 40 km/h electric bicycles are legally considered to be lightweight mopeds, they do have
a throttle, which allows riding them up to 20 km/h using motor power only. This means, that up
to 20km/h your bike can be used as an E-Bike, rather than as a Pedelec. Above that speed,
the motor will assist pedaling up to a speed of 40 km/h.
Important: The maximum power of the motor on your bicycle is limited to 250 W. Your
40 km/h electric bicycle is still a bicycle. It is therefore not recommended that you use it as a
moped or an E-bike without pedaling. Using battery power only will strongly limit your range.
3.2Differencesinequipment
The technical equipment of these 40 km/h bikes is almost identical to that on Pedelecs.
The following parts are additional and/or different:
• the rear view mirror
• the insurance plate holder
• the throttle on the controller
• extra reflectors
•Slightly different brake levers
• the type-approval plate on the frame.
These are all part of the type approval. It is not allowed to remove or exchange them for
other (non-certified) equipment. This also applies to the handlebars, tires, seat post, headlight,
rear light, brakes, kickstand and controller.
3.3Instructionsforuse
Riding is the same as the Pedelec bikes, except that the assistance does not stop at 25 km/h
but at 40 km/h.
Ride carefully. Other road users may not expect a bicycle to go this fast.
Maximum range on one battery charge depends very much on your style of use. Due to the
higher speed that can be reached, be prepared to find the range slightly shorter than on regular
Pedelec bikes that have a maximum assistance speed of 25 km/h.
17
Instructions for Use
4.InstructionsforUse
There are four types of controller: BionX G2, RIDE+ Pro, RIDE+ EASY and RIDE+ EASY II.
4
3
1
ENGLISH
5
7
6
8
9
2
4.1BionXG2controller
1• Speed indication 2• Distance, Odometer, Chronometer, Average speed 3• Current assistance
button 7• ‘+’ button 8•
level 4• Current generation level 5• On/Off
button 6• Mode-switch
‘-’ button 9• Battery level
• Switching system On / Off
Press any of the two top buttons to switch the system on.
The battery will beep four times, the system will perform a
short self-check (shown on the display as a countdown in the
‘speed’-field), and the system will activate (switch to ‘on’).
As soon as the system is ‘on’, the screen will display and each
function will be shown next to its corresponding button.
• Same as in the Quick Start
To switch the system off, press the
button . The batterypack will beep five times. Riding with the system ‘On’ in level 0
is the same as riding with the system ‘Off’. If the bike is left with
the system on, it will automatically switch off after about 10
minutes. Same as in the Quick Start
• Changing the position of the buttons
Normally, the On/Off button
and the mode-switch
button are on the right, and the ‘+’ and ‘-’ buttons on the left.
The functionality of the buttons can be swapped right-to-left.
The code to access this is 2009. More information about
programming via the controller can be found later in this
manual.
• Assistance
When the motor provides power, the bicycle is in assistance
mode. There are four levels of assistance. The level of
assistance is shown by the bar graph on the right, below the
digits for speed. The narrow graph on the display shows the
amount of energy delivered to the motor.
18
Instructions for Use
ENGLISH
To increase assistance, press button ‘+’. For assistance level 1, press once. Press again for more
assistance. For less assistance press button ‘-’. When there is no assistance level shown and the
bicycle icon is visible on the screen, there is no assistance. Pedaling is then the same as on a normal
bicycle. To switch from any level of regeneration to the first assist level, press and hold the ‘+‘ button.
Notice: It is strongly advised to ride away in a straight line when an assistance level is selected.
Never select assistance level 3 or 4 during maneuvering or riding away in a tight corner. The powerful
reaction of motor might take you unawares.
1
2
3
4
• Regeneration
When the bicycle generates electricity for the battery, the system is in generation mode. The motor
then works as a dynamo. There are four levels of regeneration. The level of assistance is shown by
the bar graph on the left, below the digits for speed. The narrow graph on the display shows the
amount of energy delivered to the battery.
To increase the regeneration level, press button ‘-’. For regenerative level 1 press once. Press again
to increase the regeneration level to a higher level. For a lower regeneration level press button ‘+’.
To switch from any level of assistance to the first regenerative level, press and hold the ‘-’ button.
When the rear brake lever is pulled, the system always switches to generating. The arrow and G
will show in the display.
1
2
3
4
• Distance, Odometer, Chronometer, Average speed
The bottom of the display shows distance, odometer, chronometer, and average speed. Press
button to switch modes. To reset distance, chronometer, or average speed, keep this button
pressed for 2 seconds.
19
Instructions for Use
• Switching lights On / Off
Press
button for 2 seconds to switch On / Off the Controller
ENGLISH
display light, and, if present, the front and rear lights. This
switches on the front light, the rear light, and the backlight in
the display. The lights will stay on even when you stop. To
switch the lights off, hold the button for 2 seconds. Even when the battery-gauge shows ‘empty’, there
is enough energy to run the lights for about two hours. If the battery-pack is fully drained, the lights
will be powered by the system as it switches to generative mode automatically.
• Removing and installing the BionX G2 Controller
To remove the BionX G2 Controller from the bike, press the
catch at the back of the holder and slide the controller off
towards the rear. To install the BionX G2 Controller onto the
handlebar, align the controller with its clamp and slide the
controller forward until it clicks. To prevent loss of riding
information, please make sure that the system is switched
off before the controller is removed from the bike.
• Unintended removal of Controller out of its dock.
If the controller is moved off its clamp while the system is active (‘on’), the system will no longer
assist, even when the controller is replaced into its clamp. Please select the correct level of
assistance again to reactivate the system.
1
• Using the BionX remote
Most bikes with the BionX G2 controller positioned on the middle clamp are
equipped (or can be equipped) with the BionX remote.
This device is mounted either the right or left side of the handlebar and can
be used to regulate the following functions without moving your hands off the
handlebar:
2
3
1•‘+’button
Increase assist level (or decrease regeneration level)
2•‘-‘button
Decrease assist level (or increase regeneration level)
3•Throttlebutton ForPedelecs: walk assist up to 3 or 6 km/h (pedaling not needed)
ForfastE-bikes: assist up to 25 km/h (pedaling not needed)
• Installation of the BionX remote for non-equipped bikes:
To connect the BionX remote to the system, the remote connector can be plugged into the receiver
connector of the controller docking. After that, the brake generator connector can be plugged into
the remote connector.
The red throttle button on the BionX remote is a convenient help to move the bike without pedaling
(up to 4 km/h) walking next to the e-bike.
Caution:Beware of unintended use of the throttle button when the system is switched on.
20
Instructions for Use
4
1
2
9
3
8
4.2RIDE+Procontroller
ENGLISH
5
4
7
6
1• Speed indication 2• Battery level 3• ‘+’ button 4• ‘-’ button 5• Distance, Odometer, Chronometer,
Average speed, Clock 6• Current assistance level 7• Current generation level 8• Mode-switch
button 10• Light indicator, On or Off
button 9• On/Off
• Switching system On / Off
Press any of the two top buttons to switch the system on.
The battery will beep four times, the system will perform a
short self-check (shown on the display as a countdown in the
‘speed’-field), and the system will activate (switch to ‘on’).
As soon as the system is ‘on’, the screen will display and each
function will be shown next to its corresponding button.
To switch the system off, press the
button . The battery-pack
will beep five times. Riding with the system ‘on’ in level 0 is the
same as riding with the system ‘Off’. If the bike is left with the
system on, it will automatically switch off after about 10 minutes.
• Changing the position of the buttons
Normally, the On/Off button
button
and the mode-switch
are on the right, and the ‘+’ and ‘-’ buttons on the left. The
functionality of the buttons can be swapped right-to-left. The code
to access this is 2009. More information about programming via
the controller can be found later in this manual.
• Assistance
When the motor provides power, the bicycle is in assistance mode. There are four levels of
assistance. The level of assistance is shown by the arrows at the bottom of the display.
Notice: It is strongly advised to ride away in a straight line when an assistance level is selected.
Never select assistance level 3 or 4 during maneuvering or riding away in a tight corner. The powerful
reaction of motor might take you unawares.
To increase assistance, press button ‘+’. For assistance level 1,
press once. Press again for more assistance. For less assistance
press button ‘-’. When there is no assistance level shown, there is
no assistance so riding is the same as pedaling a normal bicycle.
21
Instructions for Use
ENGLISH
1
2
3
4
• Regeneration
When the bicycle regenerates electricity for the battery, the system is in generation mode.
There are four levels of regeneration. The level of regeneration is shown by the arrows at the bottom
of the screen. To increase the regeneration level, press button ‘-’. For regenerative level 1 press once.
Press again to increase the regeneration level to a higher level. For a lower regeneration level press
button ‘+’.
To switch from any level of Assistance to the first regenerative level, press and hold the ‘-’ button.
To switch from any level of regeneration to the first assist level, press and hold the ‘+‘ button. The
‘G’ and the arrow will appear on the display during generation of energy.
1
2
3
4
• Distance, Odometer, Chronometer, Average speed, Clock
The right bottom corner of the screen shows the distance,
odometer, chronometer, and average speed (Order of appearance:
trip distance, odometer, average speed, time of day). Press
button to switch modes. To reset distance, chronometer, or
average speed, keep this button pressed for 2 seconds.
• Switching lights On / Off
Press the
, button for 2 seconds to switch On / Off the
Controller display light, and, if present, the front and rear lights.
The lights will stay on even when you stop. Once activated,
the text “light on” appears on the screen. Even when the
battery-gauge shows ‘empty’, there is enough energy to run the
lights for about two hours. If the battery-pack is fully drained, the lights will be powered by the
system as it switches to generative mode automatically.
To switch the lights off, hold the
, button for 2 seconds.After switching off, the text “light off”
will appear on the screen.
22
Instructions for Use
• Changing the language option of the controller
The RIDE+ Pro controller allows you to change the language that is displayed on the screen. See the
part ‘programming’ later in this manual to set the correct language.
ENGLISH
• Removing and installing the RIDE+ Pro Controller
To remove the RIDE+ Pro Controller from the bike, press the catch of the holder and slide the
controller off towards the rear. To install the RIDE+ Pro Controller onto the handlebar, align the
controller with its clamp and slide the controller forward until it clicks. To prevent loss of riding
information, please make sure that the controller is switched off before it is removed from the bike.
• Unintended removal of Controller out of its dock
If the controller is moved off its clamp while the system is active (‘on’), the system will no longer
assist, even when the controller is replaced into its clamp. Please select the correct level of
assistance again to reactivate the system.
1
• Using the RIDE+ Link
Most bikes with the RIDE+ Pro controller are equipped (or can be equipped)
with the RIDE+ Link.
2
3
This device is mounted either the right or left side of the handlebar and can
be used to regulate the following functions without moving your hands off the
handlebar:
1•‘ , ‘button
2•‘+’button
3•‘-‘button
4•Throttlebutton
4
Switch light on/off
Increase assist level (or decrease regeneration level)
Decrease assist level (or increase regeneration level)
ForPedelecs: walk assist up to 3 or 6 km/h (pedaling not needed)
ForfastE-bikes: assist up to 25 km/h (pedaling not needed)
The red throttle button on the RIDE+ Link remote is a convenient help to move the bike without
pedaling (up to 4 km/h) walking next to the e-bike.
Caution:Beware of unintended use of the throttle button when the system is switched on.
23
Instructions for Use
2
1
6
ENGLISH
4.3RIDE+EASYController
3
5
4
1• Battery level 2• Light indicator, On or Off 3• Side button (On/Off, Light On/Off) 4• Front + (right
hand) button 5• Front - (left hand) button 6• Level indicator
• Switching system On / Off
To switch the system on, push the Side button once. The battery- pack will
emit four short ‘beeps’ and the system will do a self-check. This is shown
on the display as a building up of the display: the bicycle outline shows
first, then the state of charge of the battery is shown. To switch the system
off, press the Side button again. The battery-pack will emit five short
‘beeps’. There is no difference between riding with the system ‘on’ in level
‘0’ or ‘off’. If the bike is left with the system on, it will automatically switch off after about 10 minutes.
• Assistance/(Regeneration) Level
There are four levels of assistance. The bars behind the bicycle wheel in
the display show in which assist-level the system is. For pedaling
assistance, press the ‘+ (right hand)’ button. For assistance level 1,
press once. Press again for more assistance. Push the ‘-(left hand)’
button to go to a lower level. When bars behind the bicycle wheel in the
display are all outlined only, you are pedaling a normal bicycle. When
the rear brake is pulled, the system switches to generating. The two
upper bars in the display will blink.
Regeneration levels are not installed as standard on the controller. This means that the motor will only
generate energy when the rear brake is pulled. However, if you want to, your dealer can activate the
regeneration levels. Regeneration levels can be controlled in a similar way if no level is activated on
the controller. Push ‘-’ button once for regeneration level 1, again for higher levels. Push ‘+’ button to
go to a lower level.
Notice: It is strongly advised to ride away in a straight line when an assistance level is selected.
Never select assistance level 3 or 4 during maneuvering or riding away in a tight corner. The powerful
reaction of motor might take you unawares.
• Switching lights On / Off
For bikes equipped with lights: keep the ‘Side’ button pressed for five
seconds to switch lights on or off. This switches on the front light, the
rear light and the backlight in controller screen. In the display, the
light symbol will appear. The lights will stay on even when you stop.
24
Instructions for Use
Even when the battery-gauge shows ‘empty’, there is still enough energy remaining to run the lights
for about two hours. If the battery-pack is fully drained, the lights will be powered by the system as
it switches to generative mode automatically.
ENGLISH
• Removing and installing the Controller
The RIDE+ Easy Controller can easily be removed from the bike: just slide it to the right. Putting the
Easy controller onto the bike is just as easy: slide it from right to left into its clamp until it clicks in
place.
• Unintended removal of Controller out of its dock
If the controller is moved off its clamp while the system is active (‘on’), the system will no longer
assist, even when the controller is replaced into its clamp. Please select the correct level of
assistance again to reactivate the system.
25
Instructions for Use
1
8
2
7
3
ENGLISH
6
5
4
4.4RIDE+EASYIIController
1• Level indicator 2• Side button (On/Off, Light On/Off) 3• Light indicator, On or Off 4• Battery
level 5• Front +(right hand) button, Miles/Kilometer switch button 6• Front -(left hand) button,
Mode switch button 7• Distance, Odometer 8• Speed indication
• Switching system On / Off
To switch the system on, push the ‘Side’ button once. The battery- pack
will emit four short ‘beeps’ and the system will do a self-check. To
switch the system off, press the ‘Side’ button again. The battery-pack
will emit five short ‘beeps’. There is no difference between riding with
the system ‘on’ in level ‘0’ or ‘off’. If the bike is left with the system on,
it will automatically switch off after about 10 minutes.
• Assistance/(Regeneration) Level
There are four levels of assistance. The arrows in the right top corner of
the display show in which assist-level the system is. For pedalingassistance, press the ‘+(righthand)’ button. For assistance level 1, press
once. Press again for more assistance. Push the ‘- (left hand)’ button to
go to a lower level. When arrows in the right top corner are all outlined
only, you are pedaling a normal bicycle. When the rear brake is pulled,
the system switches to generating and two arrows on the display will
start blinking.
Regeneration levels are not installed as standard on the controller. This means that the motor will
only generate energy when the rear brake is pulled. However, if you want to, your dealer can
activate the regeneration levels. Regeneration levels can be controlled in a similar way if no level
is activated on the controller. Push ‘-’ button once for regeneration level 1, again for higher levels.
Push ‘+’ button to go to a lower level.
Notice: It is strongly advised to ride away in a straight line when an assistance level is selected.
Never select assistance level 3 or 4 during maneuvering or riding away in a tight corner. The powerful
reaction of motor might take you unawares.
• Switching lights On / Off
Press the ‘Side’ button for 2 seconds to switch On / Off the Controller
display light, and if present, the front and rear lights. Once activated,
the light symbol
will appear on the screen. The lights will stay on
even when you stop. Even when the battery-gauge shows ‘empty’, there
26
Instructions for Use
is still enough energy remaining to run the lights for about two hours. If the battery-pack is fully
drained, the lights will be powered by the system as it switches to generative mode automatically.
ENGLISH
• Removing and installing the Controller
The RIDE+ Easy II Controller can easily be removed from the bike: just slide it to the right. Putting
the RIDE+ Easy II controller onto the bike is just as easy: slide it from right to left into its clamp
until it clicks in place. To prevent loss of riding information, please make sure that the controller is
switched off before it is removed from the bike.
• Unintended removal of Controller out of its dock
If the controller is moved off its clamp while the system is active (‘on’), the system will no longer
assist, even when the controller is replaced into its clamp. Please select the correct level of
assistance again to reactivate the system.
• See total distance/ trip distance
The controller can measure two types of riding information. Push ‘-’
button for 5 seconds to switch between total distance and trip distance.
• Set the trip distance to zero (0)
The trip distance can be reset to zero by pressing the ‘+’ button pushed
for 5 seconds.
• Switch between miles/kilometers
The display can show both miles and kilometers. To switch between
miles and kilometers, push the ‘+’ and ‘-‘ button simultaneously for 5
seconds.
27
Instructions for Use
4.5RearRackBattery-pack
ENGLISH
• Battery-pack size
Depending on the model, your bike will be equipped with either a “RIDE+ R250 battery-pack” or a
“RIDE+ R320 battery-pack” (2 different editions). Removal, putting back and charging are much the
same for all three packs.
• ‘RIDE+ R250 battery-pack’, containing 30 Li-Mn (Lithium-Ion) cells, 4.8 Ah, 250 Wh.
• ‘RIDE+ R320 battery-pack’ (2 editions), containing 39 Li-Mn (Lithium-Ion) cells, 6.6 Ah, 320 Wh.
• RIDE+ compatibility
The RIDE+ R250 and RIDE+ R320 batteries are compatible with the Bontrager Interchange System.
This means you can mount a Bontrager basket or pannier on the rear rack of the bike by removing the
plug from the battery.
• Removing the battery-pack from the bike
Insert the key into the lock on the battery docking and turn it clockwise (1,2). The battery can now
be taken off the bike. Slide the battery-pack out by pulling it to the rear (3,4). Don’t forget to take
the keys out of the lock after removal.
1.
2.
3.
4.
• Putting the battery-pack onto the bike
Slide the battery-pack into the rear rack, connector side first (1). Make sure the pack engages the
rail (2). Slide all the way forward, pushing through a slightly higher resistance at the end as the
connector engages (3). Now turn the key of the lock until the battery is locked and take the key out
(4). Do not ride the bike with the lock open.
28
1.
2.
3.
4.
ENGLISH
Instructions for Use
4.6DowntubeBattery-pack
• Battery-pack size
Depending on the model, your bike will be equipped with either a “RIDE+ C320 battery-pack” or a
“RIDE+ C420 battery-pack”. Removal, putting back and charging are the same for the two packs.
Both packs have the same exterior and are interchangeable.
• ‘RIDE+ C320 Battery-pack’, containing 39 Li-Mn (Lithium-Ion) cells, 6.6 Ah, 320 Wh.
• ‘RIDE+ C420 Battery-pack’, containing 52 Li-Mn (Lithium-Ion) cells, 8.8 Ah, 420 Wh.
• Bottle cage holder
A bottle cage can be mounted on the RIDE+ C320 and RIDE+ C420 batteries by installing the
‘bottle cage holder’. This adapter can be mounted by 2 bolts. Subsequently, the bottle cage can be
mounted on the adapter. Only use the 4 bolts that are delivered with the holder to prevent damage
to the battery cells inside.
• Removing battery-pack
Put the key in the lock, twist the key clockwise until the lock springs out (1,2). When the lock
springs out, the lever of the battery will be released. Now take the key from the lock and pull the
lever of the battery so that it slides upwards - parallel to the down tube - until it releases from the
rail (3). When the battery is not on the bike, always use the protective cover on the contacts on the
frame to protect the electrical system from water (5).
29
Instructions for Use
1.
ENGLISH
4.
2.
3.
5.
Contacts at the bottom side of the down tube
• Replacing battery-pack
Position the battery over the down tube (with some space between the seat tube and the lower end of
the battery) (1). Now, slide the battery-pack down onto the rail (2). Use the lever to lower the battery
carefully during the last phase of sliding, so that the connectors engage (3). Be sure that the
connector at the bottom of the battery and the connector on the docking engage properly. When the
battery is fully in place, push the lock in until it clicks (4). Do not ride the bike with the lock open.
1.
2.
3.
4.
4.7Chargingthebattery-pack
Notice: Before charging, make sure that the system is switched off and never turn the system on
or off during charging. This prevents unintended activation of the system. Only use the power supply
approved for use with this bike. Charging with a non-original power supply may cause the battery
pack to overheat, catch fire, or even explode. When charging, do not let the battery-pack or power
supply get wet – because of risk of electrical shock.
30
Instructions for Use
ENGLISH
The battery-pack can both be charged in the bike or it can be removed from the bike for charging.
Li-Ion batteries such as are used in the electric bicycle, have no ‘memory-effect’. This means that
the battery capacity is not influenced if the battery is recharged before it is completely empty. You
can recharge after every ride. However, you will get the most from your battery pack if, for the first
three charges, you use it until only one unit is showing in the ‘fuel gauge’ on your display. When it
is necessary to re-charge, the battery-pack will emit a ‘beep’.
Batteries are best charged at temperatures around 20˚C, so avoid warm locations. When coming in
out of the cold, allow the battery-pack to get up to room temperature (about 20˚C) before charging.
• Power supply 100-240V
The power supply will adjust automatically to the local voltage.
• Charging
Connect the connector of the power supply to the battery-pack.
Connect the power supply to an appropriate power source.
Warning: Replace a damaged power cable immediately to prevent an electric shock.
The light at the charging port of the battery will turn red. It will turn yellow as soon as charging starts.
As soon as the yellow light on the battery charging port turns green, the battery-pack is fully
charged. Disconnect both the connector from the battery-pack and the power source.
Charging a fully discharged battery-pack usually takes about three to four hours. After one
hour of charging, the battery will already be charged up to 80% of its capacity.
The batteries with the round charging connector can be left connected to the power indefinitely.
The power supply electronics will take care of the correct charging procedure. However, you will save
energy
by disconnecting the power supply when the light in the charging port has turned green.
NOTE: Since the computer inside the battery saves the system mileage and settings,
we discourage the use of a second battery. A second power supply would be a better solution.
The battery is very durable. The capacity is guaranteed for 600 charge cycles or 2 years (whichever
situation comes first).
31
Instructions for Use
4.8Batterycare
ENGLISH
• Storage of the battery-pack
When the battery-pack is not in use, store it in a dry, cool place. Li-Ion batteries are best stored at
70% to 80% charge. Charge it every two months. The temperature should be between 5˚C and
25˚C, preferably 5-10˚C. Do not store it in places where temperatures get higher than +25˚C or
lower than 5˚C. Keep away from extreme temperature changes. Keep the battery-pack from
condensation to prevent rust forming on the terminals.
The RIDE+ batteries that are charged with a power supply (RIDE+ R250, RIDE+ R320, RIDE+ C320,
RIDE+ C420) can be left on the power supply and will regularly recharge automatically.
Notice: Do not short-circuit the battery terminals. This may cause the battery pack to overheat,
catch fire, or even explode. Do not attempt to open the battery-pack. Opening the battery-pack may
cause a short, resulting in overheating, fire, or even explosion. There are no user-serviceable parts
inside. Opening the battery-pack will void your warranty.The battery is splash proof but not
waterproof. Do not immerse the battery into water and do not clean with a high pressure cleaner.
• Battery pack recycling
Because a battery pack contains certain harmful substances, it must be treated as chemical waste
and may not be disposed as normal waste.
a battery pack may not be disposed as normal waste To prevent environmental pollution,
a defective or end-of-life battery pack can be handed over to your dealer or to another waste
disposal according to local rules.
4.9Suggestionsforuse
• Getting the most from your electric bicycle
Riding with the system ‘on’ in level 0 is the same as riding with the system ‘off’. With the system
switched ‘on’, your speed and distance will be measured and you will be able to use the lights. This
will not be possible when the system is ‘off’. The system will be most efficient when you pedal with
a cadence of around 60 rpm. Use the assistance levels according to your needs. Always remember
that your electric bicycle is still a bicycle and should be used as such.
The tables below provide approximate distances you can expect to travel on one battery charge,
based on ideal conditions. Actual distances will vary depending on wind, tire pressure, rider weight,
riding style, road conditions, software settings, topography, age of battery and other parameters.
Rangeforafullychargedbattery(‘RIDE+R250’;250Wh)
32
Terrain/ Assistance level
1 (25%)
2 (50%)
3 (100%)
4 (200%)
Flat terrrain
50-80 km
40-65 km
30-50 km
25 - 35 km
Hilly terrrain
40-70 km
30-55 km
20-40 km
15 - 25 km
Mountainous terrrain
25-40 km
20-35 km
15-25 km
10 - 20 km
Instructions for Use
Terrain/ Assistance level
1 (25%)
2 (50%)
3 (100%)
4 (200%)
Flat terrrain
55-90 km
50-70 km
45-55 km
30-40 km
Hilly terrrain
45-75 km
35-60 km
30-45 km
20-30 km
Mountainous terrrain
30-45 km
30-45 km
20-30 km
15-25 km
ENGLISH
Rangeforafullychargedbattery(‘RIDE+R320’and‘RIDE+C320’;320Wh)
Rangeforafullychargedbattery(‘RIDE+C420’;420Wh)
Terrain/ Assistance level
1 (25%)
2 (50%)
3 (100%)
4 (200%)
Flat terrrain
80-125 km
60-100 km
55-80 km
40-55 km
Hilly terrrain
65-100 km
45-85 km
35-65 km
25-40 km
Mountainous terrrain
45-65 km
35-60 km
25-40 km
20-35 km
• Transporting an electric bike on a vehicle
Because an electric bike is heavier than a normal bicycle due to the additional drive components,
take care of the following when transporting the electrical bike on a vehicle:
• Take care about the maximum pressure on the towbar of the vehicle when placing a bike carrier
on it with multiple bicycles, including an e-bike. Please refer to the manual of the towbar and/or
the vehicle for additional information.
• Take care about the maximum load capacity of the car’s roof when placing a bike carrier on it with
multiple bicycles, including an e-bike. Please refer to the manual of the vehicle and/or bike carrier
for additional information.
• A bike carrier has a limited load capacity. Sometimes that is not enough to carry an (heavier)
electrical bicycle in combination with other (e.g. electrical) bicycles. Please refer to the manual of
the bicycle carrier for more detailed information.
• Remove the battery pack and, if present, panniers of the electrical bicycle and store it elsewhere
in the vehicle during the drive.
• Always respect local laws about transportation of a bike on a vehicle.
Warning: The drivability of the vehicle may change with extra weight on (the back of) the vehicle.
4.10Programming(bikeswith‘BionXG2’and‘RIDE+Pro’controlleronly)
This section explains how you set the odometer units (miles or kilometers), the clock, the wheel
diameter and how you can swap the functionality of the buttons and select the correct language.
33
Maintenance
ENGLISH
To enter programming mode, press buttons ‘On/Off’ and ‘Mode-switch’ for two seconds. Four
zeros will appear, with the first zero blinking.
Enter the appropriate code by pressing button ‘+’ for a higher value, ‘-’ for a lower value. Press
button ‘On/Off’ to select a value and move to the next digit. After entering the correct value for the
fourth digit, press button ‘On/Off’ to move into the chosen menu. In the programming menu,
buttons ‘+’ and ‘-’ will move to a higher or lower value. Pressing button ‘On/Off’ will save the entry
and move you to the next step, or back to the regular display.
Codes
2001
2004
2009
3771
2011
allows you to switch between miles and kilometers.
allows you to set the time.
allows you to swap the function of the buttons from left to right and vice versa.
allows you to set the correct wheel diameter.
allows you to change the display language. Use button to scroll through the languages.
5.Maintenance
After the first two to three weeks of use, or 300km, have your dealer check the spokes in the rear wheel.
Check the connections of the system every two to three months. Make sure that no dirt or moisture
can get into the ‘docking station’ (connector) when the battery-pack is not on the bike. If you notice
anything like this, clean with a smooth, dry brush.
The motor is of the ‘brushless’ type and requires no maintenance.
5.1Cleaning
When cleaning the bike, use a sponge and/or a soft brush. For the battery-case, a damp cloth
suffices. Use little water. Keep water away from the electrical connections.
Notice: Do not use a jet-wash. The powerful water-jet may damage the electronics.
5.2Removalandrefittingofwheelsforbikeswitharearwheelmotor
Removal and refitting of the rear wheel is best left to your dealer. If you are forced to do it yourself,
follow the instructions.
• Removal of the rear wheel
1. Make sure that the system is switched ‘Off’.
2. Change to the highest gear.
3. Remove the battery from its docking station.
4. Unplug the connectors of the motor at the left hand
side of the hub. Make sure that both cables are
unplugged. (see photo)
5. Disconnect the rear brake:
-V-brakes, Magura brakes: release the rear brake
-Rollerbrakes: unhook the cable and housing stop from
the brake. Undo the reaction arm bolt
6. Loosen and remove the axle nuts.
34
Maintenance
7. Slide the wheel forward in the dropouts until the wheel can be removed.
8. Remove the chain from the sprocket.
9. Remove the wheel.
ENGLISH
• Refitting the rear wheel
1 . Make sure that the system is switched ‘Off’.
2. Rollerbrake bikes: make sure that the distance piece that
centers the roller brake onto the hub is correctly in place.
3. Make sure that the flat portion on the left hand side of the
axle aligns with the left hand side dropout.
4. Make sure the groove in the rear axle is facing up (12 o’clock
position). Put the chain on the smallest rear sprocket and slide
the rear wheel into the dropouts. Make sure that the axle moves all the way back into the dropouts.
5 Tighten the rear wheel nuts equally and evenly to a torque of 40 Nm. Otherwise the system might
not work properly. If you do not have access to a torque wrench, you can use a normal wrench, but
have your dealer checked the tightening torque of the nuts at the earliest opportunity.
Warning: On bikes without a derailleur, the chain may not be adjusted too tight (measured at the
most tight point in the chain), else the system does not work properly and can the rider lose control
of the bike while riding. Adjust the chain so that there is 10-20 mm of slackness in the chain at its
tightest spot when a force of about 100g is applied.
6 Reconnect the rear brake.
Rollerbrake bikes: make sure that the bolt for the brake arm is securely tightened.
7 Reconnect the motor connectors.
8 Activate the system.
9 Test ride to make sure that the system works.
10 Check if the rear brake works.
Notice: Switch the system off before you disconnect or connect the connectors of the motor.
You may experience strong sparking and possibly electric shock if you fail to do so.
• Removal / refit of the front wheel
No specific instructions are needed to remove or refit the front wheel.
5.3Removalandrefittingofwheelsforbikeswithafrontwheelmotor
Removal and refitting of the front- and rear wheel is best left to your dealer. If you are forced to do
it yourself, follow the following instructions.
• Removal of the front wheel
1. Make sure that the system is switched ‘Off’.
2. Remove the battery from its docking station.
3. Unplug the connectors of the motor at the right hand side of the hub. Make sure that both cables
are unplugged.
35
Maintenance
ENGLISH
4. Disconnect the front brake:
- V-brakes, Magura brakes: release the front brake.
- Rollerbrakes, unhook the cable and housing stop from the brake.
5. Loosen and remove the axle nuts and washers.
6. Lift the bike so that the wheel can be removed. Take care not to lose the two torque blockers.
• Refitting of the front wheel
1. Make sure that the system is switched ‘Off’.
2. Make sure that the torque blockers are on both sides of
the axle, with their arms pointing outwards (see photo).
3. Rollerbrake bikes: make sure that the roller brake and the distance piece that centers the roller brake
onto the hub are correctly in place.
4. While sliding the wheel into the dropouts, make sure that the arms of the torque blockers are
below the axle in the open ends of the fork legs.
Rollerbrake bikes: make sure the brake arm enters its retention bracket.
5. Turn the wheel slightly backwards so that the torque blocker arms seat themselves against the
corresponding lips on the fork legs.
6. Tighten the wheel nuts equally and evenly to a torque of 40 Nm. Otherwise the system might not
work properly. If you do not have access to a torque wrench, you can use a normal wrench, but ask
your dealer to check the tightening torque of the nuts at the earliest opportunity.
7 Reconnect the front brake.
Rollerbrake bikes: make sure that the bolt for the brake
arm is securely tightened.
8. Check if the front brake works.
9. Reconnect the motor connectors.
10. Put the battery back onto the bike.
11. Activate the system.
12. Perform a short test ride to make sure that the system works.
Notice: Switch the system off before you disconnect or connect the connectors of the motor.
You may experience strong sparking and possibly electric shock if you fail to do so.
• Removal / refitting of the rear wheel
No specific instructions are valid to remove the rear wheel.
When refitting the wheel:
1. Ensure to align the axle with the frame.
Warning: On bikes without a derailleur, the chain may not be adjusted too tight (measured at the
most tight point in the chain), else the system does not work properly and can the rider lose control of
the bike while riding. Adjust the chain so that there is 10-20 mm of slackness in the chain at its
tightest spot when a force of about 100g is applied.
2. Tighten the wheel nuts equally and evenly to a torque of 40 Nm. Otherwise the system might
not work properly. If you do not have access to a torque wrench, you can use a normal wrench,
but have your dealer checked the tightening torque of the nuts at the earliest opportunity.
3. Afterwards, perform a short test ride to make sure that the system works.
36
Technical description
6.Technicaldescription
6.1Bikespecifics
Brushlessrearhubmotor
Maximum continuous power output
250W
Maximum assisted speed
25km/h
Wheel nut torque
40Nm
ENGLISH
Motor
6.2Batterypacks
RIDE+ R250
37 V
6.6 Ah
250 Wh
2.4 Kg
At least 600 full
Life
discharge-charge
cycles
Charging time fully 3 to 4 hours
discharged battery
Voltage
Gapacity
Power
Weight
RIDE+ R320
48 V
6.6 Ah
320 Wh
2.8 Kg
At least 600 full
dischargecharge cycles
3 to 4 hours
RIDE+ C320
48 V
6.6 Ah
320 Wh
2.8 Kg
At least 600 full
discharge-charge
cycles
3 to 4 hours
RIDE+ C420
48 V
8.8 Ah
420 Wh
3.8 kg
At least 600 full
discharge-charge
cycles
3 to 4 hours
6.3Minimumandmaximumtemperaturesforbattery-pack
Status
Min(oC)
Max(oC)
Charging
0
45
Use
-10
50
Storage
5
25
6.4PowerSupply
Input Voltage:
100 VAC to 240VAC
Input Current:
1.6A
Output Voltage:
26 VDC
Output Current:
3.45A
37
Problem solving
7Problemsolving
7.1Driveproblems
ENGLISH
• The system will not switch on (no beep from the battery), the LCD display remains blank
First check the battery pack. It must be in place and the lock must be pushed in fully. Check all
connectors and disconnect and reconnect if necessary. Make sure that the controller is slid into its
docking all the way. If this does not help, contact your dealer.
• The motor is always in generative mode
There is probably something wrong with the switch for generative braking in the right hand brake
lever. If there is something wrong with the generative braking switch, try switching the system off
and on again. If this does not help, unplug the connector between brake lever and controller. This
should solve the problem, but generative braking will be disabled. Contact your dealer.
• After a repair or service, the motor is not as powerful as it was earlier
On a bike with a rear motor, have the rear axle nuts tightened to the correct torque (40 Nm).
On a bike with a front motor, have the front as well as the rear axle nuts tightened to the correct
torque (40 Nm).
• The system does assist, but irregularly
On a bike with a rear motor, have the rear axle nuts tightened to the correct torque (40 Nm).
On a bike with a front motor, have the front-as well as the rear axle nuts tightened to the correct
torque (40 Nm).
• System switches on as Battery is put into Docking Station
This happens sometimes due to static electricity. There is no problem with the system.
7.2.Chargingproblems
• The display does not show ‘full’ after a complete recharge
Please make sure you are following all charging instructions.
Let the battery cool down for several hours and try again. If the problem persists, fully discharge
(by riding) and recharge battery, if necessary have your dealer update it to the latest firmware.
• The charging light does not turn red after connecting the power cable to the power source
Check the power cable to the power supply. If defective, replace the cable immediately.
Warning: Replace a damaged power cable immediately to prevent an electric shock.
• The charging light turns green after only 10 minutes of charging
Please make sure the system is turned off before you connect the power supply to a power source
or before you remove the battery to charge it.
7.3Displayproblems
• Occasionally, the display active for 1 second.
This is normal: this happens roughly every half hour as the system self-checks
38
Limited warranty
• Display active for 1 second, battery beeps
This is normal: this happens roughly every half hour as the system self-checks and the battery
should be charged
ENGLISH
• Display ‘black’: all LCD-segments active
During normal use: adjust using mode-switch & + or mode-switch & • Display blank, only lock visible
Disconnect the controller & reconnect or: push ‘Mode’ 5 times
8Limitedwarranty
Trek Bicycle Corporation warrants the motor, the battery-pack and the controller against defects in
workmanship and materials for a period of two (2) years for the original owner.
Thiswarrantydoesnotcover:
•
•
•
•
•
•
•
Normal wear and tear
Improper assembly
Improper follow-up maintenance
Installation of parts or accessories not originally intended for, or compatible with, the bicycle as sold
Damage or failure due to accident, misuse, abuse, or neglect
Labor charges for part replacement or changeover
Underperformance of the battery-pack if it has been fully discharged and charged more than 600
times within the two year warranty period.
• Any damage to the battery pack after the battery has been opened by the dealer or consumer.
• Any damage caused by installing a child seat.
This warranty is void in its entirety by any modification of the frame, fork, or components.
This warranty is expressly limited to the repair or replacement of a defective item and is the sole
remedy of the warranty.
This warranty extends from the date of purchase, applies only to the original owner, and is not
transferable.
Trek Bicycle Corporation is not responsible for incidental or consequential damages. Some states
do not allow the exclusion of incidental or consequential damages, so the above exclusion may not
apply to you. Claims under this warranty must be made through an authorized Trek dealer. Proof of
purchase is required.
The subject item must be registered with Trek Bicycle Corporation, either through on-line
registration or by the receipt of a warranty registration card by Trek Bicycle Corporation, before a
warranty claim may be processed.
Warranty duration and detail may differ by frame type and/or by country.
This warranty gives the consumer specific legal rights, and those rights may vary from place to
place. This warranty does not affect the statutory rights of the consumer.
39
Address
Trek Bicycle:
Basicweg 12a
NL 3821 BR Amersfoort
Nederland
+31 (0)33 450 90 60
Diamant:
Trek Fahrrad GmbH
Stettbachstrasse 2
CH-8600 Dübendorf
Für Deutschland: 0180-350 70 10
Für Österreich: 0820 820 121
Villiger:
Trek Fahrrad GmbH
Stettbachstrasse 2
CH-8600 Dübendorf
+41 (0)44 824 85 00
Partnumber 321466, January 2012, First Edition.
partnr. 321466