1
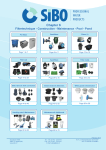
Pond Construction Supplies
Expanding Black Spray Foam
Float Valves
• Simplifies water feature and waterfall creation by filling the cracks
and voids and thus directing the flow of water over the rocks.
Nature Pond Float Valve and Support
• The NPFV is an all plastic float valve for controlling water levels.
• Mounting requires drilling a 5/8" hole about 1" above the desired water level.
• The NPFV mounts like a bulkhead through this hole. It has 1/4" male NPT threads and comes fitted with an adapter compression fitting for 1/4" tubing connection.
• This valve can handle pressures up to 90 psi.
For pond installers: Use the large cans,
with a spray gun and gun tip
SAViO Black Foam
S.BF400 — 16 oz Black Foam delivers about a
1
/2" bead of foam 575' long
S.BF500 — 24 oz Black Foam
S.BF510 — 24 oz Black Foam Gun
S.BF520 — Foam Gun Cleaner
NPFV — Plastic Float Valve NPFVS — Float Valve Support For installing a float valve with a flexible liner
Atlantic Water Garden
Float Valve
• Maintains consistent water level in water feature.
AWGAF1000 — Auto Fill Kit
Installation TIPS
Buying the Right Sized Liner
5.If you are using a liner
A.Define the outer edge (allowing for a stone “wall” or coping
“inside” the pond if desired) and the high water level with
Super-Edg and level it carefully. (Remember to have the
edging a couple inches higher then the surrounding grade
of the pond so that run-off is kept out.)
To buy the right size liner you must know the maximum length,
width, and depth in feet of the planned excavated area. Add
twice the maximum depth in feet and 2' for overlap, to the length
and width of your planned pond.
For Example: Take a pool that will measures 8' in length, 12'
in width and 2' deep. You would have to take the length of 8',
add twice the depth, which is 4', and then add 2' to calculate a
final measurement of 14', To calculate the width you take the
measurement of 12', add twice the depth, which is 4', and add
2' to calculate a final measurement of 18'. The liner size you
would need for this size pool would be 14' x 18'.
B.Complete the excavation of shelves and pond bottom measuring all depths from the Super-Edg “top line.”
C.Very Important - Make sure that the shelves and the edges
of the pond are well defined and secured – consider using
Super-Edg or other rigid material for definition. The constant freezing and thawing of the ice will cause things to shift
and settle and if the edges aren’t properly secured then the
pools edges will eventually fall apart.
Basic Pond Installation
D.Grade the bottom of the hole and remove any rocks
that are there.
These are only the very basic steps for installing a pond and do
not take into account the installation of filtration or waterfalls
E.Underlay fabric should be used around the SIDES of the
pool where most abrasion occurs and leaks appear. Sand 2 - 3" deep is best for under the bottom of the pond. The
underlay fabric will protect the liner from any abrasion that
may occur during those thawing and freezing periods. You
can tuck it over the Super-Edg to keep it secure.
1.Locate your pond where you can enjoy it and interact
with it.
A.We suggest an area with full sun.
B.Check with your Building Department for regulations.
2.Electricity adds to your options and ENJOYMENT. (Be sure to use a Ground Fault Interrupted outlet or plug.)
F. Now you’re ready for the liner. Before you put the liner
in the hole, lay it out alongside the pool to make sure it is
the right size.
3.Before you start digging, try setting out a garden hose to
“lay out” the shape and size you want.
G.Center the liner and anchor it with water. Fold the edge of
the liner up and over the Super-Edg or what ever structural
support is holding the edge. Keeping that nice and tight,
secure it with backfill and rocks.
A.Make it as large as you can because it will always seem smaller when you’re done.
B.While you are designing the area think about whether or
not you will want to add in a waterfall or a second pool and
keep that in mind.
6.Start putting the coping together with rocks and small quart
size plants, placing the plants between the rocks so it looks
more natural. Use liner scraps to pad along inside walls where
stone will be placed (Good coping plants on the wet side are
forget-me-not, moneywort, mint, watercress. For the dry side
put some sedums.) 4.If you are using a preformed pool (quick and easy for pools
under 6-10') you set the pool in the hole, being sure it is level
and 1-2" above the surrounding ground— then back fill around it.
Enjoy!