1
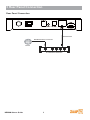
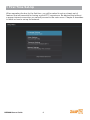
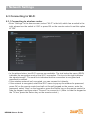
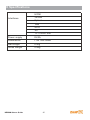
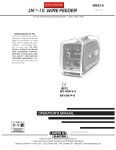
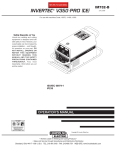
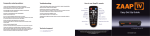
ZaapTV HD509N
User’s Guide
How to use the HD509N set-top box
Contents
1. Safety............................................................................................................................ 1
2. Appearance................................................................................................................... 4
3. Rear Panel Connection................................................................................................. 5
4. Remote..........................................................................................................................7
5 First Time Set-Up.......................................................................................................... 9
6. Network Settings........................................................................................................... 10
6.1 Available Networks and Checking Current Network Status........................................ 10
6.2 Connecting to Cable Network..................................................................................... 10
6.3 Connecting to Wi-Fi.....................................................................................................11
7. Video Settings........................................................................................................... 13
7.1 Available Video Interfaces........................................................................................... 13
7.2 Screen size settings.................................................................................................... 14
8 Specification................................................................................................................... 15
9 Disclaimer...................................................................................................................... 16
1 Safety
IMPORTANT SAFETY INSTRUCTIONS
z
z
z
z
z
z
z
z
z
Read and follow these instructions.
Heed all warnings.
Do not use this apparatus near water.
Clean only with dry cloth.
Do not block any ventilation openings. Install in accordance with the manufacturer’s
instructions.
Protect the power cord from being walked on or pinched particularly at plugs,
convenience receptacles, and the point where they exit from the apparatus.
Unplug this apparatus during lightning storms or when unused for long periods of
time.
Refer all servicing to qualified service personnel. Servicing is required when the
apparatus has been damaged in any way, such as the power-supply cord or plug is
damaged, liquid has been spilled or objects have fallen into the apparatus, the
apparatus has been exposed to rain or moisture, does not operate normally, or has
been dropped.
In ambient temperatures of no more than 27º C (80º F), the normal operating
temperature for HD509N is between 50º C (122º F) to 60º C (140º F).
IMPORTANT SAFETY CONSIDERATIONS
The HD509N set-top box requires careful handling to avoid potential damage to its
internal parts. Be sure to follow these requirements during transportation and installation.
The plug is the main disconnect device. It shall remain readily accessible and operable.
The apparatus shall not be exposed to dripping or splashing and no objects filled with
liquids, such as vases, shall be placed on the apparatus.
During Transportation to the Subscriber Home
Transport the HD509N in its shipping box or an equally padded container. Do not expose
it to rain or moisture.
HD509N-User’s Guide
1
1 Safety
During Installation
Do not place HD509N in an enclosed area where the cooling vents are blocked or
impede the flow of air through the ventilation openings.
Install so that its position does not interfere with its proper ventilation. For example,
do not place HD509N on a bed, sofa, rug, or similar surface that could block the
ventilation openings.
CAUTION!
Do not place anything on top of your HD509N set-top box, especially
other home entertainment components. Be sure to provide adequate
ventilation to prevent overheating.
Install HD509N on a hard flat surface not prone to vibration or impact and not on top
of another electronic device
Do not install near any heat sources such as radiators, heat registers, stoves, or
other apparatus (including amplifiers) that produce heat.
Installation of HD509N near consumer electronics devices, such as stereo
receiver/amplifiers and televisions, is permitted as long as the air surrounding
HD509N does not exceed 40º C (104º F).
Do not install HD509N in an area where condensation occurs.
To prevent the temporary loss of guide data and cause a temporarily nonresponding HD509N, do not plug the AC power cord into a switched power outlet.
HD509N-User’s Guide
2
1 Safety
FCC COMPLIANCE
Note: This equipment has been tested and found to comply with the limits for a Class B
digital device, pursuant to part 15 of the FCC Rules. These limits are designed to provide
reasonable protection against harmful interference in a residential installation. This
equipment uses and can radiate radio frequency energy and, if not installed and used in
accordance with the instructions, may cause harmful interference to radio
communications. However, there is no guarantee that interference will not occur in a
particular installation. If this equipment does cause harmful interference to radio or
television reception, which can be determined by turning the equipment off and on, the
user is encouraged to try to correct the interference by one or more of the following
measures:
Reorient or relocate the receiving antenna.
Increase the separation between the equipment and set-top box.
Connect the equipment into an outlet on a circuit different from that to which the settop box is connected.
Consult the dealer or an experienced radio/TV technician for help.
Caution: Changes or modifications not expressly approved by ZaapTV for compliance
could void the user’s authority to operate the equipment.
This device complies with part 15 of the FCC Rules. Operation is subject to the following
two conditions: (1) This device may not cause harmful interference, and (2) this device
must accept any interference received, including interference that may cause undesired
operation.
FCC Radiation Exposure Statement
The antennas used for this transmitter must be installed to provide a separation distance
of at least 20 cm from all persons and must be co-located for operating in conjunction with
any other antenna or transmitter.
HD509N-User’s Guide
3
2 Appearance
Front Panel
1
1. Power indicator
Side Panel
1
2
1.USB
3
2.USB
3.USB
Rear Panel
9
1
2
3
4
5
5. Reset key
6. TF card
7. RJ45 network interface
8. HDMI out
9. POWER
1. WiFi antenna
2.
3. A/V out
4. Optical fiber out
HD509N-User’s Guide
8
7
4
6
3 Rear Panel Connection
Rear Panel Connection
A/V connection cable
HDMI connection cable
White Red Yellow
Optical fiber connection cable
HD509N-User’s Guide
5
3 Rear Panel Connection
Rear Panel Connection
Wired Network
Broadband Internet connection
Internet
WAN
1
2 LAN 3
Broadband Router/Modem
HD509N-User’s Guide
6
4
4 Remote
1
17
2
3
18
4
5
6
19
7
8
9
20
10
21
22
23
24
25
26
27
11
12
13
14
15
16
HD509N-User’s Guide
7
4 Remote
No.
1
Key
Function
Go in and out of Standby
2
Numeric input
3
Change the screen resolution on the fly
4
Volume Up/Dn
5
Show additional information when available
6
Show EPG when available
7
Generic exit button. Functionality depends on the application
8
Move left, right, up, down
9
OK
10
Shortcut to the System Setup menu
11
Red button. Functionality depends on the application
12
Green button. Functionality depends on the application
13
Play/Pause
14
Stop
15
Shortcut to the PLEX APP
16
Shortcut to the YouTube APP
17
Mute/Un-Mute sound
18
Multipurpose delete button
19
Channel Up/Dn
20
Shortcut to the Main Menu
21
Back one level
22
Blue button. Functionality depends on the application
23
Yellow button. Functionality depends on the application
24
Skip to next file/Skip to previous file
25
Shortcut to the Skype APP
26
Shortcut to the Netflix APP
HD509N-User’s Guide
8
5 First Time Set-Up
When operating the box for the first time, you will be asked to set-up a basic set of
features that are essential for having a good IPTV experience. Be advised that without
a proper internet connection you cannot proceed to the main menu. Chapter 6 describes
in detail on how to set-up the network.
HD509N-User’s Guide
9
6 Network Settings
6.1 Available Networks and Checking Current Network Status
Check the available guaranteed bandwidth with your ISP.
Recommended bandwidth: To ensure smooth playing of Internet video resources, the
bandwidth should be at least 2Mbps.
Router: For easy and quick connection, a wireless router is recommended. A common
wireless router can meet the bandwidth requirement for ITPV. The HD509N Set-Top-Box
integrates a Wi-Fi module, which can connect to wireless router directly. When you intend
to stream high quality movies from internal network, an Ethernet cable connection is
recommended.
6.2 Connecting to Cable Network
6.2.1 Connecting to the router
• Connect the network cable to the LAN port of this unit, and connect the other end to
the LAN port of the router.
• Turn on the unit, select Settings – Cable Network, check the option “Cable Network”
or press OK on the remote control to set this option to “ON”.
• After turning on the cable network, check if the “Cable Network” is selected; if DHCP
(Dynamic Host Configuration Protocol) is enabled in the router, this unit will obtain IP
address automatically.
• After connecting to the network, the “Cable Network” option shows: Cable network is
turned on; IP address, gateway, subnet mask and other information are listed below.
HD509N-User’s Guide
10
6 Network Settings
6.3 Connecting to Wi-Fi
6.3.1 Connecting to wireless router
• Enter “Settings” in the home screen, select “Wi-Fi” in the left, which has a switch in the
right; please turn the switch to “ON” or press OK on the remote control to set this option
to “ON”.
• In the picture below, two Wi-Fi sources are available. The text below the name (SSID)
indicates the encryption mode of the Wi-Fi connection. The icon to the right indicates
the signal strength . The small lock indicates that the connection is encrypted and
password is needed.
• If the wireless network isn’t encrypted, you can connect to it directly.
• If the network is encrypted, select the Wi-Fi name to pop up the window for password,
press OK on the remote control and call out the soft keypad on the screen, enter the
password, select “Next” on the keypad or press the Return key on the remote control to
hide the keypad, and then select “Connect” to connect to it. (Note: to hide the keypad on
the TV box, press the Return key on the remote control.)
HD509N-User’s Guide
11
6 Network Settings
HD509N-User’s Guide
12
7 Video Settings
7.1 Available Video Interfaces
Connecting to TV through HDMI cable
If the TV set has HDMI interface, the unit can be connected to the TV set with HDMI cable.
After connecting, turn on the unit. the LED on the front panel is turned on, the screen shows
boot logos and then enters the home screen after several seconds.
Connecting to TV through TV cable
Connect the AV cable to the AV OUT port, connect the yellow video input plug of the TV
set to the yellow CVBS video interface, and connect the white and red plug to the left and
right audio interfaces respectively. Turn on the TV, switch to AV input mode, turn on the unit,
the LED on the front panel is turned on, the screen shows boot logos and then enters the
home screen after several seconds.
Note: Not all models come with the special AV cable. Ask your supplier for details.
7.2 Video Output Settings
7.2.1 Resolution settings
Before operating for the first time, please adjust the screen resolution to achieve the optimal
display: In Settings, enter Display - Output Resolution:
This option is mainly intended for HDMI interface output.
If AV port output is used, enter Display - AV Output to set.
Note: When the selected resolution is not supported by TV-Set, the system will
automatically return to the latest good resolution. As an extra safety net, the “RES” button
on the remote control can be used at all times to change the resolution without having
visual contact with the setting menu.
HD509N-User’s Guide
13
7 Video Settings
7.2.2 Screen size settings
After adjusting the resolution, the screen edges will be cut or have black borders. Enter
Settings - Display - Aspect Ratio, and press the Left/Right key on the remote control in the
aspect ratio window and adjust.
Tips: Zoom out the screen to the smallest (adjust the slider to the left), and then zoom in the
screen (adjust the slider to the right), check the screen edges, and it is optimal when the
screen edges coincide with the TV edges.
HD509N-User’s Guide
14
8 Specifications
HDMI
Interfaces
3 x USB
Optical
LAN
Wi-Fi
AV
TF CARD slot
Power supply
5V/2A
Dimensions
170x135x 30mm
Net Weight
0.4kg
Gross Weight
0.9kg
HD509N-User’s Guide
15
9 Disclaimer
This is an original work by Filotel S.A. and is protected by applicable copyright laws
worldwide. Neither the whole nor any part of this work may be reproduced, stored,
adapted or transmitted, published, modified in any form or by any means whatsoever,
mechanical, electronic, photographic, graphic, optic recording or otherwise, translated into
any language or computer language, without the prior written permission of Filotel S.A.
Unless by way of a separate agreement, Filotel S.A. makes no representations or
warranties with respect to the contents hereof, including their accuracy and error-free
nature, and shall not be responsible for any loss or damage caused to the user by the
direct or indirect use of this information. Furthermore, Filotel S.A. reserves the right to use
the subject matter of this notice in any manner whatsoever, with no obligation to notify the
recipient of the subject matter of any changes made hereto. All products referenced
herein are trademarks of the company and/or of those referenced.
Copyright© 2014 Filotel S.A.
www.zaaptv.com/termsofuse.
HD509N-User’s Guide
16