1
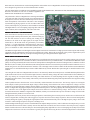
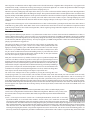
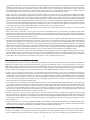
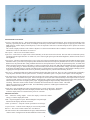
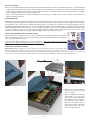
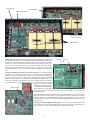
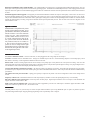
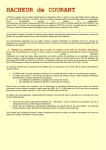
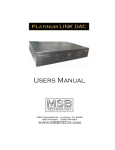
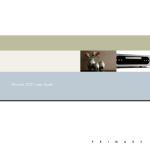
SIGN MAGNITUDE LADDER DAC SPECIFICATIONS
DAC III
Users
Manual
Rev 2 (11/05)
INPUTS:
COAXIAL, TOSLINK, BALANCED
AES/EBU, 2 MSB NETWORK
AND A BALANCED ANALOG INPUT
RCA OUTPUTS:
OUTPUT IMPEDANCE:
BALANCED OUTPUT:
3.6V RMS (10Vpp)
50 OHMS AT 0dB
7.5 V RMS (20Vpp)
VOLUME CONTROL (OPTIONAL):
2 dB STEPPED ATTENUATOR
STEPS)
SAMPLING FREQUENCY:
DIGITAL FILTER:
SLEW RATE:
SETTLING TIME:
DYNAMIC RANGE:
NOISE FLOOR:
THD+N:
SIGNAL TO NOISE RATIO:
CHANNEL SEPARATION:
CONTROL FEATURES:
32 KHZ TO 384KHZ
16 TIMES OVERSAMPLING
>1000 V/MICROSECOND
<90 NANOSECONDS
136 dBA MEASURED
< -145 dB
.002
140 dB
>130 dB
REMOTE
DISPLAY DIM MODE
PHASE INVERT
FILTER OPTION
UPSAMPLING
VOLUME AND INPUT SELECT
1
(32
DAC III Users Manual
Unique Product - a Preamp or a DAC?
This product has the option to be a unique combination of a very high performance DAC and the ultimate passive preamp. It is intended
to be used as both for the best possible sound in your system. Our preamp philosophy is based on the belief that from the moment analog
audio is created, every transition that is made degrades the quality. That means that an active preamp with many stages if perfect would
have no effect and any imperfection would result in degradation of the music. That is why we offer a passive preamp within the DAC III,
to achieve the simplest, shortest possible signal path, with the least possible degradation of the true music.
The Preamp Upgrade
The DAC III Preamp has just one analog input and many digital inputs. It is designed to be the
last component in your system before the amplifiers. With its incredibly low impedance, especially
for a passive preamp, it can drive long interconnects and handle any type of amplifier input stage
design with optimum performance.
CD or DVD-A
Transport
Depending on how many analog sources you have in your system, you may be able to eliminate
your current preamp. If you currently have only CD and vinyl in your system, you would attach
your CD players digital output to the DAC III and the output of your phono preamp to the analog
input. Your system is now complete, with the shortest possible signal path and the best sound
you can achieve. The same idea applies to use with an SACD player. Since SACD does not
normally come out the digital output, the analog SACD is attached to the analog input on the
DAC III and the digital output for CD playback. The MSB XPORT upgrade will allow SACD and
DVD Audio to be output via the MSB network directly to the DAC III.
Digital
Phono
Preamp
Analog
DAC III Preamp
Analog
If you have a complex system with a preamp with many analog inputs, attach the outputs of your
preamp to the input on the DAC III. Shift any digital sources over to digital inputs on the DAC
III and again, you will achieve optimum results. Set your preamp to a volume that matches the
DAC III output and use nothing but the DAC III volume control in your system.
AMPs
The volume control modules can be easily installed or removed by your dealer.
SACD Player
Setup and Quick Start
The front panel is quite simple with few user controls. Set the input source to auto and start
with all the other options off (No LED lit). On power up, the volume is reset to -62 dB. Turn
the volume knob up until you hear music.
Power - The Platinum comes standard with an inboard power supply. A switch on the back
allows the unit to be switched between 240V and 120V. Please check your setting before
plugging the unit in. Leave the Platinum powered on all the time.
Inputs - The Platinum comes standard with two MSB Network (CAT5), AES/EBU balanced,
coaxial and optical digital audio inputs, as well as a balance analog input, ranked in
order of performance. Connect any digital input to any active digital audio source. The
frequency of the incoming signal will be read out on the front panel and analog audio will
be found on both balanced and single-ended analog outputs.
Analog
Digital
DAC III Preamp
Analog
AMPs
Outputs
Connect the balanced or single-ended analog outputs to any amplifier and audio should
be present. The output level is controlled with the knob or remote.
Burn-In
The concept of burn-in is little understood. Does it take your ears some time to get used to the
incredibly detailed and life like sound of an MSB product or is something actually changing. The
feedback we receive leads us to recommend at least 100 hours of burn-in on this DAC. Customers
generally recommend one month.
Universal Player
with XPORT
Upgrade
MSB
Network
DAC III Preamp
Analog
AMPs
2
Unique Technology - the past and the future
Over 10 years ago early DACs were all 16 bit ladder DACs, with a precision laser-trimmed
resistor creating the appropriate analog level for each of the bits. The DACs worked well and
sounded good. They were quite expensive as very accurate resistors were required. Then along
came the “single bit” DACs. Rather than using a resistor to create an analog level, pulse width
modulation was used. Basically each bit was created by turning a switch on and off for the
appropriate length of time. The resulting square wave pattern was filtered to create a smooth
output. The expensive resistors were gone, and so was the good performance. Next came the
Delta Sigma DAC. It used the same pulse width modulation but rather than creating a single
large pulse for each data point, the data point was created with many small pulses. This allows
the pulses to be smoothed with a less radical filter, and improves the sound. As you can see,
upsampling the input signal to a higher frequency reduces the filtering requirements and thus
improves the sound. This is the current state-of-the-art as exemplified in the LINK DAC III with
the upsampling option.
Right Channel
MSB DAC Module (Non-inverted signal)
23 bit positive sign DAC
Toggle Switch
23 bit negative sign DAC
MSB DAC Module (Inverted signal)
Coaxial Out
23 bit positive sign DAC
23 bit negative sign DAC
Balanced Out
BLOCK DIAGRAM
The Platinum draws from the older, superior ladder technology, but with incredible improvements. The Platinum contains four 24 bit MSB
DAC modules (seen below). The Platinum is fully balanced so there
is a matched pair of 24 bit DAC modules for the inverted and noninverted signals on each of the right and left channels. Finally, each
DAC module contains one R2R ladder DAC with a 23 bit negative
sign and one R2R ladder DAC with a 23 bit positive sign. Together
this makes a true 24 bit DAC. This design allows the quieter moments
in your music to be true to the music, without the linearity errors near
zero that plague normal ladder and delta-sigma DAC designs. With
a dual 24 bits of combined resolution, a 24 bit source gives a true 24
bit resolution without the losses and errors that make your normal 16
or 24 bit DAC perform far less than their actual resolution (normal 16
bit DACs only muster a meager 12 bits of resolution). The Platinum
is carefully designed so as to require no DC correction in the output
Second Generation Platinum DAC module
stage. This allows direct DC coupling on the output stage for pure,
uncolored sound -- with no output filtering to muck up your high end
or smear your bass attack. And for those who require a balanced
analog output, the separate positive and negative DACs directly
drive the balanced outputs, with no analog output stage at all!
Another major difference in the Platinum is the type of output.
Essentially all ladder DACs produce a current output. This is
converted to a voltage output with a current to voltage converter.
This problematic circuit colors the sound and introduces non-linearity.
The Platinum is a true voltage DAC with a voltage output right from
the source. All amplifiers have slew rates greater than 1000 Volts/
microsecond. The output impedance of the Platinum is 50 ohms.
Original Platinum DAC module
Special Features
The DAC III has many special features. The following sections discuss these features and how they work.
Upsampling and filtering
As MSB technology has developed, so has our DAC architecture. Our advanced digital
filter now replaces the asynchronous upsampling of earlier models. The 16X Digital filter
goes way beyond our older 4X upsampling. To play a 24/192 disc the Platinum only needs
to be plugged into a DVD-A player with an MSB XPORT output. The new upsampling
feature dynamically buffers and re-clocks all the data and clock signals to provide a virtually
jitter-free source directly to the DACs.
The selectable digital filter response permits the user to choose the filter design they prefer.
It allows for the selection of a standard brick-wall filter or a slow roll-off filter, both at half
the sampling frequency. Each provide a distinct, glorious listening experience. You may
favor one or the other, or enjoy changing the filter response to suit the music you listen to.
Music with less high frequencies may benefit from the slow roll-off filter.
To play a 24/192 disc the source player needs to have an MSB Network or XPORT output.
If your DVD-A player does not have the MSB Network output, it can be added. A 192k
input will override the upsampling settings.
UPSAMPLING
EFFECT
er
Cus
tom MSB Digit
al F
ilt
Cust
Digital
Filt
ilter
The DAC III has a custom DSP based Digital filter and clock module. This breakthrough
technology is new in the DAC III. For the first time ever, we have created our own Custom
Digital Filter for the Platinum DACs. Previous versions of the Platinum DAC used the Burr3
SIGN WAVE (0 DB, 19.95 KHZ TEST TONE
SCOPE SETTINGS 2 V/DIV, 10 USEC/DIV)
Brown DF1704, which at the time was the best Digital Filter on the market. Our new Digital Filter is built to our specifications and standards,
and is designed to get the most out of the Platinum DAC modules.
This new Digital Filter is available as an user installable upgrade for the Platinum DAC, Platinum DAC Plus, Platinum DAC II, as well as the
Reference CD Station II. This filter is standard equipment in our
Platinum DAC III and Reference CD Station III.
The performance of this new Digital Filter is amazing. Immediately
you’ll notice the lack of fuzziness around voices and instruments of
all frequencies. This new filter also dramatically increases the resolution and dynamics of the machine. This filter is also completely
customizable; By playing a special .wav file on a CD new filter coefficients, either temporary or permanent, can be loaded into our DSP.
The Digital Filter is a 16x oversampling, single stage filter with 32 bit
input resolution, 80 bit computation, and 36 bit coefficients.
About the Clock / Jitter Control
Jitter control devices (and inputs on most DACs) normally reclock
the input signal in attempt to lessen the jitter of that incoming signal. The DAC III does no such re-clocking. We actually pay no
attention to the clock on the input signal (or the input from the
internal drive). All internal clocks are generated by an extremely
accurate +/- 2.5 ppm temperature compensated clock. Since the input clock is no longer related to the clock of the Platinum, an intelligent ½ second buffer is used to maintain data synchronization.
The MSB 16x Digital Filter is an ultra high-resolution digital front end. The combination of a high-speed on-board computer and carefully
optimized software and hardware result in the best possible music quality. During the development of this peerless digital audio system
MSB has accumulated a wide body of unique knowledge allowing us to design the ultimate digital filter.
Mor
eA
bout t
he Digit
al F
ilt
er
More
About
the
Digital
Filt
ilter
One of our primary goals at MSB is to provide the music lover with the most accurate musical experience possible. During years of careful
design and improvement of our custom discrete DACs, which form the heart of your Platinum DAC, we realized that the Platinums sound
quality was no longer limited by them. We soon narrowed the problem to the Digital Filter which was feeding our DACs. While the excellent
Burr-Brown (Now owned by Texas Instruments) DF1704 Digital Filter had served us well in the past, it had became the bottleneck once we
started using our new Second Generation DAC modules. After a thorough search of all the available off the shelf and custom DSP based
Digital Filters we realized that little improvement could be had from any of them. With no other option in sight we decided to build our own
solution.
Converting the ones and zeros of Digital Audio into music is an enormously delicate and critical process. Each individual sample that makes
up the audio stream must be converted into the high resolution, continuous analog voltage that can be transformed into the sound that you
hear. Any misstep can corrupt the final result ending with audio that does not sound anything like the original recording. Errors in
translation can make a harsh, veiled, muddy, and/or tonally colored result. Minimizing each potential problem allows the original recording
to shine through.
Audio reproduction starts when the DAC receives the binary coded information from the source. The first step requires recovering the
audio samples, which represent the final output voltages, and the timing, which tells the DAC when to output those voltages. Next the
sample rate is raised and the data is digitally filtered. While it is possible to feed the DAC with the original audio samples thereby avoiding
the use of a digital filter skipping this step has many unintended consequences. After being digitally filtered the digital stream is feed to the
DAC. The DAC receives the digital audio samples and converts them into a continuous analog voltage. The best DACs, such as our
Second Generation DAC Modules or Signature DAC Modules, instantly convert the data into a precise continuous voltage waveform with
timing determined by the DACs conversion clock.
The digital filter is necessary because mirrored image frequencies created during the conversion process must be removed. If the DAC did
not have a digital filter, an analog filter with an aggressive response must remove these image frequencies. These brick wall analog filters
seriously damage the signal by corrupting the original phase of the sound and cannot fully remove the high frequency images. This results
in harsh or rolled off high frequencies and poor soundstage focus.
Traditional digital filter designs consist of cascaded FIR (Finite Impulse Response) filters, each of which raise the sample rate by two. The
intermediate data between the filters is usually stored at less than 40 bit resolution. Since the next filter works with previously computed
data the resolution decreases with each filter pass. This limits higher quality digital filters to a low oversampling rate (usually 8x) before the
output starts to deteriorate. The loss in resolution is typically not apparent when using the best conventional digital filters with standard
4
DAC chips, but in combination with our high resolution 24 bit Second Generation, or Signature DACs the problem is very apparent. The
sound becomes muddy, veiled and un-involving when using any off the shelf digital filter. To counter this problem the MSB 16x Digital
Filter does it’s filtering in one filter stage that raises the sampling rate by 16.
FIR filters operate by multiplying each sample in the data by a set of filter coefficients and then summing the result. Most digital filters
round the result of each addition before the adding next sample. This repeated roundoff results in a similar problem to the cascaded 2x filter
approach, muddy sound. MSBs digital filter uses bit perfect accumulation in an 80 bit accumulator completely eliminating these debilitating
roundoff errors. Only as the last step do we carefully convert the audio to the 24 bits our DACs require. The high sampling rate of the
output allows us to include advanced ultrasonic dither and noise shaping techniques in this step to achieve greater than 24 bit effective
resolution.
Through extensive listening tests we have found that the choice of filter coefficients has a great impact on the tone of the music. We have
found that steep, phase perfect “Brick Wall” filters tend to sound the most neutral but are also the most difficult to implement without
problems. Improvements we have made in our digital filter, with its single stage design and 80 bit computation, allow us to use very steep
filters with no compromises.
Custom Filter Options
We recognize that different people often have very different taste in their music. For those who do not like the standard choice of filter, or
require a different filter response, we have provided a very easy method for customizing your MSB 16x Digital Filter. By playing a standard
CD containing a custom filter algorithm you can temporarily change the filter inside your 16x Digital Filter. This CD filter loading allows you
to load almost any FIR filter quickly and easily. You may also upgrade your MSB 16x Digital Filter with the latest custom software just by
playing a special Firmware Upgrade CD.
The timing of the DACs conversion clock also has a large impact on sound quality. Any
periodic frequency change or “jitter” causes a loss of focus in the reproduced audio. The
high power and large memory space of the SHARC DSP we use allows us to offer a unique
Ultra Clock to your MSB 16x Digital Filter. The Ultra Clock adds two ultra precision, ultra
low jitter TCXO oscillators and custom clock handling circuitry to your board. This custom
circuitry allows us to do much more than simply reclock the data, as other jitter reduction
boxes do, but completely replace the incoming clock!
Most jitter reduction schemes rely on Phase Locked Loops or Asynchronous Sample Rate
Converters. The Phase Locked Loop is able to reduce jitter to a significant degree but not
eliminate it because the output clock must be related to the input clock. The Asynchronous
Sample Rate Converter, which completely replaces the data and clock, seems ideal until you
realize that the complex computation involved harms the data by permanently imbedding a
portion of the clock jitter into the data. Sample Rate conversion is also detrimental to the
sound due to the complex and sub optimal digital filters involved, which must change their
filter response to track minute changes in the input to output clock ratio.
The Ultra Clock sidesteps both of these problems by storing the incoming data in an
extremely large buffer (1/2 second of audio.) The on-board clock then reads out the data without jitter. The on-board clocks are totally
independent from the input clock so that no jitter is transferred to the output. True absolute digital silences such as a track skips are
selectively shortened or lengthened by the DSP to keep the buffer synchronized. This process is carried out seamlessly by the DSP to
assure that all compatible sample rates have their clocks properly replaced. Compatible sample rates are 44.1 kHz, 96 kHz, 176.4 kHz, 192 kHz,
and 384 kHz. Other sample rates automatically use the recovered clock from the transport without user intervention. The 48 kHz sample rate
does not support clock replacement due to the large latency incurred by the buffer, which would cause audio from a DVD movie to be
unsynchronized.
The On-board Option Switch
The MSB 16x Digital Filter includes an on-board option DIP switch, which is a small multiple position
switch on the 16x Digital Filter board that allows additional configuration. With this switch you may select
the on-board Ultra Clock operation, Dither, Mute Mode, Single Ended Operation and the Motherboard
Revision.
Switch 1, Clock Replacement Mode - Switch 1 ON = Clock Replacement Mode, Switch 1 Off = Low Latency
Synchronized Mode, or no on-board clocks installed. Switch 1 allows you to enable the on-board Ultra
Clock option. When enabled this option will completely replace the incoming clock with an ultra low jitter
TCXO based clock. The DSP monitors the incoming sample frequency and detects standard sample rate signals, 44.1 kHz, 96 kHz, 176.4
kHz, 192 kHz and 384 kHz. The on-board clock then completely replaces the incoming clock. Other sampling frequencies use the incoming
clock from the source. The DSP allocates a huge internal FIFO buffer (1/4 second) that stores the incoming audio to decouple the
incoming and outgoing data streams. Long absolute digital silences in the music stream, such as between tracks and during pauses, are
selectively shortened or lengthened by the DSP to maintain data synchronization. This results in a significant delay between the audio
5
source and the analog audio. You will not normally notice this delay unless video is synchronized to the audio. For this reason the 48 kHz
sampling rate (which is 99% video) only operates in Low Latency Mode with no clock replacement. While using the on-board clock some
very long musical performances greater than one hour with no silences, pauses or track skips may cause a buffer overflow when using
a standard transport. This will sound like a small CD skip. You will probably never encounter this case but if you do MSB can install a
special ultra high accuracy clock in your transport or other audio source to totally eliminate this possibility.
Switch 2, Dither Mode - Switch 2 ON = Dither On, Switch 2 Off = Dither Off. Switch 2 allows you to enable the on-board dither generator.
With the dither activated the MSB 16x Digital Filter continuously adds a tiny amount (-110db) of random ultrasonic dither to the Output.
We have found through extensive listening tests that this tiny amount of dither greatly increases the perceived resolution of the audio
without harming the music in any way. The dither is added separately in common mode to the positive and negative DACs in the Platinum
and mostly cancels itself on playback helping to linearize the DACs. The dither is generated by a highly random, non-repeating white
noise generator and is then digitally filtered to remove all dither content close to the audio band. All of the dither between 0 Hz and 40 kHz
is removed. Unlike some noise shaping algorithms like DSD the very low level of the ultrasonic dither involved should never cause
system high frequency related problems. MSB highly recommends that you keep the dither enabled.
Switch 3, Reserved - Switch 3 ON = Future Upgrade Feature On, Switch 3 Off = Future Upgrade Feature Off. Switch 3 is reserved for future
upgrades. Please keep this switch off.
Switch 4, Mute Mode - Switch 4 ON = Play any Source, Switch 4 Off = Mute Data Sources. Switch 4 allows your Platinum to play audio
marked as data. If the digital source marks the audio as data, as sometimes happens, and this switch is off no sound will be produced by
the Platinum. Turning this switch off will allow the Platinum to mute unwanted data such as Dolby Digital data. Turning this switch on
will allow the Platinum to play audio from any source.
Switch 5, Balanced Mode - Switch 5 ON = Normal Balanced and SE Mode, Switch 5 Off = Special Single Ended Only Mode. Switch 4 allows
manipulation of the individual data streaming to each DAC. If the switch is ON, the Platinum operates normally with both the balanced
and single ended outputs active. If this switch is OFF, the Platinum reverts to a special mode in which all four DACs in the Platinum
reproduce the same analog phase. This allows some interesting custom analog outputs from the Platinum. Each phase on the balanced
XLR connector is the same allowing the connection of a Platinum to three single ended components. This mode also gives MSB the
ability to custom modify your Platinum to sum together each pair of DACs. This upgrade increases the sound quality of the single ended
RCA output while disabling the balanced XLR jack. If you are interested in this custom upgrade contact MSB for details.
Switch 6, Mother Board Revision - Switch 6 ON = Motherboard Revision 6.0 or Higher, Switch 6 Off = Motherboard Revision 5.9 or Lower.
Motherboard Revisions 5.x and below require this switch to be OFF. Motherboard revisions 6.x and higher require this switch to be ON.
You may read the motherboard revision at the lower right corner of the motherboard or as the second digit from the right in you Platinums
serial number. The serial number is located on the lower right rear corner of the Platinums jack panel.
Cus
tom Sof
tw
ar
e and T
em
por
ar
yF
ilt
er
s
Cust
Softw
twar
are
Tem
empor
porar
ary
Filt
ilter
ers
A custom digital filter will allow you to tailor the sound of your Platinum. Any form of custom FIR filter may be loaded into the MSB 16x
Digital Filter. You may select a custom filter from our library, you may have MSB design a filter to your specifications or you may send
MSB a list of Fir Filter coefficients that we can format into a CD loadable file for you. You cannot permanently damage your 16x Digital
Filter Board by loading a Temporary Custom Filter, it is only active until you toggle the Filter Option Button, Power down the Platinum
or play an audio track containing the Special Cancellation Code. Contact MSB Technology for details on custom filters.
Step One, Verify Your Equipment Compatibility - To successfully load your custom filter you must have your Platinum connected to a
transport that will not change the Data. Almost all CD players are acceptable, however there are some important exceptions. Upsampling
CD transports will not work; this includes the drive internal to the Platinum Reference CD Player and Platinum Reference CD Station II.
To load a filter to these machines you will have to connect your Platinum to another source to load the custom filter file. The Upsampling
drives are fine for playing audio after the upload however. DVD players should work fine when they are configured in a mode that does
not affect the Data such as CD pass-through mode.
Step Two, Burn the CD - When burning a CD containing the custom filter you must burn the WAVE audio file directly to a CD without first
converting it to another audio format such as MP3. Converting the WAVE file to another format will destroy the careful formatting which
allows DSP to load filters directly from a CD. You may however burn other audio to the CD as separate tracks. This allows you to create
a CD with a custom sound that differs from the rest of your collection. A suggestion is to place a track containing the Custom Filter on
the CD as track 1 and place the Special Filter Cancellation Code as the last track. This will allow a CD to play through with a custom filter
leaving your Platinum in the normal filter mode at the end of the CD.
Step Three, Play the CD - To ensure a proper load of the filter you must remember to disable any digital processing before the 16x Digital
Filter. This includes turning off processing in DVD players, Upsampling in CD Players and Upsampling in the Platinum itself. If the Filter
Load Fails because the equipment is not compatible or the track is not played trough the MSB 16x Digital Filter the track containing the
Custom Filter will play a short very quiet noise burst followed by a Filter Update Failed message. A successful load will just be a short,
five-second silence.
Step Four, Cancel the Filter - A custom loaded filter in a MSB 16x Digital Filter will remain the dominant filter of the DSP until some action
is taken by the user to cancel it. Toggling the Filter Option Button, powering down the unit, playing a CD track with the Special Filter
Cancellation Code or loading a new Temporary Custom Filter will immediately cancel the filter.
e
Loading N
ew F
ir
mwar
Ne
Fir
irm
are
Loading custom 16x Digital Filter Firmware will permanently change the operation of your DSP. MSB Technology can configure custom
software for your DSP to meet virtually any requirement. Playing a CD track containing the new firmware will erase the current software
in your 16x Digital Filter and replace it with the contents of the update file. This is just as safe as loading a Custom Digital Filter if one
6
precaution is faithfully observed. The firmware update process takes about 20-30 seconds and you MUST NOT INTERRUPT THE
POWER TO THE PLATINUM while the new firmware is loading. You must wait for the message after the Firmware Update before
interrupting your Platinums power. If the power to the Platinum is interrupted during a firmware update you will have to return your 16x
Digital Filter Board to MSB for reprogramming. MSB will charge you a small fee for this service. If you have accidentally loaded
firmware that you do not wish to have on your Platinum do not try to cancel it while it is loading, simply wait for the update to complete
and then load the firmware you do wish to have on your 16x Digital Filter Board.
Step One, Verify Your Equipment Compatibility - To successfully load your new Firmware you must have your Platinum connected to a
transport that will not change the DATA. Almost all CD Players are acceptable however there are some exceptions. Upsampling CD
transports will not work; this includes the drive internal to the older Platinum Reference CD Player and Platinum Reference CD Station 2.
To load a firmware file to these machines you will have to connect your Platinum to another source to load the firmware. The Upsampling
drives are fine for playing audio after the upload however. DVD players should work fine when they are configured in a mode that does
not affect the Data such as CD pass-through mode when connected to their s/pdif digital output.
Step Two, Burn the CD - When burning a CD containing the new firmware you must burn the WAVE audio file directly to a CD without first
converting it to another audio format such as MP3. Converting the WAVE file to another format will destroy the careful formatting which
allows DSP to load its new Firmware directly from a CD. You cannot however corrupt the Firmware in a way that will allow it to load
incorrect software. The firmware update file is protected by powerful error detection and encryption that will not allow a damaged file to
be loaded into the DSP. A corrupted or damaged firmware CD will simply be rejected by the DSP and fail to load the new software.
Step Three, Play the CD - To ensure a proper load of the firmware you must remember to disable any digital processing before the 16x
Digital Filter. This includes turning off any processing in DVD players, Upsampling in CD players and Upsampling in the Platinum itself.
If the Filter Load Fails (the equipment is not compatible or the track is not played trough the MSB 16x Digital Filter) the track containing
the new firmware will play a short very quiet noise burst followed by a Firmware Update Failed message. A successful load will just be a
20-30 second silence followed by a New Firmware Conformation message. The new firmware is running at this point, you do not have to
restart your Platinum to enable the new features.
Step Four, Enjoy Your New Features - Custom Firmware permanently changes the software running on your DSP. This change occurs
immediately following a firmware update. You do not need to reset or power off your Platinum. Powering the unit off after a firmware
update will load the new software on power-up, the old software was completely erased. If you are not happy with your new firmware
simply load your old firmware using the instructions above.
Cloc
k Int
er
face (adv
anced user
s)
Clock
Inter
erf
(advanced
users)
On the back of the unit is a special 5 pin XLR type connector. It is a clock interface that allows multiple
Platinum products to be synchronized, allows the Platinum Clock to be output and allows an external
clock to be input to the Platinum. The interface is a LVDS format clock interface with a signal level of 250
mV pp input or output requirement.
Pin Identification - The pins shown in the figure above are identified as follows:
1. Ground
2. Clock Select (OPEN = Master Clock Output, LOW = Master Clock Input)
3. M Clock + (Positive side of balanced Master Clock)
4. M Clock - (Negative side of balanced Master Clock)
5. DSP Ready for Networking (OPEN = OK to Run, LOW = Stop, not ready)
Clock Frequencies - By toggling the Clock Select line clocks can either be input or output. The output frequencies are as follows:
·
44.1, 88.2 or 176.4 kHz sampling frequency source outputs a clock frequency of 22.5792 MHz
·
48, 96 or 192 kHz sampling frequency source outputs a clock frequency of 24.576 MHz
The input frequency requirements are as follows:
·
44.1 kHz source will accept a 11.2896 or 22.5792 MHz input
·
48 kHz source will accept a 12.2880 or 24.576 MHz input
·
88.2 or 176.4 kHz source will accept a 22.5792 MHz input
·
96 or 192 kHz source will accept a 24.576 MHz input
7
Front Panel Controls
Frequency and Volume Display – The actual sampling frequency of the incoming signal is displayed. This is not the normal display of the
frequency reported by the decoder, which, for example, would always read 44.1 kHz even if the transport was playing at 44.3 kHz. The
MSB frequency counter displays actual frequency so don’t be surprised if some lower cost DVD transports fail to produce an accurate
playback speed.
The volume is displayed whenever the volume is adjusted. It is shown as attenuation in dB. At 0 dB, the volume control is disconnected
and the DAC works as if the feature was removed.
DAC Option – This is reserved for future features.
Input Select – Each of the six inputs can be selected manually, or the auto mode can be selected. The auto mode is an automatic priority
switching with auto signal detection. In either case, active sources light up the input LED at half brightness, and the selected source at
full brightness.
Filter Option - The Filter Option button allows you to select each of the two standard filters programmed into the DSP. The Filter Option
button also allows you to cancel any temporary filter that has been loaded (See the Temporary Loadable Filter section). The Filter Option
Button Out is the preferred filter setting of MSB. This filter has been optimized for extremely flat pass band response, excellent tonal
balance and perfect phase response. This Filter is a 3000+ tap symmetrical “brick wall” FIR with extended high frequency response and
a very low image energy of -180 db. This Setting is the most tonally neutral of the two standard filter settings. The Filter Option Button
In attenuates the High Frequency content of all digital sources a small amount to reduce brightness in already harsh sounding systems.
Toggling the Filter Option Button will cancel any externally loaded Temporary Custom Filter which may be active.
Phase Invert - Toggling the Phase Invert button will change the absolute phase of the unit. There are some recordings that "accidentally"
swap the phase. For those who are phase sensitive, we always include this option. The phase of the outputs is inverted digitally.
Input/Volume Knob - The large knob will select between inputs if the volume control option is not installed. The INPUT button on the front
of the unit will also switch between inputs. If the AUTO input is selected, the unit will automatically switch inputs based on a priority
(from left to right - Analog = lowest priority, MSB 2 = highest priority). When a source with a higher priority becomes active, the unit will
automatically switch to the new higher priority input. Toggling through the inputs manually will defeat any auto
switching. When the volume control module is installed, the knob becomes the volume control. This knob
adjusts the volume between 0 dB and -63 dB. Our 0 dB actually equates to a +6 dB of gain in relation to the
industry standard 2 Vrms level.
Display Dim - Press and hold input on the front panel and press “mode” on the remote. The display
is turned off. When changes are made, the display will show them briefly. Repeat the function
to turn the display back on or disconnect the power for a moment.
Remote Control
Mute – Mutes the analog outputs. Causes the display to flash the volume
setting, even in the display dim mode.
Mode – Steps through the 6 inputs. When holding the front panel input
button turns the display dim mode on and off.
Volume up and down – Steps the volume up and down in 2 db steps.
4 square buttons – Controls for the CD player version of the product.
Batteries – The remote control contains two AAA batteries.
The same remote works with the Platinum CD player and the Platinum
volume control. If using the DAC III with a Platinum volume control,
8
remove the volume modules from the DAC III so they will not interfere with the operation of the MVC.
Rear Panel Details
Analog Input – A balanced analog input is provided. It is passed through to both the single ended and balanced outputs when selected.
(As well as the volume control if installed). This input is ideal for adding an vinyl input to your system. Minimum input impedance is
600 ohms. For an RCA input, use an RCA to XLR conversion connector. At 0 dB volume setting, the analog inputs are a direct passthrough.
Output Switch – There is toggle switch , marked BAL and S. This is a new feature, which allows the unit to use all four DAC modules in
a Single Ended system. The Balanced setting (BAL) is the standard setting and will work in all systems. The Single ended setting (S.)
is for Single ended systems only.
Toslink – Although this format has the lowest bandwidth, it is one of the more common outputs on low-end products. It also offers ground
isolation between products and noise immunity over long runs.
Coaxial – A good input for short runs and lower frequencies.
Balanced digital – The AES/EBU Professional input is the preferred input. The balanced nature of this input allows great cable lengths
as well as total noise immunity.
MSB Network – These two CAT-5 inputs are for use with other MSB products.
Clock Feature (advanced users only) – On the back of the unit is a special 5 pin XLR type connector. It is a clock interface that allows
multiple Platinum products to be synchronized, allows the Platinum Clock to be output
and allows an external clock to be input to the Platinum. See Clock Interface.
MSB NETWORK CAPABILITY
TWISTED PAIR WIRING
The MSB Network
XLR CONNECTORS (AES/EBU COMPATIBLE)
One of the most powerful feature of the Platinum is the MSB network. This network
EIGHT 32 BIT 192 KHZ AUDIO CHANNELS
plugs into the balanced input of the Platinum and is automatically detected and acti8 CONTROL CHANNELS
vated. The MSB network has the following capability:
EXTRA SERIAL CHANNEL
•
•
•
•
Unidirectional communications over any twisted pair
Simultaneous transmission of 8 audio channels with 32 bit resolution at 192 kHz sampling rate
Simultaneous transmission of 8 data channels with 3 Mbs data rate (for volume and trim data)
A single serial channel of 384 kbits/sec for control and system data.
This network is our answer to 192 kHz audio transmission and multichannel transmission in the same package.
We provide network outputs to our own transport and offer a source upgrade to your transport as well. In our
surround processor upgrade, up to 8 channels of decoded data can be sent through one wire to separate
DACs. The twisted pair format is very convenient as it has become the standard for all computer networks.
Ethernet networks use CAT5 wire which contains 4 twisted pairs. This one cable could be used to send 32
channels of 32 bit, 192 kHz audio data! Several cables are available for connecting MSB transports to the
Platinum including CAT5 cable at any length up to 80 feet.
9
Analog Outputs
Balanced – The balanced audio outputs are the preferred output format for those customers with a balanced system. As the PLATINUM
is fully balanced, both the inverted and non-inverted outputs are generated directly by separate DACs and sent to the balanced outputs
without filtering, buffering or any analog circuits that could color the music. The balanced outputs provide a 20 Vpp at 0 dB (7.5 V RMS).
Set the volume at -12 dB to achieve a 2 Vrms output level
Coaxial – The output impedance is 50 ohms and output level is 10 Volts PP (3.6 V RMS). Set the volume control at -6 dB to achieve the
industry standard 2 Vrms level.
Power Supplies
Each function within the Platinum is provided with its own separate power supply. There are 5 power supplies in the digital portion and 6
in the analog. The power supplies in the digital section ensure the maximum jitter reduction while the 3 power supplies for each of the left
and right DACs allow for the greatest channel separation possible. The analog power supplies are the original high-speed discrete
supplies used in MSB audio products for over 13 years. The Platinum includes a built-in P1000 Power Base, with its high performance triple
wound toroidal transformer and rectification. It can be configured internally for 120 V or 240 V and has a detachable cord. Also provided
is extra DC output that can be used to power another MSB product like a volume control. The DIN connector next to the AC power
connector is an auxiliary output, not an input. MSB will supply a DIN to DIN cable upon request.
Voltage Conversion and Changing Fuses
The Platinum can be configured for 120 V or 240 V operation by switching the voltage switch on the back
panel. The Platinum will work over a wide voltage range so 80 volts is no problem at the 120 V setting and
180 V will work at the 240 V setting.
Fuses may blow during unusual power surges or disturbances. Protect this product with a good surge
protection power supply as changing fuses is quite a big operation. Replace fuses with 3 A 5 mm x 20 mm
miniature fuses. To access the fuses, follow the instructions below.
Upgrades and Modifications
Removal of the cover - Unplug the AC power. Work on a soft scratch resistant surface like a carpeted floor. Start
with the unit upside down and remove three screws located along the front edge of the cover. Then turn the unit over
and remove the three screws along the back edge of the cover. Loosen the four screws holding the endcaps on as they may prevent the cover from moving
easily. Slide the cover toward the front of the unit and lift up. Carefully reach in and unplug the cable from the front. Set aside the cover.
Co
ver R
emo
val
Cov
Remo
emov
1) Remove or loosen one Side Panel
(End Cap) by removing 4 Allen
Screws as shown.
2) Remove 6 Philips screws from top
and bottom of cover. Remove
cover, and disconnect ribbon cable
that attaches the Front Display to
the Platinum Main Board.
Reference CD Players will have
more than one ribbon cable; both
will have to be removed. Set cover,
Screws and End cap aside.
10
Input Board
Volume Modules
Digital Filter Board
With Volume Modules
Installed (above)
DAC Modules
Change the fuse - Remove the cover of the Platinum. Now the power supply must
be separated from the DAC. Each side panel is attached to both the top DAC part
and the lower Power supply part. Remove the screws from the lower Power
supply part. There are also screws between the two parts along the back edge.
On newer units, the circuit board has two notches along the back edge. These
notches line up with the threaded holes from the cover. Remove the screws that
can be found in each notch. Now separate the power supply part from the DAC
part.
Channel 1 selected
(Fronts)
Change the MSB Network Input and Channel Selection - The MSB Network
supports 4 stereo channels of 192k data at once. Any DAC can be configured to
decode any of these 4 channels. For example, when an upgraded DVD player is
playing a DTS music CD, one DAC can be configured to Channel 1 and will
receive the front channels. A second DAC can be attached to the same wire at the
same time and by selecting Channel 2 will receive and decode the rear channels.
The 3rd channel is for the front and sub channels if you want to use them. The 4th
channel is for future formats
which may come along. Move
the jumper located on the input
DIP Switches
board as shown in the diagram
to select the channel. Because the Platinum has two 192 inputs, each can have any
channel selected.
An MSB Network output upgrade provides three identical connectors allowing three
DACs to be driven at once, each set up for a different channel. With the two inputs,
another possibility would be to hook both up to the same multichannel source. Set input
one for front and input 2 for rear and you could then toggle between front and rear using
the input select.
Change the MSB 16X Digital Filter Options - The switches to change digital filter
options can be seen on the digital filter board. Please read the section of this manual on
how to set these switches very carefully before making any changes.
11
Removal or Installation of the volume modules - The volume modules can be plugged in, or unplugged from the Platinum mother board. They are
held in place with two plastic snaps which can be released by pinching together. The boards are automatically detected, so when unplugged the DAC will
output the same level signal as it would with them plugged in at 0 dB. The volume knob will now select the input and the remote volume buttons will have
no effect.
Install the Signature DAC Upgrade - This upgrade provides hand matched DAC modules for superior sound quality. These DACs can run at twice
the speed (384 kHz sampling rate) with 1/2 the settling time. The noise level is cut to 1/3 the normal value and the signal-to-noise ratio is up to 145 db.
They are user installable and come as a matched set of four, replacing the existing DACs. Remove the clamp holding the DAC modules in. Pull each module
straight out without tipping or twisting. Align the new module with the pins and push firmly back in. Take care that each connector is aligned. Do one
DAC module at a time.
Quality Check
Each Platinum is comprehensively tested
and the actual outputs measured. A test
plot should be included in your Platinum
like the one below. Just a few comments
on the test plot. Most measurement
systems cannot measure as low a level
as -145 db. That is the noise floor of our
test system which means the Platinum
may measure better, but we cannot see
it. The rise at low frequencies is always
present on our test setup and the right
channel always shows a little more noise
than the left (the right cable runs closer
to the digital input cable).
Troubleshooting
No “Source” indicated on LEDs - Check for bad cable, or cable plugged into the wrong output on the transport.
No sound - Check that source is valid audio source. Change to a standard CD just to be sure. Check that analog outputs are connected properly. Check
that volume is turned up. Check Single-End or Balanced switch on the back.
Still no sound - connect an analog output from the source directly to the preamp input. Verify that the rest of the system is working. Now move the
same analog cable to the DAC and plug in the analog source to the analog inputs. Verify the DAC pass-through is working. Now plug in a digital source.
You should hear a click and the front display should indicate frequency.
You hear audio clipping (with outboard preamp) - the output level may be too high for your preamp. Check the input specifications on your preamp.
(See Platinum specs). If you do not have the volume option, get it and turn the MSB volume down to -6 dB. This provides the standard 2 V RMS industry
specification.
The unit does not work powered on 240 V - unplug power quickly or capacitors may smoke. The unit is configured for 120 V Check voltage selector
on back.
Frequency readout is off - The Platinum shows the actual input frequency and does not show the upsampling that may occur internally.
96K source indicates 48 k on front panel - Check setup menu of DVD player. Digital output should be set for 96 k output. Some models do not
support this feature and downmix to 48 k
DVD-A source does not indicates 192k - DVD-A players must be upgraded to provide a true 192K output. Production players downmix to 48K.
Many DVD-A disks are produced in 44.1, 48 and 96 k as well.
War
ranty
arr
All MSB products carry a one year warranty. No returns accepted without an RMA. Upon receipt, MSB will repair or replace any defective product.
All product shipped FOB Aptos. Shipping and shipping damage is the responsibility of the consignee.
12