1
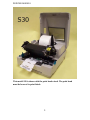
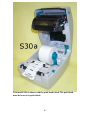
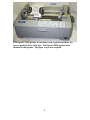
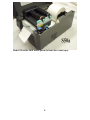
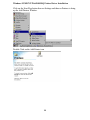
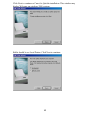
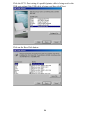
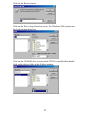
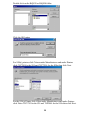
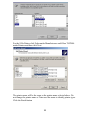
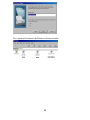
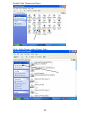
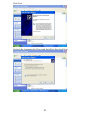
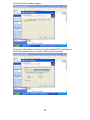
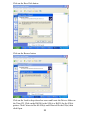
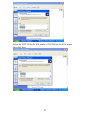
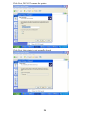
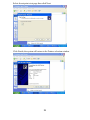
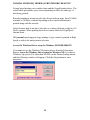
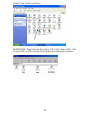
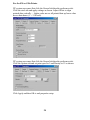
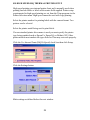
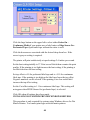
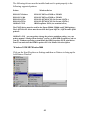
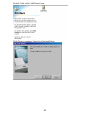
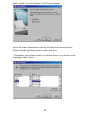
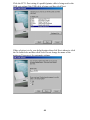
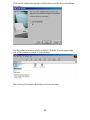
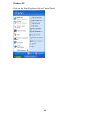
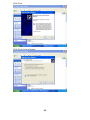
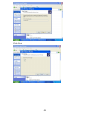
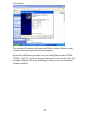
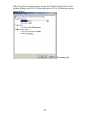
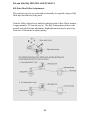
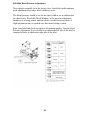
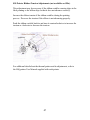
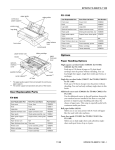
Table of Contents:
TITAN OVERVIEW .................................................................................... 1
TITAN HARDWARE REQUIREMENTS ................................................ 1
TITAN SYSTEM REQUIREMENTS: ....................................................... 2
LABEL TAPE AND APPLICATION EQUIPMENT............................... 2
PRINTER MODELS .................................................................................... 3
INSTALL THE TITAN LABEL WRITER PROGRAM ....................... 10
UPGRADING TITAN VIA THE INTERNET ........................................ 13
INSTALLING THE HIQ THERMAL PRINTER DRIVERS ............... 13
Windows 95/ME/NT/Win2000 HiQ Printer Driver Installation .............. 14
Windows XP HiQ Printer Driver Installation........................................... 21
NORMAL SPEED HIQ THERMAL PRINTER DRIVER SETUP...... 30
WINDOWS PRINTER DRIVER SETTINGS: ....................................... 33
For the S50 printer .................................................................................... 33
For the S30 or S30a Printer ...................................................................... 38
S50 HIGH SPEED HIQ THERMAL PRINTER SETUP....................... 39
INSTALLING DOT MATRIX PRINTER WINDOWS DRIVERS...... 40
Windows 95/98/ME/Window2000........................................................... 41
Windows XP ............................................................................................. 46
S50 AND S50A HIQ PRINTER ADJUSTMENTS.................................. 55
S50 Print Head Offset Adjustments.......................................................... 55
S50/S50a Head Pressure Adjustment ....................................................... 56
S50 Printer Ribbon Tension Adjustments (not available on S50a).......... 57
STARTING THE TITAN PROGRAM .................................................... 58
QUICK START FEATURE ...................................................................... 59
BARCODE LABELS.................................................................................. 60
IMPORTING A DATABASE FILE ......................................................... 62
PRINTER TROUBLESHOOTING GUIDE............................................ 64
1. HiQ Label Quality Problems ................................................................ 64
2. HiQ Label Printing Problems ............................................................... 66
3. Heat Sealing Problems.......................................................................... 69
4. System Problems................................................................................... 69
5. Dot Matrix Problems ............................................................................ 70
0
TITAN OVERVIEW
TITAN provides the user with the ability to print garment labels from
manually input data or imported database data to a dot Matrix or Thermal
transfer printer.
Titan’s program Help Menus provide step-by-step operating procedures for
all functions and options available to the operator.
The program allows the user to easily format their labels with true-type font
characters and/or with I 2 of 5, CODE 39 or CODE128-C bar codes.
A graphic preview of the label to be printed is shown in WYSIWYG format
on the computer monitor.
Titan supports unlimited printers connected to the system.
All entered data can be data based under a unique format number for future
access and printing of labels without having to re-enter data.
There is no limit to the number of formats that can be saved. Each account
can have it’s own format and personnel list.
Barcode number information is automatically sequenced and checked for
duplicate numbers.
Users include industrial laundries, nursing homes, prisons, long term care
facilities and other such business's that have the responsibility for labeling
garments for identification or tracking purposes.
TITAN HARDWARE REQUIREMENTS
90MB Pentium or greater PC computer
2 gigabyte or better hard disk drive
Dot Matrix Label Printers Supported
Epson LX, FX, LQ Series or printers that emulate EPSON
OKIDATA 39X Series
Thermal printers supported
HiQ Thermal Printers S30(a) and S50(a)
1
TITAN SYSTEM REQUIREMENTS:
Windows 95/98, ME, NT, 2000 or XP
Titan is best used with a screen resolution of 800 X 600 with large fonts
selected.
CS3001-32 Titan software on CD Diskette
LABEL TAPE AND APPLICATION EQUIPMENT
Heat seal Machine
Dot Matrix Label Tape Sizes Supported
½" x 2 ½“
5/8" x 2 ½”
5/8" x 3 ¼”
2/3" x 2 ½”
2/3" x 3 ¼”
1" x 2 ½”
1" x 3 ¼”
1 1/8” x 3 ¼”
1 ½” x 3 ¼”
1 5/8" x 3 5/8"
1 5/8" x 3 5/8" (bordered)
3/8” x 2” x 2 (Double Wide Tape)
1" x 3 ¼” x 2 (Double Wide Tape)
5/8 " x 5/8" x 5 (5 wide tabs)
3/8” X 2 X 2 (Double Wide Tape with ¼” separator gap)
HiQ Thermal TT/TU and TY/TW
Height from 1/4" to 4" in 1/8" increments
Width from 1" to 4" in 1/8" increments
2
PRINTER MODELS
This model S30 is shown with the print head raised. The print head
must be lowered to print labels.
3
This model S30a is shown with the print head raised. The print head
must be lowered to print labels.
4
This Epson LQ590 printer is currently ready to print and shows the
correct position of the label tape. The Epson FX890 printer looks
identical to this printer. The paper tray is not required.
5
This LQ590 printer is set up with dual tractors.
The LQ590 form position is in the single tractor position – FF-PULL.
6
The LQ590 form position is in the dual tractor position – FF-PUSH.
The density lever is at position 5 as a start point for a new ink ribbon.
Do not move this lever closer than position 3.
7
Model S50 with a label cutter option (in front above label tape).
8
Model S50a with a label cutter option (in front above label tape).
9
INSTALL THE TITAN LABEL WRITER PROGRAM
Insert the TITAN Installation CD into the CD-ROM reader.
After a few moments the following window will appear on your monitor.
Click the OK button to perform the installation of Titan
10
Click on the computer icon to continue.
Click the Continue button.
11
If the following window appears indicating a file being copied is not newer
than the file currently on your system, click YES in response to “Do you
want to keep this file?”
Click OK at the TITAN installation complete window.
At this point the TITAN software is completely installed.
Make sure you have the proper Windows printer driver installed before
starting Titan.
12
UPGRADING TITAN VIA THE INTERNET
Titan label writer software can be updated to the latest version via the Internet. Go
to Internet location http://www.titanlabelwriter.com/ then click Download the
latest version button. You can “open and” run the installation from the Internet
link or you can click “save” and download the file to your computer.
Follow the Install the Titan Label Writer Program section after clicking the run
button or after opening the downloaded zip file.
INSTALLING THE HIQ THERMAL PRINTER DRIVERS
Seagull Scientific developed printer drivers for the S30(a) and S50(a)
printers. Per the licensing agreement with Seagull Scientific you have the
option to install and use the 30 day Trial Edition of Bartender Label Printing
Software which can be found in the "\Drivers\Bartender Trial" folder of your
Titan CD. Following the trial period you would be required to purchase the
Bartender program that is available from .
The following procedure is for installing Windows printer drivers for the
S30(a) and S50(a) model printers supported by the Titan program. The
drivers are located on the Titan CD in the Drivers folder.
The following printer drivers must be installed to print properly to the
following supported thermal printers:
Printer
Windows Driver
S40
S41
S42
S50
S50a
S51
S51a
S52
S52a
S30
S30a
Citizen CLP6001
Citizen CLP6002
Citizen CLP6002
Citizen CLP7001
Citizen CLP7202e
Citizen CLP7002
Citizen CLP7202e
Citizen CLP7002
Citizen CLP7202e
Zebra TLP2742
Zebra TLP2844
13
Windows 95/ME/NT/Win2000 HiQ Printer Driver Installation
Click on the Start Flag button then on Settings and then on Printers to bring
up the Add Printers Window.
Double Click on the Add Printer icon
14
Click Next to continue or Cancel to Quit the installation. This window may
display Welcome on windows 2000 systems.
Bullet should be on Local Printer. Click Next to continue.
15
Click the LPT1: Port setting if a parallel printer cable is being used or the
USB port setting if the USB cable is being used then click Next
Click on the Have Disk button
16
Click on the Browse button
Click on the Drives drop-down box arrow. For Windows 2000 systems use
the Look-in drop-down box.
Click on the CD-ROM drive icon in which TITAN is installed then double
click on the drivers folder in the Folders window.
17
Double click on the HiQS30 or HiQS50 folder
Click the OK button
For S50(a) printers click Citizen under Manufacturers and under Printers
click CLP7001for the S50 and CLP7202e for the S50a then click Next.
For the S30(a) Printer click Zebra under Manufacturers and under Printers
click Zebra TLP2742 for the S30 and TLP2844 for the S30a then click Next.
18
For the S30a Printer click Zebra under Manufacturers and Zebra TLP2844
under Printers and then click Next
The printer name will be the same as the printer name selected above. Do
not change the printer name as Titan uses the name to identify printer types.
Click the Finish button
19
The system will return to the Printers selection window
20
Windows XP HiQ Printer Driver Installation
Click on the Start Flag then click on Control Panel
21
Double Click ‘Printers and Faxes
Click ‘Add a Printer’ under Printer Tasks
22
Click Next
Uncheck the Automatically Detect and Install box then click Next
23
Click Next if this window appears
Click next if the printer is connected to the standard LPT1 parallel port.
Click the dropdown arrow to make a different port selection.
24
Click on the Have Disk button
Click on the Browse button
Click on the Look in drop-down box arrow and locate the Drivers folder on
the Titan CD. Click on the HiQ50 for the S50(a) or HiQ30 for the S30(a)
printer. Click Citizen.inf for the S50(a) and Zebra.inf for the S30(a) then
click Open.
25
Click the OK button
Select the CLP7001 for the S50 printer or CLP7202e for the S50a printer
then click Next
26
Select the TLP2742 for the S30 printer or TLP2844 for the S30a printer
then click Next
27
Click Next, DO NOT rename the printer
Click Next, this printer is not normally shared
28
Select do not print a test page then click Next.
Click Finish, the system will return to the Printers selection window
29
NORMAL SPEED HiQ THERMAL PRINTER DRIVER SETUP
Normal speed printing uses window fonts and the Seagull printer driver. The
actual labels-per-minute speed varies depending on label size and type of
data being printed.
Barcode printing in normal speed is the slowest and can range from 10 labels
a minute to 20 labels a minute depending on how much information is
printed along with the barcode.
Labels formats that do not have barcodes or counter will print as high as 110
labels a minute. When printing barcode or counter labels use High Speed
internal fonts.
HiQ normal speed supports Logo printing. Logos cannot be printed in High
Speed or with a dot matrix printer selection
Access the Windows Driver setup for Windows 95/98/ME/2000/NT:
You cannot access the Windows XP printer drivers from the Titan menu.
Skip to Access the Windows Driver setup for Windows XP if you have a
Windows Xp system. For other than XP click on the Printer Settings button
and the following window will appear. Click the Setup button to enter
properties.
30
Click the Settings button.
Skip the next section and go to Windows Printer Driver Settings.
Access the Windows Driver setup for Windows XP:
Click on the Windows task bar Start Flag then click Control Panel.
31
Double Click ‘Printers and Faxes
PROPERTIES - Right Click the S30 (Zebra 2742), S30a (Zebra 2844) , S50
(Citizen 7001) or S50a (Citizen 7202e) Printer Icon then click properties.
32
Windows Printer Driver Settings:
For the S50 printer
Click the Device Setting tab.
33
The following boxes must be checked properly for printers with and without
the label cutter option installed. Check the Cutter box if the label cutter is
installed and being used in the printer.
34
Settings for the S50 Printer with cutter
XP system users must first click the General tab then the preferences tab.
Click the Stock tab and set the properties to the following for printers using
the label cutter option.
35
Settings for the S50(a) Printer without the Label Cutter Option
XP system users must first click the General tab then the preferences tab.
Click the Stock tab and set the stock properties as follows. If the printer
driver has a Label Sensor GAP setting, select it rather than Current
Settings.
Set the Sensor Location to Front for the S50a printer.
Click the Option tab and set the properties to the settings shown in the
window image below. The print head temperature setting for thermal label
tape must be set to 27.
36
To adjust the temperature setting, place the cursor on the Cooler/Hotter
slider, old down the left mouse switch and drag the slider until the desired
heat setting appears in the window.
Note: Temperature for TT and TU type label tape is 27. Clean room TY
and TW tape requires a Print Head heat setting of 27.
Click Apply and then OK to end properties setup
37
For the S30 or S30a Printer
XP system users must first click the General tab then the preferences tab.
Click the stock tab and apply settings as shown. Adjust Offset to align
printed data vertically … higher value moves all printed data up lower value
moves data down (.1 = 1/10 inch).
XP system users must first click the General tab then the preferences tab.
Click the Options tab and set print speed to 2 and Density to 12 as shown.
Click Apply and then OK to end properties setup
38
S50 HIGH SPEED HiQ THERMAL PRINTER SETUP
High-speed printing uses internal printer fonts and is normally used when
printing barcode labels or labels with counter fields applied. Printer setup
requirements for high-speed printing are set from the Titan program via the
Printer Selection menu. High-speed cannot be used with Logo printing.
Select the printer number for printing labels with the current format. Two
printers can be selected
Select the printer model being used to print labels.
If a non-standard printer driver name is used you must specify the printer
type being emulated such as Epson Fx, Epson LQ or Okidata 39X. Other
printer models must emulate the types listed or Titan may not work properly.
Click the Use Internal Fonts (HiQ Hi-Speed) check box then click Setup.
Click the Settings button.
Make settings as defined below the next window.
39
Click the large button on the upper left to select either Cutter On Continuous Media if your printer uses a label cutter or Edge Sensor On –
Perforated Tape if perforated tape without the cutter is used.
Click the down arrow associated with the desired drop down box. If the
arrow is gray no setting is required.
The printer will print satisfactorily at speed settings 2-6 inches per second.
Set the heat setting initially to 27. Print several labels then examine the print
quality. If the printing is too light increase the heat setting, if the printing is
too black decrease the heat setting.
Set top offset to 0.0 for perforated label tape and to –0.10 for continuous
label tape. If the printing is too high on the label tape lower the top offset.
Negative numbers can be selected. If the printing is too low on the label
increase the top offset setting.
Set the Cut-offset setting to 1.1 for continuous label tape. This setting will
not appear when EDGE Sensor On (perforated tape) is selected.
Click OK when all settings have been made.
INSTALLING DOT MATRIX PRINTER WINDOWS DRIVERS
This procedure is only required for systems using Windows drivers for Dot
Matrix Printers. You cannot print logos with dot matrix printers.
40
The following drivers must be installed and used to print properly to the
following supported printers:
Printer
EPSON FX Printer
EPSON LX-300
EPSON LQ570+
EPSON LQ570e
OKIDATA 39X
Windows Driver
EPSON FX870 or FX850 or FX1050
EPSON FX870 or FX850 or FX1050
EPSON LQ570 ESC\P2 (Do Not use LQ570 +)
EPSON LQ570 ESC\P2 (Do Not use LQ570 e)
IBM Proprinter XL24 (see notation below)
The FX870 driver must be used for the Epson FX880, FX880+ and FX890 printers.
The LQ570 Esc\P2 driver must be used for the Epson LQ570+, LQ570e and LQ590
printers.
OKIDATA 39X - on your printer change the printer emulation setting ( see your
printer manual “Change Menu Settings” section ) to IBM PPR (Proprinter) and on
your PC Windows operating system install the IBM Proprinter XL24 print driver.
Start Titan and select the IBM Proprinter XL24 in Printer Selection option.
Windows 95/98/ME/Window2000
Click on the Start Flag then on Settings and then on Printers to bring up the
Add Printers Window.
41
Double Click on the Add Printer icon
Click Next to continue, Cancel to Quit installation
42
Bullet should be on Local Printer. Click Next to continue.
Select the printer Manufacturer from the left drop-down box and Printer
Model from the right drop-down box then click Next.
**Remember, most printer models use alternate drivers. See specifics at the
beginning of this section.
43
Click the LPT1: Port setting if a parallel printer cable is being used or the
USB port setting if the USB cable is being used then click Next
If this selection is to be your default printer then click Next otherwise click
the No bullet hole and then click Next. Do not change the name of the
printer as Titan uses it for automatic settings.
44
Click the No bullet hole and then click Finish to end the driver installation
procedure.
The driver has been successfully installed. Click the X on the upper right
side of the window to return to your desktop.
The system will return to the Printers selection window
45
Windows XP
Click on the Start Flag then click on Control Panel
46
Double Click ‘Printers and Faxes
Click ‘Add a Printer’ under Printer Tasks
47
Click Next
Click Next for local printer
48
Click Next if this window appears
Click next if the printer is connected to the standard LPT1 parallel port.
Click the dropdown arrow to make a different port selection.
49
Select the printer Manufacturer from the left drop-down box and Printer
Model from the right drop-down box then click Next.
**Remember, most printer models use alternate drivers. See specifics at the
beginning of this section.
Click on the Yes or NO bullet then click Next. You do not have to select
your label printer as default to print from Titan.
Click Next for local operations. See your network administrator for printer sharing.
50
Click Next
51
Click Finish
The system will return to the Printers and Faxes window. Return to your
window selection window and start the program.
Repeat the Add Printer procedure for your actual printer model (FX880,
FX880+ , LQ570e, etc) if an alternate printer driver was selected. This will
eliminate Windows XP from reminding you that you have new hardware
(printer) installed.
52
If the LQ printer is printing slow change the Windows Print Driver Print
Quality setting from 360 x 360 dots per inch to 180 x 180 dots per inch as
shown below.
If running with
53
Windows 2000,Window NT or Windows XP the printer driver resolution
property must be changed to 120 X 72.
54
S50 and S50a HiQ PRINTER ADJUSTMENTS
S50 Print Head Offset Adjustments
This setting is factory-set and would not normally be required a long as HiQ
label tape and ribbon is being used.
Turn the Offset Adjust Screw until the indicator in the Offset Check window
is approximately 2/3 from the top (a). The HiQ Setting shown below is the
normal start point for this adjustment. Slight adjustments may be necessary
from here to obtain the best print quality.
55
S50/S50a Head Pressure Adjustment
This setting is normally set at the factory for a 4 inch label width and may
need adjustment when other label widths are in use.
The Initial pressure should be set for the label width in use as indicated in
the chart below. Watch the Check Window, as the pressure adjustment
thumbscrew is being turned, until the slider is in the desired position. A
slight adjustment may be needed once this initial setting is made.
Print some label and check the right-to-left printing quality. Turn the Head
Pressure Adjustment Screw clockwise to darken the left side of the label or
counterclockwise to darken the right side of the label.
56
S50 Printer Ribbon Tension Adjustments (not available on S50a)
This adjustment may be necessary if the ribbon wrinkles causing skips in the
label printing or the ribbon slips so that it does not advance correctly.
Increase the ribbon tension if the ribbon wrinkles during the printing
process. Decrease the tension if the ribbon is not advancing properly.
Push the ribbon variable knob in and turn it counterclockwise to increase the
tension or clockwise to decrease the tension.
For additional detail about the thermal printer and its adjustments, refer to
the HiQ printer User Manual supplied with each printer.
57
STARTING THE TITAN PROGRAM
To start the Titan program from Windows desktop Click:
Click Start Flag button
Click on Select Programs
Locate and click on Titan Applications
Click on Titan
Drag the Titan Icon to your desktop for quick access to the program.
58
QUICK START FEATURE
The quick start feature allows you to select default label formats to simplify
the label formatting process.
When you are at the Edit Label and preview window click the Quick Start
Menu Selection from the menu bar at the top of the screen. Select the printer
type you are using then click OK. A list of available formats for the printer
type selected will appear.
Use the drop down box to select barcode, non-barcode formats or special. If
you are using the HiQ printer you will also need to select High-Speed or
Windows Fonts (Normal Speed) from the speed select drop down box.
Special is used for format requests made by specific customers. When the
desired selection is made the available default formats will be listed for you
to choose.
The names of the formats will provide information relative to the size of the
label being used and the number of lines to be printed. Select the one that
either matches your format requirements identically or one that comes the
closest. Special formats are usually listed by a specific customer name.
Once the selection is made click the Save As button and name the format as
you wish. You can use the same format name as the default format.
Once this process is complete you can modify the format to meet your
specific needs. All changes made at this point will be saved under the name
you have selected. From this point on this new format will be used for your
label printing process. Other format types can be made and saved under a
different format name.
In the case of multiple formats you can call up a specific format by going to
Database at the menu bar then selecting list and then the format.
When starting Titan the last format used will become the start-up format and
the last data entered will appear in the Edit Label and Preview windows.
59
BARCODE LABELS
Click the Edit Format button to change a line to barcode or create a new
barcode format.
Select the line you would like to have be a barcode and click the Line Type
drop-down box arrow to reveal the line types available.
From the Line Type list click on Barcode
Click on the Barcode Alignment drop-down box arrow and select where on
the label you would like to print the barcode. The default for this selection is
Centered which provides a low density barcode across the entire width of the
label tape. Changing Barcode Width to medium or narrow will print
Barcodes of a higher density.
Selecting Left or Right will place a higher density barcode on either side of
the label tape with a small amount of room for human readable information
on the opposite side. Left and Right barcode label types are NOT available
in High-Speed printing at this time.
The samples below are samples of 2 of the justification types
Click on the Barcode Type Dropdown box and select the barcode symbology
you wish to use. Titan currently supports Interleaved 2 of 5, Interleaved 2 of
5 with Check Digit, Code128 subset C and Code 39.
60
Click on the Barcode Height drop-down box and select the height of the
barcode you wish to print on the label. The selection allows you to pick
height from ¼” to 15/16” in 1/16” increments. This initial setting can be
easily changed later from the Edit Label window by use of the
increase/decrease size arrows and the preview window.
Selecting a barcode line automatically sets the line to incrementing numbers
and check marks the Unique Line box. This insures that each time a barcode
label is printed a barcode number is not duplicated.
All labels printed with Titan recorded in a database and newly requested
barcodes are check against the database to prevent duplication. Deleting of
database records, un-selecting of the database feature or un-checking the
unique number box will disable duplicate barcode checking.
61
IMPORTING A DATABASE FILE
Titan allows the importing of the following database structures:
Excel – MS Access – FoxPro – Dbase – Lotus - Text (comma separated)
Access 20000, Excel 2000 and FoxPro 3.0 files cannot be imported.
The importing process allows the user to program which information field
goes on which line on the label. The imported information can be directed to
either the printer or the Titan database or both.
The Titan Database will not permit duplicate label information however
duplicate labels received from the import file will be printed.
If the import file has a field for the quantity of labels per record the formatter
will allow the selection that field for direct printing otherwise only one label
per record will be printed.
After setting up the label format go to the import file formatting routine by
clicking the Data Base dropdown box then click Labels in Data Base and
then Import.
62
Click the New button then name the import format then click OK. The
import format screen below will appear.
Click the Select Database Button then select the import file type (Text,
Excel, Etc).
Locate and open the import file.
Select the line number you wish to import field data into.
Select the field you wish to have printed on the select line and then click
Add. Select as many fields as will fit on the label size you are using.
Repeat the above for all line numbers.
If your database has a label quantity field select the line called Quantity and
then Add the quantity field.
After import formatting is complete the importing can take place. When
clicking on import you will be asked if you wish to database and print at the
same time. Check the appropriate boxes, ready the printer if necessary and
then click OK.
63
PRINTER TROUBLESHOOTING GUIDE
1. HiQ Label Quality Problems
A: Printed label is grainy across the entire width of the label
Cause: Wrong Ink Ribbon Installed
Verify that the ink ribbon installed is the type
recommended by your supplier.
Cause: Print head temperature is not set correctly.
Check that the print head temperature is set correctly as
specified in the INSTALLING THE HIQ THERMAL
PRINTER DRIVER section of this manual.
ON S50 printers ensure that the print head angle is
adjusted to achieve the print quality desired. The HiQ
PRINTER ADJUSTMENTS section of this manual
offers the suggested start point for this adjustment. Make
small incremental adjustments from the start point to
achieve optimum results.
B: Label is grainy on one side of the label
Cause: Tension is uneven across the print head.
On S50 and S50a printers adjust the print head tension
for optimum results. The HiQ PRINTER
ADJUSTMENTS section of this manual offers the
suggested start point for this adjustment. Make small
incremental adjustments from the start point to achieve
optimum results.
64
C: Ink ribbon sticks to media or tears when printing.
Cause: Print head temperature too high.
Check that the print head temperature is set correctly as
specified in the INSTALLING THE HIQ THERMAL
PRINTER DRIVER section of this manual.
D: Ribbon wrinkles causing skips on the label.
Cause: Ribbon tension adjustment too loose.
Increase the ribbon tension as specified in the S50 HiQ
PRINTER ADJUSTMENTS section of this manual.
Cause: Uneven head pressure adjustment.
On S50 and S50a printers adjust the pressure as specified
in the Head Pressure Adjustment section of this manual.
S30 printers do not have this adjustment.
E: Tape feeds but no printing takes place.
Cause: The ink ribbon is installed backward.
Check the printer manual for proper ink ribbon
installation. Make sure the ink side of the ribbon faces
the label tape.
There is a narrow vertical band of printing missing on the label
causing partial characters or white stripes within a barcode.
Cause: The print head has ink build-up
Clean the print head with the yellow cleaning pen
provided. If the problem persists clean the print head
with alcohol and a soft and clean non-abrasive cloth. Rub
the trouble spot briskly. DO NOT use an abrasive
material on the print head.
65
2. HiQ Label Printing Problems
Printing is not vertically centered on the label.
Cause: The PC S50 Windows Printer Driver Top Offset needs
to be adjusted.
The INSTALLING THE HIQ THERMAL PRINTER
DRIVER section of this manual offers the suggested start
point for this setting. If the printing is too high on the
label reduce the Top Offset setting to bring it down …
Negative numbers are allowed. If the printing is too low
on the label increase the value of this setting.
Cause: Label tape is not feeding smoothly within the printer.
Check the printer to insure there is no obstruction along
the tape path. Make sure the label tape unwinds freely
and smoothly from the supply spool.
Cause: The PC S30a label height setting needs to be lowered.
Click on the Titan Edit Format button and change the
Height setting to 1/8” lower than the current setting.
For example change the ¾” (.750) height to 5/8” (.625)
or 1” (1.000) height to 7/8” (.875).
66
S50 - Printing is not horizontally centered on the label.
Cause: The left margin setting is not set correctly.
Check the Titan margin setting in the Edit Format section
of the program. For the S50 printer this is normally set to
5/8” for perforated label tape and 0” for continuous unperforated label tape. The S30(a) printer is self adjusting.
Cause: The wrong label width is selected.
Mae sure the label size on the Titan preview header matches
the label size being used in the printer. Go to Titan’s Edit
Format if changes are required.
The S50 Printer skips entire labels with perforated tape or cuts a label
twice as high as requested with continuous tape
Cause: The TOP OFFSET is set too high in the PC
If running normal speed check the windows printer driver
Top Offset setting as defined in the ”Installing the HiQ
Thermal Printer Driver” section of this manual. Reduce
the Top Offset setting to eliminate the problem.
If running high-speed check the Top Offset setting as
defined in the HIGH SPEED THERMAL PRINTER
SETUP section of this manual. Reduce the Top Offset
setting to eliminate the problem.
Clean the printer tape path and feed roll.
Cause: Not enough top or bottom margin on the label
Although Titan is designed to prevent this condition the
use of some Windows fonts may result in this problem.
Provide more top or bottom margin via use of the Titan
move Up/Down arrows.
67
Cause: Ribbon Tension Setting adjustment is required on S50
printer only.
Adjust the ribbon tension as defined in the Printer Ribbon
Tension Adjustments section of this manual. If the
printed information is too high on the label increase the
front (take-up) ribbon tension to 3 and decrease the back
(feed) ribbon tension to 1.
The S50 or S50a Printer reports intermittent Paper Errors
Cause: Perforated Label Tape gap holes are not correctly
aligned over the Gap Sensor.
Check that the label tape is mounted correctly on the left
side of the label tape supply holder.
Check that the label tape is tight against the fixed label
tape guide on the left side and snug against the movable
paper guide on the right side.
Adjust the head pressure as specified in the Head
Pressure Adjustment section of this manual.
The S50 or S50a printer reports End or Out of Paper Errors
Cause: The label tape is not tracking properly through the
printer.
Check for label tape feeding as outlined in the
intermittent paper errors section above.
Clean the printer tape path and feed roll.
Cause: the GAP sensor may need adjustment.
Perform the GAP sensor adjustment as outlined in the
HiQ Printer manual.
68
3. Heat Sealing Problems
Labels fall off after a few wash cycles.
Ensure the label media and ribbon are the correct type.
Ensure the temperature and seal time are set to your supplier’s
recommendations.
Labels buckle or bubble on the garment fabric.
Ensure the temperature and seal time are set to your supplier’s
recommendation.
4. System Problems
The Titan program background display’s DEMO MODE.
Titan 2.1.xx - Check that the Blue Sentinel Pro security key is
plugged into the LPT1 printer port.
Titan 2.1.xx - Check that the Sentinel Pro security key windows
driver is installed.
Titan version 2.2.2 and later require an access code. Call your
Titan provider and request the code.
The message “No Print Drivers Available” appears at the start-up of the
Titan program.
Install the printer driver for the printer to be used with the Titan
program. The driver installation procedure is available earlier in
this document.
69
5. Dot Matrix Problems
The printer skips several labels after printing a good one
Check that the Epson FX870 driver is installed and selected for
any Epson FX model printers. Do not use the Epson FX880
driver for FX880 printers.
Check that the Epson LQ570 ESC/P2 driver is installed and
selected for any Epson LQ model printer. Do not use the Epson
LQ570e driver or LQ590 driver.
The printer skips one label after printing a good one
Make sure the correct label size is selected on the Titan program.
Increase the amount of top and/or bottom margin on the printed label.
The LQ printer prints correctly but very slowly.
Change the graphic print resolution in the windows printer
driver from 360 x 360 Dots-Per-Inch to 180 x 180 DPI. See the
Printer Driver Settings section of this guide.
The printer prints unintelligent data across the width of the printer
and off the label tape.
The printer cable is poorly connected or defective. Check
connections or replace the cable.
The line spacing is inconsistent, lines of data are printing too close
together or the printed characters are squeezed up and down.
Check that the form and density levers on the printer are set
correctly. See the printer models section for pictures of the
LQ590 form and density level settings.
70
The Titan program background display’s DEMO MODE.
Titan 2.1.XX - Check that the Blue Sentinel Pro security key is
plugged into the LPT1 printer port.
Titan 2.1.XX - Check that the Sentinel Pro security key windows
driver is installed.
Titan version 2.2.2 and later require an access code. Call your
Titan provider and request the code.
71