1
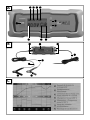
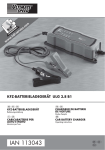
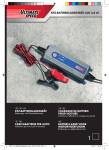
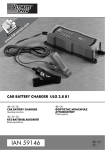
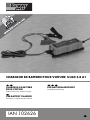
CHARGEUR DE BATTERIE POUR VOITURE ULGD 3.8 A1
CHARGEUR DE BATTERIE
POUR VOITURE
Traduction du mode d‘emploi d‘origine
CAR BATTERY CHARGER
Translation of original operation manual
IAN 102626
KFZ-BATTERIELADEGERÄT
Originalbetriebsanleitung
Avant de lire le mode d'emploi, ouvrez la page contenant les illustrations et familiarisez-vous ensuite avec
toutes les fonctions de l'appareil.
Klappen Sie vor dem Lesen die Seite mit den Abbildungen aus und machen Sie sich anschließend mit allen
Funktionen des Gerätes vertraut.
Before reading, unfold the page containing the illustrations and familiarise yourself with all functions of
the device.
FR / BE
DE / AT / CH
GB
Traduction du mode d‘emploi d‘origine
Originalbetriebsanleitung
Translation of original operation manual
Page
Seite
Page
1
9
17
A
B
C
Table des matières
Introduction . . . . . . . . . . . . . . . . . . . . . . . . . . . . . . . . . . . . . . . . . . . . . . . . . . . . . . . . . . . . 2
Usage conforme . . . . . . . . . . . . . . . . . . . . . . . . . . . . . . . . . . . . . . . . . . . . . . . . . . . . . . . . . . . . . . . . . . . . . 2
Matériel livré . . . . . . . . . . . . . . . . . . . . . . . . . . . . . . . . . . . . . . . . . . . . . . . . . . . . . . . . . . . . . . . . . . . . . . . 2
Descriptif des pièces. . . . . . . . . . . . . . . . . . . . . . . . . . . . . . . . . . . . . . . . . . . . . . . . . . . . . . . . . . . . . . . . . . 2
Caractéristiques techniques . . . . . . . . . . . . . . . . . . . . . . . . . . . . . . . . . . . . . . . . . . . . . . . . . . . . . . . . . . . . 2
Sécurité . . . . . . . . . . . . . . . . . . . . . . . . . . . . . . . . . . . . . . . . . . . . . . . . . . . . . . . . . . . . . . . 2
Consignes de sécurité . . . . . . . . . . . . . . . . . . . . . . . . . . . . . . . . . . . . . . . . . . . . . . . . . . . . . . . . . . . . . . . . 2
Utilisation . . . . . . . . . . . . . . . . . . . . . . . . . . . . . . . . . . . . . . . . . . . . . . . . . . . . . . . . . . . . . 4
Avant la mise en service . . . . . . . . . . . . . . . . . . . . . . . . . . . . . . . . . . . . . . . . . . . . . . . . . . . . . . . . . . . . . . . 4
Raccordement. . . . . . . . . . . . . . . . . . . . . . . . . . . . . . . . . . . . . . . . . . . . . . . . . . . . . . . . . . . . . . . . . . . . . . . 4
Séparation . . . . . . . . . . . . . . . . . . . . . . . . . . . . . . . . . . . . . . . . . . . . . . . . . . . . . . . . . . . . . . . . . . . . . . . . . 4
STANDBY / Mesurer la tension de la batterie . . . . . . . . . . . . . . . . . . . . . . . . . . . . . . . . . . . . . . . . . . . . . . 4
Régénération . . . . . . . . . . . . . . . . . . . . . . . . . . . . . . . . . . . . . . . . . . . . . . . . . . . . . . . . . . . . . . . . . . . . . . . 4
Sélection du mode . . . . . . . . . . . . . . . . . . . . . . . . . . . . . . . . . . . . . . . . . . . . . . . . . . . . . . . . . . . . . . . . . . . 5
Mode 1 „6 V“ (7,3 V / 0,8 A) . . . . . . . . . . . . . . . . . . . . . . . . . . . . . . . . . . . . . . . . . . . . . . . . . . . . . . . . . 5
Mode 2
„12 V“ (14,4 V / 0,8 A) . . . . . . . . . . . . . . . . . . . . . . . . . . . . . . . . . . . . . . . . . . . . . . . . . . . 5
Mode 3
„12 V“ (14,4 V / 3,8 A) . . . . . . . . . . . . . . . . . . . . . . . . . . . . . . . . . . . . . . . . . . . . . . . . . . . 5
„12 V“ (14,7 V / 3,8 A) . . . . . . . . . . . . . . . . . . . . . . . . . . . . . . . . . . . . . . . . . . . . . . . . . . . . 5
Mode 4
Chargement de maintien . . . . . . . . . . . . . . . . . . . . . . . . . . . . . . . . . . . . . . . . . . . . . . . . . . . . . . . . . . . . . . 5
Fonction de protection de l‘appareil . . . . . . . . . . . . . . . . . . . . . . . . . . . . . . . . . . . . . . . . . . . . . . . . . . . . . 6
Maintenance et entretien . . . . . . . . . . . . . . . . . . . . . . . . . . . . . . . . . . . . . . . . . . . . . . . . . 6
Garantie . . . . . . . . . . . . . . . . . . . . . . . . . . . . . . . . . . . . . . . . . . . . . . . . . . . . . . . . . . . . . . 6
Service après-vente . . . . . . . . . . . . . . . . . . . . . . . . . . . . . . . . . . . . . . . . . . . . . . . . . . . . . 6
Importeur . . . . . . . . . . . . . . . . . . . . . . . . . . . . . . . . . . . . . . . . . . . . . . . . . . . . . . . . . . . . . 6
Mise au rebut . . . . . . . . . . . . . . . . . . . . . . . . . . . . . . . . . . . . . . . . . . . . . . . . . . . . . . . . . . 7
Traduction de la déclaration de conformité originale . . . . . . . . . . . . . . . . . . . . . . . . . . 7
ULGD 3.8 A1
1
FR
BE
FR
BE
CHARGEUR DE BATTERIE
POUR VOITURE ULGD 3.8 A1
Introduction
Félicitations pour l‘acquisition de votre
nouvel appareil ! Vous avez opté pour
un produit de grande qualité.
Le mode d‘emploi fait partie intégrante de ce produit.
Il contient des indications importantes pour la sécurité,
l’utilisation et la mise au rebut. Veuillez lire consciencieusement toutes les indications d‘utilisation et de
sécurité du produit. Ce produit doit uniquement être
utilisé conformément aux instructions et dans les
domaines d‘application spécifiés. Lors d‘une cession à
tiers, veuillez également remettre tous les documents.
Usage conforme
L’Ultimate Speed ULGD 3.8 A1 est un chargeur de
batterie automobile multi-étapes servant à recharger
les accumulateurs au plomb de 6 et 12 V (batteries)
et à électrolyte (WET), à nattes absorbant l’électrolyte (AGM) ou à gel électrolytique (GEL), et à
effectuer des recharges de compensation.
L’appareil ne convient pas pour recharger les
accus lithium-ions. L’appareil n’est pas destiné à un
usage professionnel et ne doit servir qu’à l’intérieur.
Affichage d‘état
Affichage de tension
Touche de sélection (MODE)
Voir illustration B :
Chargeur
Trous de fixation
Câble d‘alimentation
Pince de raccordement de pôle plus (rouge)
Pince de raccordement de pôle moins (noire)
Câble de raccordement de pôle plus (rouge)
cosse de batterie inclue
Câble de raccordement de pôle moins (noire)
cosse de batterie inclue
Caractéristiques techniques
Tension d‘entrée :
220 - 240 V ∼ 50/60 Hz
Puissance absorbée : 60 W
Tension de sortie :
6V
/ 12 V
Intensité de sortie :
0,8 A / 3,8 A
T2A
Fusible (interne) :
2A
Température ambiante : 0°C bis 40°C
Type de protection
du boîtier :
IP 65
Classe de protection : II /
Type de batterie :
Le fabricant décline toute responsabilité en cas de
dommages résultant d’une utilisation non conforme.
Matériel livré
Batterie plomb-acide 6 V
1,2 Ah - 14 Ah
Batterie plomb-acide 12 V
1,2 Ah - 120 Ah
1 Chargeur de batterie pour voiture ULGD 3.8 A1
Sécurité
2 Pinces de raccordement (1 rouge, 1 noire)
Consignes de sécurité
1 Mode d‘emploi
Descriptif des pièces
Voir illustration A :
12 V / 0,8 A (mode 2)
12 V / 3,8 A (mode 3)
12 V / 3,8 A (mode 4)
6 V / 0,8 A (mode 1)
LED de polarité
LED Standby
Affichage „procédure de charge active“
2
Le chargeur ne convient à une utilisation
qu’à l’intérieur de locaux.
■ Cet appareil ne doit pas être utilisé par des enfants
de moins de 8 ans ni par des personnes ayant
des capacités physiques, mentales et sensorielles
réduites ou qui n’ont pas l’expérience et les connaissances nécessaires, à moins qu’elles ne soient sous
la surveillance d’une personne responsable de leur
sécurité ou qu’elles aient reçu de cette personne
des directives concernant l’utilisation de l’appareil et
qu’elles comprennent les dangers pouvant en résulter. Ne pas laisser les enfants jouer avec l’appareil.
Il est interdit aux enfants de nettoyer ou d’entretenir
l’appareil sans surveillance.
ULGD 3.8 A1
■ N’utilisez pas le chargeur pour recharger des piles
car ces dernières ne sont pas rechargeables.
■ N’utilisez pas le chargeur pour recharger des
accus lithium-ions.
■ Après avoir déposé la batterie, veillez à ce
qu’elle se trouve sur une surface bien aérée
pendant la recharge.
RISQUE D’EXPLOSION ET D’INCENDIE !
Protégez-vous contre une réaction de gaz détonant
hautement explosif !
■ Le mode de fonctionnement automatique ainsi
que les restrictions applicables à l’utilisation sont
expliquées ci-après dans ce mode d’emploi.
■ Assurez-vous que le câble de branchement positif (+) n’a pas de contact avec une conduite de
carburant (par. ex. conduite d’essence) !
RISQUE DE CHOC ÉLECTRIQUE !
■ N’utilisez pas l’appareil lorsque le câble, le
cordon d’alimentation ou la fiche secteur sont
endommagés. Des cordons d’alimentation
endommagés signifient un danger de mort
par électrocution.
■ Si le câble d’alimentation est endommagé, il
doit être remplacé par le fabricant, son service
après-vente ou des personnes de qualification
similaire afin d’éviter un danger.
■ Avant le raccordement au courant du réseau,
assurez-vous que le courant électrique présente
les propriétés et les équipements prescrits,
c‘est-à-dire une tension de 230 V ∼ 50 Hz, un
conducteur neutre mis à la terre, un fusible de
16 A et un disjoncteur de protection (interrupteur de protection contre les courants de
courtcircuit) !
■ Avant de brancher ou de débrancher à la
batterie, débrancher le chargeur de batterie
du réseau.
■ Raccorder en premier la borne d’alimentation
non branchée à la carrosserie. Raccorder à la
carrosserie l’autre borne d’alimentation éloignée de la batterie et de la conduite d’essence
Ne brancher qu’après le chargeur de batterie
au réseau d’alimentation.
■ Après la charge, débrancher le chargeur de batterie du réseau d’alimentation. Ce n’est qu’après
qu’il faut enlever la pince de raccordement de la
carrosserie. Enlever ensuite la pince de raccordement de la batterie.
ULGD 3.8 A1
■ Assurez-vous qu‘aucune source de lumière libre
ne soit présente lors de la procédure de chargement et de charge de compensation (flammes,
cendres ou étincelles).
■ Veillez à ce que des matières explosives ou
inflammables p.ex. essence ou solvant ne
puissent pas s’enflammer lors de l’utilisation
du chargeur de batterie.
■ Veillez à une aération suffisante pendant la
recharge.
RISQUE DE BRÛLURE PAR ACIDES !
■ Portez des lunettes de sécurité ! Portez des gants
de protection ! Si vos yeux ou votre peau sont entrés en contact avec l‘acide de la batterie, rincez
la partie du corps concernée avec une grande
quantité d‘eau courante et claire et consultez un
médecin dans les délais les plus brefs !
■ Éviter un court-circuit électrique lors du branchement du chargeur de batterie à la batterie.
Raccordez le câble de raccordement avec le
pôle négatif exclusivement sur le pôle négatif
de la batterie ou sur la carrosserie. Raccordez
le câble de raccordement avec le pôle positif
exclusivement sur le pôle positif de la batterie !
■ Ne pas placer le chargeur de batterie à proximité du feu, des chaleurs ni soumettre à l’impact
de températures dépassant durablement 50 °C !
■ Ne pas endommager les conduites de carburant, des câbles électriques, des freins, du
système hydraulique, de l’eau ou lors de l’installation du chargeur de batterie avec les vis.
■ Ne jamais recouvrir le chargeur de batterie
avec des objets !
■ Protégez les surfaces de contact électriques de
la batterie des courts-circuits !
■ Utilisez le chargeur de batterie exclusivement
pour les opérations de charge et de maintien de
batteries 6 V / 12 V au plomb non endommagées. Ne pas charger de batteries gelées.
3
FR
BE
FR
BE
STANDBY /
Mesurer la tension de la batterie
Utilisation
Avant la mise en service
♦ La notice d‘utilisation est à consulter avant le
raccordement du chargeur.
♦ En outre, les instructions du fabricant du
véhicule concernant une batterie branchée en
permanence sont à prendre en considération.
S‘assurer que le contact est coupé.
♦ Nettoyer les pôles de la batterie. Faites attention
à ce qu‘aucune saleté n‘entre en contact avec
vos yeux.
Suite au raccordement à l‘alimentation en courant,
l‘appareil est en mode STANDBY. L‘affichage
Standby s‘allume. Lorsque les pinces de raccordement seront branchées, la tension de la batterie
s‘affichera sur l‘écran LCD (affichage tension ).
Les segments de l‘affichage d‘état sont vides.
Si la tension mesurée est inférieure à 3,8 V ou est
supérieure à 15 V, la batterie n‘est pas chargée.
Le message d‘erreur „Err“ apparaît alors sur
l‘écran. L‘appareil se met en monde Standby.
♦ Assurer une ventilation convenable.
Raccordement
♦ Avant la procédure de recharge, y compris celle
compensation, dans un véhicule où la batterie est
reliée en permanence à ce dernier, débranchez
d’abord le câble négatif (noir) du véhicule du
pôle négatif de la batterie. Le pôle négatif de
la batterie est en règle générale relié à la
carrosserie du véhicule.
♦ Branchez la pince de raccordement plus
(rouge) au pôle plus de la batterie.
♦ Branchez la pince de raccordement moins
(noire) au pôle moins de la batterie.
♦ Brancher le câble d‘alimentation du chargeur
de batterie à une prise de courant.
Batterie 6 V:
Si la tension mesurée se situe entre 3,7 V et 7,3 V,
seul le mode 1 sera sélectionnable.
Batterie 12 V:
Si la tension de la batterie mesurée se situe dans la
plage critique de 7,3 à 10,5 V, examinez l‘appareil pour découvrir si une batterie 6 V complètement chargée ou une batterie de 12 V déchargée
s‘y trouve. Appuyez sur la touche de sélection
pour sélectionner un mode, l‘appareil effectuera
une mesure de la tension durant env. 90 sec.
S‘affichera alors sur l‘écran :
♦ L‘affichage de tension de la batterie affiche
la tension actuelle de la batterie.
♦ En cas de branchement inversé des pinces de
sortie, la LED de polarité s‘allumera.
Séparation
Régénération
♦ Séparez l‘appareil du réseau électrique.
♦ Enlevez la borne contact moins (noire)
pôle moins de la batterie.
♦ Enlevez la borne contact plus (rouge)
pôle plus de la batterie.
4
Si après 90 sec. la tension se situe entre 7,3 et 7,5 V,
la batterie 12 V est défectueuse.
L‘appareil se met en monde Standby.
du
du
Si après 90 sec. la tension se situe entre 7,5 et
10,5 V, il s‘agit d‘une batterie 12 V. Le processus
de charge passe en mode charge par impulsions
pour la régénération.
L‘affichage de tension clignote. Si la tension
de la batterie monte jusqu‘à 10,5 V, le mode de
charge supérieur s‘active.
La régénération est la même pour tous les mode de
charge 12 V.
ULGD 3.8 A1
Sélection du mode
Mode 3
REMARQUES
► Si la tension de la batterie se situe dans la
plage de 3,7 V à 7,3 V, les modes 2–3–4
sont sélectionnables. La suite de la charge se
fait automatiquement. La Utilisation courbe
de contrôle de tension, de durée et de température dépend du mode sélectionné. Avec
mode de diagnostique, mode régénération et
chargement de maintien.
(voir présentation du principe de fonctionnement
du mode 3 illu. C)
Programm
FR
BE
Pour le chargement de batteries 12 V avec une
capacité de 14 Ah –120 Ah.
♦ Appuyez sur la touche de sélection pour
sélectionner le mode 3. Le symbole
s‘affiche sur l‘écran LCD. Pendant le processus
de charge, l‘affichage „procédure de charge
active“ clignote et montre où en est le
chargement (1 à 4 barres). Lorsque la batterie
est entièrement chargée, l‘affichage d‘état
indique 4 barres. Le clignotement s‘arrête et
l‘appareil se met automatiquement en chargement de maintien.
(A) max.
Mode 4
7,3 V
0,8 A
(V) max.
„12 V“ (14,4 V / 3,8 A)
„12 V“ (14,7 V / 3,8 A)
2
*
14,4 V
0,8 A
3
*
14,4 V
3,8 A
Ce mode est adapté essentiellement à la charge
de batterie plomb-acide 12 V avec une capacité
de 14 Ah à 120 Ah dans des conditions froides et
pour charger les batteries AGM de plus de 14 Ah.
14,7 V
3,8 A
♦ Appuyez sur la touche de sélection
sélectionner le mode 4.
1 6V
4
*
Mode 1 „6 V“ (7,3 V / 0,8 A)
Ce mode est adapté à la charge de batterie plombacide 6 V avec une capacité inférieure à 14 Ah.
♦ Appuyez sur la touche de sélection pour sélectionner le mode 1. Le symbole „6 V“ s‘affiche
sur l‘écran LCD. Pendant le processus de charge,
l‘affichage „procédure de charge active“
clignote et montre où en est le chargement
(1 à 4 barres). Lorsque la batterie est entièrement
chargée, l‘affichage d‘état indique 4 barres. Le
clignotement s‘arrête et l‘appareil se met automatiquement en chargement de maintien.
Mode 2
„12 V“ (14,4 V / 0,8 A)
Ce mode est adapté à la charge de batterie plombacide 12 V avec une capacité inférieure à 14 Ah.
♦ Appuyez sur la touche de sélection pour
sélectionner le mode 2. Le symbole
s‘affiche
sur l‘écran LCD. Pendant le processus de charge,
l‘affichage „procédure de charge active“
clignote et montre où en est le chargement (1
à 4 barres). Lorsque la batterie est entièrement
chargée, l‘affichage d‘état indique 4 barres.
Le clignotement s‘arrête et l‘appareil se met
automatiquement en chargement de maintien.
ULGD 3.8 A1
pour
REMARQUE
► Ce mode se lance le cas échéant avec
un petit temps de retard. Le symbole
s‘affiche sur l‘écran LCD. Pendant le processus de charge, l‘affichage „procédure de
charge active“ clignote et montre où en
est le chargement (1 à 4 barres). Lorsque la
batterie est entièrement chargée, l‘affichage
d‘état indique 4 barres. Le clignotement
s‘arrête et l‘appareil se met automatiquement
en chargement de maintien.
Chargement de maintien
Comme précisé dans la descriptions des Modes,
l‘appareil dispose d‘une mise en chargement de
maintien automatique. En fonction de la chute de
tension – dûe à un déchargement – le chargeur
réagit avec différents courants de chargement. La
batterie peut rester raccordée sur de longues
périodes à l‘appareil.
5
FR
BE
Fonction de protection de l‘appareil
Dès qu’apparaît une situation divergente, telle qu‘un
court-circuit, une chute de tension critique pendant
le chargement, un circuit électrique ouvert ou
inversement du raccordement des bornes de sortie,
le chargeur coupe le système électronique et remet
immédiatement le système en position de base pour
éviter tous endommagements.
Si l‘appareil chauffe trop pendant la procédure de
charge, la puissance de sortie est automatiquement
réduite. Ceci est destiné à protéger l‘appareil de
tous endommagements.
Maintenance et entretien
AVERTISSEMENT! Toujours débrancher la fiche de la prise de courant
avant d’effectuer des travaux sur le
chargeur de batterie.
L’appareil ne nécessite aucune maintenance
particulière.
♦ N’utilisez sous aucun prétexte des solvants ou
d’autres produits nettoyants agressifs.
♦ Essuyer les surfaces plastiques de l‘appareil
avec un chiffon sec.
Garantie
Cet appareil bénéficie d’une garantie de 3 ans
à compter de la date d’achat. L’appareil a été
fabriqué avec soin et consciencieusement
contrôlé avant sa livraison. Veuillez conserver
le ticket de caisse en guise de preuve d’achat.
Dans le cas où la garantie s’applique, veuillez appeler le service après-vente compétent.
Cette condition doit être respectée pour assurer
l’expédition gratuite de votre marchandise.
La prestation de garantie s’applique uniquement
aux vices de matériau ou de fabrication, et non
aux dégâts de transport, aux pièces d’usure ou
aux dégâts subis par des pièces fragiles telles
que les commutateurs ou les batteries. Le produit
est destiné uniquement à un usage privé et ne
répond pas à un usage professionnel. La garantie
est annulée en cas de manipulation incorrecte et
inappropriée, d’usage de la force et en cas d’intervention non réalisée par notre centre de service
après-vente agréé.
6
Vos droits légaux ne sont pas restreints par la
présente garantie. L’exercice de la garantie ne prolonge pas la période de garantie. Cette disposition
s’applique également aux pièces remplacées ou
réparées. Signalez sans attendre toute anomalie
éventuelle sur le matériel au moment de l’achat, au
plus tard deux jours après la date d’achat. Toute
réparation fera l’objet d’une facturation après
expiration de la période de garantie.
Indépendamment de la garantie commerciale
souscrite, le vendeur reste tenu des défauts de
conformité du bien et des vices rédhibitoires dans les
conditions prévues aux articles L211-4 et suivants
du Code de la consommation et aux articles 1641
et suivants du Code Civil.
Service après-vente
Service France
Tel.: 0800 919270
E-Mail: [email protected]
IAN 102626
Service Belgique
Tel.: 070 270 171 (0,15 EUR/Min.)
E-Mail: [email protected]
IAN 102626
Heures de service de notre hotline :
du lundi au vendredi de 8 h à 20 h (HEC)
Importeur
KOMPERNASS HANDELS GMBH
BURGSTRASSE 21
44867 BOCHUM
GERMANY
www.kompernass.com
ULGD 3.8 A1
Mise au rebut
L’emballage se compose exclusivement de
matières recyclables qui peuvent être mises
au rebut dans les déchetteries locales.
Ne jetez pas les appareils électriques
aux ordures ménagères !
Conformément à la directive européenne
2012/19/EU relative aux appareils électriques et
électroniques usés, et à son application dans les
législations nationales, les outils électriques usés
doivent être collectés séparément et faire l’objet
d’un recyclage écophile.
Pour les possibilités d’élimination d’appareils électriques usagés, renseignez-vous auprès de votre
commune.
Traduction de la déclaration de
conformité originale
Nous soussignés, KOMPERNASS HANDELS GMBH,
responsables du document : M. Semi Uguzlu,
BURGSTR. 21, 44867 BOCHUM, DEUTSCHLAND,
déclarons par la présente que ce produit est en
conformité avec les normes, documents normatifs
et directives CE suivants :
Directive européenne basse tension
(2006 / 95 / EC)
Compatibilité électromagnétique
(2004 / 108 / EC)
Directive RoHS
(2011 / 65 / EU)
Normes harmonisées appliquées
EN 60335-2-29/A2:2010
EN 60335-1:2012
EN 62233:2008
EN 55014-1:2006+A1:2009+A2:2011
EN 55014-2:1997+A1:2001+A2:2008
EN 61000-3-2:2006+A1:2009+A2:2009
EN 61000-3-3:2013
Désignation du modèle de la machine :
Chargeur de batterie pour voiture ULGD 3.8 A1
Année de construction : 09 - 2014
Numéro de série : IAN 102626
Bochum, 05/03/2014
Semi Uguzlu
- Responsable qualité Sous réserve de modifications techniques à des fins
d’amélioration.
ULGD 3.8 A1
7
FR
BE
8
ULGD 3.8 A1
Inhaltsverzeichnis
Einleitung . . . . . . . . . . . . . . . . . . . . . . . . . . . . . . . . . . . . . . . . . . . . . . . . . . . . . . . . . . . . . 10
Bestimmungsgemäßer Gebrauch . . . . . . . . . . . . . . . . . . . . . . . . . . . . . . . . . . . . . . . . . . . . . . . . . . . . . . .10
Lieferumfang . . . . . . . . . . . . . . . . . . . . . . . . . . . . . . . . . . . . . . . . . . . . . . . . . . . . . . . . . . . . . . . . . . . . . . .10
Teilebeschreibung . . . . . . . . . . . . . . . . . . . . . . . . . . . . . . . . . . . . . . . . . . . . . . . . . . . . . . . . . . . . . . . . . . .10
Technische Daten . . . . . . . . . . . . . . . . . . . . . . . . . . . . . . . . . . . . . . . . . . . . . . . . . . . . . . . . . . . . . . . . . . .10
Sicherheit . . . . . . . . . . . . . . . . . . . . . . . . . . . . . . . . . . . . . . . . . . . . . . . . . . . . . . . . . . . . . 10
Sicherheitshinweise. . . . . . . . . . . . . . . . . . . . . . . . . . . . . . . . . . . . . . . . . . . . . . . . . . . . . . . . . . . . . . . . . .10
Bedienung . . . . . . . . . . . . . . . . . . . . . . . . . . . . . . . . . . . . . . . . . . . . . . . . . . . . . . . . . . . . 12
Vor der Inbetriebnahme . . . . . . . . . . . . . . . . . . . . . . . . . . . . . . . . . . . . . . . . . . . . . . . . . . . . . . . . . . . . . .12
Anschließen . . . . . . . . . . . . . . . . . . . . . . . . . . . . . . . . . . . . . . . . . . . . . . . . . . . . . . . . . . . . . . . . . . . . . . .12
Trennen . . . . . . . . . . . . . . . . . . . . . . . . . . . . . . . . . . . . . . . . . . . . . . . . . . . . . . . . . . . . . . . . . . . . . . . . . . .12
STANDBY / Batteriespannung messen. . . . . . . . . . . . . . . . . . . . . . . . . . . . . . . . . . . . . . . . . . . . . . . . . . .12
Wiederbelebung . . . . . . . . . . . . . . . . . . . . . . . . . . . . . . . . . . . . . . . . . . . . . . . . . . . . . . . . . . . . . . . . . . .12
Programme auswählen . . . . . . . . . . . . . . . . . . . . . . . . . . . . . . . . . . . . . . . . . . . . . . . . . . . . . . . . . . . . . . .13
Programm 1 „6 V“ (7,3 V / 0,8 A) . . . . . . . . . . . . . . . . . . . . . . . . . . . . . . . . . . . . . . . . . . . . . . . . . . . . .13
Programm 2
„12 V“ (14,4 V / 0,8 A) . . . . . . . . . . . . . . . . . . . . . . . . . . . . . . . . . . . . . . . . . . . . . . .13
Programm 3
„12 V“ (14,4 V / 3,8 A) . . . . . . . . . . . . . . . . . . . . . . . . . . . . . . . . . . . . . . . . . . . . . . .13
„12 V“ (14,7 V / 3,8 A) . . . . . . . . . . . . . . . . . . . . . . . . . . . . . . . . . . . . . . . . . . . . . . . .13
Programm 4
Erhaltungsladung . . . . . . . . . . . . . . . . . . . . . . . . . . . . . . . . . . . . . . . . . . . . . . . . . . . . . . . . . . . . . . . . . . .13
Geräteschutzfunktion . . . . . . . . . . . . . . . . . . . . . . . . . . . . . . . . . . . . . . . . . . . . . . . . . . . . . . . . . . . . . . . .14
Wartung und Reinigung . . . . . . . . . . . . . . . . . . . . . . . . . . . . . . . . . . . . . . . . . . . . . . . . . 14
Garantie . . . . . . . . . . . . . . . . . . . . . . . . . . . . . . . . . . . . . . . . . . . . . . . . . . . . . . . . . . . . . 14
Service . . . . . . . . . . . . . . . . . . . . . . . . . . . . . . . . . . . . . . . . . . . . . . . . . . . . . . . . . . . . . . . 14
Importeur . . . . . . . . . . . . . . . . . . . . . . . . . . . . . . . . . . . . . . . . . . . . . . . . . . . . . . . . . . . . 14
Entsorgung . . . . . . . . . . . . . . . . . . . . . . . . . . . . . . . . . . . . . . . . . . . . . . . . . . . . . . . . . . . 14
Original-Konformitätserklärung . . . . . . . . . . . . . . . . . . . . . . . . . . . . . . . . . . . . . . . . . . 15
ULGD 3.8 A1
9
DE
AT
CH
KFZ-BATTERIELADEGERÄT
ULGD 3.8 A1
DE
AT
CH
Einleitung
Wir beglückwünschen Sie zum Kauf Ihres
neuen Gerätes. Sie haben sich damit für
ein hochwertiges Produkt entschieden.
Die Bedienungsanleitung ist Teil dieses Produkts.
Sie enthält wichtige Hinweise für Sicherheit, Gebrauch
und Entsorgung. Machen Sie sich vor der Benutzung
des Produkts mit allen Bedien- und Sicherheitshinweisen vertraut. Benutzen Sie das Produkt nur wie
beschrieben und für die angegebenen Einsatzbereiche. Händigen Sie alle Unterlagen bei Weitergabe
des Produkts an Dritte mit aus.
Bestimmungsgemäßer Gebrauch
Das Ultimate Speed ULGD 3.8 A1 ist ein mehrstufiges Kfz-Batterieladegerät, dass zur Aufladung und
Erhaltungsladung von 6 V- oder 12 V-Blei-Akkus
(Batterien) mit Elektrolyt-Lösung (WET), mit Elektrolyt
absorbierenden Matten (AGM) oder mit gelförmigem
Elektrolyt (GEL) geeignet ist.
Das Gerät ist nicht zur Aufladung von LithiumIonen-Akkus geeignet! Das Gerät ist nicht für den
gewerblichen Einsatz und nur zur Verwendung in
Innenräumen bestimmt.
Zustandsanzeige
Spannungsanzeige
Programmwahltaste (MODE)
Siehe Abbildung B:
Ladegerät
Befestigungsbohrungen
Netzkabel
Pluspol-Anschlussklemme (rot)
Minuspol-Anschlussklemme (schwarz)
Pluspol-Anschlusskabel (rot), inkl. Ringschuh
Minuspol-Anschlusskabel (schwarz),
inkl. Ringschuh
Technische Daten
Eingangsspannung:
Leistungsaufnahme:
Ausgangsspannung:
Ausgangsstrom:
220 - 240 V ∼ 50/60 Hz
60 W
6V
/ 12 V
0,8 A / 3,8 A
T2A
Sicherung (innen):
2A
Umgebungstemperatur: 0°C bis 40°C
Gehäuseschutzart:
IP 65
Schutzklasse:
II /
Batterietypen:
Für aus bestimmungswidriger Verwendung entstandene
Schäden übernimmt der Hersteller keine Haftung.
Lieferumfang
6 V-Blei-Säure-Batterie
1,2 Ah - 14 Ah
12 V-Blei-Säure-Batterie
1,2 Ah - 120 Ah
1 Kfz-Batterieladegerät ULGD 3.8 A1
Sicherheit
2 Anschlussklemmen (1 rot, 1 schwarz)
Sicherheitshinweise
1 Bedienungsanleitung
Teilebeschreibung
Siehe Abbildung A:
12 V / 0,8 A (Programm 2)
12 V / 3,8 A (Programm 3)
12 V / 3,8 A (Programm 4)
6 V / 0,8 A (Programm 1)
LED-Verpolung
Stand-By-LED
Ladeanzeige
10
Das Ladegerät ist nur für den Betrieb im
Innenbereich geeignet.
■ Dieses Gerät kann von Kindern ab 8 Jahren
und darüber sowie von Personen mit verringerten physischen, sensorischen oder mentalen
Fähigkeiten oder Mangel an Erfahrung und
Wissen benutzt werden, wenn sie beaufsichtigt
oder bezüglich des sicheren Gebrauchs des
Gerätes unterwiesen wurden und die daraus
resultierenden Gefahren verstehen. Kinder
dürfen nicht mit dem Gerät spielen. Reinigung
und Benutzer-Wartung dürfen nicht von Kindern
ohne Beaufsichtigung durchgeführt werden.
ULGD 3.8 A1
■ Verwenden Sie das Ladegerät nicht zum Laden
von nicht wiederaufladbaren Batterien.
■ Verwenden Sie das Ladegerät nicht zum Laden
von Lithium-Ionen-Akkus.
■ Stellen Sie die ausgebaute Batterie während
des Ladevorgangs auf eine gut belüftete Fläche.
EXPLOSIONS- UND BRANDGEFAHR!
Schützen Sie sich vor einer hochexplosiven Knallgasreaktion!
■ Die automatische Wirkungsweise sowie Einschränkungen in der Anwendung werden nachstehend
in dieser Bedienungsanleitung erklärt.
■ Stellen Sie sicher, dass das Plus-Pol-Anschlusskabel keinen Kontakt zu einer Treibstoffleitung
(z. B. Benzinleitung) hat!
STROMSCHLAGGEFAHR!
■ Betreiben Sie das Gerät nicht mit beschädigtem
Kabel, Netzkabel oder Netzstecker. Beschädigte
Netzkabel bedeuten Lebensgefahr durch elektrischen Schlag.
■ Stellen Sie sicher, dass explosive oder brennbare
Stoffe, z.B. Benzin oder Lösungsmittel, beim
Gebrauch des Ladegerätes nicht entzündet
werden können!
■ Wenn die Netzanschlussleitung dieses Gerätes
beschädigt wird, muss sie durch den Hersteller
oder seinen Kundendienst oder eine ähnlich
qualifizierte Person ersetzt werden, um Gefährdungen zu vermeiden.
■ Stellen Sie vor dem Netzstromanschluss sicher,
dass der Netzstrom vorschriftsmäßig mit 230 V ∼
50 Hz, geerdetem Nullleiter, einer 16 A-Sicherung
und einem FI-Schalter (Fehlerstromschutzschalter)
ausgestattet ist.
■ Trennen Sie das Ladegerät vom Netz, bevor Sie
Verbindungen zur Batterie schließen oder öffnen.
■ Schließen Sie die Anschlussklemme, die nicht
an die Karosserie angeschlossen ist, zuerst an.
Schließen Sie die andere Anschlussklemme entfernt von der Batterie und der Benzinleitung an
die Karosserie an. Schließen Sie das Ladegerät
erst danach an das Versorgungsnetz an.
■ Trennen Sie das Ladegerät nach dem Laden vom
Versorgungsnetz. Entfernen Sie erst danach die
Anschlussklemme von der Karosserie. Entfernen
Sie im Anschluss daran die Anschlussklemme
von der Batterie.
■ Stellen Sie sicher, dass beim Auflade- und Erhaltungsladevorgang kein offenes Licht (Flammen,
Glut oder Funken) vorhanden ist!
■ Sorgen Sie für eine ausreichende Belüftung
während des Ladens.
VERÄTZUNGSGEFAHR
■ Tragen Sie eine Schutzbrille! Tragen Sie
Schutzhandschuhe! Wenn Augen oder Haut mit
Batteriesäure in Kontakt geraten sind, spülen Sie
die betroffene Körperregion mit viel fließendem,
klarem Wasser ab und suchen Sie umgehend
einen Arzt auf!
■ Vermeiden Sie einen elektrischen Kurzschluss
beim Anschluss des Ladegerätes an die Batterie.
Schließen Sie das Minus-Pol-Anschlusskabel
ausschließlich an den Minuspol der Batterie
bzw. an die Karosserie an. Schließen Sie das
Plus-Pol-Anschlusskabel ausschließlich an den
Pluspol der Batterie an!
■ Setzen Sie das Ladegerät nicht der Nähe von
Feuer, Hitze und lang andauernder Temperatureinwirkung über 50°C aus!
■ Beschädigen Sie bei der Montage des Ladegerätes keine Leitungen für Treibstoff, Elektrizität,
Bremsanlagen, Hydraulik oder Wasser mit
Schrauben!
■ Decken Sie das Ladegerät nicht mit Gegenständen ab!
■ Schützen Sie die Elektrokontaktflächen der
Batterie vor Kurzschluss!
■ Verwenden Sie das Ladegerät ausschließlich
zum Auflade- und Erhaltungsladevorgang von
unbeschädigten 6 V- / 12 V-Blei-Batterien. Eingefrorene Batterien dürfen nicht geladen werden.
ULGD 3.8 A1
11
DE
AT
CH
STANDBY / Batteriespannung
messen
Bedienung
Vor der Inbetriebnahme
DE
AT
CH
♦ Vor dem Anschluss des Ladegerätes ist die
Bedienungsanleitung der Batterie zu beachten.
♦ Weiterhin sind die Vorschriften des Fahrzeugherstellers bei einer ständig im Fahrzeug angeschlossenen Batterie zu beachten. Sichern Sie
das Kfz, schalten Sie die Zündung aus.
♦ Reinigen Sie die Batteriepole. Achten Sie darauf,
dass Ihre Augen dabei nicht mit dem Schmutz in
Kontakt kommen.
Nach Anschluss an die Stromversorgung ist das
Gerät im STANDBY-Betrieb. Die Standby-Anzeige
leuchtet. Bei angeschlossenen Anschlussklemmen wird die Batteriespannung im LC-Display
(Spannungsanzeige ) angezeigt. Die Segmente
der Zustandsanzeige sind leer.
Liegt die gemessene Spannung unter 3,8 V bzw.
über 15 V wird die Batterie nicht geladen. Im
Display erscheint kurz die Fehlermeldung „Err“.
Das Gerät schaltet auf Standby.
♦ Sorgen Sie für eine ausreichende Belüftung.
Anschließen
♦ Trennen Sie vor dem Auflade- und Erhaltungsladevorgang, bei einer ständig im Fahrzeug
angeschlossenen Batterie, zuerst das MinusPol-Anschlusskabel (schwarz) des Fahrzeugs
vom Minus-Pol der Batterie. Der Minus-Pol der
Batterie ist in der Regel mit der Karosserie des
Fahrzeugs verbunden.
♦ Klemmen Sie die Pluspol-Anschlussklemme (rot)
des Ladegeräts an den Pluspol der Batterie.
♦ Klemmen Sie die Minuspol-Anschlussklemme
(schwarz) an den Minuspol der Batterie.
♦ Schließen Sie das Netzkabel
an die Steckdose an.
des Ladegeräts
6 V-Batterie:
Wird eine Batterie im Spannungsbereich von 3,7–
7,3 V gemessen, ist nur das Programm 1 wählbar.
12 V-Batterien:
Wird eine Batterie im kritischen Spannungsbereich
von 7,3–10,5 V erkannt, prüft das Gerät ob eine
voll geladene 6 V-Batterie oder eine entladene
12 V-Batterie vorliegt. Drücken Sie die Programmwahltaste , um ein Programm zu wählen. Das
Gerät führt eine Kontrollmessung für ca. 90 Sek.
durch. Im Display wird angezeigt:
♦ Die Batteriespannungsanzeige zeigt die
aktuelle Spannung der Batterie an.
♦ Bei umgekehrtem Anschluss der Ausgangsklemmen leuchtet die LED-Verpolung .
Trennen
Werden nach ca. 90 Sek. zwischen 7,3–7,5 V
erkannt, ist die 12 V-Batterie defekt.
Das Gerät schaltet auf Standby.
♦ Trennen Sie das Gerät vom Netzstrom.
Wiederbelebung
♦ Nehmen Sie die Minuspol-Anschlussklemme
(schwarz) vom Minuspol der Batterie.
Werden nach ca. 90 Sek. zwischen 7,5–10,5 V erkannt, liegt eine 12 V-Batterie vor. Der Ladeprozess
beginnt mit dem Pulsbetrieb zur Wiederbelebung.
♦ Nehmen Sie die Pluspol-Anschlussklemme (rot)
vom Pluspol der Batterie.
12
Die Spannungsanzeige blinkt. Sind 10,5 V erreicht, schaltet das Gerät in die weiteren Ladestufen.
Die Wiederbelebung ist identisch bei allen 12 V
Ladeprogrammen.
ULGD 3.8 A1
Programme auswählen
HINWEIS
► Wird eine Batterie im Spannungsbereich von
3,7–7,3 V erkannt, sind die Programme 2–3–4
wählbar. Der Ladefortschritt erfolgt automatisch.
Abhängig vom gewählten Programm ist die
Ladekennlinie Spannungs-, Zeit-, und Temperaturüberwacht. Mit Diagnoseprogramm, Wiederbelebungsmodus und Erhaltungsladung.
(siehe Prinzipdarstellung Programm 3 Abb C).
Programm
max. (V)
max. (A)
1 6V
7,3 V
0,8 A
2
*
14,4 V
0,8 A
3
*
14,4 V
3,8 A
14,7 V
3,8 A
4
*
Programm 1 „6 V“ (7,3 V / 0,8 A)
Zum Laden von 6 V-Batterien mit einer Kapazität
geringer als 14 Ah.
♦ Drücken Sie die Programmwahltaste , um
Programm 1 auszuwählen. Das Symbol „6 V“
wird im LC-Display angezeigt. Während des
Ladevorgangs blinkt die Ladeanzeige und
zeigt, wie weit der Ladevorgang fortgeschritten
ist (1–4 Balken). Wenn die Batterie voll geladen
ist, zeigt die Zustandsanzeige 4 Balken. Das
Blinken stoppt und das Gerät schaltet automatisch in die Erhaltungsladung.
Programm 2
„12 V“
(14,4 V / 0,8 A)
Zum Laden von 12 V-Batterien mit einer Kapazität
geringer als 14 Ah.
♦ Drücken Sie die Programmwahltaste , um
Programm 2 zu wählen. Das Symbol
wird
im LC-Display angezeigt. Während des Ladevorgangs blinkt die Ladeanzeige und zeigt,
wie weit der Ladevorgang fortgeschritten ist
(1–4 Balken). Wenn die Batterie voll geladen
ist, zeigt die Zustandsanzeige 4 Balken. Das
Blinken stoppt und das Gerät schaltet automatisch in die Erhaltungsladung.
ULGD 3.8 A1
Programm 3
„12 V“
(14,4 V / 3,8 A)
Zum Laden von 12 V-Batterien mit einer Kapazität
von 14 Ah–120 Ah.
♦ Drücken Sie die Programmwahltaste , um
Programm 3 auszuwählen. Das Symbol
wird im LC-Display angezeigt. Während des
Ladevorgangs blinkt die Ladeanzeige und
zeigt, wie weit der Ladevorgang fortgeschritten
ist (1–4 Balken). Wenn die Batterie voll geladen ist, zeigt die Zustandsanzeige 4 Balken.
Das Blinken stoppt und das Gerät schaltet
automatisch in die Erhaltungsladung.
Programm 4
„12 V“
(14,7 V / 3,8 A)
Zum Laden von 12 V-Batterien mit einer Kapazität
von 14 Ah–120 Ah unter kalten Bedingungen
oder zum Laden von AGM-Batterien.
♦ Drücken Sie die Programmwahltaste
Programm 4 auszuwählen.
, um
HINWEIS
► Dieses Programm startet ggf. mit einer
geringen Zeitverzögerung. Das Symbol
wird im LC-Display angezeigt. Während des
Ladevorgangs blinkt die Ladeanzeige und
zeigt, wie weit der Ladevorgang fortgeschritten
ist (1–4 Balken). Wenn die Batterie voll
geladen ist, zeigt die Zustandsanzeige
4 Balken. Das Blinken stoppt und das Gerät
schaltet automatisch in die Erhaltungsladung.
Erhaltungsladung
Wie unter Programme beschrieben verfügt das
Gerät über eine automatische Erhaltungsladung.
Abhängig vom Spannungsabfall der Batterie –durch
Selbstentladung – reagiert das Ladegerät mit unterschiedlichem Ladestrom. Die Batterie kann über längere
Zeit an das Ladegerät angeschlossen bleiben.
13
DE
AT
CH
Geräteschutzfunktion
DE
AT
CH
Sobald eine abweichende Situation wie Kurzschluss,
kritischer Spannungsabfall während des Ladevorgangs,
offener Stromkreis oder umgekehrter Anschluss der Ausgangsklemmen auftritt, schaltet das Batterieladegerät
die Elektronik aus und stellt das System unmittelbar in
die Grundstellung zurück, um Schäden zu vermeiden.
Sollte das Gerät während des Ladevorgangs zu
heiß werden, wird automatisch die Ausgangsleistung
verringert. Dies schützt das Gerät vor Beschädigung.
Wartung und Reinigung
WARNUNG! Ziehen Sie den Netzstecker immer aus der Steckdose,
bevor Sie Arbeiten am Batterieladegerät durchführen.
Das Gerät ist wartungsfrei.
♦ Verwenden Sie keinesfalls Lösungsmittel oder
andere aggressive Reinigungsmittel.
♦ Reinigen Sie die Kunststoffoberflächen des
Gerätes mit einem trockenen Tuch.
Garantie
Sie erhalten auf dieses Gerät 3 Jahre Garantie
ab Kaufdatum. Das Gerät wurde sorgfältig
produziert und vor Anlieferung gewissenhaft
geprüft. Bitte bewahren Sie den Kassenbon als
Nachweis für den Kauf auf. Bitte setzen Sie sich
im Garantiefall mit Ihrer Servicestelle telefonisch
in Verbindung. Nur so kann eine kostenlose
Einsendung Ihrer Ware gewährleistet werden.
Die Garantieleistung gilt nur für Material- oder
Fabrikationsfehler, nicht aber für Transportschäden,
Verschleißteile oder für Beschädigungen an zerbrechlichen Teilen, z. B. Schalter oder Akkus. Das Produkt
ist lediglich für den privaten und nicht für den gewerblichen Gebrauch bestimmt. Bei missbräuchlicher und
unsachgemäßer Behandlung, Gewaltanwendung
und bei Eingriffen, die nicht von unserer autorisierten
Service-Niederlassung vorgenommen wurden, erlischt
die Garantie. Ihre gesetzlichen Rechte werden durch
diese Garantie nicht eingeschränkt. Die Garantiezeit
wird durch die Gewährleistung nicht verlängert. Dies
gilt auch für ersetzte und reparierte Teile. Eventuell
schon beim Kauf vorhandene Schäden und Mängel
müssen sofort nach dem Auspacken gemeldet
werden, spätestens aber zwei Tage nach Kaufdatum.
Nach Ablauf der Garantiezeit anfallende Reparaturen sind kostenpflichtig.
14
Service
Service Deutschland
Tel.: 0800 5435 111 (Kostenfrei aus dem
dt. Festnetz/Mobilfunknetz)
E-Mail: [email protected]
IAN 102626
Service Österreich
Tel.: 0820 201 222 (0,15 EUR/Min.)
E-Mail: [email protected]
IAN 102626
Service Schweiz
Tel.: 0842 665566 (0,08 CHF/Min.,
Mobilfunk max. 0,40 CHF/Min.)
E-Mail: [email protected]
IAN 102626
Erreichbarkeit Hotline:
Montag bis Freitag von 8:00 Uhr – 20:00 Uhr (MEZ)
Importeur
KOMPERNASS HANDELS GMBH
BURGSTRASSE 21
44867 BOCHUM
GERMANY
www.kompernass.com
Entsorgung
Die Verpackung besteht aus umweltfreundlichen Materialien, die Sie über die örtlichen
Recyclingstellen entsorgen können.
Werfen Sie Elektrowerkzeuge nicht
in den Hausmüll!
Gemäß Europäischer Richtlinie 2012/19/EU
müssen verbrauchte Elektrowerkzeuge getrennt
gesammelt und einer umweltgerechten Wiederverwertung zugeführt werden.
Möglichkeiten zur Entsorgung des ausgedienten
Gerätes erfahren Sie bei Ihrer Gemeinde- oder
Stadtverwaltung.
ULGD 3.8 A1
OriginalKonformitätserklärung
Wir, KOMPERNASS HANDELS GMBH, Dokumentenverantwortlicher: Herr Semi Uguzlu, BURGSTR. 21,
44867 BOCHUM, DEUTSCHLAND, erklären hiermit,
dass dieses Produkt mit den folgenden Normen,
normativen Dokumenten und EG-Richtlinien
übereinstimmt:
DE
AT
CH
EG-Niederspannungsrichtlinie
(2006 / 95 / EC)
Elektromagnetische Verträglichkeit
(2004 / 108 / EC)
RoHS Richtlinie
(2011 / 65 / EU)
angewandte harmonisierte Normen
EN 60335-2-29/A2:2010
EN 60335-1:2012
EN 62233:2008
EN 55014-1:2006+A1:2009+A2:2011
EN 55014-2:1997+A1:2001+A2:2008
EN 61000-3-2:2006+A1:2009+A2:2009
EN 61000-3-3:2013
Typbezeichnung der Maschine:
KFZ-Batterieladegerät ULGD 3.8 A1
Herstellungsjahr: 09 - 2014
Seriennummer: IAN 102626
Bochum, 05.03.2014
Semi Uguzlu
- Qualitätsmanager Technische Änderungen im Sinne der Weiterentwicklung sind vorbehalten.
ULGD 3.8 A1
15
16
ULGD 3.8 A1
Contents
Introduction . . . . . . . . . . . . . . . . . . . . . . . . . . . . . . . . . . . . . . . . . . . . . . . . . . . . . . . . . . . 18
Intended use . . . . . . . . . . . . . . . . . . . . . . . . . . . . . . . . . . . . . . . . . . . . . . . . . . . . . . . . . . . . . . . . . . . . . . .18
Scope of delivery . . . . . . . . . . . . . . . . . . . . . . . . . . . . . . . . . . . . . . . . . . . . . . . . . . . . . . . . . . . . . . . . . . .18
Parts description . . . . . . . . . . . . . . . . . . . . . . . . . . . . . . . . . . . . . . . . . . . . . . . . . . . . . . . . . . . . . . . . . . . .18
Technical Data . . . . . . . . . . . . . . . . . . . . . . . . . . . . . . . . . . . . . . . . . . . . . . . . . . . . . . . . . . . . . . . . . . . . .18
Safety . . . . . . . . . . . . . . . . . . . . . . . . . . . . . . . . . . . . . . . . . . . . . . . . . . . . . . . . . . . . . . . 18
Safety instructions . . . . . . . . . . . . . . . . . . . . . . . . . . . . . . . . . . . . . . . . . . . . . . . . . . . . . . . . . . . . . . . . . . .18
Operation . . . . . . . . . . . . . . . . . . . . . . . . . . . . . . . . . . . . . . . . . . . . . . . . . . . . . . . . . . . . 20
Before use . . . . . . . . . . . . . . . . . . . . . . . . . . . . . . . . . . . . . . . . . . . . . . . . . . . . . . . . . . . . . . . . . . . . . . . .20
Connecting . . . . . . . . . . . . . . . . . . . . . . . . . . . . . . . . . . . . . . . . . . . . . . . . . . . . . . . . . . . . . . . . . . . . . . . .20
Disconnect . . . . . . . . . . . . . . . . . . . . . . . . . . . . . . . . . . . . . . . . . . . . . . . . . . . . . . . . . . . . . . . . . . . . . . . .20
Measuring STANDBY / Battery voltage. . . . . . . . . . . . . . . . . . . . . . . . . . . . . . . . . . . . . . . . . . . . . . . . . .20
Revitalising . . . . . . . . . . . . . . . . . . . . . . . . . . . . . . . . . . . . . . . . . . . . . . . . . . . . . . . . . . . . . . . . . . . . . . . .20
Program selection . . . . . . . . . . . . . . . . . . . . . . . . . . . . . . . . . . . . . . . . . . . . . . . . . . . . . . . . . . . . . . . . . . .21
Program 1 „6 V“ (7,3 V / 0,8 A). . . . . . . . . . . . . . . . . . . . . . . . . . . . . . . . . . . . . . . . . . . . . . . . . . . . . . .21
Program 2
„12 V“ (14,4 V / 0,8 A) . . . . . . . . . . . . . . . . . . . . . . . . . . . . . . . . . . . . . . . . . . . . . . . .21
Program 3
„12 V“ (14,4 V / 3,8 A) . . . . . . . . . . . . . . . . . . . . . . . . . . . . . . . . . . . . . . . . . . . . . . . .21
„12 V“ (14,7 V / 3,8 A) . . . . . . . . . . . . . . . . . . . . . . . . . . . . . . . . . . . . . . . . . . . . . . . . .21
Program 4
Retention charge . . . . . . . . . . . . . . . . . . . . . . . . . . . . . . . . . . . . . . . . . . . . . . . . . . . . . . . . . . . . . . . . . . .21
Appliance protection function . . . . . . . . . . . . . . . . . . . . . . . . . . . . . . . . . . . . . . . . . . . . . . . . . . . . . . . . .21
Maintenance and care . . . . . . . . . . . . . . . . . . . . . . . . . . . . . . . . . . . . . . . . . . . . . . . . . . 22
Warranty . . . . . . . . . . . . . . . . . . . . . . . . . . . . . . . . . . . . . . . . . . . . . . . . . . . . . . . . . . . . . 22
Service . . . . . . . . . . . . . . . . . . . . . . . . . . . . . . . . . . . . . . . . . . . . . . . . . . . . . . . . . . . . . . . 22
Importer . . . . . . . . . . . . . . . . . . . . . . . . . . . . . . . . . . . . . . . . . . . . . . . . . . . . . . . . . . . . . 22
Disposal . . . . . . . . . . . . . . . . . . . . . . . . . . . . . . . . . . . . . . . . . . . . . . . . . . . . . . . . . . . . . . 22
Translation of the original Conformity Declaration . . . . . . . . . . . . . . . . . . . . . . . . . . . 23
ULGD 3.8 A1
17
GB
CAR BATTERY CHARGER
ULGD 3.8 A1
Introduction
GB
We congratulate you on the purchase of
your new device. You have chosen a high
quality product.
The instructions for use are part of the product.
They contain important information concerning
safety, use and disposal. Before using the product,
please familiarise yourself with all of the safety
information and instructions for use. Only use the
unit as described and for the specified applications. If you pass the product on to anyone else,
please ensure that you also pass on all the
documentation with it.
Intended use
The Ultimate Speed ULGD 3.8 A1 is a multi-stage
car battery charger that is suitable for charging
and trickle charging up of 6 V or 12 V lead-acid
batteries (batteries) with electrolyte solution (WET),
electrolyte absorbent mats (AGM) or gel electrolyte
(GEL).
This appliance is not suitable for charging lithium-ion
batteries. The is not intended for commercial use
and is for indoor use only.
The manufacturer accepts no responsibility for
damage(s) arising out of usage contrary to the
instructions specified below.
Condition display
Voltage display
Program selection button (MODE)
See Figure B:
Charger
Fastening eyelets
Mains lead
Positive pole clamp (red)
Negative pole clamp (black)
Positive pole connector cable (red) inc. lug
Negative pole connector cable (black) inc. lug
Technical Data
Input voltage:
Power consumption:
Output voltage:
Output power:
Fuse (internal):
Environmental
temperature:
Protection rating:
Protection class:
220 - 240 V ∼ 50/60 Hz
60 W
6V
/ 12 V
0.8 A / 3.8 A
T2A
2A
Battery types:
6 V lead acid battery
1.2 Ah - 14 Ah
12 V Lead acid battery
1.2 Ah - 120 Ah
Scope of delivery
1 Car battery charger ULGD 3.8 A1
2 Clamps (1 red, 1 black)
1 Instructions for use
Parts description
See Figure A:
12 V / 0.8 A (Program 2)
12 V / 3.8 A (Program 3)
12 V / 3.8 A (Program 4)
6 V / 0.8 A (Program 1)
LED reverse connection
LED stand-by
0°C bis 40°C
IP 65
II /
Safety
Safety instructions
This charger is suitable for indoor use only.
■ This appliance may be used by children aged
8 over and by persons with reduced physical,
sensory or mental capabilities or lack of experience and knowledge, provided that they are
under supervision or have been told how to use
the appliance safely and are aware of the potential risks. Children must not use the appliance as
a plaything. Cleaning and user maintenance
tasks may not be carried out by children unless
they are supervised.
Charge display
18
ULGD 3.8 A1
■ Do not use the charger for charging nonrechargeable batteries.
■ Do not use the charger for charging lithium-ion
batteries.
■ Place the removed battery in a well-ventilated
location during charging.
■ The automatic mode of operation and usage
restrictions are explained below in these operating instructions.
DANGER OF ELECTRIC SHOCK!
■ Do not operate the appliance with a damaged
cable, supply cord or mains plug. A damaged
power cord causes danger to life by electric shock.
■ If the supply cord is damaged, it must be replaced
by the manufacturer, its service agent or similarly
qualified persons in order to avoid a hazard.
■ Before connecting to the power, ensure that the
power connection is earthed, is 230 V ∼ 50 Hz,
and is 16 A fused and equipped with an RCCB
switch (residual current circuit breaker) in
accordance with the current regulations!
■ Disconnect the charger from the grid, before you
make or break connections to the battery.
■ First, connect the clamp that is not connected to
the bodywork. Then connect the other clamp to
the bodywork, away from battery and fuel pipe.
Only after this, connect the charger to the grid.
■ After charging, disconnect the charger from the
grid. Only after this remove the clamp from the
bodywork. Following this, remove the clamp from
the battery.
DANGER OF EXPLOSION
AND FIRE HAZARD!
Protect yourself from a highly explosive hydrogenoxygen reaction!
■ Ensure that during charge and charge retention
procedures, there are no naked lights (flames,
cinders or sparks)!
■ Ensure that the plus cable does not come into
contact with fuel lines (e.g. petrol pipe)!
■ Ensure that there is no possibility of ignition of explosive or flammable substances, such as petrol
or solvents, while using charger!
■ Ensure that there is adequate ventilation during
charging.
DANGER OF CHEMICAL BURNS!
■ Wear protective glasses! Wear protective gloves!
If eyes or skin has come into contact with battery
acid, rinse the affected body region off with a
large amount of clean water and consult a doctor straight away!
■ Avoid causing a short circuit when connecting
the charger to the battery. Connect the negative
pole connector cable only to the negative battery or to the body work. Connect the positive
pole connector cable only to the plus pole of
the battery!
■ Do not place the charger close to fire, heat or
to places with long-term exposure to temperatures over 50 °C!
■ Ensure that no fuel lines,electric cables, hydraulic or water pipes are damaged by the screws
during assembly of the charger!
■ Do not cover the charger with any objects!
■ Protect the electrical contact surfaces of the battery from short circuiting!
■ Only use the charger for charging and for
charge retention of 6 V / 12 V lead batteries.
Do not charge frozen batteries.
ULGD 3.8 A1
19
GB
Measuring STANDBY /
Battery voltage
Operation
Before use
♦ Before connecting the charger, the operating
instructions must be observed.
GB
♦ Furthermore, the instructions of the vehicle manufacturer regarding a permanently connected
vehicle battery must be observed. Secure the
vehicle, switch off the ignition.
♦ Clean the battery poles. Take care that while
doing so, your eyes do not come into contact
with the dirt.
After connection to the grid, the appliance is on
STANDBY. The standby display lights up. When
the clamps are connected, the battery voltage is
shown in the LCD (voltage display ). The segments
of the condition display are empty.
If the voltage is below 3.8 V or above 15 V, the
battery will not be charged. The display briefly
shows the error message „Err“.
The appliance goes on standby.
♦ Ensure sufficient ventilation.
Connecting
♦ Before starting the charging or trickle charging
procedure on a permanently installed battery in
a vehicle, first disconnect the negative terminal
connecting cable (black) of the vehicle from the
negative terminal of the battery. The negative
terminal of the battery is usually connected to
the vehicle’s coachwork.
♦ Connect the positive pole clamp (red) of the
charger to the positive pole of the battery.
♦ Connect the negative pole clamp (black)
negative pole of the battery.
♦ Connect the mains cable
the mains socket.
♦ The battery voltage display
rent battery voltage.
to the
of the charger to
6 V battery:
If the voltage range of the battery is measured
as between 3.7–7.3 V, only program 1 can be
selected.
12 V batteries:
If a battery is recognised in the critical voltage
range of between 7.3–10.5 V, the appliance
checks whether a fully charged 6 V battery, or a
discharged 12 V battery is present. After pressing
the program selection button to select a program,
the appliance carries out a control measurement
for about 90 sec.
The display shows:
shows the cur-
♦ Should the connection of the clamps be
swapped, the LED „reverse connection“
lights up.
If after about 90 sec. between 7.3–7.5 V are
detected, the 12 V battery is defective.
The appliance goes on standby.
Disconnect
♦ Disconnect the appliance from the mains supply.
Revitalising
♦ Remove the negative pole clamp (black)
the negative pole of the battery.
If after about 90 sec. between 7.5–10.5 V are
detected, a 12 V battery is present.
♦ Remove the positive pole clamp (red)
the positive pole of the battery.
20
from
from
Charging starts with a pulse charge for revitalising. The voltage display flashes. Once 10.5 V
are reached, the appliance switches to the other
charge steps.
Revitalising is the same for all the 12 V charge
programmes.
ULGD 3.8 A1
Program selection
Program 3
NOTES
► If a battery is detected in the voltage range of
between 3.7–7.3 V, the programmes 2–3–4
can be selected. The charging process takes
place automatically. Depending on the selected
program, the characteristic charge curve is
monitored for voltage, time and temperature.
Included are the diagnostics program, revitalising mode and retention charge.
(See principle representation program 3 Fig. C)
Program
max. (V)
max. (A)
1 6V
7,3 V
0,8 A
*
14,4 V
0,8 A
*
14,4 V
3,8 A
14,7 V
3,8 A
2
3
4
*
Program 1 „6 V“ (7,3 V / 0,8 A)
For charging 6 V batteries with a capacity of less
than 14 Ah.
♦ Press the program selection button , to select
program 1. The symbol „6 V“ is displayed on
the LCD. During charging, the charge display
flashes and shows the progress of the charge
procedure (1–4 bars). When the battery is fully
charged, the condition display shows 4 bars.
The flashing stops and the appliance automatically switches to retention charge.
Program 2
„12 V“ (14,4 V / 0,8 A)
For charging 12 V batteries with a capacity of less
than 14 Ah.
♦ Press the program selection button , to select
is displayed on the
program 2. The symbol
LCD. During charging, the charge display
flashes and shows the progress of the charge
procedure (1–4 bars). When the battery is fully
charged, the condition display shows 4 bars.
The flashing stops and the appliance automatically switches to retention charge.
ULGD 3.8 A1
„12 V“ (14,4 V / 3,8 A)
For charging 12 V batteries with a capacity of
between 14 Ah–120 Ah.
♦ Press the program selection button , to select
program 3. The symbol
is displayed on the
LCD. During charging, the charge display
flashes and shows the progress of the charge
procedure (1–4 bars). When the battery is fully
charged, the condition display shows 4 bars.
The flashing stops and the appliance automatically
switches to retention charge.
Program 4
„12 V“ (14,7 V / 3,8 A)
For charging 12 V batteries with a capacity of
between 14 Ah–120 Ah under cold conditions or
for charging AGM batteries.
♦ Press the program selection button
program 4.
, to select
NOTE
► This program may start with a minute delay.
is displayed on the LCD.
The symbol
During charging, the charge display
flashes and shows the progress of the charge
procedure (1–4 bars). When the battery is
fully charged, the condition display shows
4 bars. The flashing stops and the appliance
automatically switches to retention charge.
Retention charge
As described under programmes, this appliance
features the automatic retention charge. Depending
on the voltage drop of the battery, caused by
selfdischarge, the appliance reacts with different
charge currents.
The battery can remain connected to the charger
for longer periods of time.
Appliance protection function
The charger switches the electronics off and switches
the system instantly to the basic setting, as soon as
there is an abnormal situation, such as short circuit,
critical voltage drop during charging, broken circuit
or swapped connection of the connector clamps is
detected.
Should the appliance become too hot during charging, the output current is automatically reduced. This
protects the appliance from damage.
21
GB
Maintenance and care
WARNING! Before you carry out any
work on the battery charger always
pull the mains plug out of the mains
socket.
The appliance is maintenance-free.
GB
♦ Do not under any circumstances use solvents or
other aggressive cleaning agents.
♦ Clean the plastic surfaces of the device with a
dry cloth.
Warranty
The warranty for this appliance is for 3 years
from the date of purchase. The appliance has
been manufactured with care and meticulously
examined before delivery. Please retain your
receipt as proof of purchase. In the event of
a warranty claim, please make contact by
telephone with our Service Department. Only
in this way can a post-free despatch for your
goods be assured.
The warranty covers only claims for material and
manufacturing defects, but not for transport damage, for wearing parts or for damage to fragile
components, e.g. buttons or batteries. This product
is for private use only and is not intended for commercial use. The warranty is void in the case of
abusive and improper handling, use of force and
internal tampering not carried out by our authorized service branch. Your statutory rights are not
restricted in any way by this warranty. The warranty
period will not be extended by repairs made under
warranty. This applies also to replaced and repaired
parts. Any damage and defects extant on purchase
must be reported immediately after unpacking the
appliance, at the latest, two days after the purchase
date. Repairs made after the expiration of the warranty period are subject to payment.
22
Service
Service Great Britain
Tel.: 0871 5000 720 (£ 0.10/Min.)
E-Mail: [email protected]
IAN 102626
Hotline availability:
Monday to Friday 08:00 - 20:00 (CET)
Importer
KOMPERNASS HANDELS GMBH
BURGSTRASSE 21
44867 BOCHUM
GERMANY
www.kompernass.com
Disposal
The packaging is made from environmentally friendly material and can be
disposed of at your local recycling plant.
Do not dispose of power tools in
your normal domestic waste!
European Directive 2012/19/EU requires that
worn-out power tools are collected separately and
fed into an environmentally compatible recycling
process.
Your local community or municipal authorities
can provide information on how to dispose of the
worn-out appliance.
ULGD 3.8 A1
Translation of the original
Conformity Declaration
We, KOMPERNASS HANDELS GMBH, Custodian
of Documents: Mr. Semi Uguzlu, BURGSTR. 21,
44867 BOCHUM, GERMANY, hereby declare
that this product complies with the following
standards, normative documents and the EC
directives:
GB
EU Low Voltage Regulations
(2006 / 95 / EC)
EMC (Electromagnetic Compatibility)
(2004 / 108 / EC)
RoHS Directive
(2011 / 65 / EU)
Related harmonised standards:
EN 60335-2-29/A2:2010
EN 60335-1:2012
EN 62233:2008
EN 55014-1:2006+A1:2009+A2:2011
EN 55014-2:1997+A1:2001+A2:2008
EN 61000-3-2:2006+A1:2009+A2:2009
EN 61000-3-3:2013
Type designation of machine:
Car battery charger ULGD 3.8 A1
Year of manufacture: 09 - 2014
Serial number: IAN 102626
Bochum, 05/03/2014
Semi Uguzlu
- Quality Manager Subject to technical changes in the course of
further developments.
ULGD 3.8 A1
23
KOMPERNASS HANDELS GMBH
BURGSTRASSE 21
44867 BOCHUM
DEUTSCHLAND / GERMANY
www.kompernass.com
Version des informations
Stand der Informationen · Last Information Update:
07 / 2014 · Ident.-No.: ULGD3.8A1-062014-2
IAN 102626
2