1
LASE GUHDED
_OOL with LASE
EASU
Model No.
320.48252
CAUTION:
Read, understand and follow
all Safety Rules and Operating Instructions
in this manual before using this product.
o SAFETY
o OPERATION
• MAINTENANCE
• ESPAI_OL, PAGINA 11
Sears, Roebuck and Co., Hoffman Estates, iL 60179 U.S.A.
Warranty. ................................................................................
Page
2
Safety Instructions ...............................................................
Pages
2-3
Description .............................................................................
Page
3-4
Operation ...........................................................................
Pages
5-7
Maintenance
Page
7-8
Trouble Shooting ....................................................................
Page
8
Notes ......................................................................................
Service Numbers ...................................................................
Page
9-10
Back Cover
..........................................................................
ONE FULLYEAR
WARRANTY
ON CRAFTSMAN
TOOL
tf this Craftsman Tool fails due to a defect in material or workmanship within
one year from the date of purchase, RETURN ITTO THE NEAREST SEARS
SERVICE CENTER IN THE UNITED STATES, and Sears will repair it, free
of charge.
If this Craftsman Tool is used for commercial or rental purposes, this warranty
applies for only 90 days from the date of purchase°
This warranty gives you specific legal rights, and you may also have other
rights which vary from state to state.,
Sears, Roebuck and Co., Dept. 817 WA, Hoffman Estates, IL 60179
SAVE THESE RNSTRUCTIONS!
READ ALL INSTRUCTIONS!
/_ WARNING:
BE SURE
io read
and understand
all instructions
in this
manualexposure,
before
using
this product.Failure
to follow
all instructions
may resuIt
in hazardous
radiation
_ may
CAUTION:
DO NOT attempt
to modify
the
performanceof this laser device in any way.
This
result in a dangerous
exposure
to laser
radiation_
I of_an CAUTION:
eye hazard.
The use of any optical instrument with this product will increase the possibility
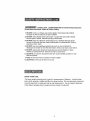
IMPORTANT: The following label is on your tool,.
It indicates where the laser light is emitted. ALWAYS BE
AWARE of its location when using the ultrasonic
measuring tool, ALWAYS MAKE SURE that any
bystanders in the vicinity of use are made aware of the
dangers of looking directly into the laser,
LAS£R
,_
RADIATION
DO NOT STARE
_k
2J:¢_
INTO
BEAM
_040.,_ ==xl |040.11
J^_,,_,,,,,_.tl_w_nr_uu_l
LASER LIGHT. LASER RADIATION
Do Not Stare into beam. Class ilia Laser Product
Avoid Direct Eye Exposure.
1. DO NOT remove or deface any product labels,, Removing product labels
increase the risk of exposure to laser radiation,
2. DO NOT stare directly at the laser beam or project the laser beam directly
into the eyes of others. Serious eye injury could result.
3. DO NOT place the ultrasonic measuring tool in a position that may cause
anyone to stare into the laser beam intentionally or unintentionally° Serious
eye injury could result°
4. DO NOT use any magnifying optical tools such as, but not limited to
telescopes or transits to view the laser beam. Serious eye injury could result,,
5. DO NOT operate the ultrasonic measuring tool around children or allow
children to operate the tool. Serious eye injury, could result°
6. ALWAYS use only the accessories
with this product.
that are recommended
by Sears for use
7. Keep the tool dry and do not place in direct sunlight,
8. ALWAYS turn the tool off when not in use,
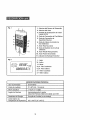
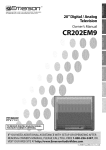
KNOW YOUR TOOL
This laser guided measuring tool is used for measurement of distance., It emits a laser
beam which projects a visible spot (_ on the target surface_ The tool generates ultrasound
to permit easy floor to ceiling and wall to wall measurement.
Use to measure distances
to the object, calculate area in square feet and volume in cubic feet.
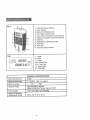
Fig. 1
2
_1
1, Ultrasound Sensor Aperture
2_ Laser Aperture
3. Back-Lit LCD Display screen
4, Feet / Meter Conversion Key
5, Area / Volume Computation Conversion Key
6, Addition Computation Key Of Two Distances
7. Read Key
8. Single Distance Measurement Key
9o Recall Key
10, Power Key
11, Horizontal Bubble Indicator
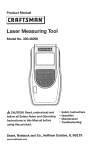
Fig. 2
L: Length
W: Width
O.'OO"
H: Height
Sq-ft: Square Feet
Cu-ft: Cubic Feet
IZ.I.I:t#_ m sq-ft
cu-ft
0.!3!30'1T#
L_" m'
tJ IJ 0 0, iZi, iZi m m'
m2: Square Meter
m_: Cubic Meter
TECHNICAL
Recommended
Measurement
use
range
SPECIFICATIONS
indoor
2
to 50fro
(0.6-15meters)
99.5% Accurate
+ / - 015% + / - 1 digit
Aperture Angle
Approximately 5 degrees
Class Ilia Maximum power output <_2,5roW
H,,,. ,, i
ii
I. .....
Power Supply
One 9-volt battery (not included)
IH
Optimum Operating
Temperature Range
.,,.,,
32 ° to 104 ° F (0 ° to 40 ° C)
4
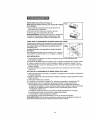
TOINSTALL
BATTERY (See Figure 3)
NOTE: This tool operates on one 9-volt battery
(not included).
1. Open battery compartment door on the back of tool
2. Plug 9-vott battery into the battery conductor,
3. Close battery compartment door_
IMPORTANT NOTE: When the battery is low, the low battery
[_
will be continuously displayed on the upper left side
of the LCD display screen,
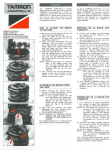
HOWTO USE LASER GUIDED MEASURING TOOL
Place the bottom of the tool at the point from which the
measurement is to begin (such as a wall or floor),
The built-in level vials will help you to align the tool at 90°.,
The ultrasonic signal is projected in circular
waves (see Fig. 4).
For tong distance measuring, between 40 to 50 feet
(12 to t5 meters), the target area should not be smaller
than 10 x 10 feet (3 x 3 meters)
Fig, 4
Bottom
J
J
IMPORTANT NOTE:
1. In order to get the most accurate result, make sure the ultrasonic wave is perpendicular
to the target,,
2. The target area must be a hard regular surface with no objects or obstacles in the measured field
3, Place a piece of cardboard on front of the target if the measured target is small, irregularor soft_,
4. This tool cannot be used to measure through glass, even though the laser beam can pass through
5. All measurements are calculated from the bottom of your tool (as shown in Fig, 4)
HOWTO READYOUR LASER GUIDED MEASURINGTOOL
1. Press the power key and the LCD display screen will show the temperature in degrees
Fahrenheit,
2. Point the tool perpendicularly at the target and get the measurement by pressing the
"Read" key,
3o Each measurement erases the previous one.
4. The measurement was unsuccessful if "Err" appears on the LCD display screen
5_When "Err" appears on the display screen, press "Read" key or re-start the tool to measure
again, making sure to avoid the following conditions:
,, The target surface does not provide a good reflection for the ultrasonic measuring
signal (e i.,it is a soft, irregular surface such as thick carpet, curtains, or irregular
wallpaper, etc)
oThe distance measured is out of the specified measuring range (2 to 50 feet),,
o There are obstructions within the specified measuring range°
=The tool is not perpendicular to the target
6. The tool automatically turns off, if not used for 30 seconds,
7o Measurements can be ready easily even in dark conditions due to the back-lit LCD screen.
IMPORTANT NOTE: in order to get accurate measurements, always be sure to point the tool
perpendicularly to the target before starting any measurements,
5
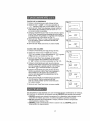
HOW TO MEASURE
1.Turn on power by pressing the power key (see Fig° 5)_The temperature of the area will be
shown on the LCD display screen (see Fig 6)_The tool can also be used as a thermometer,
The temperature display will disappear within 30 seconds°
Fig, 5
Fig. 6
HOWTO MEASURE cont.
2, Select the measurement unit°.
A. Press FT!M button to show measurement
between feet and meters
B. The unit will be shown on the LCD display
screen (see Fig, 7),
lOOm
3. Choose the measuring mode and read.
Measuring a single distance:
A. Press single distance key "t-----t",
B. Press "Read" key to get measured
distance (see Fig. 8)
C, Press "Read" key again to get new
measured distance_
D, Press "Recall" key and the latest measured distance will be shown on screen
MEASUREMENT OFTWO DISTANCES AND COMPUTING THEIR SUM
1. Press "HH"
key
2. The left blinking line in "_----" shows the first
Fig, 9
measurement to be taken (see Fig 9),
3. Press "Read" key to get the measured
distance (see Fig. 9),
4. The right blinking line in "__" shows the
second measurement to be taken,
5. Press "Read" key to get the second measured
distance shown in the upper row, The sum of
the two measurements will immediately show
Fig. 10
at the bottom of the screen (Fig° 10)
6, Press "Recall" key and the first
measurement will blink in the upper row
Press "Recall" key again and again and the
two measurements wilt blink in the upper row
circularly
NOTE; When measuring large distances that are beyond the capability of the tool, measure from
the middle point of the distance to both sides and add their values using the "t--Ill" key_
6
COMPUTING
AREA
1,Position
tooltomeasure
arealength
2.Pressthe,,,_:__//(__
I,,key,theblinkinglinein,,z_:__
,,
meansthelengthtobemeasured
(seeFig.11),,
3. Press"Read"keytodisplaythemeasured
lengthinthe
upperrowofthescreen;
thewidthlinein "_" will also
Fig, 11
start to blink,,
4. Position tool to measure area width_ Press "Read" again to
display the measured width in the upper row of the screen
and the area will immediately be displayed in the lower
row (see Fig, 13).
5. Press the "Recall" key and the measured length will blink
in the upper row,,Press again to see the measured width_
Fig. 13
6. Press "Read" key to make a new measurement,
3'00"
_
eq.tt
COMPUTING VOLUME
1. Position tool to measure area length
2. Press the "_/__,J
"key twice to show" @" on the display
screen_ The blinking line in" @" means the length to be
measured (see Fig° 14a).,
3. Press "Read" key to display the measured length in the upper
row of the screen; the width line in" (_" will also start to
blink (see Fig. t4b).
4, Position tool to measure area width., Press "Read" again to
display the measured width in the upper row of the screen
(see Fig. 14c).The height line in" _l_jl" will also start to blink°
5. Position tool to measure area height., Press "Read" again to
display the measured height in the upper row of the screen.
The volume will immediately be displayed in the lower row
(see Fig. 14d)
Fig. 14a
Fig. 14b
2'00"
Fig. 14c
3'00"
6. Press the "Recall" key and the measured length will blink in
the upper row, Press again to see the measured width., Press
again to see the measured height,
7, Press "Read" key to make a new measurement,
Fig. 14d
4'00"
24 _°
This tool has been designed to be a low maintenance tool, However, in order to maintain its
performance, you must always follow these simple directions,
1. ALWAYS handle the tool with care. Treat it as the fine optical device it is Treat it as you
would a camera or binoculars,,
2.
3.
4.
5.
AVOID exposing the too! to shock, continuous vibration or extreme hot or cold temperatures,.
ALWAYS store the tool indoors.When not in use, ALWAYS store the tool in its protective case
ALWAYS keep the tool free or dust and liquids°
ALWAYS clean and thoroughly dry the tool after each use.
7
6. Check the batteries regularly to avoid deterioration. ALWAYS remove the batteries from the
tool, if it is not going to be used for an extended period of time
7. Replace the batteries when the low battery icon is continuously displayed on the LCD.
8. DO NOT disassemble the tool This will expose the user to hazardous radiation exposure,
9. DO NOT use the tool in noisy conditions, especially if the frequency of the noise is
about 40 KHz
10_ DO NOT attempt to change any part of the laser lens_
,, ,,, ,,,,,,,,,
PROBLEM
In accu rate
measurement
CAUSE
SOLUTION
Battery runs out.
Replace with fresh battery_
Measured distance is out of the
specified range
(2 - 50 feet / .06 to 15m)
Adjust the distance to be within
the specified range.
The tool is not held
perpendicularly to the target°
Hold the tool perpendicularly
the target.
The tool was moved during the
measuring process.
Do not move and re-measure,,
i,
Err appears on
the screen
i .i H.,
HH,,,
J, ,,,,,
,, ,,,i,,,i
Cover the target surface with
cardboard or plywood,
The target surface does not
provide good reflection for the
ultrasonic pulse (i,,e,,soft and
irregular surface such as thick
carpet, curtain or irregular
wallpaper, etc.).
............
,
•
The target surface does not
provide good reflection for the
ultrasonic pulse (ioeosoft and
irregular surface such as thick
carpet, curtain or irregular
wallpaper, etc,).
Cover the target surface with
cardboard or plywood_
Obstructions are within the
sound range,,
Remove the obstructions
..........
The tool is not held
perpendicularly to the target,
to
away
.,, i,,uiu
Hold the tool perpendicularly
the target.
i,i
L.lUHL,"U"J"
to
NOTES
%
NOTES
10
Manual del Usuario
AM
TA E
GUHADA PO LAS
COn
TRAC
MR
Modelo No.
320.48252
ATENCION: Antes de usar este producto,
lea, comprenda y siga todas ias reglas
de seguridadv las instrucciones de
funcionamiento incluidas en este manual.
Sears, Roebuck
and Co., Hoffman
° SEGURIDAD
• FUNCIONAMIENTO
o [vIAINTENIMIENTO
Estates, IL 60179 U.S.A.
Garantfa .............................................................................
P_.glna
Instrucciones
P&gmas 12-13
de Seguridad ..............................................
12
Descripci6n ........................................................................
P#,gma
13-14
Funcionamiento
.............................................................
P_,gmas 15-17
Mantenimiento
...................................................................
P,_glna
17-18
Soluci6n de Averfas ...........................................................
Pb.gtna
18
Notas ..................................................................................
P_.gma
19
Nt_meros de Servicio ..........................................................
Contraportada
GARANTIA COMPLETA
CRAFTSMAN
DE UN A|;'_ODE LA HERRAMIENTA
Siesta herramienta Craftsman no le otorga compteta satisfacci6n dentro de un aSo de la
fecha de compra, DEVUELVALA AL ALMACEN SEARS MAS CERCANO EN LOS
ESTADOS UNIDOS y Sears la reempIazar_, gratuitamente..
Siesta herramienta Craftsman se usa para propSsitos comerciales o de arriendo,
esta garantfa es vdlida solamente durante 90 dfas desde la fecha de compra_
Esta garantfa le otorga derechos legales especfficos y usted adem&s puede tener otros
derechos que varfan de un estado a otro.
Sears, Roebuck and Co., Dept.. 817 WA, Hoffman Estates, IL 60179
iCONSERVE ESTAS INSTRUCCgONES!
iLEA TODAS LAS INSTRUCCJONES!
Z_ ADVERTENClA:
Antes de usar este producto ASEGURESE de leer y comprender
todas las instrucciones incluidas en este manual. El incumplimtento de todas tas instrucciones
puede resultar en exposici6n peligrosa a radiaciSn,.
l dispositivo
Z-_ ATENCION:
I&ser..Esto podri'a
NO trate
resultar
de modificar
en unade
exposici6n
ninguna peligrosa
manera elarendimiento
radiaci6n I_.ser.
de este
l lposibitidadde
z_ ATENC'ON:
sufrir una
El ,esi6n
us° deocular_
cualquier instrument° 6ptic° c°n este pr°duct° aumentara la
IMPORTANTE: La etiqueta siguiente ha sido colocada en su
herramienta, lndica el lugar por donde se emite la luz Idser. SIEMPRE
ESTE CONSClENTE de su ubicaci6n cuando use la herramienta de
medir ultras6nica. SIEIVIPRE ASEGURESE de informar a cualquier
espectador que se encuentre en la vecindad de uso acerca de los
peligros inminentes ai mirar directamente el l_ser.
12
J
[,& ADVERTENCUAI
LUZ LASER. RADIACION LASER Evite exposici6n directa
de los ojos. No mire fijamente el rayo I_iser. Producto Laser de la Clase Ilia
1. NO retire ni deteriore ninguna de las etiquetas del producto, Si se retiran las
etiquetas del producto se aumenta el riesgo de exposiciSn a radiaci6n laser
2. NO mire directamente al rayo laser ni apunte e! rayo laser directamente
otras personas. Se puede causar una lesi6n ocular grave,,
a los ojos de
3. NO cofoque la herramienta de medir ultrasSnica de manera que alguna persona
pueda mirar intencional o accidentalmente ef rayo laser° Se puede causar una lesiSn
ocular grave.
4. NO use ninguna herramienta 5ptica de aumento tal como, pero sin limitar, telescopios
ni teodolitos para ver el rayo laser. Se puede causar una lesiSn ocular grave,_
5. NO trabaje con la herramienta de medir ultrasSnica cerca de los niSos ni permita que
los niSos usen la herramienta, Se puede causar una lesiSn ocular grave,,
6. SIEMPRE use solamente
este producto.
7. Mantenga
los accesorios
por Sears para usar con
la herramienta seca y no la coloque en ta tuz directa del sol
8. SIEMPRE apague _a herramienta
CONOZCA
recomendados
con no est_ en uso_,
SU HERRAMIENTA
Esta herramienta guiada por laser se usa para medir distancias. Emite un rayo laser
que proyecta un punto visible (_ en la superficie dee obietivoo La herramienta genera
uJtrasonido que le permite medir fAcilmente del piso aFcielo raso y de pared a pared,
Se utiliza para medir distancias hasta et objetivo, caicular superficies en pies cuadrados
y volumen en pies cL_bicos.
13
Fig. 1
2
1, Abertura del Sensor de Ultrasonido
1
2, Abertura del L_ser
3. Pantalla de Visualizaci6n de Cristal
Liquido (LCD)
4. Tecla de ConversiSn de Pies/Metros
5, Tecla de Conversi6n de
Superficie/Volumen
6. Tecla de Cfilculo de Adici6n de
Dos Distancias
7. Tecta 'Read' (Lectura)
8, Tecla de Medici6n de Una Sola
Distancia
9, Tecla 'Recall' (Recuperaci6n)
10, Tecla 'Power' (Encendido)
11. tndicador de Burbuja Horizontal
Fig, 2
L: Largo
W: Ancho
H: Altura
cu4t
8888:8.82
m,
m_
Sq-ft: Pies Cuadrados
Cu-ft: Pies Cubicoc
m_: Metro Cuadrado
m3: Metro C,3bico
ESPECIFICACIONES
USO rec0mendad0
En el interior
: : ,,,,,,,,
,,,,,,,,,,,,,,
......
,,,,,,,,,,,,, .................
.........................................
.......................
Limite de medici6n
.....................
TECNICAS
2" a 50" (0,6 - 15 metros)
,....
99.5% exactitud
......
t +/" 0'5% +/' 1 digito
E
--A--ngulo de Abertura
Apr0ximadamente 5 grados
Clase llla Potencia maxima de salida: _<2,5mW
......
Su"minis'i'ro de En"ergia
Una pila de 9 voltios (no se incluye)
L[mite Optimo de
Temperatura de Operaci6n
32 ° a 104 o F (0 ° a 40 ° C)
14
INSTALACION DE LA PILA (Ver Figura 3)
NOTA: Esta herramienta funciona con una pila de 9 voitios
(no se incluye).
1, Abra la tapa del compartimiento de la pita situado en la
parte trasera de la herramienta.r
2. Enchufe ta pita de g voftios en el conductor de ta pila,
3, Cierre la tapa del compartimiento de la pila.
NOTA IMPORTANTE: Cuando la pila est6 a punto de agotarse,
et simbo!o de pila agotada [_
se desplegar& en forma
continua en el lade izquierdo superior de la pantalla LCD,
Fig. 3
COMO USAR LA HERRAMIENTA DE MEDIR GUIADA POR LASER
Coloque la parte inferior de la herramienta en el punto desde
donde comenzar_ fa medici6n (ta! como una pared o el piso).
Parte "_
I
I._ Fig. 4
Las ampollas del nivel incorporado le ayudarAn a alinear la
tnferlor ! ,_-_._<_
}
herramienta a got
La se5al ultras6nica es proyectada en ondas circulates
(ver Fig. 4).
Para medir distancias largas, entre 40 a 50 pies (12 a 15 metres),
el _rea obietivo no debe ser inferior a 10 x !0 pies (3 x 3 metros)
NOTA tMPORTANTE:
1. A fin de ebtener el resultado m&s exacto, asegL_resede que la onda ultras6nica est_
perpendicular al ebjetivo,
2. La superficie del ebjetivo debe ser regular y dura, sin objetes ni obst_culos en el campo medido.
3. Coloque un pedazo de cart6n en frente del objetivo medido si es pequeSo, irregular o suave..
4. Esta herramienta no puede set utilizada para medir a tray,s de vidrio, aun cuando el rayo I_ser
puede atravesarlo,
5. Todas las medidas se calculan desde la parte inferior de la herramienta (como se muestra
en la Fig..4)_
LECTURA DE LA HERRAMIENTA DE MEDIR GUIADA POR LASER
1. Oprima la tecla 'Power' (encendido) y fa pantalla de visualizaci6n LCD mostrar_ la temperatura
en grados Fahrenheit.
2. Apunte ta herramienta perpendicufarmente at objetivo y obtenga la medida oprimiendo la tecla
"Read" (Lectura).
3. Cada nueva medida borra la anterior..
4. La medici6n no tuvo _xito si la palabra "Err" aparece en la pantatla de visualizaci6n LCD..
5. Cuando aparezca "Err" en la pantalta, oprima ta tecla "Read" o vuelva a encender la
herramienta para medir nuevamente, asegur_ndose de evitar las siguientes condiciones:
o La superficie def objetivo no ofrece una buena reflexi6n para ta seSal de medici6n ultras6nica
(es decir, es una superficie suave, irregular tat como una alfombra gruesa, cortinas
o empapelado irregular, etcr)
• La distancia medida est,, fuera de los limites de medida especificados (2 a 50 pies),.
° Hay obstrucciones dentro de los tfmites de medida especificados.
o La herramienta no esta perpendicular at objetivoo
6. La herramienta se apaga autom_ticamente si no se usa durante 30 segundos.
NOTA IMPORTANTE: A fin de obtener rnediciones exactas, siernpre asegurese de apuntar la
herramienta perpendicutarmente al objetivo antes de comenzar a medir_
15
COMOMEDIR
1. Encienda la herramienta oprimiendo ta tecla de encendido (ver Fig. 5),,En ia pantalla LCD
aparecer4 ta temperatura de1&rea (ver Fig,,6), La herramienta tambi6n puede utilizarse como
un term6metro, Et despliegue de la temperatura desaparecer& dentro de 30 segundos.
Fig. 5
Fig. 6
I
COlViO MEDIR conto
2. Se|eccione la unidad de medida,
A. Optima et bot6n 'FTiM' para mostrar la
medida en pies y metros.
B, La unidad de medida aparecer_ en la
pantalla LCD (ver Fig,,7)_
70°F
!1
Fig. 7
3. Seleccione et modo de medici6n y lecturm
Medici6n de una sola distancia:
A. Oprima ta tecla "1---t" para una
sota distancia,,
B. Oprima la tecla "Read" para obtener
la distancia medida (ver Fig° 8),
C. Oprima nuevamente la tecla "Read" para
obtener la nueva distancia medida.
D. Oprima la tecta "Recall" y en ta pantatla
aparecer& la _ltima distancia medida.
Fig. 8
MEDICION DE DOS DISTANCIAS Y CALCULO DE LA SUMA DE AMBAS
1, Oprima la tecla "I--IF-I".
Fig. 9
2. La linea izquierda que parpadea en "_-----"
muestra la primera medida que se va
a tomar (ver Fig, 9),,
3. Oprima la tecla "Read" para obtener
la distancia medida (ver Fig, 9)_
4. La linea derecha que parpadea en "_---="
muestra la segunda medida que se va a tomaro
5, Oprima la tecta "Read" para obtener
Fig. 10
ta segunda distancia medida mostrada
en la ilia superior. La suma de las dos medidas
aparecer_ inmediatamente en la parte inferior
de la pantalla (Fig. 10)_
6. Oprima la tecla "Recall" y la primera medida
parpadear& en la fila superior. Optima
repetidamente la tecla "Recall" y las dos medidas parpadear&n circularmente en la fila superior.
NOTA: Cuando mida distancias grandes que caen fuera de ta capacidad de ta
herramienta, mida desde e! punto medio de la distancia hasta ambos lados y agregue
los valores usando la tecla "HF-I",
16
CALCULO DE LA SUPERFICIE
1_Coloque la herramienta para medir el largo de_ _reao
2. Optima la tecla
-'/b:__,, , la lfnea que parpadea en
" _"
significa el largo que va a ser medido (vet Fig. 11),
3. Optima la tecla "Read" para desplegar el largo medido en
ta illa superior de la pantalla; ta linea det ancho en" __"
comenzar& tambi_n a parpadear,
4, Coloque ta herramienta para medir el ancho de! _rea, Oprima
la tecla "Read" nuevamente pars desplegar et ancho medido
en ta fila superior de la pantalta y la superficie set& desp/egada
inmediatamente en la fila inferior (ver Fig.,13),,
5. Optima la tecta "Recall" y et largo medido parpadearA
en la ilia superior, Optima nuevamente la tecta para
ver el ancho medido,
6. Optima fa tecla "Read" para tomar una nueva medida.
CALCULO DEL VOLUMEN
1. Coloque la herramienta para medir el largo del Area,
2, Oprima dos veces la tecla _/@
para mostrar
"@"
en la pantalla_ La }inea parpadeante en" @"
el largo que va a ser medido (ver Fig 14a),
Fig° 11
Fig. 12
200°'
Fig° 13
Fig. 14a
significa
3. Oprima la tecta "Read" para desplegar et largo medido
en la Ifnea superior de la pantalla; ta linea del ancho
en" @ "tambi_n comenzar_, a parpadear (ver Fig_ 14b)..
Fig. 14b
4, Cofoque la herramienta para medir el ancho del Area,
Optima la tecla "Read" nuevamente para desptegar et ancho
en la fila superior de la pantatla (ver Fig,, 14c), La tfnea
de la attura ' _j!, comenzarA tambi4n a parpadear,
5. Coloque la herramienta para medir ta aftura det Area,
Optima nuevamente la tecla "Read" para desplegar la
altura medida en la ilia superior de ta pantallao El
volumen ser_ despfegado inmediatamente en ta fila
inferior (ver Fig, 14d),
6. Oprima ta tecta"Recall" y ta medida det largo parpadearA
en la ilia superior, Opdma nuevamente la tecta
para vet el ancho medido Optima nuevamente para
ver la aftura medida,
2'00"
Fig. 14c
3"00"
Fig, 14d
7, Oprima la tecla "Read" para tomar una nueva medida,
2_°""
Esta herramienta ha sido diseRada como una herramienta de bajo mantenimiento, Sin embargo,
para mantener su rendimiento, es necesario que siga SIEMPRE estas sencittas instrucciones,
1. SlEMPRE manipule con cuidado la herramienta, Es un dispositivo 6ptico delicado y asl es
como debe ser tratado, igual como una cAmara fotogr&fica o gemelos binocutares_
2, EvI'rE la exposici6n de la herramienta a choques, vibraci6n continua o temperaturas
extremadamente calientes o frfas
3, SlEMPRE guarde la herramienta al interior, Cuando no la use, SIEMPRE guarde la
herramienta en su caja protectora,
17
4.SIEMPREmantengala herramienta
libredepolvoy lfquidoso
5.SiEMPRElimpiey sequebienla herramienta
despu6sdecadauso,,
6.Verifiqueregularmente
laspi{asparaevitarsu deterioro.SIEMPRE retire
las pilas de
la herramienta si no va a ser usada pot un perfodo de t{empo pro!ongado,.
7. Reemplace la pilas cuando et sfrnbolo de baterfa agotada se despliegue
continuamente en Ia pantalla LCDo
8. NO desarme la herramienta.
radiaciSn,.
Esto puede causar exposiciSn peligrosa det usuario a
9. NO use la herramienta donde haya mucho ruido, especialmente
ruido es aproximadamente 40 KHz.
si la frecuencia
del
10. NO trate de cambiar ninguna pieza del lente laser.
PROBLEMA
CAUSA
SOLUCION
La pita est_ agotada,_
Reempl_cela con una pila
nueva,,
MediciSn
inexacta
La distancia medida est& fuera
del tfmite especificado
(2 - 50 pies / 0,06 a 15m)
Ajuste la distancia de modo
que quede dentro de los
I[mites especificados.
La herramienta no estA
mantenida perpendicular al
objetivo,
Sostenga }a herramienta
perpend{cular al objetivo,
La herramienta rue movida
No ta mueva y vuetva a medi_
durante el proceso de mediciSno
"Err" aparece
en la pantalta
La superficie de} objetivo no
ofrece buena reflexiSn para ei
impulso ultrasSnico (as decir,
superficie suave e irregular tai
como una alfombra gruesa,
cortina o empapetado irregular,
etc,).
Cubra la superficie dei objetivo
con cart6n o madera
contrachapadao
La superficie de! objetivo no
ofrece buena refiexiSn para el
impulso ultrasSnico (as decir,
superficie suave e irregular tal
como una alfombra gruesa,
cortina o empapelado irregular,
etc.),,
Cubra {a superficie del objetivo
con cart6n o madera
contrachapada,
Las obstrucciones est&n dentro
de los lfmites de sonido,.
Retire todas las obstrucclones,
La herramienta no se mantiene
perpendicular al objetivo,
Mantenga la herramienta
perpendicular at objetivo
I
18
NOTAS
"19
Your Home
For repair in your home of all major brand appliances,
lawn and garden equipment, or heating and cooling systems,
no matter who made it, no matter who sold it!
For the replacement parts, accessories and
owner's manuals that you need to do-it-yourselfo
For Sears professional installation of home appliances
and items like garage door openers and water heaters.
1-800-4-MY-HOME
(1-800-469-4663)
ww_,,Lsears.com
_
Anytime, day or night
(U.SA. and Canada)
wwvw,sears.ca
Our Home
For repair of carry-in products like vacuums, lawn equipment,
and electronics, call or go on-line for the nearest
Sears Pads and Repair Center.
1-800-488-1222
Anytime, day or night (U.SA only)
w'_'_v.sears.com
To purchase a protection agreement (U.S°A_) or maintenance
agreement (Canada) on a product serviced by Sears:
1-800-827-6655
(U.SoA,)
Para pedir servicio de reparaci6n
a domicilio, y para ordenar piezas:
1-888.SU-HOGAR sM
1-800-361-6665
(Canada)
Au Canada pour service en frangais:
1-800-LE-FOYER Mc
(_-8o0-533_937)
wvcw..sears_ca
© Sears,Roebucka_ Co,
@ Registered Trademark I T_ Trademark t sMService Mark of Sears, Roebuck and Co,
® Marca Registrada / T_ Marca de F, brica / s_ Marca de Servicio de Sears, Roebuck and Co
_c Marque de commerce
1 _D Marque d_pos6e
de Sears, Roebuck and Co