1
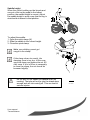
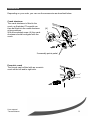
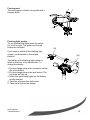
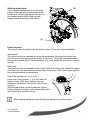
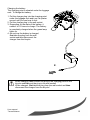
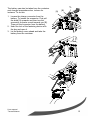
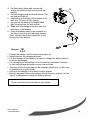
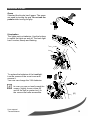
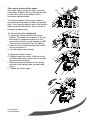
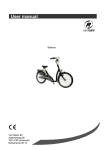
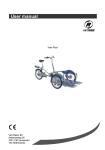
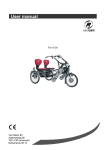
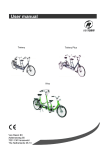
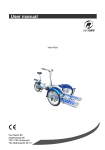
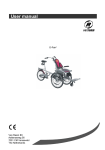
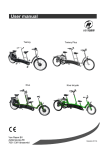
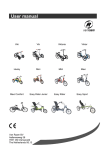
User manual
Tavara Balance
Van Raam BV
Aaltenseweg 56
7051 CM Varsseveld
Netherlands
User manual
Tavara Balance
2
Contents
Contents .................................................................................................................3
Contact details manufacturer ...................................................................................3
Conformity ..............................................................................................................3
Introduction .............................................................................................................4
Delivery...................................................................................................................4
Intended usage .......................................................................................................4
Safety measures .....................................................................................................5
Delivery inspection ..................................................................................................6
Adjustment of the bicycle .........................................................................................6
Accessories.............................................................................................................9
Before the first use ................................................................................................15
Technical details....................................................................................................16
Maintenance and adjustments to be done by owner................................................17
Repairs and maintenance to be done by dealer ......................................................19
Disposal................................................................................................................20
Handover/sale to a new owner...............................................................................20
Guarantee.............................................................................................................20
Frame number.......................................................................................................21
Contact details manufacturer
Van Raam BV
Aaltenseweg 56
7051 CM Varsseveld
Netherlands
Tel.
: +31 (0)315 257370
E-mail : [email protected]
Internet : www.vanraam.nl
Conformity
Van Raam declares as manufacturer that the Tavara Balance bicycle has been
produced in accordance with the 93/42/EEG guidelines.
User manual
Tavara Balance
3
Introduction
This user manual gives important and necessary
information about the use of your bicycle. We ask you to go
through the manual thoroughly before using the bicycle.
READ
THOROUGHLY!
Delivery
-
bicycle with possible packaging
user manuals (s)
possible charger (s), depending on options
Intended usage
The bicycle is designed for normal use on level and solid ground. The usual bicycle
caution should always be taken into consideration. At the same time all safety
instructions as described in this manual should be complied with explicitly. Also the
local traffic rules should always be complied with.
All other use, including damage or physical injuries due to this, are not the
manufacturer's responsibility.
User manual
Tavara Balance
4
Safety measures
•
Ensure the bicycle is in good condition each time before using it.
•
Check before each ride that the brakes are in order.
•
Check the lights and reflectors.
•
Regularly check whether all screw joints are tight.
•
Regularly check whether the wheels, the handlebars and the saddle are
secure.
•
Make sure there is sufficient air in the tyres.
•
Only use the bicycle on a solid and level surface.
•
Make sure that wide trousers or lose hanging clothing don’t get caught in the
chain, spokes or pedals.
•
Do not use a pressure washer or a steam cleaner for the cleaning of the
bicycle.
User manual
Tavara Balance
5
Load
The maximum load should not be exceeded. See information in the index of technical
details on page 16. By permitted load we mean the total load, including the load on
the luggage rack.
Make sure that the permitted load on the luggage rack is not exceeded.
Damaged or worn out parts
The replacement and repair of parts (frame, forks, illumination, brakes, drive
mechanism and the handle bars) should always be performed by a dealer. If not, the
guarantee ceases to be valid and you will be personally responsible in the event of
possible damage.
Specific safety parts should always be replaced by new parts!
Delivery inspection
Check the delivery immediately after receiving it.
In the event of damage or incomplete delivery we ask you to contact your dealer
immediately.
Adjustment of the bicycle
Before using the bicycle, adjust it to the measurements of the cyclist. This is of great
importance, especially the saddle and the handlebars.
If an optimal adjustment of the bicycle, as defined in the instructions, is not
possible, you can contact your dealer for a fitting solution.
The brakes are correctly adjusted as standard and can only be adjusted by the dealer
during periodic maintenance.
User manual
Tavara Balance
6
Saddle height
When the cyclist is sitting on the bicycle and
can put a foot on the pedal in the lowest
position, the saddle height is correct. Adjust
the saddle height in such a way that the leg is
stretched but relaxed in that position.
To adjust the saddle:
1. Open the quick-clamp [A].
2. Slide the saddle to the correct height.
3. Close the quick-clamp.
Make sure clothing cannot get
caught in the clamp!
[B]
[A]
If the clamp closes too easily, the
clamping force is too low. In this case,
open the clamp and tighten the nut (B)
a bit more. If a lot of force is necessary
to close the clamp, the nut should be
loosened slightly.
Do not pull out the saddle pin further than the
marking. The tube will not go into the shank deep
enough and will risk coming off. This can lead to
serious injuries.
User manual
Tavara Balance
MIN INSERT
7
Handle bar height
The height of the handle bars affects the
comfort of the ride. It determines the pressure
on the hands and the position of the back.
Determine your own most comfortable height
by using the bike.
To adjust the handle bars:
1. Slightly loosen the screw by using an Allen
key.
2. Slide the handle bars to the correct height
and tighten the screw very firmly again.
2.
1.
Do not pull out the handle bars further than the
mark. Otherwise the tube will not be deep enough in
the shaft and will risk coming off, which can lead to
serious injuries.
Position handle bars
You can tilt the handle bars. This influences
the distance from the handle bars to the upper
body. Determine your own most comfortable
position by using the bike.
To tilt the handle bars:
1. Slightly loosen the screws (A) and (B) with
an Allen key.
2. Put the handle bars in the desired position
and then tighten the screws considerably.
3. Slightly loosen screw (C) with an Allen key,
put the handle bars in the correct
(horizontal) position and then tighten the
screw again.
User manual
Tavara Balance
MIN INSERT
2.
3.
[C]
[A]
[B]
1.
8
Accessories
Depending on your order, you can use the accessories as described below.
Crank shortener
The crank shortener is fitted to the
crank, as illustrated. The pedal can
then be fitted into the crank shortener
at two positions.
With the socketed screw (A) the crank
shortener should be aligned with the
crank.
[A]
2 assembly points pedal
Eccentric crank
The bicycle can be fitted with an eccentric
crank on the left and/or right side.
User manual
Tavara Balance
9
Foot support
The foot support is fitted to the pedal with a
balance block.
Flashing light system
To use the flashing lights press the switch
(A) to left or right. The green and the red
button are not used.
If you want to switch off the flashing light
system, put the switch in the middle
position.
[A]
[B]
The battery of the flashing light system is
fitted on the front of the handle bars. To
charge the battery:
1. Put the charger plug in the connector socket
(B) of the battery.
2. Put the charger plug in the wall socket. The
red lamp will light up.
3. When the green lamp lights up, the battery
is fully charged.
4. Take the plug from the wall socket.
5. Take the plug from the battery.
User manual
Tavara Balance
10
Walking-stick holder
You can take 2 sticks with you in the stick
holder. Place the stick in the holder at the
bottom side [A] and then secure the stick in
the fastening device [B] at the top side.
Always fasten the stick(s) with velcro.
[B]
[A]
Electric motors
The bicycle can be supplied with an electric motor. There are 2 types available.
Accelerator:
The electric motor is operated by using the accelerator. By using the cockpit you
start the motor and determine the power of the motor. This motor accelerates and
drives with a speed up to 6 km/h maximum. For more speed the cyclist has to pedal
as well.
Pas-Vario:
The electric motor is operated by the cockpit. With this cockpit you switch the engine
on/off and you can also determine the power of the motor. This motor only supports
the cycling and does not accelerate.
Use of the cockpit (same in both types):
Press one of the buttons, 1, 2 or 3 to start the
electric motor. With these buttons you can
determine the power of the motor, also during
cycling.
With the red button you shut down the system.
If the system is not used, it will automatically shut
itself down after a period of time.
When walking backwards with the bicycle, always turn off the motor.
User manual
Tavara Balance
11
Charging the battery:
The charging point is situated under the luggage
rack. To charge the battery:
1. Put the charger plug into the charging point
under the luggage rack and turn it a quarter
around until you can hear it click.
2. Put the charger plug in the wall socket.
3. Depending on the state of the battery, it
needs 4 to 12 hours to charge. The battery
is completely charged when the green lamp
lights up.
4. As soon as the battery is charged,
first take the plug from the wall
socket and then disconnect the
charger from the bicycle.
1.
2.
When charging, first connect the plug to the charging point on the
bicycle and then put the plug in the wall socket!
When charged, first take the plug from the wall socket and then
disconnect the charger from the bicycle!
User manual
Tavara Balance
12
1.
The battery can also be taken from the container
and charged somewhere else, indoors for
instance. To do this:
[B]
[A]
1. Loosen the charge connector from the
battery. To loosen the connector: First pull
the knob [A] upwards and then turn the
connector a quarter round towards you [B].
Then pull the connector from the battery.
2. Undo the lock of the fastening device with
the key and open it.
3. Let the battery come ahead and take the
battery from the container.
2.
3.
User manual
Tavara Balance
13
4. Put the battery down and connect the
charge connector to the connector of the
battery.
5. Put the charger plug in the wall socket. The
red light will light up.
6. Depending on the state of the battery it will
take 4 to 12 hours to fully charge.
7. As soon as the battery is charged, first
take the plug from the wall socket.
8. Then take the charge connector from the
connector of the battery.
9. Place the battery back in the container on
the bicycle and lock the fastening devices.
Then, connect the charge connector to the
connector of the battery.
4.
Beware:
• Charge the battery until the green lamp lights up.
• Never interrupt the charging process.
• For the lifespan of the battery it is better to charge the battery when it
is almost discharged.
• It is damaging for the battery if it is not used for more than 2 months.
In that case charge the battery every now and then.
• The case of the charger may not be opened by the buyer. In the event
of problems go to your dealer!
• Only use the charger in non-humid indoor spaces.
• Below 5 degrees Celsius the charger will not function properly. In that
case it is advisable to charge the battery indoors.
Extra accessories are available at your dealer.
User manual
Tavara Balance
14
Before the first use
Gears
Standard the bicycle has 8 gears. The gears
are used by turning the grip. Do not use the
pedals when turning the grip.
Illumination
The lights work on batteries. Use the buttons
to switch the lights on and off. The back light
has 2 modes; steady and flashing.
To replace the batteries of the headlight,
turn the screws of the cover loose and
remove it.
You now can change the 3 AA batteries.
In case you can not easily reach the
screws, slightly loosen screw [A]
and tilt the light a quarter turn, so
the screws are better accessible.
User manual
Tavara Balance
[A]
15
Check before every ride:
•
the brakes
•
the tyre pressure
•
the illumination
•
that all parts are secure
Contact your dealer and do not use your bicycle if you identify any irregularities!
As with all mechanical parts, the bicycle is subject to wear and tear and high loading.
If a component fails, it can lead to very dangerous situations. This can lead to
damage or injuries to the user of the bicycle. Any form of tearing, scratching or
changing of colour is an indication that the part should be replaced.
Important safety points for the cyclist
•
Go very carefully during the first ride.
•
When riding the bicycle hold both hands firmly on the handle bars and feet
on the pedals.
•
Test the riding style of the bicycle on rough ground at moderate speed. This
way the cyclist learns how to react to unexpected movements of the bicycle
and the handle bars during use.
•
Small obstacles should be cycled over with appropriate speed.
•
Obstacles higher than 5 cm should be avoided.
Technical details
Length (cm)
Frame height (cm)
Boarding height (cm)
Front wheel
Back wheel
Weight (kg)
Max. load luggage rack (kg)
Total max. load (kg)
Brakes, front
Brakes, back
User manual
Tavara Balance
173
52
23
24“
24“
From 19
15
135
Rim brakes
Rim brakes
16
Maintenance and adjustments to be done by owner
Below you can find the instructions for maintenance and adjustments that you can do
yourself on a regular basis, which will keep your bicycle in top condition.
Cleaning
The frame of the bicycle can be cleaned with a damp cloth. For areas that are dirtier
you can use a mild detergent. The wheels can be cleaned with a damp brush with
plastic hairs (not a wire brush!) The seats and the grips can be cleaned with mild
soap and water.
Do not use a pressure washer or a steam cleaner!
Inspection of the bicycle
After 200 kilometres or after a period of 2 months the bicycle should be inspected.
Check the brakes, the illumination and the spokes. Also check the tyre tread depth.
This should be at least 1 mm. Worn out tyres or possible faulty parts should be
replaced.
User manual
Tavara Balance
17
The correct tension of the chain
The chain should not be too tight. It should
hang loose. Without effort you should be able
to move the chain up and down, half a
centimetre approximately.
[B]
[A]
1.
To keep the tension of the chain correct, a
special tensioning wheel is fitted by the pedal
axis. If you have an electric motor, this tension
wheel is behind the battery, and you have to
remove the battery first.
To remove the battery [optional]:
1. Loosen the charge connector from the
battery. To loosen the connector: First pull
the knob [A] upwards and then turn the
connector a quarter round towards you [B].
Then pull the connector from the battery.
2. Undo the lock of the fastening device with
the key and open it.
3. Let the battery come ahead.
2.
To adjust the tension wheel:
4. Slightly loosen the screw. Hold the nut at
the back tight with a socket wrench to stop
the screw from slipping.
5. Shift the tensioning wheel in such a way
that the chain hangs loose, as described
above.
6. Tighten the screw again.
3.
4.
5.
User manual
Tavara Balance
18
The right lubricant
The chain should be cleaned and maintained at regular intervals (every 3 months
approximately). Only use special chain grease or Tevlon spray. This is the only way
to make sure that the chain will run smoothly, will stay water resistant and will not
rust.
Wipe the chain with a cloth, treat it with grease or spray and remove any excess
lubricant with a rag.
Other parts should not be treated with a lubricant.
Checking the rim
Due to the combined action of the brake and the rims, not only the brake lining but
also the condition of the rim is important. For this reason the rim should be checked at
regular intervals, for example when you inflate the tyres. The presence of fine cracks
in the spoke punches or deformation of the rim when there is higher air pressure,
indicate more serious wear and tear. In that case the rim should be replaced,
because it can lead to loss of brake function or even a crack in the rim, which can
lead to all kinds of dangerous consequences.
Repairs and maintenance to be done by dealer
It is recommended that the bicycle has a yearly inspection carried out by the dealer.
In the event of technical trouble or faults, the bicycle should be taken to the dealer for
repairs immediately.
The replacing of safety-related components (especially frame, brakes, illumination,
handle bars, front fork and actuation) should be performed by the dealer.
If you still decide you want to replace components yourself, you are responsible for
damage or harm due to incorrectly fitted components.
Only use original spare parts, which you can buy at you dealer. If requested the
dealer will make the necessary information on repair and maintenance available.
User manual
Tavara Balance
19
Disposal
If you want to dispose your bicycle, contact your dealer. You can also contact the
local waste disposal company. They will dispose the bicycle according to the
regulations of your town.
Handover/sale to a new owner
When you hand over your bicycle to a new owner it is important that you also hand
over all necessary technical documentation so that the new owner can use the bicycle
safely.
Guarantee
The guarantee is valid for all faults in the product, which are proven to be caused by
material or manufacturing error.
For our bicycles we give a guarantee of 5 years on the frame and the front fork. For
the paint, all accessories and other parts (except wear parts) we provide a 2 year
guarantee, as legally regulated.
Beware!
The guarantee as well as the product liability in general expires if the instructions
stated in this manual are not followed. This is also the case if unauthorized
maintenance is carried out or if technical changes or additions are made without
permission of Van Raam.
User manual
Tavara Balance
20
Frame number
The frame number is printed on the sticker. This sticker is located on the frame, see
the image below.
Example sticker:
Frame number
Position of sticker:
on backside of the saddle tube
User manual
Tavara Balance
21