1
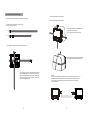
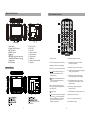
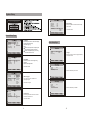
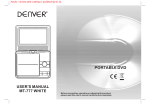
PORTABLE DVD
www.facebook.com/denverelectronics
Before connecting, operating or adjusting this product,
please read this user's manual carefully and completely.
USER'S MANUAL
MTW-984 TWIN
Important Safety Instructions
1. Warning: To reduce the risk of electric shock, do not remove the
cover or back. There are no user-serviceable parts inside. Refer
servicing to qualified personnel.
2. Warning: To prevent fire or electric shock hazard, do not expose
the unit to rain or moisture.
12. WARNNING: Only use attachments/accessories specified
provided by the manufacturer, the portable DVD is supplied by
AC adapter, the AC adapter is used as disconnect device, the
disconnect device shall remain readily operable.
3. Do not expose the Adaptor and portable DVD to water (dripping or
splashing) and no objects filled with liquids, such as vases, should
be placed on the unit.
4. Keep the portable DVD away from direct sunlight and heat source
such as radiators or stoves.
5. Do not block the ventilation openings. Slots and openings on the
unit are provided for ventilation. The openings should never be
blocked by placing your portable DVD on a cushion, sofa or other
similar surface.
6. Do not place the portable DVD on unstable cart, stand, tripod,
bracket or table. The unit may fall, resulting in possible damage
or injury.
7. Never place heavy or sharp objects on the LCD panel or frame.
8. Only use the AC adapter included with portable DVD. Using any
other adapter will void your warranty.
9. The plug of AC adaptor is used as the disconnect device, the
disconnect device shall remain readily operable.
This marking indicates that this product shouId not be
disposed with other household wastes throughout the
EU. To prevent possible harm to the environment or
human health from uncontrolled waste disposaI,
recycle it responsibly to promote the sustainable reuse
of material resources. To return your used device,
please use the return and collection systems or contact
the retailer where the product was purchased. They can
take this product for environmental safe recycIing.
10. Unplug the power from the outlet when the unit is not in use.
11. WARNNING: Excessive sound pressure from earphones or
headphones can cause hearing loss.
1
2
SERIAL NUMBER:
Safety Precautions
You can find the seriaI number on the back of the unit. This number
is unique to this unit and not available to others. You should record
requested information here and retain this guide as a permanent
record of your purchase.
Warning: This digital video disc player employs a laser system.
Use of controls, adjustments, or the performance of procedures
other than those specified herein may result in hazardous
radiation Exposure.
Model No. ______________________________
SeriaI No. ______________________________
Date of Purchase ________________________
Warning: To prevent direct exposure to laser beam, do not open
the enclosure.
Visible laser radiation when open.
Warning: Never stare directly into the laser beam.
Caution: Do not install this product in a confined space such as
a book case or simllar unit.
Warning: more than 250mm USB extension cord is prohibited to
use for USB port.
In Car Installation by mounting bracket
Notes on Copyrights:
It is forbidden by law to copy, broadcast, show, broadcast via cable,
play in public, or rent copyrighted material without permission.
This product features the copy protection function deveIoped by
Macrovision. Copy protection signals are recorded on some discs.
When recording and playing the pictures of these discs picture
noise will appear. This product incorporates copyright protection
technology that is protected by method claims of certain U.S.
Patents and other inteIlectual property rights owned by
Macrovision Corporation and other rights owners. Use of this
copyright protection technology must be authorized by Macrovision
Corporation, and is intended for home and other Iimited viewing
uses only unless otherwise authorized by macrovision Corporation.
Reverse engineering or disassembly is prohibited.
3
1. Separate the bracket by taking down the
screws on both side of the bracket.
2. Take out 4pcs screws of long part of the
bracket.
3. Install the long part of the bracket to the
steel pipe beneth the back of the seat,
then lock up the screw.
4. Insert the other part of the bracket.
5. Put the player to the indicated screw hole
and tighten the screw.
4
In Car Installation with straps
2. Fitting the straps to the headrest.
1. Fit the straps to the DVD Player / Monitor as required.
a. Fitting the straps to the headrest.
The DVD player will fit to the mount in this
position, as shown below.
Fit the straps around the headrest and
engage the 2 trident clips.
Ensure clips are securely fastened.
A
B
Turn the player around so the backs are facing you.
B
Pull the straps tight using the adjustment.
Tuck the loose ends into the strap tidy.
A
Turn the player around, slide the strap a through
the strap lock upon the right bottom of the DVD
player, then slide the strap through the strap B
and the left bottom player as shown. Enter the
strap B mounted centrally.
5
NOTE:
Be sure to complete the installation then use MTW-984 TWIN in the car.
For MTW-984 TWIN installation is recommended that the DVD Player
is on the LEFT headrest, to ensure a neat cable run to the monitor,
as shown below:
6
Main Unit Controls
The Remote Control
1. Open knob
2. Power ON/OFF switch
3.SETUP button
4. MODE button
5.
6.OK button Function same as
ENTER on Remote control
7. Play/Pause
8. STOP button
9. DC IN 9-12V
10.DC OUT
11. AV OUT
12. Earphone jack
13. Volume knob
14. SD card slot
15. USB Port
16. Rating Label Position
17. Bracket
1. Number button
10. MODE(To select the source)
2. TITLE ( To display title information)
11. ZOOM(To zoom in/out the image
during the playback)
3. AUDIO (To select audio language)
Monitor View
12. MENU(To enter or exit root menu)
4. SETUP (To go to or exit setup menu)
5.
6.
13. SUBTITLE(To select subtitle language
when playing DVD disc)
Previous/Next button (To go to
previous/next chapter or scene
during playing)
14. ANGLE(To change viewing angle
when playing disc with multi-angle)
Fast forward/backward button
(To scan forward/backward at 2, 4,
8, 16, or 32 times )
15. A-B(Repeat a specific portion from
point A to B, press it again to cancel
repeat playing)
7.OSD ( To display disc information
during playing such as elapsed and
remaining time)
8.
9.
Rating Label Position
8. Bracket
7
16. REPEAT(To repeat playing title,
chapter or track)
Play/pause
17. RETURN(To return to the main menu)
Stop ( press once to stop playback,
then press
to resume playback
from the point where you stopped;
press stop button twice to stop
playback completely)
18. MUTE(To turn to mute)
19. VOL +/- (To adjust the volume)
20. ENTER(To confirm)
8
System Setup
TV Display
Angle Mark
OSD Lang
Screen Saver
Auto Standby
16:9
ON
ENG
ON
3H
Auto Standby
Enter this option to set different auto standby
time function.
Off
3 Hours
4 Hours
The default is Off.
General Setup Page
TV Display
Angle Mark
OSD Lang
Screen Saver
Auto Standby
TV Display
Angle Mark
OSD Lang
Screen Saver
Auto Standby
16:9
ON
ENG
ON
3H
16:9
ON
ENG
ON
3H
4:3PS
4:3LB
16:9
On
Off
TV display:
Enter this option,user can set screen display
format(4:3PS,4:3LB,16:9)
The default is 16:9
Note
The function depends on the display ratio
with which the DVD disc is recorded.
Please choose Wide(16:9) when using
a 16:9 wide screen TV set.
Video Setup Page
TV Type
Quality
Panel Quality
PAL
TV Type
Quality
Panel Quality
PAL
TV Type
Quality
Panel Quality
PAL
PAL
NTSC
TV Type:
Enter this option to select TV type(PAL,NTSC)
The default is PAL.
Angle Mark:
Enter this option to set the angle during
playback.
Optional setting:ON,OFF
The default is ON
TV Display
Angle Mark
OSD Lang
Screen Saver
Auto Standby
TV Display
Angle Mark
OSD Lang
Screen Saver
Auto Standby
16:9
ON
ENG
ON
3H
16:9
ON
ENG
ON
3H
English
French
German
Portuguese
Spanish
Dutch
Swedish
Polish
On
Off
Set the Video Quality of AV OUT
OSD Language:
In the option user can set OSD menu
language English.
The default: English
Set the Video Quality of PANEL
Screen Saver
Enter this option to set whether to activate
the screen saver function.
The default is ON.
9
10
Preference Page
Audio
Subtitle
Disc Menu
Parental
Default
ENG
Off
ENG
Parameters and Specifications
Electronical parameters
English
French
German
Portuguese
Spanish
Dutch
Swedish
Polish
Audio:
Enter this option,user can select preferred
audio language for DVDs.
Note
The audio language depend on the material
on each disc.
Item
Standard Requirement
Power requirements
: AC 100-240V, 50/60 Hz
Power consumption
: < 9W
Operating humidity
: 5% to 90%
VIDEO OUT
Audio
Subtitle
Disc Menu
Parental
Default
ENG
Off
ENG
English
French
German
Portuguese
Spanish
Dutch
Swedish
Polish
Off
Audio
Subtitle
Disc Menu
Parental
Default
ENG
Off
ENG
English
French
German
Portuguese
Spanish
Dutch
Swedish
Polish
Audio
Subtitle
Disc Menu
Parental
Default
ENG
Off
ENG
Output AUDIO OUT
Subtitle
Select your preferred language to show the
subtitles on the screen.
The default is OFF
Disc Menu
This function allows you to choose the menu
language stored on the disc.
Note:
the disc menu languages depend on the
information available on the disc.
Parental:
Enter this option to set the parental control
level to some unsuitable disc scenes being
watched by the children.
Optional parental control levels: KID SAFE,
G, PG,PG 13,PGR, R, Nc17, ADULT.
The default is ADULT.
The default password:8888.
Audio
Subtitle
Disc Menu
Parental
Default
AUDIO
: 1 Vp-p (75 )
: 1.0 Vrms (1 KHz, 0 dB)
: Speaker: 1WX2, Earphone output
System
Laser
: Semiconductor laser, wavelength 650 nm
Signal system
: NTSC / PAL
Frequency response
: 20Hz to 20 kHz (1dB)
Signal-to-noise ratio
: More than 80 dB (ANALOG OUT connectors only)
Dynamic range
: More than 80 dB (DVD / CD)
Note:
Design and specifications are subject to change prior notice.
ENG
Off
ENG
11
12
EIectric and eIectronic equipment and incIuded batteries contains materials,
components and substances that can be hazardous to your health and the
environment, if the waste materiaI (discarded electric and eIectronic
equipment and batteries) is not handIed correctly.
EIectric and eIectronic equipment and batteries is marked with the crossed
out trash can symboI, seen beIow. This symboI signifies that eIectric and
eIectronic equipment and batteries shouId not be disposed of with other
househoId waste, but shouId be disposed of separately
As the end user it is important that you submit you r used batteries to the
approriate and designated faciIity. In this manner you make sure that the
batteries are recycIed in accordance with IegisIature and wiII not harm the
environment.
AII cities have estabIished coIIection points, where eIectric and electronic
equipment and batteries can either be submitted free of charge at recycIing
stations and other coIlection sites, or be collected from the househoIds.
AdditionaI information is availabIe at the technicaI department of your city.
Please fill the blank with the model number
of this player for future reference
Imported by:
DENVER ELECTRONICS A/S
Stavneagervej 22
DK-8250 EGAA
DENMARK
www.facebook.com/denverelectronics
13