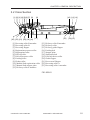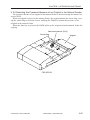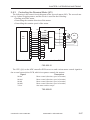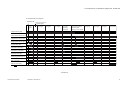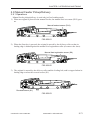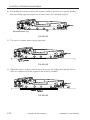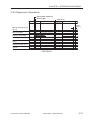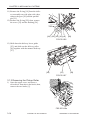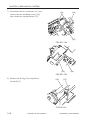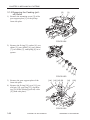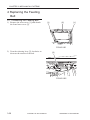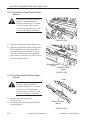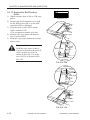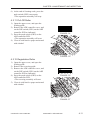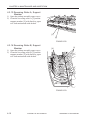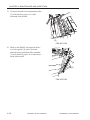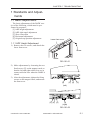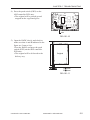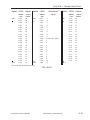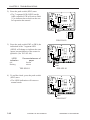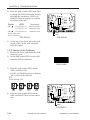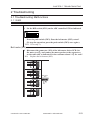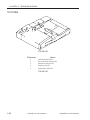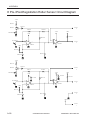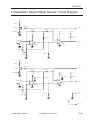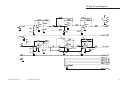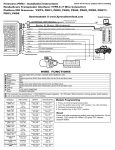
1
DADF-J1
REVISION 0
MAR. 2001
COPYRIGHT© 2001 CANON INC.
FY8-13H6-000
CANON DADF-J1 REV.0 MAR. 2001 PRINTED IN JAPAN (IMPRIME AU JAPON)
Scope of Application
This document is published by Canon Inc. for the purpose of providing its readers with
the technical knowledge needed to install, maintain, and repair the product under
discussion. It may also be used as a reference when studying the technical aspects of the
product.
The contents of this document are generic in nature so as to cover all areas where the
product is sold. In this respect, it is important to note that some of the specifications or
descriptions found in this document may not apply in some areas.
In addition, it must be borne in mind that the specifications or descriptions may differ
from those noted in the actual machine or found in advertisements or in other printed
matter.
All questions concerning this document are to be addressed to the Service Department of
the appropriate Sales Company.
Revision
The information disclosed in this document may not necessarily be accurate because of
updates made to the product, and major differences will be communicated in the form of
technical bulletins.
The following will not apply where it does not conform to the laws or regulations of the
country in which the product is used.
Trade Marks
The product names and company names found in this document are registered trade marks
or trade marks of their respective companies.
Copyright
The title to this document belongs to Canon Inc., and no part of it may be reproduced,
quoted, or translated into another language without the consent of Canon Inc. in writing.
COPYRIGHT © 2001 CANON INC.
Printed in Japan
Imprimé au Japon
Warning
This document must be handled with utmost care. Disclosure of its contents may lead to
legal proceedings.
COPYRIGHT© 2001 CANON INC.
CANON DADF-J1 REV.0 MAR. 2001 PRINTED IN JAPAN (IMPRIME AU JAPON)
INTRODUCTION
1 Symbols Used
This documentation uses the following symbols to indicate special information:
Symbol
Description
Indicates an item of a non-specific nature, possibly classified as Note, Caution,
or Warning.
Indicates an item requiring care to avoid electric shocks.
Indicates an item requiring care to avoid combustion (fire).
Indicates an item prohibiting disassembly to avoid electric shocks or problems.
Indicates an item requiring disconnection of the power plug from the electric
outlet.
Memo
REF.
Indicates an item intended to provide notes assisting the understanding of the
topic in question.
Indicates an item of reference assisting the understanding of the topic in question.
Provides a description of a service mode.
Provides a description of the nature of an error indication.
Refers to the Copier Basics Series for a better understanding of the contents.
COPYRIGHT© 2001 CANON INC.
CANON DADF-J1 REV.0 MAR. 2001
i
INTRODUCTION
2 Outline of the Sevice Manual
This Service Manual contains basic information needed to service the DADF-J1in the
field, conducted for the purpose of maintaining its product quality and a specific level of
performance.
This Service Manual consists of the following chapters:
Chapter 1 General Description, shows the features and specifications of the machine,
as well as the names of parts and how to operate it.
Chapter 2 Operations and Timing, explains the mechanical and electrical systems of
the machine by function in relation to the principles of operation and timing
at which they are driven.
Chapter 3 Mechanical Systems, shows how to disassemble/assemble the machine
and make adjustments.
Chapter 4 Maintenance and Inspection, provides tables of periodically replaced
parts and consumables/durables and a scheduled servicing chart.
Chapter 5 Troubleshooting, contains troubleshooting tables and diagrams of electrical
parts, lists of VRs, LEDs, and check pins by PCB, and an outline of selfdiagnosis.
In addition, an appendix is added to offer a general timing chart, list of signals/abbreviations, general circuit diagrams, and PCB diagrams.
The machine comes with an Installation Procedure. Refer to the instructions in the booklet when installing the machine.
ii
COPYRIGHT© 2001 CANON INC.
CANON DADF-J1 REV.0 MAR. 2001
INTRODUCTION
The following rules apply throughout this document:
As a rule, the descriptions in this documentation are based on the following:
1. As needed, the work of each function and its relationship with electrical and mechanical parts are explained; where applicable, the timing at which associated parts
are driven are also outlined.
indicates a path of mechanical drive; the symbol
In a diagram, the symbol
accompanied by a notation indicates the flow of an electrical signal.
The expression “power-on” means turning on the power switch, closing the front
door, and closing the delivery door so that the parts of the machine are supplied with
power.
2. In a digital circuit, the state of a signal is indicated by ‘1’ if its voltage level is high
and by ‘0’ if low. The level of voltage, however, differs from circuit to circuit.
The machine uses a CPU; however, since the internal functions of a CPU is outside
the scope of a service person, detailed explanations are omitted from descriptions. In
this document, a circuit diagram may cover from sensors to inputs of a controller
PCB or from outputs of a controller PCB to loads, or it may be a functional diagram.
The descriptions of the machine are subject to change for product improvement, and major changes will be communicated in the form of Service Information bulletins.
All service persons are expected to be fully familiar with the contents of this Service
Manual and Service Information bulletins to develop a good understanding of the machine,
equipping themselves with the ability and skill to identify faults and to maintain the machine
in good order.
COPYRIGHT© 2001 CANON INC.
CANON DADF-J1 REV.0 MAR. 2001
iii
INTRODUCTION
Contents
CHAPTER 1 GENERAL DESCRIPTION
1 Features ............................................... 1-1
2 Specifications ...................................... 1-2
2.1 DADF-J1 ....................................... 1-2
3 Names of Parts ..................................... 1-4
3.1 External View ................................ 1-4
3.2 Cross Section ................................ 1-5
4 Using the DADF .................................. 1-6
4.1 Original Set Indicator ................... 1-6
4.2 Warnings and Action to Take ........ 1-6
4.3 Routine Maintenance by the User 1-7
CHAPTER 2 OPERATIONS AND TIMING
1 Basic Construction .............................. 2-1
1.1 Outline of the Electrical
Circuitry ..................................... 2-1
1.2 Communication with the Copier .. 2-2
1.3 Inputs to the ADF
Controller PCB .......................... 2-3
1.4 Outputs from the ADF Controller
PCB ............................................ 2-5
2 Basic Operations .................................. 2-6
2.1 Outline .......................................... 2-6
2.2 Operations ..................................... 2-9
2.2.1 Outline ..................................... 2-9
2.2.2 CW Pickup/Delivery ............. 2-10
2.2.3 Pre-Reversal/Reversal/Delivery
(small-size original) ........... 2-11
2.2.4 Reversal Pickup/Reversal/Delivery
(large-size originals) .......... 2-13
2.2.5 Manual Feeder Pickup/Delivery
........................................... 2-15
2.3 Detecting Originals ..................... 2-16
2.3.1 Outline ................................... 2-16
2.3.2 Detecting the Presence/Absence
of an Original ..................... 2-17
2.3.3 Original Size Detection 1 ...... 2-18
2.3.4 Original Size Detection 2 ...... 2-19
2.3.5 Pre-Last Original Detection .. 2-24
2.3.6 Detecting the Presence/Absence
of an Original in the Manual
Feeder ................................ 2-25
iv
2.4 Picking Up and Separating Originals
................................................. 2-26
2.4.1 Outline ................................... 2-26
2.4.2 Moving Up/Down the Pickup
Roller Unit ......................... 2-27
2.4.3 Switching the Separation Pressure
........................................... 2-30
2.4.4 Separation Sensor (S4) and Skew
Sensor (S5) ........................ 2-31
2.4.5 Controlling the Pickup Motor
(M3) ................................... 2-33
2.4.6 Controlling the Separation Motor
(M4) ................................... 2-34
2.4.7 Sequence of Operations ........ 2-35
2.5 Moving/Delivering Originals ...... 2-36
2.5.1 Outline ................................... 2-36
2.5.2 Controlling the Belt Motor
(M2) ................................... 2-37
2.5.3 Controlling the Delivery Motor
(M5) ................................... 2-39
2.6 CW Pickup/Delivery ................... 2-40
2.6.1 Outline ................................... 2-40
2.6.2 Fixed Reading ....................... 2-40
2.6.3 Stream Reading ..................... 2-48
2.7 Pre-Reversal Pickup/Delivery ..... 2-57
2.7.1 Outline ................................... 2-57
2.7.2 Operations ............................. 2-57
COPYRIGHT© 2001 CANON INC.
CANON DADF-J1 REV.0 MAR. 2001
INTRODUCTION
2.8 Reversal Pickup/Delivery ........... 2-63
2.8.1 Outline ................................... 2-63
2.8.2 Operations ............................. 2-63
2.8.3 Controlling the Reversal Motor
(M1) ................................... 2-67
2.8.4 Sequence of Operations (largesize, double-sided) ............. 2-69
2.9 Manual Feeder Pickup/Delivery
................................................. 2-71
2.9.1 Operations ............................. 2-71
2.9.2 Sequence of Operations ........ 2-73
3 Jams ................................................... 2-74
4 Power Supply ..................................... 2-81
CHAPTER 3 MECHANICAL SYSTEMS
1 Basic Construction .............................. 3-1
1.1 External Covers ............................ 3-1
1.1.1 Disconnecting the DADF ........ 3-1
1.1.2 Removing the Front Lower
Cover .................................... 3-2
1.1.3 Removing the Front Cover ...... 3-2
1.1.4 Removing the Main Cover ...... 3-3
1.1.5 Removing the Original Tray ... 3-5
1.1.6 Removing the Upper Cover .... 3-5
1.1.7 Removing the ADF Controller
Cover .................................... 3-6
1.1.8 Side Guide Lock ...................... 3-6
2 Drive System ....................................... 3-7
2.1.1 Removing the Reversal Motor
Unit ...................................... 3-7
2.1.2 Removing the Separation Motor
Unit ...................................... 3-7
2.1.3 Removing the Pickup Motor
Unit ...................................... 3-8
2.1.4 Removing the Belt Motor
Unit ...................................... 3-9
2.1.5 Removing the Delivery
Motor ................................. 3-10
3 Feeding System ................................. 3-12
3.1.1 Removing the Delivery
Roller ................................. 3-12
3.1.2 Removing the Pickup
Roller ................................. 3-14
3.1.3 Removing the Separation
Roller ................................. 3-16
3.1.4 Removing the Manual Feed
Registration Roller ............. 3-20
3.1.5 Removing the Feeding (pull-off)
Roller ................................. 3-22
3.1.6 Removing the Registration
Roller ................................. 3-23
3.1.7 Removing the Separation
Belt .................................... 3-25
3.1.8 Removing the Reversing
Roller ................................. 3-28
4 Replacing the Feeding Belt ............... 3-30
4.1.1 Removing the Feeding Belt ......... 3-30
4.1.2 Attaching the Feeding Belt .......... 3-32
CHAPTER 4 MAINTENANCE AND INSPECTION
1 Periodically Replaced Parts ................. 4-1
2 Durables ............................................... 4-1
3 Scheduled Servicing Chart .................. 4-2
4 Cleaning ............................................... 4-4
4.1 Copyboard Glass ........................... 4-4
4.2 Belt Assembly ............................... 4-4
4.3 Sensors .......................................... 4-5
COPYRIGHT© 2001 CANON INC.
4.3.1 Pre-Last Original Paper
Sensor .................................. 4-5
4.3.2 Original Trailing Edge
Sensor .................................. 4-5
4.3.3 Original Sensor ....................... 4-5
4.3.4 Separation Paper/Skew Paper
Sensor .................................. 4-6
CANON DADF-J1 REV.0 MAR. 2001
v
INTRODUCTION
4.3.5 Pre-Registration Roller Paper
Sensor .................................. 4-6
4.3.6 Post-Registration Roller Paper
Sensor .................................. 4-7
4.3.7 Reversal Paper Sensor ............. 4-7
4.3.8 Manual Feed Registration Roller
Paper Sensor ........................ 4-9
4.3.9 Pickup Roller ........................... 4-9
4.3.10 Separation Belt/Feeding
Roller ................................. 4-10
4.3.11 Pull-Off Roller .................... 4-11
4.3.12 Registration Roller .............. 4-11
4.3.13 Reversing Roller A, Support
Member .............................. 4-12
4.3.14 Reversing Roller B, Support
Member .............................. 4-12
4.3.15 Manual Feed Roller, Support
Member .............................. 4-13
4.3.16 Delivery Roller, Support
Member .............................. 4-13
4.3.17 Manual Feed Registration Roller,
Support Member ................ 4-13
CHAPTER 5 TROUBLESHOOTING
1 Standards and Adjustments ................. 5-1
1.1 Basic Adjustments ........................ 5-1
1.1.1 ADF Height Adjustment .......... 5-1
1.1.2 ADF Right Angle Adjustment
............................................. 5-2
1.1.3 Correcting the Skew ................ 5-4
1.1.4 Horizontal Registration
Adjustment ........................ 5-15
1.1.5 Original Stop Position
Adjustment ........................ 5-20
1.2 Making Adjustments When
Replacing the Major Parts ........ 5-26
1.2.1 Outline ................................... 5-26
1.2.2 Replacing the EEPROM ....... 5-26
1.2.3 Adjusting the Sensors
and the Delivery Motor ...... 5-27
1.3 Auxiliary Adjustment .................. 5-31
1.3.1 Adjusting the Degree of Arching
at the Registration Roller
(pickup from the tray)/
(at time of reversal) /
(manual feed mode) ........... 5-31
1.3.2 Adjusting the Speed of
the Feeding Belt ................. 5-34
1.3.3 Adjusting the Speed of
Reversal ............................. 5-36
1.3.4 Checking the Sensor
Output ................................ 5-39
vi
1.4 Indications .................................. 5-41
1.4.1 Jam Counter .......................... 5-41
1.4.2 Tray Pickup Counter and Manual
Feed Pickup Counter ......... 5-42
1.4.3 Jam History ........................... 5-43
1.4.4 Version of the Software ......... 5-44
1.5 Cleaning ...................................... 5-45
1.5.1 Cleaning the Separation
Assembly ........................... 5-45
1.5.2 Cleaning the Registration
Roller ................................. 5-47
1.6 Others .......................................... 5-50
1.6.1 Checking the Original Width Detecting Switch (SW301) .... 5-50
1.6.2 Initializing the Backup
RAM .................................. 5-51
2 Troubleshooting ................................. 5-53
2.1 Troubleshooting Malfunctions .... 5-53
2.1.1 E402 ...................................... 5-53
2.1.2 E404 ...................................... 5-55
2.1.3 E405 ...................................... 5-56
2.1.4 E410 ...................................... 5-57
2.1.5 E422 ...................................... 5-59
3 Arrangement of Electrical
Components ...................................... 5-60
3.1 Sensors ........................................ 5-60
3.2 Motors, Clutches,
and Solenoids ........................... 5-61
3.3 PCBs ........................................... 5-62
COPYRIGHT© 2001 CANON INC.
CANON DADF-J1 REV.0 MAR. 2001
INTRODUCTION
4 LEDs, Check Pins, and Switches
by PCB .............................................. 5-63
4.1 ADF Controller PCB .................. 5-63
4.1.1 Arrangement of
Components ....................... 5-63
4.1.2 DIP Switch Functions ........... 5-64
4.2 Reversal Motor Driver PCB ........ 5-68
4.3 Belt Motor Driver PCB ............... 5-68
4.4 Pickup Tray PCB ........................ 5-69
4.5 Indication LED PCB ................... 5-69
5 Self Diagnosis .................................... 5-70
5.1 Outline ........................................ 5-70
5.2 Alarms ......................................... 5-71
5.3 Jams ............................................ 5-71
5.4 Errors .......................................... 5-72
APPENDIX
1 General Timing Chart ......................... A-1
1.1 A4, 3 Single-Sided Originals,
Stream Reading ......................... A-1
1.2 A3, 2 Single-Sided Originals,
Stream Reading ......................... A-2
1.3 279.4x431.8 mm (11"x17"),
2 Single-Sided Originals,
Stream Reading ......................... A-3
1.4 A4, 3 Single-Sided Originals,
Fixed Reading ........................... A-4
1.5 A3, 2 Single-Sided Originals,
Fixed Reading ........................... A-5
1.6 A4, 3 Double-Sided Originals,
Fixed Reading ........................... A-6
1.7 A3, 2 Double-Sided Originals,
Fixed Reading ........................... A-7
1.8 A4, 1 Single-Sided Original,
Manual Feeding ........................ A-8
2 Signals and Abbreviations .................. A-9
3 General Circuit Diagram .................. A-11
4 ADF Controller Circuit Diagram ...... A-13
COPYRIGHT© 2001 CANON INC.
5 Reversal Motor Driver Circuit
Diagram ........................................... A-25
6 Belt Motor Driver Circuit Diagram .. A-26
7 Reversal Sensor Circuit Diagram ..... A-27
8 Pre-/Post-Registration Roller Sensor
Circuit Diagram ............................... A-28
9 Separation Sensor/Skew Sensor
Circuit Diagram ............................... A-29
10 Original Sensor (light-emitting)
Circuit Diagram ............................... A-30
11 Original Sensor (light-receiving)
Circuit Diagram ............................... A-30
12 Tray Circuit Diagram ...................... A-31
13 Pre-Last Original Paper Sensor
Circuit Diagram ............................... A-33
14 Original Set Indicator
Circuit Diagram ............................... A-33
15 Manual Feed Registration Roller
Paper Sensor Circuit Diagram ......... A-34
16 Special Tools ................................... A-35
17 Solvents and Oils List ..................... A-35
CANON DADF-J1 REV.0 MAR. 2001
vii
CHAPTER 1
GENERAL DESCRIPTION
COPYRIGHT© 2001 CANON INC.
CANON DADF-J1 REV.0 MAR. 2001
CHAPTER 1 GENERAL DESCRIPTION
1 Features
a. First-Page-First Handling Mechanism
The DADF is equipped with a mechanism to handle the pages of a set of originals in sequence, thus increasing the productivity of a copier possessing a face-down delivery mechanism.
b. Pre-Reversal Mechanism
The DADF is equipped with a pre-reversal mechanism to increase productivity when handling double-sided originals.
c. Stream Reading of All Sizes
The DADF is capable of allowing stream reading for all sizes. (However, the copy ratio
must be between 25% and 200%.)
COPYRIGHT © 2001 CANON INC. 2000 2000 2000 2000 CANON DADF-J1 REV.0 MAR.2001
1-1
CHAPTER 1 GENERAL DESCRIPTION
2 Specifications
2.1 DADF-J1
Item
Pickup of originals
Side of original placement
Reference of original
placement
Separation of originals
Types of originals
Specifications
Auto pickup/delivery
Original tray: face-up
Manual feeder: face-down
Original tray: center
Manual feeder: rear (butted against stopper)
Top separation
Sheets
Original tray: 50 to 200 g/m2
Manual feeder: 38 to 200 g/m2
Remarks
However, 163 g/m2 max.
for large-size, double-sided
copies (200 g/m2 max. in
saddle mode).
Sizes of originals
A5 to A3 / STMT to 279.4 x 431.8mm(11" x
17")
Stack on original tray
Small-size:
100 sheets
A5, A4, B5, STMT, LTR, A4R, A5R, LTRR
Large-size:
100 sheets
A3, B4, LGL, 279.4 x 431.8mm(11" x 17")
Stack of originals on
Small-size:
100 sheets
A5, A4, B5, STMT, LTR, A4R, A5R, LTRR
original delivery tray
Large-size:
100 sheets
A3, B4, LGL, 279.4 x 431.8mm(11" x 17")
Original handling mode Single-sided original, double-sided original
Yes (all sizes; single-sided, between 25% and
Stream reading mode
200% only)
Yes (single sheet only)
Manual feed mode
Yes (default sizes only)
Identification of original size
Yes
Detection of residual
original
Yes (of the same width)
Mixing of originals of
different sizes
Yes (40 mm or less in thickness)
Book original
Paper of 80 g/m2 or less.
Paper of 80 g/m2 or less.
Paper of 80 g/m2 or less.
Paper of 80 g/m2 or less.
T01-201-01
1-2
COPYRIGHT © 2001 CANON INC. 2000 2000 2000 2000 CANON DADF-J1 REV.0 MAR.2001
CHAPTER 1 GENERAL DESCRIPTION
Item
Communication with copier
Power supply
Weight
Dimensions
Serial number
Operating environment
Temperature
Humidity
Specifications
IPC communication 2
24 VDC (from copier)
21 kg (approx.)
646 (W) x 569.5 (D) x 143 (H) mm
XFS: xxxxx
XFU: xxxxx
Same as copier.
Same as copier.
Same as copier.
Remarks
Excluding delivery tray.
Excluding delivery tray.
T01-201-02
The above specifications are subject to change for engineering revisions.
COPYRIGHT © 2001 CANON INC. 2000 2000 2000 2000 CANON DADF-J1 REV.0 MAR.2001
1-3
CHAPTER 1 GENERAL DESCRIPTION
3 Names of Parts
3.1 External View
[3]
[4]
[2]
[5]
[1]
[6]
[1] Upper cover
[2] Side guide
[3] ADF controller cover
[4] Manual feed tray
[5] Front upper cover
[6] Front lower cover
F01-301-01
1-4
COPYRIGHT © 2001 CANON INC. 2000 2000 2000 2000 CANON DADF-J1 REV.0 MAR.2001
CHAPTER 1 GENERAL DESCRIPTION
3.2 Cross Section
[1] [2] [3] [4] [5] [6] [7] [8]
[9]
[23] [22] [21] [20] [19] [18] [17]
[1] Reversing roller B member
[2] Reversing roller B
[3] Reversing flapper
[4] Registration pressure roller
[5] Registration roller
[6] Pull-off roller
[7] Pull-off pressure roller
[8] Feeding roller
[9] Pickup roller
[10] Manual feed registration roller
[11] Manual feed stopper plate
[12] Delivery roller A member
[10] [11] [12]
[16]
[15]
[14] [13]
[13] Delivery roller B member
[14] Delivery roller
[15] Delivery guide flapper
[16] Feeding belt
[17] Stopper plate
[18] Separation belt
[19] Feed belt driver roller
[20] Guide flapper
[21] Pre-reversal flapper
[22] Reversing roller A
[23] Reversing roller A member
F01-302-01
COPYRIGHT © 2001 CANON INC. 2000 2000 2000 2000 CANON DADF-J1 REV.0 MAR.2001
1-5
CHAPTER 1 GENERAL DESCRIPTION
4 Using the DADF
4.1 Original Set Indicator
The Original Set Indicator goes on when an original is placed on the original tray, and
flashes when a jam occurs.
Original Set indicator
F01-401-01
4.2 Warnings and Action to Take
If the Original Set indicator starts to flash while an original is inside the DADF, suspect a
jam; go through the following to remove the jam:
1) Remove all originals from the original tray.
2) Open the upper cover, and remove the jam, if found.
3) Open the DADF, and remove the original from the copyboard glass, if found.
4) Put the originals back into initial sequence, and place the stack in the DADF.
1-6
COPYRIGHT © 2001 CANON INC. 2000 2000 2000 2000 CANON DADF-J1 REV.0 MAR.2001
CHAPTER 1 GENERAL DESCRIPTION
4.3 Routine Maintenance by the User
Instruct the user to clean the following at least once a week:
Item
Copyboard glass
Feeding belt
Registration roller
Description
Wipe it with a cloth moistened with water, and then dry wipe it. Or, use alcohol.
Wipe it with a cloth moistened with water, and then dry wipe it. Or, use alcohol.
Execute cleaning in the copier’s user mode.
T01-403-01
COPYRIGHT © 2001 CANON INC. 2000 2000 2000 2000 CANON DADF-J1 REV.0 MAR.2001
1-7
CHAPTER 2
OPERATIONS AND TIMING
COPYRIGHT© 2001 CANON INC.
CANON DADF-J1 REV.0 MAR. 2001
CHAPTER 2 OPERATIONS AND TIMING
1 Basic Construction
1.1 Outline of the Electrical Circuitry
The electrical mechanisms of the DADF are controller by the ADF controller PCB, which
is a microprocessor (CPU).
The CPU interprets input from the sensors and signals from the copier, and generates signals to drive such DC loads as motors and solenoids according to pre-determined timing of
operation.
ADF controller PCB
Motor
CPU
(Q1)
Sensor
ROM
(IC1)
Solenoid
Clutch
EEPROM
(IC2)
Original
indicator
LED PCB
RAM
(Q4)
Sub tray PCB
D/A
(Q9)
+24R
+5V
+24V
IPC
(Q2)
+5R
DC5V
(Q65)
Reversal
motor
driver PCB
Motor
Belt motor
driver PCB
Motor
Power supply PCB
Copier
F02-101-01
COPYRIGHT © 2001 CANON INC. 2000 2000 2000 2000 CANON DADF-J1 REV.0 MAR.2001
2-1
CHAPTER 2 OPERATIONS AND TIMING
1.2 Communication with the Copier
The DADF uses IPC communication 2, which enables higher communication speeds than
the existing mode of IPC communication.
E422
E712
Indicates a fault in the communication between the DADF and the copier.
2-2
COPYRIGHT © 2001 CANON INC. 2000 2000 2000 2000 CANON DADF-J1 REV.0 MAR.2001
CHAPTER 2 OPERATIONS AND TIMING
1.3 Inputs to the ADF Controller PCB
Inputs to the ADF Controller PCB (1/2)
ADF controller PCB
+5V
Belt motor clock
sensor
PI 1
Separation motor
clock sensor
PI 2
Upper cover sensor PI 3
(rear)
Pre-reversal sensor PI 4
Registration roller
clock sensor
PI 5
Upper cover sensor PI 6
(front)
Pickup roller
home position
sensor
PI 7
Pickup roller height
sensor 1
PI 8
Pickup roller height
sensor 2
PI 9
ADF open/closed
sensor
PI 10
J141
-1 -9
-3 -7
-2 -8
-4
-6
-5
-6
-4
-5
-7
-9
-8
-3
-1
-2
Delivery motor clock PI 11
sensor
Manual feed set
sensor
PI 12
Original delivery
sensor
PI 13
J23
-5 -3
-7 -1
-6 -2
J21
-8 -5
-10 -3
-9 -4
J12-3
-2 BTCLK
-1
+5V
J12-6
-5 SPCLK
-4
+5V
J12-7
-9 LCVR
-8
+5V
J12-10
-12 PRTR
-11
+5V
J14-B10
-B9 TRCLK
-B8
+5V
J14-B5
-B7 LCVF
-B6
+5V
J14-A3
-A5 PKHP
-A4
+5V
J14-A6
-A8 PKH1
-A7
+5V
J14-A9
-A11 PKH2
-A10
+5V
J12-13
-15 RFOP
-14
+5V
J3-3
-2 EJCLK
-1
+5V
J2-8
-10 MFST
-9
+5V
J2-13
-15 EJJAM
-14
Pulses according to the
rotation speed of the belt
motor.
Pulses according to the
rotation speed of the
separation motor.
When the paper cover is
closed, '1'.
When paper is present,
'1'.
Pulses according to the
rotation speed of the
registration roller.
When the upper cover is
closed, '1'.
When the pickup roller is
in home position, '1'.
When the pickup roller is
on paper, '1'.
When the pickup roller is
on paper, '1'.
When the DADF is
closed, '1'.
Pulses according to the
rotation speed of the
delivery motor.
When paper is present,
'1'.
When paper is present,
'1'.
F02-103-01
COPYRIGHT © 2001 CANON INC. 2000 2000 2000 2000 CANON DADF-J1 REV.0 MAR.2001
2-3
CHAPTER 2 OPERATIONS AND TIMING
Inputs to the ADF Controller PCB (2/2)
ADF controller PCB
+5V
Reversal sensor
S1
Comparator
circuit
+5V
-4
-1
-2
-3
J149
-2 -4
-5 -1
-4 -2
-3 -3
J144
Pre-registration
roller paper sensor
S2
Post registration
roller paper sensor
S3
Comparator Comparator
circuit
circuit
+5V
-1 -6 -1 -8 -1
-6 -1 -6 -3 -6
-5 -2 -5 -4 -5
-4 -3 -4 -5 -4
-3 -4 -3 -6 -3
-2 -5 -2 -7 -2
J135 J133 J132
Separation sensor
S4
Skew sensor
S5
Original sensor
(light-receiving)
S6
Original sensor
(light-emitting)
Original trailing
edge sensor
Comparator Comparator
circuit
circuit
+5V
-1
-6
-5
-6
-1
-2
-4
-3
-2
J134
-3 -4
-4 -3
-5 -2
J131
-2 -7
-1 -8
J132
-1 -3
-2 -2
J140
-2
-1
J136
-2
-1
J145
Pickup tray
PCB
S7
J52-4 -3 -2
J56-1 -4 -3
S8
Original
width
detecting
switch
SW301
Reference signal for
paper detection
When paper is present, '0'.
+5V
J13-8
-3 RGBSAJ
-4 RGBS
Reference signal for
paper detection
When paper is present, '0'.
-5 RGASAJ
-6 RGAS
-7
Reference signal for
paper detection
When paper is present, '0'.
+5V
J13-14
-9 SPSAJ
-10 SPS
-11 SKSAJ
-12 SKS
-13
Reference signal for
paper detection
When paper is present, '0'.
Reference signal for
paper detection
When paper is present, '0'.
J13-2
-1 DTS
When paper is present, '0'.
J14-A1 DTSAJ
-A2
Light intensity adjustment
signal
+5V
+5V
Copy paper
Pre-last original
sensor
-1
-6
-5
J14-B1
-B4 TNSAJ
-B3 TNS
-B2
Light intensity adjustment
signal
When paper is present, '1'.
Light intensity adjustment
signal
When paper is present, '1'.
-2
-5
-4
-7
-6
-3
J5-12
-9
-10
-7
-8
-11
-13
-8
-9
-10
-11
-12
J51
J5-1
-6
-5
-4
-3
-2
-4 -9
-7 -6
-6 -7
-5 -8
J21
J2-4
-7 MFRGSAJ Reference signal for
-6 MFRGS paper detection
When paper is present, '0'.
-5
TAILSAJ
TAILS
LASAJ
LAS
+5V
SSW-0
SSW-1
SSW-2
SSW-3
SSW-4
Signal according to
paper width
(For details, see p. 2-19.)
Copy paper
+5V
+5V
Manual feed
registration roller
paper sensor
S9
-4 -1 -7
-1 -4 -4
-2 -3 -5
-3 -2 -6
J25 J23
F02-103-02
2-4
COPYRIGHT © 2001 CANON INC. 2000 2000 2000 2000 CANON DADF-J1 REV.0 MAR.2001
CHAPTER 2 OPERATIONS AND TIMING
1.4 Outputs from the ADF Controller PCB
Outputs from the ADF Controller PCB (1/1)
Reversal solenoid
SL1
Stopper plate solenoid
(2-position)
SL2
Pre-reversal solenoid
SL3
Delivery solenoid
(2-position)
SL4
Reversal motor
Belt motor
-1 -2
-2 -1
J102
-1 -2
-2 -1
J91
-1 -3
-2 -2
-3 -1
J92
J10-3
-4 CLD*
+24V
J9-1
-2 SL1D*
+24V
J9-3
-4 SL2D1*
-5 SL2D2*
-1 -2
-2 -1
J101
-1 -3
-2 -2
-3 -1
J22
+24V
J10-1
-2 SL3D*
+24V
-1 -12 J2-1
-2 -11
-2 SL4D1*
-3 -10
-3 SL4D2*
J21
+24V
+24V
A
M1 A*
B
B*
-1
-2
-3
-4
-5
-6
J602
+24V
+24V
A
M2 A*
B
B*
-1
-2
-3
-4
-5
-6
J72
Reversal moter
driver PCB
CL
-4~6 J6-8~10
-13
-1
-12
-2
-11
-3
-10
-4
-9
-5
-8
-6
J601
Belt motor
driver PCB
Separation clutch
ADF controller PCB
+24V
-4~6
-13
-12
-11
-10
-9
-8
J71
+24V
+5V
M1OB*
M1OA*
M1OB
M1OA
T-Vref
+24V
J7-8~10 +5V
-1
-2 M2OB*
-3 M2OA*
-4 M2OB
-5 M2OA
-6 B-Vref
When '0',
the separation clutch
goes on.
When '0', the solenoid
goes on.
When '0', the solenoid
goes on. (position 1)
When '0', the solenoid
goes on. (position 2)
When '0', the solenoid
goes on.
When '0', the solenoid
goes on. (position 1)
When '0', the solenoid
goes on. (position 2)
For details,
see p. 2-67.
For details,
see p. 2-37.
+24V
Pickup motor
Separation motor
Delivery motor
M3
M4
M5
FM1
-1 -6
-2 -5
-3 -4
-4 -3
-5 -2
-6 -1
J111
J11-1
-2
-3
-4
-5
-6
-2
-1
J81
-1 -2
-2 -1
J24
M3OB*
M3OA*
M3OB
M3OA
For details,
see p. 2-33.
J8-1 SEPM+
-2 SEPM-
For details,
see p. 2-34.
+24V
-11 -2 J2-11
-12 -1
-12 EJMD*
J21
For details,
see p. 2-39.
When '1', the fan
J9-6 FAN(+24V) goes on.
-7 LOCK
When the fan is
-8
at rest, '1'.
-1 -3
-2 -2
-3 -1
J93
F02-104-01
COPYRIGHT © 2001 CANON INC. 2000 2000 2000 2000 CANON DADF-J1 REV.0 MAR.2001
2-5
CHAPTER 2 OPERATIONS AND TIMING
2 Basic Operations
2.1 Outline
The DADF uses five motors and one clutch to pick up, separate, move, and deliver originals.
Name (notation)
Reversal motor (M1)
Belt motor (M2)
Pickup motor (M3)
Separation motor (M4)
Delivery motor (M5)
Separation clutch (CL)
Description
Moves and reverses originals.
Moves originals.
Moves up/down the pickup roller.
Separates originals.
Delivers originals and picks up manually fed originals.
Turns on/off the pull-off roller and the separation/feed drive system.
T02-201-01
2-6
COPYRIGHT © 2001 CANON INC. 2000 2000 2000 2000 CANON DADF-J1 REV.0 MAR.2001
SL1
PI 1
COPYRIGHT © 2001 CANON INC. 2000 2000 2000 2000 CANON DADF-J1 REV.0 MAR.2001
Delivery motor drive signal
Delivery motor clock signal (EJCLK)
Delivery solenoid drive signal 1 (SL4D)
Delivery solenoid drive signal 1 (SL4D)
Reversal solenoid drive signal (SL3D)
Registration roller clock signal (TRCLK)
Reversal motor drive signal
Belt motor drive signal
Belt motor clock signal (BTCLK)
Pickup motor drive signal
Stopper solenoid drive signal 2 (SL2D2)
Stopper plate solenoid signal 1 (SL2D1)
Separation clutch drive signal (CLD)
Separation motor drive signal
Separation motor clock signal (SPCLK)
Pre-reversal solenoid drive signal (SL1D)
CHAPTER 2 OPERATIONS AND TIMING
ADF controller PCB
M4 PI 2
CL
SL2
SL4
M3
M2
M5
PI 11
M1
SL3
PI 5
F02-201-01 Diagram of Drive
2-7
2-8
PI4
S2
S1 S3
PI7 PI8,
PI9
S4,S5
S6
(light-emitting)
S8
S7
SW301
PI10
Original delivery paper detection signal (EJJAM)
Manual feed set signal (MFST)
Manual feeding registration paper detection
signal (MFRGS)
ADF open/close detection signal (RFOP)
Original trailing edge detection signal (TAILS)
Original width detection signal (SSW *)
Pre-last original detection signal (LAS)
Original set indicator light emit signal (DTLED)
Original detection signal (DTS)
Original sensor light emit signal (DTSAJ)
Left cover front signal (LCVF)
Left cover rear signal (LCVR)
Pickup roller height 1 signal/2 signal (PKH1/PKH2)
Pickup roller home position signal (PKHP)
Pre-registration roller paper detection signal (RGBS)
Separation paper detection signal (SPS)/
skew paper detection signal (SKS)
Post-registration roller paper detection signal (RGAS)
Reversal paper detection signal (TNS)
Pre-reversal detection signal (PRTR)
CHAPTER 2 OPERATIONS AND TIMING
ADF controller PCB
PI6 S6(light-emitting)
PI3
PI12
S9
PI13
F02-201-02 Sensor Arrangement
COPYRIGHT © 2001 CANON INC. 2000 2000 2000 2000 CANON DADF-J1 REV.0 MAR.2001
CHAPTER 2 OPERATIONS AND TIMING
2.2 Operations
2.2.1 Outline
The DADF operates in either of the following three modes; the DADF operates in response to instructions from the copier, executing appropriate modes to suit the copier’s operations.
The following table shows each operation mode, an outline of its operation, and its corresponding copying mode:
No.
Mode
Operation
1
CW pickup/deliv- Picks up an original, and
ery
delivers it as it is after
copying.
2
Pre-reversal
pickup/reversal/
delivery (smallsize original)
Reversal pickup/
reversal/delivery
(large-size original)
Manual feeder
pickup/delivery
3
Reverses an original,
picks it up, reverses it
once again after copying,
and delivers it.
Picks up an original from
the manual feeder, and
delivers it after copying.
Copying mode
Copying operation
Single-sided original to
single-sided copy
Signal-sided original to
double-sided copy
Double-sided original
to double-sided copy
Double-sided original
to single-sided copy
Stream reading (fixed if
the reproduction ratio is
not between 50% and
200%)
Fixed reading
Manual copy
Fixed reading
T02-202-01
COPYRIGHT © 2001 CANON INC. 2000 2000 2000 2000 CANON DADF-J1 REV.0 MAR.2001
2-9
CHAPTER 2 OPERATIONS AND TIMING
2.2.2 CW Pickup/Delivery
The following is an outline of the flow of originals.
Picking up
Copying
Delivering
F02-202-01
2-10
COPYRIGHT © 2001 CANON INC. 2000 2000 2000 2000 CANON DADF-J1 REV.0 MAR.2001
CHAPTER 2 OPERATIONS AND TIMING
2.2.3 Pre-Reversal/Reversal/Delivery (small-size original)
The following is an outline of the flow of originals:
Picking up
Pre-reversing
Feeding
Copying
the 1st side
Moving
To next page
F02-202-02a
COPYRIGHT © 2001 CANON INC. 2000 2000 2000 2000 CANON DADF-J1 REV.0 MAR.2001
2-11
CHAPTER 2 OPERATIONS AND TIMING
From previous page
Reversing
Copying
the 2nd side
Delivering
F02-202-02b
2-12
COPYRIGHT © 2001 CANON INC. 2000 2000 2000 2000 CANON DADF-J1 REV.0 MAR.2001
CHAPTER 2 OPERATIONS AND TIMING
2.2.4 Reversal Pickup/Reversal/Delivery (large-size originals)
The following is an outline of the flow of originals:
Picking up
Moving
Reversing/
moving 1
Reversing/
moving 2
Copying
the 1st side
To next page
F02-202-03a
COPYRIGHT © 2001 CANON INC. 2000 2000 2000 2000 CANON DADF-J1 REV.0 MAR.2001
2-13
CHAPTER 2 OPERATIONS AND TIMING
From previous page
Reversing/
moving 1
Reversing/
moving 2
Copying
the 2nd side
Delivering
F02-202-03b
2-14
COPYRIGHT © 2001 CANON INC. 2000 2000 2000 2000 CANON DADF-J1 REV.0 MAR.2001
CHAPTER 2 OPERATIONS AND TIMING
2.2.5 Manual Feeder Pickup/Delivery
The following is an outline of the flow of originals:
Picking up
Stopping
Switching back
Copying
Delivering
F02-202-04
COPYRIGHT © 2001 CANON INC. 2000 2000 2000 2000 CANON DADF-J1 REV.0 MAR.2001
2-15
CHAPTER 2 OPERATIONS AND TIMING
2.3 Detecting Originals
2.3.1 Outline
The DADF is equipped with the following five types of mechanisms of detection:
Item
Description
Presence/absence of an
original
Original size 1
Original size 2
Pre-last original
Original in manual
feeder
Sensor used (notation)
Identifies the presence/absence of an
original on the original tray.
Identifies the size of the original
placed in the original tray (as to being large-size or small-size).
Identifies the size of an original on
the move (default size).
Identifies the original in the original
tray as being the last original or not.
Detects the presence/absence of an
original in the manual feeder.
Original sensor (S6)
Original trailing edge sensor (S7)
Registration roller clock sensor (PI5)
Pre-last original sensor (S8)
Manual feeder set sensor (PI12)
T02-203-01
PI12
S7
S6
(light-emitting side)
S6
(light-receiving side)
SW301
S8
PI5
F02-203-01
2-16
COPYRIGHT © 2001 CANON INC. 2000 2000 2000 2000 CANON DADF-J1 REV.0 MAR.2001
CHAPTER 2 OPERATIONS AND TIMING
2.3.2 Detecting the Presence/Absence of an Original
The presence/absence of an original in the original tray is detected by the original sensor
(S6).
When an original is placed on the original tray, the light from the light-emitting side of
the original sensor is blocked, causing the light-receiving side of the original sensor to send
the original detection signal (DTS) to the ADF controller PCB, which in response turns on
the Original Set indicator.
DTS signal
ADF controller PCB
S6 (light-emitting side)
S6 (light-receiving side)
When an original is detected
When no original is detected
S6
ADF controller PCB
DTS signal
ADF controller PCB
(light-emitting side)
S6
(light-emitting side)
Light is blocked.
S6
(light-receiving side)
S6
Original
(light-receiving side)
F02-203-02
COPYRIGHT © 2001 CANON INC. 2000 2000 2000 2000 CANON DADF-J1 REV.0 MAR.2001
2-17
CHAPTER 2 OPERATIONS AND TIMING
2.3.3 Original Size Detection 1
In original size detection 1, the original trailing edge sensor is used (S7), which is designed to identify the original in the original tray as being small-size or large-size.
When the original covers the original trailing edge sensor, the light from the LED of the
original trailing edge sensor is reflected by the original to hit the phototransistor, at which
time the DADF identifies the original as being large-size.
The DADF sends original size data (small-size or large-size) to the copier, which uses the
data to determine the point at which the scanner is stopped for stream reading.
Small size:
Large-size:
A5, A4, B5, STMT, LTR
A4R, B5R, A3, B4, LTRR, LGL, 279.4x431.8 mm (11"x17")
T02-203-02
TAILS
ADF controller PCB
S7
If the original is identified
as being large-size
If the original is identified
as being small-size
ADF controller PCB
ADF controller PCB
Reflected light detected
Original
Reflected light absent
Original
S7
S7
F02-203-03
2-18
COPYRIGHT © 2001 CANON INC. 2000 2000 2000 2000 CANON DADF-J1 REV.0 MAR.2001
CHAPTER 2 OPERATIONS AND TIMING
2.3.4 Original Size Detection 2
a. Outline
In original size detection 2, the original width detecting switch (SW301) and the registration roller clock sensor (PI5) are used to identify a default size.
The original width detecting switch is designed to find out the width of originals. As
many as five contact plates (SSW0 through 4) are in contact with the original width detecting switch, operating in keeping with the slide guide. The state (ON or OFF) of each contact
plate is communicated to the ADF controller PCB, which uses the input to determine the
width of the original.
The following table shows the states of the contact plates in relation to default sizes; the
states other than those indicated are assumed to indicate the presence of an original which is
not of a default size.
Slide guide
ON/OFF
ADF controller PCB
Original width
detecting switch (SW301)
F02-203-04
Default size
A5, A4R
A4, A3
B5R
B5, B4
STMT, LTRR, LGL
LTR, 279.4 x 431.8mm (11" x 17")
SSW0
ON
ON
ON
ON
ON
ON
ON
ON
ON
ON
ON
SSW1
ON
OFF
OFF
OFF
OFF
OFF
OFF
ON
ON
ON
ON
SSW2
OFF
OFF
OFF
OFF
OFF
ON
ON
ON
OFF
OFF
ON
SSW3
ON
ON
ON
OFF
OFF
OFF
OFF
OFF
OFF
OFF
OFF
SSW4
ON
ON
OFF
OFF
ON
ON
OFF
ON
ON
OFF
OFF
T02-203-03 (States of Switches)
COPYRIGHT © 2001 CANON INC. 2000 2000 2000 2000 CANON DADF-J1 REV.0 MAR.2001
2-19
CHAPTER 2 OPERATIONS AND TIMING
The registration roller clock sensor (PI5) is used to measure the length of originals with
reference to the revolutions made by the clock plate mounted to the slave roller of the registration roller. Based on the revolutions of the lock plate, the ADF controller PCB identifies
the length of the original in question (in feeding direction).
TRCLK
ADF controller PCB
Registration roller
Slave roller
Registration roller
clock sensor (PI5)
Clock plate
F02-203-05
The DADF uses the data on the width and the length of the original obtained by original
detection 2 to identify a default size, and sends the result to the copier. In response, the
copier selects the appropriate copy paper size to suit the identified size of the original.
2-20
COPYRIGHT © 2001 CANON INC. 2000 2000 2000 2000 CANON DADF-J1 REV.0 MAR.2001
CHAPTER 2 OPERATIONS AND TIMING
The following tables show the default sizes in relation to the sizes detected by the DADF:
A- and A/B-Configuration
Default
size
Original
length
(unit: mm)
Original
width
B5R
237 to 297
177 to 187
A5
129 to 189
205 to 213
A4R
277 to 317
FOOLSCAP
317 to 370
B5
162 to 222
252 to 262
B4
344 to 404
COMPUTER 361 to 421
274.4 to 284.4
paper
A4
190 to 250
292 to 302
A3
400 to 460
A size outside of the above ranges will be identified as a non-default size.
T02-203-04
Inch-Configuration
Default
size
STMT
LTRR
FOOLSCAP
LGL
LTR
Original
length
120 to 180
259 to 309
310 to 343
343 to 396
196 to 256
(unit: mm)
Original
width
Inch/A- and Inch/AB-Configuration
(unit: mm)
Default
size
B5R
A5
A4R
STMT
LTRR
FOOLSCAP
LGL
B5
B4
LTR
Original
length
237 to 297
129 to 189
277 to 337
120 to 180
259 to 309
317 to 343
343 to 396
162 to 222
344 to 404
196 to 256
Original
width
170 to 187
205 to 213
213 to 220.9
252 to 262
274.4 to 284.4
COMPUTER 361 to 411
paper
279.4 x 431.8 412 to 472
(11" x 17")
A4
190 to 250
292 to 302
A3
400 to 460
A size outside of the above ranges will be identified as a non-default size.
213 to 220.9
T02-203-06
274.4 to 284.4
COMPUTER 361 to 411
paper
279.4 x 431.8 412 to 472
(11" x 17")
A size outside of the above ranges will be identified as a non-default size.
T02-203-05
COPYRIGHT © 2001 CANON INC. 2000 2000 2000 2000 CANON DADF-J1 REV.0 MAR.2001
2-21
CHAPTER 2 OPERATIONS AND TIMING
b.Slide Guide Lock
The DADF is equipped with a slide guide lock so that the slide guide will not slide beyond the width of an A4/A3 sheet.
To use an original wider than 297 mm, remove the slide guide lock (up to 305 mm; however, the feeding length must be 432 mm or less).
Slide guide lock
F02-203-06
Be sure to adjust the slide guide to suit the original size when making copies. Otherwise, the original is likely to move askew.
2-22
COPYRIGHT © 2001 CANON INC. 2000 2000 2000 2000 CANON DADF-J1 REV.0 MAR.2001
CHAPTER 2 OPERATIONS AND TIMING
c. Slide Guide Positioning Member
The rail of the slide guide is provided with notches to make sure that the slide guide stops
to suit a specific default original size. Some of these points representing differing paper
sizes, however, are close enough to allow the slide guide to be set at the wrong point.
To prevent wrong positioning of the slide guide, the DADF comes with two types of slide
guide positioning members; when fitted correctly, the positioning members will make sure
that the slide guide will stop at the correct point.
Color of slide guide positioning
member
Gray (for A/B-configuration)
Stop position of slide guide
Side with 2 notches
Side with 1 notch
A4R
A4R
LTRR
LTRR
LTRR
A4R
Black (for Inch-configuration)
T02-203-07
For Inch-configuration
Relocate.
Slide guide
positioning
members (black)
Relocate.
For A/B-configuration
Slide guide
positioning member (gray)
Slide guide positioning
member (gray)
F02-203-07
COPYRIGHT © 2001 CANON INC. 2000 2000 2000 2000 CANON DADF-J1 REV.0 MAR.2001
2-23
CHAPTER 2 OPERATIONS AND TIMING
2.3.5 Pre-Last Original Detection
Pre-last original detection makes use of the pre-last original sensor (S8). Detection is executed on small-size originals only. The DADF is designed to send the second original to the
separation assembly after it has picked up the first original (small-side). At that time, if no
original covers the pre-last original sensor (S8), the dada will assume that no original will
follow, and communicates as such to the copier.
Small-size:
Large-size:
A5, A4, B5, STMT, LTR
A4R, B5R, B4, LTRR, LGL, 279.4x431.8 mm (11"x17")
F02-203-08
Pre-last original sensor
(S8)
2nd original
Separation assembly
1st original
F02-203-08
2-24
COPYRIGHT © 2001 CANON INC. 2000 2000 2000 2000 CANON DADF-J1 REV.0 MAR.2001
CHAPTER 2 OPERATIONS AND TIMING
2.3.6 Detecting the Presence/Absence of an Original in the Manual Feeder
The presence/absence of an original in the manual feeder is detected using the manual set
sensor (PI12).
When an original is placed in the manual feeder, the original pushes the sensor flag, causing the sensor flag to reach the sensor, enabling the DADF to assume the presence of an
original in the manual feeder.
When the Start key is pressed, the DADF picks up the original from the manual feeder for
copying.
Manual set sensor (PI12)
Sensor flag
Original
F02-203-09
COPYRIGHT © 2001 CANON INC. 2000 2000 2000 2000 CANON DADF-J1 REV.0 MAR.2001
2-25
CHAPTER 2 OPERATIONS AND TIMING
2.4 Picking Up and Separating Originals
2.4.1 Outline
The pickup roller unit is butted against the original, and the pickup roller is rotated to pick
up an original. The pickup roller unit is moved up/down by the pickup motor (M3), and the
pickup roller is rotated by the separation motor (M4) and the separation clutch (CL).
Originals are separated by the separation roller and the separation belt with the help of the
feeding roller. The rollers and the belt are driven by the separation motor (M4) and the separation clutch (CL).
The separation assembly is equipped with a separation sensor (S4) and a skew sensor (S5)
to monitor the movement of originals.
Pickup rollers
Feeding roller
M4
Separation sensor (S4)
CL
Skew sensor (S5)
Separation belt
Separation roller
Feeding roller
M4
CL
Feeding belt
F02-204-01
2-26
COPYRIGHT © 2001 CANON INC. 2000 2000 2000 2000 CANON DADF-J1 REV.0 MAR.2001
CHAPTER 2 OPERATIONS AND TIMING
2.4.2 Moving Up/Down the Pickup Roller Unit
a. Outline
The DADF is equipped with two pickup roller units, each designed to move up/down between home position and the surface of the stack of originals. The pickup roller unit is
moved up/down by the pickup motor (M3).
The pickup roller unit stops at either of the following positions; positioning is controlled
by means of pulses from sensors and the pickup motor.
Operation
Related sensor (notation)
Waits until the next copying operation.
Waits until the next pickup position
Picks up originals
Pickup roller home position sensor (PI7)
Pickup height sensor 1/2 (PI8/9)
Pulse control of pickup motor (M3)
Pickup height sensor 1/2 (PI8/9)
Pulse control of pickup motor (M3)
Stop position
Home position
Wait position
Pickup position
T02-204-01
M3
Pickup roller units
PI 7
PI 9
PI 8
Separation unit
Home position
PI 7
Escape position
Pickup position
PI 8/9
F02-204-02
COPYRIGHT © 2001 CANON INC. 2000 2000 2000 2000 CANON DADF-J1 REV.0 MAR.2001
2-27
CHAPTER 2 OPERATIONS AND TIMING
M3
M3
Pickup roller unit
1 mm (approx.)
b.Movement
When the Start key on the copier is pressed, the DADF’s stopper plate moves down and
the pickup motor (M3) starts so that the pickup roller unit moves down to reach the stack of
originals.
The pickup motor will stop when the pickup roller unit has reached the pickup height sensor 1 (PI8) and the pickup height sensor 2 (PI9) and then has moved down about 1 mm.
PI 8/9
Stopper plate
F02-204-03
F02-204-04
When the pickup roller unit stops to move down, the separation clutch (CL) and the separation motor (M3) start to move the 1st original to the separation assembly.
CL
M4
F02-204-05
2-28
COPYRIGHT © 2001 CANON INC. 2000 2000 2000 2000 CANON DADF-J1 REV.0 MAR.2001
CHAPTER 2 OPERATIONS AND TIMING
When the leading edge of the 1st original reaches the separation sensor (S4), the pickup
motor (M3) starts to rotate to move the pickup roller unit from the surface of the stack of
originals. The pickup roller unit stops about 6 mm from the surface of the stack of originals.
6 mm (approx.)
M3
Separation sensor (S4)
F02-204-06
When the trailing edge of the 1st original moves past the point of contact [1] of the pickup
roller, the pickup roller unit once again moves down to the surface of the stack of originals
to pick up the 2nd original.
M3
[1]
F02-204-07
COPYRIGHT © 2001 CANON INC. 2000 2000 2000 2000 CANON DADF-J1 REV.0 MAR.2001
2-29
CHAPTER 2 OPERATIONS AND TIMING
2.4.3 Switching the Separation Pressure
The DADF’s separation assembly is equipped with a separation pressure switching
mechanism which enables switching between two settings (low or high).
The separation pressure may be switched by operating the separation pressure lever located in front of the separation assembly. When the lever is operated, the position of the
separation belt moves up or down to change the amount of overlap in relation to the feeding
roller, thereby varying the separation pressure.
The separation pressure lever is set to “Low” at time of shipment from the
factory.
Memo
High
Low
F02-204-08
2-30
COPYRIGHT © 2001 CANON INC. 2000 2000 2000 2000 CANON DADF-J1 REV.0 MAR.2001
CHAPTER 2 OPERATIONS AND TIMING
2.4.4 Separation Sensor (S4) and Skew Sensor (S5)
The paper path is equipped with a separation sensor (S4) and a skew sensor (S5) to monitor the movement of originals for the following:
Item
Separation fault (delay)
Skew
Sensor used (notation)
Separation sensor (S4)
Separation sensor (S4)
Skew sensor (S5)
Alarm
0031
0011
T02-204-02
A separation fault (delay) is identified if the separation sensor does not detect an original
a specific period of time after the separation motor has started to rotate.
Separation sensor does not detect an original for
a specific period of time
Separation sensor (S4)
Separation sensor goes on within
a specific period of time
Separation sensor (S4)
F02-204-09
COPYRIGHT © 2001 CANON INC. 2000 2000 2000 2000 CANON DADF-J1 REV.0 MAR.2001
2-31
CHAPTER 2 OPERATIONS AND TIMING
Both separation sensor and skew sensor are used to find out whether an original is moving
askew. These two sensors are arranged in a single row in front-rear direction. An original is
identified as moving askew if a discrepancy in timing is detected when it moves past these
sensors. If the discrepancy is an equivalent of 10 mm, the DADF will assume that the original is moving askew, at which point it stops its operation to protect the original and causes
the copier to indicate a jam message.
Original moving askew
10 mm or more
Skew sensor (S5)
Separation sensor (S4)
Discrepancy detected in timing
F02-204-10
2-32
COPYRIGHT © 2001 CANON INC. 2000 2000 2000 2000 CANON DADF-J1 REV.0 MAR.2001
CHAPTER 2 OPERATIONS AND TIMING
2.4.5 Controlling the Pickup Motor (M3)
The following is a control circuit of the pickup motor (M3). The pickup motor is a 4phase stepping motor, and the circuit is used for the following:
• Turning on/off the motor.
• Controlling the direction of rotation of the motor.
• Keeping the motor on hold.
+24R
PICKHOLD
Q1
CPU
+5R
Q53
J11
PICKA
PICKB
A
Q24
6
2
A*
B
B*
M3
4
5
1
3
F02-204-11
The CPU (Q1) on the ADF controller causes the motor hold signal (PICKHOLD) to go
‘0’, and applies +24R to drive the pickup motor. At the same time, the CPU sends the phase
control signal (PICKA, PICKB) to the motor driver (Q24), which in response controls the
output timing of pulse signals according to the phase signal it receives, switching the direction of rotation of the pickup motor.
If the CPU does not generate the phase control signal (PICKA, PICKB), the motor hold
signal goes ‘1’, applying +5R for retention to the pickup motor to keep the spindle of the
motor on hold.
E410
Indicates a fault in the pickup motor (M3).
Indicates a fault in the pickup motor height sensor (PI8).
Indicates a fault in the pickup roller height sensor (PI9).
Indicates a fault in the pickup roller home position sensor (PI7).
Indicates a fault in the ADF controller PCB.
COPYRIGHT © 2001 CANON INC. 2000 2000 2000 2000 CANON DADF-J1 REV.0 MAR.2001
2-33
CHAPTER 2 OPERATIONS AND TIMING
2.4.6 Controlling the Separation Motor (M4)
The following is a control diagram of the separation motor (M4), which is a DC motor.
The circuit is used for the following:
• Turning on/off the motor.
• Controlling the rotation speed of the motor.
• Controlling the overcurrent protective mechanism for the motor.
+24R
J8
1
Q50
M4
Q7 Q17 SPPWM
2
PI 2
Q48
Q1
CPU
Current
detection SPLIM
circuit
+5V
LED3
J12
5
SPCLK
Speed
control
circuit
SPMFV
SEPCLKREF
F02-204-12
When the CPU generates the motor speed rotation signal (SPPWM), the separation motor
(M4) starts to rotate in a specific direction. The separation motor clock sensor (PI2) sends
the rotation speed signal (SPCLK) of the separation motor to the speed control circuit,
which in response compares it against the speed reference signal (SEPCLKREF), and sends
the result (speed control signal; SPMFV) to the CPU.
In turn, the CPU varies the rotation speed signal to suit the speed control signal. LED3
remains on as long as the rotation speed of the motor is within a specific range, and goes off
when the speed falls out of the range.
The current detection circuit monitors the current flowing to the separation motor at all
times; if the current exceeds a specific level, it generates the separation motor stop signal
(SPLIM) to stop the motor. If the separation motor stop signal is generated continuously, the
CPU will assume a fault in the separation motor, and causes the copier to indicate an error
code (E405) on its display.
E405
Indicates a fault in the separation motor (M4).
Indicates a fault in the separation motor clock sensor (PI2).
Indicates a fault in the ADF controller PCB.
2-34
COPYRIGHT © 2001 CANON INC. 2000 2000 2000 2000 CANON DADF-J1 REV.0 MAR.2001
CHAPTER 2 OPERATIONS AND TIMING
2.4.7 Sequence of Operations
Picking Up/Separation Originals
Feeding/Separation
Start key ON
Picking up/
separating
1st original
Pickup roller shifting End
to home position
Picking up/
separating
2nd original
Original sensor (S6)
Pickup roller home
position sensor (PI 7)
Pickup roller height
sensor 1/2 (PI 8/9)
Pickup motor (M3)
DOWN
UP
DOWN
UP
UP
Separation clutch (CL)
Separation motor (M4)
Separation sensor (S4)
Skew sensor (S5)
Pickup
position
Wait
position
Pickup
position
Wait
position
Home position
F02-204-13
COPYRIGHT © 2001 CANON INC. 2000 2000 2000 2000 CANON DADF-J1 REV.0 MAR.2001
2-35
CHAPTER 2 OPERATIONS AND TIMING
2.5 Moving/Delivering Originals
2.5.1 Outline
Originals are moved by rotating the feeding belt by the belt motor (M2). Further, originals
are moved either to the right or to the left depending on the operating mode in question.
Originals are delivered by rotating the delivery motor (M5). Originals are always delivered to the original delivery tray.
Delivery roller
M5
Delivery tray
Feeding belt
M2
F02-205-01
2-36
COPYRIGHT © 2001 CANON INC. 2000 2000 2000 2000 CANON DADF-J1 REV.0 MAR.2001
CHAPTER 2 OPERATIONS AND TIMING
2.5.2
Controlling the Belt Motor (M2)
The following is a control diagram of the belt motor (M2). The belt motor is a 4-phase
stepping motor, and the circuit is used for the following:
• Turning on/off the motor.
• Controlling the rotation direction of the motor.
• Controlling the rotation speed of the motor.
Q1
CPU
J7
1
2
3
4
5
6
7
8
9
10
11
12
13
14
J12
3
J71
+5R
13
12 REF-CLK
MO1
11
MO2
10
CW/CCW
9
B-Vref
8
+24R
7
6
5
4
3
2
1
+24R
J72
A
3
1
Q601
A*
4
B
5
B*
2
6
M2
PI 1
Belt motor driver PCB
BTCLK
ADF controller PCB
F02-205-02
The CPU (Q1) on the ADF controller PCB sends the motor control signal to the belt motor driver PCB. The reversal motor driver PCB serves to control the motor according to the
input signal.
COPYRIGHT © 2001 CANON INC. 2000 2000 2000 2000 CANON DADF-J1 REV.0 MAR.2001
2-37
CHAPTER 2 OPERATIONS AND TIMING
Function
Signal
M20A
M20A*
M20B
M20B*
B-Vref
BTCLK
Phase control (direction, speed of rotation)
Phase control (direction, speed of rotation)
Phase control (direction, speed of rotation)
Phase control (direction, speed of rotation)
Sets motor rotation torque.
Monitors operation of the motor, and sets belt stop position.
T02-205-01
E402
Indicates a fault in the belt motor.
Indicates a fault in the belt motor clock sensor (PI1).
Indicates a fault in the ADF controller PCB.
2-38
COPYRIGHT © 2001 CANON INC. 2000 2000 2000 2000 CANON DADF-J1 REV.0 MAR.2001
CHAPTER 2 OPERATIONS AND TIMING
2.5.3 Controlling the Delivery Motor (M5)
The following is the control circuit of the delivery motor (M5). The delivery motor is a
DC motor, and the circuit is used for the following:
• Turning on/off the motor.
• Controlling the rotation speed of the motor.
+24R
J2
11
+5v
M5
EJMD*
Q1
CPU
EJMPWM*
Q37
Q13
12
PI 11
Q38
J3
2
EJCLK
EJCLK
F02-205-03
The CPU (Q1) on the ADF controller PCB sends the motor rotation speed signal
(EJMPWM*) to the drive control assembly, which in turn generates the motor drive signal
(EJMD*) according to the input signal.
When the motor starts to rotate, the motor rotation signal (EJCLK) is generated. The CPU
monitors the operation of the motor in reference to the motor rotation signal.
Signal
EJMPWM*
EJMD*
EJCLK
Function
Controls the motor rotation speed.
Controls the motor operation drive.
Monitors the motor operation.
T02-205-02
E404
Indicates a fault in the delivery motor (M5).
Indicates a fault in the delivery motor clock sensor (PI11).
Indicates a fault in the ADF controller PCB.
-Related AdjustmentsSensor and delivery motor adjustment
At time of replacing the delivery motor.
COPYRIGHT © 2001 CANON INC. 2000 2000 2000 2000 CANON DADF-J1 REV.0 MAR.2001
2-39
CHAPTER 2 OPERATIONS AND TIMING
2.6 CW Pickup/Delivery
2.6.1 Outline
CW pickup/delivery is used in both fixed reading and stream reading.
Operation mode
Operation
CW pickup/delivery
Fixed reading
Stream reading
Copying mode
Single-sided original to single-sided copy
(reproduction ratio: 201% to 400%)
Single-sided original to double-sided copy
(reproduction ratio: 201% to 400%)
Single-sided original to single-sided copy
(reproduction ratio: 25% to 200%)
Single-sided original to double-sided copy
(reproduction ratio: 25% to 200%)
T02-206-01
The DADF selects fixed reading for the following:
• The reproduction ratio is set to 201% or higher.
• It has identified the original as being of a non-default size.
• The copier prohibits stream reading mode (as selected in service mode).
• The copier has detected dirt on the copyboard glass.
2.6.2 Fixed Reading
In fixed reading, the original is held on the copyboard glass while the copier’s scanner is
moved to make copies.
Its operation is as follows:
a. Small-Size, Single-Sided Original
1) The 1st original is picked up, and its leading edge is butted against the registration roller
to remove the skew. (For details of pickup operation, see 2.4 “Picking Up/Separating
Originals” on p. 2-26.)
1st original
Registration roller
F02-206-01
2-40
COPYRIGHT © 2001 CANON INC. 2000 2000 2000 2000 CANON DADF-J1 REV.0 MAR.2001
CHAPTER 2 OPERATIONS AND TIMING
2) The registration roller and the feeding belt are rotated to move the 1st original.
When the trailing edge of the 1st original moves past the point of contact [1] of the pick
roller, the 2nd original is picked up.
2nd original
Registration roller
Feeding belt
[1]
F02-206-02
3) The registration roller and the feeding belt are rotated to move the 1st original.
After its trailing edge moves past the pre-registration roller paper sensor (S2), the 1st
original is moved by the feeding belt over a specific length to determine its top position.
Pre-registration roller
paper sensor (S2)
Feeding belt
F02-206-03
4) The copier’s scanner starts copying operation.
F02-206-04
COPYRIGHT © 2001 CANON INC. 2000 2000 2000 2000 CANON DADF-J1 REV.0 MAR.2001
2-41
CHAPTER 2 OPERATIONS AND TIMING
5) The copier’s scanner starts to move in reverse and the feeding belt is rotated to move the
1st original in the delivery direction.
At the same time, the registration roller is rotated to move the 2nd original.
2nd original
F02-206-05
6) The 1st and the 2nd originals are moved by the feeding belt; when the trailing edge of
the 2nd original has moved past the pre-registration roller paper sensor (S2), the feeding
belt is rotated for a specific length to determine the stop position for the 2nd original.
The 1st original is moved in the delivery direction, and stopped on the copyboard glass.
Pre-registration roller
paper sensor (S2)
2nd original
1st original
F02-206-06
2-42
COPYRIGHT © 2001 CANON INC. 2000 2000 2000 2000 CANON DADF-J1 REV.0 MAR.2001
b.Sequence of Operations (small-size, single-side original)
A4, Single-Sided, 3 Originals, Fixed Reading
Delivering 2nd original
Moving 3rd original in delivery
direction
Start key ON
Reading 1st original
Separating 2nd original
Separating
1st original
Feeding 1st original in delivery direction Delivering 1st original
Reading 2nd original
Moving 2nd original in delivery direction
Separating 3rd original
Reading 3rd original
Delivering
3rd original
Original sensor (S6)
Pickup roller
home position sensor (PI 7)
Pickup roller
height sensor 1/2 (PI 8/9)
Stopper plate solenoid (SL2)
Pickup motor (M3)
DOWN
UP
DOWN
UP
DOWN
UP
UP
Separation clutch (CL)
Separation motor (M4)
Reversal motor (M1)
Belt motor (M2)
Delivery motor (M5)
: motor CCW rotation.
F02-206-07
COPYRIGHT© 2001 CANON INC. 2000 2000 2000 2000 CANON DADF-J1 REV.0 MAR. 2001
2-43
CHAPTER 2 OPERATIONS AND TIMING
c.Large-Size, Single-Sided Original
1) The 1st original is picked up, and its leading edge is butted against the registration roller
to remove the skew. (For details of pickup operation, see 2.4 “Picking Up/Separating
Originals” on p. 2-26.)
1st original
Registration roller
F02-206-08
2) The registration roller and the feeding belt are rotated to move the original.
When the trailing edge of the 1st original moves past the point of contact [1] of the
pickup roller, the 2nd original is picked up.
[1]
F02-206-09
3) The registration roller and the feeding belt are rotated to move the original.
The 1st original is moved by the feeding belt over a specific length after its trailing edge
has moved past the pre-registration roller paper sensor (S2) to determine the original
stop position.
Pre-registration roller
paper sensor (S2)
F02-206-10
COPYRIGHT © 2001 CANON INC. 2000 2000 2000 2000 CANON DADF-J1 REV.0 MAR.2001
2-45
CHAPTER 2 OPERATIONS AND TIMING
4) The copier’s scanner starts copying operation.
Scanning lamp
F02-206-11
5) When the copier’s scanner starts to move in reverse, the feeding belt is rotated to move
the 1st original in the delivery direction.
At the same time, the 2nd original is picked up.
1st original
2nd original
F02-206-12
6) The 1st and the 2nd originals are moved by the feeding belt; the feeding belt is rotated
for a specific length after the trailing edge of the 2nd original has moved past the preregistration roller paper sensor (S2) to determine the stop position for the 2nd original.
The 1st original is delivered by the delivery roller.
Pre-registration roller
paper sensor (S2)
Delivery roller
F02-206-13
2-46
COPYRIGHT © 2001 CANON INC. 2000 2000 2000 2000 CANON DADF-J1 REV.0 MAR.2001
COPYRIGHT © 2001 CANON INC. 2000 2000 2000 2000 CANON DADF-J1 REV.0 MAR.2001
Delivery motor (M5)
Belt motor (M2)
Reversal motor (M1)
Separation clutch (CL)
Separation motor (M4)
Pickup motor (M3)
Stopper plate
solenoid (SL2)
Pickup roller
home position sensor (PI 7)
Pickup roller
height sensor 1/2 (PI 8/9)
Original sensor (S6)
DOWN
UP
Reading 1st original
Separating 2nd original
UP DOWN
Separating
1st original
Start key ON
A3, Signal-Sided, 2 Originals, Fixed Reading
UP
Delivering 1st original
Reading 2nd original
Delivering
2nd original
CHAPTER 2 OPERATIONS AND TIMING
d.Sequence of Operations (large-size)
F02-206-14
2-47
CHAPTER 2 OPERATIONS AND TIMING
2.6.3 Stream Reading
In stream reading, the copier’s scanner is fixed in position, and originals are moved over
the copyboard glass to make copies.
Its operation is as follows:
a. Small-Size Originals
1) The 1st original is picked up, and its leading edge is butted against the registration roller
to remove the skew. (For details of pickup operation, see 2.4 “Picking Up/Separating
Originals” on p. 2-26.)
1st original
F02-206-15
2) The registration roller and the feeding belt are rotated to move the original.
When the trailing edge of the 1st original has moved past the point of contact [1] of the
pickup roller, the 2nd original is picked up.
2nd original
[1]
F02-206-16
2-48
COPYRIGHT © 2001 CANON INC. 2000 2000 2000 2000 CANON DADF-J1 REV.0 MAR.2001
CHAPTER 2 OPERATIONS AND TIMING
3) The 1st original is moved over a specific length by the feeding belt after its leading edge
has moved past the post-registration roller paper sensor (S3) and held in wait.
(The DADF starts to keep count of the distance the 1st original moves after it has moved
past the pre-registration paper sensor (S2).)
Pre-registration paper sensor (S2)
Post-registration roller
paper sensor (S3)
Wait position
F02-206-17
4) The feeding belt is rotated to move the original for a specific distance.
When the 1st original has moved a specific distance (in reference to the count kept since
its trailing edge has moved past the pre-registration roller sensor (S2), the DADF issues
the image leading edge signal to the copier. In response to the image leading edge signal, the copier starts reading of the original.
At this time, the 2nd original is also moved and is kept on hold in wait position.
Pre-registration roller paper sensor (S2)
2nd original
F02-206-18
COPYRIGHT © 2001 CANON INC. 2000 2000 2000 2000 CANON DADF-J1 REV.0 MAR.2001
2-49
b.Sequence of Operations (small-size)
A4, Single-Sided, 3 Originals, Stream Reading
Start key ON
Holding
Reading 1st original
1st original in wait Holding 2nd original in wait
Separating
Separating 3rd original
2nd original
Separating
1st original
Delivering 1st original
Reading 3rd original
Holding 3rd original in wait
Delivering 2nd original
Reading 3rd original
Delivering 3rd original
Original sensor (S6)
Pickup roller
home position sensor (PI 7)
Pickup roller
height sensor 1/2 (PI 8/9)
Stopper plate solenoid (SL2)
DOWN
UP
DOWN
UP
DOWN
UP
UP
Pickup motor (M3)
Separation motor (M4)
Separation clutch (CL)
Reversal motor (M1)
Belt motor (M2)
Delivery motor (M5)
: motor CCW rotation.
F02-206-19
COPYRIGHT© 2001 CANON INC. 2000 2000 2000 2000 CANON DADF-J1 REV.0 MAR. 2001
2-51
CHAPTER 2 OPERATIONS AND TIMING
c.Large-Size Originals
1) The 1st original is picked up, and its leading edge is butted against the registration roller
to remove the skew. (For details of pickup operation, see 2.4 “Picking Up/Separating
Originals” on p. 2-26.)
1st original
Registration roller
F02-206-20
2) The registration roller and the feeding belt are rotated to move the original.
When the trailing edge of the 1st original moves past the point of contact [1] of the
pickup roller, the 2nd original is started.
(If the original is 279.4x431.8 mm (11"x17") in size, this step takes place after the
movement of the original starts in step 4.)
Separation sensor (S4)
2nd original
[1]
F02-206-21
COPYRIGHT © 2001 CANON INC. 2000 2000 2000 2000 CANON DADF-J1 REV.0 MAR.2001
2-53
CHAPTER 2 OPERATIONS AND TIMING
3) When the leading edge of the original has moved past the post-registration roller (S3),
the feeding belt is rotated for a specific length, and the original is stopped once (wait position).
(The DADF starts to keep count of the distance of movement after it has moved past the
pre-registration roller paper sensor (S2).)
Pre-registration roller
paper sensor (S2)
Post-registration roller
paper sensor (S3)
Wait position
F02-206-22
4) The feeding belt is rotated to move the original.
When the original has moved a specific distance (in relation to the count kept since its
trailing edge has moved past the pre-registration roller sensor (2)), the DADF issues the
image leading edge signal to the copier.
The copier starts reading the original in response to the image signal. At this time, the
2nd original is also moved and then stopped in wait position.
Pre-registration roller
paper sensor (S2)
F02-206-23
2-54
COPYRIGHT © 2001 CANON INC. 2000 2000 2000 2000 CANON DADF-J1 REV.0 MAR.2001
d.Sequence of Operations (large-size)
A3, Signal-Sided, 2 Originals; Stream Reading
Start key ON
Separating
1st original
Moving 1st original to
wait position
Separating 2nd original
Reading and then delivering 1st original
Moving 2nd original to wait position
Reading 2nd original
Delivering
2nd original
Original sensor (S6)
Pickup roller
home position sensor (PI 7)
Delivery roller
height sensor 1/2 (PI 8/9)
Stopper plate solenoid (SL2)
Pickup motor (M3)
DOWN
UP
DOWN
UP
UP
Separation clutch (CL)
Separation motor (M4)
Reversal motor (M1)
Belt motor (M2)
Delivery motor (M5)
: motor CCW rotation.
F02-206-24
COPYRIGHT© 2001 CANON INC. 2000 2000 2000 2000 CANON DADF-J1 REV.0 MAR. 2001
2-55
CHAPTER 2 OPERATIONS AND TIMING
2.7 Pre-Reversal Pickup/Delivery
2.7.1 Outline
In pre-reversal, the original is handled by turning it over in advance of sending it to the
copyboard glass.
Pre-reversal pickup/delivery is used when making double-sided copies of small-size originals, and fixed reading is used for it.
Operation
Operation mode
Pre-reversal pickup/
delivery
Fixed reading
Copying mode
Double-sided original to single-side copy (reproduction ratio: 25% to 400%)
Double-sided original to double-sided copy (reproduction ratio: 25% to 400%)
T02-207-01
2.7.2 Operations
1) The 1st original is picked up, and its leading edge is butted against the registration roller
to remove the skew. (For details of operation, see 2.4 “Picking Up/Separating Originals”
on p. 2-26.)
1st original
Registration roller
F02-207-01
2) The registration roller and the reversing roller are driven to turn over the original.
The 1st original is moved by the reversing roller for a specific length after its trailing
edge has moved past the pre-registration roller paper sensor (S2) and then stopped.
Pre-registration roller paper sensor (S2)
Reversing roller
F02-207-02
COPYRIGHT © 2001 CANON INC. 2000 2000 2000 2000 CANON DADF-J1 REV.0 MAR.2001
2-57
CHAPTER 2 OPERATIONS AND TIMING
3) The reversing roller and the feeding belt are rotated to move the original.
When the trailing edge of the 1st original moves past the reversal sensor (S1), the feeding belt is rotated for a specific length to determine the original stop position.
Reversal sensor (S1)
Feeding belt
F02-207-03
4) The copier’s scanner starts copying operation.
Copying
Scanning lamp
F02-207-04
5) When the copier’s scanner starts to move in reverse, the feeding belt is rotated to send
the 1st original to the reversing assembly. At this time, the leading edge of the original is
butted against the reversing roller to remove the skew.
Butted.
F02-207-05
2-58
COPYRIGHT © 2001 CANON INC. 2000 2000 2000 2000 CANON DADF-J1 REV.0 MAR.2001
CHAPTER 2 OPERATIONS AND TIMING
6) The reversing roller and the feeding belt are rotated to move the original to the
copyboard glass.
The 1st original is moved over a specific distance by the feeding belt after its trailing
edge has moved past the pre-registration roller paper sensor (S2) and is stopped.
Pre-registration roller
paper sensor (S2)
F02-207-06
7) The copier’s scanner starts copying operation.
At this time, the 2nd original is also picked up and turned over. (See steps 1 and 2.)
2nd original
Copying
F02-207-07
8) When the copier’s scanner starts to move in reverse, the reversing roller and the feeding
belt are rotated to move the 1st and the 2nd originals.
2nd original
1st original
F02-207-08
COPYRIGHT © 2001 CANON INC. 2000 2000 2000 2000 CANON DADF-J1 REV.0 MAR.2001
2-59
CHAPTER 2 OPERATIONS AND TIMING
9) When the 2nd original has moved past the reversal sensor (S1), the feeding belt is rotated for a specific length to end the movement of the original.
Reversal sensor (S1)
2nd original
F02-207-09
10) The copier’s scanner starts copying operation.
Copying
F02-207-10
2-60
COPYRIGHT © 2001 CANON INC. 2000 2000 2000 2000 CANON DADF-J1 REV.0 MAR.2001
a.Sequence of Operations (small-size, double-sided)
A4, Double-Sided, 3 Originals
Delivering 2nd original
Moving 3rd original
Separating
1st original
Moving 3rd original to
copyboard glass
Moving 2nd original to
copyboard glass
Start key ON
Turning over
1st original
Reading
back of
1st original
Reversing
1st original
Separating
2nd original
Reading face
of 1st original
Turning over
2nd original
Reading
Turning over
back of
2nd original
2nd original Separating
3rd original
Reading face
of 2nd original
Turning over
3rd original
Delivering 3rd original
Reading
Turning over Reading
back of
3rd original face of
3rd original
3rd original
Original sensor (S6)
Pickup roller
home position sensor (PI 7)
Pickup roller
height sensor 1/2 (PI 8/9)
Stopper plate solenoid (SL2)
Pickup motor (M3)
DOWN
UP
DOWN
UP
UP
UP
DOWN
Separation clutch (CL)
Separation motor (M4)
Reversal motor (M1)
Reversal solenoid (SL1)
Belt motor (M2)
Delivery motor (M5)
: motor CCW rotation
F02-207-11
COPYRIGHT© 2001 CANON INC. 2000 2000 2000 2000 CANON DADF-J1 REV.0 MAR. 2001
2-61
CHAPTER 2 OPERATIONS AND TIMING
2.8 Reversal Pickup/Delivery
2.8.1 Outline
Reversal pickup/delivery is used when making copies of large-size double-sided originals.
Fixed reading is used.
Operation
Reversal pickup/delivery
Operation mode
Fixed reading
Copying mode
Double-sided original to single-sided copy (reproduction ratio: 25% to 400%)
Double-sided original to double-sided copy (reproduction ratio: 25% to 400%)
T02-208-01
2.8.2 Operations
1) The 1st original is picked up, and its leading edge is butted against the registration roller
to remove the skew. (For details of operation, see 2.4 “Picking Up/Separating Originals”
on p. 2-26.)
1st original
F02-208-01
2) The reversing roller and the feeding belt are driven to move the original.
The 1st original is moved over a specific distance by the feeding belt after its trailing
edge has moved the pre-registration roller paper sensor (2) and is stopped.
Pre-registration roller
paper sensor (S2)
F02-208-02
COPYRIGHT © 2001 CANON INC. 2000 2000 2000 2000 CANON DADF-J1 REV.0 MAR.2001
2-63
CHAPTER 2 OPERATIONS AND TIMING
3) The feeding belt is rotated to move the original to the reversing assembly. At this time,
the leading edge of the 1st original is butted against the reversing roller to remove the
skew.
Butted.
F02-208-03
4) The reversing roller and the feeding belt are rotated to move the original to the
copyboard glass.
The 1st original is moved over a specific distance by the feeding belt after its trailing
edge has moved past the pre-registration roller paper sensor (S2) and then is stopped.
Pre-registration roller
paper sensor (S2)
F02-208-04
5) The copier’s scanner starts copying operation.
Copying
F02-208-05
2-64
COPYRIGHT © 2001 CANON INC. 2000 2000 2000 2000 CANON DADF-J1 REV.0 MAR.2001
CHAPTER 2 OPERATIONS AND TIMING
6) The copier’s scanner starts to move in reverse. The feeding belt is rotated to send the 1st
original to the reversing assembly. At this time the leading edge of the original is butted
against the reversing roller to remove the skew.
2nd original
F02-208-06
7) The reversing roller and the feeding belt are rotated to move the original to the
copyboard glass.
The 1st original is moved over a specific distance by the feeding belt after its trailing
edge has moved past the pre-registration roller paper sensor (S2) and is then stopped.
F02-208-07
8) The copier’s scanner starts copying operation.
At this time, the 2nd original is also picked up, and its leading edge is butted against the
registration roller.
2nd original
Copying
F02-208-08
COPYRIGHT © 2001 CANON INC. 2000 2000 2000 2000 CANON DADF-J1 REV.0 MAR.2001
2-65
CHAPTER 2 OPERATIONS AND TIMING
9) The 2nd original is moved a specific distance by the feeding belt after it has moved past
the pre-registration belt sensor (S2) to end the movement of the original. The 1st original
is delivered by the delivery roller.
Pre-registration
paper sensor (S2)
Delivery roller
1st original
2nd original
F02-208-09
2-66
COPYRIGHT © 2001 CANON INC. 2000 2000 2000 2000 CANON DADF-J1 REV.0 MAR.2001
CHAPTER 2 OPERATIONS AND TIMING
2.8.3
Controlling the Reversal Motor (M1)
The following is the control circuit diagram of the reversal motor (M1). The reversal motor is a 4-phase stepping motor, and the circuit is used for the following:
• Turning on/off the motor.
• Controlling the rotation direction of the motor.
• Controlling the rotation speed of the motor.
J6
Q1
CPU
1
2
3
4
5
6
7
8
9
10
11
12
13
ADF controller PCB
+24R
J61
13
12
11
10
9
8
7
6
5
4
3
2
1
+5R
M1OB*
M1OB
M1OA*
M1OA
T-Vref
J62
A
Q601
+24R
3
1
A*
B
B*
M1
4
5
2
6
Reversal motor driver PCB
F02-208-10
The CPU (Q1) on the ADF controller PCB serves to send various motor control signals to
the reversal motor driver PCB, which in response controls the motors:
Signal
Description
M10A
M10A*
M10B
M10B*
T-Vref
Phase control (direction, speed of rotation)
Phase control (direction, speed of rotation)
Phase control (direction, speed of rotation)
Phase control (direction, speed of rotation)
Sets motor rotation torque.
T02-208-02
COPYRIGHT © 2001 CANON INC. 2000 2000 2000 2000 CANON DADF-J1 REV.0 MAR.2001
2-67
2.8.4 Sequence of Operations (large-size, double-sided)
A3, Double-Sided, 2nd Originals
Start key ON
Separating 1st
original
Moving 1st original to
copyboard glass
Turning over
1st original
Reading back of
1st original
Turning over
1st original
Reading face of
1st original
Separating
2nd original
Delivering 1st original
Moving 2nd original to
copyboard glass
Turning over 2nd original
Reading back of
2nd original
Turning over
2nd original
Reading face of
2nd original
Delivering
2nd original
Original sensor (S6)
Pickup roller
home position sensor (PI 7)
Pickup roller
height sensor 1/2 (PI 8/9)
Stopper plate solenoid (SL2)
Pickup motor (M3)
DOWN
UP
DOWN
UP
UP
Separation clutch (CL)
Separation motor (M4)
Reversal motor (M1)
Reversing solenoid (SL1)
Belt motor (M2)
Delivery motor (M5)
: motor CCW rotation.
F02-208-11
COPYRIGHT© 2001 CANON INC. 2000 2000 2000 2000 CANON DADF-J1 REV.0 MAR. 2001
2-69
CHAPTER 2 OPERATIONS AND TIMING
2.9 Manual Feeder Pickup/Delivery
2.9.1 Operations
Manual feeder pickup/delivery is used only in fixed reading mode.
1) When an original is placed in the manual feeder, the manual feed set sensor (PI12) goes
on.
Manual feed set sensor (PI12)
F02-209-01
2) When the Start key is pressed, the original is moved by the delivery roller so that its
leading edge is butted against the manual feed registration roller (to remove the skew).
Manual feed registration sensor (S9)
F02-209-02
3) The original is moved by the delivery roller and the feeding belt, and is stopped when its
leading edge reaches the reversal sensor (S1).
Reversal sensor (S1)
F02-209-03
COPYRIGHT © 2001 CANON INC. 2000 2000 2000 2000 CANON DADF-J1 REV.0 MAR.2001
2-71
CHAPTER 2 OPERATIONS AND TIMING
4) The feeding belt rotates to move the original, which is moved over a specific distance
after its trailing edge moves past the reversal sensor (S1) and then stopped.
Reversal sensor (S1)
F02-209-04
5) The copier’s scanner starts copying operation.
Copying
F02-209-05
6) When the copier’s scanner starts to move in reverse, the feeding belt and the delivery
roller are rotated to send the original to the delivery assembly.
F02-209-06
2-72
COPYRIGHT © 2001 CANON INC. 2000 2000 2000 2000 CANON DADF-J1 REV.0 MAR.2001
CHAPTER 2 OPERATIONS AND TIMING
2.9.2 Sequence of Operations
Manual feed original set
Start key ON
Picking up
Moving
Original set
Copying
Delivering
0.4 sec
(approx.)
Manual feed set sensor
(PI 12)
Belt motor (M2)
Delivery motor (M5)
Delivery solenoid (SL4)
Reversing solenoid
(SL1)
Reversal sensor (PI 1)
Original delivery sensor
(PI 13)
F02-209-07
COPYRIGHT © 2001 CANON INC. 2000 2000 2000 2000 CANON DADF-J1 REV.0 MAR.2001
2-73
CHAPTER 2 OPERATIONS AND TIMING
3 Jams
The DADF uses the sensors shown in F02-301-03 to detect a jam. The timing at which
jam detection is tuned on is programmed in advance in the CPU on the ADF controller PCB,
and the presence/absence of a jam is detected in relation to the presence/absence of paper
over a specific sensor.
When a jam is detected, the DADF communicates the fact to the copier in the form of a
code, and some copiers allow a check on jam codes in service mode. The indicator (LED2)
on the ADF controller PCB of the DADF may also be used to check codes.
Copier’s Service Mode Screen
Display
I/O
Adjust
Function
< JAM >
Option
< 1/7 >
Test
Counter
< READY >
01
0202
1707
1708
0
010B
7
11
A4
02
0202
1704
1706
0
010B
7
9
A4
03
0202
1703
1703
0
020A
7
7
A4
04
0202
1611
1623
2
1400
7
3
A4
05
0202
1611
1611
2
1400
0
0
-----
06
0202
1533
1534
2
1400
0
0
-----
07
----
----
----
-
----
-
------
-----
08
----
----
----
-
----
-
------
-----
Jam code
See tables T02-301-01 and later.
'1'indicates a jam in the machine.
F02-301-01 Screen
Indication on the DADF
The indication (LED2) on the ADF controller PCB is based on how the LED flashes (four
times); for example, if the code is J-13,
F02-301-02
PI6
PI3 S6
(light-emitting)
PI 7 PI 8,
PI 4
PI 9
S4,S5
S2
S8
S6
(light-receiving)
S1 S3
PI12
S7
PI 10
S9
PI 13
F02-301-03
2-74
COPYRIGHT © 2001 CANON INC. 2000 2000 2000 2000 CANON DADF-J1 REV.0 MAR.2001
CHAPTER 2 OPERATIONS AND TIMING
The following shows jam codes, jam types, related sensors, and conditions of detection:
Jam code
DADF
Copier
Jam type
Post-pickup origi- S4
nal skew
S5
J-1A
(1st original)
J-11
001A
J-1D
(1st original)
J-12
J-13
001D
Pickup fault 1
S1
0012
0013
Pickup fault 2
S3
0011
S2
S3
S2
J-1E
(1st original)
J-14
001E
J-1B
(1st original)
J-15
001B
J-1F
(1st original)
J-16
J-19
001F
Reversal delay
S1
0014
Reversal pickup
S4
trailing edge skew S5
0015
0016
0019
Conditions of detection
Related
sensor
Reversal pickup
fault
PI4
Residual original
S1
At time of pickup, the discrepancy in the
timing of detection of the trailing edge of the
original between the separation sensor and
the skew sensor is 25 mm or more in terms
of feed length.
At time of pickup up, the reversal sensor detects paper.
At time of pickup, the reversal sensor detects
paper.
At time of pickup, the post-registration paper
sensor detects an original before the reversal
motor (M1) goes on.
At time of pickup, the pre-registration paper
sensor does not detect an original although
an original is assumed to have been moved
over a specific distance.
At time of pre-reversal, the post-registration
roller sensor detects an original before the
reversal motor (M1) goes on.
At time of reversal, the pre-registration roller
paper sensor does not detect an original after
an original is assumed to have been moved
over a specific length.
At the start of reversal, the reversal sensor
does not detect an original although an original is assumed to have been moved over a
specific distance (104 mm).
At time of pre-reversal, the discrepancy in
the timing of detection of the trailing edge of
an original between the separation sensor
and the skew sensor is 10 mm or more in
terms of feed length.
At time of reversal, the pre-reversal sensor
detects an original after an original has been
moved over a specific distance.
Prior to pickup, the reversal sensor detects
an original when the belt motor is driven for
a specific amount.
T02-301-01
COPYRIGHT © 2001 CANON INC. 2000 2000 2000 2000 CANON DADF-J1 REV.0 MAR.2001
2-75
CHAPTER 2 OPERATIONS AND TIMING
Jam code
DADF
Copier
Jam type
J-22
0022
Separation delay
S4
J-23
0023
Pickup delay
S4
S2
J-2A
(1st original)
J-24
002A
Pickup leading
edge skew
S4
S5
J-2B
(1st original)
J-25
002B
J-2C
(1st original)
J-26
002C
J-2D
(1st original)
J-27
J-3A
(1st original)
J-31
002D
J-3B
(1st original)
J-32
003B
0024
Pre-reversal delay S3
1
0025
Pre-reversal delay S3
2
S1
0026
0027
003A
Pre-reversal delay PI4
3
Pickup stationary
1
S3
Pickup stationary
2
S2
0031
0032
Conditions of detection
Related
sensor
At time of operation, the separation sensor
does not detect an original although an original is assumed to have been moved over a
specific length (171 mm). (2nd original and
later)
At time of separation, the pre-registration
roller paper sensor does not detect an original although an original is assumed to have
been moved over a specific distance (about
93 mm) after the separation sensor has detected the leading edge of an original
At time of separation, the discrepancy in
timing of detection of the training edge of an
original between the separation sensor and
the skew sensor is 25 mm or more in terms
of feed length.
At time of pre-reversal, the post-registration
roller sensor does not detect an original after
the reversal motor (M1) has been driven for
an equivalent of 50 mm.
At time of pre-reversal, the reversal sensor
does not detect an original although an original is assumed to have been moved over a
specific distance (100 mm) after the postregistration roller sensor has detected its
leading edge.
At time of pre-reversal, the pre-reversal sensor does not detect an original after the reversal motor (M1) has stopped.
At time of pickup, the post-registration roller
sensor does not detect an original although
an original is assumed to have been moved
40 mm after the reversal motor has been
started.
At time of pickup, the pre-registration roller
paper sensor remains on although an original
is assumed to have been moved over a specific distance (330 mm for small-size, 660
mm for large-size) after the reversal motor
(M1) has been started.
T02-301-02
2-76
COPYRIGHT © 2001 CANON INC. 2000 2000 2000 2000 CANON DADF-J1 REV.0 MAR.2001
CHAPTER 2 OPERATIONS AND TIMING
Jam code
DADF
Copier
J-3C
(1st original)
J-33
003C
J-3D
(1st original)
J-34
003D
J-3E
(1st original)
J-35
003E
J-3F
(1st original)
J-36
003F
J-4A
(1st original)
J-41
004A
J-5A
(1st original)
J-52
005A
J-5B
(1st original)
J-54
005B
Jam type
Pre-reversal stationary 1
S1
S4
Pre-reversal stationary 2
S2
S4
Pre-reversal stationary 3
S2
S3
Pre-reversal stationary 4
S1
S3
Reversal delay
S1
Reversal pickup
delay
S2
Reversal pickup
stationary
S2
0033
0034
0035
0036
0041
0052
0054
Conditions of detection
Related
sensor
At time of pre-reversal, the separation sensor
remains on although an original is assumed
to have been moved over a specific distance
(169 mm) after the reversal sensor has detected its leading edge.
At time of pre-reversal, the pre-registration
roller paper sensor remains on although an
original is assumed to have been moved over
a specific length (about 120 mm) after the
trailing edge of an original has moved past
the separation sensor.
At time of pre-reversal, the post-registration
roller paper sensor remains on although an
original is assumed to have been moved over
a specific length (about 50 mm) after the
trailing edge of an original has moved past
the pre-registration roller paper sensor.
At time of pre-reversal, the reversal sensor
remains on although an original is assumed
to have been moved over a specific distance
(about 100 mm) after its trailing edge has
moved past the post-registration roller sensor.
At time of reversal, the reversal sensor detects an original after an original has been
made to arch and then moved over a specific
distance (original length x 1.5; approx.).
At time of reversal, the pre-registration roller
sensor does not detect an original although
an original is assumed to have been moved
over a specific distance (about 197 mm) after
it has been made to arch (S1 area).
At time of reversal, the pre-registration roller
paper sensor remains on although an original
is assumed to have been moved over a specific distance (original length x 1.5) after the
pre-registration roller paper sensor has detected its leading edge.
T02-301-03
COPYRIGHT © 2001 CANON INC. 2000 2000 2000 2000 CANON DADF-J1 REV.0 MAR.2001
2-77
CHAPTER 2 OPERATIONS AND TIMING
Jam code
DADF
Copier
J-5C
(1st original)
J-55
005C
J-5D
(1st original)
J-56
005D
J-5E
(1st original)
J-57
005E
Jam type
Pre-reversal
pickup delay
Conditions of detection
Related
sensor
S1
0055
Pre-reversal paper S1
PI4
stationary 1
0056
S1
PI4
0057
Pre-reversal
pickup stationary
2
J-8A
(1st original)
J-81
008A
Delivery delay
PI13
J-8B
(1st original)
J-82
008B
Delivery stationary 1
PI13
S9
J-8C
(1st original)
J-83
008C
Delivery stationary 2
S9
PI13
J-92
0092
Manual feed registration delay
S9
J-A1
00A1
Manual feed registration stationary
S1
0081
0082
0083
At time of pre-reversal pickup, the reversal
sensor does not detect an original when the
reversal motor has been driven for an equivalent of 100 mm in feed length.
At time of pre-reversal, the pre-reversal sensor remains on although an original is assumed to have been moved cover a specific
distance after the reversal sensor has detected its leading edge.
At time of pre-reversal pickup, the reversal
sensor remains on although an original is
assumed to have been moved over a specific
length after the pre-reversal sensor has detected its trailing edge.
At time of delivery, the original delivery sensor does not go on after the belt motor has
been driven to move an original over a specific distance.
At time of delivery, the manual feed registration roller paper sensor remains on although
an original is assumed to have been moved
over a specific distance (original length +
100 mm) after the original delivery sensor
has detected its leading edge.
At time of delivery, the original delivery sensor remains on although an original is assumed to have been moved for 100 mm after
its trailing edge has moved past the manual
feed registration roller paper sensor.
When a manually fed original is made to
arch, the manual feed registration roller paper sensor does not detect an original 1 sec
after the delivery motor is started.
At time of manual feed pickup, the reversal
sensor does not detect an original although
an original is assumed to have been moved
730 mm after the belt motor has been
started.
T02-301-04
2-78
COPYRIGHT © 2001 CANON INC. 2000 2000 2000 2000 CANON DADF-J1 REV.0 MAR.2001
CHAPTER 2 OPERATIONS AND TIMING
Jam code
DADF
Copier
Jam type
Conditions of detection
Related
sensor
J-A2
00A2
Manual feed reversal stationary
S1
J-A3
00A3
Manual feed delivery delay
PI13
J-A4
00A4
Manual feed delivery stationary
PI13
J-A5
00A5
Manual feed residual original
S1
S9
J-A6
00A6
Manual feed
original size fault
S9
S1
J-E1
J-E2
00E1
00E2
ADF open
Left cover open
J-E3
00E3
Cycle fault
PI10
PI3
PI6
S6
J-E4
00E4
Initial fault
PI4
PI12
PI13
S1
S2
S3
S4
S5
S9
At time of manual feed pickup, the reversal
sensor remains on when the belt motor has
been driven for an equivalent of about 50
mm after an original has reached the reversal
sensor.
At time of manual feed delivery, the original
delivery sensor does not detect an original
although an original is assumed to have been
moved over a specific distance (621 mm original length).
At time of manual feed delivery, the original
delivery sensor remains on although an
original is assumed to have been moved
cover a specific distance (original length x
1.5) after the original delayed sensor has detected its leading edge.
At time of manual feed pickup, the reversal
sensor detects an original before the trailing
edge of an original moves past the manual
feed registration roller paper sensor.
At time of manual feed pickup, the reversal
sensor goes on while the manual feed registration roller paper sensor remains on.
The DADF is opened.
The left cover is opened.
The pick signal arrives from the copier when
no original has been detected.
At the start of operation, an original exists in
the paper path.
T02-301-05
COPYRIGHT © 2001 CANON INC. 2000 2000 2000 2000 CANON DADF-J1 REV.0 MAR.2001
2-79
CHAPTER 2 OPERATIONS AND TIMING
Jam code
DADF
Copier
Jam type
Conditions of detection
Related
sensor
J-E6
00E6
Original size fault S3
J-E7
J-E8
00E7
00E8
J-E9
00E9
User ADF open
User left cover
open
Power down
J-EA
J-EB
(1st original)
00EA
00EB
Stream reading
PI5
image leading
S7
edge position fault
J-F3
00F3
Belt status
PI1
J-F4
00F4
J-FD
J-FE
00FD
00FE
Image leading
edge output timing fault
Last sheet fault
Error
S2
S3
SW301
PI1
PI1
PI2
PI11
PI10
PI3
PI6
In stream reading (LDR), the post-registration roller paper sensor remains on although
an original is assumed to have been moved
30 mm from wait position.
The DADF is opened while in operation.
The left cover is opened while in operation.
The voltage from the copier fluctuates while
in operation.
In stream reading, the copier does not
change the reading potion when the DADF
has picked up a large-size original in opposition to instructions for small-size originals.
When switching the state of the belt motor,
the belt motor is not in acceleration, constant
speed, or deceleration state.
In stream reading, the image leading edge
signal is generated between wait position
and image leading edge position.
The belt movement for the last sheet fails.
Jams related to the motor drive mechanism
have occurred twice or less.
T02-301-06
2-80
COPYRIGHT © 2001 CANON INC. 2000 2000 2000 2000 CANON DADF-J1 REV.0 MAR.2001
CHAPTER 2 OPERATIONS AND TIMING
4 Power Supply
The following is an outline of the power supply system.
The DADF’s power supply receives from the copier two types of 24 V; one (input to J4-1)
is supplied to each load by way of a fuse (FU1), while the other (input to J1-6) is supplied to
the sensors and the ADF controller PCB after conversion into 5 V by a regulator (Q28) and
into 5.8 V by another regulator (Q65).
The fuse (FU2) operates to cut off the power for protection in the event an overcurrent
flows into the circuit.
FU1
J4
1
24V
J1
6
FU2
24V
Copier
Motor
Clutch
Solenoid
24R
5V
5V
Regulator
Q28
Regulator
Sensor
5.8V
5R
Q65
ADF controller PCB
F02-401-01
COPYRIGHT © 2001 CANON INC. 2000 2000 2000 2000 CANON DADF-J1 REV.0 MAR.2001
2-81
CHAPTER 3
MECHANICAL SYSTEMS
COPYRIGHT© 2001 CANON INC.
CANON DADF-J1 REV.0 MAR. 2001
CHAPTER 3 MECHANICAL SYSTEMS
1 Basic Construction
1.1 External Covers
[1] Body front lower cover
[2] Body front cover
[3] Main cover
[4] Original tray
[5] Upper cover
[6] ADF controller cover
[3]
[4]
[6]
[2]
[5]
[1]
F03-101-01
Detach the covers as needed when cleaning, inspecting, or repairing the inside of the
machine.
1.1.1 Disconnecting the DADF
1) Turn off the copier.
2) Disconnect the DADF’s communication
cable [1] from the copier.
[1]
F03-101-02
3) Open the DADF fully.
4) Standing at the rear of the copier, lift
the DADF to detach.
Memo
Lift.
The hinge foot is equipped with
a locking mechanism, requiring
the DADF to be fully opened
for removal.
F03-101-03
COPYRIGHT © 2001 CANON INC. 2000 2000 2000 2000 CANON DADF-J1 REV.0 MAR.2001
3-1
CHAPTER 3 MECHANICAL SYSTEMS
1.1.2 Removing the Front Lower
Cover
[1]
[2]
[1]
1) Remove the two screws [1], and detach
the front lower cover [2] as if to slide it
out to the front.
F03-101-04a
1.1.3 Removing the Front Cover
1) Remove the four screws [1], and detach
the front cover [2] as if to slide it to the
front.
[1]
[2]
[1]
F03-101-04b
[1]
[1]
F03-101-04c
3-2
COPYRIGHT © 2001 CANON INC. 2000 2000 2000 2000 CANON DADF-J1 REV.0 MAR.2001
CHAPTER 3 MECHANICAL SYSTEMS
1.1.4 Removing the Main Cover
1) Open the upper cover, and insert a
screwdriver from above the hook; then,
remove the two hooks [1].
[1]
[1]
F03-101-05a
2) Free the hook of the pickup assembly
cover [2] from the right stay; then, detach it while paying attention to the
hooks on the front and rear side plates.
[2]
Hooks
F03-101-05b
COPYRIGHT © 2001 CANON INC. 2000 2000 2000 2000 CANON DADF-J1 REV.0 MAR.2001
3-3
CHAPTER 3 MECHANICAL SYSTEMS
3) When you have removed the ADF controller cover, disconnect the connector
[3] of the ADF controller PCB; then,
remove the screw [4], and remove the
grounding wire [5]. Free the harness
from the wire saddle [6], and detach the
other saddle [7].
[7]
Freed.
Push.
[5]
[4]
[6]
[3]
F03-101-05c
4) Remove the four screws [8], and detach
the main cover [9].
[8]
[8] [10]
[8]
[9]
The main cover is fitted with the
original tray [10], and cables are
connected to it. Take extra care
when removing it not to damage
the cables.
[8]
F03-101-06
3-4
COPYRIGHT © 2001 CANON INC. 2000 2000 2000 2000 CANON DADF-J1 REV.0 MAR.2001
CHAPTER 3 MECHANICAL SYSTEMS
1.1.5 Removing the Original Tray
1) Move the side guides (front) [1]/(rear)
[2] to the inside; then, remove the two
screws [3], and detach it.
After mounting it, be sure to adjust the horizontal registration.
[3]
[2]
[1]
[3]
F03-101-07
1.1.6 Removing the Upper Cover
1) Remove the body front cover, and remove the screw [1]; then, remove the
positioning pin [2] from the pickup
front side plate.
2) Remove the upper cover [3] by removing the stepped screw [5] used to keep
the link arm [4] in place, i.e., the one
connecting the pickup side plate (front,
rear) and the upper cover.
[5]
[4]
[3]
[5]
[4]
[2]
[1]
F03-101-08
COPYRIGHT © 2001 CANON INC. 2000 2000 2000 2000 CANON DADF-J1 REV.0 MAR.2001
3-5
CHAPTER 3 MECHANICAL SYSTEMS
1.1.7 Removing the ADF Controller
Cover
[2]
1) Remove the screw [1], and detach the
ADF controller cover [2].
[1]
F03-101-09
1.1.8 Side Guide Lock
1) The side guide of the original tray is
equipped with a side guide lock; and the
side guide lock [1] is fitted in the notch
of the original tray.
When the side guide lock is in
the notch, the DADF is set to
handle A3/A4-size sheets; upon
removal, the DADF will handle
sheets up to 305 mm in width.
[1]
F03-101-10
3-6
COPYRIGHT © 2001 CANON INC. 2000 2000 2000 2000 CANON DADF-J1 REV.0 MAR.2001
CHAPTER 3 MECHANICAL SYSTEMS
2 Drive System
2.1.1 Removing the Reversal Motor
Unit
[1]
[3]
[2]
1) Disconnect the connector J602 [2] from
the reversal motor driver PCB [1].
2) Remove the screw [3], and detach the
pre-reversal sensor base [4].
[4]
F03-201-01
3) Remove the screw [5], and detach the
cover [6]; then, remove the two screws
[7], and detach the reversal motor unit
[8].
[8]
[5]
[6]
[7]
[7]
F03-201-02
2.1.2 Removing the Separation Motor Unit
1) Remove the screw [1], and detach the
separation motor sensor support plate
[2].
[1]
[2]
F03-201-03
COPYRIGHT © 2001 CANON INC. 2000 2000 2000 2000 CANON DADF-J1 REV.0 MAR.2001
3-7
CHAPTER 3 MECHANICAL SYSTEMS
2) Disconnect the two connectors [3].
[3]
F03-201-04
3) Remove the three mounting screws [4],
and detach the separation motor unit
[5].
[4]
[5]
[4]
F03-201-05
2.1.3 Removing the Pickup Motor
Unit
1) Remove the separation motor unit.
2) Remove the two screws [1], and detach
the belt motor driver PCB unit [2].
[1]
[2]
F03-201-06
3-8
COPYRIGHT © 2001 CANON INC. 2000 2000 2000 2000 CANON DADF-J1 REV.0 MAR.2001
CHAPTER 3 MECHANICAL SYSTEMS
3) Disconnect the connector [4] of the
pickup motor unit [3] and the connector
[7] of the open/closed sensor (rear) [5].
[5]
[3]
[6]
[4]
F03-201-07
4) Remove the two mounting screws [7],
and detach the pickup motor unit [3].
[7]
[3]
F03-201-08
2.1.4 Removing the Belt Motor Unit
[2]
1) Remove the separation motor unit and
the pickup motor unit.
2) Disconnect the connector J72 [2] of the
belt motor driver PCB [1].
[1]
F03-201-09
COPYRIGHT © 2001 CANON INC. 2000 2000 2000 2000 CANON DADF-J1 REV.0 MAR.2001
3-9
CHAPTER 3 MECHANICAL SYSTEMS
3) Remove the three screws [3], and detach
the belt motor unit [4].
[3]
[4]
[3]
F03-201-10
2.1.5 Removing the Delivery Motor
[2]
1) Remove the main cover.
2) Remove the screw [1] from the bottom
of the DADF, and remove the bearing
[2] and the rod [3].
[3] [1]
F03-201-11
3) Remove the four screws [4], and detach
the hinge (right) [5].
[4]
[5]
[4]
[4]
[4]
F03-201-12
3-10
COPYRIGHT © 2001 CANON INC. 2000 2000 2000 2000 CANON DADF-J1 REV.0 MAR.2001
CHAPTER 3 MECHANICAL SYSTEMS
4) Remove the screw [6], and detach the
delivery motor sensor [7].
[6]
[7]
F03-201-13
5) Remove the grip ring [8], and detach
the lock plate [9].
6) Remove the E-ring [10], and remove the
belt retaining washer [11] and the gear
[12].
7) Remove the screw [13], and detach the
delivery motor [14].
[14]
[9]
[13]
[8]
If you have replaced the delivery motor, be sure to adjust the
sensor and the delivery motor.
[12]
[11]
[10]
F03-201-14
COPYRIGHT © 2001 CANON INC. 2000 2000 2000 2000 CANON DADF-J1 REV.0 MAR.2001
3-11
CHAPTER 3 MECHANICAL SYSTEMS
3 Feeding System
3.1.1 Removing the Delivery Roller
1) Remove the body front cover. (F03-10104b,c)
2) Remove the main cover. (F03-10105a,b)
3) Remove the E-ring [1], and detach the
solenoid link arm [2].
[1]
[2]
F03-301-01
4) Remove the screw [3], and detach the
delivery guide plate [4].
5) Remove the screw [5], and free the
grounding wire [6] of the static eliminator attached to the delivery guide.
[6]
[5]
[3] [4]
F03-301-02a
6) Remove the three screws [7], and disconnect the connector [8]; then, detach
the solenoid unit [9] from the delivery
assembly front side plate.
[7]
[7]
[8]
[9]
F03-301-02b
3-12
COPYRIGHT © 2001 CANON INC. 2000 2000 2000 2000 CANON DADF-J1 REV.0 MAR.2001
CHAPTER 3 MECHANICAL SYSTEMS
7) Remove the screw [10], and detach the
delivery sensor support plate [11] on the
delivery assembly rear side plate side.
[10]
[11]
F03-301-03
8) Remove the screw [12], and detach the
delivery guide support plate [13] on the
delivery assembly rear side plate side.
[12]
[13]
F03-301-04
9) Remove the screw [14], and detach the
delivery lower guide support plate [15]
on the delivery assembly front plate
side.
10) Remove the E-ring [16] from the delivery assembly front plate side; then, remove the screw [17], and detach the
bushing [18].
[16]
[18]
[17]
[14]
[15]
F03-301-05
COPYRIGHT © 2001 CANON INC. 2000 2000 2000 2000 CANON DADF-J1 REV.0 MAR.2001
3-13
CHAPTER 3 MECHANICAL SYSTEMS
11) Remove the E-ring [19] from the delivery assembly rear side plate side; then,
remove the gear [20] and the parallel
pin [21].
12) Remove the E-ring [22]; then, remove
the screw [23] and the bushing [24].
[24] [22] [23] [21] [19]
[20]
F03-301-06
13) Shift down the delivery lower guide
[25], and slide out the delivery roller
[26] together with the manual feed tray
[27].
[25]
[27]
[26]
F03-301-07
3.1.2 Removing the Pickup Roller
1) Open the upper cover, and insert a
screwdriver from above the hook; then,
remove the two hooks [1].
[1]
[1]
F03-301-08a
3-14
COPYRIGHT © 2001 CANON INC. 2000 2000 2000 2000 CANON DADF-J1 REV.0 MAR.2001
CHAPTER 3 MECHANICAL SYSTEMS
2) Remove pickup assembly cover [2].
[2]
Free the claws,
and detach the cover.
F03-301-08b
3) Remove the resin E-ring [3]; then, remove the roller arm [4], and detach the
pickup roller [5].
[3]
[4]
[5]
F03-301-08c
COPYRIGHT © 2001 CANON INC. 2000 2000 2000 2000 CANON DADF-J1 REV.0 MAR.2001
3-15
CHAPTER 3 MECHANICAL SYSTEMS
3.1.3 Removing the Separation
Roller
1) Remove the pickup assembly cover.
(F03-301-08a)
2) Remove the two screws [1], and detach
the sensor stay [2].
3) Remove the three screws [3], and detach
the three guide plates [5] from the right
stay [4].
[1]
[2]
[1]
[3]
[5]
[3]
[3]
[5]
[4]
[5]
F03-301-09
4) Remove the two screws [6], and detach
the lower guide [7].
[7]
[6]
F03-301-10a
[6]
[7]
F03-301-10b
3-16
COPYRIGHT © 2001 CANON INC. 2000 2000 2000 2000 CANON DADF-J1 REV.0 MAR.2001
CHAPTER 3 MECHANICAL SYSTEMS
5) Remove the grip ring [8] on the front
side plate side, and pull out the clutch
ring [9].
[8]
[9]
F03-301-11
6) Remove the screw [11] of the gear support plate (front) [10]; then, shift the
gear support plate (front) [10] to the left
to pull out the clutch [12] to the front.
[11]
[10]
[12]
F03-301-12
COPYRIGHT © 2001 CANON INC. 2000 2000 2000 2000 CANON DADF-J1 REV.0 MAR.2001
3-17
CHAPTER 3 MECHANICAL SYSTEMS
7) Disconnect the two connectors [13], and
remove the two mounting screws [14];
then, detach the separation unit [15].
[13]
[14]
[15]
F03-301-13a
[15]
[14]
F03-301-13b
8) Remove the E-ring [16], and pull out
the shaft [17].
[16]
[17]
F03-301-14
3-18
COPYRIGHT © 2001 CANON INC. 2000 2000 2000 2000 CANON DADF-J1 REV.0 MAR.2001
CHAPTER 3 MECHANICAL SYSTEMS
9) Remove the grip ring [18] at the front,
and remove the bushing [19].
[19]
[18]
F03-301-15
10) Remove the E-ring [20] and the bushing
[21] at the rear, and detach the rod arm
plate [22].
[22]
[21]
[20]
F03-301-16
11) Remove the E-ring [23] and the oneway gear [24].
[23]
[24]
F03-301-17
COPYRIGHT © 2001 CANON INC. 2000 2000 2000 2000 CANON DADF-J1 REV.0 MAR.2001
3-19
CHAPTER 3 MECHANICAL SYSTEMS
12) Remove the separation roller.
When mounting the one-way
gear, be sure that the protrusion
faces inside.
Protrusion
One-way gear
F03-301-18
3.1.4 Removing the Manual Feed
Registration Roller
[1]
1) Remove the body front cover. (F03-10104b,c)
2) Remove the main cover. (F03-101-05)
3) Remove the three screws [1], and disconnect the connector [2]; then, remove
the solenoid unit [3] from the delivery
assembly front side plate.
[1]
[2]
[3]
F03-301-19
4) Remove the two screws [4], and detach
the manual feed registration sensor PCB
assembly [5].
[4]
[5]
F03-301-20
3-20
COPYRIGHT © 2001 CANON INC. 2000 2000 2000 2000 CANON DADF-J1 REV.0 MAR.2001
CHAPTER 3 MECHANICAL SYSTEMS
5) Remove the grip ring [8] and the bearing [9] from the manual feed registration roller [6]. (delivery assembly front
side plate)
[8]
[7]
[6]
F03-301-21
6) Remove the grip ring [9] of the manual
feed registration roller [6], and remove
the E-ring [11] of the feeding belt roller
shaft [10]; then, remove the gear [12]
and the parallel pin [13]. Thereafter, remove the gear unit [14] and the bushing
[15].
[14]
[15]
[13]
[12]
[6]
[9]
[11]
[10]
F03-301-22
7) Remove the E-ring [14] and the bearing
[15] of the manual feed registration
roller [6] (delivery assembly rear plate);
then, pull out the manual feed registration roller [6].
[15]
[14]
[6]
F03-301-23
COPYRIGHT © 2001 CANON INC. 2000 2000 2000 2000 CANON DADF-J1 REV.0 MAR.2001
3-21
CHAPTER 3 MECHANICAL SYSTEMS
3.1.5 Removing the Feeding (pulloff) Roller
[1]
[2]
1) Remove the mounting screw [2] of the
gear support plate [1] of the pickup
front side plate.
F03-301-24
2) Remove the E-ring [3], washer [4], two
shims [5], gear (black) [6], gear (white)
[7], two shims [5], and spring [8] in sequence.
[8]
[5]
[7]
[6]
[5]
[4]
[3]
F03-301-25
3) Remove the gear support plate of the
front side plate.
4) Remove the E-ring [10], gear [11], parallel pin [12], grip ring [13], and bearing [14] of the feeding (pull-off) roller
[9] (front side plate).
[14]
[13] [12] [9]
[11]
[10]
F03-301-26
3-22
COPYRIGHT © 2001 CANON INC. 2000 2000 2000 2000 CANON DADF-J1 REV.0 MAR.2001
CHAPTER 3 MECHANICAL SYSTEMS
5) Remove the E-ring [15], gear [16], parallel pin [17], E-ring [18], and bearing
[19] of the feeding (pull-off) roller [9]
(rear side plate); then, remove the feeding (pull-off) roller [9].
[18]
[19]
[9]
[17]
[15]
[16]
The gear holds a pin. Take care
not to drop it.
F03-301-27
3.1.6 Removing the Registration
Roller
1) Remove the two screws [1], and detach
the reversing guide [2].
[2]
[1]
When mounting the reversing
guide, do so while forcing it in
the direction of the arrow. If not
mounted properly, it can trigger
jams.
2) Remove the two screws [3], and detach
the registration sensor PCB [4].
Only when mounting it.
[1]
F03-301-28
2) Remove the two screws [3], and detach
the registration sensor PCB [4].
[4]
[3]
[3]
F03-301-29
COPYRIGHT © 2001 CANON INC. 2000 2000 2000 2000 CANON DADF-J1 REV.0 MAR.2001
3-23
CHAPTER 3 MECHANICAL SYSTEMS
When removing the registration
sensor PCB, be sure to disconnect the connector of the cable
connected to it.
Registration sensor PCB
Connector
F03-301-30
3) Remove the grip ring [6] and the bearing [7] of the registration roller [5]
(front side plate).
[5]
[6]
[7]
F03-301-31
[8]
[5]
[9]
[10]
[11]
4) Remove the E-ring [8], gear [9], E-ring
[10], and bearing [11] of the registration
roller [5] (rear side plate).
The gear holds a pin. Take care
not to lose it when removing the
gear.
F03-301-32
3-24
COPYRIGHT © 2001 CANON INC. 2000 2000 2000 2000 CANON DADF-J1 REV.0 MAR.2001
CHAPTER 3 MECHANICAL SYSTEMS
3.1.7 Removing the Separation Belt
1) Remove the two screws, and loosen the
separation unit.
2) Remove the grip ring [1] at the front;
then, remove the clutch ring [2] and the
clutch [3].
[3]
[1]
[2]
F03-301-33
[4]
3) Disconnect the two connectors [4], and
remove the two screws [5]; then, detach
the separation unit [6].
[5]
[6]
F03-301-34a
[6]
[5]
F03-301-34b
COPYRIGHT © 2001 CANON INC. 2000 2000 2000 2000 CANON DADF-J1 REV.0 MAR.2001
3-25
CHAPTER 3 MECHANICAL SYSTEMS
4) Remove the two mounting screws [7],
and detach the separation auxiliary plate
[8].
[8]
[7]
[7]
F03-301-35
5) Loosen the screw [11] on the separation
pressure adjusting lever [10] of the
separation roller [9].
[10]
[9]
[11]
F03-301-36a
When mounting the separation
pressure adjusting lever, be sure
that the lever is set to “Low.”
"High"
"Low"
F03-301-36b
3-26
COPYRIGHT © 2001 CANON INC. 2000 2000 2000 2000 CANON DADF-J1 REV.0 MAR.2001
CHAPTER 3 MECHANICAL SYSTEMS
6) Loosen the screw [13] on the thrust
stopper [12] of the separation roller [9].
[9]
[12]
[13]
F03-301-36c
7) Remove the E-ring [14] and the gear
[15] at the rear of the separation roller
[9].
[14]
[15]
[9]
F03-301-37
8) Remove the E-ring at the rear of the
separation roller [9] to detach the separation belt [17].
[9]
[16]
[17]
F03-301-38
COPYRIGHT © 2001 CANON INC. 2000 2000 2000 2000 CANON DADF-J1 REV.0 MAR.2001
3-27
CHAPTER 3 MECHANICAL SYSTEMS
3.1.8 Removing the Reversing
Roller
1) Remove the reversal motor unit. (F03201-01)
2) Remove the two screws [1] of the
pickup front side plate, and disconnect
the connector [2]; then, detach the prereversal solenoid unit [3].
[1](M3 x 6)
[2]
[3]
[1](M3 x 4)
F03-301-39
[5]
[4]
3) Remove the two screws [4], and detach
the reversing guide [5].
When mounting the reversing
guide, do so while forcing it in
the direction of the arrow. If not
properly mounted, it can trigger
jams.
Only when mounting it.
[4]
F03-301-40
4) Remove the E-ring [8], gear [8], and
parallel pin [9] on the rear side plate
side of the reversing roller [6] (2 pc.).
[6]
[7]
[8]
The gear holds a pin. Take care
not to lose it when removing the
gear.
[9]
[6]
[7]
[8]
F03-301-41
3-28
COPYRIGHT © 2001 CANON INC. 2000 2000 2000 2000 CANON DADF-J1 REV.0 MAR.2001
CHAPTER 3 MECHANICAL SYSTEMS
5) Remove the grip ring [14] and the bearing [15] on the front side plate side of
the reversing roller [6] (2 pc.), and remove the E-ring [16] and the bearing
[17] on the rear side plate side.
6) Pull out the reversing roller [6].
[14]
[6]
[15]
[14]
[15]
[6]
F03-301-42a
[6]
[6]
[16]
[16]
[17]
[17]
F03-301-42b
COPYRIGHT © 2001 CANON INC. 2000 2000 2000 2000 CANON DADF-J1 REV.0 MAR.2001
3-29
CHAPTER 3 MECHANICAL SYSTEMS
4 Replacing the Feeding
Belt
4.1.1 Removing the Feeding Belt
1) Remove the two screws [1], and detach
the front lower cover [2].
[1]
[2]
[1]
F03-401-01
2) Turn the releasing lever [3] clockwise to
decrease the tension of the belt.
[3]
F03-401-02
3-30
COPYRIGHT © 2001 CANON INC. 2000 2000 2000 2000 CANON DADF-J1 REV.0 MAR.2001
CHAPTER 3 MECHANICAL SYSTEMS
3) Remove the mounting screws [5] (2 pc.
each), and open the left/right arm [4].
[4]
[5]
F03-401-03a
[4]
[5]
F03-401-03b
4) Detach the feeding belt [6].
[6]
F03-401-04
COPYRIGHT © 2001 CANON INC. 2000 2000 2000 2000 CANON DADF-J1 REV.0 MAR.2001
3-31
CHAPTER 3 MECHANICAL SYSTEMS
4.1.2 Attaching the Feeding Belt
1) Insert a screwdriver between the DADF
and the feeding assembly as shown to
increase the gap.
2) Fit in the feeding belt, and pull out the
screwdriver when the belt has come into
contact with it; then, push in the belt.
F03-401-05
3-32
COPYRIGHT © 2001 CANON INC. 2000 2000 2000 2000 CANON DADF-J1 REV.0 MAR.2001
CHAPTER 4
MAINTENANCE AND INSPECTION
COPYRIGHT© 2001 CANON INC.
CANON DADF-J1 REV.0 MAR. 2001
CHAPTER 4 MAINTENANCE AND INSPECTION
1 Periodically Replaced Parts
The DADF does not have parts that need to be replaced on a periodical basis.
2 Durables
Some parts of the DADF may require replacement once or more over the period of product warranty because of wear or damage. Replace them as needed by referring to the following guide, in which the life of each part is expressed in terms of the number of originals
(may be checked in the copier’s service mode).
As of February 2001
No.
1
2
3
4
Part name
Feeding belt
Pickup roller
Feeding
roller*
Separation
belt*
Part No.
FB5-9541
FB4-7640
FG6-7723
(separation unit)
FG6-7725
(feeding roller unit)
FG6-7723
(separation unit)
FF6-7724
(separation belt)
Q’ty Estimated life
1
200,000 sheets
2
250,000 sheets
1
250,000 sheets
1
1
Remarks
Actual number of sheets
The actual number of originals
handled may be checked in the
copier’s service mode (the sum of
L-FEED and S-FEED under
COPIER>COUNTER>Feeder).
250,000 sheets
Display
I/O
Adjust
Function
Option
11
00000061
L-FEED
00000123
S-FEED
00001763
TTL-MF
00000001
Test
< READY >
< 1/1 >
FEED
+/-
OK
*It is recommended that replacement be on a separation unit basis (FG6-7723). However, they (FG67725, FE6-7724) may be replaced on their own.
T04-201-01
The above values are estimates only, and are subject to change based on future data.
COPYRIGHT © 2001 CANON INC. 2000 2000 2000 2000 CANON DADF-J1 REV.0 MAR.2001
4-1
CHAPTER 4 MAINTENANCE AND INSPECTION
3 Scheduled Servicing Chart
Do not use solvents or oils not indicated.
: Clean
Ref.
1
2
3
4
5
6
7
8
9
10
11
12
13
14
15
16
17
18
19
20
: Replace
: Lubricate
: Adjust
Interval
every 100,000
every 200,000
or 6 mo
or 1 yr
Part name
: Inspect
Remarks
All in reference to the
copier are in terms of
the actual number of
sheets used. The actual
number of sheets may
be checked in the
copier’s service mode.
Copyboard glass
Original feeding belt
Original training edge sensor
(S7)
Pre-last original sensor (S7)
Original sensor (S6)
Separation paper sensor (s4)
Skew paper sensor (S5)
Pre-registration roller paper
sensor (S2)
Post-registration roller paper
sensor (S3)
Reversal paper sensor (S1)
Manual registration roller paper sensor (S9)
Pickup roller
Feeding roller
Separation belt
Pull-off roller
Registration roller
Reversing roller A, member
Reversing roller B, member
Manual feed roller, member
Delivery roller, member
Display
I/O
Adjust
Function
< 1/1 >
FEED
00000061
L-FEED
00000123
S-FEED
00001763
TTL-MF
00000001
Option
Test
< READY >
+/-
OK
T04-301-01
4-2
COPYRIGHT © 2001 CANON INC. 2000 2000 2000 2000 CANON DADF-J1 REV.0 MAR.2001
CHAPTER 4 MAINTENANCE AND INSPECTION
[4] Pre-last original sensor (S8)
[5] Original sensor (S6)
[6] Separation
paper sensor (S4)
[3] Original training edge sensor (S7)
[11] Manual registration
roller paper sensor
(S9)
[7] Skew paper sensor (S5)
[8] Pre-registration roller
paper sensor (S2)
[9] Post-registration roller
paper sensor (S3)
[10] Reversal paper sensor (S1)
[13] Feeding roller
[14] Separation belt [12] Pickup roller
[15] Pull-off roller
[2] Original feeding belt
[16] Registration roller
[1] Copyboard glass
[20] Delivery roller,
member
[18] Reversing roller B,
member
[17] Reversing roller A, member
[19] Manual feed roller, member
F04-301-01
COPYRIGHT © 2001 CANON INC. 2000 2000 2000 2000 CANON DADF-J1 REV.0 MAR.2001
4-3
CHAPTER 4 MAINTENANCE AND INSPECTION
4 Cleaning
4.1 Copyboard Glass
1) Wipe the copyboard glass of the copier
with a cloth moistened with alcohol.
F04-401-01
4.2 Belt Assembly
1) Dry wipe the original feeding belt while
moving it in the direction of the arrow.
If the dirt is excessive, wipe it with a
cloth moistened with a solution of mild
detergent; then, dry wipe it.
F04-401-02
4-4
COPYRIGHT © 2001 CANON INC. 2000 2000 2000 2000 CANON DADF-J1 REV.0 MAR.2001
CHAPTER 4 MAINTENANCE AND INSPECTION
4.3 Sensors
4.3.1 Pre-Last Original Paper Sensor
1) Clean the sensor window in the original
tray using a blower brush.
F04-401-03
4.3.2 Original Trailing Edge Sensor
1) Clean the sensor widow in the original
tray using a blower brush.
F04-401-04
4.3.3 Original Sensor
1) Remove the pickup assembly cover.
(F03-301-08a,08b)
2) Clean the light-receiving area of the
sensor stay and the light-emitting area
at the rear of the guide plate using a
blower brush.
F04-401-05
COPYRIGHT © 2001 CANON INC. 2000 2000 2000 2000 CANON DADF-J1 REV.0 MAR.2001
4-5
CHAPTER 4 MAINTENANCE AND INSPECTION
4.3.4 Separation Paper/Skew Paper
Sensor
Do not use a solvent (alcoholfamily or ketone family) to
clean the prism face. It is made
of acrylic resin, and contact
with solvent can discolor it, adversely affecting its operation.
F04-401-06a
1) Open the pickup assembly upper cover.
2) Open the registration guide, and put the
blower brush between the separation
stay and the separation guide to clean.
(The one to the front is the separation
paper sensor, while the one at the rear is
the skew paper sensor.)
Surface to clean
(back)
Surface to clean
(face)
F04-401-06b
4.3.5 Pre-Registration Roller Paper
Sensor
Prism
Do not use a solvent (alcoholfamily or ketone-family) to
clean the prism face. It is made
of acrylic resin, and contact
with solvent can discolor it, adversely affecting its operation.
1) Remove the reversing guide.
(F03-301-28)
2) Clean the face of the prism behind the
reversing guide.
Surface to clean
(back)
F04-401-07a
4-6
COPYRIGHT © 2001 CANON INC. 2000 2000 2000 2000 CANON DADF-J1 REV.0 MAR.2001
CHAPTER 4 MAINTENANCE AND INSPECTION
3) Remove the registration sensor PCB.
(F03-301-29)
4) Clean the two filter surfaces of the sensor.
Surfaces to clean
F04-401-07b
4.3.6 Post-Registration Roller Paper
Sensor
Do not use a solvent (alcoholfamily or ketone-family) to
clean the prism face. It is made
of acrylic resin, and contact
with solvent can discolor it, adversely affecting its operation.
Surfaces
to clean
F04-401-08
1) Open the pickup upper cover.
2) Remove the reversing guide. (F03-30128)
3) Clear the surface of the prism of the
post-registration roller paper sensor.
[1]
[2]
[1]
4.3.7 Reversal Paper Sensor
1) Remove the reversing guide. (F03-30128)
2) Remove the two screws [1], and detach
the reversal sensor [2].
F04-401-09a
COPYRIGHT © 2001 CANON INC. 2000 2000 2000 2000 CANON DADF-J1 REV.0 MAR.2001
4-7
CHAPTER 4 MAINTENANCE AND INSPECTION
3) lean the filter face of the reversal sensor
[2] using a blower brush.
[2]
F04-401-09b
4) Open the DADF fully. (F03-101-03)
5) While opening the pickup middle guide
found to the left of the feeding belt, aim
a blower brush against the prism of the
reflecting face of the reversal sensor in
view in the rear to clean.
F04-401-09c
4-8
COPYRIGHT © 2001 CANON INC. 2000 2000 2000 2000 CANON DADF-J1 REV.0 MAR.2001
CHAPTER 4 MAINTENANCE AND INSPECTION
4.3.8 Manual Feed Registration
Roller Paper Sensor
1) Remove the body front cover.
2) Remove the main cover.
3) Aim a blower brush against the detecting hole of the registration sensor on the
delivery upper guide to clean.
F04-401-10
4.3.9 Pickup Roller
1) Open the pickup assembly upper cover.
2) Remove the pickup cover.
3) Clean the surface of the roller using
lint-free paper or cloth moistened with
alcohol.
F04-401-11
COPYRIGHT © 2001 CANON INC. 2000 2000 2000 2000 CANON DADF-J1 REV.0 MAR.2001
4-9
CHAPTER 4 MAINTENANCE AND INSPECTION
4.3.10 Separation Belt/Feeding
Roller
1) Obtain a single sheet of A4 or LTR copy
paper.
2) Remove the ADF controller cover, and
set the DIP switch (SW1) on the ADF
controller PCB as indicated.
3) Press the push switch (SW2) on the
ADF controller PCB.
• The separation assembly will start.
4) Moisten t the copy paper obtained in
step 1) with alcohol.
5) Keep the copy paper against the pickup
slot to clean.
The pull-off roller is also driven.
Hold the copy paper so that it
will not be drawn to the pull-off
roller: in the case of A4, as
shown in F04-401-13a; in the
case of LTR, as shown in F04401-13b.
F04-401-12
Rail
Slide guide
Against the edge of
the paper.
F04-401-13a
Against
the edge of the paper.
Slide guide
Rail
F04-401-13b
4-10
COPYRIGHT © 2001 CANON INC. 2000 2000 2000 2000 CANON DADF-J1 REV.0 MAR.2001
CHAPTER 4 MAINTENANCE AND INSPECTION
6) At the end of cleaning work, press the
push switch (SW2) once again.
• The separation assembly will stop.
4.3.11 Pull-Off Roller
1) Open the upper cover, and open the
feeding guide.
2) Remove the ADF controller cover, and
set the DIP switch (SW1) on the ADF
controller PCB as indicated.
3) Press the push switch (SW2) on the
ADF controller PCB.
• The separation assembly will start.
4) Clean it with lint-free paper moistened
with alcohol.
F04-401-14
F04-401-15
4.3.12 Registration Roller
1) Open the upper cover, and open the
feeding guide.
2) Remove the reversing guide.
3) Remove the ADF controller cover, and
set the DIP switch (SW1) on the ADF
controller PCB as indicated.
4) Press the push switch (SW2) on the
ADF controller PCB.
• The reversing assembly will start.
5) Clean it with lint-free paper moistened
with alcohol.
F04-401-16
F04-401-17
COPYRIGHT © 2001 CANON INC. 2000 2000 2000 2000 CANON DADF-J1 REV.0 MAR.2001
4-11
CHAPTER 4 MAINTENANCE AND INSPECTION
4.3.13 Reversing Roller A, Support
Member
1) Open the pickup assembly upper cover.
2) Clean the reversing roller A [1] and the
support member [2] with lint-free paper
or a cloth moistened with alcohol.
[1]
[2]
F04-401-18
4.3.14 Reversing Roller B, Support
Member
[1]
[2]
1) Open the pickup assembly upper cover.
2) Clean the reversing roller B [1] and the
support member [2] with lint-free paper
or a cloth moistened with alcohol.
F04-401-19
4-12
COPYRIGHT © 2001 CANON INC. 2000 2000 2000 2000 CANON DADF-J1 REV.0 MAR.2001
CHAPTER 4 MAINTENANCE AND INSPECTION
4.3.15 Manual Feed Roller, Support
Member
1) Open the manual feed tray.
2) Clean the manual feed (delivery) roller
[1] and the support member [2] with
lint-free paper or a cloth moistened with
alcohol.
[2]
[1]
F04-401-20
4.3.16 Delivery Roller, Support
Member
[1]
1) With the manual feed tray closed, clean
the delivery (manual feed) roller [1] and
the support member [2] with lint-free
paper or a cloth moistened with alcohol.
[2]
F04-401-21
4.3.17 Manual Feed Registration
Roller, Support Member
1) Remove the main cover.
2) Remove the two screws [1], and the detach the manual feed registration sensor
PCB [2].
[1]
[2]
F04-401-22
COPYRIGHT © 2001 CANON INC. 2000 2000 2000 2000 CANON DADF-J1 REV.0 MAR.2001
4-13
CHAPTER 4 MAINTENANCE AND INSPECTION
3) Clean the manual feed registration roller
[3] with lint-free paper or a cloth
mounted with alcohol.
[3]
F04-401-23a
4) Shift up the DADF, and open the delivery lower guide [4]; then, clean the
manual feed registration roller member
[5] with lint-free paper or a cloth moistened with alcohol.
[4]
[5]
F04-410-23b
4-14
COPYRIGHT © 2001 CANON INC. 2000 2000 2000 2000 CANON DADF-J1 REV.0 MAR.2001
CHAPTER 5
TROUBLESHOOTING
COPYRIGHT© 2001 CANON INC.
CANON DADF-J1 REV.0 MAR. 2001
CHAPTER 5 TROUBLESHOOTING
1 Standards and Adjustments
1.1 Basic Adjustments
The basic adjustments of the DADF consist of the following, which must be performed in sequence:
[1] ADF height adjustment
[2] ADF right angel adjustment
[3] Skew correction
[4] Horizontal adjustment
[5] Original stop position adjustment
Lower front cover
1.1.1 ADF Height Adjustment
1) Remove the two screws, and detach the
lower front cover.
Screw
Screw
F05-101-01
2) Make adjustments by loosening the two
fixed screws [5] on the magnet catch so
that the left and right rubber feet are in
contact with the base when the DADF is
closed.
3) After the adjustment, tighten the fixing
screws on the magnet catch, and mount
the front cover.
[3]
[5] [4]
[5]
(left)
[5] [4] [5]
[3]
(right)
F05-101-02
COPYRIGHT © 2001 CANON INC. 2000 2000 2000 2000 CANON DADF-J1 REV.0 MAR.2001
5-1
CHAPTER 5 TROUBLESHOOTING
1.1.2 ADF Right Angle Adjustment
10mm
This adjustment is to adjust the right
angle made by the copier’s scanner and the
DADF’s original feed path.
1) Using an A4 or LTR sheet of copy paper, prepare a test chart as shown.
Right angle
10mm
10mm
10mm
F05-101-03
2) Place the test chart in the original tray,
and make a Direct copy in stream reading mode.
Test chart
Be sure to use stream reading
mode.
F05-101-04
5-2
COPYRIGHT © 2001 CANON INC. 2000 2000 2000 2000 CANON DADF-J1 REV.0 MAR.2001
CHAPTER 5 TROUBLESHOOTING
3) Place a separate sheet of copy paper
over the output obtained in step 2) to
check the right angel.
A<1 mm
B<1 mm
A
Feeding
direction
Separate copy
paper
Output obtained in step 2)
B
Feeding
direction
Separate copy
paper
Output obtained in step 2)
F05-101-05
4) If the value is not as indicated, loosen
the fixing nut found at the rear of the
right hinge unit; then, make adjustments
by turning the adjusting screws.
When turning the adjusting
screw, be sure to keep the
DADF open.
Adjusting screw
Fixing nut
5) Tighten the fixing nut to secure the adjusting screw.
If A>0, turn the adjusting screw counterclockwise.
If B>0, turn the adjusting screw clockwise.
F05-101-06
COPYRIGHT © 2001 CANON INC. 2000 2000 2000 2000 CANON DADF-J1 REV.0 MAR.2001
5-3
CHAPTER 5 TROUBLESHOOTING
1.1.3 Correcting the Skew
The skew must be removed for the following three:
[1] Pickup from the original tray
[2] Pickup from the manual feed tray
[3] Reversal for double-sided originals
ADF controller cover
a. Pickup from the Original Tray
1) Remove the screw, and detach the ADF
controller cover.
Screw
F05-101-07
2) Set the DIP switch (SW1) on the ADF
controller PCB as indicated.
F05-101-08
3) Place a single sheet of A4 or LTR copy
paper in the original tray.
Copy paper
F05-101-09
5-4
COPYRIGHT © 2001 CANON INC. 2000 2000 2000 2000 CANON DADF-J1 REV.0 MAR.2001
CHAPTER 5 TROUBLESHOOTING
4) Press the push switch (SW2) on the
ADF controller PCB once.
• The original will be picked up and
stopped on the copyboard glass.
J1
FU2
J14
J2
J13
J4
IC1
FU1
J5
J3
J12
SW1
SW4SW3SW2
LED2
J6
J7
J8
J9
J10
J11
SW2
F05-101-10
5) Open the DADF slowly, and check to
make sure that A and B indicated in the
figure are 2 mm or less.
Close the DADF, and press the push
switch (SW2) on the ADF controller
PCB once.
• The original will be delivered to the
delivery tray.
Original
A
B
BA
2mm
2mm
F05-101-11
COPYRIGHT © 2001 CANON INC. 2000 2000 2000 2000 CANON DADF-J1 REV.0 MAR.2001
5-5
CHAPTER 5 TROUBLESHOOTING
If the Value Is Not As Indicated
Adjust the position of the registration
roller.
1) Remove the four screws, and detach the
front cover.
Screw
Front cover
F05-101-12a
Front cover
Screw
F05-101-12b
Front cover
Screw
Screw
F05-101-12c
5-6
COPYRIGHT © 2001 CANON INC. 2000 2000 2000 2000 CANON DADF-J1 REV.0 MAR.2001
CHAPTER 5 TROUBLESHOOTING
2) Open the upper cover, and loosen the
fixing screw on the registration roller
mounting plate; then, slide it up/down
to adjust the mounting angle of the registration roller.
Registration roller mounting plate
Upper cover
Screw
If A>0, slide the mounting plate down.
If B>0, slide the mounting plate up.
F05-101-13
3) At the end of adjustment, tighten the
fixing screw of the registration roller
mounting plate.
4) Set the DIP switch (SW1) on the ADF
controller PCB back to its initial setting,
and mount the ADF controller cover.
b. Pickup from the Manual Feed Tray
1) Remove the screw, and detach the ADF
controller cover.
2) Set the DIP switch (SW1) on the ADF
controller PCB as follows.
ADF controller cover
Screw
F05-101-14
F05-101-15
COPYRIGHT © 2001 CANON INC. 2000 2000 2000 2000 CANON DADF-J1 REV.0 MAR.2001
5-7
CHAPTER 5 TROUBLESHOOTING
3) Open the manual feed tray, and place a
single sheet of A4 or LTR copy paper.
• Be sure to butt the copy paper against
the rear.
Manual feed tray
F05-101-16
Butted.
Manual feed tray
Copy paper
F05-101-17
4) Press the push switch (SW2) on the
ADF controller PCB once.
• The original will be picked up and
stopped on the copyboard glass.
J1
FU2
J14
J2
J13
J4
IC1
FU1
J5
J3
J12
SW1
SW4SW3SW2
LED2
J6
J7
J8
J9
J10
J11
SW2
F05-101-18
5-8
COPYRIGHT © 2001 CANON INC. 2000 2000 2000 2000 CANON DADF-J1 REV.0 MAR.2001
CHAPTER 5 TROUBLESHOOTING
5) Open the DADF slowly, and check to
make sure that A and B indicated in the
Figure is 2 mm or less.
Close the DADF, and press the push
switch (SW2) on the ADF controller
once.
• The original will be delivered to the
delivery tray.
Original
A
B
BA
2mm
2mm
F05-101-19a
J1
FU2
J14
J2
J13
J4
IC1
FU1
J5
J3
J12
SW1
SW4SW3SW2
LED2
J6
J7
J8
J9
J10
J11
SW2
F05-101-19b
COPYRIGHT © 2001 CANON INC. 2000 2000 2000 2000 CANON DADF-J1 REV.0 MAR.2001
5-9
CHAPTER 5 TROUBLESHOOTING
If the Value Is Not As Indicated
Adjust the position of the manual feed
registration roller.
1) Remove the four screws, and detach the
front cover.
Screw
Front cover
F05-101-20a
Front cover
Screw
F05-101-20b
Front cover
Screw
Screw
F05-101-20c
5-10
COPYRIGHT © 2001 CANON INC. 2000 2000 2000 2000 CANON DADF-J1 REV.0 MAR.2001
CHAPTER 5 TROUBLESHOOTING
2) Loosen the fixing screw on the manual
feed registration roller mounting plate,
and slide it to the left and the right to
adjust the position of the registration
roller.
3) At the end of the adjustment, tighten the
fixing screw on the manual feed registration roller mounting plate.
4) Set the DIP switch (SW1) on the ADF
controller PCB back to its initial setting,
and mount the ADF controller cover.
Screw
Manual feed registration roller
mounting plate
If A>0, slide the mounting plate to the right.
If B>0, slide the mounting plate to the left.
F05-101-21
c. Reversal for Double-Sided Originals
1) Remove the screw, and detach the ADF
controller cover.
2) Set the DIP switch (SW1) on the ADF
controller PCB as indicated.
ADF controller cover
Screw
F05-101-22
F05-101-23
COPYRIGHT © 2001 CANON INC. 2000 2000 2000 2000 CANON DADF-J1 REV.0 MAR.2001
5-11
CHAPTER 5 TROUBLESHOOTING
3) Place a single sheet of A4 or LTR copy
paper in the original tray.
Copy paper
F05-101-24
4) Press the push switch (SW2) on the
ADF controller PCB twice.
• A single press on the push switch
(SW2) causes the original to be picked
up and stopped on the copyboard
glass. (CW rotation)
Another press will reverse the original
and stop it on the copyboard glass.
J1
FU2
J14
J2
J13
J4
IC1
FU1
J5
J3
J12
SW1
SW4SW3SW2
LED2
J6
J7
J8
J9
J10
J11
SW2
F05-101-25
5-12
COPYRIGHT © 2001 CANON INC. 2000 2000 2000 2000 CANON DADF-J1 REV.0 MAR.2001
CHAPTER 5 TROUBLESHOOTING
5) Open the DADF slowly, and check to
make sure that A and B indicated in the
figure are 2 mm or less.
Close the DADF, and press the push
switch (SW2) on the ADF controller
PCB once.
• The original will be delivered to the
delivery tray.
Original
A
B
BA
2mm
2mm
F05-101-26
J1
FU2
J14
J2
J13
J4
IC1
FU1
J5
J3
J12
SW1
SW4SW3SW2
LED2
J6
J7
J8
J9
J10
J11
SW2
F05-101-27
COPYRIGHT © 2001 CANON INC. 2000 2000 2000 2000 CANON DADF-J1 REV.0 MAR.2001
5-13
CHAPTER 5 TROUBLESHOOTING
If the Value Is Not As Indicated
If the value is not as indicated, adjust the
position of the registration roller.
1) Remove the four screws, and detach the
front cover.
Screw
Front cover
F05-101-28a
Front cover
Screw
F05-101-28b
Front cover
Screw
Screw
F05-101-28c
5-14
COPYRIGHT © 2001 CANON INC. 2000 2000 2000 2000 CANON DADF-J1 REV.0 MAR.2001
CHAPTER 5 TROUBLESHOOTING
2) Loosen the fixing screw on the reversal
registration roller mounting plate, and
slide it to the left and the right to adjust
the mounting angle of the registration
roller.
3) At the end of adjustment, tighten the
fixing screw on the reversal registration
roller mounting plate.
4) Set the DIP switch (SW1) on the ADF
controller PCB back to its initial setting,
and mount the ADF controller cover.
Screw
Reversal registration roller
mounting plate
If A>0, slide the mounting plate to the left.
If B>0, slide the mounting plate to the right.
F05-101-29
1.1.4 Horizontal Registration Adjustment
Horizontal registration adjustment is
made for the following two:
[1] Pickup from the original tray
[2] Pick up from the manual feed tray
a. Pickup from the Original Tray
1) Remove the screw, and detach the ADF
controller cover.
ADF controller cover
Screw
F05-101-30
2) Set the DIP switch (SW1) on the ADF
controller PCB as indicated.
F05-101-31
COPYRIGHT © 2001 CANON INC. 2000 2000 2000 2000 CANON DADF-J1 REV.0 MAR.2001
5-15
CHAPTER 5 TROUBLESHOOTING
3) Place a single sheet of A4 or LTR copy
paper in the original tray.
Copy paper
F05-101-32
4) Press the push switch (SW2) on the
ADF controller PCB once.
• A single press on the push switch
(SW2) causes the original to be picked
up and stopped on the copyboard
glass.
J1
FU2
J14
J2
J13
J4
IC1
FU1
J5
J3
J12
SW1
SW4SW3SW2
LED2
J6
J7
J8
J9
J10
J11
SW2
5) Open the ADF slowly, and check to
make sure that C shown in the figure is
as indicated.
Original size
A4
LTR
C
F05-101-33
Value of C
03.1±1mm
11.9±1mm
T05-101-01
Original
F05-101-34
5-16
COPYRIGHT © 2001 CANON INC. 2000 2000 2000 2000 CANON DADF-J1 REV.0 MAR.2001
CHAPTER 5 TROUBLESHOOTING
6) Close the DADF, and press the push
switch (SW2) on the ADF controller
PCB once.
• The original will be delivered to the
delivery tray.
J1
FU2
J14
J2
J13
J4
IC1
FU1
J5
J12
SW1
J3
SW4SW3SW2
LED2
J6
J7
J8
J9
J10
J11
SW2
F05-101-35
If the Value Is Not As Indicated
If the value is not as indicated, adjust the
position of the original tray.
1) Loosen the tray fixing screw, and adjust
the position of the original tray.
Screw
Screw
Original tray
If C>2.4 mm, shift the original tray toward the
rear.
If C<2.4 mm, shift the original tray toward the
front.
F05-101-36
2) At the end of the adjustment, loosen the
original tray fixing screw.
3) Set the DIP switch (SW1) on the ADF
controller PCB back to its initial setting,
and mount the ADF controller cover.
COPYRIGHT © 2001 CANON INC. 2000 2000 2000 2000 CANON DADF-J1 REV.0 MAR.2001
5-17
CHAPTER 5 TROUBLESHOOTING
b. Manual Feed Tray Pickup
1) Remove the screw, and detach the ADF
controller cover.
2) Set the DIP switch (SW1) on the ADF
controller PCB as indicated.
ADF controller cover
Screw
F05-101-37
F05-101-38
3) Open the manual feed tray, and place a
single sheet of A4 or LTR copy paper.
• Be sure to butt the copy paper against
the rear.
Manual feed tray
F05-101-39
Butted.
Manual feed tray
Copy paper
F05-101-40
5-18
COPYRIGHT © 2001 CANON INC. 2000 2000 2000 2000 CANON DADF-J1 REV.0 MAR.2001
CHAPTER 5 TROUBLESHOOTING
4) Press the push switch (SW2) on the
ADF controller PCB once.
• A single press on the push switch
(SW2) causes the original to be picked
up and sopped on the copyboard glass.
J1
FU2
J14
J2
J13
J4
IC1
FU1
J5
J3
J12
SW1
SW4SW3SW2
LED2
J6
J7
J8
J9
J10
J11
SW2
5) Open the DADF slowly, and check to
make sure that C shown is as indicated.
Original size
A4
LTR
C
F05-101-41
Value of C
03.1±1mm
11.9±1mm
T05-101-02
Close the DADF, and press the push
switch (SW2) on the ADF controller PCB
once.
• The original will be delivered to the
delivery tray.
Original
F05-101-42
COPYRIGHT © 2001 CANON INC. 2000 2000 2000 2000 CANON DADF-J1 REV.0 MAR.2001
5-19
CHAPTER 5 TROUBLESHOOTING
If the Value Is Not As Indicated
If the value is not as indicated, adjust the
position of the manual feed tray.
1) Loosen the manual feed tray fixing
screw, and adjust the position of the
manual feed tray.
2) At the end of adjustment, tighten the
manual feed tray fixing screw.
3) Set the DIP switch (SW1) on the ADF
controller PCB back to its initial setting,
and mount the ADF controller cover.
Screw
Manual feed tray
If C>3.1 mm for A4 or 11.9 mm for LTR, shift
the manual feed tray toward the rear.
If C<3.1 mm for A4 or 11.9 mm for LTR, shift
the manual feed tray toward the front.
F05-101-43
1.1.5 Original Stop Position Adjustment
Original stop position adjustment is made
for the following two:
[1] Pickup from the original tray
[2] Pickup from the manual feed tray
ADF controller cover
a. Original Tray Pickup
1) Remove the screw, and detach the ADF
controller cover.
2) Set the DIP switch (SW10) on the ADF
controller PCB as indicated.
Screw
F05-101-44
F05-101-45
5-20
COPYRIGHT © 2001 CANON INC. 2000 2000 2000 2000 CANON DADF-J1 REV.0 MAR.2001
CHAPTER 5 TROUBLESHOOTING
3) Place a singe sheet of A4 or LTR copy
paper in the original tray.
Copy paper
F05-101-46
4) Press the push switch (SW2) on the
ADF controller PCB once.
• A single press on the push switch
(SW2) causes the original to be picked
up and stopped on the copyboard
glass.
J1
FU2
J14
J2
J13
J4
IC1
FU1
J5
J3
J12
SW1
SW4SW3SW2
LED2
J6
J7
J8
J9
J10
J11
SW2
F05-101-47
5) Open the DADF slowly, and check to
make sure that D indicated is 11±1 mm.
Then, close the DADF slowly.
Original
D
D=11±1mm
F05-101-48
COPYRIGHT © 2001 CANON INC. 2000 2000 2000 2000 CANON DADF-J1 REV.0 MAR.2001
5-21
CHAPTER 5 TROUBLESHOOTING
6) To adjust the original stop position, use
the push switches SW3 and SW4 on the
ADF controller PCB.
A single press on each switch will shift
the original stop position by a distance
of 0.5 mm. When the correct stop position is attained, press the push switch
(SW2).
• The original will be delivered, and the
new position will be stored in memory.
Switch
SW3
SW4
J1
FU2
J14
J2
J13
J4
IC1
FU1
J5
J3
J12
SW1
SW4SW3SW2
LED2
J6
J7
J8
J9
J10
J11
SW2
SW3
SW4
Direction of shift
Right
Left
F05-101-49
T05-101-03
Holding down on the push
switch will not cause more than
a single shift.
EX
If the copy paper is stopped 12 mm from
the copyboard glass,
Close the DADF slowly leaving the copy
paper on the copyboard glass.
To shift the stop position 1 mm to the left,
the following is true:
1 0.5 (adjustment interval) = 2
Hence, press the push switch SW4 twice,
and then press the push switch SW2.
• The copy paper will be delivered, and
the new setting will be stored in memory.
5-22
Original
SW4
SW3
F05-101-50
COPYRIGHT © 2001 CANON INC. 2000 2000 2000 2000 CANON DADF-J1 REV.0 MAR.2001
CHAPTER 5 TROUBLESHOOTING
b. Pickup from the Manual Feed Tray
1) Remove the screw, and detach the ADF
controller cover.
2) Set the DIP switch (SW1) on the ADF
controller PCB as indicated.
ADF controller cover
Screw
F05-101-51
F05-101-52
3) Open the manual feed tray, and place a
single sheet of A4 or LTR copy paper.
• Be sure to butt the copy paper against
the rear.
Butted.
Manual feed tray
Copy paper
F05-101-53
4) Press the push switch (SW2) on the
ADF controller PCB once.
• A single press on the push switch
(SW2) causes the original to be picked
up and stopped on the copyboard
glass.
J1
FU2
J14
J2
J13
J4
IC1
FU1
J5
J3
J12
SW1
SW4SW3SW2
LED2
J6
J7
J8
J9
J10
J11
SW2
F05-101-54
COPYRIGHT © 2001 CANON INC. 2000 2000 2000 2000 CANON DADF-J1 REV.0 MAR.2001
5-23
CHAPTER 5 TROUBLESHOOTING
5) Open the DADF slowly, and check to
make sure that D indicated is 11±1 mm.
Close the DADF slowly.
Original
D
D=11±1mm
F05-101-55
6) To adjust the original stop position, use
the push switches SW3 and SW4 on the
ADF controller PCB.
A single press on each switch will shift
the original stop position by 0.5 mm.
When the correct position is attained
(after switch operation), press the push
switch SW2.
• The original will be delivered, and the
new setting will be stored in memory.
Switch
SW3
SW4
J1
FU2
J14
J2
J13
J4
IC1
FU1
J5
J3
J12
SW1
SW4SW3SW2
LED2
J6
J7
J8
J9
J10
J11
SW2
SW3
SW4
F05-101-56
Direction of shift
Right
Left
T05-101-04
Holding down the push switch
will not cause more than a
single shift.
Original
SW4
SW3
F05-101-57
5-24
COPYRIGHT © 2001 CANON INC. 2000 2000 2000 2000 CANON DADF-J1 REV.0 MAR.2001
CHAPTER 5 TROUBLESHOOTING
EX
If the copy paper stops 12 mm from the
copyboard glass,
Close the DADF slowly leaving the copy
paper on the copyboard glass.
To shift the stop position 1 mm to the left,
the following is true:
1 0.5 (adjustment interval) = 2
Hence, press the push switch SW4 twice,
and press the push switch SW2.
• The copy paper will be delivered, and
new setting will be stored in memory.
COPYRIGHT © 2001 CANON INC. 2000 2000 2000 2000 CANON DADF-J1 REV.0 MAR.2001
5-25
CHAPTER 5 TROUBLESHOOTING
1.2 Making Adjustments
When Replacing the Major Parts
1.2.1 Outline
Major parts
Work
Ref.
• ADF controller PCB
1) Replacement of the EEPROM
p. 5-26
• EEPROM (memory back-up)
• Reversal sensor (S1)
• Pre-registration roller paper sensor (S2)
• Post-registration roller paper sensor (S3)
• Separation paper sensor (S4)
• Skew paper sensor (S5)
• Original sensor (S6)
• Original trailing edge sensor (S7)
• Pre-last original paper sensor (S8)
• Manual feed registration roller paper sensor (S9)
• Delivery motor (M5)
2) Adjust the sensors and the delivery motor.
p. 5-27
T05-102-01
1.2.2 Replacing the EEPROM
Perform the following when replacing the
ADF controller PCB.
1) Remove the EEPROM (IC2) from the
faulty ADF controller PCB.
IC2
J1
FU2
J14
J2
J13
J4
IC1
FU1
J5
J3
J12
SW1
SW4SW3SW2
J6
LED2
J7
J8
J9
J10
J11
F05-102-01
2) Mount the EEPROM removed in step 1)
to the new ADF controller PCB.
The EEPROM on the new ADF
controller PCB will not be used.
Memo
5-26
COPYRIGHT © 2001 CANON INC. 2000 2000 2000 2000 CANON DADF-J1 REV.0 MAR.2001
CHAPTER 5 TROUBLESHOOTING
3) Turn on the copier, and check to make
sure that error code E420 is not indicated.
4) If error code E420 is indicated, mount
back the EERPOM once removed from
the new ADF controller PCB.
5) Perform the work under 1.2.3 “Adjusting the Sensors and the Delivery Motor.”
1.2.3 Adjusting the Sensors and the
Delivery Motor
Perform the adjustment if you have replaced any of the following parts:
• EEPROM (memory backup)
• Reversal sensor (S1)
• Pre-registration roller senor (S2)
• Post-registration roller sensor (S3)
• Separation paper sensor (S4)
• Skew paper sensor (S5)
• Original sensor (S6)
• Original trailing edge sensor (S7)
• Pre-last original paper sensor (S8)
• Manual feed registration roller paper
sensor (S9)
• Delivery motor (M5)
Memo
The delivery motor is adjusted by sending a reference signal to it, and the
speed of rotation at that time is measured by the delivery motor clock sensor (PI11).
The result is used when generating the motor rotation speed control signal
(EJMPWM*).
COPYRIGHT © 2001 CANON INC. 2000 2000 2000 2000 CANON DADF-J1 REV.0 MAR.2001
5-27
CHAPTER 5 TROUBLESHOOTING
Steps to Take
1) Open the DADF, and make a single A4
copy of a solid black original.
2) Remove the screw, and detach the ADF
controller cover.
3) Set the DIP switch (SW1) on the ADF
controller PCB as indicated.
ADF controller cover
Screw
F05-102-02
F05-102-03
4) Place the output obtained in step 1) in
the original tray with the black side facing down.
Black side down
Take care not to cover the original sensor (S6) when placing
the output.
Original
sensor (S6)
Pre-last original
paper sensor (S8)
Original trailing
edge paper sensor
(S7)
F05-102-04
5-28
COPYRIGHT © 2001 CANON INC. 2000 2000 2000 2000 CANON DADF-J1 REV.0 MAR.2001
CHAPTER 5 TROUBLESHOOTING
5) Press the push switch (SW2) on the
ADF controller PCB.
• The LED will indicate the following in
sequence, showing the result at the
end: 1, 2, 3, 4, 5, 6, 7, 8, 9, A.
J1
FU2
J14
J2
J13
J4
IC1
FU1
Result
LED2
indication
OK
Description
J3
All sensors
(S1 through S9 are
normal).
Any of the sensors (S1
through S9) is faulty.
(0)
NG
(F)
J5
J12
SW1
SW4SW3SW2
LED2
J6
J7
J8
J9
J10
J11
SW2
F05-102-05
T05-102-02
6) At the end of the operation, press the
push switch (SW2) on the ADF controller PCB once again.
If the Result is NG
Check the condition of each of the sensors (S1 through S9), and replace the sensor
considered to be faulty.
The condition of a sensor is indicated in
the following three levels:
Condition
LED2
indication
Check or
replace
Good
( )
No
Alarm 1
( )
No
Alarm 2
( )
Yes
Faulty
(F)
Yes
T05-102-03
COPYRIGHT © 2001 CANON INC. 2000 2000 2000 2000 CANON DADF-J1 REV.0 MAR.2001
5-29
CHAPTER 5 TROUBLESHOOTING
1) While LED2 is indicating ‘NG’, press
the push switch SW3 or SW4 to select
the sensor.
Switch
SW3
SW4
LED2 indication
1
2
3
4
5
6
7
8
9
A
Sensor or motor in question
Original sensor (S6)
Original trailing edge sensor (S7)
Separation sensor (S4)
Skew sensor (S5)
Pre-registration roller paper sensor (S2)
Post-registration paper sensor (S3)
Reversal sensor (S1)
Manual feed registration roller paper sensor (S9)
Pre-last original paper sensor (S8)
Delivery motor (M5)
T05-102-04
2) At the end of the operation, press the
push switch (SW2) on the ADF controller PCB.
5-30
COPYRIGHT © 2001 CANON INC. 2000 2000 2000 2000 CANON DADF-J1 REV.0 MAR.2001
CHAPTER 5 TROUBLESHOOTING
1.3 Auxiliary Adjustment
Item to adjust
Function
Degree of arching at the registration roller
when pickup is from the tray
Degree of arching at the registratoin roller at
time of reversal
Degree of arching at the registration roller in
manual feed mode
Speed of the feeding belt
Speed of reversal
Checking the sensor output
Ref.
Removing the skew for CW pickup
p. 5-31
Removing the skew at time of reversal
p. 5-31
Removing the skew in manual feed mode
p. 5-31
Fine-adjusting the reproduction ratio for
stream reading mode
Fine-adjusting the speed of reversal
Checking the presence/absence of paper
over a specific sensor
p. 5-34
p. 5-36
p. 5-39
T05-103-01
1.3.1 Adjusting the Degree of Arching at the Registration Roller
(pickup from the tray)
Adjusting the Degree of Arching at the Registration Roller
(at time of reversal)
Adjusting the Degree of Arching at the Registration Roller
(manual feed mode)
1) Remove the screw, and detach the ADF
controller cover.
2) Set the DIP switch (SW1) on the ADF
controller PCB as follows to suit the
need:
Item
ADF controller cover
Switch setting
Pickup from tray
Screw
Reversal
F05-103-01
Manual feed
T05-103-02
COPYRIGHT © 2001 CANON INC. 2000 2000 2000 2000 CANON DADF-J1 REV.0 MAR.2001
5-31
CHAPTER 5 TROUBLESHOOTING
3) Place a single sheet of A4 or LTR copy
in the original tray.
Copy paper
F05-103-02
4) Press the push switch (SW2) on the
ADF controller PCB.
• The copy paper will be picked up and
stopped on the copyboard glass.
• LED2 will start to flash to indicate the
current value.
J1
FU2
J14
J2
J13
J4
IC1
FU1
J5
J3
J12
SW1
SW4SW3SW2
LED2
J6
J7
J8
J9
J10
J11
SW2
F05-103-03
5-32
COPYRIGHT © 2001 CANON INC. 2000 2000 2000 2000 CANON DADF-J1 REV.0 MAR.2001
CHAPTER 5 TROUBLESHOOTING
Switch LED2 Adjust- Switch LED2
indica- ment
indication
value*
tion
SW3
SW4
A-E2
A-E3
A-E4
A-E5
A-E6
A-E7
A-E8
A-E9
A-EA
A-Eb
A-EC
A-Ed
A-EE
A-EF
A-F0
A-F1
A-F2
A-F3
A-F4
A-F5
A-F6
-30
-29
-28
-27
-26
-25
-24
-23
-22
-21
-20
-19
-18
-17
-16
-15
-14
-13
-12
-11
-10
SW3
SW4
A-F7
A-F8
A-F9
A-FA
A-Fb
A-FC
A-Fd
A-FE
A-FF
A-00
A-01
A-02
A-03
A-04
A-05
A-06
A-07
A-08
A-09
A-0A
A-0b
Adjustment
value*
Switch LED2 Adjustindica- ment
tion
value*
-9
-8
-7
-6
-5
-4
-3
-2
-1
0 (reference value)
1
2
3
4
5
6
7
8
9
10
11
SW3
A-0C
A-0D
A-0E
A-0F
A-10
A-11
A-12
A-13
A-14
A-15
A-16
A-17
A-18
A-19
A-1A
A-1b
A-1C
A-1d
A-1E
A-1F
-
SW4
12
13
14
15
16
17
17
18
19
20
21
22
23
24
25
26
27
28
29
30
-
*0.1% (feed length).
T05-103-03
5) Press the push switch SW3 or SW4 on
the ADF controller PCB to adjust the
degree of arching by referring to the
table.
J1
FU2
J14
J2
J13
J4
IC1
FU1
J5
J3
J12
SW1
SW4SW3SW2
LED2
J6
J7
J8
J9
J10
J11
SW3
SW4
F05-103-04
COPYRIGHT © 2001 CANON INC. 2000 2000 2000 2000 CANON DADF-J1 REV.0 MAR.2001
5-33
CHAPTER 5 TROUBLESHOOTING
6) At the end of operation, press the push
switch (SW2) on the ADF controller
PCB once again.
• The copy paper will be delivered, and
the adjustment value will be stored in
memory.
Change
Switch
SW3
SW4
Increases the arching.
Decreases the arching.
T05-103-04
1.3.2 Adjusting the Speed of the
Feeding Belt
Memo
Adjusting the speed of the feeding belt will automatically adjust the speed of reversal.
ADF controller cover
1) Remove the ADF cover, and set the DIP
switch (SW1) on the ADF controller
PCB as indicated.
Screw
F05-103-05
F05-103-06
2) Press the push switch (W2) on the ADF
controller PCB.
• LED2 will start to flash to indicate the
current value.
J1
FU2
J14
J2
J13
J4
IC1
FU1
J5
J3
J12
SW1
SW4SW3SW2
LED2
J6
J7
J8
J9
J10
J11
SW2
F05-103-07
5-34
COPYRIGHT © 2001 CANON INC. 2000 2000 2000 2000 CANON DADF-J1 REV.0 MAR.2001
CHAPTER 5 TROUBLESHOOTING
Switch LED2 Adjust- Switch LED2
indica- ment
indication
value*
tion
SW3
SW4
A-E2
A-E3
A-E4
A-E5
A-E6
A-E7
A-E8
A-E9
A-EA
A-Eb
A-EC
A-Ed
A-EE
A-EF
A-F0
A-F1
A-F2
A-F3
A-F4
A-F5
A-F6
-30
-29
-28
-27
-26
-25
-24
-23
-22
-21
-20
-19
-18
-17
-16
-15
-14
-13
-12
-11
-10
SW3
SW4
A-F7
A-F8
A-F9
A-FA
A-Fb
A-FC
A-Fd
A-FE
A-FF
A-00
A-01
A-02
A-03
A-04
A-05
A-06
A-07
A-08
A-09
A-0A
A-0b
Adjustment
value*
-9
-8
-7
-6
-5
-4
-3
-2
-1
0 (reference value)
1
2
3
4
5
6
7
8
9
10
11
Switch LED2 Adjustindica- ment
tion
value*
SW3
SW4
A-0C
A-0D
A-0E
A-0F
A-10
A-11
A-12
A-13
A-14
A-15
A-16
A-17
A-18
A-19
A-1A
A-1b
A-1C
A-1d
A-1E
A-1F
-
12
13
14
15
16
17
17
18
19
20
21
22
23
24
25
26
27
28
29
30
-
*0.1% (image reproduction ratio).
T05-103-05
COPYRIGHT © 2001 CANON INC. 2000 2000 2000 2000 CANON DADF-J1 REV.0 MAR.2001
5-35
CHAPTER 5 TROUBLESHOOTING
3) Press the push switch SW3 or SW4 on
the ADF controller PCB, and adjust the
speed of the belt by referring to the
table.
J1
FU2
J14
J2
J13
J4
Switch
SW3
SW4
Change
Increases the belt speed (decreasing the image).
Decreasing the belt speed (increasing the image).
IC1
FU1
J5
J12
SW1
J3
SW4SW3SW2
LED2
J6
J7
J8
J9
J10
J11
SW3
SW4
T05-103-06
F05-103-08
4) At the end of the operation, press the
push switch (SW2) on the ADF controller PCB once again.
1.3.3 Adjusting the Speed of Reversal
ADF controller PCB
1) Remove the ADF cover, and set the DIP
switch (SW1) on the ADF controller
PCB as indicated.
Screw
F05-103-09
F05-103-10
5-36
COPYRIGHT © 2001 CANON INC. 2000 2000 2000 2000 CANON DADF-J1 REV.0 MAR.2001
CHAPTER 5 TROUBLESHOOTING
2) Press the push switch (SW2) on the
ADF controller PCB.
• LED2 will start to flash to indicate the
current value.
J1
FU2
J14
J2
J13
J4
IC1
FU1
J5
J3
J12
SW1
SW4SW3SW2
LED2
J6
J7
J8
J9
J10
J11
SW2
F05-103-11
Switch LED2 Adjust- Switch LED2
indica- ment
indication
value*
tion
SW3
SW4
A-E2
A-E3
A-E4
A-E5
A-E6
A-E7
A-E8
A-E9
A-EA
A-Eb
A-EC
A-Ed
A-EE
A-EF
A-F0
A-F1
A-F2
A-F3
A-F4
A-F5
A-F6
-30
-29
-28
-27
-26
-25
-24
-23
-22
-21
-20
-19
-18
-17
-16
-15
-14
-13
-12
-11
-10
SW3
SW4
A-F7
A-F8
A-F9
A-FA
A-Fb
A-FC
A-Fd
A-FE
A-FF
A-00
A-01
A-02
A-03
A-04
A-05
A-06
A-07
A-08
A-09
A-0A
A-0b
Adjustment
value*
-9
-8
-7
-6
-5
-4
-3
-2
-1
0 (reference value)
1
2
3
4
5
6
7
8
9
10
11
Switch LED2 Adjustindica- ment
tion
value*
SW3
SW4
A-0C
A-0D
A-0E
A-0F
A-10
A-11
A-12
A-13
A-14
A-15
A-16
A-17
A-18
A-19
A-1A
A-1b
A-1C
A-1d
A-1E
A-1F
-
12
13
14
15
16
17
17
18
19
20
21
22
23
24
25
26
27
28
29
30
-
0.1% (rotation speed of reversal motor).
T05-103-07
COPYRIGHT © 2001 CANON INC. 2000 2000 2000 2000 CANON DADF-J1 REV.0 MAR.2001
5-37
CHAPTER 5 TROUBLESHOOTING
3) Press the push switch SW3 or SW4 on
the ADF controller PCB to adjust the
speed of reversal by referring to the
table.
J1
FU2
J14
J2
J13
Switch
SW3
SW4
Change
Increase the speed of reversal.
Decrease the speed of reversal.
T05-103-08
J4
IC1
FU1
J5
J3
J12
SW1
SW4SW3SW2
LED2
J6
J7
J8
J9
J10
J11
SW3
SW4
F05-103-12
4) At the end of the operation, press the
push switch (SW2) on the ADF controller.
5-38
COPYRIGHT © 2001 CANON INC. 2000 2000 2000 2000 CANON DADF-J1 REV.0 MAR.2001
CHAPTER 5 TROUBLESHOOTING
1.3.4 Checking the Sensor Output
The DADF uses a 7-segment LED (LED2) on its ADF controller PCB to allow a check on
the presence/absence of paper or the state (open/closed) of the upper cover of the following
sensors:
LED2
Sensor in question
(notation)
LED2
Original sensor (S6)
Reversal sensor (S1)
(1)
(2)
(7)
Original trailing edge sensor
(S7)
Separation sensor (S4)
(8)
(3)
(9)
Skew sensor (S5)
(4)
(5)
(6)
Sensor in question
(notation)
Manual feed registration roller
paper sensor (S9)
Pre-last original paper sensor
(S8)
Pre-reversal sensor (PI4)
(a)
Pre-registration roller paper
sensor(S2)
Post-registration roller paper
sensor (S3)
Original paper sensor (PI13)
(b)
Manual feed set sensor (PI12)
(c)
(d)
(e)
(f)
ADF closed/open sensor
(PI10)
Upper cover sensor
(front; PI6)
Upper cover sensor
(rear; PI3)
T05-103-09
1) Remove the ADF controller cover, and
set the DIP switch (SW1) on the ADF
controller PCB as indicated (normal operation mode).
ADF controller cover
Screw
F05-103-13
F05-103-14
COPYRIGHT © 2001 CANON INC. 2000 2000 2000 2000 CANON DADF-J1 REV.0 MAR.2001
5-39
CHAPTER 5 TROUBLESHOOTING
2) Press the push switch (SW2) once.
• The 7-segment LED (LED2) on the
ADF controller PCB will start to flash
[1] to indicate that a check on the sensor operation has started.
J1
FU2
J14
J2
J13
J4
IC1
FU1
J5
J3
J12
SW1
SW4SW3SW2
LED2
J6
J7
J8
J9
J10
J11
SW2
F05-103-15
3) Press the push switch SW3 or SW4; the
indication of the 7-segment LED
(LED2) will change to indicate the state
(paper present/absent) of the sensor in
question. (See T05-103-08.)
J1
FU2
J14
J2
J13
J4
IC1
FU1
LED2
indication
ON
Flashing
Presence/absence of
paper
J5
J3
J12
SW1
SW4SW3SW2
Present
Absent
J7
J8
J9
J10
J11
SW3
SW4
T05-103-10
4) To end the check, press the push switch
(SW2) once.
• The LED2 indication will return to
normal mode.
LED2
J6
F05-103-16
J1
FU2
J14
J2
J13
J4
IC1
FU1
J5
J3
J12
SW1
SW4SW3SW2
LED2
J6
J7
J8
J9
J10
J11
SW2
F05-103-17
5-40
COPYRIGHT © 2001 CANON INC. 2000 2000 2000 2000 CANON DADF-J1 REV.0 MAR.2001
CHAPTER 5 TROUBLESHOOTING
1.4 Indications
Item
Jam counter
Tray pickup counter
Manual feed pickup counter
Jam history
Software version
Description
Ref.
Indicates the number of jams.
Indicates the number of pickups made for small-size originals and large-size originals.
Indicates the number of pickups for manually fed smallsize originals and large-size originals.
Indicates the most recent 3 jams.
Indicates the version of the software.
p. 5-40
p. 5-41
p. 5-41
p. 5-42
p. 5-43
T05-104-01
1.4.1
Jam Counter
1) Remove the screw, and detach the ADF
controller cover.
2) Set the DIP switch (SW1) on the ADF
controller PCB as indicated.
F05-104-01
3) Press the push switch (SW2) on the
ADF controller PCB.
J1
FU2
J14
J2
J13
J4
IC1
FU1
J5
J3
J12
SW1
SW4SW3SW2
LED2
J6
J7
J8
J9
J10
J11
SW2
F05-104-02
COPYRIGHT © 2001 CANON INC. 2000 2000 2000 2000 CANON DADF-J1 REV.0 MAR.2001
5-41
CHAPTER 5 TROUBLESHOOTING
3) Check the number of jams that occurred
with reference to how LED2 flashes:
• The maximum number of jams may be
as high as '65,000'.
F05-104-03
4) At the end of the check, press the push
switch (SW2) on the ADF controller
PCB once again.
1.4.2 Tray Pickup Counter and
Manual Feed Pickup Counter
1) Remove the screw, and detach the ADF
controller cover.
2) Set the DIP switch (SW1) on the ADF
controller PCB as indicated to suit the
need.
Item
Setting
Tray pickup counter
Manual feed pickup
counter
T05-104-02
3) Press the push switch (SW2) on the
ADF controller PCB.
• LED2 will start to flash to indicate the
total number of pickups made.
J1
FU2
J14
J2
J13
J4
IC1
FU1
J5
J3
J12
SW1
SW4SW3SW2
LED2
J6
J7
J8
J9
J10
J11
SW2
F05-104-04
5-42
COPYRIGHT © 2001 CANON INC. 2000 2000 2000 2000 CANON DADF-J1 REV.0 MAR.2001
CHAPTER 5 TROUBLESHOOTING
4) Press the push switches SW3 and SW4
on the ADF controller PCB to change
the indication.
J1
FU2
J14
J2
Switch Indication
SW3
SW4
A-XXXX
S-XXXX
L-XXXX
Description
Total number
Number of small-size
sheets
Number of large-size
sheets
J13
J4
IC1
FU1
J5
J3
J12
SW1
SW4SW3SW2
J7
J8
J9
J10
J11
SW3
SW4
T05-104-03
Memo
LED2
J6
F05-104-05
• The total number may be as
high as ‘4,800,000’.
• The number of small-size and
large-size sheets may be as
high as ‘2,400,000’.
• In the case of pickup from the
tray, the 1s place is set to ‘0’
when the power is turned on.
5) At the end of the check, press the push
switch (SW2) on the ADF controller
PCB once again.
1.4.3 Jam History
1) Remove the screw, and detach the ADF
controller cover.
2) Set the DIP switch (SW1) on the ADF
controller PCB as indicated.
3) Press the push switch (SW2) on the
ADF controller PCB.
• LED2 will indicate the latest jam
code.
F05-104-06
J1
FU2
J14
J2
J13
J4
IC1
FU1
J5
J3
J12
SW1
SW4SW3SW2
LED2
J6
J7
J8
J9
J10
J11
SW2
F05-104-07
COPYRIGHT © 2001 CANON INC. 2000 2000 2000 2000 CANON DADF-J1 REV.0 MAR.2001
5-43
CHAPTER 5 TROUBLESHOOTING
4) Press the push switches SW3 and SW4
to change the LED2 indication, thereby
checking the jam history. LED2 will
flash five times in sequence to indicate
the nature of the jam.
J1
FU2
J14
J2
J13
J4
Switch
SW3
LED2
1-X1-X2-Y1-Y2
2-X1-X2-Y1-Y2
SW4
3-X1-X2-Y1-Y2
X1,X2: Jam code
Y1,Y2: Not used
Description
Previous (latest)
2nd most recent
3rd most recent
IC1
FU1
J5
J3
J12
SW1
SW4SW3SW2
LED2
J6
J7
J8
J9
J10
J11
SW3
SW4
T05-104-04
F05-104-08
5) At the end of the check, press the push
switch (SW2) on the ADF controller
PCB once again.
1.4.4 Version of the Software
1) Remove the screw, and detach the ADF
controller cover.
2) Set the DIP switch (SW1) on the ADF
controller PCB as indicated.
F05-104-09
3) Press the push switch (SW2) on the
ADF controller PCB.
• LED2 will flash four times to indicate
the version of the software.
EX:
If for Version 3.01,
J1
FU2
J14
J2
4) Press the push switch (SW2) on the
ADF controller PCB to end the indication.
J13
J4
IC1
FU1
J5
J3
J12
SW1
SW4SW3SW2
LED2
J6
J7
J8
J9
J10
J11
SW2
F05-104-10
5-44
COPYRIGHT © 2001 CANON INC. 2000 2000 2000 2000 CANON DADF-J1 REV.0 MAR.2001
CHAPTER 5 TROUBLESHOOTING
1.5 Cleaning
Item
Description
Ref.
Separation assembly
Clean the separation assembly using copy paper and alcohol.
p. 5-45
Registration roller (tray
pickup)
1. If the dirt is limited,
Execute automatic cleaning of the registration roller.
2. If dirt is appreciable,
Clean the registration roller using lint-free paper and alcohol.
p. 5-47
p. 5-48
T05-105-01
1.5.1 Cleaning the Separation Assembly
1) Remove the screw, and detach the ADF
controller cover.
2) Set the DIP switch (SW1) on the ADF
controller PCB as indicated.
F05-105-01
3) Press the push switch (SW2) on the
ADF controller PCB.
J1
FU2
J14
J2
J13
J4
IC1
FU1
J5
J3
J12
SW1
SW4SW3SW2
LED2
J6
J7
J8
J9
J10
J11
SW2
F05-105-02
COPYRIGHT © 2001 CANON INC. 2000 2000 2000 2000 CANON DADF-J1 REV.0 MAR.2001
5-45
CHAPTER 5 TROUBLESHOOTING
4) Moisten copy paper with alcohol, and
slide it in while firmly holding on to its
trailing edge.
Be sure to keep the trailing edge
of the copy paper as indicated.
5) Press the push switch (SW2) on the
ADF controller PCB to end the operation.
For A4,
Rail
Slide guide
Butt the end of
paper.
T05-105-03a
Match
the edge of paper.
Slide
guide
Rail
For LTR,
T05-105-03b
5-46
COPYRIGHT © 2001 CANON INC. 2000 2000 2000 2000 CANON DADF-J1 REV.0 MAR.2001
CHAPTER 5 TROUBLESHOOTING
1.5.2 Cleaning the Registration Roller
If the dirt is limited,
1) Remove the screw, and detach the ADF
controller cover.
2) Set the DIP switch (SW1) on the ADF
controller PCB as indicated.
F05-105-04
3) Place about ten sheets of copy paper in
the original tray.
4) Press the push switch (SW2) on the
ADF controller PCB.
The operation will end automatically.
J1
FU2
J14
J2
J13
J4
IC1
FU1
J5
J3
J12
SW1
SW4SW3SW2
LED2
J6
J7
J8
J9
J10
J11
SW2
F05-105-05
COPYRIGHT © 2001 CANON INC. 2000 2000 2000 2000 CANON DADF-J1 REV.0 MAR.2001
5-47
CHAPTER 5 TROUBLESHOOTING
If dirt is appreciable,
1) Open the upper cover, and open the
feeding guide.
2) Remove the two screws, and detach the
reversal guide.
Screw
Reversal guide
Screw
F05-105-06
When mounting the reversing
guide, do so while forcing it in
the direction of the arrow. If not
mounted properly, it can trigger
jams.
[1]
Only when mounting it.
5-48
COPYRIGHT © 2001 CANON INC. 2000 2000 2000 2000 CANON DADF-J1 REV.0 MAR.2001
CHAPTER 5 TROUBLESHOOTING
3) Remove the ADF controller cover, and
set the DIP switch (SW1) ADF controller PCB as follows.
F05-105-07
4) Press the push switch (SW2) on the
ADF controller PCB.
• The reversing assembly will start to
operate.
J1
FU2
J14
J2
J13
J4
IC1
FU1
J5
J3
J12
SW1
SW4SW3SW2
LED2
J6
J7
J8
J9
J10
J11
SW2
F05-105-08
5) Clean with lint-free paper moistened
with alcohol.
F05-105-09
COPYRIGHT © 2001 CANON INC. 2000 2000 2000 2000 CANON DADF-J1 REV.0 MAR.2001
5-49
CHAPTER 5 TROUBLESHOOTING
1.6 Others
Item
Description
Checking the original width detecting switch (SW301)
Initializing the backup RAM
Ref.
Execute an automatic check on the original width detecting switch (SW301).
Initialize the backup RAM.
p. 5-48
p. 5-49
T05-106-01
1.6.1 Checking the Original Width
Detecting Switch (SW301)
1) Remove the screw, and detach the ADF
controller cover.
2) Set the DIP switch (SW1) on the ADF
controller PCB as indicated.
F05-106-01
3) Press the push switch (SW2) on the
ADF controller PCB.
• LED2 will go on or flash to indicate
the width of the original each time the
position of the side guide is changed.
J1
FU2
J14
J2
J13
J4
IC1
FU1
J5
J3
J12
SW1
SW4SW3SW2
LED2
J6
J7
J8
J9
J10
J11
SW2
F05-106-02
5-50
COPYRIGHT © 2001 CANON INC. 2000 2000 2000 2000 CANON DADF-J1 REV.0 MAR.2001
CHAPTER 5 TROUBLESHOOTING
LED2 indication
0
1
2
3
4
5
6
7
ON
Flash
ON
Flash
ON
Flash
ON
Flash
ON
Flash
ON
Flash
ON
Flash
ON
Flash
Default size
A4
Non-default
LTR
Non-default
B4
Non-default
LTR
Non-default
A4
Non-default
ERROR*
ERROR
ERROR
ERROR
ERROR*
ERROR
LED2 indication
0
1
2
3
4
5
6
7
ON
Flash
ON
Flash
ON
Flash
ON
Flash
ON
Flash
ON
Flash
ON
Flash
ON
Flash
Default size
B5R
Non-default
STMT
Non-default
B4
Non-default
STMT
Non-default
A5
Non-default
A5
Non-default
ERROR*
ERROR
ERROR*
ERROR
Note: The original width detecting switch (SW301) may be faulty.
T05-106-02
4) Press the push switch (SW2) on the
ADF controller PCB to end the operation.
1.6.2 Initializing the Backup RAM
1) Remove the screw, and detach the ADF
controller cover.
2) Set the DIP switch (SW1) on the ADF
controller PCB as indicated.
F05-106-03
COPYRIGHT © 2001 CANON INC. 2000 2000 2000 2000 CANON DADF-J1 REV.0 MAR.2001
5-51
CHAPTER 5 TROUBLESHOOTING
3) Press the push switch (SW2) on the
ADF controller PCB to start backup
RAM clear mode.
• LED2 will go off.
4) Press the push switch (SW3) five times
in succession.
• LED2 will indicate ‘0’ and go through
its sequence of indication.
J1
FU2
J14
J2
J13
J4
IC1
FU1
J5
J3
J12
SW1
SW4SW3SW2
LED2
J6
J7
J8
J9
J10
J11
SW2
SW3
F05-106-04
Memo
5-52
The counter data (jam, tray
pickup, manual feed) cannot be
initialized.
COPYRIGHT © 2001 CANON INC. 2000 2000 2000 2000 CANON DADF-J1 REV.0 MAR.2001
CHAPTER 5 TROUBLESHOOTING
2 Troubleshooting
2.1 Troubleshooting Malfunctions
2.1.1 E402
1) Set the DIP switch (SW1) on the ADF controller PCB as indicated.
Press the push switch (SW2). Does the belt motor (SW2) rotate?
(To stop the operation, press the push switch (SW2) once again.)
YES: Go to step 3).
Belt motor (M2)
2) Disconnect the connector (J62) of the belt motor driver PCB. Set
Ω, and connect the meter probes to the connectors
the meter to x1Ω,
Ω for each?
on the cable side as indicated. Is the resistance about 1.1Ω
NO: Replace the belt motor (M2).
1-3
1-4
2-5
2-6
1
2
3
4
5
6
1
2
3
4
5
6
1
2
3
4
5
6
Moter driver
PCB
J62
1
2
3
4
5
6
COPYRIGHT © 2001 CANON INC. 2000 2000 2000 2000 CANON DADF-J1 REV.0 MAR.2001
5-53
CHAPTER 5 TROUBLESHOOTING
Belt motor clock sensor (PI1)
3) Set the meter range to 10 VDC. Does the voltage between connectors J12-2 (+) and J12-1 (-) on the ADF controller PCB alternate between 0 and 5 V when the belt motor is rotated by hand?
NO: Replace the belt motor clock sensor (PI1).
Cable
4) Is the cable between the belt motor driver PCB and the ADF controller PCB connected properly?
NO: Connect it properly.
Belt motor driver PCB, ADF controller PCB
5) Try replacing the belt motor driver PCB. Is the problem corrected?
YES: Replace the belt motor drive PCB.
NO: Replace the ADF controller PCB.
5-54
COPYRIGHT © 2001 CANON INC. 2000 2000 2000 2000 CANON DADF-J1 REV.0 MAR.2001
CHAPTER 5 TROUBLESHOOTING
2.1.2 E404
1) Set the DIP switch (SW1) on the ADF controller PCB as indicated.
Does the delivery motor (M5) rotate when the push switch (SW2) is
pressed?
(To stop the operation, press the push switch (SW2) once again.)
YES: Go to step 3).
Delivery motor (M5)
2) Disconnect the connector (J2) of the ADF controller PCB. Set the
Ω, and connect the meter probes to the connectors
meter range to x1Ω,
on the connectors on the cable side as indicated. Is the resistance
Ω.
about 15Ω.
15
14
13
12
11
10
9
8
7
6
5
4
3
2
1
NO:
ADF
controller PCB
J2
Replace the delivery motor (M5).
After replacing the delivery motor, be sure to perform “Adjusting
the Sensors and the Delivery Motor.”
Delivery Motor Clock Sensor (PI11), ADF Controller PCB
3) Set the meter range to 10 VDC. Does the voltage between connectors J3-2 (+) and J3-1 (-) on the ADF controller PCB alternate between 0 and 5 V when the delivery motor is rotated by hand?
NO: Replace the delivery motor clock sensor (PI11).
YES: Replace the ADF controller PCB.
COPYRIGHT © 2001 CANON INC. 2000 2000 2000 2000 CANON DADF-J1 REV.0 MAR.2001
5-55
CHAPTER 5 TROUBLESHOOTING
2.1.3 E405
1) Set the DIP switch (SW1) on the ADF controller PCB as indicated.
Does the separation motor (M4) rotate when the push switch (SW2)
is pressed?
(To stop the operation, press the push switch (SW2) once again.)
YES: Go to step 3).
Separation motor (M4)
2) Disconnect the connector (J8) of the ADF controller PCB. Set the
Ω, and connect the meter probe to the connectors
meter range to x1Ω
Ω?
on the cable side as indicated. Is the resistance about 5.0Ω
ADF
controller PCB
1 (red)
2 (blue)
J8
J8
NO:
Replace the separation motor (M4).
Separation motor clock sensor (PI2), ADF controller PCB
3) Set the meter range to 10 VDC. Does the voltage between connectors J12-5 (+) and J12-4 (-) on the ADF controller PCB alternate between 0 and 5 V?
NO: Replace the separation motor clock sensor (PI2).
YES: Replace the DADF controller PCB.
5-56
COPYRIGHT © 2001 CANON INC. 2000 2000 2000 2000 CANON DADF-J1 REV.0 MAR.2001
CHAPTER 5 TROUBLESHOOTING
2.1.4 E410
1) Set the DIP switch (SW1) on the ADF controller PCB as indicated.
Does the motor (M3) rotate when the push switch SW2 and then
the push switch SW3/SW4 are pressed?
(To stop the operation, press the push switch (SW2) once again.)
YES: Go to step 3).
Pickup motor (M3)
2) Disconnect the connector (J11) of the ADF controller PCB. Set the
Ω, and connector the meter probe to the connecmeter range to X1Ω
Ω for
tors on the cable side as indicated. Is the resistance about 74Ω
each?
NO: Replace the pickup motor (M3).
2-4
2-6
1
2
3
4
5
6
1
2
3
4
5
6
ADF
controller PCB
1-3
1
2
3
4
5
6
J11
1-5
1
2
3
4
5
6
COPYRIGHT © 2001 CANON INC. 2000 2000 2000 2000 CANON DADF-J1 REV.0 MAR.2001
5-57
CHAPTER 5 TROUBLESHOOTING
Pickup roller height sensor 1 (PI8)
3) Se the meter range to 10 VDC. Does the voltage between J14-A8 (+)
and J14-A7 (-) on the ADF controller PCB alternate between 0 and
5 V when the pickup roller unit (rear) is moved up/down by hand?
NO: Replace the pickup roller height sensor 1 (PI8).
Pickup roller height sensor 2 (PI9)
4) Set the meter range to 10 VDC. Does the voltage between connectors J14-A1 (+) and J14-A10 (-) on the ADF controller PCB alternate between 0 and 5 V when the pickup roller unit (front) is moved
up/down by hand?
NO: Replace the pickup roller height sensor 2 (PI9).
Pickup roller home position sensor (PI7)
5) Set the meter range to 10 VDC. Is the voltage between connectors
J14-A5 (+) and J14-A4 (-) on the ADF controller PCB about 5 V
when the pickup roller unit is returned to home position by hand?
NO: Replace the pickup roller home position sensor (PI7).
ADF controller PCB
6) Try replacing the ADF controller PCB. Is the problem corrected?
YES: Replace the ADF controller PCB.
5-58
COPYRIGHT © 2001 CANON INC. 2000 2000 2000 2000 CANON DADF-J1 REV.0 MAR.2001
CHAPTER 5 TROUBLESHOOTING
2.1.5 E422
Communication cable
1) Is the cable between the copier and the DADF properly connected?
NO: Connect the cable properly.
Connector
2) Is the connector (J1) on the ADF controller PCB properly connected?
NO: Connect the connector properly.
Cable, ADF controller PCB
3) Is the cable from the connector (J1) on the ADF controller PCB to
the communication cable connected properly?
NO: Connect the cable properly.
YES: Replace the ADF controller PCB.
COPYRIGHT © 2001 CANON INC. 2000 2000 2000 2000 CANON DADF-J1 REV.0 MAR.2001
5-59
CHAPTER 5 TROUBLESHOOTING
3 Arrangement of Electrical Components
3.1 Sensors
PI 13
PI 11
PI 2
PI 1
PI 7
PI 10 PI 4
PI 3
PI 8
S5
S2
S3
S1
PI 12
S9
S6
S7
PI 9
S6 S8
S4
PI 6
PI 5
F05-301-01
Symbol
Name
Photointerrupter
Reflecting type sensor
Notation
PI 1
PI 2
PI 3
PI 4
PI 5
PI 6
PI 7
PI 8
PI 9
PI 10
PI 11
PI 12
PI 13
S1
S2
S3
S4
S5
S6
S7
S8
S9
Description
Belt motor clock detection
Separation motor clock detection
Left cover open/closed detection (rear)
Pre-reversal paper detection
Registration roller rotation detection
Left cover open/closed detection (front)
Pickup roller home position detection
Pickup roller height detection 1
Pickup roller height detection 2
ADF open/closed detection
Delivery motor clock detection
Manual feed set detection
Original delivery detection
Reversing assembly paper detection
Pre-registration roller paper detection
Post-registration roller paper detection
Separation paper detection
Skew paper detection
Original detection
Original trailing edge detection
Pre-last original detection
Manual feed registration roller paper detection
T05-301-01
5-60
COPYRIGHT © 2001 CANON INC. 2000 2000 2000 2000 CANON DADF-J1 REV.0 MAR.2001
CHAPTER 5 TROUBLESHOOTING
3.2
Motors, Clutches, and Solenoids
M4
M2
M5
SL2
M3
SL4
SL1
M1
CL
SL3
F05-302-01
Symbol
Name
Motor
M
CL
SL
Clutch
Solenoid
Fan
Notation
Description
M1
M2
M3
M4
M5
CL
Reversal motor
Belt motor
Pickup motor
Separation motor
Delivery motor
Separation clutch
SL1
SL2
SL3
SL4
FM1
Reversing solenoid
Stopper plate solenoid
Pre-reversal solenoid
Delivery solenoid
Belt motor cooling fan
T05-302-01
COPYRIGHT © 2001 CANON INC. 2000 2000 2000 2000 CANON DADF-J1 REV.0 MAR.2001
5-61
CHAPTER 5 TROUBLESHOOTING
3.3 PCBs
1
2
3
5
4
F05-303-01
Reference
1
2
3
4
5
Name
ADF controller PCB
Reversal motor driver PCB
Belt motor driver PCB
Pickup tray PCB
Indication LED PCB
T05-303-01
5-62
COPYRIGHT © 2001 CANON INC. 2000 2000 2000 2000 CANON DADF-J1 REV.0 MAR.2001
CHAPTER 5 TROUBLESHOOTING
4 LEDs, Check Pins, and Switches by PCB
Of the LEDs and check pins found in the machine, those used in the field are discussed:
Do not touch any check pins that are not indicated in the table. They are for
the factory, and require special tools and high precision.
4.1 ADF Controller PCB
Some LEDs emit light when they are off because of leakage current. This is
a normal condition, and must be kept in mind.
4.1.1 Arrangement of Components
J1
IC2
FU2
J14
J2
J13
J4
IC1
CB1
SW1
J5
J12
SW4SW3SW2
J3
J6
LED2
J7
J8
J9
J10
J11
F05-401-01
COPYRIGHT © 2001 CANON INC. 2000 2000 2000 2000 CANON DADF-J1 REV.0 MAR.2001
5-63
CHAPTER 5 TROUBLESHOOTING
4.1.2 DIP Switch Functions
The DIP switch (SW1) on the ADF controller PCB provides the following functions according to how it is set:
Function
Description
Setting
Normal operation
Normal Operation
Operation Check
Single-Sided Intermittent Feed
Press the push switch SW2 on the ADF controller
PCB; thereafter, each press on the push switch SW2
will send the original intermittently.
Double-Sided Intermittent Feed
Press the push switch SW2 on the ADF controller
PCB; thereafter, each press on the push switch SW2
will send the original intermittently.
Belt Motor (M2) Drive
Press the push switch SW2 on the ADF controller
PCB to start it; another press will stop it.
The operation will be as follows, executed automatically: CW (700 -> 520 -> 260 -> 30 mm/sec) -> (700
-> 520 -> 260 -> 130 mm/sec).
Reversal Motor (M1) Drive
Press the push switch SW2 on the ADF controller
PCB to start it; another press will stop it.
The operation will be as follows, executed automatically: CW (700 -> 520 -> 260 -> 130 mm/sec) ->
CCW (700 -> 520 -> 260 -> 130 mm/sec).
Delivery Motor (M5) Drive
Press the push switch SW2 on the ADF controller
PCB to start it; another press will stop it.
While in operation, each press on the push switch
SW3 changes the speed of motor rotation to 100
mm/sec (700 -> 100 mm/sec).
Pickup Motor (M3) Drive
Press the push switch (SW2) on the ADF controller
PCB; press SW3 to move up or SW4 to move down.
Another press on SW2 will stop it.
T05-401-01a
5-64
COPYRIGHT © 2001 CANON INC. 2000 2000 2000 2000 CANON DADF-J1 REV.0 MAR.2001
CHAPTER 5 TROUBLESHOOTING
Function
Operation Check
Setting
Description
Solenoid/Clutch Drive
Press the push switch SW2 on the ADF controller
PCB to execute the following in sequence; the operation will end automatically:
Stopper plate solenoid (SL2)
Delivery solenoid (SL4)
Pre-reversal solenoid (SL3)
Reversal solenoid (SL1)
Adjustment
Clutch (CL)
Separation Motor (M4), Clutch (CL) Drive
Press the push switch (SW2) on the ADF controller
PCB to start it; another press will stop it.
While in operation, each press on the push switch
SW3 changes the speed of motor rotation to 100
mm/sec. (700 -> 100 mm/sec)
Manual Feed Operation
Place an original in the manual feed assembly, and
press the push switch (SW2) on the ADF controller
PCB so that the original will be picked up and
stopped.
Tray Pickup Arch Adjustment
Press the push switch SW2 on the ADF controller
PCB to start, and use the push switch S23/SW4 to
make adjustments. At the end, press the push switch
SW2 to store the new setting. (For details, see p. 531.)
Reversal Arch adjustment
Press the push switch SW2 on the ADF controller
PCB to start, and use the push switch SW3/SW4 to
make adjustments. At the end, press the push switch
SW2 to store the new setting. (For details, see p. 531.)
T05-401-01b
COPYRIGHT © 2001 CANON INC. 2000 2000 2000 2000 CANON DADF-J1 REV.0 MAR.2001
5-65
CHAPTER 5 TROUBLESHOOTING
Function
Adjustment
Setting
Description
Manual Feed Arch Adjustment
Press the push switch SW2 on the ADF controller
PCB to start, and use the push switch SW3/SW4 to
make adjustments. At the end, press the push switch
SW2 to store the new setting. (For details, see p. 531.)
Feeding Belt Speed Adjustment (reproduction ratio in
stream reading)
Press the push switch SW2 on the ADF controller to
start, and use the push switch SW3/SW4 to make
adjustments. At the end, press the push switch SW2
to store the new setting. (For details, see p. 5-34.)
Reversal Speed Adjustment
Press the push switch SW2 on the ADF controller
PCB to start, and use the push switch SW3/SW4 to
make adjustments. At the end, press the push switch
SW2 to store the new setting. (For details, see p. 536.)
Original Stop Position Adjustment
Press the push switch SW2 on the ADF controller
PCB to start, and use the push switch SW3/SW4 to
make adjustments. At the end, press the push switch
SW2 to store the new setting. (For details, see p. 520.)
Manual Feed Original Stop Position Adjustment
Press the push switch SW2 on the ADF controller
PCB to start, and use the push switch SW3/SW4 to
make adjustments. A the end, press the push switch
SW2 to store the new setting. (For details, see p. 523.)
Sensor and Delivery Motor Auto Adjustment
Press the push switch SW2 on the ADF controller
PCB. The operation will end automatically. (For details, see p. 5-27.)
T05-401-01c
5-66
COPYRIGHT © 2001 CANON INC. 2000 2000 2000 2000 CANON DADF-J1 REV.0 MAR.2001
CHAPTER 5 TROUBLESHOOTING
Function
Indication
Cleaning
Setting
Description
Jam Counter Indication
The number of jams in the DADF will be indicated
by LED2 on the ADF controller PCB. (For details,
see p. 5-41.)
Tray Pickup Counter Indication
The number of left pickups in the DADF will be indicated by LED2 on the ADF controller PCB. (For
details, see p. 5-42.)
Manual Feed Pickup Counter Indication
The number of manual feed pickups in the DADF
will be indicated by LED2 on the ADF controller
PCB.
Jam History Indication
The jam history of the DADF will be indicated by
LED2 on the ADF controller PCB (most recent three
jams). (For details, see p. 5-43.)
Software Version Indication
Press the push switch SW2 on the ADF controller
PCB to indicate the version of the software; another
press will stop the indication. (For details, see p. 544.)
Separation Assembly Cleaning
Press the push switch (SW2) on the ADF controller
PCB to rotate the registration roller; another press
will stop the operation. (details, see p. 5-45.)
Registration Roller Cleaning
If the dirt is limited,
Place 10 sheets of copy paper in the original tray,
and press the push switch on the ADF controller
PCB. The operation will end automatically. (For details, see p. 5-47.)
If the dirt is appreciable,
Press the push switch SW2 on the ADF controller
PCB. When the registration roller starts to rotate,
clean with lint-free paper moistened with alcohol. To
stop operation, press the push switch SW2 once
again. (For details, see p. 5-48.)
T05-401-01d
COPYRIGHT © 2001 CANON INC. 2000 2000 2000 2000 CANON DADF-J1 REV.0 MAR.2001
5-67
CHAPTER 5 TROUBLESHOOTING
Function
Setting
Others
Description
Original Width Detecting Switch (SW301) Check
Press the push switch SW2 on the ADF controller
PCB to start it; another press will stop it. (For details, see p. 5-50.)
Backup RAM Clear
Press the push switch SW2 on the ADF controller
PCB; press the push switch SW3 five times in succession to automatically end backup RAM clear. The
counter data (jam, tray pickup, manual feed pickup)
will not be initialized. (For details, see p. 5-51.)
T05-401-01e
4.2 Reversal Motor Driver PCB
J61
J62
F05-402-01
4.3 Belt Motor Driver PCB
J61
J62
F05-403-01
5-68
COPYRIGHT © 2001 CANON INC. 2000 2000 2000 2000 CANON DADF-J1 REV.0 MAR.2001
CHAPTER 5 TROUBLESHOOTING
4.4 Pickup Tray PCB
SW301
J52
J51
F05-404-01
4.5 Indication LED PCB
J55
F05-405-01
COPYRIGHT © 2001 CANON INC. 2000 2000 2000 2000 CANON DADF-J1 REV.0 MAR.2001
5-69
CHAPTER 5 TROUBLESHOOTING
5 Self Diagnosis
5.1 Outline
The microprocessor on the DADF’s ADF controller PCB is equipped with a function to
check the condition of the machine. When it detects a fault, it will communicate the fact to
the copier in the form of a code. The communication may be any of the following three,
which may be checked by referring to the Original Set indicator or LED2 on the ADF controller PCB.
Fault
LED2 indication (code)
Original Set indicator
Alarm
Flashing at intervals of 240 msec
Jam
Flashing at intervals of 160 msec
Error
Flashing at intervals of 80 msec
Not used
T05-501-01
An alarm code or a jam may be checked in the copier’s service mode. In response to a
fault, the copier’s display will indicate its presence in the form of an error code.
Display
I/O
Adjust
Option
Function
< JAM >
< 1/7 >
Test
Counter
< READY >
01
0202
1707
1708
0
010B
7
11
A4
02
0202
1704
1706
0
010B
7
9
A4
03
0202
1703
1703
0
020A
7
7
A4
04
0202
1611
1623
2
1400
7
3
A4
05
0202
1611
1611
2
1400
0
0
-----
06
0202
1533
1534
2
1400
0
0
-----
07
----
----
----
-
----
-
------
-----
08
----
----
----
-
----
-
------
-----
Jam code
'1'indicates a jam
in the machine.
F05-501-01
5-70
COPYRIGHT © 2001 CANON INC. 2000 2000 2000 2000 CANON DADF-J1 REV.0 MAR.2001
CHAPTER 5 TROUBLESHOOTING
5.2 Alarms
The DADF may issue the following alarms:
Indication
03xx
11xx
Description
After an original has been
separated and moved over a
specific distance, the separation sensor does not detect the original.
At time of jam recovery, the
last original is detected before originals for recovery
(in reference to the number
of originals) have been
moved.
DADF
operation
Copier
operation
Resetting
Stops operation, Stops the ongo- Remove the origiand flashes the
ing operation.
nal, and place it
Original Set indionce again.
cator.
Stops the operation, and flashes
the Original Set
indicator.
Stops the ongo- Remove the origiing operation.
nals, and put them
back as they were.
T05-502-01
5.3 Jams
For descriptions of the types of jams, see 3. “Jams” on p. 2-74.
COPYRIGHT © 2001 CANON INC. 2000 2000 2000 2000 CANON DADF-J1 REV.0 MAR.2001
5-71
CHAPTER 5 TROUBLESHOOTING
5.4 Errors
E400
Cause
Detection
The combination cable between the DADF and the copier is faulty.
The ADF controller PCB is faulty.
While the DADF is in standby, the communication with the copier is disrupted for 5 sec or more.
While the DADF is in operation, the communication with the copier is disrupted for 0.5 sec or more.
E402
Cause
Detection
The belt motor (M2) is faulty.
The belt motor clock sensor (PI1) is faulty.
The ADF controller PCB is faulty.
When the belt motor drive signal is generated, no clock signal is detected
for 100 msec.
E404
Cause
Detection
The delivery motor (M5) is faulty.
The delivery motor clock sensor (PI11) is faulty.
The ADF controller PCB is faulty.
When the delivery motor drive signal is generated, no clock signal is detected for 200 msec.
E405
Cause
Detection
The separation motor (M4) is faulty.
The separation motor clock sensor (PI2) is faulty.
The ADF controller PCB is faulty.
When the separation motor drive signal is generated, no clock signal is generated for 200 msec.
T05-504-01a
5-72
COPYRIGHT © 2001 CANON INC. 2000 2000 2000 2000 CANON DADF-J1 REV.0 MAR.2001
CHAPTER 5 TROUBLESHOOTING
E410
Cause
Detection
The pickup motor (M3) is faulty.
The pickup roller height sensor 1 (PI8) is faulty.
The pickup roller height sensor 2 (PI9) is faulty.
The pickup roller home position sensor (PI7) is faulty.
The ADF controller PCB is faulty.
The pickup roller height sensor 1 (PI8) and the pickup roller height sensor 2
(PI9) do not generate a signal within 2 sec after the pickup motor has been
driven.
The pickup roller home position sensor (PI7) does not generate a signal
within 2 sec after the pickup motor has been driven.
E420
Cause
Detection
The backup data cannot be read; or, the data that has been read has an error.
When the copier is turned on, the backup data cannot be read twice; or, the
data that has been read has an error.
T05-504-01b
COPYRIGHT © 2001 CANON INC. 2000 2000 2000 2000 CANON DADF-J1 REV.0 MAR.2001
5-73
APPENDIX
COPYRIGHT© 2001 CANON INC.
CANON DADF-J1 REV.0 MAR. 2001
1 General Timing Chart
1.1 A4, 3 Single-Sided Originals, Stream Reading
Copy Start key ON
Separating 1st Holding 1st Reading 1st original
original
original
Holding 2nd original
Separating Separating 3rd original
2nd original
Delivering 1st original
Reading 2nd original
Holding 3rd original
Delivering 2nd original
Reading 3rd original
Delivering 3rd original
Original sensor (S6)
Pickup roller home
position sensor (PI 7)
Pickup roller height
sensor 1/2 (PI 8/9)
Stopper plate solenoid
(SL2)
Pickup motor (M3)
DOWN
UP DOWN
UP
DOWN
UP
UP
Separation clutch (CL)
Separation motor (M4)
Separation sensor (S4)
Skew sensor (S5)
Reversal motor (M1)
Pre-registration roller
paper sensor (S2)
Post-registration paper
sensor (S3)
Pre-reversing solenoid
(SL3)
Belt motor (M2)
Original delivery sensor
(PI 13)
Delivery motor (M5)
Delivery solenoid (SL4)
: motor CCW rotation.
COPYRIGHT© 2001 CANON INC. 2000 2000 2000 2000 CANON DADF-J1 REV.0 MAR. 2001
A-1
1.2 A3, 2 Single-Sided Originals, Stream Reading
Copy Start key ON
Separating 1st
original
Feeding 1st original
to wait position
Separating 2nd
original
Reading and delivering 1st original
Feeding 2nd original to wait position
Reading 2nd original
Delivering
2nd original
Original sensor (S6)
Pickup roller home
position sensor (PI 7)
Pickup roller height
sensor 1/2 (PI 8/9)
Stopper plate solenoid
(SL2)
Pickup motor (M3)
DOWN
UP
DOWN
UP
UP
Separation motor (M4)
Separation clutch (CL)
Separation sensor (S4)
Skew sensor (S5)
Reversal motor (M1)
Pre-registration roller
paper sensor (S2)
Post-registration paper
sensor (S3)
Pre-reversing solenoid
(SL3)
Belt motor (M2)
Original delivery sensor
(PI 13)
Delivery motor (M5)
Delivery solenoid (SL4)
: motor CCW rotation.
A-2
COPYRIGHT© 2001 CANON INC. 2000 2000 2000 2000 CANON DADF-J1 REV.0 MAR. 2001
1.3 279.4x431.8 mm (11"x17"),
2 Single-Sided Originals, Stream Reading
Copy Start key ON
Separating 1st
original
Feeding 1st
original to wait
position
Reading and delivering 1st original
Separating 2nd original, moving it to wait position
Reading 2nd original
Delivering
2nd original
Original sensor (S6)
Pickup roller home
position sensor (PI 7)
Pickup roller height
sensor 1/2 (PI 8/9)
Stopper plate solenoid
(SL2)
Pickup motor (M3)
DOWN
UP
DOWN
UP
UP
Separation motor (M4)
Separation clutch (CL)
Separation sensor (S4)
Skew sensor (S5)
Reversal motor (M1)
Pre-registration roller
paper sensor (S2)
Post-registration paper
sensor (S3)
Pre-reversing solenoid
(SL3)
Belt motor (M2)
Original delivery sensor
(PI 13)
Delivery motor (M5)
Delivery solenoid (SL4)
: motor CCW rotation.
COPYRIGHT© 2001 CANON INC. 2000 2000 2000 2000 CANON DADF-J1 REV.0 MAR. 2001
A-3
1.4 A4, 3 Single-Sided Originals, Fixed Reading
Copy Start key ON
Separating 1st
original
Reading 1st original
Separating 2nd original
Feeding 1st original to
delivery direction
Reading 2nd original
Separating 3rd original
Delivering 1st original
Feeding 2nd original to
delivery direction
Reading 3rd original
Delivering 2nd original
Feeding 3rd original to
3rd original delivery
direction
Delivering 3rd
original
Original sensor (S6)
Pickup roller home
position sensor (PI 7)
Pickup roller height
sensor 1/2 (PI 8/9)
Stopper plate solenoid
(SL2)
Pickup motor (M3)
DOWN
UP DOWN
UP
DOWN
UP
UP
Separation clutch (CL)
Separation motor (M4)
Separation sensor (S4)
Skew sensor (S5)
Reversal motor (M1)
Pre-registration roller
paper sensor (S2)
Post-registration paper
sensor (S3)
Pre-reversing solenoid
(SL3)
Belt motor (M2)
Original delivery sensor
(PI 13)
Delivery motor (M5)
: motor CCW rotation.
A-4
COPYRIGHT© 2001 CANON INC. 2000 2000 2000 2000 CANON DADF-J1 REV.0 MAR. 2001
1.5 A3, 2 Single-Sided Originals, Fixed Reading
Copy Start key ON
Separating
1st original
Reading 1st original
Separating 2nd original
Delivering 1st original
Reading 2nd original
Delivering
2nd original
Original sensor (S6)
Pickup roller home
position sensor (PI 7)
Pickup roller height
sensor 1/2 (PI 8/9)
Stopper plate solenoid
(SL2)
Pickup motor (M3)
DOWN
UP DOWN
UP
UP
Separation clutch (CL)
Separation motor (M4)
Separation sensor (S4)
Skew sensor (S5)
Reversal motor (M1)
Pre-registration roller
paper sensor (S2)
Post-registration paper
sensor (S3)
Pre-reversing solenoid
(SL3)
Belt motor (M2)
Original delivery sensor
(PI 13)
Delivery motor (M5)
: motor CCW rotation.
COPYRIGHT© 2001 CANON INC. 2000 2000 2000 2000 CANON DADF-J1 REV.0 MAR. 2001
A-5
1.6 A4, 3 Double-Sided Originals, Fixed Reading
Reading face of 1st original
Pre-reversing 2nd original
Feeding 2nd original
to copyboard glass
Copy Start key ON
Reversing
Reading
Separating Pre1st original
1st original reversing back of
1st original 1st original Separating
2nd original
Reading
back of
2nd
original
Reading face of 2nd original
Pre-reversing 3rd original
Feeding 3rd original
to copyboard glass
Reversing
2nd original
Separating
3rd original
Delivering 2nd original
Feeding 3rd original
Delivering
3rd original
Reading Reversing Reading
back of 3rd original face of
3rd
3rd
original
original
Original sensor (S6)
Pickup roller home
position sensor (PI 7)
Pickup roller height
sensor 1/2 (PI 8/9)
Stopper plate solenoid
(SL2)
Pickup motor (M3)
DOWN
UP
DOWN
UP
UP UP
DOWN
Separation clutch (CL)
Separation motor (M4)
Separation sensor (S4)
Skew sensor (S5)
Reversal motor (M1)
Reversing solenoid
(SL1)
Pre-registration roller
paper sensor (S2)
Post-registration paper
sensor (S3)
Pre-reversing solenoid
(SL3)
Reversing sensor (S1)
Pre-Reversing sensor
(PI 4)
Belt motor (M2)
Original delivery sensor
(PI 13)
Delivery motor (M5)
Delivery solenoid (SL4)
: motor CCW rotation.
A-6
COPYRIGHT© 2001 CANON INC. 2000 2000 2000 2000 CANON DADF-J1 REV.0 MAR. 2001
1.7 A3, 2 Double-Sided Originals, Fixed Reading
Copy Start key ON
Separating
1st original
Feeding 1st original
to copyboard glass
Reversing
1st original
Reading back
of 1st original
Reversing
1st original
Reading face of
1st original
Separating 2nd
original
Delivering 1st original Reading back of Reversing Reading face of Delivering
Moving 2nd original
2nd original
2nd original
2nd original 2nd original
to copyboard glass
Reversing 2nd original
Original sensor (S6)
Pickup roller home
position sensor (PI 7)
Pickup roller height
sensor 1/2 (PI 8/9)
Stopper plate solenoid
(SL2)
Pickup motor (M3)
DOWN
UP
DOWN
UP
Separation clutch (CL)
Separation motor (M4)
Separation sensor (S4)
Skew sensor (S5)
Reversal motor (M1)
Reversing solenoid
(SL1)
Pre-registration roller
paper sensor (S2)
Post-registration paper
sensor (S3)
Pre-reversing solenoid
(SL3)
Reversal sensor (S1)
Belt motor (M2)
Original delivery
sensor (PI 13)
Delivery motor (M5)
Delivery solenoid (SL4)
: motor CCW rotation.
COPYRIGHT© 2001 CANON INC. 2000 2000 2000 2000 CANON DADF-J1 REV.0 MAR. 2001
A-7
1.8 A4, 1 Single-Sided Original, Manual Feeding
Determining original set position
Original set
Picking up original
Feeding original
Reading original
Delivering original
Manual feed set sensor
(PI 12)
Delivery solenoid (SL4)
Pre-reversing solenoid
(SL3)
Manual feed registration
roller paper sensor (S9)
Belt motor (M2)
Reversal sensor (S1)
Delivery motor (M5)
Original delivery sensor
(PI 13)
Low speed
: motor CCW rotation.
A-8
COPYRIGHT© 2001 CANON INC. 2000 2000 2000 2000 CANON DADF-J1 REV.0 MAR. 2001
APPENDIX
2 Signals and Abbreviations
The following is a list of signals and its abbreviations used in this chapter and circuit diagrams.
The abbreviations in parentheses are electrical signals but are analog, which cannot be expressed in terms of '1' or '0'. Others are digital signals, which can be expressed in terms of '1'
and '0'.
BTCLK
B-Vref
CLD*
CW/CCW
DTLED
DTS
DTSAJ
EJCLK
EJJAM
EJMD*
LAS
LASAJ
LCVF
LCVR
M1OA
M1OA*
M1OB
M1OB*
M3OA
M3OA*
M3OB
M3OB*
MFRGS
MFRGSAJ
MFST
MO1
MO2
PKH1
PKH2
PKHP
REF-CLK
RFOP
RGAS
RGASAJ
RGBS
RGBSAJ
Belt Motor Clock Detection signal
Belt Motor Rotation Torque signal
Clutch Drive command
Rotation Direction signal
Original Set LED Drive command
Original Detection signal
Original Detection Reference signal
Delivery Motor Clock Detection signal
Original Delivery Detection signal
Delivery Motor Drive command
Pre-Last Original Paper Detection signal
Pre-Last Original Paper Detection Reference signal
Left Cover Front Open/Closed Detection signal
Left Cover Rear Open/Closed Detection signal
Reversal Motor Drive command
Reversal Motor Drive command
Reversal Motor Drive command
Reversal Motor Drive command
Pick-Up Motor Drive command
Pick-Up Motor Drive command
Pick-Up Motor Drive command
Pick-Up Motor Drive command
Manual Feeder Registration Roller Original Detection signal
Manual Feeder Registration Roller Original Detection Reference signal
Manual Feeder Original Set Detection signal
Belt Motor Drive command
Belt Motor Drive command
Pick-Up Roller Height Detection signal 1
Pick-Up Roller Height Detecting signal 2
Pick-Up Roller Home Position Detection signal
Belt Motor Phase Control command
ADF Open/Closed Detection signal
Registration Rear Original Edge Detecting signal
Registration Roller Rear Original Edge Detection Reference signal
Registration Roller Front Original Edge Detection signal
Registration Roller Front Original Edge Detection Reference signal
COPYRIGHT© 2001 CANON INC. 2000 2000 2000 2000 CANON DADF-J1 REV.0 MAR. 2001
A-9
APPENDIX
PRTR
SEPM+
SEPMSKS
SKSAJ
SL1D*
SL2D1*
SL2D2*
SL3D*
SL4D1*
SL4D2*
SPCLK
SPS
SPSAJ
SSW-0
SSW-1
SSW-2
SSW-3
SSW-4
TAILS
TAILSAJ
TNS
TNSAJ
TRCLK
T-Vref
A-10
Pre-Reversal Detection signal
Separation Motor Drive command
Separation Motor Drive command
Original Skew Detection signal
Original Skew Detection Reference signal
Reversing Solenoid Drive command
Stopper Plate Solenoid Drive command (position 1)
Stopper Plate Solenoid Drive command (position 2)
Pre-Reversal Solenoid Drive command
Delivery Solenoid Drive signal (position 1)
Delivery Solenoid Drive signal (position 2)
Separation Motor Clock Detection signal
Separation Detection signal
Separation Detection Reference signal
Original Width Detection signal 0
Original Width Detection signal 1
Original Width Detection signal 2
Original Width Detection signal 3
Original Width Detection signal 4
Original Trailing Edge Detection signal
Original Rear Edge Detection Reference signal
Reversal Detection signal
Reversal Detection Reference signal
Registration Roller Clock Detection signal
Reversal Motor Rotation Torque signal
COPYRIGHT© 2001 CANON INC. 2000 2000 2000 2000 CANON DADF-J1 REV.0 MAR. 2001
3 General Circuit Diagram
2
1
J111FS
J102F S
J111M
J111F
J102M
J102F
2
1
2
3
4
5
6
1
1
3
2
3
1
2
1
2
J92FS
J93FS
2
1
8
7
6
2
4
3
5
6
1
5
4
3
3
2
1
J81F
1
1
2
1
2
5
6
3
2
PI11
4
5
Delivery motor
clock sensor
6
J602M EI
J601M
2
4
3
5
6
7
8
9
10 11 12 13
J71F
1
2
J31M
4
3
5
6
7
8
9
10 11 12 13
1
1
2
3
4
5
6
7
14 13 12 11 10
9
8
7
8
9
10 11 12 13
6
5
4
3
2
1
1
2
3
4
5
6
7
13 12 11 10
9
8
7
8
9
6
5
J10
J9
J8
J7
4
3
2
2
1
J3
1
2
12
9
11
10
10
11
9
12
8
13
7
14
6
15
5
5
4
4
3
4
3
3
4
3
2
5
1
6
1
1
2
1
3
J128F
7
4
6
5
5
6
4
7
3
8
1
9
2
1
1
5
2
2
4
2
3
3
3
3
4
2
4
1
1
2
2
4
5
J140F
J140FS
J140M
2
1
3
1
2
2
1
3
MT4
6
9
10
11
12
13
14
2
3
S8
P
S
Pre-last
original
sensor
MT5
1
2
2
1
PI13
3
2
2
3
10
1
7
9
2
6
8
3
5
7
4
4
1
6
5
3
2
6
2
3
4
7
1
4
2
1
3
2
2
1
2
3
Manual feed
set sensor
5
3
PI12
1
11
1
1
1
Original
delivery sensor
12
3
2
M5
1
3
14
8
5V
GND
TRNS
TRNSAJ
5V
GND
LCVF
GND
TRCLK
5V
EJJAM
GND
13 5V
1
12 EJMD*
2
11 24V
3
10 MFST
4
9 GND
5
8 5V
7 MFRGSAJ 6
7
6 MFRGS
8
5 GND
9
4 5V
10
3 SL4D2*
11
2 SL4D1*
12
1 24V
15
7
DTSAJ
GND
5V
GND
PKHP
5V
GND
PKH1
5V
GND
PKH2
2
Delivery motor
ADF controller PCB
5
1
MT3
J24FS
4
3
1
Original trailing
13 edge sensor
12
1
2
3
4
S9
P
S
Manual feed registration
roller paper sensor
Delivery solenoid
(2 positions)
MT1
3
2
1
7
6
5
4
3
2
1
PG
24V
GND
24V
GND
TXD
RXD
EDGO
GND
W1
Interface cable
MT1
J2_2
J2_1
3
1
1
2
2
3
8
3
2
J149F
J149M
J142M
J143M
PI5
2
3
1
3
9
1
J148F
PI6
3
1
13
1 2 3 4
S
Reversal
sensor
2
1
J143F
J148M
1
1
11
12
1
3
S
7
2
S1
Registration roller
clock sensor
3
2
J147F
J147M
PI9
Pickup roller height
sensor 2
S6
1
1
1
3
Pickup roller height
sensor 1
Left cover sensor
(front)
2
J146F
J146M
PI8
2
LED2
2
P
3
J14
Pickup roller home
position sensor
P
3
3
2
J144F
PI7
CT
Original sensor
(light-emitting side)
1
J145F
1
2
J141F
2
2
10
2
J501A
6
2
11
S7
J501C
1
5
J131F
6
5
J145M
S
6
10
9
J26F
1
1
3
J26M
8
9
MT2
GND
DTS
RGBSAJ
RGBS
RGASAJ
RGAS
GND
5V
SPSAJ
SPS
SKSAJ
SKS
GND
5V
2
SW.301
8
J25M
1
8
4
J25F
6
7
J24F
J24M
1
6
SL4
3
7
7
5
J23FS
4
6
2
5
6
Original
width
detection
switch
4
5
J22FS
5
3
5
6
3
4
J23F
J23M
4
4
2
2
3
J22F
J22M
3
3
1
Tray PCB
1
2
J27M
4
2
2
J56M
8
1
1
J56F
13
J53M
7
DTLED
GND
24V
5V
GND
TAILS
TAILSAJ
LASTS
LASTSAJ
SSW_0
SSW_1
SSW_2
SSW_3
SSW_4
SSW_C
J52M
14
J52F
15
6
J27F
5
J144FS
J144M
P
J134M
S5
Skew sensor
1
J51M
5
J5
6
4
J141FS
J141M
S
2
2
4
J2
3
5
J132FS
J132M
6
2
J132F
1
J131FS
J131M
P
J134F
S4
1
J54F
3
J4
7
Post-registration roller
paper sensor
Separation
sensor
2
J54FS
J54M
J1
8
2
5
J133F
1
1
6
J133FS
J133M
2
J135F
3
J135M
S
1
J55F
J13
4
P
J55M
3
1
J6
3
5
S3
3
J51F
1
1
6
S
2
J21FS
3
2
J123F
J123M
1
2
1
J125M
2
Pre-registration roller
paper sensor
P
Display PCB
3
10 11 12 13
4
S2
2
J31F
J601F
1
2
1
4
Reversal motor driver PCB
Belt motor driver PCB
J91M
J91F
3
J602F
J71M
2
SEPMSEPM+
2
SL2D2*
SL2D1*
1
3
GND
LOCK
24V
2
SL1D*
3
1
24V
4
24V
SL3D*
24V
CLD*
1
2
J92M
J92F
J93M
J93F
24V
J121M
2
J21F
J21M
J136M
1
3
2
J136F
2
1
3
PI10
S6
2
1
ADF open/closed
sensor
Original sensor
(light-receiving
side)
GND
BTCLK
5V
GND
SPCLK
5V
5V
GND
LCVR
5V
GND
PRTR
5V
GND
RFOP
3
2
J124F
J124M
1
J11
3
3
2
2
1
J12
PI3
Pre-reversal sensor
3
6
1
Left cover sensor
PI4
4
M1
5
1
J125F
J122M
2
1
1
5
1
J91FS
J81M
J101M
J101F
6
4
2
J122F
Separation motor
clock sensor
2
1
3
3
PI2
2
J121F
Belt motor
clock sensor
3
3
J72M
J101F S
2
24V
24V
M30B*
M30A*
M30B
M30A
PI1
2
J72F
M4
1
1
3
1
EJCLK
1
5V
2
5V
3
PG
PG
PG
24V
24V
24V
GND
4
Reversal motor
M2
B-Vref
M2OA
M2OB
M2OA*
M2OB*
5
Belt motor
PG
PG
PG
24V
24V
24V
GND
6
Stopper plate solenoid
(2 positions)
Cooling
SL2
fan
Reversing
Pre-reversing FM1
solenoid
solenoid
Separation
SL3
SL1
motor
GND
CL1
5V
Clutch
M3
T-Vref
M1OA
M1OB
M1OA*
M1OB*
Pickup motor
3
COPYRIGHT© 2001 CANON INC. 2000 2000 2000 2000 CANON DADF-J1 REV.0 MAR. 2001
A-11
4 ADF Controller Circuit Diagram
ADF Controller Circuit Diagram (1/11) A502
COPYRIGHT© 2001 CANON INC. 2000 2000 2000 2000 CANON DADF-J1 REV.0 MAR. 2001
A-13
ADF Controller Circuit Diagram (2/11) A503
A-14
COPYRIGHT© 2001 CANON INC. 2000 2000 2000 2000 CANON DADF-J1 REV.0 MAR. 2001
ADF Controller Circuit Diagram (3/11) A504
COPYRIGHT© 2001 CANON INC. 2000 2000 2000 2000 CANON DADF-J1 REV.0 MAR. 2001
A-15
ADF Controller Circuit Diagram (4/11) A505
A-16
COPYRIGHT© 2001 CANON INC. 2000 2000 2000 2000 CANON DADF-J1 REV.0 MAR. 2001
ADF Controller Circuit Diagram (5/11) A506
COPYRIGHT© 2001 CANON INC. 2000 2000 2000 2000 CANON DADF-J1 REV.0 MAR. 2001
A-17
ADF Controller Circuit Diagram (6/11) A507
A-18
COPYRIGHT© 2001 CANON INC. 2000 2000 2000 2000 CANON DADF-J1 REV.0 MAR. 2001
ADF Controller Circuit Diagram (7/11) A508
COPYRIGHT© 2001 CANON INC. 2000 2000 2000 2000 CANON DADF-J1 REV.0 MAR. 2001
A-19
ADF Controller Circuit Diagram (8/11) A509
A-20
COPYRIGHT© 2001 CANON INC. 2000 2000 2000 2000 CANON DADF-J1 REV.0 MAR. 2001
ADF Controller Circuit Diagram (9/11) A510
COPYRIGHT© 2001 CANON INC. 2000 2000 2000 2000 CANON DADF-J1 REV.0 MAR. 2001
A-21
ADF Controller Circuit Diagram (10/11) A511
A-22
COPYRIGHT© 2001 CANON INC. 2000 2000 2000 2000 CANON DADF-J1 REV.0 MAR. 2001
ADF Controller Circuit Diagram (11/11) A512
COPYRIGHT© 2001 CANON INC. 2000 2000 2000 2000 CANON DADF-J1 REV.0 MAR. 2001
A-23
APPENDIX
5 Reversal Motor Driver Circuit Diagram
+24V
1 6 1 5 1 4 1 3 1 2 1 1 1 0
J601
12
2
9
8
7
6
5
4
3
2
V c c 2
A O U T
A * O U T
P G
S G
B O U T
B * O U T
T d 1
A V r e f
T d 2
B V r e f
N C
A I N
1
B I N
+5U
A * I N
13
B * I N
J601
J602
Q651
+5U
+5U
J602
C653
2
1
1
J602
3
3
R656
4
J601
5
J602
R655
4
11
R654
J601
10
J602
RA651
5
R653
C651
J601
J602
6
9
R651
J601
8
R652
C654
C652
J601
7
+24V
J601
E
6
J601
5
J601
4
J601
3
J601
2
C655
C656
J601
1
COPYRIGHT© 2001 CANON INC. 2000 2000 2000 2000 CANON DADF-J1 REV.0 MAR. 2001
A-25
APPENDIX
6 Belt Motor Driver Circuit Diagram
+24V
1 6 1 5 1 4 1 3 1 2 1 1 1 0
J71
12
2
9
8
7
6
5
4
3
2
V c c 2
A O U T
A * O U T
P G
S G
B O U T
B * O U T
T d 1
A V r e f
T d 2
B V r e f
N C
A I N
1
B I N
+5U
A * I N
13
B * I N
J71
J72
Q651
+5U
+5U
J72
C653
2
1
1
J72
3
3
R656
4
J71
5
J72
R655
4
11
R654
J71
10
J72
RA651
5
R653
C651
J71
J72
6
9
R651
J71
8
R652
C654
C652
J71
7
+24V
J71
E
6
J71
5
J71
4
J71
3
J71
2
C655
C656
J71
1
A-26
COPYRIGHT© 2001 CANON INC. 2000 2000 2000 2000 CANON DADF-J1 REV.0 MAR. 2001
APPENDIX
7 Reversal Sensor Circuit Diagram
+5R
R501
D503
Q501
1J
149
2J
149
3J
149
4J
149
+5R
LED
501
R504
R505
C501
+5R
R503
PTR501
2
3
+
6
8
1
5
+
8
7
4
4
Q502
Q502
R502
+5R
R506
D502
R507
+5R
COPYRIGHT© 2001 CANON INC. 2000 2000 2000 2000 CANON DADF-J1 REV.0 MAR. 2001
A-27
APPENDIX
8 Pre-/Post-Registration Roller Sensor Circuit Diagram
+5R
R401
D403
J135
Q401
6
R405
R404
+5R
LED401
+5R
+5R
R402
R403
2
PTR401
2
3
+
8
1
4
3
+
8
1
J135
4
5
Q404
Q403
+5R
R406
R407
D402
+5R
R414
D404
J135
Q402
4
R412
R411
+5R
LED402
+5R
+5R
C402
C401
6
PTR402
6
5
+
8
7
4
R415
R410
5
+
8
7
J135
4
3
Q404
Q403
+5R
R413
J135
R416
2
D405
+5R
J135
1
A-28
COPYRIGHT© 2001 CANON INC. 2000 2000 2000 2000 CANON DADF-J1 REV.0 MAR. 2001
APPENDIX
9 Separation Sensor/Skew Sensor Circuit Diagram
+5R
R451
D453
J134
Q451
R454
6
R455
+5R
LED451
+5R
+5R
R452
R453
2
PTR451
2
3
+
8
1
4
3
+
8
1
J134
4
5
Q454
Q453
+5R
R456
R457
D452
+5R
R464
D454
J134
Q452
R461
4
R462
+5R
LED452
+5R
+5R
C452
C451
6
PTR452
6
5
+
8
7
4
R465
R460
5
+
8
7
J134
3
4
Q454
Q453
+5R
R463
J134
D455
2
R466
+5R
J134
1
COPYRIGHT© 2001 CANON INC. 2000 2000 2000 2000 CANON DADF-J1 REV.0 MAR. 2001
A-29
APPENDIX
10 Original Sensor (light-emitting) Circuit Diagram
J145
1
LED751
J145
2
11 Original Sensor (light-receiving) Circuit Diagram
J136
1
TPS616C
J136
2
A-30
COPYRIGHT© 2001 CANON INC. 2000 2000 2000 2000 CANON DADF-J1 REV.0 MAR. 2001
12 Tray Circuit Diagram
COPYRIGHT© 2001 CANON INC. 2000 2000 2000 2000 CANON DADF-J1 REV.0 MAR. 2001
A-31
APPENDIX
13 Pre-Last Original Paper Sensor Circuit Diagram
J56
4
J56
3
LED852
J56
2
PTR851
LED851
J56
1
14 Original Set Indicator Circuit Diagram
J55
1
R901
R902
LED901
LED902
J55
2
COPYRIGHT© 2001 CANON INC. 2000 2000 2000 2000 CANON DADF-J1 REV.0 MAR. 2001
A-33
APPENDIX
15 Manual Feed Registration Roller Paper Sensor
Circuit Diagram
+5R
R557
D551
Q552
1J
25
2J
25
3J
25
4J
25
+5R
LED551
R553
R554
C551
+5R
R555
PTR551
2
3
+
6
8
1
5
+
8
7
4
4
Q551
Q551
R552
+5R
R556
D552
R558
+5R
A-34
COPYRIGHT© 2001 CANON INC. 2000 2000 2000 2000 CANON DADF-J1 REV.0 MAR. 2001
APPENDIX
16 Special Tools
You will need the following special tool when servicing the machine in addition to the
standard tools set
No.
1
Tool name
Digital
multifeeder
Memo
Tool No.
Shape
FY9-2002-000
Rank*
A
Remarks
For making
electrical checks
*Use the following as a guide:
A: Each service person is expected to carry one.
B: Each group of five service persons is expected to carry one.
C: Each workshop is expected to carry one.
17 Solvents and Oils List
No.
Name
1
Alcohol
2
Lubricant
Uses
Composition
Cleaning;
e.g., glass,
plastic, rubber
(external
covers).
Driving parts,
friction parts
Fluorine-family
hydrogen
carbon, alcohol,
surface
activating agent
Silicone oil
COPYRIGHT© 2001 CANON INC. 2000 2000 2000 2000 CANON DADF-J1 REV.0 MAR. 2001
Remarks
• Do not bring near fire.
• Procure locally.
• IPA (isopropyl alcohol)
CK-0551 (20 g)
A-35
Prepared by
Office Imaging Products Quality Assurance Center
CANON INC.
Printed in Japan
REVISION 0 (MAR. 2001) (30359)
5-1, Hakusan 7-chome, Toride-shi, Ibaraki 302-8501 Japan
COPYRIGHT© 2001 CANON INC.
CANON DADF-J1 REV.0 MAR. 2001 PRINTED IN JAPAN (IMPRIME AU JAPON)
This publication is
printed on 100%
recycled paper.
PRINTED IN JAPAN (IMPRIME AU JAPON)
0000DI0.00-0