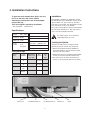
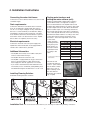
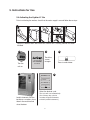
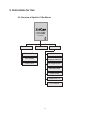
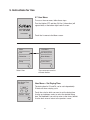
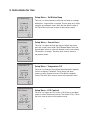
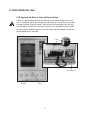
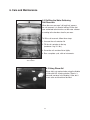
1
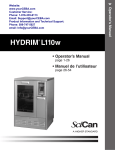
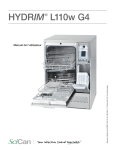
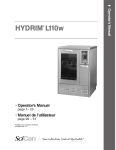
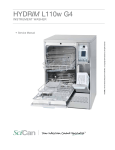
HYDRIM L110w
• Operator’s Manual
page 1– 26
• Manuel de l’utilisateur
page 28 – 53
Operator’s Manual
®
Table of Contents
1. Introduction . . . . . . . . . . . . . . . . . . . . . . 1
6. Care and Maintenance . . . . . . . . . . . 18
2. Important Information . . . . . . . . . . . . . 2
6.1 Replacing the HIP Cleaning Solution . . 18
6.2 Refilling the Water Softener
Salt Reservoir . . . . . . . . . . . . . . . . . . . . . . 19
6.3 Using Rinse Aid . . . . . . . . . . . . . . . . . . . 19
6.4 Cleaning the Hydrim L110w . . . . . . . . . 20
6.5 Filter and Wash Arm Maintenance . . . . 20
3. Disclaimers . . . . . . . . . . . . . . . . . . . . . . 3
4. Installation Instructions . . . . . . . . . . . . 4
5. Instructions for Use . . . . . . . . . . . . . . . 6
5.1 Instrument Reprocessing
Recommendations . . . . . . . . . . . . . . . . . . 6
5.2 Cycle Description Chart . . . . . . . . . . . . . . 7
5.3 Baskets and Accessories. . . . . . . . . . . . . 8
5.4 Activating the Hydrim L110w . . . . . . . . . . 9
5.5 Interrupting / Aborting a Cycle . . . . . . . . 10
5.6 Overview of the Hydrim L110w Menus . . . 11
5.7 User Menu . . . . . . . . . . . . . . . . . . . . . . . 12
5.8 Technician Menu . . . . . . . . . . . . . . . . . . 13
5.9 Setup Menu . . . . . . . . . . . . . . . . . . . . . . 14
5.10 Opening the Door in
Case of Power Failure . . . . . . . . . . . . . . 17
Manufactured by:
SciCan Ltd.
1440 Don Mills Road,
Toronto ON M3B 3P9
CANADA
Phone:
416-445-1600
Fax:
416-445-2727
Toll free:
1-800-667-7733
7. Troubleshooting. . . . . . . . . . . . . . . . . 21
8. Material Safety Data Sheet . . . . . . . . 23
9. Specifications . . . . . . . . . . . . . . . . . . 26
10. Serial Number Plate . . . . . . . . . . . . 26
For all service
Canada:
United States:
EU:
International:
Email:
HYDRIM and STATIM are registered trademarks of SciCan Ltd. HIP is a trademark of SciCan Ltd. All
other trademarks referred to in this manual are the property of their respective owners.
and repair inquiries:
1-800-870-7777
1-800-572-1211
+49- (0)821-56-74-56-0
1-416-445-1600
[email protected]
1. Introduction
Thank you for selecting the Hydrim L110w instrument washer. The Hydrim complements
the Statim® autoclave by quickly and hygienically preparing soiled instruments for sterilization. To ensure years of safe, trouble-free service, carefully review this Operator’s Manual
before operating the unit. The Hydrim L110w is suitable only for the applications listed in
this manual. Using the Hydrim for other purposes may be dangerous. The manufacturer
cannot be held responsible for damage caused by improper use.
Operational, maintenance and replacement instructions must be followed for the product
to perform as designed. All trademarks referred to in this manual are the property of their
respective owners. Contents of this manual are subject to change without notice to reflect
changes and improvements to the Hydrim product.
The Hydrim L110w should only be installed and serviced by a qualified contractor as it is
an Installation Category 2 device. Before connecting the unit, the installer should check
that the voltage and frequency of the electrical supply correspond with the details in the
installation instructions. The unit must only be plugged into a grounded outlet. Please note
that this unit is completely isolated from the electrical supply only when it is unplugged or
the circuit breaker is turned OFF. This must be done before any repair work is carried out.
The Hydrim L110w uses HIP™ Cleaning Solution exclusively. The unit will not perform
as described if other detergents / cleaning products are used. Other detergents / cleaning
products may damage the unit, the instruments, cause excessive foaming, and void
the warranty. Do not use solvents in this unit. Do not allow small children or unauthorized
personnel access to this unit or its controls.
1
2. Important Information
The following symbols appear in this book.
Caution, there is a potential hazard to the operator.
This situation may lead to a mechanical failure.
This is important information.
The following symbols appear on the touchscreen:
Used to stop the cycle
Forward Arrow – used to move to the next menu
Back Arrow – used to move to the previous menu
Up Arrow – used to adjust a value up, or to move between screens in a menu
Down Arrow – used to adjust a value down, or to move between screens in a menu
Unlock – used to unlock the door
X
Used to clear the error history
Info menu – allows access to User, Setup and Technician menus.
2
3. Disclaimers
Do not permit any person other than authorized personnel to service, maintain or
supply parts for your Hydrim L110w. SciCan shall not be liable for incidental, special
or consequential damages caused by any maintenance or services performed on
the Hydrim L110w by unauthorized personnel, or for the use of equipment or parts
manufactured by a third party, including lost profits, any commercial loss, economic
loss, or loss arising from personal injury.
Never remove the covers of the unit and never insert objects through holes or
openings in the cabinetry. Doing so may damage the unit and/or pose a hazard to the
operator. If the unit is used in a manner other than that specified, the protection
provided by the equipment may be impaired. Avoid contact with eyes and mouth. Never
lean on the open door. The unit may tip forward causing injury.
Always turn the unit OFF before adding softener salt, adding solutions or performing
routine maintenance to the unit.
The owner shall not allow any personnel other than the trained and authorized personnel
to operate the unit. For further information or questions about the Hydrim L110w,
contact your authorized dealer or:
SciCan Ltd.
1440 Don Mills Road
Toronto ON M3B 3P9
CANADA
Phone: (416) 445-1600
Fax: (416) 445-2727
Toll free: 1-800-667-7733
For all service and repair inquiries
Canada: 1-800-870-7777
United States: 1-800-572-1211
EU +49-(0)821-56-74-56-0
International 1-416- 445-1600
Email: [email protected]
SciCan Inc.
701 Technology Drive
Canonsburg, PA 15317
USA
Phone: (412) 494-0181
Fax: (412) 494-4794
Toll free: 1-800-572-1211
SciCan Medtech
Alpenstrasse 16
6300 Zug, Switzerland
Tel: +41(0) 41-727-7027
Fax: +41(0) 41-727-7029
3
4. Installation Instructions
To open the wash chamber door, plug in the unit,
turn it on and press the unlock symbol.
Alternatively, remove the screw in the kickplate
and pull the ring.
Tools and supplies required for installation:
• Slot screwdriver
• Channel locks
208 – 240 V
Frequency: 60 Hz
Rated load: 2 kW
Circuit
breaker:
15 A
per phase
Height:
850 mm / 33.5"
Width:
600 mm / 23.75"
Depth:
600 mm / 23.75"
Depth with
door open:
1200 mm / 47"
Leveling the Hydrim:
Weight:
80 kg / 176 lbs
The unit is standing on three supports: rollers
(wheels) at the back and two legs at the front.
Running Noise: 60 dBA
Length /
Diameter
Max. Distance
Distance from
inlet / drain
Water
Pressure
Shut
-off
valve
Hot inlet
1.9 m / 6 ft.
3/4"
1.5 m / 5 ft.
1-10 bar /
14.5-145 psi
Yes
Cold Inlet
1.9 m / 6 ft.
3/4"
1.5 m / 5 ft.
1-10 bar /
14.5-145 psi
Yes
Drain
1.5 m / 5 ft.
3/4"
—
—
—
Electrical
1.8 m
AWG 14-3
—
—
—
power cord
cold water inlet hose
For safety reasons, do not install the
Hydrim without the top cover.
1. Remove the kickplate. Push the Hydrim into
place while lifting the strap at the front to allow
the unit to roll on the rollers.
Utility Hook-ups
Hose /
Cord
If the Hydrim is installed in a Sterilization Center,
the manufacturer of the Sterilization Center should
allow a 10mm / 1/2" space at the top, back and
both sides of the Hydrim. This will facilitate installation, and service access to the Hydrim.
Do not move the Hydrim into place by maneuvering
the open wash chamber door. This may cause to
door to become misaligned and leak.
Specifications:
Voltage:
Installation:
2. Adjust the front legs as required until the Hydrim
is level. Access the legs from inside the unit.
3. The rear two legs are used only if the floor is
uneven or cannot provide support to the rollers.
hot water inlet hose
4
drain hose
rollers
4. Installation Instructions
Connecting the water inlet hoses:
Testing water hardness and
setting the water softener (salt):
Connect the hot and cold water inlet hoses to the hot and
cold water supply.
Hydrim is equipped with a built-in water softening
system which needs to be adjusted according to
the local water hardness. The Hydrim water test kit
includes three water hardness test strips in bags. Take
a water sample from the location where the machine
will be installed. Open one of the bags and remove
the test strip. Dip the strip in the water. Compare the
color of the strip with the chart on the back of the bag.
Determine the water hardness according to the chart
on the water test kit envelope. Power the unit on.
Touch the “i” in the lower right hand corner of the
sceen. Select
“Setup” and then
Hardness – ppm
Hydrim setting
“Set Regeneration”.
0 - 180
0
Using the up and
190 - 210
1
down arrows, set
220 - 250
2
the water softener
260 - 300
3
regeneration level
310 - 350
4
according to this
360 - 400
5
table:
410 - 540
6
Drain requirements:
Connect the drain hose to the drain outlet. The drain
hose can be attached to existing drain lines using a
3.5 cm / 1.5" or larger standpipe / P-trap combination. If
the hose is connected directly to the drain line, fittings
and adapters should not reduce water flow. The drain
hose should be attached to the main drain at a point no
more than 1 metre /3 ft. above the base of the Hydrim.
A floor drain is acceptable (check local codes).
Electrical requirements:
Connect the electrical cord to the power supply. The
Hydrim must have a dedicated circuit equipped with a
15A fuse. The outlet must be grounded.
Additional Information:
• The Hydrim unit is heavy. Use a forklift or dolly and
exercise caution when moving it.
* consider using an additional
• The Hydrim should be serviced on site.
water treatment
• The Hydrim is equipped with an air gap / anti-suction
device to prevent backflow of dirty water into the
water supply. No other air gap device is necessary.
Unscrew the salt
container lid and pour
1 litre / 1 quart of water
into the water softener.
Add 1 kg / 2.2 lbs of
water softening salt in
the same manner.
Screw the salt container
cap on tightly.
• If you need to extend the water inlet and drain hoses,
ensure that you use commercial grade plumbing hose.
The maximum length of the drain hose is 3.3 m / 13 ft.
Installing Cleaning Solution:
Install HIP Cleaning Solution as follows:
550 - 890*
> 890
7
water
treatment required
salt container
Installation Test: Turn on the shut-off valves. Run a cycle, checking for leaks in the plumbing connections.
5
5. Instructions for Use
5.1 Instrument Reprocessing Recommendations
The Hydrim L110w is designed to clean general dental and medical instruments.
SciCan recommends terminal sterilization after processing in the Hydrim L110w.
When used correctly, the Hydrim L110w is effective for the removal of debris on
instruments that may result in the insulation of microorganisms during terminal
sterilization. Prior to placing instruments in the Hydrim, consult the instrument
manufacturer's reprocessing instructions. All critical and semi-critical instruments can be
considered clean after processing in the Hydrim L110w. Non-critical instruments can be
terminally processed in the Hydrim L110w.
Examples of medical and dental instruments suitable for cleaning in the Hydrim L110w
include:
• Stainless steel scalers, spatulas and hemostats.
• Stainless steel retractors, needle holders, skin hooks, tissue forceps, scissors,
curettes, and other stainless steel instruments free of deep cavities.
For best results, instruments processed in the Hydrim L110w should
have the following properties:
• Heat resistance to a temperature of up to 70°C / 158°F
• Corrosion resistance in the presence of heat and alkalinity.
Burs, dental handpieces, microkeratomes, phaco tubing, fiberoptics and electrical
equipment should not be processed in the Hydrim.
HIPTM (Hydrim Cleaning Solution with Instrument Protection) has been carefully
formulated to provide outstanding material compatibility with a wide range of metals and
coatings. However, some manufacturers' instruments may not be compatible.
All hinged instruments should be placed in open baskets in P3 Heavy-Duty cycle.
When processing small or light objects in the Hydrim use the basket with lid
(SciCan part number 01-109966S).
6
5. Instructions for Use
5.2 Cycle Description Chart
P1 – Rinse and
Hold* Cycle
Description
Use to prevent
soil from drying
on instruments
when they will not
be washed within
one hour
P2 – Regular
Cycle
P3 – Heavy Duty
Cycle
Use for moderately
soiled loose
instruments.
Use for heavily
soiled instruments
and cassettes
Cold Prewash
<45ºC / 113ºF
N/A
<45ºC / 113ºF
Wash
N/A
50ºC / 122ºF
5 minutes
50ºC / 122ºF
9 minutes
Rinse
60ºC / 140ºF
60ºC / 140ºF
60ºC / 140ºF
Dry
N/A
0-20 min.
(10 min. default)
0-20 min.
(10 min. default)
Total Time**
without drying
9 minutes
16 minutes
25 minutes
Water
Consumption
11.5L / 3 gallons
19L / 4.75 gallons
25L / 6.25 gallons
* This is not a wash cycle. Always run a wash cycle following the rinse and hold cycle.
** Cycle times depend on the temperature and pressure of incoming water.
7
5. Instructions for Use
5.3 Baskets and Accessories
Observe the instrument manufacturer's recommendations for cleaning and care. When
loading the unit, arrange loose instruments so that they do not touch one another.
Instruments with concave surfaces or cavities should be placed so that water can drain freely.
The following are included with the Hydrim:
Rack for five 8" x11"
cassettes, for upper or
lower trolley. Full size (1/1).
Part-number 01-109963S
Basket with lid. Quarter
size (1/4). Part-number
01-109966S
Rack for five medium size
cassettes, for upper or
lower trolley. Half-size (1/2).
Part-number 01-109964S
Hygiene basket for loose
instruments. Quarter
size (1/4). Part-number
01-109967S
The following are optional:
Statim 5000 basket.
Part-number
01-107241
Rack for four 11" x 14"
cassettes, for upper or
lower trolley. Full size (1/1).
Part-number 01-109965S
Long Basket.
Part-number
01-108232
Hinged instrument rack.
Part-number 15793.00
Statim 2000 basket.
Part-number 01-107240
8
5. Instructions for Use
5.4 Activating the Hydrim L110w
Prior to activating the washer, check that the water supply is on and follow these steps:
1
Open the chemical door and ensure that a box of HIP Cleaning Solution has been
installed.
3
2
HYDRIM
Turn the
unit on.
4
Touch the
screen
to begin.
Press to unlock door.
SH11MR301
5
P1 Rinse
6
P2 Wash
P3 HD Wash
Select the desired cycle.
Load instruments into the
baskets or cassettes, place
them in the machine and
close the door.
The cycle will start automatically.
(Use a heavy duty cycle for
cassettes, hinged instruments
or heavily soiled instruments.)
9
5. Instructions for Use
P2 Wash
FILLING
The cycle will start by draining the unit for 20 seconds. The bar
on the screen indicates the progression of the cycle. The stage
within the cycle is shown beneath the bar (eg. Filling, Rinsing).
The estimated time remaining (in minutes) is always displayed.
Please note that the time will increase or decrease depending
on the projected cycle completion.
36 min
P2 Wash
Cycle Complete
When the cycle is complete, the program name and “Cycle
Complete” is displayed, and the unit beeps three times.
Press
to open the door. Use gloves to unload the
instruments. After all cycles, exercise caution as the
instruments, trolley, baskets and cassettes may be hot. Inspect
the instruments for debris prior to packaging / sterilizing.
5.5 Interrupting / Aborting a Cycle
P2 Wash
Instruments
not processed
OK
The door of the Hydrim is locked during the cycle. If the STOP
button is pressed, the cycle is aborted and cannot be re-started.
The message “Draining. Please wait” will appear. The unit will
drain. Then the message “Instruments not processed” will
appear. Press OK. Open the door by pressing
. Use gloves
if handling the instruments. Exercise caution as instruments,
trolley, baskets and cassettes may be hot. The cycle must be
repeated to ensure that instruments are properly processed.
Note that if the drying phase of the cycle is interrupted, the
critical parts of the cycle are complete and the message
displaying the program name and “Cycle Complete. Drying
interrupted” will appear.
10
5. Instructions for Use
5.6 Overview of Hydrim L110w Menus
HYDRIM
SH11MR301
User
Technician
Setup
Set Drying Time
Unit No.
Error History
Language Selection
Cycle Count
Set Regeneration
Set Button Beep
Screen Saver
Temperature C/F
LCD Contrast
11
5. Instructions for Use
5.7 User Menu
To access the user menu, follow these steps:
Turn the Hydrim OFF and then ON. An i (information) will
appear briefly at the bottom right hand of screen.
HYDRIM
SH11MR301
Touch the i to move to the Menu screen.
Menu
User Menu
User
Set Drying Time
Technician
Error History
Setup
Cycle Count
Select User.
Set Drying Time
P2 Wash
10min
Default 10min
The user menu consists
of three choices.
User Menu – Set Drying Time
The drying time for P2 and P3 can be set independently.
P1 does not have a drying cycle.
Touch the cycle for which you want to set the drying time.
Use the up and down arrows to select the desired drying
time. Touch default if you wish to return to the factory default.
Use the back arrow to return to the previous screen.
12
5. Instructions for Use
User Menu
Set Drying Time
Error History
User Menu – Error History
Error History
Printout 1 Page 1/2
HYDRIM L110w
Unit No. : 00
Cycle Number: 000032
START
26 C 00:00:02
Cycle Count
User Menu
User Menu – Cycle Count
Cycle Count
Set Drying Time
Error History
This allows the user to see the last
three errors. Press the down arrow to
move to the next page / error. Press the
X in the lower left hand corner to clear
the error history. Press the back arrow
to move to the previous menu.
2
Cycle Count
This allows the user to see how many
cycles have been run on the Hydrim.
Touch cycle count and the number of
cycles (completed and aborted) will
be displayed. This cannot be reset.
Touch the back arrow to return to the
previous menu.
5.8 Technician Menu
Technician
This menu is only available to authorized technicians.
13
5. Instructions for Use
5.9 Setup Menu
To access the Setup Menu, proceed to the menu screen by turning the Hydrim OFF and
then ON. An i (information) will appear briefly at the bottom right hand corner.
Menu
User
Technician
HYDRIM
Touch the i to move to the Menu
screen and select Setup.
Setup
SH11MR301
Setup
Setup
Unit No.
Set Button Beep
Language Selection
Screen Saver
Set Regeneration
Temperature C/F
Setup
LCD Contrast
14
The Setup Menu consists of seven
choices as shown. Using the
up and down arrows to move
through the choices, touch the
desired option to select it. For more
detail on each setup menu option,
refer to the following sections.
5. Instructions for Use
Setup Menu – Unit Number
Unit No.
0
If you have more than one Hydrim, you can designate
them Unit #1, Unit #2, etc. Use the up and down arrow
keys to select the unit number. The default is 0.
Default 0
Language Selection
English
Setup Menu – Language Selection
This allows the user to select among available languages
for the Hydrim. Use the up and down arrows to select
the desired language. The default language is English.
Touch the back arrow to return to the previous menu.
Default English
Set Regeneration
0
Setup Menu – Set Regeneration
Set the salt regeneration according to the local water hardness.
Use the up and down arrows to change the value. The default
setting is 0 . See Installation Instructions for further information.
Default 0
15
5. Instructions for Use
Set Button Beep
On
Setup Menu – Set Button Beep
The user can select between having the unit beep or not beep
whenever a screen button is touched. Turn the beep on or off by
using the up and down arrows. Note that the default setting is
ON. Touch the back arrow to return to the previous menu.
Default On
Screen Saver
4min
Default 4min
Temperature C/F
C
Setup Menu – Screen Saver
The user can adjust the time that elapses before the screen
goes into screen saver mode. Touch Screen Saver. Touch the
up and down arrows to select the desired screen saver setting.
The default is 4 minutes. Touch the back arrow to return to
the previous menu.
Setup Menu – Temperature C/F
The user can choose to have information displayed in degrees
Celsius or degrees Fahrenheit. Touch the up and down
arrows to select the desired choice. The default is degrees
Celsius.Touch the back arrow to return to the previous menu.
Default C
LCD Contrast
50%
Setup Menu - LCD Contrast
The user can adjust the LCD contrast. Touch the up and down
arrows to select the desired contrast. The default is 50%. Touch
the back arrow to return to the previous menu.
Default 50%
16
5. Instructions for Use
5.10 Opening the Door in Case of Power Failure
If there is a power failure, remove the kickplate of the Hydrim. Remove the screw
with a screwdriver and lift the kickplate up and toward you. Locate the ring and pull
it to open the door. Exercise caution! There may be fluid remaining in the unit and
the instruments may be hot. Instruments that have not completed the cycle should
not be used and should be reprocessed. When replacing the kickplate, ensure that
the grounding wire is attached.
Ring
Grounding wire
Kickplate
Screw
17
6. Care and Maintenance
6.1 Replacing the HIP Cleaning Solution
The Hydrim L110w uses a 3.8L / 1 gallon container of HIP Cleaning Solution
(Part number CS-HIPL). Use only the recommended cleaning solution and read the
MSDS before inserting into the unit.
To order additional HIP Cleaning Solution, contact your local dealer. When the
message “no detergent” appears on the screen, the cleaning solution container is empty
and is in need of changing. To avoid spillage, replace the solution container only when
the message appears and be sure to wear gloves.
NOTE: Each cleaning solution container will last approximately 30 cycles,
depending on which cycles are used..
To replace the cleaning solution container, follow these steps:
1. Turn the power switch OFF.
2. Open the cleaning solution door.
3. Disconnect the cleaning solution connector. Remove any dried chemical by
immersing the connector in a cup of water.
4. Remove the empty cleaning solution container and discard or recycle.
5. Connect new container and insert into the cleaning solution compartment.
Follow the instructions printed on each cleaning solution container.
6. Close the door.
7. Turn the power switch ON
18
6. Care and Maintenance
6.2 Refilling the Water Softening
Salt Reservoir
When the error message "salt level low" appears,
the salt reservoir is in need of refilling. Ensure that
your authorized technician has set the water softener
according to the hardness level in your area.
To fill the salt reservoir, follow these steps:
1. Unscrew the salt container lid.
2. Fill the salt container to the top
(maximum 1 kg / 2.2 lbs.)
3. Screw the salt container lid on tightly.
4. Run a complete cycle, with no instruments.
salt container
6.3 Using Rinse Aid
Rinse-aid is not required when using the Hydrim
L110w with HIP cleaning solution. There is a
rinse-aid container in the Hydrim L110w, but it
is not active and should not be filled.
19
6. Care and Maintenance
6.4 Cleaning the Hydrim L110w
To clean outer surfaces and the decal covering the touchscreen, use a soft cloth
moistened with soap and water or a surface disinfectant. Do not use harsh cleaning
chemicals.
If preparing the unit for transport or storage, waste water should be removed
from the sump.
Waste water in the unit may contain biological contaminants. Use a mechanical means
to siphon the contents. Wear disposable rubber gloves. Dispose of absorbent material
according to biological waste disposal regulations.
6.5 Filter and Wash Arm Maintenance
Filter Maintenance:
Inspect the filter in the bottom of the
chamber daily for debris and clean if
necessary. To clean, remove the filter
rinse under a tap and replace. Ensure
that the filter is firmly locked into position
when replaced.
Wash arms
Wash Arm Maintenance:
If the wash arms are not turning easily,
remove them, rinse under a tap and
reassemble. To remove the upper or
middle arm, unscrew the collar
counterclockwise. To remove the lower
arm unscrew the collar clockwise.
Filter
20
7. Troubleshooting
Problem
Possible Causes and Solutions
Instruments are
not clean
• Do not overload cassettes or instrument baskets.
• Do not load too many cassettes into the Hydrim.
• Use the Heavy Duty cycle for cassettes and hinged
instruments.
• Check filters and wash arms for debris.
Touchscreen /
Unit does not come on
• Ensure that the power button is turned ON.
• Ensure that the plug is properly inserted into the wall
socket.
• Check if a fuse or circuit is blown – call service
for assistance.
The wash arms
do not rotate
• Remove the wash arms, clean and reinstall them.
The door cannot be
opened
• The cycle is not complete.
• The cycle was aborted and the unit has not
completed draining yet.
Operating cycles appear
to be taking too long
to complete
• The water is not hot enough. Check that the incoming
hot water temperature is in the recommended range.
• Check that the hot and cold hoses are not reversed.
“No detergent” message
comes on when there is still
chemical left in the container
• Check for a kink in chemical tubing.
Drying Performance is
inadequate
• Increase the drying time (user menu).
NOTE: Fuses should NOT be replaced by the operator. Call an authorized service technician for assistance.
21
7. Troubleshooting
Error Messages
Error
Cause
Solution
CF1 Water Heating
failure
The water does not reach the
required temperature in the
specified time
Call for service.
CF2 Chamber
Filling Failure
The water does not fill the
chamber within the specified time.
Check that the water hoses
are not kinked. Open the
water shut-off valves.
CF3 Chamber
temperature
reading failure
Faulty sensor.
Call for service.
CF4 Draining
failure
Water cannot drain
from the unit.
Check that the drain hose is
not kinked. Check that the
filter in the bottom of the
chamber is not obstructed.
CF9 Software or
PCB Failure
Cycle length is more than
2hr 30 min.
Call for service.
CF11 No detergent
Flow switch did not detect detergent
during wash phase.
Replace detergent box
if empty.
If the problem persists,
call for service.
CF14 Fault Flow
Switch
Flow switch is stuck closed.
Call for service.
CF15 Chamber
overflow
Overflow switch did not turn off after
30 sec of running the drain pump.
Check if drain is blocked;
Call for service.
22
8. Material Safety Data Sheet
1.0 PRODUCT AND COMPANY IDENTIFICATION
Product Name:
HIP – Hydrim Cleaning Solution With Instrument Protection
Product Use:
Cleaner
Manufacturer/Supplier:
Virox Technolgies Inc.
Address:
2815 Bristol Circle, Unit 4, Oakville, Ontario L6H 6X5
Phone #:
(905) 813-0110
(W)HMIS Classification:
Health: 2
Reactivity: 0
Flammability: 0
Personal Protection: B (Gloves + Goggles)
2.0 INFORMATION ON ACTIVE INGREDIENTS
Ingredient
CAS#
Wt%
1-Hydroxyethane
-1,1-Diphosphonic acid, K salt
2809-21-4
1, 2 propylene glycol
57-55-6
Xylenesulfonic acid, K salt
N-Octyl -2-Pyrrolidone
OSHA-PEL
ACGIH-TLV
5-10%
N/E
N/E
15-20%
N/E
N/E
1300-72-7
5-10%
N/E
N/E
2687-94-7
3-5%
N/E
N/E
3.0 HEALTH HAZARD IDENTIFICATION
Rout of Entry:
Skin contact, Eye, Ingestion.
Signs and Symptoms
Eye contact:
Causes irritation.
Skin contact:
Causes irritation.
Ingestion:
Like any product not designed to be ingested, this product may
cause stomach distress if ingested in large quantities.
Inhalation:
Not a normal route of exposure.
Acute overexposure:
Corrosive. May cause burn or irritation.
Chronic Overexposure:
Prolonged or repeated exposure can cause drying,
defatting and dermatitis.
Respiratory Tract
Sensitization:
Non-hazardous by WHMIS criteria.
Carcinogenicity:
Non-hazardous by WHMIS criteria.
Teratogenicity:
Non-hazardous by WHMIS criteria.
Mutagenicity:
Non-hazardous by WHMIS criteria.
Reproductive Effects:
Non-hazardous by WHMIS criteria.
23
8. Material Safety Data Sheet
4.0 FIRST AID MEASURES
Eye:
Immediately flush with water for 15 minutes while lifting eyelids and rolling eyes.
Get medical attention if irritation develops or persists.
Skin:
Wash promptly with soap and water.
Ingestion:
Get medical help. Do NOT induce vomiting. If conscious and medical help not readily
available, give water.
Inhalation:
Not a normal route of exposure. If symptoms develop, move to fresh air.
If breathing is difficult get medical attention.
5.0 FIRE FIGHTING MEASURES
Flash point:
Not Available
Auto-Ignition temperature:
Not Available
Extinguisher Media:
Water spray, dry chemical, foam, carbon dioxide.
Special Fire Fighting
Procedures:
Firefighters should have eye protection and wear
self-contained breathing apparatus.
6.0 SPECIAL PRECAUTIONS AND SPILL/LEAK PROCEDURES
Precautions to be taken in handling and storage:
Store in a cool, dry, well ventilated location.
Other Precautions:
Avoid skin contact. Keep containers tightly closed. No smoking or eating in handling area.
Steps to be taken in case Material is Released or Spilled:
Flush into sewage system in accordance with local regulations.
Waste Disposable Methods:
Review federal, provincial, and local government requirements prior to disposal.
7.0 EXPOSURE CONTROLS/PERSONAL PROTECTION
Gloves:
Natural or butyl rubber, nitrile or neoprene gloves.
Eye Protection:
Safety Glasses.
Respiratory Protection:
Not normally required if good ventilation is maintained and exposure
guidelines are not exceeded.
Other protective equipment:
As required by employer code.
24
8. Material Safety Data Sheet
8.0 PHYSICAL/CHEMICAL CHARACTERISTICS
Physical State: Liquid
Boiling Point: No Data
pH: 9.5-10.5
Specific Gravity: 1.14-1.15@25°C
Solubility in Water: 100% soluble in water.
Appearance and Color: Clear colorless to slight yellow.
Melting Point: No Data
9.0 PHYSICAL HAZARDS/REACTIVITY DATA
Stability:
Stable under normal conditions of handling, use and transportation.
Incompatibility (Materials to Avoid):
Acids.
Hazardous Decomposition Products:
Combustion produces carbon dioxide and carbon monoxide.
Hazardous polymerization:
Will Not Occur.
10.0 TRANSPORTATION
T.D.G./D.O.T. Classifications:
Not regulated.
11.0 REGULATORY INFORMATION
Occupational health and safety Regulations
WHMIS Class:
Class D, Division 2B
OSHA & WHMIS:
MSDS prepared pursuant to the Hazard Communication Standard
(CFR29 1910.1200) and Canadian WHMIS regulations (Controlled Products
Regulations under the Hazardous Products Act).
Environmental
Regulatory Lists:
SARA – Section 313 (Toxic Chemical Release Reporting)
40 CFR 372 : No reportable ingredients.
Toxic Substances
Control Act (TSCA):
All ingredients are listed on the Chemical Substances Inventory
or exempt.
Canadian Domestic
Substance List (DSL):
All ingredients are listed on the DSL or exempt.
12.0 PREPARATION INFORMATION
Date:
November 9, 2005 MSDS
Prepared by:
Virox Technologies Inc.
Telephone:
(905) 813-0110
Disclaimer: Information for this material safety data sheet was obtained from sources cosidered technically accurate and reliable. While every effort has
been made to ensure full disclosure of product hazards, in same cases data is not available and is so stated. Since conditions of actual product use are
beyond control of the supplier, it is assumed that users of this material have been fully trained. No warranty, expressed or implied, is made and supplier
will not be liable for any losses, injuries or consequential damages which may result from the use of or reliance on any information contained in this form.
If user requires independent information on ingredients in this or any other material, we recommend contact with the Canadian Center for Occupational
Health and Safety (CCOHS) in Hamilton, Ontario (1-905-877-4400) or the local office of US EPA.
25
9. Specifications
Height, freestanding: 850 mm / 33.5"
Width: 600 mm / 23.75"
Depth: 600 mm / 23.75"
Depth with door open: 1200 mm / 47"
Weight: 80 kg / 176 lbs.
Running Noise: 60 dB(A)
Hot and cold water connections: 3/4”
Inlet water pressure: 1-10 bar
Incoming hot water temperature: 50-70°C / 122-158°F
Drain: 3/4”
Water softener: 1 kg / 2.2 lbs salt capacity
Filling System: 5.5L / 1.5 gallon safety maximum
Drying System: Heater 1 kW
Electrical Connection: 208-240 V 60 Hz 15 A
Equipment pollution degree: Pollution Degree 2
Equipment installation category: Installation category II
Maximum relative humidity: 80% for temp up to 31°C / 88°F
50% for temp up to 40°C / 104°F
Operating temperature range: -5°C to 40°C / 23-104°F
Max. altitude: 2000m / 6561.7 ft.
Mains supply: + / -10% of nominal
10. Serial Number Plate
When ordering supplies, spare parts or requesting service, please ensure that
the information contained on the serial number plate is available (Model number,
serial number etc.).
The serial number plate is located at the bottom left on the rear panel of the
Hydrim L110w unit. A small label is located on the left hand side of the chemical door.
26