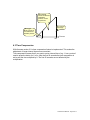
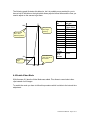
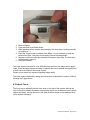
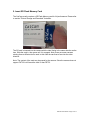
1
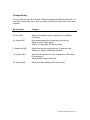
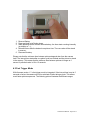
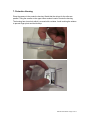
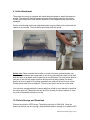
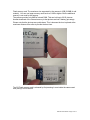
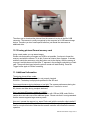
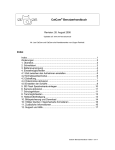
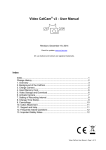
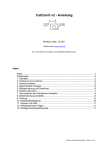
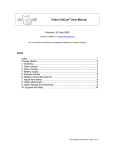
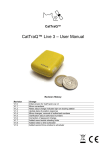
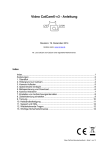
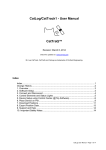
CatCam® User Manual
Revision: 26. August 2008
Check for updates on: www.mr-lee-catcam.de
Mr. Lee CatCam and CatCam are trademarks of Juergen Perthold.
Index
Index..............................................................................................................1
Change History ..............................................................................................2
1. Overview....................................................................................................3
2. Quick Start .................................................................................................3
3. Battery .......................................................................................................4
4. Adjustments ...............................................................................................4
4.1 Adjust Time between Pictures .................................................................4
4.2 Fast Trigger Mode ...................................................................................5
4.3 Time Compression...................................................................................6
4.4 Enable Video Mode .................................................................................7
4.5 Adjust Focus ............................................................................................8
5. Insert SD Flash Memory Card .................................................................10
6. Enable Camera........................................................................................11
7. Protective Housing...................................................................................12
8. Camouflage Features ..............................................................................13
9. Collar Attachment ....................................................................................14
10. Picture Storage and Download ..............................................................14
10.1 Erasing pictures/Format memory card.................................................16
11. Additional Information ............................................................................16
12. Support and Help...................................................................................17
CatCam User Manual - Page 1 of 17
Change History
We try to keep this manual up-to-date. Therefore changes and additions are made. You
may want to check from time to time for updates so that you have the most recent issue
available.
Revision Date
14. July 2007
Changes
Initial revision
25. July 2007
Addition on enabling camera. Added section “Additional
Information”.
24. August 2007
More detailed description of setting the interval time.
Addition of Fast Trigger feature.
Addition of using larger SD memory cards.
5. September 2007
Added note about securing the hinge of protective case.
Additions to chapter “Additional Information”.
18. October 2007
Added Quick Start section, Time Compression, Video Mode,
Picture erasing.
Added chapter “Support and Help”.
26. August 2008
Added note about battery status, failure codes.
CatCam User Manual - Page 2 of 17
1. Overview
The CatCam® takes pictures or short video clips in an adjustable time sequence/interval.
If no picture is taken, the camera is switched off to save battery energy. The device is
designed to be worn on the collar of an animal (cat) but may find use for general
surveillance tasks as well.
The CatCam® offers a small size of 6 x 4 x 2.5cm (2.4 x 1.6 x 1 inch) and a weight of
approx. 60 grams (2.5 oz) including standard battery.
The device is protected against dust, dirt and water. It is shock and scratch resistant. No
noise is emitted at any time.
2. Quick Start
For a quick start plug in an AAA battery and eventually insert a SD memory card into the
card slot (not required for basic function). The camera will start automatically with the
factory preset interval time which is approx. 10 seconds. You do not have to switch the
camera on.
Put the camera into the protective case and secure the hinge with tape if you intend to
take the camera on a collar. In the following chapters you will find detailed information on
camera operation, maintenance and usage.
CatCam User Manual - Page 3 of 17
3. Battery
The standard camera is powered by an AAA battery. Since the camera requires a lot of
energy also rechargeable batteries can be used. Please consider high capacitive NiMh
types which offer 900mAh or more.
The battery display shows always „full“ since the camera supplier switched to a new
hardware revision. Without this modification the runtime would be reduced to a minimum.
For all older models the following section is still valid:
Please consider by using rechargeable batteries that the low battery symbol will come
on early. This is no sign that the battery is already empty; rechargeable batteries have
usually a lower voltage which is interpreted wrong by the camera software.
The supply is not limited to 1.5V or 1.2V battery cells. Batteries with voltages up to 3.3V
like Lithium cells are supported by the internal booster circuit.
To enable the CatCam, simply slide in the battery in the battery compartment.
Power consumption depends on the frequency of picture taking. The more often the
camera is activated to take a picture the more battery power is consumed.
There is always a steady drain of the battery in periods of inactivity. Both effects together
are limiting the battery life.
Since the camera is always powered, it is not recommended to leave the battery inside
the camera if not used.
You may want to apply a piece of tape across the battery to add additional shock
protection (prevents jump out of battery).
4. Adjustments
4.1 Adjust Time between Pictures
Picture taking interval can be set freely between 1 second and 8 hours. This is done
using the On/Off switch of the camera:
CatCam User Manual - Page 4 of 17
1. Remove Battery
2. Press and hold on/off button down.
3. While pressing button connect camera battery, the time starts counting internally
(no display or --- ).
4. Release button after the desired new picture time. The new value will be stored
in memory.
5. Disconnect battery.
Please note that the minimum time between pictures depends also from the camera
itself. The interval time starts after one photo cycle has finished and the picture is stored
in the memory. This means that the minimum time between pictures is longer as 1
second. A practical value is 10 to 15 seconds.
4.2 Fast Trigger Mode
With firmware version 1.7 a fast trigger mode is integrated. If the interval time is set to 5
seconds or below, the camera will not be switched off after taking a photo. This allows
much faster picture sequences. The following picture illustrates the different ranges:
CatCam User Manual - Page 5 of 17
Normal Mode,
camera is switched
off between
pictures, no time
compression
End of linear
time range
Fast Trigger
Mode, camera is
not switched off
between pictures.
Time set
5s
20s
4.3 Time Compression
With firmware version 2.2 a time compression feature is implemented. This makes the
adjustment of longer interval times more convenient.
Time compression means that if you want to set an interval time of e.g. 1 hour you don’t
need to press the button for 1 hour. After the first 20 seconds the time compression is
active and the time multiplied by 8. The first 20 seconds are not affected by the
multiplication.
CatCam User Manual - Page 6 of 17
The following graph illustrates this behavior, but it is probably more practical for you to
have a look to the table on the right which shows popular interval times and the time you
need to adjust on the camera to get them.
Time you
set
5s
100s
Compressed
time range
(factor 8)
Photo interval
time = time
between pictures
Push-button time
= time you set on
the camera
20s
Linear time
range
20s
21s
25s
29s
33s
40s
55s
93s
130s
243s =
ca. 4
minutes
468s =
ca. 8
minutes
Interval time
you get
5s, Fast
Trigger Mode
20s
30s
1 minute
1.5 minutes
2 minutes
3 minutes
5 minutes
10 minutes
15 minutes
30 minutes
1 hour
20s 30s
4.4 Enable Video Mode
With firmware v2.2 also the Video Mode was added. This allows to record short video
clips instead of still images.
To enable the mode you have to follow this procedure which is similar to the interval time
adjustment:
CatCam User Manual - Page 7 of 17
1. Remove Battery
2. Press and hold on/off button down.
3. While pressing button connect camera battery, the time starts counting internally
(no display or --- ).
4. Press the Trigger button to enable Video Mode. It is not necessary to hold the
button all the time. Just press it once during interval time adjustment.
5. Release on/off button after the desired time between video clips. The new value
will be stored in memory.
6. Disconnect battery.
The video clips are recorded in a low 320x200 pixel resolution, the frame rate is approx.
15fps. Since the camera stops recording if a specific file size is reached the length (time)
of a clip varies in relation to the image content.
Please do not expect any wonders regarding image quality.
The video mode is disabled by setting the interval time as described in section 4 without
pressing the Trigger button.
4.5 Adjust Focus
The focus can be adjusted with the focus lever on the side of the camera. Moving the
lever in direction towards the battery compartment results in a far distance focus (remote
objects are sharp), moving the lever in the other direction results in near distance focus
(close objects are sharp).
CatCam User Manual - Page 8 of 17
You may find that the adjustable range is not matching your requirements. If so, you can
open the camera housing and adjust the focus in a larger range by rotating the lens. A
clockwise direction will result in farer focus distance.
CatCam User Manual - Page 9 of 17
5. Insert SD Flash Memory Card
The CatCam usually requires a SD Flash Memory card for full performance. Please refer
to section "Picture Storage and Download" for details.
The SD card is inserted into the camera with the label facing in the same direction as the
lens. Slide the card in, then press until it is engaged. Note: there are some cameras
existing there a different slot is used. In this case the card has to face into the other
direction.
Note: The content of the card may be erased by the camera. Since the camera does not
support FAT32 it will format the card if it has FAT32.
CatCam User Manual - Page 10 of 17
6. Enable Camera
The camera is simply enabled by inserting the battery. The On/Off button must not be
pressed. Control of the camera is performed by the integrated chip. The camera is
switched on automatically after the adjusted time interval. Please check section “Adjust
Time between Pictures” for details.
The block diagram to the right will explain the
operation sequence.
Battery inserted
Automatic Mode
Timer is incremented
Is time equal to set
interval time ?
No
Yes
Switch camera on
Take picture
Switch camera off
Reset timer
CatCam User Manual - Page 11 of 17
7. Protective Housing
Place the camera in the protective housing. Watch that the strings for the collar are
parallel. Tilting the camera on the upper corner makes it easier to enter the housing.
The housing has a lens hole which is covered with a window. Avoid touching the window
to prevent finger prints and dust buildup.
CatCam User Manual - Page 12 of 17
During normal application the housing closes out dust and water but is not water tight.
You may want to apply tape to the housing door to prevent water intrusion and provide
additional protection against cracking open.
Due to recent cases it is highly recommended that you secure the hinge with tape.
Some CatCam owners reported that they lost the camera. The cat returned with
the empty case. Although it can not be neglected that someone emptied the case
it is better to stay on the save side.
From time to time clean the housing with a soft fabric. Take special care on the hinge
sealing.
If the lens window becomes dirty you can try to clean it using Q-tips. But you also can
exchange it. The lens window is fixed with transparent office tape or flexible glue to the
housing. Using tweezers you can peel it loose and replace it with a new one. Any
transparent and thin material can be used such as a clear front cover of a binder. Please
see the Support & FAQ section of www.mr-lee-catcam.de for details.
8. Camouflage Features
Since the housing is 80% transparent you can apply camouflage features to make the
camera less visible.
Cut a paper in that way that it fits into the housing. Cut a hole into the paper at the
position of the lens. Paint the paper in the color and structure of the surrounding area
(e.g. black with white stripes if your cat has this texture). Put the paper in the empty
housing, then put the camera in.
CatCam User Manual - Page 13 of 17
9. Collar Attachment
The protective housing is equipped with metal reinforced straps to attach the camera to
a collar. The straps will hold the camera securely without being harmful to the animal.
Please check from time to time that the insulation or the integrated metal wires are not
damaged.
Slip the collar through both loops (adjusted equally long) and then put the collar with the
camera to your animal. The lens should point away from the animal.
Safety note: Please consider that a collar on a neck of a cat is a potential safety risk.
Because a cat wanders and crawls more or less in any place and can catch or trap itself
with the collar on an object such as gate rods or tree branches. This may lead to dead of
your pet. In the USA are collars common which provide a safety release if a certain
amount of force is applied. Everything mounted to the collar will be lost in such a case.
Please decide what is more important: The life of your pet or the device on the collar.
You may have recognized that the camera label has a field for your address in case that
the device gets lost. Please take the time and fill in at least your street address. In case
the collar is released the device is not lost.
10. Picture Storage and Download
Pictures are stored in JPEG format. The picture pixel size is 1280x1024. Since the
amount of pictures can be very high, the preferred method is storage to an additional SD
CatCam User Manual - Page 14 of 17
Flash memory card. The maximum size supported by the camera is 2GB (512MB for old
models). You can use larger memory cards such as 1 MB or higher. But the additional
memory is not used by the camera.
The camera provides only 8MB of internal RAM. This can hold up to 20-25 pictures.
Another drawback of the internal memory is that pictures are lost if battery gets empty.
Please note that the pictures are upside down. This is because the lens is placed at the
maximum distance from collar to provide the best view.
The SD Flash memory card is released by first pressing it more inside the camera and
then pulling it out of the slot.
CatCam User Manual - Page 15 of 17
The other way to download the pictures from the camera is to plug in the Mini USB
connector. The camera is usually recognized by the computer as a USB mass storage
device. Therefore you don’t need special software, just thread the camera as an
additional drive.
10.1 Erasing pictures/Format memory card
Using a card reader you can erase images.
Please note that erasing of images over USB is not possible. You have to format the
memory card with the camera. To do this, first set an interval time of approx. 2 minutes,
and then switch the camera on using the button next to the display. After the camera is
on press it multiple times until the letter “F” appears in the rectangle symbolizing a Flash
card. Then press the trigger button the picture counter will start blinking. Press the
Trigger button again to confirm formatting.
11. Additional Information
The display shows failure codes:
C1 – The SD card is write protected or not properly inserted.
E53/E58 – The battery is empty/write problems to the SD card.
Camera performance during darkness or low light: The camera performance during low
light situations is poor. The result will be blurred pictures if camera is moved.
No pictures are taken during complete darkness.
Can I use larger SD memory cards as 512MB ?
Yes, it was verified that the VQ1005 camera works with 1GB and 2GB cards. But the
camera does not make use of the additional space. Please note that it is not guaranteed
that the camera supports larger memory cards.
How can I operate the camera (e.g. erase Flash card) with the controller chip installed ?
To operate or erase the SD card with the camera you first have to change the interval
time to a couple of minutes. Otherwise the camera controller will influence the camera
operation.
CatCam User Manual - Page 16 of 17
The display of the camera shows strange symbols. What is wrong ?
This is one weak point of the camera. The LCD is not fixed well, it is pressed against the
circuit board using the housing. It can happen that the connections between the LCD
and the board becomes loose because of mechanical shock, pressure, whatever. The
display is not important but it can be annoying. You can try to fix it by pressing a finger
against the housing right below or beneath the display. An other method is to realign the
display by opening the camera.
I want to attach the camera to a dog/tiger/myself/car/etc. Is it possible and what do I
have to consider ?
As long as the camera returns to you and you are not overloading the animals/your neck
it should be fine. You have to consider mechanical stress and use a proper housing or
reinforce the original one. You may also think about additional protection against
moisture/water and proper attachment of the device.
Is my cat strong enough to carry the camera ?
First of all, your animal should not carry the device all the time. This may create issues in
the future after long term exposure to unnatural weight distribution.
You might test your animal by applying a dummy load to the collar. You will find out 2
things: Acceptance and strength. Acceptance does usually not relate to the weight but to
shape and dimensions of the load. Test it with low weight load. Strength can be tested
after acceptance. If you animal accepted the dummy piece but behaves different after
applying higher weight, the animal is not strong enough to carry the load.
I don’t want the camera/housing to get dirty and scratched. Is there a way to prevent
this ?
Sure, wrap it in tape like Scotch-Tape used in the office. This provides a protection layer
and is easy removable without leaving traces. Make sure that you are not covering the
lens.
The tape method is also recommended to protect the device from water, moisture and
dust. Seal all gaps of the housing.
12. Support and Help
You can get in contact with the technical support by sending a mail to [email protected]
If your CatCam got damaged or you want to update to newer software contact also the
technical support.
CatCam User Manual - Page 17 of 17