1
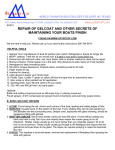
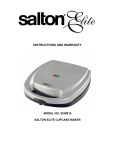
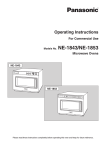
INSTRUCTION
BOOKLET
Cake Pop Maker
MODEL 17661/17837
LAKELAND CAKE POP MAKER
Thank you for choosing the Lakeland Cake Pop Maker.
We are sure you will be delighted with the performance and will enjoy many years of making
delicious cake pops.
An award winning family- owned business we have the same strong values of excellent quality,
value for money and exceptional customer care as we did when we first set up the Lakeland
company in the 1960’s. Our products are carefully selected by our highly experienced team of
experts and are thoroughly and rigorously tested to meet our consistently high standards so you
can be assured that any product you purchase will be functional, durable and easy to use. It is this
level of commitment to our customers that sets us apart.
Please take a little time to read this booklet before you use your Lakeland Cake Pop Maker and
then keep it in a safe place for future reference. Cake pops are delicious balls of cake that are
placed on sticks and then decorated with a variety of chocolate coatings, frostings and sprinkles.
The Lakeland Cake Pop Maker bakes 12 perfect and delicious cake pops in just 4 minutes. The
illuminated orange Power on and green Ready light makes the Cake Pop Maker very easy to use
and when you have finished baking it is also exceptionally easy to clean and store.
CONTENTS
2
Product Features
4
Safety Cautions
5
The Control Panel and Programmes
6
How to assemble the Lakeland Cake Pop Maker and using for the very first time
7
Instructions for use
7
A guide to ingredients
8
Adapting your own recipes
8
Hints and tips
9
Recipes
10
Troubleshooting
17
Care and cleaning
18
Recycling your electricals
18
Electrical connections 19
3
PRODUCT FEATURES
SAFETY CAUTIONS
Figure 1 – Open View
Carefully read all the instructions before using the appliance and keep in a safe place for future
reference. Always follow these safety cautions when using the appliance to avoid personal injury or
damage to the appliance. This appliance should be used only as described in this instruction book.
• Make sure your electricity supply matches the voltage shown on the appliance.
• Always ensure that hands are dry before handling the plug or switching on the appliance.
• E
nsure all packaging materials and any promotional labels or stickers are removed from the
appliance before the first use.
• A
lways inspect the appliance before use for noticeable signs of damage. Do not use if damaged
or has been dropped. In the event of damage, or if the appliance develops a fault contact the
Lakeland customer care team on 015394 88100.
• D
o not use this appliance if the lead is damaged. If the lead is damaged it must be replaced
with a special lead contact the Lakeland customer care team on 015394 88100.
• Always use the appliance on a dry, level, heat resistant surface.
Figure 2 – Control Panel Close up
• U
nplug from the mains when not in use and before cleaning. Allow to cool before cleaning the
appliance. To disconnect, turn the switch to “off “and remove the plug from the mains socket.
• T
his appliance can be used by persons with reduced physical, sensory or mental capabilities or
lack of experience or knowledge if they have been given supervision or instruction concerning
the use of the appliance in a safe way and understand the hazards involved. Children shall not
play with the appliance. Cleaning and user maintenance shall not be made by children without
supervision.
• Children should always be supervised to ensure they do not play with this product.
• D
o not use any accessories or attachments with this appliance other than those recommended
by Lakeland.
• T
o protect against fire, electric shock or personal injury, do not immerse cord, plug or unit in
water or other liquids.
1. Lid handle with locking latch – This allows the Cake Pop Maker to be opened and closed and
the latch ensures that the machine remains closed during cooking and when stored.
2. Upper non-stick cooking plate
3. Lower non-stick cooking plate
4. Non slip rubber feet
5. Orange power on light – This illuminates when the Cake Pop Maker is plugged into the mains
supply.
6. Green ready to cook light – This will illuminate when the machine is heated and is ready to
bake.
7. Power cord and 13 amp plug
4
• D
o not leave the lead hanging over the edge of a kitchen table or worktop. Avoid contact
between the lead and hot surfaces.
• For indoor use only.
• For domestic use only. Never use the appliance for other than the intended use
• T
his appliance should be used for preparation of food as described within the instructions for
use that accompany it.
• A
lways ensure that your hands are dry before removing the plug from the mains socket. Never
pull the plug out of the mains socket by its lead.
5
• To avoid injury or possible fire, do not cover the appliance when in use.
OTHER FEATURES
• Do not connect this appliance to an external timer or remote control system.
• The Cake Pop Maker has nonslip feet
• A
n extension cable may be used with care. The electrical rating of the cable should be at least
as great as the appliance. Do not allow the cable to hang over the edge of the worktop or
touch any hot surfaces.
HOW TO ASSEMBLE THE LAKELAND CAKE POP MAKER AND USING FOR THE VERY
FIRST TIME
• T
his appliance complies with the basic requirements of Directives 04/108/EC (Electromagnetic
Compatibility) and 06/95/EC (Safety of Domestic Electrical Appliances)
• W
ipe the cooking plates and outer surface of the Cake Pop Maker with a clean slightly damp
sponge or cloth before the first use then dry with a soft cloth. Do not immerse in water or any
other liquid, and avoid abrasive cleaners or scourers as they will damage the appliance.
• W
ARNING; a cut off plug inserted into a 13amp socket is a serious safety (shock) hazard.
Ensure the cut off plug is disposed of safely.
• The temperature of all surfaces marked with this symbol will be very hot when the
appliance is in use. DO NOT TOUCH these surfaces as possible injury could occur. Allow to cool
completely before handling this appliance. Note: The machine does not have a triangle symbol
however the surface does get hot especially around the edge where the plates are visible. If the
plates are touched then there is a risk of burns.
• CAUTION; the plastic bags used to wrap this appliance or the packaging may be
dangerous. To avoid risk of suffocation, keep these bags out of reach of babies and children.
These bags are not toys.
• W
hen your Cake Pop Maker is heated for the first time it may emit a slight odour and smoke
however this is normal and will disappear after the first use. This does not affect the safety of
the appliance.
• W
hen the main plug is switched on at the wall the orange light will illuminate and the Cake
Pop Maker will begin to preheat.
• T
he moulds in both the upper and lower plates require greasing lightly with vegetable oil
which should be done using a plastic, nylon or silicone brush.
• T
he surface of the Cake Pop maker will become hot during cooking therefore it is important
that it is not moved and caution should be taken if touching the machine.
• S
witch off and unplug the Lakeland Cake Pop Maker from the wall and allow to cool before
cleaning or storing.
• S
team will escape from the Cake Pop Maker when in use and also when the lid is lifted to
remove the cooked cake pops.
• Do not operate empty. Always make 12 cake pops during each batch of cooking.
INSTRUCTIONS FOR USE
• Do not touch any moving parts whilst in use.
1.
Prepare a recipe for the Cake Pop Maker.
2.
Place the Cake Pop Maker on a suitable surface and plug into the mains socket. The orange
Power light will come on to indicate that the Cake Pop Maker is preheating.
3.
After about 2 minutes, the green Ready light will illuminate. Lift the lid, taking care not to
touch the hot surfaces (It is recommended that oven mitts are worn when opening and
closing the Cake Pop Maker).
• Ensure the lid is in the closed position before switching on the Cake Pop Maker.
4.
Using a heat resistant plastic, nylon or silicone brush lightly grease the moulds in both the
upper and lower cooking plates.
• P
lug in the power cord and the Cake Pop Maker will automatically begin heating up. The
orange POWER on light will illuminate and the appliance will begin to preheat.
5.
Fill each of the 12 moulds with a heaped teaspoon of mixture, using the back of another
spoon to level. Do not overfill as this will cause the mixture to overspill and the cake pops will
not cook correctly.
6.
Carefully close the lid using the lid handle, ensuring that the locking latch clicks into position.
7.
As the cake pops cook, steam will be discharged from the Cake Pop Maker and this is normal.
• Do not lift or move the Lakeland Cake Pop Maker whilst in use.
• Do not cover the Lakeland Cake Pop Maker or block the air vents in the lid or sides whilst in use.
• Make sure there is plenty of air circulation around the Lakeland Cake Pop Maker when in use.
THE CONTROL PANEL AND PROGRAMMES
• W
hen the Cake Pop Maker is preheated and ready for baking the green Ready light will
illuminate. Preheating usually takes about 2 minutes.
• T
he green light will illuminate intermittently throughout the baking cycle and this will indicate
that the machine is maintaining the correct baking temperature.
6
7
8.
9.
The cake pops will take approximately 4 minutes to cook and should be well risen and springy
to touch. When the cakes are ready, switch the Cake Pop Maker off at the mains then leave
the cakes to stand for 1 minute before removing them using a heat resistant plastic, nylon or
silicone spatula and transfer to a wire rack to cool before decorating.
HINTS AND TIPS
If additional cake pops are being made then it is advisable to allow the plates to cool then
wipe them with a clean dry cloth or kitchen paper to remove any residue and then repeat the
cooking process as described above.
• Always grease the upper and lower moulds prior to cooking a batch of cake pops.
10. When baking is complete, switch the Cake Pop Maker off at the wall and unplug then lift the
lid and allow the machine to cool completely before cleaning.
A GUIDE TO INGREDIENTS
• D
o not use metal utensils to lift out the cake pops as this will damage the non- stick surface.
Always use heat resistant plastic, nylon or silicone spatulas.
• It is recommended that all 12 holes are filled when using the Cake Pop Maker. If there is not
enough mixture do not attempt to bake a short batch as this will result in unsatisfactory
baking results.
• If you prefer to make a smaller batch of the suggested recipes then you can freeze any leftover
mixture then defrost and use later.
Standard cake making ingredients are suitable for this machine e.g. Plain and self-raising flour,
baking powder, caster sugar, soft brown sugar, eggs, milk, butter.
• W
hen making a few batches of cake pops the cooking times may need to be adjusted as the
Cake Pop Maker will retain some heat which may result in a faster cooking time.
A selection of chocolate, cake coverings, frostings and sugar sprinkles and decorations can be used
to decorate the cake pops.
• T
he cake pops take approximately 4 minutes to cook but if they need a slightly longer cooking
time just close the lid and allow them to bake for a little longer.
ADAPTING YOUR OWN RECIPES
• If a few batches of desserts are being made keep the lid closed to retain the heat. Always wait
until the green Ready light illuminates before adding more mixture.
After you have made some of the recipes supplied you may wish to adapt a few of your own
recipes. Start by selecting one of the recipes in this booklet, which is similar to your own and use
this as a guide.
• M
ixtures that contain higher amounts of sugar will brown more quickly so some adjustments
need to be made to ensure good results; such as reducing the amount of sugar or ensuring a
shorted cooking time.
• If any mixture spills onto the plates during cooking, unplug the machine, allow to cool and
clean the plates with a clean dry cloth or kitchen roll before resuming cooking.
• D
o not attempt to scrape off any burnt on cake mixture but try removing by brushing over
some oil when the plate is cool then wipe off with a damp cloth.
• If your recipe does contain a higher amount of sugar you may find it useful to generously
grease the plates to ensure that the cake pops can be removed easily.
• M
ake sure that you do not overfill the cake pop holes and adjust your recipe to ensure that you
have enough mixture to make equal batches.
• W
hen using the Cake Pop Maker the cooking times will be much quicker therefore when using
your own recipe check the cake pops after a couple of minutes to ensure that they do not burn.
• Adjust your recipes to ensure that the batters are not too wet. A fairly firm mixture is required.
• If adding fruits and nuts to a mixture ensure that they are chopped into smaller pieces so that
they are dispersed more evenly into the mixture.
8
9
RECIPES
CHOCOLATE CAKE POPS
A basic fairy cake or cupcake recipe works very well in the Cake Pop Maker however if you prefer
to use your own recipes just ensure that the batter is not too wet and that the sugar content is
not very high.
Makes 24
If you do not want to make a full batch of the recipe then the batter can be frozen then defrosted
and used later, alternatively the cooked cake pops also freeze very well.
Each recipe makes 24 cake pops
VANILLA CAKE POPS
Makes 24
Ingredient
Quantity
Soft butter
125g
Caster sugar
125g
Egg
2
Milk
1 tbsp
Vanilla extract
2 tsp
Self-raising flour
125g
1. In a mixing bowl beat together the butter and sugar until pale and fluffy,
2. In a jug gently beat the eggs, milk and vanilla extract and gradually add to the mixture, mixing
well between each addition.
3. Sift the flour into the mixture and stir well until all of the flour is incorporated.
4. Preheat the Cake Pop Maker for 2 minutes and when the green READY light illuminates lightly
grease the moulds with vegetable oil then add a heaped teaspoon of mixture into each of the
12 moulds.
5. Close the lid and cook for 4 minutes or until the cake pops are well risen, golden and spring
back when touched. Continue to bake until all of the mixture is used.
6.Turn off the Cake Pop Maker and leave the cakes to cool for about 1 minute then carefully
remove and leave on a wire rack to cool.
7.Place the cake pops onto sticks and decorate with your choice of frostings, chocolate and
sprinkles.
10
Ingredient
Quantity
Soft butter
125g
Caster sugar
125g
Egg
2
Milk
1 tbsp
Self-raising flour
100g
Cocoa powder
25g
1.
2.
3.
4.
5.
6.
7.
In a mixing bowl beat together the butter and sugar until pale and fluffy
In a jug gently beat the eggs and milk and gradually add to the mixture, mixing well between
each addition.
Sift the flour and cocoa powder into the mixture and stir well until all of the flour is
incorporated.
Preheat the Cake Pop Maker for 2 minutes and when the green READY light illuminates then
lightly grease the moulds with vegetable oil then add a heaped teaspoon of mixture into each
of the 12 moulds.
Close the lid and cook for 4 minutes or until the cake pops are well risen and spring back
when touched. Continue to bake until all of the mixture is used.
Turn off the Cake Pop Maker and leave the cakes to cool for about 1 minute then carefully
remove and leave on a wire rack to cool.
Place the cake pops onto sticks and decorate with your choice of frostings, chocolate and
sprinkles.
11
RED VELVET CAKE POPS
CHOCOLATE FUDGE CAKE POPS
Makes 24
Makes 24
Ingredient
Quantity
Ingredient
Quantity
Butter, softened
115g
Plain chocolate
100g
Caster sugar
115g
Butter
100g
Soured cream
60ml
Soft light brown sugar
100g
Vanilla extract
1 tsp
Egg, beaten
1
Egg, beaten
1 tsp
Soured cream
60ml
Vanilla extract
1 tsp
Red food colouring paste
Self-raising flour
115g
Self-raising flour
100g
Cocoa powder
1 tsp
Cocoa powder
2 tbsp
1.
2.
3.
4.
5.
6.
7.
12
Beat together the butter and sugar in a medium sized mixing bowl, until pale and fluffy.
In a jug gently blend the soured cream, vanilla extract, egg and the red food colouring paste,
then gradually add to the butter mixture with 1 tbsp of sieved flour, beating well after each
addition.
Sift the remaining flour and cocoa into the bowl and stir well until combined.
Preheat the Cake Pop Maker for 2 minutes and when the green READY light illuminates,
grease the moulds lightly with vegetable oil then add a heaped teaspoon of mixture into each
of the 12 moulds.
Close the lid and cook for 4 minutes or until the cake pops are well risen and spring back
when touched. Continue to bake until all of the mixture is used.
Turn off the Cake Pop Maker and leave the cakes to cool for about 1 minute then carefully
remove and leave on a wire rack to cool.
Place the cake pops onto sticks and decorate with your choice of frostings, chocolate and
sprinkles.
1.
2.
3.
4.
5.
6.
7.
Break the chocolate into pieces and place in a medium sized saucepan with the butter and
soft brown sugar then melt gently over a low heat, stirring occasionally until the sugar has
dissolved. Allow to cool for 5 minutes.
In a jug gently blend together the egg, soured cream and vanilla extract then gradually add
to chocolate mixture and beat well.
Sift the flour and cocoa into the pan and stir well until all combined.
Preheat the Cake Pop Maker for 2 minutes and when the green READY light illuminates,
lightly grease the moulds with vegetable oil then add a heaped teaspoon of mixture into each
of the 12 moulds.
Close the lid and cook for 4 minutes or until the cake pops are well risen and spring back
when touched. Continue to bake until all of the mixture is used.
Turn off the Cake Pop Maker and leave the cakes to cool for about 1 minute then carefully
remove and leave on a wire rack to cool.
Place the cake pops onto sticks and dip in melted chocolate and decorate with mini fudge
cubes.
13
CARROT CAKE POPS
Makes 24
Another fantastic idea when using your cake pop maker is to make mini doughnuts. They can be
served coated in sugar like this recipe or try adding flavours such as lemon zest or cinnamon. For a
jam doughnut just warm some seedless raspberry jam and inject into the doughnut using a syringe
or piping bag with plain nozzle.
Ingredient
Quantity
Carrots, peeled
100g
MINI DOUGHNUTS
Self-raising flour
100g
Makes 24
Soft brown sugar
85g
Bicarbonate of soda
½ tsp
Ingredient
Quantity
Ground mixed spice
½ tsp
Plain flour
115g
Egg, beaten
1
Baking powder
1 tsp
75ml
Butter, softened
60g
Caster sugar, plus extra for coating
60g
Egg, beaten
1
Milk
75ml
Vegetable oil
1.
2.
3.
4.
5.
6.
7.
Finely grate the carrots and place in a mixing bowl.
Sift the flour into the bowl then add the soft brown sugar, bicarbonate of soda and mixed
spice.
Add the egg and vegetable oil and beat well until the mixture is smooth.
Preheat the Cake Pop Maker for 2 minutes and when the green READY light illuminates,
grease the moulds lightly with vegetable oil then add a heaped teaspoon of mixture into each
of the 12 moulds.
Close the lid and cook for 4 minutes or until the cake pops are well risen, golden and spring
back when touched. Continue to bake until all of the mixture is used.
Turn off the Cake Pop Maker and leave the cakes to cool for about 1 minute then carefully
remove and leave on a wire rack to cool.
Place the cake pops onto sticks and decorate with a cream cheese frosting and orange
sprinkles.
1.
2.
3.
4.
5.
6.
14
In a large bowl mix together the flour and baking powder then add the butter and rub in until
the mixture resembles fine breadcrumbs.
Stir in the sugar.
In a jug lightly whisk the egg and milk then gradually add the liquid to the flour mixture
beating well during each addition until the mixture is creamy and smooth.
Preheat the Cake Pop Maker for 2 minutes and when the green READY light illuminates,
grease each mould lightly with vegetable oil then add a heaped tablespoon of mixture into
each of the 12 moulds.
Close the lid and cook for 4 minutes or until the doughnuts are golden and spring back when
touched.
Turn off and unplug the Cake Pop Maker then allow the doughnuts to cool for a minute then
carefully remove the doughnuts and toss in the sugar then leave on a wire rack to cool.
15
DECORATING CAKE POPS
TROUBLESHOOTING
To create a variety of cake pops you will need the following equipment and a selection of decorating
ingredients:
Following are some common problems that can occur when using the Lakeland Cake Pop Maker.
Please revue the problems, their possible cause and any corrective action that should be taken to
ensure successful baking
• Lollipop sticks – you can buy sticks from Lakeland.
• C
ake pop stand – when the cake pops are setting they need to be upright so it is best to stand
them in a polystyrene block, a piece of oasis or even a tall glass.
• C
andy Melts – these are small coloured candy discs that can be easily melted to coat the cake
pops. Lakeland stocks a number of these.
• C
hocolate or cake covering – melted white, plain, milk or flavoured chocolate or cake coverings
can be used to coat the cake pops, although it is a bit more difficult to handle as the chocolate
is runnier than the candy melts.
Problem
Possible cause
Reduce the amount of sugar
The Cake Pops are browning
too quickly.
Too much sugar in the recipe
or the Cake Pop Maker is too
hot
or the Cake Pop Maker is not
filled correctly
• Glitter – edible glitter can be added to cake pops to add some extra sparkle.
The mixture is overflowing
onto the plate.
• If using chocolate or cake covering it is advisable to chill the cake pops as the chocolate will set
more easily.
• If using candy melts and the mixture becomes thick just add some vegetable oil and mix well
to produce a thinner consistency.
• T
o coat the cake pop hold the end of the stick and dip the cake pop into the chocolate until it
is completely covered. Gently twirl the cake pop to remove any excess chocolate.
• S
hake the sprinkles or decoration over the cake pop whilst the chocolate is still wet then
transfer to a polystyrene block or other suitable container to hold the cake pop upright until it
sets.
• T
o store the cake pops cover in cellophane and keep in a cool dry place. Do not store the cake
pops in the fridge as the covering will sweat. Cake pop gift boxes can also be purchased to
make them easy to carry and present as gifts.
16
Too much mixture being
added
The mixture is too wet.
• The cake pops should be completely cool before decorating.
• M
elt some candy melts, chocolate or cake covering and then dip 1cm of a lollipop stick into the
melted chocolate and then insert the stick into the cake pop. Repeat with the remaining cake
pops then set aside until the chocolate has set and the stick is cake pop is securely attached to
the cake pop.
Switch the Cake Pop Maker
off after 30 minutes and
allow to cool before adding
more mixture.
Ensure that all 12 moulds are
filled with mixture.
• Sprinkles – there are a wide variety of sprinkles available.
HOW TO DECORATE A CAKE POP
Solution
Use one heaped teaspoon
of mixture ensuring that the
mould is no more than ¾
full.
Add less liquid to the mixture
to ensure a stiffer cake mix.
The Cake Pops are not rising
very well
Not enough mixture being
added.
Fill the cake pop moulds to a
minimum of ½ full.
The Cake Pop Maker is
producing smoke when turned
on.
The plates are not cleaned
correctly
Clean the plates thoroughly
The Cake Pop Maker is
producing smoke during
cooking.
The plates are not clean and
mixture has spilled over.
Turn the machine off and
allow to cool, and then clean
the plates with a clean dry
cloth or kitchen roll before
making another batch.
The Cake Pops are taking
longer to cook than suggested
in the recipe.
The lid is being left upright
for too long and mixture is
being added before the green
Ready light is on.
Ensure that the lid is kept
closed until adding the
mixture and wait for the
green light to illuminate
before adding any mixture.
17
CARE AND CLEANING
ELECTRICAL CONNECTIONS
• Before the first use and after every use, clean each part thoroughly.
THIS APPLIANCE MUST BE EARTHED
• S
witch off at the wall and unplug the Cake Pop Maker and allow to cool completely before
cleaning. There are no parts to disassemble for cleaning.
This appliance is fitted with a fused three-pin plug to BS1363 which is suitable for use in all homes
fitted with sockets to current specifications. If the fitted plug is not suitable for your socket outlets,
it should be cut off and carefully disposed of. To avoid an electric shock, do not insert the discarded
plug into a socket.
• Periodically check all parts before reassembly.
• Never immerse the appliance in water or other liquids
Fitting a new plug
If for any reason you need to fit a new plug, the flexible mains lead must be connected as shown
here. The wires in the mains lead fitted to this appliance are coloured in accordance with the
following code:
• Never place the Cake Pop Maker in the dishwasher
•
Earth(green/yellow)
Always use plastic, nylon or silicone spatulas etc. – metal tools will damage non-stick coatings.
• Never immerse the unit in water or any other liquid.
E
L
Neutral(blue)
• To clean the unit and control panel, wipe with a clean, damp cloth and dry before storing.
• Do not use abrasive cleaners, steel wool or abrasive materials or cleansers.
• A
lways clean the outside of the cake Pop Maker and the top and bottom cooking plates after
each use to prevent a build-up of baked-on foods.
• S
tore the Cake Pop Maker with the power cable loosely coiled around base. Never wrap it
tightly around the appliance.
• E
nsure that the Cake Pop Maker is cooled, clean and dry before storing do not place anything
on top of the Cake Pop Maker when storing.
RECYCLING YOUR ELECTRICALS
Along with many other high street retailers, Lakeland has joined a scheme whereby customers can
take their unwanted electricals to recycling points set up around the country.
Visit www.recycle-more.co.uk to find your nearest recycling point.
13amp FUSE
• T
he cooking plates should be conditioned with oil before each use by lightly coating each
mould with vegetable oil, using a heat resistant silicone or plastic soft pastry brush.
13amp fuse
N
Live(brown)
Connect BLUE to Neutral (N)
Connect GREEN & YELLOW to Earth (E)
Connect BROWN to Live (L)
13 amp fuse to be used
If the colours of the wires in the mains lead of this appliance do not correspond with the coloured
markings identifying the terminals in your plug, proceed as follows. The wire which is coloured
green and yellow MUST be connected to the terminal which is marked with the letter E (Earth)
or coloured green. The wire which is coloured blue MUST be connected to the terminal which is
marked with the letter N (Neutral) or coloured black. The wire which is coloured brown MUST be
connected to the terminal which is marked with the letter L (Live) or coloured red.
Before refitting the plug cover, check that there are no cut or stray strands of wire inside the plug.
Use a 13 amp BS1362 fuse. Only BSI or ASTA approved fuses should be used. If you are at all unsure
which plug or fuse to use, always refer to a qualified electrician.
Note: after replacing or changing a fuse on a moulded plug which has a fuse cover, the cover must
be refitted to the plug; the appliance must not be used without a fuse cover. If lost, replacement
fuse covers can be obtained from an electrical shop. This appliance complies with the following
EEC Directives: 2006/95/EC (Low Voltage Directive) and 89/336 EEC (EMC Directive)
18
19
Lakeland
Alexandra Buildings, Windermere, Cumbria LA23 1BQ
Tel: 015394 88100 Web: www.lakeland.co.uk