1
Siemens Gas Range
with threeD Surround
Convection®
Installation Instructions
Models: HG2425UC, HG2528UC
Please read instructions before using.
Important: Save these instructions.
Cuisinières à gaz Siemens
Instructions d installation
Modèle: HG2425UC, HG2528UC
Merci de lire les instructions avant d'utiliser.
Important : Conserver ces instructions.
Estufas de gas de Siemens
Instrucciones de instalaci n
Modelo: HG2425UC, HG2528UC
Favor de leer las instrucciones antes de usar.
Importante: Guarde estas instrucciones.
Table of Contents
Important Safety Instructions ...................................................................................................... 1
Preparation ............................................................................................................................... 4
Installation ............................................................................................................................... 5
Final Steps ............................................................................................................................... 6
Service ..................................................................................................................................... 8
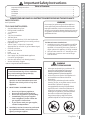
PLEASE READ AND SAVE ALL INSTRUCTIONS BEFORE USING THIS APPLIANCE.
PARTS PROVIDED:
Anti-Tip Bracket
WARNING
TOOLS AND PARTS NEEDED:
•
•
•
•
•
•
•
•
•
•
•
•
•
•
•
•
Standard Measuring Tape
Phillips Head Screwdriver
1-1/4” Wrench
Pencil
T-20 Torx Screwdriver
3/8” Nut Driver
Screws (2) and Anchors (2) for Anti-tip Bracket
(Style will vary depending on mounting surface)
Pipe Wrench (2)
Teflon® Tape* or Pipe Joint Compound
(Appropriate for use with LP gas and Natural gas)
Channel Lock Pliers
Gas Leak Test Solution
Level
Drill and Drill Bit
Gas Supply Line (Flexible Metal Appliance
Connector or Rigid Pipe)
Gas Shut Off Valve (If not already present)
Gloves and Safety Goggles
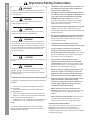
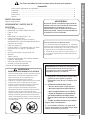
Do not repair or replace any part of the appliance
unless specifically recommended in the manuals.
Improper installation, service or maintenance can
cause injury or property damage. Refer to this manual
for guidance. All other servicing should be done by a
qualified technician.
For Massachusetts Installations:
1. Installation must be performed by a qualified
or licensed contractor, plumber or gas fitter
qualified or licensed by the state, province or
region where this appliance is being installed.
2. Shut-off valve must be a “T” handle gas cock.
3. Flexible gas connector must not be longer
than 36 inches.
WARNING
RANGE TIPPING HAZARD
* Teflon is a registered trademark of DuPont
WARNING: If the information in this manual
is not followed exactly, a fire or explosion
may result causing property damage,
personal injury or death.
− Do not store or use combustible materials,
gasoline or other flammable vapors and
liquids in the vicinity of this or any other
appliance.
− WHAT TO DO IF YOU SMELL GAS:
•
•
•
•
•
Do not try to light any appliance.
Do not touch any electrical switch.
Do not use any phone in your building.
Immediately call your gas supplier
from a neighbor’s phone. Follow the
gas supplier’s instructions.
If you cannot reach your gas supplier,
call the fire department.
•
•
•
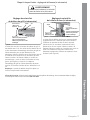
All ranges can tip and injury could result. To
prevent accidental tipping of the range,
attach it to the wall, floor or cabinet by
installing the Anti-Tip Device supplied.
A risk of tip-over may exist if the appliance is
not installed in accordance with these
instructions.
If the range is pulled away from the wall for
cleaning, service, or any other reason, ensure
that the Anti-Tip Device is properly
reengaged when the range is pushed back
against the wall. In the event of abnormal
usage (such as a person standing, sitting, or
leaning on an open door), failure to take this
precaution could result in tipping of the
range. Personal injury might result from
spilled hot liquids or from the range itself.
− Installation and service must be performed
by a qualified installer, authorized service
agency or the gas supplier.
English • 1
Final Steps Final
Installation
Safety
Instructions
Steps
Installation
Safety
Instructions Preparation
Preparation
Service
Important Safety Instructions
Service
Installation
Preparation Safety
Instructions
Safety
Instructions
Installation
Final Steps Final Steps
Preparation
Important Safety Instructions
WARNING
Before installing, turn power OFF at the service panel.
Lock service panel to prevent power from being turned
ON accidentally.
•
Installation must conform with local codes or, in
the absence of local codes, with the National
Fuel Gas Code, ANSI Z223.1.
•
The appliance must be electrically grounded in
accordance with local codes or, in the absence of
local codes, with the National Electrical Code
ANSI/ NFPA 70, latest edition. (In Canada,
installation must be in accordance with the CAN 1B149.1 and .2 Installation Codes for Gas Burning
Appliances and/ or local codes).
•
Remove all tape and packaging before using the
range. Destroy the carton and plastic bags after
unpacking the range. Never allow children to play with
packaging material.
•
Be sure your appliance is properly installed and
grounded by a qualified technician. Installation,
electrical connections and grounding must comply
with all applicable codes.
•
Install only per installation instructions
included in the literature package for this range.
•
Ask your dealer to recommend a qualified
technician and an authorized repair service.
•
Know how to disconnect the power to the range at
the circuit breaker or fuse box and the gas supply at
the shutoff in case of an emergency.
•
Do not repair or replace any part of the
appliance unless specifically recommended
in the manuals. All other servicing should be done
by a qualified technician. This may reduce the risk of
personal injury and damage to the range.
•
When testing the supply piping system at test
pressures in excess of 1/2 psig (3.5 kPa), the
appliance and its indiviual shut-off valve must
be disconnected from the gas piping system.
•
When testing the supply piping system at test
pressures equal to or less than 1/2 psig
(3.5 kPa), the appliance must be isolated from
the gas supply piping system by closing its
individual manual shut-off valve.
•
Never modify or alter the construction of a
range by removing leveling legs, panels, wire covers,
anti-tip brackets/screws, or any other part of the
product.
•
Do not lift door by door handle. Remove the door
for easier handling and installation. See Section
“Removing Oven Door” in Use and Care manual.
CAUTION
Unit is heavy and requires at least two persons or
proper equipment to move.
CAUTION
Hidden surfaces may have sharp edges. Use caution
when reaching behind or under appliance.
WARNING
Stepping, leaning or sitting on the doors or drawers of
this range can result in serious injuries and also cause
damage to the range. Do not allow children to climb or
play around the range. The weight of a child on an open
door may cause the range to tip, resulting in serious
burns or other injury.
CAUTION
Do not use the oven or warming drawer (if equipped) for
storage.
WARNING
Do not store items of interest to children in the cabinets
above the range or on the backguard of a range.
Children climbing on the range to reach items could be
seriously injured.
This appliance complies with one or more of the following
Standards:
•
UL 858, The Standard for the Safety of Household
Electric Ranges
• UL 923, The Standard for the Safety of Microwave
Cooking Appliances
• UL 507, The Standard for the Safety of Electric Fans
• ANSI Z21.1-2000, The American National Standard
for Household Cooking Gas Appliances
• CAN/CSA-C22.2 No. 113-M1984 Fans and Ventilators
• CAN/CSA-C22.2 No. 61-M89 Household Cooking
Ranges
It is the responsibility of the owner and the installer to
determine if additional requirements and/or standards
apply to specific installations.
High Altitude Installation Note:
This range is CSA certified for safe operation up to an
altitude of 10,000 ft. without any modifications.
Exception: for use with LP, the range must first be
converted using the LP conversion instructions included in
this literature package.
Electrical Safety:
Gas Safety
If required by the National Electrical Code (or Canadian
Electrical Code), this appliance must be installed on a
separate branch circuit.
Install a gas shutoff valve near the appliance. It must be
easily accessible in an emergency.
For appliances equipped with a cord and plug, do not cut or
remove the ground prong. It must be plugged into a
matching grounding type receptacle to avoid electrical
shock. If there is any doubt as to whether the wall
receptacle is properly grounded, the customer should have
it checked by a qualified electrician.
Installer - show the owner the location of the circuit breaker
or fuse. Mark it for easy reference.
Important - Save these instructions for the local electrical
inspector's use.
Refer to data plate for more information. See "Product Data
Plate" under "Service" for data plate location.
WARNING
To eliminate the risk of burns or fire by reaching over
heated surface units, cabinet storage space located above
the surface units should be avoided. If cabinet storage is
to be provided, the risk can be reduced by installing a hood
that projects horizontally a minimum of 5 inches beyond
the bottom of the cabinet.
Leak testing must be conducted by the installer according
to the instructions in this manual.
Installer - show the owner where the gas shut-off valve is
located.
The minimum supply pressure must be 1" water column
above the manifold pressure printed on the data plate:
The maximum supply pressure must not exceed 14.0
inches water column (34.9Millibars).
Propane Safety
Important note for LP users: The appliance is
shipped from the factory for use with natural gas. It
must be converted for use with propane. A qualified
technician or installer must do the conversion.
The propane gas tank must be equipped with its own high
pressure regulator. In addition, the regulator supplied with
this unit must also be used.
Verify that cabinets above the cooktop are a maximum of
13" (330 mm) deep.
English • 3
Final Steps Final
Installation
Safety
Instructions
Steps
Installation
Safety
Instructions Preparation
Preparation
Service
Important Safety Instructions
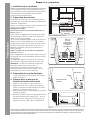
1. Install Ventilation
Siemens strongly recommends the installation of a
ventilation hood above this range. For most kitchens a
certified hood rating of not less than 300 CFM is
recommended. The range hood must be installed
according to instructions furnished with the hood.
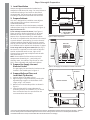
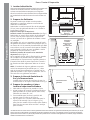
30” Minimum
Centered
30”
Min.
2. Prepare Cabinets
This unit is designed for installation near adjacent
walls and projecting surfaces constructed of
combustible materials.
Allow a minimum of 30 inches between overhead
cabinets where range is to be installed (See Figure 1).
Required Clearances*
From cooktop to materials above (See Figure 1)
There must be a minimum clearance of 30 inches
between the top of the cooking surface and the
bottom of an unprotected wood or metal cabinet.
24 inches is acceptable when the bottom of the wood
or metal cabinet is protected by (a) not less than1/4"
of flame retardant material which must be covered
with (b) not less than No. 28 MSG sheet metal, 0.015
inch stainless steel’ or 0.024 inch aluminum or copper.
From range walls to adjacent materials (See Fig.1)
No clearance is required from unit walls to adjacent
vertical combustible walls on rear, right or left.
Clearance from range top to adjacent vertical walls
must be at least 4”.
NOTE: Some cabinet finishes cannot survive the
temperatures allowed by U.L., particularly selfcleaning ovens; the cabinets may discolor or stain.
This is most noticeable with laminated cabinets.
3. Prepare Gas Supply Line and
Electrical Outlet
4” Min.
No Clearance to
Cabinet Wall
Required
Figure 1: Cabinet Preparation
Place Gas
Supply Line
and Electrical
Outlet Here
771/2"
1/2”
1/2”
331/2"
1/2"
441/2”
1/8 "
13 13
1/8”
4"
4”
1/2"
7/8" 441/2”
33 7/8”
30"
30”
Figure 2: Gas Supply Line and Electrical Outlet Placement
The gas supply line and electrical outlet must be
located in the shaded space in Figure 2.
Backwall
4. Prepare Walls and Floor and
Install Anti-Tip Bracket
1. Seal any holes in the walls or floor.
2. Adjust height of range and level by rotating the
adjustable leg supports on the bottom of the
range, using 1-1/4" wrench.
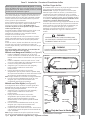
3. Measure to locate bracket position as shown in
Figure 3.
4. Secure bracket with 2 screws adequate for
mounting surface, not included. (i.e.; for wood
floor use wood screws for concrete floor use
concrete anchors and screws).
18”
Min.
4” Min.
Flush
1 9/16”
Service
Installation
Preparation Safety
Instructions
Safety
Instructions
Installation
Final Steps Final Steps
Preparation
Steps 1 through 4: Preparation
Cabinet Sidewall
Anti-Tip Device
Figure 3
Gas Connection
Figure 4
*Instructions were determined using Standard American cabinets. Standard base cabinets measure 36" high x 24" deep . Cabinets
over the cooking surface and cabinets adjacent to those over the cooking surface measure 13 inches deep from backwall. If
nonstandard cabinets are used, care should be taken to alter dimensions accordingly.
Step 5: Installation - Connect Gas Supply
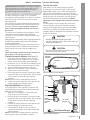
The gas connection is located below the back panel of
the range (See Figure 4, Page 3). It is accessible
through the warming drawer access panel or from the
back of the range. To reach access panel, remove
warming drawer.
Shut off main gas supply valve before disconnecting
the old range and leave it off until the new hook-up
has been completed. Don’t forget to relight the
pilot on other gas appliances when you turn the
gas back on.
The range can be installed using rigid pipe or a CSA
International-certified flexible metal appliance
connector. If using a flexible connector, always use a
new connector.
Apply pipe joint compound or Teflon* tape appropriate for
use with LP gas and Natural gas around all male pipe
threads to prevent leaks.
If not already present, install gas shut off valve in an
easily accessible location. Make sure all users know
where and how to shut off the gas supply to the
range.
Note: The installer should inform the consumer of
the location of the gas shut-off valve.
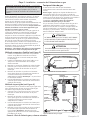
Flexible Connector Method (see Figure 5)
1. Install male 1/2” flare adaptor at the 1/2” NPT
internal thread of the range inlet. Use a backup
wrench on the elbow fitting to avoid damage.
2. Install male 1/2” or 3/4” flare union adapter on the
NPT internal thread of the manual shut-off valve.
3. Connect flexible metal appliance connector.
4. Make sure circuit breaker is off and then plug
range cord in to electrical outlet.
5. Push range back into position insuring that range
leg slides under the anti-tip bracket. The range will
sit 3/4” away from the wall when properly
installed.
Note: Be careful not to crimp flexible connector!
6. Carefully tip range forward to insure that anti-tip
bracket engages and prevents tip-over.
Rigid Pipe Method (see Figure 6)
The configuration of the rigid pipe connection will
vary depending on the location of the gas pipe stub.
Refer to Figure 6 for details.
1. Make sure circuit breaker is off and then plug
range cord in to electrical outlet.
2. Push range back into position insuring that range
leg slides under the anti-tip bracket. The range will
sit 3/4” away from the wall when properly
installed.
3. Carefully tip range forward to insure that anti-tip
bracket engages and prevents tip-over.
4. Connect pipe to range at union. Access the
connection through the access panel behind the
warming drawer.
Note: Be careful not to apply pressure to warming
drawer element during rigid pipe installation.
Test for Gas Leaks
Leak testing is to be conducted by the installer
according to the instructions given in this section.
Turn on Gas. Apply a non-corrosive leak detection
fluid to all joints and fittings in the gas connection
between the shut-off valve and the range. Include gas
fittings and joints in the range if connections may
have been disturbed during installation. Bubbles
appearing around fittings and connections indicate
a leak.
If a leak appears, turn off supply line gas shut-off
valve and tighten connections. Retest for leaks by
turning on the supply line gas shut-off valve. When
leak check is complete (no bubbles appear), test is
complete. Wipe off all detection fluid residue. Proceed
to Step 6: Final Steps.
CAUTION
NEVER CHECK FOR LEAKS WITH A FLAME.
DO NOT CONTINUE TO THE NEXT STEP UNTIL ALL
LEAKS ARE ELIMINATED.
CAUTION
Before you plug in an electrical cord, be sure all
controls are in the OFF position.
Gas ShutOff Valve
Regulator
Flexible
Connector
Figure 5: Flexible Connector Method
gas shut
off valve
elbow
elbow
nipple
union
nipple
nipple
elbow:
connect to
regulator
here
1/2” to 3/4”
gas pipe
Gas Flow to Range
Figure 6: Rigid Pipe Method
English • 5
Final Steps Final
Installation
Safety
Instructions
Steps
Installation
Safety
Instructions Preparation
Preparation
Service
Important note for LP users: The range is shipped
from the factory for use with natural gas. For use
with propane (LP) gas, your range must first be
converted using the LP conversion kit.
Service
Installation
Preparation Safety
Instructions
Safety
Instructions
Installation
Final Steps Final Steps
Preparation
Step 6: Final Steps - Test Burner Function
1. Turn on Power at Breaker
If LCD screen flashes and beeps continuously, the wiring is
incorrectly installed. Verify that wiring in house is correctly
installed. If house wiring is correct so, call Siemens
Service.
2. Test Rangetop Burners
Test Burner Ignition. Select a rangetop burner knob.
Push down and turn to the flame symbol. The ignitor/spark
module will produce a clicking sound. Once the air has
been purged from the supply lines, the burner should light
within four (4) seconds.
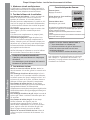
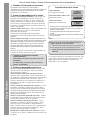
Test Flame: High Setting. Turn burner on to HI. See
Figure 7 for appropriate flame characteristics.
If any of the burners continue to burn mostly or completely
yellow, call Siemens Service.
Test Flame: Low Setting. Turn burner on to LO. Verify
that the flame completely surrounds the burner. There
should be a flame at each burner port and there should be
no air gap between the flame and the burner. If any of the
burners do not carry over, call Siemens Service.
Test the ignition and flame of each rangetop burner as
described above.
WHEN FLAME IS PROPERLY ADJUSTED:
There should be a flame at each rangetop
burner port.
There should be no air gap between the
flame and the burner port.
3. Test Oven Burners
Remove the oven bottom cover. Remove the two
rear thumb screws, slide cover forward and out.
Test Bake Burner Ignition. Set the oven to bake at
350° F. After 30-75 seconds, the burner will ignite.
The burner will stay lit until the 350° F is reached and
then shut off. From this point forward, the burner will
cycle on and off to maintain the temperature.
Test Bake Burner Flame. While the burner is lit,
inspect the flame. See Figure 7 for proper flame
characteristics. If the flame burns completely or
mostly yellow, adjust the bake burner air shutter. See
Figure 8 (next page) for details.
Test Broil Burner Ignition. Set cooking mode to Hi
Broil. The burner will ignite after 30-75 seconds.
Test Broil Burner Flame. While the burner is lit,
inspect the flame. See Figure 6 for proper flame
characteristics. If the flame burns completely or
mostly yellow, adjust the broil burner air shutter. See
Figure 8 (next page) for details.
Replace oven bottom cover. Slide cover into place
and replace two rear thumb screws.
Flame Characteristics
Yellow Flames:
Further adjustment is required.
Yellow Tips on Outer Cones:
Normal for LP Gas.
Soft Blue Flames:
Normal for Natural Gas.
If the flame is completely or mostly yellow, verify that the
regulator is set for the correct fuel. After adjustment, retest.
Some yellow streaking is normal during the initial start-up.
Allow unit to operate 4-5 minutes and re-evaluate before
making adjustments.
Figure 7
Call Siemens Service 866-447-4363 if:
1. Any of the burners do not light.
2. The broil burner or bake burner flame goes
out before either reaches temperature.
3. Any of the burners continue to burn yellow.
If flame adjustment is necessary, continue to next
page. Otherwise, installation is complete at this point.
Step 6: Final Steps - Adjust the Flame (if necessary)
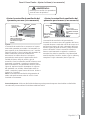
Adjust Broil Burner Air Shutter
(if necessary)
More Open:
•Less Yellow Flame
Adjust Bake Burner Air Shutter
(if necessary)
Shutter Screw
More Closed:
•Less Blue Flame
•More Carryover
•Less lifting or
blowing
Figure 8
The air shutter is located on the back end of the broil
burner. It is attached to the top of the oven cavity with 7
screws. Remove screws and gently pull broil burner
assembly straight out being careful not to detach electrical
wires. Place broil burner against back wall of oven cavity.
Loosen screw and turn shutter. Close the shutter if the
flame is lifting or blowing or not carrying over. Open the
shutter if it is too yellow (see Figure 8). Tighten screw.
Replace broil assembly being careful to feed all wires
through the back of the oven. Reinsert all 7 screws.
Note: The air shutter on the broil burner fits over the
orifice when installed correctly.
Shutter
More Open:
•Less Yellow
Flame
More Closed:
•Less Blue Flame
•More Carryover
•Less lifting or
blowing
Figure 9
The oven burner air shutter is located near the oven
regulator. Reach it through the access hole in the
interior back panel of the warming drawer (loosen
screws and remove access panel). Loosen screw on
shutter. Close the shutter if the flame is lifting or
blowing or not carrying over; Open the shutter if it is
too yellow. Tighten screw. Reattach cover plate and
replace warming drawer (see Figure 9).
Replacement Parts: Visit your Siemens dealer for replacement parts. For a dealer near you contact Siemens Service
866-44SIEMENS (447-4363).
English • 7
Final Steps Final
Installation
Safety
Instructions
Steps
Installation
Safety
Instructions Preparation
Preparation
Service
WARNING:
Allow Burner(s) to cool before
attempting to remove them!
Service
Installation
Preparation Safety
Instructions
Safety
Instructions
Installation
Final Steps Final Steps
Preparation
Before Calling Service
See Use and Care Manual for troubleshooting information.
Refer to the Warranty in the Use and Care Manual.
To reach a service representative, see the contact
information at the front of the manual. Please be prepared
with the information printed on your product data plate
when calling.
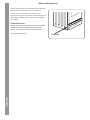
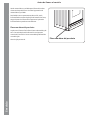
Product Data Plate
The data plate shows the model and serial number. Refer
to the data plate on the appliance when requesting
service. It is located on the frame near the drawer.
Open the drawer to view it
Data Plate
Table des matières
Instructions de sécurité importantes ............................................................................................. 1
Préparation ................................................................................................................................. 4
Installation ................................................................................................................................. 5
Étapes finales ............................................................................................................................. 6
Service ....................................................................................................................................... 8
Lire toutes les instructions avant d’utiliser cet appareil
AVERTISSEMENT
PIÈCES FOURNIES :
•
Fixation antibascule
PIÈCES NÉCESSAIRES :
•
•
•
•
•
•
•
•
•
Ruban à mesurer standard
Tournevis à tête Phillips
Clé 1 1/4 po
Crayon
Tournevis T-20 Torx
Tourne-écrou 3/8 po
Vis (2) et ancrages (2) pour fixation antibascule
(style variant selon la surface de fixation)
Clés à tuyau (2)
Ruban* Teflon® ou pâte isolante à joint
(appropriée pour utilisation avec gaz LP et naturel)
Pince de verrouillage
Solution pour tester les fuites de gaz
Niveau
Perceuse et mèche
Canalisation d’alimentation en gaz (connecteur
d’appareil en métal flexible ou tuyau rigide)
Soupape d’arrêt de gaz (si non déjà présente)
Lunettes et gants de sécurité
* Teflon est une marque de commerce de DuPont
AVERTISSEMENT
RISQUE DE BASCULE
AVERTISSEMENT : Si l’information contenue
dans ce guide n’est pas observée, il peut en
résulter un incendie ou une explosion
causant des dommages à la propriété ou des
blessures ou la mort. .
− • Ne pas ranger ni utiliser de matériaux
combustibles, essence ou autres liquides
ou vapeurs inflammables à proximité de
cet appareil ou de tout autre appareil.
− S’IL Y A UNE ODEUR DE GAZ :
• Ne pas allumer cet appareil.
• Ne pas toucher aux interrupteurs
Electriques.
Ne pas utiliser le téléphone de
l’édifice.
• Téléphoner immédiatement au
fournisseur de gaz chez un voisin.
Suivre les instructions du fournisseur
de gaz.
• Si l’on ne peut rejoindre le fournisseur
de gaz, téléphoner au service des
incendies.
L’installation et le service doivent être
effectués par un installateur qualifié, une
agence de service autorisée ou le
fournisseur en gaz.
•
−
Français• 1
Étapes finales Service
• Toutes les cuisinières peuvent basculer et il peut en
résulter des blessures. Pour éviter tout accident, fixer
au mur, au plancher ou à l’armoire en installation la
fixation antibascule.
• Un risque debascule peut exister si l’appareil n’est pas
installé conformément aux instructions.
• Si la cuisinière est tirée du mur pour le nettoyage, le
service ou autre raison, s’assurer que la fixation
antibascule est réenclenchée lorsque l’appareil est
remis en place contre le mur. Dans le cas d’une
mauvaise utilisation comme une personne se tenant
debout, s’assoyant ou s’appuyant sur la porte ouverte,
si cette précaution n’est pas prise, l’appareil peut
basculer et causer des blessures par des liquides
chauds ou la cuisinière elle-même.
Pour installations au Massachusetts :
1. L’installation doit être effectuée par un entrepreneur qualifié ou avec licence, un plombier, un ajusteur
de gaz qualifié ou avec licence de l’État, province ou
région où l’appareil est installé.
2. La soupape d’arrêt doit être dotée d’un robinet à
gaz en «T».
3. Un connecteur à gaz flexible ne doit pas être plus
long que 36 po.
Préparation Installation
•
•
•
•
•
•
•
Ne pas réparer ni remplacer toute pièce de l’appareil à
moins que cela ne soit spécifiquement indiqué dans
les guides. Un service, installation ou entretien
inadéquat peut causer des dommages à la propriété
ou des blessures. Consulter ce guide. Tout autre
service doit être effectué par un technicien qualifié.
Instructions de sécurité
Instructions de sécurité importantes
Instructions de sécurité importantes
Service
Étapes finales
Installation Préparation Instructions de sécurité
AVERTISSEMENT
Avant d’installer, mettre l’alimentation hors circuit au
panneau de service. Le verrouiller pour empêcher la
mise en circuit accidentelle.
•
L’installation doit être conforme aux codes
locaux ou en l’absence des codes, avec le code
national pour combustibles, ANSI Z223.1.
•
Cet appareil doit être mis à la terre
conformément aux codes locaux ou en l’absence
des codes, avec le Code national d’électricité
ANSI/ NFPA 70 dernière édition (au Canada,
l’installation doit être conforme aux codes CAN 1B149.1 et .2 d’installation pour les appareils à gaz et/
ou les codes locaux.
•
Retirer tout ruban et emballage avant d’utiliser.
Détruire l’emballage par la suite. Ne jamais laisser
les enfants jouer avec le matériel d’emballage.
•
S’assurer que l’appareil est installé et mis à la
terre adéquatement par un technicien qualifié.
L’installation, les connexions électriques et la mise à la
terre doivent être conformes à tous les codes
applicables.
•
Installer selon les instructions d’installation
fournies avec la cuisinière.
•
Demander au marchand de recommander un
technicien qualifié et un centre de service autorisé.
•
Il faut savoir comment débrancher l’alimentation
à la cuisinière au coupe-circuit ou au fusible en cas
d’urgence
•
Ne pas réparer ni remplacer toute pièces de
l’appareil à moins de recommandations
spécifiques dans les guides. Tout autre service
doit être effectué par un technicien qualifié. Ceci peut
réduire le risque de dommages à la propriété et de
blessures.
•
Au moment de tester un système de analisation
à un test de pression excédant 1/2 lb/po2
(3,5 kPa), l’appareil et sa soupape d’arrêt
individuelle doivent être débranchés du
système de canalisation de gaz.
•
Au moment de tester un système de analisation
à un test de pression égal ou inférieur à 1/2 lb/
po2 (3,5 kPa), l’appareil doit être isolé du
système de canalisation de gaz en fermant sa
soupape d’arrêt manuelle individuelle.
•
Ne jamais modifier la fabrication de l’appareil
en enlevant les pieds niveleurs, panneaux, couvercles
de fils, vis/fiation antibascule ou toute autre pièce.
ATTENTION
L’appareil est lourd et requiert au moins deux
personnes ou un équipement approprié pour le
déplacer.
ATTENTION
Les surfaces dissimulées peuvent avoir des bords
tranchants. Faire attention en allant derrière ou
sous l’appareil.
AVERTISSEMENT
Monter, s’appuyer ou s’asseoir sur les portes ou les
tiroirs de cette cuisinière peut causer des dommages à
l’appareil ou des blessures. Ne pas laisser les enfants
grimper ni jouer autour de l’appareil. Le poids d’un
enfant sur une porte ouverte peut faire basculer
l’appareil, causant ainsi des blessures ou des brûlures
sérieuses.
ATTENTION
Ne pas utiliser le four ou le tiroir réchaud (si équipé) à
des fins de rangement.
AVERTISSEMENT
Ne pas ranger des articles intéressants pour les
enfants dans les armoires au-dessus de la cuisinière
ou sur le dosseret. Les enfants peuvent grimper sur la
cuisinière pour atteindre ces articles et se blesser.
Cet appareil est conforme à une ou plusieurs des normes
ci-dessous :
•
UL 858, norme de sécurité pour cuisinières
électriques domestiques
• UL 923, norme de sécurité pour appareil de cuisson à
micro-ondes
• UL 507, norme de sécurité pour ventilateur électrique
• ANSI Z21.1-2000, norme nationale américaine pour
appareils de cuisson à gaz domestiques
• CAN/CSA-C22.2 n° 113-M1984 ventilateurs
• CAN/CSA-C22.2 n° 61-M89 cuisinières domestiques
Il est de la responsabilité du propriétaire et de
l’installateur de déterminer si des exigences et/ou des
normes additionnelles s’appliquent à une installation
spécifique.
Remarque pour installation à haute altitude :
Cette cuisinière est approuvée CSA pour un fonctionnement sûr jusqu’à une altitude de 10 000 pi sans
modification.
Exception : pour utilisation avec gaz LP, la cuisinière doit
d’abord être convertie à l’aide du nécessaire de
conversion LP compris avec la documentation.
Instructions de sécurité importantes
Sécurité relative aux équipements à gaz:
Si requis par le Code national d’électricité (ou Code
d’électricité canadien), cet appareil doit être installé sur
un circuit séparé.
Installer une soupape d’arrêt de gaz à proximité de
l’appareil ; elle doit être facilement accessible en cas
d’urgence.
Pour les appareils dotés d’un cordon d’alimentation, ne
pas couper ni enlever la broche de mise à la terre. La fiche
doit être branchée sur une prise mise à la terre
correspondante pour éviter tout choc électrique. En cas de
doute quant à la mise à la terre de la prise, le propriétaire
doit la faire vérifier par un électricien qualifé.
Le test de fuite doit être fait par l’installateur conformément aux instructions données dans cette section.
Installateur – indiquer au propriétaire l’emplacement du
coupe-circuit ou du fusible. Le noter à des fins de
références.
Important – conserver ces instructions pour utilisation par
l’inspecteur en électricité local.
AVERTISSEMENT
Pour éviter les risques de brûlures ou d’incendie en
passant au-dessus des surfaces chaudes, l’espace de
rangement dans les armoires au-dessus de l’appareil doit
être évité. Si une armoire de rangement est en place, le
risque peut être réduit en installant une hotte ayant une
projection horizontale de 5 po du bas des armoires.
La pression d’alimentation minimale doit être 1 po,
colonne d’eau, au-dessus de la pression du collecteur,
imprimée sur la plaque signalétique.
La pression d’alimentation maximale ne doit pas excéder
14,0 po, colonne d’eau (34,9 millibarres).
Sécurité gaz propane:
Remarque importante pour gaz LP : La cuisinière est
expédiée de l’usine pour une utilisation avec le gaz
naturel. Pour le gaz propane (LP), il faut la convertir à
l’aide du nécessaire de conversion pour gaz LP.
Le réservoir de gaz propane doit être doté de son propre
régulateur de pression. De plus, le régulateur fourni avec
cet appareil doit être
S’assurer que les armoires au-dessus de la surface de
cuisson ont un maximum de 13 po (330 mm) de
profondeur.
Préparation Installation
Consulter la plaque signalétique pour plus de détails. Voir
« Plaque signalétique » à la rubrique Service pour son
emplacement.
Installateur – indiquer au propriétaire l’emplacement de la
soupape d’arrêt de gaz.
Instructions de sécurité
Sécurité électrique:
Étapes finales Service
Français• 3
Étapes 1 à 4 : préparation
Service
Étapes finales
Siemens recommande fortement l’installation d’une hotte
au-dessus de la cuisinière. Pour la plupart des cuisines,
une cote de hotte certifiée de pas moins de 300 CFM est
recommandée. La hotte doit être installée selon les
instructions fournies avec la hotte.
30 po minimum
centré
30 po
Min.m
2. Préparation des armoires
Cet appareil est conçu pour une installation près de
murs adjacents et surfaces de projection fabriqués de
matériaux combustibles.
Allouer un minimum de 30 po entre les armoires où la
cuisinière est installée (voir figure 1).
Dégagements requis*
De la surface de cuisson jusqu’aux matériaux audessus (figure 1)
Il doit y avoir un dégagement de 30 po entre le haut
de la surface de cuisson et le bas d’une armoire en
métal ou en bois non protégé.
24 po sont acceptables lorsque le bas de l’armoire en
métal ou en bois est protégée par (a) un matériaux
ignifuge de pas moins de 1/4 po qui doit être couvert
par (b) une feuille de métal de pas moins de n° 28
MSGacier inoxydable 0,015 po ou aluminium ou
cuivre 0,024 po.
Depuis les parois de la cuisinière aux matériaux
ajdacents (figure 1)
Aucun dégagement n’est nécessaire depuis les parois
de l’appareil aux murs combustibles verticaux arrière,
droit, gauche.
Le dégagement depuis le haut de la cuisinière aux
murs verticaux adjacents doit être d’au moins 4 po.
REMARQUE : certains finis d’armoire ne peuvent
tolérer les températures permises par U.L.,
particulièrement des fours autonettoyants. Les
armoires peuvent se décolorer ou tacher. Ceci est
remarquable avec des armoires laminées.
4 po min.
4 po min.
Aucun dégagement
requis aux parois
d’armoire
Figure 1: Préparation d’armoire
Placer la
sortie de
canalisation
d’alimentation
en gaz et
électrique ici
771/2"
1/2”
1/2”
331/2"
1/2"
441/2”
1/8 "
13131/8”
4"
4”
1/2"
33 7/8"
7/8” 44 1/2”
30"
30”
Figure 2: Emplacement de sortie électrique et canalisation en gaz
Mur arrière
3. Préparation de la sortie électrique
Égalité
La sortie électrique doit être située dans l’espace
ombré à la figure 2.
4. Préparer murs et plancher et
installer la fixation anti bascule
1. Sceller les trous dans les murs et plancher.
2. Régler la hauteur de la cuisinière et mettre de
niveau en tournant les pieds niveleurs au bas de
l’appareil, à l’aide d’une clé 1 1/4 po.
3. Mesurer pour repérer l’emplacement de la fixation
comme à la figure 3.
4. Maintenir la fixation avec 2 vis appropriées pour la
surface de fixation (non comprise) (ex. : pour un
plancher en bois, utiliser des vis à bois, pour un
plancher en béton, utiliser des vis appropriées).
18 po min.
Paroi latérale de
l’armoire
1 9/16”
Installation Préparation Instructions de sécurité
1. Installation de la ventilation
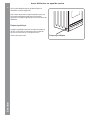
Fixation anti bascule
Figure 3
Figure 4
*Les instructions sont déterminées en utilisant des armoires américaines standard. Les armoires de base standard mesurent 36 po de
haut x 24 po de profondeur. Les armoires au-dessus de la surface de cuisson et celles adjacentes à celles au-dessus de la surface de
cuisson mesurent 13 po de profondeur depuis le mur arrière. Si des armoires non standard sont utilisées, il faut prendre soin de
modifier les dimensions de façon appropriée.
Étape 5 : installation - connexion de l’alimentation en gaz
Méthode connecteur flexible (voir figure 5)
1.
2.
3.
4.
5.
Méthode tuyau rigide (voir figure 6)
La configuration de la connextion avec tuyau rigide varie
selon l’emplacement du bout du tuyau rigide de gaz.
Consulter la figure 6 pour plus de détails.
1. S’assurer que le coupe-circuit est hors circuit, puis
brancher le cordon de la cuisinière sur la prise
électrique.
2. Remettre la cuisinière en position en s’assurant
que le pieds glisse sous la fixation anti bascule. La
cuisinière sera à 3/4 po du mur lorsque
adéquatement installée.
3. Incliner délicatement la cuisinière vers l’avant pour
s’assurer que la fixation anti bascule s’enclenche et
empêche de basculer.
4. Brancher le tuyay à la cuisinière au joint. Accéder à
la connexion par le panneau d’accès derrière le
tiroir réchaud. Remarque : Attention à ne pas
appliquer de pression sur le tiroir réchaud pendant
l’installation du tuyau.
ATTENTION
NE JAMAIS VÉRIFIER LES FUITES AVEC UNE FLAMME.
NE PAS PASSER À L’ÉTAPE SUIVANTE TANT QUE LES
FUITES NE SONT PAS ÉLIMINÉES.
ATTENTION
Avant de brancher le cordon électrique, s’assurer que
tous les contrôles sont en position OFF.
Soupape
d’arrêt de
gaz
Connecteur
flexible
Régulateur
Figure 5: Méthode de connecteur flexible
Coude
Soupape
d’arrêt de gaz
Coude
nipple
joint
mamelon
mamelon
coude :
brancher sur
régulateur
ici
Tuyay de gaz
1/2 à 3/4 po
Débit de gaz à l’appareil
Figure 6: Méthode de tuyau rigide
Passer à «Test de fuite de gaz», colonne suivante.
Français• 5
Étapes finales Service
6.
Installer un adaptateur évasé mâle 1/2 po au filet
interne 1/2 po NPT de l’entrée de la cuisinière.
Utiliser une clé sur le raccord coude pour éviter
les dommages.
Installer un adaptateur de lien évasé mâle 1/2 ou
3/4 po sur le filet interne NPT de la soupape
d’arrêt manuelle.
Brancher le connecteur d’appareil en métal flexible.
S’assurer que le coupe-circuit est hors circuit, puis
brancher le cordon de la cuisinière sur la prise
électrique.
Remettre la cuisinière en position en s’assurant
que le pieds glisse sous la fixation anti bascule. La
cuisinière sera à 3/4 po du mur lorsque
adéquatement installée. Remarque : ne pas coincer
le connecteur flexible !
Incliner délicatement la cuisinière vers l’avant pour
s’assurer que la fixation anti bascule s’enclenche et
empêche de basculer.
Le test de fuite doit être fait par l’installateur
conformément aux instructions données dans cette
section.
Ouvrir le gaz. Appliquer un liquide de détection non
corrosif pour fuites sur tous les joints et racords de
connexion de gaz entre la soupape d’arrêt et la cuisinière.
Inclure les raccords de gaz et les joints dans la cuisinière si
les connexions doivent être dérangées pendant
l’installation. Des bulles autour des raccords et
connexions indiquent qu’il y a une fuite.
S’il y a une fuite, fermer la soupape d’arrêt de gaz de la
canalisation d’alimentation et serrer les connexions.
Refaire un test de fuite en ouvant la soupape d’arrêt de
gaz de la canalisation. La vérification est complétée
lorsqu’il n’y a pas de bulles. Essuyer le résidu de liquide.
Passer à l’étape 6 : étapes finales.
Préparation Installation
La connexion de gaz est située en dessous du panneau
arrière de l’appareil. (Voir figure 4, page 3). Ce dernier
est accessible par le panneau du tiroir réchaud ou de
l’arrière de la cuisinière. Pour accéder au panneau,
enlever le tiroir réchaud. Fermer la soupape
d’alimentation en gaz principale avant de débrancher une
ancienne cuisinière et laisser fermer jusqu’à ce que le
nouveau raccordement soit effectué. Ne pas oublier de
rallumer la veilleuse sur les autres appareils à gaz
lorsque l’on remet le gaz en circuit.
L’appareil peut ête installée avec un tuyau rigide ou un
connecteur d’appareil en métal flexible certifié CSA
International. Si l’on utilise un connecteur flexible,
toujours en utiliser un nouveau. Appliquer un produit sur
les joints de tuyau ou du ruban Teflon* approprié pour
l’utilisation avec du gaz LP et le gaz naturel tout autour
des filets de tuyau mâle pour empêcher les fuites.
Si non déjà en place, installer une soupape d’arrêt de gaz
dans un endroit facile d’accès. S’assurer que tous les
utilisateurs savent où est la soupape d’arrêt de gaz de la
cuisinière et comment la fermer.
Remarque : L’installateur doit aviser le consommateur
de l’endroit où se situe la soupape d’arrêt de gaz.
Test pour fuites de gaz
Instructions de sécurité
Remarque importante pour gaz LP : La cuisinière
est expédiée de l’usine pour une utilisation avec le
gaz naturel. Pour le gaz propane (LP), il faut la
convertir à l’aide du nécessaire de conversion pour
gaz LP.
Étape 6: étapes finales - test du fonctionnement du brûleur
Service
Étapes finales
Installation Préparation Instructions de sécurité
1. Mettre en circuit au disjoncteur
Si l’affichage CL clignote et fait un bip continuel, le
câblage est incorrect. Vérifier si le câblage de la maison
est correct. Sinon, téléphoner au service Siemens.
2. Test des brûleurs de la cuisinière
Test allumage des brûleurs. Choisir un bouton de
brûleur sur la cuisinière. Pousser et tourner au
symbole de la flamme. Si le module allumeurétincelle fonctionne adéquatement, il produit un clic.
Une fois l’air purgé des canalisations d’alimentation,
le brûleur devrait s’allumer dans un délai de quatre
(4) secondes.
Test flamme: réglage élevé. Régler le brûleur à HI.
Voir la figure 7 pour les caractéristiques de la
flamme.
Si la flamme est complètement ou presque jaune,
téléphoner le service Siemens.
Test flamme: réglage bas. Régler le brûleur à LO.
Vérifier si la flamme enveloppe complètement le
brûleur. Il devrait y avoir une flamme à chaque port
de brûleur et il ne devrait pas y avoir d’espace entre
la flamme et le brûleur. Si un des brûleurs n’enveloppe
pas, appeler le service Siemens.
Vérifier l’allumage et la flamme sur tous les brûleurs
de la cuisinière comme il est décrit ci-dessus.
LORSQUE LA FLAMME EST BIEN RÉGLÉE:
Il devrait y avoir une flamme sur chaque port
de brûleur.
Il ne devrait pas y avoir d’espace d’air entre la
flamme et le port de brûleur.
3. Test brûleurs du four
Retirer le couvercle inférieur du four. Retirer les
deux fermetures à vis arrière, glisser le couvercle et le
retirer.
Test allumage du brûleur de four. Régler le four à
350 °F. Après 30 à 75 secondes le brûleur s’allumera.
Le brûleur restera ainsi jusqu’il atteigne le 350 °F et il
se fermera. À partir de ce point, le brûleur alternera
d’allumer à fermer pour maintenir la température.
Test flamme du brûleur de four. À cette étape
vérifier la flamme. Voir figure 7 pour les caractéristiques
appropriées de la flamme. Si la flamme brûle
complètement ou est le plus souvent jaune, régler le volet
d’air du brûleur de four. Voir figure 8 (page suivante) pour
plus de détails.
Test allumage du brûleur de grill. Régler le mode de
cuisson grill à élevé. Le brûleur s’allumera après 30 à
75 secondes.
Test flamme du brûleur de grill. À cette étape
vérifier la flamme. Voir figure 6 pour les
caractéristiques appropriées de la flamme. Si la
flamme brûle complètement ou est le plus souvent
jaune, régler le volet d’air du brûleur de grill. Voir
figure 8 (page suivante) pour plus de détails.
Replacer le couvercle inférieur du four. Glisser le
couvercle en place et remettre les fermetures à vis
arrières.
Caractéristiques de flamme
Flamme jaune:
Réglage nécessaire.
Pointe jaune sur cône extérieur:
Normal pour gaz LP.
Flamme bleue doux:
Normal pour gaz naturel.
Si la flamme est complètement ou presque jaune, vérifier si le
régulateur est réglé pour le combustible approprié. Après le
réglage, vérifier de nouveau.
Une rainure jaune est normale pendant la mise en marche
initiale.
Laisser l’appareil fonctionner de 4 à 5 minutes et réévaluer avant
d’effectuer d’autres réglages.
Figure 7
Appeler le service Siemens 866-447-4363 si:
1. Si un des brûleurs ne s’allume pas.
2. La flamme de brûleur du grille ou la flamme de
brûleur de cuisson sort avant l’une ou l’autre
température de portée.
3. Si un des brûleurs continue de brûler jaune.
Si un ajustement du brûleur/flamme est nécessaire,
aller à l’étape 6 : « ajustement de la flamme » (si
nécessaire), à la page suivante. Autrement, à ce point,
l’installation est terminée.
Étape 6: étapes finales - réglage de la flamme (si nécessaire)
Réglage du volet d’air
de brûleur de grill (si nécessaire)
Plus ouvert:
•Moins de
flamme jaune
Volet
Vis
Figure 8
Le volet d’air est situé à l’arrière du brûleur de grill. Il
est attaché avec 7 vis à la cavité du four. Retirer les vis
et tirer doucement l’assemblage du brûleur de grill en
faisant attention pour ne pas détacher les fils
électriques. Placer le brûleur contre l’arrière du mur de
la cavité du four. Desserrer la vis et tourner le volet.
Fermer le volet si la flamme s’élève ou souffle ou
n’entraîne pas ; ouvrir le volet si la flamme est trop
jaune. (Voir figure 8.) Serrer la vis. Replacer
l’assemblage du grill en faisant attention de passer
tous les fils à travers l’arrière du four. Réinsérer les 8
vis.
Remarque : le volet du brûleur de grill se place sur
l’orifice lorsqu’installé correctement.
Volet
Plus ouvert:
•Moins de
flamme jaune
Plus fermé:
•Moins de flamme
bleue
•Plus d’entraînement
•Moins de poussée
ou de soufflage
Figure 9
Le volet d’air de brûleur du four est situé proche du
régulateur de four. L’atteindre par le trou d’accès à
l’intérieur du panneau arrière du tiroir réchaud.
(Desserrer les vis et enlever le panneau d’accès).
Desserrer les vis sur le volet. Fermer le volet si la
flamme s’élève ou souffle ou n’entraîne pas; ouvrir le
volet si la flamme est trop jaune. Serrer la vis.
Rattacher la plaque du couvercle et replacer le tiroir
réchaud. (Voir figure 9).
Pièces de rechange : visitez le marchand Siemens pour les pièces de rechange. Pour un marchand dans la région,
communiquer avec le service Siemens 866-447-4363.
Préparation Installation
Plus fermé:
•Moins de flamme bleue
•Plus d’entraînement
•Moins de poussée ou de
soufflage
Réglage du volet d’air
de brûleur de four (si nécessaire)
Instructions de sécurité
AVERTISSEMENT:
Laisser le (les) brûleur(s) se refroidir
avant de tenter de le (les) retirer !
Étapes finales Service
Français• 7
Service
Étapes finales
Installation Préparation Instructions de sécurité
Avant d’effectuer un appel de service
Voir le guide de dépannage du guide d’utilisation et
d’entretien. Consulter la garantie.
Pour communiquer avec un représentant de service, voir
l’information au début du guide. Avoir l’information
imprimée sur la plaque signalétique sous la main avant de
téléphoner.
Plaque signalétique
La plaque signalétique donne les numéros de modèle et
de série. La consulter au moment de faire un appel de
service. Elle est située sur le care près du tiroir.
Ouvrir le tiroir pour la voir.
Plaque signalétique
Contenido
Instrucciones Importantes de Seguridad .................................................................................... 1
Preparación ................................................................................................................................ 4
Instalación ................................................................................................................................. 5
Pasos Finales ............................................................................................................................. 6
Servicio ...................................................................................................................................... 8
PARTES INCLUIDAS
Soporte Antivolcadura
HERRAMIENTAS Y PARTES QUE SE
NECESITAN:
•
•
•
•
•
•
•
•
•
•
•
•
•
•
•
•
Cinta de Medir Estándar
Desarmador de Cabeza Phillips (de Cruz)
Llave de 1-1/4”
Lápiz
Desarmador con Cabeza Torx T-20
Llave para Tuercas de 3/8”
Tornillos (2) y Anclas (2) para el Soporte
Antivolcadura (El estilo varía dependiendo de la
superficie de montaje)
Llave para Tubos (2)
Cinta de Teflón®* o Compuesto para Unir Tubos
(Se puede usar con gas LP y gas Natural)
Pinzas
Solución para Probar si hay Fuga de Gas
Niveleta
Taladro y Broca
Línea de Suministro de Gas (Conector Metálico
Flexible o Tubo Rígido)
Válvula de Cierre de Gas (si no hay)
Guantes y Lentes de Seguridad
* Teflon es una marca registrada de DuPont
ADVERTENCIA
RIESGO DE VOLCADURA DE LA ESTUFA
•
•
Para Instalaciones en Massachusetts:
1. La instalación debe ser realizada por un contratista,
plomero o técnico de gas calificado o autorizado, quien
está calificado o autorizado por el estado, la provincia
o región donde se está instalando este aparato.
2. La válvula de cierre debe ser un grifo de gas en T.
3. El conector flexible de gas no debe medir más de
36 pulgadas.
ADVERTENCIA: El no observar la información
en este manual puede causar un fuego o
una explosión, y como resultado daños a la
propiedad, lesiones o la muerte.
− No guarde o use materiales combustibles,
gasolina u otros vapores y líquidos
Inflamables cerca de este o cualquier otro
aparato.
− QUÉ HACER CUANDO HUELE A GAS:
• No trate de encender ningún aparato.
• No toque ningún interruptor eléctrico.
• No use ningún teléfono en su edificio.
• Llame de inmediato a su proveedor de
− Un instalador calificado, una agencia de
servicio autorizada o el proveedor de gas debe
realizar la instalación y el servicio.
Español • 1
Servicio
gas desde el teléfono de algún vecino.
Siga las instrucciones de su proveedor de
gas.
• Cuando no pueda localizar a su proveedor
de gas, llame a los bomberos.
Pasos FInales
•
Todas las estufas pueden volcarse y producir lesiones.
Para prevenir la volcadura accidental de la estufa,
fíjela a la pared, al piso o al gabinete con el
Dispositivo Antivolcadura que se incluye.
Cuando no se instala el aparato de acuerdo con estas
instrucciones, existe el riesgo de una volcadura.
Cuando se jala la estufa de la pared por motivos de
limpieza, servicio u otra razón, asegúrese de
volver a embonar correctamente el Dispositivo
Antivolcadura al volver a empujar la estufa contra la
pared. En el caso de un uso poco normal (como
alguien sentado, parado o recostado sobre una puerta
abierta), el hecho de ignorar esta precaución puede
causar la volcadura de la estufa y como consecuencia
lesiones debido a líquidos calientes derramados o por
la misma estufa.
ADVERTENCIA
No trate de reparar o reemplazar ninguna parte del
aparato a menos que los manuales lo recomienden
específicamente. La instalación, servicio o
mantenimiento incorrecto puede causar lesiones o
dañar la propiedad. Todo servicio adicional debe ser
realizado por un técnico calificado.
Instrucciones de Seguridad Preparación Instalación
Seguridad
Por favor lea todas las instrucciones antes de usar este aparato.
Servicio Pasos Finales
Instalación Preparación Instrucciones de Seguridad
Instrucciones Importantes de Seguridad
ADVERTENCIA
Antes de instalar, APAGUE la corriente en el panel de
servicio. Bloquee el panel para evitar que se PRENDA
la corriente accidentalmente.
•
La instalación debe cumplir con los códigos
locales o, a falta de códigos locales, con el
Código Nacional de Gas Combustible, ANSI
Z223.1.
•
Se debe conectar el aparato a tierra conforme a
los códigos locales o, a falta de códigos locales,
conforme al Código Eléctrico Nacional ANSI/NFPA
70, última edición. (En Canadá, la instalación debe
estar conforme a los códigos de instalación para
aparatos que usan gas CAN 1.B149.1 y .2 y/o
conforme a los códigos locales)
•
Quite las cintas adhesivas y materiales de
empaque antes de usar la estufa. Destruya el
cartón y las bolsas de plástico después de
desempacar la estufa. Nunca permita que los niños
jueguen con el material de empaque.
•
Asegúrese de que su aparato esté instalado y
aterrizado correctamente por un técnico
calificado. La instalación, las conexiones
eléctricas y la puesta a tierra deben cumplir con
todos los códigos aplicables.
•
Instale sólo de acuerdo a las instrucciones de
instalación que se incluyen con esta estufa.
•
Solicite que su distribuidor recomiende un
técnico calificado y un centro de servicio autorizado.
•
Aprenda a desconectar la corriente en el
cortacircuitos o la caja de fusibles y el suministro de
gas en caso de una emergencia.
•
No trate de reparar o reemplazar alguna parte
del aparato a menos que los manuales lo
recomienden específicamente. Todo servicio
adicional debe ser realizado por un técnico calificado.
Esto puede reducir el riesgo de heridas personales o
daños a la estufa.
•
Cuando ponga a prueba el sistema de la tubería de
suministro a presiones de prueba arriba de 1/2 psig
(3.5 kPa), se deben desconectar el aparato y su
válvula individual de cierre de gas del sistema de la
tubería del gas.
•
Cuando ponga a prueba el sistema de la tubería
de suministro a presiones de prueba iguales o
menores de 1/2 psig (3.5 kPa), se debe aislar el
aparato del sistema de la tubería de suministro
de gas cerrando su válvula manual de cierre de
gas.
•
Nunca modifique o altere la construcción de una
estufa quitando las patas de nivelación, paneles,
protecciones de cables, soporte antivolcadura/
tornillos o cualquier otra parte del
producto.
•
No levante la puerta por la agarradera. Quite la
puerta para facilitar el manejo y la instalación. Vea la
Sección ‘Quitar la Puerta del Horno’ en la sección de
Mantenimiento del manual de Uso y Cuidado.
CUIDADO
La unidad está pesada y debe ser movida por al menos
dos personas o con el equipo apropiado.
CUIDADO
Puede haber superficies ocultas con bordes filosos.
Tenga cuidado cuando meta la mano detrás o
debajo del aparato.
ADVERTENCIA
Pisar, recostarse o sentarse sobre las puertas o los
cajones de esta estufa puede causar lesiones serias y
también dañar la estufa. No permita que los niños se
suban o que jueguen cerca de la estufa. El peso de un
niño sobre una puerta abierta puede causar la
volcadura de la estufa, causando quemaduras serias u
otras lesiones.
CUIDADO
No utilice el horno o el cajón calentador (si viene
incluido) para almacenar cosas.
ADVERTENCIA
No almacene cosas de interés para los niños en los
gabinetes arriba de la estufa o la parte trasera de ésta.
Cuando los niños se suben a la estufa para alcanzar
estas cosas, pueden sufrir heridas serias.
Este aparato cumple con una o más de las siguientes
normas:
•
UL 858, Norma de seguridad para estufas
electrodomésticas
•
UL 923, Norma de seguridad para hornos de
microondas
•
UL 507, Norma de seguridad para ventiladores
eléctricos
•
ANSI Z21.1-2000, Norma americana nacional
para aparatos domésticos de gas
•
CAN/CSA-C22.2 No. 113-M1984 Ventiladores
•
CAN/CSA-C22.2 No. 61-M89 Estufas domésticas
Es la responsabilidad del propietario y del instalador
determinar si aplican requerimientos y/o normas
adicionales en instalaciones específicas.
Seguridad eléctrica:
Si el Código Eléctrico Nacional (o el Código Eléctrico
Canadiense) lo requiere, se debe instalar este aparato en
un circuito de derivación separado.
En los aparatos que incluyen un cable con enchufe, no se
debe cortar o quitar la clavija de tierra. El enchufe debe
ser insertado en una tomacorriente correspondiente para
evitar una descarga eléctrica. En caso que existan dudas
si la tomacorriente está puesta a tierra correctamente, el
cliente debe contratar a un eléctrico calificado para que la
revise.
Instalador – muéstrele al propietario el lugar donde se
encuentra el cortacircuitos o el fusible. Marque este lugar
para futuras referencias.
Importante – Guarde estas instrucciones para el uso del
inspector eléctrico local.
Consulte la placa de datos para más información. Vea
“Placa con información del producto” bajo “Servicio” para
encontrar la placa.
Seguridad con el gas:
Instale una válvula de cierre de gas cerca del aparato.
Debe tener fácil acceso en caso de una emergencia.
El instalador debe revisar si hay fugas de gas de acuerdo
a las instrucciones indicadas en esta sección.
Instalador – muéstrele al propietario donde se encuentra
la válvula de cierre de gas.
La mínima presión de suministro de gas debe ser 1"”
columna de agua arriba de la presión en el manifold
impresa en la placa de información.
La máxima presión de suministro no debe exceder 14.0
pulgadas de columna de agua (34.9 mb).”
Seguridad gas propano:
Aviso importante para usuarios de gas LP: La estufa
viene de fábrica para el uso con gas natural. Para usar gas
propano (LP), ud. debe convertir primero su estufa usando
el kit de conversión a gas LP.
El tanque de gas propano debe tener su propio regulador
de alta presión. Además, se debe usar también el
regulador que viene incluido con este parato.
ADVERTENCIA
Para eliminar el riesgo de quemaduras o fuego al
inclinarse encima de superficies calientes, se deben evitar
espacios de almacenamiento en los gabinetes arriba de
las unidades superficiales. En caso de proporcionar
espacio de almacenamiento, se puede reducir el riesgo al
instalar una campana que salga horizontalmente como
mínimo 5 pulgadas (127 mm) debajo del fondo del
gabinete.
Instrucciones de Seguridad Preparación Instalación
Nota para instalaciones en gran altitud:
Esta estufa está certificada por CSA para una operación
segura hasta una altitud de 10,000 pies (3,000 m) sin
ninguna modificación.
Excepción: para el uso con gas LP, se debe convertir la
estufa primero usando las instrucciones de instalación LP
que se incluyen en este juego de literatura.
Seguridad
Instrucciones Importantes de Seguridad
Pasos FInales
Verifique que los gabinetes arriba de la parrilla tengan una
profundidad máxima de 13" (330 mm).
Servicio
Español • 3
Servicio Pasos Finales
1. Instalar la Ventilación
Siemens recomienda fuertemente instalar una campana de
ventilación arriba de esta estufa. Para la mayoría de
cocinas se recomienda una campana con un régimen
eléctrico nominal no menor de 300 CFM. La campana debe
ser instalada de acuerdo a las instrucciones incluidas con
ésta.
30” Mínimo
Centrado
30”
Min.
2. Preparar los Gabinetes
Se puede instalar esta unidad cerca de paredes
adyacentes y superficies salientes construidas de
materiales combustibles.
Debe haber un mínimo espacio libre de 30 pulgadas
(76 cm) entre los gabinetes donde se va a instalar la
estufa (Vea la Figura 1).
Espacios Libres que se Requieren*
Desde la estufa a los materiales de arriba (vea Fig.1)
Debe haber un espacio libre mínimo de 30 pulgadas
(76 cm) entre la parte superior de la superficie de
cocinar y el fondo de un gabinete de madera o metal
no protegido.
24 pulgadas (61 cm) son aceptables cuando el fondo
del gabinete de metal o madera está protegido por (a)
no menos de 1/4” de material pirorretardante que debe
estar cubierto con (b) no menos de chapa No. 28 MSG,
0.015 pulgadas (4 mm) de acero inoxidable o 0.024
pulgadas (6 mm) de aluminio o cobre.
Desde las paredes de la estufa a los materiales
adyacentes (Vea Figura 1)
No se requiere ningún espacio libre desde las paredes
de la unidad a las paredes verticales adyacentes
combustibles en la parte trasera, izquierda y derecha.
El espacio libre desde la parte superior de la estufa a
las paredes verticales adyacentes debe ser al menos
4”.
NOTA: El acabado de algunos gabinetes no puede
resistir las temperaturas permitidas por U.L., sobre
todo los hornos de autolimpieza; es posible que los
gabinetes pierdan el color o que se manchen. Esto se
nota aún más con gabinetes laminados.
4” Min.
18”
Min.
4” Min.
No se requiere
ningún espacio
libre a la
pared del gabinete
Figura 1: Preparación de Gabinetes
Coloque la
Línea de
Suministro de
Gas y la
Tomacorriente
Aquí
771/2"
1/2”
1/2”
331/2"
1/2"
441/2”
1/8 "
13131/8”
4"
4”
1/2"
33 7/8"
7/8” 44 1/2”
30"
30”
Figura 2: Colocación de la Línea de Suministro de Gas y de la
Tomacorriente
3. Preparar la Línea de Suministro de
Gas y la Tomacorriente
Al ras
Se debe ubicar la línea de suministro de gas y la
tomacorriente en el espacio sombreado en la Fig 2.
Pared lateral del
gabinete
1 9/16”
Instalación Preparación Instrucciones de Seguridad
Pasos 1 hasta 4: Preparación
4. Preparar las paredes y el piso e
instalar el soporte antivolcadura
1. Selle todos los hoyos en las paredes o el piso.
2. Ajuste la altura de la estufa y nivélela girando las
patas ajustables en la parte inferior de la estufa,
utilizando una llave de 1-1/4".
3. Tome medidas para localizar la posición del
soporte como se indica en la Figura 3.
4. Fije el soporte con 2 tornillos adecuados para la
superficie de montaje (no se incluyen). (p.ej.,
para pisos de madera utilice tornillos para madera,
para pisos de concreto utilice tornillos o anclajes
para concreto).
Dispositivo Antivolcadura
Figura 3
Figura 4
*Se determinaron las instrucciones en base a gabinetes americanos estándar. Los gabinetes estándar de piso miden 36” (91 cm) de
altura x 24” (61 cm) de profundo. Los gabinetes arriba de la superficie de cocinar y los gabinetes junto a los que están arriba de la
superficie de cocinar miden 13” (33 cm) de profundo de la pared trasera. Cuando se usan gabinetes no estándar, tenga cuidado de
modificar las dimensiones correctamente.
Paso 5: Instalación - Conectar el Suministro de Gas
Método con Manguera Flexible (vea Figura 5)
El instalador debe revisar si hay fugas de gas de acuerdo
a las instrucciones indicadas en esta sección.
Prenda el Gas. Aplique un líquido no corrosivo para
detectar fugas a todas las uniones y conexiones en la
conexión de gas entre la válvula de cierre y la estufa.
Incluya los accesorios y las uniones de gas en la estufa, si
las conexiones pudieron haber sido perturbadas durante
la instalación. Burbujas que aparecen alrededor de las
conexiones y uniones indican una fuga.
Cuando se presenta una fuga, apague la válvula de cierre
de la línea de suministro de gas y apriete las conexiones.
Vuelva a probar si hay fugas abriendo la válvula del gas.
Al terminar el chequeo de fugas (ya no aparecen
burbujas), la prueba ha terminado. Limpie los residuos
del líquido de detección. Siga con el Paso 6: Pasos
Finales.
CUIDADO
NUNCA REVISE SI HAY FUGAS CON UNA LLAMA.
NO SIGA CON EL SIGUIENTE PASO HASTA HABER
ELIMINADO TODAS LAS FUGAS.
CUIDADO
Antes de enchufar un cable eléctrico, asegúrese que
todos los controles están APAGADOS.
1.
Manguera
Flexible
codo
Pasos FInales
Instale el adaptador macho de 1/2” en la rosca
Válvula
interna 1/2” NPT de la entrada de la estufa. Use una
de cierre
llave de reserva sobre la conexión del codo para evitar
del gas
daños.
2. Instale el adaptador macho de unión de 1/2” o 3/4”
Regulador
en la rosca interna NPT de la válvula manual de cierre.
3. Conecte la manguera metálica flexible.
4. Asegúrese que el cortacircuitos esté apagado y
luego enchufe el cable de la estufa en la
tomacorriente.
5. Empuje la estufa de vuelta a su posición,
asegurándose que las patas vuelvan a quedar abajo
Figura 5: Método con Manguera Flexible
del soporte antivolcadura. La estufa descansará a 3/4”
de la pared si queda instalada correctamente.
válvula de cierre
codo
Nota: Tenga cuidado de no enrollar la manguera flexible!
del gas
6. Incline la estufa cuidadosamente hacia ud. para
asegurar que el soporte antivolcadura esté
enganchado para evitar la volcadura.
Método con Tubo Rígido (vea Figura 6)
Servicio
La configuración de la conexión con tubo rígido varía
niple
dependiendo del lugar del extremo del tubo de gas.
Consulte la Figura 6 para detalles.
1. Asegúrese que el cortacircuitos esté apagado y
unión
niple
luego enchufe el cable de la estufa en la
tomacorriente.
niple
2. Empuje la estufa de vuelta a su posición,
asegurándose que las patas vuelvan a quedar
abajo del soporte antivolcadura. La estufa
codo:
tubo de gas
descansará a 3/ 4” de la pared si queda instalada
conectar al
1/2” a 3/4”
correctamente.
regulador
3. Incline la estufa cuidadosamente hacia ud. para
aquí
asegurar que el soporte antivolcadura esté
enganchado para evitar la volcadura.
4. Conecte el tubo a la estufa en la unión. Tiene acceso
a la conexión a través del panel de acceso detrás del
Flujo de Gas a la Estufa
cajón calentador.
Nota: Tenga cuidado de no aplicar presión al elemento
Figura 6: Método con Tubo Rígido
del cajón calentador durante la instalación con tubo
rígido. Siga con “Verificar Fugas de Gas”, siguiente columna.
Español
Instrucciones de Seguridad Preparación Instalación
La conexión del gas se encuentra abajo del panel trasero
de la estufa (Vea Figura 4, Página 3). Se tiene acceso a
través del panel de acceso del cajón calentador o desde
la parte trasera de la estufa. Para alcanzar el panel de
acceso, quite el cajón calentador.
Cierre la válvula principal del suministro de gas antes de
desconectar la estufa vieja y déjela cerrada hasta
terminar la conexión nueva. No olvide volver a
encender el piloto en otros aparatos de gas cuando
vuelva a prender el gas.
Se puede instalar la estufa usando un tubo rígido o una
manguera metálica flexible certificada por CSA
International. Cuando usa una manguera flexible,
siempre use un conector nuevo.
Aplique un compuesto de unión para tubos o cinta de
Teflón* apropiada para el uso con gas natural y gas LP
alrededor de las roscas macho del tubo para prevenir
fugas.
Si aún no la tiene, instale una válvula de cierre de gas en
un lugar con acceso fácil. Asegúrese que todos los
usuarios sepan dónde y cómo cerrar el suministro de gas
a la estufa.
Nota: El instalador debe informar al consumidor del
lugar de la válvula de cierre del gas.
Verificar Fugas de Gas
Seguridad
Aviso importante para usuarios de gas LP: La estufa
viene de fábrica para el uso con gas natural. Para usar
gas propano (LP), ud. debe convertir primero su estufa
usando el kit de conversión a gas LP.
• 5
Servicio Pasos Finales
Instalación Preparación Instrucciones de Seguridad
Paso 6: Pasos Finales - Probar el Funcionamiento de los Quemadores
1. Prender el interruptor de corriente
Si parpadea la pantalla LCD y si emite pitidos
continuamente, se conectaron mal los cables. Verifique el
cableado fue instalado correctamente. En caso que sí,
llame al Servicio de Siemens.
2. Probar los quemadores de la estufa
Probar la ignición de quemadores. Seleccione una
perilla de un quemador de la estufa. Presiónela y
gírela al símbolo de la llama. El ignitor módulo de
chispas producirá un sonido de un clic (chasquido).
Una vez que se haya purgado el aire de las líneas de
suministro, el quemador debe encenderse dentro de
cuatro (4) segundos.
Probar la llama: Calor alto. Cambie el quemador a HI
(Alto). Vea la Figura 7 para las características
apropiadas de las llamas.
Si alguno de los quemadores de la estufa sigue
quemándose con un color amarillo, llame al Servicio de
Siemens.
Probar la llama: Calor bajo. Cambie el quemador a LO
(Bajo). Verifique que la llama envuelva completamente el
quemador. Debe haber una llama en el puerto de cada
quemador y no debe haber un espacio de aire entre la
llama y el quemador. Si alguno de los quemadores no
queda completamente envuelto, llame al Servicio de
Siemens.
Verifique la ignición y la llama de cada quemador de
la estufa del modo mencionado arriba.
CUANDO LA LLAMA ESTÁ AJUSTADA
CORRECTAMENTE:
Debe haber una llama en el puerto de cada
quemador.
No debe haber un espacio de aire entre la
llama y el quemador.
3. Probar los quemadores del horno
Quitar la cubierta inferior del horno. Quite los dos
tornillos traseros de mariposa, deslice la cubierta
hacia adelante y sáquela.
Probar la ignición del quemador para hornear.
Ajuste el horno para hornear a 350°F. Después de 3075 segundos, el quemador se encenderá. El quemador
permanece encendido hasta alcanzar los 350°F y
luego se apagará. De este momento en adelante, el
quemador se prende y se apaga para mantener la
temperatura.
Probar la llama del quemador para hornear. Con el
quemador encendido, inspeccione la llama. Vea la
Figura 7 para las características apropiadas de la llama.
Cuando la llama se quema casi completamente amarillo,
ajuste la ventanilla de ventilación. Vea la Figura 8 (sig.
página) para los detalles.
Probar la ignición del quemador para asar. Cambie
el modo de cocinar a Asado Alto Calor. El quemador
se encenderá después de 30-75 segundos.
Probar la llama del quemador para asar. Con el
quemador encendido, inspeccione la llama. Vea la
Figura 6 para las características apropiadas de la
llama. Cuando la llama se quema casi completamente
amarillo, ajuste la ventanilla de ventilación. Vea la
Figura 8 (sig. página) para los detalles.
Reemplazar la cubierta inferior del horno. Deslice
la cubierta en su lugar y reemplace los dos tornillos de
mariposa.
Características de la Llama
Llama Amarilla:
Se requiere más ajuste.
Puntas Amarillas sobre Conos:
Normal para Gas LP.
Llama Azul Suave:
Normal para Gas Natural.
Si la llama está casi completamente amarilla, verifique que
el regulador esté ajustado para el gas correcto. Después de
ajustarlo, vuelva a probar.
Ver algunas llamas amarillas al arranque inicial es cosa
normal.
Permita que la unidad opere 4-5 minutos y reevalúe antes de
hacer otros ajustes.
Figura 7
Llame al Servicio de Siemens 866-447-4363 si:
1. Algún quemador no se enciende.
2. La llama del quemador de asar o del quemador de
hornear apagará antes de la temperature alcance.
3. Algún quemador sigue quemándose con color
amarillo.
Si se requiere ajustar los quemadores o la llama, siga
con el “Paso 7: Ajustar la Llama (si es necesario)”, en la
página siguiente. De otro modo, la instalación ha
terminado en este momento.
Paso 6: Pasos Finales - Ajustar la Llama (si es necesario)
Más abierta:
•Menor llama
amarilla
Ventanilla Tornillo
Más cerrada:
•Menor llama azul
•La llama envuelve más
•Se leventa o sopla
menos
Figura 8
La ventanilla de ventilación se encuentra en la parte
trasera del quemador para asado. Está montada a la
parte superior de la cavidad del horno con 7 tornillos.
Quite los tornillos y jale el conjunto del quemador de
asado suavemente, teniendo cuidado de no
desconectar los cables eléctricos. Coloque el
quemador de asado contra la pared trasera de la
cavidad del horno. Afloje el tornillo y gire la
ventanilla. Cierre la ventanilla cuando la llama se está
levantando o soplando o cuando no envuelve bien;
Abra la ventanilla si está demasiado amarilla. (Vea la
Figura 8). Apriete el tornillo. Reemplace el conjunto
del quemador con cuidado, alimentando todos los
cables a través de la parte trasera del horno. Vuelva a
insertar los 7 tornillos.
Nota: La ventanilla de ventilación del quemador de
asado cabe perfectamente sobre el orificio si está
instalada correctamente.
Ajustar la ventanilla de ventilación del
quemador para hornear (si es necesario)
Ventanilla
Más abierta:
•Menor llama
amarilla
Más cerrada:
•Menor llama azul
•La llama envuelve
más
•Se levanta o sopla
menos
Figura 9
La ventanilla de ventilación del quemador de
horneado se encuentra cerca del regulador del horno.
Lo puede alcanzar a través del orificio de acceso en el
panel trasero interno del cajón calentador (Afloje los
tornillos y quite el panel de acceso). Afloje el tornillo
sobre la ventanilla. Cierre la ventanilla cuando la
llama se está levantando o soplando o cuando no
envuelve bien; Abra la ventanilla si está demasiado
amarilla. Apriete el tornillo. Vuelva a fijar la cubierta y
reemplace el cajón calentador (Vea la Figura 9).
Pasos FInales
Partes de Repuesto: Visite a su distribuidor de Siemens para las partes de repuesto. Para localizar un distribuidor
cerca de usted, contacte al Servicio de Siemens 866-447-4363.
Instrucciones de Seguridad Preparación Instalación
Ajustar la ventanilla de ventilación del
quemador para asar (si es necesario)
Seguridad
ADVERTENCIA:
Permita que se enfrién los quemadores
antes de tratar de quitarlos!
Servicio
Español • 7
Servicio Pasos Finales
Instalación Preparación Instrucciones de Seguridad
Antes de llamar al servicio
Vea el manual de uso y cuidado para información sobre
cómo resolver proble-mas. Consulte la garantía en el
manual de uso y cuidado.
Para hablar con un representante de servicio, vea la
información de contacto al principio del manual. Por favor,
tenga a la mano la información impresa en la placa de
información de su producto cuando llame.
Placa con datos del pro-ducto
La placa con información indica el número de modelo y de
serie. Consulte la placa de información en el aparato
cuando solicite servicio. Se encuentra debajo del bastidor
cerca del cajón.
Abra el cajón para verla.
Placa con datos del pro-ducto
BSH reserves the right to change specifications or design without notice. Some models are certified for use in Canada.
BSH is not responsible for products which are transported from the United States for use in Canada. Check with your
local Canadian distributor or dealer. BSH Home Appliances Corporation, 5551 McFadden Avenue, Huntington Beach, CA
92649.
For the most up to date critical installation dimensions by fax, use your fax handset and call 702/833-3600. Use code
#8030.
s
5551 McFadden Avenue, Huntington Beach, CA 92649 • (866) 447-4363 www.siemens-home.com
9000002502 (5V06S2) Rev. B 08Antes de llamar al servicio