1
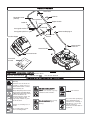
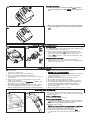
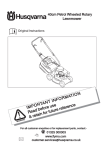
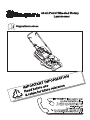
40cm Petrol Wheeled Rotary
Lawnmower
Original Instructions
AT
ORM
ION
F
T IN
N
A
RT
O
P
use
ence
r
e
M
r
I
e
f
o
f
e
be
re r
Read in for futu
a
& ret
Carton Contents
Brake lever
Cable tie
Powerdrive lever
(If fitted)
Cord guide nut
Cable tie
Cord guide washer x2
Upper Handle
Cord guide
Handle knob
Cord guide nylock nut
Lower handle plug x2
Handle knob
washer
Grassbox Upper
Lower Handle
screws x2
Lower Handle
Grassbox Lower
Instruction
manual
IMPORTANT ! Please check the contents of the carton are correct BEFORE assembling your new product.
IF ANY PARTS ARE MISSING CONTACT:Husqvarna UK Ltd. Customer Service Department direct:Telephone : 0844 844 4558 UK
1800 882 350 ROI
Fax : 01325 302530
Explanation of Symbols on your product
Warning
Read the user instructions
carefully to make sure you
understand all the controls
and what they do.
Always keep the product on the
ground when operating. Tilting
or lifting the product may cause
stones to be thrown out.
Keep bystanders away. Do
not mow whilst people
especially children or pets
are in the area.
Beware of severing toes or
hands.
Do not put hands or feet
near a rotating blade.
Risk of breathing in toxic
gases! Do not use the
appliance in closed or poorly
ventilated environments.
Risk of explosion! Do not top
up with fuel with engine
running
Caution! Hot surface
Disconnect the spark plug
before attempting any
maintenance, cleaning or
adjustment, or if you are
going to leave the
lawnmower unattended for
any period.
Safety Precautions
If not used properly this lawnmower can be dangerous! This lawnmower can cause serious injury to the
operator and others, the warnings and safety instructions must be followed to ensure reasonable safety
and efficiency in using this lawnmower. The operator is responsible for following the warning and safety
instructions in this manual and on the lawnmower. Never use the mower unless the grassbox or guards
provided by the manufacturer are in the correct position.
General
1. Read the instructions carefully. Be familiar with the
controls and the proper use of the equipment.
2. Never allow children or people unfamiliar with these
instructions to use the mower. Local regulations may
restrict the age of the operator.
3. Never mow while people, especially children, or pets
are nearby.
4. Only use the lawnmower in the manner and for the
functions described in these instructions.
5. Never operate the lawnmower when you are tired, ill
or under the influence of alcohol, drugs or medicine.
6. The operator or user is responsible for accidents or
hazards occurring to other people or their property.
Fuel Safety
WARNING - Petrol is highly flammable
Wear protective clothing when handling any fuels and
lubricants.
Avoid contact with skin. If affected, wash liberally with
soap and water.
Remove petrol and engine oil before transporting the
product.
Store fuel in a cool place in a container specifically
designed for the purpose.
refuel outdoors only and do not smoke while refuelling
add fuel BEFORE starting the engine. Never remove
the cap of the fuel tank or add fuel while the engine is
running or when the engine is hot
if petrol is spilled, do not attempt to start the engine
but move the machine away from the area of spillage
and avoid creating any source of ignition until petrol
vapours have dissipated
replace all fuel tanks and container caps securely
move the product away from the fuelling area before
starting
Fuel should be stored in a cool place away from
naked flames
Preparation
1. While mowing, always wear substantial footwear and
long trousers. Do not operate the equipment when
barefoot or wearing open sandals.
2. The use of ear protection is recommended.
3. Make sure the lawn is clear of sticks, stones, bones,
wire and debris; they could be thrown by the blade.
4. Before using the machine and after any impact, check
for signs of wear or damage and repair as necessary.
5. Replace worn or damaged blades together with their
fixings in sets to preserve balance.
6. Have faulty silencers replaced.
Use
1. Caution - Do not touch rotating blade.
2. Do not operate the engine in a confined space where
exhaust fumes (carbon monoxide) can collect.
3. Use the lawnmower only in daylight or good artificial light.
4. Avoid operating your lawnmower in wet grass, where
feasible.
5. Take care in wet grass, you may lose your footing.
6. On slopes, be extra careful of your footing.
7. Mow across the face of slopes, never up and down.
8. Exercise extreme caution when changing direction on
slopes.
9. Mowing on banks and slopes can be dangerous. Do
not mow on banks or excessively steep slopes.
10. Do not walk backwards when mowing, you could
trip.Walk never run.
11. Never cut grass by pulling the mower towards you.
12. Release the brake lever to stop the engine before
pushing the mower across surfaces other than grass
and when transporting the lawnmower to and from
the area to be mowed.
13. Never operate the lawnmower with damaged guards
or without guards in place.
14. Do not overspeed the engine or alter governor
settings. Excessive speed is dangerous and
shortens lawnmower life.
15. Disengage all blade and drive clutches before starting.
16. Keep hands and feet away from the blade at all times
and especially when switching on the engine.
17. Do not tilt lawnmower when starting the engine.
18. Never pick up or carry a lawnmower while the engine
is running
19. Spark plug wire may be hot - handle with care.
20. Do not attempt any maintenance on your lawnmower
when the engine is hot.
21. Release the brake lever, to stop the engine, and wait
until the blade has stopped:before leaving the mower unattended for any period.
22. Release the brake lever, to stop the engine, wait until
the blade has stopped and disconnect the spark plug
lead and wait until the engine has cooled:whenever you leave the lawnmower;
before refuelling;
before clearing a blockage or unclogging chute
before checking, cleaning or working on the lawnmower;
if you hit an object. Do not use your lawnmower until
you are sure that the entire lawnmower is in a safe
operating condition;
if the lawnmower starts to vibrate abnormally. Check
immediately. Excessive vibration can cause injury.
Maintenance and storage
1. Caution - Do not touch rotating blade.
2. Keep all nuts, bolts and screws tight to be sure the
lawnmower is in safe working condition.
3. Replace worn or damaged parts for safety.
4. Check the grass catcher frequently for wear or
deterioration.
5. Only use the replacement blade, blade bolt, spacer
and impeller specified for this product.
6. Never store the lawnmower with fuel in the tank inside
a building where fumes can reach an open flame or
spark.
7. To reduce fire hazard, keep the engine, silencer,
battery compartment and fuel storage area free of
grass, leaves or excessive grease.
8. If the fuel tank has to be drained, this should be done
outdoors.
9. Be careful during adjustment of the machine to
prevent entrapment of the fingers between moving
blade and fixed parts of the machine.
10.Store in a cool dry place and out of reach of children.
Do not store outdoors.
11.Allow the product to cool for at least 30 minutes
before storing.
Assembly Instructions
A1
A2
Lower Handles
1. Insert the lower handle into the deck as shown in Fig.
A1
2. Push the handle firmly down until it is located
securely into the deck.
3. Insert the screw into the hole using a pozidrive
screwdriver and tighten fully. (A2).
Repeat for other side
Lower Handle Plug
A3
B1
1. Insert the two lower handle plugs into the top of each
of the lower handles (A3).
B2
Upper Handles
When viewing product from the rear the yellow
Warning labels should be facing upwards.
1. Insert the nut into the handle knob (B1)
2. Allign the holes in the upper and lower handles and
secure with the bolt, washer and handle knob (B2).
3. Fit the cables to the handles with the cable ties
provided, making sure the cables are not trapped
between the upper and lower handles.
C1
C2
Cord Guide
C3
C4
3. Disconnect the spark plug lead.
4. Pull the brake lever fully towards the handle (on left
hand side of handle when viewed from the rear).
5. Extend the pull cord fully.
6. Locate the cord in the cord guide positioned on the
handle (C4).
1. Attach the cord guide, nut and washers as illustrated
in Fig. C1 using a 10mm spanner.
2. Using a spanner, attach the locknut to the cord guide
until it is secure, (C2) ensuring the cord guide is in the
correct position (C3).
D1
Grassbox Assembly
D2
2. When the location points are matched correctly firmly press
the grassbox together until all clips are securely connected.
(D2)
1. Position the two grassbox halves together (D1) and press
each location point into position without fully connecting the
clips.
Cutting Height Adjustment
E1
E2
Cutting Height
The cutting height can be adjusted by removing the front
and back wheels on the product.
1. Remove the wheel by turning the wheel hub in an
anticlockwise direction (E1) and relocate in new hole
turning the wheel hub in a clockwise direction to
tighten (E2). Repeat for other wheels adjusting to the
same position.
POWERDRIVE VERSION
1. When the rear wheels are removed the height
adjustment holes can be viewed by moving the drive
wheel disc up and down,
Engine Notes
Oil
1. To fill with oil:a) Remove oil filter cap.
b) Fill to the FULL mark on the dipstick.
2. Use a good quality SAE 30 four stroke oil.
3. Check oil level periodically and after every five hours
of operation.
4. Add oil as necessary to keep the level to the FULL
mark on the dipstick.
5. Change the oil after the first five hours operation and
thereafter every 25 working hours.
6. Always change the oil while the engine is warm - but not
hot - never attempt any maintenance on a hot engine.
Refer to the Engine Operators Manual for further information.
Petrol
1. Use fresh regular grade lead free petrol.
2. NEVER USE LEADED PETROL
Using leaded petrol will make the exhaust smoke and
cause irreparable damage to engines fitted with a
catalytic converter.
3. Do not fill the fuel tank when the engine is hot.
4. Do not fill the fuel tank while smoking.
5. Do not fill the fuel tank while the engine is running.
6. To avoid introducing dirt into the fuel system, wipe all grass
and dirt from the petrol filler cap before unscrewing it.
7. It is recommended that you fill the tank through a
funnel with a filter.
8. Wipe away spillages before starting.
Starting and Stopping
F1
F2
Please note:- When starting the engine for the first time,
fill with oil and petrol as described above in the Engine
Notes section.
PUSH LAWNMOWER
1. Connect the spark plug lead.
Starting the cold engine
Push primer bulb firmly 3 times before starting cold engine.
(F1) (Also, if the engine has stopped because it has ran out
of fuel, refuel engine and push primer 3 times).
Starting the warm engine
NOTE: Priming is usually unnecessary when restarting a
warm engine. However, cool weather (550F/130C or
below) may require priming to be repeated.
2. Pull the brake lever fully towards the handle (F2)
(on left hand side of handle when viewed from the
rear).
Starting and Stopping cont’d
3. Pull the recoil starter (F3) cord towards you until you
feel the full resistance, return the handle slowly then
pull the handle firmly towards you to its full extent.
4. After the engine has started, allow to run for 30
seconds before commencing to use.
To stop your lawnmower - release the start/stop lever
POWERDRIVE LAWNMOWER
1. Follow the procedure for Push lawnmowers.
2. Forward drive is engaged and disengaged with the
Powerdrive lever (on right hand side of handle when
viewed from the rear).
3. Releasing the Powerdrive Lever stops the forward
drive automatically.
To stop your lawnmower - release the Powerdrive lever,
then the start/stop lever.
F3
Maintenance
G
H1
H2
Always remove the spark plug lead before repair,
cleaning or maintenance work.
All nuts, bolts and screws should be checked for
tightness after 5 hours use.
Check the oil.
Push the handle down to ground level when tilting the
mower for cleaning purposes. This will avoid oil spillage.
Regularly
1. Hose down or brush off all grass, leaves, etc., from the
mower.
2. Check the oil level.
Always handle the blade with care - sharp edges could
cause injury.
USE GLOVES
Renew your metal blade after 50 hours mowing or 2
years whichever is the sooner - regardless of condition.
If the blade is cracked or damaged replace it with a new
one.
ANNUALLY CARRY OUT THE FOLLOWING:
1. Sharpening and balancing the cutter blade.
Remove the spark plug lead. Remove the cutter blade
and take it to a service workshop for sharpening and
balancing. When reassembling the blade ensure that
the retaining washer is flat and not dished, tighten the
bolt to a torque of 35-40 Nm. (G)
2. Change the oil after each season or after 25 hours.
Run the engine until warm. Remove the spark plug
lead. Remove the blade to gain access to the oil drain
plug, using a 3/8” sq. drain plug key. Refer to the
Engine Owners Manual. Open the drain plug
underneath the mower and let the oil run out. Refit the
plug and fill with new oil.
3. Remove cover and take out the air filter.(H1 & H2)
4. Clean the filter with warm, soapy water and dry
thoroughly. Add 2-3 spoons of oil, distributing evenly
throughout the filter.
Transport
Remove the spark plug lead
Loosen the wire/cable from the handle before carefully
folding it. Avoid damaging the wire/cable.
Empty the petrol tank. The machine must be drained of
oil and fuel when moving it by public transport.
Service
When ordering spare parts, always quote the mower’s
product number. Always check oil level after service.
At the End of the Mowing Season
1. Replace blade, bolts, nuts or screws, if necessary.
2. Clean your lawnmower thoroughly.
3. Ask your local Service Centre to clean the air filter
thoroughly and carry out any service or repairs required.
4. Drain engine of oil.
Storing your Lawnmower
1. Do not store your lawnmower immediately after use.
2. Wait until the engine has cooled to avoid a potential
fire hazard.
3. Clean your lawnmower
4. Store in a cool, dry place where your lawnmower is
protected from damage.
Service Recommendations
Your product is uniquely identified by a silver and black
product rating label.
We strongly recommend that your product is serviced at
least every twelve months, more often in a professional
application.
Engine Maintenance Schedule
Follow the hourly or calendar intervals, whichever occur
first. More frequent service is required when operating in
adverse conditions.
First 5 hours - Change oil.
Every 5 hours or daily - Check oil level.
Clean finger guard. Clean around muffler.
Every 25 hours or every season - Change oil if operating
under heavy load or high ambient temperature. Service
air cleaner.
Every 50 hours or every season - Change oil. Inspect
spark arrester, if equipped.
Every 100 hours or every season - Clean cooling
system*. Replace spark plug.
* Clean more often under dusty conditions, or when
airborne debris is present or after prolonged operation
cutting tall, dry grass.
Engine Servicing & Guarantee
The engine fitted to your lawnmower is guaranteed by the
Engine Manufacturer.
Fault Finding
Fault Finding
Engine Will Not Start
1. Check that there is sufficient fuel in the tank and the
cap air vent is clear.
2. Remove and dry the spark plug.
3. Petrol may be stale. Replace. Once petrol has been
replaced, it may take a little time for fresh petrol to filter
through.
4. Check that the blade bolt is tight. A loose bolt could
cause difficult starting.
5. If the engine will still not start, immediately disconnect
the spark plug lead.
6. CONSULT YOUR LOCAL APPROVED SERVICE
CENTRE.
Lack of Engine Power and/or Overheating
1. Disconnect the spark plug lead and allow the engine
to cool down.
2. Clean grass clippings and debris from around the
engine and air inlets and the underside of the deck.
3. Clean the engine air filter (Ask your local Approved
Service Centre to clean the engine air filter thoroughly).
4. Petrol may be stale. Replace. Once petrol has been
replaced, it may take a little time for fresh petrol to filter
through.
5. If the engine still lacks power and/or is overheating,
immediately disconnect the spark plug lead.
6. CONSULT YOUR LOCAL APPROVED SERVICE
CENTRE.
Excessive Vibration
1. Disconnect the spark plug lead.
2. Check that the blade is correctly fitted.
3. If the blade is damaged or worn replace it with a new one.
4. If vibration persists, turn the blade through 1800 by first
loosening the blade bolt, turning the blade and retightening the blade bolt.
5. If vibration persists, immediately disconnect the spark
plug lead.
6. CONSULT YOUR LOCAL APPROVED SERVICE
CENTRE.
Guarantee & Guarantee Policy
If any part is found to be defective due to faulty manufacture
within the guarantee period, Husqvarna UK Ltd., through its
Authorised Service Repairers will effect the repair or
replacement to the customer free of charge providing:
(a) The fault is reported directly to the Authorised Repairer.
(b) Proof of purchase is provided.
(c) The fault is not caused by misuse, neglect or faulty
adjustment by the user.
(d) The failure has not occurred through fair wear and tear.
(e) The machine has not been serviced or repaired,
taken apart or tampered with by any person not
authorised by Husqvarna UK Ltd.
(f) The machine has not been used for hire.
(g) The machine is owned by the original purchaser.
(h) The machine has not been used commercially.
*
This guarantee is additional to, and in no way diminishes the
customers statutory rights.Failures due to the following are
not covered, therefore it is important that you read the
instructions contained in this Operator's Manual and
understand how to operate and maintain your machine:
Failures not covered by guarantee
*
Replacing worn or damaged blades.
*
Failures as a result of not reporting an initial fault.
*
Failures as a result of sudden impact.
*
Failures as a result of not using the product in accordance
with the instructions and recommendations contained in
this Operator's Manual.
*
Machines used for hire are not covered by this
guarantee.
*
The following items listed are considered as wearing
parts and their life is dependent on regular maintenance
and are, therefore not normally subject to a valid
warranty claim: Blade, Electric Mains cable, belt.
*
Caution!
Husqvarna UK Ltd. does not accept liability under the
warranty for defects caused in whole or part, directly
or indirectly by the fitting of replacement parts or
additional parts that are not either manufactured or
approved by Husqvarna UK Ltd., or by the machine
having been modified in any way.
Service Recommendations
1. We strongly recommend that your product is serviced
at least every twelve months, more often in a
professional application.
2. Always use genuine Husqvarna Spare Parts.
3. Prepacked spares are available from most
Husqvarna UK Ltd. stockists.
4. Your product is uniquely identified by a silver and
black product rating label
5. If you have a problem with your machine contact your local
Approved Service Centre ensuring you have full details of
your product as described on the product rating label.
6. Should it be necessary for work to be carried out by
your Service Centre, it is important to take your
complete machine.
A network of specialist dealers can be found in your local
Yellow Pages.
To obtain service on your Husqvarna product simply
telephone or visit your local Service Centre.
Should you require service under the terms of our guarantee
the Service Centre will require proof of purchase.
All of the centres listed stock genuine Husqvarna Spare
Parts.
NOTE: Our Service Repairers act on their own behalf
and are not empowered to commit or legally bind
Husqvarna UK Ltd. in any manner whatsoever.
Replacement Parts
Blade
Part no.:
531211653
Environmental Information
ENVIRONMENTAL INFORMATION
Husqvarna UK Ltd. are manufactured under an
Environmental Management System (ISO 14001) using,
where practical, components manufactured in the most
environmentally responsible manner, according to
company procedures, and with the potential for recycling
at the end of the products’ life.
•
Packaging is recyclable and plastic components
have been labelled (where practical) for categorised
recycling.
•
Awareness of the environment must be considered
when disposing of ‘end-of-life’ product.
•
If necessary, contact your local authority for disposal
information.
DISPOSAL OF FUELS AND LUBRICATING OILS
•
Wear protective clothing when handling any fuels
and lubricants.
•
Avoid contact with skin.
•
Remove petrol and engine oil before transporting the
product.
•
Contact your local authority for information of your
nearest Recycling/Disposal Station.
Do NOT dispose of used fuels/oils with
household waste
Waste fuels/oils are harmful, but can be
recycled and should be disposed of through
the recognised facilities.
Do NOT dispose of used fuels/oils to water.
Do NOT incinerate
EC Declaration of Conformity
Husqvarna AB, 561 82 Huskvarna, Sweden
Declare under our sole responsibility that the product(s);
Category............................Petrol Lawnmower
Type(s) ...........................540, 540D
Identification of Series.......See Product Rating Label
Year of Construction..........See Product Rating Label
Conforms to the essential requirements & provisions of the following EC Directives:
98/37/EC (until 28.12.09), 2006/42/EC (from 29.12.09), 2004/108/EC, 2000/14/EC
based on the following EU harmonized standards applied:
EN 836, EN ISO 14982, EN ISO 20643, EN ISO 3744, EN ISO 11201
The maximum A weighted sound pressure level LpA at the operator’s position, recorded on a sample of the above product(s) corresponds to the Level given in the table.
The maximum hand / arm vibration weighted value measured according to EN ISO 5349 on a sample of the above product(s)
corresponds to the Value ah given in the table.
2000/14/EC: The Measured Sound Power LWA & Guaranteed Sound Power LWA values are according to the tabulated figures.
Conformity Assessment Procedure..................
Annex VI
Notified Body....................................................
Intertek, Cleeve Road
Leatherhead, Surrey
KT22 7SB, England
Newton Aycliffe 29/10/2009
M.Bowden
Research & Development Director
Husqvarna UK Ltd.
Keeper of technical documentation
Type
Width of Cut (cm)
Nominal Power kW
Measured Sound Power LWA (dB(A))
Guaranteed Sound Power LWA (dB(A))
Level (dB(A))
Value ah (m/s2)
Uncertainty K of ah (m/s2)
Weight (Kg)
540
40
1.9
95
96
540D
40
1.9
95
96
81
5
1.5
81
5
1.5
21
23
The power rating of the engine(s) indicated is the average net power output (at specified rpm) of a typical production engine for
the engine model measured to SAE standard J1349 / ISO 1585. Mass production engines may differ from this value. Actual engine power for the engine installed in the final machine will depend on the operating speed, environmental conditions and other
variables
Husqvarna UK LTD.
Aycliffe Industrial Park
NEWTON AYCLIFFE
Co.Durham DL5 6UP
ENGLAND
Telephone - 01325 302302 Fax - 01325 310339
Our policy of continuous improvement means that the specification of products may be altered from time to time without prior notice.
5229601-02