1
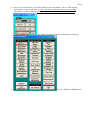
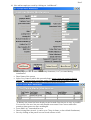
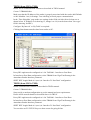
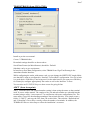
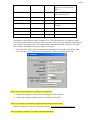
Time & Attendance System
( TAS2000 )
Softools Middle East
http://www.softoolsme.com
PO Box 14959 Dubai, U.A.E.
Tel: 2680533, Fax: 2680535, [email protected]
Manual
Version C.4 Rev 1
(TAS2KSQL)
INDEX
Part 1…………………….…… Introduction
Part 2……………………….… Getting Started
……………………………….. Installing TAS2000 software
……………………………….. Joining Secured Workgroup
……………………………….. Log On To TAS2000
……………………………….. System Initialization
……………………………….. Adding A New Employee
……………………………….. Adding A New Cost center
……………………………….. Marking Attendance on Manual Screen
……………………………….. IN/OUT/Absentee/Incomplete Explained
……………………………….. Exit From TAS2000
Part 3……………………….… Advance Features
……………………………….. Department Maintenance
……………………………….. Shift Maintenance
……………………………….. Group TKA Maintenance
……………………………….. Automatic Action Scheduling
……………………………….. Cautionary Password
……………………………….. User Configuration
……………………………………. Create New User/Modify Password
……………………………………. Define Roles
……………………………………. Privilege Maintenance
……………………………………. Define User’s Data Scope
Part 4……………………….… Reason/Jobbing/Job Costing
……………………………….. Using Reason
……………………………….. Using Jobbing
……………………………….. Using Job
Part 5……………………….… System Operations
……………………………….. Master Maintenance
……………………………….. Daily Operations
…………………………………… Scan Maintenance
…………………………………… Day Closing
…………………………………… Backup
……………………………….. Monthly Operations
…………………………………… Reports
…………………………………… End Of Month
……………………………….. Other Reports
Part 6……………………….… DOs and DON’Ts for Time Keeper
Part 7……………………….… Configuring Readers
…………………………………… iGuard from Lucky Technology
…………………………………… TR510 (from GIGA-TMS)
…………………………………… TR550 (from GIGA-TMS)
…………………………………… TR40XX (from GIGA-TMS)
Part 8……………………….… Frequently Asked Questions
Part 9……………………….… System Configuration Parameters
Part 1
Introduction
TAS2000 (Time & Attendance System) provides following facilities and benefits.
1. Employees mark their attendance electronically, using a method like fingerprint, magnetic
card, proximity card, barcode reader, or even computer screen itself. This speeds up
attendance related activity (typically 2-8 seconds per employee depending on terminal type).
2. Recurring effort on maintaining punch cards and associated cost is eliminated.
3. An employee’s presence / absence can be known instantly.
4. Normal and overtime hours are calculated automatically.
5. Total hours (Normal, Holidays, OT, sick) worked from the beginning of the month are
available.
6. Monthly attendance data is available immediately after the last day’s activity of the month are
over, which can be used in payroll.
Overall, the system significantly improves the availability and timeliness of information, which
has the effect of improving quality and efficiency of the organization.
TAS2000 records employees’ IN / OUT time through scanners (or manual entry as in evaluation)
into a computer and provides facilities for improved controls and quicker reports for management.
It also provides monthly attendance data to the accounts department for payroll processing.
Totally six scans – 3 INs and 3 OUTs are possible for every employee each day for the purpose of
attendance.
We have provided a manual interface for evaluation sake to mark attendance (which may also
serve the purpose of a small company with up to 9 employees). In normal case each employee is
provided with a card which he swipes in a bar-code / magnetic / proximity reader. The Card
Reader scans the card and transmits data to the computer, where it is stored and processed.
After downloading evaluation from Internet or from the Evaluation CD, install TAS2000 in
C:\PROGRAM FILES\TAS2KSQL folder (do not install anywhere else) and follow steps
mentioned in Getting Started.
Part 2
Getting Started
Once you are ready, it may take less than 5 minutes to start marking attendance in the evaluation
system. Simply follow these steps:
1. Download the evaluation file from Internet (http://www.softoolsme.com) or use the CD if you
have.
2. Double click the installation file (which is named like TFijCxyN.EXE, e.g. TF93C91N.EXE
for version TF9.3D9.0C9.1D9.0). This will bring up the following screen.
Click on OK button and accept
all the default options to install in C:\PROGRAM FILES\TAS2KSQL folder.
4. Join “SOFTOOL6.MDW” Workgroup by clicking on
Workgroup Administrator as shown below and following
How To JOIN the
instructions in the box.
SOFTOOL6.MDW
workgroup
On Workgroup
Administrator screen
1. Click “JOIN”
2. Click “BROWSE”
3. Go to C:\Program
Files\TAS2KSQL folder
5. Start “Interface To Post data” (see above).
4. Select SOFTOOL6.MDW
6. At Logon, in Name field enter TAS2000 and leave Password
5. Click Okay, Okay & Exit
3.
field blank.
7. The “First Time Information” form will open up. You will be asked two questions: Employee
ID Length and Month Start Date (see “System Configuration Parameters” for explanation of
all system-wide parameters). Even if you agree with default values, re-enter the information
for the system to recognize that you have made conscious decision.
Suggestions/Help:
Employee ID Length:
If you are really a small company make it 3 digits. This way you would have taken care of
many years in future. On the other hand if you are simply evaluating, then make anything
that you wish between 1 and 7 characters.
Month Start Date:
Besides employee attendance monitoring, it is common that attendance data from T&A
system is used in payroll. Since many companies distribute pay-slips 1-2 days before
month-end, they make their attendance period from 26th to 25th or something similar. On
the other hand some companies always have their period from 1st of month to end of
month. Enter a number that reflects your company’s policy.
Part 2
8. Once you exit from above, you will be asked to start “Operations”. Do so. After starting
“Operations”, a screen will open up. Note: The first screen that opens up after starting
“Operations” is called “Time and Attendance Screen” in this manual and the system.
Click “More Operations” button for the Menu to open up.
9.
Click on “Employee Maintenance”.
Part 2
10. Now add an employee record by clicking on “Add Record”:
•
•
•
•
•
•
Enter Employee ID – it must have as many characters (1 to 7) as stated during
initialization.
Enter Name of the person
Select Cost Centre to which this person belongs (create a new cost-centre by double
clicking). Creation of new cost center codes is normally done by clicking on the “Cost
Centre Maintenance” button in More Operations menu switchboard.
A dummy cost-centre has been already created to make first time use as easy as possible.
You can use it for now, but you really should create actual Cost-Centres when time
permits so that reports are more meaningful.
Leave Shift “A1” untouched for now.
Enter Joining Date (Actual - it can be up to 7 days in future, or leave blank if unknown).
Save by clicking on the pencil icon on record selector on left.
Part 2
• Exit “Employee Maintenance”.
• Exit Operations
11. Now start “Interface To Post Data” again and enter your Employee ID to record attendance.
Incorrect entry will display “Sorry”. Correct entry will display “Thanks”.
12. Start Operations and in “Time and Attendance Screen” click on “IN”. Two screens will open
up on Right Hand Side. In the RHS, top screen you will see this new employee - as expected,
since you have just now marked his attendance.
13. Now click on “Out” button. “No such Employee” message is shown. A person with 2, 4 or 6
scans is shown as a person who came to office and then went out. Click OK.
14. Now click on “Incomplete” – you should again see the same person listed. This is also as
expected. Any person with 1, 3 or 5 scans is shown as “Incomplete”. Click OK.
15. Click on Absent button. You will again see “No Such Employee” – as expected.
16. Click on “More Operations” and see other reports, screens.
Very Important Note:
To obtain information like IN/OUT/ABSENT/Daily Attendance etc or even creating manual
attendance in Scan Maintenance (you will read about it later in this manual), first enter that
particular date in the “Time and Attendance” form.
Exiting: All forms must be closed first. Click on Exit in "Time and Attendance" form.
Part 3
Advance Features:
It is best that you come to this place after using system and seeing various reports.
Department Maintenance
This is available if system parameters have been setup to use it.
• Enter 2 character code
• Enter 15 character description
Department is useful to see department wise daily OT. In smaller companies you may not use it or
allow all employees to be part of default department “*”.
Shift Maintenance
Do you have following issues?
• Five days a week or Half days (5.5 days a week)
• Late to come / Early to go reporting
• Different working hours for different employees
• Different working hour during some days of year (Ramadan in gulf region)
Go to “Shift Maintenance” for all of above. Just study the screen – it is quite simple to understand
it. It is explained below:
Shift: Enter A1 to A9 and AA to AZ or C1 to C9 and CA to CZ. The “A” are used for day shifts
(start and end is same day). The “C” are used for night shifts (Start and End dates are not same). If
all employees have same working hours and working days, the already created “A1” shift is
enough.
Shift Desc: You can give a description here.
Days per Week: Enter 5 for five day week, 6 for six day week or 5.5 if you have five plus a half
day week.
Auto Deduction 1 & 2: This may not be available if this feature is not used. If used: enter how
much time (in hours) should be deducted from attendance automatically, provided the employee
has worked upto a certain time. For example if you want to deduct 30 minutes every day as all
employees go for tea break from 16:00 to 1630 hours, then enter 0.5 and 16:30 (there is no point
in making tea time deduction if he worked upto only, say 15:30 hours).
STANDARD:
Full Day Hours: Number of hours of attendance given to a person for working on a Normal day
Half Day Hours: Number of hours of attendance given to a person for working on a Half day
(applicable only Days per week is 5.5).
Start Normal (Right Time): Shift starting time on a normal day
Start Normal (Grace Time): If Use is checked, considered late if came to work after this time on
a Normal Day
Start HDay (Right Time): Shift starting time on a Half day
Start HDay (Grace Time): If Use is checked, considered late if came to work after this time on a
Half day.
End Normal (Right Time): Shift End time on Normal Day
End Normal (Grace Time): If Use is checked, considered to have left early if gone from work
before this time on a Normal Day
End HDay (Right Time): Shift End time on Half Day
End HDay (Grace Time): If Use is checked, considered to have left early if gone from work
before this time on a Half Day
Part 3
Similar to above, you can also enter data for Break 1 and Break 2 – if they are used. For example
Break 1 could be for lunch, and you may like to monitor who is going early and coming back late.
Break 2 could be a second break like tea break.
RAMADAN/Special Days
Just as for STANDARD days, you can configure the shift for those days in the year when working
hours are different. In gulf and many Islamic countries it is common that during the month of
Ramadan, working hours are shorter than standard. Please note that you must configure the
system’s “Ramadan Used” to be able to use this feature in Shift Maintenance.
Group TKA Maintenance
This is available if system parameters have been setup to use it. Sometimes the employees do not
use attendance reader for IN/OUT and yet you want their attendance to be included in the system.
You can make a list of such employees and tell the system how their attendance is to be carried
out on normal days and holidays. You can either put exact hours to be added by TKA or use “-1”
to tell the system that the value is to be taken from the “Shift” table. You also disable a record and
later re-enable it in the list.
Later in “Daily Attendance” Form, you have the facility to execute a command, which will
actually do the timekeeper adjustment by simple mouse clicks.
Automatic Action Scheduling
Feature added in version F7.4D7.2C7.4D7.1, there are13 pre-defined actions that can be invoked
automatically. More actions may be added in future versions of TAS2000.
Actions that Send Email need a compatible MAPI based email client on the PC on which
Operations is running that allows other programs to send email through it, otherwise this feature
will not work. We have tested successfully with combinations of Windows 2003 Server + Eudora
3.06 (32 bit for NT), Windows XP Home + Outlook 2000, Windows 98 + Outlook 2000,
Windows 2000 Professional/Server + Outlook 2000.
Action
Type
Action
Frequency
Action
Time
Done
Date
Stamp
Use User ID
Additional Info
0
D
0:00 -1
10-07-04 -1 TAS2000 TASBACK.BAT
Action types are 0 to 9, A,B and C.
Action frequency can be D (daily) only (current version)
Action time Action 0 and C: when that action should start. For Action 1to B: when it will happen.
Done shows whether that action has been completed or not
Date Stamp will normally display today’s date and is meant for internal use.
Use allows whether the action, although defined, is to be used or not. This way you can
activate/deactivate an Action rather than delete/re-create.
User ID is the user that needs to be logged into Operations for Actions to take place
Additional Info is used differently for different Actions (not used by Action C)
Action
Remarks
0
Executes command file named in Additional Info field
1
Sends Email of Absentees and Late Comers after Grace Time is over.
If there are more than one Grace Times (due to different timings of
employees) system automatically schedules next action time.
The list is sent separately for each Cost Centre in-charge and in-charge’s
superior.
The email address is taken from Cost Centre Master and Employee Master.
In Additional info you can enter the number of seconds that must pass
after Grace Time is over before the action is taken. For example, say Shift
starts at 8:00 and you have defined Grace Time as 8:10, but you want to
allow 5 minutes for the records to be downloaded from reader and
Part 3
processes by TAS2000. In such a case enter 300 in ‘Additional Info’.
Action will take place after 8:15.
2
3
4
5
6
7
8
9
A
B
C
Similar to ‘1’ above, however, the report is sent to Manager’s email
address, defined in System Configuration and it cost-centre separation is
NOT done.
Similar to ‘1’ above, however instead of using Grace Time, this action uses
Start Time of shifts.
Similar to ‘2’ above, however instead of using Grace Time, this action uses
Start Time of shifts.
Sends Email of employees with Incomplete Attendance on previous day.
All other things are same as in ‘1’ above.
Sends Email of employees with Incomplete Attendance on previous day to
Timekeeper’s email address defined in System Configuration.
Sends Email of employees with Incomplete Attendance on previous day to
Manager’s email address defined in System Configuration.
Sends Email of employees who came to duty on their working day (does
not include employees who came on their non-working day). In other
features it is similar to ‘1’ above. Action is based on Grace Time as in ‘1’.
Similar to ‘8’ above but sends to Manager like in ‘2’ above.
Similar to ‘8’ above, but email is sent after shift Start Time
Similar to ‘A’ above but email is sent to Manager’s email address
Sends Attendance Register report to Manager’s email address. Additional
info is not used by this Action.
You can have more than one entry of Action 0 and C, (for example you want to send
Attendance Register more than once in a day to the manager).
Employee Schedules
Are employees rotated in shifts with fixed periodicity? Go to “Employee Schedules”. Just enter
from which next date which employee will be working in which SHIFT. And if the employee will
be back in same shift after a fixed number of days (like 21 in a three shift operations), enter it in
“Cycle” field. You can also affect a change in their weekly off day.
Cautionary Password
Cautionary Password: At some places (End of Month Processing, for example) TAS2000 asks for
password in black window. The password here is ”Softools”. This is just a cautionary password.
User Configuration
Create New User Modify Password
Only user “siteadmin” can do a user Creation/Deletion.
Each user can change (only) own password
Define Roles
This powerful feature allows you to setup your system in a multi-user environment in which you
can provide a user only those permissions/privileges that he needs for each report and form.
System maintains ‘Roles’. You can add/delete roles.
A group of users can be assigned same ‘Role’. Roles are maintained here. The
‘View/Create/Modify/Delete’ privileges are defined for each role.
Part 3
Define User's Role
User is linked to a Role here.
Privilege Maintenance
Privileges of each Role are maintained here. Select a ‘Role’ and then for each Form/Report
specify exactly what privileges are allowed. For Reports only ‘Read’ permission is meaningful.
Define User's Data Scope
This is a powerful feature that allows you to limit the scope of a user only to those employees
which he needs to process. For example, in a multi-branch company with centralized database, if
you want that the time-keepers of each branch should maintain correctness of attendance data for
their own employees, and not view data of other branches, you can set it up using this feature.
You can define whether a certain Cost Centre employees are within the scope of a user or not.
This is defined by entering +user1+user2+…+ in the “Users” column.
User’s data scope can be defined selectively for each Cost Centre.
Part 4
Reason/Jobbing/Job Costing
TAS2000 has extended features for ‘Non-Attendance’ scans too. What is non-attendance scans?
These are scans that should not affect the attendance of an employee. For example, you want the
employee to scan even when he is going out for and coming back from official work. Obviously
we don’t want to use these scans for attendance purpose and deduct the time he was out of the
office for official work from his daily attendance! Such scans are called ‘Non-Attendance Scans’.
With an appropriate Reader, TAS2000 can handle this situation.
To take this one step further, you may like to know the reason for going out by an employee
(marketing/support/government work etc) in each case. TAS2000 can handle that too.
One further step is Jobbing, i.e. hours spent by an employee on different jobs. TAS2000 has
additional module with various reports for this. This Jobbing module can be very useful for
Construction, Manufacturing, Contracting, Consultancy type of organizations.
Job Costing is the next logical step in this direction. TAS2000 has a very powerful module for
this. The costing can be done based on one of the three cost units (depending on your company’s
policy) – 1) A flat rate for each Trade (like plumbing, welding etc), or 2) Employee’s basic salary
rate or finally 3) Employee’s special job rate (which may include overheads for the employee).
Jobs can also be linked to a customer. In addition, a Job can be further divided into different tasks.
Combining all above, with filtering features, gives a very powerful job costing system.
It is obvious that you need Readers capable of features commensurate with requirements of
sophistication of the application. One need not invest in costly readers if requirements are only
Time & Attendance. On the other hand, if requirements fall into the category of complex job
costing, you need to have appropriate readers.
Job Code, Task Codes need to be created before using in the system.
Job Reports can be seen if that module is licensed.
Using Reason
Reason is a standard feature. You don’t need additional license for using ‘Reason’. The simplest
scenario is where you want employees to register even when they are going out on official work.
This example assumes that you are using our TR4XXX series reader:
1.
2.
3.
4.
Ensure that ‘Reason/Job Used’ is checked in Configuration
Check ‘Use FunKeys for official IN/OUT’
Leave NINOOBOOS1S2 default values
Instruct Employees to use F1 and F2 keys for normal attendance scans and F3/F4 keys to
mark back from official work/going out for official work
Sophisticated Reason: If more sophisticated ‘Reason’ is required, you can assign codes to each
‘reason’ and punch that code before swiping the card. You will also have to enter these codes in
‘Reason Master’. You will see ‘Reason’ field in ‘Scan Maintenance’ form. You will also be able
to view reports for ‘Reason’.
Using Jobbing
Jobbing requires additional license (free in Evaluation pack). Usage is like “Sophisticated
Reason”.
1. Ensure that ‘Reason/Job Used’ is checked in Configuration
2. ‘Job Time Calculation’
You now be able to see time spent in each job. You can also maintain ‘Customer’, Task masters.
Part 4
Using Job Costing
Job Costing Requires additional license: Ensure ‘Job Costing’ is checked.
Note: In Evaluation package, you can do all this with manual entry (in place of
TR4xxxx/ATS/ADCT)
Part 5
System Operations
This section gives an overall summary of how TAS2000 works. TAS2000 can be divided into
following sections:
1. Master Maintenance
a) Cost Centre: Upto 9 characters. At least one CC should exist. It is a good idea to use 9
character code (CC basis + CostCentre) that matches with PPR2000 – if also purchased.
b) Employee:
• Create new employee
Mark shift A1
Ex-employee - Mark shift X1
Temporary suspension - Mark Shift S1
Enter Cost Centre (new CC can be created by double clicking CC field)
If ATS terminal is in use (Not Applicable For Evaluation or TR4XXX terminals)
After all employee records are created/modified, go to Terminal Interface Module of
TAS2000 (NOT AccuCom) and first
• Click “Edit Terminal Settings”, and then
• Click “Update Terminal Settings”
This will update the Terminal with latest information. This step is again required
whenever a new employee is added or old removed from Employee Master.
2. Cyclic Operations
They are tasks that are to be done on a regular basis.
A) Daily Operations
i) Employees register their attendance when they come in or go out of the company as per
company norms (method can be badges or finger print or manual entry in evaluation).
ii) For better control and immediate corrective action, following reports are obtained:
a) List of employees who did not come to duty (absentees) is taken any time in the shift.
•
If the employee is on leave but shown absent, mark him “On Leave” using
Employee Maintenance form.
•
If the employee scanning is temporarily suspended (may have been ‘loaned’ to
another site) but shown absent, mark his shift “S1” using Employee Maintenance
form.
•
If a person works for less than pre-set hours, he is deemed to be absent.
b) List of employees have swiped once only (have come to duty).
c) List of employees who swiped OUT (2, 4 or 6 swipes).
d) List of employees who swiped 1, 3 or 5 times (Incomplete Attendance)).
iii)After the shift is over, time keeper goes to “Daily Attendance” form. If any adjustments are
to be made in attendance, time keeper makes it in this form. Only T/K Adj and Sick Hrs
fields can be edited in this form. All other fields are read-only,
Part 5
•
To help in easy maintenance of daily attendance, 15 powerful filters are provided in
Daily Attendance Form.
When this form is opened, a
warning message appears if attendance data is not complete (i.e. as per the system,
one or more employee has yet not left company at the end of the day’s work).
If all the employees have actually left, then it means that either they have wrongly
punched IN/OUT or forgotten to swipe their card. Correct this situation using “Scan
Maintenance” form, by either modifying an existing scan or creating record
manually.
•
This form also contains the button for applying Group Timekeeper Adjustment.
Adjustment is done for a past day (date under ‘status’, in Time & Attendance Form)
for those employees who were added to list using “Maintain Group TKA”.
Using Scan Maintenance
Scan Maintenance form is used for various purposes. You can view scan records of an
employee starting from a given date. To do this, enter Employee ID and the Starting Date
in the form. For an existing record editing is possible:
•
You cannot change date and time of scan.
•
You CAN change 'Date of Attendance', Shift, Off-day
You can create a New Record (e.g. when an employee forgets to swipe):
•
First scroll down to new record (all fields are blank)
•
Select one of the six Radio Buttons (S E L L T T) by clicking on it.
S stands for Start of the day scan
E stands for End of the day scan
L (first) stands for Lunch-Out scan (Break 1 OUT, in Shift Maintenance)
L (second) stands for Lunch-Back scan (Break 1 IN, in Shift Maintenance)
T (first) stands for Tea-Time-Out scan (Break 1 OUT, in Shift Maintenance)
T (second) stands for Tea-Time-Back scan (Break 1 IN, in Shift Maintenance)
Part 5
•
Click on ADD button. A new record is automatically presented with all fields
filled-in (values taken from the Shift Table), ready to be created. If you agree with
the data, simply click the Mouse outside the Record area for it to be created.
Otherwise edit the field that you wish to change and then Create it as described
above.
(Note: you CAN modify scan date and time if required for records you created, later)
Close A Day
Once you are satisfied all attendance data is correct, close the day.
Closing is done by entering the date that you wish to close, in 'Time and Attendance'
form and then selecting this option in 'More Operations'.
You can un-close a day by deleting the closed day's record. This should be avoided
though.
Backup: Ensure that you take periodic backup of database files TASQLDAT.MDB,
TASQLCOM.MDB and TASQLFRM.MDB files.
B) Monthly Operations
• Ensure Sick Leave data is entered (if it is being used and important).
• At the end of the month, once the first working day of the next month is closed, Month
End Procedure is run. This gives attendance data of the month and also removes old
data.
3. Reports
Various reports are available in the system. Some reports are taken on daily basis. Some are taken
on demand.
A) Time Card - for a range of dates. For all employees, just one employee or a cost centre.
B) Absentee Report - This lists absent employees in the shift.
C) Daily Attendance
D) Dept Wise Daily Report
E) Departmental Ovetime
F) All scans of an employee – can be seen in Sick Leave form.
G) Hours works since beginning of the month.
H) Employee List
I) On Leave Employees - List of employees on leave at the time of taking report.
J) On Leave During Month - List of employees on leave during the month.
K) Cost Centre wise Attendance Report
L) Monthly Attendance - Lists Normal hours, OT1 and OT2 worked on daily basis by
employees.
M) Monthly Figures of Attendance, Days to Pay, OT, Absence
N) Mini Payroll – Available only if licensed. As the name suggests it is an absolutely basic
payroll which calculates salary depending on number of days attended. Enter basic pay rate
in Employee master. You can also enter any adjustment for that month (which is made 0
after end of month).
O) Log of Scan Maintenance - Modifications done through Scan Maintenance are listed out.
P) The Exception Reports – incomplete attendance, late comers/early goers, absent, sick leave,
normal leave, leave return based other reports
Part 6
The DOs and DON’Ts for Time Keeper
The DOs
=======
Daily:
======
1. Ensure all employees are "Out" for yesterday. This can only be done if attendance is
"complete", i.e. there are no "IN" or "IN-OUT-IN" records for yesterday.
2. Ensure that information in following columns in "Daily Attendance" is correct for yesterday:
-Normal (normal attendance), usually it should be same as PH (planned hours).
-OT1
-OT2
-Holiday Hours
-Sick Hours
-Flat
If Normal is not same as PH hours due to truncation (or any other reason), make sure that Normal
contains hours that you want for payroll (if at month end you want TAS data to be used for
payroll). Similarly if OT is shown because an employee was overstaying without work, correct it.
If any correction needs to be done it can be done under TKA (time keeper adjustment).
3. Do the "Close A Day" step for yesterday.
4. Print yesterday's "Daily Report" and file it.
5. Print today's absent report and make sure all are REALLY absent.
6. If an 'absentee' is really 'on-leave', then mark him as such using 'Employee Maintenance'.
7. If an employee's services are terminated, change the shift to a special system shift X1 (be sure
employee is not coming back!). His Employee Master record will be removed automatically once
all related data is gone from the system (this depends on the number of months you want to keep
history for – as defined in “Configuration”).
8. If an employee does not swipe (for example he is temporarily transferred to another site, or he is
the BIG BOSS who does not swipe), but you do not want to see him in ‘absent’ list daily, you can
change his shift to a special system shift “S1”. You must bring him back to normal shift when he
starts swiping again.
9. Whenever possible the Holidays and Ramadan dates should be defined in advance. If done
later, force recalculation by logging in as SiteAdmin > More Operations > Initialize > Open a
Table or Query > Select table ReCalFlag > and change ReCal_ORPEPD to 'Yes' for the required
days. Make Sure that these days are not “closed”, otherwise recalculation will not take place.
10. Backup: Ensure that you take periodic backup of database files TASQLDAT.MDB,
TASQLCOM.MDB and TASQLFRM.MDB files.
Monthly:
========
1. Print "Management Summary" and "CC wise Attend by Employee" reports. Review and
file.
Part 6
2. Print Time Card and if any attendance is not correct (normal, OT, sick, Flat), correct it, so
that payroll system gets correct data.
3. . Do the E.O.M.
The DON'Ts
==========
1. If using PPR2000 and interface is being used, then do not create a new employee in TAS2000.
New employee is created when a new employee is created in PPR2000 automatically.
2. If using PPR2000 and interface is being used, then do not create a Cost Centre in TAS2000, it
is created automatically through PPR2000
4. Do not post-pone marking 'on-leave' employee or any other daily task for next day.
Part 7
Configuring Readers
IGuard from Lucky Technology
While configuring the reader, let the machine numbers be 4 digits like 0001.
Use ISVRSetup2512.exe or later file to install iServer.
During installation of iServer, ensure that you select MS Access version 2.0 and also Text Status
for IN/OUT status as shown below.
On the next screen (shown below), just click on OK button
Next, to “Do you want to configure the program now?” select Yes.
Part 7
On the following screen, select date format as dd-mm-yyyy”:
Click Apply and OK.
On the main screen click on ‘Add’ button. The Add Terminal screen will pop-up. Enter TCP/IP
address, Admin User Name and Admin Password of the iGuard terminal and click ‘Add’ button.
You may connect to database now.
For more details read iServer manual.
Special Notes:
1. The User Id used in iGuard reader is to be used as Proxy ID in TAS2000 Employee
Master. Ensure Proxy ID length in TAS2000 is configured
2. In Interface to Post Data configuration, select iGuard from Lucky Technology in the
Attendance Reader Interface.
3. Ensure that iServer is started before “Interface to Post Data” for smooth working.
Part 7
TR510 (from GIGA-TMS)
Install TR510 communication software as described in TR510 manual.
Create C:\TR4000 folder.
Make sure that the IP address of the reader is properly associated with the reader (000-Default
or 001-Machine-1 etc) in Settings. Test with Ping to check proper communication.
In the ‘Time Scheduler’ page make sure settings in the fields circled with red colour are as
shown below. If ID digits set is showing 15, change it to 14 (it can be done when ’Save type’
field is showing ‘default’).
Configure ‘By Interval’ or ‘By Table’ as required.
Clicking Start button transfers data from readers to PC.
Proxy ID Length must be configured as 14 in TAS2000 – Interface to Post Data.
In Interface to Post Data configuration, select TR4000 from Giga-Tms/Promag in the
Attendance Reader Interface parameter.
SHIFT KEY length. Make it 0 (zero) in “Interface To Post Data” configuration
TR550 (from GIGA-TMS)
Install communication software as described in TR550 manual.
Create C:\TR4000 folder.
Setup serial or modem configuration as per the manual and your requirements.
Ensure all file transfer details as described above for TR510.
Proxy ID Length must be configured as 14 in TAS2000 – Interface to Post Data.
In Interface to Post Data configuration, select TR4000 from Giga-Tms/Promag in the
Attendance Reader Interface parameter.
SHIFT KEY length. Make it 0 (zero) in “Interface To Post Data” configuration
You can also use F1/F2/F3/F4 keys to show reason for going In/Out.
Part 7
TR4020/TR4030 (from GIGA-TMS)
Install as per the user manual.
Create C:\TR4000 folder
Download settings should be as shown above.
Saved Data Format (in Miscellaneous) should be ‘Default’
Schedule can be as per requirement.
In Interface to Post Data configuration, select TR4000 from Giga-Tms/Promag in the
Attendance Reader Interface.
While configuring the reader with master card, you can change the SHIFT KEY length. Make
sure that this is same as configured in “Interface To Post Data” configuration. Zero (0) in both
is a good choice if Shift key is not being used. On the other hand if you want to use Shift key
for reason/job, configure appropriately the reader as well as the Interface To Post.
You can also use F1/F2/F3/F4 keys to show reason for going In/Out
ADCT (from Acroprint)
ADCT communication and terminal number setting is done using the menu on the terminal
itself. It comes with a manual. The employee Ids, job and task number are uploaded into the
terminal using a utility “Acrocomm.exe” in conjunction with some configuration files. The
same utility is used for downloading attendance data to hard disk also. You simple create a
folder “C:\ADCT” and copy the files from CD to this folder. Then edit the “Download.bat”
and “Upload.bat” files to they correctly reflect the number of terminals. In addition, the
TERMnn.INI files are also setup to reflect the installation’s resources.
Part 7
Using Different Type Of Terminals Simultaneously
You can use different type of readers at the same time. Selecting “Readers.INI Based” in
Attendance Reader Interface under configuration does this.
The readers.ini file should exist in same folder where TASQLDAT.MDB is placed. In the
“Readers.INI” file, you select the reader being used by having a line Interface=N (no space
before or after the “=”). Till version FA.3D9.2C9.9D9.4, valid N values are 1, 3, 4, 5, 6, 7, 8,
9, 97, 98 (total 10, note 0 & 2 must not be used). Open the file in notepad to check which
number corresponds to which terminal.
Since different terminals send different values of IN/OUT/F1/F2/F3/F4, you need to ensure
that the readers.ini is correctly configured for it (the default file is correctly configured for
existing terminals). In addition, readers that can also accept punching of job code and task
code, also need to be defined properly in this file. The proxy id lengths may also be different.
Moreover you may like to have automatic posting for one type of reader but not for another.
Readers.ini file allows you to define parameters that are different for different readers.
Note:
1. A terminal is disabled simply by putting # before “Interface” (like #Interface=9 will make
ADCT terminal inactive).
2. Each terminal’s definition ends with a line ‘END’.
Creating Interface For New Type Of Terminal
Two Interface types, namely IF97 and IF98 are used for mapping data of terminals for which
TAS2000 does not have an existing Interface. This is a powerful feature that can be used with
any reader that sends data in text file, which can be mapped using IF97 or IF98 interface.
These two interfaces are used via “Readers.INI Based” interface as explained in “Using
Different Type…” above. Simply disable all other terminals (or rename the original and create
a new readers.ini file).
The difference between IF97 and IF98 is that while IF97 expects data in a format where each
field is separated by comma, the IF98 interface expects fixed length record.
The offsets defined in readers.ini file for IF97 are within each field. The restriction is that all
records must have same number of fields. This allows even variable length records, provided
the field, which is of variable length, is ignored. For example if iGuard’s Access log is
exported, it gives 9 fields including employee name and department name in each record.
However since these two fields are ignored by TAS2000 interface, they do not cause any
harm.
For IF98, the offsets are defined within the whole record.
You can also define values in a certain position that will force the interface to ignore that
record. You can also define values in a certain position that will tell the interface that it is a
valid record.
For better understanding go through the readers.ini file that comes with system.
Part 8
Frequently Asked Questions
Q How to close a day?
A Suppose you want to close 15-Aug-2006:
1) Change the date in Time & Attendance Form:
2) Click on ‘Out’ and all employees should be listed there.
3) Click on Incomplete and you should get “No such employee” message
4) If there were any ‘Incomplete’ attendance records, use ‘Scan Maintenance’ to rectify, such that
no employee has ‘Incomplete Attendance’.
5) Click ‘More Operations’ button.
6) Click ‘Close A Day’ button.
7) Click on Close 15-Aug-06
8) Read the BIG message and make sure you are ready to close the day to proceed ahead.
9) It is possible that you are unable to continue due to a reason that is explained in a message.
Resolve that issue and proceed with ‘Close A Day’ again.
How is Normal, OT1and OT2 hours calculation done?
This depends on your system configuration and options chosen which affect globally as well as to
a shift or even a person. But before we go into details, look at the following examples:
DOA is date of attendance, SH is the shift in which this person worked that day and PH is
planned hours (normal hours he is supposed to work that day). S1, S2…S6 etc are the time of first
swipe, second swipe…sixth swipe. S1, S3, S5 are IN and S2, S4, S6 are OUT swipes. Ded is the
Part 8
automatic deduction (in hours) that is made by system. TKA is time keeper adjustment (+/-), done
manually (how, is explained elsewhere). Tot is the total time worked depending on S1…S6, Ded
and TKA.
Calculation is done as follows (The terms Scan and Swipe are used interchangeably):
1. First, Tot is calculated as per steps shown below:
Step 1: Depending on configuration parameter, S1, S2…S6 are or are not re-adjusted. The
configuration parameter in question is:
.
If this is not checked, then original values of swipe times are taken. If it is checked then
the scan times are re-adjusted as explained in box.
If “Adjust Scan Time to 0, 15, 30, 45 minutes” is used
Minute: <= 7.5 is adjusted internally to 0
Minute: > 7.5 and <=22.5 is adjusted internally to 15
Minute: > 22.5 and <=37.5is adjusted internally to 30
Minute: > 37.5 and <= 52.5 is adjusted internally to 45
Minute: > 52.5 is adjusted internally to 60
Explanation: If IN is 7:51:23 and OUT is 17:09:10, for
calculation purpose, they are taken to be 7:45:00 and
17:15:00 respectively and the difference is 9.5 hours
Step 2: The scan times (re-adjusted if needed, as explained above) are used to calculate an
intermediate total time worked using formula:
Temp=(S2 - S1) + (S4 - S3) + (S6 - S5) – Ded +/- TKA
In above example Temp=(17:02 – 8:03) – 0.5 + 1.5 = 10.0 hours
Where did Ded value0.5 come from? It came from Shift setup. Since this person is
working in AA shift and the AA shift has been configured to deduct 0.5 hours from
attendance automatically, the same has been done by system.
2. Calculate Tot from Temp, depending on how configuration parameter “Effective Hours
Logic” was set-up as per following steps (choose between No R/O, 15 minutes of R/O or
Truncating, 30 minutes of R/O or Truncating and 1 hour of R/O or Truncating):
Step 1: Out of Temp, PH hours are allocated to Normal (Full Day Hours 8.5 in this
example)
Step 2: The balance is allocated to OT (only if the person is entitled for OT). The OT is
subjected to the “Effective Hours Logic”. In our example balance is 1.5 hours, but
“Effective Hours Logic” dictates that any fraction must be removed from OT. Therefore
0.5 hours is deducted from Temp.
Step 3: Tot=Temp – 0.5 = 9.5 hours
Part 8
3. Out of ‘Tot’ we allocate, Normal Hours (Nml), OT1 and OT2
4. For Weekly off and holidays, ‘Holiday Hours’ (Hol) are automatically given by system to
staff employees (hourly workers don’t get it). From payroll calculation point of view,
accountants will note that ‘Normal’ and ‘Holiday’ hours are same. However it is useful to
see attendance given through actual presence and without presence.
5. Some examples with different configurations and setups (assuming TKA is 0)
Shift Setting
Attendance Reader User
Based
System Wide
AST EHL MnH MnO MO1 PH AD1 AD2
Yes
Yes
Yes
Yes
Yes
Yes
Yes
Yes
Yes
Yes
No
No
No
No
No
No
No
No
No
No
No
No
TF
TF
TF
TF
TF
RH
RH
RH
RF
RF
TF
RH
TH
RF
RH
RF
RH
RH
RH
RF
RH
RH
2
2
2
2
2
2
1
1
1
1
1
1
4
4
4
4
4
4
8.5
8.5
8.5
8.5
8.5
8.5
8.5
8.5
8.5
8.5
8.5
8.5
8.5
8.5
8.5
8.5
8
8
8
8
8
0
0.5
0.5
0.5
0.5
0.5
0.5
0.5
0.5
0.5
0.5
0.5
0.5
0.5
0.5
0.5
0.5
1
1
1
1
1
1
1.0
1.0
1.0
1.0
1.0
1.0
1
1
1
1
1
1
Out
IN
After Temp Tot
After
Adjust Adjust
8:00
17:15 8.75 8.50
7:45
16:45 8.5 8.50
8:15
20:45 11.0 10.5
8:15
16:30 7.75 7.5
8:00
18:15 9.75 9.5
8:00
17:15 8.75
9
7:45
16:45 8.5 8.50
8:15
20:45 11.0 11.0
8:15
16:30 7.75 7.5
8:00
18:45 10.25 10.5
7:53
17:09 8.766 8.5
7:53
17:09 8.766 9.0
7:53
17:09 8.766 8.5
7:53
17:09 8.766 8.5
0.5 8:10
16:35 8.417 8.5
8:00
18:45 10.22 10.5
8:00
17:00
8
8
8:00
9:30
1.5
0
1.5 9:00
20:00
10
10
9:00
24:00
13
13
9:00
19:30 8.5
8.5
8:00
17:00
8
8
Actual Actual TK
IN
Out
A
7:53
7:52
8:10
8:10
7:55
7:53
7:52
8:10
8:10
7:55
7:53
7:53
7:53
7:53
8:10
7:55
8:00
8:00
9:00
9:00
9:00
8:00
17:09
16:50
20:52
16:35
18:08
17:09
16:50
20:52
16:35
18:38
17:09
17:09
17:09
17:09
16:35
18:38
17:00
9:30
20:00
24:00
19:30
17:00
Based on TAS2000 Calculations
Nml
8.5
8.5
8.5
7.5
8.5
8.5
8.5
8.5
7.5
8.5
8.5
8.5
8.5
8.5
8.5
8.5
8
0
8
8
8
0
OT1 OT2
2
1
0.5
2.5
2
0.5
2
2.5
4
0
0
AST – Adjust Scan Time
TF=Truncate OT/UT to Full Hour
EHL – Effective Hours Logic
RF=Round off OT/UT to Full Hour
MnH – Minimum Hours of attendance, else Absent
TH=Truncate OT/UT to Half hour
MOT – Minimum OT1
RH=Round off OT/UT to half hour
MxOT1 – OT more than this becomes OT2
PH – Planned Hours
AD1 – Auto deduction 1 (if worked up to 14:00 hours, in this example)
AD2 – Auto deduction 2 (if worked up to 18:00 hours, in this example)
When PH=0, then Holiday hours equal to PH are given automatically, not shown here.
How to Add an Employee without Id (HR department takes few days to issue ID after joining)?
Issue a temporary ID to the newly joined employee and work as usual. When permanent ID is
issued to the employee, “MOVE” the employee from old to new ID (in Employee Master
Maintenance). Ensure correct Proxy ID in the new record. If you are using a card based terminal,
you may have to keep some temporary cards for new employees.
How to Import Employees?
Instead of creating each employee master records manually by using “Employee Maintenance”
screen, employee records can be imported from a text file.
To import:
1
8
Part 8
1. Create a text file in C:\PROGRAM FILES\TAS2KSQL folder with name
“EMPLOYEE.TXT”. One of the methods is to have the list in Excel and then use ‘save
as’ in CSV format.
2. First line of EMPLOYEE.TXT is the header of field names, separated by comma. Second
and subsequent lines contain actual data.
3. File must contain following data at the minimum:
a. Employee ID (header Emp_Id)
b. Employee Name (header Emp_Name)
c. Cost Centre Code (header Supervisor_Code)
In addition to above, you may also import other fields if being used, subject to availability of
information. Please note:
-Whatever codes are being used in employee records (Shift, Department, Trade), those codes
should have been added in their respective masters before importing employee data. Otherwise
invalid records will be rejected.
-If date field is used (default value is the date on which import is done), year must be YYYY
(4 digits). The DD and MM order should be as per Regional Settings. For example, if date of
joining is February, 26th ‘05, and Regional settings is dd-mmm-yy, then it should appear in the
text file as 26-02-2005.
-All employees must have same Employee ID length (1 to 7) and Proxy ID length (1 to 14), as
defined in configuration.
4. List of field that can be imported are (+ in remarks means mandatory field):
Header
Type
Size in
text
Remarks
Emp_Id
Text
1-7
+
Emp_Name
Text
25
+
BirthDate
Date/Time
10
Trade_Code
Text
2
Joining_Date
Date/Time
10
Shift
Text
2
Department_Code
Text
2
Supervisor_Code
Text
9
+ (This is cost center)
Tea_Boy
Yes/No
3/2
No Auto Deduction-1
Tea_Boy2
Yes/No
3/2
No Auto Deduction-2
Weekly_Off
Number
Used in Job reports
Default is A1
1=Sun, 6=Fri, 7=Sat
Previous_Scan_DOA Date/Time
10
Previous_Scan_Shift
Text
2
Last_Scan_Time
Date/Time
10
Records earlier than this
are rejected
PresentLasTDay
Yes/No
3/2
Whether present on last
working day of previous
period
EmpType
Text
2
SE or HW
SNH
Number
Normal Hours to work in a
Part 8
day. Default is –1 which
means value is taken from
Shift
SNHDBWO
Number
Same as SNH but for "Day
Before Weekly Off"
EntitledForOT
Yes/No
Rate
Currency
RateIsMDH
Text
HourlyJobRate
Number
ProxyID
Text
14
EmailD
Text
30
3/2
1
(M)onthly, (D)aily or
(H)ourly
Generally it is good idea to create “Employee.Txt” file with Employee id, Employee name,
cost center, Shift and Proxy id fields. This is because even if you were manually entering data,
you would be expected to have at least this much information in hand. In fact you may also
like to import EntitledForOT value to reduce work later.
5. Once the file is ready, log-in as siteadmin in Operations. Select ‘More Operations’ and
then ‘Initialize’. You will see ‘Import Employees’ button. Click it and proceed.
How can we use old employee’s card for new employee?
1. Change old employee’s Proxy ID to something else (like 999991)
2. Create new employee and use old card’s number in Proxy ID.
How can we remove old employees from current list and license count?
Mark ex-employee’s shift as X1 Employee Master. Be careful, you cannot reverse it.
How to install on another PC to share centralized database?
Part 8
Take backup before you start, just in case you make a mistake. Also, stop down-loader program of
the attendance reader (re-start, once you have tested and are satisfied with new configuration).
On First (Main) PC
1.
Move TASQLCOM.MDB, TASQLDAT.MDB and SOFTOOL6.MDW files to another
folder like C:\PROGRAM FILES\TAS2KSQL\TASDATA (cut/paste so that these three
files do not exist in default folder anymore). Join Workgroup SOFTOOL6 again.
2.
Share this folder such that users have add/delete/modify rights in this share. Test it by
creating a text file in this shared folder and editing it successfully from (a) First PC itself
using network path (UNC) and (b) other PC using that user’s log-in id successfully.
3.
Start ‘Operations’, enter path of new destination as indicated in UNC format (\\servername\share-name\ e.g. \\AttendanceServer\tasdata\).
4.
Edit shortcut of ‘Interface To Post’ in program group to indicate new location of
TASQLCOM.MDB and Start it.
Other PCs
1.
Install TAS2000 on second PC
2.
Delete:
(a) TASQLCOM.MDB, TASQLDAT.MDB and SOFTOOL6.MDW files from the
C:\PROGRAM FILES\TAS2KSQL folder.
(b) “Interface To Post Data” shortcut in program group.
3.
Join SOFTOOL6.MDW workgroup in shared folder created on First PC.
4.
Login into Compact and Repair as siteadmin and remove entries of TASQLCOM.MDB
and TASQLDAT.MDB files from the table.
5.
Start Operations and when asked enter the path of TASQLCOM.MDB and
TASQLDAT.MDB files in the shared folder.
In case CITRIX is being used to connect multiple users remotely, do the following for each
user on the same Citrix server:
1. Install TAS2000 for each remote user in different folders on the Citrix server. Ensure also
that each user gets separate program group shortcuts.
2. Delete (a) TASQLCOM.MDB (b) TASQLDAT.MDB files (c) TAS2KTMP.MDB files
from user’s installation folder and (d) “Interface To Post Data” shortcut in program group.
3. Follow Step 3, 4 and 5 above.
Important Note:
1. Only one instance of the “Interface to Post Data” should be running and that too only on the
first PC.
2. The first instance of “Operations” should start on the first PC (preferably use TAS2000 user
ID). You can ensure this by configuring your PC to start ‘Operations’ automatically on system
start-up.
3. Preferably, no user should be working on the first PC.
4. Different users should login with their own Ids and close ‘Operations’ when not using.
I am getting a message similar to - it may not be Microsoft Access database or file may be
corrupted. What to do?
Run Compact and Repair from TAS2000 program group and click on Repair button. If in multiuser environment, contact your administrator to do this on the computer where full TAS2000
Part 8
database is installed (First/Main PC). Ensure no TAS2000 program is running during repair from
any computer.
The system seems to be running slow. What to do?
Run Compact and Repair from TAS2000 program group. Select TASQLDAT.MDB file and click
Compact button. If in multi-user environment, contact your administrator to do this on the
computer where full TAS2000 database is installed. Ensure no TAS2000 program is running
during Compact. You can also select other MDB files and compact them. Compacting reduces
space occupied on hard disk and makes database more efficient.
Though I can see one or two attendance-scans of the day for some employees, yet these employees
are seen in Absentee/ Incomplete list for that day. What to do?
In “Initialize” form (see import above), use “Select a Table or Query” and open the table
ReCalFlag. Go to the required date and change Recal_ORPEPD from “No” to “Yes”.
What to do if someone forgets to mark attendance?
Use Scan Maintenance to add an attendance record for that person.
Can I use my existing attendance reader with TAS2000 software?
Yes. If your reader is not one of currently supported readers, you can either convert your data to
TAS2000 compatible format (available on request) or we can develop interface for your reader.
I am trying to create a new employee but cannot enter in Emp ID field. Why?
It’s because you are not clicking on “Add Record” button first.
Can I “Close A Day” without “completing” the attendance?
Normally you can’t, because if you do, total time worked cannot be calculated by system with just
1, 3 or 5 scans. However in some companies, management is only interested in knowing whether
an employee has come or not. Normal hours, OT hours and all other related information is not of
concern to them. If yours is such a company, you can select this option in configuration.
Obviously all time related information becomes meaningless when this option is used.
What happens when I “Close A Day”?
The “Close A Day” process:
1. Updates certain internal tables, which are used in Monthly Attendance 1 & 2 reports
2. Attempts to correct the ‘Holiday Hours’ given to employees, which depend on whether the
employee was present before and after holidays and weekly off, as well as the option chosen in
configuration.
3. Locks the day so that timekeeper can only enter sick leave data and nothing else.
What happens when I do “End of Month”?
The EOM process:
1. Corrects the ‘Holiday Hours’ given to employees, which depend on whether the employee was
present before and after holidays and weekly off, as well as the option chosen in configuration.
Part 8
2. Deletes attendance data that is older than required in history (depends on configuration
parameter “Keep History For (Months)”.
Note: Leave and Job Costing records are exceptions. Leave records are removed only when
employee is removed from system. Job Records are removed if Job is inactive as well as old.
3. Deletes “Ex-Employees” from Employee Master, for whom there no data in the system any
more.
What to do when an employee goes on leave?
Mark the employee ‘On Leave’ as described below:
1. Find out a) “Leave From” date, b) “Planned Back” date and c) Type of Leave
2. Go to “Time & Attendance” screen and in the date field (under status), enter the date from
which employee is on leave.
3. Open “Employee Maintenance” screen. Select the employee. Click “On Leave” check box.
4. Answer whether it is half-day leave or not.
5. Confirm “From date” is correct or Cancel.
6. If confirmed, a small screen shall pop-up.
7. If not half-day leave, Enter Planned Backdate
8. Select the Type of Leave (Paid, Unpaid etc).
9. Click on OK to finish or Cancel to abort this leave data entry.
Note: In Daily Attendance, Attendance Register and Time Card reports LP, LU, LW, LM, LC, LE
signify Leave and it’s type - Paid, Unpaid, Without Pay, Maternity, Casual, Emergency. For halfday leaves, L is replaced by F (FP, FU, FW, FM, FC, FE).
I made a mistake when I put an employee ‘on leave’, how can I correct it?
Delete the incorrect leave entry and create the correct one.
How can I delete a leave entry I made for an employee?
1. Open “Employee Maintenance” screen and note “Leave From” date for concerned employee.
2. Go to “Time & Attendance” screen and in the date field (under status), enter the noted date.
3. Back to “Employee Maintenance” screen; click “On Leave” check box. Follow instructions.
I’m trying to do month-end closing and I cannot open the month-end menu. There’s a message
after we input some password “permission for end of month not given.”
The correct password is “softools”.
For EOM, I use the “softools” password and then the message appears “Please enter starting date
of the period in Time and Attendance window”. Which window is mentioned here? And what
starting date should I key-in? We installed the system on 17 March 2007. Since we are in October
2007 now and our last completed period was 1st September to 30th September, should I enter
1/Sep/2007? Please help because it is just the first time we’re doing month end processing.
Time and Attendance Window: It is the first window that opens automatically, when you start
Operations
What starting date: No, in your case you have to input 1-Mar-2007. After this EOM is done, do
the same for April, May and up to last completed period. For those who have period like 26th to
25th should input the date, which is the first day of the period for which EOM is being done.
Part 8
I’m getting “illegal function call’ error. Why?
Change date format in regional settings to dd-mmm-yy and time hh:mm:ss tt or h:mm:ss tt.
We have A1 (morning) and A2 (general) shift timings. How to take only A1 shift absentees list?
Enter A1 in the ‘shift’ field in “Time & Attendance window” and click on ‘Absent’ button.
The reader is showing wrong time (or date). How to set accurate time?
Ensure your computer time is correct.
iGuard: In iServer program, Right mouse click on the reader, which has wrong time and "Time
Synchronize".
TR510/TR550: The downloader program has option to update reader time with PC time on “Time
Scheduler” page.
TR40xx: The downloader program has option to update reader time with PC time on “Download”
page, under Tools-> Options.
It is safer to adjust date/time under personal control and not leave the option “ON”, because wrong
PC time will result in wrong clock times and create major problem.
I have received a file for upgrading TAS2000 to new version. How can I use this file to safely
upgrade my system?
You will either receive an EXE file or a ZIP file that contains latest version files.
It's a good idea NOT to do this job towards the end of your day. This is because while mostly it
may finish in 30 minutes, sometimes it may take even 2 hours.
Please follow the steps given below to upgrade:
1. Stop Downloader program of your attendance terminal so that fresh data is not downloaded
from the terminals till upgrading is over.
2. Use “Interface To Post Data” and Post the last remaining data manually.
3. Stop TAS2000 system completely (exit from Interface To Post Data and Operations).
4. Back up your TAS2000 system (TASQLFRM.MDB, TASQLCOM.MDB and
TASQLDAT.MDB files). Ensure you are backing up the correct files. The date and size of files
will tell you which files are latest.
5. Double click the Upgrade file received from us and follow the instructions to extract all the
files into a folder C:\SMETMP (over-write old files if they exist).
6. Copy the three currently used files (lets call them OLD files) to C:\SMETMP\OLD folder (if
needed, create folders & overwrite files). The three files are TASQLFRM.MDB,
TASQLDAT.MDB and TASQLCOM.MDB.
It is absolutely VITAL that you copy correct files. The TASQLFRM.MDB file is almost always
in the C:\PROGRAM FILES\TAS2KSQL folder. The other two files may be in C:\PROGRAM
FILES\TAS2KSQL\TASDATA folder (as is the case in most of places where two or more users
have access to TAS2000 system. Or these two may be in C:\PROGRAM FILES\TAS2KSQL
folder itself. In some cases users have kept these files on D: drive or a server.
In any case, ensure that you copy the correct files.
7. Copy the new files TASQLCOM.MDB and TASQLDAT.MDB from C:\SMETMP to
C:\SMETMP\NEW folder.
8. Copy TAS2KHUP.MDB file from C:\SMETMP to C:\PROGRAM FILES\TAS2KSQL folder
(over-write existing)
9. From TAS2000 program group select "Update and Upgrade".
Part 8
10. Ignore this step if your current version is F7 or later. Version is seen on the top edge of "Time
and Attendance Screen" (check FAQ above for what is Time and Attendance Screen, if you don't
know). If your current version is F6 or older, click on "Show Duplicate..." (step 1) to take care of
duplicates. Edit time by 1 second to convert duplicate into non-duplicate.
11. Click on "Upgrade" button (step 2). It will first confirm with you that old and new
TASQLCOM.MDB and TASQLDAT.MDB files have been copied to their respective folders.
After this, data will be migrated from old to new files, one table at a time. It may take 5 minutes to
30 minutes, depending on CPU power and data quantity. Keep pressing OK for each table. The
tables ORPEPD, SCANDATA and Actual.... take relatively more time than other tables
(sometimes a lot more). Don't kill the job thinking system is hanging!
12. After this step is successful and you get a message telling you to copy files, it is advised that
you first click on "Cleanup" button. This step is mandatory if you upgrade to version 9 or later. It
may delete some superfluous records.
13. After "Cleanup" is done, exit from Update and Upgrade.
14. Copy C:\SMETMP\NEW\TASQLCOM.MDB and C:\SMETMP\NEW\TASQLDAT.MDB
files to the folder from where OLD files were copied (Over-write old files).
15. Copy ALL files from C:\SMETMP (not the folders), except TASQLCOM.MDB and
TASQLDAT.MDB to C:\PROGRAM FILES\TAS2KSQL folder.
16. Start Operations. If required, enter Path of files as indicated in dialog box. In multi-user
installation, enter path as UNC (like \\server name\shared folder name\).
17. Start Interface To Post Data. If required to enter TAS2000 data files path, enter Path of files as
indicated in dialog box. If path of iGuard is required enter as "C:\progra~1\iGuard~1\".
18. Once everything is found ok, in multi-user environment, copy the file C:\PROGRAM
FILES\TAS2KSQL\TASQLFRM.MDB file to the C:\PROGRAM FILES\TAS2KSQL folder of
other users’ PCs too.
Remember, your old files are safely kept in C:\SMETMP\OLD and also in your backup. In case
after step 14 or 15 you face problems, you can always go back to them.
We have started using Night Shift feature and created C1 shift. But when we try to take any of the
Absentee/IN/OUT/Incomplete status, we get “Please enter correct date and shift.”
This happens when C1 shift is not used right from beginning of system installation (like A1). To
resolve this, in “Initialize” form (see import above), use “Select a Table or Query” and open the
table ReCalFlag. Now do the following:
1. Go to “new record” (end of table, blank record with * on left side) to create a new record.
2. Enter: DOA = one day BEFORE you created C1 shift (ensure year is 4 digits), Shift=C,
Recal_ORPEPD=No
3. If a record for DOA=day you created C1 shift and Shift=C does not exist, then create that also,
with Recal_ORPEPD=Yes. Create similar records for all days till today (if not existing).
How can we change Employee Ids of all employees from 5 digits to 7 digits long?
This mass change of employee ids is a very non-standard requirement and needs all references of
old Ids be to be converted to new references in all the tables in the database. Contact Softools
Middle East or the reseller with details.
We have several sites where there is no connection to head office (telephone or network). How
can we get attendance data from such places?
You can use a reader that has a USB port for flash (also called pen) drive. Alternatively you can
take a portable device like laptop/notebook and connect for transferring data. You may also use a
hand held terminal for taking attendance and bring the HHT to office. This is a common “remote
Part 8
sites’ related Time & Attendance problem; TAS2000 has powerful features to handle such issues.
How can we get attendance time, overtime etc of workers in different sites (projects) separately?
Let each project be defined as a cost-centre and ensure that workers have correct cost centre.
As it happens in any typical construction company, we have several sites (we call them projects)
where majority of employees go to same project every day. However there are some employees
who are transferred from one place to another. Do we have to manually change the cost centre of
such employees on daily basis? It is not easy to track such employees.
TAS2000 has a feature that links a reader to a cost centre. Use this feature to automatically change
the cost centre of an employee. The last reader that the employee marks his attendance on is used
to determine his cost centre for that day.
The different construction sites may not have same working hours. When workers are transferred
from one site to another, can their shift timings be handled automatically?
Yes, the readers can also be linked to a particular shift (in addition to cost centre)
Some HO employees like from HR, Accounts, Audit department may go to the site and at end of
day, mark their OUT in the site reader itself. But we do not want their attendance to be seen under
that project. How can that be done?
There is an over-ride facility in employee master for such employees and their cost centre will not
be taken from the reader.
Is it necessary that data from all readers be transferred before posting data?
This restriction applies for version FA9.8 and before. It is removed in version FA.9.
How can we force system to calculate hours worked starting from day’s scheduled start time or
later if the employee comes late? We want this because many employees come too much in
advance and mark their attendance which leads to wrong hours worked?
Use “Ignore Early In Duration” option in configuration and select “Ignore First Early IN
Duration”. The time ignored will be added to Auto Deduction. Don’t use it with job costing.
For monthly summary reports, we want hours to be converted to days as 0, 0.5 and 1 respectively
if an employee works for less that 2 hours, 2 or more hours but less than 6 hours and 6 or more
hours out of the 8 hours he is supposed to work in a day?
In the “Hours to Day Logic (0/0.5/1)” option of configuration, enter 0.25,0.75 to achieve this.
Part 9
System Configuration Parameters
System parameters are applied system-wide.
System parameter is set by logging into “Interface To Post Data” as user siteadmin. Each
parameter is explained below in alphabetic order:
Adjust Previous/Current Month Days: This is applicable only when first day of period is
not 1st of month. In the “Summary Employee Attendance by Cost Centre” (“CC wise Attend
By Employee in More Operations”, the difference between days in month and days processed
is added or subtracted from ‘Normal Days”. For example, if first day of period is 26th, then
April months attendance is taken from 26th March to 25th April, which gives 31 days. But
April has only 30 days. If this parameter is checked (Yes, True), 1 day will be subtracted from
Normal Days of attendance.
Adjust Scan Time To 0, 15, 30, 45 minutes: The minute part of scan time is aligned to 0/60,
15, 30 or 45. For details see FAQ on how normal, OT1 and OT2 hours are calculated.
Allow Exception to Automatic Deduction: If used, Employee Master Maintenance will
allow an employee to be exempted from automatic deduction, even though the shift is
configured to deduct.
Allow Group TimeKeeper Adjustment: Gives option to create list of employees for whom
Timekeeper adjustment can be done as a group. Actual execution of this step is done in “Daily
Attendance” form. It can only be done for a past day and not today. This is useful when there
are many employees who cannot come to the reader for marking their attendance (or will not
do so because of some other reason), and yet you want their attendance to be included in
TAS2000.
Allow Incomplete Attendance: Although not recommended, you can close a day even if
attendance is incomplete if this is selected. It is to be noted that number of hours worked will
be wrong in all the reports.
Allow Individual Regular Hours: Normally working hours are taken from Shift, but if this
option is used, then you can enter a different value for a person in Employee Master
Maintenance.
Allow Individual Weekly Offs: All employees need not have same weekly off in Employee
Master Maintenance.
Allow ProxyID To Be Edited: User can enter/modify proxy id in Employee Maintenance.
Attendance Reader Interface: TAS2000 supports several readers in the market and formats.
Select the one you are using. TR40xx, ATS and ADCT support job costing also.
Authorized OT used: With this option you can select a cost center and give the amount of
OT to those employees who were authorized for it. Balance amount will be automatically
deducted (or added) as TKA (time keeper adjustment).
Auto Back From Leave: When an employee comes back from leave, he is put back into
system automatically. If this is not selected, user is forced to inspect the attendance records of
the employee on leave when he first uses the attendance reader.
Automatic Deduction of Attendance-1 Used: Allows auto deduction editing in Shift
Maintenance.
Automatic Deduction of Attendance-2 Used: Allows auto deduction editing in Shift
Maintenance
Automatic Posting: Data downloaded from readers is automatically posted at a frequency
determined by parameter “Posting Frequency (minutes)”.
Part 9
C.C. Wise Effective Hours Logic: If used, under-time/overtime is truncated or rounded off as
per settings in cost-centre master, otherwise as per Effective Hours Logic (see below).
Company Name: Appears on report title and is linked to license.
Deduct Break Time Automatically From Job: If jobbing is used and if a job spans across
the time when break is to be taken for automatic deduction,
Default Half Day Regular Hours: Defines the number of hours a person is supposed to work
on a half day, before overtime is paid. A value “–1” suggests that it should be as per Shift
definition.
Default Regular Hours: Similar to above, except on normal days/
Default Special/Ramadan Hours: Similar to above
Default Weekly Off (1=Sunday): When new employee record is created, this is the weekly
off. Friday is 6 and Saturday is 7.
Duplicate If Scanned Again In Less Than: If next record is within this time, it is ignored.
Effective Hours Logic: See FAQ
Employee Type (HW/SE) Used (default is SE): Hourly workers do not get attendance on
weekly offs and national holidays.
Exception Reports Used: There are many exception reports that can be availed when this is
selected.
Export Attendance: At end of month when EOM is done, provided license is purchased.
First Day of Last End of Period: Shows when last EOM was done
First Day of Period - Last Time Job Rate Recalculed: One of the methods of calculating
job cost requires recalculation of records for the period. At the start-up, enter first day of
previous period.
First Day of Period (e.g.26): Determines every month what will be the date range month
data.
First Month of Year: Which month is considered the first month.
Force Inspection If extra Scans: If normally only 2 scans are expected but on a given day
some employees have more than 2 attendance scans, till you inspect the data, would will not
be allowed to close that day.
In-Out Key Used: Whether employees are supposed to use IN/OUT keys when coming for
work and going home.
Job Costing - Salary or Job Rate: If job costing basis is ‘employee Record’ (see below),
determine whether salary is to be used or job rate is to be used.
Job Costing Basis: Whether calculation is done based on individual employee’s rate or
common rate of the trade to which employee belongs.
Job Costing: Whether job costing is used or not (Job Time Calculations must be yes for this –
see below).
Job Time Calculation: Whether duration of a job is to be calculated or not.
Keep History For (Months): Default is 24 months, but big companies should reduce it to
smaller NUMBER.
Length of Employee ID: Can be up to 7 characters. If chosen between 1 and 6, only digits are
allowed. If alphanumeric (including “-“) is needed, enter 101 to 107.
Length of Proxy ID: This is your user id length in a biometric reader or a card number.
Part 9
Length of Reason/Job Code Field In Record: Mainly for TR4xxx readers, can be 0 to 8
Length of Task Code Field In Record: Mainly for TR4xxx and ADCT readers, can be 0 to
7. In TR4xxx readers, data punched after Job code is taken as Task code, if used (hence
combined length of job code and task code can’t be greater than 8 for TR4xxx readers).
Manager's Email Address: Used in automatic emails. Automatic emails work only if system
is compatible with TAS2000.
Maximum OT1: If overtime is more than this value, the balance becomes OT2 on a normal
working day. Make it a large number if OT2 is not given like this.
Minimum Hours Must Work (else attendance=0): If a person works for less than this time,
he is deemed to be absent.
Minimum OT1: If OT is less than this, it is zero.
NINOOBOOS1S2values: The 2 character value returned by Function Keys when pressed for
Normal In, Normal Out, Official Back, Official Out, Special 1, Special 2. Parameter Other
Function Keys Used must be yes.
Normal In Reason Code: “Attendance IN” is mapped to this reason/job code for reports and
maintenance.
Normal Out Reason Code: “Attendance OUT” is mapped to this reason/job code for reports
and maintenance.
Official In Reason Code: “Back From Official Work” is mapped to this reason/job code for
reports and maintenance.
Official Out Reason Code: “Going Out For Official Work” is mapped to this reason/job code
for reports and maintenance.
OT1 Multiplier: used in mini payroll, like 1.25
OT2 Multiplier: used in mini payroll, like 1.5
Other Function Keys Used: Whether function keys other than IN/OUT are to be used or
ignored.
Out Used: If yes, the Out (of office) column is shown in Daily Records, Timecard.
Posting Frequency (minutes): Downloaded data is posted at this frequency.
Punch Reason/Job Codes on Terminal: Whether job/reason code is punched or not.
Punch Task Codes on Terminal: Whether task code is punched or not.
Reader Linked To Job: When used, the reader number itself determines which job the
employee was doing and the employee need not punch the job number.
Reason/Job Used: Whether Job or Reason feature is being used or not
Record Duplicates: Records which are considered duplicates due to scanning within a short
time of previous one can be ignored or recorded. Note that if recorded, you will be forced to
inspect them.
Remove Holiday Hours Logic: You can select between “Do not remove”, Remove only
when a person is not present before and after holidays and Remove if employee was on leave
before holiday and joined on first day after holidays.
Schedule Used: Employees can be scheduled to change Shift and Weekly Off automatically if
this feature is used.
Shift/Reason/Job Named As: The ‘job’ can be renamed to something else like “Proj”
Part 9
Special 1 Reason Code: If reader has 5 function keys, this can be used for special reason like
‘going out for personal work’ in just the same manner “Official In Reason Code”.
Special 2 Reason Code: Same as above, if 6 function keys exist.
Special Days/Ramadan Used: Whether show related fields in Shift Maintenance or not
Swipe is ProxyID: Whether the identification number in the attendance record is proxy id or
the employee id itself.
System Start Date: The date system was installed
Tardy Report (Average) Pink (Percent): If employee is tardy (late comer/early leaver),
figure will be highlighted with pink if it is not less than this value in percentage of attendance.
Tardy Report (Average) Yellow (Percent): If employee is in-time, figure will be highlighted
with yellow if it is not less than this value in percentage of attendance.
Tardy Report (Average) Min Days Worked (Percent): Highlighting (above) is done only if
the person has worked for at least the minimum % of days.
Task Used: Whether task feature is being used or not
Task Length Used: You will need to created task codes of this length only. Also, if it is less
than ‘Length of Task Code Field In Record’, only first few required characters would be used.
Task Named As: Job related forms and reports would use the renamed value in labels.
Use Department: Allows entering department code (more like within a cost center) and gives
department wise daily OT.
Use Suspend/Release OT: OT’s inclusion in “Monthly Figures” can be suspended from a
particular date and released w.e.f. another date. It is useful when employees go on leave and
part of OT is to be paid after they return from leave.
Manual Revision Log
Version 9.6 Rev 2
April 30, 2007: Installation on Citrix method modified because TASQLFRM.MDB now looks
for TAS2KTMP.MDB file in current directory on every startup.
Version 9.6 Rev 3
Word Doc margins are Top=0.5, Bottom=0.5, Left=1, Right=0.7 inches
Revised Repair & Compact wordings in FAQ
Revised Multi-user FAQ
Version 9.6 Rev 4
FAQ added for on leave, for correcting leave mistake and for deleting leave record
Version 9.6 Rev 5
May 21, 2007 FAQ modified for “What to do when an employee goes on leave?”
Version 9.7 Rev 0
July 7, 2007 Configuration modified for Cost Centre Wise Effective Hours Logic.
Version 9.7 Rev 1
July 14, 2007 FAQ corrected for Leave Deletion as per F9.7 changed logic. Added FAQ on
‘What is Close A Day’ and ‘End of Month’.
Version 9.8 Rev 0
July 14, 2007 FAQ Added Task and Tardy (average) highlight related system configuration.
Version 9.8 Rev 1
Oct 5, 2007 FAQ Added EOM password and “what date” (version F9.9 not updated yet in
manual).
Version A.3 Rev 0
Feb 6, 2008 FAQ Added “illegal function call”.
Feb 9, 2008 FAQ Added “How to take A1 shift absentees”.
Feb 9, 2008 FAQ Added “How to add employee without ID”.
Feb 9, 2008 Added Different type of Interfaces and IF97 & IF98 descriptions
Version A.4 Rev 0
March 1, 2008, FAQ Added date/time correction of readers.
Oct 15, 2008 Spelling corrected: Nut >> But
Oct 15, 2008 Normal, OT1, OT2 calculation FAQ’s Pie chart and text in box – colour
synchronized.
Version A.4 Rev 1
Nov 2, 2008 FAQ Added How to do version upgrade
Version A.4 Rev 2
Feb 4, 2009 FAQ Added for “Please enter correct date and shift.”, when C1 shift is created.
Version A.7 Rev 0
May 3, 2009 Changed to replace 6 by 7 for length of employee id (although actually database
now accepts 12 digits long employee id – but control lengths have not been changed
accordingly in forms and reports).
May 3, 2009 Changed to include 15 minutes R/O and no R/O or truncation
Version A.8 Rev 0
Jul 12, 2009 Hours to Day parameters added so that day is seen as 0, 0.5 or 1 in reports and
interface to payroll.
Jul 12, 2009 DECO interface can now run from any day to any day. It does not run as part of
EOM now, but as an on demand feature of Jobs.
Jul 12, 2009 Added “Create Missing Scans” button in Missing Scans & OT form so that
multiple manual records can be created with the push of a button.
Version A.9 Rev 0
Jul 12, 2009 Multiple employees can now be inserted in Employee Schedule based on certain
criteria.
Jul 12, Added a feature, which allows Shifts to be decided based on reader number (port).
Jul 12, 2009 Added feature to schedule change of job, cost centre and shift that are linked to a
reader.
Jul 12, 2009 Added Yes/No field to employee master so that even if cost centre and shift is
based on reader, an employee can over-ride it and have fixed values.
Dec 26, 2011 Edited for version C (TAS2KSQL) – the file names and paths.
July 18, 2012 Changed picture of program group on page 5 for 32 bit… Version C.4 Rev 1