1
Touch Screen
Travel Chess
Instructions
Bedienungsanleitung
Mode d’emploi
Instrucciones de Funcionamiento
Istruzioni d’uso
Handleiding
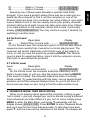
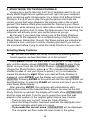
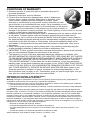
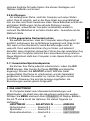
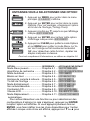
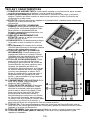
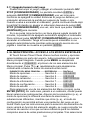
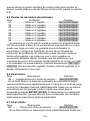
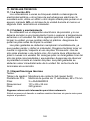
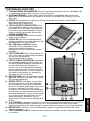
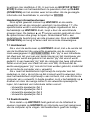
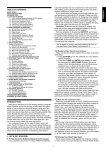
QUICK START
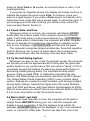
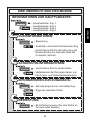
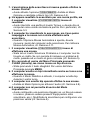
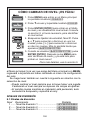
To play a game right away, simply follow these steps!
the battery cover and insert three “AAA”
1 Open
(AM4/R03) alkaline batteries, making sure to
3x
AAA
(AM4/R03)
observe the correct polarity.
Remove the stylus from the storage area on
the right-hand side of the unit, as shown here.
2
Press GO/STOP, located on the top edge of
3 the
unit, to turn the computer on. If you get no
response, reset it as noted in Section 11.1.
4
Press NEW GAME twice, in quick succession,
to reset the computer. If the board doesn’t
reset for a new game of chess, you’ve taken
too long between keypresses. Just try again!
x2
moves by pressing the stylus gently on
5 Enter
the from and to squares for each move. Note
that you may also use your fingertip.
6
When the computer displays its move, its piece
will flash briefly on the from and to squares,
and the move will then be made on the board.
ıPd7-d5````
Now, it’s your turn again!
To turn the unit off, press GO/STOP. When Stop? is displayed, press
GO/STOP again to confirm—and your game will be stored in memory!
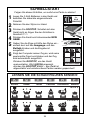
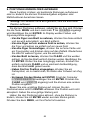
GET TO KNOW THE CHESS PIECES!
K`
KING
Q`
R`
B`
N`
P`
QUEEN
ROOK
BISHOP
KNIGHT
PAWN
White
Black
QUICK START
KEYS AND FEATURES
INTRODUCTION
1. GETTING STARTED: THE BASICS
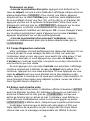
1.1 Batteries In, Power On
1.2 Ready to Play? Here’s How!
1.3 The Computer Makes its Move
1.4 Game Over? Start a New Game
1.5 Too Easy/Hard? Change Levels!
2. MORE FEATURES TO EXPLORE
2.1 Whose Turn? Check the Display!
2.2 Special Chess Moves
2.3 Illegal/Incorrect Moves
2.4 Check, Mate, and Draw
2.5 Try the Self-Rating System!
2.6 Want a Hint? Just Ask!
2.7 Interrupting the Search
2.8 Changing Sides
2.9 Built-In Openings
2.10 Thinking on the Opponent’s Time
2.11 Power Down/Game Memory
3. THE MAIN MENU
4. OPTION MODE
Selecting Game Options
4.1 Two Player Mode
4.2 Search Algorithm
4.3 Autobook Mode
4.4 White at Top
4.5 Countdown Clock
4.6 Ticking Sound
4.7 Coach Mode
4.8 Sound On/Off
3
4.9 LCD Contrast
4.10 LCD Speed
4.11 Automove Mode
5. LEVEL MODE
Setting a Playing Level
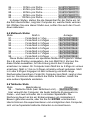
5.1 Fun Levels
5.2 Casual Play Levels
5.3 Tournament Levels
5.4 Speed Chess Levels
5.5 Problem Solving Levels
5.6 Tactical Level
5.7 Infinite Level
6. TAKEBACK MODE
7. INFO MODE
Automatic Info Displays
Manual Info Displays
7.1 Principal Variation
7.2 Search Information
7.3 Chess Clock Information
7.4 Move Count/Game Moves
7.5 Rating Display
8. SETUP MODE
9. STUDY MODE
Selecting Study Positions
Using the Board for Selection
10. NEED HELP? LOOK HERE!
11. TECHNICAL DETAILS
11.1 The ACL Function
11.2 Care and Maintenance
11.3 Technical Specifications
APPENDIX:
STUDY MODE GAMES
ENGLISH
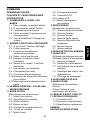
TABLE OF CONTENTS
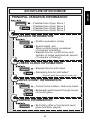
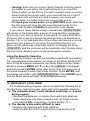
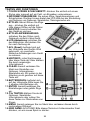
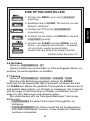
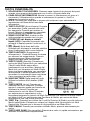
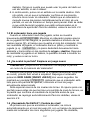
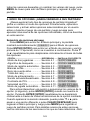
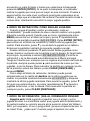
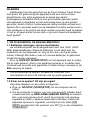
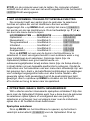
KEYS AND FEATURES
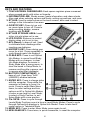
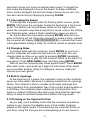
1. TOUCH SCREEN CHESSBOARD: Each square registers piece movement
when pressed gently with stylus or fingertip.
2. INFORMATION LINE: Shows moves, game information, and chess clocks.
Also used when selecting options and levels, setting up positions, and more.
3. STYLUS: Used to make moves on the touch screen; also used to select
settings in the Information Line area.
4. GO/STOP KEY: Press to turn unit
on; press twice to turn off. Press to
pause scrolling display; resume
scrolling with CLEAR.
5. STYLUS STORAGE AREA: Insert
stylus into slot when not in use.
6. LCD COVER: Slides on to protect
display when unit is not in use.
7. ACL (Reset): In base of unit. Used
to eliminate static discharge after
inserting new batteries.
8. HINT/INFO KEY: Press during your
move for a hint. Press repeatedly to
cycle through main Info displays.
9. CLEAR KEY: Press to exit Option/
Info Modes; to cancel Level/Study
Modes with no changes; to clear
Info Mode displays; to remain in
Study Mode after a wrong move; to
clear the board in Setup Mode; to
resume scrolling after a pause; and
to resume play after takebacks.
10. BATTERY COMPARTMENT: In
base of unit. Uses three “AAA”
(AM4/R03) alkaline batteries.
11. ENTER KEY: Press to change sides
with the computer. Press while the
computer is thinking to force it to
move. Press to select Main Menu
items; to select settings and turn
options on/off in Option/Info Modes;
to enter a new level in Level Mode;
to select a Study Position; to exit
Setup Mode with a new position.
12. ¯/˘ KEYS: Press to cycle through
Levels/Study Positions one at a time in Level/Study Modes. Press to cycle
through Options/Info displays in Option/Info Modes. Press to take back/
replay moves in Takeback Mode.
13. MENU KEY: Press to enter Menu Mode; press again to exit.
14. NEW GAME KEY: Press twice, in quick succession, to reset the computer.
4
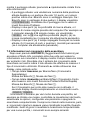
1. GETTING STARTED: THE BASICS!
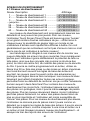
1.1 Batteries In, Power On
Your chess computer runs on three “AAA” (AM4/R03) batteries.
Insert the batteries into the compartment in the base of the unit,
making sure to observe the correct polarity. We recommend fresh
alkaline batteries for longer battery life!
To turn the computer on, press GO/STOP. If you get no response,
reset the unit by pressing a paper clip or another sharp object down
into the hole marked ACL in the base for at least one second.
To conserve batteries, the computer will automatically turn itself
off if left idle for about 20 minutes.
1.2 Ready to Play? Here’s How!
Follow these steps to start a game:
a. Press GO/STOP to turn the computer on.
b. To reset the computer for a new game of chess, press NEW
GAME twice, in quick succession. If you take too long between
keypresses, the computer won’t reset itself, and you’ll need to
press the keys again. As soon as the unit has been reset, you’ll
see New Game displayed briefly, and then the symbol for White
(„) and the chess clock (00:00:00).
c. To make a move, lightly press the stylus on the piece you want
to move until you hear a beep and the piece flashes. Note that
you can use your fingertip instead of the stylus, if desired.
d. Next, press the stylus on your destination square. You’ll hear a
second beep as the computer confirms your move. Now, it’s the
computer’s turn. You’ll notice that the computer often moves
instantly at the beginning of a game, instead of taking time to
5
ENGLISH
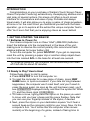
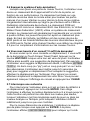
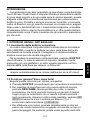
INTRODUCTION
Congratulations on your purchase of Saitek’s Touch Screen Travel
Chess Computer! Featuring extraordinary chessplaying abilities and a
vast array of special options, this sleek unit offers a touch screen
interface for convenience and ease of play. Portable and always
travel-ready, it will also allow you to enjoy a game of chess anywhere,
at home or on the road! Once you familiarize yourself with the basic
operation, go on to explore all the extras this unique computer has to
offer. You’ll soon find that you’re enjoying chess as never before!
think. This is because it is playing moves which are stored in its
openings library. For details, see Section 2.9.
1.3 The Computer Makes its Move
When the computer moves, it first shows Thinking... briefly.
While the computer considers its move for Black, the display flashes
the symbol for Black (ı), while showing the computer’s clock. Once
the actual move is made, the computer will beep and display its move
(e.g., ıPe7-e5), and the piece will briefly flash back and forth on
the from and to squares. After the move has been made on the
board, the display will go back to showing your clock—and it’s your
turn again.
1.4 Game Over? Start a New Game
Caution: Resetting the computer clears your current game
from the computer’s memory!
Whenever you finish a game (or if you decide to give up on your
current game), it’s easy to start over again! Reset the computer by
pressing NEW GAME twice in a row. New Game will be displayed,
signalling that the computer is ready for another game of chess, using
the currently selected playing level.
Special note regarding the Tournament Levels: If you reset for a
new game before a Tournament Level game is over, you’ll be asked to
confirm the game’s outcome before the computer resets itself. For
details, see Section 2.5.
1.5 Too Easy/Hard? Change Levels!
When the computer is first turned on, it is automatically set to
Playing Level 63, with an average computer response time of five
seconds per move. You can, however, choose from 100 different
levels of play! For descriptions of all the levels, as well as instructions
on how to change the playing levels, see Section 5.
2. MORE FEATURES TO EXPLORE
2.1 Whose Turn? Check the Display!
When the computer thinks for Black, it flashes a Black square (ı).
After the computer moves, the display shows a steady White square
(„), indicating that it’s now your turn to move for White.
6
2.2 Special Chess Moves
Please note the following, in regard to certain chess moves.
Captures: Captures are shown with an x, as in ıPa7xb6.
En Passant: In this type of capture, displayed with an EP after the
capturing move, the computer reminds you to remove the captured
pawn by flashing it. Press the pawn to remove it from the board.
Castling: After the King has been moved, the Rook will flash.
Make the indicated Rook move on the board to complete the castling
maneuver. Kingside castling is displayed as O-O, and Queenside
castling is displayed as O-O-O.
Pawn Promotion:
• When you promote a pawn, first press the pawn on its from
square, as usual. The display then changes to show the available
promotion pieces (Q R B N). To promote to a Queen, simply press
the to square to complete your move. To underpromote to a Rook,
Bishop, or Knight, press one of the displayed promotion symbols. The
display will confirm briefly (e.g., Prom: rook). Press the to square
to complete the promotion, and the piece will automatically change on
the board. Note: If you change your mind about the promotion piece
before pressing the to square, simply press one of the other symbols.
• When the computer promotes a pawn, it indicates its move,
along with the promoted piece, as in ıPh2-h1/Q.
2.3 Illegal/Incorrect Moves
Your computer knows all the rules of chess—and it will never
cheat! If you attempt to make an illegal move, a high-pitched double
beep will alert you to your error. This will occur, for instance, if you
7
ENGLISH
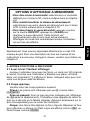
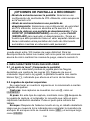
DISPLAY OPTIONS TO KEEP IN MIND!
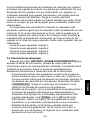
• To brighten/darken the display: Select a different LCD
Contrast setting, as noted in Section 4.9.
• To slow down/speed up a scrolling display: Select a
different LCD Speed setting, as described in Section 4.10.
• To pause a scrolling display: Press GO/STOP once;
press CLEAR to resume scrolling. Note that this feature is
especially valuable if you have several of the automatic Info
Mode displays activated while the computer is thinking!
press an illegal from or to square, an incorrect piece or color, or an
invalid game key.
If you press an illegal to square, the display will simply continue to
indicate the square the piece came from. To continue, move your
piece to a legal square. If you press a from square, but decide not to
make that move, press that same square again to cancel the input. If
you change your mind after entering your whole move, retract the
move as described in Section 6.
2.4 Check, Mate, and Draw
Whenever a King is in check, the computer will display Check
briefly after the move is made. If the computer discovers a forced
mate, it will briefly show a mate announcement (e.g., Mate in 3).
When a game ends in checkmate, the computer will either congratulate you or express its condolences, depending on whether you’ve
won or lost. A display of Checkmate! will then end the game.
The computer recognizes draws by stalemate, three-fold repetition,
and the 50-move rule. In each of these cases, the corresponding
display will be shown after the drawing move has been made.
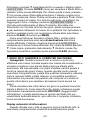
2.5 Try the Self-Rating System!
Whenever you play on any of the Tournament Levels, the computer
will provide you with an approximate ELO rating after the game has
ended, based on your performance. Not sure what a “rating” is? It’s a
universally recognized method of measuring chess performance or
describing relative playing ability. The international body which
governs chess is called FIDE, or Fédération Internationale des
Échecs, and FIDE ratings are sometimes referred to as ELO ratings.
The United States Chess Federation (USCF) uses a similar rating
system. Ratings are usually four-digit numbers, with stronger players
having higher ratings. Towards the upper end of the scale, Masters
rank in at 2200 and above, with International Grandmasters at 2500+.
Want to know where you stand? Here’s your chance! Refer to Section
5.3 for more information on the Tournament Levels.
2.6 Want a Hint? Just Ask!
If you ever need help with a move, the computer will be glad to
oblige! Press HINT/INFO during your turn, and the computer will
display a move suggestion. If the hint happens to be e4xd5, for
example, Ply 1: e4xd5 will be displayed. A “ply” is an individual
move, or a move for either side. The hint can take from one to five
8
2.7 Interrupting the Search
To interrupt the computer while it’s thinking about a move, press
ENTER. This forces the computer to play the best move it has found
so far. This feature can be extremely useful on the higher levels,
where the computer may take a long time to move, and on the Infinite
and Tactical Levels, where it thinks indefinitely unless you stop it.
On the Problem Solving Levels, pressing ENTER while the computer is thinking will not cause the computer to make a move. Instead,
the computer will display No move found! to indicate that it was
interrupted before finding a mate. To continue, switch to another level.
2.8 Changing Sides
To change sides with the computer, press ENTER on your turn—
and the computer will make the next move for your side. You can
change sides as often as you wish by pressing ENTER repeatedly.
Want the computer to play the first move for White at the start of a
new game? Press NEW GAME twice, and then press ENTER!
Want to see the computer play chess against itself? Press ENTER
after each move—and watch as it plays for both sides of the board,
one move after another. Study its strategies, and you might just
improve your own game!
2.9 Built-In Openings
At the beginning of a game, the computer’s reply is often instantaneous on many levels, because it is playing moves from its openings
library. The computer’s library includes most major openings and
many positions from grandmaster play. If the current board position is
in its library, the computer plays a response to that position from
memory, instead of thinking about the move. Note that the openings
library is used on all levels except the Problem Solving Levels.
2.10 Thinking on the Opponent’s Time
As you play, you’ll probably notice that the computer sometimes
replies to your moves immediately, even in the middle of games
played on the higher levels. This is because the computer thinks on
your time, using the time you are contemplating your next move to
9
ENGLISH
seconds to show, but it may sometimes take longer. To accept the
hint, make the displayed move on the board. To make a different
move, simply disregard the hint and make a move of your own. You
can also cancel the hint display by pressing CLEAR.
think ahead and plan its own strategies. It tries to anticipate the move
you are likely to make, and calculates its responses for that move
while you’re still thinking. If the computer has guessed correctly,
there’s no reason for it to keep on calculating—it immediately plays
the move it has already found! Note that the computer does not think
on the opponent’s time on the Fun Levels.
2.11 Power Down/Game Memory
You may interrupt your game and turn the computer off by pressing
GO/STOP. The display will show Stop?, and pressing GO/STOP
once more to confirm will turn the unit off. Play is then suspended,
and the computer will store your game for up to one year. When you
switch back on again, you can continue from where you left off! If you
decide not to turn the computer off after pressing GO/STOP once,
simply press CLEAR to cancel.
If no keypresses or moves are made for 20 minutes, the Auto
Power Down feature will automatically turn your computer off. To
continue, press GO/STOP to turn the computer back on. Note that the
computer will not turn itself off while it is thinking about a move, or
while Stop? is being displayed.
3. THE MAIN MENU: ACCESSING SPECIAL MODES
Touch Screen Travel Chess offers many user-selectable modes
and options, all accessed via the integrated Main Menu. Once you
press MENU, you’re taken to ¿OPTION, the first of six Main Menu
items. Press ¯ (or ˘) repeatedly to cycle through all the Menu items:
MAIN MENU ITEM ....... REFERENCE ............... DISPLAY
Option Mode ..................... Section 4 ................... ¿OPTION
Level Mode ....................... Section 5 ................... ¿LEVEL
Take Back Mode ............... Section 6 ................... ¿TAKEBACK
Info Mode ......................... Section 7 ................... ¿INFO
Setup Mode ...................... Section 8 ................... ¿SETUP
Study Mode ...................... Section 9 ................... ¿STUDY
To select one of the Main Menu items, press ENTER. In each case,
you’ll be taken to a sub-menu, where you can make subsequent
selections. Some of the items (e.g., Option Mode) will offer a variety
of different choices and sub-choices, while others (e.g., Setup Mode)
will allow you to activate a particular game feature. Since the instructions for selecting menu items will vary, depending on the item you’ve
chosen, please see the referenced section numbers for full details on
10
accessing each of these major features. After selecting all desired
options and/or changing game settings, press MENU again to exit the
Main Menu and return to game play.
4. OPTION MODE: ADD VARIETY TO YOUR GAMES!
Want to explore all sorts of intriguing game options? Just take a
look at Option Mode! First, learn how to select and activate these
user-selectable options before or during game play, and then go on to
learn about the individual options, as described in this section.
Selecting Game Options
Press MENU to enter the Main Menu, and the display automatically shows ¿OPTION for Option Mode. Press ENTER to enter
Option Mode, and you’ll see the first of 11 options, as shown below.
Press ¯ (or ˘) repeatedly to cycle through all the options:
OPTION ...................... REFERENCE ......... DEFAULT DISPLAY
Two Player Mode .......... Section 4.1 ........... player: P-C
Search Algorithm ......... Section 4.2 ........... search: select
Autobook Mode ............ Section 4.3 ........... book: on
11
ENGLISH
A QUICK LOOK AT THE MAIN MENU!
• ¿OPTION: Explore a number of exciting game options.
• Two Player Mode
• Coach Mode
• Search Algorithm
• Sound On/Off
• Autobook Mode
• LCD Contrast
• White at Top
• LCD Speed
• Countdown Clock
• Automove Mode
• Ticking Sound
• ¿LEVEL: Choose from 100 different levels of play.
• ¿TAKEBACK: Take back any or all previous moves.
• ¿INFO: Select various automatic information displays.
• Show Moves
• Show Progress
• Show Nodes
• Show Evaluation
• Show Time per Move
• ¿SETUP: Set up or change any board position.
• ¿STUDY: Test yourself with 64 unique Study Positions.
White at Top ................. Section 4.4 ........... top: black
Countdown Clock ......... Section 4.5 ........... clock: up
Ticking Sound .............. Section 4.6 ........... ticks: off
Coach Mode ................. Section 4.7 ........... coach: off
Sound On/Off ............... Section 4.8 ........... sound: on
LCD Contrast ............... Section 4.9 ........... contrast: 3
LCD Speed ................... Section 4.10 ......... LCD speed: 2
Automove Mode ........... Section 4.11 ......... automove: on
To turn an option on/off or to select option settings (if any), press
ENTER when the option is displayed. Pressing ENTER repeatedly will
cycle through all choices for the displayed option. When your desired
choice is displayed, either press ¯ or ˘ to go on to a different option,
or press CLEAR to return to the Main Menu, and then MENU to
return to normal game play. For details on each of these options, see
the referenced section numbers. Note: When you reset the computer
for a new game, most of your selected options are carried over to the
next game. The only exception is Two Player Mode, which automatically returns to Player vs. Computer whenever you start a new game.
4.1 Two Player Mode
Options: player: P-C (Player vs. Computer)
player: P-P (Player vs. Player)
Normally, the computer automatically answers with a countermove
after you enter your move. If you activate player: P-P, however,
you can enter any number of moves one by one, without allowing the
computer to answer. This feature can be used in a number of interesting ways:
• Play through master games. Press ENTER to see what the
computer would do in any position!
• Keep records of your own chess games. When a game is over,
play to certain board positions to see how other moves or
different strategies might have affected the outcome.
• Study opening lines by entering them manually.
• Play against a friend, with the computer acting as a referee. The
computer will check all moves for legality and keep track of the
time for both sides!
If you’re playing against another person and you want to see what
the computer would do in your position, press ENTER to have the
computer make your next move. After the computer has moved, Two
Player Mode remains in effect, and you can continue your game. Note
that this option automatically reverts to its default setting of Player vs.
12
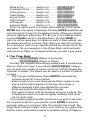
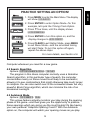
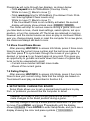
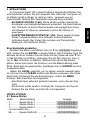
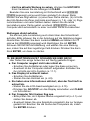
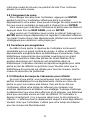
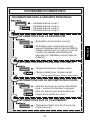
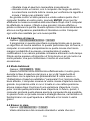
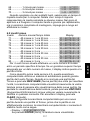
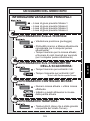
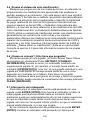
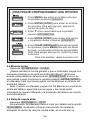
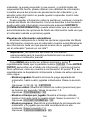
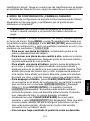
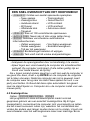
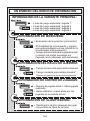
1. Press MENU to enter the Main Menu. The display
will show ¿OPTION.
2. Press ENTER to enter Option Mode. For this
example, let’s pick the Ticking Clock Option.
3. Press ¯ five times, until the display shows
ticks: off.
4. Press ENTER to turn this option on, and the
display changes to ticks:on.
5. Press CLEAR to exit Option Mode, press MENU
to exit Menu Mode—and the simulated ticking
will start! Note: To turn this option off again,
repeat the above steps.
For more details, see Section 4.6.
Computer whenever you reset for a new game.
4.2 Search Algorithm
Options: search: select / brute
The program in this chess computer normally uses a Selective
Search algorithm. In this particular type of search, the computer
concentrates mainly on those moves most likely to be successful,
allowing it to see combinations that might otherwise take much longer
to compute. You can also switch over to the somewhat slower but very
powerful Brute Force algorithm, which can minimize the risk of an
occasional oversight.
4.3 Autobook Mode
Options: book: on / off
This unique feature actually monitors your play during the opening
phase of the game—and then gives you the opportunity to practice
those openings which are giving you the most trouble! It’s like having
your own personal “Adaptive Opening Coach”! With the Autobook
option on, the computer will watch your opening moves as you play.
13
ENGLISH
PRACTICE SETTING AN OPTION!
The next time you end up with a bad position a few moves after the
end of an opening variation, the computer will “remember” that
particular opening line. In the future, then, the computer will play that
same opening whenever possible. This allows you to try out different
moves and strategies, in an attempt to become more familiar with that
opening, and thereby strengthen your play!
4.4 White at Top
Options: top: black / white
Want to depart from the usual standard and have the computer
play the White pieces from the top of the board? Then try out this
feature by selecting top: white at the beginning of a new game!
Start your game by pressing ENTER, and the computer will make the
first move for White from the top of the board.
Note: When the computer plays White from the top of the board,
you’ll notice that the Kings and Queen are positioned differently, and
the board notation is automatically reversed.
4.5 Countdown Clock
Options: clock: up / down
Normally, the computer defaults to the clock: up option,
displaying the elapsed time. Activating the Countdown Clock option,
however, will display the remaining time instead. Here’s how to
differentiate between the clocks symbols at a glance:
[/]
{/}
Countup Clocks (White/Black)
Countdown Clocks (White/Black)
Note that the Countdown Clock option is only available in combination with the Tournament and Speed Chess Levels.
4.6 Ticking Sound
Options: ticks: off / on
Turning this option on will activate a ticking sound that simulates a
chess clock. You can create the atmosphere of a championship chess
tournament in your very own living room!
4.7 Coach Mode
Options: coach: off / novice / inter. / adv.
Activating Coach Mode allows the computer to look over your
shoulder while you play, watching what you do and offering help if you
14
4.8 Sound On/Off
Options: sound: on / off
Selecting one of these sound settings gives you the option of
playing chess with or without sound effects.
4.9 LCD Contrast
Options: contrast: 1 / 2 / 3 / 4 / 5
This option allows you to adjust the contrast of the LCD display,
with 1 being the lightest, and 5 the darkest. If you find that the default
setting of 3 is too light or too dark to read comfortably, change it by
pressing ENTER repeatedly, until your desired setting is displayed.
15
ENGLISH
need it! In this unique capacity, the computer might warn you if you
are in danger of losing a piece, or if it thinks your move is about to
lead to an avoidable material loss. You may see displays like Your
Queen is in jeopardy! or Watch your Knight!. If
you stand to benefit from a particular situation, you might even see
He’s giving you a big chance!. Sometimes, the computer will also ask you to confirm or cancel an obviously illogical
move. If you choose to cancel, your move will be taken back and you
can try another!
To choose one of the Coach options, press ENTER repeatedly until
your desired level is displayed. Once you exit Option Mode and return
to game play, the last displayed Coach option will automatically be in
effect. The following are the available settings.
• coach: off: No coaching features are activated.
• coach: novice: Here, the computer assumes that you are
familiar with many tactical and strategic concepts, so it will only
make you aware of less obvious and more advanced concepts,
such as sacrifices and combinations.
• coach: intermediate: In this case, the computer gives
the amount of assistance it deems appropriate for players who
can see the most obvious points, but who also need to be made
aware of others.
• coach: advanced: This setting will give warnings and
advice whenever the computer feels they’re necessary, such as
when you commit a blunder or if a piece is in jeopardy.
When Coach Mode is activated, the computer will sound intermittent beeps during your turn as White, as a reminder that it’s waiting
for you to make a move.
4.10 LCD Speed
Options: LCD speed: 1 / 2 / 3 / 4
You can control the scrolling speed of the LCD display by setting
this option, with 1 being the slowest, and 4 the fastest. If you find that
the default setting of 2 is too slow or too fast to read comfortably, you
can change it by pressing ENTER repeatedly, until your desired
setting is displayed.
4.11 Automove Mode
Options: automove: on / off
Normally, when the computer makes a move, it briefly flashes its
piece on the from and to squares, and then automatically makes the
move on the board. If you change to automove: off, however,
the computer will announce its moves as usual—but it will be up to
you to move the computer’s pieces on the board. After the computer
has announced its move, it will flash its piece on the from square.
Press the flashing piece, and it will then move to the to square. Press
the to square to complete the computer’s move.
5. LEVEL MODE: CHOOSE FROM 100 LEVELS!
Your chess computer has 100 unique playing levels to choose
from! The levels are divided into two basic groups:
• FUN LEVELS (1-60): These levels offer beginners and average
players a chance to build their chess skills. On many of the Fun
Levels, you’ll see the computer make mistakes on purpose—just
so you can learn from it!
• COMPETITION LEVELS (61-100): These levels are geared
towards intermediate and more advanced players. Included are
levels for casual and tournament play, problem solving, speed
chess, and even special levels for experimentation. As you are
selecting levels, keep in mind that when the computer has more
time to think about its moves, it becomes stronger and plays
better—just like a human chess player!
Setting a Playing Level
Press MENU to enter the Main Menu, and press ¯ until the display
shows ¿LEVEL. Press ENTER to enter Level Mode, and you’ll see
the currently selected level, as in <00:05/move> (the default level
on the first power up). To change the level, press ˘ or ¯ to increase/
decrease the levels by one, or use your stylus to press > or < to
16
FUN LEVELS
5.1 Fun Levels
Level Description
Display
1 ....... Fun Level 1 ........................................ <Fun Level 1>
2 ....... Fun Level 2 ........................................ <Fun Level 2>
3 ....... Fun Level 3 ........................................ <Fun Level 3>
…all the way up to…
58 ...... Fun Level 58 ...................................... <Fun Level 58>
59 ...... Fun Level 59 ...................................... <Fun Level 59>
60 ...... Fun Level 60 ...................................... <Fun Level 60>
The Fun Levels are meant primarily for beginners and younger
players. On these levels, this computer is much more “human” than
most other chess computers—it gives everyone a chance to win, in a
world where chess machines are typically relentless and often quite
difficult to beat. Although the general consensus seems to be that
computers never make mistakes, on some of these levels, this
computer actually does!
Handicaps are built into these levels, demonstrating common
mistakes made by beginners. You may see the computer deliberately
ignore the material worth of pieces, and ignore key concepts such as
pawn structure, centrality, mobility, and King safety. It may overlook or
walk into mates, develop its Queen too early, or make impulsive
captures and checks. Chess books often advise of basic rules, yet
players see their opponents breaking the rules and getting away with
it. The Fun Levels provide a way to practice punishment of these
17
ENGLISH
increase/decrease the levels by ten. Note that pressing and holding
down ˘ or ¯ will automatically increase/decrease the levels one at a
time, until you stop pressing the key. When your desired level is
displayed, press ENTER to enter that level selection into the computer. The display will confirm with Level changed, and you’ll go
back to the Main Menu. Press MENU to return to game play.
If you enter Level Mode to verify the level, but you don’t actually
want to change levels, press CLEAR to go back to the Main Menu.
Once you exit the Main Menu with MENU, you’ll return to your game
without changing the level or clock settings.
Please also note the following regarding level selection:
• The level can be changed whenever it’s your turn to move.
• Changing the level always resets the chess clocks.
• If you change levels while the computer is thinking, the computer
will abort its search and reset the clock.
typical mistakes, enabling the beginner to strengthen his game
against the human opponents he’s likely to face! On some of the
weaker Fun Levels, the computer will not only leave pieces unguarded, but it might actually try to lose material. As the levels get
higher, they give away material less consistently. They progressively
start to consider the material worth of pieces more and more, and
eventually only occasionally give pieces away. On the upper Fun
Levels, the computer won’t actually give away material, but it will play
more like a beginner who has learned the basics of the game. You
might still see it make errors such as opening itself up to threats of
check or checkmate. Why not explore all the Fun Levels—and try to
learn from the computer’s mistakes!
COMPETITION LEVELS
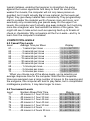
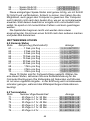
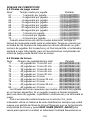
5.2 Casual Play Levels
Level
Average Time per Move
Display
61 ................ 1 second per move ....................... <00:01/move>
62 ................ 2 seconds per move ..................... <00:02/move>
63 ................ 5 seconds per move ..................... <00:05/move>
64 .............. 10 seconds per move ..................... <00:10/move>
65 .............. 15 seconds per move ..................... <00:15/move>
66 .............. 30 seconds per move ..................... <00:30/move>
67 .............. 45 seconds per move ..................... <00:45/move>
68 ................ 1 minute per move ........................ <01:00/move>
69 ................ 2 minutes per move ...................... <02:00/move>
70 ................ 3 minutes per move ...................... <03:00/move>
When you choose one of the above levels, you’re selecting an
average response time for the computer. Note that the response
times are averaged over a large number of moves. In the opening and
the endgame, the computer will tend to play faster, but in complicated
middlegame positions, it may take longer to move.
5.3 Tournament Levels
Level
Number Moves/Total Time
71 ............ 40 moves in 1 hour 20 min. ............ <
72 ............ 40 moves in 1 hour 30 min. ............ <
73 ............ 35 moves in 1 hour 45 min. ............ <
74 ............ 40 moves in 1 hour 45 min. ............ <
75 ............ 35 moves in 1 hour 30 min. ............ <
76 ............ 40 moves in 2 hours ....................... <
77 ............ 45 moves in 2 hours 30 min. ........... <
18
40
40
35
40
35
40
45
Display
in 1:20
in 1:30
in 1:45
in 1:45
in 1:30
in 2:00
in 2:30
>
>
>
>
>
>
>
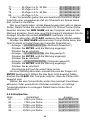
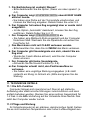
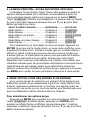
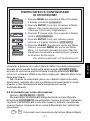
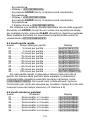
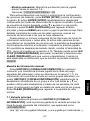
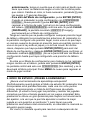
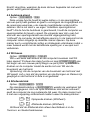
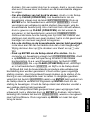
1. Press MENU to enter the Main Menu. The display
will show ¿OPTION.
2. Press ¯ one time, and the display will show
¿LEVEL.
3. Press ENTER to enter Level Mode, and the
current level is displayed. Refer to Section 5, if
necessary, to identify the current level.
>`
<`
4. Let’s find Speed Chess Level 81. Press ˘ or ¯
to increase or decrease the levels by one; press
> or < to increase or decrease the levels by ten.
Watch the display for < 5 min/game >.
5. When you see < 5 min/game >, press
ENTER. Then, press MENU to exit Menu Mode—
and you’re ready to try out your new level!
For more details, see Section 5.
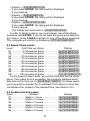
78 ............ 50 moves in 2 hours. ...................... < 50 in 2:00 >
79 ............ 40 moves in 2 hours 30 min. ........... < 40 in 2:30 >
80 ............ 40 moves in 3 hours ....................... < 40 in 3:00 >
The Tournament Levels require you to make a certain number of
moves within a specific amount of time. If a player exceeds the
allotted time for a given number of moves, the display will indicate
this, and the game is over.
As described previously in Section 2.5, this computer utilizes a
Self-Rating system whenever you play Tournament Level games!
After a Tournament game has ended and you press NEW GAME
twice to reset the unit, the computer will briefly display your rating
before going on to the new game display. If you miss the rating
display, you can press HINT/INFO five times to see the rating again at
any time. To clear the display, press CLEAR.
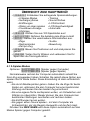
If you reset the computer for a new game during a Tournament
game, before the game has actually ended, the computer will allow
you to dictate the outcome, as follows:
19
ENGLISH
CHANGING THE LEVEL: IT’S EASY!
• Display = Rate as draw?.
If you press ENTER, the rating will be displayed.
If you press ˘:
• Display = Rate as win?.
If you press ENTER, the rating will be displayed.
If you press ˘:
• Display = Machine wins?.
If you press ENTER, the rating will be displayed.
If you press ˘:
The display will cycle back to Rate as draw?.
In order to obtain a rating, you must answer one of the above
questions with ENTER! If you do not want the game to be rated for
any reason, press CLEAR in answer to any of the above questions.
The computer will confirm by displaying Game not rated.
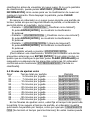
5.4 Speed Chess Levels
Level
Total Time per Game
Display
81 .............. 5 minutes per game ................... < 5 min/game>
82 .............. 7 minutes per game ................... < 7 min/game>
83 .............. 10 minutes per game ................... <10 min/game>
84 .............. 15 minutes per game ................... <15 min/game>
85 .............. 20 minutes per game ................... <20 min/game>
86 .............. 30 minutes per game ................... <30 min/game>
87 .............. 45 minutes per game ................... <45 min/game>
88 .............. 60 minutes per game ................... <60 min/game>
89 .............. 90 minutes per game ................... <90 min/game>
90 ............ 100 minutes per game ................... <100 min/game>
On the Speed Chess Levels, you set the total time for the whole
game. If the game time is exceeded, the computer displays which
side has lost on time, as in White time out. For these levels,
you may want to activate the Countdown Clock option to show the
countdown time instead of the elapsed time (see Section 4.5).
5.5 Problem Solving Levels
Level
Problem
91 .................... Mate in 1 move .......................
92 .................... Mate in 2 moves .....................
93 .................... Mate in 3 moves .....................
94 .................... Mate in 4 moves .....................
95 .................... Mate in 5 moves .....................
96 .................... Mate in 6 moves .....................
20
<
<
<
<
<
<
Display
Mate in
Mate in
Mate in
Mate in
Mate in
Mate in
1
2
3
4
5
6
>
>
>
>
>
>
5.6 Tactical Level
Level
Description
Display
99 ............ Tactical Play (no time limit) ............. < Tactical >
On the Tactical Level, the computer’s goal is to find the best tactical
sequence more quickly than it would on a normal playing level. The
computer will search indefinitely until it finds a win of two pawns or
more, or until you stop the search by pressing ENTER. The Tactical
Level is great for experimentation, since it lets the computer concentrate fully on special tactical positions!
5.7 Infinite Level
Level
Description
Display
100 ................ Infinite (no time limit) .................. < Infinite >
On the Infinite Level, the computer searches indefinitely until it
finds a forced mate, or until you stop the search by pressing ENTER.
If the search is halted, the computer makes the move it currently
thinks is best. Try experimenting with this level—set up special board
positions and let the computer analyze them for you! It will think for
hours and even days on end, trying to find the best possible move.
6. TAKEBACK MODE: TAKE BACK MOVES
When you’re playing chess against this computer, nothing is ever
“set in stone”—you can change your mind or decide to play a different
move whenever you’d like! When it’s your turn to move, simply press
MENU to enter the Main Menu, and press ¯ repeatedly until the
display shows ¿TAKEBACK. Press ENTER to enter Takeback Mode,
and you’ll see the last move that was made. To take that move back,
press ¯, and the move will be retracted on the board. The display will
21
ENGLISH
97 .................... Mate in 7 moves ..................... < Mate in 7 >
98 .................... Mate in 8 moves ..................... < Mate in 8 >
Selecting one of these levels activates a special mate finder
program. If you have a position where there may be a mate and you
would like the computer to find it, set the computer on one of the
Problem Solving Levels. Your computer can solve mates in up to eight
moves. Mates in one to five are usually found quite quickly, whereas
solutions taking six to eight moves may take quite some time. If there
is no mate present or the computer cannot find a mate, it will briefly
display No move found!. You may continue to play, if desired, by
switching to another level.
then show the next move to be taken back. You may continue to press
¯ to take back any number of moves, all the way back to the beginning of the game, if desired. If you reach the beginning, the display
will show End takebacks, and you’ll automatically be returned
to the Main Menu. Note that, as long as you don’t go back to the very
start of the game, you can always press ˘ to go forward through the
moves again, if desired. To resume your game at any point with the
current board position, press CLEAR and then MENU.
As a shortcut to entering Takeback Mode, you can also simply
press on the to square of the last move that was made. The display
will briefly show TAKEBACK, and it will then show the last move that
was made. To take the move back, press ¯. As above, repeated
presses of ¯ will take more moves back, if desired. To resume game
play at any point, press CLEAR.
7. INFO MODE: WATCH THE COMPUTER THINK!
Imagine this: You’re playing chess against a friend, and it’s his
move. You’d love to know what move he’s considering and you’d really
like his opinion of the current board position. But, of course, you won’t
ask—because that’s just not done! Well, guess what—when you play
against this chess computer, you can ask anything you want, and
you’ll get all the answers! In fact, you can obtain an incredible amount
of information about the computer’s thought process, and studying
this information can help you learn so much more about the game!
You may access game information at any time via Info Mode. As
described below, you can call up this information manually by pressing HINT/INFO, or you can select Info Mode options to be displayed
automatically, every time the computer is considering its next move.
Automatic Info Displays
Activating any or all of the following Info Mode options causes the
computer to automatically display that information every time it thinks
about its move—you can actually watch the computer “think out loud”!
Important: Info Mode options selected for automatic display
are only activated while the computer is thinking!
Press MENU to enter the Main Menu, and press ¯ repeatedly until
the display shows ¿INFO. Press ENTER to enter Info Mode, and
you’ll see the first of five options, as shown below. Pressing ¯ (or ˘)
repeatedly cycles through these options, as follows:
22
Manual Info Displays
Press HINT/INFO at any time, and the first move of the computer’s
predicted line of play will be shown (as described in Section 7.1).
Game information is divided into several different groups, and pressing HINT/INFO repeatedly cycles from one group to another. The ˘
and ¯ keys can then be used to cycle through the displays within
each group. Note that each of the groups is discussed in detail below.
Press CLEAR to return to the normal clock display.
7.1 Principal Variation
When you first press HINT/INFO, you’ll see the first move of the
23
ENGLISH
• Show Moves: Shows the computer’s predicted line of play, up to
four individual moves. See Section 7.1.
Options: 0 / 1 / 2 / 3 / 4 moves
• Show Nodes: Shows the number of nodes (positions) searched
per second. See Section 7.2.
Options: nodes: off / on
• Show Time per Move: Shows the time used so far for the
current move. See Section 7.3.
Options: time/move: off / on
• Show Progress: Shows the computer’s search depth and the
move currently being considered. See Section 7.4.
Options: progress: off / on
• Show Evaluation: Shows the score for the current position. See
Section 7.2.
Options: evaluation: off / on
To turn an option on/off or to select option settings (if any), press
ENTER when the option is displayed. Pressing ENTER repeatedly will
cycle through all choices for the displayed option. When your desired
choice is displayed, either press ¯ or ˘ to go on to a different option,
or press CLEAR to go back to the Main Menu, and then MENU to
return to normal game play. For full details on each of these options,
see the referenced section numbers.
You may turn on any or all of the above Info Mode Options. If you
activate more options than will fit in the display at one time, the
display will scroll continuously while the computer considers its next
move. If the display is scrolling too quickly, change the LCD Speed,
as noted in Section 4.10. You can also press GO/STOP to pause the
display, and then press CLEAR to resume the scrolling. Whenever
requested information is not available, the display will show --x--.
principal variation (the computer’s predicted line of play), displayed as
in Ply1: b1-c3. A “ply” is an individual move, or a move for either
side, and the computer’s search depth is described in terms of the
number of ply it looks ahead. On a two-ply search, for example, the
computer will look ahead two individual moves (one move for Black
and one for White). Note that this first ply display can also be used as
a hint, since this is the move the computer is expecting you to make.
If you check this display while the computer is thinking, you’ll see
the move the computer is currently considering. If you check it during
your turn, you’ll see the move the computer is expecting you to make
next. In either case, pressing ˘ repeatedly cycles through the rest of
the moves in the predicted line of play, up to four ply:
• Predicted line of play: Move 1
• Predicted line of play: Move 2
• Predicted line of play: Move 3
• Predicted line of play: Move 4
7.2 Search Information
After pressing HINT/INFO to access Info Mode, press it again to
see information about the computer’s search. The initial display will
show the current score; pressing ˘ repeatedly cycles through the rest
of the information:
• The current score: A numerical evaluation of the current position,
based on a pawn being worth 1.0 points; a positive number
indicates that White is ahead. Example: If White is winning by
two pawns, the display will show Score: +2.0. Note that the
score is not valid on the Problem Solving Levels.
• Two-part display: (a) The current search depth, or the number of
individual moves the computer is looking ahead. For example: If
the computer is looking ahead 439 individual moves, you’ll see
d:4 39, with the d: standing for depth. (b) The move being
considered (if the computer is currently thinking).
• Two-part display: (a) The time used so far for the current move.
(b) The number of nodes, or positions, being searched per
second (if the computer is currently thinking).
7.3 Chess Clock Information
After pressing HINT/INFO to access Info Mode, press it two more
times to see chess clock information. The display will show the total
elapsed time for both sides. Notice that the chess clock symbol in the
middle portrays the current side to move and the type of clock in use.
24
PRINCIPAL VARIATION INFORMATION:
•
•
•
•
Predicted line of play: Move 1
Predicted line of play: Move 2
Predicted line of play: Move 3
Predicted line of play: Move 4
SEARCH INFORMATION:
• Position evaluation (score)
• Search depth; and
Move currently being considered
(if computer is thinking)
• Elapsed time for current move; and
Number of nodes searched per second
(if computer is thinking)
CHESS CLOCK INFORMATION:
• Elapsed time for both sides
• Remaining time for both sides*
*Speed Chess/Tournament Levels only
MOVE COUNT INFORMATION:
• Current move number + last move made
• Backwards and forwards through moves
of current game
RATING INFORMATION:
• ELO rating (after a Tournament Level
game has been played)
25
ENGLISH
AN OUTLINE OF INFO MODE
Pressing ˘ will cycle through two displays, as shown below:
• Total elapsed time for White/Black (Countup Clock)
White to move [, Black to move ].
• Total remaining time for White/Black (Countdown Clock: Problem Solving/Speed Chess Levels only)
White to move {, Black to move }.
If the Countdown Clock is not currently activated, the second
display will simply show a blank clock (--:--{--:--).
The clocks will stop for various reasons during a game, such as if
you take back a move, check level settings, select options, set up a
position, or turn the computer off. The times are retained in memory,
however, and the clocks resume as soon as play is continued. Whenever you change playing levels or reset the computer for a new game,
the clocks are always set back to zero.
7.4 Move Count/Game Moves
After pressing HINT/INFO to access Info Mode, press it three more
times to see the current move number and the last move made. You
can then press ¯ to cycle back through the moves of your game, if
desired, or press ˘ to go forward again at any point. This gives you
an opportunity to go back and write down the moves of a game that
turns out to be unexpectedly great!
• Current move number and last move made.
• Moves of the current game.
7.5 Rating Display
After pressing HINT/INFO to access Info Mode, press it four more
times to see your current rating. Note that the ratings are based on
Tournament Level play, as described in Section 5.3.
8. SETUP MODE: CHANGE THE BOARD!
Setup Mode allows you to set up special board positions to play
from, or problems you would like the computer to solve!
Caution: All moves in your current game will be erased if you
make changes to the board position during a game.
You may change or set up a board position whenever it’s your turn
to move. Press MENU, and press ¯ repeatedly until the display
shows ¿SETUP. Press ENTER to enter Setup Mode, and you’ll see a
display showing the color and piece symbols („ıKQRBNP).
26
27
ENGLISH
• To remove a piece from the board, simply press on the piece
and it will disappear from the board.
• To move a piece from one square to another, press on the
piece, causing it to disappear. Then, press on the new square,
and the piece will appear in that location.
• To add a piece to the board, first press directly on the displayed
color and piece symbol for the piece you want to add, and then
press the square where you’d like to add the piece. To add
another piece of the same type and color, simply press down on
another square. To add a different piece, press another piece
and/or color symbol, and follow the same steps as above.
• To clear the board, press CLEAR while in Setup Mode. The
display will ask for confirmation with Clear board?. Press
ENTER, and the display will show Cleared. You can then add
any number of pieces, as described above. If you decide you
don’t want to clear the board after all, simply press CLEAR again
to cancel, and you’ll see Not cleared. Note that this feature
can be handy for setting up positions with only a few pieces,
where it would be much easier to start out with an empty board!
• Once you have changed the position as described above,
note that the color for the side to move is determined by the color
of the last piece you set up. Change the color, if necessary, by
pressing either ı for Black or „ for White.
• To exit Setup Mode, press ENTER. When the computer asks for
confirmation with New position?, press ENTER to return
to normal play with your new board setup. New position!
confirms this. If you press CLEAR, the display will show Resume, and you’ll remain in Setup Mode.
Note that any legal board position can be set up using the above
procedures. The computer will not permit you to set up an illegal
position, such as one where there are more than the prescribed
number of pieces for a normal game, or one where a King is in check
and is not to move. In such cases, after you press ENTER to exit
Setup Mode, and then ENTER to confirm, the computer will display
Illegal. You will not be allowed to exit Setup Mode until you have
set up a legal board position!
If you enter Setup Mode, but you haven’t yet made any changes to
the board, you can exit by pressing ENTER. The display will confirm
with unchanged, and you’ll be returned to the Main Menu. Press
MENU again to return to normal game play.
9. STUDY MODE: TRY TESTING YOURSELF!
Looking for a terrific learning tool? You’ll definitely want to try out
Study Mode! Eight famous games are built right into your computer,
each containing eight critical points—for a total of 64 different Study
Positions. It’s up to you to play through the games and make the
correct moves that were played for the winning side in the original
games! This feature offers great potential for improving your chess
knowledge, while allowing you to learn about making the best move in
a particular position. And, to make this feature even more exciting, the
computer will actually score your performance as you go.
By the way, if you need help solving any of the Study Positions,
simply refer to the Appendix for a complete listing of all the Study
Mode Games. Remember, though, that these games are included as
a reference tool—and you’ll only be cheating yourself if you look at
the solutions before trying to solve the Study Positions on your own!
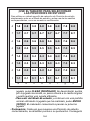
Selecting Study Positions
Tip: You can also select the Study Positions by pressing certain
board squares, as described later on in this section!
Press MENU to enter the Main Menu, and press ¯ (or ˘) repeatedly until the display shows ¿STUDY. Press ENTER to enter Study
Mode, and you’ll see the first Study Position, < Study1-1 >. To
change the Study Position, press ˘ or ¯ to increase/decrease the
studies by one, or use your stylus to press > or < to increase/decrease the studies by eight. When your desired Study Position is
displayed, press ENTER, and the display will confirm with Start
Study?. Pressing ENTER at this point will start the Study Game, as
described below, or pressing CLEAR will cancel and return you to the
main Study Mode display.
After pressing ENTER, the computer will automatically start
making the moves of the selected Study Game. As soon as the first
Study Position is reached, the display will briefly show Your Move,
and the clock will start. Time for you to guess the move that was
played in that position in the original game! Here’s how it works:
• There is only one “correct” move per Study Position.
• Once the Study Position has been reached, the displayed color
symbol indicates which side is to move.
• If you make the correct move, Well Done will be displayed.
The computer will then make the next moves in the game,
28
8
1-8
2-8
3-8
4-8
5-8
6-8
7-8
8-8
7
1-7
2-7
3-7
4-7
5-7
6-7
7-7
8-7
6
1-6
2-6
3-6
4-6
5-6
6-6
7-6
8-6
5
1-5
2-5
3-5
4-5
5-5
6-5
7-5
8-5
4
1-4
2-4
3-4
4-4
5-4
6-4
7-4
8-4
3
1-3
2-3
3-3
4-3
5-3
6-3
7-3
8-3
2
1-2
2-2
3-2
4-2
5-2
6-2
7-2
8-2
1
1-1
2-1
3-1
4-1
5-1
6-1
7-1
8-1
a
b
c
d
e
f
g
h
eventually stopping at the next Study Position to be solved.
• If you make the wrong move, you’ll see Wrong Move
displayed briefly, and then Quit Study?.
• To remain in Study Mode and try another move, press
CLEAR. Points will be deducted for the incorrect guess, your
piece will go back to its original square, and you can make a
different move.
• To exit Study Mode and continue a normal game using the
move you played, press ENTER. The computer will start
thinking about its next move.
29
ENGLISH
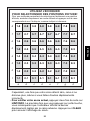
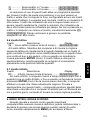
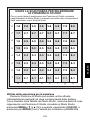
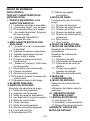
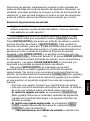
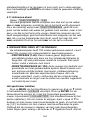
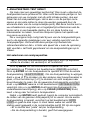
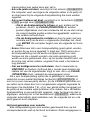
USE THE BOARD TO SELECT STUDY POSITIONS!
For an easy method of selecting a Study Position, simply enter Study Mode
and press one of the corresponding board squares, as shown below.
• Scoring: Each time you solve a Study Position correctly, points
are added to your score. You’ll get full points if you solve the
Study Position on the first try. For each incorrect move you make
before finding the correct move, your score will be cut in half. If
you reach zero points at any time, however, your score will
remain there, no matter how many more moves you try.
• To check your current score, press HINT/INFO twice. Note that
the first press will show the last move that was made for the
other side. Pressing CLEAR will cancel the score display.
If you solve a Study Game ending in checkmate, Checkmate!
will remain in the display after a series of congratulatory messages.
At this point, you can (a) reset for a new game, (b) use Info Mode to
document the moves by tracing back through them (as described in
Section 7.4), or (c) take back any of the moves and resume a normal
game from any position. If you solve the last Study Position in a
game, but the game has not actually ended, the display will show
End Game, and the computer will automatically start thinking about
the next move, allowing you to continue the game normally.
Using the Board for Selection
Each Study Position can also be activated individually by pressing
the corresponding board square. As shown in the Study Mode Chart,
each of the 64 squares represents one Study Position. Enter Study
Mode by pressing MENU and ¯ (or ˘) until ¿STUDY is displayed,
and then pressing ENTER. Next, refer to the chart and press one of
the board squares to select that Study Position. Press ENTER, and
the display will confirm with Start Study?. Press ENTER again,
and the Study Game will start, as described previously.
10. NEED HELP? LOOK HERE!
For troubleshooting purposes, we’ve compiled the following list of
situations you might encounter, along with some possible solutions.
a. The computer doesn’t react, behaves erratically, or “freezes”
during a game.
• Reinsert the batteries, or replace them with fresh alkalines.
• Static discharge may have caused a lock-up. Press into the
hole marked ACL to reset the unit (see Section 11.1).
b. The display is dim and/or difficult to read.
• Replace the batteries with fresh alkalines.
• Select a different LCD Contrast Option (see Section 4.9).
30
31
ENGLISH
c. I’ve activated some automatic Info Displays to watch the
computer think, but the display is scrolling too quickly.
• Select a different LCD Speed option (see Section 4.10).
• Press GO/STOP to pause the scrolling display at any time;
press CLEAR to resume scrolling.
d. The computer won’t make a move.
• The unit only responds automatically if Two Player Mode is set
to player: P-C for Player vs. Computer (see Section 4.1).
• You might be on a level where the computer thinks for a long
time. You can force it to move, if desired, by pressing ENTER.
e. The computer won’t accept my move.
• You’re attempting to make an illegal move. Check the rules.
• Is your King in check? Will your move put your King into check?
Are you castling incorrectly? Review the position.
• Is it your turn? If the color symbol is flashing, the computer is
thinking. Press ENTER to interrupt, if desired.
f. The board notation is reversed when I make moves. Why?
• You have the white: top option activated. Go into Option
Mode and change to black: top (see Section 4.4).
g. I just reset for a new game, but the computer is showing
Rate as draw? instead of resetting itself.
• You’ve interrupted a Tournament Level game, and you need to
tell the computer how you want the game to be rated. For
details, see Section 5.3.
h. The computer has displayed its move, but its piece is flashing and the move hasn’t been made on the board.
• When the Automove Option is turned off, you have to move the
computer’s pieces on the board. To turn Automove back on,
refer to Section 4.11.
i. The computer is displaying No Move Found! instead of
making a move.
• You’re on a Problem Solving Level and the computer hasn’t
found a mate. If you’re not trying to solve a mate problem,
switch to a normal playing level (see Section 5).
j. I’m trying to exit the Main Menu by pressing CLEAR, but I’m
getting an error beep.
• You’re pressing the wrong key! The only way to exit the Main
Menu is by pressing MENU.
k. The computer is beeping intermittently even though it’s my
turn to move.
• When Coach Mode is activated, the computer will sound
reminder beeps during your turn.
l. The computer isn’t beeping when it moves.
• Go into Option Mode to turn the sound on (see Section 4.8).
m.The computer won’t allow me to exit Setup Mode.
• You’ve set up an illegal position (e.g., a King may be in check,
there may be too many pawns on the board, etc.). Change the
board to set up a valid position (see Section 8).
11. TECHNICAL DETAILS
11.1 The ACL Function
Computers sometimes “lock up” due to static discharge or other
electrical disturbances. If this should happen, use a pin or another
sharp object to press into the hole marked ACL in the base of the unit
for at least one second. This resets the computer.
11.2 Care and Maintenance
Your computer is a precision electronic device, and should not be
subjected to rough handling or exposed to extreme temperatures or
moisture. Do not use chemical agents or liquids to clean the unit, as
they may damage the plastic. Be sure to remove the batteries before
cleaning the unit.
Weak batteries should be replaced promptly, since they can leak
and damage the computer. Please also note the following, regarding
the use of batteries. Caution: Use only alkaline or zinc carbon batteries. Do not mix different types of batteries or new and used batteries.
Do not recharge non-rechargeable batteries. Use only recommended
batteries or equivalent. Be sure to observe the correct polarity when
inserting the batteries. Worn out batteries should be removed from
the unit promptly. Do not short circuit the supply terminals.
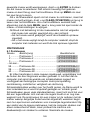
11.3 Technical Specifications
Keys:
8
Chessboard: 9x8 contact membrane (touch panel)
LCD Display: 11-character dot matrix, 68 x 79 mm
Batteries:
3 x AAA/AM4/R03
Dimensions: 131 x 83 x 22 mm
Weight:
220 grams
Please retain this information for future reference.
Saitek reserves the right to make technical changes without notice in the interest
of progress.
32
1. Warranty period is 2 years from date of purchase with proof of
purchase submitted.
2. Operating instructions must be followed.
3. Product must not have been damaged as a result of defacement,
misuse, abuse, neglect, accident, destruction or alteration of the
serial number, improper electrical voltages or currents, repair,
alteration or maintenance by any person or party other than our own
service facility or an authorized service center, use or installation of nonSaitek replacement parts in the product or the modification of this product
in any way, or the incorporation of this product into any other products, or
damage to the product caused by accident, fire, floods, lightning, or acts of God, or any use
violative of instructions furnished by Saitek plc.
4. Obligations of Saitek shall be limited to repair or replacement with the same or similar unit,
at our option. To obtain repairs under this warranty, present the product and proof of
purchase (e.g., bill or invoice) to the authorized Saitek Technical Support Center (listed on
the separate sheet packaged with this product) transportation charges prepaid. Any requirements that conflict with any state or Federal laws, rules and/or obligations shall not be
enforceable in that particular territory and Saitek will adhere to those laws, rules, and/or
obligations.
5. When returning the product for repair, please pack it very carefully, preferably using the
original packaging materials. Please also include an explanatory note.
6. IMPORTANT: To save yourself unnecessary cost and inconvenience, please check carefully
that you have read and followed the instructions in this manual.
7. This warranty is in Lieu of all other expressed warranties, obligations or liabilities. ANY
IMPLIED WARRANTIES, OBLIGATIONS, OR LIABILITIES, INCLUDING BUT NOT LIMITED
TO THE IMPLIED WARRANTIES OF MERCHANTABILITY AND FITNESS FOR A PARTICULAR PURPOSE, SHALL BE LIMITED IN DURATION TO THE DURATION OF THIS WRITTEN LIMITED WARRANTY. Some states do not allow limitations on how long an implied
warranty lasts, so the above limitations may not apply to you. IN NO EVENT SHALL WE BE
LIABLE FOR ANY SPECIAL OR CONSEQUENTIAL DAMAGES FOR BREACH OF THIS OR
ANY OTHER WARRANTY, EXPRESS OR IMPLIED, WHATSOEVER Some states do not
allow the exclusion or limitation of special, incidental or consequential damages, so the
above limitation may not apply to you. This warranty gives you specific legal rights, and you
may also have other rights which vary from state to state.
Information for Customers in the United States:
FCC Compliance and Advisory Statement
Warning: Changes or modifications to this unit not expressly approved by the party responsible for
compliance could void the user’s authority to operate the equipment.
This device complies with Part 15 of the FCC Rules. Operation is subject to the following two conditions:
1. This device may not cause harmful interference, and
2. This device must accept any interference received, including interference that may cause undesired
operation
NOTE: This equipment has been tested and found to comply with the limits for a Class B digital device,
pursuant to Part 15 of the FCC Rules. These limits are designed to provide reasonable protection against
harmful interference in a residential installation. This equipment generates, uses and can radiate radio
frequency energy and, if not installed and used in accordance with the instructions, may cause harmful
interference to radio communications. However, there is no guarantee that interference will not occur in a
particular installation. If this equipment does cause harmful interference to radio or television reception,
which can be determined by turning the equipment off and on, the user is encouraged to try to correct the
interference by one or more of the following measures:
• Reorient or relocate the receiving antenna.
• Increase the separation between the equipment and receiver.
• Connect the equipment into an outlet on a circuit different from that to which the receiver is connected.
• Consult the dealer or an experienced radio/TV technician for help.
Saitek Industries, 2295 Jefferson Street, Torrance, CA 90501, USA
33
ENGLISH
CONDITIONS OF WARRANTY
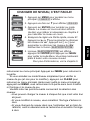
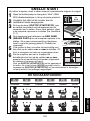
SCHNELLSTART
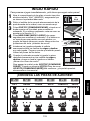
Folgen Sie diesen Schritten, um sofort eine Partie zu starten!
Sie 3 AAA Batterien in das Gerät und
1 Legen
beachten Sie dabei die eingezeichnete
3x
AAA
(AM4/R03)
Polarität.
Nehmen Sie den Stylus zur Hand.
2
Sie GO/STOP. Schaltet sich das
3 Drücken
Gerät nicht an folgen Sie den Schritten in
Abschnitt 11.1.
Sie 2mal kurz hintereinander NEW
4 Drücken
GAME.
Sie die Züge mit Hilfe des Stylus ein –
5 Geben
einfach kurz auf das Ausgangs- und das
x2
Zielfeld drücken und die Eingabe ist
ausgeführt.
der Computer seinen Zug an, wird seine
6 Zeigt
gewünschte Figur kurz blinken und der Zug
wird automatisch ausgeführt.
Drücken Sie GO/STOP, um das Gerät
ıPd7-d5````
auszuschalten. Wird Stop? angezeigt,
drücken Sie GO/STOP erneut – das Gerät ist
abgeschaltet und unterbrochene Partien werden gespeichert!
LERNEN SIE DIE SCHACHFIGUREN KENNEN!
K`
KÖNIG
Q`
DAME
R`
B`
TURM
N`
P`
LÄUFER SPRINGER
BAUER
Weiss
Schwarz
34
SCHNELLSTART
TASTEN UND FUNKTIONEN
EINLEITUNG
1. DIE GRUNDLAGEN
1.1 Batterien einlegen, Anschalten
1.2 Spielbereit? So funktioniert es!
1.3 Computerzüge ausführen
1.4 Partie zu Ende? Starten Sie neu!
1.5 Zu einfach/schwierig? Ändern Sie
die Spielstufe!
2. WEITERE FUNKTIONEN
2.1 Wer ist am Zug? Prüfen Sie die
Anzeige!
2.2 Schlagzüge und Sonderregeln
2.3 Ungültige Züge
2.4 Schach, Matt und Remis
2.5 Lassen Sie Ihre Spielstärke
bewerten!
2.6 Sie benötigen Hilfe? Fragen Sie
einfach!
2.7 Die Computersuche unterbrechen
2.8 Seitenwechsel mit dem Computer
2.9 Eröffunungsbücher
2.10 Die gegnerische Rechenzeit
nutzen
2.11 Ausschalten/Spielstandspeicher
3. DAS HAUPTMENÜ
4. SPIELOPTIONEN
Eine Option auswählen
4.1 2-Spieler-Modus
4.2 Suchalgorythmus
4.3 Eröffnungen
4.4 Weiss von oben spielen
4.5 Countdown-Anzeige
4.6 Uhrticken
4.7 Training
4.8 Sound An/Aus
35
4.9 LCD-Kontrast
4.10 LCD-Geschwindigkeit
4.11 Automatik
5. SPIELSTUFEN
Eine Spielstufe einstellen
5.1 Spass-Stufen
5.2 Normale Spielstufen
5.3 Turnierstufen
5.4 Schnellpartien
5.5 Mattsuch-Stufen
5.6 Taktische Stufen
5.7 Analyse-Stufe
6. RÜCKNAHME VON ZÜGEN
7. SPIELINFORMATIONEN
Automatische Anzeigen
Manuell abrufbare Anzeigen
7.1 Grund-Varianten
7.2 Such-Informationen
7.3 Schachuhr-Informationen
7.4 Zugzähler/Spielzüge
7.5 Bewertung
8. POSITIONEN ÄNDERN
ODER AUFBAUEN
9. TRAINING
Lernen anhand von
gespeicherten Stellungen
Stellungen direkt aufrufen
10. SIE BENÖTIGEN HILFE?
SCHAUEN SIE HIER NACH!
11. TECHNISCHE DETAILS
11.1 Die ACL-Funktion
11.2 Pflege und Wartung
11.3 Technische Spezifikation
ANHANG:
GESPEICHERTE PARTIEN
DEUTSCH
INHALTSANGABE
TASTEN UND FUNKTIONEN
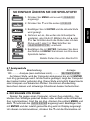
1.TOUCH SCREEN SCHACHBRETT: drücken Sie einfach mit einem
Stylus oder manuell auf ein Feld, um Eingaben vorzunehmen.
2.INFORMATIONSANZEIGE: Sie sehen Züge, Spielinformationen und
Schachuhren. Darüber hinaus bietet das LCD Hilfe bei der Einstellung
und Nutzung von Optionen, Spielstufen, Trainingsmodus etc.
3.STYLUS: hiermit führen Sie Züge
aus – drücken Sie einfach mit
Hilfe dieses Stiftes auf die Felder.
4.GO/STOP: hiermit schalten Sie
das Gerät an und aus.
5.STYLUS AUFBEWAHRUNG:
schieben Sie den Stylus nach
Gebrauch einfach in das Gerät.
6.LCD-Abdeckung: schützen Sie
den Bildschirm und decken Sie
ihn nach Nutzung ab.
7.ACL (Reset): befindet sich auf
der Unterseite des Geräts. Wird
gebraucht, um eventuelle
statische Aufladungen vom Gerät
zu nehmen.
8.HINT/INFO: rufen Sie Hinweise
über diese Taste ab! Oder blättern
Sie durch angezeigte
Informationen.
9.CLEAR: hiermit verlassen Sie
Modi zum Einstellen von
Optionen, Informationen,
Spielstufen etc. Wir gehen in der
Anleitung noch genauer auf diese
Taste ein.
10.BATTERIEFACH: befindet sich
auf der Unterseite. Bitte legen Sie
3 alkaline AAA Batterien ein.
11.ENTER: hiermit bestätigen Sie
Einstellungen oder geben Züge
ein.
12.¯/˘ TASTEN: blättern Sie durch
Optionen, Spielstufen,
Informationen oder nutzen Sie
diese Tasten zur Rücknahme von
Zügen.
13.MENU: hiermit gelangen Sie ins Menü bzw. verlassen dieses durch
nochmaliges Drücken.
14.NEW GAME: ACHTUNG! Bitte dieses Taste kurz hintereinander 2mal
drücken, um ein neues Spiel zu starten.
36
1. DIE GRUNDLAGEN
1.1 Batterien einlegen, Anschalten
Ihr neuer Schachcomputer benötigt 3 AAA (AM4/R03) Batterien.
Legen Sie diese gemäss der eingezeichneten Polarität ein. Wir
empfehlen neue, alkaline Batterien für eine längere Lebensdauer.
Schalten Sie das Gerät an, indem Sie GO/STOP drücken. Reagiert
der Computer nicht, setzen Sie Ihn über die ACL-Funktion zurück.
Drücken Sie mit einer Büroklammer für 3 Sekunden in die Vertiefung
ACL. Dies nimmt die Aufladung vom Computer.
Um Energie zu sparen, schaltet sich das Gerät automatisch ab,
wenn Sie 20 Minuten keine Eingabe machen
1.2 Spielbereit? So funktioniert es!
Folgen Sie diesen Schritten, um zu starten:
a. Drücken Sie GO/STOP, um den Computer anzuschalten.
b. Drücken Sie 2mal NEW GAME, um eine neue Partie zu starten.
Drücken Sie nicht zu lange auf die Taste, sondern nur kurze Zeit.
Für eine neue Partie zeigt der Computer New Game und dann
das Symbol für Weiss („) sowie die Schachuhr mit 00:00:00
an.
c. Um einen Zug einzugeben, drücken Sie den Stylus auf das
Ausgangsfeld. Der Computer registriert, welche Figur Sie ziehen
möchten. Sie können auch mit dem Finger auf ein Feld drücken.
d. Dann drücken Sie mit dem Stylus (oder Finger) auf das Zielfeld.
Sie hören einen Signalton als Bestätigung. Nun ist deer Computer am Zug. Sie werden bemerken, dass der Computer
manchmal sofort antwortet anstatt zu rechnen. Dies ist der Fall,
wenn er aus der Eröffnungsbibliothek spielt (s. Abschnitt 2.9).
37
DEUTSCH
EINLEITUNG
Herzlichen Glückwunsch zum Erwerb Ihres Schachcomputers!
Touch Screen Travel Chess wird Sie durch sein schickes Design mit
direkter, schneller Handhabung und einem starken Schachprogramm
nicht nur unterhalten, sondern auch Ihr Schachspiel verbessern und
jederzeit herausfordern. Sie erhalten Tipps in schwierigen
Situationen, können Analysen abfragen oder Ihr Eröffnungs-Spiel
verbessern! Sie werden Schach neu erleben! Wir wünschen Ihnen
viel Spass!
1.3 Computerzüge ausführen
Ist der Computer am Zug, wird Thinking... angezeigt.
Rechnet der Computer, blinkt das Symbol für Schwarz (ı) im Display
und die Zeit verstreicht. Ist die Rechnung beendet, hören Sie einen
Ton. Sie sehen den Zug im LCD, z.B. ıPe7-e5 und die Figur wird
blinken. Wurde der Zug ausgeführt, sind Sie wieder an der Reihe.
1.4 Partie zu Ende? Starten Sie neu!
Bitte beachten Sie, dass mit NEW GAME eine aktuelle Partie
gelöscht wird!
Sobald Sie eine Partie beendet haben, drücken Sie einfach 2mal
kurz hintereinander NEW GAME, um neu zu starten. Der Computer
wird kurz New Game anzeigen. Die gewählte Spielstufe bleibt aktiv.
Spielten Sie eine Turnierpartie, wird Ihre Spielstärkenbewertung in
angezeigt. Brechen Sie diese Turnierpartie ab, erscheint eine Reihe
von Fragen bezüglich Ihrer Bewertung. Details finden Sie in Abschnitt
2.5.
1.5 Zu einfach/schwierig? Ändern Sie die Spielstufe!
Wird der Computer zum ersten Mal angeschaltet, ist automatisch
Spielstufe 63 eingestellt. Der Computer hat ca. 5 Sekunden
Rechenzeit pro Zug. Sie können jedoch aus 100 Spielstufen
auswählen! In Abschnitt 5 finden Sie alle Details hierfür.
2. WEITERE FUNKTIONEN
2.1 Wer ist am Zug? Prüfen Sie die Anzeige!
Sobald der Computer für Schwarz rechnet, blinkt ein schwarzes
Quadrat in der Anzeige (ı). Wurde der Computerzug ausgeführt,
zeigt die Anzeige ein weisses Quadrat („). Das heisst, Sie sind am
Zug mit den weissen Figuren.
2.2 Schlagzüge und Sonderregeln
Bitte beachten Sie folgende Besonderheiten:
Schlagzüge: werden mit x angezeigt, z.B. ıPa7xb6.
En Passant: Der Computer zeigt bei diesem Zug solange EP im
Display an, bis Sie auf das Feld des geschlagenen Bauern drücken
und er somit vom Brett genommen ist.
Rochade: Wird der Königszug zuerst gemacht, erkennt der Computer die Rochade automatisch. Nachdem Sie den König auf sein
38
2.3 Ungültige Züge
Ihr Computer wird niemals einen ungültigen Zug akzeptieren!
Versuchen Sie, einen auszuführen, hören Sie einen Signalton und
das Display zeigt das Ausgangsfeld an. Um fortzufahren, stellen Sie
die Figur zurück oder Sie führen einen regelkonformen Zug aus.
Führen Sie den Computerzug nicht korrekt aus, hören Sie wieder den
Signalton. Sie bewegen entweder die falsche Figur oder die richtige
Figur auf ein falsches Feld.
Drücken Sie ein Ausgangsfeld, wünschen jedoch, den Zug nicht zu
machen, können Sie abbrechen, indem Sie wieder auf das gleiche
Feld drücken. Nun können Sie einen völlig anderen Zug eingeben.
Ändern Sie Ihre Meinung nachdem der Zug schon eingegeben ist,
können Sie die Rücknahme aktivieren (s. Abschnitt 6).
2.4 Schach, Matt und Remis
Steht ein König im Schach, zeigt der Computer seinen Zug
zunächst wie gewöhnlich an. Nachdem der Zug gemacht wurde, zeigt
der Computer das Schach mit Check an. Erkennt der Computer
eine zwingende Mattführung, zeigt er dies mit z.B. Mate in 3 an.
Endet eine Partie Schachmatt, wird Ihnen entweder gratuliert oder
etwas Mitgefühl entgegengebracht. Im Display wird kurz Checkmate! gezeigt.
Der Computer erkennt Remis durch Patt, 3-malige Wiederholung
und 50-Züge Regel. Die Anzeige gibt Ihnen den Remis-Grund an.
39
DEUTSCH
Ausgangs- und Zielfeld gedrückt haben, wird Ihr Zug angezeigt, bis
Sie auch den Turmzug ausgeführt haben. Kurze Rochade wird als
O-O, lange als O-O-O angezeigt.
Bauernumwandlung: Wandeln Sie einen Bauern um, drücken Sie
diesen zunächst nur auf sein Ausgangsfeld. Das Display zeigt dann
die verfügbaren Figuren zur Umwandlung an (Q R B N). Um in eine
Dame umzuwandeln, komplettieren Sie einfach Ihren Zug (=drücken
Sie den Bauern auf sein Zielfeld). Um in Springer, Läufer oder Turm
umzuwandeln, drücken Sie kurz auf das entsprechende Symbol und
die Anzeige bestätigt Ihre Wahl kurz, z.B. mit Prom: rook.
Drücken Sie erst dann den Bauern auf sein Zielfeld. Ändern Sie Ihre
Meinung, können Sie den Zug abbrechen, indem Sie einfach
nochmals auf das Ausgangsfeld des Bauern drücken.
Wandelt der Computer um, wird er Ihnen die gewünschte
Umwandlung anzeigen, sobald Sie seinen Bauern auf dessen
Ausgangsfeld gedrückt haben z.B. ıPh2-h1/Q.
2.5 Lassen Sie Ihre Spielstärke bewerten!
Spielen Sie eine Partie in der Turnierstufe, gibt Ihnen der Computer eine Bewertung Ihrer Spielstärke, sobald das Spiel beendet ist.
Was ist eine Bewertung? Es gibt eine offizielle Methode, die Leistung
in Schachpartien zu messen. Die internationale Schachunion - FIDE
(Fédération Internationale des Échecs) - erwähnt manchmal ELOWertungen. Die “United States Chess Federation” (USCF) nutzt ein
ähnliches System. Wertungen sind im Schach 4-stellig. Starke Spieler
haben - logischerweise - hohe Wertungen. Meister rangieren über
2200 Elo oder höher, Internationale Grossmeister liegen bei ca. 2500.
Wenn Sie Ihre Wertung herausfinden wollen, wählen Sie eine
Turnierstufe aus und spielen Sie eine Partie. Der Computer wird Ihre
Leistung bewerten! Informationen finden Sie in Abschnitt 5.3.
2.6 Sie benötigen Hilfe? Fragen Sie einfach!
Ihr Computer verfügt über eine einzigartige Hilfe-Funktion, die
Ihnen jederzeit zur Verfügung steht! Drücken Sie HINT/INFO, um
Tipps abzurufen oder mehr über die Computer-Rechnungen zu
lernen. Ist der Tipp z.B. e4xd5, wird Ply 1: e4xd5 angezeigt.
Akzeptieren Sie den Tipp, führen Sie einfach den Zug aus. Lehnen
Sie ihn ab, drücken Sie einfach CLEAR.
2.7 Die Computersuche unterbrechen
Sie denken, der Computer rechnet zu lange? Sie können ihn
jederzeit unterbrechen! Drücken Sie einfach ENTER während der
Computer nachdenkt. Er wird sofort stoppen und den besten bisher
errechneten Zug spielen. Diese Funktion kann sehr praktisch bei
einigen Stufen sein in denen der Computer lange rechnen darf.
In den Mattsuch-Stufen oder den Taktischen Stufen, erzwingt
ENTER keinen Zug. Statt dessen wird No move found!
angezeigt. Stellen Sie eine andere Spielstufe ein, um fortzufahren.
2.8 Seitenwechsel mit dem Computer
Drücken Sie einfach ENTER wenn Sie am Zug sind. Der Computer
startet sofort seine Berechnungen für Ihre Seite. Wechseln Sie sooft
Sie wünschen!
Sie wollen, daß der Computer den ersten Zug für Weiss am Anfang
der Partie macht? Drücken Sie NEW GAME 2mal kurz hintereinander
und dann ENTER.
Sie wollen dem Computer zuschauen, wie er für beide Seiten
spielt? Drücken Sie ENTER nach jedem Zug - so sehen Sie die
40
2.9 Eröffnungen
Am Anfang einer Partie, zieht der Computer auf vielen Stufen
sofort. Dies ist möglich, weil er die Züge direkt aus einer Bibliothek
holt, sie also nicht mehr berechnen muss. Diese Bibliothek enthält die
wichtigsten Eröffnungen. Ist die aktuelle Stellung in seiner
Eröffnungen, antwortet der Computer automatisch anstatt zu
rechnen! Die Bibliothek ist auf allen Stufen aktiv - Ausnahme ist die
Mattsuch-Stufe.
2.10 Die gegnerische Rechenzeit nutzen
Sie werden bemerken, dass der Computer seine Züge sofort
ausführt, selbst wenn Sie im Mittelspiel angelangt sind. Dies ist der
Fall, wenn er Ihre Denkzeit für seine Berechnungen nutzt. Er
versucht, Ihren wahrscheinlichen Zug zu finden und kalkuliert
daraufhin seine möglichen Antworten. Führen Sie den erwarteten Zug
aus, kann der Computer natürlich dann seine Berechnung nehmen.
Diese Möglichkeit steht dem Computer in den Spass-Stufen nicht zur
Verfügung.
2.11 Ausschalten/Spielstandspeicher
Sie können Ihre Partie jederzeit unterbrechen, indem Sie GO/
STOP drücken. Das Symbol für Pause Stop? wird daraufhin
angezeigt. Drücken Sie GO/STOP erneut, wird das Gerät
ausgeschaltet. Die Partie ist unterbrochen und der Spielstand
gespeichert. Schalten Sie wieder an, können Sie ganz normal
fortsetzen. Pausieren Sie wird die Anzeige angehalten, die
Berechnungen werden jedoch fortgesetzt.
3. DAS HAUPTMENÜ
Ihr Computer bietet viele interessante Einstellungen und
Möglichkeiten, die direkt über das Hauptmenü aufgerufen werden.
Drücken Sie MENU erscheint direkt ¿OPTION im Display. Blättern
Sie mit ¯ und ˘ durch die Optionen. Es stehen folgende zur
Verfügung:
HAUPTMENÜ ............. ANLEITUNG IN ............. ANZEIGE
Optionsmodus ................ Abschnitt 4 .................. ¿OPTION
Spielstufen ...................... Abschnitt 5 .................. ¿LEVEL
Rücknahmefunktion ....... Abschnitt 6 .................. ¿TAKEBACK
41
DEUTSCH
optimale Zugfolge für beide Seiten. Sie können Strategien und
Taktiken studieren und lernen!
Infomodus ....................... Abschnitt 7 .................. ¿INFO
Positionsmodus .............. Abschnitt 8 .................. ¿SETUP
Training ........................... Abschnitt 9 .................. ¿STUDY
Um einen dieser Hauptmenü-Punkte aufzurufen, drücken Sie
ENTER. Sie gelangen dann zu Untermenüs, in denen Sie spezifische
Auswahlen treffen können. Einige Submenüs bieten mehrere
Optionen (z.B. Spielstufen), andere sind nur Einstellungen (z.B.
Positionsmodus).
4. OPTIONSMODUS: BRINGEN SIE ABWECHSLUNG INS SPIEL
Nutzen Sie Spieloptionen, um Varianten zu testen oder
interessante Einstellungen zu wählen, um das Schachspiel aus
mehreren Perspektiven kennenzulernen!
Spieloptionen
Drücken Sie MENU, um das Hauptmenü aufzurufen und das
Display zeigt ¿OPTION an. Bestätigen Sie mit ENTER und Sie
sehen die erste von 11 Optionen. Um auszuwählen, blättern Sie mit
¯ oder ˘. Sie sehen folgende Auswahl:
OPTION ..................... ANLEITUNG IN ...... ANZEIGE
2-Spieler-Modus ........... Abschnitt 4.1 ........ player: P-C
Suchalgorythmus ......... Abschnitt 4.2 ........ search: select
Eröffnungen .................. Abschnitt 4.3 ........ book: on
Weiss von oben spielen Abschnitt 4.4 ........ top: black
Countdown-Anzeige ..... Abschnitt 4.5 ........ clock: up
Uhrticken ...................... Abschnitt 4.6 ........ ticks: off
Training ......................... Abschnitt 4.7 ........ coach: off
Sound An/Aus .............. Abschnitt 4.8 ........ sound: on
LCD-Kontrast ................ Abschnitt 4.9 ........ contrast: 3
LCD-Geschwindigkeit .. Abschnitt 4.10 ...... LCD speed: 2
Automatik ..................... Abschnitt 4.11 ...... automove: on
Um eine angezeigte Option zu aktivieren oder zu deaktivieren,
drücken Sie ENTER. Drücken Sie ENTER mehrmals, blättern Sie
durch die verschiedenen Auswahlen. Um zum nächsten Untermenü
zu gelangen, drücken Sie ¯ oder ˘. Mit CLEAR verlassen Sie das
Menü – die gewählten Einstellungen sind dann aktiv!
Wichtig: aktivieren Sie NEW GAME, werden alle Optionen weiter
aktiv bleiben. Die Ausnahme ist der 2-Spieler-Modus, der vor jeder
neuen Partie eingestellt werden muss!
42
4.1 2-Spieler-Modus
Optionen: player: P-C (Spieler gegen Computer)
player: P-P (Spieler gegen Spieler)
Normalerweise rechnet der Computer automatisch sobald Sie
Ihren Zug eingegeben haben. Schalten Sie jedoch diese Option aus,
spielen Sie für beide Seiten. Diese Einstellung ist dann erforderlich
wenn:
• Sie durch Meisterpartien gehen. Geben Sie die Züge für beide
Seiten ein, aktivieren Sie den Computer bei einer bestimmten
Stellung und lassen Sie den besten Zug errechnen!
• Sie eine eigene Partie nachspielen wollen, um Schwächen und
Stärken zu überprüfen. Wieder können Sie den Computer bei
bestimmten Stellungen zuschalten und rechnen lassen.
• Sie Eröffnungen lernen wollen.
• Sie gegen einen Freund spielen - mit dem Computer als
Schiedsrichter, der die Regeln überwacht und die Zeit misst.
Drücken Sie NEW GAME wird diese Option automatisch auf den
Modus Spieler gegen Computer gesetzt.
43
DEUTSCH
ÜBERSICHT ZUM HAUPTMENÜ!
• ¿OPTION: Entdecken Sie aufregende Spieleinstellungen.
• 2-Spieler-Modus
• Training
• Suchalgorythmus
• Sound An/Aus
• Eröffnungen
• LCD-Kontrast
• Weiss von oben spielen • LCD-Geschwindigkeit
• Countdown-Anzeige
• Automatik
• Uhrticken
• ¿LEVEL: Wählen Sie aus 100 Spielstufen aus!
• ¿TAKEBACK: Nehmen Sie beliebig viele Züge zurück!
• ¿INFO: Wählen Sie verschiedene Informationen aus.
• Züge
• Suche
• Rechenknoten
• Bewertung
• Zeit pro Zug
• ¿SETUP: Bauen Sie Positionen auf und analysieren Sie
gezielt.
• ¿STUDY: Testen Sie Ihr Wissen und verbessern Sie Ihr
Spiel über die Trainingsfunktion.
4.2 Suchalgorythmus
Optionen: search: select / brute
Das Programm rechnet normalerweise mit einem selektiven
Algorythmus, der nicht mehr alles kalkuliert, sondern
unwahrscheinliche Züge ausschliesst. Es kann natürlich vorkommen,
dass hier etwas übersehen wird. Wollen Sie dies ausschliessen,
sollten Sie auf die Option Brute Force umstellen. Der Computer
rechnet alles und übersieht nichts, ist jedoch etwas langsamer.
4.3 Eröffnungen
Optionen: book: on / off
Diese Funktion ist einzigartig! Sie überwacht Ihren Partie-Einstieg
und gibt Ihnen dann die Möglichkeit, Eröffnungen zu trainieren, die
Ihnen noch Probleme bereiten. Sie haben Ihren idealen
Trainingspartner! Der Computer wird eine Eröffnung mehrmals
spielen. Solange, bis Sie Ihr Spiel verbessern und den idealen
Einstieg gefunden haben.
4.4 Weiss von Oben spielen
Optionen: top: black / white
Wollen Sie vom Standard abweichen oder dem Computer den
ersten Zug überlassen?
Dann testen Sie diese aufregende Option, indem Sie top:
white am Beginn einer neuen Partie auswählen. Drücken Sie dann
ENTER, und der Computer rechnet für Weiss.
Aktivieren Sie diese Option, wird der Computer das Brett drehen.
Dies bedeutet, dass König und Dame vertauscht sind und die
Feldnamen im Display irreführend sind. Es ist etwas schwierig auf
diese Art zu spielen und Sie benötigen einige Gewöhnung. Aber nach
der ersten Eröffnung, sollte es kein Problem mehr darstellen!
4.5 Countdown
Optionen: clock: up / down
Normalerweise wird Ihre Zeit addiert. Sie können jedoch einen
Countdown einstellen, um nach Zeitvorgaben zu spielen. So
unterscheiden Sie diese Möglichkeiten:
[/]
{/}
Zeit wird addiert (Weiss/Schwarz)
Countdown (Weiss/Schwarz)
Countdown kann nur für Turnierstufen oder Schnellpartien aktiviert
werden!
44
EINE OPTION EINSTELLEN!
1. Drücken Sie MENU und es wird ¿OPTION
angezeigt.
3. Drücken Sie ¯ 5mal bis ticks: off
angezeigt wird.
4. Schalten Sie die Option mit ENTER an. Es wird
ticks:on gezeigt.
5. Drücken Sie CLEAR und dann MENU, um die
Partie – nun begleitet von Uhrticken – zu spielen.
Um die Option wieder auszuschalten,
wiederholen Sie einfach die oberen Schritte.
Details finden Sie unter 4.6.
4.6 Uhrticken
Optionen: ticks: off / on
Hiermit schalten Sie ein Uhrticken zu. Eine aufregende Option, um
wirkliche Turnieratmosphären zu schaffen!
4.7 Training
Optionen: coach: off / novice / inter. / adv.
Wird die erste Einstellung angezeigt, drücken Sie ENTER
mehrmals bis die gewünschte Option erscheint. Verlassen Sie dann
mit CLEAR den Modus. Die gewählte Trainingsstufe ist aktiviert. Es ist
eine wirklich ideale Option, um Ihr Spiel zu verbessern. Der Computer
wird Sie sogar mit Kommentaren im Display unterstützen und auf
diese Art, aktiv Warnungen und Hinweise geben.
Wie unterscheiden sich die Trainingseinstellungen? Hier einige
Erklärungen:
• coach: off: Es stehen Ihnen keine Trainingshilfen zur
Verfügung.
• coach: novice: Der Trainer macht Sie auf Kombinationen
oder Opfer aufmerksam. Sinnvoll, um die Inhalte der Taktischen
Lektionen umzusetzen.
45
DEUTSCH
2. Bestätigen Sie mit ENTER. Wir nehmen nun das
Beispiel „Uhrticken“.
• coach: intermediate: Mit dieser Stufe werden die
Ausensichtlichen Warnungen abgestellt. Dafür wird mehr auf
Strategie eingegangen. Ein wichtiger Punkt,um das Mittelspiel
besser zu beherrschen.
• coach: advanced: Diese Einstellung ist ideal für
Einsteiger. Hier werden Warnungen und Tipps gegeben sollten
Figuren gefährdet sein. Ausserdem stehen Zugvorschläge und
Querverweise auf Lektionen zur Verfügung! Sie lernen, Ihre
Partie erfolgreich zu starten.
4.8 Sound An/Aus
Optionen: sound: on / off
Mit dieser Option können Sie den Sound völlig abschalten und
ohne Signale spielen.
4.9 LCD-Kontrast
Optionen: contrast: 1 / 2 / 3 / 4 / 5
Hiermit stellen Sie den Kontrast des LCDs ein. 1 ist die hellste
Einstellung, 5 die dunkelste. 3 ist voreingestellt. Wird diese Option
angezeigt, drücken Sie ENTER mehrmals bis die gewünschte
Einstellung erscheint. Verlassen Sie dann mit CLEAR den Modus.
Der gewählte Kontrast ist aktiviert.
4.10 LCD-Geschwindigkeit
Optionen: LCD speed: 1 / 2 / 3 / 4
Mit dieser Einstellung bestimmen Sie, wie schnell der Text in der
Anzeige ablaufen soll. 1 ist die langsamste Einstellung, 4 die
schnellste. Wird diese Option angezeigt, drücken Sie ENTER
mehrmals bis die gewünschte Einstellung erscheint. Verlassen Sie
dann mit CLEAR den Modus. Die gewählte Geschwindigkeit ist
aktiviert.
4.11 Automatik
Optionen: automove: on / off
Führt der Computer einen Zug aus, wird normalerweise das
Ausgangs- und Zielfeld kurz blinken und der Zug wird dann
automatisch auf dem Brett ausgeführt. Schalten Sie jedoch die
Option ab, wird automove: off angezeigt. Ist dies aktiv, wird der
Computer seinen Zug anzeigen, jedoch abwarten, bis Sie den
Computerzug eingegeben haben. Der Vorteil ist, dass Sie die Partie
besser verfolgen können und die Geschwindigkeit bestimmen.
46
Eine Spielstufe einstellen
Drücken Sie Menü und blättern Sie mit ¯ bis ¿LEVEL angezeigt
wird. Gehen Sie mit ENTER in diesen Modus. Der Computer zeigt die
aktuelle Stufe an. Ändern Sie die Stufe mit den Tasten ˘ oder ¯ um
in 1er Schritten zu blättern, aktivieren Sie mit dem Stylus > bzw. <,
um in 10er Schritten zu blättern. Während Sie durch die Stufen
gehen, sehen Sie immer die Nummer und die Beschreibung jeder
Stufe. Erscheint die gewünschte, bestätigen Sie mit ENTER und Ihre
Auswahl ist aktiv.
Haben Sie LEVEL gedrückt, um zu sehen, welche Auswahl aktiv
ist, können Sie mit CLEAR einfach den Modus verlassen. Die Stufe
bleibt aktiv. Verlassen Sie die Einstellungen, indem Sie MENU
drücken. Bitte beachten Sie folgendes:
• Die Stufe kann jederzeit geändert werden, wenn Sie am Zug
sind.
• Sie können nichts ändern, solange der Computer am Zug ist.
• Ändern Sie die Stufe, wird die Uhr zurückgesetzt.
SPASS-STUFEN
5.1 Spass-Stufen
Stufe
Beschreibung
Anzeige
1 ............ Spass-Stufe 1 ............................... <Fun Level
2 ............ Spass-Stufe 2 ............................... <Fun Level
3 ............ Spass-Stufe 3 ............................... <Fun Level
…und so weiter bis…
58 ........... Spass-Stufe 58 ............................. <Fun Level
47
1>
2>
3>
58>
DEUTSCH
5. SPIELSTUFEN
Ihr Computer bietet 100 unterschiedliche Spielstufen! Wählen Sie
eine Stufe aus, sollten Sie sich bewusst sein, dass der Computer um
so stärker spielt je länger er rechnen kann - genauso wie ein
menschlicher Spieler! Die Spielstufen sind wie folgt unterteilt:
• 60 SPASS-STUFEN (1-60): Diese Stufen wurden speziell für
Einsteiger und Gelegenheitsspieler entwickelt. Sie beschränken
den Computer in seiner Rechenweise und ermöglichen Ihnen,
schrittweise Ihr Spiel zu verbessern und erste Partien zu
gewinnen!
• 40 WETTBEWERBS-STUFEN (61-100): Diese zweite Gruppe
bietet Fortgeschrittenen eine Auswahl unterschiedlicher
Anforderungen! Hier finden Sie normale und Turnierstufen,
Mattsuch- und taktische Stufen.
59 ........... Spass-Stufe 59 ............................. <Fun Level 59>
60 ........... Spass-Stufe 60 ............................. <Fun Level 60>
Diese einzigartigen Spass-Stufen sind genau richtig, um mit Schritt
für Schritt und viel Motivation, Schach zu lernen. Hier haben Sie die
Möglichkeit, auch gegen den Computer zu gewinnen. Der Computer
sucht nämlich nicht nach dem besten Zug, wie wir es normalerweise
erwarten. Statt dessen beachtet er einiges nicht und schwächt sich
selbst. So spielt er mit menschlichen Fehlern und kann geschlagen
werden.
Die Spaßstufen beginnen leicht und werden dann etwas
anspruchsvoller. Sie können einen Schritt nach dem anderen machen
und jedes Mal dazulernen.
WETTBEWERBS-STUFEN
5.2 Normale Stufen
Stufe
Zeit pro Zug (Durchschnitt)
Anzeige
61 .................. 1 Sek. pro Zug ........................... <00:01/move>
62 .................. 2 Sek. pro Zug ........................... <00:02/move>
63 .................. 5 Sek. pro Zug ........................... <00:05/move>
64 ................ 10 Sek. pro Zug ........................... <00:10/move>
65 ................ 15 Sek. pro Zug ........................... <00:15/move>
66 ................ 30 Sek. pro Zug ........................... <00:30/move>
67 ................ 45 Sek. pro Zug ........................... <00:45/move>
68 .................. 1 Min. pro Zug ........................... <01:00/move>
69 .................. 2 Min. pro Zug ........................... <02:00/move>
70 .................. 3 Min. pro Zug ........................... <03:00/move>
Diese 10 Stufen sind für Fortgeschrittene gedacht. Wählen Sie
eine dieser Stufen, aktivieren Sie eine Zeitbeschränkung für die
Computer-Rechnungen. Die Zeitangabe mit Sekunden und Minuten
ist nur eine ungefähre Angabe - in der Eröffnung wird normalerweise
schneller gezogen, während das Mittelspiel längere Kalkulationen
benötigt.
5.3 Turnierstufen
Stufe
Nummer Züge/Gesamtzeit
71 .............. 40 Züge in 1 hr. 20 Min. ............... <
72 .............. 40 Züge in 1 hr. 30 Min. ............... <
73 .............. 35 Züge in 1 hr. 45 Min. ............... <
74 .............. 40 Züge in 1 hr. 45 Min. ............... <
75 .............. 35 Züge in 1 hr. 30 Min. ............... <
76 .............. 40 Züge in 2 hr. ............................ <
48
40
40
35
40
35
40
Anzeige
in 1:20
in 1:30
in 1:45
in 1:45
in 1:30
in 2:00
>
>
>
>
>
>
5.4 Schnellpartien
Stufe
Gesamtzeit
81 ................ 5 Min. pro Partie
82 ................ 7 Min. pro Partie
83 ................ 10 Min. pro Partie
84 ................ 15 Min. pro Partie
85 ................ 20 Min. pro Partie
.....................
.....................
.....................
.....................
.....................
49
< 5
< 7
<10
<15
<20
Anzeige
min/game>
min/game>
min/game>
min/game>
min/game>
DEUTSCH
77 .............. 45 Züge in 2 hr. 30 Min. ............... < 45 in 2:30 >
78 .............. 50 Züge in 2 hr. ............................ < 50 in 2:00 >
79 .............. 40 Züge in 2 hr. 30 Min. ............... < 40 in 2:30 >
80 .............. 40 Züge in 3 hr. ............................ < 40 in 3:00 >
In den Turnierstufen geben Sie eine bestimmte Anzahl an Zügen
innerhalb einer vorgegebenen Zeit ein. Überzieht ein Spieler diese
Zeit, verliert er die Partie.
Wie zuvor beschrieben, ist das Bewertungssystem aktiv in diesen
Stufen. Details finden Sie unter Abschnitt 2.5. Ist eine Turnier-Partie
beendet, drücken Sie NEW GAME und der Computer wird kurz die
Wertung anzeigen, bevor eine neue Partie beginnt. Verpassen Sie die
Anzeige, drücken Sie einfach HINT/INFO mehrmals, um die
Wertungen abzurufen. Mit CLEAR verlassen Sie den Modus wieder.
Drücken Sie NEW GAME während einer Turnier-Partie bevor das
Spiel zu Ende ist, bietet Ihnen der Computer folgendes an:
• Anzeige = Rate as draw? (Als Remis bewerten?)
Drücken Sie ENTER, wird die Wertung angezeigt.
Drücken Sie ˘: erscheint
• Anzeige = Rate as win? (Als Sieg werten?).
Drücken Sie ENTER, wird die Wertung angezeigt.
Drücken Sie ˘: erscheint
• Anzeige = Machine wins? (Computer gewinnt?).
Drücken Sie ENTER, wird die Wertung angezeigt.
Drücken Sie ˘: erscheint
Die Anzeige geht auf die erste Frage zurück.
Um eine Wertung abzurufen, müssen Sie eine der Fragen mit
ENTER beantworten! Wollen Sie das Spiel nicht bewertet haben,
drücken Sie CLEAR. Der Computer zeigt an, dass die Partie nicht
bewertet wird.
Wählen Sie eine Turnier-Stufe, wollen Sie eventuell Countdown
aktivieren. Oder eventuell ein Uhrticken einstellen, um richtige
Turnieratmosphäre zu erzeugen! Details hierzu finden Sie in
Abschnitt 4.
86 ................ 30 Min. pro Partie ..................... <30 min/game>
87 ................ 45 Min. pro Partie ..................... <45 min/game>
88 ................ 60 Min. pro Partie ..................... <60 min/game>
89 ................ 90 Min. pro Partie ..................... <90 min/game>
90 .............. 100 Min. pro Partie ..................... <100 min/game>
In diesen Stufen, stellen Sie die Gesamtzeit für die Partie ein. Ist
die Zeit überschritten, zeigt der Computer an, welche Seite verloren
hat. Wählen Sie eine dieser Stufen aus, sollten Sie auch den Countdown aktivieren.
5.5 Mattsuch-Stufen
Stufe
Matt in
Anzeige
91 .................... Finde Matt in 1 Zug ................ < Mate in 1 >
92 .................... Finde Matt in 2 Zügen ............ < Mate in 2 >
93 .................... Finde Matt in 3 Zügen ............ < Mate in 3 >
94 .................... Finde Matt in 4 Zügen ............ < Mate in 4 >
95 .................... Finde Matt in 5 Zügen ............ < Mate in 5 >
96 .................... Finde Matt in 6 Zügen ............ < Mate in 6 >
97 .................... Finde Matt in 7 Zügen ............ < Mate in 7 >
98 .................... Finde Matt in 8 Zügen ............ < Mate in 8 >
Diese Stufen aktivieren ein spezielles Mattsuch-Programm. Haben
Sie z.B. eine Position eingegeben, die zum Matt führt, können Sie
diese Stufen auswählen, um die Lösung durch den Computer
errechnen zu lassen. Ihr Computer kann Matt bis zu 8 Züge im voraus
errechnen. Matt in 1 bis zu 5 Zügen ist relativ schnell gefunden. Matt
in 6 oder 8 Zügen hingegen ist sehr schwierig und kann lange
Rechenzeiten benötigen. Findet Ihr Computer kein Matt, zeigt er dies
kurz an. Sie können dann einfach die Partie fortsetzen, indem Sie
eine andere Spielstufe einstellen.
5.6 Taktische Stufe
Stufe
Beschreibung
Anzeige
99 ..... Taktische Stufe (kein zeitliches Limit) ... < Tactical >
Hier versucht der Computer, die beste taktische Zugsequenz zu
finden - und zwar schneller als in normalen Spielstufen. Die
Rechnung dauert an bis ein Eroberungsweg von mindestens 2
Bauern gefunden wurde, oder bis Sie mit ENTER unterbrechen.
Hiermit können Sie experimentieren und ermöglichen dem Computer,
sich voll auf spezielle taktische Varianten zu konzentrieren.
50
SO EINFACH ÄNDERN SIE DIE SPIELSTUFE!
1. Drücken Sie MENU und es wird ¿OPTION
angezeigt.
3. Bestätigen Sie mit ENTER und die aktuelle Stufe
wird gezeigt.
>`
<`
4. Nehmen wir an, Sie wollen die Schnellpartie
einstellen, also Stufe 81. Blättern Sie mit ˘ oder
¯ in 1er Schritten durch die Stufen oder mit dem
Stylus und > oder < in 10er Schritten bis
< 5 min/game > erscheint.
5. Bestätigen Sie mit ENTER. Verlassen Sie dann
den Modus mit MENU. Sie können nun Ihre neue
Spielstufe testen.
Details finden Sie unter Abschnitt 5.
5.7 Analysestufe
Stufe
Beschreibung
Anzeige
100 .......... Analyse (kein zeitliches Limit) ......... < Infinite >
Auf dieser Stufe, wird der Computer analysieren bis er mit ENTER
zum Zug gezwungen wird. Ist die Suche gestoppt, zeigt der Computer
den besten bisher gefunden Zug. Diese Stufe ermöglicht Experimente
oder Analysen von bekannten Partien. Sie können stundenlang
berechnen lassen und schwierige Situationen besser beherrschen.
6. RÜCKNAHME VON ZÜGEN
Spielen Sie gegen einen Computer, ist kein Zug endgültig – Sie
können Ihre Strategie jederzeit ändern oder einfach einen schlechten
Zug zurücknehmen. Sind Sie am Zug, drücken Sie einfach MENU und
dann ¯ mehrmals bis ¿TAKEBACK angezeigt wird. Bestätigen Sie
mit ENTER und der zuletzt gemachte Zug wird im Display angezeigt.
Um diesen zurückzunehmen, drücken Sie ¯ und die Rücknahme ist
51
DEUTSCH
2. Drücken Sie ¯ und Sie sehen ¿LEVEL.
abgeschlossen. Es wird der vorhergehende Zug angezeigt und Sie
können diesen nun auf die gleiche Weise zurücknehmen. Haben Sie
den Partieanfang erreicht, wird End takebacks angezeigt und
das Menü automatisch verlassen. Solange Sie nicht den Partieanfang
erreicht haben, können Sie vorwärtsblättern mit der Taste ˘ und
somit die Rücknahmen löschen. Um weiterzuspielen, verlassen Sie
den Modus mit CLEAR und dann MENU.
Die kürzere Methode zur Rücknahme von Zügen ist die direkte
Eingabe auf dem Touch Screen-Monitor. Sind Sie am Zug, drücken
Sie einfach mit dem Stylus auf das Zielfeld des zuletzt gemachten
Zuges und drücken ¯. Sie können dies für weitere Züge wiederholen.
Drücken Sie CLEAR, um Ihr Spiel fortzusetzen.
7. SPIELINFORMATIONEN
Stellen Sie sich folgendes vor: Sie spielen gegen einen Freund
und er ist am Zug. Sie würden gerne wissen, was er gerade denkt
und wie er die Stellung einschätzt. Aber natürlich fragen Sie nicht
nach, weil dies einfach nicht gemacht wird! Ganz anders mit einem
Computer. Sie haben jederzeit Einblick in die Rechenvorgänge und
können nachsehen, wie Ihre Stellung eingeschätzt wird! Nutzen Sie
diesen Vorteil und verbessern Sie Ihr Spiel!
Mit Hilfe dieses Modus können Sie jederzeit Informationen abrufen.
Aktivieren Sie die Option während der Computer rechnet, haben Sie
Einblick in dessen Rechentiefe und Bewertungen. Drücken Sie HINT/
INFO, um den Informations-Modus aufzurufen.
Automatische Anzeigen
Aktivieren Sie eine der folgenden Optionen des
Informationsmodus, können Sie die Computerberechnungen
einsehen und den Touch Screen Travel Chess „laut denken sehen“!
Wichtig: diese automatische Anzeige ist nur aktiv, solange der
Computer rechnet!
Drücken Sie MENU und dann mehrmals ¯ bis im Display ¿INFO
angezeigt wird. Drücken Sie ENTER. Blättern Sie durch die
Untermenüs mit ¯ oder ˘. Sie haben folgende Auswahl:
• Zeige Züge: zeigt die Berechnungen des Computers bis zu 4
Züge im voraus an. Siehe Abschnitt 7.1.
Optionen: 0 / 1 / 2 / 3 / 4 moves
52
Manuell abrufbare Informationen
Drücken Sie HINT/INFO während der Partie, wird der vom Computer als „wahrscheinlich“ berechnete Zug angezeigt.
Spielinformationen sind in verschiedene Gruppen unterteilt. Mit ˘
und ¯ können Sie durch diese blättern. Sie sehen diese Gruppen in
den folgenden Abschnitten. Drücken Sie CLEAR, um zur normalen
Partie zurückzukehren.
7.1 Hauptvariante
Drücken Sie HINT/INFO, um den Informations-Modus aufzurufen.
Sie sehen den ersten Zug der Hauptvariante, z.B. Ply1: b1-c3.
Sie können dies auch als Tipp ansehen und den Vorschlag als Zug
eingeben. Die Rechentiefe eines Computers wird durch die
Zuganzahl angegeben. Ist die Rechentiefe 2, kalkuliert der Computer
die nächsten 2 Züge im voraus.
Rufen Sie die Information ab, solange der Computer rechnet,
sehen Sie genau, was er gerade kalkuliert. Rufen Sie die Information
ab, wenn Sie am Zug sind, sehen Sie, welchen Zug der Computer
von Ihnen erwartet. Drücken Sie ˘ mehrmals, um die nächsten
Informationen zu sehen:
• Wahrscheinlichste Variante: Zug 1
• Wahrscheinlichste Variante: Zug 2
• Wahrscheinlichste Variante: Zug 3
• Wahrscheinlichste Variante: Zug 4
53
DEUTSCH
• Zeige Rechenknoten: s. Abschnitt 7.2.
Optionen: nodes: off / on
• Zeige Zeit pro Zug: s. Abschnitt 7.3.
Optionen: time/move: off / on
• Zeige Suchtiefe: s. Abschnitt 7.4.
Optionen: progress: off / on
• Zeige Bewertung: s. Abschnitt 7.2.
Optionen: evaluation: off / on
Um eine Option an- oder auszuschalten, drücken Sie ENTER.
Blättern Sie mit ¯ oder ˘ durch die Optionen. Verlassen Sie den
Modus mit CLEAR und dann MENU.
Sie können alle oder nur einzelne Optionen dieses Info-Modus
zuschalten. Das Display wird den Text für alle Informationen im
Display abrollen. Geht dies zu schnell, können Sie die LCDGeschwindigkeit verändern (s. 4.10). Ist eine Information nicht
verfügbar, wird --x-- angezeigt.
7.2 Suchinformationen
Drücken Sie 2mal HINT/INFO, um diese Gruppe aufzurufen.
Drücken Sie ˘ mehrmals, um folgende Informationen abzurufen:
• Den aktuellen Stand: gibt eine Bewertung der aktuellen Stellung.
Die Werte der Figuren werden addiert. Ein Bauer ist z.B. 1.0
Punkte wert. Eine positive Zahl zeigt, dass Weiss führt. z.B.:
Weiss gewinnt durch 2 Bauern - es wird Score: +2.0
angezeigt. Diese Wertung ist nicht aktiv in den Mattsuch-Stufen.
• 2-teiliges Display: (a) Die aktuelle Suchtiefe oder die Anzahl der
vorausberechneten Züge wird gezeigt. z.B. rechnet der Computer 439 Züge voraus, sehen Sie d:4 39 - d steht für
Suchtiefe (Englisch: depth). (b) Der berechnete Zug (wenn der
Computer am Zug ist).
• 2-teiliges Display: (a) Die verstrichene Zeit für den aktuellen Zug.
(b) Die Rechenknoten pro Sekunde (wenn der Computer am Zug
ist).
7.3 Schachuhr-Informationen
Drücken Sie 3mal HINT/INFO, um diese Gruppe aufzurufen. Mit ˘
blättern Sie innerhalb der Gruppe durch folgende Informationen:
• Verstrichene Gesamtzeit für Weiss/Schwarz; Weiss am Zug [,
Schwarz am Zug ].
• Verbleibende Gesamtzeit für Weiss/Schwarz; Weiss am Zug {,
Schwarz am Zug } (nur bei Turnier- oder Blitzschach).
Ist der Countdown nicht aktiviert, erscheint im zweiten Fenster
einfach --:--{--:--.
7.4 Zugzähler/Spielzüge
Drücken Sie 4mal HINT/INFO, um diese Gruppe aufzurufen. Mit ¯
und ˘ blättern Sie zu folgenden Informationen:
• Aktuelle Zugnummer und letzter Zug
• Züge der aktuellen Partie
7.5 Bewertung
Drücken Sie 3mal HINT/INFO, um diese Gruppe aufzurufen. Diese
steht nur zur Verfügung, wenn Sie eine Partie im Turniermodus
spielen! Details finden Sie in Abschnitt 5.3.
54
EINE ÜBERSICHT ZUM INFO-MODUS!
•
•
•
•
Hauptvariante: Zug 1
Hauptvariante: Zug 2
Hauptvariante: Zug 3
Hauptvariante: Zug 4
SUCHINFORMATIONEN:
• Bewertung
• Suchtiefe; und derzeit berrechneter Zug
• Verstrichene Zeit für aktuellen Zug und
Rechenknoten pro Sekunde (falls der
Computer rechnet)
SCHACHUHR-INFORMATIONEN:
• Verstrichene Zeit für beide Seiten
• Verbleibende Zeit für beide Seiten (nur
bei Turnier- und Schnellschachpartien)
INFORMATIONEN ZUR ZUGANZAHL:
• Aktuelle Zugnummer und letzter Zug
• Züge der aktuellen Partie
BEWERTUNG:
• ELO-Wertung (wenn Sie eine Partie im
Turniermodus spielen)
55
DEUTSCH
INFORMATIONEN ZUR HAUPTVARIANTE:
8. POSITIONEN ÄNDERN ODER AUFBAUEN
Diese Funktion ist ideal, um bestimmte Stellungen aufzubauen
oder zu ändern! Sie können Problemaufgaben eingeben oder
Mattsituationen berechnen lassen.
Wichtig: Ihre aktuelle Partie wird gelöscht, falls Sie eine neue
Position aufbauen.
Sie können Positionen aufbauen, sobald Sie am Zug sind. Drücken
Sie die Taste MENU und dann mehrmals ¯ bis ¿SETUP angezeigt
wird. Bestätigen Sie mit ENTER. Im Display werden Farben und
Figurensymbole angezeigt.
• Um die Figur vom Brett zu nehmen, drücken Sie diese einfach
und sie wird automatisch vom Brett entfernt.
• Um eine Figur auf ein anderes Feld zu setzen, drücken Sie
die Figur und setzen sie einfach auf ein neues Feld.
• Um eine Figur hinzuzufügen, drücken Sie auf eine Farbe und
ein Figursymbol und drücken dann auf das Zielfeld. Wiederholen
Sie dies für weitere Figuren, wie Sie wünschen.
• Um das Brett zu leeren, drücken Sie CLEAR und Sie werden
gefragt, ob Sie das Brett wirklich löschen wollen. Bestätigen Sie
mit ENTER. Wollen Sie dies rückgängig machen, drücken Sie
einfach nochmals CLEAR und es erscheint die Bestätigung,
dass das Brett nicht geleert wurde.
• Haben Sie Ihre Position eingegeben, drücken Sie ein
Farbsymbol, um zu bestimmen, ob Weiss oder Schwarz am Zug
ist.
• Verlassen Sie den Modus mit ENTER. Fragt der Computer
New position? bestätigen Sie mit ENTER. Drücken Sie
CLEAR wird Resume angezeigt und Sie können eine andere
Position eingeben.
Bauen Sie eine ungültige Stellung auf, können Sie den
Positionsmodus nicht mit ENTER verlassen. Die Position wird nicht
akzeptiert. Geben Sie eine gültige Stellung ein!
Haben Sie den Poistionsmodus aktiviert, ohne die Stellung zu
ändern, können Sie mit ENTER wieder aus dem Modus gehen.
Drücken Sie dann MENU, um Ihre Partie fortzusetzen.
56
Lernen anhand von gespeicherten Stellungen
Tipp: Sie können die gespeicherten Stellungen auch über
Felder aufrufen, wie wir in der weiteren Anleitung erklären.
Drücken Sie MENU und dann mehrmals ¯ oder ˘ bis das Display
¿STUDY anzeigt. Bestätigen Sie mit ENTER und jetzt sehen Sie
< Study1-1 >. Blättern Sie mit ˘ oder ¯ durch die gespeicherten
Stellungen in 1er Schritten (oder drücken Sie mit dem Stylus auf >
oder < um in 8er Schritten zu blättern). Rufen Sie die Stellung Ihrer
Wahl mit ENTER auf. Es wird Start Study? gefragt. Bestätigen
Sie erneut mit ENTER. (Sie können jederzeit mit CLEAR abbrechen).
Der Computer wird automatisch die Züge der gespeicherten Partie
ausführen. Ist die erste Lernstellung erreicht, wird das Display Your
Move anzeigen und die Uhr startet. Jetzt ist es an der Zeit, dass Sie
den richtigen und für diese Situation besten Zug eingeben. Beachten
Sie folgendes:
• Es gibt jeweils nur einen „richtigen“ Zug.
• Das Display zeigt an, welche Farbe am Zug ist.
• Haben Sie den richtigen Zug eingegeben, wird Well Done
angezeigt. Der Computer wird dann die nächsten Züge
ausführen bis die folgende Lernstellung erreicht ist.
• Geben Sie den falschen Zug ein, erscheint Wrong Move
und dann Quit Study?.
• Um im Training zu bleiben, drücken Sie CLEAR. Es werden
Ihnen Punkte abgezogen, Sie können jedoch einen weiteren
Versuch ausführen.
• Um das Training zu verlassen, drücken sie ENTER. Sie
sind wieder im normalem Spielmodus.
• Wertung: Lösen Sie die Aufgaben korrekt, erhalten Sie Punkte.
Volle Punktzahl bei Lösung mit dem ersten Versuch und
Minuspunkte für Fehlversuche.
57
DEUTSCH
9. TRAINING
Beabsichtigen Sie, Ihr Spiel zu verbessern, empfehlen wir Ihnen
dieses hervorragende Trainingsmethodik. Ihr Computer verfügt über 8
gespeicherte Lernstellungen, die jeweils 8 kritische Situationen
enthalten – ingesamt stehen Ihnen 64 Positionen zur Analyse zur
Verfügung! Sie können einiges an Taktik hinzulernen und sich sogar
zum Schluss bewerten lassen! Benötigen Sie Hilfe bei diesen
Aufgaben, empfehlen wir Ihnen, den Anhang zu lesen.
• Um Ihre aktuelle Wertung zu sehen, drücken Sie HINT/INFO
2mal. Verlassen Sie die Anzeige mit CLEAR.
Beenden Sie eine Lernstellung mit Schachmatt wird Checkmate! angezeigt und es wird Ihnen gratuliert! An dieser Stelle
können Sie wie folgt wählen: (a) eine neue Partie starten, (b) mit Hilfe
des Info-Modus die Züge nochmals anschauen (s. 7.4), oder (c) Züge
zurücknehmen und neue Taktiken testen. Haben Sie die letzte
Lernstellung einer Partie gelöst, erscheint End Game und der
Computer wird automatisch zu einer normalen Partie zurückkehren
Stellungen direkt aufrufen
Sie können jede Lernstellung auch direkt über das Schachbrett
aufrufen. Bitte schauen Sie in der Anleitung auf die Abbildung dieses
Abschnittes. Drücken Sie dann zunächst MENU und blättern mit ¯
oder ˘ bis ¿STUDY angezeigt wird. Bestätigen Sie mit ENTER.
Schauen Sie nun auf die Abbildung und wählen Sie eine Stellung
aus, indem Sie auf das zugehörige Feld drücken. Drücken Sie dann
2mal ENTER, um diese zu starten.
10. SIE BENÖTIGEN HILFE? SCHAUEN SIE HIER NACH!
Hier finden Sie einige Antworten auf häufig gestellte Fragen.
a. Der Computer reagiert nicht oder stürzt ab.
• Ersetzen Sie die Batterien oder legen Sie diese erneut ein.
• Eventuell ist der Computer statisch aufgeladen. Entladen Sie
ihn mit Hilfe der ACL-Funktion (s. 11.1).
b. Das Display ist schlecht lesbar.
• Ersetzen Sie die Batterien.
• Stellen Sie den Kontrast ein (s. 4.9).
c. Sie haben eine Informationen aktiviert, aber der Text läuft zu
schnell ab.
• Stellen Sie die LCD-Geschwindigkeit ein (s. 4.10).
• Drücken Sie GO/STOP um das Display anzuhalten und CLEAR
um fortzufahren.
d. Der Computer führt keinen Zug aus.
• Bitte prüfen Sie, ob 2-Spieler-Modus eingestellt ist (s. 4.1) und
stellen Sie diesen ab.
• Eventuell haben Sie eine Spielstufe eingestellt, die zur Analyse
gedacht ist. Brechen Sie die Suche des Computers ab, indem
Sie ENTER drücken.
58
DIE 64 LERNSTELLUNGEN
8
1-8
2-8
3-8
4-8
5-8
6-8
7-8
8-8
7
1-7
2-7
3-7
4-7
5-7
6-7
7-7
8-7
6
1-6
2-6
3-6
4-6
5-6
6-6
7-6
8-6
5
1-5
2-5
3-5
4-5
5-5
6-5
7-5
8-5
4
1-4
2-4
3-4
4-4
5-4
6-4
7-4
8-4
3
1-3
2-3
3-3
4-3
5-3
6-3
7-3
8-3
2
1-2
2-2
3-2
4-2
5-2
6-2
7-2
8-2
1
1-1
2-1
3-1
4-1
5-1
6-1
7-1
8-1
a
b
c
d
e
f
g
h
e. Der Computer akzeptiert Ihren Zug nicht.
• Sie versuchen, einen ungültigen Zug einzugeben. Bitte prüfen
Sie die Regeln.
• Steht Ihr König im Schach? Oder wird Ihr Zug Ihren König ins
Schach stellen?
Führen Sie die Rochade unkorrekt aus? Bitte prüfen Sie die
Stellung!
• Sind Sie am Zug? Blinkt das Farbsymbol, rechnet der Computer und es ist sein Zug.
59
DEUTSCH
Sie können jede Lernstellung auch direkt über das Schachbrett aufrufen!
Wählen Sie eine Stellung aus, indem Sie auf das zugehörige Feld drücken.
f. Die Brettstellung ist verdreht. Warum?
• Bitte deaktivieren Sie die Option „Weiss von oben spielen“ (s.
4.4).
g. Der Computer zeigt Rate as draw? obwohl NEW GAME
aktiviert wurde.
• Sie haben eine Partie auf der Turnierstufe unterbrochen und
müssen die Wertung eingeben. Details finden Sie unter 5.3.
h. Der Computer hat seinen Zug angezeigt aber er wurde nicht
ausgeführt.
• Ist die Option „Automatik“ deaktiviert, müssen Sie den Zug
ausführen. Details finden Sie in 4.11.
i. Der Computer zeigt No Move Found! an.
• Sie haben eine Mattsuch-Stufe eingestellt und der Computer
findet kein Matt. Wechseln Sie die Spielstufe und setzen Sie
Ihre Partie fort.
j. Das Menü kann nicht mit CLEAR verlassen werden.
• Bitte beachten Sie, dass Sie mit MENU das Menü verlassen.
k. Der Computer gibt Soundsignale von sich, obwohl Sie am
Zug sind.
• Wurde der Coach-Modus aktiviert, wird Sie der Computer
daran erinnern.
l. Der Computer gibt keine Soundsignale.
• Aktivieren Sie die Sound-Funktion (s. 4.8).
m.Der Computer erlaubt nicht, den Positionsaufbau zu
verlassen.
• Sie haben eine ungültige Stellung eingegeben (z.B. steht
vielleicht ein König im Schach etc.) Bitte korrigieren Sie die
Stellung.
11. TECHNISCHE DETAILS
11.1 Die ACL-Funktion
Computer hängen sich manchmal auf. Dies ist auf statische
Aufladung oder elektronische Störungen zurückzuführen und kann
einfach behoben werden. Stecken Sie einen spitzen Gegenstand für
1-2 Sek. in die ACL-Vertiefung auf der Unterseite Ihres Geräts. Das
setzt den Computer wieder zurück.
11.2 Pflege und Wartung
Ihr Schachcomputer ist ein präzises, elektronisches Gerät. Setzen
Sie es nicht extremen Temperaturen oder hoher Luftfeuchtigkeit aus.
60
11.3 Technische Spezifikation
Tasten:
8
Schachbrett: 9x8 Kontaktmembran (Touch panel)
LCD Display: Punktmatrix 11-stellig, 68 x79 mm
Batterien:
3 x AAA/AM4/R03
Abmessung: 131 x 83 x 22 mm
Gewicht:
220 Gramm
Bitte bewahren Sie diese wichtigen Information auf!
Saitek behält sich das Recht vor ohne vorherige Ankündigung, technische
Änderungen im Interesse eines überarbeiteten Programm durchzuführen.
Leisten Sie einen Beitrag zum Umweltschutz:
• Verbrauchte Batterien und Akkumulatoren
(Akkus) gehören nicht in den Hausmüll.
• Sie können sie bei einer Sammelstelle für
Altbatterien bzw. Sondermüll abgeben.
Informieren Sie sich bei Ihrer Gemeinde.
61
DEUTSCH
Vor Reinigen der Einheit, entnehmen Sie bitte die Batterien bzw.
stecken Sie den Adapter aus. Verwenden Sie keine chemischen
Mittel, da diese eventuell schädigen können.
Schwache Batterien müssen sofort ersetzt werden, da sie
auslaufen und den Computer schädigen können. Bitte achten Sie
auch auf folgenden Warnhinweis: Achtung! Nutzen Sie alkaline oder
Zink Carbon Batterien. Verwenden Sie keine unterschiedlichen Arten
oder neue und alte gleichzeitig! Versuchen Sie nicht, Batterien
aufzuladen, die nicht wiederaufladbar sind. Verwenden Sie nur die
empfohlenen Batterien. Versichern Sie sich, daß die Batterien gemäß
der Polaritätsvorgabe eingelegt sind. Leere Batterien müssen sofort
aus dem Gerät entnommen werden. Schließen Sie die
Anschlußklemmen nicht kurz!
DEMARRAGE RAPIDE
Pour commencer tout de suite une partie, suivez les étapes suivantes!
1
2
3
4
Ouvrez le compartiment des piles et insérez trois
piles alcalines “AAA” (AM4/R03) en faisant
3x
AAA
attention de bien respecter la polarité.
(AM4/R03)
Sortez le stylet de son compartiment situé sur le
côté droit de l’ordinateur, comme indiqué ci-contre.
Appuyez sur la touche GO/STOP située en haut et
sur le côté pour allumer l’ordinateur. S’il ne répond
pas, réinitialisez-le comme indiqué dans le chapitre
11.1.
Appuyez rapidement et deux fois de suite sur NEW
GAME pour réinitialiser l’ordinateur. Si l’échiquier
n’est pas remis à zéro pour une nouvelle partie
d’échec, vous n’avez pas appuyé assez
rapidement sur la touche. Essayez encore une fois!
Pour déplacer les pièces, appuyez doucement à
l’aide du stylet sur la case de départ puis sur la
case d’arrivée. Vous pouvez également les
déplacer du bout des doigts.
Lorsque l’ordinateur déplace une de ses pièces,
celle-ci clignote brièvement sur la case de départ
puis sur la case d’arrivée. Le déplacement est
alors effectué et c’est à vous de jouer.
ıPd7-d5````
Pour éteindre l’ordinateur, appuyez sur GO/STOP.
Lorsque Stop? est affiché, appuyez à nouveau sur GO/STOP pour
confirmer–et votre partie sera enregistrée!
x2
5
6
FAMILIARISEZ-VOUS AVEC LES PIECES!
K`
ROI
Q`
REINE
R`
B`
TOUR
FOU
N`
CAVALIER
P`
PION
Blanc
Noir
62
DEMARRAGE RAPIDE
TOUCHES ET CARACTÉRISTIQUES
INTRODUCTION
1. COMMENCER A JOUER: LES
BASES
1.1 Piles insérées, ordinateur allumé
1.2 A vos marques, prêts? Partez!
1.3 L’ordinateur joue son coup
1.4 Partie terminée! Commencez une
nouvelle partie!
1.5 Trop facile/difficile? Changez de
niveau!
2. AUTRES FONCTIONS A DECOUVRIR
2.1 A qui le tour? Vérifiez l’affichage!
2.2 Coups spéciaux
2.3 Coups non autorisés/non
conformes aux règles
2.4 Echec, mat et partie nulle
2.5 Essayez le système d’autoévaluation!
2.6 Besoin d’un conseil? Il suffit de
demander!
2.7 Interrompre une recherche
2.8 Changement de camp
2.9 Ouvertures pré-enregistrées
2.10 Utilisation du temps de l’adversaire
pour réfléchir
2.11 Mise hors tension/mémoire de la
partie
3. LE MENU PRINCIPAL: ACCES AUX
MODES SPECIAUX
4. MODE OPTION
Sélectionner une option de jeu
4.1 Mode Deux joueurs
4.2 Algorithme de recherche
4.3 Mode Autobook
4.4 Blancs en haut
4.5 Horloge de compte à rebours
4.6 Tic-tac de l’horloge
4.7 Mode Coach
63
4.8 Son activé/désactivé
4.9 Contraste LCD
4.10 Vitesse LCD
4.11 Mode Déplacement
automatique
5. MODE NIVEAU
Sélectionner un mode de jeu
5.1 Niveaux de divertissement
5.2 Niveaux Amateur
5.3 Niveaux Tournoi
5.4 Niveaux Partie rapide
5.5 Niveaux Résolution des
problèmes
5.6 Niveau tactique
5.7 Niveau analyse
6. MODE RETOUR EN ARRIERE
7. MODE INFO
Affichage automatique des infos
Affichage manuel d’informations
7.1 Variante principale
7.2 Recherche d’informations
7.3 Informations sur la pendule
d’échecs
7.4 Décompte des coups / des
déplacements
7.5 Affichage du classement
8. MODE MISE EN PLACE
9. MODE ETUDE
Sélectionner des positions
d’étude
Utiliser l’échiquier pour
sélectionner une position
10. BESOIN D’AIDE? C’EST ICI
11. DETAILS TECHNIQUES
11.1 La fonction ACL
11.2 Entretien et maintenance
11.3 Spécifications techniques
ANNEXE:
PARTIES DU MODE ETUDE
FRANÇAIS
SOMMAIRE
TOUCHES ET CARACTERISTIQUES
1. ECHIQUIER TACTILE: Chaque case enregistre le déplacement d’une pièce par simple
contact du bout des doigts ou à l’aide du stylet.
2. LIGNE D’INFORMATIONS: Affiche les déplacements, les informations de jeu et les
pendules d’échec. Egalement utile lors de la sélection d’options et de niveaux, la
disposition des pièces sur l’échiquier, etc.
3. STYLET: Sert à déplacer les pièces à l’écran. Sert également à sélectionner des options
figurant sur la ligne d’informations.
4. TOUCHE GO/STOP: Appuyez une fois sur
cette touche pour allumer l’ordinateur,
deux fois pour l’éteindre. Appuyez une fois
pour suspendre le défilement de
l’affichage. Continuez à faire défiler en
appuyant sur CLEAR.
5. COMPARTIMENT DU STYLET: Pour
ranger le stylet lorsque celui-ci n’est pas
utilisé.
6. PROTECTION DE L’ECRAN LCD: Se
coulisse pour protéger l’écran lorsque
l’ordinateur n’est pas utilisé.
7. ACL (Réinitialiser): Sur le socle de
l’ordinateur. Utilisé pour décharger toute
électricité statique formée après
l’installation de nouvelles piles.
8. TOUCHE HINT/INFO: Appuyez sur cette
touche en cours de jeu pour obtenir une
suggestion. Appuyez de façon répétée
pour faire défiler les principales informations.
9. TOUCHE CLEAR: Appuyez sur cette
touche pour quitter les modes Option/Info,
pour annuler les modifications des modes
Niveau/Etude, pour masquer les affichages
du mode Info, pour rester en mode Etude
après un mauvais déplacement, pour
effacer l’échiquier en mode Mise en place
(Setup), pour faire à nouveau défiler une
liste après avoir interrompu le défilement
et pour recommencer à jouer après un
retour en arrière.
10. COMPARTIMENT DES PILES: Sur le
socle de l’ordinateur. Utilisez des piles
alcalines AAA (AM4/R03).
11. TOUCHE ENTER: Appuyez sur cette
touche pour un changement de côté avec
l’ordinateur, pour forcer l’ordinateur à
déplacer une pièce alors qu’il est en train
de réfléchir, pour sélectionner des options
dans le menu principal, pour sélectionner
des paramétrages et activer/désactiver les
options pour les modes Option/Info, pour
sélectionner un nouveau niveau en mode Niveau, une position d’étude ou quitter le mode
Mise en place (Setup) après une nouvelle disposition des pièces.
12. TOUCHES ¯/˘: Appuyez sur ces touches pour faire défiler une par une les Niveaux/
Positions d’étude en mode Niveau/Etude. Appuyez sur cette touche pour faire défiler les
affichages des Options/Infos en mode Options/Info. Appuyez pour revenir en avant/en
arrière parmi vos coups en mode Retour en arrière.
13. TOUCHE MENU: Appuyez sur cette touche pour accéder au mode Menu et appuyez à
nouveau pour quitter ce mode.
14. TOUCHE NEW GAME: Appuyez rapidement deux fois de suite sur cette touche pour
commencer une nouvelle partie.
64
1. COMMENCER A JOUER: LES BASES!
1.1 Piles insérées, ordinateur allumé
Votre ordinateur d’échecs utilise trois piles «AAA» (AM4/R03).
Insérez les piles dans le compartiment prévu à cet effet sur le socle
de l’ordinateur, en faisant attention à bien respecter la polarité. Nous
vous recommandons d’utiliser trois piles alcalines neuves pour une
plus longue durée de vie.
Pour allumer l’ordinateur, appuyez sur GO/STOP. Si l’ordinateur ne
répond pas, réinitialisez-le en insérant pendant au moins une
seconde un trombone ou un objet pointu dans l’orifice indiquant ACL
sur le socle de l’ordinateur.
Pour économiser les piles, l’ordinateur s’éteint automatiquement
s’il est laissé allumé sans être utilisé pendant environ 20 minutes.
1.2 A vos marques, prêts? Partez!
Pour commencer une partie, suivez les étapes suivantes:
a. Appuyez sur GO/STOP pour allumer l’ordinateur.
b. Pour réinitialiser l’ordinateur pour une nouvelle partie, appuyez
rapidement deux fois suite sur NEW GAME. Si vous n’appuyez
pas assez rapidement, l’ordinateur ne sera pas réinitialisé et
vous devrez recommencer. Dès que l’ordinateur a été
réinitialisé, New Game s’affiche brièvement, ainsi que le
symbole pour les Blancs („) et la pendule d’échecs
(00:00:00).
c. Pour déplacer une pièce, appuyez doucement à l’aide du stylet
sur la pièce que vous désirez déplacer jusqu’à ce que vous
entendiez un ‘bip’ et que la pièce commence à clignoter. Si vous
65
FRANÇAIS
INTRODUCTION
Félicitations! Vous venez d’acheter un ordinateur Touch Screen
Travel Chess! Avec ses capacités extraordinaires au jeu d’échecs, cet
ordinateur élégant vous offre une interface tactile pratique et facile à
utiliser. Portable et toujours prêt à voyager, il vous permettra
d’apprécier une partie d’échec où que vous soyez, chez vous ou en
vacances! Après vous être familiarisé avec les opérations de base,
vous pourrez découvrir de nouvelles options uniques à cet ordinateur.
Une nouvelle dimension des échecs s’ouvre à vous!
préférez, vous pouvez appuyer sur la pièce du bout des doigts
au lieu d’utiliser le stylet.
d. Appuyez ensuite à l’aide du stylet sur la case d’arrivée. Vous
entendez alors un deuxième ‘bip’ qui confirme le déplacement.
C’est maintenant à l’ordinateur de jouer. Vous remarquerez que
l’ordinateur déplace ses pièces instantanément en début de
partie au lieu de mettre un certain temps à réfléchir à un
déplacement. Il accède en effet à plusieurs coups préenregistrés dans sa bibliothèque d’ouvertures. Pour tout
complément d’informations, se référer au chapitre 2.9.
1.3 L’ordinateur déplace une pièce
Lorsque l’ordinateur déplace une pièce, il affiche tout d’abord
brièvement Thinking.... S’il est en train de réfléchir pour
déplacer les Noirs, l’affichage correspondant (ı) clignote et l’horloge
s’affiche. Une fois le déplacement effectué, l’ordinateur émet un ‘bip’
et affiche son déplacement (par ex., ıPe7-e5). La pièce clignote
brièvement en alternance sur les cases de départ et d’arrivée. Une
fois que la pièce a été déplacée sur l’échiquier, l’écran affiche à
nouveau votre horloge et c’est à vous de jouer.
1.4 Partie terminée? Commencer une nouvelle partie
Attention: Si vous réinitialisez l’ordinateur, la dernière partie
est effacée de la mémoire de l’ordinateur!
Lorsque vous terminez une partie (ou si vous décidez
d’abandonner une partie en cours), vous pouvez facilement commencer une nouvelle partie! Réinitialisez l’ordinateur en appuyant
deux fois de suite sur NEW GAME. New Game s’affiche alors,
indiquant que l’ordinateur est prêt à commencer une nouvelle partie
d’échecs au niveau de jeu sélectionné.
Avertissement concernant les niveaux de tournoi: si vous
réinitialisez l’ordinateur avant qu’une partie du niveau tournoi soit
terminée, l’ordinateur vous demandera de confirmer le résultat de la
partie avant de commencer une nouvelle partie. Se référer au
chapitre 2.5.
1.5 Trop facile/difficile? Changez de niveau!
Lorsque vous allumez l’ordinateur pour la première fois, le niveau
de jeu est automatiquement réglé au niveau 63, avec un temps de
réponse de l’ordinateur de cinq secondes en moyenne pour chaque
66
OPTIONS D’AFFICHAGE A MEMORISER!
déplacement. Vous pouvez cependant sélectionner un des 100
niveaux de jeu! Pour une description de tous les niveaux et les
instructions à suivre pour changer le niveau, veuillez vous référer au
chapitre 5.
2. AUTRES FONCTIONS A DECOUVRIR
2.1 A qui le tour? Vérifiez l’affichage!
Lorsque l’ordinateur joue avec les Noirs, un carré noir (ı) clignote
à l’écran. Une fois que l’ordinateur a déplacé une pièce, un carré
blanc non clignotant („) s’affiche à l’écran, indiquant ainsi que c’est
votre tour de jouer avec les Blancs.
2.2 Coups spéciaux
Veuillez noter les coups spéciaux suivants.
Prises: Les prises sont indiquées par une x, comme dans
ıPa7xb6.
Prise en passant: Pour ce type de prise (indiquée par l’affichage
de EP après le déplacement), l’ordinateur vous rappelle de retirer le
pion qui a été pris en le faisant clignoter. Appuyez simplement sur le
pion correspondant pour le retirer de l’échiquier.
Roque: Une fois le Roi déplacé, la Tour clignote. Déplacez la Tour
pour effectuer un Roque. Un Petit roque est affiché comme O-O, un
Grand roque comme O-O-O.
67
FRANÇAIS
• Pour faire varier la luminosité: sélectionnez un contraste
différent pour l’écran LCD, comme indiqué dans le chapitre
4.9.
• Pour ralentir/accélérer la vitesse de déroulement:
sélectionnez une autre vitesse de déroulement pour l’écran
LCD, comme indiqué dans le chapitre 4.10.
• Pour interrompre le menu déroulant: appuyez une fois
sur la touche GO/STOP; appuyez sur CLEAR pour
réactiver le menu déroulant. Cette fonction est
particulièrement utile si vous avez activé plusieurs
affichages du mode Info automatique lorsque l’ordinateur
est en train de réfléchir.
Promouvoir un pion:
• Lors de la promotion d’un pion, appuyez tout d’abord sur la
case de départ, comme à votre habitude. L’affichage indique alors les
pièces disponibles (Q R B N). Pour choisir une Reine, appuyez
simplement sur la case d’arrivée pour confirmer votre déplacement.
Si vous préférez choisir une Tour (R), un Fou (B) ou un Cavalier (N),
appuyez une fois sur le symbole correspondant. Votre choix sera
brièvement confirmé (par ex. Prom: rook). Appuyez sur la case
d’arrivée pour confirmer votre déplacement et la pièce est
automatiquement modifiée sur l’échiquier. NB: si vous changez d’avis
sur la pièce à sélectionner avant d’appuyer sur la case d’arrivée,
appuyez simplement sur un des autres symboles.
• Lors de la promotion d’un pion par l’ordinateur, celui-ci
indique son déplacement ainsi que la pièce sélectionnée, par ex.
ıPh2-h1/Q.
2.3 Coups illégaux/non autorisés
Votre ordinateur connaît parfaitement les règles des échecs et il ne
trichera jamais! Si vous essayez de faire un coup non autorisé,
l’ordinateur émet un son aigu pour vous avertir de votre erreur. C’est
le cas, par exemple, si vous appuyez sur une case de départ ou
d’arrivée qui n’est pas autorisée, une pièce ou couleur incorrecte ou
une touche du jeu non valide.
Si vous appuyez sur une case d’arrivée non autorisée, l’affichage
continue simplement à afficher la case de départ de la pièce. Pour
continuer, appuyez sur une case autorisée. Si vous appuyez sur une
case de départ mais que vous décidez de ne plus déplacer cette
pièce, appuyez à nouveau sur la case pour annuler votre sélection. Si
vous changez d’avis après avoir déplacé la pièce, suivez les instructions figurant dans le chapitre 6.
2.4 Echec, mat et partie nulle
Si le Roi est mis en échec, l’ordinateur affiche brièvement Check
avant de déplacer la pièce. Si l’ordinateur découvre un mat forcé, il
annonce brièvement ce mat (par ex. Mate in 3). Lorsqu’une
partie se termine par un échec et mat, l’ordinateur vous félicite ou
vous offre ses condoléances, selon si vous avez gagné ou perdu.
Checkmate! s’affiche alors, indiquant que la partie est terminée.
L’ordinateur annonce que la partie est nulle après un Pat, une
triple répétition de la position ou par la règle des 50 coups. Dans
chacun des cas, le message correspondant est affiché à l’écran.
68
2.6 Vous avez besoin d’un conseil? Il suffit de demander!
Si vous voulez qu’on vous conseille un déplacement, il vous suffit
de le demander au Touch Screen Travel Chess! Appuyez sur la
touche HINT/INFO lorsque votre tour est venu de jouer. L’ordinateur
affiche alors aussitôt une suggestion de déplacement. Par exemple, si
l’ordinateur vous suggère le déplacement e4xd5, il affichera Ply 1:
e4xd5. Un demi-coup (ou “ply”) est un coup joué par l’un ou l’autre
des adversaires. L’ordinateur peut mettre jusqu’à 5 secondes (ou
plus) pour suggérer un déplacement. Pour accepter la suggestion,
effectuez le déplacement sur l’échiquier. Pour ignorer ce conseil,
effectuez simplement le déplacement de votre choix. Vous pouvez
également masquer l’affichage du conseil en appuyant sur CLEAR.
2.7 Interrompre une recherche
Pour interrompre l’ordinateur alors qu’il est en train de réfléchir à
un déplacement, appuyez sur la touche ENTER. Ceci oblige
l’ordinateur à effectuer le meilleur déplacement qu’il a trouvé jusqu’ici.
Cette fonction est parfois très utile dans les niveaux plus élevés,
lorsque l’ordinateur met trop longtemps avant de jouer ou dans les
niveaux Analyse ou Tactique, pour lesquels l’ordinateur réfléchit
indéfiniment jusqu’à ce que vous l’arrêtiez.
Pour le niveau Résolution de problèmes, l’ordinateur ne déplace
pas de pièce lorsque vous appuyez sur ENTER. A la place,
l’ordinateur affiche No move found! pour indiquer qu’il a été
69
FRANÇAIS
2.5 Essayez le système d’auto-évaluation!
Lorsque vous jouez une partie du niveau Tournoi, l’ordinateur vous
donne un classement ELO approximatif à la fin de la partie, en
fonction de vos performances. Ce classement est basé sur une
méthode reconnue dans le monde entier pour évaluer les performances d’un joueur d’échec ou pour décrire la force de jeu relative.
L’organisation internationale qui régit le jeu d’échecs est la FIDE ou
Fédération internationale des échecs. Le classement FIDE est
souvent décrit comme un classement ELO. Aux Etats-Unis, la ‘United
States Chess Federation’ (USCF) utilise un système de classement
similaire. Le classement est généralement représenté par un nombre
à quatre chiffres, les joueurs les plus fort ayant un classement plus
élevé. En haut de l’échelle, les Maîtres ont des scores de plus de
2200 points et les Grands Maîtres des tournois internationaux de plus
de 2500 points. Tentez votre chance! Veuillez vous référer au chapitre
5.3 pour un complément d’informations sur les niveaux Tournoi.
interrompu avant de trouver une position de mat. Pour continuer,
passez à un autre niveau.
2.8 Changement de camp
Pour changer de camp avec l’ordinateur, appuyez sur ENTER
pendant votre tour. L’ordinateur effectuera alors le prochain
déplacement à votre place. Vous pouvez changer de camp autant de
fois que vous le souhaitez en appuyant à chaque fois sur ENTER.
Vous voulez que l’ordinateur commence la partie avec les Blancs?
Appuyez deux fois sur NEW GAME, puis sur ENTER.
Vous voulez voir l’ordinateur jouer contre lui-même? Appuyez sur
ENTER après chaque déplacement et regardez l’ordinateur effectuer
l’un après l’autre chacun des déplacements. Etudiez ses mouvements
stratégiques pour améliorer votre propre jeu!
2.9 Ouvertures pré-enregistrées
Au début d’une partie, la réponse de l’ordinateur est souvent
immédiate pour un grand nombre de niveau. Il utilise en effet des
déplacements enregistrés dans sa bibliothèque d’ouvertures. Cette
bibliothèque comprend les plus grandes ouvertures et un grand
nombre de positions tirées des parties de Grand Maîtres. Si la
position des pièces sur l’échiquier est enregistrée dans sa
bibliothèque, l’ordinateur donnera la réponse enregistrée pour cette
partie au lieu de réfléchir au prochain coup. Veuillez noter que la
bibliothèque d’ouvertures est utilisée pour tous les niveaux, sauf le
niveau de résolution de problèmes.
2.10 Utilisation du temps de l’adversaire pour réfléchir
Au cours d’une partie, vous remarquerez que l’ordinateur répond
parfois immédiatement à vos déplacements, même en milieu de
partie ou pour les niveaux plus élevés. Ceci est dû au fait que
l’ordinateur utilise votre temps de réflexion pour préparer son
prochain déplacement et élaborer une stratégie. Il essaye d’anticiper
le déplacement que vous allez effectuer et de préparer une défensive
alors que vous êtes encore en train de réfléchir. Si l’ordinateur a
deviné correctement, il n’y a aucune raison pour lui de continuer à
réfléchir – il effectue donc le déplacement auquel il avait déjà réfléchi!
Veuillez noter que l’ordinateur n’utilise pas votre temps de réflexion
pour les niveaux de Divertissement.
70
2.11 Mise hors tension/Mémoire de la partie
Vous pouvez interrompre une partie en cours et mettre votre
ordinateur hors tension en appuyant sur GO/STOP. L’écran affiche
alors Stop?. Confirmez que vous désirez éteindre votre ordinateur
en appuyant à nouveau sur GO/STOP. La partie est alors interrompue
et l’ordinateur conserve en mémoire cette partie pendant un an au
maximum. Lorsque vous remettez l’ordinateur sous tension, vous
pourrez recommencer la partie là où vous vous étiez arrêté. Si vous
préférez ne pas éteindre votre ordinateur après avoir appuyé sur GO/
STOP, appuyez sur CLEAR pour annuler votre sélection.
Si aucun déplacement n’est effectué ou si aucune touche n’est
appuyée pendant plus de 20 minutes, la fonction de Mise hors
tension automatique éteint votre ordinateur. Pour continuer, appuyez
sur GO/STOP pour ré-allumer votre ordinateur. Veuillez noter que
votre ordinateur ne s’éteindra pas automatiquement s’il est en train
de réfléchir à un déplacement ou si le message Stop? est affiché.
71
FRANÇAIS
PETIT RECAPITULATIF DU MENU PRINCIPAL!
• ¿OPTION: Explorez des options de jeu excitantes.
• Mode Deux joueurs
• Mode Entraînement
• Algorithme de recherche
• Marche/Arrêt du son
• Mode Autobook
• Contraste de l’affichage LCD
• Blancs en haut
• Vitesse de l’affichage LCD
• Horloge de compte
• Mode Déplacement
à rebours
automatique
• Tic-tac de l’horloge
• ¿LEVEL: Choisissez un des 100 niveaux de jeu.
• ¿TAKEBACK: Revenez en arrière d’un ou plusieurs coups.
• ¿INFO: Sélectionnez divers affichages automatiques
d’information.
• Afficher les coups
• Afficher la progression
• Afficher les nœuds
• Afficher l’évaluation
• Afficher le temps par coup
• ¿SETUP: Mettez en place des pièces ou modifiez leur position
sur l’échiquier.
• ¿STUDY: Testez vos capacités à l’aide des 64 positions
d’étude.
3. LE MENU PRINCIPAL: ACCES AUX MODES SPECIAUX
L’ordinateur Touch Screen Travel Chess offre plusieurs modes et
options sélectionnables par l’utilisateur et accessibles à partir du
menu principal intégré. Après avoir appuyé sur la touche MENU,
l’objet ¿OPTION s’affiche immédiatement, le premier des six objets
du menu principal. Appuyez plusieurs fois sur ¯ (ou ˘) pour faire
défiler les objets du menu:
OBJET DU MENU PRINCIPAL .............. REFERENCE ............ AFFICHAGE
Mode Option ................................. Chapitre 4 .......... ¿OPTION
Mode Niveau ................................ Chapitre 5 .......... ¿LEVEL
Mode Retour en arrière ................ Chapitre 6 .......... ¿TAKEBACK
Mode Info ..................................... Chapitre 7 .......... ¿INFO
Mode Mise en place (Setup) ........ Chapitre 8 .......... ¿SETUP
Mode Etude .................................. Chapitre 9 .......... ¿STUDY
Pour sélectionner un des objets du menu principal, appuyez sur
ENTER. Quel que soit le mode choisi, un sous-menu s’affiche, vous
proposant d’autres choix. Certains modes (par ex. le Mode Option)
offrent un grand nombre de menus et de sous-menus, tandis que
d’autres (par ex. le mode Mise en place) vous permettront d’activer
une fonction particulière d’une partie. Puisque les instructions
dépendent du mode qui a été sélectionné, veuillez vous référer aux
chapitres indiqués pour de plus amples informations concernant leurs
caractéristiques principales. Après avoir sélectionné toutes les
options voulues et/ou modifié les options de jeu, appuyez à nouveau
sur MENU pour quitter le menu principal et retourner à votre partie.
4. MODE OPTION: POUR DES PARTIES PLUS VARIEES!
Vous voulez ajouter du piment à vos parties? Alors explorez les
différentes options de jeu disponibles à partir du mode Option! Tout
d’abord, apprenez à sélectionner et à activer ces options avant de
commencer une partie (ou en cours de partie) puis familiarisez-vous
avec les différentes options décrites dans ce chapitre.
Pour sélectionner les options de jeu
Appuyez sur MENU pour accéder au menu principal et afficher
l’objet ¿OPTION du Mode Option. Appuyez sur ENTER pour
accéder au Mode Option et afficher les premières des 11 options
indiquées ci-dessous. Appuyez plusieurs fois sur ¯ (ou ˘) pour faire
défiler toutes les options:
72
ENTRAINEZ-VOUS A SELECTIONNER UNE OPTION!
1. Appuyez sur MENU pour entrer dans le menu
principal. ¿OPTION s’affiche.
2. Appuyez sur ENTER pour entrer dans le mode
Options. Pour cet exemple, choisissons l’option
du tic-tac de l’horloge (Ticking Clock).
3. Appuyez cinq fois sur ¯, jusqu’à ce que l’affichage
indique ticks: off.
5. Appuyez sur CLEAR pour quitter le mode Options
et sur MENU pour quitter le mode Menu. Le ‘tictac’ de l’horloge se fait maintenant entendre!
NB: pour désactiver cette fonction, répétez les
étapes indiquées ci-dessus.
Pour tout complément d’informations, se référer au chapitre 4.6.
OPTION ................................................. REFERENCE ..... AFFICHAGE PAR DEFAUT
Mode Deux joueurs .................. Chapitre 4.1 ... player: P-C
Algorithme de recherche ......... Chapitre 4.2 ... search: select
Mode Autobook ........................ Chapitre 4.3 ... book: on
Blancs en haut. ........................ Chapitre 4.4 ... top: black
Horloge de compte à rebours .. Chapitre 4.5 ... clock: up
Tic-tac de l’horloge .................. Chapitre 4.6 ... ticks: off
Mode Entraînement ................. Chapitre 4.7 ... coach: off
Son activé/désactivé ................ Chapitre 4.8 ... sound: on
Contraste LCD ......................... Chapitre 4.9 ... contrast: 3
Vitesse LCD ............................. Chapitre 4.10 . LCD speed: 2
Mode Déplacement .................. Chapitre 4.11 . automove: on
automatique
Pour activer/désactiver une fonction ou pour sélectionner des
configurations d’options (si cela s’applique), appuyez sur ENTER
lorsque l’option est affichée. Si vous appuyez plusieurs fois sur
ENTER, vous ferez défiler tous les choix disponibles pour l’option
affichée. Lorsque votre choix est affiché, appuyez sur ¯ ou ˘ pour
73
FRANÇAIS
4. Appuyez sur ENTER pour activer cette option.
L’affichage indique alors ticks:on.
passer à une autre option ou appuyez sur CLEAR pour retourner au
Menu principal, puis sur MENU pour retourner à la partie en cours.
Pour de plus amples informations sur chacune de ces options,
veuillez consulter les chapitres de référence. NB: lorsque vous
réinitialisez l’ordinateur pour une nouvelle partie, la plupart des
options sélectionnées sont conservées pour la partie suivante. La
seule exception concerne le mode Deux joueurs qui retourne
automatiquement au mode Joueur contre Ordinateur lorsque vous
commencez une nouvelle partie.
4.1 Mode Deux joueurs
Options: player: P-C (Joueur contre Ordinateur)
player: P-P (Joueur contre Joueur)
L’ordinateur répond généralement automatiquement à l’un de vos
déplacements par un autre déplacement. Cependant, si vous activez
la fonction player: P-P, vous pourrez effectuer les déplacements
l’un après l’autre, sans que l’ordinateur ne déplace de pièces. Cette
option peut s’avérer utile dans les cas suivants:
• Suivez une partie de Maître. Appuyez sur ENTER pour voir quel
pièce l’ordinateur déplacerait quelle que soit la position des
pièces!
• Enregistrez vos propres parties d’échecs. Lorsqu’une partie est
terminée, jouez d’autres positions sur l’échiquier pour voir
comment d’autres déplacements auraient pu affecter le résultat
de la partie.
• Etudiez les ouvertures en les entrant manuellement.
• Jouez contre un(e) ami(e), l’ordinateur ayant le rôle d’arbitre.
L’ordinateur vérifiera que les déplacements sont effectués
conformément aux règles et tiendra un décompte du temps
accordé à chaque joueur!
Si vous jouez contre une autre personne et que vous voudriez
savoir quelle pièce l’ordinateur déplacerait s’il était à votre place,
appuyez sur ENTER pour faire jouer l’ordinateur à votre place. Après
cela, le mode Deux Joueurs sera toujours sélectionné et vous
pourrez continuer votre partie. Veuillez noter qu’avec cette option, la
partie retourne automatiquement à sa sélection par défaut (Joueur
contre Ordinateur) lorsque vous ré-initialisez l’ordinateur pour une
nouvelle partie.
74
4.3 Mode Autobook
Options: book: on / off
Cette fonction unique permet de suivre vos déplacements pendant
la phase d’ouverture de la partie – vous permettant de vous entraîner
à réaliser les ouvertures qui vous posent le plus de problèmes! C’est
un peu comme si vous aviez votre propre coach pour vous guider
dans vos ouvertures! Une fois l’option Autobook activée, l’ordinateur
‘surveille’ vos ouvertures alors que vous déplacez vos pièces.
Lorsque, à la fin d’une ouverture, vous vous trouvez dans une
mauvaise position au bout de quelques déplacements, l’ordinateur se
‘souviendra’ de l’ouverture en question. A l’avenir, l’ordinateur
essayera dès que possible de réaliser la même ouverture. Ceci vous
permettra de tester plusieurs déplacements et diverses stratégies
pour mieux vous familiariser avec cette ouverture et ainsi vous
améliorer!
4.4 Blancs en haut
Options: top: black / white
Vous voulez que l’ordinateur joue avec les blancs en haut de
l’échiquier? Alors sélectionnez l’option top: white au début
d’une nouvelle partie! Commencez la partie en appuyant sur ENTER
et l’ordinateur jouera en premier avec les Blancs en haut de l’écran.
NB: Lorsque l’ordinateur joue avec les Blancs en haut de
l’échiquier, vous remarquerez que les Rois et les Reines sont
positionnés différemment et que la notation de l’échiquier est
automatiquement inversée.
4.5 Horloge de compte à rebours
Options: clock: up / down
Normalement, l’ordinateur sélectionne par défaut l’option clock:
up qui permet d’afficher le temps écoulé. Cependant, si vous activez
75
FRANÇAIS
4.2 Algorithme de recherche
Options: search: select / brute
Le programme de cet ordinateur utilise normalement un
Algorithme de recherche sélective. Pour ce type de recherche,
l’ordinateur se concentre principalement sur les déplacements qui ont
le plus de chances de réussir. Ceci permet d’obtenir des
combinaisons plus rapides. Mais vous pouvez également sélectionner
l’algorithme de force brute, plus lent mais beaucoup plus puissant,
qui minimise au maximum les déplacements dangereux.
l’horloge de compte à rebours, vous pourrez afficher le temps restant.
Voici les symboles qui vous permettent de faire rapidement la
différence entre les deux types d’horloges:
[/]
{/}
Horloge du temps écoulé (Blancs/Noirs)
Horloge de compte à rebours (Blancs/Noirs)
NB: L’option Horloge de compte à rebours n’est disponible qu’en
combinaison avec les niveaux Tournoi et Partie rapide.
4.6 ‘Tic-tac’ de l’horloge
Options: ticks: off / on
Si vous activez cette option (‘on’), un ‘tic-tac’ se fait entendre,
simulant ainsi le bruit d’une horloge d’échecs. Vous pourrez ainsi
recréer chez vous les sensations d’un tournoi de championnat
d’échecs!
4.7 Mode Coach
Options: coach: off / novice / inter. / adv.
Activez le mode Coach pour que l’ordinateur vous ‘regarde’ jouer
et vous apporte son aide si vous en avez besoin! Avec cette fonction
unique, l’ordinateur pourra vous avertir si vous risquez de perdre une
pièce ou s’il pense que votre dernier déplacement risque de vous
mettre dans une situation très difficile. Des messages s’afficheront
comme Your Queen is in jeopardy! (votre Reine est en
danger) ou Watch your Knight! (Attention à votre Cavalier!).
Si par contre, l’ordinateur pense que la situation est à votre avantage,
il affichera des messages comme He’s giving you a big
chance! (Il vous fait une fleur!). Parfois, l’ordinateur vous
demandera également de confirmer ou d’annuler un déplacement qui
semble (de façon évidente) illogique. Si vous choisissez d’annuler
votre coup, votre pièce reviendra en arrière et vous pourrez essayer
un autre déplacement!
Pour sélectionner l’une des options Coach, appuyez plusieurs fois
sur ENTER jusqu’à ce que le niveau désiré soit affiché. Lorsque vous
quittez le mode Options et retournez à la partie, la dernière option
Coach affichée est celle qui sera utilisée pour la partie. Les options
Coach suivantes sont disponibles:
• coach: off: Aucune fonction de coach activée.
• coach: novice: Pour cette option, l’ordinateur considère
que vous connaissez un grand nombre des déplacements
76
4.8 Son activé/désactivé
Options: sound: on / off
Sélectionnez l’un ou l’autre de ces options pour activer ou
désactiver les sons lors d’une partie d’échecs.
4.9 Contraste LCD
Options: contrast: 1 / 2 / 3 / 4 / 5
Cette option vous permet d’ajuster le contraste de l’écran LCD, 1
étant le plus lumineux et 5 le plus sombre. Si vous trouvez que
l’option par défaut (3) est trop lumineuse ou trop sombre, modifiez-la
en appuyant plusieurs fois sur ENTER jusqu’à ce que l’option désirée
soit affichée.
4.10 Vitesse LCD
Options: LCD speed: 1 / 2 / 3 / 4
Vous pouvez contrôler la vitesse de déroulement de l’affichage
LCD à partir cette option, 1 correspondant à la vitesse la plus lente et
4 la plus rapide. Si vous trouvez que l’option par défaut (2) est trop
lente ou trop rapide, modifiez-la en appuyant plusieurs fois sur
ENTER jusqu’à ce que l’option désirée soit affichée.
4.11 Mode Automove
Options: automove: on / off
Normalement, lorsque l’ordinateur déplace une pièce, il fait
brièvement clignoter les cases de départ et d’arrivée, puis effectue le
77
FRANÇAIS
tactiques et stratégiques. Il ne vous avertira que pour les concepts les moins évidents, comme les sacrifices ou les
enchaînements.
• coach: intermediate: Pour cette option, l’ordinateur
vous donne l’aide qu’il considère appropriée pour les joueurs
ayant conscience des points les plus évidents mais qui ont
besoin d’être averti pour les coups plus sophistiqués.
• coach: advanced: Pour cette option, vous serez averti
lorsque l’ordinateur estime que cela est nécessaire, par exemple
lorsque vous faites une erreur ou lorsque l’une de vos pièces est
en danger.
Lorsque le mode Coach est activé, des bips intermittents se font
entendre lorsque c’est votre tour de jouer avec les Blancs.
L’ordinateur vous rappelle ainsi qu’il attend que vous déplaciez une
pièce.
déplacement sur l’échiquier. Cependant, si vous sélectionnez l’option
automove: off, l’ordinateur annoncera son déplacement
comme d’habitude, mais ce sera à vous d’effectuer le déplacement
sur l’échiquier. Lorsque l’ordinateur annonce qu’il est prêt à déplacer
une pièce, il fait clignoter la case de départ. Appuyez sur la pièce qui
clignote: elle sera alors déplacée sur la case d’arrivée. Appuyez sur
cette case d’arrivée pour compléter le déplacement.
5. MODE NIVEAU: UN CHOIX ENTRE 100 NIVEAUX DIFFERENTS!
Votre ordinateur vous permet de choisir entre 100 niveaux de jeu
différents! Les niveaux sont divisés en deux catégories principales:
• NIVEAUX DE DIVERTISSEMENT (1-60): Ces niveaux
permettent aux débutants et aux joueurs moyens d’améliorer
leurs aptitudes aux échecs. Dans un grand nombre de niveaux
de divertissement, vous verrez que l’ordinateur fait
volontairement des erreurs pour que vous puissiez en tirer des
leçons!
• NIVEAUX DE COMPETITION (61-100): Ces niveaux sont
destinés aux joueurs moyens ou expérimentés. Parmi ceux-ci,
vous trouverez des niveaux permettant un jeu en amateur et en
tournoi, la résolution des problèmes, les parties rapides et les
niveaux spéciaux pour enrichir votre expérience de jeu. Lorsque
vous sélectionnez un niveau, gardez à l’esprit que plus
l’ordinateur aura le temps de réfléchir à ses déplacements,
mieux il jouera – tout comme un être humain jouant aux échecs!
Sélectionner un niveau de jeu
Appuyez sur MENU pour accéder au menu principal puis appuyez
sur ¯ jusqu’à ce que l’ordinateur affiche ¿LEVEL. Appuyez sur
ENTER pour accéder au mode Niveau et vous verrez apparaître le
niveau en cours de sélection, comme par ex. <00:05/move> (le
niveau par défaut la première fois que l’ordinateur est allumé). Pour
changer de niveau, appuyez sur ˘ ou ¯ pour augmenter/diminuer
d’un niveau ou utilisez votre stylet pour appuyer sur > ou < pour
augmenter/diminuer de dix niveaux. Veuillez noter qu’en maintenant
les touches ˘ ou ¯ enfoncées, vous augmenterez ou diminuerez
automatiquement les niveaux de ‘un’ à la fois, jusqu’à ce que vous
relâchiez la touche. Lorsque le niveau désiré est affiché, appuyez sur
ENTER pour valider votre sélection. L’ordinateur vous confirmera que
le niveau a été modifié en affichant Level changed et vous
78
CHANGER DE NIVEAU, C’EST FACILE!
>`
<`
3. Appuyez sur ENTER pour accéder au mode
Niveau. Le niveau en cours est alors affiché.
Veuillez vous référer si nécessaire au chapitre 5
pour identifier le niveau en cours.
4. Essayons de régler une Partie rapide, niveau 81.
Appuyez sur ˘ ou ¯ pour augmenter ou diminuer
les niveaux de ‘un’, appuyez sur > ou < pour
augmenter ou diminuer les niveaux de ‘dix’.
Recherchez à l’écran < 5 min/game >.
5. Lorsque < 5 min/game > est affiché,
appuyez sur ENTER puis appuyez sur MENU
pour quitter le mode Menu. Vous êtes maintenant
prêts à tester votre nouveau niveau!
Pour plus d’informations, voir le chapitre 5.
retournerez au menu principal. Appuyez sur MENU pour retourner à
la partie.
Si vous accédez au mode Niveau simplement pour vérifier le
niveau de jeu (et non pour le modifier), appuyez sur CLEAR pour
retourner au menu principal. Après avoir quitté le menu principal en
appuyant sur MENU, vous retournerez à la partie sans avoir modifié
ni l’horloge ni le niveau de jeu.
Veuillez noter les points suivants concernant la sélection des
niveaux:
• Vous pouvez changer le niveau à chaque fois que c’est votre tour
de jouer.
• Si vous modifiez le niveau, vous remettrez l’horloge d’échecs à
zéro.
• Si vous changez de niveau alors que l’ordinateur est en train de
réfléchir, celui-ci abandonnera sa recherche et remettra l’horloge
à zéro.
79
FRANÇAIS
1. Appuyez sur MENU pour accéder au menu
principal. ¿OPTION s’affiche.
2. Appuyez une fois sur ¯ pour afficher ¿LEVEL.
NIVEAUX DE DIVERTISSEMENT
5.1 Niveaux de divertissement
Niveau Description
Affichage
1 ....... Niveau de divertissement 1 ............... <Fun Level 1>
2 ....... Niveau de divertissement 2 ............... <Fun Level 2>
3 ....... Niveau de divertissement 3 ............... <Fun Level 3>
…jusqu’au…
58 ...... Niveau de divertissement 58 ............. <Fun Level 58>
59 ...... Niveau de divertissement 59 ............. <Fun Level 59>
60 ...... Niveau de divertissement 60 ............. <Fun Level 60>
Les niveaux de divertissement sont principalement réservés aux
débutants et aux joueurs les plus jeunes. Pour ces niveaux,
l’ordinateur Touch Screen Travel Chess est beaucoup plus ‘humain’
qu’un grand nombre d’autres ordinateurs de jeu – offrant ainsi à
chaque joueur la possibilité de gagner dans un monde où les
ordinateurs d’échecs sont réputés être difficiles à battre. On croit
généralement que les ordinateurs ne font pas d’erreurs mais ce n’est
pas le cas de cet ordinateur à certains niveaux!
Les handicaps sont intégrés à ces niveaux afin de montrer aux
joueurs débutants les erreurs les plus courantes. Vous remarquerez
parfois que l’ordinateur ignore délibérément le potentiel de telle ou
telle pièce, ainsi que des concepts clés comme la structure des
pions, la notion de centre fort, de mobilité des pièces ou de sécurité
du Roi. Il pourra se mettre progressivement en échec, utiliser sa
Reine trop tôt ou faire des prises ou des mises en échec impulsives.
Les livres donnent souvent les règles de base des échecs et
pourtant, les joueurs jouent souvent contre des adversaires qui
enfreigne ces règles sans se faire remarquer. Les niveaux de divertissement permettent d’empêcher toutes ces erreurs typiques,
permettant ainsi au débutant de renforcer son jeu contre l’adversaire
humain auquel il devra faire face! Pour certains des niveaux de
divertissement les moins forts, l’ordinateur laissera non seulement
des pièces non protégées, mais il pourra même essayer de perdre
des pièces. Plus les niveaux deviennent élevés, moins l’ordinateur
perd des pièces facilement. La valeur des pièces devient alors de
plus en plus importante et l’ordinateur est moins susceptible de
‘donner’ des pièces. Pour les niveaux de divertissement plus élevés,
l’ordinateur ne donnera pas de pièces mais il jouera comme un
débutant qui a appris les règles de base des échecs. Il pourra encore
faire quelques erreurs, comme s’exposer à une mise en échec ou à
un échec et mat. Essayez plusieurs niveaux de divertissement – et
essayez de tirer des leçons des erreurs de l’ordinateur!
80
5.3 Niveaux Tournoi
Niveau Nombre déplacements/Durée totale
Affichage
71 ...... 40 déplacements en 1 heure 20 min. ... < 40 in 1:20 >
72 ...... 40 déplacements en 1 heure 30 min. .. < 40 in 1:30 >
73 ...... 35 déplacements en 1 heure 45 min. .. < 35 in 1:45 >
74 ...... 40 déplacements en 1 heure 45 min. .. < 40 in 1:45 >
75 ...... 35 déplacements en 1 heure 30 min. .. < 35 in 1:30 >
76 ...... 40 déplacements en 2 heures .............. < 40 in 2:00 >
77 ...... 45 déplacements en 2 heures 30 min. . < 45 in 2:30 >
78 ...... 50 déplacements en 2 heures. ............. < 50 in 2:00 >
79 ...... 40 déplacements en 2 heures 30 min. . < 40 in 2:30 >
80 ...... 40 déplacements en 3 heures .............. < 40 in 3:00 >
Pour les niveaux ‘Tournoi’, vous devrez effectuer un certain
nombre de déplacements en un temps donné. Si un joueur dépasse
la limite de temps qui lui est impartie pour un nombre donné de
déplacements, ceci est affiché à l’écran et le joueur perd la partie.
Comme décrit ci-dessus dans le chapitre 2.5, l’ordinateur utilise un
système d’auto-évaluation lorsque vous jouez une partie de niveau
Tournoi. A la fin d’une partie à ce niveau et après avoir ré-initialisé
l’ordinateur en appuyant deux fois sur NEW GAME, l’ordinateur
affiche rapidement votre classement avant de passer à la nouvelle
81
FRANÇAIS
NIVEAUX COMPETITION
5.2. Niveau Amateur
Niveau Temps moyen par déplacement
Affichage
61 ............ 1 seconde par déplacement ............ <00:01/move>
62 ............ 2 secondes par déplacement ........... <00:02/move>
63 ............ 5 secondes par déplacement ........... <00:05/move>
64 .......... 10 secondes par déplacement ........... <00:10/move>
65 .......... 15 secondes par déplacement ........... <00:15/move>
66 .......... 30 secondes par déplacement ........... <00:30/move>
67 .......... 45 secondes par déplacement ........... <00:45/move>
68 ............ 1 minute par déplacement ............... <01:00/move>
69 ............ 2 minutes par déplacement .............. <02:00/move>
70 ............ 3 minutes par déplacement .............. <03:00/move>
Lorsque vous choisissez l’un des niveaux figurant ci-dessus, vous
sélectionnez un temps de réponse moyen pour l’ordinateur. Veuillez
noter que les temps de réponse donnés sont une moyenne effectuée
sur un grand nombre de déplacements. A l’ouverture et en fin de
partie, l’ordinateur jouera plus rapidement mais au milieu d’une
partie, il mettra plus longtemps à réfléchir.
partie. Si vous n’avez pas eu le temps de voir votre classement, vous
pouvez l’afficher à nouveau à tout moment en appuyant cinq fois de
suite sur HINT/INFO. Pour masquer l’affichage, appuyez sur CLEAR.
Si vous ré-initialisez l’ordinateur pour une nouvelle partie pendant
un jeu au niveau Tournoi et avant la fin de la partie, l’ordinateur vous
permettra de décider de l’issue de la partie, comme indiqué cidessous:
• Affichage = Rate as draw? (match nul?)
Si vous appuyez sur ENTER, ce classement sera affiché.
Si vous appuyez sur ˘:
• Affichage = Rate as win? (partie gagnée?)
Si vous appuyez sur ENTER, ce classement sera affiché.
Si vous appuyez sur ˘:
• Affichage = Machine wins? (l’ordinateur a gagné?)
Si vous appuyez sur ENTER, ce classement sera affiché.
Si vous appuyez sur ˘:
L’affichage indique à nouveau Rate as draw?.
Pour obtenir un classement, vous devez répondre à la question
posée ci-dessus en appuyant sur ENTER! Si, pour une raison ou
pour une autre, vous ne voulez pas que la partie soit prise en
considération, appuyez sur CLEAR en réponse à l’une des questions
posées ci-dessus. L’ordinateur confirmera votre choix en affichant
Game not rated (partie non classée).
5.4 Niveaux Partie rapide
Niveau
Temps total par partie
Affichage
81 .............. 5 minutes par partie .................. < 5 min/game>
82 .............. 7 minutes par partie .................. < 7 min/game>
83 .............. 10 minutes par partie .................. <10 min/game>
84 .............. 15 minutes par partie .................. <15 min/game>
85 .............. 20 minutes par partie .................. <20 min/game>
86 .............. 30 minutes par partie .................. <30 min/game>
87 .............. 45 minutes par partie .................. <45 min/game>
88 .............. 60 minutes par partie .................. <60 min/game>
89 .............. 90 minutes par partie .................. <90 min/game>
90 ............ 100 minutes par partie .................. <100 min/game>
Pour les niveaux Partie rapide (‘Speed Chess’), vous déterminez la
durée totale de la partie. Si la durée du temps accordé est dépassée,
l’ordinateur indique quel camp a perdu à cause du temps, par ex.
White time out. Pour ces niveaux, vous préférerez peut-être
activer l’option ‘Horloge de compte à rebours’ pour indiquer le temps
restant au lieu du temps qui s’est écoulé (voir chapitre 4.5).
82
5.6 Niveau tactique
Niveau
Description
Affichage
99 .... Jeu tactique (aucune limite de temps) ... < Tactical >
Au niveau tactique, le but de l’ordinateur est de trouver la meilleure
séquence tactique. Ceci est également effectué plus rapidement
qu’en niveau de jeu normal. L’ordinateur cherche indéfiniment jusqu’à
ce qu’il trouve une combinaison gagnante ou jusqu’à ce que vous
arrêtiez la recherche en appuyant sur ENTER. Le niveau tactique est
idéal pour enrichir vos connaissances, car il permet à l’ordinateur de
se concentrer sur des positions tactiques!
5.7 Niveau analyse
Niveau
Description
Affichage
100 ...... Analyse (aucune limite de temps) ....... < Infinite >
Au niveau analyse, l’ordinateur cherche indéfiniment jusqu’à ce
qu’il trouve un mat forcé ou jusqu’à ce que vous arrêtiez la recherche
en appuyant sur ENTER. Si la recherche est interrompue, l’ordinateur
effectue le coup qu’il considère comme étant le meilleur à ce moment. Essayez d’utiliser au maximum les possibilités offertes par ce
83
FRANÇAIS
5.5 Niveau résolution de problèmes
Niveau
Problème
Affichage
91 .................... Mat en 1 coup. ....................... < Mate in 1 >
92 .................... Mat en 2 coups ...................... < Mate in 2 >
93 .................... Mat en 3 coups ...................... < Mate in 3 >
94 .................... Mat en 4 coups ...................... < Mate in 4 >
95 .................... Mat en 5 coups ...................... < Mate in 5 >
96 .................... Mat en 6 coups ...................... < Mate in 6 >
97 .................... Mat en 7 coups ...................... < Mate in 7 >
98 .................... Mat en 8 coups ...................... < Mate in 8 >
En sélectionnant un de ces niveaux, vous activerez un programme
de recherche de mat. Si vous vous trouvez dans une position où un
mat est possible et que vous aimeriez que l’ordinateur trouve la
combinaison, sélectionnez un des niveaux résolution de problèmes.
Votre ordinateur peut résoudre un mat jusqu’à un maximum de huit
coups. Il trouve généralement plus rapidement les mats réalisés en 1
à 5 coups, tandis que les solutions en 6 à 8 coups prennent plus de
temps. Si l’ordinateur ne peut pas trouver de mat ou s’il n’y a aucun
mat possible, l’ordinateur affiche brièvement No move found!.
Vous pouvez continuer à jouer en passant à un autre niveau si vous
le désirez.
niveau - mettez par exemple des pièces en position sur l’échiquier et
laissez l’ordinateur réfléchir aux meilleurs coups possibles! Si vous
laissez l’ordinateur réfléchir, il recherchera le meilleur coup pendant
des heures, voire des jours!
6. MODE RETOUR EN ARRIERE: COMMENT REVENIR EN ARRIERE
Lorsque vous jouez aux échecs contre l’ordinateur, rien n’est
irréparable: vous pouvez changer d’avis ou effectuer un autre coup à
tout moment de la partie! Lorsque c’est votre tour de jouer, appuyez
simplement sur MENU pour accéder au menu principal et appuyez
plusieurs fois sur ¯ jusqu’à ce que l’ordinateur affiche ¿TAKEBACK.
Appuyez sur ENTER pour accéder au mode Retour en arrière. Le
dernier coup effectué s’affiche. Appuyez sur ¯ pour annuler ce coup:
les pièces semblent alors revenir en arrière sur l’échiquier. Le coup
précédent s’affiche alors et vous pouvez à nouveau appuyer sur ¯
pour annuler ce coup, et ce jusqu’au début de la partie si vous le
désirez. Une fois arrivé au début de la partie, l’ordinateur affiche End
takebacks (fin des retours en arrière) et retourne
automatiquement au menu principal. Veuillez noter que, tant que vous
n’êtes pas retourné au tout début de la partie, vous pouvez toujours
appuyer sur ˘ pour sélectionner à nouveau un des coups suivants, si
vous le désirez. Pour reprendre la partie, quelle que soit la position
des pièces sur l’échiquier, appuyez sur CLEAR puis sur MENU.
Pour utiliser un raccourci au mode Retour en arrière, appuyez
simplement sur la case d’arrivée du dernier coup effectué.
L’ordinateur affiche brièvement TAKEBACK ainsi que le dernier coup
effectué. Pour annuler ce dernier coup, appuyez sur ¯. Si nécessaire,
appuyez plusieurs fois de suite sur ¯ pour annuler plusieurs coups,
comme indiqué ci-dessus. Pour reprendre la partie, appuyez sur
CLEAR.
7. MODE INFO: REGARDEZ L’ORDINATEUR REFLECHIR!
Imaginez la situation suivante: Vous jouez aux échecs avec
un(e) ami(e) et c’est son tour de jouer. Vous aimeriez savoir à quel
coup il/elle est en train de réfléchir et ce qu’il/elle pense de la position
actuelle des pièces sur l’échiquier. Mais bien sûr, vous n’osez pas lui
demander, car cela ne se fait pas! Eh bien maintenant, lorsque vous
jouez contre cet ordinateur, vous pouvez lui demander tout ce que
vous voulez et l’ordinateur vous répondra! En fait, vous pouvez
obtenir une multitude d’informations sur le processus de réflexion de
84
l’ordinateur et vous pourrez ainsi utiliser ces informations pour
améliorer votre connaissance des échecs!
Vous pouvez accéder à tout moment à ces informations à partir du
mode Info. Comme indiqué ci-dessous, vous pouvez afficher ces
informations manuellement en appuyant sur HINT/INFO ou les
afficher automatiquement à chaque fois que l’ordinateur réfléchit à
son prochain coup.
NB: Les options du mode Info sélectionnées pour l’affichage
informatique ne sont activées que lorsque l’ordinateur est en
train de réfléchir!
Appuyez sur MENU pour accéder au menu principal et appuyez
plusieurs fois sur ¯ jusqu’à ce que l’ordinateur affiche ¿INFO.
Appuyez sur ENTER pour accéder au mode Info. La première option
de ce mode s’affiche (parmi les 5 options disponibles, comme indiqué
ci-dessous). Appuyez plusieurs fois sur ¯ ou ˘ pour faire défiler les
options suivantes:
• Show Moves (afficher les coups): Pour afficher les coups que
l’ordinateur prévoit de jouer, jusqu’à un maximum de quatre
coups. Voir le chapitre 7.1.
Options: 0 / 1 / 2 / 3 / 4 moves
• Show Nodes (afficher les nœuds): Pour afficher le nombre de
nœuds (ou positions) recherchés par seconde. Voir le chapitre
7.2.
Options: nodes: off / on
• Show Time per Move (afficher le temps par coup): Pour afficher
le temps utilisé jusqu’ici pour le coup. Voir le chapitre 7.3.
Options: time/move: off / on
• Show Progress (afficher la progression): Pour afficher les
détails de la recherche de l’ordinateur et du coup auquel
l’ordinateur réfléchit. Voir le chapitre 7.4.
Options: progress: off / on
• Show Evaluation (afficher l’évaluation): Pour afficher le score
pour la position actuelle. Voir le chapitre 7.2.
Options: evaluation: off / on
85
FRANÇAIS
Affichage automatique des infos
En activant une ou plusieurs des options du mode Info indiquées
ci-dessous, l’ordinateur affiche automatiquement ces informations à
chaque fois qu’il réfléchit à son prochain coup. Vous pourrez ainsi
quasiment «voir» l’ordinateur réfléchir!
Pour activer ou désactiver une option (on/off) ou pour sélectionner
un paramétrage d’une option, appuyez sur ENTER lorsque l’option
est affichée. Appuyez plusieurs fois sur ENTER pour faire défiler tous
les choix disponibles pour cette option. Lorsque votre choix est
affiché, appuyez sur ¯ ou ˘ pour passer à une autre option ou sur
CLEAR pour retourner au menu principal, puis sur MENU pour
retourner à la partie en cours. Pour de plus amples informations sur
les différentes options, veuillez vous reporter aux chapitres indiqués
ci-dessus.
Vous pouvez activer une ou plusieurs des options du mode info
indiquées ci-dessus. Si vous activez plus d’option que l’ordinateur ne
peut afficher, il les fera défiler continuellement lorsqu’il est en train de
réfléchir à son prochain coup. Si l’affichage défile trop rapidement,
modifiez la vitesse LCD comme indiqué dans le chapitre 4.10. Vous
pouvez également appuyer sur GO/STOP pour suspendre le
défilement puis sur CLEAR pour reprendre le défilement. Lorsque
des informations requises ne sont pas disponibles, l’ordinateur affiche
--x--.
Affichage manuel d’informations
Appuyez à tout moment sur HINT/INFO pour afficher le premier
coup auquel l’ordinateur a réfléchi pour sa variante prévue (comme
indiqué dans le chapitre 7.1). Les informations de jeu sont divisées en
plusieurs groupes. Appuyez plusieurs fois sur HINT/INFO pour faire
défiler les différents groupes. Les touches ˘ et ¯ servent à faire
défiler les différents affichages de chaque groupe. Veuillez noter que
chaque groupe est décrit ci-dessous plus en détails. Appuyez sur
CLEAR pour retourner à l’affichage normal de l’horloge.
7.1 Variante principale
Lorsque vous appuyez pour la première fois sur HINT/INFO, la
variante principale s’affiche (la variante prévue par l’ordinateur) de la
façon suivante: Ply1: b1-c3. Un ‘demi-coup’ est un déplacement
individuel et le niveau de recherche de l’ordinateur dépend du
nombre de demi-coups auxquels il réfléchit à l’avance. Pour une
recherche en deux demi-coups, par exemple, l’ordinateur réfléchit à
deux déplacements individuels (un pour les Noirs et un pour les
Blancs). Veuillez noter que l’affichage du premier demi-coup peut
également servir de suggestion, puisque c’est le coup auquel
l’ordinateur s’attend de votre part.
Si vous jetez un coup d’œil à cet affichage lorsque l’ordinateur
86
UN RESUME DU MODE INFO
INFORMATIONS SUR LA VARIANTE PRINCIPALE:
•
•
•
•
Variante prévue: coup 1
Variante prévue: coup 2
Variante prévue: coup 3
Variante prévue: coup 4
INFORMATIONS SUR LA RECHERCHE:
• Profondeur de la recherche et coup
auquel l’ordinateur est en train de réfléchir.
• Temps écoulé pour le coup en cours et
nombre de nœuds recherchés par
seconde (si l’ordinateur est en train de
réfléchir)
INFORMATIONS SUR L’HORLOGE D’ECHECS:
• Temps écoulé pour chaque camp
• Temps restant pour chaque camp*
*Partie rapide/Niveaux Tournoi uniquement
INFORMATIONS SUR LE DECOMPTE DES COUPS:
• Numéro du coup qui est en train d’être
joué + numéro du dernier coup joué
• Aller en avant ou en arrière dans les
coups d’une partie en cours
INFORMATIONS SUR LE CLASSEMENT:
• Classement ELO (à la fin d’un jeu du
niveau tournoi)
87
FRANÇAIS
• Evaluation de la position (score)
réfléchit, vous verrez le déplacement que l’ordinateur est en train
d’analyser. Si vous regardez cet affichage pendant que vous
réfléchissez, vous verrez le coup que l’ordinateur attend de votre part.
Dans chacun des cas, appuyez plusieurs fois sur ˘ pour faire défiler
le reste des coups dans la variante prévue, jusqu’à quatre demicoups:
• Variante prévue: coup 1
• Variante prévue: coup 2
• Variante prévue: coup 3
• Variante prévue: coup 4
7.2 Recherche d’informations
Appuyez sur la touche HINT/INFO pour accéder au mode Info et
appuyez à nouveau pour afficher des informations relatives aux
recherches de l’ordinateur. L’ordinateur affichera tout d’abord le score
actuel. Appuyez plusieurs fois sur ˘ pour faire défiler le reste des
informations:
• Le score actuel: une évaluation numérique de la position
actuelle, un pion valant 1,0 point et un nombre positif indiquant
que les Blancs sont en tête. Exemple: si les Blancs ont deux
pions d’avance, l’ordinateur affiche Score: +2.0. Veuillez
noter que ce score n’est pas valide pour les niveaux de
résolution des problèmes.
• Affichage en deux parties: (a) La profondeur de la recherche en
cours ou le nombre de déplacements individuels que l’ordinateur
est en train de prévoir. Par exemple, si l’ordinateur réfléchit à 439
coups à l’avance, il affichera d:4 39, où d: représente la
profondeur (ou ‘depth’). (b) Le coup auquel l’ordinateur est en
train de réfléchir (si cela s’applique).
• Affichage en deux parties: (a) Le temps utilisé jusqu’ici pour le
déplacement en cours. (b) Le nombre de nœuds ou de positions
que l’ordinateur est en train de rechercher par seconde (si
l’ordinateur est en train de réfléchir).
7.3 Informations sur la pendule d’échecs
Après avoir appuyé sur HINT/INFO pour accéder au mode Info,
appuyez encore deux fois sur cette touche pour afficher des informations sur la pendule d’échecs. L’ordinateur affiche le temps total qui
s’est écoulé pour les deux camps. Veuillez noter que le symbole de la
pendule d’échecs au milieu de l’écran indique le camp qui doit jouer
et le type d’horloge utilisé. Appuyez sur ˘ pour faire défiler les deux
affichages suivants:
88
7.4 Décompte des coups / Déplacements
Après avoir appuyé sur HINT/INFO pour accéder au mode informations, appuyez encore trois fois sur cette touche pour afficher le
numéro de votre dernier coup et du déplacement en cours. Vous
pouvez alors appuyer sur ¯ pour revenir en arrière dans le jeu (si
vous le désirez) ou sur ˘ pour revenir en avant. Ceci vous permet de
revenir en arrière et de noter les déplacements d’une partie lorsque
celle-ci s’avère particulièrement intéressante!
• Numéro du déplacement en cours et du dernier coup effectué.
• Déplacements pour la partie en cours.
7.5 Affichage du classement
Après avoir appuyé sur HINT/INFO pour accéder au mode informations, appuyez encore quatre fois sur cette touche pour afficher
votre classement actuel. Veuillez noter que les classements sont
basés sur des parties de niveau tournoi, comme décrit dans le
chapitre 5.3.
8. MODE MISE EN PLACE: MODIFIEZ L’ECHIQUIER!
Le mode Mise en place (Set-up) vous permet d’installer les pièces
sur l’échiquier pour commencer à jouer ou laisser l’ordinateur
résoudre un problème particulier!
89
FRANÇAIS
• Temps total écoulé pour les Blancs/Noirs (Horloge du temps
écoulé)
Blancs à jouer [, Noirs à jouer ].
• Temps total restant pour les Blancs/Noirs (Horloge de compte à
rebours: niveaux de résolution de problèmes/parties rapides
uniquement)
Blancs à jouer {, Noirs à jouer }.
Si l’horloge de compte à rebours n’est pas activée, le deuxième
affichage est laissé en blanc (--:--{--:--).
Les horloges s’arrêtent pour diverses raisons durant une partie: si
vous retournez en arrière, si vous vérifiez les paramètres des
niveaux, sélectionnez des options, mettez des pièces en position ou
arrêtez l’ordinateur. L’heure est enregistrée dans la mémoire de
l’ordinateur et l’horloge reprendra dès que vous recommencez une
partie. Lorsque vous changez de niveau de jeu ou lorsque vous réinitialisez l’ordinateur pour une nouvelle partie, l’heure est toujours
remise à zéro.
Attention: Tous les coups de la partie en cours seront effacés
si vous modifiez la position des pièces pendant une partie.
Vous pouvez changer la position des pièces sur l’échiquier
seulement si c’est votre tour de jouer. Appuyez sur MENU et appuyez
plusieurs fois sur ¯ jusqu’à ce que l’ordinateur affiche ¿SETUP.
Appuyez sur ENTER pour accéder au mode Mise en place.
L’ordinateur affiche les symboles correspondant aux pièces et à leur
couleur. („ıKQRBNP).
• Pour retirer une pièce de l’échiquier, appuyez simplement sur
la pièce et elle disparaîtra.
• Pour déplacer une pièce d’une case à une autre, appuyez sur
la pièce pour la faire disparaître, puis sur une nouvelle case pour
la faire apparaître à cette position.
• Pour ajouter une pièce sur l’échiquier, appuyez tout d’abord
sur le symbole de la pièce à ajouter et sur sa couleur puis
appuyez sur la case où vous voulez ajouter la pièce. Pour ajouter
une pièce du même type et de la même couleur, appuyez
simplement sur une autre case. Pour ajouter une pièce
différente, appuyez sur une autre pièce et/ou sur une autre
couleur et procédez comme indiqué ci-dessus.
• Pour vider l’échiquier de toutes ses pièces, appuyez sur
CLEAR en mode Mise en place. L’ordinateur vous demande de
valider votre choix en affichant Clear board?. Appuyez sur
ENTER et l’ordinateur indique que l’échiquier est vide
(Cleared). Vous pouvez maintenant ajouter des pièces,
comme indiqué ci-dessus. Si vous décidez de ne plus vider
l’échiquier, appuyez à nouveau sur CLEAR pour annuler votre
choix. L’ordinateur affiche alors Not cleared. Veuillez noter
que cette fonction est particulièrement utile pour mettre en place
un nombre restreint de pièces – il s’avère alors bien plus facile
de commencer avec un échiquier vide!
• Après avoir placé toutes vos pièces sur l’échiquier comme
décrit ci-dessus, veuillez noter que c’est au tour de la couleur
opposée à celle de la dernière pièce placée sur l’échiquier. Si
nécessaire, changez la couleur en appuyant sur ı pour les Noirs
ou sur „ pour les Blancs.
• Pour quitter le mode Mise en place, appuyez sur ENTER.
Lorsque l’ordinateur vous demande de confirmer cette nouvelle
disposition des pièces (New position?), appuyez sur
ENTER pour retourner à une partie normale utilisant cette
90
9. MODE ETUDE: ESSAYEZ DE TESTER VOS CAPACITES!
Vous recherchez un outil d’apprentissage efficace? N’hésitez pas
à tester le mode Etude! Huit parties célèbres sont pré-enregistrées,
chacune figurant huit points critiques – pour un total de 64 positions à
étudier. A vous de revivre ces parties en réalisant les mêmes coups
qui ont conduit à la victoire! Cette fonction permet d’améliorer
considérablement votre connaissance des échecs tout en vous
apprenant à réaliser le meilleur coup dans une position donnée. Et
pour rendre cette fonction encore plus excitante, l’ordinateur évaluera
vos performances tout au long de la partie.
Au fait, si vous avez besoin d’aide pour résoudre une des positions
du mode Etude, consultez l’annexe pour une liste complète de toutes
les parties en mode Etude. N’oubliez pas, cependant, que ces parties
sont un outil de référence – rien ne sert donc de tricher en regardant
les solutions sans chercher à résoudre les problèmes posés par les
positions d’étude!
Sélection des positions d’étude
Conseil: Vous pouvez également sélectionner les positions
d’études en appuyant sur certaines cases de l’échiquier,
comme décrit un peu plus loin dans ce chapitre!
91
FRANÇAIS
nouvelle disposition. L’ordinateur affiche New position!
pour vous le confirmer. Si vous appuyez sur CLEAR, l’affichage
indique Resume et vous resterez au mode Mise en place.
Toute disposition des pièces conforme aux règles est permise en
suivant les étapes indiquées ci-dessus. L’ordinateur ne vous laissera
pas disposer les pièces si les règles ne sont pas respectées, par
exemple si vous utilisez plus de pièces que pour une partie normale
ou si vous mettez un Roi en échec et qu’il ne peut plus bouger. Dans
ces cas-là, après avoir appuyé sur ENTER pour quitter le mode Mise
en place et appuyé sur ENTER pour confirmer, l’ordinateur affiche
Illegal. Vous ne pourrez pas quitter le mode Mise en place tant
que vous n’aurez pas disposé les pièces conformément aux règles!
Si vous accédez au mode Mise en place mais que vous n’avez pas
encore déplacé des pièces sur l’échiquier, vous pouvez quitter ce
mode en appuyant sur ENTER. L’ordinateur affiche alors unchanged et vous retournez au menu principal. Appuyez à nouveau
sur MENU pour retourner à une partie normale.
Appuyez sur MENU pour accéder au menu principal et plusieurs
fois sur ¯ (ou ˘) jusqu’à ce que ¿STUDY s’affiche à l’écran.
Appuyez sur ENTER pour accéder au mode Etude et vous verrez
apparaître la première position d’étude, < Study1-1 >. Pour
changer de position d’étude, appuyez sur ˘ ou ¯ pour augmenter ou
diminuer le numéro de la position de ‘un’ ou, à l’aide du stylet,
appuyez sur > ou < pour augmenter ou diminuer ce numéro de ‘huit’.
Lorsque la position d’étude voulue est affichée, appuyez sur ENTER.
L’ordinateur vous demande de confirmer en affichant Start
Study?. Appuyez sur ENTER pour démarrer la partie à étudier,
comme indiqué ci-dessous, ou appuyez sur CLEAR pour annuler et
retourner à l’affichage principal du mode Etude.
Après avoir sélectionné ENTER, l’ordinateur commence
automatiquement à réaliser les coups de la partie d’étude
sélectionnée. Dès qu’il atteint la première position d’étude, il vous
indique que c’est à votre tour de jouer en affichant brièvement Your
Move. L’horloge se met alors en marche. C’est à vous maintenant de
deviner le coup qui a été réalisé lorsque cette partie a été jouée pour
la première fois. En voici les principes:
• Il n’y a qu’une seule position ‘correcte’ par position d’étude.
• Lorsque l’ordinateur arrive à une position d’étude, celui-ci affiche
la couleur du camp pour qui c’est le tour de jouer.
• Si vous déplacez la bonne pièce au bon endroit, l’ordinateur
affiche Well Done (Bien joué!). L’ordinateur réalise alors les
coups suivants, jusqu’à la position d’étude suivante.
• Si vous ne déplacez pas la bonne pièce au bon endroit,
l’ordinateur affiche brièvement Wrong Move et vous demande
si vous voulez quitter le mode Etude (Quit Study?).
• Pour rester en mode étude et essayer un autre coup,
appuyez sur CLEAR. Des points seront déduits pour chaque
déplacement incorrect, votre pièce retournera à sa case de
départ et vous pourrez effectuer un autre déplacement.
• Pour quitter le mode étude et continuer une partie normale
en utilisant le dernier déplacement que vous avez effectué,
appuyez sur ENTER. L’ordinateur réfléchit à son prochain
coup.
• Score: A chaque fois que vous déplacez une pièce correctement
pour une position d’étude, des points sont ajoutés à votre score.
Vous marquerez le maximum de points si vous déplacez la
bonne pièce sur la bonne case dès votre première tentative. A
chaque déplacement incorrect, votre score diminue de moitié.
92
UTILISEZ L’ECHIQUIER
POUR SELECTIONNER DES POSITIONS D’ETUDE!
8
1-8
2-8
3-8
4-8
5-8
6-8
7-8
8-8
7
1-7
2-7
3-7
4-7
5-7
6-7
7-7
8-7
6
1-6
2-6
3-6
4-6
5-6
6-6
7-6
8-6
5
1-5
2-5
3-5
4-5
5-5
6-5
7-5
8-5
4
1-4
2-4
3-4
4-4
5-4
6-4
7-4
8-4
3
1-3
2-3
3-3
4-3
5-3
6-3
7-3
8-3
2
1-2
2-2
3-2
4-2
5-2
6-2
7-2
8-2
1
1-1
2-1
3-1
4-1
5-1
6-1
7-1
8-1
a
b
c
d
e
f
g
h
Cependant, une fois que votre score atteint zéro, celui-ci ne
diminue plus, même si vous faites d’autres déplacements
incorrects.
• Pour vérifier votre score actuel, appuyez deux fois de suite sur
HINT/INFO. La première fois que vous appuyez sur cette touche,
vous remarquerez que l’ordinateur affiche le dernier
déplacement réalisé par le camp adverse. Appuyez sur CLEAR
pour annuler l’affichage du score.
93
FRANÇAIS
Pour une méthode permettant de sélectionner facilement une position
d’étude, accédez simplement au mode d’étude et appuyez sur la case
correspondante sur l’échiquier, comme indiqué ci-dessous.
Si vous réalisez un échec et mat à la fin d’un jeu d’étude,
Checkmate! reste affiché à l’écran après une série de messages
de félicitation. Vous pouvez alors (a) ré-initialiser l’ordinateur pour une
nouvelle partie, (b) utiliser le mode Info pour revoir plus en détail les
déplacements effectués en revenant en arrière (comme indiqué dans
le chapitre 7.4) ou (c) revenir en arrière du nombre de coups choisi
puis recommencer la partie en mode normal. Si vous déplacez la
bonne pièce sur la bonne case pour la dernière position d’étude,
End Game s’affiche et l’ordinateur commence automatiquement à
réfléchir à son prochain coup. Vous pourrez ainsi terminer la partie
normalement.
Utiliser l’échiquier pour sélectionner une position
Chaque position d’étude peut être activée de façon individuelle en
appuyant sur la case correspondante sur l’échiquier. Comme indiqué
dans le tableau du mode étude, chacune des 64 cases représente
une position d’étude. Accédez au mode étude en appuyant sur MENU
et sur ¯ (ou ˘) jusqu’à ce que ¿STUDY soit affiché, puis appuyez
sur ENTER. Consultez alors le tableau et appuyez sur la case de
l’échiquier pour sélectionner la position d’étude correspondante.
Appuyez sur ENTER. L’ordinateur vous demande de confirmer en
affichant Start Study?. Appuyez à nouveau sur ENTER et la
partie d’étude commence alors, comme indiqué précédemment.
10. BESOIN D’AIDE? C’EST ICI!
Pour vous aider à résoudre les problèmes les plus courants, nous
avons établi une liste des situations les plus communément
rencontrées, ainsi que certains solutions possibles à ces problèmes.
a. L’ordinateur ne réagit pas, fait des erreurs ou se fige en
cours de partie.
• Réinstallez les piles ou remplacez-les par des piles alcalines
neuves.
• L’électricité statique est parfois responsable d’un blocage.
Appuyez à l’intérieur de l’orifice indiquant ACL pour réinitialiser l’ordinateur (voir le chapitre 11.1).
b. L’affichage est trop sombre et/ou difficile à lire.
• Remplacez les piles par des piles alcalines neuves.
• Sélectionnez une option de contraste LCD différente (voir le
chapitre 4.9).
94
95
FRANÇAIS
c. J’ai activé certaines options d’affichage automatique pour
regarder l’ordinateur réfléchir, mais les messages défilent
trop rapidement.
• Sélectionnez une option de vitesse LCD différente (voir le
chapitre 4.10).
• Pour interrompre le menu déroulant: appuyez une fois sur la
touche GO/STOP; appuyez sur CLEAR pour réactiver le menu
déroulant.
d. L’ordinateur ne joue pas.
• L’ordinateur répond automatiquement uniquement si le mode
Deux joueurs est réglé sur player: P-C pour une partie
Joueur contre Ordinateur (voir le chapitre 4.1).
• Vous êtes peut-être à un niveau où l’ordinateur met longtemps
à réfléchir. Si vous le désirez, vous pouvez l’obliger à jouer en
appuyant sur ENTER.
e. L’ordinateur ne veut pas accepter mon coup.
• Vous essayez de déplacez une pièce en enfreignant les règles.
Vérifiez les règles du jeu d’échec.
• Votre Roi est-il en échec? Le coup que vous envisagez
mettrait-il votre Roi en échec? Est-ce que votre roque n’est pas
correct? Vérifiez vos positions.
• Est-ce votre tour de jouer? Si le symbole de la couleur clignote,
l’ordinateur est en train de réfléchir. Appuyez sur ENTER pour
l’interrompre, si nécessaire.
f. Les notations de l’échiquier sont inversées lorsque je
déplace une pièce. Pourquoi?
• L’option white: top est activée (les Blancs en haut).
Accédez au mode Options et changez cette option pour
black: top (voir le chapitre 4.4)
g. Je viens de ré-initialiser l’ordinateur pour commencer une
nouvelle partie mais l’ordinateur affiche Rate as draw?
au lieu de se ré-initialiser.
• Vous avez interrompu une partie de niveau tournoi et vous
devez décider de l’issue de la partie pour l’ordinateur. Pour plus
de détails, voir le chapitre 5.3.
h. L’ordinateur a affiché son déplacement mais sa pièce
clignote toujours et le déplacement n’a toujours pas été
effectué sur l’échiquier.
• Lorsque l’option Automove (déplacement automatique) est
désactivée, vous devez déplacer vous-même les pièces de
l’ordinateur sur l’échiquier. Pour réactiver l’option Automove,
voir le chapitre 4.11.
i. L’ordinateur affiche No Move Found! au lieu de déplacer
une pièce.
• Vous êtes à un niveau de résolution de problème et l’ordinateur
n’a pas trouvé de mat. Si vous ne cherchez pas à résoudre un
problème de mat, passez à un niveau de jeu normal (voir le
chapitre 5).
j. J’essaye de quitter le menu principal en appuyant sur
CLEAR mais j’obtiens un bip d’erreur.
• Vous appuyez sur la mauvaise touche! La seule façon de
quitter le menu principal consiste à appuyer sur la touche
MENU.
k. L’ordinateur émet un bip de façon intermittente lorsque c’est
mon tour de jouer.
• Lorsque le mode d’entraînement est activé, l’ordinateur émet
un bip lorsque c’est votre tour de jouer.
l. L’ordinateur n’émet pas de bip lorsqu’il effectue un coup.
• Dans le mode Options, activez le son (voir le chapitre 4.8)
m.L’ordinateur ne me laisse pas quitter le mode Mise en place
(Setup).
• Vous avez mis des pièces en place sur l’échiquier sans respecter les règles (par ex. un Roi est en échec, il y a trop de
pions sur l’échiquier, etc.). Modifiez l’échiquier pour mettre en
place une position valide (voir le chapitre 8).
11. DETAILS TECHNIQUES
11.1 La fonction ACL
Les ordinateurs se ‘figent’ parfois en raison d’une décharge
statique ou d’autres perturbations électriques. Si c’est le cas, utilisez
un trombone ou un objet pointu pour appuyer à l’intérieur de l’orifice
indiquant ACL sur le socle de l’ordinateur pendant au moins une
seconde. Ceci permet de ré-initialiser l’ordinateur.
11.2 Entretien et maintenance
Votre ordinateur est un dispositif électronique très sensible. Pour
cette raison, il devra être manipulé avec précaution et il ne devra pas
être exposé à des températures extrêmes ou à une atmosphère trop
humide. Pour le nettoyer, n’utilisez pas d’agents ou de liquides
chimiques, ceux-ci risquant d’endommager le plastique. Toujours
retirer les piles avant de nettoyer l’ordinateur.
Les piles déchargées doivent être remplacées dans les plus brefs
96
11.3 Spécifications techniques
Touches:
8
Echiquier:
Membrane tactile 9x8 (panneau tactile)
Affichage LCD: Matrice de points 11 caractères, 68 x 79 mm
Piles:
3 x AAA/AM4/R03
Dimensions:
131 x 83 x 22 mm
Poids:
220 grammes
Veuillez conserver ces informations pour référence future.
Saitek se réserve le droit d’apporter sans préavis des modifications techniques
pour améliorer son produit.
97
FRANÇAIS
délais, celles-ci risquant de couler et d’endommager l’unité. Veuillez
également noter les recommandations suivantes concernant les piles
de votre ordinateur. Attention: n’utilisez que des piles alcalines ou
carbone-zinc. Ne pas mélanger différents types de piles ou des piles
neuves et des piles usagées. Ne pas recharger des piles non
rechargeables. N’utilisez que des piles recommandées ou de qualité
équivalente. Respectez la polarité lorsque vous insérez les piles. Les
piles usagées doivent être retirées de l’ordinateur le plus rapidement
possible. Ne pas court-circuiter le point d’échange.
ISTRUZIONI RAPIDE
Per giocare immediatamente, seguire semplicemente queste istruzioni!
1
2
3
4
5
6
Aprite il coperchio della batteria e inserite tre
batterie alcaline “AAA” (AM4/R03), osservando la
3x
corretta polarità.
AAA
(AM4/R03)
Rimuovete lo stilo dal vano sul lato destro
dell’unità, come indicato nella figura.
Premete il tasto GO/STOP (Avvio/Arresto), situato
sul bordo superiore dell’unità, per accendere il
computer. Se non ottenete una risposta, resettatelo
nel modo indicato nella Sezione 11.1.
Premete NEW GAME (Nuova partita) due volte, in
rapida successione, per riconfigurare la scacchiera
computerizzata. Se la scacchiera non si riconfigura
per una nuova partita, il tempo trascorso fra una
premuta e l’altra è stato troppo lungo. Riprovate!
Inserite le mosse premendo gentilmente lo stilo
sulla casa di partenza e sulla casa di
destinazione per ciascuna mossa. NB: Se
preferite, potete usare un dito invece dello stilo.
Quando il computer visualizza la sua mossa, il
pezzo lampeggia brevemente sulle case di
partenza e di destinazione e la mossa viene
quindi effettuata sulla scacchiera. È poi
ıPd7-d5````
nuovamente il vostro turno!
Per spegnere l’unità, premete GO/STOP (Avvio/
Arresto). Quando Stop? è visualizzato, premete nuovamente GO/
STOP (Avvio/Arresto) per confermare e la partita viene memorizzata!
x2
IMPARATE A CONOSCERE I PEZZI DEGLI SCACCHI!
K`
RE
Q`
R`
DAMA
TORRE
B`
ALFIERE
N`
P`
CAVALLO PEDONE
Bianchi
Neri
98
ISTRUZIONI RAPIDE
TASTI E FUNZIONALITÀ
INTRODUZIONE
1. ISTRUZIONI INIZIALI: DATI
BASILARI
1.1 Inserimento delle batterie,
accensione
1.2 Pronti per giocare? Ecco come
farlo!
1.3 Il computer effettua la prima
mossa
1.4 Partita terminata? Inizia una
nuova partita
1.5 Troppo facile/difficile? Cambiate
livello!
2. ALTRE FUNZIONALITÀ DA
ESPLORARE
2.1 A chi tocca? Controllate il display!
2.2 Mosse speciali degli scacchi
2.3 Mosse illegali/errate
2.4 Matto, scaccomatto e patta
2.5 Provate il sistema di autotaratura!
2.6 Volete un suggerimento? Dovete
solo chiederlo!
2.7 Interruzione della ricerca
2.8 Cambio di lato
2.9 Aperture incorporate
2.10 Pensando durante il tempo
dell’avversario
2.11 Spegnimento/Memoria della
partita
3. MENU PRINCIPALE
4. MODO OPZIONI
Selezione delle opzioni di gioco
4.1 Modo a due giocatori
4.2 Algoritmo di ricerca
4.3 Modo Autobook
4.4 Bianco in cima
4.5 Cronometro per conto alla
rovescia
4.6 Ticchettio
4.7 Modo Didattico
4.8 Accensione/spegnimento suono
99
4.9 Contrasto LCD
4.10 Velocità LCD
4.11 Modo Mossa Automatica
5. MODO LIVELLI
Configurazione di un livello di
gioco
5.1 Livelli di divertimento
5.2 Livelli casuali di gioco
5.3 Livelli torneo
5.4 Livelli partita rapida
5.5 Livelli soluzione problemi
5.6 Livello tattico
5.7 Livello infinito
6. MODO RITIRO
7. MODO INFO
Display di informazioni
automatici
Display di informazioni
manuali
7.1 Variazione principale
7.2 Informazioni sulla ricerca
7.3 Informazioni sul
cronometro della
scacchiera
7.4 Conteggio mosse/Mosse
partita
7.5 Visualizzazione della
taratura
8. MODO IMPOSTAZIONE
9. MODO STUDIO
Selezione delle posizioni di
studio
Utilizzo della scacchiera per la
selezione
10. AVETE BISOGNO DI
AIUTO? ECCOLO!
11. PARTICOLARI TECNICI
11.1 La funzione ACL
11.2 Cura e manutenzione
11.3 Caratteristiche tecniche
APPENDICE:
GIOCO IN MODO STUDIO
ITALIANO
INDICE
TASTI E FUNZIONALITÀ
1. SCACCHIERA TOUCHSCREEN: Ciascuna casa registra il movimento dei pezzi
quando viene premuta delicatamente con lo stilo o la punta delle dita.
2. LINEA DELLE INFORMAZIONI: Mostra le mosse, le informazioni sul gioco e il
cronometro. Utilizzata anche quando si selezionano le opzioni e i livelli, si
sistemano le posizioni e altro.
3. STILO: Utilizzato per effettuare le mosse sullo schermo e per selezionare le
impostazioni nell’area della Linea delle
informazioni.
4. TASTO GO/STOP (Avvio/Arresto): Premete
per accendere l’unità; premete due volte
per spegnerla. Premete per mettere in
pausa il display di scorrimento; riprendete
lo scorrimento con CLEAR (Annulla).
5. SPAZIO PORTASTILO: Inserite lo stilo
nella scanalatura quando non è in uso.
6. COPERCHIO del display a cristalli
liquidi (LCD): Coperchio scorrevole che
protegge il display quando l’unità non è in
uso.
7. ACL (Reset): Nella base dell’unità.
Utilizzato per eliminare le scariche statiche
dopo l’inserimento delle nuove batterie.
8. TASTO HINT/INFO (Suggerimenti/
Informazioni): Premete durante la mossa
per ottenere un suggerimento. Premete
ripetutamente per ciclare attraverso i
display principali delle informazioni.
9. TASTO CLEAR (Annulla): Premete per
uscire dai Modi Opzioni/Info, per cancellare
i Modi Livello/Studio senza alcun
cambiamento, per annullare i display del
Modo Info, per rimanere nel Modo Studio
dopo una mossa sbagliata, per cancellare
la scacchiera in Modo Impostazione, per
riprendere lo scorrimento dopo una pausa
e per riprendere la partita dopo i ritiri.
10. VANO BATTERIE: Nella base dell’unità.
Utilizza tre batterie AAA alcaline (AM4/
R03).
11. TASTO ENTER (Invio): Premete per
cambiare lati con il computer. Premete
mentre il computer pensa per forzarlo ad
effettuare la mossa. Premete per
selezionare le voci del Menu Principale,
per selezionare le impostazioni e per
accendere/spegnere le opzioni nei Modi Opzioni/Info, per inserire un nuovo livello
nel Modo Livelli, per selezionare una Posizione di Studio, per uscire dal Modo
Impostazione con una nuova posizione.
12. TASTI ¯/˘: Premeteli per ciclare fra i Livelli/le Posizioni di Studio uno alla volta nei
Modi Livello/Studio. Premete per ciclare tra i display delle Opzioni/Info nei Modi
Opzioni/Info. Premete per le mosse di ritiro/ripetizione nel Modo Ritiro.
13. TASTO MENU: Premete per accedere al Modo Menu; premete nuovamente per
uscire.
14. TASTO NEW GAME (Nuova partita): Premete due volte, in rapida successione, per
resettare la scacchiera computerizzata.
100
1. ISTRUZIONI INIZIALI: DATI BASILARI
1.1 Inserimento delle batterie, accensione
La vostra scacchiera computerizzata è alimentata da tre batterie
AAA (AM4/R03). Inserite le batterie nel vano nella base dell’unità,
osservando la corretta polarità. Consigliamo di utilizzare batterie
alcaline nuove per una durata maggiore!
Per accendere la scacchiera computerizzata, premete GO/STOP
(Avvio/Arresto). In caso di assenza di risposta, resettate l’unità
premendo con una graffetta o un altro oggetto appuntito nel foro
marcato ACL nella base per almeno un secondo.
Per conservare le batterie, la scacchiera computerizzata si
spegne automaticamente se rimane inattiva per circa 20 minuti.
1.2 Pronti per giocare? Ecco come farlo!
Seguite queste istruzioni per iniziare una partita:
a. Premete GO/STOP (Avvio/Arresto) per accendere la scacchiera.
b. Per resettare la scacchiera per una nuova partita di scacchi,
premete NEW GAME (Nuova partita) due volte, in rapida
successione. Se fra le premute trascorre un periodo di tempo
troppo lungo, la scacchiera non si resetta e dovete premete i
tasti nuovamente. Appena l’unità è stata resettata, vedrete New
Game brevemente e poi il simbolo per Bianco („) e il
cronometro della scacchiera (00:00:00).
c. Per effettuare una mossa, premete delicatamente lo stilo sul
pezzo che volete muovere fino a quando non sentite un bip e il
pezzo lampeggia. Se preferite, potete usare la punta delle dita
101
ITALIANO
INTRODUZIONE
Congratulazioni per aver acquistato la scacchiera computerizzata
Touch Screen Travel Chess Computer! Dotata di straordinarie abilità
di gioco degli scacchi e di una vasta serie di opzioni speciali, questa
elegante unità offre un’interfaccia touchscreen per convenienza e
facilità di gioco. Portatile e sempre pronta per la partita, vi consente
inoltre di divertirvi con gli scacchi ovunque, sia a casa sia in viaggio!
Dopo esservi familiarizzati con il funzionamento basilare, procedete
ad esplorare tutte le ulteriori funzionalità che vi offre questa tastiera
computerizzata unica. Presto troverete che gli scacchi vi piaceranno
più che mai!
invece dello stilo.
d. Premete poi lo stilo sulla casa di destinazione. Sentirete un
secondo bip quando la scacchiera conferma la vostra mossa.
Adesso, è il turno della scacchiera. Spesso il computer effettua
la mossa istantaneamente all’inizio di una partita, invece di
soffermarsi a riflettere, perché effettua delle mosse che sono
memorizzate nella biblioteca di aperture. Per ulteriori particolari,
cfr. Sezione 2.9.
1.3 Il computer effettua la sua mossa
Quando il computer effettua la mossa, visualizza prima
brevemente Thinking.... Mentre considera la sua mossa per i
Neri, nel display lampeggia il simbolo per i Neri (ı), mostrando
contemporaneamente l’orologio del computer. Quando la mossa
effettiva è stata effettuata, la scacchiera computerizzata emette un
bip e visualizza la sua mossa (ad es. ıPe7-e5), e il pezzo
lampeggia rapidamente brevemente dalle case di partenza alle case
di destinazione. Dopo che la mossa è stata effettuata sulla
scacchiera, il display visualizza nuovamente il cronometro, ed è
nuovamente il vostro turno.
1.4 Partita terminata? Iniziatene una nuova
Attenzione: Quando la resettate, la scacchiera computerizzata
cancella la vostra partita attuale dalla memoria!
Ogni volta che finite una partita (o se decidete di arrendervi
durante la partita attuale), è facile ricominciare! Resettate la
scacchiera computerizzata premendo NEW GAME (Nuova partita)
due volte di seguito. Visualizzate New Game, che vi indica che la
scacchiera è pronta per un’altra partita, usando il livello di gioco
attualmente selezionato.
Nota speciale relativa ai Livelli Torneo: se resettate la scacchiera
per una nuova partita prima che la partita del Livello Torneo sia finita,
vi sarà chiesto di confermare l’esito della partita, prima che la
scacchiera si resetti. Cfr. i particolari nella Sezione 2.5.
1.5 Troppo facile/difficile? Cambiate livello!
Quando accendete la scacchiera computerizzata inizialmente, è
automaticamente configurata al Livello di gioco 63, con un tempo di
risposta medio del computer di cinque secondi per mossa. Potete
comunque scegliere fra 100 livelli diversi di gioco! Per le descrizioni di
102
OPZIONI DEL DISPLAY UTILI!
• Per rendere il display più o meno luminoso: Selezionate
una diversa configurazione del Contrasto LCD, come
indicato nella Sezione 4.9.
• Per rallentare/accelerare la velocità del display di
scorrimento: Selezionate una diversa configurazione della
velocità LCD, come descritto nella Sezione 4.10.
• Per mettere in pausa un display di scorrimento:
Premete GO/STOP (Avvio/Arresto) una volta; premete
CLEAR (Annulla) per riprendere lo scorrimento. NB: questa
funzionalità è particolarmente utile se diversi display
automatici del Modo Info sono attivati, mentre il computer
pensa!
2. ALTRE FUNZIONALITÀ DA ESPLORARE
2.1 A chi tocca? Controllate il display!
Quando il computer pensa per i Neri, fa lampeggiare una casa
Nera (ı). Dopo che ha effettuato la mossa, il display visualizza una
casa Bianca fissa („), che indica che voi dovete effettuare la mossa
per i Bianchi.
2.2 Mosse speciali degli scacchi
Notate i seguenti punti, relativamente ad alcune mosse degli
scacchi.
Catture: Le catture sono indicate con una x, come in ıPa7xb6.
En Passant: In questo tipo di cattura, visualizzata con EP dopo la
mossa di cattura, il computer vi ricorda di rimuovere il pedone
catturato facendolo lampeggiare. Premete il pedone per rimuoverlo
dalla scacchiera.
Arrocco: Dopo che il RE è stato mosso, la Torre lampeggia.
Muovete la Torre indicata sulla scacchiera per completare la manovra
di arrocco. L’arrocco sul lato del Re viene visualizzato come O-O,
mentre l’arrocco sul lato della Dama viene visualizzato come
O-O-O.
103
ITALIANO
tutti i livelli, nonché le istruzioni per modificare i livelli di gioco, cfr. la
Sezione 5.
Promozione del pedone:
• Quando promuovete un pedone, prima premete sul pedone
sulla sua casa di partenza, come al solito. Il display cambia per
mostrare i pezzi di promozione disponibili (Q R B N). Per
promuovere a una Dama premete semplicemente sulla casa di
destinazione per completare la mossa. Per sottopromuovere a una
Torre, un Alfiere, o un Cavallo, premete su uno dei simboli della
promozione visualizzati. Il display conferma brevemente (es. Prom:
rook). Premete sulla casa di destinazione per completare la
promozione e il pezzo cambia automaticamente sulla scacchiera. NB:
Se cambiate idea sul pezzo di promozione prima di premere sulla
casa di destinazione, premete semplicemente su uno degli altri
simboli.
• Quando il computer promuove un pedone, indica la sua
mossa, con il pezzo promosso, come in ıPh2-h1/Q.
2.3 Mosse illegali/errate
Il computer conosce tutte e regole degli scacchi e non bara mai!
Se tentare una mossa illegale, un doppio bip acuto vi comunica
l’errore. Questo si verifica ad esempio se premete su una casa di
partenza o di destinazione illegale, un pezzo o colore errato o un
tasto di gioco invalido.
Se premete su una casa di destinazione illegale, il display
continua semplicemente ad indicare la casa da dove proviene il
pezzo. Per continuare, muovete il pezzo ad una casa legale. Se
premete su una casa di partenza, ma decidete di non effettuare
quella mossa, premete nuovamente sulla stessa casa per annullare
la mossa, Se cambiate idea dopo aver inserito tutta la mossa, ritirate
la mossa nel modo descritto nella Sezione 6.
2.4 Matto, scaccomatto e patta
Quando un Re è in scacco, la scacchiera computerizzata
visualizza Check brevemente dopo la mossa. Se il computer scopre
un matto forzato, visualizza brevemente un annuncio di scaccomatto
(es., Mate in 3). Quando una partita si conclude in scaccomatto,
il computer vi fa le congratulazioni o esprime le sue commiserazioni,
se avete vinto o perso. Checkmate! visualizzato nel display
conclude la partita.
Il computer riconosce le patte per stallo, la tripla ripetizione e la
regola delle 50 mosse. In ciascuno di questi casi, il display
corrispondente è visualizzato dopo che è stata effettuata la mossa
di patta.
104
2.6 Volete un suggerimento? Dovete solo chiederlo!
Se avete bisogno di aiuto per effettuare una mossa, la scacchiera
computerizzata è pronta a darvelo! Premete HINT/INFO
(Suggerimenti/Informazioni) durante il vostro turno, e la scacchiera
visualizza il suggerimento per una mossa. Se il suggerimento è ad
esempio e4xd5, visualizzate Ply 1: e4xd5. Una “ply” (piega) è
una mossa individuale o una mossa per ciascun lato. La
visualizzazione del suggerimento richiede da uno a cinque secondi, a
volte più a lungo. Per accettare il suggerimento, effettuate la mossa
visualizzata sulla scacchiera. Per effettuare una mossa diversa, non
seguite il suggerimento ed effettuate una mossa vostra. Potete anche
cancellare la visualizzazione del suggerimento premendo CLEAR
(Annulla).
2.7 Interruzione della ricerca
Per interrompere il computer mentre riflette su una mossa,
premete ENTER (Invio). Questo la costringe a giocare la mossa
migliore che ha trovato finora. Questa funzionalità può essere
particolarmente utile ai livelli superiori, in cui il computer può
impiegare molto tempo per effettuare la mossa, e ai Livelli Infinito e
Tattico, in cui pensa indefinitamente se non la fermate.
Ai Livelli Soluzione Problemi, se premete ENTER (Invio) mentre
pensa, il computer non effettua una mossa, ma visualizza, invece, No
move found! per indicare che è stata interrotta prima di aver
trovato uno scaccomatto. Per continuare selezionate un altro livello.
105
ITALIANO
2.5 Provate il sistema di autotaratura!
Quando giocate ad uno dei Livelli Torneo, il computer vi fornisce
una taratura ELO approssimativa dopo la conclusione della partita,
basata sulla vostra prestazione. Non sapete cosa sia una “taratura”?
È un metodo universalmente riconosciuto per misurare la prestazione
nel gioco degli scacchi o per descrivere l’abilità di gioco relativa.
L’ente internazionale che regola il gioco degli scacchi è la FIDE,
Fédération Internationale des Échecs, e le tarature FIDE spesso sono
chiamate tarature ELO. La USCF (United States Chess Federation)
utilizza un sistema di taratura simile. In genere le tarature sono
numeri di quattro cifre, con i giocatori più abili che hanno le tarature
più alte. Verso l’estremità superiore della scala, i Maestri hanno una
taratura a partire da 2.200 punti e i Grandi maestri internazionali a
partire da 2.500 punti. Volete conoscere la vostra posizione? Potete
saperlo adesso. Vedete la Sezione 5.3 per ulteriori informazioni sui
Livelli Torneo.
2.8 Cambio di lato
Per cambiare lato con il computer, premete ENTER (Invio) quando
è il vostro turno e la scacchiera effettuerà la mossa successiva per il
vostro lato. Potete cambiare lato quando volete, premendo ENTER
(Invio) ripetutamente.
Volete che il computer effettui la prima mossa per i Bianchi
all’inizio di una nuova partita? Premete NEW GAME (Nuova partita)
due volte, e poi premete ENTER (Invio)!
Volete vedere il computer che gioca contro se stesso? Premete
ENTER (Invio) dopo ciascuna mossa e guardate come gioca per
entrambi i lati della scacchiera, una mossa dopo l’altra. Studiatene le
strategie, e potrete migliorare il vostro gioco!
2.9 Aperture incorporate
All’inizio di una partita, spesso la risposta del computer è
istantanea su molti livelli, perché gioca mosse tratte dalla sua
biblioteca di aperture, che contiene la maggior parte delle principali
aperture e molte posizioni del gioco dei Grandi Maestri. Se la
posizione attuale si trova nella sua biblioteca, il computer gioca una
risposta a quella posizione dalla memoria, invece di pensare alla
mossa. La biblioteca di aperture viene utilizzata su tutti i livelli,
eccetto i Livelli Soluzione Problemi.
2.10 Pensando durante il tempo dell’avversario
Mentre giocate, noterete probabilmente che a volte il computer
risponde immediatamente alle vostre mosse, persino nel mezzo di
partite giocate ai livelli superiori. Questo avviene perché il computer
pensa mentre voi giocate, usando il tempo durante il quale voi
contemplate la vostra mossa successiva per pensare al
proseguimento della partita e pianificare le sue strategie. Cerca di
anticipare la vostra mossa e calcola le sue risposte per quella mossa
mentre voi pensate ancora alla mossa. Se il computer ha indovinato
correttamente, non deve continuare a calcolare, gioca
immediatamente la mossa che ha già trovato! Ricordate che il computer non pensa durante il tempo dell’avversario ai Livelli di
Divertimento.
2.11 Spegnimento/Memoria della partita
Potete interrompere la partita e spegnere la scacchiera
computerizzata premendo GO/STOP (Avvio/Arresto). Il display
visualizza Stop?, e premendo GO/STOP (Avvio/Arresto)
106
UN RAPIDO SGUARDO AL MENU PRINCIPALE!
nuovamente per confermare spegnete l’unità. La partita viene quindi
sospesa e la scacchiera computerizzata memorizza la vostra partita
per un massimo di un anno. Quando la riaccendete, potete continuare
al punto in cui avevate sospeso la partita. Se decidete di non
spegnere la scacchiera computerizzata dopo aver premuto GO/STOP
(Avvio/Arresto) una volta, premete semplicemente CLEAR (Annulla)
per annullare.
Se per 20 minuti non premete dei tasti o non effettuate delle
mosse, la funzione di spegnimento automatico spegne
automaticamente la scacchiera computerizzata. Per continuare
premete GO/STOP (Avvio/Arresto) per riaccenderla. NB: la
scacchiera computerizzata non si spegne mentre il computer riflette
su una mossa, o mentre è visualizzato Stop?.
107
ITALIANO
• ¿OPTION: Esplorate una serie di entusiasmanti opzioni
di gioco.
• Modo a due giocatori • Modo didattico
• Algoritmo ricerca
• Audio acceso/spento
• Modo Autobook
• Contrasto LCD
• Bianco in cima
• Velocità LCD
• Cronometro per conto • Modo mossa automatica
alla rovescia
• Ticchettio
• ¿LEVEL: Scegliete fra 100 livelli di gioco diversi.
• ¿TAKEBACK: Ritirate una o tutte le mosse precedenti.
• ¿INFO: Selezionate vari display informativi automatici.
• Mostra mosse
• Mostra progresso
• Mostra nodi
• Mostra valutazione
• Mostra tempo per mossa
• ¿SETUP: Configurate o modificate qualsiasi posizione
sulla scacchiera.
• ¿STUDY: Mettetevi alla prova con 64 posizioni di studio
uniche.
3. MENU PRINCIPALE: ACCESSO A MODI SPECIALI
La scacchiera computerizzata Touch Screen Travel Chess offre
molti modi e opzioni selezionabili dall’utente, tutti accessibili tramite il
Menu Principale integrato. Quando premete MENU, passate
direttamente a ¿OPTION, la prima delle sei voci del Menu
Principale. Premete ¯ o ˘ ripetutamente per ciclare fra tutte le voci
del Menu:
VOCE MENU PRINCIPALE ... RIFERIMENTO .............. DISPLAY
Modo Opzioni ...................... Sezione 4 ............... ¿OPTION
Modo Livelli ......................... Sezione 5 ............... ¿LEVEL
Modo Ritiro .......................... Sezione 6 ............... ¿TAKEBACK
Modo Info ............................ Sezione 7 ............... ¿INFO
Modo Impostazione ............. Sezione 8 ............... ¿SETUP
Modo Studio ........................ Sezione 9 ............... ¿STUDY
Per selezionare una delle voci del Menu Principale, premete
ENTER (Invio). In ciascun caso, passerete ad un menu secondario,
dove potrete effettuare ulteriori selezioni. Alcune delle voci (ad es.
Modo Opzione) offrono una serie di scelte principali e secondarie
diverse, mentre altre (ad es. Modo Impostazione) consentono di
attivare una particolare funzionalità del gioco. Poiché le istruzioni per
la selezione delle voci dei menu variano, a seconda della voce che
avete selezionato, troverete nelle sezioni di riferimento i particolari
completi per accedere a ciascuna di queste funzionalità principali.
Dopo aver selezionato tutte le opzioni richieste e/o aver modificato le
impostazioni del gioco, premete nuovamente MENU per uscire dal
Menu Principale e ritornare al gioco.
4. MODO OPZIONI: DATE MAGGIORE VARIETÀ ALLE VOSTRE PARTITE!
Volete esplorate tutti i tipi di opzioni di gioco intriganti? Guardate
semplicemente il Modo Opzioni! Innanzitutto, imparate a selezionare
e attivare queste opzioni selezionabili dall’utente prima o durante la
partita, e poi imparate le singole opzioni, nel modo descritto in questa
sezione.
Selezione delle opzioni di gioco
Premete MENU per accedere al Menu Principale, e il display
automaticamente mostra ¿OPTION per il Modo Opzioni. Premete
ENTER (Invio) per accedere al Modo Opzioni, e vedrete le prime
delle 11 opzioni, come illustrato sotto. Premete ¯ (o ˘) ripetutamente
per ciclare fra tutte le opzioni:
108
Modo a due giocatori ......... Sezione 4.1 .... player: P-C
Algoritmo ricerca ................ Sezione 4.2 .... search: select
Modo Autobook .................. Sezione 4.3 .... book: on
Bianco in cima .................... Sezione 4.4 .... top: black
Cronometro per conto ........ Sezione 4.5 .... clock: up
alla rovescia
Ticchettio ............................ Sezione 4.6 .... ticks: off
Modo didattico .................... Sezione 4.7 .... coach: off
Audio acceso/spento .......... Sezione 4.8 .... sound: on
Contrasto LCD .................... Sezione 4.9 .... contrast: 3
Velocità LCD ....................... Sezione 4.10 .. LCD speed: 2
Modo mossa automatica .... Sezione 4.11 .. automove: on
Per attivare/disattivare un’opzione o selezionare le impostazioni
(eventuali) dell’opzione premete ENTER (Invio) quando l’opzione è
visualizzata. Premendo ENTER (Invio) ripetutamente ciclate tra tutte
le scelte per l’opzione visualizzata. Quando la vostra scelta richiesta
è visualizzata, premete ¯ o ˘ per passare ad un’opzione diversa o
premete CLEAR (Annulla) per ritornare al Menu Principale e poi
MENU per ritornare al gioco normale. Per i particolari su ciascuna di
queste opzioni, vedete le relative sezioni di riferimento. NB: Quando
resettate la scacchiera computerizzata per una nuova partita, la
maggior parte delle vostre opzioni selezionate viene trasferita al
gioco successivo. L’unica eccezione è il Modo a due giocatori, che
ritorna automaticamente al Giocatore contro Computer ogni volta che
iniziate una nuova partita.
4.1 Modo a due giocatori
Opzioni: player: P-C (Giocatore contro computer)
player: P-P (Giocatore contro giocatore)
Normalmente, il computer risponde automaticamente con una
contromossa dopo che avete inserito la vostra mossa. Se attivate
player: P-P, però, potete inserire qualsiasi numero di mosse
una alla volta, senza permettere al computer di rispondere. Questa
funzionalità può essere utilizzata in diversi modi interessanti:
• Giocate le partite dei maestri. Premete ENTER (Invio) per
vedere che cosa farebbe il computer in qualsiasi posizione!
• Mantenete la documentazione delle vostre partite a scacchi.
Quando una partita è terminata, giocate a certe posizioni della
scacchiera per vedere come altre mosse o strategie diverse
potrebbero aver influito sull’esito.
109
ITALIANO
OPZIONE .................................... RIFERIMENTO ..... DISPLAY PRECONFIGURATO
• Studiate linee di apertura inserendole manualmente.
• Giocate contro un amico, con il computer che funge da arbitro.
La scacchiera controlla tutte le mosse per verificarne la legalità e
misura il tempo per entrambi i lati!
Se giocate contro un’altra persona e volete vedere quello che il
computer farebbe al vostro posto, premete ENTER (Invio) per far
effettuare la mossa successiva alla scacchiera. Dopo che il computer
ha effettuato la mossa, il Modo a due giocatori rimane effettivo e
potete continuare la partita. Questa opzione ritorna automaticamente
alla sua configurazione prestabilita di Giocatore contro Computer
ogni volta che resettate per una nuova partita.
4.2 Algoritmo di ricerca
Opzioni: search: select / brute
Il programma in questa scacchiera computerizzata usa in genere
un algoritmo di ricerca selettiva. In questo particolare tipo di ricerca, il
computer si concentra principalmente su quelle mosse che hanno
maggior probabilità di successo, consentendole di vedere
combinazioni il cui calcolo potrebbe richiedere altrimenti molto tempo.
Potete anche passare all’algoritmo di forza bruta un po’ più lento ma
molto potente, che può minimizzare il rischio di una svista
occasionale.
4.3 Modo Autobook
Opzioni: book: on / off
Questa funzione unica monitorizza effettivamente il vostro gioco
durante la fase di apertura del gioco e poi vi dà l’opportunità di
esercitarvi con le aperture più problematiche! È come avere un
“Addestratore d’apertura adattativo” personale! Con l’opzione Autobook attivata, il computer osserva le vostre mosse d’apertura mentre
giocate. La prossima volta in cui vi trovate in una cattiva posizione
alcune mosse dopo il termine di una variazione d’apertura, il computer ricorda quella particolare linea d’apertura. In futuro, quindi, il
computer giocherà quella stessa apertura ogniqualvolta sia possibile.
In questo modo voi provate mosse e strategie diverse, nel tentativo di
familiarizzarvi con quell’apertura e rafforzate in tal modo il vostro
gioco!
4.4 Bianco in cima
Opzioni: top: black / white
Volete allontanarvi dal consueto standard e volete che sia il
110
ESERCITATEVI A CONFIGURARE
DI UN’OPZIONE!
1. Premete MENU per accedere al Menu Principale.
Il display visualizza ¿OPTION.
2. Premete ENTER (Invio) per accedere al Modo
Opzioni. Per questo esempio, prendiamo
l’Opzione Cronometro Segnatempo.
3. Premete ¯ cinque volte, fino a quando il display
mostra ticks: off.
4. Premete ENTER (Invio) per attivare questa
opzione e il display cambia a ticks:on.
5. Premete CLEAR (Annulla) per uscire dal Modo
Opzioni, premete MENU per uscire dal Modo
Menu, e il ticchettio simulato ha inizio! NB: Per
disattivare nuovamente questa opzione, ripetete
le istruzioni fornite sopra.
computer a giocare con i pezzi bianchi dalla cima della scacchiera?
Provate allora questa funzionalità selezionando top: white
all’inizio di una nuova partita! Iniziate la partita premendo ENTER
(Invio) e il computer effettua la prima mossa per i Bianchi dalla cima
della scacchiera.
NB: Quando la scacchiera gioca con i Bianchi dalla cima della
scacchiera, noterete che i Re e le Dame sono posizionati in modo
diverso, e che l’annotazione della scacchiera è inversa
automaticamente.
4.5 Cronometro per conto alla rovescia
Opzioni: clock: up / down
Normalmente, la scacchiera computerizzata è preconfigurato
all’opzione clock: up visualizzando il tempo trascorso. Attivando
l’opzione Cronometro per conto alla rovescia, tuttavia, visualizzate
invece il tempo rimanente. Ecco come differenziate fra i simboli dei
cronometri:
[/]
Cronometri per misurazione del tempo (Bianco/Nero)
111
ITALIANO
Per ulteriori particolari, cfr. la Sezione 4.6.
{ }
/
Cronometri per conto alla rovescia (Bianco/Nero)
Notate che l’opzione Cronometro per conto alla rovescia è solo
disponibile in combinazione con i Livelli Torneo e Partita rapida.
4.6 Ticchettio
Opzioni: ticks: off / on
Accendendo questa opzione attivate un ticchettio che simula un
orologio da scacchi. Potete creare l’atmosfera di un torneo di
campionato di scacchi nel vostro soggiorno!
4.7 Modo didattico
Opzioni: coach: off / novice / inter. / adv.
Attivando il Modo didattico permettete al computer di osservarvi
mentre giocate, vedendo quello che fate e aiutandovi se ne avete
bisogno! In questa unica capacità, il computer potrebbe avvertirvi se
rischiate di perdere un pezzo o se pensa che la vostra mossa
potrebbe causare una perdita evitabile di materiale. Potete
visualizzare messaggi come Your Queen is in jeopardy!
o Watch your Knight!. Se una particolare situazione
potrebbe essere vantaggiosa, potreste persino visualizzare He’s
giving you a big chance!. A volte, la scacchiera
computerizzata vi chiede anche di confermare o cancellare una
mossa ovviamente illogica. Se scegliete di cancellarla, la vostra
mossa sarà ritirata e potrete provarne un’altra!
Per scegliere una delle opzioni Didattiche, premete ENTER (Invio)
ripetutamente fino a quando visualizzate il livello richiesto. Quando
uscite dal Modo Opzioni e ritornate al gioco, l’ultima opzione Didattica
visualizzata sarà automaticamente effettiva. Le seguenti sono le
impostazioni disponibili.
• coach: off: Non sono attivate funzionalità didattiche.
• coach: novice: Qui il computer presume che conosciate
molti concetti tattici e strategici, per cui vi comunica soltanto i
concetti meno ovvi e più avanzati, come i sacrifici e le
combinazioni.
• coach: intermediate: In questo caso, il computer
fornisce il livello di assistenza che ritiene appropriato per i
giocatori in grado di vedere i punti più ovvi, ma non consapevoli
di altri.
• coach: advanced: Questa configurazione fornisce
avvertenze e consigli quando il computer li ritiene necessari,
come quando commettete un errore o se un pezzo è in pericolo.
112
Quando il Modo didattico è attivato, la scacchiera computerizzata
emette bip intermittenti durante il vostro turno come Bianco, per
ricordarvi che attende la vostra mossa.
4.8 Audio acceso/spento
Opzioni: sound: on / off
La selezione di una di queste impostazioni audio vi fornisce
l’opzione di giocare a scacchi con o senza gli effetti sonori.
4.10 Velocità LCD
Opzioni: LCD speed: 1 / 2 / 3 / 4
Potete controllare la velocità di scorrimento del display a cristalli
liquidi (LCD) configurando questa opzione, con 1 il livello più lento e 4
il livello più veloce. Se trovate che la configurazione di 2 preimpostata
è troppo lenta o troppo veloce per leggere comodamente, potete
modificarla premendo ENTER (Invio) ripetutamente, fino a quando
visualizzate la configurazione richiesta.
4.11 Modo mossa automatica
Opzioni: automove: on / off
Normalmente, quando il computer effettua una mossa, fa
lampeggiare brevemente il suo pezzo sulle case di partenza e di
destinazione e poi effettua automaticamente la mossa sulla
scacchiera. Se passate ad automove: off il computer annuncia
la sua mossa come al solito, ma voi dovete muovere i pezzi del
computer sulla scacchiera. Dopo che il computer ha annunciato la
sua mossa, fa lampeggiare il suo pezzo sulla casa di partenza.
Premete il pezzo lampeggiante e questo si muove alla casa di
destinazione. Premete la casa di destinazione per completare la
mossa del computer.
113
ITALIANO
4.9 Contrasto LCD
Opzioni: contrast: 1 / 2 / 3 / 4 / 5
Questa opzione vi consente di regolare il contrasto del display a
cristalli liquidi (LCD), dove 1 è il livello più luminoso e 5 il livello più
scuro. Se trovate che la configurazione preimpostata di 3 è troppo
luminosa o troppo scura per leggere comodamente, modificatela
premendo ENTER (Invio) ripetutamente, fino a quando visualizzate la
configurazione richiesta.
5. MODO LIVELLI: SCEGLIETE FRA 100 LIVELLI!
La vostra scacchiera computerizzata comprende 100 livelli di gioco
unici tra cui potete scegliere! I livelli sono divisi in due gruppi di base:
• LIVELLI DI DIVERTIMENTO (1-60): Questi livelli offrono ai
principianti e ai giocatori medi la possibilità di migliorare le loro
abilità scacchistiche. In molti dei Livelli di divertimento, vedrete
che il computer commette degli errori intenzionalmente – così
che voi possiate imparare!
• LIVELLI COMPETIZIONE (61-100): Questi livelli sono per
giocatori intermedi e più avanzati. Sono inclusi livelli per gioco
casuale e tornei, soluzione di problemi, partite lampo e persino
livelli speciali per la sperimentazione. Dato che voi selezionate i
livelli, ricordate che quando il computer ha più tempo per
riflettere sulle sue mosse, si rafforza e gioca meglio –
esattamente come un giocatore umano!
Configurazione di un livello di gioco
Premete MENU per accedere al Menu Principale, e premete ¯ fino
a quando il display mostra ¿LEVEL. Premete ENTER (Invio) per
accedere al Modo Livelli, e vedete il livello attualmente selezionato,
come in <00:05/move> (il livello preconfigurato quando
accendete la scacchiera per la prima volta). Per modificare il livello,
premete ˘ o ¯ per aumentare /ridurre i livelli di uno, o usate lo stilo
per premere > o < per aumentare/ridurre i livelli di dieci. Notate che
premendo e tenendo premuto ˘ o ¯ aumentate/riducete
automaticamente i livelli uno alla volta, fino a quando smettete di
premere il tasto. Quando il livello richiesto è visualizzato, premete
ENTER (Invio) per immettere quella selezione di livello nella
scacchiera computerizzata. Il computer conferma con Level
changed, e ritornate al Menu Principale. Premete MENU per
ritornare al gioco.
Se immettete il Modo Livelli per verificare il livello, ma non volete
effettivamente modificare i livelli, premete CLEAR (Annulla) per
ritornare al Menu Principale. Quando uscite dal Menu Principale con
MENU, ritornate al vostro gioco senza modificare le impostazioni del
livello o del cronometro.
Notate inoltre le seguenti istruzioni concernenti la selezione del
livello:
• Il livello può essere modificato ogni volta che tocca a voi
effettuare la mossa.
114
CAMBIARE IL LIVELLO È FACILE!
• La modifica del livello resetta sempre gli orologi da scacchi.
• Se modificate i livelli mentre il computer pensa, il computer
termina la sua ricerca e resetta il cronometro.
LIVELLI DI DIVERTIMENTO
5.1 Livelli di divertimento
Livello
Descrizione
Display
1 ............. Livello di divertimento 1 .............. <Fun Level 1>
2 ............. Livello di divertimento 2 .............. <Fun Level 2>
3 ............. Livello di divertimento 3 .............. <Fun Level 3>
…fino a…
58 ............ Livello di divertimento 58 ............ <Fun Level 58>
59 ............ Livello di divertimento 59 ............ <Fun Level 59>
60 ............ Livello di divertimento 60 ............ <Fun Level 60>
I Livelli di divertimento sono intesi principalmente per giocatori
principianti e più giovani. In questi livelli, la scacchiera computerizzata
115
ITALIANO
>`
<`
1. Premete MENU per accedere al Menu Principale.
Il display visualizza ¿OPTION.
2. Premete ? una volta, e il display visualizza
¿LEVEL.
3. Premete ENTER (Invio) per accedere al Modo
Livelli e il livello attuale viene visualizzato. Vedete
la Sezione 5, se necessario per identificare il
livello attuale.
4. Troviamo il Livello Partita veloce 81.
Premete ˘ o ¯ per aumentare o ridurre i livelli
di uno; premete > o < per aumentare o ridurre
i livelli di dieci. Vedete sul display
< 5 min/game >.
5. Quando visualizzate < 5 min/game >,
premete ENTER (Invio). Poi premete MENU per
uscire dal Modo Menu – e siete pronti a provare
il vostro nuovo livello!
Per ulteriori particolari cfr. la Sezione 5.
Touch Screen Travel Chess è molto più umana della maggior parte
delle altre scacchiere computerizzate – dà a tutti una possibilità di
vincere, in un mondo dove in genere le scacchiere computerizzate
sono inflessibili e spesso piuttosto difficili da battere. Anche se
secondo l’opinione generale le scacchiere computerizzate non
commettono mai errori, in qualcuno di questi livelli questa commette
veramente degli errori!
Gli handicap sono incorporati in questi livelli, dimostrando i comuni
errori commessi dai principianti. Potete vedere che il computer
intenzionalmente ignora il valore materiale dei pezzi e i concetti
chiave come la struttura dei pedoni, la centralità, la mobilità e la
sicurezza del Re. Può non riconoscere o imbattersi in scaccomatti,
sviluppare la sua Dama troppo presto, o effettuare catture e scacchi
impulsivi. Spesso i manuali degli scacchi consigliano regole basilari,
ma i giocatori si rendono conto che i loro avversari non rispettano le
regole e non sono puniti. I Livelli di divertimento forniscono un modo
per abituarsi a punire questi errori tipici, consentendo al principiante
di rafforzare il suo gioco contro gli avversari umani con cui si
cimenterà probabilmente! In alcuni dei Livelli di divertimento più
deboli, il computer non solo lascia dei pezzi incustoditi, ma potrebbe
effettivamente cercare di perderli. Man mano che i livelli diventano
più alti, il computer è meno propenso a perdere dei pezzi. Inizia
progressivamente a considerare maggiormente il valore materiale dei
pezzi ed eventualmente dà via dei pezzi solo occasionalmente. Nei
Livelli di divertimento superiori, il computer non dà via dei pezzi, ma
gioca più come un principiante che ha imparato le basi del gioco.
Potreste ancora vedere che commette degli errori, esponendosi ad
esempio a minacce di scacco o scaccomatto. Perché non esplorate
tutti i livelli di divertimento e non provate ad imparare dagli errori del
computer!
LIVELLI COMPETIZIONE
5.2 Livelli casuali di gioco
Livello
Tempo medio per mossa
Display
61 ................ 1 secondo per mossa ................... <00:01/move>
62 ................ 2 secondi per mossa .................... <00:02/move>
63 ................ 5 secondi per mossa .................... <00:05/move>
64 .............. 10 secondi per mossa .................... <00:10/move>
65 .............. 15 secondi per mossa .................... <00:15/move>
66 .............. 30 secondi per mossa .................... <00:30/move>
67 .............. 45 secondi per mossa .................... <00:45/move>
116
5.3 Livelli torneo
Livello
Numero mosse/Tempo totale
Display
71 ............ 40 mosse in 1 ora 20 min. ............. < 40 in 1:20 >
72 ............ 40 mosse in 1 ora 30 min. ............. < 40 in 1:30 >
73 ............ 35 mosse in 1 ora 45 min. ............. < 35 in 1:45 >
74 ............ 40 mosse in 1 ora 45 min. ............. < 40 in 1:45 >
75 ............ 35 mosse in 1 ora 30 min. ............. < 35 in 1:30 >
76 ............ 40 mosse in 2 ore .......................... < 40 in 2:00 >
77 ............ 45 mosse in 2 ore 30 min. ............. < 45 in 2:30 >
78 ............ 50 mosse in 2 ore .......................... < 50 in 2:00 >
79 ............ 40 mosse in 2 ore 30 min. ............. < 40 in 2:30 >
80 ............ 40 mosse in 3 ore .......................... < 40 in 3:00 >
Per i Livelli torneo dovete effettuare un certo numero di mosse
entro un periodo specifico di tempo. Se un giocatore supera il tempo
assegnato per un dato numero di mosse, il display indica questo e la
partita è finita.
Come descritto prima nella sezione 2.5, questa scacchiera
computerizzata utilizza un sistema di autotaratura quando giocate
partite del Livello Torneo. Quando si è conclusa una partita del
Torneo e premete NEW GAME (Nuova partita) due volte per resettare
l’unità, la scacchiera computerizzata visualizza brevemente la vostra
taratura prima di passare alla visualizzazione della nuova partita. Se
perdete la visualizzazione della taratura, potete premere HINT/INFO
(Suggerimenti/Informazioni) cinque volte per vedere nuovamente la
taratura in qualsiasi momento. Per annullare il display, premete
CLEAR (Annulla).
Se riconfigurate la scacchiera computerizzata per una nuova
partita durante una partita di Torneo, prima che la partita si sia
effettivamente conclusa, la scacchiera computerizzata vi consente di
stabilire l’esito come segue.
• Display = Rate as draw?.
Se premete ENTER (Invio), la taratura viene visualizzata.
117
ITALIANO
68 ................ 1 minuto per mossa ...................... <01:00/move>
69 ................ 2 minuti per mossa ....................... <02:00/move>
70 ................ 3 minuti per mossa ....................... <03:00/move>
Quando scegliete uno dei suddetti livelli, selezionate un tempo di
risposta medio per il computer. Notate che i tempi di risposta
rappresentano la media calcolata su diverse mosse. Nel gioco di
apertura e a finegioco il computer tende a giocare più rapidamente,
ma in posizioni complicate di mediogioco, impiega più a lungo ad
effettuare le mosse.
Se premete ˘:
• Display = Rate as win?.
Se premete ENTER (Invio), la taratura sarà visualizzata.
Se premete ˘:
• Display = Machine wins?.
Se premete ENTER (Invio), la taratura sarà visualizzata.
Se premete ˘:
Il display ritorna a Rate as draw?.
Per ottenere una taratura, dovete rispondere ad una delle seguenti
domande con ENTER (Invio)! Se non volete che la partita sia tarata
per qualsiasi motivo, premete CLEAR (Annulla) in risposta a qualsiasi
delle suddette domande. La scacchiera computerizzata conferma
visualizzando Game not rated.
5.4 Livelli partita rapida
Livello
Tempo totale per partita
Display
81 .............. 5 minuti per partita .................... < 5 min/game>
82 .............. 7 minuti per partita .................... < 7 min/game>
83 .............. 10 minuti per partita .................... <10 min/game>
84 .............. 15 minuti per partita .................... <15 min/game>
85 .............. 20 minuti per partita .................... <20 min/game>
86 .............. 30 minuti per partita .................... <30 min/game>
87 .............. 45 minuti per partita .................... <45 min/game>
88 .............. 60 minuti per partita .................... <60 min/game>
89 .............. 90 minuti per partita .................... <90 min/game>
90 ............ 100 minuti per partita .................... <100 min/game>
Ai Livelli partita rapida, configurate il tempo totale per tutta la
partita. Se il tempo della partita è stato superato, la scacchiera
computerizzata visualizza quale lato ha perso nel tempo, come
White time out. Per questi livelli, potete attivare l’opzione
Cronometro per conto alla rovescia per mostrare il tempo di conto alla
rovescia invece del tempo trascorso (cfr. Sezione 4.5).
5.5 Livelli soluzione problemi
Livello
Problema
91 .............. Scaccomatto in 1 mossa .............
92 .............. Scaccomatto in 2 mosse .............
93 .............. Scaccomatto in 3 mosse .............
94 .............. Scaccomatto in 4 mosse .............
95 .............. Scaccomatto in 5 mosse .............
96 .............. Scaccomatto in 6 mosse .............
118
<
<
<
<
<
<
Display
Mate in
Mate in
Mate in
Mate in
Mate in
Mate in
1
2
3
4
5
6
>
>
>
>
>
>
97 .............. Scaccomatto in 7 mosse ............. < Mate in 7 >
98 .............. Scaccomatto in 8 mosse ............. < Mate in 8 >
La selezione di uno di questi livelli attiva un programma speciale
per trovare il matto. Se avete una posizione in cui può esservi un
matto e volete che il computer lo trovi, configuratelo ad uno dei Livelli
Soluzione Problemi. Il computer può risolvere i matti in un massimo di
otto mosse. I matti che richiedono da una a cinque mosse sono in
genere reperiti rapidamente, mentre le soluzioni che richiedono da
sei a otto mosse possono richiedere più tempo. Se non è presente un
matto o il computer non riesce a trovarlo, visualizza brevemente No
move found!. Potete continuare a giocare, se preferite,
scegliendo un altro livello.
5.7 Livello infinito
Livello
Descrizione
Display
100 ........ Infinito (nessun limite di tempo) ......... < Infinite >
Al Livello infinito, il computer ricerca a tempo indeterminato fino a
quando trova un matto forzato, o fino a quando voi fermate la ricerca
premendo ENTER (Invio). Se la ricerca viene interrotta, il computer
effettua la mossa che ritiene attualmente migliore. Provate a
sperimentare con questo livello – configurate posizioni speciali della
scacchiera e lasciate che il computer le analizzi per voi! Penserà per
ore e persino giorni, cercando di trovare la mossa migliore possibile.
6. MODO RITIRO: MOSSE DI RITIRO
Quando giocate a scacchi contro questa scacchiera
computerizzata nessuna mossa è definitiva; potete cambiare idea o
decidere di giocare una mossa diversa quando volete! Al vostro
turno, premete semplicemente MENU per accedere al Menu
119
ITALIANO
5.6 Livello tattico
Livello
Descrizione
Display
99 .... Gioco tattico (nessun limite di tempo) ... < Tactical >
Al Livello tattico, l’obiettivo del computer è di trovare la migliore
sequenza tattica più rapidamente di quando farebbe ad un livello di
gioco normale. Il computer cerca indefinitamente fino a quando trova
una vincita di due o più pedoni, o fino a quando voi arrestate la
ricerca premendo ENTER (Invio). Il Livello Tattico è utile per la
sperimentazione, perché permette al computer di concentrarsi
pienamente sulle posizioni tattiche speciali!
Principale e premete ¯ ripetutamente fino a quando il display indica
¿TAKEBACK. Premete ENTER (Invio) per accedere a Modo Ritiro e
vedrete l’ultima mossa effettuata. Per ritirare quella mossa, premete
¯ e la mossa viene ritirata dalla scacchiera. Il display mostra poi la
prossima mossa da ritirare. Potete continuare a premere ¯ per ritirare
qualsiasi numero di mosse, fino all’inizio del gioco, se preferite. Se
raggiungete l’inizio, il display visualizza End takebacks, e
ritornate automaticamente al Menu Principale. Ricordate che,
fintantoché non ritornate all’inizio del gioco, potete sempre premere
˘ per avanzare attraverso le mosse, se lo preferite. Per riprendere la
partita in qualsiasi punto con la posizione attuale della scacchiera,
premete CLEAR (Annulla) e poi MENU.
Come scorciatoia per accedere al Modo Ritiro, potete anche
semplicemente premere sulla casa di destinazione dell’ultima
mossa effettuata. Il display visualizza brevemente TAKEBACK e
visualizza poi l’ultima mossa effettuata. Per ritirare la mossa premete
¯. Come sopra, premendo ripetutamente ¯ ritirate le mosse. Per
riprendere la partita in qualsiasi punto premete CLEAR (Annulla).
7. MODO INFO: GUARDATE IL COMPUTER CHE PENSA!
Immaginate: Giocate a scacchi con un amico e tocca a lui
effettuare una mossa. Vorreste sapere che mossa sta considerando e
vorreste conoscere il suo parere della posizione attuale della
scacchiera. Ma naturalmente, non glielo chiedete, perché questo è
contro le regole del gioco! Invece, quando giocate contro questa
scacchiera computerizzata, potete fare qualsiasi domanda e ottenete
tutte le risposte! Infatti, potete ottenere un’incredibile quantità di
informazioni sul processo del pensiero del computer e lo studio di
queste informazioni può assistervi ad imparare tanto ancora sul
gioco!
Potete accedere alle informazioni sul gioco in qualsiasi momento
tramite il Modo Info. Come descritto sotto, potete richiamare queste
informazioni manualmente premendo HINT/INFO (Suggerimenti/
Informazioni), o potete selezionare le opzioni del Modo Info per
visualizzarle automaticamente, ogni volta che il computer considera
la sua mossa successiva.
Display automatici di informazioni
Quando attivate una o tutte le seguenti opzioni del Modo Info, la
scacchiera computerizzata visualizza automaticamente quelle
120
informazioni ogni volta in cui riflette sulla sua mossa. Potete
letteralmente vedere mentre “pensa ad alta voce”!
Premete MENU per accedere al Menu Principale, e premete ¯
ripetutamente fino a quando il display mostra ¿INFO. Premete
ENTER (Invio) per accedere al Modo Info e vedrete la prima di
cinque opzioni, come illustrato sotto. Premendo ¯ (o ˘)
ripetutamente ciclate tra queste opzioni come segue:
• Mostra Mosse: Mostra la linea di gioco prevista del computer
fino a Quattro mosse individuali. Cfr. Sezione 7.1.
Opzioni: 0 / 1 / 2 / 3 / 4 moves
• Mostra Nodi: Mostra il numero dei nodi (posizioni) ricercati al
secondo. Cfr. Sezione 7.2.
Opzioni: nodes: off / on
• Mostra Tempo per Mossa: Mostra il tempo utilizzato finora per
la mossa attuale. Cfr. Sezione 7.3.
Opzioni: time/move: off / on
• Mostra Progresso: Mostra la profondità della ricerca del
computer e la mossa attualmente considerata. Cfr. Sezione 7.4.
Opzioni: progress: off / on
• Mostra Valutazione: Mostra il punteggio per la posizione
attuale. Cfr. Sezione 7.2.
Opzioni: evaluation: off / on
Per attivare/disattivare un’opzione o per selezionare le
impostazioni dell’opzione (eventuali), premete ENTER (Invio) quando
l’opzione è visualizzata. Premendo ENTER (Invio) ripetutamente
ciclate tra tute le scelte per l’opzione visualizzata. Quando la scelta
preferita è visualizzata, premete ¯ o ˘ per andare ad un’opzione
diversa o premete CLEAR (Annulla) per ritornare al Menu Principale,
e poi MENU per ritornare al gioco normale. Per tutti i particolari su
ciascuna di queste opzioni, vedere i numeri delle sezioni di
riferimento.
Potete attivare una o tutte le suddette Opzioni del Modo Info. Se
attivate più opzioni di quante possano essere contenute nel display in
una volta, il display scorre continuamente mentre il computer
considera la sua mossa successiva. Se il display scorre troppo
rapidamente, cambiate la Velocità LCD, come illustrato nella Sezione
4.10. Potete anche premere GO/STOP (Avvio/Arresto) per mettere il
121
ITALIANO
Importante: Le opzioni del Modo Info selezionate per la
visualizzazione automatica sono solo attivate mentre il computer pensa!
display in pausa e poi premete CLEAR (Annulla) per riprendere lo
scorrimento. Quando le informazioni richieste non sono disponibili, il
display visualizza --x--.
Display di informazioni manuali
Premete HINT/INFO (Suggerimenti/Informazioni) in qualsiasi
momento e visualizzate la prima mossa della linea di gioco prevista
del computer (come descritto nella Sezione 7.1). Le informazioni sul
gioco sono divise in diversi gruppi diversi, e premendo HINT/INFO
(Suggerimenti/Informazioni) ripetutamente cicla da un gruppo ad un
altro. I tasti ˘ e ¯ possono essere utilizzati per ciclare fra i display in
ciascun gruppo. I gruppi sono discussi singolarmente in modo
particolareggiato sotto. Premete CLEAR (Annulla) per ritornare al
normale display del cronometro.
7.1 Variazione principale
Quando premete HINT/INFO (Suggerimenti/Informazioni) per la
prima volta, vedete la prima mossa della variazione principale (la
linea di gioco prevista del computer), visualizzata come in Ply1:
b1-c3. Un “ply” è una singola mossa, o una mossa per uno dei lati,
e la profondità della ricerca del computer viene descritta secondo il
numero di mosse future previste dal computer. In una ricerca a due
“ply”, ad esempio, il computer prevede due singole mosse (una
mossa per i Neri e una per i Bianchi). Ricordate che questa prima
visualizzazione di “mossa” può essere anche usata come un
consiglio, perché questa è la mossa che il computer prevede voi
facciate.
Se controllate questo display mentre il computer pensa, vedete la
mossa che il computer sta attualmente considerando. Se lo
controllate durante il vostro turno, vedete la mossa che il computer
prevede effettuerete successivamente. In ogni caso, premendo ˘
ripetutamente ciclate fra il resto delle mosse nella linea prevista di
gioco, fino a Quattro ply:
• Linea di gioco prevista: Mossa 1
• Linea di gioco prevista: Mossa 2
• Linea di gioco prevista: Mossa 3
• Linea di gioco prevista: Mossa 4
7.2 Informazioni sulla ricerca
Dopo aver premuto HINT/INFO (Suggerimenti/Informazioni) per
accedere al Modo Info, premete nuovamente per vedere le
informazioni sulla ricerca del computer. La visualizzazione iniziale
122
UN QUADRO DEL MODO INFO
INFORMAZIONI VARIAZIONE PRINCIPALI:
•
•
•
•
Linea di gioco prevista: Mossa 1
Linea di gioco prevista: Mossa 2
Linea di gioco prevista: Mossa 3
Linea di gioco prevista: Mossa 4
INFORMAZIONI SULLA RICERCA:
• Valutazione posizione (punteggio)
INFORMAZIONI SUL CRONOMETRO
DELLA SCACCHIERA:
• Tempo trascorso per entrambi i lati
• Tempo rimanente per entrambi i lati*
*Solo Livelli Partita rapida/Torneo
INFORMAZIONI CONTEGGIO MOSSE:
• Numero mossa attuale + ultima mossa
effettuata
• Indietro e avanti attraverso le mosse
della partita attuale
INFORMAZIONI TARATURA:
• Taratura ELO (dopo che è stata giocata
una partita del Livello Torneo)
123
ITALIANO
• Profondità ricerca; e Mossa attualmente
considerata (se il computer pensa
attualmente)
• Tempo trascorso per la mossa attuale;
e Numero di nodi ricercati per secondo
(se il computer pensa attualmente)
mostra il punteggio attuale; premendo ˘ ripetutamente ciclate fra le
altre informazioni:
• Il punteggio attuale: una valutazione numerica della posizione
attuale basata su un pedone che vale 1,0 punto, un numero
positivo indica che i Bianchi sono in vantaggio. Esempio: Se i
Bianchi sono in vantaggio di due pedoni, il display visualizza
Score: +2.0. Ricordate che il punteggio non è valido ai
Livelli Soluzione Problemi.
• Display in due parti: (a) La profondità di ricerca attuale, o il
numero di mosse singole previste dal computer. Per esempio: se
il computer prevede 439 singole mosse, voi visualizzate
d:4 39, con la d: che significa profondità (depth). (b) La
mossa considerata (se il computer sta attualmente pensando).
• Display in due parti: (a) Il tempo impiegato finora per la mossa
attuale. (b) Il numero di nodi, o posizioni, ricercati per secondo
(se il computer sta attualmente pensando).
7.3 Informazioni sul cronometro della scacchiera
Dopo aver premuto HINT/INFO (Suggerimenti/Informazioni) per
accedere al Modo Info, premetelo altre due volte per vedere le
informazioni sul cronometro. Il display mostra il tempo trascorso totale
per entrambi i lati. Ricordate che il simbolo del cronometro della
scacchiera nel centro indica il lato attuale che effettua la mossa e il
tipo di cronometro utilizzato. Premendo ˘ ciclate attraverso due
display, come indicato sotto:
• Tempo totale trascorso per Bianco/Nero (Cronometro
Segnatempo)
Mossa dei Bianchi [, Mossa dei Neri ].
• Tempo totale rimanente per Bianchi/Neri (Cronometro Conto
alla rovescia: solo Livelli Soluzione Problemi/Partita Rapida)
Mossa dei Bianchi {, Mossa dei Neri }.
Se il Cronometro per conto alla rovescia non è attivato, il
secondo display mostra semplicemente un cronometro vuoto
(--:--{--:--).
I cronometri si fermano per vari motivi durante una partita, ad
esempio se ritirate una mossa, controllate le impostazioni del livello,
selezionate le opzioni, configurate una posizione o spegnete la
scacchiera computerizzata. I tempi sono ritenuti nella memoria, però,
e i cronometri ripartono appena viene ripristinata la partita. Quando
modificate i livelli di gioco o resettate la scacchiera computerizzata
per una nuova partita, i cronometri sono sempre azzerati.
124
7.4 Conteggio mosse/Mosse partita
Dopo aver premuto HINT/INFO (Suggerimenti/Informazioni) per
accedere al Modo Info, premetelo altre tre volte per vedere il numero
della mossa attuale e l’ultima mossa effettuata. Potete poi premere ¯
per ciclare attraverso le mosse precedenti della partita, se preferite,
o premete ˘ per avanzare nuovamente a qualsiasi punto. Questo vi
permette di tornare indietro e scrivere le mosse di una partita che
risulta inaspettatamente stupenda!
• Numero mossa attuale e ultima mossa effettuata.
• Mosse della partita attuale.
7.5 Visualizzazione della taratura
Dopo aver premuto HINT/INFO (Suggerimenti/Informazioni) per
accedere al Modo Info, premetelo altre quattro volte per vedere la
vostra taratura attuale. Notate che le tarature sono basate sul gioco
Livello Torneo, come descritto nella Sezione 5.3.
Attenzione: tutte le mosse nel vostro gioco attuale saranno
cancellate se apportate delle modifiche alla posizione della
scacchiera durante una partita!
Potete modificare o configurare una posizione della scacchiera
ogni volta che tocca a voi effettuare una mossa. Premete MENU, e
premete ¯ ripetutamente fino a quando il display mostra ¿SETUP.
Premete ENTER (Invio) per accedere al Modo Impostazione, e
vedrete un display che mostra il colore e il simbolo dei pezzi
(„ıKQRBNP).
• Per rimuovere un pezzo dalla scacchiera, premete
semplicemente sul pezzo e questo scompare dalla scacchiera.
• Per muovere un pezzo da una casa all’altra premete sul
pezzo, facendolo scomparire. Premete poi sulla nuova casa e il
pezzo compare in quella posizione.
• Per aggiungere un pezzo alla scacchiera premete prima
direttamente sul simbolo del colore e del pezzo visualizzato per il
pezzo che volete aggiungere e poi premete sulla casa dove
volete aggiungere il pezzo. Per aggiungere un altro prezzo dello
125
ITALIANO
8. MODO IMPOSTAZIONE: CAMBIATE LA SCACCHIERA!
Il Modo Impostazione vi permette di configurare le posizioni
speciali della scacchiera da cui giocare o problemi che volete far
risolvere al computer!
stesso tipo e colore, premete semplicemente su un’altra casa.
Per aggiungere un pezzo diverso, premete su un altro pezzo e/o
simbolo di colore, e seguite le stesse istruzioni fornite sopra.
• Per liberare la scacchiera premete CLEAR (Annulla) mentre
siete in Modo Impostazione. Il display chiede la conferma con
Clear board?. Premete ENTER (Invio), e il display mostra
Cleared. Potete poi aggiungere qualsiasi numero di pezzi,
come descritto sopra. Se decidete di non liberare la scacchiera
dopo tutto, premete semplicemente nuovamente CLEAR
(Annulla) per cancellare, e vedrete Not cleared. Questa
funzione può essere utile per configurare le posizioni solo con
alcuni pezzi, mentre sarebbe molto più facile iniziare con una
scacchiera vuota!
• Una volta che avete modificato la posizione nel modo
descritto sopra, ricordate che il colore per il lato che deve
effettuare la mossa viene determinato dal colore dell’ultimo
pezzo configurato. Modificate il colore, se necessario, premendo
ı per i Neri o „ per i Bianchi.
• Per uscire dal Modo Impostazione premete ENTER (Invio).
Quando la scacchiera computerizzata chiede la conferma con
New position?, premete ENTER (Invio) per ritornare al
gioco normale con la nuova configurazione della tastiera. New
position! conferma questo. Se premete CLEAR (Annulla), il
display visualizza Resume, e rimanete nel Modo Impostazione.
Ricordate che qualsiasi posizione legale della scacchiera può
essere configurata usando i suddetti procedimenti. Il computer non vi
consente di configurare una posizione illegale, ad esempio se è
presente un numero di pezzi superiore a quello stabilito per una
partita normale, o se un Re è in scaccomatto e non deve muoversi. In
questi casi, dopo che premete ENTER (Invio) per uscire dal Modo
Impostazione e poi ENTER (Invio) per confermare, la scacchiera
computerizzata visualizza Illegal. Non potete uscire dal Modo
Impostazione fino a quando non avete configurato una posizione
legale della scacchiera!
Se accedete al Modo Impostazione, ma non avete ancora
apportato modifiche alla scacchiera, potete uscire premendo ENTER
(Invio). Il display conferma con unchanged, e ritornate al Menu
Principale. Premete MENU nuovamente per ritornare al gioco
normale.
126
9. MODO STUDIO: METTETEVI ALLA PROVA!
Volete uno strumento didattico fenomale? Vorrete decisamente
provare il Modo Studio! Otto partite famose sono incorporate nel
computer, ciascuna contenente otto punti critici – per un totale di 64
Posizioni di studio. Voi dovete giocare le partite ed effettuare le mosse
corrette che erano giocate per il lato vincente nelle partite originali.
Questa funzionalità offre un alto potenziale per migliorare la vostra
conoscenza degli scacchi, consentendovi allo stesso tempo di
imparare come effettuare le mosse migliori in posizioni particolari. Per
rendere questa funzionalità ancora più entusiasmante, il computer
assegna un punteggio alla vostra prestazione mentre giocate.
Se avete bisogno di aiuto per risolvere una delle Posizioni di
studio, consultate semplicemente l’Appendice contenente un elenco
completo di tutte le partite in Modo Studio. Ricordate tuttavia che
queste partite sono incluse come strumento di riferimento e che
ingannerete voi stessi se leggerete le soluzioni prima di tentare di
risolvere le Posizioni di studio da soli!
Consiglio: Potete anche selezionare le Posizioni di studio
premendo alcune case della scacchiera, come descritto più
tardi in questa sezione !
Premete MENU per accedere al Menu Principale, e premete ¯ (o
˘) ripetutamente fino a quando il display visualizza ¿STUDY.
Premete ENTER (Invio) per accedere al Modo Studio, e vedrete la
prima Posizione di Studio, < Study1-1 >. Per modificare la
Posizione di Studio, premete ˘ o ¯ per aumentare/ridurre gli studi di
uno, o usate lo stilo per premere > o < per aumentare/ridurre gli studi
di otto. Quando visualizzate la Posizione di Studio desiderata,
premete ENTER (Invio) e il display conferma con Start Study?.
Premendo ENTER (Invio) a questo punto iniziate la Partita di Studio,
come descritto sotto, o premendo CLEAR (Annulla) cancellate e
ritornate al display principale del Modo Studio.
Dopo aver premuto ENTER (Invio), il computer inizia
automaticamente ad effettuare le mosse della Partita di Studio
selezionata. Appena viene raggiunta la prima Posizione di Studio, il
display visualizza brevemente Your Move, e parte il cronometro.
Voi dovete indovinare adesso la mossa che è stata giocata in quella
posizione nella partita originale! Ecco come funziona:
127
ITALIANO
Selezione delle posizioni di studio
• Esiste solo una mossa “corretta” per la Posizione di Studio.
• Quando avete raggiunto la Posizione di Studio, il simbolo del
colore visualizzato indica quale lato deve effettuare la mossa.
• Se effettuate la mossa corretta, visualizzate Well Done. Il
computer effettua quindi le mosse successive nel gioco,
fermandosi eventualmente alla Posizione di Studio successiva
da risolvere.
• Se effettuate la mossa sbagliata, visualizzate Wrong Move
brevemente sul display e poi Quit Study?.
• Per rimanere nel Modo Studio e provare un’altra mossa,
premete CLEAR (Annulla). I punti sono detratti se avete
indovinato in modo errato, il vostro pezzo ritorna alla sua
casa originale e potete effettuare una mossa diversa.
• Per uscire dal Modo Studio e continuare una partita
normale usando la mossa che avete giocato, premete
ENTER (Invio). Il computer inizia a riflettere sulla mossa
successiva.
• Punteggio: Ogni volta che risolvete una Posizione di Studio
correttamente, i punti sono aggiunti al vostro punteggio. Ottenete
il punteggio pieno se risolvete la Posizione di Studio al primo
tentativo. Per ciascuna mossa errata che effettuate prima di
trovare quella giusta, il vostro punteggio sarà dimezzato. Se
raggiungete zero punti in qualsiasi momento, il vostro punteggio
rimarrà a zero, indipendentemente dal numero di mosse ulteriori
che tentate.
• Per controllare il vostro punteggio attuale, premete HINT/
INFO (Suggerimento/Informazioni) due volte. Ricordate che la
prima premuta mostrerà l’ultima mossa che è stata effettuata per
l’altro lato. Premendo CLEAR (Annulla) cancellate la
visualizzazione del punteggio.
Se risolvete una conclusione del Gioco di Studio in scaccomatto,
Checkmate! rimane nel display dopo una serie di messaggi di
congratulazioni. A questo punto, potete (a) resettare per una nuova
partita, (b) usare Modo Info per documentare le mosse ripercorrendo
le mosse precedenti (come descritto nella Sezione 7.4), o (c) ritirare
qualsiasi mossa e riprendere una partita normale da qualsiasi
posizione. Se risolvete l’ultima Posizione di Studio in una partita, ma
la partita non si è effettivamente conclusa, il display visualizza End
Game, e il computer inizia automaticamente a riflettere sulla mossa
successiva, permettendovi di continuare la partita normalmente.
128
USATE LA SCACCHIERA PER SELEZIONARE
LE POSIZIONI DI STUDIO!
8
1-8
2-8
3-8
4-8
5-8
6-8
7-8
8-8
7
1-7
2-7
3-7
4-7
5-7
6-7
7-7
8-7
6
1-6
2-6
3-6
4-6
5-6
6-6
7-6
8-6
5
1-5
2-5
3-5
4-5
5-5
6-5
7-5
8-5
4
1-4
2-4
3-4
4-4
5-4
6-4
7-4
8-4
3
1-3
2-3
3-3
4-3
5-3
6-3
7-3
8-3
2
1-2
2-2
3-2
4-2
5-2
6-2
7-2
8-2
1
1-1
2-1
3-1
4-1
5-1
6-1
7-1
8-1
a
b
c
d
e
f
g
h
Utilizzo della scacchiera per la selezione
Ciascuna Posizione di Studio può essere anche attivata
individualmente premendo la casa corrispondente della tastiera.
Come illustrato nella Tabella del Modo Studio, ciascuna delle 64 case
rappresenta una Posizione di Studio. Accedete al Modo Studio
premendo MENU e ¯ (o ˘) fino a quando visualizzate ¿STUDY, e
premendo poi ENTER (Invio). Vedete poi la tabella e premete una
129
ITALIANO
Per un modo facile di selezionare una Posizione di Studio, accedete
semplicemente al Modo Studio e premete una delle case corrispondenti
della scacchiera, come illustrato sotto.
delle case della scacchiera per selezionare la Posizione di Studio.
Premete ENTER (Invio) e il display conferma con Start Study?.
Premete nuovamente ENTER (Invio), e inizia la Partita di Studio,
come descritto prima.
10. AVETE BISOGNO DI AIUTO? ECCOLO!
Per risolvere i problemi, abbiamo compilato la seguente lista di
situazioni potenziali, con alcune possibili soluzioni.
a. Il computer non reagisce, si comporta in modo erratico o “si
congela” durante una partita.
• Reinserite le batterie, o sostituitele con batterie alcaline nuove.
• Le scariche di elettricità statica possono aver causato un
congelamento. Premete nel foro marcato ACL per resettare
l’unità (cfr. Sezione 11.1).
b. Il display è scuro e/o difficile da leggere.
• Sostituite le batterie con batterie alcaline nuove.
• Selezionate un’Opzione di Contrasto LCD diversa (cfr. Sezione
4.9).
c. Ho attivato alcuni Display Info automatici per osservare il
computer mentre pensa, ma il display effettua lo
scorrimento troppo rapidamente.
• Selezionate un’opzione Velocità LCD diversa (crf. Sezione
4.10).
• Premete GO/STOP (Avvio/Arresto) per fermare il display di
scorrimento in qualsiasi momento; premete CLEAR (Annulla)
per riprendere lo scorrimento.
d. Il computer non effettua una mossa.
• L’unità risponde solo automaticamente se il Modo Due
Giocatori è configurato a player: P-C per Giocatore
contro Computer (cfr. Sezione 4.1).
• Potreste essere ad un livello in cui il computer pensa per un
periodo di tempo lungo. Potete forzarlo ad effettuare la mossa,
se volete, premendo ENTER (Invio).
e. Il computer non accetta la mia mossa.
• State cercando di effettuare una mossa illegale. Controllate le
regole.
• Il vostro Re è in scacco? La vostra mossa metterà il vostro Re
in scacco? Il vostro arrocco è errato? Esaminate la posizione.
• È il vostro turno? Se il simbolo del colore lampeggia, il computer sta pensando. Premete ENTER (Invio) per interromperlo,
se preferite.
130
131
ITALIANO
f. L’annotazione della scacchiera è inversa quando effettuo le
mosse. Perché?
• Avete attivato l’opzione white: top. Andate al Modo
Opzione e cambiate a black: top (cfr. Sezione 4.4).
g. Ho appena resettato la scacchiera per una nuova partita, ma
il computer visualizza Rate as draw? invece di
resettarsi.
• Avete interrotto una partita di Livello Torneo, e dovete dire al
computer come volete sia tarata la partita. Per i particolari, cfr.
Sezione 5.3.
h. Il computer ha visualizzato la sua mossa, ma il suo pezzo
lampeggia e la mossa non è stata effettuata sulla
scacchiera.
• Quando l’Opzione Mossa Automatica è spenta, dovete
muovere i pezzi del computer sulla scacchiera. Per riattivare
Mossa Automatica, cfr. Sezione 4.11.
i. Il computer visualizza No Move Found! invece di
effettuare una mossa.
• Siete ad un Livello Soluzione Problema e il computer non ha
trovato un matto. Se non cercate di risolvere un problema di
matto, passate ad un livello di gioco normale (cfr. Sezione 5).
j. Sto cercando di uscire dal Menu Principale premendo
CLEAR (Annulla), ma ricevo invece un bip di errore.
• State premendo il tasto sbagliato! Per uscire dal Menu
Principale premete MENU.
k. Il computer emette un bip intermittente anche se tocca a me
effettuare la mossa.
• Quando il Modo Didattico è attivato, il computer emette bip
durante il vostro turno.
l. Il computer non emette bip quando effettua le sue mosse.
• Andate al Modo Opzioni per attivare l’audio (cfr. Sezione 4.8).
m.Il computer non mi permette di uscire dal Modo
Impostazione.
• Avete configurato una posizione illegale (es. un Re può essere
in scacco, possono essere presenti troppi pedoni sulla
scacchiera, ecc.). Modificate la scacchiera per configurare una
posizione valida (cfr. Sezione 8).
11. PARTICOLARI TECNICI
11.1 La funzione ACL
A volte le scacchiere computerizzate si congelano a causa delle
scariche di elettricità statica o di altri disturbi elettrici. Se questo
succede, usate uno spillo o un altro oggetto acuminato per premere
nel foro marcato ACL nella base dell’unità per almeno un secondo.
Questo resetta il computer.
11.2 Cura e manutenzione
La scacchiera computerizzata è un dispositivo elettronico di
precisione, e non dovrebbe essere soggetta a manipolazione
impropria o esposta a temperature estreme o umidità. Non utilizzate
agenti chimici o liquidi per pulirla, perché possono danneggiare la
plastica. Accertatevi di rimuovere le batterie prima di pulirla.
Le batterie scariche devono essere sostituite prontamente, perché
possono perdere e danneggiare il computer. Seguite inoltre le
seguenti istruzioni relative all’uso delle batterie. Attenzione: Utilizzate
solo batterie alcaline o al carbonio di zinco. Non utilizzate tipi diversi
di batterie o batterie nuove e usate. Non ricaricate batterie non
ricaricabili. Usate solo batterie consigliate o equivalenti. Accertatevi di
osservare la corretta polarità quando inserite le batterie. Le batterie
esaurite devono essere rimosse prontamente dall’unità. Non mettete i
terminali di alimentazione in cortocircuito.
11.3 Caratteristiche tecniche
Tasti:
8
Tastiera:
9x8, membrana contatto (touch panel)
Display a cristalli
liquidi (LCD):
matrice di punti 11 caratteri, 68 x 79 mm
Batterie:
3 x AAA/AM4/R03
Dimensioni:
131 x 83 x 22 mm
Peso:
220 g
Conservate queste informazioni per riferimento futuro.
Saitek si riserva il diritto di apportare modifiche tecniche senza preavviso
nell’interesse del progresso.
132
INICIO RÁPIDO
Para ponerse a jugar inmediatamente, ¡sólo tiene que seguir estos pasos!
4
Abra el compartimento de las pilas e inserte tres pilas
alcalinas tamaño “AAA” (AM4/R03), asegurando que
se observa la polaridad adecuada.
3x
AAA
(AM4/R03)
Retire el estilete de la zona de almacenamiento de la
parte derecha de la unidad, como se muestra aquí.
Pulse GO/STOP [COMENZAR/PARAR], situado en el
borde superior de la unidad, para encender el
ordenador. Si no obtiene respuesta, restaure como se
apunta en la Sección 11.1.
Pulse NEW GAME [NUEVO JUEGO] dos veces
seguidas para restaurar el ordenador. Si el tablero no
se repone para una partida nueva de ajedrez, es
porque ha dejado transcurrir mucho tiempo entre las
pulsaciones de tecla. ¡Inténtelo de nuevo!
x2
5
Introduzca las jugadas pulsando el estilete
suavemente sobre las casillas de origen y destino
por cada jugada. Tenga en cuenta que también puede
utilizar las yemas de los dedos.
6
Cuando el ordenador muestra la jugada, la pieza
destellará brevemente en las casillas de origen y
destino y luego se hará la jugada en el tablero.
¡Ahora es su turno de nuevo!
ıPd7-d5````
Para apagar la unidad, pulse GO/STOP [COMENZAR/
PARAR]. Cuando se muestre Stop? Pulse de nuevo
GO/STOP [COMENZAR/PARAR] para confirmar: ¡y la partida quedará
almacenada en la memoria!
¡CONOZCA LAS PIEZAS DE AJEDREZ!
K`
REY
Q`
R`
REINA
TORRE
B`
ALFIL
N`
P`
CABALLO
PEÓN
Blancas
Negras
133
ESPAÑOL
1
2
3
ÍNDICE DE MATERIAS
INICIO RÁPIDO
TECLAS Y CARACTERÍSTICAS
INTRODUCCIÓN
1. PUESTA EN MARCHA: LOS
ASPECTOS BÁSICOS
1.1 Instalación de pilas, encendido
1.2 ¿Listo para jugar? ¡Así se hace!
1.3 El ordenador hace una jugada
1.4 ¿Se acabó la partida? Empiece
un nuevo juego
1.5 ¿Demasiado fácil/difícil?
¡Cambie de nivel
2. MÁS CARACTERÍSTICAS QUE
EXPLORAR
2.1 ¿A quién le toca? ¡Compruebe
la pantalla!
2.2 Jugadas de ajedrez especiales
2.3 Jugadas ilegales/incorrectas
2.4 Jaque, mate y tablas
2.5 ¡Pruebe el sistema de autoclasificación!
2.6 ¿Desea un consejo? ¡Sólo tiene
que preguntar!
2.7 Interrupción de la búsqueda
2.8 Cambio de bando
2.9 Aperturas incorporadas
2.10 Pensando durante el tiempo del
contrincante
2.11 Apagado/memoria del juego
3. EL MENÚ PRINCIPAL
4. MODO DE OPCIONES
Selección de opciones de juego
4.1 Modo de dos jugadores
4.2 Algoritmo de búsqueda
4.3 Modo de registro automático
4.4 Las blancas en la parte superior
4.5 Reloj de cuenta atrás
4.6 Tictac del reloj
4.7 Modo de entrenamiento
4.8 Sonido encendido/apagado
4.9 Contraste de PCL
4.10 Velocidad de PCL
134
4.11Modo de jugada
automática
5. MODO DE NIVEL
Configuración de un nivel de
juego
5.1 Niveles de diversión
5.2 Niveles de juego casual
5.3 Niveles de torneo
5.4 Niveles de ajedrez veloz
5.5 Niveles de resolución de
problemas
5.6 Nivel táctico
5.7 Nivel infinito
6. MODO DE RETRACCIÓN
7. MODO DE INFORMACIÓN
Muestras de información
automáticas
Muestras de información
manuales
7.1 Variante principal
7.2 Información de búsqueda
7.3 Información de reloj de
ajedrez
7.4 Conteo de jugadas/
jugadas de partida
7.5 Muestra de clasificación
8. MODO DE
CONFIGURACIÓN
9. MODO DE ESTUDIO
Selección de posiciones de
estudio
Utilización del tablero para la
selección
10. ¿NECESITA AYUDA?
¡BÚSQUELA AQUÍ!
11. DETALLES TÉCNICOS
11.1La función ACL
11.2Cuidado y mantenimiento
11.3Especificaciones técnicas
APÉNDICE: JUEGOS DEL
MODO DE ESTUDIO
1. TABLERO DE AJEDREZ TÁCTIL: Cada casilla registra un movimiento de pieza cuando
se pulsa suavemente con el estilete o con la yema de los dedos.
2. LÍNEA DE INFORMACIÓN: Muestra movimientos, información del juego y relojes de
ajedrez. También se utiliza cuando se seleccionan opciones y niveles, posiciones de
configuración y más cosas.
3. ESTILETE: Utilizado para hacer jugadas en la pantalla táctil y también para seleccionar
valores en el área de la línea de
información.
4. TECLA DE GO/STOP [COMENZAR/
PARAR]: Púlsela para encender la unidad
y púlsela dos veces para apagarla. Pulse
para detener el desplazamiento de
pantalla y reanude el desplazamiento con
CLEAR [DESPEJAR].
5. ÁREA DE ALMACENAMIENTO DE
ESTILETE: Inserte el estilete en la ranura
cuando no esté en uso.
6. FUNDA DE PCL: Se desliza para proteger
la pantalla cuando la unidad no está en
uso.
7. ACL (Reponer): En la base de la unidad.
Utilizado para eliminar la descarga estática
después de instalar pilas nuevas.
8. TECLA DE HINT/INFO [CONSEJOS/
INFORMACIÓN]: Púlsela durante una
jugada para obtener un consejo. Púlsela
repetidamente para desplazarse entre las
pantallas principales de información.
9. TECLA DE CLEAR [DESPEJAR]: Pulse
para salir de los modos de Opciones/
Información; para cancelar los modos de
Niveles/Estudio sin hacer cambios; para
despejar las pantallas del Modo de
información; para permanecer en el Modo
de estudio después de hacer una jugada
errónea; para despejar el tablero en el
Modo de configuración; para reanudar el
desplazamiento por pantalla tras una
pausa, y para reanudar el juego después
de las retracciones.
10. COMPARTIMENTO DE LAS PILAS: En la
base de la unidad. Utiliza tres pilas
alcalinas “AAA” (AM4/R03).
11. TECLA DE ENTER [INTRO]: Pulse para
cambiar sitios con el ordenador. Pulse
mientras el ordenador esté procesando
para forzarlo a hacer una jugada. Pulse
para seleccionar elementos del Menú
principal; para seleccionar valores y
activar/desactivar opciones en los modos
de Opciones/Información; para introducir
un nuevo nivel en el Modo de niveles; para
seleccionar una Posición de estudio, y
para salir del Modo de configuración con una nueva posición.
12. TECLAS ¯/˘: Pulse para desplazarse entre las posiciones de Niveles/Estudio una de
cada vez en los modos de Nivel/Estudio. Pulse para jugadas de retracción/volver a hacer
jugadas en el modo de Retracción.
13. TECLA DE MENÚ: Pulse para entrar en el Modo de menús y pulse de nuevo para salir.
14. TECLA DE NEW GAME [NUEVO JUEGO]: Pulse dos veces, repetidamente, para
reponer el ordenador.
135
ESPAÑOL
TECLAS Y CARACTERÍSTICAS
INTRODUCCIÓN
¡Enhorabuena por la adquisición del ordenador Touch Screen
Travel Chess! Con unas capacidades extraordinarias de partidas de
ajedrez y una amplia serie de opciones especiales, esta unidad
estilizada ofrece un interfaz de pantalla táctil para jugar cómoda y
fácilmente. Portátil y siempre lista para llevar de viaje, le permitirá
disfrutar de una partida de ajedrez en cualquier sitio: ¡ya esté en
casa o en carretera! Una vez que se familiarice con el funcionamiento
básico, explore todas las prestaciones extra que ofrece este
ordenador exclusivo. ¡Pronto se dará cuenta de que disfruta del
ajedrez como nunca antes había disfrutado!
1. PUESTA EN MARCHA: ¡LOS ASPECTOS BÁSICOS!
1.1 Instalación de las pilas, encendido de la unidad
El ordenador de ajedrez funciona con tres pilas “AAA” (AM4/R03).
Instale las pilas en el compartimento de la base de la unidad,
asegurando que observa la polaridad correcta. ¡Recomendamos
utilizar pilas alcalinas nuevas para una mayor duración de las pilas!
Para encender el ordenador, pulse GO/STOP [COMENZAR/
PARAR]. Si no obtiene respuesta, reponga la unidad pulsando con
un clip u otro objeto punzante en el agujero etiquetado ACL de la
base durante un segundo como mínimo.
Para conservar las pilas, el ordenador se apagará
automáticamente cuando esté inactivo durante unos 20 minutos.
1.2 ¿Listo para jugar? ¡Así se hace!
Para comenzar una partida, siga los pasos siguientes:
a. Pulse GO/STOP [COMENZAR/PARAR] para encender el
ordenador.
b. Para reponer el ordenador para una nueva partida de ajedrez,
pulse NEW GAME [NUEVO JUEGO] dos veces sucesivamente.
Si transcurre mucho tiempo entre las pulsaciones de tecla, el
ordenador no se repondrá y tendrá que pulsar las teclas de
nuevo. Tan pronto como la unidad se haya repuesto, visualizará
brevemente New Game y luego el símbolo de las piezas
blancas („) y el reloj de ajedrez (00:00:00).
c. Para hacer una jugada, pulse ligeramente con el estilete en la
pieza que desea mover hasta que oiga un pitido y la pieza
136
destelle. Tenga en cuenta que puede usar la yema del dedo en
vez del estilete, si así lo desea.
d. A continuación, pulse con el estilete en la casilla destino. Oirá
otro pitido, con el que el ordenador confirma el movimiento.
Ahora le toca mover al ordenador. Notará que el ordenador a
menudo mueve las piezas instantáneamente al inicio de una
partida, en vez de tomarse un tiempo para pensar. Esto se debe
a que está haciendo jugadas que están almacenadas en la
biblioteca de aperturas. Para los detalles, véase la sección 2.9.
1.3 El ordenador hace una jugada
Cuando el ordenador hace una jugada, antes se muestra
brevemente Thinking.... Mientras el ordenador piensa acerca
de su jugada con las Negras, la pantalla destella el símbolo de las
piezas negras (ı), al tiempo que muestra el reloj del ordenador. Una
vez realizada la jugada, el ordenador dará un pitido y mostrará la
jugada (p. ej., ıPe7-e5) y la pieza destellará brevemente hacia
adelante y hacia atrás en las casillas de origen y destino. Después
de realizada la jugada en el tablero, la pantalla volverá a mostrar su
reloj: y vuelve a ser su turno.
1.4 ¿Se acabó la partida? Empiece un juego nuevo
Siempre que finaliza una partida (o si decide abandonar la partida
en curso) ¡resulta fácil volver a empezar! Reponga el ordenador
pulsando NEW GAME [NUEVO JUEGO] dos veces seguidas. Se
mostrará en pantalla New Game, indicando que el ordenador está
listo para otra partida de ajedrez, utilizando el nivel de juego
actualmente seleccionado.
Nota especial acerca de los niveles de torneo. Si repone para una
partida nueva antes de que termine una partida de nivel de torneo, se
le pedirá que confirme el resultado de la partida antes de que
ordenador se reponga automáticamente Para los detalles, véase la
sección 2.5.
1.5 ¿Demasiado fácil/difícil? ¡Cambie de nivel!
La primera vez que se enciende el ordenador, se coloca
automáticamente en el nivel de juego 63, con un tiempo de respuesta
media del ordenador de cinco segundos por jugada. No obstante,
137
ESPAÑOL
Precaución: ¡Reponiendo el ordenador se despeja la partida
en curso de la memoria del ordenador!
¡OPCIONES DE PANTALLA A RECORDAR!
• Modo de avivar/oscurecer la pantalla: Seleccione una
configuración de contraste de PCL diferente, como se apunta
en la sección 4.9.
• Modo de aminorar/acelerar una pantalla de
desplazamiento: Seleccione una configuración de velocidad
de PCL diferente, como se describe en la sección 4.10.
• Modo de detener una pantalla de desplazamiento: Pulse
GO/STOP [COMENZAR/PARAR] una vez y pulse CLEAR
[DESPEJAR] para reanudar el desplazamiento. ¡Tenga en
cuenta que esta prestación tiene un valor especial cuando se
tienen activadas varias pantallas del modo de información
automático mientras el ordenador está pensando!
¡puede elegir entre 100 niveles de juego distintos! Para las
descripciones de todos los niveles, así como para las instrucciones
acerca de cómo cambiar los niveles de juego, véase la sección 5.
2. MÁS CARACTERÍSTICAS QUE EXPLORAR
2.1 ¿A quién le toca? ¡Compruebe la pantalla!
Cuando el ordenador procesa la jugada para las Negras,
destellará una casilla de las negras (ı). Después de que el
ordenador haya hecho la jugada, la pantalla muestra una casilla
blanca fija („), indicando que ahora es el turno de las blancas.
2.2 Jugadas de ajedrez especiales
Se ruega tener en cuenta lo siguiente en lo relacionado a ciertas
jugadas de ajedrez.
Capturas: Las capturas se muestran con una x, como en
ıPa7xb6.
Al paso: En este tipo de captura, mostrado como EP después de
la jugada de captura, el ordenador le recuerda que retire el peón
capturado haciéndolo destellar. Pulse el peón para retirarlo del
tablero.
Enroque: Después de haberse movido el rey, el caballo destellará.
Haga que se mueva la torre indicada para completar la maniobra de
enroque. El enroque corto se muestra como O-O y el enroque largo
como O-O-O.
138
Coronación de un peón:
• Cuando corona un peón, primero pulse el peón en la casilla de
origen de la forma usual. La pantalla cambiará entonces para
mostrar las piezas de coronación disponibles (Q R B N). Para
coronar a reina sólo tiene que pulsar la tecla de destino para
completar la jugada. Para coronar a torre, alfil o caballo, pulse uno de
los símbolos de promoción mostrados. La pantalla confirmará
brevemente (p. ej., Prom: rook). Pulse la casilla de destino para
completar la coronación y la pieza cambiará automáticamente en el
tablero. Nota: si cambia de idea acerca de la pieza de coronación
antes de pulsar la tecla de destino, sólo tiene que pulsar uno de los
otros símbolos.
• Cuando el ordenador corona un peón indica la jugada,
conjuntamente a la pieza coronada, como en ıPh2-h1/Q.
2.4 Jaque, mate y tablas
Siempre que el rey esté en jaque, el ordenador mostrará Check
brevemente después de realizada la jugada. Si el ordenador
descubre un mate forzado, mostrará brevemente un aviso de mate (p.
ej., Mate in 3). Cuando una partida acaba con jaque mate, el
ordenador le felicitará o le compadecerá, dependiendo que haya
ganado o perdido. El juego se acabará mostrando Checkmate!.
El ordenador reconoce las tablas por ahogado, las tablas
fotográficas y la regla de las 50 jugadas. En cada uno estos casos, la
pantalla correspondiente se mostrará después de haberse hecho la
jugada de tablas.
139
ESPAÑOL
2.3 Jugadas ilegales/incorrectas
El ordenador conoce todas las reglas del ajedrez: ¡y nunca hará
trampa! Si intenta hacer una jugada ilegal, un pitido doble de tono
elevado le alertará del error. Esto ocurrirá si, por ejemplo, pulsa una
casilla de origen o destino ilegales, una pieza o color incorrectos o
una tecla de juego inválida.
Si pulsa una casilla de destino ilegal, la pantalla simplemente
proseguirá para indicar la casilla de origen. Para continuar, mueva la
pieza a una casilla legal. Si pulsa una casilla de destino pero decide
no hacer el movimiento, pulse de nuevo esa misma casilla para
cancelar la instrucción. Si cambia de idea después de introducir la
totalidad de la jugada, retracte la jugada como se describe en la
sección 6.
2.5 ¡Pruebe el sistema de auto-clasificación!
Siempre que juegue uno de los niveles de torneo, el ordenador le
proporcionará una clasificación Elo aproximada tras acabarse la
partida, basado en su actuación. ¿No está seguro de lo que significa
“clasificación”? Se trata de un método reconocido internacionalmente
para medir la actuación de los ajedrecistas o describir la capacidad
de juego relativa de los mismos. El organismo internacional que
regula el ajedrez se llama FIDE, o Fédération Internationale des
Échecs, y a menudo se hace referencia a las clasificaciones de FIDE
como clasificaciones Elo. La Federación Estadounidense de Ajedrez
(USCF) utiliza un sistema de clasificación similar. Las clasificaciones
generalmente son números de cuatro cifras y los mejores
ajedrecistas obtienen las clasificaciones más elevadas. Hacia la parte
superior de la escala los maestros tienen puntuaciones de 2.200 y
superiores y los Gran maestros internacionales tienen de 2.500 en
adelante. ¿Desea saber su clasificación? ¡Esta es su oportunidad!
Consulte la sección 5.3 para más información acerca de los niveles
de torneo.
2.6 ¿Desea un consejo? ¡Sólo tiene que preguntar!
Si precisa ayuda con una jugada, ¡el Touch Screen Travel Chess
se complace en ofrecérsela! Pulse HINT/INFO [CONSEJO/
INFORMACIÓN] durante su turno y el ordenador mostrará una
sugerencia de jugada. Si, por ejemplo, el consejo fuese e4xd5, se
mostrará Ply 1: e4xd5. Una “ply” es una jugada individual o una
jugada por cada bando. El consejo puede tardar de uno a cinco
segundos en mostrarse en el tablero. Para hacer una jugada
diferente, solamente tiene que ignorar el consejo y hacer una jugada
propia. También puede cancelar la visualización del consejo pulsando
CLEAR [DESPEJAR].
2.7 Interrupción de la búsqueda
Para interrumpir al ordenador cuando está pensando en una
jugada, pulse ENTER [INTRO]. Esto fuerza al ordenador a hacer la
mejor jugada que haya encontrado hasta el momento. Esta
prestación puede ser extremadamente útil con los niveles superiores,
en que el ordenador puede tardar mucho tiempo en hacer una
jugada, así como en los niveles infinito y táctico, en que el ordenador
piensa indefinidamente, a no ser que lo pare.
En los niveles de reproducción de problemas si se pulsa ENTER
[INTRO] mientras el ordenador está pensando no hará que el
140
ordenador haga una jugada. En vez de ello, el ordenador mostrará
No move found! para indicar que se le interrumpió antes de
encontrar un mate. Para continuar, cambie de nivel.
2.8 Cambio de bando
Para cambiar de bando con el ordenador, pulse ENTER [INTRO]
cuando sea su turno: y el ordenador hará la siguiente jugada de su
bando. Puede cambiar de bando tantas veces como desee pulsando
ENTER [INTRO] repetidamente.
¿Desea que el ordenador haga la primera jugada para las blancas
al inicio de una nueva partida? Pulse NEW GAME [NUEVO JUEGO]
dos veces ¡y luego pulse ENTER [INTRO]!
¿Desea que el ordenador juegue una partida contra sí mismo?
Pulse ENTER [INTRO] después de cada jugada: y observe como
juega por ambos bandos del tablero, una jugada tras otra. ¡Estudie
las estrategias del ordenador y podrá mejorar su juego!
2.10 Pensando durante el tiempo del contrincante
Según juega, probablemente apreciará que el ordenador a veces
contesta a sus jugadas inmediatamente, incluso en el medio de las
partidas jugadas en los niveles superiores. Esto se debe a que el
ordenador piensa durante su tiempo, utilizando el tiempo que usted
dedica a pensar acerca de su jugada para planear por adelantado
estrategias propias. Intenta anticipar las jugadas que vaya a hacer
con mayor probabilidad y calcula las respuestas de dichas jugadas
cuando usted aún está pensando qué mover. Si el ordenador ha
adivinado correctamente, no tiene motivo para seguir calculando:
¡hace inmediatamente la jugada que ya ha encontrado! Tenga en
cuenta que el ordenador no piensa durante el tiempo del contrincante
en los niveles de diversión.
141
ESPAÑOL
2.9 Aperturas incorporadas
Al inicio de un juego, la respuesta del ordenador a menudo es
instantánea en muchos niveles, debido a que hace jugadas de su
biblioteca de aperturas. La biblioteca del ordenador incluye la
mayoría de las aperturas principales y muchas posiciones de
partidas de gran maestro. Si la posición del tablero actual se
encuentra en la biblioteca, el ordenador hace una jugada en
respuesta a esa posición desde la memoria, en vez de pensar acerca
de la jugada. Tenga en cuenta que la biblioteca de aperturas se
utiliza en todos los niveles, excepto en los niveles de resolución de
problemas.
2.11 Apagado/memoria del juego
Puede interrumpir el juego y apagar el ordenador pulsando GO/
STOP [COMENZAR/PARAR]. La pantalla mostrará Stop? y
pulsando GO/STOP [COMENZAR/PARAR] una vez más para
confirmar se apagará la unidad. Entonces el juego se detiene y el
ordenador almacenará la partida por espacio de hasta un año.
Cuando vuelva a encender el ordenador, ¡podrá continuar donde dejó
la partida! Si decide no apagar el ordenador después de pulsar GO/
STOP [COMENZAR/PARAR] una vez, sólo tiene que pulsar CLEAR
[DESPEJAR] para cancelar.
Si no se pulsa ninguna tecla o se hace alguna jugada durante 20
minutos, la prestación de apagado automático apagará el ordenador.
Para continuar pulse GO/STOP [COMENZAR/PARAR] para volver a
encender el ordenador. Tenga en cuenta que el ordenador no se
apagará automáticamente mientras esté pensando acerca de una
jugada o mientras se muestre en pantalla Stop?.
3. EL MENÚ PRINCIPAL: ACCESO A LOS MODOS ESPECIALES
El Touch Screen Travel Chess ofrece muchos modos y opciones
seleccionables por parte del usuario, todos accesibles a través del
Menú principal integrado. Cuando pulse MENU se desplazará
directamente a ¿OPTION, el primero de los seis elementos del
Menú principal. Pulse ¯ (o ˘) repetidamente para desplazarse
cíclicamente a través de todos los elementos del menú:
ELEMENTO DEL MENÚ PRINCIPAL ....... REFERENCIA .......... PANTALLA
Modo de opciones ..................... Sección 4 ......... ¿OPTION
Modo de niveles ........................ Sección 5 ......... ¿LEVEL
Modo de retracción ................... Sección 6 ......... ¿TAKEBACK
Modo de información ................ Sección 7 ......... ¿INFO
Modo de configuración .............. Sección 8 ......... ¿SETUP
Modo de estudio ....................... Sección 9 ......... ¿STUDY
Para seleccionar uno de los elementos del Menú principal, pulse
ENTER [INTRO]. En cada caso, pasará a un submenú, donde puede
hacer selecciones subsiguientes. Algunos de los elementos (p. ej., el
modo de opciones) le ofrecerá una serie de elecciones y
subelecciones diferentes, mientras que otros (p. ej., el modo de
configuración) le permitirá activar una prestación del juego en particular. Dado que las instrucciones para la selección de elementos de
menú variará en función del elemento elegido, se ruega consultar los
números de sección a los que se hace referencia para los detalles
completos acerca de estas prestaciones principales. Tras seleccionar
142
todas las opciones deseadas y/o cambiar los valores del juego, pulse
MENU de nuevo para salir del Menú principal y regresar a jugar una
partida.
4. MODO DE OPCIONES: ¡AÑADA VARIEDAD A SUS PARTIDAS!
¿Desea explorar todo tipo de opciones de partida intrigantes?
¡Eche un vistazo al modo de opciones! Primeramente, aprenda a
seleccionar y activar estas opciones seleccionables por el usuario
antes o durante el juego de una partida y luego prosiga para
aprender más acerca de las opciones individuales, como se describe
en esta sección.
Selección de opciones de juego
Pulse MENU para entrar en el Menú principal y la pantalla
mostrará automáticamente ¿OPTION para el Modo de opciones.
Pulse ENTER [INTRO] para entrar en el Modo de opciones y verá la
primera de 11 opciones, como se muestran a continuación. Pulse ¯
(o ˘) repetidamente para desplazarse cíclicamente a través de todas
las opciones:
Modo de dos jugadores .......... Sección 4.1 ... player: P-C
Algoritmo de búsqueda ........... Sección 4.2 ... search: select
Modo de registro automático .. Sección 4.3 ... book: on
Blancas arriba ......................... Sección 4.4 ... top: black
Reloj de cuenta atrás .............. Sección 4.5 ... clock: up
Tictac del reloj ......................... Sección 4.6 ... ticks: off
Modo de entrenamiento .......... Sección 4.7 ... coach: off
Sonido activado/desactivado .. Sección 4.8 ... sound: on
Contraste de PCL .................... Sección 4.9 ... contrast: 3
Velocidad de PCL .................... Sección 4.10 . LCD speed: 2
Modo de jugada automática .... Sección 4.11 . automove: on
Para activar/desactivar una opción o seleccionar los valores de la
opción (si algunos), pulse ENTER [INTRO] cuando se muestre la
opción. Pulsando ENTER [INTRO] repetidamente se desplazará
cíclicamente a través de todas las elecciones de la opción mostrada.
Cuando aparezca la elección deseada, puede pulsar ¯ o ˘ para
pasar a una opción diferente o pulse CLEAR [DESPEJAR] para
regresar al Menú principal y luego pulse MENU para regresar al
juego de partidas normal. Para detalles acerca de estas opciones,
vea los números de las secciones a los que se hace referencia. Nota:
143
ESPAÑOL
OPCIÓN .................................................... REFERENCIA ..... PANTALLA POR DEFECTO
¡UN VISTAZO RÁPIDO AL MENÚ PRINCIPAL!
• ¿OPTION: Explore una serie de opciones de juego
estimulantes.
• Modo de dos jugadores
• Algoritmo de búsqueda
• Modo de registro automático
• Blancas arriba
• Reloj de cuenta atrás
• Tictac del reloj
• Modo de entrenamiento
• Sonido activado/desactivado
• Contraste de PCL
• Velocidad de PCL
• Modo de jugada automática
• ¿LEVEL: Elija entre 100 niveles de juego diferentes.
• ¿TAKEBACK: Retracte cualesquiera jugadas (o la
totalidad) anteriores.
• ¿INFO: Seleccione varias pantallas de información
automáticas.
• Mostrar jugadas
• Mostrar el progreso
• Mostrar nodos
• Mostrar la evaluación
• Mostrar el tiempo por jugada
• ¿SETUP: Configurar o cambiar alguna posición de tablero.
• ¿STUDY: Examínese con 64 posiciones de estudio
exclusivas.
Cuando se repone el ordenador para una partida nueva, la mayoría
de las opciones seleccionadas pasan a la partida siguiente. La única
excepción es el Modo de dos jugadores, que regresa
automáticamente a jugador contra ordenador siempre que se inicia
una nueva partida.
4.1 Modo de dos jugadores
Opciones: player: P-C (Jugador contra el ordenador)
player: P-P (Jugador contra jugador)
Generalmente, el ordenador responde automáticamente con una
contrajugada después de que haga usted su jugada. No obstante, si
activa la opción player: P-P, puede introducir cualquier número
de jugadas, una tras otra, sin permitir que el ordenador responda.
Esta prestación se puede utilizar en una serie de maneras
interesantes:
• Juegue en partidas de maestros. ¡Pulse ENTER [INTRO] para
ver lo que haría el ordenador en cualquier posición!
144
• Mantenga registros de sus propios juegos de ajedrez. Cuando
se haya acabado una partida, juegue en ciertas posiciones del
tablero para ver cómo podrían haber afectado el resultado otras
jugadas o estrategias diferentes.
• Estudie tipos de apertura introduciéndolos manualmente.
• Juegue con un amigo, con el ordenador actuando de árbitro. ¡El
ordenador verificará la legalidad de todas las jugadas y
mantendrá un registro del tiempo de ambos bandos!
Si juega contra otra persona y desea ver lo que haría el ordenador
en su lugar, pulse ENTER [INTRO] para que el ordenador haga la
jugada siguiente. Una vez que el ordenador haya hecho la jugada, el
Modo de dos jugadores permanece en funcionamiento y puede
seguir con la partida. Tenga en cuenta que esta opción revierte
automáticamente a los valores por defecto de jugador contra
ordenador siempre que reponga para una nueva partida.
4.3 Modo de registro automático
Opciones: book: on / off
Esta prestación exclusiva en realidad controla su juego durante la
etapa de apertura de la partida: ¡y le da la oportunidad de practicar
las aperturas que le resulten más difíciles. ¡Es cómo tener su propio
“entrenador de aperturas adaptable” personal! Con la opción de
registro automático activada, el ordenador observará sus jugadas de
apertura cuando juegue.
La próxima vez que acabe en una posición mala tras unas pocas
jugadas al final de una variante de apertura, el ordenador “recordará”
dicha línea de apertura particular. Entonces, en el futuro el ordenador
jugará la misma apertura siempre que resulte posible. Esto le permite
intentar jugadas y estrategias diferentes, intentando familiarizarse
con dicha apertura, ¡fortaleciendo así su juego!
145
ESPAÑOL
4.2 Algoritmo de búsqueda
Opciones: search: select / brute
El programa de este ordenador de ajedrez normalmente utiliza un
algoritmo de búsqueda selectiva. Con este tipo particular de
búsqueda, el ordenador se concentra especialmente en aquellas
jugadas que vayan a tener éxito más probablemente, permitiendo ver
combinaciones que de otra manera tardaría mucho más en computar.
También puede cambiar al algo más lento pero muy poderoso
algoritmo de fuerza bruta, que puede reducir al mínimo el riesgo de
inadvertencias ocasionales.
¡PRACTIQUE CONFIGURANDO UNA OPCIÓN!
1. Pulse MENU para entrar en el Menú principal.
La pantalla mostrará ¿OPTION.
2. Pulse ENTER [INTRO] para entrar en el Modo
de opciones. Para este ejemplo, elijamos la
opción de tictac de reloj.
3. Pulse ¯ cinco veces hasta que la pantalla
muestre ticks: off.
4. Pulse ENTER [INTRO] para activar esta opción
y la pantalla cambia a mostrar ticks:on.
5. Pulse CLEAR [DESPEJAR] para salir del modo
de opciones y pulse MENU para salir del Modo
de menú: ¡y comenzará el tictac de reloj simulado!
Nota: Para apagar esta opción, repita los pasos
anteriores.
Para más detalles, véase la sección 4.6.
4.4 Blancas arriba
Opciones: top: black / white
¿Desea cambiar la norma general y que el ordenador juegue con
las piezas blancas en la parte de arriba del tablero? ¡Entonces
pruebe esta prestación seleccionando top: white al inicio de
una partida nueva! Comience la partida pulsando ENTER [INTRO] y
el ordenador hará la primera jugada con las Blancas en la parte de
arriba del tablero.
Nota: Cuando el ordenador juegue con las Blancas en la parte de
arriba del tablero, apreciará que los reyes y las reinas están
colocados de manera diferente y la anotación del tablero se invierte
automáticamente.
4.5 Reloj de cuenta atrás
Opciones: clock: up / down
Normalmente, el ordenador tiene el valor por defecto de la opción
clock: up, mostrando el tiempo transcurrido. No obstante,
activando la opción de reloj de cuenta atrás, en vez de ello se
146
mostrará el tiempo restante. Esta es la forma de distinguir
rápidamente entre los símbolos de reloj:
[/]
{/}
Relojes de cuenta normal (Blancas/Negras)
Relojes de cuenta atrás (Blancas/Negras)
Tenga en cuenta que la opción de reloj de cuenta atrás solamente
está disponible en combinación con los niveles de torneo y ajedrez
veloz.
4.7 Modo de entrenamiento
Opciones: coach: off / novice / inter. / adv.
Activando el modo de entrenamiento, ¡el ordenador puede vigilar
la forma en que juega usted, observando la partida y ofreciendo
ayuda si la necesita! Con esta capacidad exclusiva, el ordenador le
avisa si se encuentra en peligro de perder una pieza o si piensa que
su jugada va a llevar a una pérdida de material. Podría ver
visualizaciones como Your Queen is in jeopardy! o
Watch your Knight! [¡La reina corre peligro!], [¡Cuidado con
el caballo!].
Si se podría beneficiar de una situación particular, incluso podría
ver el mensaje He’s giving you a big chance! [¡Se lo
está poniendo en bandeja!]. En algunas ocasiones el ordenador le
pedirá que confirme o cancele una jugada evidentemente ilógica. ¡Si
elige cancelar, la jugada se retractará y puede intentar otra!
Para elegir una de las opciones de entrenamiento, pulse ENTER
[INTRO] repetidamente hasta que se muestre el nivel deseado. Una
vez que salga del modo de opciones y regrese a jugar una partida,
será efectiva la última opción de entrenamiento mostrada. A
continuación se indican los valores disponibles.
• coach: off: No hay prestaciones de entrenamiento
activadas.
• coach: novice: Aquí el ordenador supone que está usted
familiarizado con muchos conceptos tácticos y estratégicos, así
que sólo le informará de los conceptos menos obvios y más
147
ESPAÑOL
4.6 Tictac del reloj
Opciones: ticks: off / on
Activando esta opción sonará un tictac que simula un reloj de
ajedrez. ¡Puede crear la atmósfera de un torneo de campeonato de
ajedrez en su sala de estar!
avanzados, como sacrificios y combinaciones.
• coach: intermediate: En este caso, el ordenador
ofrece la cantidad de asistencia que juzga apropiada para los
jugadores que pueden darse cuenta de los puntos más obvios,
pero que también necesitan que se les haga ver otros.
• coach: advanced: Esta configuración dará avisos y
consejo siempre que el ordenador lo juzgue necesario, como
cuando comete una equivocación o una pieza se encuentra en
peligro.
Cuando se activa el Modo de entrenamiento, el ordenador dará
pitidos intermitentes durante su turno con las Blancas, a modo de
recordatorio de que está esperando que haga una jugada.
4.8 Sonido activado/desactivado
Opciones: sound: on / off
Seleccionando una de estas configuraciones de sonido, le ofrece
la opción a jugar al ajedrez con o sin efectos de sonido.
4.9 Contraste de PCL
Opciones: contrast: 1 / 2 / 3 / 4 / 5
Esta opción le permite ajustar el contraste de la pantalla PCL,
siendo 1 el más claro y 5 el más oscuro. Si le parece que el valor por
defecto de 3 es demasiado claro u oscuro para leer cómodamente,
cámbielo pulsando ENTER [INTRO] repetidamente, hasta que se
muestre la configuración deseada.
4.10 Velocidad de PCL
Opciones: LCD speed: 1 / 2 / 3 / 4
Puede controlar la velocidad de desplazamiento de la pantalla
PCL configurando esta opción, siendo 1 la más lenta y 4 la más
rápida. Si le parece que el valor 2 por defecto es demasiado lento o
rápido para leer, puede cambiarlo pulsando ENTER [INTRO]
repetidamente, hasta que se muestre la configuración deseada.
4.11 Modo de jugada automática
Opciones: automove: on / off
Generalmente, cuando el ordenador hace una jugada, destella
brevemente la pieza en las casillas de origen y destino y luego hace
la jugada automáticamente en el tablero. No obstante, si cambia a
automove: off, el ordenador anunciará sus jugadas de la forma
usual: pero tendrá que encargarse usted de mover las piezas del
148
ordenador en el tablero. Después de que el ordenador haya
anunciado su jugada, destellará la pieza en la casilla de origen.
Pulse la pieza destellante y muévala a la casilla de destino. Pulse en
la casilla de destino para completar la jugada del ordenador.
Configuración de un nivel de juego
Pulse MENU para entrar en el menú principal y pulse ¯ hasta que
la pantalla muestre ¿LEVEL. Pulse ENTER [INTRO] para entrar en
el Modo de nivel y verá el nivel actualmente seleccionado, como en
<00:05/move> (el nivel por defecto cuando se arranca el
ordenador). Para cambiar el nivel pulse ˘ o ¯ para incrementar/
reducir los niveles de uno en uno o utilice el estilete para pulsar > o <
para incrementar/reducir los niveles de diez en diez. Tenga en cuenta
que pulsando y manteniendo pulsado ˘ o ¯ los niveles se
incrementarán/reducirán automáticamente uno de cada vez, hasta
que se deje de pulsar la tecla. Cuando se muestre el nivel deseado,
pulse ENTER [INTRO] para introducir la selección de nivel en el
ordenador. La pantalla confirmará con Level changed y
regresará al Menú principal. Pulse MENU para regresar al modo de
jugar partidas.
Si entra en el Modo de nivel para verificar el nivel pero en realidad
no desea cambiar de nivel, pulse CLEAR [DESPEJAR] para regresar
149
ESPAÑOL
5. MODO DE NIVEL: ¡ELIJA ENTRE 100 NIVELES!
¡El ordenador de ajedrez dispone de 100 niveles de juego
exclusivos entre los que elegir! Los niveles se dividen en dos grupos
básicos:
• NIVELES DE DIVERSIÓN (1-60): Estos niveles ofrecen a los
principiantes y jugadores medios una oportunidad de mejorar su
conocimiento del ajedrez. En muchos de los niveles de diversión
verá que el ordenador comete errores intencionadamente: ¡de
manera que pueda aprender de estos errores!
• NIVELES DE COMPETICIÓN (61-100): Estos niveles van
dirigidos a los jugadores intermedios y más avanzados. Se
incluyen niveles de juego casual y de torneo, resolución de
problemas, ajedrez veloz e incluso niveles especiales para
experimentar! Cuando seleccione niveles, recuerde que cuando
el ordenador dispone de más tiempo para pensar acerca de las
jugadas, se hace más fuerte y juega mejor: ¡igual que un
ajedrecista!
CÓMO CAMBIAR DE NIVEL: ¡ES FÁCIL!
1. Pulse MENU para entrar en el Menú principal.
La pantalla mostrará ¿OPTION.
2. Pulse ¯ una vez y la pantalla mostrará ¿LEVEL.
>`
<`
3. Pulse ENTER [INTRO] para entrar en el Modo
de nivel y se visualizará el nivel actual. Consulte
la sección 5, si fuera necesario, para identificar
el nivel actual.
4. Busquemos Ajedrez de velocidad, Nivel 81. Pulse
˘ o ¯ para aumentar o disminuir en uno los
niveles; pulse > o < para aumentar o disminuir
en diez los niveles. Mire la pantalla hasta que
aparezca < 5 min/game >.
5. Cuando se visualice < 5 min/game >, pulse
ENTER [INTRO]. Después pulse MENU para
salir del Modo de menú ¡y ya está listo para
probar un nivel nuevo!
Para más detalles, vea la sección 5.
al Menú principal. Una vez que salga del Menú principal con MENU,
regresará a la partida sin haber cambiado el nivel ni la configuración
del reloj.
Se ruega tener también en cuenta lo siguiente en relación con la
selección de nivel:
• Puede cambiar el nivel siempre que le toque hacer una jugada.
Cambiando el nivel siempre se reponen los relojes de ajedrez.
• Si cambia niveles mientras el ordenador está pensando, éste
cancelará la búsqueda y repondrá el reloj.
NIVELES DE DIVERSIÓN
5.1 Niveles de diversión
Nivel Descripción
Pantalla
1 ....... Nivel de diversión 1 ........................... <Fun Level 1>
2 ....... Nivel de diversión 2 ........................... <Fun Level 2>
3 ....... Nivel de diversión 3 ........................... <Fun Level 3>
150
151
ESPAÑOL
…y así sucesivamente hasta…
58 ...... Nivel de diversión 58 ......................... <Fun Level 58>
59 ...... Nivel de diversión 59 ......................... <Fun Level 59>
60 ...... Nivel de diversión 60 ......................... <Fun Level 60>
Los niveles de diversión están pensados especialmente para los
principiantes y jugadores jóvenes. En estos niveles, el Touch Screen
Travel Chess es mucho más “humano” que la mayoría del resto de los
ordenadores de ajedrez: da la oportunidad a que ganen todos, en un
mundo en el que las máquinas de ajedrez suelen ser implacables y a
menudo muy difíciles de derrotar. Aunque en general se suele admitir
que los ordenadores nunca cometen fallos, ¡en algunos de estos
niveles este ordenador realmente los comete!
En estos niveles se incorporan dificultades, demostrando errores
comunes entre los principiantes. Puede ver cómo el ordenador ignora
deliberadamente el valor material de las piezas e ignora conceptos
clave como la estructura de los peones, la centralidad, movilidad y la
seguridad del rey. Puede no apreciar o meterse en situaciones de
jaque, desarrollar la reina muy pronto o hacer capturas o dar jaques
impulsivos. Los libros de ajedrez a menudo aconsejan acerca de
reglas básicas, pero los jugadores ven cómo sus contrincantes
rompen las reglas y se salen con la suya. Los niveles de diversión
proporcionan una manera de practicar el castigo de estos errores
típicos, ¡dando la posibilidad a los principiantes a que fortalezcan su
juego contra los contrincantes humanos con los que probablemente
se enfrentarán! En algunos de los niveles de diversión más sencillos,
el ordenador no sólo dejará piezas sin proteger, sino que podría
intentar realmente perder material.
Según ascienden los niveles, se regala material de manera menos
consistente. Progresivamente se comienza a tomar más y más en
consideración el valor material de las piezas hasta que al final sólo
se regalan piezas ocasionalmente. En los niveles de diversión
superiores, el ordenador no regalará ningún material, pero jugará
más como un principiante que ha aprendido los aspectos básicos del
juego. Aún podrá seguir viendo cómo el ordenador comete errores,
como quedarse expuesto a amenazas de jaque o de jaque mate. Por
qué no explora todos los niveles de diversión: ¡y trata de aprender de
los errores del ordenador!
NIVELES DE COMPETICIÓN
5.2 Niveles de juego casual
Nivel
Tiempo medio por jugada
Pantalla
61 ................ 1 segundo por jugada .................. <00:01/move>
62 ................ 2 segundos por jugada ................ <00:02/move>
63 ................ 5 segundos por jugada ................ <00:05/move>
64 .............. 10 segundos por jugada ................ <00:10/move>
65 .............. 15 segundos por jugada ................ <00:15/move>
66 .............. 30 segundos por jugada ................ <00:30/move>
67 .............. 45 segundos por jugada ................ <00:45/move>
68 ................ 1 minuto por jugada ..................... <01:00/move>
69 ................ 2 minutos por jugada ................... <02:00/move>
70 ................ 3 minutos por jugada ................... <03:00/move>
Cuando selecciona uno de los niveles anteriores, escoge un
tiempo de respuesta medio para el ordenador. Tenga en cuenta que
la media de los tiempos de respuesta se calcula utilizando un gran
número de jugadas. En la apertura y el final de partida, el ordenador
tenderá a jugar más rápido, pero en las posiciones complicadas de
mitad de juego puede tardar más en mover.
5.3 Niveles de torneo
Nivel
Número de jugadas/tiempo total
Pantalla
71 ............ 40 jugadas en 1 hora 20 min. ........ < 40 in 1:20 >
72 ............ 40 jugadas en 1 hora 30 min. ........ < 40 in 1:30 >
73 ............ 35 jugadas en 1 hora 45 min. ........ < 35 in 1:45 >
74 ............ 40 jugadas en 1 hora 45 min. ........ < 40 in 1:45 >
75 ............ 35 jugadas en 1 hora 30 min. ........ < 35 in 1:30 >
76 ............ 40 jugadas en 2 horas ................... < 40 in 2:00 >
77 ............ 45 jugadas en 2 horas 30 min. ...... < 45 in 2:30 >
78 ............ 50 jugadas en 2 horas ................... < 50 in 2:00 >
79 ............ 40 jugadas en 2 horas 30 min. ...... < 40 in 2:30 >
80 ............ 40 jugadas en 3 horas ................... < 40 in 3:00 >
Los Niveles de torneo requieren que realice una serie de jugadas
en un tiempo específico. Si un jugador supera el tiempo asignado
para una serie de jugadas, la pantalla lo indicará así y se terminará el
juego.
Como se describe anteriormente en la sección 2.5, ¡este
ordenador utiliza un Sistema de auto-clasificación siempre que usted
juegue una partida de Nivel de torneo! Después que se ha terminado
una partida de torneo y pulsa NEW GAME [NUEVO JUEGO] dos
veces para reponer la unidad, el ordenador mostrará brevemente su
152
5.4 Niveles de ajedrez veloz
Nivel
Tiempo total por partida
Pantalla
81 .............. 5 minutos por jugada ................ < 5 min/game>
82 .............. 7 minutos por jugada ................ < 7 min/game>
83 .............. 10 minutos por jugada ................ <10 min/game>
84 .............. 15 minutos por jugada ................ <15 min/game>
85 .............. 20 minutos por jugada ................ <20 min/game>
86 .............. 30 minutos por jugada ................ <30 min/game>
87 .............. 45 minutos por jugada ................ <45 min/game>
88 .............. 60 minutos por jugada ................ <60 min/game>
89 .............. 90 minutos por jugada ................ <90 min/game>
90 ............ 100 minutos por jugada ................ <100 min/game>
En los Niveles de ajedrez veloz, usted fija el tiempo total para toda
la partida. Si se supera el tiempo de partida, el ordenador muestra
qué bando ha perdido por tiempo, como por ejemplo White time
out [Se terminó el tiempo para las blancas]. En estos niveles puede
153
ESPAÑOL
clasificación antes de visualizar el nuevo juego. Si no ve la pantalla
de clasificación, puede pulsar HINT/INFO [CONSEJO/
INFORMACIÓN] cinco veces para ver la clasificación de nuevo en
cualquier momento. Para despejar la pantalla, pulse CLEAR
[DESPEJAR].
Si repone el ordenador a un juego nuevo durante una partida de
torneo, antes de que se haya terminado la partida, el ordenador le
permitirá dictar el resultado, como sigue:
• Pantalla = Rate as draw? [¿Clasificar como tablas?].
Si pulsa ENTER [INTRO], se mostrará la clasificación.
Si pulsa ˘:
• Pantalla = Rate as win? [¿Clasificar como una victoria?].
Si pulsa ENTER [INTRO], se mostrará la clasificación.
Si pulsa ˘:
• Pantalla = Machine wins? [¿Gana la máquina?].
Si pulsa ENTER [INTRO], se mostrará la clasificación.
Si pulsa ˘:
La pantalla volverá a mostrar Rate as draw?.
¡Para obtener una clasificación, tendrá que contestar una de las
preguntas anteriores con ENTER [INTRO]! Si por algún motivo no
quiere que se clasifique la partida, pulse CLEAR [DESPEJAR] en
respuesta a cualquiera de las preguntas anteriores. El ordenador
confirmará esto mostrando Game not rated [Partida no
clasificada].
querer activar la opción de Reloj de cuenta atrás para mostrar el
tiempo cuenta atrás en vez del tiempo transcurrido (véase la sección
4.5).
5.5 Niveles de resolución de problemas
Nivel
Problema
Pantalla
91 .................... Mate en 1 jugada ................... < Mate in 1 >
92 .................... Mate en 2 jugadas ................. < Mate in 2 >
93 .................... Mate en 3 jugadas ................. < Mate in 3 >
94 .................... Mate en 4 jugadas ................. < Mate in 4 >
95 .................... Mate en 5 jugadas ................. < Mate in 5 >
96 .................... Mate en 6 jugadas ................. < Mate in 6 >
97 .................... Mate en 7 jugadas ................. < Mate in 7 >
98 .................... Mate en 8 jugadas ................. < Mate in 8 >
Al seleccionar uno de estos niveles se activa un programa especial de encontrar mates. Si se encuentra en una posición en la que
puede que haya un mate y le gustaría que el ordenador lo
encontrase, configure el ordenador en uno de los Niveles de
resolución de problemas. El ordenador puede resolver mates en
hasta ocho jugadas. Los mates en una a cinco jugadas se
encuentran bastante rápido, mientras que las soluciones que
requieren de seis a ocho pueden tardar bastante. Si no hay un mate
o el ordenador no puede hallarlo, mostrará brevemente No move
found! [¡No se encontró jugada!]. Puede continuar jugando, si lo
desea, cambiando a otro nivel.
5.6 Nivel táctico
Nivel
Descripción
Pantalla
99 ..... Jugada táctica (sin límite de tiempo) .... < Tactical >
En el Nivel táctico, la meta del ordenador es encontrar la mejor
secuencia táctica más rápidamente que lo haría en un nivel de juego
normal. El ordenador buscará indefinidamente hasta que encuentre
una victoria de dos peones o más o hasta que usted pare la
búsqueda pulsando ENTER [INTRO]. El Nivel táctico es estupendo
para experimentar, ¡ya que permite que el ordenador se concentre
totalmente en posiciones tácticas especiales!
5.7 Nivel infinito
Nivel
Descripción
Pantalla
100 ........... Infinito (sin límite de tiempo) .......... < Infinite >
En el Nivel infinito el ordenador busca indefinidamente hasta que
154
6. MODO DE RETRACCIÓN: CÓMO ANULAR JUGADAS
Cuando juega al ajedrez contra el ordenador, nada es
“incambiable”: ¡puede cambiar de idea o decidir realizar una jugada
diferente cuando quiera! Cuando sea su turno, simplemente pulse
MENU para entrar en el Menú principal y pulse ¯ repetidamente
hasta que la pantalla muestre ¿TAKEBACK. Pulse ENTER [INTRO]
para entrar en el Modo de retracción y verá la última jugada que
realizó. Para anularla, pulse ¯ y se anulará la jugada en el tablero.
Entonces la pantalla mostrará la siguiente jugada a anular.
Puede continuar pulsando ¯ para anular tantas jugadas como
desee, hasta el comienzo de la partida si así lo desea. Si llega hasta
el principio, la pantalla mostrará End takebacks [Final de la
retracción] y se le devolverá automáticamente al Menú principal.
Tenga en cuenta que, siempre que no regrese al principio del todo de
la partida, siempre puede pulsar ˘ para avanzar de nuevo por las
jugadas, si así lo desea. Para reanudar la partida en cualquier punto
de la posición actual del tablero, pulse CLEAR [DESPEJAR] y
después MENU.
Como atajo al Modo de retracción, también puede pulsar
simplemente en la casilla de destino de la última jugada que se
realizó. La pantalla mostrará brevemente TAKEBACK y después
mostrará la última jugada realizada. Para anular la jugada, pulse ¯.
Al igual que anteriormente, el pulsar repetidamente ¯ le llevará a
jugadas anteriores, si así lo desea. Para reanudar la partida en
cualquier punto, pulse CLEAR [DESPEJAR].
7. MODO DE INFORMACIÓN: ¡VEA AL ORDENADOR PENSAR!
Imagine esto: Está jugando al ajedrez con un amigo y es la
jugada de éste. Le encantaría saber qué jugada está considerando y
le gustaría saber su opinión acerca de la posición actual del tablero.
Pero, por supuesto, no se lo preguntará: ¡porque simplemente eso no
se hace! Pues, ¿sabe qué? Cuando juega al ajedrez con este
155
ESPAÑOL
encuentra un mate forzado o hasta que usted pare la búsqueda
pulsando ENTER [INTRO]. Si se para la búsqueda, el ordenador
realiza la jugada que cree que es mejor en ese momento. Pruebe a
experimentar con este nivel: configure posiciones especiales en el
tablero y ¡deje que el ordenador las analice! Pensará durante horas e
incluso días, intentando encontrar la mejor jugada posible.
ordenador, le puede preguntar lo que quiera ¡y recibirá todas las
respuestas! De hecho, puede obtener una cantidad de información
increíble acerca del proceso de pensamiento del ordenador ¡y el
estudiar esta información le puede ayudar a aprender mucho más
acerca del juego!
Puede acceder información sobre la partida en cualquier momento
a través del Modo de información. Como se describe a continuación,
puede pedir esta información manualmente pulsando HINT/INFO
[CONSEJO/INFORMACIÓN] o puede seleccionar que se muestren
automáticamente las opciones de Modo de información cada vez que
el ordenador estudie su próxima jugada.
Muestras de información automáticas
El activar cualquiera de o todas las opciones siguientes del Modo
de información ocasiona que el ordenador muestre automáticamente
esa información cada vez que piensa acerca de su jugada: ¡puede
ver al ordenador “pensar en voz alta”!
Importante: ¡las opciones del Modo de información
seleccionadas para la muestra automática sólo se activan
mientras el ordenador piensa!
Pulse MENU para entrar en el Menú principal y pulse ¯
repetidamente hasta que la pantalla muestre ¿INFO. Pulse ENTER
[INTRO] para entrar en el Modo de información y verá las primeras
cinco opciones, como se muestra a continuación. El pulsar ¯ (o ˘)
repetidamente le desplazará cíclicamente a través de estas opciones,
como sigue:
• Mostrar jugadas: Muestra la línea de juego esperada del
ordenador, hasta cuatro jugadas individuales. Véase la sección
7.1.
Opciones: 0 / 1 / 2 / 3 / 4 moves
• Mostrar nodos: Muestra el número de nodos (posiciones) que
se buscan por segundo. Véase la sección 7.2.
Opciones: nodes: off / on
• Mostrar el tiempo por jugada: Muestra el tiempo utilizado
hasta el momento para la jugada actual. Véase la sección 7.3.
Opciones: time/move: off / on
• Mostrar progreso: Muestra la profundidad de la búsqueda del
ordenador y la jugada que se está considerando en ese
momento. Véase la sección 7.4.
Opciones: progress: off / on
156
Muestra de información manual
Pulse HINT/INFO [CONSEJO/INFORMACIÓN] en cualquier
momento y se mostrará la primera jugada de la línea de juego
esperada del ordenador (como se describe en la sección 7.1). La
información de la partida se divide en varios grupos diferentes y el
pulsar HINT/INFO [CONSEJO/INFORMACIÓN] repetidamente le
desplazará cíclicamente de un grupo a otro. Las teclas ˘ y ¯ se
pueden utilizar para desplazarse a través de las pantallas de cada
grupo. A continuación se trata en detalle de cada uno de los grupos.
Pulse CLEAR [DESPEJAR] para regresar a la pantalla de reloj
normal.
7.1 Variante principal
Cuando pulsa por primera vez HINT/INFO [CONSEJO/
INFORMACIÓN], verá la primera jugada de la variante principal (la
línea de juego esperada del ordenador), que aparecerá como
Ply1: b1-c3.
Una “ply” es una jugada individual, o una jugada por cada bando, y
157
ESPAÑOL
• Mostrar evaluación: Muestra la puntuación para la jugada
actual. Véase la sección 7.2.
Opciones: evaluation: off / on
Para activar/desactivar una opción o seleccionar la configuración
de opciones (de haberla), pulse ENTER [INTRO] cuando se muestre
la opción. El pulsar ENTER [INTRO] repetidamente le desplazará
cíclicamente por todas las elecciones de la opción mostrada. Cuando
se visualiza la opción deseada, pulse ¯ o ˘ para ir a una opción
diferente o pulse CLEAR [DESPEJAR] para regresar al Menú
principal y después MENU para volver a jugar la partida normal. Para
detalles completos de cada una de estas opciones, véanse los
números de secciones a los que se hace referencia.
Puede activar un número cualquiera de las Opciones de modo de
información anteriores o todas ellas. Si activa más opciones de las
que cabrían en la pantalla de una sola vez, la pantalla se desplazará
continuamente mientras el ordenador considera su próxima jugada.
Si la pantalla se desplaza demasiado rápido, cambie la Velocidad de
PCL, como se muestra en la sección 4.10. También puede pulsar GO/
STOP [COMENZAR/PARAR] para parar la pantalla y después pulse
CLEAR [DESPEJAR] para que vuelva a desplazarse. Cuando no
esté disponible la información que se solicita, la pantalla mostrará
--x--.
UN ESBOZO DEL MODO DE INFORMACIÓN
INFORMACIÓN DE LA VARIANTE PRINCIPAL:
•
•
•
•
Línea de juego esperada: Jugada 1
Línea de juego esperada: Jugada 2
Línea de juego esperada: Jugada 3
Línea de juego esperada: Jugada 4
INFORMACIÓN DE BÚSQUEDA:
• Evaluación de la posición (puntuación)
• Profundidad de la búsqueda; y jugada
que está estudiando en ese momento (si
el ordenador está pensando)
• Tiempo transcurrido para la jugada actual;
y número de nodos buscados por
segundo (si el ordenador está pensando)
INFORMACIÓN DEL RELOJ DE AJEDREZ:
• Tiempo transcurrido para ambos bandos
• Tiempo restante para ambos bandos*
*Niveles de ajedrez veloz/de torneo solamente
INFORMACIÓN DE CONTEO DE JUGADAS:
• Número de jugada actual + última jugada
realizada
• Hacia adelante y hacia atrás por las
jugadas de la partida actual
INFORMACIÓN DE CLASIFICACIÓN:
• Clasificación de Elo (después de jugar
una partida de Nivel de torneo)
158
7.2 Información de búsqueda
Después de pulsar HINT/INFO [CONSEJO/INFORMACIÓN] para
acceder al Modo de información, púlselo de nuevo para ver
información acerca de la búsqueda del ordenador. La pantalla inicial
mostrará la puntuación actual; el pulsar ˘ repetidamente le
desplazará cíclicamente a través del resto de la información:
• La puntuación actual: Una evaluación numérica de la posición
actual, basada en que un peón tiene un valor de 1,0 puntos; un
número positivo indica que las blancas van ganando. Ejemplo: Si
las blancas van ganando por dos peones, la pantalla mostrará
Score: +2.0. Tenga en cuenta que la puntuación no es
válida en los Niveles de resolución de problemas.
• Pantalla de dos partes: (a) La profundidad de búsqueda actual o
el número de jugadas individuales que está planeando el
ordenador. Por ejemplo: Si el ordenador está planeando 439
jugadas individuales, verá d:4 39, con la d: significando
profundidad (“depth” en inglés). (b) La jugada que se está
estudiando (si el ordenador está pensando en ese momento).
• Pantalla de dos partes: (a) El tiempo utilizado hasta ese
momento para la jugada actual. (b) El número de nodos, o
posiciones, que se buscan por segundo (si el ordenador está
pensando en ese momento).
159
ESPAÑOL
la profundidad de búsqueda del ordenador se describe con relación
al número de jugadas por bando que planea por adelantado. En una
búsqueda de dos jugadas, una por cada bando, por ejemplo, el
ordenador planeará dos jugadas individuales (una jugada para las
negras y una para las blancas). Tenga en cuenta que esta
visualización de primera jugada por bando también se puede utilizar
como un consejo, ya que es la jugada que el ordenador espera que
usted realice.
Si comprueba esta visualización mientras el ordenador está
pensando, verá la jugada que el ordenador está considerando en ese
momento. Si la comprueba durante su turno, verá la jugada que el
ordenador espera que usted realice. En cualquier caso, el pulsar ˘
repetidamente le desplazará cíclicamente por todo el resto de las
jugadas en la línea de juego esperada, hasta cuatro jugadas, dos por
cada bando:
Línea de juego esperada: Jugada 1
Línea de juego esperada: Jugada 2
Línea de juego esperada: Jugada 3
Línea de juego esperada: Jugada 4
7.3 Información de reloj de ajedrez
Después de pulsar HINT/INFO [CONSEJO/INFORMACIÓN] para
acceder al Modo de información, pulse dos veces más para ver la
información de reloj de ajedrez. La pantalla mostrará el tiempo total
transcurrido para ambos bandos. Tenga en cuenta que el símbolo del
reloj de ajedrez en el medio muestra qué bando tiene que jugar y el
tipo de reloj en uso. El pulsar ˘ le desplazará cíclicamente a través
de dos pantallas, como se muestra a continuación:
• Tiempo total transcurrido para las blancas/negras (Reloj normal)
Blancas a mover [, Negras a mover ].
• Tiempo total restante para las blancas/negras (Reloj de cuenta
atrás: Niveles de resolución de problemas/ajedrez veloz
solamente)
Blancas a mover {, Negras a mover }.
Si el Reloj de cuenta atrás no está activado en ese momento, la
segunda pantalla simplemente mostrará un reloj en blanco
(--:--{--:--).
Los relojes pararán por varios motivos durante una partida, como
por ejemplo si anula una jugada, comprueba la configuración de
nivel, selecciona opciones, configura una posición o apaga el
ordenador. No obstante, se retienen los tiempos en la memoria y los
relojes se ponen otra vez en marcha tan pronto como se reanuda el
juego. Siempre que cambie los niveles de juego o que reponga el
ordenador para un nuevo juego, los relojes se volverán a configurar
en cero.
7.4 Conteo de jugadas/jugadas de partida
Después de pulsar HINT/INFO [CONSEJO/INFORMACIÓN] para
acceder el Modo de información, pulse tres veces más para ver el
número de jugada actual y la última jugada realizada. Después
puede pulsar ¯ para desplazarse por las jugadas de su partida, si así
lo desea, o pulsar ˘ para ir hacia adelante de nuevo en cualquier
momento. ¡Esto le ofrece la oportunidad de ir hacia atrás y anotar las
jugadas de una partida que se convierta en estupenda de manera
inesperada!
• Número de jugada actual y última jugada realizada.
• Jugadas de la partida actual.
7.5 Muestra de clasificación
Después de pulsar HINT/INFO [CONSEJO/INFORMACIÓN] para
acceder al Modo de información, pulse cuatro veces más para ver su
160
clasificación actual. Tenga en cuenta que las clasificaciones se basan
en partidas del Nivel de torneo, según se describe en la sección 5.3.
8. MODO DE CONFIGURACIÓN: ¡CAMBIE EL TABLERO!
El Modo de configuración le permite colocar posiciones de tablero
especiales en las que jugar ¡o problemas que le gustaría que
resolviese el ordenador!
Puede cambiar o colocar una posición de tablero siempre que sea
su turno de mover. Pulse MENU y pulse ¯ repetidamente hasta que
la pantalla muestre ¿SETUP. Pulse ENTER [INTRO] para entrar en
el Modo de configuración y verá una pantalla mostrando el color y los
símbolos de las piezas („ıKQRBNP).
• Para sacar una pieza del tablero, simplemente pulse en la
pieza y desaparecerá del tablero.
• Para mover una pieza de una casilla a otra, pulse en la pieza,
haciendo que desaparezca. Después pulse en la nueva casilla y
la pieza aparecerá en esa posición.
• Para añadir una pieza al tablero, primero pulse directamente
en el color y símbolo de pieza mostrado que quiera añadir y
después pulse en la casilla a la que quiera añadir la pieza. Para
añadir otra pieza del mismo tipo y color, simplemente pulse en
otra casilla. Para añadir una pieza diferente, pulse otro símbolo
de pieza y/o color y siga los mismos pasos que anteriormente.
• Para despejar el tablero, pulse CLEAR [DESPEJAR] mientras
se encuentra en el Modo de configuración. La pantalla le pedirá
que confirme con el mensaje Clear board? [¿Despejar
tablero?]. Pulse ENTER [INTRO] y la pantalla mostrará
Cleared [Despejado]. Entonces puede añadir cualquier
número de piezas, como se describe anteriormente. Si decide
que, después de todo, no quiere despejar el tablero,
simplemente pulse CLEAR [DESPEJAR] de nuevo para
cancelar y verá Not cleared [No despejado]. Note que esta
función puede resultar útil para configurar posiciones con tan
sólo unas pocas piezas, ¡donde sería mucho más sencillo
comenzar con un tablero vacío!
• Una vez que haya cambiado la posición como se describe
161
ESPAÑOL
Precaución: Se borrarán todas las jugadas en su partida
actual si realiza cambios a la posición del tablero durante un
juego.
anteriormente, tenga en cuenta que el color para el bando que
tiene que mover se determina según el color de la última pieza
que colocó. Cambie el color, si fuera necesario, pulsando ı para
las negras o „ para las blancas.
• Para salir del Modo de configuración, pulse ENTER [INTRO].
Cuando el ordenador le pida confirmación con New position? [¿Nueva posición?] pulse ENTER [INTRO] para
regresar a la forma de jugar normal con la nueva configuración
del tablero. New position! confirma esto. Si pulsa CLEAR
[DESPEJAR], la pantalla mostrará Resume [Prosiga] y
permanecerá en el Modo de configuración.
Tenga en cuenta que se puede configurar cualquier posición legal
de tablero utilizando los procedimientos anteriores. El ordenador no
le permitirá configurar una posición ilegal, como una en la que haya
un número superior de piezas al prescrito para una partida normal o
una en la que el rey está en jaque y no le toca mover. En dichos
casos, después que haya pulsado ENTER [INTRO] para salir del
Modo de configuración y después ENTER [INTRO] para confirmar, el
ordenador mostrará Illegal. ¡No se le permitirá salir del Modo de
configuración hasta que haya configurado una posición de tablero
legal!
Si entra en el Modo de configuración pero todavía no ha realizado
ningún cambio en el tablero, puede salir pulsando ENTER [INTRO].
La pantalla confirmará esto con unchanged [Sin cambiar] y se le
devolverá al Menú principal. Pulse MENU de nuevo para regresar al
modo de jugar normal.
9. MODO DE ESTUDIO: ¡PRUEBE A EXAMINARSE!
¿Busca una herramienta de aprendizaje estupenda?
¡Definitivamente querrá probar el Modo de estudio! El ordenador trae
incorporadas ocho partidas famosas, cada una con ocho puntos
críticos, proporcionando un total de 64 Posiciones de estudio
diferentes. ¡A usted le toca jugar las partidas y realizar las jugadas
correctas que hizo el bando ganador en los juegos originales! Esta
prestación le ofrece un gran potencial para mejorar su conocimiento
del ajedrez, a la vez que le permite aprender a realizar la mejor
jugada en una posición en particular. Y, para hacer que esta
prestación sea todavía más emocionante, el ordenador le marcará su
actuación según juega.
Por cierto, si necesita ayuda para resolver cualesquiera de las
162
Posiciones de estudio, simplemente consulte la lista completa de
todas las Partidas de modo de estudio del Apéndice. Recuerde, no
obstante, que estas partidas se incluyen a modo de herramienta de
referencia: ¡y sólo se hará trampa a sí mismo si mira las soluciones
antes de intentar resolver las Posiciones de estudio por sí solo!
Selección de posiciones de estudio
Pulse MENU para entrar en el Menú principal y pulse ¯ (o ˘)
repetidamente hasta que la pantalla muestre ¿STUDY [Estudio].
Pulse ENTER [INTRO] para entrar en el Modo de estudio y verá la
primera Posición de estudio, < Study1-1 >. Para cambiar la
Posición de estudio, pulse ˘ o ¯ para aumentar/reducir los estudios
en uno o use su estilete para pulsar > o < para aumentar/reducir los
estudios en ocho. Cuando se visualice la Posición de estudio
deseada, pulse ENTER [INTRO] y la pantalla confirmará esto con
Start Study? [¿Comenzar estudio?]. El pulsar ENTER [INTRO]
en este momento iniciará la Partida de estudio, como se describe a
continuación, o el pulsar CLEAR [DESPEJAR] lo cancelará y le
devolverá a la pantalla principal de Modo de estudio.
Tras pulsar ENTER [INTRO], el ordenador comenzará
automáticamente a realizar jugadas de la Partida de estudio
seleccionada. Tan pronto como se alcanza la primera Posición de
estudio, la pantalla mostrará brevemente Your Move [Su jugada] y
comenzará el reloj. ¡Es la hora de adivinar la jugada que se realizó
en esa posición en la partida original! Funciona de la siguiente
manera:
• Sólo hay una jugada “correcta” por cada Posición de estudio.
• Una vez que se ha alcanzado la Posición de estudio, el símbolo
de color que aparece indica qué bando tiene que mover.
• Si realiza la jugada correcta, se visualizará Well Done
[Bien jugado]. Entonces el ordenador realizará las siguientes
jugadas de la partida hasta llegar a la siguiente Posición de
estudio a resolver.
• Si realiza una jugada equivocada, se visualizará Wrong
Move [Jugada equivocada] brevemente y después Quit
Study? [¿Salir del Estudio?].
• Para permanecer en el Modo de estudio e intentar otra
163
ESPAÑOL
Sugerencia: También puede seleccionar las Posiciones de
estudio pulsando ciertas casillas del tablero, como se describe
más adelante en esta sección!
¡USE EL TABLERO PARA SELECCIONAR
LAS POSICIONES DE ESTUDIO!
Para utilizar un método sencillo de selección de Posición de estudio,
simplemente entre en el Modo de estudio y pulse una de las casillas
correspondientes, como se muestra a continuación.
8
1-8
2-8
3-8
4-8
5-8
6-8
7-8
8-8
7
1-7
2-7
3-7
4-7
5-7
6-7
7-7
8-7
6
1-6
2-6
3-6
4-6
5-6
6-6
7-6
8-6
5
1-5
2-5
3-5
4-5
5-5
6-5
7-5
8-5
4
1-4
2-4
3-4
4-4
5-4
6-4
7-4
8-4
3
1-3
2-3
3-3
4-3
5-3
6-3
7-3
8-3
2
1-2
2-2
3-2
4-2
5-2
6-2
7-2
8-2
1
1-1
2-1
3-1
4-1
5-1
6-1
7-1
8-1
a
b
c
d
e
f
g
h
jugada, pulse CLEAR [DESPEJAR]. Se descontarán puntos
por la jugada incorrecta, su pieza volverá a la casilla original
y podrá realizar una jugada diferente.
• Para salir del Modo de estudio y continuar con una partida
normal utilizando la jugada que ha realizado, pulse ENTER
[INTRO]. El ordenador comenzará a pensar su próxima
jugada.
• Puntuación: Cada vez que resuelve una Posición de estudio
correctamente, se añadirán puntos a su puntuación. Conseguirá
164
Utilización del tablero para la selección
Cada Posición de estudio también se puede activar
individualmente pulsando la casilla del tablero correspondiente.
Como se muestra en el Diagrama del modo de estudio, cada una de
las 64 casillas representa una Posición de estudio. Entre en el Modo
de estudio pulsando MENU y ¯ (o ˘) hasta que se visualice
¿STUDY y después pulse ENTER [INTRO]. A continuación,
consulte el diagrama y pulse una de las casillas del tablero para
seleccionar esa Posición de estudio. Pulse ENTER [INTRO] y la
pantalla confirmará esto con Start Study? [¿Iniciar estudio?].
Pulse ENTER [INTRO] de nuevo y se iniciará la Partida de estudio,
como se describe anteriormente.
165
ESPAÑOL
la máxima puntuación si resuelve la Posición de estudio a la
primera. Por cada jugada incorrecta que realice antes de la
correcta, se dividirá su puntuación a la mitad. No obstante, si en
algún momento llega a cero, su puntuación no bajará más, sin
importar cuántas jugadas más intente.
• Para comprobar su puntuación actual, pulse HINT/INFO
[CONSEJO/INFORMACIÓN] dos veces. Tenga en cuenta que la
primera pulsación le mostrará la última jugada que realizó el otro
bando. El pulsar CLEAR [DESPEJAR] cancelará la visualización
de la puntuación.
Si resuelve una Partida de estudio que termina en jaque mate,
Checkmate! permanecerá en pantalla después de una serie de
mensajes de felicitación. En ese momento, puede (a) preparar una
partida nueva, (b) usar el Modo de información para documentar las
jugadas en sentido inverso (como se describe en la sección 7.4), o
(c) anular cualquiera de las jugadas y reanudar una partida normal
desde cualquier posición. Si resuelve la última Posición de estudio en
una partida, pero ésta no se ha terminado, la pantalla mostrará End
Game, [Final de partida] y el ordenador comenzará automáticamente
a pensar la siguiente jugada, permitiéndole continuar la partida de
forma normal.
10. ¡NECESITA AYUDA? ¡BÚSQUELA AQUÍ!
Con fines de resolución de problemas, hemos compilado la
siguiente lista de situaciones con las que podría encontrarse, junto
con algunas soluciones posibles.
a. El ordenador no reacciona, se comporta de manera errática
o se “congela” durante una partida.
• Vuelva a introducir las pilas o reemplácelas con unas alcalinas
nuevas.
• Una descarga de electricidad estática podría haber causado un
bloqueo. Pulse el agujero marcado ACL para reiniciar la unidad
(véase la sección 11.1).
b. La pantalla está oscura y/o resulta difícil de leer.
• Cambie las pilas por unas alcalinas nuevas.
• Seleccione una Opción de contraste de PCL diferente (véase
la sección 4.9).
c. He activado algunas Pantallas de información automáticas
para ver cómo piensa el ordenador, pero la pantalla se
desplaza demasiado rápidamente.
• Seleccione una opción de Velocidad de PCL diferente (véase la
sección 4.10).
• Pulse GO/STOP [COMENZAR/PARAR] para parar la pantalla
en cualquier momento; pulse CLEAR [DESPEJAR] para que
vuelva a desplazarse.
d. El ordenador no realiza una jugada.
• La unidad sólo responde automáticamente si el Modo de dos
jugadores está configurado en player: P-C para jugar
contra el ordenador (vea la sección 4.1).
• Puede que se encuentre en un nivel en el que el ordenador
tarda mucho en pensar. Puede forzarlo a mover, si así lo
desea, pulsando ENTER [INTRO].
e. El ordenador no acepta mi jugada.
• Está intentando realizar una jugada ilegal. Compruebe las
reglas.
• ¿Tiene el rey en jaque? ¿Pondrá su jugada a su rey en jaque?
¿Está haciendo un enroque incorrectamente? Revise la
posición.
• ¿Es su turno? Si el símbolo de color destella, el ordenador
está pensando. Pulse ENTER [INTRO] para interrumpir, si así
lo desea.
166
167
ESPAÑOL
f. La anotación del tablero está invertida cuando realizo
jugadas. ¿Por qué?
• Tiene la opción de white: top activada. Vaya a Modo de
opción y cámbiela a black: top (véase la sección 4.4).
g. He repuesto un nuevo juego, pero el ordenador muestra
Rate as draw? en vez de reponerse.
• Ha interrumpido una partida de Nivel de torneo y necesita
decirle al ordenador cómo quiere que se clasifique la misma.
Para detalles, véase la sección 5.3.
h. El ordenador ha mostrado su jugada pero su pieza destella
y no se ha realizado la jugada en el tablero.
• Cuando se desactiva la Opción de jugada automática, tiene
que mover usted las piezas del ordenador en el tablero. Para
volver a activar Jugada automática, consulte la sección 4.11.
i. El ordenador muestra No Move Found! en vez de realizar
una jugada.
• Seleccione una Opción de contraste de PCL diferente (véase
la sección 4.9).Se encuentra en el Nivel de resolución de
problemas y el ordenador no ha hallado un mate. Si no está
intentando resolver un problema de mate, cambie a un nivel de
jugar normal (vea la sección 5).
j. Estoy intentando salir del Menú principal pulsando CLEAR
[DESPEJAR], pero obtengo un pitido de error.
• ¡Está pulsando la tecla equivocada! La única manera de salir
del Menú principal es pulsando MENU.
k. El ordenador emite un pitido intermitentemente aunque me
toca mover a mí.
• Cuando el Modo de entrenamiento está activado, el ordenador
emitirá 30 pitidos de aviso durante su turno.
l. El ordenador no emite pitidos cuando mueve.
• Vaya al Modo de opción para activar el sonido (véase la
sección 4.8).
m.El ordenador no me permite salir del Modo de
configuración.
• Ha configurado una posición ilegal (p. ej.: puede que un rey
esté en jaque, que haya demasiados peones en el tablero,
etc.). Cambie el tablero configurando una posición válida
(véase la sección 8).
11. DETALLES TÉCNICOS
11.1 La función ACL
Los ordenadores a veces se bloquean debido a descargas de
electricidad estática u otros tipos de perturbaciones eléctricas. Si
sucediera esto, utilice un alfiler u otro objeto afilado para pulsar en el
agujero marcado ACL en la base de la unidad durante al menos un
segundo. Esto reinicializa el ordenador.
11.2 Cuidado y mantenimiento
Su ordenador es un dispositivo electrónico de precisión y no se
debería someter a una manipulación tosca o exponer a temperaturas
extremas o a humedad. No utilice agentes químicos o líquidos para
limpiar la unidad, ya que podrían dañar el plástico. Asegúrese de
quitar las pilas antes de limpiar la unidad.
Las pilas gastadas se deberían reemplazar inmediatamente, ya
que pueden perder y dañar el ordenador. Rogamos también tener en
cuenta lo siguiente, respecto al uso de pilas. Precaución: Use tan
sólo pilas alcalinas o de carbón-zinc. No mezcle tipos diferentes de
pilas o nuevas con usadas. No recargue pilas no recargables. Use tan
sólo las pilas recomendadas o equivalentes. Asegúrese de observar
la polaridad correcta al insertar las pilas. Las pilas gastadas se
deberían sacar inmediatamente de la unidad. No cortocircuite las
terminales de suministro.
11.3 Especificaciones técnicas
Teclas:
8
Tablero de ajedrez: Membrana de contacto 9x8 (panel táctil)
Pantalla de PCL: Matricial de puntos de 11 caracteres, 68 x 79 mm
Pilas:
3 x AAA/AM4/R03
Dimensiones:
131 x 83 x 22 mm
Peso:
220 gramos
Rogamos retener esta información para futura referencia.
Saitek se reserva el derecho a realizar cambios técnicos sin previo aviso para
mejorar el producto.
168
SNELLE START
Om direct te spelen, hoeft u alleen maar de onderstaande stappen te volgen!
Open het batterijvakje en breng drie “AAA” (AM4/
R03) alkalinebatterijen in; let op de juiste polariteit.
3x
AAA
Verwijder het stilet uit de houder aan de
(AM4/R03)
rechterkant zoals aangegeven.
Druk op de knop GO/STOP (START/STOP), aan
de rechter bovenkant van het apparaat om de
computer aan te zetten. Als er niets gebeurt, dient
u de computer opnieuw in te stellen (zie Hoofdstuk
11.1).
Druk tweemaal snel achtereen op NEW GAME
(NIEUWE PARTIJ) om de computer opnieuw in te
stellen. Als u geen nieuwe partij kunt beginnen,
heeft u niet snel genoeg gedrukt. Probeer het
x2
nogmaals!
Voer zetten in door voor elke zet voorzichtig met
het stilet op de velden van en naar te drukken. Dit
kunt u overigens ook met uw vingertoppen doen.
Als de computer aan zet is, knippert het
betreffende stuk kort op de velden van en naar,
waarna de zet op het bord zal worden uitgevoerd.
En daarna is het weer uw beurt!
1
2
3
4
5
6
ıPd7-d5````
Druk op GO/STOP (START/STOP) om het apparaat uit
te zetten. Als in het scherm Stop? verschijnt, drukt u
nogmaals op GO/STOP (START/STOP) om het uitschakelen te bevestigen —
uw partij wordt in het geheugen opgeslagen!
DE SCHAAKSTUKKEN!
Q`
DAME
R`
B`
N`
TOREN
LOPER
PAARD
P`
PION
Wit
Zwart
169
NEDERLANDS
K`
KONING
INHOUDSOPGAVE
SNELLE START
TOETSEN EN FUNCTIES
INLEIDING
1. OM TE BEGINNEN: DE
BASISELEMENTEN
1.1 Batterijen inbrengen, stroom
inschakelen
1.2 Klaar om te spelen? Dit zijn de
regels!
1.3 De computer aan zet
1.4 Partij beëindigd? Een nieuwe
partij beginnen
1.5 Te makkelijk/moeilijk? Van
niveau wijzigen!
2. NOG MEER FUNCTIES
2.1 Wie is aan zet? Zie
beeldscherm!
2.2 Speciale schaakzetten
2.3 Onjuiste zetten
2.4 Schaak, schaakmat en remise
2.5 Probeer het
zelfwaarderingssysteem!
2.6 Hint nodig? Gewoon vragen!
2.7 Het zoeken onderbreken
2.8 Van kleur wisselen
2.9 Ingebouwde openingszetten
2.10 Denken in de tijd van de
tegenstander
2.11 Uitschakelen/Spelgeheugen
3. HOOFDMENU
4. OPTIESTAND
Spelopties selecteren
4.1 Twee spelers
4.2 Zoekalgoritme
4.3 Autobook-stand
4.4 Wit boven
4.5 Aftellende klok
170
4.6 Tikkende klok
4.7 Trainingsstand
4.8 Geluid aan/uit
4.9 LCD-contrast
4.10 LCD-snelheid
4.11 Automove-stand
5. NIVEAUSTAND
Het spelniveau instellen
5.1 Pretniveaus
5.2 Gelegenheidsspelniveaus
5.3 Toernooiniveaus
5.4 Snelschaakniveaus
5.5. Probleemoplossingsniveaus
5.6 Tactisch niveau
5.7 Oneindig niveau
6. TERUGNEEMSTAND
7. INFOSTAND
Automatische informatieschermen
Handmatige informatieschermen
7.1 Hoofdvariant
7.2 Zoekinformatie
7.3 Schaakklokinformatie
7.4 Aantal zetten/spelzetten
7.5 Waarderingsweergave
8. SETUP-STAND
9. ANALYSESTAND
Het selecteren van
analysestellingen
Het bord gebruiken voor selectie
10. HULP NODIG? ZIE HIER!
11. TECHNISCHE GEGEVENS
11.1 De ACL-functie
11.2 Verzorging en onderhoud
11.3 Technische specificaties
APPENDIX:
GEANALYSEERDE PARTIJEN
1. TOUCHSCREEN-SCHAAKBORD: Elk veld registreert beweging van een schaakstuk als
er voorzichtig met een stilet of vinger op wordt gedrukt.
2. INFORMATIEREGEL: Geeft zetten, partij-informatie en schaakklok weer. Wordt ook
gebruikt voor het selecteren van opties en niveaus, het opzetten van stellingen en nog
veel meer.
3.` STILET: Wordt gebruikt om zetten op het touch-screen uit te voeren; wordt tevens
gebruikt om instellingen in de
Informatieregel te selecteren.
4. TOETS GO/STOP (START/STOP): Druk
om het apparaat aan te zetten; tweemaal
indrukken om uit te zetten. Indrukken om
het scrollen van het beeldscherm stop te
zetten; scrollen kan worden hervat met
CLEAR (OPHEFFEN).
5. STILETHOUDER: Steek stilet in houder
indien niet in gebruik.
6. LCD-KLEP: Kan over het beeldscherm
worden geschoven het te beschermen als
het apparaat niet wordt gebruikt.
7. ACL (Opnieuw instellen): aan de
onderkant van het apparaat. Wordt
gebruikt om statische lading te
verwijderen na het insteken van nieuwe
batterijen.
8. TOETS HINT/INFO: Druk deze tijdens uw
zet in voor een hint. Meermaals indrukken
om door de belangrijkste
informatieschermen te lopen.
9. TOETS CLEAR (OPHEFFEN): Indrukken
om de stand Opties/Info af te sluiten; om
de stand Niveaus/Analayse te annuleren;
om de informatie in de Infostand te
wissen; om in de Analysestand te blijven
na een verkeerde zet; om het bord in de
Setup-stand te wissen; om het scrollen te
hervaten na een pauze; om de partij te
hervatten na een terugname.
10. BATTERIJVAK: aan de onderkant van het
apparaat. Geschikt voor drie “AAA” (AM4/
R03) alkalinebatterijen.
11. ENTER-TOETS: Indrukken om van kleur
te wisselen met de computer. Indrukken
als de computer aan zet; op die manier
wordt de computer gedwongen een zet uit
te voeren. Indrukken om items in het
Hoofdmenu te selecteren; om instellingen
te selecteren en opties aan/uit te zetten in
de stand Opties/Info; om een nieuw niveau
in te voeren in de stand Niveau; om een
analysestelling te selecteren; om de
Setup-stand met een nieuwe stelling af te
sluiten.
12. ¯/˘-TOETSEN: Indrukken om één voor één door niveaus/analysestellingen te scrollen in
de stand Niveaus/Analyse Indrukken om door de Opties/Info te scrollen in de stand
Opties/Info Indrukken om zetten terug te nemen/opnieuw te spelen in de Terugneemstand
13. MENUTOETS: Indrukken om de Menustand te openen; nogmaals indrukken om deze
stand te verlaten.
14. TOETS NIEUWE PARTIJ: Tweemaal snel achtereen indrukken om de computer opnieuw
in te stellen.
171
NEDERLANDS
TOETSEN EN FUNCTIES
INLEIDING
Gefeliciteerd met de aanschaf van de Touch Screen Travel Chess
Computer! Dit gestroomlijnde apparaat heeft een touch-screen
beeldscherm voor extra spelgemak en bevat een aantal
buitengewone schaakfuncties en een groot aantal speciale opties.
Het apparaat is draagbaar en kan eenvoudig mee op reis worden
genomen zodat u thuis of onderweg een lekker partijtje schaak kunt
spelen! Als u eenmaal weet hoe de standaard functies werken kunt u
zich verdiepen in de extra’s die deze unieke computer heeft te bieden.
U zult er al gauw achter komen dat u nog nooit zoveel schaakplezier
heeft gehad!
1. OM TE BEGINNEN: DE BASISELEMENTEN!
1.1 Batterijen inbrengen, stroom inschakelen
Uw schaakcomputer wordt aangedreven door drie “AAA” (AM4/
R03) alkalinebatterijen. Steek de batterijen in het vakje aan de
onderkant van het apparaat, en zorg ervoor dat u ze op de juiste
manier inbrengt. We raden u aan om nieuwe batterijen te gebruiken
omdat die langer meegaan!
Druk op GO/STOP (START/STOP) om het apparaat aan te zetten.
Als er niets gebeurt, dient u het apparaat opnieuw in te stellen door
minimaal een seconde een paperclip of ander scherp voorwerp in de
ACL-opening te steken.
Om de batterijen te sparen, schakelt de computer zich
automatisch uit als er 20 minuten niet op wordt gespeeld.
1.2 Klaar om te spelen? Dit zijn de regels!
Volg deze stappen om een partij te beginnen:
a. Druk op GO/STOP (START/STOP) om de computer aan te
zetten.
b. Om de computer in stellen voor een nieuwe partij schaak, dient
u tweemaal snel op NEW GAME (NIEUWE PARTIJ) te drukken.
Als u niet snel genoeg drukt, wordt de computer niet opnieuw
ingesteld en dient u opnieuw tweemaal te drukken. Zodra het
apparaat opnieuw is ingesteld, verschijnt kort de tekst New
Game, gevolgd door het symbool voor Wit („) en de schaakklok
(00:00:00).
172
c. Om een stuk te verplaatsten, dient u voorzichtig met het stilet op
het betreffende schaakstuk te drukken totdat u een signaal hoort
en het stuk gaat knipperen. U kunt dit indien gewenst ook met
uw vinger doen.
d. Druk vervolgens met het stilet op het bestemmingsvlak. U hoort
een tweede signaal als de computer uw zet bevestigt. Daarna is
de computer weer aan de beurt! U zult zien dat de computer aan
het begin van een partij vaak direct opent, zonder na te denken.
Dat zijn openingszetten die staan opgeslagen in de database.
Zie voor meer gegevens Hoofdstuk 2.9.
1.3 De computer aan zet
Als de computer aan zet is, staat er eerst kort Thinking....
Terwijl de computer de zet voor Zwart overdenkt, knippert op het
beeldscherm het symbool voor Zwart (ı) en wordt de computerklok
getoond. Als de zet is voltooid, klinkt er een signaal en wordt de zet
weergegeven (bijv., ıPe7-e5), waarna het stuk kort tussen de
velden van en naar heen en weer beweegt. Nadat de zet op het bord
is gemaakt, toont het beeldscherm uw klok en is het weer uw beurt.
1.4 Partij beëindigd? Een nieuwe partij beginnen
Waarschuwing: Als u de computer opnieuw instelt, wordt de
huidige partij uit het geheugen van de computer gewist!
1.5 Te makkelijk/moeilijk? Van niveau wijzigen!
Als u de computer voor de eerste keer aanzet, wordt automatisch
spelniveau 63 ingesteld waarbij de gemiddelde responstijd van de
computer vijf seconden is. U kunt echter uit 100 verschillende
spelniveaus kiezen! Zie Hoofdstuk 5 voor een beschrijving van alle
niveaus en aanwijzingen voor het veranderen van het spelniveau.
173
NEDERLANDS
Als u een partij beëindigd (of als u uw huidige partij opgeeft), kunt
u eenvoudig weer opnieuw beginnen! Stel de computer opnieuw in
door tweemaal achtereen op NEW GAME (NIEUWE PARTIJ) te
drukken. In het venster verschijnt New Game hetgeen aangeeft dat
de computer klaar is voor een nieuwe partij op het ingestelde niveau.
Speciale opmerking m.b.t. de toernooiniveaus: Als u en nieuwe
partij wilt beginnen voordat een toernooipartij is beslist, zal de
computer vragen om de uitkomst van de partij te bevestigen voordat
er opnieuw kan worden begonnen. Zie voor meer gegevens
Hoofdstuk 2.5.
BEELDSCHERMOPTIES!
• Helder/donker maken van het beeldscherm: Selecteer een
andere LCD-contrastinstelling zoals aangegeven in
Hoofdstuk 4.9.
• Een beeldscherm sneller/langzamer laten scrollen:
Selecteer een andere LCD-snelheidsinstelling zoals
aangegeven in Hoofdstuk 4.10.
• Een scrollend beeldscherm pauzeren: Druk eenmaal op
GO/STOP (START/STOP); druk vervolgens op CLEAR
(OPHEFFEN) om het scrollen te hervatten. Deze functie is
met name handig als u verscheidene automatische
informatieschermen hebt geactiveerd terwijl de computer aan
het denken is!
2. NOG MEER FUNCTIES
2.1 Wie is aan zet? Zie beeldscherm!
Als de computer met Zwart aan zet is, knippert er een zwart
vierkantje (ı). Nadat de computer aan zet is geweest, verschijnt er
een niet-knipperend wit vierkantje („), hetgeen aangeeft dat het nu
uw beurt is.
2.2 Speciale schaakzetten
Onthoud het volgende m.b.t. bepaalde zetten:
Slaan: Een stuk dat wordt geslagen wordt aangegeven met een x,
zoals in ıPa7xb6.
En passant: Na een slag van dit type, die wordt aangegeven met
de letters EP na het slaan, herinnert de computer u eraan om de
geslagen pion te verwijderen door deze te laten knipperen. Druk op
de pion om deze van het bord te verwijderen.
Rokade: Nadat de Koning is verplaatst, zal de Toren gaan
knipperen. Verplaatst de knipperende Toren om het rokeren te
voltooien. Rokade aan de kant van de Koning wordt weergegeven als
O-O, en rokade aan de kant van de Dame wordt weergegeven als
O-O-O.
Promotie van een pion:
• Als u een pion laat promoveren, druk dan eerst net als anders
op het veld van. Het beeldscherm laat vervolgens de beschikbare
174
promotiestukken zien (Q R B N). Om naar een Dame te promoveren
hoeft u alleen maar op het veld naar te drukken. Om te promoveren
naar een Toren, Loper of Paard, dient u op het betreffende
promotiesymbool te drukken. Het beeldscherm bevestigt uw keuze
(bijv. Prom: rook). Druk op het veld naar om de promotie te
voltooien; het stuk verandert automatisch op het bord. Opmerking: als
u van gedachten verandert voordat u op het veld naar hebt gedrukt,
hoeft u alleen maar een op van de andere symbolen te drukken.
• Als de computer een pion promoveert, wordt de zet
aangegeven alsmede het stuk waarnaar gepromoveerd wordt,
bijvoorbeeld ıPh2-h1/Q.
2.4 Schaak, schaakmat en remise
Als een Koning schaak staat, geeft de computer kort na de zet
Check aan. Als de computer een onvermijdelijke matsituatie
ontdekt, verschijnt er kort een mataankondiging (bijv. Mate in 3).
Als een partij eindig in schaakmat, wordt u door de computer
gefeliciteerd of betuigt deze zijn deelneming, afhankelijk van of u
gewonnen of verloren hebt. Er verschijnt Checkmate! op het
beeldscherm waarna de partij is afgelopen.
De computer herkent remise als gevolg van patstelling, remise als
gevolg van herhaling van zetten en de ‘50-zetten’-regel. In elk van
deze gevallen wordt het corresponderende scherm weergegeven
nadat de remisezet is gemaakt.
2.5 Probeer het zelfwaarderingssysteem!
Als u een van de toernooiniveaus speelt, geeft de computer u
afhankelijk van uw prestatie een ELO-score als de partij is afgerond.
175
NEDERLANDS
2.3 Onjuiste zetten
Uw computer kent alle schaakregels en speelt nooit vals! Als u een
verkeerde zet maakt, wordt u door een hoge dubbele piep
geattendeerd op uw fout. Dit gebeurt bijvoorbeeld als u op een
verkeerde van/naar combinatie drukt, een ongeldig stuk of verkeerde
kleur aanklikt of een ongeldige speeltoets gebruikt.
Als u op een verkeerde naar-veld drukt, blijft het beeldscherm het
veld van aangeven. Om verder te kunnen, dient u uw stuk naar een
geldig veld te verplaatsen. Als u op het veld van drukt, maar
vervolgens besluit dat u een ander stuk wilt verplaatsen, dient u
nogmaals op hetzelfde veld te drukken. Als u uw zet na voltooiing wilt
corrigeren, dient u te werk te gaan zoals beschreven in Hoofdstuk 6.
Weet u niet precies wat een ‘ELO-score’ is? Het is een algemeen
erkende manier om de schaakprestatie te meten of een bepaald
spelniveau aan te geven. De internationale schaakfederatie FIDE
(Fédération Internationale des Échecs) heeft deze methode in het
leven geroepen en FIDE-scores worden ook wel ELO-scores
genoemd. De Amerikaanse Schaakfederatie (USCF), maakt gebruik
van een soortgelijk systeem. De scores worden doorgaans in
viercijferige codes uitgedrukt en betere spelers hebben hogere
scores. Aan de bovenkant van de schaal, scoren schaakmeesters
rond de 2200 of meer en internationale grootmeesters 2500 of meer.
Wilt u weten wat u scoort? Dan is dit uw kans! Zie Hoofdstuk 5.3 voor
meer informatie over toernooiniveaus.
2.6 Hint nodig? Gewoon vragen!
Als u hulp nodig heeft bij een zet, is de Touch Screen Travel Chess
u graag van dienst! Druk tijdens uw beurt op HINT/INFO en de
computer geeft een suggestie aan. Als de hint e4xd5 is, verschijnt er
bijvoorbeeld Ply 1: e4xd5. Een ‘ply’ is een individuele zet ofwel
een zet voor een van beide kleuren. De hint verschijnt meestal binnen
vijf seconden, maar soms duurt het langer. Om de hint te accepteren
dient u de aangegeven zet op het bord te maken. Als u een eigen zet
wilt doen, kunt u de hint gewoon negeren. U kunt de hint ook wissen
door op CLEAR (OPHEFFEN) te drukken.
2.7 Het zoeken onderbreken
Om de computer tijdens het denkproces te onderbreken, drukt u
op ENTER. Op die manier dwingt u de computer om de beste zet die
tot dan toe is gevonden te spelen. Deze functie kan heel nuttig zijn op
de hogere spelniveaus, waar de computer vaak lang nadenkt of op de
niveaus Oneindig en Tactisch, waar de computer oneindig lang blijft
nadenken tenzij u het proces onderbreekt.
Op de Probleemoplossingsniveaus doet de computer geen zet als
u tijdens het nadenken op ENTER drukt. In plaats daarvan verschijnt
No move found! om aan te geven dat de computer is
onderbroken tijdens het zoeken naar een matsituatie. Schakel over op
een ander niveau om door te gaan.
2.8 Van kleur wisselen
Om met de computer van kleur te wisselen dient u tijdens uw beurt
op ENTER te drukken; de computer doet de volgende zet dan voor
uw kleur. U kunt zo vaak als u wilt van kleur wisselen door
herhaaldelijk op ENTER te drukken.
176
Wilt u dat de computer de eerste zet aan het begin van een nieuwe
partij voor Wit uitvoert? Druk tweemaal op NEW GAME (NIEUWE
PARTIJ) en druk vervolgens op ENTER!
Wilt u de computer tegen zichzelf zien spelen? Druk na elke zet op
ENTER en zie hoe de computer zet na zet tegen zichzelf speelt.
Bestudeer de strategie en misschien verbetert u uw eigen spel wel!
2.9 Ingebouwde openingszetten
Aan het begin van een partij reageert de computer op de meeste
niveaus vaak zeer snel omdat het apparaat over een database met
openingszetten beschikt. In deze database staan de meeste
belangrijke openingszetten en vele stellingen van
grootmeesterpartijen Als de huidige bordstelling in de database staat,
speelt de computer een zet uit het geheugen in plaats van over de zet
na te denken. De database met openingszetten wordt op alle niveaus
gebruikt, behalve in het niveau Probleemoplossing.
2.11 Uitschakelen/Spelgeheugen
U kunt uw partij onderbreken en de computer uitzetten door op
GO/STOP (START/STOP) te drukken. Op het beeldscherm verschijnt
Stop? en als u daarna nogmaals op GO/STOP (START/STOP)
drukt, schakelt het apparaat uit. De partij wordt onderbroken en tot
maximaal een jaar in het geheugen opgeslagen. Als u de computer
weet aanzet, kunt u verdergaan waar u was opgehouden! Als u de
computer niet uitzet nadat u op GO/STOP (START/STOP) hebt
gedrukt, kunt u gewoon op CLEAR (OPHEFFEN) drukken om het
uitschakelen te annuleren.
Als er 20 minuten lang geen handelingen worden verricht, schakelt
de computer zichzelf automatisch uit. Druk op GO/STOP (START/
177
NEDERLANDS
2.10 Denken in de tijd van de tegenstander
Terwijl u speelt zult u ontdekken dat de computer soms direct op
uw zetten reageert, zelfs halverwege partijen op hoger niveau. Dat
komt omdat de computer ook in de tijd dat u aan het nadenken bent
over de volgende zet nadenkt en een eigen strategie uitstippelt. Het
apparaat probeert de meest waarschijnlijke zet van uw kant te
anticiperen en berekent mogelijke tegenzetten terwijl u nog aan het
nadenken bent. Als de computer goed heeft gegokt, hoeft er niet
verder te worden nagedacht; de gevonden tegenzet kan direct
worden gespeeld! De computer denkt niet in de tijd van de
tegenstander in de Pretniveaus.
STOP) om de computer weer aan te zetten. De computer schakelt
zichzelf niet uit als er over een zet wordt nagedacht of als het bericht
Stop? Wordt weergegeven.
3. HET HOOFDMENU: TOEGANG TOT SPECIALE FUNCTIES
De computer heeft een aantal door de gebruiker te selecteren
functies en opties die via het Hoofdmenu kunnen worden
opgevraagd. Als u op MENU drukt, verschijn het menu ¿OPTION,
het eerste van de zes Hoofdmenu’s. Druk herhaaldelijk op ¯ (of ˘)
om door alle menu-items te lopen:
HOOFDMENU-ITEM ....... REFERENTIE ................. BEELDSCHERM
Optiestand ...................... Hoofdstuk 4 ................. ¿OPTION
Niveaustand ................... Hoofdstuk 5 ................. ¿LEVEL
Terugneemstand ............ Hoofdstuk 6 ................. ¿TAKEBACK
Infostand ......................... Hoofdstuk 7 ................. ¿INFO
Setup-stand .................... Hoofdstuk 8 ................. ¿SETUP
Analysestand .................. Hoofdstuk 9 ................. ¿STUDY
Druk op ENTER om een van de items in het Hoofdmenu te
selecteren. U komt vervolgens terecht in een submenu waar u nog
meer instellingen kunt selecteren. Sommige items (bijv. de
Optiestand) hebben een groot aantal keuze- en
subkeuzemogelijkheden terwijl andere items (bijv. de Setup-stand) u
in staat stellen om een bepaalde spelfunctie te activeren. Omdat de
instructies voor het selecteren van een menu-item afhankelijk zijn van
het gekozen item, dient u de betreffende hoofdstukken te raadplegen
voor volledige toegangsinformatie voor elke functie. Nadat u alle
gewenste opties hebt geselecteerd en/of de spelinstellingen hebt
gewijzigd, dient u opnieuw op MENU te drukken om het Hoofdmenu
af te sluiten en terug te keren naar de spelstand.
4. OPTIESTAND: MAAK U PARTIJ GEVARIEERDER!
Wilt u allerlei soorten interessante spelopties ontdekken? Kijk dan
eens naar de Optiestand! Ontdek eerst hoe u deze door de gebruiker
te selecteren opties tijdens of voorafgaand aan een partij kunt
selecteren en activeren; leer vervolgens meer over de individuele
opties die in dit hoofdstuk staan beschreven.
Spelopties selecteren
Druk op MENU om het Hoofdmenu te openen; op het scherm
verschijnt automatisch ¿OPTION voor de Optiestand. Druk op
178
ENTER om de Optiestand te openen en u ziet de eerste van de 11
opties (zie onder). Druk herhaaldelijk op ¯ (of ˘) om door alle opties
te lopen:
OPTIE ........................... REFERENTIE .......... STANDAARD SCHERM
4.1 Twee spelers
Opties: player: P-C (Speler vs. Computer)
player: P-P (Speler vs. Speler)
Normaal gesproken beantwoordt de computer uw zet met een
tegenzet. Maar als u player: P-P activeert, kunt u een aantal
zetten doen zonder dat de computer een tegenzet uitvoert. Deze
functie kan op een aantal interessante manieren worden gebruikt:
• Om meesterpartijen te doorlopen. Druk op ENTER om te zien
wat de computer in een bepaalde stelling zou doen!
• Bewaar uw eigen schaakpartijen. Als een partij is beëindigd,
kunt u naar bepaalde bordstellingen terugkeren om te zien of
andere zetten tot een andere uitkomst zouden hebben geleid.
179
NEDERLANDS
Twee spelers .............. Hoofdstuk 4.1 ........ player: P-C
Zoekalgoritme ............ Hoofdstuk 4.2 ........ search: select
Autobook-stand .......... Hoofdstuk 4.3 ........ book: on
Wit boven ................... Hoofdstuk 4.4 ........ top: black
Aftellende klok ............ Hoofdstuk 4.5 ........ clock: up
Tikgeluid ..................... Hoofdstuk 4.6 ........ ticks: off
Trainingsstand ............ Hoofdstuk 4.7 ........ coach: off
Geluid Aan/Uit ............ Hoofdstuk 4.8 ........ sound: on
LCD-contrast .............. Hoofdstuk 4.9 ........ contrast: 3
LCD-snelheid ............. Hoofdstuk 4.10 ...... LCD speed: 2
Automove-stand ......... Hoofdstuk 4.11 ...... automove: on
Om een optie aan/uit te zetten of om eventuele optie-instellingen te
selecteren, dient u op ENTER te drukken als de optie wordt
weergegeven. Door herhaaldelijk op ENTER te drukken, loopt u door
alle keuzemogelijkheden voor de weergegeven optie. Als de
gewenste keuze is geselecteerd, kunt u op ¯ of ˘ drukken om naar
een andere optie te gaan of op CLEAR (OPHEFFEN) drukken om
naar het Hoofdmenu terug te keren; als u vervolgens op MENU drukt,
keert u terug naar de normale speelstand. Voor meer gegevens over
deze opties verwijzen wij u naar de betreffende hoofdstukken.
Opmerking: Als u de computer opnieuw instelt voor een nieuwe partij,
worden de meeste gekozen opties gehandhaafd. Dit geldt niet voor
de stand Twee spelers, van waaruit automatisch wordt teruggekeerd
naar de spelstand Speler vs. Computer als u een nieuwe partij begint.
EEN SNEL OVERZICHT VAN HET HOOFDMENU!
• ¿OPTION: Ontdek een aantal spannende spelopties.
• Twee spelers
• Trainingsstand
• Zoekalgoritme
• Geluid Aan/Uit
• Autobook-stand
• LCD-contrast
• Wit boven
• LCD-snelheid
• Aftellende klok
• Automove-stand
• Tikgeluid
• ¿LEVEL: Kies uit 100 verschillende spelniveaus.
• ¿TAKEBACK: Neem één of alle vorige zetten terug.
• ¿INFO: Selecteer verscheidene automatische
informatieschermen.
• Zetten weergeven
• Voortgang weergeven
• Nodes weergeven
• Evaluatie weergeven
• Tijd per zet weergeven
• ¿SETUP: Bordstellingen instellen of wijzigen.
• ¿STUDY: Test uzelf met 64 unieke analysestellingen.
• Analyseer de openingszetten door ze handmatig in te voeren.
• Speel tegen een vriend waarbij de computer als scheidsrechter
optreedt. De computer controleert of alle zetten geldig zijn en
houdt voor beide kleuren de tijd bij!
Als u tegen iemand anders speelt en u wilt zien wat de computer in
uw geval zou doen, drukt u op ENTER om de computer de volgende
zet te laten uitvoeren. Nadat de computer aan zet is geweest, keert
de computer weer terug naar de stand Twee spelers en kunt u uw
partij voortzetten. Onthoud dat deze optie automatisch terugkeert
naar de stand Speler vs. Computer als u de computer instelt voor een
nieuwe partij.
4.2 Zoekalgoritme
Opties: search: select / brute
Het programma in deze schaakcomputer maakt normaal
gesproken gebruik van een selectief zoekalgoritme. Bij dit type
zoekopdracht, concentreert de computer zich voornamelijk op zetten
die het meest succesvol zullen zijn, waardoor het combinaties kan
vinden die anders veel langer zouden duren om te vinden. U kunt ook
overschakelen naar het wat langzamere maar zeer krachtige ‘Brute
180
Kracht’-algoritme, waardoor de kans dat een bepaalde zet niet wordt
gezien wordt geminimaliseerd.
4.3 Autobook-stand
Opties: book: on / off
Deze unieke functie houdt bij welke zetten u in de openingsfase
van een partij hebt gedaan en geeft u vervolgens de mogelijkheid om
de openingen waarmee u de meeste moeilijkheden ondervindt te
oefenen. Het is net alsof u uw eigen “instelbare openingstrainer
heeft”! Als de functie Autobook is geactiveerd, houdt de computer uw
openingszetten bij terwijl u speelt. De volgende keer dat u aan het
eind van een openingsvariant een slechte uitgangsstelling hebt,
“onthoudt” de computer de betreffende opening. In de toekomst zal de
computer indien mogelijk op dezelfde manier openen. Op deze
manier kunt u verschillende zetten en strategieën uitproberen zodat u
meer bekend wordt met de betreffende opening en u uw spel kunt
verbeteren.
4.4 Wit boven
Opties: top: black / white
Wilt u wel eens wat anders en de computer bovenaan met Wit
laten spelen? Probeer dan deze functie en kies top: white aan
het begin van een nieuwe partij! Begin uw partij door op ENTER te
drukken en de computer maakt de eerste zet voor Wit van de
bovenkant van het bord.
Opmerking: Als de computer van de bovenkant van het bord met
Wit speelt, zult u zien dat de posities van de Koningen en Dames zijn
gewijzigd en dat het bord in feite is omgedraaid.
[/]
{/}
Oplopende klokken (Wit/Zwart)
Aftellende klokken (Wit/Zwart)
Onthoud dat de Aftellende klok alleen beschikbaar is in de
Toernooi- en Snelschaakniveaus.
181
NEDERLANDS
4.5 Aftellende klok
Opties: clock: up / down
De standaardinstelling is clock: up, waarbij de verstreken tijd
wordt weergegeven. Als u de optie Aftellende klok echter activeert,
geeft de computer de nog resterende tijd weer. Op deze manier kunt
u met een oogopslag onderscheid maken tussen de kloksymbolen:
DE OPTIE-INSTELLINGEN OEFENEN!
1. Druk op MENU om het Hoofdmenu te openen.
In het beeldscherm verschijnt ¿OPTION.
2. Druk op ENTER om de Optiestand te openen.
Laten we voor dit voorbeeld de optie Tikkende
klok selecteren.
3. Druk vijfmaal op ¯ tot het beeldscherm ticks:
off aangeeft.
4. Druk op ENTER om deze optie aan te zetten;
het beeldscherm zegt nu ticks:on.
5. Druk op CLEAR (OPHEFFEN) om de Optiestand
af te sluiten; druk vervolgens op MENU om de
Menustand af te sluiten – het gesimuleerde tikken
begint. Opmerking: Om deze optie weer uit te
zetten, dient u de bovenstaande stappen te
herhalen.
Zie voor meer gegevens Hoofdstuk 4.6.
4.6 Tikkende klok
Opties: ticks: off / on
Als u deze optie activeert, wordt er een tikkend geluid
weergegeven waarmee een schaakklok wordt gesimuleerd. U kunt op
die manier in uw eigen huiskamer de sfeer van een schaakwedstrijd
creëren!
4.7 Trainingsstand
Opties: coach: off / novice / inter. / adv.
Als u de Trainingsstand activeert, kijkt de computer als het ware
over uw schouder mee als u speelt; hij kijkt wat u doet en biedt hulp
aan als dat nodig is! In deze stand waarschuwt de computer u als u
op het punt staat om een stuk te verliezen of als u op het punt staat
een zet te doen die onvermijdelijk tot verlies zal leiden. U krijgt
waarschuwingen als Your Queen is in jeopardy! of
Watch your Knight!. Als u kunt profiteren van een bepaalde
situatie, krijgt u misschien wel een bericht zoals He’s giving
you a big chance!. Soms vraagt de computer u ook om een
182
duidelijk onlogische zet te bevestigen of annuleren. Als u besluit om
te annuleren, wordt uw zet teruggenomen en kunt u het opnieuw
proberen!
Om een van de Trainingsopties te kiezen, dient u herhaaldelijk op
ENTER te kiezen tot de gewenste optie wordt weergegeven. Als u de
Optiestand verlaat en terugkeert naar het spel, blijft de laatst
weergegeven Trainingsoptie automatisch van kracht. Dit zijn de
beschikbare instellingen.
• coach: off: Geen trainingsfuncties actief.
• coach: novice: De computer gaat ervan uit dat u bekend
bent met een aantal tactische en strategische concepten en wijst
u dus alleen op de minder duidelijke en meer geavanceerde
concepten, zoals opofferingen en combinaties.
• coach: intermediate: In dit geval geeft de computer de
hoeveelheid assistentie die het nodig acht voor spelers die het
spel redelijk begrijpen maar hulp nodig hebben bij minder
duidelijke spelsituaties.
• coach: advanced: Bij deze instelling geeft de computer
wanneer nodig waarschuwingen en assistentie, bijvoorbeeld als
u op het punt staat een blunder te begaan of als er een stuk in
gevaar is.
Als de Trainingsstand is geactiveerd, hoort u van tijd tot tijd een
geluidssignaal als u met Wit speelt, ter herinnering aan het feit dat
het uw beurt is.
4.9 LCD-contrast
Opties: contrast: 1 / 2 / 3 / 4 / 5
Met deze optie kunt u het contrast van het LCD-scherm wijzigen,
waarbij 1 het lichtst is en 5 het donkerst. Als u de standaardinstelling
3 te licht of donker vindt, kunt u deze wijzigen door herhaaldelijk op
ENTER te drukken totdat de gewenste instelling verschijnt.
4.10 LCD-snelheid
Opties: LCD speed: 1 / 2 / 3 / 4
U kunt de scrollsnelheid van het LCD-scherm wijzigen door deze
instelling te wijzigen; 1 is het langzaamst en 4 het snelst. Als u de
183
NEDERLANDS
4.8 Geluid aan/uit
Opties: sound: on / off
Als u een van deze geluidsinstellingen selecteert, geeft de computer u de keus uit spelen met of zonder geluidseffecten.
standaardinstelling 2 te langzaam of snel vindt, kunt u deze wijzigen
door herhaaldelijk op ENTER te drukken totdat de gewenste instelling
verschijnt.
4.11 Automove-stand
Opties: automove: on / off
Normaal gesproken laat de computer een stuk kort op de velden
van en naar knipperen voordat de zet op het bord wordt uitgevoerd.
Als u de instelling wijzigt naar automove: off, geeft de computer net als anders aan welke zet gedaan moet worden, maar is het
aan u om dat op het bord uit te voeren. Nadat de computer een zet
heeft aangekondigd, gaat het betreffende stuk knipperen op het veld
van. Als u op het knipperende stuk drukt, wordt het naar het veld
naar verplaatst. Druk op het veld naar om de zet te voltooien.
5. NIVEAUSTAND: KEUS UIT 100 NIVEAUS!
Uw schaakcomputer heeft 100 unieke spelniveaus waaruit u kunt
kiezen! De niveaus zijn onderverdeeld in twee basisgroepen:
• PRETNIVEAUS (1-60): Deze niveaus geven beginners en
gemiddelde spelers een kans om hun schaakvaardigheden te
vergroten. Op veel pretniveaus maakt de computer met opzet
fouten, zodat u daarvan kunt leren!
• WEDSTRIJDNIVEAUS (61-100): Deze niveaus zijn bedoeld voor
gevorderde en meer geavanceerde spelers. Bevat niveaus voor
een terloops partijtje schaak, toernooien, probleemoplossing,
snelschaken en speciale experimentele niveaus. Als u de
niveaus selecteert, moet u onthouden dat de computer beter
wordt naarmate er langer over de zetten kan worden nagedacht,
net zoals bij een mens.
Het spelniveau instellen
Druk op MENU om het Hoofdmenu te openen en druk op ¯ totdat
in het beeldscherm ¿LEVEL verschijnt. Druk op ENTER om de
Niveaustand te openen en u ziet het momenteel geselecteerde
niveau, bijvoorbeeld <00:05/move> (het standaardniveau bij het
eerste opstarten). Om van niveau te wijzigen, dient u op ˘ of ¯ te
drukken om één niveau naar boven/beneden te gaan, of met het stilet
op > of < te drukken om tien niveaus naar boven/beneden te gaan.
Onthoud dat de niveaus in stappen van één naar boven/beneden
zullen blijven gaan zolang u de toets ˘ of ¯ ingedrukt houdt. Als het
184
PRETNIVEAUS
5.1 Pretniveaus
Niveau
Beschrijving
Beeldscherm
1 ............ Pretniveau 1 ................................. <Fun Level 1>
2 ............ Pretniveau 2 ................................. <Fun Level 2>
3 ............ Pretniveau 3 ................................. <Fun Level 3>
…tot aan…
58 ........... Pretniveau 58 ............................... <Fun Level 58>
59 ........... Pretniveau 59 ............................... <Fun Level 59>
60 ........... Pretniveau 60 ............................... <Fun Level 60>
Er zitten handicaps in deze niveaus ingebouwd, vergelijkbaar met
de fouten die door beginners worden gemaakt. U zult zien dat de
computer met opzet de waarde van schaakstukken negeert en
voorbijgaat aan belangrijke concepten zoals pionopstelling,
centralisering, mobiliteit en veiligheid van de Koning.
Schaakmatsituaties worden over het hoofd gezien, de Dame wordt te
snel ontwikkeld en er wordt impulsief geslagen en ‘schaak’ gezet.
Schaakboeken geven vaak standaardadvies, maar toch komt het voor
dat een tegenstander zich niet aan die regels houdt en er nog mee
wegkomt ook. De pretniveaus zijn een manier om te oefenen met de
manier waarop dergelijke fouten worden afgestraft, waardoor beginners hun spel kunnen verbeteren voor menselijke tegenstanders! Op
een aantal van de lagere pretniveaus, laat de computer stukken niet
alleen onbeschermd staan, maar probeert de machine ook
daadwerkelijk om stukken te verliezen. Naarmate de niveaus
185
NEDERLANDS
gewenste niveau wordt weergegeven, dient u op ENTER te drukken
om dat niveau te selecteren. Het scherm bevestigt het gekozen
niveau en keert terug naar het Hoofdmenu. Druk op MENU om naar
het spel terug te keren.
Als u de Niveaustand opent om het niveau te controleren, maar het
niveau niet wilt wijzigen, drukt u op CLEAR (OPHEFFEN) om terug te
keren naar het Hoofdmenu. Als u het Hoofdmenu eenmaal hebt
afgesloten met de toets MENU, keert u terug naar het spel zonder de
niveau- of klokinstellingen te wijzigen.
Onthoud met betrekking tot de niveauselectie ook het volgende:
• Het niveau kan worden gewijzigd als u aan zet bent.
• Als het niveau wordt gewijzigd, wordt de schaakklok opnieuw
ingesteld.
• Als u het niveau wijzigt terwijl de computer nadenkt, stopt de
computer met nadenken en wordt de klok opnieuw ingesteld.
WIJZIGING VAN HET NIVEAU: HEEL EENVOUDIG!
1. Druk op MENU om het Hoofdmenu te openen.
In het beeldscherm verschijnt ¿OPTION.
2. Druk eenmaal op ¯ en in het beeldscherm
verschijnt ¿LEVEL.
>`
<`
3. Druk op ENTER om de Niveaustand te openen
en het huidige niveau wordt weergegeven. Zie
indien nodig Hoofdstuk 5 om te controleren wat
huidige niveau inhoudt.
4. Laten we snelschaakniveau 81 eens opzoeken.
Druk op ˘ of ¯ om één niveau naar boven/
beneden te gaan of druk op > of < om tien niveaus
naar boven/beneden te gaan. Kijk of op het
beeldscherm < 5 min/game > verschijnt.
5. Als < 5 min/game > verschijnt, drukt u op
ENTER. Druk vervolgens op MENU om de
Menustand af te sluiten; u kunt uw nieuwe niveau
nu uitproberen!
Zie voor meer gegevens Hoofdstuk 5.
moeilijker worden, geeft de computer minder makkelijk stukken weg.
De waarde van de stukken wordt steeds meer in acht genomen en
uiteindelijk worden er slechts zelden stukken weggegeven. In de
hoogste pretniveaus geeft de computer helemaal geen stukken meer
weg, maar wordt er meer gespeeld als een beginner die de
basisregels van het spel heeft geleerd. Er worden wel nog steeds
fouten gemaakt in de zin van dat de dreiging van een schaak- of
schaakmatsituatie over het hoofd wordt gezien. Probeer alle
pretniveaus en probeer te leren van de fouten van de computer!
WEDSTRIJDNIVEAUS
5.2 Gelegenheidsspelniveaus
Niveau
Gemiddelde tijd per zet
Beeldscherm
61 ................ 1 seconde per zet ........................ <00:01/move>
62 ................ 2 seconden per zet ...................... <00:02/move>
186
5.3 Toernooiniveaus
Niveau
Aantal zetten/Verstreken tijd
Beeldscherm
71 ............ 40 zetten in 1 uur 20 min. .............. < 40 in 1:20 >
72 ............ 40 zetten in 1 uur 30 min. .............. < 40 in 1:30 >
73 ............ 35 zetten in 1 uur 45 min. .............. < 35 in 1:45 >
74 ............ 40 zetten in 1 uur 45 min. .............. < 40 in 1:45 >
75 ............ 35 zetten in 1 uur 30 min. .............. < 35 in 1:30 >
76 ............ 40 zetten in 2 uur ........................... < 40 in 2:00 >
77 ............ 45 zetten in 2 uur 30 min. .............. < 45 in 2:30 >
78 ............ 50 zetten in 2 uur ........................... < 50 in 2:00 >
79 ............ 40 zetten in 2 uur 30 min. .............. < 40 in 2:30 >
80 ............ 40 zetten in 3 uur ........................... < 40 in 3:00 >
In het Toernooiniveau dient u binnen een bepaalde tijd een aantal
zetten te doen. Als een speler de toegekende tijd voor een bepaald
aantal zetten overschrijdt, geeft het beeldscherm dat aan en is de
partij voorbij.
Zoals uitgelegd in Hoofdstuk 2.5, maakt deze computer gebruik
van een zelfwaarderingssysteem als u toernooien speelt! Nadat een
toernooi is beëindigd en u op NEW GAME (NIEUWE PARTIJ) drukt
om de computer opnieuw in te stellen, verschijnt kort uw score
voordat er naar een nieuwe partij wordt overgegaan. Als u de score
mist, dient u vijfmaal op HINT/INFO te drukken om deze op elk
gewenst moment nogmaals te bekijken. Druk op CLEAR
(OPHEFFEN) om de score van het beeldscherm te verwijderen.
Als u de tijdens een toernooi aan een nieuwe partij wilt beginnen
voordat de huidige partij is beëindigd, geeft de computer u de
volgende mogelijkheden om de uitkomst van de partij te bepalen:
187
NEDERLANDS
63 ................ 5 seconden per zet ...................... <00:05/move>
64 .............. 10 seconden per zet ...................... <00:10/move>
65 .............. 15 seconden per zet ...................... <00:15/move>
66 .............. 30 seconden per zet ...................... <00:30/move>
67 .............. 45 seconden per zet ...................... <00:45/move>
68 ................ 1 minuut per zet ........................... <01:00/move>
69 ................ 2 minuten per zet ......................... <02:00/move>
70 ................ 3 minuten per zet ......................... <03:00/move>
Als u een van de bovenstaande niveaus kiest, selecteert u een
gemiddelde responstijd voor de computer. Onthoud dat dit de
gemiddelde responstijden zijn over een groot aantal zetten. Aan het
begin en eind van de partij speelt de computer doorgaans sneller,
maar halverwege de partij kan het wat langer duren.
• Beeldscherm = Rate as draw?.
Als u op ENTER, drukt, wordt de score weergegeven.
Als u op ˘ drukt:
• Beeldscherm = Rate as win?.
Als u op ENTER, drukt, wordt de score weergegeven.
Als u op ˘ drukt:
• Beeldscherm = Machine wins?.
Als u op ENTER, drukt, wordt de score weergegeven.
Als u op ˘ drukt:
Het beeldscherm keert weer terug naar Rate as draw?.
Om een score te verkrijgen dient u bij een van de bovenstaande
vragen op ENTER te drukken! Als u de partij om de een of andere
waarde geen score wilt toekennen, drukt u op CLEAR (OPHEFFEN).
De computer bevestigt dit door Game not rated weer te geven.
5.4 Snelschaakniveaus
Niveau
Totale tijd per partij
Beeldscherm
81 .............. 5 minuten per partij ................... < 5 min/game>
82 .............. 7 minuten per partij ................... < 7 min/game>
83 .............. 10 minuten per partij ................... <10 min/game>
84 .............. 15 minuten per partij ................... <15 min/game>
85 .............. 20 minuten per partij ................... <20 min/game>
86 .............. 30 minuten per partij ................... <30 min/game>
87 .............. 45 minuten per partij ................... <45 min/game>
88 .............. 60 minuten per partij ................... <60 min/game>
89 .............. 90 minuten per partij ................... <90 min/game>
90 ............ 100 minuten per partij ................... <100 min/game>
In de snelschaakniveaus, stelt u de totale tijd voor de hele partij in.
Als de speeltijd wordt overschreden, geeft de computer aan wie er op
basis van tijd heeft verloren, bijvoorbeeld White time out. Voor
deze niveaus kunt u de optie Aftellende klok instellen om de
resterende tijd weer te geven in plaats van de verstreken tijd (zie
Hoofdstuk 4.5).
5.5 Probleemoplossingsniveaus
Niveau
Probleem
91 .................... Mat in 1 zet ............................
92 .................... Mat in 2 zetten .......................
93 .................... Mat in 3 zetten .......................
94 .................... Mat in 4 zetten .......................
95 .................... Mat in 5 zetten .......................
188
<
<
<
<
<
Beeldscherm
Mate in 1
Mate in 2
Mate in 3
Mate in 4
Mate in 5
>
>
>
>
>
96 .................... Mat in 6 zetten ....................... < Mate in 6 >
97 .................... Mat in 7 zetten ....................... < Mate in 7 >
98 .................... Mat in 8 zetten ....................... < Mate in 8 >
Als u een van deze niveaus activeert, wordt er een speciaal
programma gestart dat naar matsituaties zoekt. Als u een stelling
hebt die tot een schaakmatsituatie zou kunnen leiden en graag zou
willen dat de computer ontdekt of dat zo is, dan kunt u een van de
Probleemoplossingsniveaus activeren. Uw computer kan
schaakmatsituaties tot maximaal 8 zetten vooruit oplossen.
Matsituaties in één tot vijf zetten worden doorgaans vrij snel
gevonden; oplossingen die zes tot acht zetten in beslag nemen duren
wat langer. Als er geen matsituatie is of als de computer geen
matsituatie kan vinden, verschijnt er een kort bericht No move
found!. U kunt doorgaan met spelen of overschakelen naar een
ander niveau.
5.7 Oneindig niveau
Niveau
Beschrijving
Beeldscherm
100 ................ Oneindig (geen tijdslimiet) ......... < Infinite >
In het niveau Oneindig zoekt de computer oneindig naar een
onvermijdelijke matsituatie, net zolang tot u het zoeken onderbreekt
door op ENTER te drukken. Als het zoeken wordt gestopt, doet de
computer de zet die tot dan toe het best lijkt. Experimenteer eens met
dit niveau; creëer speciale bordstellingen en laat de computer ze voor
u analyseren! De computer kan uren en zelfs dagen nadenken om de
best mogelijke zet te vinden.
189
NEDERLANDS
5.6 Tactisch niveau
Niveau
Beschrijving
Beeldscherm
99 ............ Tactische partij (geen tijdslimiet) ... < Tactical >
In het niveau Tactisch gaat de computer op zoek naar de beste
tactische strategie, sneller dan op een normaal spelniveau. De
computer zoekt oneindig naar een manier waarop twee of meer
pionnen kunnen worden geslagen, net zolang tot u het zoeken
onderbreekt door op ENTER te drukken. Het niveau Tactisch is zeer
geschikt om mee te experimenteren omdat de computer zich volledig
richt op speciale tactische stellingen!
6. TERUGNEEMSTAND: NEEM ZETTEN TERUG
Als u tegen de computer schaakt, zijn gemaakte zetten niet
onomkeerbaar; u kunt op elk willekeurig moment van gedachten
veranderen of een andere zet spelen. Als u aan zet bent, drukt u
gewoon op MENU om het Hoofdmenu te openen en drukt u
vervolgens herhaaldelijk op ¯ totdat er ¿TAKEBACK in het scherm
verschijnt. Druk op ENTER om de Terugneemstand te openen en u
ziet de laatste zet die was uitgevoerd. Om de zet ongedaan te maken,
drukt u op ¯ waarna de zet op het bord wordt teruggedraaid. Het
beeldscherm toont vervolgens de volgende zet die teruggenomen kan
worden. U kunt net zo lang op ¯ drukken om zetten terug te nemen
tot u weer aan het begin van het spel bent aanbeland. Als u weer bij
het begin bent aangekomen, verschijnt er in het beeld End
takebacks en keert u automatisch terug naar het Hoofdmenu. Zo
lang u niet helemaal teruggaat naar het begin van het spel, kunt u
altijd op ˘ drukken om weer vooruit te gaan. Om het spel op een
bepaald punt te hervatten drukt u op CLEAR (OPHEFFEN) en
vervolgens op MENU.
Een snellere manier om een zet terug te nemen, is door op het
veld naar te drukken van de laatste zet die was uitgevoerd. In het
beeld verschijnt kort TAKEBACK, waarna de laatste zet wordt
getoond. Druk op ¯ om de zet terug te nemen. Indien u herhaald op
¯ drukt, kunnen er meer zetten worden teruggenomen. Druk op
CLEAR (OPHEFFEN) om de partij op elk gewenst moment te
hervatten.
7. INFOSTAND: ZIE DE COMPUTER DENKEN!
Stelt u zich eens voor: U schaakt tegen een vriend en hij is aan
zet. Zou u niet dolgraag willen weten welke zet hij overweegt en wat
er in hem omgaat m.b.t. de huidige bordstelling. Natuurlijk kunt u dat
niet vragen want dat hoort niet! Maar als u tegen de computer speelt
kan dat wel; u kunt alles vragen wat u wilt en u krijgt nog gewoon
antwoord ook! U kunt een enorme hoeveelheid informatie over het
denkproces van de computer opvragen waarmee u een hoop over het
spel kunt leren!
U kunt de spelinformatie op elk willekeurig moment via de
Infostand opvragen. Zoals onderstaand aangegeven, kunt u deze
informatie ook handmatig opvragen door op HINT/INFO te drukken;
als u de Infostand kiest, wordt de informatie elke keer dat de computer over een zet nadenkt automatisch weergegeven.
190
Automatische informatieschermen
Als u een van de volgende Infostand-opties activeert, geeft de
computer de betreffende informatie elke keer dat er wordt nagedacht
over en zet weer; u kunt de computer als het ware hardop zien
denken.
Druk op MENU om het Hoofdmenu te openen en druk op ¯ totdat
in het beeldscherm ¿INFO verschijnt. Druk op ENTER om de
Infostand te openen en u ziet de eerste van de 5 opties (zie onder).
Druk herhaaldelijk op ¯ (of ˘) om door alle opties te lopen:
• Zetten weergeven: Laat de verwachte speelwijze zien, tot
maximaal vier zetten vooruit. Zie Hoofdstuk 7.1.
Opties: 0 / 1 / 2 / 3 / 4 moves
• Nodes weergeven: Geeft het aantal nodes (stellingen) waarnaar
per seconde wordt gezocht weer. Zie Hoofdstuk 7.2.
Opties: nodes: off / on
• Tijd per zet weergeven: Geeft de tijd weer die tot op dat moment is gebruikt voor de huidige zet. Zie Hoofdstuk 7.3.
Opties: time/move: off / on
• Voortgang weergeven: Geeft het zoekniveau van de computer
weer en de zet die momenteel wordt overwogen. Zie Hoofdstuk
7.4.
Opties: progress: off / on
• Evaluatie weergeven: Geeft de score van de huidige stelling
weer. Zie Hoofdstuk 7.2.
Opties: evaluation: off / on
Om een optie aan/uit te zetten of om eventuele optie-instellingen te
selecteren, dient u op ENTER te drukken als de optie wordt
weergegeven. Door herhaaldelijk op ENTER te drukken, loopt u door
alle keuzemogelijkheden voor de weergegeven optie. Als de
gewenste keuze is geselecteerd, kunt u op ¯ of ˘ drukken om naar
een andere optie te gaan of op CLEAR (OPHEFFEN) drukken om
naar het Hoofdmenu terug te keren; als u vervolgens op MENU drukt,
keert u terug naar de normale speelstand. Voor meer gegevens over
deze opties verwijzen wij u naar de betreffende hoofdstukken.
U kunt alle bovenstaande Infostand-opties tegelijk activeren. Als u
meer opties activeert dan in het beeldscherm passen, scrollt het
beeldscherm continu terwijl de computer over de volgende zet
nadenkt. Als het beeldscherm te snel scrollt, dient u de LCD-snelheid
191
NEDERLANDS
Belangrijk: De geselecteerde Infostand-opties worden alleen
automatisch weergegeven als de computer nadenkt!
EEN OVERZICHT VAN DE INFOSTAND
INFORMATIE OVER DE HOOFDVARIANT:
•
•
•
•
Verwachte speelwijze: Zet 1
Verwachte speelwijze: Zet 2
Verwachte speelwijze: Zet 3
Verwachte speelwijze: Zet 4
ZOEKINFORMATIE:
• Waardering van de stelling (score)
• Zoekniveau;
zet die momenteel wordt overwogen (als
de computer nadenkt)
• Verstreken tijd voor huidige zet;
aantal nodes waarnaar per seconde wordt
gezocht (als de computer nadenkt)
SCHAAKKLOKINFORMATIE:
• Verstreken tijd voor beide partijen
• Resterende tijd voor beide partijen*
*Alleen bij snelschaak-/ toernooiniveaus
SPELZETINFORMATIE:
• Huidig aantal spelzetten + laatst
uitgevoerde zet
• Heen en terug door de zetten van de
huidige partij
SCORINGSINFORMATIE:
• ELO-score (nadat er een toernooi is
gespeeld)
192
te wijzigen (zie Hoofdstuk 4.10). U kunt ook op GO/STOP (START/
STOP) drukken om het beeldscherm te pauzeren; druk op CLEAR
(OPHEFFEN) om het scrollen weer te hervatten. Als de gevraagde
informatie niet beschikbaar is, verschijnt er --x--.
Handmatige informatieschermen
Druk op elk gewenst moment op HINT/INFO en de eerste
verwachte zet van de computer verschijnt (zie Hoofdstuk 7.1). De
spelinformatie wordt in verscheidene groepen ingedeeld en als u
herhaaldelijk op HINT/INFO drukt, loopt u door de verschillende
groepen heen. De toetsen ˘ en ¯ kunnen worden gebruikt om door
de opties binnen elke groep te lopen. Onderstaand treft u een
gedetailleerde beschrijving van alle groepen aan. Druk op CLEAR
(OPHEFFEN) om terug te keren naar de normale klokweergave.
7.2 Zoekinformatie
Druk nadat u op HINT/INFO hebt gedrukt om de Infostand te
openen nogmaals op HINT/INFO om informatie over het zoekproces
van de computer op te vragen. Het beeldscherm geeft de huidige
193
NEDERLANDS
7.1 Hoofdvariant
Als u voor de eerste keer op HINT/INFO drukt, ziet u de eerste zet
van de hoofdvariant (de verwachte speelwijze van de computer),
zoals weergegeven in Ply1: b1-c3. Een “ply” is een individuele
zet ofwel een zet voor een van beide kleuren en het zoekniveau van
de computer wordt aangeduid in het aantal “ply” dat vooruit wordt
gedacht. In een tweezets “ply” kijkt de computer dus twee individuele
zetten vooruit (een voor Zwart en een voor Wit). Onthoud dat de
eerste weergegeven “ply” ook als hint kan worden gebruikt, omdat dat
de zet is die de computer van u verwacht.
Als u naar het beeldscherm kijkt terwijl de computer aan het
nadenken is, ziet u de zet die op dat moment wordt overwogen. Als u
naar het beeldscherm kijkt terwijl u aan zet bent, ziet u de zet die de
computer van u verwacht. In beide gevallen, kunt u herhaaldelijk op ˘
drukken om door de overige zetten in de verwachte speelwijze te
lopen, tot maximaal vier individuele zetten vooruit:
• Verwachte speelwijze: Zet 1
• Verwachte speelwijze: Zet 2
• Verwachte speelwijze: Zet 3
• Verwachte speelwijze: Zet 4
UN ESBOZO DEL MODO DE INFORMACIÓN
INFORMACIÓN DE LA VARIANTE PRINCIPAL:
•
•
•
•
Línea de juego esperada: Jugada 1
Línea de juego esperada: Jugada 2
Línea de juego esperada: Jugada 3
Línea de juego esperada: Jugada 4
INFORMACIÓN DE BÚSQUEDA:
• Evaluación de la posición (puntuación)
• Profundidad de la búsqueda; y jugada
que está estudiando en ese momento (si
el ordenador está pensando)
• Tiempo transcurrido para la jugada actual;
y número de nodos buscados por
segundo (si el ordenador está pensando)
INFORMACIÓN DEL RELOJ DE AJEDREZ:
• Tiempo transcurrido para ambos bandos
• Tiempo restante para ambos bandos*
*Niveles de ajedrez veloz/de torneo solamente
INFORMACIÓN DE CONTEO DE JUGADAS:
• Número de jugada actual + última jugada
realizada
• Hacia adelante y hacia atrás por las
jugadas de la partida actual
INFORMACIÓN DE CLASIFICACIÓN:
• Clasificación de Elo (después de jugar
una partida de Nivel de torneo)
194
7.3 Schaakklokinformatie
Druk nadat u op HINT/INFO hebt gedrukt om de Infostand te
openen nog tweemaal op HINT/INFO om de schaakklokinformatie op
te vragen. Het beeldscherm geeft de totaal verstreken tijd voor beide
kleuren weer. Onthoud dat het schaakkloksymbool in het midden
aangeeft welke kleur aan zet is en welk type klok er wordt gebruikt.
Als u op ˘ drukt, loopt u door de twee onderstaande beeldschermen:
• Totaal verstreken tijd voor Wit/Zwart (Oplopende klok)
Wit aan zet [, Zwart aan zet ].
• Totaal resterende tijd voor Wit/Zwart (Aftellende klok) (Alleen
voor probleemoplossingsniveaus/snelschaakniveaus)
Wit aan zet {, Zwart aan zet }.
Als de Aftellende klok momenteel niet is geactiveerd, geeft het
tweede beeldscherm een blanco klok weer (--:--{--:--).
De klok kan om verschillende redenen stoppen tijdens een partij,
bijvoorbeeld als u een zet terugneemt, als u de niveau-instellingen
controleert, als u de opties bekijkt, wanneer u een stelling creëert of
als u de computer uitzet. De tijden worden echter in het geheugen
opgeslagen en de klok gaat weer lopen als het spel wordt hervat. Als
u de spel niveaus wijzigt of de computer opnieuw instelt voor een
nieuwe partij, wordt de klok altijd op nul gezet.
195
NEDERLANDS
score weer; als u herhaaldelijk op ˘ drukt, loopt u door de rest van de
informatie:
• De huidige score: Een numerieke evaluatie van de huidige
stelling, gebaseerd op een pionwaarde van 1.0 punt; een
positieve waarde geeft aan dat Wit voor staat. Voorbeeld: Als Wit
twee pionnen voor staat, verschijnt er op het beeldscherm
Score: +2.0. Onthoud dat deze score niet geldt in de
Probleemoplossingsniveaus.
• Tweedelig beeldscherm: (a) Het huidige zoekniveau, ofwel het
aantal individuele zetten dat de computer vooruit denkt.
Bijvoorbeeld: Als de computer 439 individuele zetten vooruit
denkt, verschijnt er d:4 39, waarbij de d: voor ‘depth’ (niveau)
staat. (b) De zet die wordt overwogen (als de computer aan het
nadenken is).
• Tweedelig beeldscherm: (a) De tijd die tot op dat moment is
gebruikt voor de huidige zet. (b) Het aantal nodes of stellingen
waarnaar per seconde wordt gezocht (als de computer aan het
nadenken is).
7.4 Aantal zetten/spelzetten
Druk nadat u op HINT/INFO hebt gedrukt om de Infostand te
openen nog driemaal op HINT/INFO om het huidig aantal spelzetten
en de laatst gespeelde zet op te vragen. U kunt vervolgens op ¯
drukken om indien gewenst door de zetten terug te lopen of op ˘
drukken om weer vooruit te gaan. Dit geeft u de mogelijkheid om door
de partij terug te lopen en de zetten te noteren die onverwacht
succesvol waren!
• Huidige aantal spelzetten en laatst uitgevoerde zet
• Zetten in de huidige partij.
7.5 Waarderingsweergave
Druk nadat u op HINT/INFO hebt gedrukt om de Infostand te
openen nog viermaal op HINT/INFO om uw huidige score op te
vragen. Onthoud dat de scores zijn gebaseerd op toernooipartijen
(zie Hoofdstuk 5.3).
8. SETUP-STAND: HET BORD WIJZIGEN!
In de Setup-stand kunt u speciale bordstellingen creëren van
waaruit u verder wilt spelen, of probleemsituaties instellen die u door
de computer wilt laten oplossen!
Waarschuwing: Alle zetten in uw huidige partij worden gewist
als u de bordstellingen tijdens een partij wijzigt.
U kunt een bordstelling wijzigen of creëren als u aan zet bent. Druk
op MENU en druk op ¯ totdat in het beeldscherm ¿SETUP
verschijnt. Druk op ENTER om de Setup-stand te openen en u ziet
een scherm waarin de kleur en de schaaksymbolen staan
weergegeven („ıKQRBNP).
• Om een stuk van het bord te verwijderen, hoeft u er alleen
maar op te klikken waarna het van het bord verdwijnt.
• Om een stuk naar een ander veld te verplaatsen, dient u er
eerst op te drukken, waarna het verdwijnt. Vervolgens drukt u op
het veld waar u het wilt laten verschijnen en het stuk komt op die
plek weer tevoorschijn.
• Om een stuk aan het bord toe te voegen, dient u eerst op de
weergegeven kleur te drukken, vervolgens op het stuk dat u wilt
toevoegen en tenslotte op het veld waar u het stuk wilt laten
verschijnen. Om nog een stuk van hetzelfde soort en dezelfde
kleur te laten verschijnen, kunt u gewoon op een ander veld
196
197
NEDERLANDS
drukken. Om een ander stuk toe te voegen, dient u op een nieuw
stuk en/of nieuwe kleur te drukken en de bovenstaande stappen
te volgen.
• Om alle stukken van het bord te wissen, drukt u in de Setupstand op CLEAR (OPHEFFEN). Het beeldscherm zal om
bevestiging vragen met de tekst Clear board?. Druk op
ENTER en in het beeldscherm verschijnt Cleared. U kunt
vervolgens een willekeurig aantal stukken toevoegen; volg de
bovenstaande beschrijving. Als u het bord toch niet wilt wissen,
drukt u gewoon op CLEAR (OPHEFFEN) om het wissen te
annuleren; in het beeldscherm verschijnt Not cleared.
Onthoud dat deze functie handig kan zijn voor het creëren van
stellingen met slechts een paar stukken; het is in dat geval veel
handiger om met een leeg bord te beginnen.
• Als u de stelling op de bovenstaande manier hebt gewijzigd,
is de kleur aan zet van het laatste stuk dat u hebt toegevoegd.
Wijzig de kleur door op ı te drukken voor Zwart en op „ voor
Wit.
• Druk op ENTER om de Setup-stand af te sluiten. Als de
computer om bevestiging vraagt met New position?, drukt
u op ENTER om naar het spel terug te keren in de nieuwe
bordopstelling. E.e.a. wordt bevestigd door het bericht New
position!. Als u op CLEAR (OPHEFFEN) drukt, verschijnt
er in het beeldscherm Resume, en blijft u in de Setup-stand.
Onthoud dat met de bovenstaande procedure elke willekeurige
bordstelling kan worden gecreëerd. U kunt echter geen ongeldige
stelling creëren, door bijvoorbeeld teveel stukken op te stellen of de
Koning in een schaakpositie neer te zetten. In dergelijke gevallen
verschijnt het bericht Illegal nadat u op ENTER hebt gedrukt om
de Setup-stand te verlaten en nogmaals op ENTER drukt om de
stelling te bevestigen. U kunt de Setup-stand niet afsluiten voordat u
een geldige stelling hebt gecreëerd!
Als u de Setup-stand hebt geopend maar geen wijzigingen hebt
uitgevoerd, kunt u afsluiten door op ENTER te drukken. Het scherm
bevestigt dit middels het bericht unchanged, waarna u terugkeert
naar het Hoofdmenu. Druk nogmaals op MENU om naar het spel
terug te keren.
9. ANALYSESTAND: TEST UZELF!
Op zoek naar een geweldige leerfunctie? Dan moet u absoluut de
Analysestand eens proberen! Er zitten acht beroemde partijen in het
geheugen van uw computer met elk acht kritieke punten, dus een
totaal van 64 analysestellingen. Het is aan u om de partijen na te
spelen en de juiste zetten te doen die werden gespeeld door de
winnende kleur van de oorspronkelijke partij. Met deze functie kunt u
uw schaakkennis vergroten en er tegelijkertijd achterkomen wat de
beste zet is in een bepaalde stelling. En om deze functie nog
interessanter te maken, houdt de computer tijdens het spelen ook
nog eens uw score bij.
Als u overigens hulp nodig hebt bij een van de Analysestellingen,
kunt u de appendix raadplegen voor een volledig overzicht van de
Analysepartijen. Onthoud dat deze partijen zijn bedoeld als
referentiemiddel en dat u in feite vals speelt als u naar de oplossing
kijkt voordat u zelf hebt geprobeerd om de analysestellingen op te
lossen.
Het selecteren van analyseposities
Tip: U kunt ook Analysestellingen selecteren door op bepaalde
velden te drukken; zie verderop in dit hoofdstuk!
Druk op MENU om het Hoofdmenu te openen en druk
herhaaldelijk op ¯ totdat in het beeldscherm ¿STUDY verschijnt.
Druk op ENTER om de Analysestand te openen en u ziet de eerste
Analysestelling, < Study1-1 >. Om de Analysestelling te wijzigen,
dient u op ˘ of ¯ te drukken om één analyse naar boven/beneden te
gaan, of met het stilet op > of < te drukken om acht analyses naar
boven/beneden te gaan. Als de gewenste Analysepositie verschijnt,
drukt u op ENTER, waarna in het beeldscherm Start Study?
verschijnt. Als u nu op ENTER drukt begint de Analysepartij (zie
onderstaande beschrijving); als u op CLEAR (OPHEFFEN) drukt,
keert u terug naar het scherm Analysestand.
Nadat u op ENTER heeft gedrukt, begint de computer automatisch
de zetten van de gekozen Analysepartij uit te voeren. Als de eerste
Analysestelling is bereikt, verschijnt op het beeldscherm Your
Move en gaat de klok lopen. U moet raden welke zet vanuit die
stelling werd gespeeld in de oorspronkelijke partij! Dit zijn de regels:
• Er is slechts één “juiste” zet per Analysestelling.
• Als de Analysestelling is bereikt, geeft het weergegeven
198
Het bord gebruiken voor selectie
Elke Analysestelling kan ook worden geactiveerd door op het
corresponderende veld op het bord te drukken. Zoals aangegeven in
199
NEDERLANDS
kleursymbool aan welke kleur aan zet is.
• Als u de juiste zet doet, verschijnt in het scherm Well Done.
De computer voert vervolgens de volgende zetten in de partij uit
en stopt weer bij de volgende Analysestelling die moet worden
opgelost.
• Als u een foutieve zet doet, verschijnt er in het scherm Wrong
Move gevolgd door Quit Study?.
• Om in de Analysestand te blijven en een andere zet te
proberen, drukt u op CLEAR (OPHEFFEN). Er worden
punten afgetrokken voor een verkeerde zet en uw stuk zal op
de oorspronkelijke positie worden teruggeplaatst, waarna u
een andere zet kunt doen.
• Om de Analysestand te verlaten en door te gaan met een
normale partij na de door u uitgevoerde (foutieve) zet, drukt
u op ENTER. De computer begint over de volgende zet na te
deken.
• Score: Elke keer dat u een Analysestelling goed oplost, worden
er punten bij uw score opgeteld. U krijgt een 100%-score als u
de Analysestelling met de eerste zet goed oplost Voor elke
foutieve zet die u maakt voordat u de juiste oplossing vindt,
wordt uw score gehalveerd. Als u op nul punten terecht komt, zal
de score niet verder zakken, ongeacht hoe vaak u het daarna
nog probeert.
• Om uw huidige score te controleren, dient u tweemaal op
HINT/INFO te drukken. Onthoud dat u na één keer drukken de
laatste zet van de tegenstander krijgt te zien. Als u op CLEAR
(OPHEFFEN) drukt, verdwijnt de weergegeven score.
Als u een Analysestelling oplost die is geëindigd in schaakmat,
verschijnt na een aantal felicitaties het bericht Checkmate!. U
kunt nu (a) een nieuwe partij starten, (b) de Infostand gebruiken om
uw zetten op te slaan door ze in omgekeerde volgorde nogmaals te
doorlopen (zie Hoofdstuk 7.4), of (c) een aantal zetten teruggaan en
de partij op een andere wijze proberen af te maken. Als u de laatste
Analysestelling in een partij hebt opgelost, maar het spel nog niet is
afgelopen, verschijnt er in het beeldscherm End Game, waarna de
computer automatisch gaat nadenken over de volgende zet en u de
partij gewoon kunt uitspelen.
HET BORD GEBRUIKEN
OM ANALYSESTELLINGEN TE SELECTEREN!
Voor eenvoudige selectie van een analysestelling, opent u de Analysestand
en drukt u op een van de corresponderende velden, zoals hieronder aangegeven.
8
1-8
2-8
3-8
4-8
5-8
6-8
7-8
8-8
7
1-7
2-7
3-7
4-7
5-7
6-7
7-7
8-7
6
1-6
2-6
3-6
4-6
5-6
6-6
7-6
8-6
5
1-5
2-5
3-5
4-5
5-5
6-5
7-5
8-5
4
1-4
2-4
3-4
4-4
5-4
6-4
7-4
8-4
3
1-3
2-3
3-3
4-3
5-3
6-3
7-3
8-3
2
1-2
2-2
3-2
4-2
5-2
6-2
7-2
8-2
1
1-1
2-1
3-1
4-1
5-1
6-1
7-1
8-1
a
b
c
d
e
f
g
h
de grafiek, vertegenwoordigt elk van de 64 velden een
Analysepositie. Open de Analysestand door op MENU en ¯ (of ˘) te
drukken tot er ¿STUDY verschijnt; druk vervolgens op ENTER.
Raadpleeg vervolgens de grafiek en druk op een van de velden om
de betreffende Analysestelling te selecteren. Druk op ENTER en in
het beeldscherm verschijnt Start Study?. Druk nogmaals op
ENTER en de Analysepartij begint zoals eerder beschreven.
200
201
NEDERLANDS
10. HULP NODIG? ZIE HIER!
Onderstaand treft u een lijst met mogelijke problemen aan
alsmede een aantal mogelijke oplossingen.
a. De computer reageert niet, doet raar of “bevriest” tijdens
een partij.
• Controleer de batterijen; indien nodig vervangen met nieuwe
alkalinebatterijen.
• Statische ontlading kan tot ‘vastlopen’ hebben geleid. Steek
met een scherp voorwerp in de ACL-opening om het apparaat
opnieuw in te stellen (zie Hoofdstuk 11.1).
b. Het beeldscherm is donker en/of moeilijk leesbaar.
• Nieuwe alkalinebatterijen inbrengen.
• Selecteer een andere LCD-contrastoptie (zie Hoofdstuk 4.9).
c. Ik heb een aantal automatische Infoschermen geactiveerd
om de computer te kunnen zien denken, maar het
beeldscherm scrollt te snel.
• Selecteer een andere LCD-snelheidsoptie (zie Hoofdstuk 4.10).
• Druk op GO/STOP (START/STOP) om het scrollen te
pauzeren; druk indien nodig op CLEAR (OPHEFFEN) om het
scrollen te hervatten.
d. De computer voert geen zet uit.
• Het apparaat reageert alleen automatisch als de instelling
Twee spelers is ingesteld op player: P-C voor Speler vs.
Computer (zie Hoofdstuk 4.1).
• U bent misschien op een niveau waar de computer lang
nadenkt. U kunt indien gewenst een zet forceren door op
ENTER te drukken.
e. De computer accepteert mijn zet niet.
• U probeert een ongeldige zet uit te voeren. Controleer de
spelregels.
• Staat uw Koning schaak? Zal uw Koning schaak komen te
staan? Voert u de rokade wel goed uit? Controleer uw stelling.
• Is het wel uw beurt? Als het kleursymbool knippert, is de
computer aan het nadenken. Druk indien gewenst op ENTER
om het nadenken te onderbreken.
f. Mijn zetten worden aan de verkeerde kant van het bord
uitgevoerd. Waarom is dat?
• De optie white: top is geactiveerd. Ga naar de Optiestand
en wijzig dit naar black: top (zie Hoofdstuk 4.4).
g. Ik wil een nieuwe partij opstarten, maar de computer zegt
Rate as draw? in plaats van dat er een nieuwe partij
wordt gestart.
• U hebt een toernooipartij onderbroken en u dient aan te geven
hoe u de partij wilt beëindigen. Zie voor meer gegevens
Hoofdstuk 5.3.
h. De computer heeft de volgende zet laten zien, maar het stuk
blijft knipperen en wordt niet op het bord uitgevoerd.
• Als de optie Automove is uitgeschakeld, moet u de stukken van
de computer zelf verplaatsen. Zie Hoofdstuk 4.11 om Automove
weer in te schakelen.
i. De computer zegt No Move Found! en voert geen zet uit.
• U bevindt zich op een Probleemoplossingsniveau en de computer heeft geen matsituatie kunnen vinden. Als u geen
matsituatie probeert op te lossen, dient u naar een gewoon
spelniveau over te schakelen (zie Hoofdstuk 5).
j. Ik probeer het Hoofdmenu af te sluiten door op CLEAR
(OPHEFFEN) te drukken maar ik krijg een geluidssignaal dat
er iets fout is.
• U drukt op de verkeerde toets! De enige manier op het
Hoofdmenu te verlaten is door op de toets MENU te drukken.
k. De computer produceert van tijd tot tijd een geluidssignaal,
zelfs als ik aan zet ben.
• Als de Trainingsstand is geactiveerd, laat de computer tijdens
uw beurt herinneringssignalen horen.
l. De computer geeft geen geluidssignaal als er een zet wordt
uitgevoerd.
• Ga naar de Optiestand en zet het geluid aan (zie Hoofdstuk
4.8).
m.Ik kan de Setup-stand niet afsluiten.
• U hebt een ongeldige stelling ingevoerd (er staat bijvoorbeeld
een Koning schaak of er staan teveel pionnen op het bord
enz.). Voer een geldige stelling in (zie Hoofdstuk 8).
11. TECHNISCHE GEGEVENS
11.1 De ACL-functie
Computers ‘lopen soms vast’ vanwege statische elektriciteit of
elektrische storing. Als dat gebeurt, dient u minimaal een seconde
een speld of ander scherp voorwerp in de ACL-opening aan de
onderkant te steken. Hiermee stelt u de computer opnieuw in.
202
11.2 Verzorging en onderhoud
Uw computer is een elektronisch precisie-instrument en dient niet
te worden onderworpen aan ruw gebruik of worden blootgesteld aan
extreme temperaturen. Gebruik geen chemische
schoonmaakmiddelen omdat de kunststof daardoor beschadigd kan
raken. Zorg ervoor dat u de batterijen verwijdert voordat u het
apparaat schoonmaakt.
Lege batterijen dienen direct te worden vervangen omdat ze
kunnen gaan lekken en de computer kunnen beschadigen. Neem ook
kennis van het onderstaande met betrekking tot het gebruik van
batterijen. Waarschuwing: Gebruik alleen alkaline zinkkoolstof
batterijen. Gebruik geen verschillende batterijen door elkaar; dit geldt
ook voor nieuwe en gebruikte batterijen. Laad niet-oplaadbare
batterijen niet opnieuw op. Gebruik alleen aanbevolen batterijen of
gelijkwaardige batterijen. Zorg ervoor dat de batterijen op de juiste
manier worden ingebracht; let op de polariteit! Lege batterijen dienen
direct uit het apparaat te worden genomen. Veroorzaak geen
kortsluiting aan de batterijaansluiting.
11.3 Technische specificaties
Toetsen:
8
Schaakbord:
9x8 contactmembraan (touch panel)
LCD-beeldscherm: Dot matrix van 11 tekens, 68 x 79 mm
Batterijen:
3 x AAA/AM4/R03
Afmetingen:
131 x 83 x 22 mm
Gewicht:
220 gram
Bewaar deze informatie voor naslagdoeleinden.
NEDERLANDS
Saitek behoudt zich het recht voor om zonder voorafgaande kennisgeving
wijzigingen door te voeren in het belang van vooruitgang.
203
APPENDIX: STUDY MODE GAMES (Section 9)
ANNEXE: PARTIES DU MODE ETUDE (Chapitre 9)
ANHANG: GESPEICHERTE PARTIEN (Abschnitt 9)
APPENDIX: GEANALYSEERDE PARTIJEN (Hoofdstuk 9)
APÉNDICE: JUEGOS DEL MODO DE ESTUDIO (Sección 9)
APPENDICE: GIOCO IN MODO STUDIO (Sezione 9)
#1
#2
1.
2.
3.
e2-e4
g1-f3
d2-d4
e7-e5
d7-d6
c8-g4
4.
d4xe5!
.........
d1xf3
f1-c4
.........
g4xf3
d6xe5
g8-f6
(1-1)
f3-b3!
.........
b1-c3
.........
d8-e7
c7-c6
(1-2)
c1-g5!
.........
.........
b7-b5
(1-3)
.........
c6xb5
b8-d7
a8-d8
(1-4)
13. d1xd7!! .........
.........
d8xd7
14. h1-d1
e7-e6
5.
6.
7.
8.
9.
10. c3xb5!
.........
11. c4xb5+
12. 0-0-0
1.
2.
3.
4.
5.
6.
7.
8.
9.
10.
11.
12.
13.
14.
15.
16.
e2-e4
g1-f3
f1-c4
c2-c3
d2-d4
c3xd4
b1-c3
e4xd5
0-0
c1-g5
c4xd5
c3xd5
g5xe7
f1-e1
d1-e2
a1-c1
e7-e5
b8-c6
f8-c5
g8-f6
e5xd4
c5-b4+
d7-d5
f6xd5
c8-e6
b4-e7
e6xd5
d8xd5
c6xe7
f7-f6
d5-d7
c7-c6
.........
c6xd5
e8-f7
h8-c8
g7-g6
(2-1)
(1-5)
17. d4-d5!
.........
18. f3-d4
19. d4-e6
20. e2-g4
15. b5xd7+! .........
.........
f6xd7
(1-6)
21. e6-g5+! .........
.........
f7-e8
(2-2)
16. b3-b8+! .........
.........
d7xb8
(1-7)
22. e1xe7+! .........
.........
e8-f8
(2-3)
17. d1-d8++
(1-8)
23. e7-f7+!
.........
.........
f8-g8
(2-4)
24. f7-g7+!
.........
(2-5)
204
.........
g8-h8
25. g7xh7+! .........
.........
h8-g8
26. h7-g7+ g8-h8
(2-6)
.........
18. e3-e4
19. e4-e5
20. g1-h1
27. g4-h4+!
.........
28. h4-h7
29. h7-h8+
30. h8-g7+
31. g7-g8+
32. g8-f7+
33. f7-f8+
.........
h8xg7
g7-f8
f8-e7
e7-e8
e8-e7
e7-d8
d7-e8
(2-7)
.........
21. d3-e4
f6-g4!
.........
(3-4)
.........
22. g2-g3
e7-h4
.........
(3-5)
.........
23. g3xh4
c8xc3!!
.........
(3-6)
(2-8)
.........
24. e2xd2
25. d2-g2
d8-d2!!
b7xe4+
.........
(3-7)
34. g5-f7+! .........
.........
d8-d7
35. f8-d6++
c3-h3!
(3-8)
.........
#3
e5-c7
a8-c8
c7-b6+
.........
(3-3)
#4
1.
2.
3.
4.
5.
6.
7.
8.
9.
10.
11.
d2-d4
g1-f3
e2-e3
c2-c4
b1-c3
d4xc5
a2-a3
b2-b4
c1-b2
d1-d2
f1-d3
d7-d5
e7-e6
c7-c5
b8-c6
g8-f6
f8xc5
a7-a6
c5-d6
0-0
d8-e7
.........
.........
d3xc4
c4-d3
d2-e2
0-0
d5xc4
b7-b5
f8-d8
c8-b7
.........
(3-1)
12.
13.
14.
15.
.........
16. f3xe5
17. f2-f4
c6-e5!
d6xe5
.........
(3-2)
1.
2.
3.
205
e2-e4
g1-f3
f1-b5
e7-e5
b8-c6
g8-f6
4.
0-0
.........
5. d2-d4
6. b1-c3
7. f1-e1
8. f3xd4
9. d1xd4
10. c3xb5
.........
d7-d6
c8-d7
f8-e7
e5xd4
c6xd4
d7xb5
0-0
(4-1)
11. d4-c3!
.........
12. b5-d4
.........
c7-c6
f6-d7
(4-2)
13. d4-f5!
.........
.........
e7-f6
(4-3)
14. c3-g3!
.........
.........
d7-e5
(4-4)
15. c1-f4
16. a1-d1
d8-c7
a8-d8
17. d1xd6!
.........
18. f4xe5
19. e1xd1
.........
d8xd6
d6-d1
f6xe5
(4-5)
20. f5-h6+!
.........
.........
g8-h8
(4-6)
21. g3xe5!
.........
.........
c7xe5
(4-7)
22. h6xf7+
.........
(4-8)
.........
.........
d7-b5
(5-5)
21. a2-a4!
.........
.........
b5xa4
(5-6)
22. e2-e4!
.........
.........
a4-b5
(5-7)
.........
(5-8)
#6
e2-e4
g1-f3
d2-d4
d1xd4
f1-b5
b5xc6
b1-c3
0-0
c3-d5
e4xd5
c1-g5
e7-e5
d7-d6
e5xd4
b8-c6
c8-d7
d7xc6
g8-f6
f8-e7
c6xd5
0-0
c7-c6
12. c2-c4!
.........
13. c4xd5
14. f1-e1
15. e1-e2
16. a1-e1
.........
c6xd5
a7-a5
f8-e8
a8-c8
d8-d7
(5-1)
17. g5xf6
.........
.........
e7xf6
(5-2)
18. d4-g4!! .........
.........
d7-b5
(5-3)
19. g4-c4!!
(5-4)
.........
20. c4-c7!!
.........
23. c7xb7
1.
2.
3.
4.
5.
6.
7.
8.
9.
10.
#5
1.
2.
3.
4.
5.
6.
7.
8.
9.
10.
11.
b5-d7
206
d2-d4
c2-c4
g2-g3
f1-g2
c4xd5
b1-c3
e2-e3
g1-e2
0-0
b2-b3
g8-f6
g7-g6
c7-c6
d7-d5
c6xd5
f8-g7
0-0
b8-c6
b7-b6
.........
.........
11. c1-a3
c8-a6!
.........
(6-1)
.........
12. d1-d2
f8-e8!
.........
(6-2)
.........
13. d4xe5
14. f1-d1
e7-e5!
c6xe5
.........
(6-3)
.........
15. d2-c2
e5-d3!
.........
(6-4)
.........
16. g1xf2
17. f2-g1
18. c2-d2
d3xf2!!
f6-g4+
g4xe3
.........
(6-5)
.........
e3xg2!!
(6-6)
19. g1xg2
.........
20. e2xd4
21. g2-f1
.........
.........
20. c2-d1
d5-d4
a6-b7+
.........
(6-7)
d8-d7!!
(6-8)
e1xd1++
#8
1.
2.
3.
4.
5.
6.
7.
8.
9.
10.
11.
12.
13.
#7
d2-d4
c2-c4
b1-c3
g1-f3
c4xd5
e2-e3
f1-d3
0-0
c3xd5
e3-e4
d4xc5
e4-e5
d1-e2
d7-d5
e7-e6
g8-f6
c7-c5
f6xd5
b8-c6
f8-e7
0-0
d8xd5
d5-d8
e7xc5
c5-e7
c6-b4
14. d3-b1
.........
.........
c8-d7
(8-1)
15. a2-a3!
.........
16. e2-e4
17. c1-h6
.........
b4-d5
g7-g6
f8-e8
(8-2)
1.
2.
3.
4.
b2-b3
c1-b2
c2-c4
g1-f3
e7-e5
b8-c6
g8-f6
.........
.........
f3-d4
d4xc6
e5-e4!
f8-c5
.........
(7-1)
5.
6.
.........
e2-e3
d1-c2
f1-e2
d7xc6!
c8-f5
d8-e7
.........
(7-2)
7.
8.
9.
.........
10. f2-f4
0-0-0
.........
(7-3)
.........
11. g2-g3
f6-g4!
.........
(7-4)
18. h2-h4!
.........
.........
d8-b6
(8-3)
.........
12. h2-h3
h7-h5!
.........
(7-5)
19. h4-h5!
.........
.........
f7-f5
(8-4)
.........
13. h3xg4
14. h1-g1
h5-h4!
h4xg3
.........
(7-6)
20. e5xf6 ep! .......
.........
d5xf6
(8-5)
21. e4-e1
.........
22. f3-e5
.........
f6xh5
d7-b5
(8-6)
23. b1xg6!
.........
.........
h5-f6
(8-7)
24. g6xh7+! .........
(8-8)
15.
16.
17.
18.
.........
g1xh1
h1-f1
e1-d1
e2xf1
.........
19. d1-c1
h8-h1!! (7-7)
g3-g2
e7-h4+
g2xf1/Q+
.........
f5xg4+
h4-e1+
(7-8)
207
www.saitek.com
©2003 Saitek Ltd. Made and printed in China
All trademarks are the property of their respective owners.
XXXXXX XXX P/N XXXXXX-XXXXX
0303