1
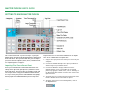
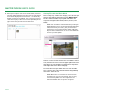
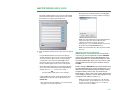
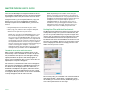
MAXTOR FUSION
™
User’s Guide
MAXTOR FUSION USER’S GUIDE
Contents
Introduction
................................................................1
Maxtor Fusion Features . . . . . . . . . . . . . . . . . . . . . . . . . . . . . . . . . . . . . . . . . . . . . . . . . . . . .
About this Guide . . . . . . . . . . . . . . . . . . . . . . . . . . . . . . . . . . . . . . . . . . . . . . . . . . . . . . . . . . . .
System Requirements . . . . . . . . . . . . . . . . . . . . . . . . . . . . . . . . . . . . . . . . . . . . . . . . . . . . . . .
Handling Precautions . . . . . . . . . . . . . . . . . . . . . . . . . . . . . . . . . . . . . . . . . . . . . . . . . . . . . . .
Maxtor Product Support . . . . . . . . . . . . . . . . . . . . . . . . . . . . . . . . . . . . . . . . . . . . . . . . . . . . .
Getting to Know Maxtor Fusion
1
1
1
1
2
...........................................3
Importing Files From a Recent Event . . . . . . . . . . . . . . . . . . . . . . . . . . . . . . . . . . . . . . . . . . . 3
Sharing Files by Invitation . . . . . . . . . . . . . . . . . . . . . . . . . . . . . . . . . . . . . . . . . . . . . . . . . . . . 4
Linking Files to Online Groups . . . . . . . . . . . . . . . . . . . . . . . . . . . . . . . . . . . . . . . . . . . . . . . . 6
Using the Maxtor Fusion . . . . . . . . . . . . . . . . . . . . . . . . . . . . . . . . . . . . . . . . . . . . . . . . . . . 7
Login In as a User . . . . . . . . . . . . . . . . . . . . . . . . . . . . . . . . . . . . . . . . . . . . . . . . . . . . . . . . . . 7
Importing Files . . . . . . . . . . . . . . . . . . . . . . . . . . . . . . . . . . . . . . . . . . . . . . . . . . . . . . . . . . . . . 7
Sorting Your Files with the View Controls. . . . . . . . . . . . . . . . . . . . . . . . . . . . . . . . . . . . . . . . 9
Viewing and Setting Detailed File Information . . . . . . . . . . . . . . . . . . . . . . . . . . . . . . . . . . 10
Organizing Files Using Categories and Folders . . . . . . . . . . . . . . . . . . . . . . . . . . . . . . . . . 11
Sharing Files . . . . . . . . . . . . . . . . . . . . . . . . . . . . . . . . . . . . . . . . . . . . . . . . . . . . . . . . . . . . . . 13
Searching and Tagging . . . . . . . . . . . . . . . . . . . . . . . . . . . . . . . . . . . . . . . . . . . . . . . . . . . . . 14
Exporting Files . . . . . . . . . . . . . . . . . . . . . . . . . . . . . . . . . . . . . . . . . . . . . . . . . . . . . . . . . . . . 16
Setting User Preferences . . . . . . . . . . . . . . . . . . . . . . . . . . . . . . . . . . . . . . . . . . . . . . . . . . . 16
System Administration Tasks . . . . . . . . . . . . . . . . . . . . . . . . . . . . . . . . . . . . . . . . . . . . . . . . 16
Frequently Asked Questions. . . . . . . . . . . . . . . . . . . . . . . . . . . . . . . . . . . . . . . . . . . . . . 19
Appendices . . . . . . . . . . . . . . . . . . . . . . . . . . . . . . . . . . . . . . . . . . . . . . . . . . . . . . . . . . . . . . . . 21
Appendix I – Setup Wizard . . . . . . . . . . . . . . . . . . . . . . . . . . . . . . . . . . . . . . . . . . . . . . . . . . .
Adding Additional User Accounts . . . . . . . . . . . . . . . . . . . . . . . . . . . . . . . . . . . . . . . . . . .
Dynamic DNS . . . . . . . . . . . . . . . . . . . . . . . . . . . . . . . . . . . . . . . . . . . . . . . . . . . . . . . . . .
Email Invitation . . . . . . . . . . . . . . . . . . . . . . . . . . . . . . . . . . . . . . . . . . . . . . . . . . . . . . . . .
Port Forwarding . . . . . . . . . . . . . . . . . . . . . . . . . . . . . . . . . . . . . . . . . . . . . . . . . . . . . . . . .
Appendix II – Maxtor Fusion Checklist . . . . . . . . . . . . . . . . . . . . . . . . . . . . . . . . . . . . . . . . .
21
21
22
23
24
25
© 2006 Maxtor Corporation. All rights reserved. Changes are periodically made to the information herein which will be incorporated in
revised editions of this publication. Maxtor may make changes or improvements to the product(s) described in this publication at any
time and without notice. Maxtor is a registered trademark of Maxtor Corporation. All other brands or products are trademarks or
registered trademarks of their respective holders. Maxtor Corporation, 500 McCarthy Blvd., Milpitas, California 95035 USA
MAXTOR FUSION USER’S GUIDE
INTRODUCTION
Thank you for selecting a Maxtor product.
About This Guide
Maxtor Fusion™ lets you simply organize and personalize
all your digital photos, videos, music and documents and
selectively share your experiences with family, friends
and colleagues either privately or publicly in a secure
environment. While providing one central safe location for
all your digital content, Maxtor Fusion’s simple, web-based
interface makes blending and assembling all types of files
easy, provides versatility with support for all operating
systems, and enables quick remote access to all your
content from anywhere, anytime. The gigabit Ethernet
connection to your network router enables fast access
and two USB ports are provided for easy storage expansion
with additional hard drives.
This User’s Guide contains four sections:
Maxtor Fusion Features
In addition, there are appendices which provide information
which is useful when running the Setup Wizard, and a place
to record important system information.
– Simple interface to organize, personalize and
selectively share all types of digital content
– Secure environment for private and public sharing
– Email invitations to specified guests safely takes them
directly to what you want to share
– The Introduction provides a brief overview of features,
care, and support information.
– Getting to Know Maxtor Fusion shows how to quickly
load and share files with others. It provides brief,
straightforward information on how to accomplish
tasks such as importing and sharing files.
– Using the Maxtor Fusion describes how to use the
many features and capabilities, and provides more
comprehensive instructions on using Maxtor Fusion.
– Frequently Asked Questions provides a Q&A for
common questions.
The following symbols and conventions are used in this
guide:
Bold
Used for menu, command, and keyboard selections you
make and screens you will see.
Italics
Used for emphasis and to identify new terms, which
may also be defined in the Glossary.
– Assemble different types of content to share more
expressive digital experiences
– Easily create unique combinations of photos and
videos from the same event for different people
– One central safe location for all your digital content
System and Network Requirements
– Remote access to all your digital content anytime,
anywhere
Please see the Maxtor Fusion Setup Guide for complete
system requirements, network hardware prerequisites,
and installation procedures.
– High capacity storage for large amounts of data
– Supports Windows XP SP2 and Macintosh OS X (10.4
or higher)
– Fast gigabit Ethernet connection to network router
– Easy expansion – Two USB ports for additional hard
drive storage
PAGE 1
Handling Precautions
Please handle your new Maxtor Fusion with care! Follow the
precautions listed here or you could damage the internal
components and void the product warranty. Review the
Maxtor Limited Warranty for more information.
MAXTOR FUSION USER’S GUIDE
Follow these precautions to prevent data loss
– Do not bump, move or drop the Maxtor Fusion while in
operation.
– Do not disconnect the power cord from your Maxtor
Fusion without first shutting it down through the
browser interface, or using the power switch on the
back of the unit.
Navigation
Although the Maxtor Fusion interface runs from within a
browser window, it uses its own navigational buttons rather
than the forward, back, refresh buttons of your browser.
During the installation process, please refrain from using
the buttons on your browser – use the Next and Back
buttons provided in the Setup Wizard screens.
– Do not set any liquids or drinks on or near the Maxtor
Fusion. Liquids will damage the internal electronics.
– Do not open the Maxtor Fusion enclosure. This can
cause loss of data and will void the product warranty.
Maxtor Product Support
Maxtor Corporation provides a comprehensive product
support section on its web site, including the latest software drivers, product specifications, a complete troubleshooting section, and the Maxtor Knowledge Base.
Visit www.maxtorkb.com for the following information:
– Search the Knowledge Base
We store all resolved problems and FAQ’s in our
knowledge base. Search by product, category,
keywords, or phrases.
– My Stuff
Login to modify or view your FAQ update
notifications or update your personal profile.
– Most Popular Help Topics
Top five most frequently asked questions.
– Software Download
Download installation and update software
for your Maxtor Fusion.
Maxtor Worldwide Support
Visit www.maxtor.com and click worldwide support or
contact us for product support outside of the USA.
Much of the information found is this User Guide can also
be found in the online help.
Next
Clicking on the Next button moves to the next step of the
Setup Wizard. Please note that all of the information
requested must be filled in for the setup process to be
completed successfully.
Back
Clicking on the Back button moves to the previous step of the
Setup Wizard. Information that was previously entered can
be changed by deleting or overwriting the previous entries.
Quit
Clicking on the Quit button exits the Setup Wizard. You may
quit at any time but will need to return and complete all of
the steps of the Setup Wizard before you can use Maxtor
Fusion. The information and settings you enter do not take
effect until the very end of the process.
Help
Clicking on the Help button opens a browser window with
this help file.
PAGE 2
MAXTOR FUSION USER’S GUIDE
GETTING TO KNOW MAXTOR FUSION
This section shows how – in just a few steps – to put your
Maxtor Fusion to work quickly by importing files and sharing
them with others. Once you have done this, you can import
your entire archive of photos, videos, music, and documents.
See “Importing Files” on page 7.
Anyone with a user account and a web browser can import
files. To use a web browser to import files:
1. Copy or move your picture files from your camera to your
computer.
2. Click on the Launch desktop icon to open your browser
Importing Files From a Recent Event
You've just returned from a weekend of whitewater river
rafting. You've got some great pictures, and want to share
them with others. The picture files are too big to email, and
not everyone wants every picture. With the Maxtor Fusion,
it's easy to share your pictures with individuals and groups,
and let people view and download the pictures they want.
and then log in to your Maxtor Fusion.
3. Click on the Pictures category and then click the
Organize button. Create a new folder for the rafting
pictures by typing in a folder name, such as “Rafting,” in
the New Folder box and then click the enter arrow to the
right of the box.
4. The folder you just created in the left-hand column of the
browser window. Click on the folder to open it.
5. To import your pictures to the Rafting folder, click on
the Import button.
PAGE 3
MAXTOR FUSION USER’S GUIDE
At the bottom of the Import pop-up window click on
< YES > next to the message
“Need to Import folders/files at once in bulk?”
Depending on your browser settings you may need to
agree to the launching of the File Dropbox.
Sharing Files by Invitation
Once your files are imported onto your Maxtor Fusion,
sharing them is easy. You can invite individuals and groups to
look at and download your content, and you can make files
publicly available. It's easy to invite an individual to share
your content – you need only select the files and enter their
email address.
Sharing Files with an Individual
1. Select one or more files – you can select more files by
using the Shift, Control (PC), or Command (Apple) key
when clicking the mouse button.
2. Once files are selected, click on the SHARE button at the
top of the browser screen.
NOTE: To use the File Dropbox your computer must
have Java installed. To learn more about Java go to
www.java.com – you can download the latest version
by clicking on the Download Now button.
6. From your computer’s file manager, drag and drop the
3. In the text box next to PERSON: type in an email address.
4. Click on the arrow to the right of this box, and click OK to
confirm that you want to share the selected file(s). An
email containing a link to the shared files will be sent to
the email address, similar to the picture below.
pictures from your rafting trip, either as a file group or
as a folder, from your file manager to the File Dropbox
window. Note that the maximum file size is 2 GB.
7. Click on the IMPORT ALL button to copy the files from
your computer to the Rafting folder in your Maxtor
Fusion.
8. After the import operation has finished, close the File
Dropbox by clicking on the X icon in the upper corner.
9. Click Refresh to display the thumbnails of the pictures
you just imported.
NOTE: When pictures are imported to your box,
thumbnails are automatically created for each file. It
may take several minutes to generate the thumbnails
for every imported picture. As the thumbnails are
being generated the default camera icon thumbnails
will be replaced by the picture thumbnail. Thumbnail
generation progress can be monitored through a
message in the screen tip as you mouse over a
thumbnail. Clicking Refresh will replace the camera
icons with newly generated thumbnails.
NOTE: The email message containing the link to the
shared files can be forwarded by the recipient to other
email addresses. Any recipient of the link will be able
to view and download the files as though they were the
original recipients.
PAGE 4
MAXTOR FUSION USER’S GUIDE
5. When your recipient clicks on the emailed link, a browser
will open and thumbnails of the files that you shared with
them will be displayed in their browser – see below. By
double clicking on a thumbnail, they can launch a picture
slide show or play a video or music file depending on the
types of files that you have shared with them.
Sharing Files with the Whole World
This is really easy – within each category, select the files you
want to share with the world, then click on MAKE PUBLIC.
The files will be available at your public URL link in the
respective Categories (Documents, Music, Pictures, and
Video).
NOTE: You can find the link information by clicking on
Set Preferences, then selecting the User Preferences
tab (automatically selected) – your personal link is
listed on the line starting with Your Public URL/Link.
Anyone with a web browser can access and download
the files you make public.
Viewers can vote on their favorite files! Just double-click on
a file, and then select the icon in the upper right-hand corner
that expresses your thoughts. A running total is kept in the
lower right hand corner of the web page.
To remove files from your Public Site area click on Public
Site, select the files to be removed and then drag and drop
them to the Trashcan icon.
NOTE: When files are moved to the Trashcan from
the Public Site, they are not deleted. They are only
removed from public view. The original files are
maintained within their respective categories.
PAGE 5
MAXTOR FUSION USER’S GUIDE
Linking Files to Online Groups
You can link up to five pictures at a time to popular online
communities such as MySpace and eBay. The microlink
button automatically generates a link (URL) that users can
click on to view the pictures in a dedicated browser window
and HTML code (IMG) that can be used to embed the selected
pictures into a web page.
MySpace
1. Select up to five pictures by holding down the Control key
(Command key for Mac users) and then mouse clicking
the desired pictures.
2. Click on the microlink icon.
3. Select the IMG tab. In the pop-up window, select the
entire link – it starts with “<img” – and copy (Control-C
or Command-C) to your computer's clipboard.
4. Login to your MySpace account and click on Edit Profile.
5. Select the area where you wish the photo to appear
– for example, About Me – and paste (Control-V or
Command-V) the HTML IMG code into the box.
6. Click on Save All Changes, and you’re all set.
eBay
1. Log into eBay and create a new listing to sell.
2. Go through the listing steps until you reach Item
Description. Copy and paste the HTML IMG code into the
description.
3. You can add additional images to your eBay listing using
URL links. Continue with your listing until you reach the
section “Add Pictures,” click on the tab Your Web Hosting
and paste the URL link into the Picture 1 Web Address.
NOTE: You may need to use a photo editor to adjust the
picture to the size you need.
For more information and support on embedding content or
linking files to other sites, please refer to the support or help
section of the destination web site.
PAGE 6
MAXTOR FUSION USER’S GUIDE
USING THE MAXTOR FUSION
Maxtor Fusion offers a new level of flexibility and control for
storing, organizing, accessing, and sharing personal digital
content. Maxtor Fusion offers a simple yet powerful way to
help transform scattered video, pictures, music, and
documents files into personalized digital experiences that
can be shared to reflect an event, an occasion, a person, an
activity, or even a mood. With the easy-to-use interface,
shown below, you can import files and share them with
others, and even create picture links to web sites such as
MySpace and eBay.
Maxtor Fusion is designed to share personal files. Please
obey all applicable copyright laws.
Login In as a User
The admin user assigns Usernames and Passwords. If you
have installed the Maxtor Fusion icons on your desktop,
double-click the Launch icon to open a browser at the login
screen. Or, type in the DNS Hostname or IP address of the
Maxtor Fusion. Log in using your Username and Password.
Importing Files
One of the first things you’ll want to do is import files onto
your Maxtor Fusion. There are two ways to add files to your
Maxtor Fusion: through the web browser interface or over
your local network (LAN) using your PC’s file manager
(Windows Explorer or Mac Finder). If you have a large numbers of files to load onto Maxtor Fusion, it is recommended
that you use the LAN interface. The files you import are
copied – the original files on your computer are not changed
or moved.
If you’ve added a lot of files to your Maxtor Fusion and
wonder if you have enough space to import more files, you
can check the disk space gauge in the upper right-hand part
of the interface. If you need more information than just the
percentage of disk space that’s available, click the icon for a
detailed and categorized listing.
Importing Using the Web Interface
This option is best for uploading content to your Maxtor
Fusion when you are accessing it from outside of your home
network or working from someone else’s computer.
1. Select the folder where you would like the imported files
to be placed by clicking on the Category and then clicking
on a desired folder and sub-folder. The categories are in
the upper left hand side and are labeled: Pictures, Music,
Video, and Documents. Folders are displayed in the left
column of the interface when in the thumbnail views.
Sub-folders are displayed along side the thumbnails in
the main viewing area. To learn how to create a new
folder, refer to “Creating Folders” on page 11.
2. Click on IMPORT in the upper right-hand corner.
The rest of this section will assume your are logged in.
PAGE 7
MAXTOR FUSION USER’S GUIDE
The Import window appears. You can move it by holding
your mouse button down on the blue half-circle outside
the window, on the upper right-hand corner.
Alternately, you can drag many files to the Dropbox,
and import them one at a time to different Category.
NOTE: The drag and drop feature for bulk importing
requires that you have Java installed on your
computer. To learn more about Java go to
www.java.com – you can download the latest version
by clicking on the Download Now button.
NOTE: You cannot import files directly into the Public
Site area.
3. From the Import window, you have two choices to upload
files:
– Click the Browse button and a Choose File pop-up
window will appear. Select the file you want to upload.
Select up to 10 files. When you are ready to upload,
click the blue carat next to the word Import at the
bottom left. Once the files have been imported, the
Results window appears with a status of the import.
– The drag and drop option lets you upload multiple files
at the same time. At the bottom of the Import pop-up
window click on < YES > next to the message:
“Need to Import folders/files at once in bulk?”
A File Dropbox will appear. From your desktop, drag
and drop all the files you want to upload then click
IMPORT ALL.
Note: The first time this happens, a security warning
may appear. Select Run to proceed.
Importing Using the Local Network
If Maxtor Fusion is connected to the same local network
as your PC, you can also import files using the EXPLORE
icon that was installed on your desktop during the setup
and installation process. To install the desktop icons after
the setup and installation process you can rerun the setup
and installation launcher CD on your computer and click
on ICONS.
Double-clicking on EXPLORE will open a login window. Enter
the required information for the User Authentication – User
ID and Password. A familiar desktop file manager window
will appear with the name of your current directory on
Maxtor Fusion – “Home” when you first log in. Note that you
cannot modify this top level – you can only copy files into the
existing directories (Music, Pictures, etc.)
NOTE: If you log in as the admin user, the directory
is called “Homes.” As the admin user, you can read
an write to any of the folders you see – it’s best to
choose one, such as “Admin.”
PAGE 8
MAXTOR FUSION USER’S GUIDE
There are two advantages to using this method. The first is
that all folder and sub-folder structures are preserved when
importing files. And second, file transfers are much faster.
Using this interface, you can import (and move, copy, and
delete) just as you can on your Windows or Macintosh
desktop. To import files into HOME folders, you have two
choices:
NOTE: Depending on the number of files that you
import, it may take several minutes or even hours to
generate the thumbnails for every imported file. As the
thumbnails are being generated, the default camera or
headphone icons are replaced by the picture or
embedded album art. Placing your mouse over a
thumbnail as they are being generated will reveal a
tooltip with a status message. Until this process is
complete external accessibility may be affected.
– Drag and drop files into the folder of your choice.
– Move, Copy, Cut, and Paste files using the EDIT pull
down menu or right click on your mouse.
NOTE: Once you log into the EXPLORE interface, your
PC’s OS will keep your user account logged in even
after you close the EXPLORE window. To log out, your
computer requires you to perform a user log out from
its operating system or restart the computer. If you are
the only Maxtor Fusion user that uses your computer
then you can have your computer automatically log you
in after restarting your computer – select the
appropriate option from the login screen of your file
manager when you double-click the EXPLORE icon.
Sorting Your Files with the View Controls
The Maxtor Fusion web interface allows you to sort your files
in many different ways. The system has a default view, but
you can sort your files differently at any time using the view
controls. You can change the view by clicking one of the icons
in the horizontal bar located near the top of the interface.
The default view shows small thumbnail-sized icons for each
file in the selected folder, but there are several other useful
views. Changing the view does not change your files or the
folder structure you have created.
Thumbnail Generation and Performance
When content is uploaded to your Maxtor Fusion, it will
automatically create a thumbnail for each file. For picture
files, thumbnails of the picture itself will appear. During
upload, thumbnails for pictures will initially appear as
generic camera thumbnails, but as soon as all the files are
uploaded, the real picture will appear.
For movie files, a thumbnail of a video camera will appear.
For music files with album art embedded in their mp3 tag
the album art will be displayed. For other audio files, a
thumbnail of headphones will appear, and for documents,
a thumbnail of the type of application the file was created
in will appear. When you roll the cursor over the thumbnails,
a tool tip will appear with the name of the file.
After locating a file, you can double-click it and the Detailed
Information window – shown above – will pop open. From
this window, you can rename the file, download it, play it, or
enter a description and one or more tags.
PAGE 9
MAXTOR FUSION USER’S GUIDE
Selecting the View
The following views allow you to sort your files in many
useful ways:
View as Thumbnails – Small images (38x24-pixel thumbnails) representing your files are organized alphabetically
based on filename.
View as Large Thumbnails – Same as the previous view
except the thumbnails are larger (58x52 pixels).
View as Timeline – A clickable timeline allows you to sort
your files by selecting a date of interest. Further, your sort
can be based on import date (the date the file was imported
into Maxtor Fusion) or authored date (the date the file was
created).
For example, to view all the files that were created on May 4,
2006, you would click AUTHORED > 2006 > MAY > 4 on the
timeline. Your files will appear and your date selections will
have red parentheses around them in the timeline. Bold
formatting is applied to a month or day to indicate that files
exist for that date.
NOTE: Because this view considers all the files on
Maxtor Fusion, it usually takes more time to display
than the other sorting choices.
View as List – A list of folders is displayed on the left and a
simple text list of filenames is displayed and sorted alphabetically on the right. This view is helpful if you remember
the names of the files you need, or like to look at lists.
View as Detail – A cascading view of your files is presented.
Three columns are used to show the folders and file you
traverse and the columns scroll to the left if you traverse
more than three levels of hierarchy.
In this view, the controls normally found in the Detailed
Information window (a popup from the other views) are
continuously available on the right side of this view. Doubleclick a file to show its details in this area. With these
controls, you can rename the file, download it, play it, or
enter a description and one or more tags. In this same area,
you can use the Left and Right arrow icons to sequence
through the previous and next files in the selected folder.
View All – A hierarchical view of your entire library. Unlike
the other views, you do not select this one from the bar of
other view icons. To get to this view, click on the ORGANIZE
icon at the top right-hand side of the browser, and then click
on the VIEW ALL button. You can drag and drop files between
categories easily in this view.
Viewing and Setting Detailed File Information
Detailed information and settings are displayed after
double-clicking a file. As later topics will discuss, you can
view an enlarged thumbnail, download the file, rotate the
thumbnail, see if the file is public or private, move backward
and forward between the files, rename the file, download it,
play it, or enter a description and one or more tags for the
file.
PAGE 10
MAXTOR FUSION USER’S GUIDE
Organizing Files Using Categories and Folders
Creating Folders
You can organize your library using categories and folders.
The categories are Pictures, Music, Video, and Documents,
and are accessed by clicking the links in the upper left part
of the screen. These categories cannot be changed but you
can create your own folders (and sub-folders) within a
Category to refine the organization of your library.
To create a new folder using the web interface:
The predefined Category folders are provided to help you get
started and are not limited to a single type of file. Feel free to
mix and blend of pictures, music, video or documents in a
single folder or sub-folder. This can be very useful for
events, such as vacations, that have a mixture of file types
associated with them.
In general, if you’re working on the PC on the same LAN
as your Maxtor Fusion, you can perform many of the file
organization tasks using the file management application
running on that PC (for example, Windows Explorer on
Windows and Finder on the Mac). For example, you could
create new folders, import files, rename files, and move/
copy files using your desktop file management application
instead of the Maxtor Fusion web interface. The EXPLORE
icon on the desktop (set up at installation time) open a file
manager and automatically navigates to your HOME
directory on the Maxtor Fusion drive on the LAN. You can
switch back and forth between these two interfaces as
often as you like – the web interface will always remain up
to date with the changes you make using the other interface.
NOTE: If you have a lot of folders to set up and files to
import, the EXPLORE interface is often the most
efficient to use.
NOTE: In the procedures for organizing files, we will
focus on using the web interface and only mention
special considerations that apply to the desktop file
manager interface.
1. Select the Category (Pictures, Music, etc.) in which the
new folder will be created. If the new folder is to be a
sub-folder of another folder, navigate to the parent
folder and double-click on it to select that sub-folder.
2. Click the Organize icon (file folder icon) near the top of
the interface.
3. In the Create field, type the name of the folder you want
to create and click the arrow icon to its right to create the
folder. Your new folder appears in the left-hand column
with the other folders.
NOTE: If you are using the EXPLORE desktop file
management application (only available to PCs on the
same LAN as your Maxtor Fusion) instead of the web
interface, copying a folder (and its sub-folders) creates
the folders as well as copying its contents.
Moving and Copying Files and Folders
To move or copy one or more files or folders:
1. Select the Category and then the items you want to move
or copy. You can use standard multiple-selection
techniques to select any items that are visible without
changing folders or categories.
2. Click the Organize icon (file folder icon) near the top of
the interface.
3. Select the destination Category and folder:
a.In the Move field, click the blue down-arrow to expand
the drop-down menu.
b.Click a destination Category (e.g., Pictures, Music, etc.)
from the top of the drop-down menu.
c.Select the destination folder (make sure it is
highlighted). If the destination folder is the child of
another folder, use the expansion icon at the left of
the folder to open the child folder(s) for selection.
PAGE 11
MAXTOR FUSION USER’S GUIDE
4. Click the right-arrow next to the Move field to launch the
Move/Copy command.
5. In the pop-up that appears, select Copy or Move and then
click OK.
The selected items are moved or copied to the new
location.
NOTE: In the View All view (accessed by clicking the
View All button in the Organize area), you can copy and
move folders by dragging and dropping.
Deleting Files and Managing the Trash
You can delete files and folders by dragging them to the
Trashcan icon in the upper right-hand corner of the
interface. The items remain in the trash until you empty it.
– To empty all the trash: Open the Trashcan by doubleclicking its icon. Then click Empty Trash to
permanently remove all the files from Maxtor Fusion.
Renaming Files
You can rename files in the Detailed Information window.
To rename a file:
1. Double-click a file to open this window.
2. Type the new filename over the existing one and click
Rename before closing the window.
NOTE: The Detailed Information controls are always
visible in the View in Detail view.
Renaming Folders
You can rename folders from the View in Detail view.
To rename a folder:
1. In the folder list area, double-click the folder to be
renamed.
2. Type the new name below the folder icon in the detail
area on the right side of screen and then click the
RENAME button.
– To empty some of the trash: Open the Trashcan by
double-clicking its icon. Then select the files to delete
and click Absolute Delete to permanently remove
them from Maxtor Fusion. Until the trash is emptied,
you can change your mind and put files back into the
file system.
– To undelete files, open the Trashcan, select files to
restore, and click Undelete. Undeleting a file does not
return the file to its original location. Instead, it puts
the files into the Undeleted folder that is visible from
the View All view.
– To move a file from the Undeleted folder, click the
Organize button and then click View All. Open the
Undeleted folder and drag the files to the desired
locations.
If you are sitting at the PC on the same LAN as your Maxtor
Fusion, you can delete files from the Maxtor Fusion’s file
system using the EXPLORE icon that launches your desktop
file manager. This takes you to the hard drive inside Maxtor
Fusion. To delete files, you can move them to Maxtor
Fusion’s Trash folder or your file system’s trash folder. If
you use the file system’s trash folder, you lose the ability to
manipulate the files later in the trashcan’s web interface.
Generally, the web interface will automatically reflect the
changes (deletions) you make in the EXPLORE interface.
PAGE 12
MAXTOR FUSION USER’S GUIDE
Sharing Files
If you need to set up a group:
Once files are loaded onto your Maxtor Fusion, sharing them
is easy. You can invite individuals and groups to view and
download your content, and you can make files publicly
available.
1. Click on the SHARE icon near the top of the interface,
Sharing Files with an Individual
1. Select the files you want to share.
You can select multiple files using the Shift, Control (PC),
or Command (Apple) key when clicking the mouse
button.
2. Click the SHARE icon in the upper left part of the
interface.
then Edit Groups.
2. Type each group member’s name and email address into
the Enter Contact Name and Enter Contact Email text
boxes and click Enter.
All addresses are added to the group All Contacts.
3. Continue entering names and email addresses until
complete. Then click Save.
4. To create a group, enter the name in the lower left
corner, in the text box underneath CREATE. Then click on
the arrow to the right.
3. In the text box next to PERSON: type an email address.
4. Click on the arrow to the right of this box, and click OK
when asked if you want to share the file. An email
containing a URL to the shared file(s) will be sent to the
person.
Sharing Files with a Group
If you already have a group set up:
1. Select the files you want to share.
You can select more files by using the Shift, Control (PC),
or Command (Apple) key when clicking the mouse
button.
2. Select the group name you want to share them with by
clicking on the box to the right of Group.
3. Select the desired group, and then click the arrow icon to
the right.
4. Click OK when asked if you want to share the file.
An email containing a URL to the shared file(s) will be
sent to each person in the group.
PAGE 13
5. The group name will appear underneath All Contacts on
the left side. Continue adding group names until
complete.
6. Add users to a group by selecting individual names from
All Categories, then dragging them to the group name.
7. Click Save at the bottom right to save all your changes.
NOTE: Email messages containing the links of shared
files can be forwarded to others, who can view and
download them as though they were the original
recipients.
MAXTOR FUSION USER’S GUIDE
Sharing Files through the Public Site Folder
Searching and Tagging
In addition to sharing your files through email invitations
with an individual or group, you can also place files in an
area that is openly accessible on the Web. Each user account
is provided a separate Public Site area. The URL to this
Public Site for your user account can be found in the Set
Preferences menu.
As your collection of files grows, the more you’ll need a good
way to find specific files. Sometimes your folder names are
all you need to find things in a flash, but sometimes that’s
not enough. Other times, knowing the date that the file was
created or imported is the best way to find a file. But often
times, you’ll need the Search command to peek inside your
tags and descriptions to find the right file or collection of
related files.
Adding Files to Your Public Site
You can add files to the Public Site for your user account by
selecting the files in the main view area of the browser
interface and then clicking on the MAKE PUBLIC button.
Managing Files in Your Public Site
You can view the files that you have made public by clicking
on the Public Site folder button located below the Pictures,
Music, Video and Documents Categories.
Using Search
The Search command finds files based on the text contained
in file names, folder names, tags, and descriptions.
Typically, you’ll have the best results if you attach tags to
your files and then search for the terms you’ve used in your
tags.
To begin a search:
If you wish to remove access to files in the Public Site, select
them while in the Public Site folder view and then drag them
to the Trashcan. This removes access to the files from the
Public Site area but does not delete the actual file from the
Category folder or sub-folder.
NOTE: If you delete files from Maxtor Fusion that were
being shared through the Public Site feature, they will
no longer be accessible through the Public Site.
1. Click the Search button in the upper left-hand part of the
interface (looks like a magnifying glass).
2. In the Search text box that appears, type one or more
words that you think are somewhat unique to the file(s)
you seek, and press Enter.
The files matching your search criteria are listed in a
hierarchical view of the file system. If no files are found,
modify your search terms and try again.
Tip: If you don’t know any terms or filenames to use
with the Search command, but you know the
approximate date in which the file was created or
imported, you can use the View as Timeline view and
browse for it that way.
PAGE 14
MAXTOR FUSION USER’S GUIDE
Adding Tags and Descriptions for Better Searches
A tag is some text that is attached to a file and helps
categorize or identify it in some way. You might be familiar
with the terms keyword or metadata, which have very
similar meaning and purpose. By attaching unique and
descriptive tags to your files, you can make it easy and
fast to find the files you seek.
For example, you might have a picture with the filename
rafting.jpg. In the description field you might enter, “Rafting
on the south fork.” In the tags field you might add: raft, oar,
river, Coloma, Debbie, Bob, Susan, sports, hobbies, summer.
Now when you do a search, you don’t need to know the
filename, and you can use any of the words in the tags
and descriptions to find the right files.
To add tags using TAG IT:
1. Select the file(s) to which you want to add a tag.
2. Click on the TAG IT button near the top right-hand corner.
3. Type the tag in the text box with the label “Create New
Tag” and then click on the arrow icon.
4. Alternately, you can select an existing tag – click on the
box with the label Select One and then click on the arrow
icon.
To add tags using the Detailed Information window:
1. Double-click the file to which you want to add a tag or
description.
2. In the Detailed Information window, type the description
and/or tags for the file. In the tag field, you can use
spaces or commas as separators.
3. When you’re finished describing and tagging the file,
click Attach to record your changes close the window.
PAGE 15
The tags you enter from the browser interface of Maxtor
Fusion are different from other metadata tags that might be
embedded in some of your files. For example, your digital
camera files probably have some metadata about their
camera exposure settings or the date when the picture was
taken. The tags you add with the box will not overwrite or
alter the metadata attached to your files by other products
or applications.
The way you search in this product is very similar to
searches you’re probably familiar with in other products or
Internet search engines. Searching and tagging are easy and
you should experiment a little to learn more.
MAXTOR FUSION USER’S GUIDE
Exporting Files
System Administration Tasks
To make a copy of a file on Maxtor Fusion and save it to your
local file system, you use the Export command.
This section contains management and maintenance topics
to help the Maxtor Fusion administrator. While any user
can import and share files, only the administrator can
create and manage user accounts, configure network
settings, and back up files. Unless you are logged in using
the administrator account, you will not be able to perform
the tasks in this section.
To export a file:
1. Select the file you want to export.
2. Click the Export button in the upper right-hand part of
the interface.
3. Save the file to a folder on your PC.
You cannot export more than one file at a time using the web
interface. If Maxtor Fusion is on the same LAN as the PC you
are using, you can click on the EXPLORE icon and use the
desktop file manager to copy (drag and drop) the files you
want to export to a folder on the PC.
Setting User Preferences
You can access the user preferences associated with your
account by clicking on the SET PREFERENCES icon (looks
like the outline of a person) located under the MAKE PUBLIC
button.
As a (non-administrator) user, you can set some of the
preferences for your account. You can change your
password, display name, and primary email address. You
can set the Category for your default landing page. Also,
the URL where public files can be accessed is listed.
Using the Administrator Account
To log in as the administrator, start at the main login screen
– you may need to first log out (click the Log Out button in
the upper right-hand part of the interface). Then log in using
the username admin and the password created during
installation.
If you’ve forgotten the admin password, it should be
recorded in the printed checklist that was filled out at
installation time. If you don’t have the checklist or didn’t
record the password, you can enter the username admin and
then click the link at the bottom that says Forgot Password?.
The login screen can display a hint (also set up at installation
time) to help you remember the password.
All system administration tasks are performed after clicking
on SET PREFERENCES when logged in as the administrator.
Adding and Deleting User Accounts
As the administrator, you can set up accounts for other
Maxtor Fusion users. Anyone can view images on the Public
Site or view files from an email invitation, but only users with
accounts can access the web interface and use the features
of the system to import, organize and share files. After you
create an account for a new user, they will be able to log into
the system and begin using it. Maxtor Fusion supports up to
14 users, including the administrator.
PAGE 16
MAXTOR FUSION USER’S GUIDE
To Add a New User
1. If you’re not already logged in with the admin account,
log out and log in again using admin as the username
and the password assigned at installation time.
2. Click the Set Preferences button to the right of the
content area (the button has the outline of a person).
3. In the USER PREFERENCES tab, click Add User at the
bottom left-hand area of the interface.
4. Enter the information for the new user and click Save.
After you click Save, the User Name cannot be changed
(to change it you must delete the account and create it
again).
5. Communicate the new account information and login
URL to the new user.
Note: After the new user logs in, they can change some
of the settings for their account, such as password,
display name, and email address.
Note that the URL for the user's public web site is listed at
the bottom of the User Preferences tab. For example, the
public site URL for a user with user name “ace” and a DNS
hostname of “bobsfusion.no-ip.org” will be:
http://bobsfusion.no-ip.org/public/ace
To Delete a User
1. If you’re not already logged in with the admin account,
log out and log in again using admin as the username and
the password assigned at installation time.
2. Click the SET PREFERENCES button to the right of the
content area (the button has the outline of a person).
3. In the USER PREFERENCES tab, select the account to be
deleted and click Delete User at the bottom left-hand
area of the interface.
PAGE 17
4. In the confirmation dialog that appears, click OK.
NOTE: When a user is deleted, all data and files
associated with that account will be lost. The
administrator can back up the data, but any tag or
description data is permanently lost.
Backing Up Files
Backup can only be done to a USB device, and will only
backup the original data (files and directory information,
but not tag or description data added after the files were
imported into your Maxtor Fusion). Only the administrator
can perform file backups. Administrators can back up all
files for all users, or all files for an individual user.
1. Plug a USB hard drive into Maxtor Fusion.
2. Click on the Set Preferences icon, then the BACKUP tab.
3. Select the User, and Backup Location (the USB drive),
then click BackUp.
BackUp copies the files for each selected user to a USB
drive, and timestamps the copied files.
NOTE: In order to back up files you must connect a USB
drive that is formatted for the FAT32 or VFAT file
system. Drives formatted for the NTFS file system can
be read by the admin user of Maxtor Fusion but cannot
be used as a destination for backing up or writing files.
MAXTOR FUSION USER’S GUIDE
Changing Network Settings
– Configure your time zone.
By default, Maxtor Fusion obtains and configures all LAN
settings at setup and installation time. As the administrator
you can review or reconfigure network settings. If you’re not
already logged in with the admin account, log out and log in
again using admin as the username and the password
assigned at installation time.
– Reset your Maxtor Fusion to the factory defaults,
update its internal software, and shut down or reboot
it. The controls for doing these tasks are located in the
lower left corner of the System Preferences window.
To change network settings:
1. Click the Set Preferences button to the right of the
content area (the button has the outline of a person).
2. Click on the SYSTEM SETTINGS tab. From this tab you
can:
– Adjust the local IP address. Note that several other
network settings are displayed for informational
purposes and cannot be modified.
– Configure the Dynamic DNS settings, including
DynDNS.org, No-IP.com, or using a static IP address.
Many Internet accounts use dynamic IP addresses.
Services such as DynDNS and No-IP help users find
your Maxtor Fusion over the web, even when the IP
address has been changed by your Internet service
provider. After registering with one of these (free)
services and selecting a domain name to use, enter
that information here.
The Setup Wizard
At any time, the admin can use the Setup Wizard to add
accounts, activate the email invitation engine, and configure
Internet settings.
1. Click on the Set Preferences icon, then the
SETUP WIZARD tab.
The Setup Wizard window replaces the
User Preferences window.
2. Follow the instructions to proceed with the Setup.
You can quit at any time.
NOTE: You may need to turn off the popup blocker
in your browser.
– Configure your outgoing SMTP mail server address.
This is the name of the mail server that will send out
email for Maxtor Fusion.
– Configure Port Forwarding settings. Port forwarding
enables user requests to come in from the web
through your router to your Maxtor Fusion. When you
share your files, it enables people to use web
browsers to come in through your Internet connection
and see pictures, documents, and so on. As part of the
set up process, Maxtor Fusion provides information
that can be used at www.portforward.com to configure
your router so that port forwarding works correctly on
your LAN. More information on port forwarding can be
found in the section “What is Port Forwarding?” on
page 24.
PAGE 18
MAXTOR FUSION USER’S GUIDE
FREQUENTLY ASKED QUESTIONS
I’m having a lot of problems with the web interface to my
Maxtor Fusion. Why?
I had to restart my router/modem, and now people cannot
access my shared files. How do I fix this?
Check to see that you are using the latest supported
browsers:
When your router is turned off and then turned on you will
lose the last IP address you had. Assuming you’ve configured
your Maxtor Fusion correctly, it will communicate with your
dynamic DNS provider and keep things synchronized. However, it can take a little time for all this to happen so user
access may be unavailable until the process is complete.
– Firefox 1.5
– Internet Explorer 6.0 SP1
Safari is not supported for Mac OS installation of Maxtor
Fusion software at this time.
My invited guests get an error message when they try to
click on the link in my email invitation. Why?
There is an issue with your network settings. Check to make
sure that your Dynamic DNS settings are correct.
Why don’t thumbnails show up immediately after importing
documents?
When I access Maxtor Fusion remotely, it performs slowly.
Why?
The performance of your web experience is dependent on
the upload speeds of your Internet plan with your ISP. Check
with your ISP on what speed you are using. To improve your
web performance, you may need to look at higher level
Internet plans that include faster upload speeds.
What do the lights on the front panel mean?
Thumbnails of pictures take a little while to appear because
Maxtor Fusion needs to process each one. Thumbnails for
videos and music use smaller or generic thumbnails and
show up much sooner after import.
Can I create the same folder hierarchy on my Maxtor Fusion
that I have on my desktop?
If you are using a PC that is on the same LAN as Maxtor
Fusion, the answer is yes. Using the installation CD, Install
Icons on your desktop. The EXPLORE icon allows you to copy,
paste, and delete files on Maxtor Fusion using your system
file manager (Windows Explorer or Mac OS Finder), all while
maintaining folder hierarchy. The folder hierarchy you create
in EXPLORE view will also appear in the web browser view.
PAGE 19
I notice there are USB ports on the back of my Maxtor
Fusion. Can I connect it to another PC using these ports? Can
I use Maxtor Fusion as a USB drive?
No. While a USB drive can be connected to Maxtor Fusion, it
cannot function as a USB drive to another PC. The USB ports
are for adding additional storage to the Maxtor Fusion. Also,
note that only the primary partition of the external USB drive
will be visible to Maxtor Fusion. If the device has been
partitioned into more than one logical drive, the extended
partitions will not be accessible.
MAXTOR FUSION USER’S GUIDE
My USB drive is not recognized.
External USB drives must be formatted for the FAT32
or VFAT file system. Drives formatted for the NTFS file
system can be read by the Maxtor Fusion admin user but
cannot be used as a destination for backing up or writing
files.
If I send an invitation to a user, do they have to use Firefox
or Internet Explorer 6.0 to view the files?
No. Users should be able to click on links received in most
major browsers.
I have a Mac and a PC. On the PC, I can play video and listen
to music from the Detailed Information windows for these
files. I cannot do this on a Mac. Why?
Some browser and plug-in configurations do not support
playing of video or music files from within the browser.
If this occurs, verify that you have the latest browser and
player updates or export the file and play it directly from
the player application on your computer. The default media
player on the Mac is QuickTime, and it cannot play .WMV files
at the time this document was written. You can always
download the file, and play it with an alternate application.
For example, VLC from VideoLAN can play .WMV files in the
Mac OSX environment.
I am the Maxtor Fusion administrator and also have a user
account. After I use the EXPLORE icon as a non-administrative user, I cannot see the admin’s files – even after I log in
again as administrator. What’s happening?
Once you log into the EXPLORE interface, the operating
system of your computer will keep your user account logged
in even after you close the EXPLORE window. To log out,
your computer requires you to perform a user logout from
its operating system or restart the computer. If you are the
only Maxtor Fusion user that uses your computer then you
can have your computer automatically log you in after
restarting your computer. Select the appropriate option
from the login screen of your file manager when you
double-click the EXPLORE icon.
How do I select a new the default browser so I can complete
the installation?
On Mac OS X, Safari-Set Preferences sets the default Web
browser for your user login. Change this setting from Safari
(or any other browser) to Firefox once you have installed this
application.
On Microsoft XP, select Start > Set Program Access and
Defaults.
Can the admin see and modify files in another user's
account?
Yes, through the EXPLORE file manager interface, the admin
user can view and manage the file and folder contents of
any user account. However, the admin cannot change or
modify any of the tags, descriptions or share groups,
invited or public, that have been created by other users.
PAGE 20
MAXTOR FUSION USER’S GUIDE
APPENDICES
Appendix I – Setup Wizard
Adding Additional User Accounts
You may not have finished the second part of the Maxtor
Fusion installation – the Setup Wizard can be restarted at
any time. Use the information here to help you complete
Maxtor Fusion installation, or to assist you when making
system-level changes (applying a new DNS Hostname,
for example). Much of the information contained here is
available in the Setup Wizard online help.
You can add up to 14 user accounts for yourself, family,
friends, or co-workers. Each user will have their own
storage space with their own login and password – every
sub-user account is private from all others.
Part II of the installation helps you set up your Maxtor
Fusion, guiding you through the process of adding sub-user
(non-administrator) accounts, activating the email engine,
and configuring the system for Internet access.
As in the previous section, do not use the forward and back
buttons on your browser. Instead, use the Next and Back
icons located in the bottom right corner of the screen.
Back Next
Using the browser buttons for navigation may require you to
rerun the Setup Wizard process.
To run the Setup Wizard you must log in as the administrator.
Log in using the admin username and password at the main
login screen.
If you’ve forgotten the admin password, it should be
recorded in the printed checklist that was filled out at
installation time. If you don’t have the checklist or didn’t
record the password, you can enter the username admin and
then click the link at the bottom that says Forgot Password?.
The login screen will display a hint (also set up at installation
time) to help you remember the password.
After logging in, click on SET PREFERENCES (looks like the
outline of a person) located under the MAKE PUBLIC button,
then on the SETUP WIZARD tab.
The Setup Wizard enables the admin user to add and
manage user accounts, and configure network and system
settings.
PAGE 21
A user account is not required to view files loaded onto your
Maxtor Fusion; however, only registered users can access
the system and use the features of the system, including
adding and deleting files.
If you don't want to add anyone at this time, simply click on
the SKIP button. You can always add users later.
If you'd like to add users:
1. Enter a User Name, Password, Password Hint, and Email
Address in the proper fields.
2. After entering the information for each user, click the
Create New Account button in the lower left.
3. Once you have finished adding user names, click on the
Next Page button.
Note: All user information except the User Name can
be changed later. The user name cannot be changed.
Users can change their Display Name for their Public
Share page, but they cannot change their User Name,
which is used for login purposes.
MAXTOR FUSION USER’S GUIDE
Dynamic DNS
What is DNS?
DNS stands for Domain Name Service. An integral part of the
Internet, DNS functions just like a telephone book by
keeping a table of names associated with numbers. DNS
translates easy-to-remember names (www.maxtor.com) to
the IP address (123.45.67.123) that's used by all the Internet
plumbing – it is how people find things on the Internet.
Maxtor Fusion needs DNS capabilities so that your friends
and families can get to your files – it links the IP address
assigned by your Internet service provider (ISP) to the
domain name you assign to your Maxtor Fusion.
Not all users have static, or fixed, IP addresses. ISPs often
assign dynamic, or constantly changing, IP addresses to
users each time they log in. If all you do is surf the web and
use email, you won't notice the difference between the two.
But if other users want to access the files located on your
Maxtor Fusion, its IP address needs to be known. This could
be challenging if your ISP is constantly changing it.
Dynamic DNS services solve this problem (and they are free
to use). If you don't have a static IP address, a dynamic DNS
service ensures that your Maxtor Fusion will always be
updated with the ever-changing IP address associated with
your Internet connection. Your friends, family, or co-workers
will always be able to find the content you invite them to see.
Setting Up DNS
Maxtor Fusion works with static IP addresses, as well as
dynamic IP addresses using services from No-IP.com and
DynDNS.org. If you need to set up an account with No-IP.com
or DynDNS.org, the Setup Wizard can assist with that. These
dynamic DNS services will enable you to choose a domain
name that will be accessible to users outside your LAN.
Static DNS
In general, this option is for more advanced users. If you
have a domain name that resolves to the static IP address of
your Maxtor Fusion, select the Static button in the Dynamic
DNS screen, then press Next. Then enter the DNS Hostname
for your Maxtor Fusion.
Dynamic DNS
Maxtor Fusion can use a dynamic DNS service to choose a
DNS Hostname (domain name) that will be accessible over
the web. You can use services from either No-IP.com or
DynDNS.org. You can use your existing account at either of
these services, or you can register for a new one. If you need
a new account at either of these services, the Setup Wizard
program will open up a new browser window for you. When
you have selected a new DNS Hostname for your Maxtor
Fusion, return to the Setup Wizard.
No-IP.com
Select No-IP.com. In general, you will need to register,
select a No-IP DNS Hostname (domain name), and then
enter this information on your Maxtor Fusion setup screen
(Username, Password, DNS Hostname).
– If you have an existing account, select that option and
then click on the Next button. Enter your No-IP.com
Username and Password, as well as the DNS
Hostname you selected at No-IP.com.
– If you do not have an account
1. Select “I need to set up an account …” and then click on
the Next button. A new window will open on the new user
page at No-IP.com. Fill out the new user information,
agree to the terms of service, and click the SIGN UP NOW
button at the bottom of the page.
Note that you do not need to download the No-IP DUC
(Dynamic Update Client)
2. No-IP will send you a confirmation email – you must click
on the included link before proceeding.
3. Log in to your No-IP account – enter your email address
and password.
4. Click on the Hosts/Redirects link in the left margin.
When the next page appears, click on the Add a Host
button.
5. In the Hostname Information section, type in the
hostname you want to use as part of your Maxtor
Fusion's domain name in the text box after Hostname.
Then, use the pulldown to select the second half of your
domain name. Unless otherwise directed, leave the
remaining options alone. Click on Create Host at the
bottom of the page.
PAGE 22
MAXTOR FUSION USER’S GUIDE
For example, if you want your Maxtor Fusion to be called
MyFusion, type that into the text box. If you go with the
default, your domain name will be MyFusion.no-ip.info.
6. Take the No-IP information – Username, Password, and
DNS Hostname, and enter it into the appropriate text
boxes in the Setup Wizard window. Then press Next.
DynDNS.org
Select DynDNS.org. In general, you will need to register,
select a DynDNS Hostname (domain name), and then enter
this information on your Maxtor Fusion setup screen
(Username, Password, DNS Hostname).
– If you have an existing account, select that option and
then click on the Next button. Enter your DynDNS
Username and Password, as well as the name of the
DNS Hostname you selected at DynDNS.org.
– If you do not have an account:
1. Select “I need to set up an account …” and then click on
the Next button.
2. A new window will open on the home page at
DynDNS.org. Click on the Account tab.
3. Click on the Create one now link at the bottom of the
screen to create a new account.
4. Agree to the Acceptable Use Policy, enter a username,
email address, and password, then click on the Create
Account button.
5. After you receive your confirmation email, click on the
link as directed.
6. Click on the login link, and enter your DynDNS username
and password, and log in.
7. Click on Services
8. Click on Dynamic DNS under DNS Services.
9. Click on Add Dynamic DNS.
10. In the New Dynamic DNS Host page, type in the
hostname you want to use as part of your Maxtor
Fusion's domain name in the text box after Hostname.
Then, use the pulldown to select the second half of your
domain name. Unless otherwise directed, leave the
remaining options alone. Click on the Add Host button.
PAGE 23
For example, if you want your Maxtor Fusion to be called
MyFusion, type that into the text box. If you go with the
default, your domain name will be
MyFusion.dynalias.com.
11. Take the Dynamic DNS information – Username,
Password, and DNS Hostname, and enter it into the
appropriate text boxes in the Setup Wizard window.
Then press Next.
Email Invitation
You will need to enter settings for a SMTP outgoing mail
server in order to share your content using email invitations.
The SMTP settings will be the same as the ones you use to
set up your email account on your home computer.
You can obtain your SMTP settings and Port Number from
your service provider.
Enter the information into the appropriate text boxes, and
then click Next.
If everything is correctly configured you will receive an
email.
MAXTOR FUSION USER’S GUIDE
Port Forwarding
What is Port Forwarding?
In general, your network router rejects requests for
information that come from the Internet. Requests from
users that want to access your Maxtor Fusion should not be
rejected but passed on from your router. Port forwarding
allows your router to pass along request (such as view a
Web page or download a file) to the Maxtor Fusion. To enable
applications to keep track of things, specific ports are
designated. This technique can allow an external user to
reach a port on a specific IP address (inside a LAN) from
the outside via a NAT-enabled router.
Setting up Port Forwarding
To setup Port Forwarding:
1. Unless otherwise directed, leave the WWW Port setting
(in the lower left corner) at 8888.
2. Select the router manufacturer's name and then the
model from the pull down menus on the wizard screen.
3. Click on the link Visit Manufacturers Site.
4. A new browser window will open up at
www.portforward.com, with specific instructions on
setting up port forwarding on your router.
5. To proceed from here, you will need to log in to your
router, using the admin username and password. Follow
the instructions at portforward.com, or those found in
your router's user guide. PortForward.com is very
helpful because it will take you through a step-by-step
process to get port forwarding working for your router.
6. Once your router has been configured for port
forwarding, return to the Setup Wizard and click the Test
button. If properly configured, you will see a message
that testing was successful.
7. Click the Next button. The next screen says
Congratulations, and will contain a listing of important
information. You should print it out or copy it into a
document that is safe and accessible.
PAGE 24
MAXTOR FUSION USER’S GUIDE
Appendix II – Maxtor Fusion Checklist
Maxtor Fusion Information
Dynamic DNS Service Information
*Serial Number
*Dynamic DNS Service Provider
*Password for Admin Account
*Username for Dynamic DNS Service
*Email Address for Admin Account
*Password for Dynamic DNS Service
Time Zone
*DNS Hostname
Outgoing Email Settings (for Email Invitations)
Port Forwarding
*SMTP Server Name
*Router Manufacturer
*SMTP Username
*Router Model
*SMTP Password
*Router Username
*SMTP Server Port Number
*Router Passwor
*Port Number
User Account Information
Display Name
admin
Username
admin
Password
Email Address
Network Settings
IP Address:
.
.
.
Subnet Mask:
.
.
.
Default Gateway
.
.
.
DNS Server 1:
.
.
.
DNS Server 2:
.
.
.
It is recommended that you record this information and keep
it in a safe, accessible place. Information with an asterisk
should be recorded before installing Maxtor Fusion.
PAGE 25
PN: 20342400