1
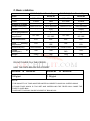
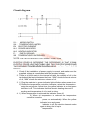
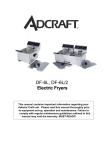
ELECTRIC FRYERS RO-S6L RO-DF6L RO-SF8L RO-DF8L USER’S MANUAL TELEPHONE: FAX: SERVICE (44) 01332 875665 SERVICE (44) 01332 875536 Please read the manual carefully before use and keep it for future reference. WARNINGS! ANY REFITTING, INCORRECT INSTALLATION, ADJUSTMENT AND MAINTENANCE CAN LEAD TO DAMAGE. PLEASE CONTACT THE SUPPLIER IF YOU NEED TO AJDUST OR MAINTAIN THIS UNIT. ALL ADJUSTMENTS SHOULD BE CARRIED OUT BY AUTHORISED PROFESSIONALS. DO NOT PUT FLAMMABLE LIQUID, GAS OR OTHER OBJECTS AROUND THE PRODUCT FOR SAFETY REASONS. THIS MACHINE MUST BE EARTHED. PLEASE ENSURE THE OIL IS ABOVE THE MINIMUM LEVEL INDICATED TO MINIMISE RISK OF FIRE. This Fryer is easy to use, has constant temperature control, fast heating and saves oil and energy. It can cook, fry and warm food. A. Structure Single Electric Fryer 1 2 3 4 5 6 7 8 9 10 11 Double Electric Fryer POWER INDICATOR HEATING INDICATOR TEMPERATURE CONTROLLER ELECTRIC BOX ELECTRIC HEATING ELEMENT POWER CABLE RUBBER FOOT LOWER BOX FRYING BASKET OIL TANK PROTECTING BOARD FOR ELECTRIC HEATING TUBE B. FUNCTION 1. Single product is 1-tank fryer; double product is 2-tank fryer. Double tank fryers can fry two different kinds of food at once. 2. Built-in thermostat sets temperature for fryer, and indicators show when this is achieved. 3. If the oil becomes too hot the power supply cuts off automatically. 4. When lifting the element, the micro-switch works at once. It will cut off power as a fail-safe device. 5. The electric heating element has protective plate which is easy to remove from the tank. C. Basic statistics Model SINGLE (1) Tank Electric Fryers RO-SF6L RO-SF8L Voltage ~230V, 50Hz 220-240V,50/60Hz ~230V, 50Hz 220-240V,50/60Hz Power 2.5KW 3KW 2×2.5KW 2×3KW 1 185×270×175 1 240×300×200 2 185×270×175 2 240×300×200 6(L) 8(L) 2×6(L) 2×8(L) No.of frying baskets 1 1 2 2 Setting range of Oil temperature 60º-190º Number of oil tanks Oil tank Size (mm) Volume 60º-190º DOUBLE (2)-Tank Electric Fryers RO-DF6L RO-DF8L 60º-190º Max temperature 230º Hand resisting temperature 150º Dimension(mm) Length of handle(mm) 265x430x285 280x440x360 545x430x285 550x440x360 240 240 240 240 5.8kg 8kg 11kg 12kg Weight 230º 150º 230º 60º-190º 150º 230º 150º DO NOT OVER FILL THE FRYER, USE THE DATA BELOW AS A GUIDE. RO-SF6L & RO-DF6L RO-SF8L 0.6Kg/pot 1.2Kg/pot & RO-DF8L NOTE ①THE QUANTITY OF FOOD MUST BE LIMITED IN ORDER TO AVOID OIL OVERFLOWING. ② FRYING FOOD WHICH IS TOO WET AND OVERFILLING THE FRYER WILL CAUSE THE FRYER TO OVER BOIL. ④ OVER-WET FOOD MAY CAUSE A SURGE OF BOILING OIL. Circuit diagram S1- SA- EH HL1 HL2 E- SB MICRO-SWITCH TEMPERATURE LIMITER ELECTRIC ELEMENT POWER INDICATOR HEATING INDICATOR EARTH GROUND TEMPERATURE CONTROLLER NOTE: THE CIRCUIT PRINCIPLE OF RO SERIES 1-TANK/2-TANK ELECTRIC FRYER IS DIFFERENT. THE DIFFERENCE IS THAT 2-TANK ELECTRIC FRYER HAS TWO TANKS AND TWO ELECTRIC BOXES AND TWO SEPARATE TEMPERATURE CONTROLLERS. Instruction 1. Check if the installation of power supply is normal, and make sure the supplied voltage is coordinated with the required voltage. 2. There is oil level mark in the internal oil tank; the quantity of oil in the tank should be kept at between the lines. “MAX” shows the most volume of oil, “MIN” shows the minimum volume of oil. 3. 1) Plug the machine in, green indicator light will show when power is on. 2) Rotate the temperature controller clockwise; select the temperature using the red pointer. At that time, the yellow indicator is on and green indicator is off. This indicates that that electric heating element is working and temperature of oil in tank is rising. 4. 1) When temperature is achieved the indicator turns off. 2) When oil temperature is reduced the temperature controller turns the power on automatically. When the yellow indicator is on and green indicator is off; the electric element works again to bring the oil up to temperature. 3) This process repeats to ensure temperature is constant. 5. The cover of tank is designed to keep pot clean and retain heat. Please ensure no liquid is on the cover before use to minimize risk of spitting oil. 6. 1) The enclosed frying basket is for frying small food. There is hook and handle on the basket. 2) Immerse the basket into oil when operating. When the frying is finished, lift the basket and hang it on the front notch of tank to filter oil. 7. After working, please rotate the temperature controller anti-clockwise to the limit position and cut off power. 8. 1) Please make sure oil is cool before emptying tank. 9. 2) First, switch off power, then remove the element protection plate from the tank, and then take the element out of the back notch in bottom box. Once the electric box and element are separate from the tank put them to one side and then empty out the oil. 10. The partition board of oil tank is designed for protecting electric heating element. Put the protection plate into the oil pot when frying food. 11. 1) There is temperature min/max control. The maximum temperature is 230º; reset temperature is less 170º. 2) There is “reset button for over heating”. Press the reset button to restart. 12. There is micro-limit switch in the power box. 13. Please change oil regularly. Do not use old oil because it will have a reduced flash-point and be more prone to surge boiling. D. Notes for installation 1. The using voltage for this equipment must be coordinated with the supplied voltage. 2. User should install a suitable power switch and breaker switch near the fryer. 3. At the back of the equipment is the earth bolt. Please connect the earth wire in compliance with the safety regulations with copper cable of no less that 2mm². 4. Before using, check every connection, that voltage is normal and ground connection is safe. 5. Do not use water to clean the electric box. 6. This fryer must be installed by qualified engineers. Notice ● This equipment must be operated by trained professionals. Modification of this product may cause serious accident. ● Do not clean the product with a water jet or expose the electrics to water while cleaning. ● Do not use another power supply with different voltage. Do not use main switch that is not coordinated with safety regulation. ● Do not damage the body of the fryer. ● Turn off when not in use. ●The installation and maintenance of electric circuit must be carried out by qualified engineers ●If power cable is damaged; it should be changed by a qualified engineer. Warning! ● ● ● ● When using, hand, plug and switch must be dry. Oil should not be lower than the indicated minimum oil level. Do not allow switch on unless there is sufficient oil in the tank. Do not use water to clean the electric box directly or soak the electric box in water to clean. ● Do not use old oil to fry because it will cause over boiling. ● Do not fry wet food or overfill the fryers. E. Troubleshooting Troubles Causes 1. The Machine is plugged in 1. Plug is not inserted but not working. properly 2. Micro-switch contacts not correct. 2. Heating indicator is not on 1. Element connection is and temperature is not loose. raised. 3. Power indicator is on but 1.Temperature controller is temperature is not rising. faulty. 4. Temperature control is 1. Indicator is faulty. normal but indicator is not on. 5. After circuit heating 1. Temperature limiter element is not heating. working. Solution 1. Replace the plug firmly 2. Check Fuse. 3. Adjust the limit distance of micro-switch 1. Tighten element connection 2. Change element 1. Change temperature controller. 1. Change indicator. 1. Reset “over heating protecting button” 6. Temperature control can not be controlled. 1. Temperature limiter is faulty 1. Change temperature limiter. If any faults occur do not use and consult professionals for repair. F. Transportation and storage During transportation, the machine should be not be shaken. The packaged machine should not be stored in the open air. It should be put in a ventilated warehouse without corrosive gas. It should not be put upside down. G. Cleaning and maintenance 1. Cut off the power supply before cleaning to prevent accidents. 2. Do not use wet cloths to clean the module plate, the surface of the equipment or power cable. 3. Switch off when not in use. 4. When storing for a long time without use, please ensure fryer is cleaned thoroughly and stored in a cool, dry place. H. Daily checks Check the fryer daily before using. Before using After using Whether the machine level? Whether the power lead is old, broken or damaged? Whether the control panel is damaged? Whether there is a strange smell? Is there any strange noise? WARNING! Checking the Fryer everyday can help minimize chance of serious accidents. Stop using if user feels that there are some problems in the circuit or machine. Ask the trained engineer to check and repair the machine if necessary.