1
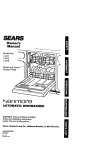
8EAR8
_.wner's
( Manual
~,"
Model Nos.
14071
14072
14074
14O75
Model an_d Serial
Number.Plate
•
AUTOMATIC
DISHWASHER
CAUTION: Read and foli0w all S;_fety
Rules and Operating Instructions'
before first use of this product.
Sears,
Roebuck
and
_6SD3592f_059
_R5558-1
;42 CG
)tinted in U.S.A.
Co., Hoffman
Estates,
IL 60179
U.S.A.
Warranty
...................
.Below
Important Safety'Instructions
.......
3
Important Parts of Your Dishwasher
. .4
What Your Dishwasher
Needs .......
5
Rinse Agent Dispenser ..............
Proper Loading ..............
User Maintenance Instructions
101.
..... 12
Care and Cleaning
.....
..........
12
I
Special Tips .............
Operating Instructions
1.......
6
" .... 7-8
......
Air Gap .......................
Color Panels ................
Detergent Dispenser ..............
9
Problems and Solutions
Detergent Usage Guide
9
Sears Service ..................
Full One-Year
Dishwasher
...........
Warranty
on
For one year from the first day of use
in your home, Sears will repair, free of
charge, defects in material or workmanship
which appear in this dishwasher.
Full Ten-Year Warranty
Against
Leaks in the Tub and Inner Door
Panel
For ten years from the first day of
your home, if a leak should occur
result of failure of the tub or inner
panel due to cracking, chipping, or
Sears wilt replace, free of charge,
or inner door panel.
use in
as a
door
peeling,
the tub
12
_..13
.......
20
The model number of your automatic
dishwasher is found on the serial plate
fastened to the tub wall just inside the
dishwasher door,
All repair parts are available for immediate
pui'chase or special order when you visit
your nearest Sears Service Center, or the
Service Department at most Sears
Stores. To request service or order ,'qrts
by phone, call the toll free numbe
_ed
on the back cover.
-When requesting service or ordering r
always provide the following informat.
• Product Type
• Part Number
If the dishwasher is subjected to other than
private family use, _e above warranty
coverage is effective for only 90 days.
• Model Number
Warranty service is available by
contacting the nearest Sears Service
Center/Department in the United States.
This warranty applies only while t}iis
product is in use in the United States..
Sears, Roebuck
and Co.,
Dept. 817WA,
Hoffman Estates,
IL 60179
This warranty gives you: specific legal
rights, and you may also have ot.her dghts.
which vary from state to state.
14-17
• Part Description
WARNING:
Please follow these basic precautions, including the following:
i
.i all instructions before using your
dishwasher.
• (_nly use detergents and rinse agents
recommended for use in a dishwasher.
• Store detergents and rinse agents in a
cool dry place out of children's reach.
• Do not tamper with controls.
* To avoid risk of electrical shock,
the dis.hwasher must be electrically
grounded before it is operated.
• If you did not receive Installation
Instructions with your dishwasher, you
can get a copy by contacting your Sears
Service Center.
• Do not operate dishwasher unless all
enclosure panels are properly in place.
• Do not touch heating unit during
or immediately after use. Allow time to
cool.
• Always disc6nnect electrical power to
dishwasher before attempting to service
it. We recommend having a qualified
technician service your appliance.
• Load sharp or pointed tableware with
handles up (points down) to avoid injury
when reaching into dishwasher.
• Remember, use dishwasher for its
• intended purpose only.
• Do not wash plastic items unless marked
• "Dishwasher Safe" or equivalent. If
unmarked, check manufacturer's
recommendations.
• This dishwasher must be properly
installed in accordance with the Instal,
lation Instructions before it is used.
( IOUNDING
INSTRUCTIONS
:
_nect to a properly rated, protected
. .Jsized power-supply circuit tO avoid
electrical overload.
• This appliance must be connected to
a grounded metal, permanent wiring
system; or an equipment-grounding
conductor must be run wffh the circuit
conductors and connected to the
equipment-grounding
terminal or lead
of the appliance.
WARNING:
The improper connection of the
equipment-grounding conductor can
result in a dsk of electric shock. Check
with a qualified electrician or service
;epresent_tive if you are in doubt whether
:he appliance is properly grounded.
• Load sharp items and knives so they
aren't likely to damage door seal.
• Do not sit or stand on or abuse
dishwasher door or dishracks.
• Do not allow children to play in or on
dishwasher.
• When discarding old dishwasher,
be sure to remove door to prevent
accidental entrapment.
• Do not install the dishwasher on
carpeted floor.
AWARNING:
Under certain conditions, hydrogen gas
may build up in a hot water system that
has not been used for two weeks or more.
HYDROGEN GAS IS EXPLOSIVE. TO
prevent injury or damage, before using
dishwasher, turn on all hot water faucets
and allow water to run for several
minutes. This will allow gases to escape.
As the ga_ is flammable, do not smoke or
use an open flame or appliance near
faucets while they are open.
NOTE: Do not store or use combustible
materials, gasoline or bther flammable
vapors and liquids in the vicinity of this
or any other appliance.
SAVE THESE
3INSTRUCTIONS
'
Appearance willvary accordingto the m_lel number
Upper rack
Wash tower
--
Lowerrack
Lowersprayarm
Heatingunit
Right
Side
View
Door latch
Inner
Controlpanel
Door panel
,,-_I'g'IRPIRRI_'=
,---.---Jr_
@
Door
]i
r
Rinse agent
dispenser
Loweraccess panel-
Front
View
4
Detergent
dispensers
La al_adenclavaria seg_'r_el nOmemde modelo
Canastillasuperior
lavado
Inferior
.azo inferior rociador
Unidad
calefaclora
Vista
Lateral
Derecha
." "
i
Se.gurode la
puerta '
s
°o
[
i,t._el_!
F
' de
.
q
_
Puerta
....
-@
•
Interior
r_._a.,,...........................
Panelde la
puerta
,
Dispensador
del-agente
de enjuague.
'_nel Inferior
Vista
Frontal
5
-
m
.
Dispens_lores
de deter ente
Agua Callente
- ParaIlmpiary secar los plates ustednecesita
agua caliente.Paraayudarlea usteda obtener
agua a unatemperaturaaproplada,su
.lavadorade plates calientael agua
automdticamenteen el ciclode lavado.Se
necesita agua a temperaatura
elevada para.
disolverla grasay actlvarlos detergentesen
polvo.Para un buen lavadoy seca.do,el agua
que entradebe tener unatemperaturade per
Io menos 120°F.Para evitardaSoa los plates,
el agua entranteno debeexceder los 150°F."
Condiciones
del Agua
En las Areas donde el agua es muydura (12 "
granoso mds), pudierahacersenecesariala
instalacl6nde un suavizadorde agua para
asegurarel rendimientoapropladode su
lavadorade plates.Si ustedno sabe el grade
de dureza i:lesu suministrode agua, p6ngase
en contactocon su departamentolocalde
agua o traiga una muestraa su tiendaSears
para haeeruna prusba.
Compruebela temperatura"
de su agua con
dn.term6metropara caramelo o came.
• Abrala Ilavedel agua callentemds cercana
a la lavadorade plates.Pongael ten_dmetm
en un vase y deje que el agua corra
continuamentedentrodel vase hastaque ia
ternperaturadeje de sublr.
..
Detergentes
"" Use solamente detergentesespeclalespara
No pongaa funclonar la lavadorade plates
duranteo Inmediatamentedespu6sde otto • use an lavadorasde plates automdtlcas.
• NUNCA usa en su lavadorade plates
use abundantede agua caliente,ta! come
dete_jentes de lavar mpa, jabonesI|quidosu •
el lavadode ropao un ba_0." " ...
Otros.Ilmpiadorescaseins.Algunosdetergentes
Presi6n del Agua ;
serdnmds eficacesque otros,de acuerdo con
condtcionesde su agua. Almaceneel
La presi6ndel suminlstro de agua deber_estar ' las
detergentden un lugar fresco y seco.
entre 15 y 120 librasper pulgadacuadrada.
Paradelermlnar sl ustedtlene sufldente
presi6n,ponga unreciplenta conuna
capacldadde un cuartode gal6n debaJode la
Ilavede agua callentemds.corcanaa-la
lavadorade platesy abra la llave al mdxlmo.SI
el reciplentese Ilena en menoSde 9 segundos;
la presi6ndel agua estd dentm de un margen
aceptable.Cerci6rese"de que todas las demds
llavesde agua est6n cerradasdurar)teesta
Agentes
de En.luague
prueba; "
Losagentes de enjuague hacen que el agua
corm sobre losplates mds rdpldamenteque Io
•usual. Esto_lismlnuye las manchasde agua y
Ilace q.Oeel secadosea mdsrdpldo.tambidn.
. I_osagentesde enjuague se pueden
.":obtenerya sea en formaIfqu|dao s6fida.El
dispen_dor de su lavadorade plates usa la
=forma.ll'qulda.
.f)
Appearance may vary
_1111
I I I I II1
i
mmm
II
STARTING
YOUR
DISHWASHER
• Load the dishwasher (seepages 10 and 11). • Turn on hot water faucet nearest dishwasher
Add detergent_
_ (see page 9).
and letit run until the watel"is hot.
• Close the door but do not latch it.
• If dishwasher drains into a food waste
• Turn the Dial to the'desired wash cycle.
Then latch the door to start the dishwasher.
disposer, operate disposer until it is emply.
SELECT
THE
CYCLE
HEAVY WASH
For heavily soiled dishes and pots and pans.
Cycle Time: Approx. 93 minutes
Water Usage: Approx. 9.5 gallons
'
3MAL WASH
F,,, normally soiled dishes.
Cycle Time: Approx. 89 minutes
"er Usage: Approx. 8.0 gallons
LIGHT WASH
For prerinsed or lightly soiled dishes and
dishes that have been stored.
Cycle Time: ApProx. 86 minutes
Water Usage: Approx. 6.6 gallons
+.He+
For rinsing dishes that will be washed later.
DO NOT USE DETERGENT.
Cycle Time: Approx. 12 minutes
Water Osage: Approx. 3.9 gallons
_
_
_
_e,e_
coo,
o__ea,_n_+o_
7
+!
SELECT
HOW TO ADD A DISH
A cYCLE
OPTIONS
HOT DRY Option
Turns drying heating unit on for
@
fast drying.
COOL DRY Option
Turns heating unit off for entire
drying period. To shorten drying
time, open dishwasher door
slightly.
NORMAL
SOUNDS
SIGHTS
!
I_1
DURINr-
• Add dishesanytime during RINSE &
HOLD cycle.
• With other wash cycles, you can add
dishes at any time BEFORE the
detergentcup has opened.
Here's how to add a forgotten dish:
.1,Push door latchto the left.Washingwill
stop.
2. Wait a few secondsuntilthe water
calms. Then open the door.
3. Add' dishes you've forgotten,
AND
• You'll see water vapor coming ihrough
the vents by the door latch during drying
and when water is being pumped out.
• You'lt hear occasionat sounds while your
dishwasher is running:
• Soft food disposer shredding action.
• Drain valve Opening to pump water
out.
• Timer control as cycle progresses.
• Detergent cup opening.
• Pump motor startrng.
• The motor stops during drying.
PREPARING
WASHING
DISHES
FOR
• Prerinsing of normalfood soil Is not
necessary.
• Scrape offbones, seeds, skins,
toothpicksand otherhard soils.
• Remove hardshelledvegetables,
meat trimmings,leafy vegetables,ann
excessiveamountsof oilor grease.
• Remove foods with high acid content-they can discolorstainlesssteel.
, ....
• Remove large quantitiesof any food_
ENERGY
TIPS
AND WATER
SAVING
• Wash full loads.
• Use your dishwasher
hours.
during off-peak
•Use the LIGHT WASH cyclewhehever
possible.
• Select COOL DRY optionwhen you
don'tneed dry dishesin a hurry.
• Don't prerinsenormallysoileddishes.
• Load t:orrectly to ensuregood washing
action.
° When usingthe HEAVY WASH cycle,
less preparationis required.This cycle
can wash heavily-soileddishesand
removedried-onand baked-onsoils
from pots,pans and casseroles.
However,itemswith burned-onsoils
may not come clean.
',i'llfind two detergent
• Alwaysclosethe.maincup tightly.When it
is firmly latched you will hear a •clicking
sound,it Is not .necessaryto overtighten,
dispenserson
.inside door of your dishwasher.•
-.. ,
Open cup
Grasp handle, rotate /
.andcloseUghUy /
._
,
Maincup
_°
Closethe main cup.
Do not.adddetergentuntilyou are ready
to start the cycle.,Usefresh detergent.
The dispenserwillautomaticallyrelease
detergentat the correcttimes duringthe
cycle.
Detergent
Usage
Guide
(powder
•
Cycles
Soft Water
• (0 to 3 grains)
Lo_,tWash
MainCup
1 tablespoon
_avy Wash. EachCup
•i:i _alWash 1 tablespoon
Rinse &.Hold
No Detergent
•NOTE: To open.thedeteFgontdispenser
afterithas beenclosed,'unlatchthe doorand rotatethe'Dial a fulltiJrnto the OFF
position.When the dosed•cupcontains "
soap it is bestthat the doorbe in a
partiallyopenpositionbeforerotatingthe
Dial.Thiswillhelpreducethe amountof ."
detergentand dnse aid agent spillage!nto
thetub.
.-
or liquid)
.
Moderately
Hard Water
(4 to 8 grains)
-
Hard Water
•(9 to t2 grains)
MainCup
Each.Cup
:Completely Full
No Detergent
• No Detergent
Hard
Water
12 grains)
Wate( Softener
• Recommended
Completely Full
• Each Cup
Half Full
Uhscrewthe cap.Note the FULL line
on the tip of the cap. Add the liquidrinse
agent untilitjust reaches the top of
the FULL line. Replace the cap. The
dispenserautomaticallyreleasesthe
rinse agent intothe final dnse water.
Very
- (over
" MainCup-
Half Full•. •
To fill the dispenser=.
-:
WaterSoftener
.: Recommended
WaterSoftener
Recommended
T
Fu,"..<".
Fillas needed, butdo :ndt overfill:
UPPER
RACK
(appearance will vaw)
The upper rack is best forglasses, cups
and saucers. Cups andglasses fit best
along the sides. This is also the place for
dishwasher safe plastics. Make sure small
plastic items are lodged in tightly so they
can't fall onto the heating unit. Arrange
stemware so that it cannot move easily.
Don't let the glasses touch each other.
The upper rack is handy fol_all kinds of .
odd shapes. Saucepans, mixing bowls
and other Items should be placed face
down:When ioadlng diShwasher-safe
plastics make sure each .plastic Item.is =. '
secured oVer two fingers.This will ihsOr.e_
. good Washing results. :. ....
. ......,
I
lO
IL 1ER RACK(appearance wili_ry)
:..i'"_TE:Do not load large platters.orti'ays Put flatwarein the removable•basketwith
fork and knife handlesup to protectyour
.::.;: 'ontrightcorner of lower,rack.They.
• hands. PlacespOonsin the basketwith
hlay preventdetergentfrom circulating'
•handles'down;Mix kn.ives,forksand
in the.washcycle.
•
spoonssothey don'tnest toge.ther. The lowerrack'isbest used for plates,
•Distributeevenly.
=
.
saucers,and cookware.Large itemssuch
as broilerPansand racksshouldgo in the Small plasticitems, suchas measuring
lowerrackalong the edge. Loadplatters, • Spoonsand lidsfrom small containers,
a_re not recommendedfor automatic
potsand bowls along the sides, in
corners,or in the back. For best washing •dishwashi.ng.If placed In dishwasher,they
results,all itemsshouldbe positione,
d with shouldgo in bottomof utensilbasketwith
the soiledside of the dis_ facingthe
•silverwareon top.
center of the rack.
"
'
I
,It
Q centerarea
clear in the
I,
,r rack.
.7"-q.WashTowerrises throughthe center
:;i:!:.Jelower rockduringthe wash and rinse
_rtions ofth.e cycle.Don'tblockit or load "
tall thingsnextto it.Also,becareful notto :
leta portionof an itemsuch as a pot or
dishhandle extendthroughthebottom •
rack.Thiscouldblockthe.washarm and
causepoorwashingresults.
- CAUTION Takeout anything
that may fall or
extendthroughthe.
10bttom
of the Utensil
basket.
WashTower
11
Utensil basket
g
CAREOFSURFACES
..
PROTECTION
'AGAINST
FREEZING
:.
• Clean control panel with lightly
|
.,.
dampened cloth. Dry thoroughly.
_.
If dishwasher is left in an unheated plac,_-.,'
DO NOT use abrasives or sharp
durirlg the winter:
objects---they could damage the control"
'* Shut off water and electrical power.
•panel.
.
• Remove access panel•
• Clea_ Outslde cabinet finish with a good
• Disconnect water lines from valve. Drain
appliance polish wax. DO NOT use
scoudng pads, harsh or gritty cleaners.
Intoa fiat pan.
• Interior is self-cleaning with normal use.
If it should ever need cleaning, use a
mild cleansing powder. If hard water
* Drain collection chamber at rear of unit
below filter by disconnecting hose to
pump.
causes lime build-up, clean as follows"
--Pour 2 cups white vinegar into empty
dishwasher. DO NOT use detergent.
---operate .machine On NORMAL WASH
• cycle.
• Remove plastic pump cover in tub
bottom and use sponge to soak up any
remaining water.
• Reconrlect water lines to valve and
• :hoses to pump.
j
. ,
• Pump coverscrews
,L
CARE.
OF AIR
.RSPARA FOR
iO. .OV'"GI...Ii
GAP
• Disconr_ect electrical power.
If an air gap was installed for your built-In
dishwasher, check to make sure it is
clean. Air gaps are usually mounted on
the coiJntertop and c&n be inspected by
removing the cover. Theair gap is not part
of your dishwasherand is not covered by
Sears warranty.
•
.
Turn off water supply, disconnect water
and drain lines.
• Tape-racks in place; close door securely
and tape it shut.
• Wrapwt_ blankets and, if using a hand
trucl_ lift dishwasher from side in upright
•:position only.
Drain.air gap..
12
OPTIONAL
ACCESSORIES
'"
can change the door and lower
Jss panelappearance of your
d=shwasherby orderingone of these
optionalaccessories:
• ColorPanels
• 1/4" Wood PanelTrim Kit
These accessoriesare availablefrom:
Dri_ViewManufacturing
4706 AIImondAvenue
Louisville,KY 40209
Specifyaccessorynumber when ordering
DESCRIPTIONS
ACCESSORIES
OF OPTIONAL
Color Panels_ Replacementdoor and
loweraccess panels are availableIn the
followingcolors:
GPF400A (Almond)
GPF400B (Black)
GPF400W (White)
Wood PanelTrim KitmThis accessory
containstrim and Instructionsfor you to
s' -ly and installa 1/4" thickdecorative
door and loweraccess panel:
22-16071 (White)
_" 16075 (Black)
8078 (Almond)
NOTE: The 22-16072 dishwasher door
spring kit mustalso be orderedand
installedwhen the door panel weighs
four Ibs or more;
13
BY
SOLUTION
PROBLEM
CAUSED
Dishwasher
will not start
• Dishwasher not
• Check housefuseor circu!tbreaker.
receiving electricity
• Dial not in correct
position for c_ycle
selected
-Make sure Dial is turned far enough and
cycle button is fully pushed in.
•Turning the Dial
too far
• Be carefulyoudo notturn1heDialany
"
fartherthan necessary.Thera is a delay
between start-upand water fillso you will
not hear any wash action right away,
-See the solutionabove.
Dishwasher.will •Turning the Dial
notfill withwater too far
•No water supply
•Make sure water supplyvalve under sinkis
turnedon.
•Water inletvalve
•Water valve supplyline may be cloggedwith
sediment.Clean out.
UnuJ;ual!noise I.Im_ropjer
cldgge_ I_Lding
•Utensilsmay not be secure on rack pins,
or somethingsmall may have droppedfrom
the rack.Water is causingutensils to rattle.
•Make sura everythingis securelyplaced
indishwasher.
_Leveldishwasheras descdbedin Installation
Instructions.
Don'tplacedishwasheron carpet.
i
,
!
i
J
Dlsl_washer I
i'Oi_hw_sh_nbt
leak i. !
I.To_)m_ch_udsing
•Improperdetergent.Use automatic
• dishwasher detergent only or try a
I different brand or less detergenL
• If handdishwashingdeter_]entis used by
mistake,pour one measuringcup of
..
vegetableoil in bottomoftub and run ;
dishwasherthrougha completeNORMAL•
WASH cyclewith recommendedamount of
automaticdishwashingdetergent.
•,To remove suds from tub:Open dishwasher.
Let suds evaporate.Add 1 gallonof cold
waterto tub. Closeand latch dishwasher.
Pump out waterbyslowlyturning Dialuntila
drainpedodis reached.Repeatif necessary.
_-Spilled rinse a.gent
•Dishwasher door
interfereswith
surrounding
cabinets
•Spilledrinseagent can cause foam during
washrig. This can lead to overflowing:Wipe
up a(cidental spillof rinseagent with a
daml: cloth.
•Make sure doordoes not touchcabinets
when openingor closing.Use levellinglegs
to level dishwasher.
14
-'_OBLEM
CAUSED
BY
_ _hes not dry
•Water is not hot
SOLUTION
•Raise water heater thermostatto 140°F if
necessary.
• COOL DRY option • Do notselectCOOL DRY option.Allow
selected.
dishesto dry in heated air.
• Impr0pe_ loading
Spottingand
filming
!.Rinse agent
dispenserempty
• Hardwater
•Water is not I_ot
• Loaddishesso items drain properly.Avoid
overloading.
• Fill rinseagent dispenserif empty.
• Filldetergentcupsto capacity.Usedishwasher
detergentwithhighest availablephosphorous
content.May be necessaryto installa water
softener.
• Raise water heater thermostat to 140°F.
•COOL DRY optiori • Dryingwithoutheat may cause some
selected
spotting.Do not selectCOOL DRY option.
*Use
more fresh automaticdishwasher
._
• NOtenou_.hor,
•poor quahty
detergent.Use detergentwith highest
detergent
availablephosphorouscontent,
especially ifyou have hardwater.
*Old detergent
• Use onlyfresh, automatic dishwasher
detergenLStoretightlyb-losedin a cool, dry
place.Discardold, lumpyor separated
detergent.Do not fill detergentdispenser
untilready to wash.
• No rinse agent
• Fill rinseagent dispenser.
To I'bmovestubborn spots and film from
glassware:
1. Remove all metalutensilsfrom the
'dishwasher.
2. Do not add detergent.
m"
m
p,-
I=
r
3. Select HEAVY WASH cycie.
v"
4. Startthe dishwasherand allowto runfor
3
18 to 20:minutes.The dishwasherwill now .L
be in the;mainwash.
5. Then openthe doorand pour 2 cups
(500 ml)white vinegar intobottomof
dishwasher. •
6. Closethe doorand allowto completethe
cycle.
If vinegar rinse doesn't work: Repeat as
above, exceptuse 1/4 cup (60 ml) of citric
acid crystalsinsteadof vinegar.(Most
drugstorescarry citricacid crystals.)
15
PROBLEM
Etching-permanent
filming which
cannot be
removed
'CAUSED
SOLUTION
BY
• Reduceamountof dishwasher detergentl
Usedetergentwithlowerphosphorous
content.
•Too much
detergent
in soft water
,t
• Improper loading
I
Water left
in bottom
of tub
• Normal amount of
water
• Make sure dishes and glassware are loaded
properly to permit water spray to rinse all
surfaces. Do not overload.
• It is normal for a small amountof clean Water
to remain in bottom of tub after each cycle.
• Clean the drain air gap. See User
Maintenance Instructions.
Dishes and
interior of
dishwasher
brown or yellow
• ll'on or manganese
in water
• install an iron or manganese
water supply.
Film build-up on
lower front of tub
•Some detergent
did not dissolve
• Use fresh,automatic dishwasherdetergent.
Usedetergentwithhighest available
_hosphorouscontent,especia!ly
if youhave
ard water.Raisewater heaterthermostatto
140°Fifnecessary.Runwaterat sinkuntilhot
beforestartingdishwasher.
Removefilmwith
dishwashing
detergent andwarm water.
Silverware
stained
•Undissolved.
deterg..entcontacting
wet sdverware
•Avoidspillingdry detergenton wet
silverware.
Clean withsilver polish.
• Acidic or salty
food soils
• Use RINSE & HOLD cycle. Certain foods left
on silverwarefor extended periods of time m=
cause pitting..
Bronze tarnish
on silver plate
•Silverplatewom
offexposingbase
metal-takes on
bronzehue
• Remove tarnish with silver polish.
Black or gray
marks on dish
• Metal utensils
rubbing against
dishes during wash
• Load metal utensilsso they do not rub against
dishes. Marks may be removed with mild
abrasive cleanser and plasticscouring pad.
Dishware chipped • Improper loading
or broken
Dishwasher odor
filter in home
,,Do not overload. Load glasses in _ppei" rack
only.See Loading section for tips.
•Soiled dishes held
too long in
..
dishwasher
• Use RINSE& HOLDcycleifdisheswillnotbe
washedat end ofday.
• Vinyl rack coating
• Plastic odor will be gone after several weeks use
16
m
' PROBLEM
::!:i_otor hums
CAUSED
BY
i
Staining of ..
tub interior
SOLUTION
• Dishwasherhas
not been used on
a regular basis •
• If youdo notuseyourdishwasheroften,
set it to fill and pumpOUtonce every week.
•This will helpkeep the seal moistand the "
• garbage disposerclear. ....
•Some detergents
contain,colorant
(pigment or dyes)
,,Thiswilldiscolorthe tub interiorwithextended
use, Check the detergentdispenserfor Signs
. of any discoloration.
Ifdispenseris discolored,
change to detergentwithoutany colorant.
• Some tomato-based
foods can stain
• Usingthe RINSE & HOLDcycleafteradding
dishto.theloadcandecreasethelevelofstaining.
•This is a normal occurrence.
Vapor at the
vent
• Water vapor comes
through the vent by
the door latch dudng
drying and when
water is being
pumped out
Detergent cup
lid won't latch
after adding
detergent
• Dial not in OFF
position
• Dial mustbe in OFF positionfor cup lid to
close and latch properly.If you unlatchthe
door and open it todryyour dishes,the Dial
does not advancetOOFF by itself.
NOTES
18
NOTES.
19
Forthe repair or replacementparts you need
delivereddirectlyto your home
Call7 am - 7 pm, 7 days a week
1-800-366-PART
(1-800-366-7278)
For in-home major brand repair service
Call2.4hours a day, 7 days a week
1-800-4-MY-HOME_"
(1-800-469-4663)
For the locationof a
SearsParts and RepairCenterin your area
Call 24 hours a day, 7 days a week
,__h,.
1"800"488,1222
For informationon purchasinga Sears
Ma!ntona.,o
Agroome.t
ortoi.qui,e __--__,_U_S_
aboutan
call9
am - 5existingAgreement
pro, Monday-:Saturday
"___,_/
.8oo.827.66ss
Whenrequestingserviceor ordering
parts, always providethe following
information:
• ProductType
• .ModelNumber
• Part Number
,, Part Description
2O
8E/ 8
Arnerk',a'sRepair Specialists "