1
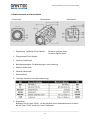
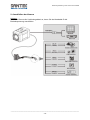
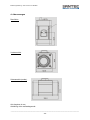
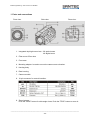
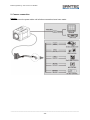
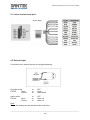
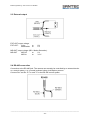
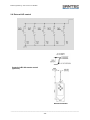
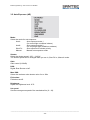
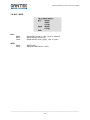
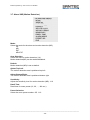
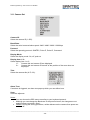
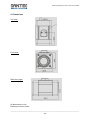
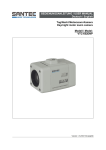
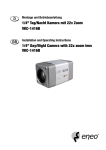
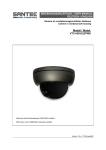
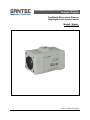
BEDIENUNGSANLEITUNG / USER MANUAL Deutsch / English Tag/Nacht Motorzoom-Kamera Day/night motor zoom camera Modell / Model: VTC-652DNP Version 1.3sfi/0813/dt-engl/A6 Sehr geehrter Kunde, vielen Dank, dass Sie sich für ein SANTEC Qualitätsprodukt entschieden haben. Bitte lesen Sie vor der ersten Inbetriebnahme diese Bedienungsanleitung sorgfältig durch und halten Sie sich unbedingt an alle hier beschriebenen Anweisungen. Bei eventuell auftretenden Fragen zur Inbetriebnahme oder falls Sie eine Gewährleistung oder Serviceleistung in Anspruch nehmen möchten, wenden Sie sich bitte an Ihren Fachhändler oder rufen Sie uns an. Zusätzliche Informationen finden Sie auch auf unserer Internetseite: www.santec-video.com Impressum: Das Copyright dieser Bedienungsanleitung liegt ausschließlich bei der SANTEC BW AG. Jegliche Vervielfältigung auch auf elektronischen Datenträgern bedarf der schriftlichen Genehmigung der SANTEC BW AG. Der Nachdruck – auch auszugsweise – ist verboten. Irrtum und technische Änderungen vorbehalten. SANTEC ist ein eingetragenes Warenzeichen der SANTEC BW AG. Übrige evtl. genannte Firmenund Produktnamen sind Warenzeichen oder eingetragene Warenzeichen bzw. Marken der jeweiligen Inhaber. © Copyright by SANTEC BW AG, Ahrensburg Bedienungsanleitung / User manual VTC-652DNP Dear customer, Thank you for purchasing a high quality SANTEC device. We recommend that you read this manual thoroughly before operating your new system for the first time. Please follow all instructions and observe the warnings contained in this manual. Please contact your local dealer or us directly if you have any questions or if you wish to claim for a service or warranty. You will find further information on our website: www.santec-video.com All rights reserved. This publication may not be reproduced, stored in a retrieval system or transmitted, in any form or by any means (electronic, mechanical, photocopying, recording or otherwise), without the written prior permission of SANTEC BW AG. No reproduction of any part or excerpts thereof are permitted. Errors excepted. Specifications are subject to change without notice for quality improvement. SANTEC is a registered trademark of SANTEC BW AG. All other companies or products mentioned in this publication are trademarks, registered trademarks or brands of the respective company. © Copyright by SANTEC BW AG, Ahrensburg (Germany) _________________________________________________________________________________ -3- Bedienungsanleitung / User manual VTC-652DNP DEUTSCH Inhaltsverzeichnis Allgemeine Vorsichtsmaßnahmen Allgemeine Sicherheitshinweise Lieferumfang 5 6 7 1. Bedienelemente und Anschlüsse 2. Anschließen der Kamera 2.1 Kabelfarben und Belegung 2.2 Externer Input 2.3 Externer Output 2.4 RS-485 Anschluss 2.5 Externe Objektiv-Steuerung 2.6 Externe A/D Steuerung 3. Einstellung der Kamera über das OSD (Bildschirmmenü) 4. Abmessungen 5. Besondere Ausstattungsmerkmale 6. Technische Daten 8 10 11 11 12 12 13 14 15 25 26 27 ENGLISH Table of contents Safety precautions Safety instructions Items included in the delivery 30 31 32 1. Parts and connections 2. Camera connection 2.1 Colour lead wire and pins 2.2 External input 2.3 External output 2.4 RS-485 connection 2.5 External lens control 2.6 External A/D control 3. Camera adjustment via OSD menu 4. Dimensions 5. Special features 6. Technical specifications 33 35 36 36 37 37 38 39 40 50 51 52 _________________________________________________________________________________ -4- Bedienungsanleitung / User manual VTC-652DNP Allgemeine Vorsichtsmaßnahmen Vorsicht VORSICHT LEBENSGEFAHR NICHT ÖFFNEN VORSICHT: SETZEN SIE SICH NICHT DER GEFAHR EINES ELEKTRISCHEN SCHLAGES AUS UND ÖFFNEN SIE NICHT DIE GEHÄUSEABDECKUNG ODER DIE GERÄTERÜCKSEITE. IM GERÄTEINNERN BEFINDEN SICH KEINE KOMPONENTEN, DIEGEWARTET WERDEN MÜSSEN. ÜBERLASSEN SIE WARTU NGSARBEITEN QUALIFIZIERTEM PERSONAL. Erläuterung der verwendeten Symbole Gefahr: Das Gefahrensymbol weist auf lebensgefährliche Spannung hin. Öffnen Sie niemals das Gerätegehäuse, Sie könnten einen lebensgefährlichen elektrischen Schlag erleiden. Achtung: Das Achtungssymbol weist auf unbedingt zu beachtende Betriebsund Wartungsanweisungen hin. CE-Richtlinien Vorsicht: Änderungen und Modifizierungen, die nicht ausdrücklich durch die zuständige Genehmigungsbehörde genehmigt worden sind, können zum Entzug der Genehmigung zum Betreiben des Gerätes führen. Dieses Gerät entspricht den CE-Richtlinien. _________________________________________________________________________________ -5- Bedienungsanleitung / User manual VTC-652DNP Allgemeine Sicherheitshinweise Vor Inbetriebnahme des Gerätes sollte dieses Handbuch sorgfältig gelesen und als Nachschlagewerk verwahrt werden. Vor jeder Reinigung muss das Gerät ausgeschaltet und von der Betriebsspannung getrennt werden. Benutzen Sie für die Reinigung ein feuchtes Tuch. Benutzen Sie keine scharfen Reinigungsmittel oder Sprühdosen. Das Typenschild darf nicht ersetzt werden. Benutzen Sie keine Zusatzgeräte, die nicht vom Hersteller des Gerätes empfohlen wurden. Diese können die Funktionalität des Gerätes beeinflussen und schlimmstenfalls Verletzungen und einen elektrischen Schlag herbeiführen oder sogar Feuer auslösen. Das Gerät sollte an einem sicheren Ort und auf einem festen Untergrund, der das Gewicht der Kamera tragen kann, installiert werden. Schnelle Halts, übermäßige Krafteinwirkungen und unebener Boden können die Ursache sein, dass das Gerät zu Boden fällt und schweren Schaden an Personen und anderen Objekten verursacht. Eventuell am Gerät befindliche Öffnungen dienen der Entlüftung und schützen das Gerät vor Überhitzung. Diese Öffnungen dürfen niemals zugedeckt oder zugestellt werden. Sorgen Sie dafür, dass das Gerät nicht überhitzt wird. Verwenden Sie nur die empfohlene Betriebsspannungsversorgung. Wenn Sie nicht sicher sind, ob die am Installationsort vorhandene Stromversorgung verwendet werden kann, fragen Sie Ihren Händler. Ein Gerät, das von einer polarisierten Stromversorgung versorgt wird, hat meistens als Sicherheitsvorkehrung einen Netzanschlussstecker mit unterschiedlichen Klinken, welche nur auf eine Art und Weise mit der Netzsteckdose verbunden werden können. Versuchen Sie niemals, diese Sicherheitsvorkehrung eines polarisierten Steckers außer Betrieb zu setzen. Wenn das Gerät eine Stromversorgung mit Erdungsanschluss erfordert, dann sollte es auch nur an eine entsprechende Netzsteckdose mit Erdungsanschluss angeschlossen werden. Steht eine solche Schukosteckdose nicht zur Verfügung, dann sollte sie von einem Elektriker installiert werden. Anschlusskabel sollten so verlegt werden, dass man nicht darauf treten kann oder dass sie durch herab fallende Gegenstände beschädigt werden können. Bei einem Gewitter oder bei längerer Nutzungspause sollte das Gerät immer von der Betriebsspannung getrennt werden. Lösen Sie auch andere Kabelverbindungen. Auf diese Weise schützen Sie das Gerät vor Blitzschäden oder Stromstößen. Setzen Sie Netzsteckdose und Netzkabel niemals einer Überbelastung aus. Feuer und elektrische Schläge können die Folge sein. Stecken Sie niemals Gegenstände durch die Öffnungen des Geräts. Sie können Spannungsführende Teile berühren und einen elektrischen Schlag erhalten. Vergießen Sie auch niemals Flüssigkeiten über das Gerät. _________________________________________________________________________________ -6- Bedienungsanleitung / User manual VTC-652DNP Bei Betriebsstörungen oder einem vollständigen Betriebsausfall schalten Sie das Gerät aus und trennen es von der Versorgungsspannung. Versuchen Sie niemals, selbst Wartungs- oder Reparaturarbeiten bei geöffnetem Gehäuse durchzuführen, da Sie sich gefährlichen Spannungen aussetzen. Überlassen Sie Wartungs- oder Reparaturarbeiten ausschließlich qualifizierten Fachwerkstätten. Als Ersatzteile dürfen nur Teile verwendet werden, die vom Hersteller zugelassen wurden oder solche, die identische Leistungsdaten aufweisen. Nicht genehmigte Ersatzteile können zu Schäden an Personen (elektrischer Schlag) und Gerät (Feuer) führen. Nach jeder Wartung oder Reparatur des Geräts muss das Gerät auf einwandfreien Betrieb überprüft werden. Die Installation des Geräts sollte nur von qualifiziertem Personal ausgeführt werden und muss den örtlichen Spezifikationen und Vorschriften entsprechen. Richten Sie die Kamera nie auf ein Objekt mit hoher Leuchtkraft. Helle vertikale oder horizontale Linien können auf dem Bildschirm das gesamte Bild überstrahlen. Dieser Nachzieheffekt ist kein Fehler, sondern eine Eigenart der Halbleiter CCD’s, wenn diese einer starken Lichtquelle direkt ausgesetzt werden. Die Kamera sollte am Installationsort auf die Lichtverhältnisse usw. eingestellt werden (siehe OSD). Bitte beachten Sie im Fall der Entsorgung unbrauchbarer Geräte die geltenden gesetzlichen Vorschriften. Dieses Symbol bedeutet, dass elektrische und elektronische Geräte am Ende ihrer Nutzungsdauer vom Hausmüll getrennt entsorgt werden müssen. Bitte entsorgen Sie das Gerät bei Ihrer örtlichen kommunalen Sammelstelle. Über dieses Handbuch Dieses Handbuch dient zur Unterstützung bei der Verwendung der Kamera VTC-652DNP. Diese Bedienungsanleitung unterliegt einer strikten Qualitätskontrolle. Dennoch kann keine Garantie dafür gegeben werden, dass keine Fehler enthalten sind. Es können Änderungen zu der Bedienungsanleitung vorgenommen werden ohne vorherige Ankündigung. Bevor Sie diese Kamera in Gebrauch nehmen, lesen Sie diese Anleitung sorgfältig durch. Bewahren Sie diese Anleitung für die künftige Verwendung gut auf. Überprüfen Sie, ob alle Komponenten der Kamera mitgeliefert wurden. Sollten Komponenten fehlen, so nehmen Sie die Kamera nicht in Betrieb und wenden sich an Ihren Fachhändler. Versuchen Sie nicht, eine defekte Kamera selbst zu reparieren, sondern lassen Sie die Reparaturen ausschließlich von qualifiziertem Fachpersonal ausführen! Bei unsachgemäßer Handhabung der Kamera entfällt jeglicher Garantieanspruch. Lieferumfang 1x Kamera VTC-652DNP 1x 12-poliges Interface-Kabel mit offenem Kabelende 1x Handbuch _________________________________________________________________________________ -7- Bedienungsanleitung / User manual VTC-652DNP 1. Bedienelemente und Anschlüsse Frontansicht: Seitenansicht: 1. Eingebautes Tag/Nacht Zoom-Objektiv: Rückansicht: 22-facher optischer Zoom 16-facher digitaler Zoom 2. Filtergewinde 37mm Objektiv 3. Vorderes Gehäuseteil 4. Befestigungsadapter: Zur Befestigung an einer Halterung 5. Mittleres Gehäuseteil 6. Hinteres Gehäuseteil 7. Kamera-Modul 8. 12-poliger Anschluss (für Kamerasteuerung): 9. Zoomtasten: Betätigen Sie die Taste "WIDE", um das Objektiv in den Weitwinkelbereich zu fahren. Mit der Taste "TELE" fahren Sie in den Telebereich. _________________________________________________________________________________ -8- Bedienungsanleitung / User manual VTC-652DNP 10. Menü-Tasten: Betätigen Sie die Menü-Taste, um eine Funktion auszuwählen. 11. Fokustasten: Mit der Taste "NEAR" wird ein im Nahbereich befindliches Objekt und mit der Taste "FAR" ein Objekt im Fernbereich fokussiert. Diese Tasten sind nur dann aktiviert, wenn der Autofokus (AF) ausgeschaltet ist. 12. BNC-Anschluss: Zum Anschluss der Kamera an einen Monitors, usw. 13. Klemmleiste für den Betriebsspannungsanschluss (12V DC): 14. Betriebsspannungsanzeige: leuchtet, wenn die Kamera in Betrieb ist. _________________________________________________________________________________ -9- Bedienungsanleitung / User manual VTC-652DNP 2. Anschließen der Kamera Achtung: Schließen Sie erst alle Verbindungskabel an, bevor Sie das Netzkabel für die Betriebsspannung anschließen. _________________________________________________________________________________ - 10 - Bedienungsanleitung / User manual VTC-652DNP 2.1 Kabelfarben und Belegung 12-poliges Kabel 2.2 Externer Input Anschluss an einen externen Sensor zur Tag-/Nacht Umschaltung. Tag/Nacht Modus EXT-IN: Offen Geschlossen EXT Farbe Schwarz/weiß Alarm Modus: EXT-IN: Offen Geschlossen EXT Alarm aus Alarm ein Hinweis: Diese beiden Einstellungen können gleichzeitig aktiviert werden. _________________________________________________________________________________ - 11 - Bedienungsanleitung / User manual VTC-652DNP 2.3 Externer Output EXT-OUT Ausgangsspannung: EXT-OUT: Farbe Schwarz/weiß 0V 5V MD-OUT Ausgangsspannung (MD = Motion Detection, Bewegungserkennung): MD-OUT MD Off: 0V MD On 3,3 V 2.4 RS-485 Anschluss Anschluss an die RS-485 Buchse: Die Kamera kann mit einem externen Gerät oder Kontrollsystem gesteuert werden, wie z.B. einer Tastatur, die über das Halb-Duplex Protokoll verfügt. Schließen Sie Rx+ und Rx- an Tx+ an und Tx- an das RS-485 Steuerungssystem an. _________________________________________________________________________________ - 12 - Bedienungsanleitung / User manual VTC-652DNP 2.5 Externe Objektiv-Steuerung Focus: Near (+): Far (-): Zoom: Tele (+): Wide (-): Gelb Rot Gelb Rot = = = = Externe Betriebsspannung DC +/- 3 V bis +/- 12 V GND (Erdung) GND (Erdung) Externe Betriebsspannung DC +/- 3 V bis +/- 12 V BNC Rosa Rot Rosa Rot = = = = Externe Betriebsspannung DC +/- 3 V bis +/- 12 V GND (Erdung) GND (Erdung) Externe Betriebsspannung DC +/- 3 V bis +/- 12 V _________________________________________________________________________________ - 13 - Bedienungsanleitung / User manual VTC-652DNP 2.6 Externe A/D Steuerung Steuerung über RC-60 Fernbedienung (optional): _________________________________________________________________________________ - 14 - Bedienungsanleitung / User manual VTC-652DNP 3. Einstellungen der Kamera über das OSD (Bildschirmmenü) Im Folgenden werden die Einrichtungsmenüs beschrieben, die über die Kamerataste MENU (ENTER) aufgerufen und deren Funktionen über die Kameratasten TELE (Aufwärts), WIDE (Abwärts), NEAR (Rechts) und FAR (Links) angesteuert werden können. 3.1 OSD Überblick 1. Kamera-Titel 2. Eingestellte Fokussierungseinstellung 3. Eingestellter Zoomwert 4. Kamera-ID (Kennung/Name) 3.2 OSD Hauptmenü Bitte beachten Sie: Wenn Sie im OSD-Menü Einstellungen verändert haben, so müssen diese auch abgespeichert werden, da sonst die Kamera nach einem Neustart wieder zu den alten Einstellungen zurückkehrt. Speicherung der OSD-Einstellungen: Mit der Pfeil-runter-Taste („Wide“) auf „END <EXIT>“ gehen. Mit der Pfeil-links-Taste („Far“) bzw. Pfeil-rechts-Taste („Near“) können Sie wählen zwischen: o END <EXIT>: Änderungen sind nur temporär bis zum nächsten Neustart, d.h. keine Einstellungsspeicherung. o END <SAVE & EXIT>: Die Einstellungsänderungen werden gespeichert (auch bei Neustart noch vorhanden). o END <DEFAULT & EXIT>: Einstellungen werden auf Werkseinstellungen zurückgesetzt. Bestätigen Sie Ihre Auswahl mit der „MENU“-Taste. _________________________________________________________________________________ - 15 - Bedienungsanleitung / User manual VTC-652DNP 3.3 Focus Mode: Es bestehen folgende Auswahlmöglichkeiten: Auto, Manual oder Push-Auto. Distance: Stellen Sie den Mindestabstand zwischen der Kamera und dem Objekt ein: 0,1 m / 1,0 m /1,5 m /2,5 m / 6 m. D-Zoom: Ein- und Ausschalten des digitalen Zooms. D-Zoom End: Stellen Sie die höchste Vergrößerungsstufe des digitalen Zooms ein: 2-fach, 3-fach, 4-fach, 6-fach, 8-fach, 12-fach oder 16-fach. Zoom Preset: Stellen Sie die Preset-Nummer des Zooms ein (1-10). Standardeinstellung ist 1. Set Preset: Stellen Sie die Zoom-Position für das Zoom-Preset ein. Tour Configuration: Stellen Sie die Zoom-Tour ein (10 Zoom-Presets für eine Tour). Home Preset: Stellen Sie die Zoom-Position auf das ausgewählte Preset ein. Home Wait: Stellen Sie hier die Dauer der Zeit ein, bis „Home Preset“ aktiviert wird. Hinweise: Wenn „Zoom Preset“ eingestellt ist, können Sie mit Hilfe der „Tele“ und „Wide“-Tasten die Position des Preset-Zooms einstellen. Wenn die Zoom-Position festgelegt ist, drücken Sie die „Menu“-Taste, um die Position zu speichern. _________________________________________________________________________________ - 16 - Bedienungsanleitung / User manual VTC-652DNP 3.4 Weißabgleich (WB) Mode: Wählen Sie den Modus für den Weißabgleich: AWB: Automatischer Weißabgleich (2500° - 9500°K) WAWB: Wide Range Auto White Balance (1800° - 10500°K) Indoor: Weißabgleich im Innenbereich Outdoor: Weißabgleich im Außenbereich Manual: Rot- (R) und Blauwerte (B) werden manuell eingestellt. CRS: Colour Rolling Suppression (Verminderung des Farbrollens) R Gain: Einstellung des Rot-Werts (0-255). B Gain: Einstellung des Blau-Werts (0-255). Frame Adjustment: Je nach verwendetem Fluoreszenz-Lampe ist der Verlauf des Farbrollens unterschiedlich. Daher müssen Sie den Rahmen für das Farbrollen für jede Fluoreszenz-Lampe einstellen. Drücken Sie hierfür die „Menu“-Taste. Nach ca. 10 Sekunden ist der Einstellvorgang beendet und die Anzeige „ENT“ wird zu „END“. _________________________________________________________________________________ - 17 - Bedienungsanleitung / User manual VTC-652DNP 3.5 Automatische Belichtung (Auto Exposure) Mode: Wählen Sie den Modus für die automatische Belichtung: Auto1: Automatische Belichtungseinstellung Modus 1 (für normale Lichtverhältnisse im Innenbereich) Auto2: Automatische Belichtungseinstellung Modus 2 (für sehr helle Lichtverhältnisse im Außenbereich) Shut Pri: Automatische Belichtungseinstellung mit Verschlussvorrang Manual: Manuelle Belichtungseinstellung Shutter: Wählen Sie die Verschlusszeit: 1/50 – 1/100 K Die Verschlusszeit kann geändert werden, wenn Sie sich im „Shut Pri“ bzw. „Manual“ Modus befinden. Gain: Verstärkungsreglung (0-30 dB) DSS: Digital Slow Shutter (kann ein- bzw. ausgeschaltet werden). Max. DSS: Der maximale Wert für den Digital Slow Shutter kann eingestellt werden: 2x bis 128x Flickerless: Bildflackern kann ein- bzw. ausgeschaltet werden. Brightness: Einstellung des Helligkeitswert: 0-70 Iris Speed: Einstellung der Konvergenzgeschwindigkeit der mechanischen Blende (0 – 20). _________________________________________________________________________________ - 18 - Bedienungsanleitung / User manual VTC-652DNP 3.6 BLC / WDR (Gegenlichtunterdrückung) BLC: Mode: Area: Level: BLC kann ausgeschaltet („Off“) oder auf „Auto“ oder „Manual“ eingestellt werden. Einstellung des BLC-Bereichs (1-9) Einstellung des BLC-Werts („high“, „mid“ oder „low“). Mode: Level: WDR kann ein- oder ausgeschaltet werden. Einstellung des WDR-Werts (1-100) WDR: _________________________________________________________________________________ - 19 - Bedienungsanleitung / User manual VTC-652DNP 3.7 Alarm / MD (Motion Detection) Mode: Der Modus für den Alarm sowie für die Bewegungserkennung (MD) kann eingestellt werden: Off (aus) MD (Bewegungserkennung ein) EXT (extern) MD+EXT Area Selection: Wählen Sie einen Bewegungserkennungsbereich (1-4). Die Bewegungserkennung (MD) kann aktiviert/deaktiviert werden. Default: Die Bewegungserkennung (MD) wird als Standard eingestellt. Ajdust Top/Left: Der Bewegungserkennungsbereich wird oben links positioniert. Adjust Bottom/Right: Der Bewegungserkennungsbereich wird unten rechts positioniert. Sensitivity: Einstellung der Empfindlichkeit für die Bewegungserkennung (MD): 1-10 Dwell Time: Verweilzeit für das Zoom-Preset (10, 20, …, 180 Sekunden) Alarm Mode: Alarmeinstellung in EXT-Modus: BW oder Preset. Preset Selection: Einstellung der Zoom-Preset-Nummer: Off (aus), 1-10 _________________________________________________________________________________ - 20 - Bedienungsanleitung / User manual VTC-652DNP 3.8 Privacy (Privatzonen) Mask Selection: Wählen Sie die Bereichsnummer aus, die verdeckt werden soll (1-16). Aktivieren oder deaktivieren Sie die Privatzonen. Default: Stellen Sie eine bestimmte Privatzone als Standard ein. Adjust Top/Left: Der Privatzonenbereich wird oben links positioniert. Adjust Bottom/Right: Der Privatzonenbereich wird unten rechts positioniert. Color: Bestimmen Sie die Farbe für die Privatzone (1-8). Mosaic: Aktivieren/deaktivieren Sie die Mosaik-Anzeige. Mosaic Type: Stellen Sie das Raster für die Mosaike ein (1-4). Hinweis: Die Mosaik-Anzeige ist auch bei transparenten Farben möglich. _________________________________________________________________________________ - 21 - Bedienungsanleitung / User manual VTC-652DNP 3.9 Special D/N Mode: Wählen Sie D/N (Tag/Nacht), Color (Farbe), BW (Schwarz-Weiß) oder EXT (extern) D/N Delay: Stellen Sie die Länge für den Sperrfilter im Tag/Nacht-Modus ein: 5 Sek, 10 Sek, 20 Sek. Hi-Res: Wählen Sie für die Hochauflösung zwischen Off (aus), Low (niedrig), Mid (mittel) oder High (hoch). 2DNR: Stellen Sie den 2D-Wert für die Rauschunterdrückung ein: Off (aus), 1-7. 3DNR: Stellen Sie den 3D-Wert für die Rauschunterdrückung ein: Off (aus), 1-31. White Detection: Drücken Sie die „Menu“-Taste, um die „White Pixel Detection“ Funktion zu starten. Die Blende schließt sich dann automatisch. Wenn die Erkennung beendet ist, wird der normale Betrieb wieder aufgenommen. Level: Stellen Sie den Schwellwert von 1-15 ein (Standard: 4). _________________________________________________________________________________ - 22 - Bedienungsanleitung / User manual VTC-652DNP 3.10 Effect Sharpness: Stellen Sie die Schärfe für die Umrisse/Konturen ein: 0-15 Negative: Wählen Sie zwischen positivem und negativem Bild (invertierte Bilddarstellung ein- bzw. ausschalten). D-Flip: Wählen Sie die Bilddrehung oder Flip-Funktion aus: Off (aus), H Flip (horizontal), V Flip (vertikal), Rotate (Drehung). Freeze: Wählen Sie zwischen Live-Bild oder Standbild. DIS: Sie können die digitale Bildstabilisierung (DIS) ein- oder ausschalten. _________________________________________________________________________________ - 23 - Bedienungsanleitung / User manual VTC-652DNP 3.11 Camera Set Camera ID: Wählen Sie die Kamera-ID aus (1-255). Baud Rate: Wählen Sie die serielle Kommunikationsgeschwindigkeit aus: 2400 / 4800 / 9600 / 19200 bps Protocol: Wählen Sie das Protokoll aus: SANTEC, Pelco-P, Pelco-D, Command Display Mode: Wählen Sie den Anzeige-Modus: On (ein) / Off (aus) / Push on Display Item 1 / 2: Wählen Sie die Einstellung 1 oder 2: 1= Kamera-Titel und Kamera-ID werden angezeigt. 2= Kamera-Title und Kamera-ID sowie die Position des Zoom-Objektivs werden angezeigt. Title: Wählen Sie einen Kamera-Titel aus (A-Z, 0-9): Alarm Text: Wenn ein Alarm ausgelöst wird, erscheint ein Alarmtext, den Sie hier definieren können. Save: Speichern Sie die eingestellten Einstellungen. Hinweise: Sie können das BPS-Menü gemäß Ihres Keyboard-Protokolls auswählen. Selbst wenn Sie die Baud Rate oder das Protokoll ändern, werden diese Änderungen erst dann gespeichert, wenn Sie auf „Save“ klicken. Achtung: Während des Speicherns die Kamera nicht von der Betriebsspannung trennen oder ausschalten! _________________________________________________________________________________ - 24 - Bedienungsanleitung / User manual VTC-652DNP 4. Abmessungen Draufsicht: Vorderansicht: Seitenansicht (rechts): Alle Angaben in mm. Abbildung nicht maßstabsgerecht. _________________________________________________________________________________ - 25 - Bedienungsanleitung / User manual VTC-652DNP 5. Besondere Ausstattungsmerkmale Tag/Nacht Motorzoom-Kamera mit mechanischem IR-Sperrfilter 700 TVL Bildauflösung Zoombereich 22x optisch, 16x digital RS-232/485 Schnittstelle 12 V DC, 5 Watt Tag/Nacht Funktion DSS (Digital Slow Shutter) DIS (Digital Image Stabilisation) WDR (Wide Dynamic Range) DNR (Digital Noise Reduction) Bewegungserkennung AWB (Auto White Balance) AE (Auto Exposure) AGC (Automatic Gain Control) BLC (Backlight Compensation) OSD (On-Screen Display) Zoom Preset und Tour Privatzonen Alarm _________________________________________________________________________________ - 26 - Bedienungsanleitung / User manual VTC-652DNP 6. Technische Daten Kameramodell Kameratyp Videonorm Bildaufnahmesensor Aktive Bildelemente Abtastung Abtastfrequenz Synchronisation Auflösung Minimale Beleuchtung Videoausgang Kamerafunktionen Signal/Rausch-Abstand Wide Dynamic Range (WDR) Gegenlichtkompensation (BLC) Tag/Nacht Einstellung Alarm / Bewegungserkennung Bildstabilisator (DIS) Digital Slow Shutter (DSS) Digitale Rauschunterdrückung (DNR) Privatzonen Weißabgleich Auto Exposure (AE) Blendensteuerung Automat. Verstärkungsregelung (AGC) Shutter Geschwindigkeit Kameratitel Anzeige Helligkeit Schärfe Zoom Preset Zoom Tour Kamerasteuerung Kamera ID D-Flip Effekte Home Preset Objektiv Fokus Entfernung Zoom Objektivart Horizontaler Blickwinkel VTC-652DNP Tag/Nacht Motorzoom-Kamera PAL ¼” 960H Super HAD CCD II Chip 1028 (H) x 596 (V) 2 : 1 Interlace 15,625 KHz (H), 50 Hz (V) Intern 700 TVL 0,0 Lux (Farbe) 0,01 Lux (Schwarz-weiß) 0,00001 Lux (Low Shutter) 1 Vss an 75 Ohm, Composite 50 dB (bei ausgeschalteter AGC) Ein, Aus Aus, HLC, BLC, BLC-M (manuell) Auto, Farbe, Schwarz-weiß Aus, MD, EXT, MD+EXT Ein, Aus 2x bis 512x 2DNR, 3DNR 16 Zonen AWB, WAWB, Indoor, Outdoor, Manual, CRS Auto1, Auto2, Shutter PRI, Manual Automatisch Min, Low, Mid, High (max. 30 dB) Normal – 1/100.000 A-Z, 0-9 Ein, PushOn, Aus 10 – 50 0 – 15 Preset 1 – 10 Tour 1 RS-232/485 (Santec, Pelco P / D, Command, ADKey) 001 – 255 Aus, V-Flip, H-Flip, Rotation Schärfe, Negativ / Positiv, D-Flip, Freeze, DIS, Hi-Res, 2/3 DNR Aus, Home Preset Auswahl, Verweilzeit Auto, Manual, Push AF 0,1 m / 1,0 m / 1,5 m / 2,5 m / 6,0 m 22x optisch; 16x digital Motorzoom-Objektiv f= 3,9 – 85,8 mm F1.6 – F3.7 49,5° (Wide), 2,4° (Tele) _________________________________________________________________________________ - 27 - Bedienungsanleitung / User manual VTC-652DNP Kameramodell Elektrische Eigenschaften Spannungseingang Videoausgang Betriebsspannung Leistungsaufnahme Mechanische Eigenschaften Abmessungen (B x H x T) Gewicht Gehäusematerial Umgebungsbedingungen Betriebstemperatur Relative Luftfeuchtigkeit Lagertemperatur Empfohlenes Zubehör Netzteil Fernbedienung Wandhalterung VTC-652DNP 3-Pin Terminalblock BNC Buchse 12 V DC ca. 4 Watt 62 x 62 x 105 mm ca. 220 g Aluminium, weiß -10° bis ca. +50°C 0 bis ca. 96 % (nicht-kondensierend) -20° bis ca. +60°C VCA-12V-1.5ASA RC-60 VA-13WIK Irrtum und technische Änderungen vorbehalten. _________________________________________________________________________________ - 28 - Bedienungsanleitung / User manual VTC-652DNP _________________________________________________________________________________ - 29 - Bedienungsanleitung / User manual VTC-652DNP Safety precautions Caution Description of symbols Danger: This symbol is intended to alert the user to the presence of un-insulated "dangerous voltage" within the product’s enclosure that may be of sufficient magnitude to constitute a risk of electric shock to a person. Warning: This symbol is intended to alert the user to the presence of important operating and maintenance (servicing) instructions in the literature accompanying the appliance. CE compliance Attention: Any changes or modifications to this appliance which have not been explicitly approved of by the respective regulatory authority, may lead to a prohibition of usage of this appliance. This appliance complies with the CE guidelines. _________________________________________________________________________________ - 30 - Bedienungsanleitung / User manual VTC-652DNP Safety instructions Before operating the appliance, please read this manual carefully and retain it for further reference. Before cleaning the appliance, it has to be switched off and unplugged from the power outlet. Wipe the appliance with a soft damp cloth. Do not use harsh cleansers or aerosols for cleaning. The type label may not be replaced. Do not use attachments unless recommended by the manufacturer as they may affect the functionality of the appliance and result in the risk of fire, electric shock or injury. The camera housing is IP-66 classified. Never install the appliance in areas exposed to water or other liquids. The appliance has to be installed in a safe and stable location which is able to carry the weight of the appliance.. Quick stops, excessive force, and uneven surfaces may cause the appliance to fall causing serious injury to persons and damage to objects. Openings in the appliance, if any, are provided for ventilation to ensure reliable operation of the appliance and to protect if from overheating. These openings must not be covered or blocked. Please make sure that the appliance does not overheat. The appliance should only be operated from the type of power source indicated on the marking label. If you are not sure of the type of power supplied at the installation location, please contact your local dealer. An appliance which is powered through a polarized plug (a plug with one blade wider than the other) will fit into the power outlet only one way. This is a safety feature. If you are unable to insert the plug into the outlet, try reversing the plug. Do not defeat the safety purpose of the polarized plug. If the appliance is powered through a grounding-type plug, the plug will only fit into a groundingtype power outlet. This is a safety feature. If your outlet does not have the grounding plug receptacle, contact your local electrician. Route power cords and cables in a manner to protect them from damage by being walked on or pinched by items places upon or against them. For protection of the appliance during a lightning storm or when it is left unattended and unused for a longer period, unplug the appliance from the wall outlet. Disconnect any antennas or cable systems that may be connected to the appliance. This will prevent damage to the appliance due to lightning or power-line surges. Do not overload wall outlets and extension cords as this can result in a risk of fire or electric shock. Never insert items into the openings of the appliance. They may touch parts under electric current which may cause an electric shock. Never pour any liquids over the appliance. _________________________________________________________________________________ - 31 - Bedienungsanleitung / User manual VTC-652DNP In case of any operating interruption or a complete operating failure please switch off the appliance and disconnect it from the wall outlet. Never attempt to service or repair the appliance yourself, as opening or removing covers may expose you to dangerous voltage or other hazards. Refer all servicing to qualified service personnel. When replacement parts are required, be sure that the service technician uses replacements parts specified by the manufacturer or that have the same characteristics as the original part. Unauthorized substitutions may result in fire, electric shock or other hazards. Upon completion of any service or repairs to the appliance, ask the service technician to perform safety checks to verify that the appliance is in proper operating condition. The appliance should only be installed by qualified service personnel and has to comply with local specifications and regulations. Never point the camera at an object with a high degree of luminance. Bright vertical or horizontal lines can result in a distortion (outshine) of the entire image on the monitor. This artifact is not an error but a particularity of semiconductor CCDs when they are directly exposed to a powerful light source. At the installation site, the camera has to be adjusted to the given light conditions (see OSD). Please respect the local legal regulations on waste if you need to dispose of discarded appliances. This symbol means that electrical appliances need to be disposed of properly and not simply with unsorted household refuse. Please respect local regulations on waste disposal. About this user manual This manual aims at assisting the user on how to operate cameras VTC-652DNP. This manual is subject to rigid quality control. However, no guarantee can be given that mistakes are not present. We reserve the right to make changes to the manual without prior notice. Before operating the appliance, please read this manual carefully and retain it for further reference. Verify that all appliance items are included in the delivery. Should items be missing, do not operate the appliance and contact your local dealer. Never attempt to repair the appliance yourself. This should only be done by qualified service personnel. Improper handling of the appliance will invalidate the warranty. Items included in the delivery 1x camera VTC-652DNP 1x 12-pin interface cable (open cable ends) 1x user manual _________________________________________________________________________________ - 32 - Bedienungsanleitung / User manual VTC-652DNP 1. Parts and connections Front view: Side view: Rear view: 1. Integrated day/night zoom lens: 22x optical zoom 16x digital zoom 2. Filter mount 37mm lens 3. Front case 4. Mounting adapter: Is used to mount the camera onto a bracket. 5. Housing body 6. Rear housing 7. Camera module 8. 12-pin connector for control interface: 9. Zoom buttons: Push the "WIDE" button for wide angle views. Push the "TELE" button to zoom in. _________________________________________________________________________________ - 33 - Bedienungsanleitung / User manual VTC-652DNP 10. Menu buttons: Push the menu button to select a function. 11. Focus buttons: Press the "NEAR" button to focus on near objects. Press the "FAR" button to focus on far objects. The focus buttons are only active if auto focus (AF) is off. 12. BNC connector: To connect the camera to a monitor, etc. 13. Power input terminal: Receives 12 V DC from the power supply unit. 14. Power indicator: Is lit when power is supplied to the camera. _________________________________________________________________________________ - 34 - Bedienungsanleitung / User manual VTC-652DNP 2. Camera connection Caution: Do not connect the power cable until all other connections have been made. _________________________________________________________________________________ - 35 - Bedienungsanleitung / User manual VTC-652DNP 2.1 Colour lead wire and pins 12-pin cable: 2.2 External input Connection to an external sensor for day/night switching. Day/night mode EXT-IN: Open Closed EXT Color Black/white Alarm mode: EXT-IN: Open Closed EXT Alarm off Alarm on Note: These two settings can be selected at the same time. _________________________________________________________________________________ - 36 - Bedienungsanleitung / User manual VTC-652DNP 2.3 External output EXT-OUT output voltage: EXT-OUT: Color Black/white 0V 5V MD-OUT output voltage (MD = Motion Detection): MD-OUT MD Off: 0V MD On 3.3 V 2.4 RS-485 connection Connection to the RS-485 jack: The camera can remotely be controlled by an external device or a control system, e.g. a control keyboard using a half-duplex protocol. Connect Rx+ and Rx- to Tx+ and Tx- to the RS-485 control system. _________________________________________________________________________________ - 37 - Bedienungsanleitung / User manual VTC-652DNP 2.5 External lens control Focus: Near (+): Far (-): Zoom: Tele (+): Wide (-): Yellow = Red = Yellow = Red = External power DC +/- 3 V to +/- 12 V GND GND External power DC +/- 3 V to +/- 12 V BNC Pink Red Pink Red External power DC +/- 3 V to +/- 12 V GND GND External power DC +/- 3 V to +/- 12 V = = = = _________________________________________________________________________________ - 38 - Bedienungsanleitung / User manual VTC-652DNP 2.6 External A/D control Control via RC-60 remote control (optional): _________________________________________________________________________________ - 39 - Bedienungsanleitung / User manual VTC-652DNP 3. Camera adjustment via OSD menu In this chapter, the OSD menu is described. The OSD menus is accessed by the button MENU (ENTER) and it is adjusted by the buttons TELE (up), WIDE (down), NEAR (right) and FAR (left) 3.1 OSD overview 1. camera title 2. status of focus mode 3. status of zoom position 4. camera ID 3.2 OSD main menu Please note: If you change the OSD settings, please make sure to save them otherwise these settings will be lost and the old settings will be restored when the camera is rebooted. How to save OSD settings: Use the arrow down key (“wide”) to go to <END <EXIT>“. Use the arrow left key (“far”) or arrow right key (“near”) key to select one of the following options: o END <EXIT>: Changed settings are only valid until the next camera reboot, i.e. the settings will be lost after the next camera reboot. o END <SAVE & EXIT>: The settings will be saved (will also be available after the next camera reboot). o END <DEFAULT & EXIT>: Settings will be restored to factory default settings. Confirm your selection by pressing the “MENU“ key. _________________________________________________________________________________ - 40 - Bedienungsanleitung / User manual VTC-652DNP 3.3 Focus Mode: You can choose from the following modes: Auto, manual or push-auto. Distance: Select the minimum distance between camera and object: 0.1 m / 1.0 m /1.5 m /2.5 m / 6 m. D-Zoom: Digital zoom on/off. D-Zoom End: Select the maximum digital zoom magnification: 2x, 3x, 4x, 6x, 8x, 12x or 16x. Zoom Preset: Select the zoom preset number (1-10). Default setting is 1. Set Preset: Select the zoom position for the zoom preset. Tour Configuration: Select the zoom tour (10 zoom presets for one tour). Home Preset: Move the zoom position to the selected preset. Home Wait: Select the duration time to activate Home Preset. Notes: When „Zoom Preset“ is selected, you can adjust the preset zoom location using the „Tele“ and „Wide“ buttons. When the zoom position has been selected, press the „Menu“ button to save the position. _________________________________________________________________________________ - 41 - Bedienungsanleitung / User manual VTC-652DNP 3.4 White balance (WB) Mode: Select the white balance mode: AWB: Auto white balance (2500° - 9500°K) WAWB: Wide range auto white balance (1800° - 10500°K) Indoor: White balance for indoor Outdoor: White balance for outdoor Manual: Red (R) and blue (B) values can manually be adjusted. CRS: Color rolling suppression R Gain: Adjust the R gain value (0-255). B Gain: Adjust the B gain value (0-255). Frame Adjustment: Depending on the used fluorescence lamp, the colour rolling path is different. Because of this, you have to adjust the colour rolling frame for each fluorescence lamp. Press the “Menu” button. After approx. 10 seconds the adjustment has been made and the displayed „ENT“ turnst o „END“. _________________________________________________________________________________ - 42 - Bedienungsanleitung / User manual VTC-652DNP 3.5 Auto Exposure (AE) Mode: Select the mode for auto exposure: Auto1: Auto exposure mode 1 (for normal light conditions indoors) Auto2: Auto exposure mode 2 (for very bright light condisions outdoors) Shut Pri: Auto exposure for shutter priority Manual: Manual auto exposure mode Shutter: Select the shutter speed: 1/50 – 1/100 K The shutter speed can be changed while you are in „Shut Pri“or „Manual“ mode. Gain: Gain control (0-30 dB) DSS: Digital Slow Shutter on/off. Max. DSS: Select the maximum slow shutter value: 2x to 128x Flickerless: Flickerless on/off. Brightness: Adjust the brightness level: 0-70 Iris speed: Set the convergence speed of the mechanical iris (0 – 20). _________________________________________________________________________________ - 43 - Bedienungsanleitung / User manual VTC-652DNP 3.6 BLC / WDR BLC: Mode: Area: Level: Set the BLC mode to „Off“, „Auto“ or „Manual“ Select the BLC area (1-9) Select the BLC level („high“, „mid“ or „low“). Mode: Level: WDR on/off. Adjust the WDR level (1-100) WDR: _________________________________________________________________________________ - 44 - Bedienungsanleitung / User manual VTC-652DNP 3.7 Alarm / MD (Motion Detection) Mode: Select the mode for the alarm and motion detection (MD). Off MD EXT MD+EXT Area Selection: Select the area for motion detection (1-4). Motion detection(MD) can be enabled/disabled. Default: Motion detection (MD) is set as default. Ajdust Top/Left: The motion detection area is positioned top left. Adjust Bottom/Right: The motion detection area is positioned bottom right. Sensitivity: Adjust the sensitivity level for motion detection (MD): 1-10 Dwell Time: Dwell time for zoom preset (10, 20, …, 180 sec.) Preset Selection: Select the zoom preset number: Off, 1-10 _________________________________________________________________________________ - 45 - Bedienungsanleitung / User manual VTC-652DNP 3.8 Privacy Mask Selection: Select the area number to be masked (1-16). Enable/disable the mask area/privacy zone. Default: Set a specific mask area/privacy zone as default. Adjust Top/Left: The privacy zone area is positioned top left. Adjust Bottom/Right: The privacy zone area is positioned bottom right. Colou: Select the colour for the privacy zone (1-8). Mosaic: Enable/disable the mosaic display. Mosaic Type: Set the mosaic roughness (1-4). Note: Mosaic display is also possible with transparent colours. _________________________________________________________________________________ - 46 - Bedienungsanleitung / User manual VTC-652DNP 3.9 Special D/N mode: Select D/N (day/night), color, BS (black/white) or EXT (external). D/N Delay: Adjust the operation time fort he cut filter in day/night mode: 5 sec, 10 sec, 20 sec. Hi-Res: Select the high resolution mode: Off, low, mid or high. 2DNR: Select the 2D noise reduction level: Off, 1-7. 3DNR: Select the 3D noise reduction level: Off, 1-31. White Detection: Press the „Menu“ button to start the „White Pixel Detection“ function. The iris will be closed automatically. Once the detection is finished, normal operation mode is resumed. Level: Adjust the threshold level from 1-15 (derfault: 4). _________________________________________________________________________________ - 47 - Bedienungsanleitung / User manual VTC-652DNP 3.10 Effect Sharpness: Adjust the sharpness of outlines: 0-15 Negative: Select between positive or negative picture. D-Flip: Select picture rotation or flip function: Off, H Flip (horizontal), V Flip (vertical), rotate. Freeze: Select between live-picture or still mode. DIS: Enable or disable the digital image stabilizer. _________________________________________________________________________________ - 48 - Bedienungsanleitung / User manual VTC-652DNP 3.11 Camera Set Camera ID: Select the camera ID (1-255). Baud Rate: Select the serial communication speed: 2400 / 4800 / 9600 / 19200 bps Protocol: Select the operating protocol: SANTEC, Pelco-P, Pelco-D, Command Display Mode: Select the display mode: On, off, push on Display Item 1 / 2: Select display item 1 or 2: 1= Camera title and camera ID are displayed. 2= Camera title and camera ID as well as the position of the zoom lens are displayed. Title: Select the camera title (A-Z, 0-9): Alarm Text: If an alarm is triggered, an alarm text pops up which you can define here. Save: Save the adjments. Notes: You can choose the BPS menu according to your keyboard protocol. Although you can change the Baud rate or the protocol menu, the changes are not applied unless you select „Save“. Caution: During the saving procedure, neither disconnect the camera from power nor switch it off. _________________________________________________________________________________ - 49 - Bedienungsanleitung / User manual VTC-652DNP 4. Dimensions Top view: Front view: Side view (right): All dimensions in mm. Drawing not true to scale. _________________________________________________________________________________ - 50 - Bedienungsanleitung / User manual VTC-652DNP 5. Special features Day/night motor zoom camera with mechanical IR cut filter 700 TVL resolution Zoom: 22x optical, 16x digital RS-232/485 interface 12 V DC, 5 watt Day/night function DSS (Digital Slow Shutter) DIS (Digital Image Stabilisation) WDR (Wide Dynamic Range) DNR (Digital Noise Reduction) Motion detection AWB (Auto White Balance) AE (Auto Exposure) AGC (Automatic Gain Control) BLC (Backlight Compensation) OSD (On-Screen Display) Zoom preset and tour Privacy zones Alarm _________________________________________________________________________________ - 51 - Bedienungsanleitung / User manual VTC-652DNP 6. Technical specifications Camera Camera type Video norm Sensor Active pixel Scanning system Scanning frequency Synchronisation Resolution Minimum illumination Video output Camera functions S/N ration Wide Dynamic Range (WDR) Backlight compensation Day/night adjustment Alarm / motion detection Digital Image Stabilisation (DIS) Digital Slow Shutter (DSS) Digital Noise Reduction (DNR) Privacy zones White balance Auto Exposure (AE) Iris control Automatic Gain Control (AGC) Shutter speed Camera title Display Brightness Sharpness Zoom preset Zoom tour Camera control Camera ID D-Flip Effects Home preset Lens Focus Distance Zoom Lens type Horizontal angle of view VTC-652DNP Day/night motor zoom camera PAL ¼” 960H Super HAD CCD II chip 1028 (H) x 596 (V) 2 : 1 interlace 15.625 KHz (H), 50 Hz (V) Internal 700 TVL 0.0 lux (color) 0.01 lux (black/white) 0.00001 lux (low shutter) 1 Vpp at 75 Ohm, Composite 50 dB (AGC off) On, Off Off, HLC, BLC, BLC-M (manual) Auto, colour, black/white Off, MD, EXT, MD+EXT On, Off 2x to 512x 2DNR, 3DNR 16 zones AWB / WAWB / indoor / outdoor / manual / CRS Auto1, Auto2, Shutter PRI, Manual Automatic Min, Low, Mid, High (max. 30 dB) Normal – 1/100,000 A-Z, 0-9 On, PushOn, Off 10 – 50 0 – 15 Preset 1 – 10 Tour 1 RS-232/485 (Santec, Pelco P / D, Command, ADKey) 001 – 255 Off, V-flip, H-flip, rotate Sharpness, negative / positive, D-flip, freeze, DIS, hi-res, 2/3 DNR Off, home preset select, dwell time Auto, manual, push AF 0,1 m / 1.0 m / 1.5 m / 2.5 m / 6.0 m 22x optical; 16x digital Motor zoom lens f= 3.9 – 85.8 mm F1.6 – F3.7 49.5° (Wide), 2,4° (Tele) _________________________________________________________________________________ - 52 - Bedienungsanleitung / User manual VTC-652DNP Camera Electronic characteristics Power input Video output Voltage Power consumption Mechanical characteristics Dimensions (W x H x D) Weight Housing material Environment Operating temperature Relative humidity Storage temperature Recommended accessories Power supply unit Remote control Wall bracket VTC-652DNP 3-pin terminal block BNC connector 12 V DC Approx. 4 watt 62 x 62 x 105 mm Approx. 220 g Aluminium, white -10° to approx. +50° C 0 to approx. 96 % (non-condensing) -20° to approx. +60° C VCA-12V-1.5ASA RC-60 VA-13WIK Subject to technical changes. Errors excepted. _________________________________________________________________________________ - 53 - Bedienungsanleitung / User manual VTC-652DNP Notizen / Notes: _________________________________________________________________________________ - 54 - Bedienungsanleitung / User manual VTC-652DNP Notizen / Notes: _________________________________________________________________________________ - 55 - Ihr Fachhändler / Your local distributor: __________________________________________________________________________ www.santec-video.com