1
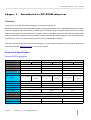
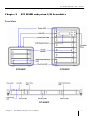
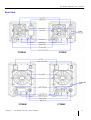
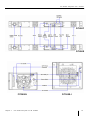
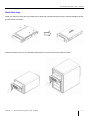
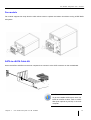
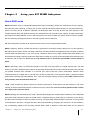
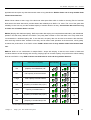
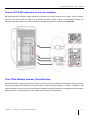
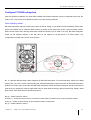
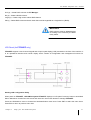
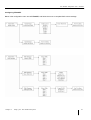
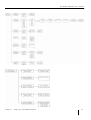
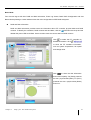
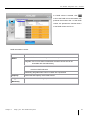
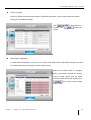
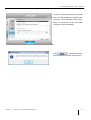
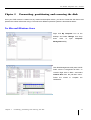
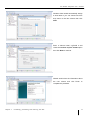
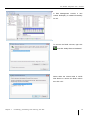
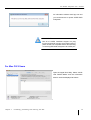
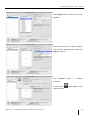
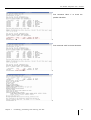
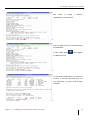
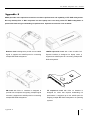
FiT RAID SUBSYSTEM User’s Manual V1.0 Contents Chapter 1 Introduction to FiT RAID subsystem 4 Overview 4 Features & Specification 4 External RAID Subsystems 4 Inner RAID Cages 5 Safety Precautions 5 System Requirements 6 Box Contents 6 Chapter 2 FiT RAID subsystem I/O & modules 7 Front View 7 Rear View 9 Hard drive tray 11 Fan module 12 SATA to eSATA Cable Kit 12 Chapter 3 Setup your FiT RAID Subsystem 13 About RAID mode 13 Connect FiT RAID subsystem to the host computer 15 Over 2TB & Multiple Volumes (Port Multiplier) 15 Configure FiT RAID subsystem 16 Quick Setup by switch 16 LCD Panel (for FiT500E/F only) 17 Starting LCD Configuration Utility 17 Configuring FiT500E/F 18 GUI — FiT Manager Basic Mode 20 21 RAID and Disk Information 21 Event Log Viewer 24 Basic RAID Configuration 24 One Button Backup Settings 26 Advance Mode 29 Email Notification and Event Settings 29 Advanced RAID Configuration 29 Firmware Information 32 RAID Settings 32 Chpter 4 Formatting, partitioning and removing the disk 35 For Microsoft Windows Users 35 For Mac OS X Users 39 For Linux Users 41 Limited Warranty 46 Appendix A 47 FiT RAID subsystem user’s manual Chapter 1 Introduction to FiT RAID subsystem Overview Thank you for using FiT series RAID subsystem of AXUS Microsystems, Inc. FiT RAID subsystem built-in the newest disk storage technology (Redundant Array of Independent/Inexpensive Disks) is ideal for integration with video and every creative system. RAID technology is the best method to protect your data, while providing greater I/O performance than a single hard drive. With RAID technology, FiT RAID subsystem offers superior performance for data I/O and high reliability for data protection. FiT RAID subsystem is also designed for easy to grab and go. Users can easily do editing anywhere with a portable RAID subsystem. This user’s manual will introduce the FiT series products. To get the latest information for the products, please visit AXUS official website www.axus.com.tw or contact your vendors. Features & Specification External RAID Subsystems RAID Series Model number Bay number Tower/Rack RAID Level Event notification Hot Swap Components Host Interface Disk Interface HDD size RAID Management Operating System FiT 300 FiT300E FiT300F 3 Tower FiT 500 FiT500E FiT500F 5 Tower FiT 400-R FiT400E-R FiT400F-R 4 1U Rack-Mount 0/1/3/5/PM/LARGE/CLONE 0/1/10/3/5/PM/LARGE/CLONE 0/1/10/3/5/PM/LAREG/CLONE Buzzer, GUI Buzzer, LCD, GUI Buzzer GUI Hard Disk, Fan Module Hard Disk eSATA/USB2. eSATA/1394b/ eSATA/USB2. eSATA/1394b/ eSATA/1394b/ eSATA/USB2. 0 USB2.0 0 USB2.0 USB2.0 0 SATAI/II SATAI/II SATAI/II 3.5" 3.5" 3.5" GUI/Rotary Switch GUI /Rotary Switch GUI/LCD/Rotary switch Windows /Linux / Mac OS ( OS independent and transparent ) Power Supply Electrical Temperature Relative Humidity Dimension (mm) WxDx Weight (kg) 90W(Adapter) , DC output: 19V ,4.74A Max. 220W 220W AC Voltage 100~240 VAC / AC frequency 50~60 Hz Operating temperature 5~35 ℃,None-Operating temperature : -40 ~60 ℃ 20% ~ 80% non-condensing 140 X 237 x 115 446.4 x 396 x 43.2 140 x 242 x 208 2.03 3.88 5.93 Specifications are subject to change without notification. All trademarks or registered trademarks are properties of their respective owners. Chapter 1 Introduction to FiT RAID subsystem 4 FiT RAID subsystem user’s manual Inner RAID Cages RAID Series Model number number of 5 1/4" slot # of drive in a 3.5" drive space RAID Level Eventlog notification Hot Swap Components Host Interface Disk Interface HDD size RAID Management Operating System Temperature Relative Humidity Dimension (mm) WxDxH Weight (kg) FiT300/500E-I FiT300E-I FiT500E-I 2 3 3 5 0/1/3/5/PM//Large/CLONE 0/1/10/3/5/PM//Large/CLONE Buzzer / GUI Disk Drive SATA SATAI/II 3.5" Rotary Switch / GUI Windows /Linux / Mac OS ( OS independent and transparent ) Operating temperature 5~35 ℃,None-Operating temperature : -40 ~60 ℃ 20% ~ 80% non-condensing 148x233x84 148x233x127 1.61 2.46 Specifications are subject to change without notification. All trademarks or registered trademarks are properties of their respective owners. Features ¾ Easy plug & play installation on PC or Mac ¾ RAID rotary switch for quick setup ¾ Support eSATA 3Gbits, Hi-Speed USB 2.0, FireWire 400&800 ¾ Support several RAID modes & capacity > 2TB ¾ Graphic user interface “FiT Manager” for advanced management ¾ Easy to One Button Backup Safety Precautions FiT RAID subsystem is a delicate electronic instrument and is susceptible to damage due to excessive physical shock. Place FiT RAID subsystem in a vented area away from moisture or liquids. Do not open the case that may void the warranty. If the product is returned with any damage caused by improper operation, the warranty will be void. Users must read warnings as below: ¾ Do Not place FiT RAID subsystem on uneven or unstable work surface. ¾ Do Not expose FiT RAID subsystem to liquids, rain or moisture. ¾ Do Not use attachments not contained in shipping box. Chapter 1 Introduction to FiT RAID subsystem 5 FiT RAID subsystem user’s manual ¾ Do Not use accessories not recommend by the manufacture of FiT RAID subsystem. ¾ Must read User’s Manual carefully and follow the instruction when setting up FiT RAID subsystem. System Requirements Computers with eSATA3.0Gb, USB2.0 or 1394a (1394b) interfaces. About systems support RAID volumes beyond 2TB and multiple volumes (port multiplier), please refer to the compatibility list and white paper from AXUS for more information. Box Contents z FiT RAID Subsystem x 1 z SATA to SATA cable x 1 (for FiT300/500 E-I only) z HDD Trays x 3 (for FiT300E/F/E-I only) z SATA to eSATA Cable Kit x 1 (not for FiT300/500E-I) z HDD Trays x 4 (for FiT400E/F only) z eSATA to eSATA cable x 1 (not for FiT300/500E-I) z HDD Trays x 5 (for FiT500E/F/E-I only) z USB2.0 Type A to B cable x 1 (not for FiT300/500E-I) z Slide Rail x 1 (for FiT400E/F only) z 1394a to 1394b cable x 1 (for FiT300/400/500F only) z Fan Module x 1 (not for FiT400E/F) z 1394b to 1394b cable x 1 (for FiT300/400/500F only) z 90W Power Adapter x 1 (for FiT300E/F only) z User’s Manual & software CD x 1 z Power Cord x 1 (not for FiT300/500E-I) z Quick Installation Guide Chapter 1 Introduction to FiT RAID subsystem 6 FiT RAID subsystem user’s manual Chapter 2 FiT RAID subsystem I/O & modules Front View FiT300E/F FiT500E/F FiT400E/F Chapter 2 FiT RAID subsystem I/O & modules 7 FiT RAID subsystem user’s manual FiT300E-I FiT500E-I LED Power LED is “Blue” when the system is power on. Status Fail LED is “Red” when system or hardware is failed. Link/Access LED is “Blue” when system links to a computer machine; LED is blinking as “Blue” when data is accessed. Fan Fail LED is “Yellow” when one of fans is failed. (For FiT400E/F only) Over Temp. LED is “Yellow” when FiT RAID subsystem’s (For FiT400E/F only) temperature is abnormal. Disk Power LED is “Blue” when disk is normal; LED is /Access blinking as “Blue” when data is accessed. Disk Fail LED is “Red” when disk is failed. IMPORTANT! See “events” to get more detail about failure information Chapter 2 FiT RAID subsystem I/O & modules 8 FiT RAID subsystem user’s manual Rear View FiT300E FiT500E Chapter 2 FiT RAID subsystem I/O & modules FiT300F FiT500F 9 FiT RAID subsystem user’s manual FiT400F FiT400E FiT300E-I Chapter 2 FiT RAID subsystem I/O & modules FiT500E-I 10 FiT RAID subsystem user’s manual Hard drive tray Install your disk in the hard drive tray. Make sure to fasten the hard disk securing screws to prevent damages caused by unnecessary movement. Insert the hard drive tray into your FiT RAID subsystem then make sure the tray handler is locked. Chapter 2 FiT RAID subsystem I/O & modules 11 FiT RAID subsystem user’s manual Fan module Fan module supports hot swap function which allows users to replace the broken fan without turning off FiT RAID subsystem. SATA to eSATA Cable Kit Screw the SATA to eSATA kit on the host computer then connect it to the SATA connector on the motherboard. NOTE! To get more stable SATA signal, users can install an eSATA re-driver card or eSATA HBA (both optional by AXUS) in the host computer. Chapter 2 FiT RAID subsystem I/O & modules 12 FiT RAID subsystem user’s manual Chapter 3 Setup your FiT RAID Subsystem About RAID mode RAID (Redundant Array of Independent/Inexpensive Disks) technology utilizes the mechanisms such as Striping, Mirroring and Parity Checking, to employ two or more physical hard drives (equal capacity) in one logical disk array. Disks in an array can be of different capacities, but RAID treat them as if they all have the same capacity of the smallest physical disk. With RAID technology, the storage device can provide a huge capacity, increase input/output performance and data reliability. If one of the hard drives in the array is failed, the system would continue to operate with the remaining working hard drives to avoid any system crash or data loss. FiT RAID subsystem provides seven modes of RAID volume, which are described as below: RAID 0 (Striping): RAID 0 provides advanced I/O performance and large storage capacity but no fault tolerance. Because when the data is written to a RAID 0 disk array, the data is broken into fragments which are written to RAID 0 member disks simultaneously on the same sector. Therefore, failure of any single member disk would destroy the entire disk array. RAID 0 requires at least two disks and more disks in an array would offer better performance but also increase the risk of data loss. Once one of array member disks is failed, the whole RAID 0 volume would be failed. RAID 1 (Mirroring): RAID 1 provides fault tolerance from disk errors and failure of a single member disk. The data written to one disk is simultaneously written to another disk. Read performance may be enhanced if the array controller can parallel accesses both members of a mirrored pair. There would be a minor performance reduction when compared writing to a single disk. If one disk fails, all data is preserved on the other disk. RAID 1 requires two disks which offers extremely high data reliability, but it costs half of storage capacity to backup data. RAID 1 allows one of array member disks failed without data loss. Large: Large provides the largest capacity but without performance enhancement and fault tolerance. The entire capacity of each member disk would be consumed for Large volume. But once one of array member disks is failed, the Large volume would be failed. RAID 3 (Striping with dedicated parity): RAID 3 provides disk striping and complete data redundancy with a dedicated parity disk. RAID 3 breaks up data into smaller blocks, calculates parity by performing an exclusive-or on the blocks, and then writes the blocks to all but one disk in the array. The parity data created during the exclusive-or is then written to the last disk in the array. If a single disk fails, data is still available by computing the exclusive-or of the contents in the corresponding stripes of the surviving member disks. RAID 3 requires at least three disks and it is best for Chapter 3 Setup your FiT RAID subsystem 13 FiT RAID subsystem user’s manual applications that require very fast data- transfer rates or long data blocks. RAID 3 allows one of array member disks failed without data loss. Clone: Clone makes an exact copy of the disk onto other spare disks which is similar to mirroring. Each of member disks stores the same data which provides better data reliability than RAID 1 for users. The cost of the great data reliability is users can only use the smallest capacity of member disks in an array. Clone allows data access as long as either one of member disks is on-line. RAID 5 (Striping with distributed parity): RAID 5 provides disk striping and complete data redundancy with distributed parities in the disk array. Different from RAID 3, the parity data is written to all of the disks in an array rather than concentrated on a dedicated parity disk. If one disk fails, the parity data can be used to reconstruct the data from other surviving member disks. All disks in the array can be used to seek operation at the same time, which greatly increases the performance of the RAID volume. RAID 5 allows one of array member disks failed without data loss. RAID 10: RAID 10 is a combination of multiple RAID 1 arrays with striping. It uses an even number of disks and combines features of both striping and mirroring. Striping helps to increase capacity and performance without adding disks to each RAID 1 array. RAID 10 allows one disk failed in each sub-array without data loss. Data Reliability Data Transfer Minimum # RAID mode RAID Volume Capacity R0 (Capacity of smallest disk) x N* 2 R1 Half capacity of two hard drives 2 Large Total capacity of all hard drives 2 R3 (Capacity of smallest disk) x (N-1) 3 Clone Capacity of smallest disk x 1 2 R5 (Capacity of smallest disk) x (N-1) 3 R10 (Capacity of smallest disk) x N/2 4 Speed of HDDs * N is the number of array member disks. Chapter 3 Setup your FiT RAID subsystem 14 FiT RAID subsystem user’s manual Connect FiT RAID subsystem to the host computer FiT RAID subsystem supports multiple interfaces connected to the host computers (PC or MAC). In the meantime, users can only access data via either one of following interfaces: eSATA, USB 2.0 or FireWire800 (1394b). For example, below figure shows how interface cables connected between MAC computer & FiT300F/500F. Over 2TB & Multiple Volumes (Port Multiplier) FiT RAID subsystem supports the capacity of RAID volume larger than two terabytes and multiple volumes. However, it also needs support from hardware, driver and operating systems of host computers. Therefore, capability of over 2TB and multiple volumes may not be practiced due to different operating systems and compatibility of motherboards. Please refer to the compatibility list and white paper from AXUS for more information. Chapter 3 Setup your FiT RAID subsystem 15 FiT RAID subsystem user’s manual Configure FiT RAID subsystem After the hardware installation, the hard disks installed to FiT RAID subsystem must be configured before they are ready to use. This can be accomplished by either one of the following methods: Quick Setup by switch FiT RAID subsystem supports a RAID rotary switch at rear for setting up your RAID volume immediately. RAID rotary switch is the fastest way to create the RAID volume. By setting up the RAID rotary switch, users can easily create a RAID volume without GUI. Although hard disks of different capacity may be used in an array, FiT RAID subsystem would use the smallest capacity of the disk drive as the capacity of all disk drives in a RAID volume. The configurations of RAID rotary switch show as follow: No. 0~7 present different RAID modes supported by FiT RAID subsystem. Turn the RAID rotary switch to the RAID mode which you want to create. Hold pressing the “setting/mute/backup” button and power on FiT RAID subsystem. Release the button about 5 seconds after FiT RAID subsystem startup. FiT RAID subsystem would consume all of hard drives you inserted to create a single RAID volume. About RAID technology features please see chapter “About RAID mode”. Each RAID mode is described as below: R0 (0) – Create a RAID 0 volume. R1/R10 (1) – Create a R1/R10 volume. If at least four hard disks are inserted, R10 volume would be created. Clone (2) – Create a clone volume. All of hard disk is backup to each other. R3 (3) – Create a RAID 3 volume. Chapter 3 Setup your FiT RAID subsystem 16 FiT RAID subsystem user’s manual GUI (4) – Create RAID volumes via FiT Manager. R5 (5) – Create a RAID5 volume. Large (6) – Create a big volume without RAID feature. PM (7) – Delete RAID volume and each hard disk would be regarded as a single device (JBOD). IMPORTANT! RAID volumes must be deleted before re-creating a new volume by the RAID rotary switch. LCD Panel (for FiT500E/F only) FiT500E/F supports a touch-control keypad and a liquid crystal display (LCD) mounted on the front of the machine. It is an operational interface and monitor display which controls all configuration and management functions for FiT500E/F. Starting LCD Configuration Utility When power on FiT500E/F, “AXUS Microsystem FiT500E/F” displays on LCD panel. Press any button to enter Main Menu. Main Menu contains four sub-menus and users can use function buttons to manage FiT500E/F. Press the UP/DOWN to move to forward and backward/select menu items. Press ENT to select the menu items. Press ESC to return to previous menu item. Chapter 3 Setup your FiT RAID subsystem 17 FiT RAID subsystem user’s manual Configuring FiT500E/F Below is the configuration menu tree of FiT500E/F, and follow the menu to complete RAID volume settings: Chapter 3 Setup your FiT RAID subsystem 18 FiT RAID subsystem user’s manual Chapter 3 Setup your FiT RAID subsystem 19 FiT RAID subsystem user’s manual GUI — FiT Manager FiT Manager is a management utility for users to administrate one or multiple FiT RAID subsystems attached to the host computer. Users need to install FiT Manager on their PC or MAC where FiT RAID subsystem is connected to. FiT Manager provides a simple graphic user interface that users can easily create volumes, monitor hardware status, check event logs and upgrading the firmware, etc. There are two modes in FiT Manager: Basic Mode and Advanced Mode. In Basic Mode, some basic functions are available, such as hard disk information, viewing event logs, creating a RAID volume and setting one button backup. If you want to configure more administration functions: Email Notification, Upgrading Firmware and System information, you have to setup configurations in Advanced Mode. Minimize to Task Bar Minimize to System Tray Mute Beeper About Management Modes Configuration Window Function Tags NOTE! Refer to “read me” for installing FiT Manager in different operating systems. Chapter 3 Setup your FiT RAID subsystem 20 FiT RAID subsystem user’s manual Basic Mode Four function tags at left side: RAID and Disk Information, Event Log Viewer, Basic RAID Configuration and One Button Backup Settings. Central window shows the main configurations of FiT RAID subsystem. RAID and Disk Information RAID and Disk Information provides users the information about FiT controller, physical disks and RAID volumes. To identify the controllers, RAID volumes and hard disks, click the information bar at top and the related disk power LED would flash. Users can also check the current status of RAID volumes. Click to select the FiT controller for detailed information. Click to show the FiT hardware information, such as system temperature, fan speed and voltage value. Click to show the disk information and unused capacity. P0 (Port0) presents the slot 1 physical disk (Disk1); P1 (Port1) presents the slot 2 physical disk (Disk2) and so on. Chapter 3 Setup your FiT RAID subsystem 21 FiT RAID subsystem user’s manual If a RAID volume is created, click to show the RAID volume information. M0 presents the member disk 1 of the RAID volume; M1 presents the member disk 2 of the RAID volume and so on. RAID Information includes: RAID Level Shows the RAID mode of the RAID volume Status Normal: RAID volume is working without failed any member disk Degrade: One or more disks are failed but the RAID volume still can be accessible with data redundancy Broken: RAID volume is inaccessible because the number of failed disks are more than RAID tolerance Rebuilding: Degrade RAID volume is rebuilt with a spare disk Capacity Shows the total capacity of the RAID volume Plugged Shows the members disks grouped into a RAID volume Member(s) Chapter 3 Setup your FiT RAID subsystem 22 FiT RAID subsystem user’s manual Click to show the disk information and unused capacity of RAID member disks. Click SMART to information of check each the RAID member disk. Chapter 3 Setup your FiT RAID subsystem 23 FiT RAID subsystem user’s manual Event Log Viewer Event Log Viewer records all events happen in FiT RAID subsystem. Logs include issued module, date, event type and detailed message. Click to save logs as a text file or click to delete all events. Basic RAID Configuration In “Basic RAID Configuration”, users can only create a single RAID volume. FiT RAID subsystem consumes all of hard disks which are inserted to create a RAID volume. Select one of RAID modes in “Configure RAID”. Red section presents the capacity used by RAID volume and the green section presents the unused capacity. Click if you want to stop creating RAID volume. Chapter 3 Setup your FiT RAID subsystem 24 FiT RAID subsystem user’s manual Check with “Support Password” to enable RAID volume protection. Once the option is enabled, FiT RAID subsystem would request correct password when users want to delete the RAID volume. The password supports up to 8 characters. Click to start creating RAID volume and a confirmation window would to complete the pop out. Click to stop the configuration or click procedure. Once the successfully, RAID volume is an information created message would pop out and click “OK”. The RAID volume information which includes RAID level, capacity and member disks shows at top. To delete RAID volumes, select “DELETE ALL RAID” in “Configure RAID”. The RAID volume information would show as red and come with an X mark. Click if you want to stop deleting RAID volumes. Chapter 3 Setup your FiT RAID subsystem 25 FiT RAID subsystem user’s manual Click to proceed deleting RAID volume and a confirmation window would pop complete out. the to Click configuration or click to stop the procedure. Once the successfully, RAID volume an information is deleted message would pop out and click “OK”. One Button Backup Settings FiT RAID subsystem supports users to easily backup folders and data from host computer to FiT RAID subsystem. Once complete “One Button Backup Settings”, users can just push “Set/Mute/Backup” button and the backup application would automatically start to backup specific folders and data into FiT RAID subsystem. Click to select the program path of backup application. Chapter 3 Setup your FiT RAID subsystem 26 FiT RAID subsystem user’s manual For example, select “PCClone EX” as the one button backup application. Fill in “Program Arguments” with path /filesbackup:X. X is the drive letter where the data was backup to. In this case, drive J: is the backup target. Chapter 3 Setup your FiT RAID subsystem 27 FiT RAID subsystem user’s manual Click to complete settings and an information message would pop out and click “OK”. Before starting backup data, users need to select source data in the backup application as example. Press “Set/Mute/Backup” button to start backup data and a processing bar would appear. Chapter 3 Setup your FiT RAID subsystem 28 FiT RAID subsystem user’s manual Advance Mode Four function tags at left side: Email Notification and Event Settings, Advanced RAID Configuration, Firmware Information and RAID Settings. Central window shows the main configurations of FiT RAID subsystem. Email Notification and Event Settings In “Email Notification and Event Settings”, user can setup an email address to receive events. According to urgent level, users can select what type of events they want to receive. In addition, users can save the settings as a template and load it to other FiT RAID subsystems. Complete the settings of the mail server then select events that users are able to receive an email notification. Click select all of events and to to deselect them all. Advanced RAID Configuration In “Advanced RAID Configuration”, users can select available hard disks to create one or more RAID volumes. Users can also modify the capacity size of RAID volumes. Chapter 3 Setup your FiT RAID subsystem 29 FiT RAID subsystem user’s manual Select “Create RAID” first in “Configure RAID” then decides one of RAID modes to create the RAID volume. Select available hard disks to create a RAID volume. Red section presents the capacity used by the RAID volume and the green section presents the unused capacity. Click on the red section to adjust the capacity of each hard disk used by the RAID volume. Click if you want to stop creating RAID volume. Click to start creating the RAID volume and a confirmation window would pop complete out. the to Click configuration or click to stop the procedure. Chapter 3 Setup your FiT RAID subsystem 30 FiT RAID subsystem user’s manual Once the RAID volume an information successfully, is created message would pop out and click “OK”. The RAID volume information which includes RAID level, capacity and member disks shows at top. Repeat the same steps to create the second RAID volume and FiT RAID subsystem only shows unused hard disks for creating RAID volume. To delete RAID volumes, select “DELETE RAID” in “Configure RAID” then select the RAID volume which you want to delete. The selected RAID volume information would show as red and come with an X mark. Click stop if you want to deleting RAID to volumes. delete the Click selected volume and follow the instruction to complete procedures. Chapter 3 Setup your FiT RAID subsystem 31 FiT RAID subsystem user’s manual Firmware Information Except firmware version, “Firmware Information” also shows relative information about RAID subsystem and vendor manufacturer. To update firmware, click to select the firmware version you want to update. Click to proceed updating firmware. RAID Settings RAID Settings allows users to setup the Stand-by Timer and rebuilding priority of FiT RAID subsystem. Stand-by Timer is designed for saving power consuming. Setup Stand-by Timer to force FiT RAID subsystem becoming stand-by mode which would consume less electricity than normal status. About rebuilding priority setting, it provides users different balances between data I/O and background rebuilding task of FiT RAID subsystem. Chapter 3 Setup your FiT RAID subsystem 32 FiT RAID subsystem user’s manual To enable Stand-by Timer, setup an idle time (no I/O access) before FiT RAID subsystem becoming stand-by mode. 0 minute presents that Stand-by Timer is off. Click to complete the setting and a confirmation window would pop out. Quit Fit Manager, and FiT RAID subsystem will become stand-by mode after it stays idle status. IMPORTANT! Without quit FiT Manager, FiT RAID subsystem would not become stand-by mode. Chapter 3 Setup your FiT RAID subsystem 33 FiT RAID subsystem user’s manual Modify the rebuilding priority bar to decide how prior that background rebuilding task would be. Lower rebuilding priority offers better I/O performance while FiT RAID subsystem is during rebuilding. Click to complete the setting and a confirmation window would pop out. Chapter 3 Setup your FiT RAID subsystem 34 FiT RAID subsystem user’s manual Chpter 4 Formatting, partitioning and removing the disk Once your RAID volume is created via any method as description above, you have to format the disk device and partition the volume before start using it. The method for different operation systems is described as below: For Microsoft Windows Users Right click My Computer icon on the desktop and select Manage from drop down menu to open Computer Management utility. Click Disk Management at left panel. AXUS RAID volume is recognized as Disk 1 in console. Right click on Disk 1 and select Initialize Disk from the pull-down menu. Follow the wizard to complete the initialization. Chapter 4 Formatting, partitioning and removing the disk 35 FiT RAID subsystem user’s manual Right-click on the Disk 1 “Unallocated” bar and select New Simple Volume from the pull-down menu. A New Simple Volume Wizard window would pop out and click Next to continue. Follow the instruction to specify your volume size then click Next. Chapter 4 Formatting, partitioning and removing the disk 36 FiT RAID subsystem user’s manual Windows Vista would automatically assign a drive letter or you can choose one from drop menu to the new volume then click Next. Enter a Volume Label, e.g.RAID 5 and check the Perform a quick format option then click Next to continue. Wizard would show the information about the new volume and click Finish to complete the procedure. Chapter 4 Formatting, partitioning and removing the disk 37 FiT RAID subsystem user’s manual In Disk Management console, a new volume: RAID5(M:), is created successfully for use. To remove the RAID volumes, right click and click “Safely Remove Hardware”. Select either the volume label or AXUS Disk Device to remove the RAID volume then click “OK”. Chapter 4 Formatting, partitioning and removing the disk 38 FiT RAID subsystem user’s manual An information window would pup out and you can disconnect or power off FiT RAID subsystem. IMPORTANT! Not all of eSATA interfaces support hot plug function and AXUS strongly recommend users to power off the host computer before disconnecting or removing FiT RAID subsystem via eSATA port. For Mac OS X Users Open the Apple Disk Utility. Select “AXUS H/W RAIDX Media” and the information about it would be displayed at bottom. Chapter 4 Formatting, partitioning and removing the disk 39 FiT RAID subsystem user’s manual Click Partition tab to create one or more partitions. Follow the instruction to setup partitions, such as name, size and format. Then click Apply to continue. Click Partition button to complete procedure. A new volume would appear on the desktop for use. Chapter 4 Formatting, partitioning and removing the disk 40 FiT RAID subsystem user’s manual For Linux Users Open terminal and run command “fdisk –l” to check disk device. Run command “fdisk /dev/sda” to partition device. Type “n” to create a new partition table. Chapter 4 Formatting, partitioning and removing the disk 41 FiT RAID subsystem user’s manual Type “p” or “e” to create a primary partition or an extended partition. Follow the instruction to complete creating partitions. Chapter 4 Formatting, partitioning and removing the disk 42 FiT RAID subsystem user’s manual Type “w” to write the partition table to device. Chapter 4 Formatting, partitioning and removing the disk 43 FiT RAID subsystem user’s manual Run command “fdisk –l” to check the partition /dev/sda1. Run command “mkfs” to format /dev/sda1. Chapter 4 Formatting, partitioning and removing the disk 44 FiT RAID subsystem user’s manual Run “mkdir” to create a directory /mnt/RAID5 for a mount point. Run command “mount” to mount /dev/sda1 at /mnt/RAID5. A new media device would appear on desktop for use. To remove the RAID volume, run command “umount” to unmount /dev/sda1 then you can disconnect or power off FiT RAID subsytem. Chapter 4 Formatting, partitioning and removing the disk 45 FiT RAID subsystem user’s manual Limited Warranty AXUS warrants to the original purchaser that all the hardware product shall be free from defects in material and workmanship from the date of purchase to the corresponding standard warranty period. AXUS, at its expense and option, shall either repair or replace any products or part thereof which is proven defective under the warranty period. Replacement, if required, shall be with new, comparable, or reconditioned products. THIS LIMITED WARRANTY DOES NOT COVER MISUSE OR MINOR IMPERFECTIONS IN UNITS THAT MEET DESIGN SPECIFICATIONS OR IMPERFECTIONS THAT DO NOT MATERIALLY AFTER FUNCTIONALITY. THIS LIMITED WARRANTY DOES NOT COVER AND AXUS IS NOT RESPONSIBLE FOR: z Damages caused by misuse, abuse, accidents, fire, theft, disappearance, misplacement, power surges, viruses, reckless, willful or intentional conduct. z Damages caused by servicing not authorized by AXUS. z Damages caused by usage that is not in accordance with product instructions. z Damages caused by failure to follow the product instructions or failure to perform preventive maintenance. z Data loss due to any defective hardware or necessary for repairing FiT RAID Subsystems. Technical Support The scope of technical support consists of helping you to diagnose and resolve problems with detects in FiT RAID Subsystems. If you encounter any difficulties while installing FiT RAID Subsystem, please contact AXUS Technical Support via one of the following ways: Telephone: 886-2-32348686 Fax: 886-2-32341515 E-mail: [email protected] URL: http://www.axus.com.tw Limited Warranty 46 FiT RAID subsystem user’s manual Appendix A AXUS provides users optional accessories to enhance performance and capability of FiT RAID subsystems. Not only desktop PCs or Mac computers but also laptop users can easily utilize FiT RAID subsystems to protect their data and get outstanding I/O performance. Optional accessories show as below: Redriver Card is designed to provide a more stable eSATA express/43 Card with 1-lane 2.5Gb/s PCI signal. It supports two eSATA ports for connecting Express interface is designed for laptop users. It multiple FiT RAID subsystems. supports two eSATA ports for connecting multiple FiT RAID subsystems. PM Card with PCIe x1 interface is designed to FiT express-4e Card with PCIe x4 interface is provide host computers recognizing multiple logical designed for users who request outstanding I/O volumes. It supports two eSATA ports for connecting performance. It supports up to four eSATA ports for multiple FiT RAID subsystems. stripping multiple FiT RAID subsystems on operating systems. Appendix A 47