1
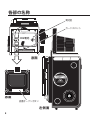
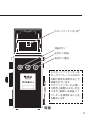
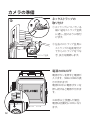
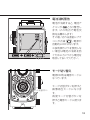
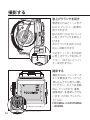
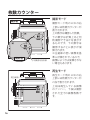
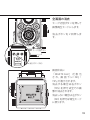
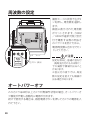
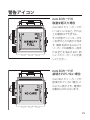
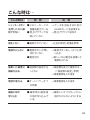
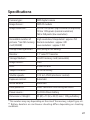
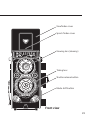
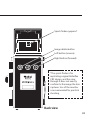
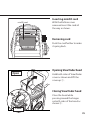
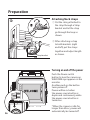
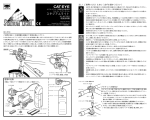
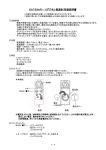
取扱説明書
INDEX
この度はRolleiflex MiniDigi AF5.0をお買い上げいただき、誠
にありがとうございます。
製品を正しくお使いいただくために、ご使用になる前に必ずこ
の取扱説明書をよくお読みいただき、正しくお使いください。
仕 様 ------------------------ 3
安全にご使用いただくために-- 4
各部の名称 ------------------- 6
カメラの準備
底蓋の開閉 ------------------ 10
電池を入れる----------------- 10
電池を取り出す--------------- 10
枚数カウンター
撮影モード ----------------- 16
再生モード ------------------ 16
画像再生--------------------- 17
解像度の設定 --------------- 17
画像の消去
選択画面の消去 ------------ 18
MiniSD カードの入れ方 ------ 11
全画面の消去 -------------- 19
MiniSD カードを取り出す----- 11
周波数の設定 --------------- 20
オートパワーオフ------------ 20
ファインダーフードの開閉 ---- 11
ネックストラップの取付け ---- 12
電源の ON/OFF -------------- 12
電池消耗警告 ---------------- 13
モード切替え ----------------- 13
撮影する
巻上げクランクを回す -------- 14
撮影する --------------------- 14
警告アイコン
MiniSD カードの
容量を超えた場合 ---------- 21
MiniSD カードが
装填されていない場合------ 21
カメラの構え方-------------- 22
MiniDigi AF5.0 に関して --- 22
こんな時は…---------------- 23
2
仕様
カメラタイプ
5メガピクセルデジタルカメラ
イメージセンサー
3メガ AFモジュール
記録画素数(pixel) 2304 x 2304(高解像度/画像補間)
1536 x 1536(標準解像度)
768 x 768(低解像度)
予測記録枚数※1
miniSDカード
(256MB)
高解像度
(画像補間)
:約250枚
標準解像度モード:約430枚
低解像度モード:約1300枚
連続撮影時間※2
約2時間
(CR2 リチウム電池 x1)
ディスプレイ
1.1インチ TFTモニタ
記憶メディア
miniSD カード
画像フォーマット
JPEG
レンズ
4.9mm F2.8 オートフォーカス
撮影距離
10cm - ∞
(無限遠)
シャッタースピード
1/15 - 1/2500秒
(電気式)
露出調整
自動
ホワイトバランス
自動
オートパワーオフ
無操作状態で60秒後にOFF
電源
CR2 リチウム電池 x1
大きさ/重量
W49× H73× D45mm/100g(電池込)
※1:予測撮影枚数は、記録メディアの容量や被写体、その他撮影条件で異なります。
※2:連続撮影時間は撮影条件、プレビュー回数といったその他諸条件で変化します。
3
安全にご使用いただくために
安全で快適にご使用いただくために下記の注意事項をよくお読
みになった上、 正しくお使い下さい。 以下の事項が守られずに
カメラに故障が生じた場合、 保証は適用されません。
また、これらの注意事項は、 カメラ使用者やその周りの人々に
危害や損害が起こるのを未然に防ぐためのものです。 注意マー
ク・禁止マークの意味は右記のとおりです。
このカメラの取扱説明書中で指定されていない電池は使用しない
で下さい。電池の破裂、液漏れにより、火災、怪我の原因となりま
す。
電池廃棄の際には、接点部にテープを貼るなどして絶縁してくださ
い。他の金属と混じると発火・破裂等の原因となります。
カメラに電池を入れる際、「+」 「-」 の接点を正しく入れてくださ
い。 電池の破裂・液漏れにより火災・怪我の原因となります。
取り外した電池は、お子様の手の届かないところへ置いて下さい。
万一、飲み込んだ場合、電池が壊れて電池の液で胃、腸等が損傷
する恐れがありますので、直に医師と相談してください。
万一、カメラ(電池)が熱くなる、煙が出る、焦げ臭いなどの異常が
起きた場合、そのまま使用すると火災、火傷の原因になります。火
傷しないように注意して電池を取出し、弊社までご連絡ください。
電池を火の中に入れたり、ショート、 分解、 加熱や、 アルカリ電
池およびリチウム電池などの充電できない電池に充電をしないで
下さい。 爆発して大怪我の危険があります。
4
注意
禁止
このマークは、注意事項を守らずに誤った取り扱いをする
と、使用者が重傷を負ったり死亡する可能性がある状況、
および物的障害のみの発生が想定される内容です。必ず
お守り下さい。
この記号は行為を禁止する記号です。
の中には具体的な内容が表示されています。
自分でカメラを分解しないでください。カメラ内部には高電圧回路
があるので感電の危険性があります。
カメラは乳幼児の手の届かないところに置いてください。乳幼児が
誤ってストラップを首に巻き付けると窒息する危険があります。
カメラは湿気や埃のない場所で保管してください。 また高温状態
の車の中に放置したり、 熱いものの側に放置しないでください。
自動車等の運転者は運転中絶対にカメラを操作しないでくださ
い。交通事故の原因となります。
カメラをストラップで下げているときは、他のものを引っ掛けたり
しないようにご注意ください。怪我等の原因となることがありま
す。
カメラごと水に落としたり、 内部に水が入った場合は、 電池を抜
いて速やかに弊社サービス部までご連絡ください。そのまま使用
すると火災や感電の原因となります。
5
各部の名称
上面
TFTカラーモニタ
ファインダーフード
ストラップ金具
電源ボタン
巻上げクランク
右側面
6
ファインダーカバー
スポーツファインダー蓋
ファインダーレンズ
(ダミーレンズ)
撮影レンズ
シャッターボタン
モード切替ボタン
正面
7
各部の名称
電池室
カードスロット
CR2電池
底面
底蓋
底蓋オープンボタン
左側面
8
スポーツファインダー窓※
消去ボタン
左ボタン
(戻る)
右ボタン
(進む)
※スポーツファインダーは
ローライフレックス2.8Fの
外観の特長を再現する上で
装備されています。
このファインダーから覗い
た景色と画像にはズレが生
じます。撮影には液晶ファ
インダーを使用することを
お薦めします。
背面
9
カメラの準備
底蓋オープンボタン
開け方
底蓋の開閉
底蓋を開けるときは、底蓋
オープンボタンを矢印①方
向に押しながら、底 蓋 を
矢印②の方向にスライドし
て、底蓋を外します。
底蓋を閉じるときは、底蓋
をカメラ前方にスライドし、
「カチッ」と音がするまで
閉じます。
※底蓋は本体から外れま
す。落下や紛失にご注意く
ださい。
閉じ方
電池を入れる
CR2電池
電池の極性に注 意して図
のように入れます。
この時、電池取り出しテープ
を電池の奥に入れ、端が外
に出るようにしてください。
電池を取り出す
電池取り出しテープ
10
電池取り出しテープを引っ
ぱって電 池を取り出しま
す。
miniSDカードを入れる
MiniSDカード(裏)
底蓋が開いている状態で、
カードを図のように奥まで
挿入します。
miniSDカードを
取り出す
miniSD カードをさらに押
し込むと先端が飛び出しま
す。
開け方
ファインダーフードの
開閉
ファインダーフードを開け
るときは、図のように本体
上部のファインダーフード
カバーの両脇を持ち、上に
引き上げます。
閉じ方
ファインダーフードを閉じる
ときは、フード両脇のヒンジ
部を押しながら閉じます。
11
カメラの準備
ネックストラップの
取り付け
①ストラップについている
細い紐をストラップ金具
に通し、図のように取付
けます。
ストラップ金具
②左右のストラップ金具に
ストラップの紐を取付け
てからストラップをつな
ぎ、長さを調節します。
電源のON/OFF
電源ボタンを押すと電源が
入ります。
(WELCOMEの表
示が流れます)
電源ON中に電源ボタンを
押し続けると電源が切れま
す。
電源ボタン
12
※60秒以上放置した場合、
電源は自動的にOFFになり
ます。
電池消耗警告
電池が消耗すると、電池ア
イコンが
となり警告し
ます。
(この時点で電池交
換をお薦めします)
その後、切れる直前にアイ
コンが点滅
、電源が
自動的にOFFになります。
※長時間カメラを使用しな
い場合は電池の消耗を防
ぐためにカメラから電池を
取出しておいてください。
モード切り替え
電源ON時は撮影モードに
なっています。
モード切替ボタン
モード切替ボタンを押すと
画 像再生モードになりま
す。
再 度モード切 替ボタンを
押すと撮影モードに戻りま
す。
13
撮影する
巻上げクランクを回す
電源を入れると 1 〜 2 秒で
LCD にプレビュー画 像 が
表示されます。
図の矢印①のようにフィル
ム巻上げクランクを跳ね上
げます。
次にクランクを矢印②の方
向に一回転させます。
電源ボタン
※必ずシャッターを切る前
に巻上げクランクを回して
下さい。 回さないとシャッ
ターは切れません。
撮影する
構図を決め、シャッターボ
タンを最後までしっかりと
押し込んでから直ぐに離し
てください。カメラは自動
的に、ピント合わせ、撮影、
画像保存、を連続して行な
います。この時、ディスプレ
イ上には、
FOCUSING→CAPUTURING
→SAVING
14
シャッターボタン
と表示が変わります。
表示が消えるまでカメラを
動かさないようにしてくだ
さい。
シャッターボタンを半押し
した時点で"FOCUSING"の
表示が出ますが、この時に
シャッターボタンを離して
しまうと巻上げの解除がで
きず、巻き上げクランクが
回転できない場合があり
ます。
[フォーカスロック]
シャッターボタンを押すと
FOCUSING の文字が表 示
されます。その表示が消え
たらフォーカシングが完了
し、フォーカスロックされ
た状態となります。
シャッターボタンを放すと
撮 影(CAPUTURING)、保
存(SAVING)されます。
※カメラの正しい構え方は
P22をご参照ください。
15
枚数カウンター
撮影モード
撮影前
撮影後
予測撮影可能枚数
撮影モード時の LCD の右
上部には枚数カウンターが
表示されます。
上の数字は撮影した枚数、
下の数字は計算上あと何
枚撮影できるかを表示す
るものです。下の 数字は
撮 影するごとに表示が減
算されます。
※圧縮率の低い画像を基
準に計算されているので、
画像によっては減算されな
い場合もあります。
再生モード
再生画像ナンバー
撮影枚数
16
再生モード時の LCD の右
上部には枚数カウンターが
2 段で表示されます。
上段は再生している画 像
のナンバー、下段は撮 影
された全ての画像枚数で
す。
画像再生
モード切替ボタンを押して
画像再生モードにします。
右ボタン(画像進む)
左ボタン(画像戻る)
直前に撮影した画像が表
示されます。
右ボタンを押すと画像が進
み、 左ボタンを押すと画
像が戻ります。
解像度の設定
解像度
撮影モード時に右ボタンで
解像度を選択します。
画面左上に選択した解像度
(H/N/L)
が表示されます。
H -----高解像度モード
2304 x 2304 pixel(画像補間)
N -----標準解像度モード
1536 x 1536 pixel
L -----低解像度モード
768 x 768 pixel
17
画像の消去
選択画面の消去
モード切替ボタンを押して
画像再生モードにします。
右ボタン、左ボタンを操作
し、消去したい画像を選択
し表示します。
モード切替ボタン
消 去 ボタン を1回 押 し ま
す。
右ボタン(進む)
左ボタン(戻る)
消去ボタン
画面中央に
「DELETE ONE?」 が 表
示 さ れ、画 面 下 に「NO」
「YES」が表示されます。
消去する場合は、右ボタン
(YES)を押せば選択され
た 画 像1点 が 消 去 さ れ ま
す。
消去しない場合は左ボタン
(NO)を押せば再生モード
に戻ります。
18
全画面の消去
モード切替ボタンを押して
画像再生モードにします。
消 去ボタンを 2 回 押しま
す。
モード切替ボタン
消去ボタン(2回)
画面中央に
「DELETE ALL?」 が 表 示
さ れ、画 面 下 に「NO」
「
YES」が表示されます。
消去する場 合は右ボタン
(YES)を押せば全ての画
像が消去されます。
消去しない場合は左ボタン
(NO)を押せば再生モード
に戻ります。
19
周波数の設定
撮影モードの状態で左ボタ
ンを押し、周波数を選択し
ます。
画面に表示された周波数
がセットされます。
(50HZ
/ 60HZが選択可能)蛍光
灯で撮影する際の明るさ
のバラツキを防ぐために、
電源周波数に合わせてセッ
トしてください。
ご注意
左ボタン(戻る)
設定を誤ると、普通の蛍光灯
(高周波点灯のものは除く)
での撮影で横縞が出ること
があります。
※蛍 光 灯の直下では、周波
数の設定を変えても横縞が
出る場合があります。
オートパワーオフ
このカメラは60秒以上カメラが無操作状態の場合、オートパワーオ
フ機能が作動し自動的に電源が切れます。
続けて使用する場合は、再度電源ボタンを押してカメラの電源を入
れて下さい。
20
警告アイコン
mini SDカードの
容量を超えた場合
mini SDメモリーカードが
いっぱいになると、それ以
上の撮影はできません。
その状態でシャッターボタ
ンを押すとこの表示が出ま
す。撮影を続けるにはメモ
リーカードの画像の一部ま
たは全てを消去するか、新
しいメモリーカードに交換
してください。
mini SDカードが
装填されていない場合
mini SDメモリーカードが
装填されていない場合、こ
のように表示され、電源が
自動的にOFFになります。
21
カメラの構え方
ぶれを防ぐために、カメラ
は手でしっかり保持し、動
かないように構えます。
この時、撮 影レンズ(下の
レンズ)に指が写り込まな
いようにご注意ください。
MiniDigi AF5.0 に関して
※このカメラのバッテリー寿命(CR-2電池)は撮影モードを使用し
て連続約2時間です。ただし、この時間は撮影条件、プレビュー回
数、
その他諸条件で変化します。
※Rolleiflex MiniDigi AF5.0で撮影したMiniSD内の画像は、携帯電
話で再生することはできませんのでご了承ください。
※極端にコントラストの高い状況下、例えば室内で光源が直接画面
に入るような状態においては、プレビュー画面がちらつく場合があ
りますが撮影画像に支障はありません。
※暗い照明下、あるいはコントラストの低い被写体の場合、オート
フォーカスに数秒かかる場合があります。また、このような状況下
ではオートフォーカスの精度は低下する場合があります。
22
こんな時は…
こんな時は
原 因
シャッターボタン ●メモリーカードの
を押したのに撮
影できない
容量を超えている
●巻上げクランクを
処 置
→データを消去するか別の
miniSDカードを装填する
→巻上げクランクを回す
回していない
再生しない
●撮影されていない
→上記の原因・処置を参照
電源が入らない
●電源ボタンが押し
→電源ボタンをしっかりと押
切れていない
●電池切れ
し込む
→新しいCR-2電池を装填して
電源を入れる
撮影した画像に ●周波数の設定が正
横縞が出る。
しくない
→周波数を変えて撮影する
(「周波数の設定」参照)
→再度電源を入れ直す
電源が落ちる
●オートパワーオフ
→再度電源を入れ直す
が作動
画面に影が
写り込む
● 撮 影 時 に撮 影 者
→撮影レンズ(下のレンズ)に
の指が写り込んで
指がかからないようにする
いる。
23
日本総代理店
株式会社駒村商会
〒 103-0013 東京都中央区日本橋人形町 3-2-4 駒村ビル
TEL.03-3639-3351 FAX.03-3808-0115
ww w . k o m a m u r a . c o . j p
Owner's Manual
Table of Contents
Thank you for purchasing the new Rolleiflex MiniDigi AF 5.0
digital camera, a miniature replica of the famed Rolleiflex
2.8F twin-lens-reflex camera.
Specifications ------------------- 3
For Your Safety ----------------- 4
Identification of parts---------- 6
Preparation
Opening / Replacing
bottom cover------------------ 10
Inserting battery ------------- 10
Removing battery ----------- 10
Record mode -------------- 16
Playback mode ------------ 16
Replaying images ----------- 17
Setting resolution ----------- 17
Deleting images:
Deleting a selected
image ------------------------ 18
Inserting miniSD card ------- 11
Deleting all images ------- 19
Removing miniSD card ----- 11
Setting frequency ----------- 20
Opening / Closing
Viewfinder hood ------------- 11
Auto power-off -------------- 20
Attaching neck straps ------ 12
Turning on/off power------- 12
Warning battery status ----- 13
Shifting modes --------------- 13
Shooting:
Winding crank handle ------ 14
Shooting ----------------------- 14
26
Frame counter
Warning signs and icons:
Memory Full ---------------- 21
No Card ---------------------- 21
Holding the camera -------- 22
Rolleiflex MiniDigi AF5.0 -- 22
Trouble shooting ------------ 23
Specifications
Camera type :
5MP digital camera
Image Sensor :
3MP AF module
Image resolution :
2304 x 2304 pixels (high resolution/interpolated)
1536 x 1536 pixels (normal resolution)
768 x 768 pixels (low resolution)
Recordable number of
High resolution/interpolated : approx. 250
pictures :*miniSD memory Normal resolution : approx. 430
card (256MB) :
Low resolution : approx. 1300
Average shooting duration :** 2hrs (using a CR2 battery)
Monitor :
1.1" color TFT monitor
Storage Medium :
miniSD memory card (removable)
Image format :
JPEG
Lens :
4.9mm F2.8 AF
Subject Distance :
10 cm to infinity
Shutter speeds :
1/15 to 1/2500 (electronic control)
Exposure control :
Automatic
White balance :
Automatic
Auto power-off :
Shuts camera off after being idle 60sec
Power source :
1 x CR2 Lithium battery
Dimensions / Weight :
43 (W) x 73 (H) x 45 (D) mm / 100g w/battery
* This number may vary depending on the size of the memory, subject type, etc.
** Battery duration on continuous shooting differs depending on shooting
conditions.
27
For Your Safety
For the safe and correct use of your camera, please read
the following notes carefully. Our warranty may be void for
damage caused by willful disregard of the instructions.
The instruction alerts are to protect the user of the camera
and people around him/her from possible damages and
injuries. Caution and prohibition signs used in the booklet
are shown on the right:
Never use a battery other than specified in the manual. Possible
explosion and leakage could cause hazards and injuries.
When discarding a battery, insulate the poles with a piece of
tape, etc. to prevent possible contact with metallic objects that
could lead to ignition and/or explosion.
Insert battery correctly in the camera. Wrong polarity (+/-) could
cause explosion and/or leakage of battery, possibly leading to
hazards and injuries.
Keep removed battery out of children ユ s reach. If swallowed,
consult the doctor immediately as electrolyte within may
seriously harm digestive organs.
Should the camera (battery) get hot, emit smoke or smell as
if burning, stop using it immediately and contact our service
department. Continued use may cause fire or burn.
Never throw in fire, short-circuit, break up or heat batteries, nor
try to charge the ones not designed for recharge. This could lead
to possible explosion and serious injuries.
28
Caution
Prohibition
This mark indicates that the disregard of the
notes may lead to fatal or serious injuries or
substantial material damages.
This mark with additional symbols indicates
prohibition of certain actions or processes
specified in the notes.
Never try to disassemble the camera. High-voltage circuitry inside
the camera could cause an electric shock.
Keep the camera out of the reach of infants and small children.
Camera ユ s strap could wind itself round their necks, causing
suffocation.
Store the camera away from moisture and dust. Do not store in
high temperatures, as inside a closed car in summer, or close to a
hot object.
Never operate the camera while driving a car, which could lead
to a traffic accident.
When hanging the camera with the strap. Be careful the strap
will not catch other objects, which could lead to injuries and
hazards.
Should the camera dropped in water or water gets into it,
remove the battery and contact our service department. Using it
wet could cause fire or an electric shock.
29
Identification of parts
Top View
TFT monitor
Viewfinder hood
Strap bracket
Power on/off switch
Crank handle
Right side view
30
Viewfinder cover
Sports finder cover
Viewing lens (dummy)
Taking lens
Shutter release button
Mode shift button
Front view
31
Identification of parts
Battery chamber
Memory card slot
CR2
Lithium battery
Bottom view
Bottom cover
Bottom cover lock bar
Left side view
32
Sports finder eyepiece*
Image delete button
Left button (reverse)
Right button (forward)
*The sports finder is for
replicating original Rolleiflex
2.8F design, and the view
through it does not exactly
conform to the image the lens
captures. Use of the monitor
is recommended for practical
shooting.
Back view
33
Preparation
Bottom cover lock bar
Open
Opening Bottom cover
Remove the cover by sliding
it to the direction of Arrow
②, while pushing the Bottom
cover lock bar to the direction
of Arrow ①.
Replacing Bottom cover
Set the cover as shown and
slide it toward the camera
front (Arrows) till it clicks in
place.
*The cover can be removed
from the camera. Be careful
not to misplace it !
Replace
Inserting Battery
CR2
Lithium battery
Put the battery as shown,
minding the battery polarity
(as shown), placing it over
the tape so that the tip of the
tape juts out.
Removing Battery
Pull the tape to remove the
battery.
Tape to remove
the battery
34
Inserting miniSD card
miniSD card
With the Bottom cover
removed insert the card all
the way as shown.
Removing card
Push the card further to make
it spring back.
Open
Opening Viewfinder hood
Hold both sides of Viewfinder
cover as shown and lift the
cover up ① .
Closing Viewfinder hood
Close the hood while
pressing inward the hinges
on both sides of the hood as
shown ② .
Close
35
Preparation
Attaching Neck straps
① Put the string attached to
the strap through a Strap
bracket and let the strap
go through the loop as
shown.
Strap bracket
② After attaching a strap
to both brackets (right
and left) put the straps
together and adjust length
as shown.
Turning on and off the power
Power switch button
36
Push the Power switch
button to turn the camera on.
WELCOME sign appears on the
monitor.
Another push on the button
turns power off.
Power will be cut when
the power source button is
depressed continuously while
the power source button is
turned on.
*When the camera is idle for
longer than 60sec, power will
automatically be turned off.
Warning battery status
When the battery is almost
drained, the battery icon gives
a warning signal by blinking
(
). (Replacing the battery
at this point with a new one is
recommended.) Then, before
the battery is completely
drained, the icon flashes
(
) and the power is
automatically turned off.
* When you do not use the
camera for a long time, be sure
to remove the battery from
the camera in order to prevent
battery drain.
Shifting modes
Pushing Mode shift button
will alternately shift the
mode between Record and
Playback.
Mode shift button
* You cannot shift to Playback
mode when no image is
stored.
37
Shooting
Winding Crank handle
Press Power switch to turn
power on.
An image will appear on
Monitor display in 1-2sec.
Unfold Crank handle as
shown (Arrow ① ) and turn it
360° clockwise (Arrow ② ) .
Power switch
*Turn the handle before
shooting each picture.
Otherwise the shutter
remains locked.
Shooting
When composition is decided
depress the shutter button all
the way.
Display will show:
FOCUSING
↓
CAPTURING
↓
SAVING
38
Shutter release button
*Focusing may take longer
time under low light
conditions.
*Image may be captured even
when the shutter button is
not fully depressed, but crank
handle may not be released
in this case.
About focus-lock
When the shutter release
button is depressed, the
FOCUSING signal is
displayed once. Focusing is
completed when the display
disappears, and the camera
is in a focus-lock condition.
Remove your finger from
the shutter release button to
capture ( CAPTURING )
and save the image
( SAVING ).
Refer to P46 for proper ways
39
Frame counter
Record mode
Before shooting
After shooting
Maximum frame
number allowing
predicted capturing
A frame counter is displayed in
the right upper corner of the
display when the camera is in
a shooting mode. The upper
number shows the total shot
number and the lower number
indicates the remaining number
of frames, which is subtracted
each time when the shutter is
released.
* Since the function of the lower
counter is calculated based on
images with relatively low data
compression ratios, depending
upon photographic conditions,
there may be a case that the
number is not subtracted.
Playback mode
Playback
image number
Shot number
40
When the camera is in
Playback mode, two numbers
appear at upper right corner
of the monitor. The upper
one indicates the frame
number of the image being
played on the monitor. The
lower one indicates total
number of pictures taken.
Replaying images
Right button
(forward)
Left button
(reverse)
Press Mode shift button to set
the camera to Playback mode
and the last picture taken
appears on the monitor.
Press Right button to advance
pictures and Left button to
reverse them.
Setting resolution
Image
resolution
Remember to select the resolution
setting each time you turn on the
camera. The setting auto starts
at "N" Normal resolution. With
camera turned on in Record mode,
press Right button to select image
resolution which will appear upper
left corner of the monitor in letters
H, N and L.The letters stand for:
H = High resolution
at 2304 x 2304 pixels
(interpolated)
N = Normal resolution
at 1536 x 1536 pixels
L = Low resolution
at 768 x 768 pixels
41
Deleting images
Deleting selected image
Press Mode shift button to
set the camera to Playback
mode.
Select the image to be
deleted with Left and Right
buttons.
Mode shift button
Right button (forward)
Left button (reverse)
Image delete button
Press Image delete button
once and DELETE ONE? sign
appears in the center of the
monitor accompanied by
< NO YES > below it.
Press Right button to delete
the image and Left to
cancel deletion, returning to
Playback mode.
42
Deleting all images
on the card
Press Mode shift button to
set the camera to Playback
mode.
Mode shift button
Image delete button (x2)
Press Image delete button
twice and DELETE ALL?
< NO YES > sign appears on
the monitor screen.
Press Right button to delete
all images on the card
and Left button to cancel
deletion, returning to
Playback mode.
When all images are
deleted, the mode will be
automatically shifted to
Record mode.
43
Selecting frequency (for fluorescent lamp)
While the camera is in Record
mode, press Left button to
select frequency for shooting
under fluorescent lamp(s).
50Hz and 60HZ alternately
appears on the monitor for
selection.
Caution
Left button (reverse)
*This is to prevent the
flickering of light under
fluorescent lamp(s). Except for
high-frequency fluorescent
lamp(s), stripes may appear
across images captured under
normal fluorescent lamp(s) at
the incompatible frequency.
Even set at the correct
frequency, stripes may appear
under strong fluorescent
lighting.
Auto power-off
The camera, when left without operation for longer than 60sec,
automatically activates Auto power-off circuitry to turn power off.
Press Power switch again to resume operation.
44
Warning signs and icons
Warning signs:
Memory Full
When a memory card is used
up and shutter release button
is pressed, MEMORY FULL
sign will appear. To continue
shooting, deletion of partial
or all images on the card will
be necessary. Otherwise,
replace memory card with
new one.
Warning signs:
No Card
When a mini SD memory card
is not loaded, the situation
is indicated in this way, and
the power is turned off
automatically.
45
Holding the camera
Hold the camera securely with
both hands as shown.
*Keep finger(s) off the taking
lens !
Rolleiflex MiniDigi AF 5.0
* Battery life will be approx. 2 hours in continuous use. This may become
shorter under low temperature condition.
*Images taken with Rolleiflex MiniDigi AF5.0 may not be replayed on mobile
phones.
* In photographic situations where contrast is extremely high, for example
in a scene where a light source is directly captured in the frame in indoor
photography, preview screen images may sometimes blink, but the actual
image will be unaffected.
* In low-lit conditions or when the contrast of your subject is low, it may
take several seconds for the camera to do auto-focusing. Also, in such
photographic conditions, auto-focus accuracy may be affected.
46
Trouble Shooting
Problem:
Possible causes:
Solution:
Shutter release
button depressed,
but no response.
* Memory card exhausted.
→Delete data or replace the
card.
* Crank handle not
wound.
→Wind the Crank handle.
Playback fails:
* No pictures taken.
→Refer to the above mentioned solutions
No power
* Power on/off switch →Press the switch firmly.
not pressed.
* Battery exhausted.
→Replace battery and press.
Stripes appear
across the pictures.
* Frequency set incor- →Alter frequency (see P.44).
rectly.
→Turn power on again.
Power turned off.
* Auto power/off circuitry activated.
→Turn power on again.
Shadow over the
pictures.
* Finger(s) pictured.
→Keep finger(s) away from
the taking lens (lower
lens).
47