1
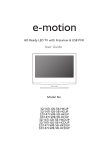
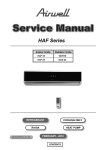
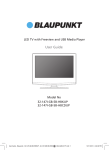
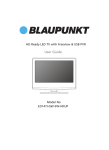
ountain
BREEZE
C L E A N
air purifier
instructions and guarantee
model 12746
A I R
ountain
BREEZE
C L E A N
odour sensor
remote control sensor
main body
ountain
BREEZE
front body
air
intakes
A I R
air outlets
ountain
BREEZE
carrying handle
C L E A N
A I R
back panel
air intake
front pane l
removal clip
battery life
preserving tag
power cord
MODE
SET
TIMER -
TIMER +
ON/OFF
battery removal clips
dust
sensor
cover
lithium battery (not shown)
ountain
BREEZE
filter change
indicator
MODE
xxxxx
SET
TIMER -
TIMER +
ON/OFF
xxxxxxxx
xxxxxxxxx
ountain
BREEZE
battery removal clips
washable
pre-filter
front panel
HEPA
filter
activated
carbon filter
UV
sterilization
Read the instructions and keep them safe. Pass them on if you pass the
air purifier on. Remove all packaging, but keep it until you’re satisfied the
air purifier is working.
ountain
BREEZE
C L E A N
important safeguards
Follow basic safety precautions, including:
1 The air purifier must only be used by or under the direct supervision of a
responsible adult.
2 Don’t put the air purifier in liquid; don’t use it in a bathroom, near water,
or outdoors.
3 Always turn the air purifier off and disconnect from the power supply
before attempting to remove any of the filters or UV tubes.
4 Do not place anything on, or in front of the product that could cause an obstruction to the air intake or outlet openings.
5 Do not attempt to operate the product without its filters in place or without the
front cover attached at all times.
6 Don’t use the air purifier if it has been dropped or if it’s damaged. If the power
cord is damaged, return the product to avoid hazard.
7 Always turn the air purifier off and disconnect from the power supply before
moving it to another location.
8 To disconnect from the mains power supply, grip the plug and pull from the power
socket. Never pull the cord directly.
9 Do not put any objects into the air intake or outlet openings.
10 Do not operate the air purifier near a stove or heater.
11 Do not operate the air purifier in areas where petrol, paint or other flammable
liquids or gases are stored or used.
12 Do not attempt to repair the unit other than to clean or replace the filters and UV
tubes.
13 Carry the air purifier using the handle on the rear panel. Never carry the product
using the power cord or by using the air intake slots on the front panel.
14 Don’t use accessories or attachments other than those we provide.
15 Site the air purifier only on a stable, level surface.
16 Do not operate the air purifier in close proximity to walls or curtains.
17 Remove the packaging around the activated carbon before the unit is switched on.
18 Do not wash the HEPA or activated carbon filters. This will cause damage and
prevent them operating effectively.
household use only
before using for the first time
1 Insert 2 AAA batteries (provided) into the remote control unit.
2 Remove the front panel by pressing in the front panel removal clips on both sides
of the main body near the body. Then lift up and pull the front panel towards you and
it will come away from the main body. You will see the battery life preserving tag above
the filters. Pull this tag upwards and out and the lithium battery will become activated.
4
A I R
ountain
BREEZE
C L E A N
1. To remove the outer
cover, push in the tabs at
the base as shown on insert
below. (Tabs push inwards)
enlarged
2. How to remove the
battery tag (pull up)
5
A I R
ountain
3 Next remove the pre filter and HEPA filters by pulling on the plastic frame
BREEZE
surrounding the HEPA. (The pre filter is attached to this frame also).
C L E A N A I R
Behind this you will see the activated carbon filter which is packed in a plastic
bag for freshness. Remove the bag and replace the filter in the main body.
To replace the HEPA filter frame tilt the frame with the top side away from you and
put the top part into place in the main body. There are two plastic tags within the
top of the main body to help locate the frame in position. Once the top of the filter
frame is behind these tabs push the base of the filter frame into position. Replace the
front panel by locating the tabs at the top of the front panel into the main body.
Then snap the base of the front panel into the front panel removal clips. You will hear
it click into position. The machine will not function if the filter frame or front panel is
not positioned correctly as a safety feature.
4 Ensure none of the air intakes or outlets are blocked.
positioning
5 Sit the air purifier on a dry, stable, level surface, near a power socket.
6 For best results the air purifier should be placed on an elevated surface, around
50cm from the floor. The air purifier can also be placed directly on the floor.
7 Route the cable so it doesn’t overhang, and can’t be tripped over or caught.
8 Put the plug into the power socket (switch the socket on, if it’s switchable).
UV1
4
3
2
1
UV2
UV3
Check Filter
A
Fan Speed Purify Air Refresh Timer On/Off Auto
Air Quality
LCD display panel
Your air purifier has many functions and the LCD panel displays the ambient air
quality reading, the time, the mode selected.
When any buttons are pressed on the control panel or remote control the LCD lights
up in a blue colour. Thirty seconds after pressing the last button, the blue light fades.
The LCD will also beep once to indicate that a button has been pressed. If it beeps
twice then it means the button you are pressing is not able to perform any function.
setting the clock
As soon as you plug the air purifier into the mains socket you will hear a beep and
notice the display reads
. You should set the time at this stage if you would like
to use the programmable on/off timer later.
Whilst still in standby mode to set the time, press the SET button. You will notice the
hours part of the time starts flashing and the word
time appears on the display. Use
the TIMER + and TIMER - buttons to set the hour correctly. Please note this clock works on a
24 hour basis. Press the SET button again and you will notice the minutes part of the
display starts flashing. Again use the TIMER + and TIMER - buttons to set the time and
press SET again to confirm.
6
If you wish to change the time simply follow the above
instructions when the unit is instandby mode.
There is a lithium battery within the main body of the air purifier.
The clock will continue to work even whilst the air purifier
is not plugged in so you should not have to reset the clock
each time you unplug the unit.
switching the air purifier on
As soon as the air purifier is plugged into the mains the red light on the ON/OFF button
will light up to show the unit is in standby mode.
Once the clock has been set press the ON/OFF button once. The unit will start in Auto
mode the first time after being plugged in.
The red light will not be lit whilst the unit starts working.
Pressing the ON/OFF button again will return the unit to standby mode.
The last fan speed and cleaning program selected will be remembered so the unit will
automatically enter this mode the next time the ON/OFF button is pressed unless the unit
has been unplugged in between use.
The ON/OFF button on the remote control can be pressed instead and this has the same
effect.
filter change
indicator
MODE
xxxxx
SET
TIMER -
TIMER +
ON/OFF
xxxxxxxx
xxxxxxxxx
ountain
BREEZE
4. UV tubes and
sterilization mesh
2. HEPA
filter
1. Washable
pre-filter
3. Activated
carbon filter
front panel
filtering the air
Your air purifier is equipped with a highly efficient 5 stage cleaning system that can
remove particles such as dust, pollen, hair, pet dander, smoke particles, bacteria and
odour from the air.
1.Pre Filter
The pre filter is the first stop for all large particles; therefore it is important to keep it
in place during operation in order to prolong the life of your HEPA filter.
The pre filter is treated with nano silver to prevent bacteria and other micro organisms
from reproducing on its surface.
If the filter gets torn or damaged then a replacement part can be ordered.
7
2.HEPA filter
ountain
The HEPA filter is highly effective at filtering the air and removing
BREEZE
99.97% of particles that are greater than or equal to 0.3 microns in size.
C L E A N A I R
This filter is sealed in a plastic frame to ensure there is no air leakage so that all air
that passes through the air purifier is effectively filtered. Do not attempt to remove
the filter from this frame as it will result in damage.
The life of the filter will vary according to the atmospheric conditions it is used within.
In average conditions it should last for twelve months. The LCD display will alert you
periodically to check your HEPA filter.
A replacement part can be ordered when required.
3.Carbon Filter
You must remove the packaging surrounding the activated carbon filter before you use
the machine for the first time. It is packaged in a plastic bag so it arrives fresh.
This filter is highly effective at removing odour particles and smoke from the
atmosphere. The filter acts like a sponge and traps particles in its holes so they cannot
escape back into the atmosphere.
In particularly smoky environments the activated carbon filter will quickly clog up and
needs to be replaced to give optimal performance.
A replacement part can be ordered when required.
The filters have been placed in this sequence in order to give optimum filtration
efficiency combined with maximum filter lifespan. Do not swap their locations about.
The filtration system is the heart of your air purifier and you must maintain the filters
properly to ensure effective cleaning (see care and maintenance ).
4. Air sterilisation function
Your air purifier is equipped with air sterilising
™ photocatalysis technology
that is proven to reduce bacteria, viruses, mould spores, odours and volatile organic
compounds (VOCs). It works by using a combination of the sterilisation mesh and ultra-violet
light to generate a chemical reaction to neutralize VOCs, bacteria and viruses that are
sucked into the air purification chamber.
5. Sterilisation process
MODE
SET
TIMER -
TIMER +
The TiO2 mesh is situated behind the three
UV tubes. This mesh is permanent and
replacement is not required.
When the machine is switched on it will start
filtering the air. When it is in standby mode it
does not filter the air. It is recommended
UV
you operate your machine 24 hours a day
tubes
because indoor air can quickly become
polluted and constant filtration is the best
way to maintain a clean indoor environment.
Your air purifier has four different fan speeds
as well as an auto mode that you can choose
to suit your preferences.
front panel
fixing clasp
8
ON/OFF
sterilisation
mesh
activated
carbon
filter
support
frames
double safety
switch
front panel
fixing clasp
ountain
BREEZE
C L E A N
changing the fan speed
Your air purifier has four fan speeds. It is recommended you use speed 1 at night as
this is very quiet. During day to day operation you should use fan speed two or three
and for very dirty and polluted rooms use fan speed four.
The faster the fan speed the more air in the room gets filtered.
To change the fan speed press the MODE button until the flashes on the LCD
display. Then press SET until your required speed is chosen. You will see numbers
to the right of the . These numbers relate to the speed of the fan.
Alternatively if you use the remote control, press the FAN SPEED button until your
required fan speed is selected. The Air Purifier at maximum fan speed filters 5 times the
air volume of an average room, per hour (68m³).
auto mode
Auto mode is a useful way to let the machine itself take control and react to any pollutants that it senses. It regulates the fan speed automatically so that when the ambient
air is clean the fan turns slowly, reducing noise and saving energy. If the air quality is
poor it will turn the fan speed to a suitable level to clean the air quickly and then
reduce the speed when cleaner to maintain the cleanliness.
To select this mode press the MODE button until the A flashes on the LCD display.
Press SET to confirm. The display will show the A to show that this mode is set.
You can also select this function using the remote control. Pressing the AUTO button
will turn this mode on.
Auto mode relies on the product’s two sensors to detect pollutants. The unit will
determine the quality of the air and display this on the LCD display.
dust sensor
The dust sensor is located within the main body, behind the
front panel and just above the filters on the right hand side.
This sensor will detect the quantity of particles in the air to
determine the air quality. To ensure this works effectively it
must be cleaned regularly (see care and maintenance)
and you should ensure there are no blockages
preventing air from entering this chamber.
odour sensor
The odour sensor is located to the left of the
LCD display. This detects odour molecules and traces of
chemical and organic compounds in the atmosphere.
Do not block the openings.
9
dust
sensor
cover
own)
odour
sensor
MODE
SET
TIMER -
TIMER +
ON/OFF
A I R
ountain
BREEZE
C L E A N
air quality
air quality reading
fan speed selected automatically
Excellent
2
Good
2
Average
4
Poor
4
Very Poor
4
air quality reading
The LCD display contains a bar that shows the ambient air quality.
This bar is determined by the readings from the dust and odour sensors.
The sensors will give you one of five readings depending upon the air quality.
If all five bars are illuminated this means the air quality is very good.
If only one bar is illuminated then it means that the air is very dirty.
This is directly linked to the fan speed setting within auto mode. The fan speed will
change according to how many bars are illuminated on the air quality meter reading.
selecting the cleaning mode
You can choose whether to set the unit to filter the air only or combine air filtration
with air sterilisation.
To turn the air sterilisation feature on press the MODE button until ‘Purify Air’ flashes
on the LCD. Then press the SET button to turn the function on - the
icon will be
displayed. Once the icon stops flashing and it remains constant then you know the mode is
selected. You can also activate this function by pressing the PURIFY AIR button on
the remote control.
The sterilisation feature is stronger when the fan speed is relatively low. Although
fewer bacteria, viruses, VOCs will be sucked into the main body with a slower fan
speed, the slower fan speed will give the pollutants more exposure to the chemical
reaction that decomposes them.
If you turn the sterilisation mode on whilst the unit is in Auto mode it will exit Auto
mode and the fan speed will come on at its previous level.
10
A I R
ountain
ioniser
BREEZE
Your air purifier is equipped with an ioniser that emits millions of negative ions
C L E A
into the atmosphere. Negative ions help to reduce stress and fatigue and increase
alertness and general well being.
To turn on the ioniser mode press the MODE button until ‘Refresh’ flashes on the LCD.
Then press the SET button to turn the function on - the icon will be displayed.
Once the icon stops flashing and it remains constant then you know the mode is selected.
You can also activate this function by pressing the REFRESH button on the remote control.
To turn the feature off simply press the REFRESH button on the remote control or reselect the and press SET until the icon disappears.
using the on/off timer
Your air purifier is equipped with a digital on/off timer so that you can set the unit to
come on and off to your requirement.
Before setting this function you should have set the clock already. If not please follow
the section above telling you how to set the clock.
Once the clock is set you have options to control program timing. You can elect for the
timer to be set to come on at a determined time and remain on, or you can elect to
program a time for it to switch off. Also, if the unit is already running you can program
a time for it to switch off.
To program the unit to switch on the unit it must first be in standby.
Press either the TIMER + or TIMER - buttons once. You will notice the hours part of the time
starts flashing and the words timer on appear. Use the TIMER + and TIMER - buttons to
select the hour and press SET . The minutes part of the time will start flashing and
again use the TIMER + and TIMER - buttons to select the minutes. Press SET to confirm. At
this point you will notice the appear to confirm the program is set.
As soon as the appears you will notice that the hour part of the time starts flashing
and the words timer off appear. If you want to program the unit to switch off at a
certain time then you should press the
and
buttons to select the hour, then
press SET and again
and
buttons to confirm the minutes and then SET to
confirm the times.
TIMER +
TIMER +
TIMER -
TIMER -
If you want to leave the unit running after switching on then you don’t have to program an off time.
When the words timer off appear simply leave the display flashing and don’t press any
buttons. After 4 seconds the display will stop flashing and revert to the current time.
This means the on time only has been set.
When setting the timer to switch the unit on, it will turn on in Auto mode.
If the unit is currently running you can decide to program an exact time to turn the
unit off and put into standby. To do this press the TIMER + or TIMER - button once and the
hour part of the time will start flashing and the words timer off will appear. Use
the TIMER + and TIMER - buttons to select the hour and then SET and the TIMER + and TIMER buttons to program the minutes. Then press SET to confirm. You will notice the
appears and the display reverts to the current time. The machine will keep operating
until your programmed time arrives, then it will switch off and into standby.
11
N
A I R
ountain
setting the countdown timer
BREEZE
This function switches off the machine after a set period of time and is only settable
C L E A
from the remote control. Pressing the COUNTDOWN button on the remote control
will activate the countdown timer. Pressing the button once will select 8 hours countdown.
Pressing again will select 4 hours, then again will select 2 hours then again will select
1 hours then again will turn the countdown timer off.
As each time interval is selected the number will flash. If you stop pressing the button
then the last number flashing will be selected and the will appear in the display to
confirm the countdown timer has been set. If you press the COUNTDOWN button
after already setting the countdown timer then the display will automatically show the
time period below the one you previously selected.
moving your air purifier
Ensure the unit is switched off and the plug is not attached to the wall socket.
Insert your hand into the carrying handle located at the top of the back panel.
Do not use the air intake grooves on the front panel to help lift the air purifier as the
front panel may come off in your hand whilst the rest of the air purifier hits the floor.
Lift and carry to your required location.
care and maintenance
Unplug from the power source before cleaning.
Accumulated dust may be removed from the surfaces with a soft cloth. The air intakes
on the front panel will get especially dusty so you should clean this panel frequently.
The air purifier may be cleaned with a cloth that has been moistened with a solution of
mild detergent and water. Dry the air purifier thoroughly before operating.
Don’t use harsh or abrasive cleaning agents or solvents as this will cause damage.
Never immerse the air purifier in water or allow water to enter the air purifier
housing as this could create an electric shock hazard.
filter maintenance
It is vitally important that you maintain your filters in accordance with our instructions
otherwise the performance of your air purifier will be compromised.
You should check appearance of the pre filter on a regular basis. When it gets dirty
you should remove it from the HEPA filter plastic frame and clean it with your vacuum
cleaner or rinse it using warm water and a mild detergent. Do not scrub it or wring it.
You must wait for it to dry completely before replacing it.
To replace it simply pull all four corners into the frame until it covers the area of the
HEPA filter behind it. Generally speaking, the HEPA filter will last around 12 months,
and the Carbon filter will last around 6 months.
To help you determine when the HEPA filter needs replacing the unit is equipped with
a filter check indicator. When the unit feels a replacement may be necessary you will
notice the Check Filter appear on the LCD display. When you see this you should remove
the HEPA filter from the main body and examine the colour of the filter.
There is a guide at the top left hand corner of the frame which indicates when a
change of HEPA filter is required. A new HEPA filter will start off white and with use
will become progressively darker. When the colour of the HEPA filter matches the
darkest colour on the indicator then its time to replace your filter.
If you decide not to change your filter at this time the unit will start flashing the Check Filter
at a later stage as a further reminder. Once you have replaced your HEPA filter press the
MODE and SET buttons simultaneously to clear the Check Filter from the display.
Never try to wash or clean or vacuum your HEPA filter as this will likely result in damage.
Filter life depends on how often and long the Air Purifier is used and the air quality.
12
N
A I R
ountain
BREEZE
C L E A N
A I R
To check whether the activated carbon filter needs replacing you should
hold it up to the light. If you can see light coming through then it has some
life left; if you can’t see any light coming through then the filter is clogged up and
needs replacement. To replace the filter just pull it out of position using the tab provided
and fit a replacement part into place, paying attention to fit it the correct way around. The front has
FRONT clearly marked on the top of the filter. The Carbon filter may last between 3 and 6 months
if there is cigarette smoke in the house. UVA tubes last for around 10,000 hours (to 50% failure).
The sterilisation mesh is permanent and will never need replacement. However with
prolonged use it may become a little dusty. If it looks dusty you should remove the
three UV tubes and gently vacuum using a soft tipped brush attachment. Do not knock
the surface of the filter or it may damage.
UV tubes
The UV tubes need replacement from time to time. The LCD screen will alert you to a
faulty UV tube by displaying one or more of the following icon.
corresponds to the top tube, to the middle and to the lowest tube so you can
easily locate the faulty tube.
To replace a tube, grip both metal ends and rotate 90 degrees towards from you.
Once rotated the tube becomes unlocked and can easily be pulled towards you.
To replace a tube grip on the metal ends, and rotate 90 degrees away from you. It will
click into place when correctly fitted.
Never rotate the tube by gripping the glass as this may cause injury.
Your air purifier has been fitted with safety devices so the tubes cannot operate without the front cover or HEPA filter in place. Never disable these safety switches.
The tubes are UV-A type and replacements can be ordered.
UV3
UV2
UV1
dust sensor
The dust sensor is located in the inner body, just above the filters. This should be
cleaned once a month for optimum performance.
Firstly remove the dust sensor cover and wipe the lens using a cotton wool bud.
ordering spare parts
Spare parts can be ordered from Salton via our website www.salton.com.au
or by contacting our service department on Freecall 1800 427 842. Please quote the
following when ordering your replacement filters:
MBSP1
MBSP2
MBSP3
MBSP4
Replacement Hepa and Pre-filter
2x Replacement activated Carbon filters
3x Replacement UV tubes
Replacement filter pack (HEPA + 2x Pre filter + 2x Carbon filter)
13
ountain
BREEZE
C L E A N
Guarantee
This product is guaranteed for a period of 2 years from date of purchase,
against defects in material and workmanship. It is particularly important that
the purchaser carefully read the instructions provided in order to get maximum
use from this product.
This guarantee is only valid if the appliance is used solely for domestic purposes
in accordance with the instructions and provided it is not connected to an
unsuitable electricity supply or dismantled or interfered with in any way or
damaged through dropping or misuse. Under this guarantee we undertake to
repair or replace free of charge any parts found to be defective.
Nothing in this guarantee or the instructions relating to the product excludes,
restricts or otherwise affects your statutory right.
In line with our policy of continuous product development we reserve the right
to change the product, packaging and documentation specifications without
notice.
This product conforms to Radio Frequency Interference requirements
230-240V 50Hz AC Only
14
A I R