1
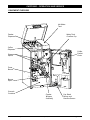
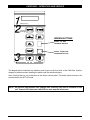
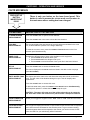
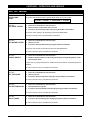
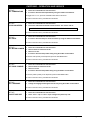
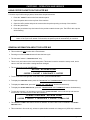
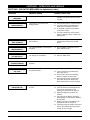
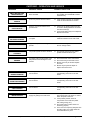
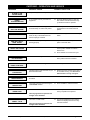
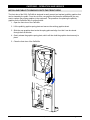
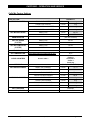
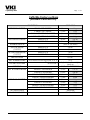
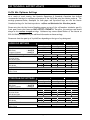
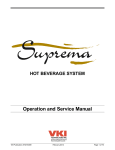
2001
Operation and Service Manual
Software Version
CAFFÈ MIO – 4.1.1
VKI Publication # N016487
April 3, 2002
CAFFÈ MIO – OPERATION AND SERVICE
SPECIFICATIONS – CAFFÈ MIO
WARNING: The CAFFÈ MIO hot beverage system is designed for INDOOR USE ONLY. Placing
the unit outdoors is extremely dangerous. VKI Technologies is not responsible for any damage or
injury resulting from outdoor placements of these coffee makers.
Dimensions:
HEIGHT
DEPTH
WIDTH
26,5 in
18,0 in
13,5 in
(67,5 cm)
(46,0 cm)
(34,0 cm)
WITH LID OPEN
WITH DOOR OPEN
WITH CHANGER UNIT
40,0 in
32,0 in
18,3 in
(101,5 cm)
(81,0 cm)
(46,4 cm)
Weight: .......................................... Approximately 84 lbs (38 kg)
Electrical: ...................................... 115 VAC - 11 amps
Heater: ........................................... 1100 watts
Water Tank Capacity: .................. 1.9 gallons U.S. (7.3 liters)
Brewing Temperature: ................. approximately 199°F (93°C)
Dispenser Capacity: .................... Coffee
............ Powder
= 1.5 lb (0.7 kg)
= 2.2 lb (1.0 kg)
Overflow Protection:.................... For Cup Tray and Water Tank
Brewer Type: ................................ ZUMA brewer only
Fuses:
5 amp ........................ Protects valves, motors and electronics
15 amp....................... Protects heater circuit only
Caffè Mio 2001 - Operation & Service Manual
April 3, 2002
Page 2 of 14
CAFFÈ MIO – OPERATION AND SERVICE
EQUIPMENT OVERVIEW
Hot Water
Tank
Powder
Dispenser
Water Tank
Overflow Cup
Coffee
Dispenser
Coffee
Packet
Chute
Dispenser
Spouts
Zuma
Brewer
Brewer
Spout
Grounds
Container
Caffè Mio 2001 - Operation & Service Manual
Powder
Whipper
Assembly
April 3, 2002
Cup Stand
Sensor and
Overflow Sensor
Page 3 of 14
CAFFÈ MIO – OPERATION AND SERVICE
Place your cup
Choose a
beverage
HIDDEN BUTTONS
SCROLL ‘UP’ AND
‘INCREASE’ BUTTON
SCROLL ‘DOWN’ AND
‘DECREASE’ BUTTON
Choose a
cup size
to start
The diagram above illustrates the selection panel layout on the front door of the Caffè Mio. Use this
diagram as reference when installing the decals onto the selection buttons.
Also, note that there is only one button on the interior control panel. This button allows access to the
counters and to the SET-UP mode.
NOTE: An optional side-mounted coin changer unit (A510122) can also be installed on this
unit. Consult VKI Publication # N016524 for more detailed information.
Caffè Mio 2001 - Operation & Service Manual
April 3, 2002
Page 4 of 14
CAFFÈ MIO – OPERATION AND SERVICE
CAFFÈ MIO MENUS
PRESS SET-UP
BUTTON
INSIDE FRONT
DOOR
There is only one button on the inner board panel. This
button is used to access the SET-UP mode, and to return to
the main menu after a setting has been changed.
MAIN MENU
LCD MESSAGE
DESCRIPTION OF ITS FUNCTION
TO OPEN BREWER
PRESS PRODUCT
Press the COFFEE button to open the brew chamber.
Press the COFFEE button once more to close the brew chamber.
CASH BOX
PRESS PRODUCT
This counter displays the total amount of money that has accumulated in the cash
box, located inside the optional Coin Changer Assembly.
To reset the counter to zero, press the COFFEE and MOCHA buttons on the front
selection panel simultaneously.
RINSE CYCLE
PRESS PRODUCT
Activates the different types of rinse cycles available on this equipment.
¾ Press COFFEE for the brewer rinse cycle.
¾ Press CHOCOLATE for the whipper rinse cycle.
¾ Press COFFEE to cancel the brewer rinse cycle after it has been initiated.
SET-UP
PRESS PRODUCT
Press the COFFEE button to access the SET-UP mode.
The menus displayed in the SET-UP mode are listed in the table on the next page
(titled SET-UP MENU).
EMPTY WATER TANK
PRESS PRODUCT
This feature opens the water valve and allows the water tank to drain to the valve
level. The inlet valve will be disabled during this cycle. This will simplify valve
replacement.
Press the COFFEE button to access this menu.
To drain the water tank, press the COFFEE and HOT WATER buttons simultaneously
and keep them pressed – release the buttons to stop the cycle.
CAUTION – The water will come out of the coffee valve and may be extremely
hot. Also make certain the coffee hose is placed inside a leak-proof container.
TOGGLE FREE/COIN
PRESS PRODUCT
Allows you to toggle the equipment from “FREE” mode to “COIN” mode and vice-versa.
TOTAL/SELECTION
PRESS PRODUCT
This counter will display the number of cups brewed for the selection that corresponds
to the LED’s that are illuminated on the selection panel. To get a counter reading,
press the buttons that would correspond to the counter you need to access. At this
point, the LED’s for your selection(s) will be illuminated.
Caffè Mio 2001 - Operation & Service Manual
April 3, 2002
Page 5 of 14
CAFFÈ MIO – OPERATION AND SERVICE
SET-UP MENU
LCD MESSAGE
PROCEDURE
ENTER CODE
CODE:
An access code must be entered to get into SET-UP mode. The access code is:
'SET-UP'
SET PROD. COFFEE
1.
2.
3.
COFFEE
+
PACKET
+
CHOCOLATE
+
COFFEE
Press the COFFEE button to enter this menu.
Select COFFEE or COFFEE STRONG and a CUP size.
Increase or decrease the product timing using the hidden scroll buttons.
To test the coffee quantity to be dispensed, press the HOT WATER button.
To return to the main menu, press the SET-UP mode button.
'SET-UP'
SET WATER COFFEE
1.
2.
3.
Press the COFFEE button to enter this menu.
Select a CUP size.
Increase or decrease water timing using the hidden scroll buttons.
To test the water quantity to be dispensed, press the HOT WATER button.
To return to the main menu, press SET-UP mode button.
'SET-UP'
ENABLE SWITCH
1.
2.
Press the COFFEE button to enter this menu.
Enable or disable product or cup size by pressing the corresponding button on the
front selection panel.
If LED is on, the corresponding button is enabled and if LED is off, the corresponding button is
disabled.
To return to the main menu, press SET-UP mode button.
'SET-UP'
SET TOP PAUSE
1.
2.
3.
Press the COFFEE button to enter this menu.
Select a cup size.
Increase or decrease top pause timing by using the hidden scroll buttons.
To return to the main menu, press SET-UP mode button.
'SET-UP'
SET BOTTOM PAUSE
1.
2.
3.
Press the COFFEE button to enter this menu.
Select product and cup size.
Increase or decrease bottom pause timing by using the hidden scroll buttons.
To return to the main menu, press SET-UP mode button.
'SET-UP'
DELAY PAUSE
1.
2.
Press the COFFEE button to enter this menu.
Increase or decrease delay pause timing by using the hidden scroll buttons.
To return to the main menu, press SET-UP mode button.
Caffè Mio 2001 - Operation & Service Manual
April 3, 2002
Page 6 of 14
CAFFÈ MIO – OPERATION AND SERVICE
'SET-UP'
SET TEMPERATURE
1.
2.
Press the COFFEE button to enter this menu.
Increase or decrease the temperature by using the hidden scroll buttons.
To toggle from C° to F°, press the “COFFEE” button while in this menu.
To return to the main menu, press SET-UP mode button.
'SET-UP'
CLEAR COUNTERS
1.
2.
Press the COFFEE button to enter this menu.
An access code must be entered to reset counters. The access code is:
COFFEE
+
PACKET
+
CHOCOLATE
+
COFFEE
+
SMALL CUP
To return to the main menu, press SET-UP mode button.
'SET-UP'
SET PRICE
1.
2.
Press the COFFEE button to enter this menu.
Increase or decrease the price of the selections by using the hidden scroll buttons.
To return to the main menu, press SET-UP mode button.
'SET-UP'
SET WATER POWDER
1.
2.
3.
4.
Press the COFFEE button to enter this menu.
Select POWDER or POWDER/COFFEE MIX.
Select a CUP size.
Increase or decrease the product timing using the hidden scroll buttons.
To test the water quantity to be dispensed, press the HOT WATER button.
To return to the main menu, press SET-UP mode button.
'SET-UP'
SET PROD. POWDER
1.
2.
3.
4.
Press the COFFEE button to enter this menu.
Select POWDER or POWDER/COFFEE MIX.
Select a CUP size.
Increase or decrease the powder timing using the hidden scroll buttons.
To test the powder quantity to be dispensed, press the HOT WATER button.
To return to the main menu, press SET-UP mode button.
'SET-UP'
SET LANGUAGE
1.
2.
Press the COFFEE button to enter this menu.
Change the language from English to French by using the hidden scroll buttons.
To return to the main menu, press SET-UP mode button.
'SET-UP'
PACKET CUP SIZE
1.
2.
Press the COFFEE button to enter this menu.
Press “SMALL” cup or “LARGE” cup to configure the packet cup size.
To return to the main menu, press SET-UP mode button.
Caffè Mio 2001 - Operation & Service Manual
April 3, 2002
Page 7 of 14
CAFFÈ MIO – OPERATION AND SERVICE
USING COFFEE PACKETS ON THE CAFFÈ MIO
To brew a cup of coffee using a packet, follow these simple instructions.
1. Press the “PACKET” button on the front selection panel.
2. Open the packet door on the top front of the machine.
3. Open the coffee packet and pour the contents into the packet opening on the top of the machine.
4. Close the packet door.
5. Press the pre-selected cup size button for the packet to start the brew cycle. The LED for this cup size
will be flashing.
NOTE: To cancel the packet option if the packet button has been pressed accidentally, press the “COFFEE”
button. If the cycle is not started in 30 seconds, the packet cycle will automatically be canceled.
GENERAL INFORMATION ABOUT THE CAFFÈ MIO
¾
This machine will only function with a Zuma brewer.
¾
Pressing one of the CUP SIZE buttons will start the brew cycle.
¾
The hot water feature is “PRESS AND HOLD” only.
¾
There is only one button on the inner board panel. This button is used to access the set-up mode, and to
return to the main menu after a setting has been changed.
¾
The access code to enter the SET-UP is:
“SET-UP” ACCESS CODE
COFFEE
+
PACKET
+
CHOCOLATE
+
COFFEE
¾
To exit a sub-menu and get back to the main menu, press the SET-UP button.
¾
To display the FREE VEND TOTAL, press the "CHOCOLATE" and "COFFEE STRONG" buttons simultaneously.
¾
To display the VEND TOTAL, press the "COFFEE" and "CAFÉ MOCHA" buttons simultaneously.
¾
To display the WATER TEMPERATURE, press the "COFFEE STRONG" and "CAFÉ MOCHA" buttons simultaneously.
¾
To reset the counters, it is necessary to scroll to the “CLEAR COUNTERS” menu in the set-up and enter an
access code. The access code to clear the counters is:
“CLEAR COUNTERS” ACCESS CODE
COFFEE
+
PACKET
+
CHOCOLATE
+
COFFEE
+
SMALL CUP
¾
The COFFEE and SMALL CUP
SWITCHES menu.
buttons cannot be disabled. All other buttons can be disabled in the ENABLE
¾
This unit works in free vend only, unless an optional side-mounted coin changer unit (A510122) is installed.
Caffè Mio 2001 - Operation & Service Manual
April 3, 2002
Page 8 of 14
CAFFÈ MIO – OPERATION AND SERVICE
CAFFÈ MIO - INDICATOR MESSAGES (in alphabetical order)
MESSAGE
BEVERAGE BEING
PREPARED
BREWER HOME ERR
PRESS PRODUCT
POSSIBLE CAUSE
CORRECTIVE ACTION
Brewing cycle is in progress.
Â
The message will revert to the standby
message once the current brew cycle is
complete.
The brewer is not in the home or
starting position.
Â
Â
Press product button to cycle the brewer.
The home switch may be defective or
needs to be re-adjusted or cleaned.
An electrical connection to the brewer
home switch is faulty.
The brewer brake may not be working
properly. Adjust the brake or replace the
brewer motor.
Â
Â
The wiring harness is not connected to
the rear board.
Â
Connect the wiring harness to the
corresponding connector on the rear
board.
CLEAR COUNTERS
PRESS PRODUCT
The “CLEAR COUNTERS” menu has been
accessed.
Â
Press “COFFEE” to enter this menu or
press “SET-UP” to exit.
COIN CHANGER
NOT INSTALLED
The system is set to "COIN" mode, but a
coin changer is not installed.
Â
Â
Install a coin changer.
Switch to "FREE" mode.
DEFECTIVE COIN
CHANGER SENSOR
A sensor in the coin changer is
defective.
Â
Replace the coin changer.
EMPTY OR INSTALL
CUP TRAY
The cup tray may not be installed, or it
may be full of liquid.
Â
Â
Install the cup tray.
If the cup stand may be full of liquid,
empty and clean it.
The hot water valve may be leaking.
Repair or replace hot water valve.
If the message cannot be cleared, the
rear board may be wet. Replace the
board and let the wet one dry overnight.
CHECK WATER
TEMP. HARNESS
Â
Â
EMPTY WATER TANK
OVERFLOW CUP
The water tank overflow cup may be full
of water.
Â
Â
Â
Â
Â
Â
Caffè Mio 2001 - Operation & Service Manual
April 3, 2002
Empty the tank overflow cup.
Verify the water level probe adjustment.
They may be positioned too high
allowing too much water into the tank.
Water level probes may need to be
cleaned.
Inlet valve may be leaking, constantly
allowing water to enter the tank. Replace
the inlet valve.
Water in the tank may be boiling. Turn
temperature down to 185-195 °F.
If message cannot be cleared, rear board
may be wet. Replace the board and let
the wet one dry overnight.
Page 9 of 14
CAFFÈ MIO – OPERATION AND SERVICE
MESSAGE
POSSIBLE CAUSE
CORRECTIVE ACTION
EMPTY WATER TANK
PRESS PRODUCT
The “EMPTY WATER TANK” function has
been accessed.
Â
To empty the water tank, press and hold
the “COFFEE” and “HOT WATER” buttons
simultaneously.
ERROR – CALL FOR
SERVICE
An error is present with the machine.
Â
If this message appears, the caretaker
needs to call a technician for service.
A button on the front board is stuck
pressed down.
Â
Fascia may be binding against the side
of a button. Re-align fascia or trim fascia
around the button(s).
A front board button may have collapsed.
Replace front board.
ERROR - CHECK
STUCK BUTTON
Â
ERROR DETECTED
RELOAD SOFTWARE
EXACT CHANGE
POUR PACKET
CONTENTS
PLEASE CHECK
BREWER
The software in the rear board has been
corrupted.
Â
Using the Data Link Downloader, reinstall the software into the rear board.
Equipment requires exact change to
operate.
Â
Insert exact change or add some coins to
the coin changer tubes.
The packet system has been activated.
Â
Pour packet contents into the packet
system and activate brew cycle.
A problem exists with the brewer motor
that prevents it from finding the home
position.
Â
Â
Â
Check the brewer motor home switch.
Check the wiring to the brewer motor.
Brewer motor may be seized. Replace
the motor.
Brewer may be jammed. Repair or
replace the brewer motor.
Â
PLEASE CHECK
BREWER HARNESS
PLEASE CHECK
OVERFLOW HARNESS
PLEASE CHECK
TANK HARNESS
PLEASE CHECK
WATER SOURCE
The wiring harness is not connected to
the rear board.
Â
Connect the wiring harness to the
corresponding connector on the rear
board.
The wiring harness is not connected to
the rear board.
Â
Connect the wiring harness to the
corresponding connector on the rear
board.
The wiring harness is not connected to
the rear board.
Â
Connect the wiring harness to the
corresponding connector on the rear
board.
Indicates a problem with the main water
supply not getting to the water tank.
Â
At this point, the water tank is not full and
this message has to be reset. To reset it,
switch the power off and on.
If the problem persists, check all
components on the water line (water
filter, tubing, fittings, etc.).
Check inlet valve to make certain it is
functioning properly.
In the case of a temporary disruption with
the water supply, the coffee maker will
reset itself after every hour.
Â
Â
Â
Caffè Mio 2001 - Operation & Service Manual
April 3, 2002
Page 10 of 14
CAFFÈ MIO – OPERATION AND SERVICE
MESSAGE
POSSIBLE CAUSE
CORRECTIVE ACTION
The packet system door is open.
Â
Close the packet door.
A correctable fault may exist with the
equipment.
Â
Press the flashing button to clear this
fault. Please note that the brewer may
cycle after the button is pressed.
Water tank may be overfilling due to
mineral build-up on water level probes.
Â
Clean any mineral build-up that has
accumulated on the water tank level
probes.
REMOVE THE KEY
If an optional free vend key switch kit is
used, the key is still inserted into the
switch, keeping it activated.
Â
Remove the key from the free vend key
switch.
REPLACE FAULTY
TEMP. PROBE
The electronic temperature probe is not
working properly.
Â
Replace the electronic temperature
probe in the water tank.
RINSE CYCLE
CHOCO. OR COFFEE
The “RINSE CYCLE” has been activated.
Â
Press “CHOCOLATE” to activate whipper
rinse or press “COFFEE” to activate
brewer rinse.
Press “SET-UP” to exit the rinse cycle.
PLEASE CLOSE
PACKET DOOR
PRESS
FLASHING BUTTON
PROBES
CALL FOR SERVICE
Â
SELECTION
NOT AVAILABLE
SELECT - THEN
PRESS <CUP SIZE>
TANK IS FILLING
PLEASE WAIT
TO OPEN BREWER
PRESS PRODUCT
TO CLOSE BREWER
PRESS START
SELECT – THEN
INSERT COIN
Product selected may be disabled.
Â
Check the "ENABLE SWITCHES" menu to
see if product has been canceled.
Coffee maker is in "standby" mode.
Â
None required.
Indicates that the water tank has not yet
been filled with water.
Â
Please wait a few minutes for the tank to
fill. If it takes too long, a "PLEASE CHECK
WATER SOURCE" message will appear.
The “OPEN BREWER” menu has been
accessed.
Â
Press “COFFEE” to open the brewer.
The brewer has been opened using the
“OPEN BREWER” feature.
Â
Press “COFFEE” to close the brewer.
The unit is in “COIN” mode.
Â
Select a product and insert the amount of
money required for that product.
Â
The top line displays the price and the
bottom line displays how much money
has been inserted.
This only applies if the optional coin
changer unit is installed.
PRICE: $ X.XX
CREDIT: $X.XX
The unit is in “COIN” mode.
This only applies if the optional coin
changer unit is installed.
Caffè Mio 2001 - Operation & Service Manual
April 3, 2002
Page 11 of 14
CAFFÈ MIO – OPERATION AND SERVICE
CAFFÈ MIO - DOWNLOADING SOFTWARE UPDATES
For updating the software in the Caffè Mio, it is necessary to purchase a VKI Data Link downloader. A DB9
cable, a phone jack harness, and an auxiliary downloading harness are required to interface the Data Link to the
coffee maker. Updates to the software will be provided on an Eprom from VKI Technologies. This Eprom will
then need to be inserted into the Data Link Downloader. Please note that only one Eprom is needed in the Data
Link to program as many Caffè Mio coffee makers as needed.
The following procedures are required to download software updates from the Data Link device to the Caffè Mio.
Equipment required:
•
VKI Data Link Downloader (p/n – A210214, sold separately)
•
Auxiliary Downloading Harness (p/n - G310262, sold separately)
•
Eprom with Software Upgrade
1. Insert the Eprom containing the updated software into the VKI Data Link Downloader.
a) With the notch on the Eprom pointing upwards, line up the two rows of pins on the Eprom with the two
rows on the socket. Slowly insert the Eprom into the socket making absolutely certain not to bend any
of the pins between the Eprom and the socket.
2. Switch off the power to the machine.
3. Remove the front board access panel on the inside of the front door.
4. Connect one end of the auxiliary harness to the rear board (Data Link connector), and the other
end to the Data Link downloader. If an auxiliary harness is not available, any Vista NT download
harness can be used instead.
5. Disconnect the phone jack cable from front board.
6. Connect the phone jack cable to the Data Link.
7. Switch on the power to the unit.
8. Press the “START” button on the Data Link to begin the downloading operation. Please note that
the new factory settings must be downloaded as well.
WARNING: Do not interrupt this procedure once it is in progress as data being transferred
may become corrupted, creating problems with the operation of the equipment.
9. Once the download is complete, re-install the front board access panel on the inside of the front
door.
Caffè Mio 2001 - Operation & Service Manual
April 3, 2002
Page 12 of 14
CAFFÈ MIO – OPERATION AND SERVICE
INSTALLING PUBLICITY GRAPHICS ONTO THE FRONT DOOR
The front door of the 2001 Caffè Mio is designed to easily accept (and replace) publicity graphics that
can be viewed by the public. From time to time, new graphics may become available and you may
want to replace the existing graphics in the equipment. The procedure for replacing the publicity
graphics on the Caffè Mio door is outlined below.
1. Open the front door of the Caffè Mio.
2. Lift the publicity graphics spring plate and remove the existing graphics sheet.
3. Slide the new graphics sheet under the spring plate and align it so that it can be viewed
through the front window.
4. Gently release the graphics spring plate, which will then hold the graphics sheet securely in
place.
5. Close the front door of the Caffè Mio.
Caffè Mio 2001 - Operation & Service Manual
April 3, 2002
Page 13 of 14
CAFFÈ MIO – OPERATION AND SERVICE
Caffè Mio Factory Settings
SELECTION
SET PROD. COFFEE
DEFAULT
SMALL CUP COFFEE
4.1 sec.
11 g
LARGE CUP COFFEE
5.2 sec.
14 g
SMALL CUP STRONG COFFEE
4.8 sec.
13 g
LARGE CUP STRONG COFFEE
5.9 sec.
16 g
SMALL CUP
4.0 sec.
225 ml
LARGE CUP
5.0 sec.
275 ml
SET WATER COFFEE
ENABLE SWITCH
(ALL ACTIVATED)
SET TOP PAUSE
SMALL CUP
5.0 sec.
(COFFEE)
LARGE CUP
6.0 sec.
SET BOTTOM PAUSE
SMALL CUP
7.0 sec.
(COFFEE)
LARGE CUP
8.0 sec.
DELAY PAUSE
SET TEMPERATURE
0.3 sec.
Press Packet switch to toggle from °C to °F
CLEAR COUNTERS
Access code =
SET PRICE
SET WATER POWDER
SET PROD. POWDER
95°C
Coffee +
Packet +
Chocolate +
Coffee +
Small cup
$0.25 (ALL SELECTION)
SMALL CUP POWDER
5.0 sec.
190 ml
LARGE CUP POWDER
6.4 sec.
250 ml
SMALL CUP MIX POWDER
1.6 sec.
75 ml
LARGE CUP MIX POWDER
2.1 sec.
95 ml
SMALL CUP POWDER
4.1 sec.
25 g
LARGE CUP POWDER
5.6 sec.
33 g
SMALL CUP MIX POWDER
3.0 sec.
18 g
LARGE CUP MIX POWDER
3.6 sec.
23 g
SET LANGUAGE
ENGLISH
PACKET CUP SIZE
SMALL CUP
Caffè Mio 2001 - Operation & Service Manual
April 3, 2002
Page 14 of 14
Engineering / R&D
Page 1 of 1
Caffè Mio Factory settings
(software Caffè Mio 4.0)
SELECTION
SET PROD. COFFEE
SET WATER COFFEE
ENABLE SWITCH
SET TOP PAUSE
(COFFEE)
SET BOTTOM PAUSE
(COFFEE)
DELAY PAUSE
SET TEMPERATURE
CLEAR COUNTERS
SET PRICE
SET WATER POWDER
SET PROD. POWDER
SET LANGUAGE
PACKET CUP SIZE
Oct. 20, 2000
DEFAULT
SMALL CUP COFFEE
LARGE CUP COFFEE
SMALL CUP STRONG COFFEE
LARGE CUP STRONG COFFEE
SMALL CUP
LARGE CUP
SMALL CUP
LARGE CUP
SMALL CUP
LARGE CUP
Press Packet switch to toggle from °C to °F
Access code =
SMALL CUP POWDER
LARGE CUP POWDER
SMALL CUP MIX POWDER
LARGE CUP MIX POWDER
SMALL CUP POWDER
LARGE CUP POWDER
SMALL CUP MIX POWDER
LARGE CUP MIX POWDER
4,1 sec.
11 g
5,2 sec.
14 g
4,8 sec.
13 g
5,9 sec.
16 g
4,0 sec.
225 ml
5,0 sec.
275 ml
(ALL ACTIVATED)
5,0 sec.
6,0 sec.
7,0 sec.
8,0 sec.
0,3 sec.
95°C
Coffee-Packet-Choco-CoffeeSmall cup
$0,25 (ALL SELECTION)
5,0 sec.
190 ml
6,4 sec.
250 ml
1,6 sec.
75 ml
2,1 sec.
95 ml
4,1 sec.
25 g
5,6 sec.
33 g
3,0 sec.
18 g
3,6 sec.
23 g
ENGLISH
SMALL CUP
VKI TECHNICAL SUPPORT UPDATE
TSU#02002
Caffè Mio Optimum Settings
As a result of much testing, Van Houtte’s Operations & Standards Committee has defined
recommended settings for optimum performance of the Caffè Mio using Van Houtte products. The
settings presented below, developed for both paper and Styrofoam cups, are the Van Houtte
Standard settings for Van Houtte products - coffees and Distinction Hot Chocolate powder.
Please note that the Van Houtte Branding program set-up of the coffeemaker included a specific
front panel fascia that features ONE COFFEE STRENGTH. Therefore, the settings used should
always be the medium strength settings. Customers may contact Daniel Richer of Van Houtte at
800-361-5628 (extension 214) for additional information on these settings.
Please note that the quantity of liquid differs depending on the type of cup being used.
PAPER CUP SETTINGS
8-oz (200 ml)
10-oz (250 ml)
COFFEE SETTINGS
10 g
13 g
Light & Medium Roast
– Setting A
3.5 sec
4.5 sec
Dark Roast
– Setting B
3.9 sec
5.1 sec
European Collection
– Setting C
3.7 sec
4.8 sec
WATER SETTINGS (approximate settings – must be validated in the field)
Coffee Water
200 ml
3.7 sec
250 ml
4.7 sec
Chocolate Water
180 ml
4.8 sec
225 ml
6.2 sec
Café Mocha Water
72 ml
1.1 sec
90 ml
1.6 sec
POWDER SETTINGS
Hot Chocolate
26 g
4.3 sec
32 g
5.3 sec
Café Mocha
16 g
2.7 sec
21 g
3.9 sec
PAUSE SETTINGS
Top Pause
4 sec
5 sec
Bottom Pause
5 sec
7 sec
STYROFOAM CUP SETTINGS
8-oz (175 ml)
10-oz (225 ml)
COFFEE SETTINGS
9g
11 g
Light & Medium Roast
– Setting A
3.2 sec
3.9 sec
Dark Roast
– Setting B
3.4 sec
4.3 sec
European Collection
– Setting C
3.3 sec
4.1 sec
WATER SETTINGS (approximate settings – must be validated in the field)
Coffee Water
175 ml
3.2 sec
225 ml
4.2 sec
Chocolate Water
160 ml
4.2 sec
200 ml
5.4 sec
Café Mocha Water
60 ml
0.6 sec
80 ml
1.4 sec
POWDER SETTINGS
Hot Chocolate
23 g
3.8 sec
28 g
4.6 sec
Café Mocha
14 g
2.3 sec
18 g
3.0 sec
PAUSE SETTINGS
Top Pause
4 sec
5 sec
Bottom Pause
5 sec
7 sec
Page 2 of 4
12-oz (325 ml)
16 g
5.7 sec
6.1 sec
5.9 sec
325 ml
295 ml
117 ml
6.2 sec
7.6 sec
2.3 sec
42 g
27 g
7.0 sec
4.5 sec
6 sec
9 sec
12-oz (275 ml)
14 g
4.9 sec
5.5 sec
5.2 sec
275 ml
250 ml
100 ml
5.2 sec
6.7 sec
2.0 sec
36 g
23 g
6.0 sec
3.8 sec
6 sec
9 sec