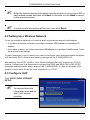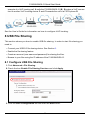
1
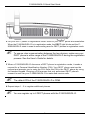
P-2602HWUDL-D
802.11g Wireless ADSL VoIP IAD
with Built-in DECT Base Station
Quick Start Guide
Version 3.40
8/2007
Edition 1
DEFAULT LOGIN
IP Address http://192.168.1.1
Password
1234
Copyright © 2007. All rights reserved.
P-2602HWUDL-D Quick Start Guide
Overview
The P-2602HWUDL-D model is a router which combines high-speed ADSL Internet
access, a built-in switch, a firewall and high-speed wireless networking capability. It also
has a built-in DECT GAP base station for compatibility with DECT cordless phones, USB
2.0 ports for sharing files via USB compatible storage devices and one phone port for
making calls over the Internet (Voice over IP or VoIP). The P-2602HWUDL-D can use
regular phone services through regular (PSTN) phone lines and can also function as a
print server.
1 Requirements
Make sure you have the following things before you set up your P-2602HWUDL-D.
• Internet access - account information provided by your ISP, such as user name, password,
and so on.
• VoIP account - You need the account information provided by your VoIP service provider
(the company that lets you make phone calls over the Internet).
• Internet Explorer 6.0 or later or Netscape Navigator 7.0 or later, with JavaScript enabled.
"
See the User’s Guide for all configuration details including file sharing and
setting up a shared printer.
1
P-2602HWUDL-D Quick Start Guide
To read the User’s Guide insert the CD that came in the box into your CD-ROM drive. A
screen should pop up. Navigate to the User’s Guide from this screen. If a screen does not
pop up, open Windows Explorer (click My Computer), click on the CD-ROM drive (usually
drive D:) and navigate to it from there.
2 Hardware Connections
1 DSL: Use a telephone wire to connect this port to the DSL or MODEM jack on a splitter.
2 LINE: Use the green PSTN cable to connect the TEL or PHONE jack on the splitter to this
port. Connect the splitter to a telephone jack.
2
P-2602HWUDL-D Quick Start Guide
"
When the ZyXEL Device does not have power, the phone(s) connected to
the PHONE port can still be used for making PSTN calls.
3 PHONE: Use a telephone cable (and any telephone adaptor provided with your P2602HWUDL-D) to connect your telephone to this port.
4 USB 2.0: Connect a USB (version 2.0 or lower) memory stick for file sharing. The P2602HWUDL-D automatically detects the USB device.
5 USB 2.0: Use a USB cable (not provided) to connect a USB (version 2.0 or lower)
printer to this port.
6 ETHERNET 1-4: Use an Ethernet cable to connect a computer to this port for initial
configuration and/or Internet access.
7 Use the power adaptor provided with your P-2602HWUDL-D to connect an appropriate
power source to this socket.
8 Push the power switch to the on position.
Look at the LEDs (lights) on the top panel of the P-2602HWUDL-D.
• The POWER light blinks during start-up and is green once the P-2602HWUDL-D is ready.
• Each ETHERNET light turns on if the corresponding ETHERNET port is properly connected. The lights blink when the P-2602HWUDL-D is sending or receiving data through
the corresponding ETHERNET port.
• The DSL light stays on if a physical connection with your DSL modem exists and blinks
when transmitting data. The INTERNET light stays on when Internet access is available.
• The PHONE lights stay on when your SIP account is registered and they blink if the
receiver is off the hook.
• The WLAN light turns on when the wireless LAN is ready. It blinks when the P2602HWUDL-D is sending/receiving data through the wireless LAN.
• The USB light turns on when there is a USB device (printer or memory stick) connected to
the P-2602HWUDL-D.
3
P-2602HWUDL-D Quick Start Guide
If the PHONE light is on, skip to Section 6 to see how to make calls through the Internet.
If the INTERNET light comes on but the PHONE light is off, go to Section 4.3 and use the
VOICE OVER INTERNET SETUP wizard.
If the INTERNET light is off but the DSL light is on, go to Section 4 and use the INTERNET/
WIRELESS SETUP to configure your Internet access settings.
V
Check your connections if an LED does not turn on. Then turn the P2602HWUDL-D off, wait for a few seconds and turn it back on. See
Troubleshooting. If the problem remains, contact your local vendor.
3 DECT Phone Registration
In order to use your DECT phone with the P-2602HWUDL-D, the DECT phone must
register with the P-2602HWUDL-D’s DECT base station. Take the following steps to
register your DECT phone with the P-2602HWUDL-D.
1 Press down the DECT base station button (
) on the left side (when facing the LEDs
(lights)) of your P-2602HWUDL-D for 6 to 11 seconds. When the DECT light begins to
blink, the P-2602HWUDL-D is in registration mode. The P-2602HWUDL-D in
registration mode for 25 to 30 seconds. Your DECT phone must be registered within the
time period.
"
If you press the DECT base station button for 12 seconds or more, the
DECT base station resets and all previously registered DECT phones must
be re-registered.
4
P-2602HWUDL-D Quick Start Guide
2 Put your DECT phone in registration mode. Refer to your DECT phone documentation.
When the P-2602HWUDL-D is in registration mode, the DECT light blinks and the P2602HWUDL-D starts to scan its surrounding area for DECT phones in registration mode.
"
To ensure clear communication between the two devices, make sure your
DECT phone is within range of the P-2602HWUDL-D during the registration
process. See the User’s Guide for details.
3 When a P-2602HWUDL-D discovers a DECT phone in registration mode, it sends a
request for a Personal Identification Number (PIN). Your DECT phone receives the
request and prompts you to enter the PIN. Enter the PIN in the DECT phone by using
the handset keypad. Entering a PIN ensures that only authorized DECT phones
connect to and use your P-2602HWUDL-D to make and receive calls.
"
The default PIN of the P-2602HWUDL-D is 1234.
4 Repeat steps 1 - 3 to register additional phones.
"
You can register up to 6 DECT phones with the P-2602HWUDL-D.
5
P-2602HWUDL-D Quick Start Guide
Once your DECT phones are registered with the P-2602HWUDL-D you can assign SIP
accounts to make and receive VoIP calls. You can also use DECT phones to make internal
calls, see your DECT phone documentation for more information. Internal calls are calls
between DECT phones registered with the P-2602HWUDL-D. For the P-2602HWUDL-D
you can also assign your DECT phones to receive calls from the PSTN line (regular phone
line).
4 Initial Configuration
1 Open your browser and enter the P2602HWUDL-D's IP address
192.168.1.1 (default) as the URL.
2 Enter the admin password 1234
(default). Click Login.
If your browser cannot find this screen,
make sure your browser is configured
correctly. See Troubleshooting in the
User’s Guide for details.
3 Follow the directions in this screen.
4 Click Apply to replace the P2602HWUDL-D’s default digital
certificate.
6
P-2602HWUDL-D Quick Start Guide
5 Click Go to Wizard setup.
4.1 Internet/Wireless Setup
The connection wizard helps you set up your Internet connection as well as your wireless
settings.
1 Click INTERNET/WIRELESS
SETUP.
Wait while the P-2602HWUDL-D
tries to detect your Internet
connection. If the P2602HWUDL-D cannot detect
your Internet connection, follow
the directions. Enter the
information provided by your ISP.
Keep the default settings if your
ISP did not provide some
information.
To create a wireless network the
P-2602HWUDL-D and your wireless computer(s) must all use the same SSID (network
name), channel and security settings.
If you do not set wireless security, any one within range could use your P-2602HWUDL-D
to access your network and the Internet.
Make sure your wireless security settings are compatible with your existing wireless
devices. See the User’s Guide for more information on wireless networks.
2 When your Internet connection is setup correctly, the DSL LED should be green. When
you are finished click Return to Wizard Main Page.
.
7
P-2602HWUDL-D Quick Start Guide
"
"
Enter the Internet access information exactly as given to you by your ISP in
each wizard screen and then click Next to continue or click Back to return
to the previous screen.
Current screen information will be lost if you click Back.
4.2 Setting Up a Wireless Network
To set up a wireless network you need at least one wireless network card/adapter.
• If you have a desktop computer, use either a wireless USB adapter or a wireless PCI
adapter.
• If you have a laptop, use either a wireless USB adapter or a wireless CardBus card. These
are built into many laptops.
To add a computer to your network you need to configure your wireless-enabled computer
with the same SSID, channel and security settings as the P-2602HWUDL-D.
Alternatively, use OTIST, ZyXEL’s One-Touch Intelligent Security Technology (OTIST)
feature. It allows you to automatically configure the SSID and WPA-PSK on all OTISTequipped wireless clients within range of the P-2602HWUDL-D. See the wireless LAN
chapter in the User’s Guide for more information on OTIST.
4.3 Configure VoIP
Click VOICE OVER INTERNET
SETUP.
"
You should have the
information provided by
your VoIP service
provider.
8
P-2602HWUDL-D Quick Start Guide
Enter the information provided by your VoIP service provider. Keep the default settings if
your VoIP service provider did not provide some information. If you have a SIP account like
[email protected], the SIP Number is 1234567, and the SIP Service Domain is
VoIP-provider.com. When you are done, the PHONE light should be on. Close the wizard
and the main screen opens.
5 Regular Phone Line Setup
When one of your VoIP accounts is registered, the P-2602HWUDL-D normally uses the
Internet (not the regular phone line) to make phone calls. Follow the directions in this
section to make sure you can also use the regular phone line while one of your VoIP
accounts is registered.
"
When the ZyXEL Device does not have power, the phone(s) connected to
the PHONE port can still be used for making PSTN calls.
In the main screen, click VoIP >
PSTN Line.
PSTN Line Pre-fix Number:
Enter a prefix (up to seven
numbers) you dial before you dial
the phone number, if you want to
make a regular phone call while
one of your SIP accounts is
registered. These numbers tell the
P-2602HWUDL-D that you want to
make a regular phone call.
Relay to PSTN Line: Enter phone
numbers for regular phone calls (that do not use the Internet) that you always want to dial
without the prefix number. For example, enter emergency phone numbers here.
Click Apply.
6 Make Phone Calls
Follow these directions to make calls over the Internet.
9
P-2602HWUDL-D Quick Start Guide
• If you want to dial a SIP number that only uses numbers (for example, “12345”), dial the
number on your phone’s keypad. You can also set up a speed-dial entry, if you want. See
the User’s Guide for instructions.
• If you want to dial a SIP number that uses letters or if you want to make a peer-to-peer call,
set up a speed-dial entry first. See the User’s Guide for instructions. Then, dial the speeddial number to make the call.
• If you want to call regular telephone numbers, use your VoIP service provider’s dialing plan.
Follow these directions to make phone calls that do not use the Internet.
• If you set up the phone number in Section 5, just dial the phone number.
• If the PHONE light is off, just dial the phone number.
• Otherwise, first dial the prefix you set in Section 5, and then dial the phone number.
Follow these directions to call the phone that is connected to the P-2602HWUDL-D.
• Use your VoIP service provider’s dialing plan, or just dial the phone number.
7 VoIP Trunking Overview
VoIP trunking connects an IP network (like the Internet) and the Public Switched
Telephone Network (PSTN). PSTN includes the world’s circuit-switched telephone network
which is composed of fixed and mobile telephones. VoIP trunking allows you to create
VoIP links which PSTN (Public Switched Telephone Network) callers can use to:
• Make phone calls via the Internet - Make a PSTN call to the P-2602HWUDL-D and it forwards the call to any SIP based VoIP phone. In the example below, we call the P2602HWUDL-D (B) from a regular phone (A), the P-2602HWUDL-D then forwards the call
to a VoIP phone (C).
• Save on long distance calls - The P-2602HWUDL-D creates a VoIP link which can be used
to connect to a PSTN phone in another country, province, region and so on. Below is an
10
P-2602HWUDL-D Quick Start Guide
example of a VoIP trunking call. A calls the P-2602HWUDL-D (B), B makes a VoIP connection to another VoIP trunking device C and C forwards the call to a PSTN phone D.
See the User’s Guide for information on how to configure VoIP trunking.
8 USB File Sharing
This section shows you how to enable USB file sharing. In order to start file sharing you
need to:
• Connect your USB 2.0 file sharing device. See Section 2.
• Enable the file sharing feature.
• Create an account (user name and password) for sharing the files.
• Browse to your files using the IP address of the P-2602HWUDL-D.
8.1 Configure USB File Sharing
1 Click Advanced > File Sharing.
2 Check the box Enable File Sharing Services and click Apply.
3 Click the User Configuration tab and then the Add button.
11
P-2602HWUDL-D Quick Start Guide
4 Select Active in the User Configuration Setting section and fill in the User Name and
Password fields. Retype your password and click Apply.
The P-2602HWUDL-D automatically recognizes the USB device which is connected to the
USB port and makes it available for sharing.
8.2 Browse to the USB File Share
1 In Windows Explorer’s
Address bar type a
double backslash “\\”
followed by the IP
address of the P2602HWUDL-D
(192.168.1.1 is the
default) and hit
[ENTER].
2 Enter the user name
and password when
prompted and hit OK.
3 The files on the USB
file sharing device
connected to the P2602HWUDL-D are
now part of your file
12
P-2602HWUDL-D Quick Start Guide
structure and you can manage those files just like any other files on your computer.
"
Refer to the User’s Guide for a complete description of this feature.
Troubleshooting
V
If you cannot access the P-2602HWUDL-D, follow these steps.
1 Check the device’s lights. If they are different than what is described in Section 2, make
sure the connections are correct, and inspect your cables for damage. If the lights are
still different, turn off the device, wait a few seconds, and turn it on again.
2 Make sure your computer is on the same subnet as the P-2602HWUDL-D. The P2602HWUDL-D is set up by default to assign an IP address to your computer. If you
have a static IP address on your computer change this setting to obtain an IP address
automatically. See the User’s Guide for more details.
3 Make sure you typed the address correctly. If the address has changed you can press
the RESET button for ten seconds to restart the P-2602HWUDL-D and to restore
factory defaults. The default IP address is “192.168.1.1” and the default password is
“1234”.
V
If you cannot access the Internet, follow these steps.
1 Check the device’s lights. If they are different than what is described in Section 2, make
sure the connections are correct, and inspect your cables for damage. If the lights are
still different, turn off the device, wait a few seconds, and turn it on again.
2 Follow the steps in section Section 4 again. Make sure you enter the correct
information. For example, if your account has a user name and password, make sure
you type it correctly. In addition, if you are not sure which encapsulation your ISP uses,
contact your ISP.
3 If you are using a new Internet account, contact your ISP to make sure it is active.
4 If you still have problems, see Troubleshooting in the User’s Guide.
13
P-2602HWUDL-D Quick Start Guide
V
If you can access the Internet, but you cannot make calls through the
Internet, follow these steps.
1 Check the PHONE lights. If neither of them is on, Make sure that your telephone is
connected to the corresponding PHONE port.
2 Make sure the VOICE OVER INTERNET SETUP wizard screens are properly
configured (see Section 4.3).
3 You can also check the VoIP status in the Status screen. See the User’s Guide for
more information about this screen.
Viewing Your Product’s Certifications
1 Go to www.zyxel.com.
2 Select your product from the drop-down list box on the ZyXEL home page to go to that
product's page.
3 Select the certification you wish to view from this page.
14