1
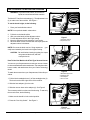
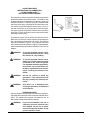
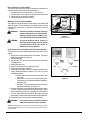
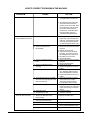
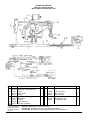
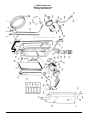
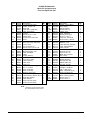
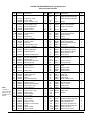
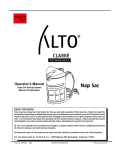
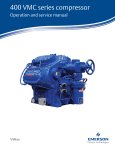
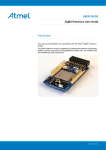
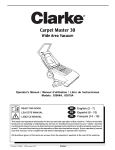
E
Operator's
Manual
Model 577
Carpetmaster
READ THIS BOOK
This book has important information for the use and safe operation of this machine. Failure to read this
book prior to operating or attempting any service or maintenance procedure to your ALTO machine could
result in injury to you or to other personnel; damage to the machine or to other property could occur as
well. You must have training in the operation of this machine before using it. If you or your operator(s)
cannot read English, have this manual explained fully before attempting to operate this machine.
Si Ud. o sus operadores no pueden leer el Inglés, se hagan explicar este manual completamente antes
de tratar el manejo o servicio de esta máquina.
All directions given in this book are as seen from the operator’s position at the rear of the machine.
For new books write to: ALTO U.S. Inc., 2100 Highway 265, Springdale, Arkansas 72764.
Form No. 78046C
3/00
CLARKE TECHNOLOGY TECHNOLOGY
Printed in the U.S.A.
TABLE OF CONTENTS
Operator Safety Instructions ................................................................................................... 6
How to Prepare The Machine For Operation:
How To Adjust The Brush ..........................................................................................
How To Use Your Machine As A Tank Type Vacuum Cleaner ....................................
Instructions For Connection To The Power Supply & Electrical Ground .....................
Extension Cords .......................................................................................................
2
2
3
3
How To Operate Your Machine:
How To Start The Machine ........................................................................................ 4
How To Stop The Machine ........................................................................................ 4
Circuit Breaker .......................................................................................................... 4
Maintenance:
How To Clean The Filter Bags ....................................................................................
How To Clean The Foam Filter ...................................................................................
How To Install The Micro-Staphicidal® Filter ...............................................................
How To Clean The Micro-Staphicidal® Filter ..............................................................
How To Check For Worn Brushes ..............................................................................
How To Replace The Brush ........................................................................................
How To Open The Bottom Cover ................................................................................
How To Clean The Air Tunnel .....................................................................................
How To Adjust The Brush Drive Belt ...........................................................................
How To Remove The Drive Motor ................................................................................
Maintenance Of The Vacuum Motor ...........................................................................
How To Check The Commutator And The Carbon Brushes .........................................
How To Correct Problems In The Machine ..................................................................
4
5
5
6
6
6
6
7
7
8
8
8
9
Drawings and Parts List:
Model 577 Wiring Schematic .....................................................................................
Model 577 Upper-Half Drawing ...................................................................................
Model 577 Upper-Half Parts List ................................................................................
Model 577 Lower-Half Drawing ...................................................................................
Model 577 Lower-Half Parts List ................................................................................
10
12
13
14
15
CLARKE TECHNOLOGY Operator's Manual 577 Carpetmaster
Page 2
OPERATOR SAFETY INSTRUCTIONS
WARNING
AVERTISSEMENT
ADVERTENCIA
DANGER:
Failure to read and observe all DANGER statements could result in
severe bodily injury or death. Read and observe all DANGER
statements found in your Owner's Manual and on your machine.
WARNING:
Failure to read and observe all WARNING statements could result
in injury to you or to other personnel; property damage could
occur as well. Read and observe all WARNING statements found in
your Owner's Manual and on your machine.
CAUTION:
Failure to read and observe all CAUTION statements could result in
damage to the machine or to other property. Read and observe all
CAUTION statements found in our Owner's Manual and on your
machine.
DANGER:
Failure to read the Owner's Manual prior to operating or attempting any service or
maintenance procedure to your machine could result in injury to you or to other
personnel; damage to the machine or to other property could occur as well. You
must have training in the operation of this machine before using it. If you or your
operator(s) cannot read English, have this manual explained fully before attempting
to operate this machine.
DANGER:
Operating a machine that is not completely or fully assembled could result in injury
or property damage. Do not operate this machine until it is completely assembled.
Inspect the machine carefully before operation. Do not use as a step or furniture,
the machine could move causing injury.
DANGER:
Machines can cause an explosion when operated near flammable materials and
vapors. Do not use this machine with or near fuels, grain dust, solvents, thinners,
or other flammable materials.
DANGER:
Using a machine with a damaged power cord could result in an electrocution. Do
not use the machine if the power cord is damaged. To prevent damage to the
power cord, do not let the brush touch the power cord when the machine is
running. Always lift the power cord over the machine. Do not use the electrical
cord to move the machine.
DANGER:
Electrocution could occur if maintenance and repairs are performed on a unit that
is not disconnected from the power source. Disconnect the power supply before
changing the brush or accessories or attempting any maintenance or service.
Maintenance and repairs must be done by authorized personnel.
WARNING:
Operating a machine without observing all labels and instructional information could
result in injury or damage. Read all machine labels before attempting to operate. Make
sure all of the labels and instructional information are attached or fastened to the machine. Get replacement labels and plates from your Clarke Technology distributor.
WARNING:
Always use a three-wire electrical system connected to the electrical ground. For
maximum protection against electric shock, use a circuit that is protected by a ground
fault circuit interrupter. Consult your licensed electrician and/or contact your local
Clarke Technology distributor for assistance.
WARNING:
To prevent electrical shock, do not use this machine on wet surfaces. Protect the
machine from rain, Keep the machine in a dry building. Always clean the machine with
a clean dry cloth.
CLARKE TECHNOLOGY Operator's Manual 577 Carpetmaster
Page 3
HOW TO PREPARE THE MACHINE FOR OPERATION
WARNING: To prevent electric shock, do not vacuum
liquids or wet surfaces with this machine.
The Model 577 has five brush settings (1). The adjustment lever
(2) is at the rear of the machine. See Figure 1.
To set the brush height, do the following:
1. Place your foot behind one wheel.
NOTE: Do not push the handle release lever.
2.
3.
4.
5.
6.
Pull back on the handle a little.
With your other hand, pull the adjustment lever.
Put the adjustment lever in the "High" setting.
Move the adjustment lever toward the "Low" setting.
When the brush comes in contact with the carpet, push the
adjustment lever in the detent.
NOTE: Do not set the brush too low. Shag carpets are
erally best cleaned by the brush in the highest setting.
Figure 1
1. Five Brush Settings
2. Adjustment Lever
gen-
CAUTION: Be careful when cleaning long shag, the carpet
can go around the brush, and slow
or stop the brush.
How To Use Your Machine As A Tank Type Vacuum Cleaner
You can use your Carpetmaster as a tank type vacuum cleaner
to clean overhead and hard to reach areas. Get extension tubes,
hoses, wands, and attachments from your Clarke Technology
dealer.
To attach the accessories to your Carpetmaster, follow this procedure.
1. Pull the black standpipe hose (1) off the standpipe tube (2).
The hose is at the lower-right corner of the machine.
Figure 2
1. Black Standpipe Hose
2. Standpipe Tube
3. Hose Adapter
4. Vacuum Hose
2. Slide the hose adapter (3) on the tube.
3. Slide the vacuum hose on the adapter (4). See Figure 2
The accessory switch is on the rear of the housing. To start only
the vacuum motor, do the following:
1. Make sure the handle is in the vertical position.
2. Press the "Vac Only Switch." See Figure 3.
Figure 3
1. "Vac Only" Switch
CLARKE TECHNOLOGY Operator's Manual 577 Carpetmaster
Page 4
120 VOLT MACHINES
INSTRUCTIONS FOR CONNECTION
TO THE POWER SUPPLY
AND THE ELECTRICAL GROUND
The machine must be connected to the electrical ground to
protect the operator from electric shock. The machine has
an approved power cord with three conductors and a plug
with three terminals. Connect the plug to a receptacle that
has three holes and is connected to the electrical ground.
For maximum protection against electric shock, use a circuit that is protected by a ground fault circuit interrupter.
The green (or green and yellow) conductor in the cord is the
ground wire. Never connect this wire to any terminal other
than the ground terminal.
This machine uses a 120 volt AC 60 cycle electrical circuit.
Make sure you have the correct frequency and voltage before connecting the power cord to an outlet. The machine
has a plug as shown in Figure 4. If a receptacle connected
to the electrical ground as shown in Figure 4 is not available,
have one installed by an electrical contractor. Do not use an
adapter.
WARNING:
To prevent possible electric shock,
protect the machine from rain. Keep
the machine in a dry building.
WARNING:
To prevent possible electric shock,
always use a 3-wire electrical system
connected to the electrical ground.
For maximum protection against electrical shock, use a circuit that is protected by a ground fault circuit interrupter. Consult your electrical contractor.
WARNING:
Do not cut, remove or break the
ground pin. If the outlet does not fit
the plug, consult your electrical contractor.
WARNING:
Have worn, cut, or damaged cords
and plugs replaced by an authorized
service person.
Plate
Screw
Outlet
must be
connected to
the electrical
ground.
Ground Pin
Figure 4
EXTENSION CORDS
Use only an approved extension cord with three conductors,
a plug with three terminals, and a connector body with three
holes. The machine has a power cord with wire size 14
AWG (AWG means American Wire Gauge).
WARNING:
If you use an extension cord, use an
extension cord with minimum wire
size 16 AWG. Do not use an extension cord longer than 50 feet. Do not
join two extension cords.
CLARKE TECHNOLOGY Operator's Manual 577 Carpetmaster
Page 5
HOW TO OPERATE YOUR MACHINE
How To Start The Machine
The handle release lever is at the lower left rear corner of the
machine (1). See Figure 5.
To start the machine, do the following:
1. Using your foot, push the release lever forward (1).
2. Lower the handle.
The vacuum motor and the brush drive motor will start when the
handle is lowered. To activate the vacuum motor only, push the
"Vac Only Switch," and lower the handle.
NOTE: When using the vacuum motor and the brush drive
motor, make sure the "VAC Only Switch" is in the off position.
Figure 5
1. Release Lever
How To Stop The Machine
To stop the vacuum motor and the brush drive motor, push the
handle to the upright position.
Circuit Breaker
The Model 577 has a circuit breaker. If there is an obstruction
in the machine, the brush drive motor will stop. To restart the
motor, follow this procedure:
1. Make sure the handle is in the upright position.
2. Remove the electrical plug from the electrical outlet.
3. Put the machine on its side so that the right side is up.
4. If there is an obstruction, remove the obstruction.
5. Put the machine in the upright position.
6. Put the electrical plug in the electrical outlet.
7. The reset button is at the lower rear of the machine. Push
the reset button. See figure 6
Figure 6
1. Circuit Breaker Reset Button
MAINTENANCE
This section describes the procedures that must be done by a
person authorized to do maintenance.
WARNING:
To prevent electric shock, always remove the electrical plug from the electrical outlet before doing any repairs or
maintenance to this machine.
How To Clean And Install The Filter Bag
WARNING:
Do not put a filter bag in an incinerator
or fire. It could cause injury to the operator by causing a fire.
CLARKE TECHNOLOGY Operator's Manual 577 Carpetmaster
Page 6
Maintenance
How To Clean and Install The Filter Bag (cont)
CAUTION:
Do not operate this machine unless a filter bag is in position. It could damage the
vacuum motor.
When replacing the paper filter bags, follow this procedure:
1. When the bag is ¾ full, open the tank by pushing the knob
(1) on top of the tank. See figure 7
2. Lift out and discard the used bag.
3. Unfold a new paper bag.
4. Hold the bag by the cardboard inlet tab (2).
5. Slide the inlet over the standpipe (3). Do not apply pressure
to the back of the bag.
6. Close the front cover.
Figure 7
1. Knob
2. Inlet
3. Standpipe
When cleaning the cloth filter bag, follow this procedure:
1. When the bag is ¾ full, open the tank by pushing the knob
on top of the tank.
2. Pull out the cloth bag.
3. Slide off the clip.
4. Remove the dirt from the bag.
5. Sweep the inside surface of the bag to remove the remaining dirt.
6. When the bag is clean, fasten the clip.
7. Slide the inlet seal over the standpipe.
8. Close the front cover.
How To Clean The Foam Filter
A foam filter is on the base of the vacuum motor. See figure 8.
The filter helps to prevent dust and debris from entering the
vacuum motor. Wash the foam filter every week. To remove
the filter, slide it off the motor housing.
CAUTION:
Figure 8
1. Foam Filter
Make sure the foam filter is completely
dry before you install it. Moisture will
damage the vacuum motor.
How To Install The Micro-Staphicidal® Filter
The Micro-Staphicidal filter is offered as optional equipment.
Use the Micro-Staphicidal filter with the cloth filter or the paper
filter. To install the Micro-Staphicidal filter, follow this procedure:
1. Open the tank by pushing the knob on top of the tank.
2. Remove the foam filter from the base of the machine.
3. Make sure the cloth bag or the paper filter bag is in position.
4. Push the Micro-Staphicidal filter on the base of the motor.
See figure 9.
5. Close the front cover.
CLARKE TECHNOLOGY Operator's Manual 577 Carpetmaster
Figure 9
1. Micro-Staphicidal® Filter
Page 7
The Micro-Staphicidal filter will trap minute airborne particles down
to .3 microns in size. The filter traps the bacteria, it does not kill
the bacteria. Clean the filter at least once a month. To clean the
Micro-Staphicidal filter, follow this procedure:
1. Remove the filter.
2. Tap the filter against a hard surface.
3. Blow or vacuum the loose dirt from the filter.
If the filter is not clean after doing the above, do the following:
1. Wash or soak the filter in a detergent and water solution.
CAUTION:
Do not wash or soak the filter more than
five minutes.
2. Remove the filter from the solution.
3. Rinse the filter with clean water.
4. Dry the filter thoroughly.
Figure 10
1. Brush Bristles
The Micro-Staphicidal filter should be replaced after six months
of use.
How To Check For Worn Brushes
To check for worn brushes, follow this procedure:
1. Put the machine on its side so that the right side is up.
2. Check the bristles, make sure the bristles are not shorter
than 5/16 inch. See figure 10
3. If the bristles are shorter than 5.16 inch, replace the brush.
How to Replace The Brush
Figure 11
1. Brush Screws
The brush has a chevron design. The brush has two halves fastened to a steel tube by screws. To remove the worn brushes, do
the following:
1. Remove the three screws from each half. See figure 11.
2. When installing the brush halves, make sure the center of
each half of the brush points to the front of the machine
when seen from the bottom.
3. Tighten the three screws from each half.
4. Always replace both halves of the brush.
How To Open The Bottom Cover
The bottom of your Carpetmaster® has a cover which is also a
mounting plate for the front swivel casters. Open the cover to get
access to the brush drive motor, belt, switches, and the air tunnel. The release lever is at the rear of the machine.
CLARKE TECHNOLOGY Operator's Manual 577 Carpetmaster
Page 8
To open the cover, follow this procedure:
1. Remove the electrical plug from the electrical outlet.
2. Put the machine on its side so that the right side is up.
3. Remove the screw.
4. Pull the lever (1) and turn it clockwise to release the cover.
5. Put the rod in the detent opposite the five brush setting
holes (2). See figure 12
How To Clean The Air Tunnel
The air tunnel cover is located on the bottom of the machine.
To clean the air tunnel, follow this procedure:
1. Lift the tunnel clamp (1).
2. Remove the cover (2).
3. Remove the object or debris.
4. Put the cover in position.
5. Push the tunnel clamp down. See figure 13
How To Adjust The Brush Drive Belt
To adjust the tension of the belt to drive the brush, use this
procedure:
1. Loosen the four screws that hold the motor.
2. Move the motor toward the front of the machine to loosen
the belt. Move the motor toward the back of the machine
to tighten the belt.
3. The tension of the belt is correct when you can push the
belt 1/8 inch to 3/16 inch at the belt guard (14 lbs. pressure if you use a belt tension gauge).
4. Tighten the four screws that hold the motor.
Figure 12
1. Lever
2. Bottom Right Side Detent
Turn the belt by hand to make sure the belt is aligned on the
pulleys. To adjust the alignment of the belt, use this procedure:
1. Loosen the two set screws on the pulley on the motor.
2. Move the pulley to the left or to the right.
3. Tighten the two set screws.
To put the machine back in operation, follow this procedure:
1. Close the bottom cover.
2. Move the brush adjustment lever to one of the five brush
height settings.
3. Push the lever in the setting detent.
4. Set the machine upright. Make sure the handle is in the
vertical position.
WARNING:
Figure 13
1. Tunnel Clamp
2. Tunnel Cover
Do not operate this machine unless it is
fully assembled. The machine could be
damaged or injury could occur to the
operator
CLARKE TECHNOLOGY Operator's Manual 577 Carpetmaster
Page 9
How To Remove The Drive Motor
The motor to drive the brush needs no preventive maintenance. If
the motor must be replaced, follow this procedure:
1. Remove the four mounting screws (1). See figure 14
2. Lift the motor to remove the two screws from the motor plate.
3. Disconnect the six spade connectors.
4. Remove the motor from the machine.
Maintenance Of The Vacuum Motor
This machine uses a universal motor that has a commutator and
carbon brushes. The commutator and carbon brushes must be
checked every six months, or 600 hours of operation, whichever
comes first.
WARNING:
WARNING:
Electrical inspections must be made by a
person authorized to do maintenance.
Electrical repairs must be made by a person authorized to make electrical repairs.
To prevent electrical shock, always remove the electrical plug from the electrical outlet before doing any repairs or
maintenance to this machine.
How To Check The Commutator and The Carbon Brushes
To check the commutator and the carbon brushes, follow this procedure:
1. Remove the screws that hold the motor baffle. The motor
baffle is at the rear of the machine.
2. Remove the baffle.
3. Remove the wire clip mounting screw and the grounding
mounting screw.
4. Remove the wire nuts.
5. Remove the vacuum motor mounting screws.
6. Remove the motor from the tank.
7. Inspect the commutator. Take the machine to a Clarke Technology Authorized Repair Location if you see any of the
following conditions:
a. Small holes in the surface of the commutator. See
figure 15A
b. Uneven color. Look for an even dark brown color.
Clean areas or very dark areas indicate a problem.
See figure 15B
c. High mica. The mica insulation must be lower than
the commutator bars. See figure 15C
8. Remove the carbon brush assemblies and check the carbon
brushes. Replace both carbon brush assemblies if either
brush is shorter than 3/8 inch. If either brush is shorter than
1/2 inch, order replacement brushes. Be ready to replace
both carbon brushes earlier than the normal inspection time.
9. Install the motor, the motor baffle, and the fasteners.
WARNING:
Figure 14
1. Mounting Screws
Figure 15
The machine must be tested for electrical
safety after electrical repairs are made.
NOTE: For safe operation have your machine checked by a Clarke Technology
Authorized Repair Person every 12 months. Always use Clarke Technology replacement parts.
CLARKE TECHNOLOGY Operator's Manual 577 Carpetmaster
Page 10
HOW TO CORRECT PROBLEMS IN THE MACHINE
PROBLEM
The machine does not run.
CAUSE
1. There is no power
ACTION
1. There is an obstruction. See
"Circuit Breaker" in the manual.
2. The electrical outlet, power cord,
electrical switches and motor
brushes are to be checked. Electrical inspections must be made
by a person authorized to do
maintenance. Electrical repairs
must be made by a person
authorized to make electrical repairs.
The machine does not
remove debris from the floor.
1. The filter bag is dirty.
1. If the bag is ¾ full, discard the
paper bag. clean the bag if it is a
cloth bag. If the machine is used
to pick up heavy debris, discard
or clean the bag before it is ¾ full.
2. There is an obstruction in
the standpipe.
1. Remove the hose from the standpipe tube.
2. Start the vacuum motor.
3. Hold your hand over the standpipe tube. If you feel no suction,
the standpipe has an object in it.
4. Shut off the vacuum motor.
5. Remove the object.
1. Remove the hose from the standpipe tube.
2. Remove the obstruction.
1. Check the air tunnel.
2. Replace the gasket if it is worn or
broken.
1. Check the entire gasket (top,bottom, and sides) where the front
tank seals against the rear tank.
2. Replace the gasket if it is worn or
broken.
1. Return the machine to a Clarke
Service Branch or a Clarke
Technology Service Center to
have the motor wired correctly.
1. Change the brush setting. If the
brush is set too low on a deep pile
carpet, the housing can stop the
air flow.
1. Replace the brush.
1. Clean the foam filter.
3. There is an obstruction in the
hose.
4. There is an obstruction in the
air tunnel.
5. The tank gasket is worn or broken.
6. The brush does not turn clockwise
when seen from the right-hand side
side of the machine.
7. The brush setting is not correct.
8. The brush is worn.
9. The foam filter is dirty.
The brush does not rotate.
1. There is an obstruction in the
brush housing.
2. There is an obstruction in the bearings on the end of the brush.
3. The belt is broken or loose.
4. There is low line voltage.
5. The brush drive motor will not run.
CLARKE TECHNOLOGY Operator's Manual 577 Carpetmaster
1. Remove the obstruction.
1. Remove the obstruction.
1. Replace or tighten the belt.
1. Remove other appliances on the
line or provide a separate circuit.
1. Push the circuit breaker button.
Page 11
CLARKE TECHNOLOGY
Model 577 Upright Vacuum
Wiring Diagram & Schematic 8/98
Ref Part No.
1 44606A
44602A
2 48500A
3 911562
4 609407
5 u 42186B
6 657501
7 911413
8 606440
9 u 41954A
Description
Motor Asm. - Brush ¼HP 120V
Motor Asm. - Brush ¼HP 220V
Tubing
Switch (Main)
Tubing
Cord Asm. (Power Supply)
Strain Relief
Wire Nut
Plate, Grounding
Cord Asm. (Vac Motor)
Qty
1
1
1
1
1
1
3
3
1
1
Ref
10
11
12
13
14
15
Part No.
912294
Description
Lead Asm.
912262
990716
44900A
44901A
912263
912270
Switch - Accessory
Tape - Electrical
Motor - Vac 120V
Motor - Vac 220V
Circuit Breaker, 120V
Circuit Breaker, 220V
NOTE:
CAUTION: Repairs by qualified personnel only.
uindicates a change
ARHTUNG: Reparaturen nur durch facharbeiter.
has been made since
PRECAUCION: Reparations par personnel specialise seulement.
last publication of this
PRECAUCION: Unicamente personal calificado deberian hacer reparaciones.
manual.
CLARKE TECHNOLOGY Operator's Manual 577 Carpetmaster
Qty
1
1
1
1
1
1
1
Page 12
Notes
CLARKE TECHNOLOGY Operator's Manual 577 Carpetmaster
Page 13
65
69
CLARKE TECHNOLOGY
Model 577 Upright Vacuum
Drawing Upper Half 3/00
CLARKE TECHNOLOGY Operator's Manual 577 Carpetmaster
Page 14
CLARKE TECHNOLOGY
Model 577 Upright Vacuum
Parts List Upper Half 3/00
Ref #
1
2
3
4
5
6
7
8
9u
10
11
12
13
14
15
16
17
18
19
20
21
22
23
24
25
26 u
27
28
29
30
31
32
33
34
35
Part No.
42186B
604040
607340
609041
33500A
603940
962965
603443
962968
875072
38902B
930113
602440
920200
86100A
60700A
600641
39300A
625184
623380
911413
602442
215104
65500A
30003A
77378A
925546
66100A
930120
601340
930077
73273A
67303A
623382
44900A
44901A
Description
Qty
Cord Assembly, Power
1
Holder, handle cord
1
Ring Split
1
Tube Asm., Handle RH
1
Filler, Tank Flange
1
Handle
1
2
Screw, 10-24 x 5/16 Set
Gasket, Tank
1
Screw 10-24 x ½ Pan Hd
7
Knob
1
Tank, Rear
1
Rivet, Pop 1/8 Dia. Open End
14
Catch, Latch
1
Nut, 10-24 Hex Hd.
4
Screw 10-24 x 13/8 Soc. Hd.
1
Bag, Cloth
1
Bag, Paper (Pkg. of 6)
1
Tube, Standpipe
1
Label
1
Flange, Backup
1
Nut, Wire
2
Cord, Asm., Nylon
1
Label, Warning
1
Latch, Tank
1
Tank, Front
1
Label, Clarke Technology
1
1
Pin, 3/16 x ½ Roll
Pivot, Front Tank
1
Rivet, 1/8 Dia Pop
3
Backup, Tank Lower
1
Rivet, 1/8 x .482 Lg. Cl. End
4
Label, Warning, Electric Shock 1
Shelf, Bag Support
1
Filter, Vac Can
1
Motor, Vacuum (120V)
1
Motor, Vacuum (220V)
1
Ref #
36
37
38
39 u
40
41
42
43
44
45 u
46
47
48
49
50
51
52
53
54
55
56
57
58
59
60
61
62
63
64
65
66
67
68
69 u
Part No.
623443
627680
603341
85517A
602041
604140
61200A
85810A
609040
962546
605147
607245
705134
805151
215103
215110
911926
962970
60004A
37000A
657501
600854
912064
980603
911262
911927
41954A
872102
930108
603642
980652
51419A
962161
962900
Description
Gasket, Vacuum Motor
Seal, O'Ring
Flange, Retainer
Screw, 10-24 x ½
Clamp, Hose
Hose, Standpipe
Bracket, Asm., Pivot
Screw 5/16 -18 x 5/8
Tube, Asm., Handle LH
Screw 10-24 x ½ Rd. Hd.
Label, Tank Latch
Retainer, Cord
Label, Warning (Canada)
Label, Exhaust Baffle
Label, Caution
Label, Caution, Spanish
Terminal, Clip #6
Screw 10-16 x 1¼
Baffle, Asm., Exhaust
Pad, Noise
Strain, Relief
Bracket, Bushing
Terminal Clip, #10
Washer, #SH 1110
Terminal, Female
Clip, Terminal
Cord Asm., Vac Motor
Clip, 5/16 Dia. Nylon
Rivet, 1/8 Diameter Lg. Fl.
Guard, Vac Motor Fan
Washer, 5/16 Lock
Brush, Carton (2 Pack)
Screw, 10-24 x 3/8
Screw, 10-16 x 5/8
Qty
1
1
1
2
1
1
1
2
1
2
1
1
1
1
1
1
1
5
1
1
1
1
1
1
1
1
1
1
8
1
2
1
1
4
NOTE: uindicates a change has been made
since last publication of this manual.
CLARKE TECHNOLOGY Operator's Manual 577 Carpetmaster
Page 15
9
11
32
84
84
108
112
CLARKE TECHNOLOGY
Model 577 Upright Vacuum
Drawing Lower Half 3/00
CLARKE TECHNOLOGY Operator's Manual 577 Carpetmaster
Page 16
CLARKE TECHNOLOGY Model 577 Upright Vacuum
Parts List Lower Half 3/00
Ref#
1
2
3
4
5
6u
7
NOTE:
uindicates a
change has taken
place since last
publication of this
manual.
8
9
10 u
11 u
12
13
14
15
16
17
18
19
20
21
22
23
24
25
26
27
28
29
30
31
32 u
33
34
35
36
37
38
39
40
41
42
43
44
45
46
47
48
49
50 u
51
52
53
54
55
56
57
Part No.
Description
Qty
617522
24526B
962968
962041
912263
912270
32334B
85517A
61196B
962954
612050
657501
608245
628382
980646
67100A
42186B
41954A
912262
980407
605143
Roller Asm. - Side
Frame - Main
Screw - #10-24 x ½ Pn
Screw - #10-24 x 7/16 Pan
Circuit Breaker 120V
Circuit Breaker 220V
Cover, Electrical
Screw 10-24 x ½
Plate, Cam Rod
Screw #8-18 x ½
Clamp
Relief, Strain
Spacer, Cam Rod
Spring, Rod Return
Washer ¼ Plain
Rod, Cam
Cord Assembly, Power
Cord Asm., Vac Motor
Switch
Washer, Shakeproof
Label, Rear Cover
1
1
2
2
1
1
1
38
1
1
1
2
1
1
1
1
1
1
1
1
1
605145
911208
911927
911262
602341
606440
920200
602040
962957
Label, Brush Adjustment
Terminal, Clip
Terminal, Ring Tongue
Terminal, Clip
Cover, Bottom Electrical
Plate, Grounding
Nut #10-24 Hex
Clamp, Tunnel
Screw 10-16 x ½
1
1
1
1
1
1
1
1
1
603441
68300A
603440
602345
628383
607044
61200A
980091
600842
962212
48500A
600841
962979
911562
920056
602342
925062
605140
920256
980652
61181A
629780
38700A
38701A
Gasket, Tray
Tray Asm., Cleanout
Gasket, Inlet Cover
Cover, Inlet
Spring
Pivot, Tank Assembly
Bracket Assembly, Pivot
Washer, Thrust
Bracket, Spring Mounting
Screw 6-32 x 7/8 Pn
Tubing, Electrical
Bracket, Switch Mounting
Screw, 6-32 x ½ Pan
Switch, cherry
Nut 6-32 ESNA
Cover, Switch
Pin, 3/16 Spiral
Lever, Switch
Nut 5/16 -18 Hex
Washer 5/16 Lock
Bracket, Cover & Caster
Wheel
Spacer, Wheel
Spacer, Wheel
1
1
1
1
1
1
1
1
1
2
1
1
3
1
2
1
1
1
2
2
1
2
1
4
CLARKE TECHNOLOGY Operator's Manual 577 Carpetmaster
Ref#
58
59
60
61
62
63
64
65
66
67
68
69
70
71
72
73
74
75
76
77
78
79
80
81
82 u
83
84 u
85
86
87
88
89
90
91
92
93
94
95
96
97
98
99
100
101
102 u
103
104
105
106
107
108 u
109
110
111
112 u
113 u
Part No.
607041
NI
NI
Description
Pivot, Wheel Right Hand
Plate, Model & Serial (120V)
Plate, Model & Serial (220V)
Qty
1
1
1
629770
46712A
61007A
607741
Caster
Strain Relief
Brace, Lever Assembly
Shaft, Lever Release
2
1
1
1
920110
16701A
607040
610853
608340
621181
628380
66140A
620891
603641
962027
Nut, ESNA
Lever, Assembly, Release
Pivot, Wheel Left Hand
Bracket, Spring
Spring
Bushing, Pivot
Spring
Pivot, Tank Assembly
Bracket, Assembly, Motor
Guard, Belt
Screw 8-32 x ½ Rd. Hd.
2
1
1
1
1
1
1
1
2
1
4
44606A
44602A
962165
616950
903042
85603A
Motor, Brush Drive (120V)
Motor, Brush Drive (220V)
Screw 10-24 x 3/16 St
Pulley, Driver
Belt
Screw 10-24 x 1¼
1
1
2
1
1
18
962677
609047
Screw, 10-24 x ¾
Tubing, Electrical
4
1
38504A
621182
980442
623681
902648
626671
627770
629070
620970
962821
607640
925589
606943
623680
607246
60019A
31200A
Shoe
Bushing, Shaft
Washer, Wave
Guard, Thread
Bearing
Plate, End
Shaft, Brush
Tube, Brush
Brush, Half (Set of 2)
Screw 8 x 5/8 Flat Head
Seal, Brush End
Pin 1/8 x ½ Roll
Pulley, Driven
Guard, Thread
Retainer, Brush Shaft
Plate, Label
Bumper
1
1
1
1
2
1
1
1
1
6
1
2
1
1
1
1
1
607240
607247
920296
605146
672412
980607
85381A
962987
Retainer, Bumper Front
Retainer, Bumper Left Hand
Nut 10-24 Elastic Stop
Label, Bottom Cover
Connector, Wire (220 volt)
Washer #1106 Shakeproof
Screw, 10-24 x ¾
Screw 10-24 x 3/8 Pan
1
1
6
1
1
4
6
1
Page 17
NOTES
ALTO® PRODUCT SUPPORT BRANCHES
U. S. A. Locations
HEAD OFFICE
European Locations
PRODUCTION FACILITIES
ALTO U.S. Inc., St. Louis, Missouri
16253 Swingley Ridge Road, Suite 200
Chesterfield, Missouri 63017-1725
PRODUCTION FACILITIES
ALTO U.S. Inc., Springdale, Arkansas
2100 Highway 265
Springdale, Arkansas 72764
(501) 750-1000
Customer Service - 1-800-253-0367
Technical Service - 1-800-356-7274
ALTO U.S. Inc., Bowling Green, Ohio 43402
1100 Haskins
SERVICE FACILITIES
ALTO U.S. Inc., Carlstadt, New Jersey 07072
150 Commerce Road
(201) 460-4774
ALTO U.S. Inc., Elk Grove, Illinois 60007
2280 Elmhurst Road
(847) 956-7900
ALTO U.S. Inc., Denver, Colorado 80204
1955 West 13th Ave.
(303) 623-4367
ALTO U.S. Inc., Houston, Texas 77040
7215 North Gessner Road
SALES AND SERVICE FACILITIES
ALTO U.S. Inc., Madison Heights, Michigan 48071-0158
29815 John R.
(810) 544-6300
ALTO U.S. Inc., Marietta, Georgia 30062
1355 West Oak Common Lane
(770) 973-5225
CLARKE TECHNOLOGY
AMERICAN SANDERS TECHNOLOGY
A.L. COOK TECHNOLOGY
Customer Service Headquarters and Factory
2100 Highway 265
Springdale, Arkansas 72764
(501) 750-1000
Technical Service
1-800-356-7274
ALTO Danmark A/S, Aalborg
Blytaekkervej 2
DK-9000 Aalborg
+45 72 18 21 00
ALTO Danmark A/S, Hadsund
Industrikvarteret
DK-9560 Hadsund
+45 72 18 21 00
SALES SUBSIDIARIES
ALTO Canada Ltd., Rexdale Ontario
24 Constellation Ct.
(416) 675-5830
ALTO Overseas Inc., Sydney (Australia)
1B/8 Resolution Drive
Caringbah NSW 2229
+61 2 9524 6122
ALTO Cleaning Systems Asia Pte Ltd., Singapore
No. 17 Link Road
Singapore 619034
+65 268 1006
ALTO Deutschland GmbH, Bellenberg (Germany)
Guido-Oberdorfer-Straße 2-8
89287 Bellenberg
+49 0180 5 37 37 37
ALTO Cleaning Systems (UK) Ltd., Penrith
Gilwilly Industrial Estate
Penrith
Cumbria CA11 9BN
+44 1768 868 995
ALTO France S.A. Strasbourg
B.P. 44, 4 Place d’Ostwald
F-67036 Strasbourg
Cedex 2
+33 3 8828 8400
ALTO Nederland B.V. Vianen
Stuartweg 4C
NL-4131 NJ Vianen
+31 347 324000
ALTO Sverige AB, Molndal (Sweden)
Aminogatan 18
Box 4029
S-431 04 Molndal
+46 31 706 73 00
ALTO Norge A/S, Oslo (Norway)
Bjornerudveien 24
N-1266
+47 2275 1770
CLARKE TECHNOLOGY WARRANTY
This Clarke Technology Industrial/Commercial Product is warranted to be free from defects in materials and
workmanship under normal use and service for a period of one year from the date of purchase, when operated and
maintained in accordance with Clarke Technology's Maintenance and Operations Instructions.
This warranty is extended only to the original purchaser for use of the product. It does not cover normal
wear parts such as electrical cable, rubber parts, hoses, bearings, casters, and belts.
If difficulty develops with the product, you should:
(a). Contact the nearest authorized Clarke Technology repair location or contact the Clarke Technology Service
Operations Department, 2100 Highway 265, Springdale, Arkansas 72764, for the nearest authorized Clarke Technology repair location. Only these locations are authorized to make repairs to the product under this warranty.
(b). Return the product to the nearest Clarke Technology repair location. Transportation charges to and from the
repair location must be prepaid by the purchaser.
(c). Clarke Technology will repair the product and or replace any defective parts without charge within a reasonable time after receipt of the product.
Clarke Technology's liability under this warranty is limited to repair of the product and/or replacement of parts
and is given to purchaser in lieu of all other remedies, including INCIDENTAL AND CONSEQUENTIAL DAMAGES.
THERE ARE NO EXPRESS WARRANTIES OTHER THAN THOSE SPECIFIED HEREIN. THERE ARE NO
WARRANTIES WHICH EXTEND BEYOND THE DESCRIPTION OF THE FACE HEREOF. NO WARRANTIES,
INCLUDING BUT NOT LIMITED TO WARRANTY OF MECHANTABILITY, SHALL BE IMPLIED. A warranty
registration card is provided with your Clarke Technology product. Return the card to assist Clarke Technology in
providing the performance you expect from your new floor machine.
ALTO U.S. Inc., 2100 Highway 265, Springdale, Arkansas 72764.
CLARKE TECHNOLOGY reserves the right to make
changes or improvements to its machine without notice.
Always use genuine Clarke Technology Parts for repair.
CLARKE TECHNOLOGY
2100 Highway 265
Springdale, Arkansas, 72764