1
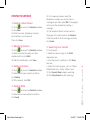
Quick Start Guide.indd 1 9/18/07 1:53:54 PM º²¾dG q ¹JÄÇc fêfEG 14%,).4%2.%4/.4(%-/6% Quick Start Guide.indd 2 9/18/07 1:53:56 PM Table of Contents Getting Qtel Internet E220 Ready 5 Install Guide 5 Introduction to the Qtel Internet E220 Interface 7 Internet Service 7 SMS 8 Contacts Service 9 Safety Information 10 Quick Start Guide.indd 3 9/18/07 1:53:56 PM º²¾dG q ¹JÄÇc fêfEG 14%,).4%2.%4/.4(%-/6% Quick Start Guide.indd 4 9/18/07 1:53:57 PM Welcome to Qtel Internet E220 USB Modem Quick Start Guide. 2) Insert the slot into E220, as shown in the following figure. E220 provides the following functions: • Accessing the Internet • SMS • Contacts Getting Qtel Internet E220 Ready 1) Take out the SIM card slot from E220, and then place the SIM card into the slot, as shown in the following figure. Make sure that the SIM card is fully in place. Quick Start Guide.indd 5 Install Guide The installation procedures of the Qtel Internet E220 may differ under different operating systems (OS) such as Windows XP and Windows 2000. Refer to the actual install tips if there is any difference. Note: • For Windows XP, it is recommended to install patches such as Service Pack 2 or above. • For Windows 2000, it is recommended to install patches such as Service Pack 4 or above. • For Mac operating systems download the driver from the Qtel website: www.qtel.com.qa E220 USB modem - Quick start guide | Note: This manual only briefly introduces the basic functions of E220. For detailed functions as well as warnings and precautions, refer to Qtel Internet E220 USB Modem User Manual. 9/18/07 1:53:59 PM 1.Connecting E220 with a PC Note: First, start up your computer. Then connect E220 with the computer. Otherwise, the normal installation of your E220 can be affected. 3) The system auto detects and recognizes the new hardware and displays on the status area of the desktop, indicating the connection between E220 and the PC is successful. The sketch map for the data cable is as shown. E220 USB modem - Quick start guide | 1)Insert the Mini-USB-connector of the data cable into E220. 2) Insert A connector of USB data cable into the USB interfaces of the PC/Laptop. Quick Start Guide.indd 6 2. Installing the Qtel Internet E220 1) Connect E220 to a PC. 2) The install program will auto start. If the auto-run program does not respond, go to the driver path. Find and double-click the AutoRun.exe file, and then the program will auto run. 3) Install the program according to the prompts on the screen. Note: Do not plug or unplug E220 in the installation process. 4) After successful installation, a shortcut icon the desktop. for E220 appears on 9/18/07 1:54:01 PM To remove E220 from the system, please follow the steps below: 1) Double-click on the status area of the desktop; the “Safely Remove Hardware” prompt will be displayed. 2) Stop the E220 hardware «Huawei Mass Storage USB Device». 3) At the prompt, pull E220 out. : Access the SMS window. : Access the contacts window. Internet Service 1.Network Connection Settings Double-click on the desktop to start E220 Manager. If the system prompts you to enter a PIN, enter the correct one. No need for any settings in order to connect to Qtel Internet E220, however you can do it as below: To create a new profile: 1) Select Settings > Network Connection Settings. 2) Click New. 3) Enter the profile name and the parameters, like APN, Phone number, Username and password. 4) Click Save. Note: For the detailed parameters, consult the local network operator. 2. Introduction to the Icons 2. Connecting to the Internet / : Connect/Disconnect the network connection. 1) Click to connect to the network. 2) When the connection is created, the current connection information will be displayed on the right panel of the window, including connect Introduction to the Qtel Internet E220 Interface 1.Accessing the E220 Manager Interface : Open the Internet. Quick Start Guide.indd 7 E220 USB modem - Quick start guide | 3. Removing E220 9/18/07 1:54:03 PM duration, data volumes, received and sent volumes, rate and the top rate. If Alert tone is selected, when there is a new message, you will hear a prompt. 3) Click to open the Internet. 4) Click connection. to disconnect the network 1) Click to access the SMS window. 2) Click Inbox to view the messages. SMS E220 USB modem - Quick start guide | 1. Creating SMS 1) Click to access the SMS window. 2) Click Write. 3) Enter one or more telephone numbers, separated by semicolon (;) and the SMS contents. 4) Click Send. Note: While entering telephone numbers, you can click Contacts to search for and add numbers. 2. Viewing SMS You can select Settings > Options > SMS Alerts to set the prompt methods for a new message. You can select Alert tone or Alert window. Quick Start Guide.indd 8 If Alert window is selected, when there is a new message, a prompts window will be displayed. Click View to view the message or click Close to view it later. 3. SMS Settings Select Settings > SMS Settings for the following settings. • Reports: to set whether ask for a delivery report. • Use the same SMS center for reply: to set the receiver to use the same SMS center number for reply. • SMS Bear Domain: to set the bear domain for sending messages. • Validity: to set the valid period during which messages can be stored in the SMS center. • SMC number: E220 will auto read the number preset in the SIM card. 9/18/07 1:54:05 PM 1.Creating a New Contact 1) Click to access the Contacts window. 2) Click New. 3) Enter the name, telephone numbers, email address and comments. Then click Save. 2. Modifying Contacts 1) Click to access the Contacts window. 2) Select a contact to modify and then double-click it or click Edit. 3) After the modification, click Save. 3. Deleting Contacts 1) Click to access the Contacts window. 2) Select one or more contacts and then click Delete. 3) At the prompt, click OK. 4. Sending SMS 1) Click to access the Contacts window. 2) Select one or more contacts and then click Send. Quick Start Guide.indd 9 3) In the pop-up window, select the telephone numbers you want to send a message to and then select OK. The program will jump to the window for creating a message. 4) The selected contact numbers will be displayed in the blank column of Contacts. Enter the contents of the message and then click Send. 5. Searching for a Contact 1) Click Search. • Select the search range in the Field drop-down box. • Enter the search conditions in the Value text box. • Select the matching type, such as “Match Whole Word Only” and/or “Match Case”. 2) Click Search Now to begin searching. 3) Click Stop Search to stop searching. E220 USB modem - Quick start guide | Contacts Service 9/18/07 1:54:06 PM Safety Information Please read the safety information carefully to ensure the correct and safe use of your wireless device. E220 USB modem - Quick start guide | 10 General Recommendations for Use Always handle your wireless device with care and keep it in a clean and dust-free place. Do not expose your wireless device to open flames or lit tobacco products. • Always keep your wireless device dry. • Do not drop, throw or try to bend your wireless device. • Do not paint or scratch your wireless device. • Do not attempt to disassemble your wireless device. Doing so will void warranty. Only authorized personnel are allowed to do so. • This product requires a minimum distance of 1.5 cm from the body when in operation. • Keep your wireless device in normal temperature. Your wireless device can only operate between -5ºC and +55 ºC. • Use approved accessories only. Do not connect your wireless device to any incompatible products. Obey Laws and Regulations required not to do so. To deactivate your wireless device, close all applications using the wireless device first and then remove the wireless device from your PC. Obey all local laws, regulations, rules, orders, signs and notices while using the wireless device. Signs about the use of mobile phones should also be obeyed as referring to other wireless equipment including wireless devices. Deactivate in Explosive Areas Deactivate your wireless device where the air is potentially explosive. It is rare, but your PC could generate sparks. Deactivate in Blasting Areas Deactivate your wireless device where blasting is in progress. Remote-controlled RF devices are often used at construction sites to set off blasting. Deactivate in Aircrafts Deactivate your wireless device before boarding or in any aircraft. Wireless devices can cause interference in aircrafts. Do not operate your wireless device where it may be unsafe to do so or where you are Quick Start Guide.indd 10 9/18/07 1:54:08 PM Deactivate at Hospitals Cleaning and Maintenance Obey regulations or rules at hospitals. Deactivate your wireless device near medical equipment. Wireless devices can cause interference to cardiac pacemakers, implanted defibrillators or other medical equipment. • Before you clean or maintain the wireless device, close all applications using wireless device and remove your wireless device from your PC. • Clean your wireless device with a piece of soft antistatic cloth. • If the wireless device or any of its accessories does not work, turn to an authorized service center for help. Deactivate near Hearing Devices Deactivate your wireless device near hearing devices. People with hearing aids may experience interfering noises near wireless devices. Environmental Protection Do NOT allow children to play with your wireless device. They could hurt themselves or others, or could accidentally damage the wireless device. Your wireless device contains small parts with sharp edges that may cause an injury or a choking hazard. Observe the local regulations regarding the disposal of your packaging materials, old wireless device and its accessories. Please promote their recycling. SIM/USIM Cards Immunity to Interference While inserting or removing the SIM card, protect yourself against electrostatic discharge (ESD). Do not touch the connector of the SIM card. As a precaution, always make sure that the wireless device is already in your hand before you insert or remove the SIM card. Your wireless device is immune to interferences caused by audible signals. Restart on ESDs Deactivate While Driving Do not use the wireless device while driving. Software will attempt to re-initialize a connection once a substantial electrostatic Quick Start Guide.indd 11 E220 USB modem - Quick start guide | 11 Recommendations for Children 9/18/07 1:54:09 PM discharge causes the device to reset. If the software is not operational after an ESD, restart the modem software application. Agency/Regulatory Information The wireless device is approved for use in many regions of the world. In these regions, the device meets all radio frequency exposure requirements. The following approvals and notices apply in specific regions as noted. E220 USB modem - Quick start guide | 12 CE Approval (European Union) The wireless device is approved to be used in the member states of the EU. Huawei declares that the wireless device is in compliance with the essential requirements and other relevant provisions of the Radio and Telecommunications Terminal Equipment Directive 1999/5/EC (R&TTE Directive). Radio Frequency Exposure To ensure compliance at all times with the R&TTE Directive* 1999/5/EC, the wireless device can be held in the hand but still requires a minimum distance of 1.5 cm from the body when in operation. For body-worn use, it must be suitably mounted so that it is at least 1.5 cm away from the body. Quick Start Guide.indd 12 Mounting accessories (for example, belt clips) cannot be made of metal. Do not put the wireless device in your pocket. • The general public RF exposure limits referenced in the R&TTE Directive are consistent with the published Guidelines of the International Commission on NonIonizing Radiation Protection (ICNIRP) 1998. ICNIRP is a formally recognized nongovernmental organization in Non-Ionising Radiation Protection for the World Health Organisation (WHO), the International Labour Organisation (ILO) and the European Union (EU). For more information, visit the ICNIRP website at www.icnirp.de. Certification Information (SAR) THIS DEVICE MEETS THE GOVERNMENT’S REQUIREMENTS FOR EXPOSURE TO RADIO FREQUENCY ELECTROMAGNETIC FIELD. Your wireless device is a low-power radio transmitter and receiver. When it is running, it emits low levels of radio frequency energy (also known as radio waves or radio frequency fields). 9/18/07 1:54:11 PM Specific Absorption Rate (SAR) is the unit of measurement for the amount of radio frequency energy absorbed by the body when using a wireless device. The SAR value is determined at the highest certified power level in laboratory conditions, but the actual SAR level of the wireless device while operating can be well below the value. This is because the wireless device is designed to use the minimum power required to reach the network. All models of Huawei’s wireless device are designed to meet radio frequency Quick Start Guide.indd 13 exposure guidelines such as European Council Recommendation and Federal Communications Commission Notice (United States). European Council Recommendation: Before a wireless device model is available for sale to the public, it must be tested according to the technical standard-EN 50361 and not exceed the limit established by the European Council Recommendation: 1999/519/EC for safe exposure. The SAR limit adopted by the 1999/519/EC is 2.0 watts/kilogram (W/kg) averaged over ten gram of tissue. The highest SAR value for this device type when tested is 1.20 W/kg. [EN 50361 scope states “This basic standard applies to any electromagnetic field (EM) transmitting devices intended to be used with the radiating part of the equipment in close proximity to the human ear including mobile phones, cordless phones, etc. The frequency range is 300 MHz to 3 GHz. Therefore, the above text does not address primary use of the wireless device product.] Federal Communications Commission Notice (United States): Before a wireless device model is available for sale to the public, it must be tested and certified to E220 USB modem - Quick start guide | 13 Governments around the world have adopted comprehensive international safety guidelines, developed by scientific organizations, e.g. ICNIRP (International Commission on Non-Ionizing Radiation Protection) and IEEE (Institute of Electrical and Electronics Engineers Inc.), through periodic and thorough evaluation of scientific studies. These guidelines establish permitted levels of radio wave exposure for the public. The levels include a safety margin designed to assure the safety of all persons, regardless of age and health, and to account for any variations in measurements. 9/18/07 1:54:12 PM the FCC that it does not exceed the limit established by the government-adopted requirement for safe exposure. The SAR limit adopted by the USA and Canada is 1.6 watts/kilogram (W/kg) averaged over one gram of tissue. The highest SAR value reported to the FCC and IC for this device type when tested for use is 0.59W/kg. [There is no reference to the specific reference standard or its applicability to the intended use of the product] be determined by turning the equipment off and on, the user is encouraged to try to correct the interference by one or more of the following measures: • Reorient or relocate the receiving antenna. • Increase the separation between the equipment and receiver. • Connect the equipment into an outlet on a circuit different from that to which the receiver is connected. • Consult the dealer or an experienced radio/ TV technician for help. E220 USB modem - Quick start guide | 14 FCC Statement This equipment has been tested and found to comply with the limits for a Class B digital device, pursuant to Part 15 of the FCC Rules. These limits are designed to provide reasonable protection against harmful interference in a residential installation. This equipment generates, uses and can radiate radio frequency energy and, if not installed and used in accordance with the instructions, may cause harmful interference to radio communications. However, there is no guarantee that interference will not occur in a particular installation. If this equipment does cause harmful interference to radio or television reception, which can Quick Start Guide.indd 14 This device complies with Part 15 of the FCC Rules and with RSS-210 of Industry Canada. Operation is subject to the following two conditions: (1) this device may not cause harmful interference, and (2) this device must accept any interference received, including interference that may cause undesired operation. Warning: Changes or modifications made to this equipment not expressly approved by HUAWEI may void the FCC authorization to operate this equipment. 9/18/07 1:54:14 PM املتحدة أ المريكية وكندا هي 1.6واط/كيلوغرام، املعدل على أ��سا�س غرام واحد من وقد احت�سب هذا ّ الن�سيج .أ�ما أ�كرب ن�سبة SARيحدثها هذا النوع من أ الجهزة عند اختباره فهي ت�ساوي 0.59واط/ كيلوغرام بح�سب ما أ�فيد إ�ىل جلنة FCCوال�صناعة املحدد الكندية ( . ICما من مرجع للمعيار املرجعي ّ املعد للمنتج) أ�و إ�مكانية تطبيقه على اال�ستعمال ّ بيان FCC لقد مت ّ اختبار هذا اجلهاز وثبت أ�نّه يتوافق مع احلدود املو�صى بها أ للجهزة الرقمية من الفئة B مبوجب الفقرة 15من قواعد جلنة .FCCلقد مت ّ جيدة من خطر إ�عداد هذه احلدود لت أ�مني حماية ّ | 14دليل البداية ال�رسع E220 USB Modem - الت�شوي�ش امل�رضّ يف املحيط ال�سكني .إ� ّن هذا اجلهاز يحدث ،وي�ستعمل ،وميكن أ�ن ير�سل طاقة يتم تثبيته من الرت ّددات الال�سلكية .لذلك ،إ�ذا مل ّ ي�سبب ت�شوي�شا ً وا�ستعماله وفقا ً للتعليمات ،فقد ّ م�رضا ً باالت�صاالت الال�سلكية .ومع ذلك ،ما من �ضمانة أ�كيدة ب أ� ّن هذا الت�شوي�ش لن يحدث يف حالة ت�سبب هذا اجلهاز يف حدوث معينة .إ�ذا تثبيت ّ ّ ت�شوي�ش م�رضّ يف ا�ستقبال موجات الراديو أ�و • إ�عادة توجيه الهوائي امل�ستقبل أ�و تغيري موقعه. • زيادة امل�سافة الفا�صلة بني اجلهاز وجهاز ا�ستقبال. • تو�صيل اجلهاز مبنفذ للتيار الكهربائي �ضمن دارة املو�صل بها اجلهاز امل�ستقبل. كهربائية خمتلفة عن تلك ّ تقني خبري يف ت�صليح • مراجعة الوكيل أ�و ّ أ�جهزة الراديو والتلفزيون للح�صول على م�ساعدة. يتوافق هذا اجلهاز مع الفقرة 15لقواعد جلنة FCC وموا�صفة 210-RSSلهيئة ال�صناعة الكندية IC. كما يخ�ضع الت�شغيل لل�رشطني التاليني )1( :ينبغي يت�سبب هذا اجلهاز يف حدوث ت�شوي�ش م�رض)2( ، أ�ال ّ كما يجب أ�ن يقبل هذا اجلهاز أ� ّي ت�شوي�ش وارد ،مبا يف ذلك الت�شوي�ش الذي قد ي ؤ� ّدي إ�ىل الت�شغيل غري املرغوب فيه. حتذير :إ� ّن التغيريات أ�و التعديالت التي يخ�ضع لها هذا اجلهاز من دون موافقة �رشكة كيوتل ال�رصيحة قد تبطل ترخي�ص جلنة FCCلت�شغيل هذا اجلهاز. التلفزيون ،أ المر الذي ميكن حتديده من خالل إ�يقاف اجلهاز ثم إ�عادة ت�شغيله ،ينبغي على امل�ستخدم حماولة ت�صحيح الت�شوي�ش بوا�سطة اعتماد أ�حد الجراءات التالية أ�و أ�كرث: إ 9/18/07 1:54:15 PM Quick Start Guide.indd 15 طورتها منظمات علمية مثل اللجنة الدولية ّ ال�شعاعات غري امل�شحونة كهربائيا ً للحماية من إ ICNIRPوجمعية املهند�سني الكهربائيني واللكرتونيني IEEEمن خالل تقييم دوري ودقيق إ للدرا�سات العلمية. الر�شادات امل�ستويات امل�سموح بها وحتدد هذه إ ّ لتعر�ض أ ال�شخا�ص للموجات الال�سلكية. بالن�سبة ّ وت�شمل امل�ستويات هام�ش �سالمة يهدف إ�ىل �ضمان �سالمة كافة أ ال�شخا�ص ،مهما كان عمرهم ال�صحي ،مع أ وو�ضعهم الخذ يف عني االعتبار ّ التفاوت الذي قد يحدث يف القيا�سات. إ� ّن ن�سبة االمت�صا�ص املحددة SARهي وحدة قيا�س يف الظروف املعتمدة يف املختربات ،ولكن ن�سبة SARالفعلية ال�صادرة عن الهاتف أ�ثناء الت�شغيل قد تكون أ� ّ قل بكثري. م�صمم لكي ي�ستهلك أ�قل ذلك أل ّن الهاتف النقال ّ ن�سبة ممكنة من الطاقة لالت�صال بال�شبكة. تقدمها �رشكة �صممت كافة الطرازات التي لقد ّ ّ الر�شادات اخلا�صة بن�سبة التعر�ض كيوتل لتتوافق مع إ للرت ّددات مثل تو�صية املجل�س أ الوروبي و إ��شعار جلنة االت�صاالت الفدرالية (الواليات املتحدة) تو�صية املجل�س أ الوروبي :قبل أ�ن ي�صبح طراز مع جلهاز ال�سلكي مطروحا ً للبيع يف أ ال�سواق ،يجب اختباره 9/18/07 1:54:17 PM التعر�ض الآ منة. 1999/519/ECحول ن�سبة ّ إ� ّن حدود ن�سبة SARاملو�صى بها مبوجب االحتاد أ الوروبي 1999/519/ECهي 2.0واط/كيلوغرام املعدل على أ��سا�س 10غرامات وقد احت�سب هذا ّ حمددة SAR من الن�سيج .أ�ما أ�كرب ن�سبة امت�صا�ص ّ يحدثها هذا النوع من أ الجهزة عند اختباره فت�ساوي 1.20واط/كيلوغرام( .ي ّن�ص معيار 50361 EN على ما يلي« :ينطبق هذا املعيار أ ال�سا�سي على أ�يّة أ�جهزة إ�ر�سال حتدث حقال ً كهربائيا ً مغنطي�سيا ً ومعدة لال�ستعمال مع أ الجهزة الال�سلكية ()EM ّ الن�سان، جدا ً من أ�ذن إ التي تُ�ستخدم ب�شكل قريب ّ مبا فيها الهواتف النقالة ،والهواتف الال�سلكية، إ�لخ .أ�ما �رسعة نطاق الرت ّددات فهي 300ميغاهرتز أ�و 3غيغاهرتز .وبالتايل ،ال ي�شمل ال ّن�ص املذكور أ�عاله اال�ستعمال أ ال ّويل للجهاز الال�سلكي). �إ�شعار جلنة االت�صاالت الفدرالية (الواليات املتحدة) :يجب اختبار طراز اجلهاز الال�سلكي قبل طرحه للبيع يف أ ال�سواق ،وتزويد جلنة االت�صاالت ّ يتخطى احلدود الفدرالية FCCب�شهادة على أ�نّه ال املتوافقة مع املتطلبات املعتمدة من احلكومة حول التعر�ض الآ منة. ن�سبة ّ | 13دليل البداية ال�رسع E220 USB Modem - ن�سبة طاقة الرت ّددات الال�سلكية التي مي ّت�صها اجل�سم أ�ثناء ا�ستخدام جهاز ال�سلكي .ويتم حتديد ن�سبة SARعند أ�على درجات طاقتها املثبت عنها وفقا ً للمعيار التقني 50361 ENو أ�ال يتخطى املعدة مبوجب تو�صية املجل�س أ الوروبي احلدود ّ إ� ّن حدود ن�سبة SARاملو�صى بها يف الواليات Quick Start Guide.indd 16 إ�فراغ إ�لكرتو�ستاتي كبري إ�ىل إ�عادة إ�عداد اجلهاز. اللكرتو�ستاتي، الفراغ إ إ�ذا مل يعمل الربنامج بعد إ قم ب�إعادة ت�شغيل تطبيق برنامج املودم. معلومات تنظيمية /حول الوكالة يُ�سمح با�ستعمال اجلهاز الال�سلكي يف مناطق متعددة حول العامل حيث يتوافق مع ّ كل املتط ّلبات ّ التعر�ض للرت ّددات الال�سلكية. املعتمدة حول ن�سبة ّ طبق يف مناطق إ� ّن املوافقات إ وال�شعارات التالية ت ُ ّ حمددة كما �سريد. ّ موافقة ( CEاالحتاد أ الوروبي) ُمنحت املوافقة على ا�ستعمال اجلهاز الال�سلكي يف الع�ضاء يف االحتاد أ الدول أ الوروبي. | 12دليل البداية ال�رسع E220 USB Modem - تعلن �رشكة كيوتل أ� ّن اجلهاز الال�سلكي متوافق والحكام أ ال�سا�سية أ مع املتط ّلبات أ الخرى املتع ّلقة بتوجيه EC/5/1999 R&TTEاخلا�ص أ بالجهزة الطرفية ال�سلكية والال�سلكية. التعر�ض للرتددات الال�سلكية ميكن حمل اجلهاز الال�سلكي باليد ولكن ينبغي إ�بقا ؤ�ه بعيدا عن اجل�سم م�سافة أ�دناها � 1.5سنتيمرتا ً أ�ثناء الت�شغيل ،وذلك ل�ضمان التوافق يف أ�ي وقت مع توجيه . EC/5/1999 R&TTEكذلك بالن�سبة إ�ىل ا�ستعماله وهو حممول على اجل�سم ،يجب تثبيته ب�شكل مالئم وبعيدا ً عن اجل�سم م�سافة أ�دناها 1.5 �سنتيمرتاً .ال يجوز أ�ن تكون ملحقات التثبيت مثل 9/18/07 1:54:18 PM ي�صح و�ضع ملقط احلزام م�صنوعة من املعدن .وال ّ اجلهاز الال�سلكي يف اجليب. العامة تعر �ض املعدة حول ن�سبة • إ� ّن احلدود ّ ّ ّ للرت ّددات الال�سلكية املُ�شار إ�ليها يف توجيه R&TTE الر�شادات التي ن�رشتها اللجنة الدولية متوافقة مع إ ال�شعاعات غري امل�شحونة كهربائيا ً للحماية من إ ICNIRPيف العام . 1998 إ� ّن جلنة ICNIRPهي منظمة غري حكومية للحماية ال�شعاعات غري امل�شحونة كهربائيا ً موافق من إ عليها ر�سميا ً من قبل منظمة ال�صحة العاملية ،WHOومنظمة العمل الدولية ، ILOواالحتاد أ الوروبي .EU ملزيد من املعلومات ،قم بزيارة عنوان جلنة ICNIRP النرتنت www.icnirp.de على إ معلومات حول ال�شهادات ()SAR يتوافق هذا اجلهاز مع املتط ّلبات احلكومية حول التعر �ض للحقول الكهربائية املغنطي�سية ن�سبة ّ للرت ّددات الال�سلكية. إ�ن جهازك الال�سلكي هو عبارة عن جهاز منخف�ض الطاقة إلر�سال وا�ستقبال املوجات الال�سلكية. وعندما يكون يف و�ضع الت�شغيل ،ف�إنه يُر�سل م�ستويات منخف�ضة من طاقة الرت ّددات الال�سلكية (املعروفة أ�ي�ضا ً باملوجات الال�سلكية أ�و بحقول الرت ّددات الال�سلكية) .لقد اعتمدت احلكومات حول العامل إ�ر�شادات عاملية �شاملة خا�صة بال�سالمة Quick Start Guide.indd 17 عدم ا�ستعمال اجلهاز يف امل�ست�شفيات التزم بالقوانني أ والنظمة التي تفر�ضها امل�ست�شفيات. أ�وقف جهازك الال�سلكي عن الت�شغيل أ�ثناء تواجدك بالقرب من أ�جهزة طبية .قد ت ؤ� ّدي أ الجهزة الال�سلكية إ�ىل الت�شوي�ش على أ�جهزة تنظيم �رضبات القلب ،و أ�جهزة إ�زالة الرجفان أ�و أ�يّة أ�جهزة طبية أ�خرى تُزرع يف اجل�سم. الإ يقاف عن الت�شغيل بالقرب من أ�جهزة ال�سمع أ�وقف جهازك الال�سلكي عن الت�شغيل أ�ثناء تواجدك بالقرب من أ�جهزة ال�سمع .فقد يت أ�ثّر أ ال�شخا�ص تو�صيات أ للطفال ال ت�سمح أ للطفال بالعبث بجهازك الال�سلكي أ�و مبلحقاته .فقد ي ؤ� ّدي ذلك إ�ىل إ�حلاق أ الذى بهم أ�و بالآ خرين أ�و قد ي�رضّ ذلك باجلهاز الال�سلكي عن غري ق�صد. ومن ناحية أ�خرى ،ف إ� ّن اجلهاز الال�سلكي يحتوي على أ�جزاء �صغرية حا ّدة أ تت�سبب لهم الطراف قد ّ باجلروح أ�و باالختناق. الإ يقاف عن الت�شغيل أ�ثناء القيادة ال ت�ستخدم اجلهاز الال�سلكي أ�ثناء القيادة. 9/18/07 1:54:20 PM ال�شارات امل�سموعة. الذي ت�سببه إ ّ كيفية التنظيف وال�صيانة • قبل املبا�رشة بتنظيف اجلهاز الال�سلكي أ�و �صيانته، أ�وقف ّ كل التطبيقات التي ت�ستعمل اجلهاز الال�سلكي وقم ب�إزالته من الكمبيوتر ال�شخ�صي لديك. • ّ نظف جهازك الال�سلكي بقطعة قما�ش ناعمة مانعة للكهرباء اال�ستاتية. • يف حال توقّف اجلهاز الال�سلكي أ�و أ�حد ملحقاته عن العمل ،اجل أ� إ�ىل مركز خدمة مرخ�ص له للح�صول على م�ساعدة. ّ حماية البيئة تقيد أ بالنظمة املح ّلية يف ما يتع ّلق بطرق التخ ّل�ص ّ من مواد التو�ضيب ،واجلهاز الال�سلكي القدمي وملحقاته .يرجى الت�شجيع على إ�عادة ت�صنيعها. بطاقات SIM أ�ثناء إ�دخال بطاقة SIMأ�و إ�زالتها ،احمِ نف�سك من مو�صل بطاقات الفراغات إ إ اللكرتو�ستاتية .ال تلم�س ّ SIMت أ� ّكد دائما ً من أ�نّك حتمل اجلهاز الال�سلكي بيدك قبل إ�دخال بطاقة SIMأ�و إ�زالتها ،وذلك كتدبري وقائي. إ�عادة الت�شغيل إ�ثر الإ فراغات الإ لكرتو�ستاتية �سيحاول الربنامج إ�عادة بدء االت�صال حاملا ي ؤ� ّدي | 11دليل البداية ال�رسع E220 USB Modem - الذين ي�ضعون أ�جهزة م�ساعدة على ال�سمع إ�ذ قد ت�صاب تلك أ الخرية بالت�شوي�ش عند تواجدها بالقرب من أ�جهزة ال�سلكية. مناعة �ض ّد الت�شوي�ش �ضد الت�شوي�ش ي ّت�سم جهازك الال�سلكي مبناعة ّ Quick Start Guide.indd 18 ا�ستعمال جهازك الال�سلكي ب�شكل �صحيح و�آمن. تو�صيات عامة حول اال�ستعمال قم باالعتناء بجهازك دائما ً واحفظه يف مكا ٍن ٍ نظيف وخا ٍل من الغبار .كذلك ،ال ي�صح تعري�ض جهازك للنار ،أ�و لل�سجائر امل�شتعلة. • احفظ جهازك الال�سلكي جافا ً دائماً. • جت ّنب إ��سقاط جهازك الال�سلكي أ�و رميه أ�و ثنيه. • ال ي�صح طالء جهازك أ�و خد�شه. • ال حتاول تفكيك جهازك الال�سلكي إ�ذ أ� ّن هذا أ المر ي ؤ�دي إ�ىل بطالن الكفالة .ينبغي إ�جراء مرخ�ص لهم فقط. ال�صيانة على يد أ�خ�صائيني ّ • يُن�صح ب�إبقاء هذا املنتج بعيدا ً عن اجل�سم م�سافة أ�دناها � 1.5سنتيمرتا ً أ�ثناء الت�شغيل. | 10دليل البداية ال�رسع E220 USB Modem - • إ�حفظ جهازك الال�سلكي �ضمن درجات حرارية عادية .ميكن جلهازك الال�سلكي العمل يف درجات حرارية ترتاوح بني 5 -و 55 +درجة مئوية. • ال ت�ستعمل إ�ال ملحقات اجلهاز أ ال�صلية .كما ال ي�صح تو�صيل جهازك الال�سلكي ب أ�يّة منتجات غري ّ متوافقة معه. التزم بالقوانني أ والنظمة ال ت�شغّ ل جهازك الال�سلكي أ�ثناء تواجدك يف أ الماكن التي قد تكون غري �آمنة للقيام بذلك أ�و عندما يُطلب منك عدم القيام بذلك. إ�ذا أ�ردت إ�يقاف جهازك الال�سلكي عن الت�شغيل، 9/18/07 1:54:21 PM قم أ� ّوال ً ب�إيقاف ّ كل التطبيقات التي ت�ستعمل ثم قم ب�إزالته من الكمبيوتر اجلهاز الال�سلكي ،ومن ّ ال�شخ�صي لديك. التزم بكافة القوانني املح ّلية ،أ والنظمة ،والقواعد، أ وال�شعارات أ�ثناء ا�ستعمال اجلهاز وال�شارات ،إ والوامر ،إ الال�سلكي .كذلك ،ينبغي االلتزام ب�إ�شارات ا�ستعمال املعدات الهواتف النقالة إ�ذ أ�نّها ت�شري أ�ي�ضا ً إ�ىل ّ الخرى مبا يف ذلك أ لال�سلكية أ الجهزة الال�سلكية. الإ يقاف عن الت�شغيل يف أ الماكن التي تتّ�سم بالقابلية لالنفجار. أ�وقف جهازك الال�سلكي عن الت�شغيل يف أ الماكن التي ت ّت�سم أ�جوا ؤ�ها بالقابلية على االنفجار .من املمكن أ�ن ينتج عن ت�شغيل الكمبيوتر ال�شخ�صي لديك �رشارات حتى لو كان ذلك نادراً. عدم ا�ستعمال اجلهاز يف أ�ماكن التفجري أ�وقف جهازك الال�سلكي عن الت�شغيل يف أ الماكن التي يجري فيها التفجري .غالبا ً ما تُ�ستعمل أ�جهزة ّ التحكم بها عن بعد الرت ّددات الال�سلكية التي ميكن يف مواقع البناء إلطالق التفجري. عدم ا�ستعمال اجلهاز على منت الطائرة أ�وقف جهازك الال�سلكي عن الت�شغيل قبل �صعودك إ�ىل أ�يّة طائرة أ�و أ�ثناء تواجدك على متنها .فقد ت�سبب أ الجهزة الال�سلكية يف حدوث ت�شوي�ش على ّ منت الطائرة. Quick Start Guide.indd 19 ال�سماء أ خدمة أ والرقام .1كيفية إ�ن�شاء «ا�سم ورقم » جديد )1أ�نقر على للو�صول إ�ىل نافذة أ ال�سماء/ أ الرقام .Contacts (2أ�نقر على جديد .New )3أ�دخل اال�سم ،و أ�رقام الهاتف ،وعنوان الربيد ثم انقر على حفظ .Save إ اللكرتوين ،والتعليقاتّ . ال�سماء أ .2كيفية تعديل أ والرقام )1أ�نقر على أ الرقام .Contacts للو�صول إ�ىل نافذة أ ال�سماء/ ال�سماء أ .3كيفية حذف أ والرقام )1أ�نقر على أ الرقام .Contacts للو�صول إ�ىل نافذة أ ال�سماء/ ثم انقر )2إ�خرت «ا�سم ورقم » واحد أ�و أ�كرث ومن ّ على حذف .Delete )3أ�نقر على موافق OKعندما يُطلب منك ذلك. )1أ�نقر على أ الرقام .Contacts للو�صول إ�ىل نافذة أ ال�سماء/ ثم انقر على )2إ�خرت «ا�سم ورقم » واحد أ�و أ�كرث ومن ّ إ�ر�سال .Send )3إ�خرت أ�رقام الهاتف التي تريد إ�ر�سال ر�سالة إ�ليها ثم انقر على موافق .OK �ضمن النافذة املنبثقة ،ومن ّ فيظهر الربنامج �ضمن النافذة إلن�شاء ر�سالة جديدة. «ال�سماء أ يتم عر�ض أ�رقام أ والرقام » املختارة يف ّ )4 أ العمود ال�شاغر اخلا�ص أ �سماء/الرقام .Contacts بال أ�دخل حمتوى الر�سالة وانقر على إ�ر�سال .Send .5كيفية البحث عن ا�سم ورقم )1أ�نقر على بحث Search • إ�خرت نطاق البحث �ضمن مربع احلقل Fieldاملن�سدل. • أ�دخل �رشوط البحث يف املربع الن�صي اخلا�ص بالقيمة .Value • إ�خرت نوع املطابقة ،مثل «مطابقة الكلمة ب أ�كملها فقط » Match Whole Word Onlyو /أ�و «مطابقة حالة أ الحرف .» Match Case )2أ�نقر على البحث الآ ن Search Nowلبدء عملية البحث. )3أ�نقر على إ�يقاف البحث Stop Searchإليقاف البحث. معلومات حول ال�سالمة | 9دليل البداية ال�رسع E220 USB Modem - ثم )2إ�خرت «اال�سم والرقم » الذي تريد تعديله ومن ّ أ�نقر عليه ب�شكل مزدوج أ�و انقر على تعديل .Edit )3بعد االنتهاء من التعديل ،أ�نقر على حفظ .Save .4كيفية إ�ر�سال ر�سائل SMS يرجى قراءة املعلومات حول ال�سالمة بعناية ل�ضمان 9/18/07 1:54:23 PM Quick Start Guide.indd 20 خدمة الر�سائل الق�صرية SMS .1كيفية إ�ن�شاء ر�سائل SMS )1أ�نقر على )2أ�نقر على كتابة Write )3أ�دخل رقم هاتف أ�و أ�كرث وحمتوى ر�سائل .SMS )4أ�نقر على إ�ر�سال .Send للو�صول إ�ىل نافذة خدمة .SMS مالحظة :أ�ثناء إ�دخال أ�رقام الهاتف ،ميكنك النقر أ على أ �سماء/الرقام Contactsللبحث عن أ�رقام ال و إ��ضافتها. .2كيفية عر�ض ر�سائل SMS العدادات < Settingsاخليارات > Options ميكنك اختيار إ | 8دليل البداية ال�رسع E220 USB Modem - إ�نذارات بر�سائل SMS Alertsإلعداد طريقة إ�نذارك بورود ر�سالة جديدة .ميكنك اختيار إ�نذار �صوتي Alert النذار .Alert Window toneأ�و نافذة إ . 3إ�عدادات خدمة SMS العدادات > Settingsإ�عدادات اخلدمة قم باختيار إ للعدادات التالية: SMS Settingsإ الخطارات :إلعداد طلب إ�خطار بالت�سليم. • إ • ا�ستعمال رقم مركز ر�سائل SMSنف�سه للر ّد: للعداد ب�شكل أ�ن ي�ستعمل امل�ستلم رقم مركز إ ر�سائل SMSذاته عند الر ّد على الر�سالة. • جمال حامل ر�سائل : SMSإلعداد جمال احلامل إلر�سال الر�سائل. مدة �صالحية حفظ ر�سالة • ال�صالحية :إلعداد ّ ما يف مركز ر�سائل .SMS • رقم مركز ر�سائل : SMSإ� ّن Qtel Internet E220 املعد م�سبقا ً يف بطاقة .SIM يقر أ� تلقائيا ً الرقم ّ إ�ذا اخرتت إ�نذار �صوتي ، Alert toneت�سمع إ�نذارا ً �صوتيا ً عند ورود ر�سالة جديدة. )1أ�نقر على للو�صول إ�ىل نافذة خدمة .SMS )2أ�نقر على الربيد الوارد Inboxلعر�ض الر�سائل. يتم عر�ض إ�ذا اخرتت نافذة إ النذار ّ ، Alert Window نافذة تنذرك بورود ر�سالة جديدة. أ�نقر على عر�ض Viewلعر�ض الر�سالة أ�و انقر على إ�غالق Closeلعر�ضها الحقاً. 9/18/07 1:54:24 PM Quick Start Guide.indd 21 ب�شكلآ من ”.”Safely Remove Hardware )2أ�وقف «وحدة Qtel Internet E220للتخزين كبري ال�سعة ””Huawei Mass Storage USB Device )3ا�سحب Qtel Internet E220إ�ىل اخلارج عندما يُطلب منك ذلك. التعرّف �إىل واجهة «مديراملودم» Qtel Internet E220 .1كيفية الو�صول إ�ىل واجهة «مدير املودم» Qtel Internet E220 Manager أ�نقر ب�شكل مزدوج على من �سطح املكتب لبدء ت�شغيل «مدير املودم Qtel Internet ». على إ�دخال الرمز ال�صحيح. .2التع ّرف إ�ىل أ اليقونات / :االت�صال /قطع االت�صال بال�شبكة النرتنت IE :فتح م�ستعر�ض إ :الو�صول إ�ىل نافذة خدمة SMS. ال�سماء أ :الو�صول إ�ىل نافذة أ والرقام 9/18/07 1:54:26 PM .1إ�عدادات االت�صال بال�شبكة ال داعي الجراء أ�ي اعدادات للو�صول اىل Qtel Internet E220ولكن ميكنك عمل ذلك من خالل اخلطوات التالية: العدادات > Settingsإ�عدادات االت�صال )1إ�خرت إ بال�شبكة .Network Connection Settings )2أ�نقر على جديد .New )3أ�دخل ا�سم النمط والثوابت مثل ،APN رقم الهاتف ،ا�سم امل�ستخدم ،وكلمة ال�رس. )4أ�نقر على حفظ .Save مالحظة :إ�ذا أ�ردت احل�صول على تفا�صيل حول الثوابت ،راجع م�شغّ ل ال�شبكة املح ّلي. .2كيفية االت�صال بالإ نرتنت )1أ�نقر على لالت�صال بال�شبكة. تتم إ�قامة االت�صال ،تظهر املعلومات حول )2عندما ّ االت�صال احلايل على الّلوحة اليمنى من النافذة، مدة االت�صال ،وحجم البيانات ،وحجم وهي ت�شمل ّ البيانات املر�سلة وامل�ستلمة ،وال�رسعة، وال�رسعة الق�صوى. )3أ�نقر على )4أ�نقر على النرتنت IE لفتح م�ستعر�ض إ لقطع االت�صال بال�شبكة. | 7دليل البداية ال�رسع E220 USB Modem - E220إ�ذا طلب منك النظام إ�دخال رمز ، PINاحر�ص النرتنت خدمة إ Quick Start Guide.indd 22 .1كيفية تو�صيل Qtel Internet E220 بكمبيوتر �شخ�صي مالحظة :عليك أ�وال ً ت�شغيل الكمبيوتر لديك .ثم �صل Qtel Internet E220بالكمبيوتر .و إ�الّ ،قد تت أ�ثّر عملية التثبيت العادية Qtel Internet E220 ّ إ� ّن الر�سم التخطيطي لكبل البيانات هو التايل يتعرف النظام تلقائيا ً على اجلهاز اجلديد، )3 ّ ويعر�ض أ اليقونة �ضمن ناحية احلالة على �سطح املكتب ،ما ي�شري إ�ىل جناح عملية تو�صيل Qtel Internet E220بالكمبيوتر ال�شخ�صي. .2كيفية تثبيت «مدير املودم » Qtel Internet E220 � )1صل Qtel Internet E220بكمبيوتر �شخ�صي. )2يبد أ� برنامج التثبيت تلقائياً .إ�ذا مل ي�ستجيب املحرك. برنامج الت�شغيل التلقائي ،اذهب إ�ىل م�سار ّ مو�صل USBال�صغري لكبل البيانات يف )1أ�دخل ّ Qtel Internet E220 ابحث عن ملف الت�شغيل التلقائي AutoRun.exe وانقر عليه ب�شكل مزدوج ،فيبد أ� ت�شغيله تلقائياً. | 6دليل البداية ال�رسع E220 USB Modem - ثبت الربنامج بح�سب أ الوامر التي تظهر على ّ )3 ال�شا�شة. مالحظة :ال ت�صل أ�و تف�صل Qtel Internet E220 خالل عملية التثبيت. )4بعد عملية تثبيت ناجحة ،تظهر على �سطح املكتب أ�يقونة االخت�صار .Qtel Internet E220 مو�صل كبل البيانات USBالرئي�سي )2أ�دخل ّ وامللحق يف واجهتي � USBضمن الكمبيوتر ال�شخ�صي. 9/18/07 1:54:28 PM اخلا�صة .3كيفية إ�زالة Qtel Internet E220 إ�ذا أ�ردت إ�زالة Qtel Internet E220،ا�ستعمل وظيفة حذف أ الجهزة املتوفرة يف نظام Windowsإليقاف ثم ا�سحبه. ت�شغيل ، Qtel Internet E220ومن ّ �ضمن ناحية احلالة )1أ�نقر ب�شكل مزدوج على المر« إ�زالة أ فيتم عر�ض أ الجهزة على�سطح املكتب؛ ّ Quick Start Guide.indd 23 أ�هال ً بك إ�ىل دليل ا�ستخدام Qtel Internet E220 من �رشكة كيوتل وي ؤ� ّمن Qtel Internet E220 الوظائف التالية: )2أ�دخل حاملة البطاقة يف Qtel Internet E220 بح�سب امل�شار إ�ليه يف الر�سم التايل. النرتنت • الو�صول إ�ىل إ • خدمة الر�سائل الق�صرية SMS ال�سماء أ • أ والرقام يعرفك هذا الدليل على الوظائف مالحظة: ّ أ ال�سا�سية اخلا�صة ( )Qtel Internet E220ب�شكل خمت�رص .إ�ذا أ�ردت احل�صول على مزيد من التفا�صيل حول الوظائف ،والتحذيرات وتدابري حد �سواء ،راجع دليل امل�ستخدم اخلا�ص الوقاية على ّ Qtel Internet E220 )1أ�زل حاملة بطاقة SIMمن Qtel Internet E220 ثم أ�دخل بطاقة SIMيف خانتها �ضمن ومن ّ احلاملة بح�سب امل�شار إ�ليه يف الر�سم التايل .ت أ� ّكد مثبتة يف مكانها بالكامل. من أ� ّن بطاقة SIM ّ قد تختلف تدابري تثبيت «مدير املودم » Qtel Internet E220بع�ض ال�شيء بني نظام ت�شغيل و�آخر كنظام Windows XPمثال ً و Windows .2000يرجى مراجعة ن�صائح التثبيت يف حال الحظت أ� ّي اختالف. مالحظة: بالن�سبة إ�ىل نظام ، Windows XPيُن�صح بتثبيت �ضافية مثل Service Pack 2 ال برامج اخل�صائ�ص إ ّ أ�و ما فوق. بالن�سبة إ�ىل نظام ،Windows 2000يُن�صح �ضافية مثل Service ال بتثبيت برامج اخل�صائ�ص إ ّ Pack 4أ�و ما فوق. مل�ستخدمي نظام ماكنتو�ش قُم بتنزيل املحرك من النرتنتwww.qtel.com.qa : موقع كيوتل على إ 9/18/07 1:54:30 PM | 5دليل البداية ال�رسع E220 USB Modem - جتهيز مودم Qtel Internet E220 دليل التثبيت Quick Start Guide.indd 24 º²¾dG q ¹JÄÇc fêfEG 14%,).4%2.%4/.4(%-/6% Quick Start Guide.indd 25 9/18/07 1:54:31 PM جدول املحتويات جتهيز Qtel Internet E220 دليل Getting التثبيت التعرف إ�ىل واجهة «مدير املودم» Getting Qtel Internet E220 خدمة النرتنت إ خدمة الر�سائل الق�صرية SMS معلومات حول ال�سالمة ال�سماء و أ خدمة أ الرقام 9/18/07 1:54:31 PM 5 5 7 7 8 9 10 Quick Start Guide.indd 26 º²¾dG q ¹JÄÇc fêfEG 14%,).4%2.%4/.4(%-/6% Quick Start Guide.indd 27 9/18/07 1:54:33 PM Quick Start Guide.indd 28 9/18/07 1:54:34 PM