1
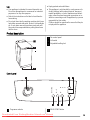
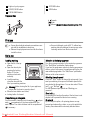
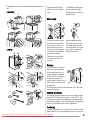
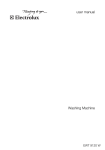
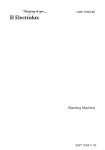
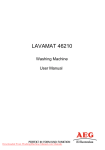
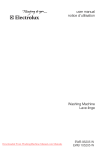
EN
User manual
Washing Machine
ZWP 582
ZWQ 5104
ZWQ 5105
Downloaded From WashingMachine-Manual.com Manuals
Contents
Safety information _ _ _ _ _ _ _ _ _ _ _ _ _ _ _ _ _ _
Product description _ _ _ _ _ _ _ _ _ _ _ _ _ _ _ _ _
First use _ _ _ _ _ _ _ _ _ _ _ _ _ _ _ _ _ _ _ _ _ _
Daily use _ _ _ _ _ _ _ _ _ _ _ _ _ _ _ _ _ _ _ _ _ _
Washing programmes _ _ _ _ _ _ _ _ _ _ _ _ _ _ _ _
Care and cleaning _ _ _ _ _ _ _ _ _ _ _ _ _ _ _ _ _ _
2
3
4
4
6
7
Operating Problems _ _ _ _ _ _ _ _ _ _ _ _ _ _ _ _ _ 8
Detergents and Additives _ _ _ _ _ _ _ _ _ _ _ _ _ _ 9
Technical data _ _ _ _ _ _ _ _ _ _ _ _ _ _ _ _ _ _ _ 10
Consumption values _ _ _ _ _ _ _ _ _ _ _ _ _ _ _ _ 10
Installation _ _ _ _ _ _ _ _ _ _ _ _ _ _ _ _ _ _ _ _ 10
Environment concerns _ _ _ _ _ _ _ _ _ _ _ _ _ _ _ 12
Subject to change without notice.
Safety information
Please read these points carefully before installing and
using your appliance. Keep this user manual with your appliance.
General safety
• Do not modify or attempt to modify this appliance. This
would put yourself in danger.
• Ensure that all coins, safety pins, brooches, screws etc
have been removed before starting a washing programme. If left in washing, they can seriously damage
the appliance.
• Use the recommended quantity of detergent.
• Put small items together (socks, belts etc.) in a small
linen bag or pillow case.
• Unplug and close inlet hose tap after using appliance.
• Always disconnect the power supply from the appliance before cleaning or maintenance.
• Do not machine wash clothes with ribbing, unfinished
or torn material.
Installation
• Unpack or ask for the appliance to be unpacked immediately upon delivery. Check the outside of the appliance is not damaged in any way. Report all transit
damage to your retailer.
• Remove all transit bolts and packaging before installing the appliance.
• Connection to the water supply must be carried out by
a qualified plumber.
• If your domestic electrical circuit needs adapting to allow the appliance to be plugged in, use a qualified
electrician.
• Ensure that, after installation, the power cable is not
trapped under the appliance.
• If the appliance is installed on carpeted floor, ensure
that the carpet does not obstruct any ventilation ducts
located at the base of the appliance.
• The appliance must be equipped with an earthed power
plug which conforms to regulations.
• Before connecting your appliance to the power supply,
carefully read the instructions in the chapter entitled
“Electrical connection”.
• Replacing the power cable should only be carried out
by an authorised service engineer.
• The manufacturer cannot be held responsible for any
damage resulting from incorrect installation.
Precautions to be taken against frost
If your appliance is exposed to temperatures below 0°C,
the following precautions must be taken:
• Close the tap and disconnect the inlet hose.
• Place the end of this hose and the drain hose in a basin
on the floor.
• Select the Drain programme let it run until the end of
the cycle.
• Disconnect the appliance from the power supply by
turning the programme selector to “Stop” .
• Unplug the appliance.
• Replace the inlet hose and drain hose.
This way, the water remaining in the hoses will be drained
away, avoiding any ice formation which would damage
your appliance.
Before turning your appliance on again, ensure that it is
installed in an area where the temperature will not fall below freezing.
2
Downloaded
From WashingMachine-Manual.com Manuals
Use
• Your appliance is intended for normal domestic use.
Do not use the appliance for commercial or industrial
purposes or for any other purpose.
• Refer to the instructions on the label of each item before washing.
• Do not put items into the washing machine which have
had stains removed with petrol, alcohol, trichlorethylen
etc. If such stain removers have been used, wait until
the product has evaporated before putting these items
into the drum.
• Empty pockets and unfold items.
• This appliance is not intended for use by persons (including children) with reduced physical, sensory or
mental capabilities, or lack of experience and knowledge, unless they have been given supervision or instruction concerning use of the appliance by a person
responsible for their safety.
Children should be supervised to ensure that they do
not play with the appliance.
Product description
1
1 The control panel
2 Lid handle
3 Adjustable levelling feet
2
3
Control panel
1
2
7
1 Programme selector
6
5
3
4
2 DELAY START button
Downloaded From WashingMachine-Manual.com Manuals
3
3 Lights of cycle progress
4 START/PAUSE button
6 OPTIONS button
7 SPIN button
5 EXTRA RINSE button
Dispenser box
Prewash
Wash
Softener (do not fill above the MAX symbol
M
)
First use
• Ensure the electrical and water connections comply with the installation instructions.
• Remove the polystyrene insert and all other items
inside the drum.
• Run an initial wash cycle at 90 °C, without any
washing but with detergent to remove any manufacturing residue from the drum and tub.
Daily use
Loading washing
Selection of desired programme
• Open the lid of the appliance.
• Open the drum by depressing the locking
A
button A: The two
shutters unlock automatically.
• Load the washing,
close the drum and the
lid of your washing machine.
Turn the programme selector to the required programme.
The “Start/Pause” pushbutton flashes green.
If you turn the programme selector to another programme
while a cycle is in progress, the appliance will ignore the
new selected programme. The “Start/Pause” pushbutton
flashes red for a few seconds.
Warning! Before closing the lid of your appliance,
ensure that the drum is properly closed :
• When the two shutters are closed,
• locking button A released.
Proportioning of detergents
Pour the amount of washing into the washing
and precompartments if you have selected the “prewash
wash” option. Pour fabric softener into the compartment
if necessary.
Selecting the spin speed
Press the “ Spin ” button to change the spin speed, if you
want your washing to be spun at a different speed to the
one selected by the appliance. You can also select “Rinse
.
hold” or “No Spin”
For the maximum spin speeds see "Washing programmes".
Rinse hold
By selecting this function the water of the last rinse is not
emptied out to prevent the fabrics from creasing.
No spin
By selecting this option, all spinning phases are suppressed and replaced by a drain, so as not to wrinkle the
laundry. Recommended for extremely delicate fabrics.
4
Downloaded
From WashingMachine-Manual.com Manuals
At the end of the programme, if you have selected “Rinse
hold” , you then need to select a “ Spin ” or “ Drain ”
programme to finish the cycle and empty the water.
Selecting options
You must select the different options after selecting the
programme and before pressing the “Start/Pause” button
(see “Washing programmes”). Press the desired button(s) : the corresponding lights come on. If pressed
again, the lights go out. If one of the options is not compatible with the selected programme, the “Start/Pause”
button flashes red.
“ Prewash ” option
The appliance runs a prewash at 30°C max.
“ Super quick ” option
The washing time will be reduced depending on the programme selected.
“ Extra rinse ” option
The washing machine will add one or more rinses during
the cycle. This option is recommended for people with
sensitive skin and in soft water areas.
“ Delay start ”
This option allows you to delay the start of a wash programme by 3, 6 or 9 hours by pressing the “ Delay start ”
button.
You can change or cancel the delayed start time at any
time before you press the “Start/Pause” button by pressing the “ Delay start ” button again (when all indicators are
off, the wash programme will start immediately).
If you have already pressed the “Start/Pause” button and
you want to change or cancel the delayed start, proceed as
follows :
• To cancel the delay start and start the cycle immediately, press “Start/Pause” and then “ Delay start ” . Press
“Start/Pause” to start the cycle.
• To change the timer delay period, you must go through
the “Stop” position and select your cycle again.
Stand by: once the programme has finished after a
few minutes the energy saving system is enabled
The lid will be locked during the delayed start time. If you
need to open it, you must first pause the appliance by
pressing the “Start/Pause” button. After closing the lid
again, press the “Start/Pause” button.
Start of the programme
Press the “Start/Pause” button to start the cycle. The corresponding light will come on green. It is normal for the
programme selector to remain stationary during the cycle.
The light corresponding to the current cycle is illuminated.
+
: Prewash + Wash
+
: Rinses + Spin
: End of cycle
Interrupting a programme
Adding washing during the first 10 minutes
Press the “ Start/Pause ” pushbutton : the corresponding
light will flash green while the appliance is paused. The
lid can only be opened around 2 minutes after the washing machine has come to a stop. Press the “ Start/Pause ”
pushbutton again to continue the programme.
Modifying the programme in progress
Before making any changes to the current programme,
you need to pause the washing machine by pressing the
“ Start/Pause ” pushbutton. If the modification is not possible, the “ Start/Pause ” pushbutton flashes red for a few
seconds. If you still decide to change the programme, you
must cancel the current programme (see below).
Cancelling the programme
If you want to cancel the programme, turn the programme
selector to the “ Stop ” position .
End of the programme
The washing machine stops automatically, the “Start/
Pause” button goes out and the light “End of cycle”
comes on. The lid can only be opened around 2 minutes
after the washing machine has come to a stop. Turn the
programme selector to the “Stop” position . Remove
washing. Unplug and close water inlet tap.
with the pilot lights switched on. By pressing any button
the appliance will come out of the energy saving status.
Downloaded From WashingMachine-Manual.com Manuals
5
Washing programmes
Programme / Type of washing
Cotton (30° - 90°) : White or colour, e.g. normally
soiled work clothes, bed linen, table linen, body linen, towels.
Max. spin speed: 850 rpm for model ZWP 582/ 1000
rpm for model ZWQ 5104, ZWQ 5105
Load
6 kg
Available options
No spin, Rinse hold, Super quick, Prewash,
Extra rinse, Delay start
Cotton Eco (40° and 60°) : White or colour, e.g. nor- 6 kg
mally soiled work clothes, bed linen, table linen, body
linen, towels.
Max. spin speed: 850 rpm for model ZWP 582/ 1000
rpm for model ZWQ 5104, ZWQ 5105
No spin, Rinse hold, Prewash, Extra rinse,
Delay start
Synthetics (30° - 60°) : Synthetic fabrics, body linen,
coloured fabrics, non-iron shirts, blouses.
Max. spin speed: 850 rpm for model ZWP 582/ 900
rpm for model ZWQ 5104, ZWQ 5105
2,5 kg
No spin, Rinse hold, Super quick, Prewash,
Extra rinse, Delay start
Easy iron (40°) : For cottons and synthetics. Reduces
creasing and makes ironing easier.
Max. spin speed: 850 rpm for model ZWP 582/ 900
rpm for model ZWQ 5104, ZWQ 5105
1,0 kg
No spin, Rinse hold, Prewash, Extra rinse,
Delay start
Delicates (30° - 40°) : For all delicate materials, for
example curtains.
Max. spin speed: 700 rpm
2,5 kg
No spin, Rinse hold, Super quick, Prewash,
Extra rinse, Delay start
Handwash (30°- 40°) : Very delicate items carrying
the “wash by hand” label.
Max. spin speed: 850 rpm for model ZWP 582/ 1000
rpm for model ZWQ 5104, ZWQ 5105
1,0 kg
No spin, Rinse hold, Delay start
Wool (40°) : Machine washable wool carrying the labels “pure new wool, machine washable, does not
shrink”.
Max. spin speed: 850 rpm for model ZWP 582/ 1000
rpm for model ZWQ 5104, ZWQ 5105
1,0 kg
No spin, Rinse hold, Delay start
Sport intensive (40°) : For normally and heavily
soiled outdoor sport clothes. machine will add automatically a prewash phase before the main wash to
eliminate mud stains.1)
Max. spin speed: 850 rpm for model ZWP 582/ 900
rpm for model ZWQ 5104, ZWQ 5105
2,5 kg
No spin, Rinse hold, Extra rinse, Delay start
Curtains (40°) : For washing curtains. The Prewash
option is activated.
Max. spin speed: 700 rpm
2,5 kg
No spin, Rinse hold, Extra rinse, Delay start
6
Downloaded
From WashingMachine-Manual.com Manuals
Programme / Type of washing
Load
Rinses : Hand washed items can be rinsed in this
programme.
Max. spin speed: 850 rpm for model ZWP 582/ 1000
rpm for model ZWQ 5104, ZWQ 5105
Available options
6 kg
No spin, Rinse hold, Extra rinse, Delay start
Drain : Runs an empty cycle after a Rinse hold option. 6 kg
Spin : A spin cycle to 850 rpm for model ZWP 582/
1000 rpm for model ZWQ 5104, ZWQ 5105 after a
Rinse hold option.
6 kg
Delay start
1) We recommend not to add any detergent for prewash phase.
Care and cleaning
Unplug the appliance before cleaning.
Descaling the appliance
To descale the appliance, use an appropriate non-corrosive product designed for washing machines. Read product label for recommended amounts and how often descaling should be carried out.
1
2
The exterior
Use warm soapy water to clean the exterior of the appliance. Never use alcohol, solvents or similar products.
4
Dispenser box
3
To clean, proceed as follows :
6
5
3
1
2
4
8
7
9
Drain filter
Regularly clean the drain filter which is located at the bottom of the drum :
10
CLACK
11
CLACK
Water inlet filters
To clean, proceed as follows :
Downloaded From WashingMachine-Manual.com Manuals
7
Operating Problems
Numerous checks were carried out on your appliance before it left the factory. However, should you notice a malProblems
function, please refer to the sections below before contacting the after-sales service.
Causes
The appliance doesn’t start or • the appliance isn’t plugged in correctly, the electrical installation isn’t working,
doesn’t fill:
there is a power failure,
• the lid of your appliance and the drum shutters aren’t closed firmly,
• the programme start command hasn’t been properly selected,
• the water supply has been cut off, the water inlet tap is closed,
• the water inlet filters are dirty (see “Care and cleaning ”).
The appliance fills but empties straight away:
• the drainage U-piece is fixed too low (see “Installation”).
The appliance doesn’t rinse
or doesn’t empty:
• the drain hose is blocked or bent,
• the drainage filter is obstructed (see “Care and cleaning ”),
• the out of balance detector has been activated: washing is unevenly distributed in
the drum,
• the “Drain” programme or “Night Cycle” or “Rinse hold” option have been selected,
• the height of the drainage U-piece is unsuitable.
The appliance doesn’t spin:
• balance problem with the laundry load: add more laundry or manually adjust the
items in the drum.
You have found water around • too much detergent has caused foam to overflow,
the appliance:
• the detergent is unsuitable for machine washing,
• the drainage U-piece isn’t attached correctly,
• the water inlet hose is leaking.
The washing results are not
satisfactory :
•
•
•
•
the detergent is unsuitable for machine washing,
there is too much washing in the drum,
the wash cycle is unsuitable,
there isn’t enough detergent.
8
Downloaded
From WashingMachine-Manual.com Manuals
Problems
Causes
The appliance vibrates, is
noisy:
•
•
•
•
•
all packaging have not been removed from the appliance (see “Installation”),
the appliance isn’t level and is unbalanced (see “Installation”),
the appliance is too close to the wall or furniture,
washing is unevenly distributed in the drum, the load is too small,
the appliance is in running in period, noise will disappear with time.
The wash cycle is much too
long:
•
•
•
•
•
The appliance stops during a
wash cycle:
• the water or electricity supply is defective,
• a “Rinse hold” has been selected,
• the drum shutters are open.
The lid doesn’t open at the
end of the cycle:
• the temperature inside the drum is too high,
• the lid unlocks 1 - 2 minutes after the end of the cycle.
Softener runs directly into
the drum when filling the
dispenser box:
• you have gone past the MAX indicator.
The drainage pump runs
constantly, even when the
appliance is inactive:
• the anti-flooding security system has been activated, please proceed as follows :
- close the water inlet tap,
- empty the appliance for 2 minutes before unplugging,
- call the after-sales service.
The “Start/Pause” pushbutton 1) flashes red 2):
•
•
•
•
•
•
•
the water inlet filters are dirty (see “Care and cleaning ”),
the power or water supply has been cut off,
the motor overheating detector has been activated,
the water inlet temperature is lower than usual,
the foam detection security system has been activated (too much detergent) and the
washing machine has begun draining the foam,
• the out of balance detector has been activated: an extra phase has been added to
distribute washing more evenly in the drum.
the lid is not closed properly,
the drainage filter is obstructed,
the drain hose is blocked or bent,
the drain hose is fixed to high (see "Installation"),
the drainage pump is blocked,
the standpipes blocked,
the water tap is closed, the water supply has been cut off.
1) On some models, the audible signals can sound
2) After solving any problems, press "Start/Pause" pushbutton to restart the interrupted programme.
Detergents and Additives
Only use detergents and additives designed for use in a
washing machine. We do not recommend mixing different
types of detergents. This may spoil the washing. There are
no restrictions on the use of powder detergents. Liquid
detergents must not be used when a prewash has been selected. For cycles without prewash, pour the liquid deter-
Downloaded From WashingMachine-Manual.com Manuals
9
gent directly into the drum or use a special dosing device
(supplied by the detergent's manufacturer). Detergent tab-
lets or doses must be placed in the detergent compartment of your appliance's dispenser box.
Technical data
Dimensions
Width / Height / Depth
400 / 850 / 600 mm
Electrical connection
Voltage
Overall power
Fuse
Frequency
230 V
2300 W
10 A
50 Hz
Water supply pressure
Minimum
Maximum
0,5 bar (0,05 MPa)
8 bar (0,8 MPa)
Level of protection against ingress of solid particles and moisture
IPX4
Water supply 1)
Cold water
Maximum Load
Cotton
6 kg
Spin Speed
Maximum
850 rpm (ZWP 582)
1000 rpm (ZWQ 5104, ZWQ 5105)
1) Connect the water inlet hose to a water tap with a 3/4'' thread.
Consumption values
Programme
Energy consumption
(kWh)1)
Water consumption
(litre)1)
Programme duration
(Minutes)1)
White Cottons 90 °C
2.2
67
150
Cottons 60 °C
1.3
62
145
Cottons 40 °C
0.75
62
120
Synthetics 40 °C
0.65
48
80
Delicates 30 °C
0.3
53
60
Wool 30 °C
0.4
48
54
Handwash 30 °C
0.4
48
54
1) The consumption information shown in this chart is indicative. It can vary depending on the quantity and the type of laundry, on the
temperature of the water supply and on the ambient temperature.
Standard programmes for the Energy Label consumption
values
The cotton 60 °C economy and cotton 40 °C economy are
the standard cotton programmes for normally soiled cotton laundry. They are suitable to clean normally soiled
cotton laundry and they are the most efficient programmes
in terms of combined energy and water consumption for
washing that type of cotton laundry.
They agree with EN60456.
Installation
Remove all protective packaging for transit before using
for the first time. Keep in case needed for future transit:
Transporting a non-secured appliance may damage internal components and cause leakages and malfunctions.
10
Downloaded
From WashingMachine-Manual.com Manuals
The appliance can also be damaged through physical contact.
Unpacking
1
1
2
2
Keep the transit bolts for
when you move the appliance.
To install the appliance at
the same level as neighboring furniture, cut these
plastic pieces.
Water supply
90O
1
In case of necessity move
the inlet hose in the direction shown on picture. To
make this loose the inlet
hose ring nut and position
the inlet hose downwards
as drawn on picture.
Tighten the ring nut back
and make sure there are
no leaks.
2
Untying
A
B
A
C
D
2
Open the water inlet tap.
Check there are no leaks.
The water inlet hose can
not be extended. If it is too
short, please contact the
after-sales service.
Drainage
B
1 B
2
1
D
Fit the U-piece on the drainage hose. Place everything
in a drainage point (or in a
sink) at a height of between
min
max
70 cm 100 cm
70 and 100 cm. Ensure it is
positioned securely. Air
must be able to enter the end
of the hose, to avoid any risk
of siphoning.
The drain hose must never be stretched. If it is too short,
contact an engineer.
Electrical connection
This washing machine must only be connected in singlephased 230 V. Check the fuse size: 13 A for 230 V. The
appliance must not be connected with an extension lead
or multi-plug adaptor. Ensure that the plug is earthed and
that it is in accordance with current regulations.
Positioning
Position the appliance on a flat and hard surface in a ventilated location. Ensure the appliance does not come into
Downloaded From WashingMachine-Manual.com Manuals
11
contact with the wall or other furniture. Accurate levelling
avoids vibrations, noise and prevents the appliance from
moving when running.
Environment concerns
The symbol on the product or on its packaging
indicates that this product may not be treated as
household waste. Instead it should be taken to the
appropriate collection point for the recycling of electrical
and electronic equipment. By ensuring this product is
disposed of correctly, you will help prevent potential
negative consequences for the environment and human
health, which could otherwise be caused by inappropriate
waste handling of this product. For more detailed
information about recycling of this product, please contact
your local council, your household waste disposal service
or the shop where you purchased the product.
Disposing of the appliance
All materials carrying the
symbol are recyclable.
Dispose of them at a waste collection site (enquire
at your local council) for collection and recycling. When
disposing of your appliance, remove all parts which could
be dangerous to others: cut off the power supply cable at
the base of the appliance.
Protecting the environment
To save water and energy and therefore help protect
the environment, we recommend the following:
• Whenever possible, use the appliance at full capacity
and avoid partial loads.
• Only use the prewash and soak programmes for heavily
soiled items.
• Use an appropriate amount of detergent for the hardness of the water, the size of the load and how soiled
the washing is.
12
Downloaded
From WashingMachine-Manual.com Manuals
Downloaded From WashingMachine-Manual.com Manuals
13
14
Downloaded
From WashingMachine-Manual.com Manuals
Downloaded From WashingMachine-Manual.com Manuals
15
192986600-A-312011
www.zanussi.com/shop
Downloaded From WashingMachine-Manual.com Manuals