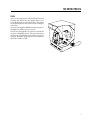
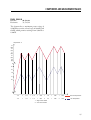
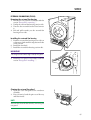
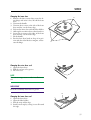
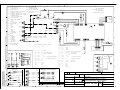
1
DAM 5
SERVICE MANUAL
PUBLICATION DATE: 09/02
8064375
INDUSTRIAL DRYER
VENTED VERSION, CONDENSED VERSION
INTRODUCTION
INTRODUCTION
You have in your hand the ASKO Service Manual for the commercial machines of
the new generation of tumble driers, that are friendly to the environment in both
their manufacture and their use.
This new generation of tumble driers has been designed for ease of servicing. By
this we mean that it's a simple job, for example, to replace a damaged side panel.
That's why we've changed the design from a one-piece shell to a split shell.
To secure parts and wiring, we have replaced many of the screws by plastic snap
fasteners, and certain parts have integrated ribbon cabling, all for simplifying service.
We have also integrated service aids, such as hooks to hang parts on, so that you
can use both hands for installation.
Presentation of the different models:
TDC33 - is a sensor-controlled electronic tumble dryer with air extraction
TDC44 - is a sensor-controlled electronic tumble dryer with a condenser
The machines have a humidity sensor that can tell when the clothes are dry.
You can choose from a total of eleven different languages on the display, the
number and choice of languages depend on the market.
Servicing the tumble driers has to be easy, and just as it is important for us that the
customer shall be satisfied with our simple, able and durable machines, so we also
want to give you, the service engineer, the conditions to permit you to work efficiently and satisfactorily.
We hope that this Service Manual will be a positive tool in your daily work.
Important - late change!
Machines manufactured week 46/2000 or later have a new design of the fastening of
the bottom cover. See illustration below.
For more information, see service information Group 22 No. 47.
2
2
Art.no. Service manual 80 643 75
TABLE OF CONTENTS
Safety regulations
Specifications
The drying process
TDC33
TDC44
Installation
Tumble drier location
Location alternatives:
Adjusting the feet
Condensation water (TDC44)
Air extraction (TDC33)
Connection to the tumble drier
Connection to exhaust duct
Examples of installations
Installation in warm climates
Condensation problems
Electrical installation
Doorhanging
Left hanging to right hanging
Right hanging to left hanging
Fault tracing
Problems
Components and measurements
Test program and fault indications
Test program
Internal counter
Fault indications
Consumption values
TDC33
TDC44
Tools
List of tools
Application areas
Special tools
Service
Top cover
Removing the top cover
Installing the top cover
Changing the guides
Removing the rear panel
Installing the rear panel
Removing the inner and outer rear
panels
Installing the inner and outer rear
panels
Changing the foam rubber seal
2
5
6
7
7
8
9
9
9
11
11
12
12
12
12
13
13
14
15
15
17
19
21
22
26
26
26
26
27
27
28
29
29
30
32
33
33
33
33
33
34
34
35
35
36
Changing the bearing
Changing the rear felt strip seal
Changing/cleaning the heating element
Changing the overheating protection
device
Input terminal block
Removing the input terminal block
Installing the input terminal block
Removing the radio interference filter
Installing the radio interference filter
Contactor
Removing the contactor
Installing the contactor
Fuse
Changing the fuse
Changing the fuse holder/insert
Drum
Removing the drum
Installing the drum
Changing the drive belt
Changing the drum ridge
External fan housing (TDC44)
Removing the external fan housing
Installing the external fan housing
Cleaning the external fan wheel
Motor
Removing the motor
Installing the motor
Changing the capacitor
Air extraction system
Removing the exhaust air duct hook
Installing exhaust air duct hook
Removing the exhaust air duct T-piece
Installing the exhaust air duct T-piece
Humidity sensor
Removing the humidity sensor
Installing humidity sensor
Thermistor
Removing the thermistor
Installing the thermistor
Front frame
Removing the front frame
Installing the front frame
Changing the front felt seal
Changing the support roller
36
37
37
38
39
39
39
40
40
41
41
41
42
42
42
43
43
43
43
44
45
45
45
45
46
46
46
47
48
48
48
48
48
49
49
49
50
50
50
51
51
51
52
52
TABLE OF CONTENTS
Front door
53
Removing the front door
53
Installing the front door
53
Changing the hinge pin
53
Changing the hinge socket
54
Changing the door magnet/escutcheon
plate
54
Changing the handle
54
Changing the inner door
55
Changing the outer door seal
55
Changing the inner door seal
55
Changing/cleaning the filter holder
56
Changing the door switch
56
Changing the door switch pin
57
Front panel
58
Removing front panel
58
Installing front panel
58
Changing the fixing clip for the bottom
cover (female)
59
Changing the fixing clip for the bottom
cover (male)
59
Panel
60
Removing the panel
60
Installing the panel
60
Changing the panel handle
61
Changing the indication lamp/symbol
lens
61
Changing the main power button
62
Changing the push-button switches
63
Changing the DCU panel board and the
push-buttons
63
Electronic control unit
64
Changing the electronic control unit
64
Installing electronic control unit with its
holder
65
Condenser housing (TDC44)
66
Removing the condenser housing
66
Installing the condenser housing
66
Changing the condensed water pump 66
Changing the microswitch for the condensed water pump
67
Changing the foam rubber seal
67
Changing the float
68
Water tank housing (TDC44)
Removing water tank housing
Installing water tank housing
Changing the water tank handle
Side panels
Changing the side panels
Bottom
Changing the bottom
Front rail
Changing the front rail
Program and options
Programs
Drying time
Change settings
Language
Locking a programme
button
Child lock on
Program overview
Tumble drying
Cleaning and maintenance
Cleaning the fluff filter
Emptying the condensed water tank
(TDC44)
Cleaning the outside of the machine
Cleaning the fan
Cleaning the condenser (TDC44)
69
69
69
69
70
70
71
71
71
71
72
72
72
73
73
73
73
74
75
76
76
76
77
77
78
Drying guide TDC33
Drying guide TDC44
Circuit diagram
3
TABLE OF CONTENTS
4
SAFETY REGULATIONS
SAFETY REGULATIONS
GENERAL
• The electrical and plumbing installations shall
be carried out by a qualified electrician and
plumber respectively.
SERVICE
WARNING
Always switch off the main electrical power supply
when dismantling and assembling the washing
machine.
•
Always use an earthed EMC wristband when
working with electrical components, such as
panel printed circuit boards and electronic
control units.
TDC33: TRANSPORT/WINTER STORAGE
If the tumble drier is to be transported, or stored
for the winter in unheated premises, ensure that
the condensation water tank has no water in it.
DISPOSAL
When the tumble drier comes to end of its useful
life and is to be scrapped, it must be immediately
rendered unusable.
Contact your local authority to find out how the
tumble drier should be scrapped and recycled properly.
The tumble drier is manufactured and labelled
for recycling.
5
SPECIFICATIONS
SPECIFICATIONS
PRINCIPAL DIMENSIONS
Height:
Width:
Depth:
Weight:
TDC33
TDC44
850 mm
595 mm
585 mm
39 kg
47 kg
VOLUME/CAPACITY
Drum volume:
Drying capacity :
Speed:
111 litres
5.0 kg
52 rpm
ELECTRICAL CONNECTION ALTERNATIVES
Power consumption:
Heating element power:
See type label
See type label
Drying drum material:
Stainless steel.
Outer casing material:
Powder-painted and hot galvanised steel plate
or stainless steel.
Installation:
Tower, free-standing or built-in.
Drain
TDC44:
Air extraction hose
TDC33:
6
2.0 m rubber hose
3.0 m PVC
THE DRYING PROCESS
THE DRYING PROCESS
TDC33
Air at room temperature is heated by the heating
element and drawn into the drum, where it extracts the dampness from the clothes. The ridges
in the drum prevent the clothes from sticking to
each other.
Air passes through the fluff filter in the front door,
through the exhaust system and out.
On the way through the air extraction system the
air passes a humidity sensor. The sensor measures
the amount of humidity in the clothes. If you are
using an automatic program, the sensor indicates
when the clothes are dry.
7
THE DRYING PROCESS
TDC44
The condensing tumble drier has two circulation
systems: one for drying air and one for cooling
air. The black arrows show the warm drying air,
and the white arrows the cooling air at room temperature. The ridges in the drum prevent the clothes from sticking to each other. On the way through the air extraction system the air passes a
humidity sensor. The sensor measures the amount
of humidity in the clothes. If you are using an
automatic program, the sensor indicates when the
clothes are dry.
AIR DRIER
Air at room temperature is heated by the heating
element and passes through the drum, where it
blows through the clothes and extracts the dampness from them.
The air is filtered through the fluff filter in the
front door, goes down to the fan and onwards to
the condenser unit.
On its way through the condenser the saturated
air releases its water content. The extracted water
falls into a holder, from which it is either pumped up to a water tank or taken out via a drain
hose to a floor drain or similar.
COOLING AIR
The condenser is cooled by air at room temperature, drawn in through the rear of the machine.
The air is blown through the condenser and exhausts through a grille in the bottom hatch. If
the machine is built in, the air is drawn through
the gap between the floor and the bottom of the
machine.
8
INSTALLATION
INSTALLATION
TUMBLE DRIER LOCATION
A
TDC44
The tumble drier can be free-standing, built in or
part of a tower. Remember that the tumble drier
produces heat, and should therefore not be placed in too confined a space. If the tumble drier is
put into a very small room, because of the limited amount of air, the drying process will take
longer.
NOTE
To improve the air circulation, leave the door leading into the room where the tumble drier is
placed open.
B
WARNING
The electrical installation must be carried out by
a qualified tradesman.
min 600
min 850
140
A. Free-standing
The tumble drier can be placed on the floor, either
on its own or up against a wall or cupboard.
B. Built-in
The tumble drier can be built in under a work
top with a minimum working height of 850 mm.
The width of the opening must be at least 600
mm.
103
120
LOCATION ALTERNATIVES:
135
C
C. Washing tower
The tumble drier can be placed on top of an ASKO
washing machine. The tumble drier is fastened
securely and prevented from moving by the tower fasteners that come with the machine:
2 off angle pieces.
2 off plastic cups.
A pull-out worktop is available as an accessory
(Part no. 80 619 07-0 - white, 80 619 07-26 black), available for purchase from your local
ASKO dealer. A mounting kit for decor frame
(Art. no. 80 639 81) is available for purchase from
your local ASKO dealer.
9
INSTALLATION
Install the tower configuration like this:
1. Unscrew and remove the outermost screws
from each side of the rear of the washing
machine.
2
1
2. Screw the angle pieces to the rear of the washing machine.
3. Secure the two plastic cups to the front edge
of the top cover.
WARNING
The plastic cups must be fitted, they secure the
front edge of the tumble drier.
Right side: Break off the left-hand tag from
one of the plastic cups and remove the paper
from the underside. Position the cup so that
the arm that sticks out is flush with the top
cover and press it firmly into place.
See Figure 3.
Left side: Break off the right-hand tag from
the other plastic cup and remove the paper
from the underside. Position the cup so that
the arm that sticks out is flush with the top
cover and press it firmly into place.
See Figure 3.
4. Position the tumble drier by fitting the two
angle pieces into the slots at the rear of the
tumble drier while keeping the front edge of
the tumble drier raised by 1 - 2 cm.
5. Lower the tumble drier so that its front feet
enter the plastic cups. Adjust the feet as necessary to straighten the tumble drier vertical.
10
3
INSTALLATION
ADJUSTING THE FEET
Screw the feet in or out until the tumble drier is
standing vertical and steady. Lock the feet by tightening their locking nuts.
CONDENSATION WATER (TDC44)
1
Alternative 1 (as delivered)
Condensation water is pumped up into the condensation water tank, which is pulled out and
emptied manually.
Alternative 3
By connecting the accompanying rubber hose to
the blue nipple and leading it to a sink or similar,
condensation water is pumped directly out to the
drain.
2
3
max 1000 mm
Alternative 2
By connecting the accompanying rubber hose to
the blue nipple and leading it down to a floor
drain, the condensation water is pumped directly
out to the drain.
11
INSTALLATION
AIR EXTRACTION (TDC33)
The exhaust air from the tumble drier should be
taken to an exhaust duct or a wall outlet with the
aid of the accompanying air extraction hose.
Connection to the tumble drier
The tumble drier has three possible air extraction
points: the rear, right or left side. On delivery one
of the holes is open, and the other two are closed
by covers.
The tumble drier is delivered with a connecting flange (A), a plastic ring (B) and an air extraction hose (C).
ABC
Install the air extraction system as follows:
1. Push the air extraction hose on to the connecting flange and secure it with the plastic ring.
2. If necessary, remove the plastic cover from the
hole where you want to connect the hose.
3. Insert the connecting flange and air extraction
hose into the chosen hole.
4. Close the other two holes with the plastic
covers. Turn as illustrated.
Connection to exhaust duct
The air extraction hose must be routed the shortest possible way and as straight as possible from
the tumble drier to the exhaust duct. Cut the air
extraction hose if it is too long. If necessary the
air extraction hose can be extended by up to a
maximum of 8 metres (inner diameter 102 mm).
If a longer hose is needed, the inner diameter must
be increased in order to retain the fan capacity of
the tumble drier.
Any bends must be made as gentle as possible.
If 90º bends are necessary, there should be no more
than four. Each bend reduces the fan capacity of
the tumble drier.
If the air extraction hose leads to a wall outlet,
the entry of cold air can be cut down by installing
a ventilation grille (part no. 92 059 00). The ventilation grille can be installed either outside or
inside.
If there is only one exhaust duct leading from
the room a draught break (A) must be installed
(part no. 92 059 01).
NOTE
Each bend reduces the fan capacity of the tumble
drier. The same if the hose is too long.
12
Examples of
installations
A
INSTALLATION
Installation in warm climates
When installing in temperatures above 25°C
(77°F) with a high level of humidity, do not route
the air exhaust hose upwards.
The hose must always run downwards or stay
level with the tumble dryer.
Condensation problems
If the hose is long and the room is cold, condensation will form inside the hose. This is unavoidable.
If the air exhaust hose is slack, water may build
up at the low points, blocking he air flow.
To avoid water build-up in the hose or that
water runs back into the machine, drill a hole
(Ø3 mm) at the lowest point in the hose and
put a water collector underneath.
13
INSTALLATION
ELECTRICAL INSTALLATION
The electrical installation must be carried out by
a qualified tradesman.
The installation is made using fixed wiring and
a multi-pole breaker.
Connections on delivery
The machine is supplied, depending on market,
for one of the following supplies (see rating
plate):
A. 3-phase, 400V 50Hz supply 10A, heating power 2620/2500W.
B. Single-phase, 230V 50Hz supply 13/16A, heating power 2620/2500W.
TDC44 (Condenser tumble drier with display):
For the machine to show the correct remaining
drying time, after rewiring select the Low heating
power (or High if you rewire to 3-phase or
1-phase 16A).
Do this:
Switch off the mains power button,
, and
press it again to restart the machine.
Press the P8 button 5 times, then press the P2
button 5 times. These 10 button presses must be
done within 15 seconds.
Within 3 seconds of the last button press select
Low with the P6 P7 buttons.
Joint connection of the tumble drier and an
ASKO washing machine
C. Single-phase, 230V 50Hz supply 10A, heating power 1900W.
NOTE
If an earth fault breaker is installed, it should
be of type A.
Joint electrical connection as described below
must be carried out by a qualified tradesman.
Rewiring to single-phase
The machine can be reconfigured The machine
should be reconfigured as shown in the wiring
diagram underneath the top panel of the machine.
To ensure even loading of the phases when installing the tumble drier jointly with a single-phase
ASKO washing machine, the phases should be
connected like this:
IMPORTANT
Electrical connections/rewiring must be carried
out by a qualified tradesman.
Tumble drier:
Terminal labelled L1 to phase 1.
Terminal labelled L2 to phase 2.
Terminal labelled L3 to phase 2.
Washing machine:
Terminal labelled L to phase 3.
IMPORTANT
The electrical rewiring to 1-phase 10A is lengthen
the drying program.
14
DOORHANGING
DOOR HANGING
The tumble drier's front door can be adjusted to
hang on either the left or the right.
Tumble driers are normally delivered with the
door hanging on the left.
Left hanging to right hanging
1.
Keep the front door closed, it will be held in
position by the door magnet.
2.
Remove the bottom cover and unscrew the
3 screws that secure the hinge fixing.
3.
Tilt the hinge fixing so that it comes free from
the hinge socket in the front door.
4.
Lift down the front door.
2
2
3
5
5.
Change the hinge pin over.
6.
Then change over the hinge pin for the upper hinge.
7.
Then change over the plastic plugs and the
hinge sockets located on the upper and lower edges of the front door respectively. Use
a flat-bladed screwdriver.
8.
Half unscrew the two screws on the sides of
the front door.
9.
Then take out the door magnet and cover
washer.
Right side: Push the magnet/washer upwards
and pull them out.
Left side: Push the magnet/washer downwards and pull them out.
10. Fit the door magnet and cover washer.
7
7
9
11. Screw in the two screws on the sides of the
front door.
8
12. TDC44: Open the condenser housing cover.
15
DOOR HANGING
13. Remove the screw that is securing the front
panel at the bottom edge of the side where
the hinge will be installed.
14. Keep the front door in place with the door
magnet.
15. Install the hinge fixing in the order a,b,c,d.
16. Refit the screw that secures the front panel at
the bottom edge.
12
17. TDC44: Close the condenser housing cover.
18. Refit the bottom cover.
15
d
b
16
a
c
13
DOOR HANGING
Right hanging to left hanging
1.
Keep the front door closed, it will be held in
position by the door magnet.
2.
Remove the bottom cover.
3.
TDC44: Open the condenser housing cover.
4.
Remove the 3 screws that secure the hinge
fixing and the lower screw that secures the
front panel.
5.
Tilt the hinge fixing so that it comes free from
the hinge socket in the front door.
6.
Tighten the lower screw securing the front
panel.
7.
Lift down the front door.
8.
Change the hinge pin over.
9.
Then change over the hinge pin for the upper hinge.
10. Then change over the plastic plugs and the
hinge sockets located on the upper and lower edges of the front door respectively. Use
a flat-bladed screwdriver.
4
3
5
8
10
10
11. Half unscrew the two screws on the sides of
the front door.
12. Then take out the door magnet and cover
washer.
Right side: Push the magnet/washer upwards
and pull them out.
Left side: Push the magnet/washer downwards and pull them out.
13. Fit the door magnet and cover washer.
12
14. Screw in the two screws on the sides of the
front door.
15. Keep the front door in place with the door
magnet.
11
17
DOOR HANGING
16. Install the hinge fixing in the order a,b,c.
17. TDC44: Close the condenser housing cover.
18. Refit the bottom cover.
a
b
c
18
FAULT TRACING
FAULT TRACING
GENERAL
There is more information in chapter ”Test program and fault indications”
ERROR MESSAGES
The display text field shows a message if a fault
occurs during the time the program is running.
The error messages that may be shown are:
THE MACHINE WILL NOT START
Maximum program time: When the machine
has been running for its maximum time (3 hours)
it will stop.
This can have several independent reasons, or a
combination of these.
Check
• that the outer lid is properly closed.
• that the mains power button is pressed in.
• if the child lock is activated. To start the tumble dryer when the child lock is activated, hold
in the
-button for 3 seconds. See Changing settings.
• that you have set the program or the desired
timer program correctly.
• that the condensation water tank is empty.
(TDC44)
• that if a power plug is used it is connected.
• that the fuses for the house electricity supply
are not blown. Change two of the fuses over.
It is not always visible from the outside when
a fuse is blown.
• that the overheating protection has not tripped, see below.
Start
OVERHEATING PROTECTION
The overheating protection switches off the tumble drier if the temperature is too high, e.g. because fluff is blocking the fluff filter. Clean the
filter, empty the condensation water tank and clean the condenser. Then reset the overheating protection by pressing on the rubber membrane at
the rear of the machine.
Overheating protection tripped even though
fluff filter and condenser unit have been
cleaned.
1. Fault in control unit
2. Fluff in internal fan wheel - clean also air ducts
and behind the element.
3. Motor overheating protection tripped.
1. Mains power fuse has blown
2. Fluff in the filter, condenser unit or fan hou
sing.
3. Incorrect connection to single phase, 10A
4. External air is restricted or blocked, resulting
in poor condensation
5. High ambient temperature + low heating ele
ment power + low drying temperature resul
ting in poor condensation
6. Low ambient temperature + low heating ele
ment power + low drying temperature so that
it is difficult to get the dampness out of the
clothes .
7. The washing has been spun dry at low speed,
i.e. less than 800 rpm
8. The washing has been taken out before the
program was completed. The machine was
then loaded with a new batch of washing. In
that case the control unit did not have time
to reset itself and the time was added to the
next drying cycle.
9. Damaged humidity sensor, its wiring or con
nections.
To remove the error message, switch off the machine or open its door.
Thermistor error: Thermistor fault, change thermistor.
Sensor error: Fault in the humidity sensor.
This error message may also appear if you run
the machine with laundry that is already dry, or
run it empty.
Open the door and the message should disappear.
Overfull: (TDC44) Means that the condensation
water tank is full. Empty it and restart. If the same
error message appears again, it can mean that the
19
FAULT TRACING
bottom water container is full, because the pump
or hoses are blocked or faulty. If the condensate
water is pumped straight out via the drain hose check that the hose is not kinked or blocked.
Other possible reasons:
Condenser water pump is blocked or burned out.
If the pump is burned out an associated fault will
be burned wiring in the control unit. Always check
first if the condenser water pump has burned out
before installing a new control unit.
See service bulletin Group 22 Number 21.
DISPLAY
Incorrect language on the display
If for some reason the language on the display has
changed, you can go back to the original language.
Earlier models had two versions of the machine
(Alternatives 1 and 2) but now all eleven languages are present in all machines.
Alternative 1: The languages you can choose
from are Danish, Finnish, French, Dutch, Norwegian and Swedish.
Alternative 2: The languages you can choose
from are English, French, Italian, Portuguese, Spanish and German.
To change the language, do this:
Switch off the mains power button,
, and
press it again to restart the machine.
Press the P8 button five times, then press the
P1
button five times. These 10 button presses
must be done within 15 seconds.
Within 3 seconds of last pressing the P1 button, use the P6 P7 buttons to step through to
the language you want.
The display is black
Check the overheating protection.
See Fault tracing ”Overheating protection”.
The display is lighting when a programme is
selected, but no characters or digits are
shown
No characters or digits are shown on the display
when a locked programme is selected.
To unlock a programme, see Changing settings.
20
PROBLEMS IF THE PROGRAM UNIT IS CHANGED
If the program unit is changed, check if the jumper is cut correctly. Cut J1 on TDC44. Do not
cut J2!
PROBLEMS
PROBLEMS
COMMON QUESTIONS AND PROBLEMS
Yhe machine only runs for 20 minutes?
1. Mains power fuse has blown.
2. Overheating, fluff blocking the filter, condenser unit or fan housing.
3. Overfilling: The display shows "Fault indication, filling"
4. The machine does not reach the measured
value of 1,8 mV within 15 minutes.
This can be due to:
- Incorrect connection to single phase = too
low heating element power (720 or 600 W)
- Incorrect connection of element to control
unit
- Incorrect connection in element terminal
block
- Humidity sensor not located in fan hous
ing
- Faulty humidity sensor
- Heating element open circuit
5. Drive belt running incorrectly on motor shaft
= too high drum speed > 56 rpm
The washing will not dry?
1. Air leakage around the moisture sensor sea will
cause incorrect drying operation. / Verify the
seal.
Tumble drying is taking too long
Check that the fluff filter is not blocked.
1. Check that the fluff filter is not blocked.
2. TDC44: check that condenser are not blocked.
3. Spinning the garments in the washing machine affects the drying time. Spin at at least 800
revolutions. A short spin cycle at 800 revolutions is not recommended.
4. A tumbler dryer has a very high air exchange
level. Small spaces can heat up quickly, prolonging the drying time. Be sure there is sufficient ventilation where the machine is
installed.As an example, open the doors to
other rooms.
5. Heating elements with low power (single phase, 10 A) also prolongs the drying time.
6. TDC33: The length of and number of bends
on the evacuation hose affects drying operation. Try to use a hose as short as possible and
if bending is needed soften the bends.
Low points in the hose can create water pockets and block the airflow.
2. Incorrect setting in moisture sensor. (The sensor is sensitive to impact)/ Replace it.
3. Air leakage at door seal will cause incorrect
drying operation. / Verify the seal.
4. Air leakage around the motor shaft (loose seal,
incorrect setting) will affect the drying result
when the “Iron dry” programme is used. /
Verify the seal.
Uneven drying results
1. Mixing different types of garments may result in uneven drying results. (E.g. thick terry
towels with thin garments of cotton/polyester)
2. The tumbler load also affects the drying result. If the tumbler is filled (5 kg) with e.g.
jeans, the drying result could be uneven. The
garments in the tumbler must have sufficient
space to tumble.
21
COMPONENTS AND MEASUREMENTS
COMPONENTS AND MEASUREMENT VALUES
MOTOR
50 Hz
Part no.:
80 618 24
Resistance of winding
Cabel marked white-blue:
24,5 W
Cabel marked white-red:
26,5 W
Voltage:
220/240 V
Current:
1,1 A, 270 W, 2850 rpm
60 Hz
Part no.:
80 618 95
Resistance of winding
Cabel marked grey-blue:
25,5 W
Cabel marked grey-red:
16,0 W
Voltage:
220/240 V
Current:
0,9 A, 200 W, 3300 rpm
The 2-pole motor is connected directly to the fan
for internal air, and via a gear to drive the drum.
On machines with condensers (TDC44) it also
drives the fan for external air.
All recistance values are ±7%.
CAPACITOR
Part no.:
80 542 68
The capacitor is located on the motor and has a
value of 8µF.
CONDENSATE WATER PUMP
HANNING
TDC44
Part no.:
Resistance:
25W
80 638 09
111 W
RADIO INTERFERENCE FILTER
Part no.:
80 585 58
Leakage current: 230 V/ 50 Hz 0.315 mA
The filter eliminates radio interference generated
by the machine.
22
INDICATION LAMP
Part no.:
80 070 73
Current:
1.68 mA, 230 V, 50 Hz
The lamp indicates that the main power switch is
set to on.
THERMISTOR
Part no.:
Resistance:
80 619 00
40-60 kW at 20°-30°C
The thermistor controls temperature regulation.
If the thermistor becomes short-circuited or disconnected from the control unit, the program
stops.
CONTACTOR
50 Hz
Part no.:
80 091 48
60 Hz
Part no.:
80 603 80
The contactor opens in case of overheating, when
the door is opened and at the end of the program.
COMPONENTS AND MEASUREMENT VALUES
OVERHEATING PROTECTION
Part no.:
80 084 87 (150°C manual)
The 150°C thermostat stops the program if the
temperature rises too high and has to be manually reset. This thermostat is also called the overheating protection.
HUMIDITY SENSOR
Part no.:
80 618 55
The humidity sensor is used to control the drying process. During operation the sensor output
signal is between 1 and 16 mVDC. Any other
value causes the program to stop.
PROGRAM CONTROL TDC44
Program unit
The control unit contains microprocessors to control the program, motor, heating element etc.
Part no.:
80 639 24
LIQUID CRYSTAL DISPLAY UNIT (Panel board)
The LC display unit include press buttons and
indications.
Part no.:
80 638 75 (ASKO)
Part no.:
80 637 29 (OEM)
DOOR SWITCH
Part no.:
50 531 07
The front-loading door operates a door switch,
and when this is open the program stops. If the
door has been opened and closed again during the
program, the machine must be restarted with the
start button.
OVERFILLING PROTECTION TDC44
Part no.:
80 526 43
If both of the tumble drier containers are overfilled, the program is halted by a switch located in
the lower container. The display indicates overfilling.
ELECTRICAL CONNECTIONS
The machine is supplied, depending on market,
for one of the following supplies (see rating
plate):
A. 3-phase, 400V 50Hz supply 10A, heating power 2620/2500W.
B. Single-phase, 230V 50Hz supply 13/16A, heating power 2620/2500W.
C. Single-phase, 230V 50Hz supply 10A, heating power 1900W.
The connection cable is 2.0 metres of RKK 5x1.5
mm 2.
23
COMPONENTS AND MEASUREMENT VALUES
HEATING ELEMENT
TDC33 2620 W
Part no.:
80 618 33
Resistance:
66.7/25.7 W
The element has a maximum power rating of
2620W but consists of two loops of 1900W and
720W, which permits rewiring from 2620W to
1900W.
Temperature ˚C
57
56
55
54
53
43
42
41
40
39
1+2
1
1+2
1
1+2
1
OFF
1
1+2
1
OFF
1
OFF
Normal Temperature
1+2
1
1+2
1
1+2
1
OFF
2
1+2
1
OFF
2
OFF
Low Temperature
1 = High Power Heater
2 = Low Power Heater
24
COMPONENTS AND MEASUREMENT VALUES
TDC44 2500 W
Part no.:
80 638 08
Resistance:
79,7/25 W
The element has a maximum power rating of
2500W but consists of two loops of 1900W and
600W, which permits rewiring from 2500W to
1900W.
Temperature ˚C
73
(68)
72
(67)
71
(66)
70
(65)
69
(64)
50
49
48
47
46
1+2
1+2
1
1
1+2
1+2
1
1
1+2
1
OFF
1
1+2
1
OFF
1
OFF
Normal Temperature
1+2
1
OFF
2
1+2
1
OFF
2
OFF
Low Temperature
1 = High Power Heater
2 = Low Power Heater
25
TEST PROGRAM AND FAULT INDICATIONS
TEST PROGRAM AND FAULT
INDICATIONS
TEST PROGRAM
The machine must be in its starting state (obtained by pressing the main power button).
Connect the jumper on the outputs ST4-1 and
ST4-2.
Start
P1
P2
Overfill condensation
water holder.
Maximum running time: Maximum running
time achieved, 3 hours.
Thermistor fault:
Thermistor fault.
Sensor fault:
Fault in humidity
sensor.
Start the test program.
Reasons for faults
TDC44: Start the condensation water
pump.
Open or short circuit in thermistor
Program stops and display shows "Thermistor
fault". The thermistor may have become disconnected or have an internal fault. A serviceable thermistor has a resistance of between 60 and 40 kW
at 20-30°C.
or wait for 60 seconds and the test proTemperature
gram will continue.
measured by
thermistor
Amplified voltage
value from humidity
sensor
The program heats, increasing the temperature
by 14° in max. 10 minutes, then allows it to cool
for 5 minutes (testing that the heating element is
working).
The value detected by the humidity sensor can
vary according to the environment and on
whether there is wet clothing in the tumble drier.
INTERNAL COUNTER
The electronic control unit contains an internal
counter of the number of drying cycles.
To show the number of drying cycles in the
display:
1. Switch off the power switch,
and connect
the jumper on the outputs ST4-1 and ST4-2.
2. Switch on the machine again.
3. Press the P8 -button five times.
The counter is shown on the display.
The counter disappear when the jumper is disconnected.
26
FAULT INDICATIONS
Overfill:
Thermistor not installed in fan housing
The heating element will remain switched in for
as long as the thermistor cannot detect the selected air temperature. This can lead to an excessively high air temperature in the drum.
Blocked filter
The overheating protection (150°C) will be tripped and the machine will stop. Reset is manual in
the back of the machine.
Humidity sensor not installed in fan housing
or control unit
The machine will stop after 20 minutes.
Incoming phase missing
• Error L1, the machine will stop after 20
minutes. Low heating element power (720 or
600W).
• Error L2, the machine will not start. Indication lamp not lit.
• Error L3, the machine operates but the run
ning time is too long (low heating element
power (1900W)).
380V between each phase and neutral
The fan motor stops after a few seconds. Overheating protection trips, heating element and control damaged.
CONSUMPTION VALUES
CONSUMPTION VALUES
TDC33
The following conditions apply for the consumption values stated below:
Incoming air temperature:
Incoming air humidity:
Drying temperature:
Heating element power:
20 °C
65 %
Normal ( )
Low ( )
2620 W
Cotton garments should, before tumble drying,
be spun at 1000 rpm (long spin drying) in an
ASKO washing machine.
Other garments (non-iron and acrylic) should,
before tumble drying, be spun at 800 rpm (short
spin drying) in an ASKO washing machine.
The consumption values may differ between
machines for differens markets. To get the values
for the machine, see the user guide for the machine.
27
CONSUMPTION VALUES
TDC44
The following conditions apply for the consumption values stated below:
Incoming air temperature:
Incoming air humidity:
Drying temperature:
Heating element power:
20 °C
65 %
Normal ( )
Low ( )
2500 W
Cotton garments should, before tumble drying,
be spun at 1000 rpm (long spin drying) in an
ASKO washing machine.
Other garments (non-iron and acrylic) should,
before tumble drying, be spun at 800 rpm (short
spin drying) in an ASKO washing machine
The consumption values may differ between
machines for differens markets. To get the values
for the machine, see the user guide for the machine.
28
TOOLS
TOOLS
LIST OF TOOLS
"Torx" spanners:
• T25
• T20
• T10
U-ring spanners:
• 11/16”
• 13 mm
• 8 mm
Socket screwdriver:
• 10 mm
Flathead screwdriver 6.5 - 7 mm
Star socket head screwdriver
Flat-nose pliers
29
TOOLS
APPLICATION AREAS
Top lid:
• torx T25
Rear piece:
• torx T25
• torx T20
• U-ring spanner 13 mm
• special tool (Part no. 72 816 15)
Input terminal block:
• torx T25
• torx T20
• U-ring spanner 8 mm
Radio interference filter:
• torx T25
• U-ring spanner 13 mm
Contactor:
• torx T25
• torx T20
Fuse holder:
• torx T25
• U-ring spanner 11/16"
Drum:
• torx T25
• torx T20
• socket spanner 10 mm
• special tool (Part no. 88 011 54)
External fan housing:
• torx T25
• torx T20
• socket spanner 10 mm
Motor:
• torx T25
• torx T20
• torx T10
• socket spanner 10 mm
• U-ring spanner 13 mm
• special tool (Part no. 88 011 54)
30
Humidity sensor:
• torx T25
• torx T20
• torx T10
• special tool (Part no. 88 011 54)
Thermistor:
• torx T25
• torx T20
• torx T10
• flat-nose pliers
• special tool (Part no. 88 011 54)
Front frame:
• torx T25
• torx T20
• torx T10
• socket spanner 10 mm
• U-ring spanner 13 mm
• special tool (Part no. 88 011 54)
Front door:
• torx T25
• torx T20
• U-ring spanner 8 mm
• star socket head screwdriver
Front panel:
• torx T25
• torx T20
• torx T10
Panel:
• torx T25
• torx T20
• 6.5-7 mm wide blade screwdriver
Electronic control unit:
• torx T25
Condenser housing:
• torx T25
• torx T20
• socket spanner 10 mm
• special tool (Part no. 88 011 54)
TOOLS
Water tank housing:
• torx T25
• torx T20
Side panels/Bottom:
• torx T25
• torx T20
• torx T10
• 6.5-7 mm wide blade screwdriver
Front panel:
• torx T25
• torx T20
• 6.5-7 mm wide blade screwdriver
31
SPECIAL TOOLS
SPECIAL TOOLS
INSTALLING THE DRUM TD20
Part no. 88 011 54
The tool hangs in one of the punched-out keyholes in the front rail, then the rear edge of the
drum is rolled up on to the roller and the drum is
held in place.
INSTALLATION OF FELT STRIP SEAL
Part no. 72 816 15
This tool is used to tighten the tensioning band
around the felt strip seal.
32
SERVICE
SERVICE
TOP COVER
1
Removing the top cover
1. Remove the 3 screws at the rear of the top
cover.
2. Tilt the cover and pull it backwards.
Installing the top cover
1. Ensure that the sealing strip is positioned along
the edge of the top cover.
2. Push the front edge of the top cover under
the panel and lower the cover.
3. Secure the top cover with the 3 screws at the
rear.
1
3
Changing the guides
1. Remove the top cover.
2. Squeeze the latches together and pull or push
the guide upwards.
3. Push the new guide into place.
4. Secure the top cover with the 3 screws at the
rear.
33
SERVICE
Removing the rear panel
1. Remove the 3 screws at the rear of the top
cover and lift it off.
2. Unscrew the centring nut until the face of the
nut is level with the end of the thread and
knock out the bearing.
3. Fit the special tool (part no. 88 011 54) by
fitting the tube end into one of the stamped
out keyholes in the front rail. Lift the rear edge
of the drum and press the drum edge on to
the roller.
4. Remove the earth connection (yellow/green
wire) from the input terminal block.
5. Take the cable bundle out of the cable clamp
and pull the header block off its terminal pins.
6. Remove the wiring:
Ra, Rb, R13, R14, R34 on the contactor and
F3 and F4 on the radio interference filter.
7. TDC44: Remove the hoses to the water tank
housing.
8. Remove the centring nut and the 8 screws.
9. TDC44: Remove the 3 plastic screws.
10. Lift off the rear panel.
Installing the rear panel
11. Hook the rear panel on to the base.
12. Remove the special tool.
13. Screw on the centring nut and fit the 8 screws.
14. TDC44: Refit the hoses.
15. Fit the earth connection and the wiring:
Ra, Rb, R13, R14, R34 on the contactor and
F3 and F4 on the radio interference filter.
16. Push the header block on to its terminal pins
and place the cable bundle in the cable clamp.
17. Fit the top cover.
3
4
6
5
8
2,8
9
34
SERVICE
Removing the inner and outer rear panels
1. Remove the rear panel in accordance with the
section "Rear panel - removing...".
2. Remove the screws that secure the inner rear
panel to the outer, and the cable clamp.
3. Lift them apart.
2
IMPORTANT
The bearing is now free and can be removed.
Installing the inner and outer rear panels
4. Put the inner rear panel on to the drum shaft
and feed it on to the bearing.
5. Offer up the outer rear panel and secure it with
the screws to the inner rear panel, along with
the cable clamp.
3
WARNING
It is important that the wiring bundle runs along
its groove.
6. Secure the rear panel to the side panels and
bottom. Install the remaining wiring in accordance with the electrical schematic diagram
and fit the top cover.
7. Tighten the centring nut.
35
SERVICE
Changing the foam rubber seal
1. Remove the 3 screws at the rear of the top
cover and lift it off.
2. Remove the screws that secure the rear panel
sides and bottom.
3. Remove the screws that secure the inner and
outer rear panels.
4. Lift off the outer rear panel.
5. Change the foam rubber seal.
6. Put the outer rear panel in place.
7. Secure the rear panels to each other.
8. Secure the rear panels to the machine.
9. Fit the top cover.
Changing the bearing
1. Remove the rear panel in accordance with the
section "Rear panel - removing...".
2. Remove the screws that secure the inner and
outer rear panels, also the cable clamp.
3. Lift them apart.
4. Change the bearing.
5. Put the inner rear panel and the bearing on
the shaft.
6. Offer up the outer rear panel and secure the
inner rear panel to it, along with the cable
clamp.
WARNING
It is important that the wiring bundle runs along
its groove.
7. Remove the special tool.
8. Secure the rear panel to the side panels and
bottom. Install the remaining wiring in accordance with the electrical schematic diagram
and refit the disconnected cables, and the top
cover.
9. Tighten the centring nut.
36
2,3
5
4
SERVICE
Changing the rear felt strip seal
1. Remove the rear panel in accordance with the
section "Rear panel - removing...".
2. Lift off the felt strip seal.
3. Thread the new felt strip into place.
4. Tighten the tensioning band around the felt
strip, using the special tool.
5. Fold over the felt strip.
3. Fit the rear panel in accordance with the section "Rear panel - installing...".
5
3
4
Changing/cleaning the heating element
1. Remove the three screws at the rear edge and
lift off the top cover.
2. Remove the screws that secure the rear panel
to the sides and bottom.
3. Remove screws that secure the inner and outer rear panels, along with the cable clamp.
4. Lift off the outer rear panel.
5. Unscrew the heating element.
6. Install a new heating element or clean the old
one.
7. Secure the heating element.
8. Put the outer rear panel in place.
9. Secure the rear panels to each other.
10. Secure the rear panels to the machine.
11. Fit the top cover.
2,3
5
37
SERVICE
Changing the overheating protection device
1. Remove the three screws at the rear edge and
lift off the top cover.
2. Remove the screws that secure the rear panel
to the sides and bottom.
3. Remove the screws that secure the inner and
outer rear panels, along with the cable clamp.
4. Lift off the outer rear panel.
5. Unscrew the overheating protection device.
6. Fit the new overheating protection device.
7. Secure the overheating protection device.
8. Put the outer rear panel in place.
9. Secure the rear panels to each other.
10. Secure the rear panels to the machine.
11. Fit the top cover.
2,3
5
38
SERVICE
INPUT TERMINAL BLOCK
Removing the input terminal block
1. Remove the three screws at the rear edge and
lift off the top cover.
2. Remove the earth screw.
3. Remove all the wiring.
4. Press in the latches with a screwdriver and pull
out the input terminal block.
4
3
NOTE
Ensure that the right wires go to the right places
when changing the input terminal block and the
wiring.
2
Installing the input terminal block
5. Fit the input terminal block, the latches must
snap on to the edge of the plate.
6. Install the wiring in accordance with the electrical schematic diagram.
7. Secure the earth screw.
8. Fit the top cover.
39
SERVICE
RADIO INTERFERENCE FILTER
Removing the radio interference filter
1. Remove the three screws at the rear edge and
lift off the top cover.
2. Disconnect the wiring from the radio interference filter.
3. Unscrew the nut securing the filter.
2
Installing the radio interference filter
4. Fit the radio interference filter.
5. Install the wiring in accordance with the labels on the wires and filter.
3
IMPORTANT
Connect the wires to the correct flat pin connectors.
6. Fit the top cover.
F3
F1
40
F4
F2
SERVICE
CONTACTOR
Removing the contactor
1. Remove the three screws at the rear edge and
lift off the top cover.
2. Remove the wiring to the contactor.
3. Unscrew the 2 screws that secure the contactor.
2
Installing the contactor
4. Fit the contactor.
5. Install the wiring in accordance with the labels on the wires and contactor.
IMPORTANT
3
Connect the wires to the correct flat pin connectors.
6. Fit the top cover.
Ra/R1 a
Rb/R1 b
R13/R1 13
R14/R1 14
R23/R1 23
R24/R1 24
R33/R1 33
R34/R1 34
R34/R1 43
R44/R1 44
41
SERVICE
FUSE
2
Changing the fuse
1. Remove the fuse holder insert with a screwdriver (1/4 turn).
2. Change the fuse.
IMPORTANT
The fuse must be of 250V and 6.3 Ampere type.
3. Fit the fuse holder insert with the fuse into
the fuse holder.
Changing the fuse holder/insert
1. Remove the three screws at the rear edge and
lift off the top cover.
2. Remove the wiring that goes to the fuse holder.
3. Remove the fuse holder insert with a screwdriver (1/4 turn).
4. Unscrew the fuse holder.
5. Fit the new fuse holder.
6. Connect the wiring.
7. Install the fuse holder and its insert.
8. Fit the top cover.
42
3
2
3
4
SERVICE
DRUM
Removing the drum
1. Remove the rear panel in accordance with the
section "Rear panel - removing...".
2. TDC44: Remove the external fan housing in
accordance with the section " External fan housing - removing..." steps 2-4.
3. Remove the special tool.
4. Remove the belt from the belt tensioner.
5. Lift out the drum while taking off the belt.
Installing the drum
6. Feed the belt over the drum.
7. Feed the belt on to the motor shaft and over
the belt tensioner.
8. Offer up the drum against the front frame
and install the special tool.
9. TDC44: Install the external fan housing in
accordance with the section " External fan housing - installing..." steps 5-7.
10. Install the rear panel in accordance with the
section "Rear panel - installing...".
5
Changing the drive belt
1. Remove the rear panel in accordance with the
section "Rear panel - removing...".
2. TDC44: Remove the external fan housing in
accordance with the section " External fan housing - removing..." steps 2-4.
3. Remove the special tool.
4. Remove the belt from the belt tensioner and
take off the belt.
5. Feed the belt over the drum, on to the motor
shaft and over the belt tensioner.
6. Install the special tool.
7. TDC44: Install the external fan housing in
accordance with the section " External fan housing - installing..." steps 5-7.
8. Install the rear panel in accordance with the
section "Rear panel - installing...".
43
SERVICE
Changing the drum ridge
1. Remove the three screws at the rear edge and
lift off the top cover.
2. Unscrew the 5 screws that secure the drum ridge.
NOTE
Rotate the drum until you can gain access to the
screws.
3. Secure the new drum ridge.
WARNING
The drum ridges must be installed in each direction, see the illustration.
4. Fit the top cover.
44
2
SERVICE
EXTERNAL FAN HOUSING (TDC44)
Removing the external fan housing
1. Remove the rear panel in accordance with the
section "Rear panel - removing...".
2. Unclip the external fan housing suction side.
3. Unscrew the external fan wheel and remove
it.
4. Lift and pull towards you the external fan
housing motor side.
2
Installing the external fan housing
5. Push the external fan housing motor side on
to the motor shaft until the snap fastener locks
at the bottom.
6. Install the fan wheel.
7. Install the external fan housing suction side.
IMPORTANT
4
The snap fasteners must clip securely into place.
8. Install the rear panel in accordance with the
section "Rear panel - installing...".
3
Cleaning the external fan wheel
1. Open the cover and pull out the condenser
assembly.
2. Put you arm in, bend the pins out of the way
and clean inside.
NOTE
You can also clean the fan wheel by removing the
rear panel.
1
45
SERVICE
MOTOR
Removing the motor
1. Remove the drum in accordance with the section "Drum - removing...".
2. Take off the bottom cover (snap fasteners).
3. Remove the fan housing cover (4 snap fasteners and 1 screw).
4. Unscrew the fan wheel.
5. TDC44: Remove the external fan housing in
accordance with the section "External fan housing - removing..." steps 2-4.
6. Disconnect the wiring in the switch housing
on the motor, and the earthing wire.
7. Unscrew the 4 screws securing the motor to
the bottom plate.
2
5
NOTE
To gain access to the screws the belt tensioner can
be lifted off.
6
8. Lift out the motor.
3
Installing the motor
9. Align the motor with the four holes and secure it.
10. Connect the wiring.
IMPORTANT
Don't forget to put the belt tensioner back.
11. Install the fan wheel and the cover for the fan
housing.
12. Put the bottom cover back.
13. TDC44: Install the external fan housing in
accordance with the section "External fan housing - installation..." steps 5-7.
14. Install the drum in accordance with the section "Drum - installation...".
46
4
SERVICE
Changing the capacitor
1. Remove the rear panel in accordance with the
section "Rear panel - removing...".
2. TDC44: Remove the external fan housing in
accordance with the section "External fan housing - removing..." steps 2-4.
3. Unscrew the capacitor.
4. Install a new capacitor and connect the wiring.
IMPORTANT
Ensure the wiring connections are correct.
5. TDC44: Install the external fan housing in
accordance with the section "External fan housing - installation..." steps 5-7.
6. Install the rear panel in accordance with the
section "Rear panel - installation...".
3
47
SERVICE
AIR EXTRACTION SYSTEM
Removing the exhaust air duct hook
1. Remove the bottom cover.
2. Take hold of the duct hook and twist it free.
1
Installing exhaust air duct hook
3. Push one end into the exhaust air duct T-piece.
4. Press it on to the exhaust front lip.
2
Removing the exhaust air duct T-piece
1. Remove the exhaust air duct hook.
2. Take off the two exhaust covers from the side
and/or rear panels by pressing with a screwdriver on the three latches. On machines produced after week 50 1999 the exhaust covers
should be unscrewed.
3. Lift out the exhaust air duct T-piece.
2
Installing the exhaust air duct T-piece
4. Position the exhaust air duct T-piece on the
bottom.
5. Install both exhaust covers.
IMPORTANT
The covers must be connected to the T-piece outlets.
6. Install the exhaust air duct hook.
48
3
SERVICE
HUMIDITY SENSOR
Removing the humidity sensor
1. Remove the three screws at the rear edge and
lift off the top cover.
2. Take off the bottom cover (snap fasteners).
3. Use a screwdriver to remove the plugs.
4. Remove the cover for the fan housing (4 snap
fasteners and 1 screw).
5. Unscrew the 2 screws that secure the sensor to
the cover.
6. Lift out the humidity sensor.
2
NOTE
To check if the humidity sensor is faulty, a new
sensor can be installed in the fan housing, with its
wire taken outside the machine to the control
board/programmer.
7. Remove the drum in accordance with the section "Drum - removing...".
8. Remove the humidity sensor from the control board and the wiring from the front frame.
9. Pull out the sensor's connecting cable.
3
4
6
Installing humidity sensor
10. Route the humidity sensor's connecting cable
up to the control board.
11. Secure the cable in the cable clamps and connect the plug to the control board.
12. Install the drum in accordance with the section "Drum - installation...".
13. Install the strip seal on the humidity sensor.
14. Secure the humidity sensor inside the cover
and protection.
15. Install the plugs and the cover for the fan housing.
16. Install the bottom and top covers.
IMPORTANT
Always install new strip seal when the humidity
sensor is changed.
49
SERVICE
THERMISTOR
Removing the thermistor
1. Remove the three screws at the rear edge and
lift off the top cover.
2. Take off the bottom cover (snap fasteners).
3. Remove the protection.
4. Take out the thermistor with the aid of flatnose pliers.
2
NOTE
To check if the thermistor is faulty, a new thermistor can be installed in the fan housing, with
its wire taken outside the machine to the control
board/programmer.
5. Remove the drum in accordance with the section "Drum - removing...".
6. Remove the thermistor from the control board
and the cable from the front frame.
7. Pull out the thermistor's connecting cable.
Installing the thermistor
8. Route the thermistor's connecting cable up
to the control board.
9. Secure the cable in the cable clamps and connect the plug to the control board.
10. Install the thermistor.
NOTE
The rubber seal for the thermistor must provide
a very tight seal
11. Install the drum in accordance with the section "Drum - installation...".
12. Install the protection, bottom and top covers.
50
3
SERVICE
FRONT FRAME
Removing the front frame
1. Remove the motor in accordance with the
section "Motor removing...".
2. TDC33: Remove the hooked exhaust duct
by twisting it free.
3. Remove the wire bundle from the cable
clamps on the front frame.
4. Remove the fan housing cover (4 snap fasteners and 1 screw).
5. Take out the thermistor with the aid of flatnose pliers.
6. Open the front door.
7. Unscrew the 4 screws that secure the front frame to the front panel.
8. Lift out the front frame.
6
8
7
Installing the front frame
9. Offer up the front frame against the front
panel.
10. Tighten the 4 screws that secure the front frame to the front panel.
11. Install the thermistor.
12. Install the fan housing cover (4 snap fasteners
and 1 screw).
13. Put the cable bundle into the cable clamps.
14. TDC33: Install the exhaust duct hook by pressing it on to the front frame exhaust lip.
15. Install the motor in accordance with the section "Motor installation...".
51
SERVICE
Changing the front felt seal
1. Remove the drum in accordance with the section "Drum - removing...".
2. Remove the seal.
3. Install the new seal evenly distributed around
the groove.
IMPORTANT
2
The strip seal must be pressed firmly all around
the groove. Irregular fitted strip seal can cause
unwanted noice.
4. Install the drum in accordance with the section "Drum - installation...".
Changing the support roller
1. Remove the front frame in accordance with
the section "Front frame - removing...".
2. Unscrew the support roller.
3. Install the new support roller.
4. Install the front frame in accordance with the
section "Front frame - installation...".
52
2
SERVICE
FRONT DOOR
Removing the front door
NOTE
The front door must remain closed during the
entire removal procedure; the door magnet will
hold it in place.
2. Unscrew and remove the 3 screws that secure
the hinge fixture.
3. Lift down the front door.
2
2
3
Installing the front door
4. Offer up the front door against the hinge socket in the panel.
5. Close the front door so that the door magnet
holds it in place.
6. Put the hinge pin into its socket.
7. Tighten the 3 screws that secure the hinge fixture.
8. Install the bottom cover
Changing the hinge pin
1. Remove the front door.
2. Unscrew the hinge pin.
2
NOTE
The illustration shows the lower hinge fixture.
The hinge pin is installed in a similar manner in
the upper hinge fixture.
3. Install the hinge pin.
4. Install front door.
53
SERVICE
Changing the hinge socket
1. Remove the three screws that secure the lower hinge and twisting it free, take off the
front door.
2. Change the hinge socket.
3. Hang the front door back on with the aid of
the door magnet and secure the hinge.
2
Changing the door magnet/escutcheon plate
1. Half unscrew the screws in the side of the front
door.
2. Door magnet: Push the door magnet upwards and pull it outwards.
3. Escutcheon plate: Press the plate down and
pull it outwards.
4. Install a new magnet/escutcheon plate and
tighten the screws.
2,3
1
Changing the handle
1. Remove the three screws that secure the lower hinge and twist it free, lift off the front
door.
2. Unscrew the 3 screws that secure the handle
to the front door.
3. Offer up the new handle.
4. Secure the handle with the 3 screws.
5. Put the front door back on, keep it in position with the aid of the door magnet, and secure the hinge.
54
2
SERVICE
Changing the inner door
1. Remove the three screws that secure the lower hinge and twist it free, lift off the front
door.
2. Unscrew the handle.
3. Unscrew the 2 screws at the side of the front
door and the 3 at the lower edge.
4. Lift out the inner door with the filter holder.
5. Offer up the new inner door to the front door.
6. Secure the 2 screws at the sides of the front
door and the 3 at the lower edge.
7. Fit the handle.
8. Put the front door back on, keep it in position with the aid of the door magnet, and secure the hinge.
2
3
3
3
2
Changing the outer door seal
1. Open the front door.
2. Pull the seal out of its groove.
3. Fit a new seal.
NOTE
You can use soapy water to make installation easier.
IMPORTANT
Press the seal firmly down into its groove.
3
Changing the inner door seal
1. Open the front door.
2. Open the filter holder.
3. Peel the strip off the edge.
4. Install a new strip by easing it over all round
the edge.
55
SERVICE
Changing/cleaning the filter holder
1. Open the front door.
2. Pull out the filter holder and take out the
double filter.
3. Squeeze the snap fasteners inwards while at
the same time lifting the filter holder out of
the inner door.
IMPORTANT
Take care when lifting the filter holder out not to
damage it.
2
NOTE
Clean the filter holder if necessary.
4. Install it by first inserting the snap fasteners at
the top edge of the inner door.
5. Then push in the lower edge.
3
3
Changing the door switch
1. Remove the three screws at the rear edge and
lift off the top cover.
2. Bend up the protection.
3. Prise off the door switch with the aid of a
screwdriver.
4. Transfer the wiring to the new door switch
and connect it up.
5. Bend down the protection.
6. Fit the top cover.
56
3
2
SERVICE
Changing the door switch pin
1. Drill a 4 mm diameter hole where the old pin
was.
2. Fit a door switch pin (part no.: 80 642 40)
into the hole.
11
IMPORTANT
Fit the pin so that it projects by 11 mm.
57
SERVICE
FRONT PANEL
Removing front panel
1. Remove the three screws at the rear edge and
lift off the top cover.
2. Remove the three screws that secure the lower hinge and twist it free, lift off the front
door.
3. Unscrew the 4 screws that secure the front frame to the front panel.
4. Unscrew the 4 screws that secure front panel
to the side panels.
5. Unscrew the 2 screws that secure the bottom
edge of the front panel.
6. Lift off the front panel.
Installing front panel
7. Put the front panel into position.
8. Secure the 4 screws from the inside in the side
panels.
9. Put the front door back on, keep it in position with the aid of the door magnet, and secure the hinge.
.
10. Secure the 2 screws that secure front panel at
the bottom edge.
IMPORTANT
Don't forget the 2 star washers.
11. Secure the 4 screws that secure the front frame to the front panel.
12. Fit the top cover.
58
4
6
5
SERVICE
Changing the fixing clip for the bottom cover
(female)
1. Remove the bottom cover.
2. Squeeze the snap fasteners and pull or push
out the clip.
3. Install a new clip.
4. Install the bottom cover.
Changing the fixing clip for the bottom cover
(male)
TDC33, Left TDC44:
1. Remove the bottom cover.
2. Squeeze the snap fasteners and pull or push
out the clip.
3. Install a new clip.
4. Install the bottom cover.
Right TDC44:
1. Remove the bottom cover.
2. Remove the condenser housing in accordance
with the section "Condenser housing - removing...".
3. Squeeze and pull or push out the clip.
4. Install a new clip.
5. Install the condenser housing in accordance
with the section "Condenser housing - installation...".
6. Install the bottom cover.
ge
han
c
n
bee later.
!
s
T
a
A N m cover6/h2000 oNr o.47.
T
4
22
to
ORe:
bot d week roup
P
e
IM e chang n of thfacture ation G
Lat desig manu inform
The c h i n e s e r v i c e
ma o see s
Als
n
do
59
SERVICE
PANEL
Removing the panel
1. Remove the three screws at the rear edge and
lift off the top cover.
4
5
2. TDC44: Pull out the water tank.
3. TDC44: Unscrew the 2 screws that secure the
panel to the front rail.
4. TDC33: Unscrew the 2 screws securing the
front rail.
5. Remove the 4 snap fasteners at the bottom
edge by bending the clips apart with a screwdriver with a 6.5 to 7 mm wide blade. Unhook the panel.
WARNING
Take care when bending the clips apart not to
damage the plastic snap fasteners in the panel.
Installing the panel
6. Hook on the top edge of the panel and snap
closed the 4 snap fasteners at the bottom edge.
IMPORTANT
Support the centre with a screwdriver as the panel is pressed into place.
7. Refit the removed parts.
60
3
2
SERVICE
Changing the panel handle
1. Remove the three screws at the rear edge and
lift off the top cover.
2. TDC33: Unscrew the 2 screws securing the
front rail.
3. Pull the handle off.
4. Fit the handle.
5. Fit the top cover.
Changing the indication lamp/symbol lens
1. Remove the panel in accordance with the section "Panel - removing...".
2. Change the indication lamp/symbol lens.
3. Install the panel in accordance with the section "Panel - installation...".
2
2
61
SERVICE
Changing the main power button
1. Remove the panel in accordance with the section "Panel - removing...".
2. Press in the latches with a screwdriver and pull
out the button.
3. Install the new button.
IMPORTANT
Ensure that the spring is located in the button
before installation.
4. Install the panel in accordance with the section "Panel - installation...".
62
2
SERVICE
Changing the push-button switches
1. Remove the panel in accordance with the section "Panel - removing...".
2. Get hold of the switch inside the machine and
pull on it, while at the same time bending the
wings at the front of the switch inwards with
a screwdriver.
2
IMPORTANT
Connect the correct wire to the correct terminal.
3. Press in the new push-button and check that
the wings open out.
4. Install the panel in accordance with the section "Panel - installation...".
2
Changing the DCU panel board and the pushbuttons
WARNING
An earthed EMC wristband must be worn at all
times when working with electronic components
to prevent damage to them.
3
1. Remove the three screws at the rear edge and
lift off the top cover.
2. Remove the panel in accordance with the section "Panel - removing...".
3. Remove the panel board from the snap fasteners with the aid of a screwdriver.
4. Lift out the panel board and the button sheet
with the push-buttons.
5. Install the push-buttons and the panel board.
6. Install the panel in accordance with the section "Panel - installation...".
7. Fit the top cover.
4
63
SERVICE
ELECTRONIC CONTROL UNIT
3
WARNING
An earthed EMC wristband must be worn at all
times when working with electronic components
to prevent damage to them.
Changing the electronic control unit
1. Remove the three screws at the rear edge and
lift off the top cover.
2. Remove the wiring from the integral cable
clamps in the electronic control unit holder.
3. Unclip the electronic control unit from its
holder.
4. Remove all the wiring from the control unit.
WARNING
Ensure that all wires and connection blocks are
connected correctly.
5. Connect all the wiring to the new control unit.
6. Check the jumpers on the new control unit.
For TDC44: J1 should be cut.
J2 should never be cut.
For more information, see Circuit Diagram.
7. Snap the control unit into its holder.
8. Fit the top cover.
64
3
2
SERVICE
Removing the electronic control unit with its
holder
1. Remove the three screws at the rear edge and
lift off the top cover.
2. Remove the panel in accordance with the section "Panel - removing...".
3. Press in the 2 snap fasteners.
4. Move the assembly sideways and remove it.
5. Remove the wiring.
Installing electronic control unit with its
holder
6. Install the wiring in accordance with its labels.
7. Offer up the holder to the front rail.
3
4
IMPORTANT
Fit the 4 hooks into the square holes in the front
rail.
8. Move the holder sideways so it snaps into place.
9. Install the panel in accordance with the section "Panel - installation...".
10. Fit the top cover.
IMPORTANT
If the latches are broken the holder can be fasten
with screws.
65
SERVICE
CONDENSER HOUSING (TDC44)
Removing the condenser housing
1. Remove the drum in accordance with the section "Drum - removing...".
2. Remove the external fan housing in accordance
with the section "External fan housing - removing...".
3. Remove the snap fasteners with the aid of a
screwdriver.
4. Lift out the condenser assembly.
4
Installing the condenser housing
5. Position the condenser housing on the bottom.
3
IMPORTANT
Ensure that the condenser housing is secured to
the bottom.
6. Install the external fan housing in accordance
with the section "External fan housing - installation...".
7. Install the drum in accordance with the section "Drum -installation...".
3
Changing the condensed water pump
1. Remove the rear panel in accordance with the
section "Rear panel - removing...".
2. Remove the 4 screws that secure the pump.
3. Lift out the pump.
4. Secure the new pump with the 4 screws.
5. Install the rear panel in accordance with the
section "Rear panel -installation...".
2
2
66
SERVICE
Changing the microswitch for the condensed
water pump
1. Remove the rear panel in accordance with the
section "Rear panel - removing...".
2. Remove the wiring and the microswitch.
3. Fit the new microswitch.
4. Install the rear panel in accordance with the
section "Rear panel - installation...".
Changing the foam rubber seal
1. Remove the rear panel in accordance with the
section "Rear panel - removing...".
2. Change the seal.
3. Install the rear panel in accordance with the
section "Rear panel - installation...".
2
2
67
SERVICE
Changing the float
1. Remove the drum in accordance with the section "Drum - removing...".
2. Remove the external fan housing in accordance
with the section "External fan housing - removing...".
3. Remove the snap fasteners with the aid of a
screwdriver and lift out the condenser assembly.
4. Remove the 4 screws that secure the condensed water pump.
5. Remove the 7 screws from around the edge.
6. Remove the foam rubber seal.
7. Take apart the two halves of the housing.
8. Change the float.
9. Screw the housing halves together.
7
8
5
5
NOTE
4
We recommend changing the foam rubber seal
every time the housing is dismantled.
10. Install the external fan housing in accordance
with the section "External fan housing - installation...".
11. Install the drum in accordance with the section "Drum -installation...".
68
6
3
4
SERVICE
WATER TANK HOUSING (TDC44)
Removing water tank housing
1. Pull out the water tank.
2. Remove the three screws at the rear edge and
lift off the top cover.
3. Remove the hoses.
4. Unscrew the 2 screws in the panel and the
screws in the rear panel.
5. Push the housing back and lift it out.
3
4
4
6
Installing water tank housing
6. Offer up the housing to its correct position.
7. Secure it to the panel and the rear panel.
8. Refit the hoses.
9. Fit the top cover.
10. Insert the water tank.
5
2
Changing the water tank handle
1. Pull out the water tank.
2. Remove the two plastic clips on the underside of the tank with the aid of a screwdriver.
3. Pull the handle off the tank.
4. Install the new handle by threading it through
the groove in the container. Press it to snap it
into place.
5. Refit the water tank.
3
69
SERVICE
SIDE PANELS
Changing the side panels
1. Remove the front panel in accordance with
the section "Front panel - removing...".
2. Remove the panel in accordance with the section "Panel - removing...".
3. Early models: the hole is marked out on the
bottom.
4. Early models: the hole is marked out on the
front rail.
5. Using a narrow chisel, cut off the rivet heads
(7) and break those on the front rail off with
a screwdriver (2).
6. Lift away the side panel.
7. File or grind smooth the places where the rivets were in the bottom and use a polygrip to
flatten the front rail.
4
5
5
WARNING
3
The edges of the bottom and the front rail where
the rivets were placed must be completely flat and
smooth.
8. Early models: Drill a 6.5 mm diameter hole
in the bottom at the marking.
9. Early models: Drill a 5 mm diameter hole in
the front rail at the marking.
10. Install 3 clips at the bottom of the side panels.
11. Screw the side plates to the bottom from underneath and to the front rail.
12. Install the front panel in accordance with the
section "Front panel -installation...".
13. Install the panel in accordance with the section "Panel -installation...".
70
10
SERVICE
BOTTOM
3
Changing the bottom
1. Remove the condenser housing in accordance
with the section "Condenser housing - removing..."
2. Early models: the hole is marked out on the
bottom.
3. Cut off the rivets between the bottom and
side panels.
4. Install 6 clips along the bottom edge of the
side panels.
5. Early models: Drill a 6.5 mm diameter hole
in the bottom at the marking.
6. Screw the side plates to the bottom from underneath.
7. Install the condenser housing in accordance
with the section "Condenser housing - installation...".
FRONT RAIL
2
4
2
Changing the front rail
1. Remove the panel in accordance with the section "Panel - removing...".
2. Early models: the hole is marked out on the
front rail.
3. Remove the rivets with a screwdriver and flatten with a polygrip.
4. Early models: Drill a 5 mm diameter hole in
the front rail at the marking.
5. Secure the new front rail.
6. Install the panel in accordance with the section "Panel - installation...".
71
PROGRAM AND OPTIONS
PROGRAMS AND OPTIONS
Program selection
Main power
P1
P2
Start
P3
LC-Display
P4
Stop
P5
Start/Stop
P6
P7
P8
Program selection
PROGRAMS
P1 Extra dry
This program is for fabrics that are particularly
difficult to dry, such as jeans with very thick
seams.
IMPORTANT
Tricot fabrics are, more than any others, liable to
shrink. Use the Dry, Normal dry or Iron dry programs for this material. Stretch out the garments
immediately after drying.
P2 Dry, P3 Normal dry
These programs switch off the heating when the
laundry is dry, but not "snuff dry".
The dry program switches off the heating later
than Normal dry. Experiment with these to find
what suits you best. Use these programs to get
your laundry completely dry.
P4
Iron dry
This program switches off the heating when the
laundry is still damp enough for ironing or mangling.
72
Extra dry, P6 Dry, P7 Normal dry and
P8 Iron dry
These programs correspond to program 1-4, but
they have low temperture instead of high.
These programs could be used for acrylic, rayon,
acetate and delicate fabrics.
P5
DRYING TIME
The Drying time depends on many different factors, such as the amount of laundry, the degree of
dampness in the fabric, the type of fabric, the
heating power, the temperature of the incoming
air and its humidity. Naturally the Drying time is
also influenced by how dry you want the laundry
to be.
CHANGE SETTINGS
CHANGE SETTINGS
LANGUAGE
You can change the language of the displayed text.
The languages you can choose from are Dansk,
Deutsch, English, Espanol, Français, Italiano,
Nederlands, Norsk, Portugués, Suomi and Svenska.
Earlier models had two versions of the machine (Alternatives 1 and 2) but now all eleven languages are present in all machines.
Alternative 1: The languages you can choose
from are Danish, Finnish, French, Dutch, Norwegian and Swedish.
Alternative 2: The languages you can choose
from are English, French, Italian, Portuguese, Spanish and German.
To change language do as follows:
Switch off the power switch,
, then switch it
on again so that the machine is in start-up mode.
Press the P8 button five times, then press the
P1 button five times. You have to complete these ten button presses within fifteen seconds.
Within three seconds of pressing the P1 button for the fifth time you should then select the
language you want by pressing the P6 or P7 buttons.
CHILD LOCK ON
BUTTON
To prevent accidental button pushes on the
button you can activate the child lock function.
The
button then must be held in for three
seconds to activate the machine.
To switch the child lock on or off, do as
follows:
Switch off the power switch,
, then switch it
on again so that the machine is in start-up mode.
Press the P8 button five times, then press the
P3 button five times. You have to complete these ten button presses within fifteen seconds.
Within three seconds of pressing the P3 button for the last time you must then press the P6
or P7 button to choose whether you want the
child lock on or off.
Press P7 to activate the child lock.
Press P6 to disable the child lock.
To start a program with locked Start button.
Press the Start button for three seconds and the
machine will start.
LOCKING A PROGRAMME
If for some reason you want to limit the number
of programmes that can be used you can lock one
or more programmes.
No characters or digits are shown on the display when a locked programme is selected.
To lock or unlock a programme, do as follows:
Switch off the power switch,
, then switch it
on again so that the machine is in start-up mode.
Press the P8 -button five times, then press the
P7 -button five times. You have to complete these ten button presses within fifteen seconds.
Within three seconds of pressing the P7 -button for the fifth time you should hold in the programme button for the programme you want to
lock for 5-10 seconds until the information in
the display starts flashing.
Then you can lock the programme by releasing the programme button and pressing the
button once.
Do the same to unlock the programme.
73
TEMP NORMAL/LOW
DRYING PHASE
COOLING
P1
Extra dry
normal
Like the drying phase on program P2 and another 10 min.
approx. 20 min
P2
Dry
normal
approx. 20 min
P3
Normal dry
normal
The length of the drying phase is calculated from measurements
during the heating phase.
Like the drying phase on program P2, but is interrupted erarlier.
approx. 20 min
P4
Iron dry
normal
Like the drying phase on program P3, but is interrupted erarlier.
approx. 20 min
P5
Extra dry
low
Like P1
approx. 20 min
P6
Dry
low
Like P2
approx. 20 min
P7
Normal dry
low
Like P3
approx. 20 min
P8
Iron dry
low
Like P4
approx. 20 min
PROGRAM OVERVIEW
TYPE
PROGRAM OVERVIEW
74
PROGRAM
TUMBLE DRYING
TUMBLE DRYING
1. Sort the laundry.
2. Set the main power switch to on,
.
3. Check the fluff filter.
4. Put the laundry into the tumble drier.
5. Close the door.
6. Select program.
7. Press the
Start
button.
8. When the program is finished:
- Clean the fluff filter.
- For TDC44: Empty the condense water tank.
9. When you have finished tumble drying.
Set the main power switch to off,
.
75
CLEANING AND MAINTENANCE
CLEANING AND MAINTENANCE
CLEANING the fluff filter
The fluff filter should be cleaned after every tumble-drying session.
If you have very hard water the fluff filter may
collect a layer of scale. Check when you are cleaning fluff out of the filter if scale is present, and if
so, wash the scale off by hand.
3
2
1. Take hold of the filter handle and pull it
towards you.
2. Lift the filter out of its holder.
1
3. Open the filter and pick off the fluff with your
hand. Then rinse the filter to remove any scale.
4. Fold the filter and put it back into the holder.
EMPTYING THE CONDENSED WATER TANK
(TDC44)
The condensed water tank should be emptied after every tumble-drying session (this does not
apply if the condensed water hose is connected
directly to the drain).
1. Pull out the condensed water tank, empty
out the water and put the tank back.
If the condensed water tank becomes overfull,
the program is interrupted and the error message
Overfull appears on the display. Empty the tank
and press the
-button to resume the program from where it was interrupted, see also "Fault
tracing".
IMPORTANT
Don't pull out the condensed water tank while
the tumble drier is running.
76
1
CLEANING AND MAINTENANCE
CLEANING THE OUTSIDE OF THE MACHINE
Clean the outside and the program panel with a
mild detergent.
NOTE
Don't use any king of solvent, this can damage
the machine. Don't drench the machine in water,
either.
IMPORTANT
Don't let dust collect around the machine. Keep
the area around the tumble drier clean and dry:
the presence of dust, heat and damp all prolong
the drying time.
CLEANING THE FAN
Check once or twice a year to see if the fan wheel
needs cleaning.
3
1. Set the main power switch to off.
2. Remove the bottom cover.
3. Unscrew and unclip the fan cover.
4
4. Hold the fan wheel and unscrew the nut (8
mm ring spanner).
5. Take out the fan wheel and clean it with a
brush and water.
5
6. Refit the fan wheel and fan cover.
7. Put the bottom cover back.
77
CLEANING AND MAINTENANCE
CLEANING THE CONDENSER (TDC44)
The condenser should be cleaned at least six times a year.
NOTE
If you have pets at home the condenser should be
cleaned more often.
UP
3
1. Set the main power switch to off.
2. Remove the bottom cover.
3. Open the condenser cover by turning the two
knobs counterclockwise.
4. Take out the condenser and wash the plates
clean with the aid of a hand shower, for example.
WARNING
Don't poke in between the plates, this can damage the condenser. Never use sharp metal objects
for cleaning.
IMPORTANT
The condenser must not be cleaned in a dishwasher.
5. Put the condenser back.
IMPORTANT
When refitting, make sure it is put back correctly. The top of the condenser is marked "upp",
"up", and "oben".
6. Refit the bottom cover.
78
4
INDEX
Adjusting the feet
Air extraction
Bearing
Bottom
Capacitor
Child lock settings
Condensed water pump
Condensation water
Condensed water tank
Condenser
Condenser housing
Consumption values
Contactor
Counter
Door magnet/escutcheon plate
Door switch pin
Door switch
Doorhanging
Drive belt
Drum ridge
Drum
Electrical installation
Electronic control unit
Exhaust air duct hook
Exhaust air duct T-piece
Fan housing
Fan wheel
Fan
Fault indications
Filter holder
Fixing clip
Float
Fluff filter
Foam rubber seal
Front door
Front felt seal
Front frame
Front panel
Front rail
Fuse
Fuse holder/insert
11
12,48
36
71
47
73
66
11
76
78
66
27
41
26
54
57
56
15
43
44
43
14
65
48
48
45
45
77
26
56
59
68
76
36,68
53
52
51
58
71
42
42
Handle
Heating element
Hinge pin
Hinge socket
Humidity sensor
Indication lamp/symbol lens
Inner door seal
Inner door
Input terminal block
Language settings
Locking program settings
Main power button
Microswitch for the condensed water pump
Motor
Outer door seal
Overheating protection device
Panel board
Panel handle
Panel
Push-button switches
Push-buttons
Radio interference filter
Rear felt strip seal
Rear panel
Reasons for faults
Settings
Side panels
Special tools
Support roller
Test program
54
37
53
54
49
61
55
55
39
73
73
62
67
46
55
38
63
61
60
63
63
40
37
34
26
73
70
32
52
Thermistor
Tools
Top cover
26
50
29
33
Water tank housing
69
79
WHAT THE DISPLAY SHOWS
DRYING GUIDE
1
TDC33
Program information
When you press P1 to P8 this field shows which
program is selected. While the program is running
it shows how far the cycle has progressed.
FABRICS
ERROR MESSAGES
Dry fabrics of the same type together to ensure uniform drying.
If an error message appears on the display after completed or
interrupted program, proceed as follows:
FABRIC
WEIGHT
Whites, coloureds Cotton and
and synthetics
linen
Delicates
TEMPERATURE
(5.0 kg) Normal
Polyester/
cotton
(2.5 kg) Normal
Acrylic, rayon,
acetate, etc.
(2.5 kg) Low
Start
The program has started.
Stop
The program is complete
or has been interrupted.
- Write down the error message that is displayed.
- Turn off the power switch.
- Open the door and take out
the laundry.
- Contact service.
P1
P2
P3
P4
Start
Stop
P5
P6
P7
P8
Symbol means that fabric can be tumble dried.
3
SELECT PROGRAM
Press one of the program buttons P1 to P8.
Do not tumble dry...
• fabric labelled “Do not expose
to dry heat”.
• garments that have been drycleaned at home.
2
• foam plastic.
• fabric containing glass fibre.
• woollens.
NOTE! If you do not press a
button within 3 minutes the
display will be switched off. It
will light up again when you
press a button.
Open the door.
P1
P2
P3
P4
Start
Stop
P5
P6
P7
P2
P3
This machine is not intended for drying dry-cleaned fabrics.
P4
Start/St
op
P5
P6
P7
P8
Children must not use this machine.
Do not spray the machine with water when cleaning.
P1 - Extra dry, normal temperature
P2 - Dry, normal temperature
P3 - Normal dry, normal temperature
P4 - Iron dry, normal temperature
P5 - Extra dry, low temperature
P6 - Dry, low temperature
P7 - Normal dry, low temperature
P8 - Iron dry, low temperature
LOAD DRYER
Press the power switch. The
display will light up.
P1
SAFETY PRECAUTIONS
4
WHEN PROGRAM IS COMPLETE
An audible signal will indicate when Clean the lint filter.
the drying program has finished.
The word Stop will appear on the
display. The display is switched off
three minutes after the end of program.
P8
Press the Start button to start
the drying program.
Check the lint filter. If it needs
cleaning then proceed as described
on the right.
Put the laundry in the drum and
close the door.
P1
P2
P3
P4
Start/St
op
P5
P6
P7
P8
2
1
Open the door. Take out the laundry
and check that the drum is empty.
You can use the Stop button to interrupt a program.
Hold it pressed in for 3 seconds.
Close the door.
The word Start will appear on the display to show
that the drying program has begun.
Turn off the power
switch.
VENT
Symbol means that fabric cannot be tumble dried.
WHAT THE DISPLAY SHOWS
DRYING GUIDE
FABRICS
ERROR MESSAGES
Dry fabrics of the same type together to ensure uniform drying.
If an error message appears on the display after completed or
interrupted program, proceed as follows:
FABRIC
WEIGHT
Whites, coloureds Cotton and
and synthetics
linen
Delicates
TEMPERATURE
(5.0 kg) Normal
Polyester/
cotton
(2.5 kg) Normal
Acrylic, rayon,
acetate, etc.
(2.5 kg) Low
Start
The program has started.
Stop
The program is complete
or has been interrupted.
Error message ” Over flow” : Empty the condensation tank (check
the drain hose if it is used), press the Startbutton and the program
will continue from where it was interrupted.
In other cases:
- Write down the error message that is displayed.
- Turn off the power switch.
- Open the door and take out
the laundry.
- Contact service.
P1
Symbol means that fabric can be tumble dried.
P2
P3
P4
Start
Stop
P5
3
SELECT PROGRAM
Do not tumble dry...
• fabric labelled “Do not expose
to dry heat”.
• garments that have been drycleaned at home.
2
• foam plastic.
• fabric containing glass fibre.
• woollens.
Press the power switch. The
display will light up.
NOTE! If you do not press a
button within 3 minutes the
display will be switched off. It
will light up again when you
press a button.
Open the door.
P1
P2
P3
P4
Start
Stop
P5
P6
P7
P2
P3
P4
Children must not use this machine.
Start/St
op
P5
P6
P7
P8
Do not spray the machine with water when cleaning.
4
WHEN PROGRAM IS COMPLETE
An audible signal will indicate when
the drying program has finished.
The word Stop will appear on the
display. The display is switched off
three minutes after the end of program.
P8
Press the Start button to start
the drying program.
Check the lint filter. If it needs
cleaning then proceed as described
on the right.
Put the laundry in the drum and
close the door.
P8
This machine is not intended for drying dry-cleaned fabrics.
P1
P1 - Extra dry, normal temperature
P2 - Dry, normal temperature
P3 - Normal dry, normal temperature
P4 - Iron dry, normal temperature
P5 - Extra dry, low temperature
P6 - Dry, low temperature
P7 - Normal dry, low temperature
P8 - Iron dry, low temperature
LOAD DRYER
P7
SAFETY PRECAUTIONS
Press one of the program buttons P1 to P8.
Symbol means that fabric cannot be tumble dried.
P6
P1
P2
P3
P4
Start/St
op
P5
P6
P7
P8
Open the door. Take out the laundry
and check that the drum is empty.
You can use the Stop button to interrupt a program.
Hold it pressed in for 3 seconds.
Close the door.
The word Start will appear on the display to show
that the drying program has begun.
Turn off the power
switch.
Empty the condensation water
tank (only applies to condenser tumble dryer, when
drain hose isn’t
used).
Clean the lint filter.
2
1
COND
1
TDC44
Program information
When you press P1 to P8 this field shows which
program is selected. While the program is running
it shows how far the cycle has progressed.
7
6
R23
C R23
F1
R33
R33
R43
R43
4
L
MO2
02
R33
R33
R34
R3 4
R43
R43
R44
R44
1
E
ST1ST1 -4
MO
J1
FOR TD
TD4
44 CU
CUT J1
J2
ELB
N
N
ELV
N
EL1
D
POWER ON
ON, PROGRAM
P ROGRAM IN ST
STANDBY, DOOR CLOS ED
S
BRU
BR UN/BROW
N/BROWN
BROW N
ST2
ST 2-1 - ST
S T2-2
0 Vac
V ac (TD
(TD4
TD44)
ST3
ST 3-1 - ST
S T3 - 2
ST3
T3 - 2
ST 3-1 - SST
O V (TD
( TD4
TD44) CLOSED SWI
SW ITCH
13 Vd
Vdc (TD
(TD4
TD44) OPEN
OPE N SWI
SW ITCH
BL]/BL UE
ST6ST 6-1
6-1 - ST
S T6-2
6-2
5 Vd
V dc
THERM
TH ERMIS
ERMISTOR
ISTOR DISCO
D ISCON
ISCO NNECT
ECTED
R\D/RE D
ST7
ST 7-1 - ST
S T7-3
ST7
ST 7-5 - ST
S T7-3
0 V
0 v
ORANG
ORA NGE/ORA
NG E/ORA NGE
NGE
ST8-1
ST8-1 - ST8
ST8T8-2
ST8ST8 -3
ST8ST8 -4
ST8ST8 -5
13 Vd
Vdc
DAT
DATA IN
CLOCK
DAT
DATA OU
O UT
KOPPLI NG 3-FAS / WIR
WIRI
IRING 3-PHASE
-PHASE
L3
L3
MACH
MACHIINE
L2
L2
L2
L1
JS
N
L1
R23
R23
S
R33
R33
N
INKB
NKB
INKB
NK B
7
N(L1)
N(L 1)
N(L1)
N(L 1)
F1
ST2
ST2-1 - ST
ST2-2
SECON
EACH 4 MI
MINUTES
23O Vac
Vac (TD
(TD4
CONDS EACH
TD44) 30 SECO
ST3
ST3-1 - ST
S T3-2
ST3
T3-2
ST3-1 - SST
O V (TD
( TD4
TD44)
13 Vd
Vdc (TD
(TD4
TD44)
CLOSED SWI
SW ITCH
OPEN
N SWI
OPE
SW ITCH
ST5
ST5-1 - ST
S T5-4
ST5
ST5-2 - ST
S T5 - 3
15 Vd
V dc
1-1
1 -15
-15 mVdc
DEPE
DEPENDING
DING ON
O N THE
THE HUM
H UMID
UMIDI
IDITY
ST
ST666-11
ST
ST666-2
2
ST8
ST8-1
-1
ST8
ST8-2
ST8
ST8-3
ST8
ST8-4
ST8
ST8-5
C
WIRI
WIRING
RING JAPAN
APA N
R\D/RE D
R23
R23
ST6ST6-1
6-1 - ST
S T6-2
6-2
5 Vd
VdcV
THERM
THERMIS
ERM ISTOR
ISTOR DISCO
D ISCON
ISCO NNECT
ECTED
230 Vac
Vac
230 Vac
Vac
HEAT
HEA TER ON
ON
HEAT
HEA TER ON
ON
ST8-1
ST8 -1 - ST8
S T8T8-2
ST8ST8 -3
ST8ST8 -4
ST8ST8 -5
13 Vd
V dc
DAT
DATA IN
CLOCK
DAT
DATA OU
O UT
SS
VIT/WHI
T/WH ITE
L3
L2
02
L1
Pos. Qty Part No.
F1 BL]/BL UE
R33
R33
Material
Name of item
Material
B
R43
R43
N
R33
R33
Dens.Kg/dm3 Dimensions, Type, etc.
Scale
Gen.tolerance
Description(ENG)
Designed by
Gen.tol.Angle
Description(SE)
CIRCUIT DIAGRAM TD33/44, TDC33/44
Wiring Japan added,JS added,MO4 changed
PS
01
ST2-1 - ST2-2 was 230
HT
99 02
Appd Year Week
5
KCU
OF1
ST7
ST7-1 - R2
R 24
ST7
ST7-5 - R4
R 44
02
6
ST
ST3
3-1
ST
ST3
3-2
230 Vac
Vac
230 Vac
Vac
23O Vac
Vac
N(L1)
N(L 1)
F1
F1N
F 2N
F1 N
xA EJ
EJ INKLU
NKLUDERAD
DERAD I 11-FAS 10
10 A
xA NOT
NOT INCLU
CLUDED IN 1-PH
1-PHASE
-PHASE 10
10 A
Rev ind Revision
OF2
OF 2
ST1-1
ST1 -1 - ST11
ST11-1
T11 -1
ST1-1
-1 - SST1
T1ST1
T1-3
ST1-1
ST1 -1 - ST1
ST1T1-4
KOPPLI NG 11-FAS / WIR
WIRI
IR ING 1-PH
1-PHASE
-PH ASE
NUMMER
UMM ER INOM ( ) G[LL ER F\R USA
USA & CAN
CA NADA
NUMBERS
UM BERS IN ( ) VAL
VALID
AL ID FOR USA
USA & CAN
CA NADA
L3(L2)
L3(L 2)
R23
R23
L2
SS (F 2)
R43
R43
L1(L2)
L1(L2)
xA
R43
R43
TH
PROGRAM RU
R UNNING,
NG,
DEPE
DEP ENDING
DING ON
ON THE
THE HUM
H UMID
UMIDI
IDITY
S2S
USED
USED FOR 4-WIR
-WIRE
IRE CON
CONNECT
ECTION
ION
REC G
02
230 Vac
Vac
15 Vd
V dc
1-1
1 -15
-15 mVdc
L1
USED
USED FOR 3-WIR
-WIRE
IRE CON
CONNECT
ECTION
ION
INK2
NK2
L2 2
REC L
S2B
L2 2
ST1-1
ST1 -1 - ST11
ST11-1
T11 -1
ST5
ST 5-1 - ST
S T5 - 4
ST5
5-2 - ST
ST
S T5-3
SVART/
SVART/BLACK
T/BLACK
ST7
ST7-1
EL4
EL4
AP
BO
ST
ST7
7-5
MO
INKB
NKB
ST
ST7
7-3
REC G
REC L
8
ST1ST1-3
L1
FUSE
USE CON
CONNECT
ECTION
IO N FOR USA
USA & CAN
CA NADA
CON
ECT
ION
CO
NNEC
TIO
N BOX
S1S
L1
S1B
L1 2
N
Rb
R24
R24
TP5
TP5
L1 2
AP
ST1ST1 -2
Ra
4
3 HUM
H UMID
UMIDI
IDITY
SE NSOR
2 SENSOR
ST1-1
ST1 -1
EL3
EL3
SS
R23
R23
TP4
TP4
L
EL6
LB4
LB4
2
L2
TP3
TP3
TP3
TP3
L2
AP
R14
R1 4 MO4
TP2
TP2
L3
LB2
LB2
LB1
ST
ST5
5-4
ST
ST5
5-3
ST
ST5
5-2
ST
ST5
5-1
1
ST11
ST11-1
-1
ST11
ST11-2
F4
F
AP
ST
ST2
2-1
ST
ST2
2-2
F2
TB1
TB1
R13
TP1
TP1
B
BE
ILA
ILA
F3
F
KOPPLI NG 3-FAS UTAN NOLLA
NOLL A / WIR
W IRI
IRING 3-PHASE
-PHASE WI
WITHOU
THO UT NEUTRAL
TRAL
This document must not be copied without
our written pemission, and the contents
thereof must not be imparted to a third party
nor be used for any unauthorized purpose.
Contravention will be prosecuted.
Asko Cylinda AB
S:\U\Wmd20\1_Tryckunderlag\Kopplingsschema\8061866.dft , sosv , 2000-10-17 12:25:36
DRA
DR AIN PUM
P UMP
UMP
AP:
AVLOPPSP
AVLOPPSP UMP
UMP
MOTOR
MO TOR
MO:
MOTOR
MO TOR
THERM
THERMIS
ERM ISTOR
ISTOR
TH:
TERMIS
ERMISTOR
IS TOR
BELYS
B ELYSN
ELYS NING
BE:
ILLUM
ILL UMI
UMINATION
IO N
DOOR SWI
SW ITCH
LB:
LU
L UCKBRY TARE
MAI
MA IN TERMI
ERMINAL BLOCK
INKB:
NKB:
INKOPPLI
NKOP PLINGSPL
PLI NGSPLI
NGSPL INT
D
A
BE
8
1
INTERN
ERNAL CON
CONNECT
ECTION
ION
INTERN
ERN KOPPL ING
ALT
AL TERN
ER NATIVE WIR
WIRI
IR ING
ALT
AL TERN
ER NATIV KOP PLING
PLI NG
6
L3
E
2
TB1
TB1
5
F1
SB
3
4
Ra
F
5
TRYCKBR
TRYCKBR YTARE
PUSH
PUSH BU
BUTTON
TON SWI
SW ITCH
PROGR AM CON
CONTROL UNIT
PROGR AM KO NTROLLE
TROL LENH
LENHE
NHET
KN
KNAPPSA TS MED
MED DISPL
DISPLAY
ISPL AY
USERS
USERS INTERFA
ERFACE
FA CE
Ra
8
V[RME
V[RME ELEME
ELEM ENT, L]G EF
EFFEKT
FEK T
TB:
TB:
HEA
HE ATER, LOW POWER
POW ER
V[RME
V[RME ELEME
ELEM ENT, H\G EFFEK
EFFEKT
FEK T
EL2,
PCU
EL2,6:
2,6:
PCU:
HEA
HE ATER, HIGH
HIGH POWER
POW ER
TERMOS TAT, MAN
MANUELLT
ELLT ]T
]TERST
ERST[LLBA R
EL3,
KCU
EL3,7:
3,7:
KCU:
THERMOS
THERMOS TAT, MAN
MA NUEL RESET
RESE T
TERMOS TAT, AU
AUTOMA
TOM ATISK (LU
(L UDDAVK[
DDA VK[N
VK[ NNING)
EL4,
EL4,8:
4,8:
THERMOS
THERMOS TAT, AU
AUTOMA
TOM ATIC (LI
(L INT DE
DETECT
ECTION)
ION)
\V ERSV[M
ERSV [MN
[MNINGSBRY
NGSB RYT
RYTARE
OF:
OV ERFLOW
ERFLOW PROT
PRO TECT
ECTION
IO N SWI
SW ITCH
UTTAG TV[T
V[TTMASKI
TMASKI N
REC:
REC:
OU
O UTLE
TLET WASH ING-MA
NG-MACHI
-MA CHIN
CHI NE
BOT
BO TTOM
BO:
BOT
BO TTEN
INDIKER
DIK ERI
ER INGSLAMPA
NGSL AMPA
L3
ILA:
ILA: INDCAT
DCA TION
ION LAMP
LAM P
RELA
R ELAY
ELAY
R:
REL[
REL[
L2
S[KR ING
S:
FUSE
USE
FILT
ILTER
L1
F:
FILT
ILTER
EL1,5:
EL1, 5:
99
26
Released by
4
HT
Iss by Dept
KOPPLINGSSCHEMA TD33/44, TDC33/44
Year
UT
98
ASKO CYLINDA
Week
05
3
Rev Ind
80 618 66 02
2
Replace
Project
A
8061866 rev:01
1FORMAT A3