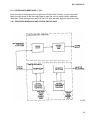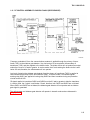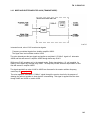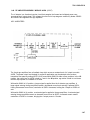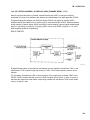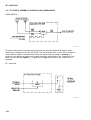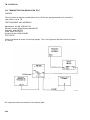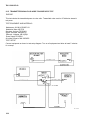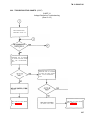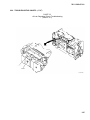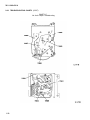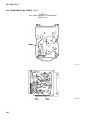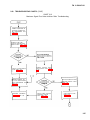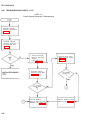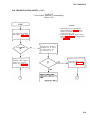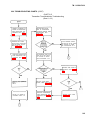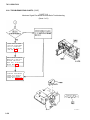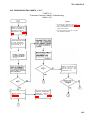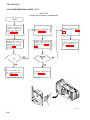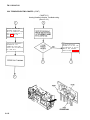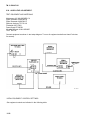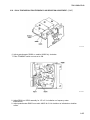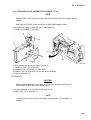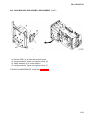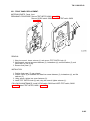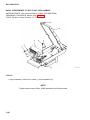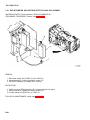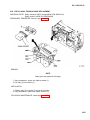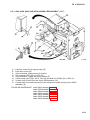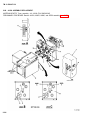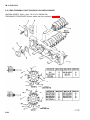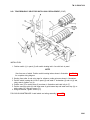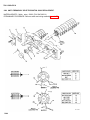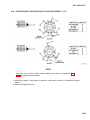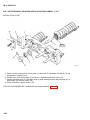
1
TM 11-5820-670-30
TECHNICAL MANUAL
AVIATION INTERMEDIATE
MAINTENANCE MANUAL
RADIO SET AN/ARC-131
(NSN 5821-00-937-4686)
HEADQUARTERS, DEPARTMENT OF THE ARMY
13 SEPTEMBER 1985
TM 11-5820-670-30
SAFETY STEPS TO FOLLOW IF SOMEONE IS THE
VICTIM OF ELECTRICAL SHOCK
DO NOT TRY TO PULL OR GRAB THE INDIVIDUAL
IF POSSIBLE, TURN OFF THE ELECTRICAL POWER
IF YOU CANNOT TURN OFF THE ELECTRICAL
POWER, PULL, PUSH, OR LIFT THE PERSON TO
SAFETY USING A WOODEN POLE OR A ROPE OR
SOME OTHER INSULATING MATERIAL
SEND FOR HELP AS SOON AS POSSIBLE
AFTER THE INJURED PERSON IS FREE OF
CONTACT WITH THE SOURCE OF ELECTRICAL
SHOCK, MOVE THE PERSON A SHORT DISTANCE
AWAY AND IMMEDIATELY START ARTIFICIAL
RESUSCITATION
A
TM 11-5820-670-30
HIGH VOLTAGE
is used in the operation of this equipment.
DEATH ON CONTACT
may result if personnel fail to observe safety precautions.
Never work on electronic equipment unless there is another person nearby competent in
administering first aid. When aided by operators, the technician must warn them about
dangerous areas.
Whenever possible, the power supply to the equipment must be shut off before beginning
work on the equipment. Take particular care to ground every capacitor likely to hold a
dangerous potential. When working inside the equipment, after the power has been
turned off, always ground every part before touching it.
Be careful not to contact high-voltage connections or 115 vac input connections when
installing or operating this equipment.
Whenever the nature of the operation permits, keep one hand away from the equipment
to reduce the hazard of current flowing through vital organs of the body.
Do not be misled by the term “low voltage”. Potentials as low as 50 volts may cause death
under adverse conditions.
Dangerous potentials, which could cause severe electrical shock, exist at several points
throughout this equipment. When equipment is operated with the covers removed, do
not touch exposed connections, components, or dc input connections. Some
transistors have voltages present on their cases.
Do not operate radio set if any cables are frayed or other physical damage is evident.
Electrical shock to personnel could result.
Exercise care when lifting the radio set to avoid personal injury. The receivertransmitter weighs 25 pounds.
B
TM 11-5820-670-30
Adequate ventilation should be provided while using TRICHLOROTRIFLUOROETHANE.
Prolonged breathing of vapor should be avoided. The solvent should not be used near
heat or open flame; the products of decomposition are toxic and irritating. Since
TRICHLOROTRIFLUOROETHANE dissolves natural oils, prolonged contact with skin
should be avoided. When necessary, use gloves which the solvent cannot penetrate. If
the solvent is taken internally, consult a physician immediately.
For Artificial Respiration, refer to FM 21-11.
C/(D Blank)
*TM 11-5820-670-30
HEADQUARTERS
DEPARTMENT OF THE ARMY
Technical Manual
Washington, DC, 13 September 1985
No. 11-5820-670-30
AVIATION INTERMEDIATE MAINTENANCE MANUAL
RADIO SET AN/ARC-131
(NSN 5821-00-937-4686)
REPORTING ERRORS AND RECOMMENDING IMPROVEMENTS
You can help improve this manual. If you find any mistakes or if you know of a way to
improve the procedures, please let us know. Mail your letter, DA Form 2028
(Recommended Changes to Publications and Blank Forms), or DA Form 2028-2 located
in the back of this manual direct to: Commander, US Army CommunicationsElectronics Command and Fort Monmouth, ATTN: AMSEL-ME-MP, Fort Monmouth,
New Jersey 07703-5007. A reply will be furnished direct to you.
Page
INTRODUCTION . . . . . . . . . . . . . . . . . . . . . . . . . . . . . . . . . . . . . . . . . . . . . . . . . . . . . . . . .
1-1
General Information . . . . . . . . . . . . . . . . . . . . . . . . . . . . . . . . . . . . . . . . . . . . . . . . . . . . .
Equipment Description . . . . . . . . . . . . . . . . . . . . . . . . . . . . . . . . . . . . . . . . . . . . . .
Principles of Operation . . . . . . . . . . . . . . . . . . . . . . . . . . . . . . . . . . . . . . . . . . . . . . .
1-1
1-3
1-4
MAINTENANCE . . . . . . . . . . . . . . . . . . . . . . . . . . . . . . . . . . . . . . . . . . . . . . . . . . . . .
2-1
Repair Parts, Special Tools, and TMDE . . . . . . . . . . . . . . . . . . . . . . . . . . . . . .
Performance Tests . . . . . . . . . . . . . . . . . . . . . . . . . . . . . . . . . . . . . . . . . . . . . . . . . . . . . . . . . . . . . . . .
Troubleshooting . . . . . . . . . . . . . . . . . . . . . . . . . . . . . . . . . . . . . . . . . . . . . . . . . . . . . . . . . . . . . . . . . . . .
Alinement and Adjustment Procedures . . . . . . . . . . . . . . . . . . . . . . . . . . . . . . . . . . . . . .
Repair and Replacement Procedures . . . . . . . . . . . . . . . . . . . . . . . . . . . . . . . . . . . . . . . .
2-1
2-2
2-50
2-126
2-150
APPENDIX A
REFERENCES . . . . . . . . . . . . . . . . . . . . . . . . . . . . . . . . . . . . . . . . . . . . . . . . . . . . . . . .
A-1
B
EXPENDABLE SUPPLIES AND MATERIALS LIST. . . . . . . . . . . . . . . . . . . . . .
B-1
CHAPTER 1
Section I
II
Ill
CHAPTER 2
Section 1
II
Ill
IV
V
GLOSSARY
. . . . . . . . . . . . . . . . . . . . . . . . . . . . . . . . . . . . . . . . . . . . . . . . . . . . . . . . . . . . . . . . . . . . . . . . . . . . . . . Glossary 1
INDEX
. . . . . . . . . . . . . . . . . . . . . . . . . . . . . . . . . . . . . . . . . . . . . . . . . . . . . . . . . . . . . . . . . . . . . . . . . . . . . . . . Index 1
FOLDOUTS
. . . . . . . . . . . . . . . . . . . . . . . . . . . . . . . . . . . . . . . . . . . . . . . . . . . . . . . . . . . . . . . . . . . . . . . . . . . . . . Located in
Rear of Manual
* This manual supersedes TM 11-5820-670-34 Direct Support and General Support (Aviation
Intermediate) Maintenance Manual Radio Set AN/ARC-131, 16 February 1978.
i
TM 11-5820-670-30
HOW TO USE THIS MANUAL
This manual is designed to help you maintain Receiver-Transmitter, Radio RT-823/ARC-131 and
Control, Radio Set C-7088/ARC-131 which are components of Radio Set AN/ARC-131.
A front cover index is provided for quick reference to important information contained in this manual.
Each item appearing on the front cover is boxed and identified by topic, with the page number where
the information is located.
Paragraphs in this manual are numbered by chapter and order of appearance within a chapter. A
subject index appears at the beginning of each section to help you find the exact paragraph you are
looking for.
Measurements in this manual are given in both US standard and metric units. A metric to US standard
conversion chart can be found in the back of this manual.
There are warnings at the beginning of this manual. Before doing maintenance on the equipment,
learn the warnings and always follow safety procedures and precautions.
Step by step procedures with illustrations give you all the necessary information needed to maintain
the equipment. The steps must be followed in exact sequence. Do not attempt any shortcuts.
ii
TM 11-5820-670-30
EL1AT231
Radio Set AN/ARC-131
(iii blank)/1-0
TM 11-5820-670-30
CHAPTER 1
INTRODUCTION
Section
Subject
General Information . . . . . . . . . . . . . . . . . . . . . . . . . . . . . . . . . . . . . . . . . . . . . . . . . . . . . . . . . . . . . . . . .
Equipment Description . . . . . . . . . . . . . . . . . . . . . . . . . . . . . . . . . . . . . . . . . . . . . . . . . . . . . . . . . . .
Principles of Operation . . . . . . . . . . . . . . . . . . . . . . . . . . . . . . . . . . . . . . . . . . . . . . . . . . . . . . . . .
I
II
Ill
Page
1-1
1-3
1-4
OVERVIEW
This chapter will familiarize you with Radio Set AN/ARC-131. It contains general information about the
equipment, references to pertinent forms and publications, equipment specifications, and principles
of operation.
Section I GENERAL INFORMATION
Subject
Scope . . . . . . . . . . . . . . . . . . . . . . . . . . . . . . . . . . . . . . . . . . . . . . . . . . . . . . . . . . . . . . . . . . . . . . . . . . . . . . . . . . .
Maintenance Forms, Records, and Reports . . . . . . . . . . . . . . . . . . . . . . . . . . . . . . . . . . . . . . . . .
Reporting Equipment Improvement Recommendations (EIR) . . . . . . . . . . . . . . . . . . .
Consolidated Index of Army Publications and Blank Forms . . . . . . . . . . . . . . . . . . . .
Destruction of Army Electronics Materiel to Prevent Enemy Use . . . . . . . . . . . . . . . .
Administrative Storage . . . . . . . . . . . . . . . . . . . . . . . . . . . . . . . . . . . . . . . . . . . . . . . . . . . . . . . . . . .
Nomenclature Cross-Reference List . . . . . . . . . . . . . . . . . . . . . . . . . . . . . . . . . . . . .
Safety, Care, and Handling . . . . . . . . . . . . . . . . . . . . . . . . . . . . . . . . . . . . . . . . . . . . . . . . . . . . .
Para
Page
1-1
1-2
1-3
1-4
1-5
1-6
1-7
1-8
1-1
1-1
1-2
1-2
1-2
1-2
1-2
1-3
1-1. SCOPE.
Type of Manual: Direct support maintenance manual.
Equipment Names and Model Numbers: Receiver-Transmitter Radio RT-823/ARC-131 and Control,
Radio Set C-7088/ARC-131, parts of Radio Set AN/ARC-131.
Purpose of Equipment: To provide two-way, voice communication between aircraft in flight and aircraft and ground stations, frequency modulated (fm) in the 30.00 to 75.95 MHz frequency range.
1-2. MAINTENANCE FORMS, RECORDS, AND REPORTS.
REPORT OF MAINTENANCE AND UNSATISFACTORY EQUIPMENT
Department of the Army forms and procedures used for equipment maintenance will be those prescribed in
DA Pam 736-750 as contained in Maintenance Management Update.
REPORT OF PACKAGING AND HANDLING DEFICIENCIES
Fill out and forward SF 364 (Report of Discrepancy (ROD)) as prescribed in AR 735-11-2/DLAR
4140.55/NAVMATINST 4355.73A/AFR 400-54/MCO 4430.3F.
1-1
TM 11-5820-670-30
1-2. MAINTENANCE FORMS, RECORDS, AND REPORTS. (CONT)
DISCREPANCY IN SHIPMENT REPORT (DISREP) (SF 361)
Fill out forward Discrepancy in Shipment Report (DISREP) (SF 361) as prescribed in AR 55-38/
NAVSUPINST 4610.33C/AFR 75-18/MCO P4610.19D/DLAR 4500.15.
1-3. REPORTING EQUIPMENT IMPROVEMENT RECOMMENDATIONS (EIR).
If your Radio Set AN/ARC-131 needs improvement, let us know. Send us an EIR. You, the user, are
the only one who can tell us what you don’t like about your equipment. Let us know why you don’t like
the design. Put it on an SF 388 (Quality Deficiency Report). Mail it to: Commander, US Army
Communications-Electronics Command and Fort Monmouth, ATTN: AMSEL-ME-MP, Fort
Monmouth, New Jersey 07703-5007. We’Il send you a reply.
1-4. CONSOLIDATED INDEX OF ARMY PUBLICATIONS AND BLANK FORMS.
Refer to the latest issue of DA Pam 310-1 to determine whether there are new editions, changes, or
additional publications pertaining to the equipment.
1-5. DESTRUCTION OF ARMY ELECTRONICS MATERIEL TO PREVENT ENEMY USE.
Destruction of Army electronics materiel to prevent enemy use shall be in accordance with
TM 750-244-2.
1-6. ADMINISTRATIVE STORAGE.
Administrative storage of equipment issued to and used by Army activities will have preventive
maintenance performed in accordance with the PMCS charts before storing. When removing the
equipment from administrative storage, the PMCS shall be performed to ensure operational
readiness. Refer to TM 11-5820-870-12 for PMCS.
Administrative storage of equipment shall be done in accordance with TM 740-90-1, Administrative
Storage of Equipment. Disassembly and repacking of equipment for shipment or limited storage are
covered in TM 11-5820-670-12.
1-7. NOMENCLATURE CROSS-REFERENCE LIST.
This list contains names used throughout this manual in place of official nomenclature.
1-2
COMMON NAME
OFFICIAL NOMENCLATURE
control unit
headset/microphone
radio set
receiver-transmitter
Control, Radio Set C-7088/ARC-131
Headset H-78/AIC
Radio Set AN/ARG-131
Receiver-Transmitter RT-823/ARC-131
TM 11-5820-670-30
1-8. SAFETY, CARE, AND HANDLING.
Observe all warnings, cautions and notes in this manual. This equipment can be extremely dangerous
if these instructions are not followed. Ensure the following caution is observed as well.
CAUTION
Receiver-transmitter of radio set is compact and heavy. Use caution when handling it.
Serious damage could result if mishandled and dropped.
Section II EQUIPMENT DESCRIPTION
Subject
General . . . . . . . . . . . . . . . . . . . . . . . . . . . . . . . . . . . . . . . . . . . . . . . . . . . . . . . . . . . . . . . . . . . . . . . . . . . . . . . . . . . . . . .
Equipment Characteristics, Capabilities, and Features . . . . . . . . . . . . . . . . . . . . . . . . . . . .
Differences Between Models/Silicon Versions . . . . . . . . . . . . . . . . . . . . . . . . . . . . . . . . . . . . . . . . . .
Para
Page
1-9
1-10
1-11
1-3
1-3
1-3
1-9. GENERAL.
This section contains overall information about the Radio Set AN/ARC-131. It includes references to
publications that provide detailed equipment description and data, and coverage of major differences
between radio sets. There is only one model of the radio set but functional modules in the receivertransmitter may contain either germanium or silicon semiconductors.
1-10. EQUIPMENT CHARACTERISTICS, CAPABILITIES, AND FEATURES.
Equipment characteristics, capabilities, and features of Radio Set AN/ARC-131 and its parts are
found in TM 11-5820-670-12.
1-11. DIFFERENCES BETWEEN MODELS/SILICON VERSIONS.
This paragraph contains information covering redesigned receiver-transmitter (rt) modules using
silicon semiconductors in lieu of germanium devices. Operation of the radio set is not affected by interchange of modules in the receiver-transmitter.
MODULES CONTAINING SILICON SEMICONDUCTORS
Modules equipped with silicon semiconductors are identified by the suffix letter A. For example,
A8100A denotes a silicon version transmitter modulator. The A8100 is the germanium version of the
same module.
It is possible that radios in field might be equipped with a combination of germanium and silicon
modules in the receiver and transmitter sections, as listed below.
Mixer Assembly A1400A
Local Oscillator A1500A
Tuner Power Supply A1600A
CRS Oscillators A2000A
Voltage Regulator A2100A
CRS Harmonic Generator A3100A
CRS Balanced Mixer A3200A
CRS Second Mixer A3300A
CRS First and Second IF. Amps A3400A
CRS Limiter A3500A
CRS Hunt Discriminator A3600A
CRS Phase Discriminator A3700A
Master Oscillator A6300A
Buffer Amplifier A6400A
11.5 MHz Modulator A8100A
First and Second IF. Amps A8300A
Hunt Generator A8400A
1-3
TM 11-5820-670-30
1-11. DIFFERENCES BETWEEN MODELS/SILICON VERSIONS. (CONT)
INTERCHANGEABILITY OF MODULES
Germanium and silicon modules may be used together in the same radio with the following exceptions.
Only germanium versions of the following modules should be used:
First and Second IF. Amps A4100)
IF. Amps and Limiter A4200
Squelch Amplifier A5200
Squelch Filter A5300
Audio and Squelch Preamplifier A4300
AF Amplifier A5400
ALINEMENT DIFFERENCES
With the following exception, there is no difference in germanium and silicon version alinement
procedures.
Transmitter 11.5 MHz Modulator A8100/A8100A
Rearrangement of the circuit board in the A8100A silicon version has moved the shorting point for
modulator testing and alinement. Additionally, the polarity of the variable capacitance diodes has
been reversed, eliminating the 180-degree phase shift in the modulation. This permits compatible
interface with various data systems.
Section Ill PRINCIPLES OF OPERATION
Subject
General . . . . . . . . . . . . . . . . . . . . . . . . . . . . . . . . . . . . . . . . . . . . . . . . . . . . . . . . . . . . . . . . . . . . . . . . . . . . . . . . . . . .
RECEIVE MODE
Receiver Signal Flow . . . . . . . . . . . . . . . . . . . . . . . . . . . . . . . . . . . . . . . . . . . . . . . . . . . . . . . . . . . . . . . . .
Local Oscillator AFC/Crystal Reference System . . . . . . . . . . . . . . . . . . . . . . . . . . . . . . . . .
CRS Balanced Mixer A3200 . . . . . . . . . . . . . . . . . . . . . . . . . . . . . . . . . . . . . . . . . . . . . . . . . . . . . . . .
CRS Second Mixer A3300 and Crystal Switch A2000 . . . . . . . . . . . . . . . . . . . . . . . . . . .
CRS First and Second IF. Amplifier A3400/CRS Third IF. Amplifier
and Limiter A3500 . . . . . . . . . . . . . . . . . . . . . . . . . . . . . . . . . . . . . . . . . . . . . . . . . . . . . . . . . . . . . . . .
CRS Hunt Discriminator A3600, CRS Phase Discriminator A3700, and
Reference Oscillator A2000 . . . . . . . . . . . . . . . . . . . . . . . . . . . . . . . . . . . . . . . . . . . . . . . . . . . . .
Time Delay Circuit P/O Module A2100 . . . . . . . . . . . . . . . . . . . . . . . . . . . . . . . . . . . . . . . . . . .
Gearbox Assembly A9700 . . . . . . . . . . . . . . . . . . . . . . . . . . . . . . . . . . . . . . . . . . . . . . . . . . . . . . .
RF Control Assembly P/O Module A4500 (Receive Mode) . . . . . . . . . . . . . . . . . . . . . . .
Antenna Tuning and Protection Module A1100 . . . . . . . . . . . . . . . . . . . . . . . . . . . . . . . . . . . . . .
First RF Amplifier Module A1200 . . . . . . . . . . . . . . . . . . . . . . . . . . . . . . . . . . . . . . . . . . . . . . . . . . . . . . . .
Second RF Amplifier Module A1300 . . . . . . . . . . . . . . . . . . . . . . . . . . . . . . . . . . . . . . . . . . . . . . . . . . . . .
Mixer and Buffer Amplifier A1400 (Receive Mode) . . . . . . . . . . . . . . . . . . . . . . . . . . . . . . . . . . .
Local Oscillator Module A1500 . . . . . . . . . . . . . . . . . . . . . . . . . . . . . . . . . . . . . . . . . . . . . . . . . . . . . . .
IF. Attenuator Module A4900 (Receive Mode) . . . . . . . . . . . . . . . . . . . . . . . . . . . . . . . . . . . . . . . . .
First and Second IF. Amplifier A4100 . . . . . . . . . . . . . . . . . . . . . . . . . . . . . . . . . . . . . . . . . . . . . . . . . . .
Third, Fourth and Fifth IF. Amplifier, Limiter and Discriminator
A4200 . . . . . . . . . . . . . . . . . . . . . . . . . . . . . . . . . . . . . . . . . . . . . . . . . . . . . . . . . . . . . . . . . . . . . . . . . .
Audio and Squelch Preamplifier Module A4300 . . . . . . . . . . . . . . . . . . . . . . . . . . . . . . . . . . . . .
Audio Amplifier Module A5400 (Receive Mode) . . . . . . . . . . . . . . . . . . . . . . . . . . . . . . . . . . .
Receiver Squelch Amplifier Module A5200 and Squelch Filter Module
A5300 (Receive Mode) . . . . . . . . . . . . . . . . . . . . . . . . . . . . . . . . . . . . . . . . . . . . . . . . . . . . . . . . . . . . .
1-4
Para
Page
1-12
1-6
1-13
1-14
1-15
1-16
1-7
1-8
1-10
1-11
1-17
1-14
1-18
1-19
1-20
1-21
1-22
1-23
1-24
1-25
1-26
1-27
1-28
1-15
1-19
1-20
1-21
1-22
1-22
1-23
1-23
1-24
1-26
1-26
1-29
1-30
1-31
1-27
1-28
1-28
1-32
TM 11-5820-670-30
Para
Page
1-33
1-34
1-35
1-36
1-37
1-38
1-39
1-40
1-41
1-42
1-43
1-44
1-45
1-46
1-47
1-48
1-49
1-31
1-33
1-36
1-36
1-37
1-38
1-39
1-40
1-41
1-42
1-43
1-44
1-45
1-45
1-45
1-46
1-48
HOMING MODE
Homing Signal Flow . . . . . . . . . . . . . . . . . . . . . . . . . . . . . . . . . . . . . . . . . . . . . . . . . . . . . . . . . . . . . . . . . . . . . . . . . 1-50
RF Control Assembly P/O Module A4500 (Homing Mode) . . . . . . . . . . . . . . . . . . . . . . . . . . 1-51
IF. Attenuator Module A4900 (Homing Mode) . . . . . . . . . . . . . . . . . . . . . . . . . . . . . . . . . . . . . . . . . 1-52
Homer-Detector Amplifier Assembly A4800 . . . . . . . . . . . . . . . . . . . . . . . . . . . . . . . . . . . . . . . . . . . . 1-53
1-50
1-52
1-53
1-54
RETRANSMIT MODE
Retransmit Operation . . . . . . . . . . . . . . . . . . . . . . . . . . . . . . . . . . . . . . . . . . . . . . . . . . . . . . . . . . . . . . . . . . . . . . . . 1-54
1-58
POWER AND CONTROL CIRCUITS
VHF Tuner Power Supply Module A1600 . . . . . . . . . . . . . . . . . . . . . . . . . . . . . . . . . . . . . . . . . . . . . . . .
Voltage Regulator Assembly A2100 . . . . . . . . . . . . . . . . . . . . . . . . . . . . . . . . . . . . . . . . . . . . . . . . . . . . .
Power Supply Assembly A9500 . . . . . . . . . . . . . . . . . . . . . . . . . . . . . . . . . . . . . . . . . . . . . . . . . . . . . . . . . .
Receiver-Transmitter lntraUnit Circuit Functioning . . . . . . . . . . . . . . . . . . . . . . . . . . . . . . . . . . .
Control, Radio Set C-7088/ARC-131 Functioning . . . . . . . . . . . . . . . . . . . . . . . . . . . . . . . . . . . . . .
Radio Set AN/ARC-131 Interunit Circuit Details . . . . . . . . . . . . . . . . . . . . . . . . . . . . . . . . . . . .
Tuning System Radio Set AN/ARC-131 . . . . . . . . . . . . . . . . . . . . . . . . . . . . . . . . . . . . . . . . . . . . . . . . . . .
1-59
1-60
1-60
1-81
1-63
1-68
1-77
Subject
TRANSMIT MODE
Transmitter Signal Flow . . . . . . . . . . . . . . . . . . . . . . . . . . . . . . . . . . . . . . . . . . . . . . . . . . . . . . . . . . . . . . . . . . .
Master Oscillator Frequency Control Loop . . . . . . . . . . . . . . . . . . . . . . . . . . . . . . . . . . . . . . . . .
Audio Mixer Module A8600 . . . . . . . . . . . . . . . . . . . . . . . . . . . . . . . . . . . . . . . . . . . . . . . . . . . . . . . . . . . . . . .
11.5 MHz Modulator Module A8100 . . . . . . . . . . . . . . . . . . . . . . . . . . . . . . . . . . . . . . . . . . . . . . . . . . . . . .
First and Second IF. Amplifiers Module A8300 . . . . . . . . . . . . . . . . . . . . . . . . . . . . . . . . . . . . . .
Phase Discriminator Module A8200 . . . . . . . . . . . . . . . . . . . . . . . . . . . . . . . . . . . . . . . . . . . . . . . . . . . . .
Hunt Generator Module A8400 . . . . . . . . . . . . . . . . . . . . . . . . . . . . . . . . . . . . . . . . . . . . . . . . . . . . . . . . . . . . .
Master Oscillator Module A6300 . . . . . . . . . . . . . . . . . . . . . . . . . . . . . . . . . . . . . . . . . . . . . . . . . . . . . . . . . .
Buffer Amplifier Module A6400 and Regulator Assembly . . . . . . . . . . . . . . . . . . . . . . . . . . . .
Isolation Amplifier Module A6600 . . . . . . . . . . . . . . . . . . . . . . . . . . . . . . . . . . . . . . . . . . . . . . . . . . . . . . . .
Mixer and Buffer Amplifier A1400 (Transmit Mode) . . . . . . . . . . . . . . . . . . . . . . . . . . . . . . . . . . .
Hunt Cutoff Detector P/O Module A4200 . . . . . . . . . . . . . . . . . . . . . . . . . . . . . . . . . . . . . . . . . . . . . . . .
Audio Amplifier Module A5400 (Transmit Mode) . . . . . . . . . . . . . . . . . . . . . . . . . . . . . . . . . . . . . .
Squelch Amplifier Module A5200 (Transmit Mode) . . . . . . . . . . . . . . . . . . . . . . . . . . . . . . . . . . . .
Automatic Gain Control (AGC) . . . . . . . . . . . . . . . . . . . . . . . . . . . . . . . . . . . . . . . . . . . . . . . . . . . . . . . . . .
RF Amplifier Assembly Module A6500 . . . . . . . . . . . . . . . . . . . . . . . . . . . . . . . . . . . . . . . . . . . . . . . . .
RF Control Assembly P/O Module A4500 (Transmit Mode) . . . . . . . . . . . . . . . . . . . . . . . . .
1-55
1-56
1-57
1-58
1-59
1-60
1-61
1-5
TM 11-5820-670-30
1-12. GENERAL.
This section contains information covering principles of operation of major electronic assemblies of
the receiver-transmitter, beginning with the receiver. Material is presented in functional block
diagram format, with supporting text which explains the operation of each electronic module in the
radio.
Details pertaining to operation of most individual components in each module are not discussed in this
section. instead, the text explains overall effect each module has on an incoming signal, and how the
module contributes to the operation of the radio. Individual circuit details are in the foldouts in the
back of this manual.
At the direct support maintenance level, electronic components within radio modules are not
replaced. Because of this maintenance approach, this section generally does not discuss the performance of specific circuits and components such as diodes and transistors. In fact, it is not necessary to understand how circuits in a module operate to effectively troubleshoot or aline it. However, it
is very important to know what a module actually does in order to perform signal checks at test points
for the purpose of testing, troubleshooting, or alining the module.
This section also explains the principles of operation of the control unit and discusses the flow of
signals between the control unit and the receiver-transmitter in various modes of operation.
To present the technician with an effective understanding of principles of operation, both simplified
and detailed signal flow of all operational modes is in this section. First, an overview or simplified
paragraph explaining signal flow for each mode is presented, followed by a detailed description of the
operation of the modules in the particular mode.
Certain modules in the radio set operate in more than one mode; therefore, these modules are
explained in paragraphs pertaining to the selected mode. This approach allows the technician to
follow the signal flow through the modules of the radio set in each mode without interruption.
Discussion of the radio set operating in the retransmit mode is limited to an explanation of the control
circuits when the radio is set for retransmit so as not to duplicate other areas of the manual. Explaining
the signal flow through the modules when the radio is set for retransmit is not necessary since the rf
flows through modules already discussed in the transmit and receive modes of operation.
1-6
TM 11-5820-670-30
1-13. RECEIVER SIGNAL FLOW.
A system block diagram showing receiver signal flow can be found on FO-1 in the back of this manual.
Refer to the foldout while reading the text in this paragraph.
In the receive mode of operation, frequency modulated rf signals from the communications antenna
are applied to reflectometer (1) and sidetone gate detector (2), in module A4500. Due to the low
level of received signal, the reflectometer and sidetone gate detector will not operate; however, these
stages will provide a path for the rf signal to flow to transmit/receive relay K4501.
In the receive mode, relays K4501 and K4502 are deenergized. When these relays are deenergized,
frequency modulated rf is applied from the sidetone gate detector to the antenna tuning and protection
circuits in module A1100 (3). The tuning circuits pass signals of the frequency to which the receiver is
tuned and reject all other frequencies. The protection circuit contains a neon lamp which is used for
attenuating high levels of rf power that may be entering the receiver from a nearby transmitter.
Low level signals leaving the antenna tuning and protection circuits enter first rf amplifier, module
A1200 (4), for amplification. The signal is then applied to second rf amplifier, module A1300 (5) for
further amplification.
Amplified rf is then applied to mixer module A1400 (6), where the signals are heterodyned (mixed)
with the output of local oscillator module A1500 (7). The local oscillator generates frequencies of
41.50 MHz through 64.45 MHz, and is kept from drifting by the crystal reference system (crs). Crs
(21) is covered in detail in paragraph 1-14. For all frequency settings on the control unit through
gearbox assembly A9700 (20) in the
band range, 30 MHz through 52.95 MHz, the local oscillator
runs exactly 11.5 MHz above the selected frequency. For all frequency settings on the control unit in
the
band range, 53 MHz through 75.95 MHz, the local oscillator runs exactly 11.5 MHz below the
selected frequency.
Mixer module A1400 (6) produces sum or difference frequencies as a result of the mixing process. All
frequencies, except 11.5 MHz intermediate frequency, are rejected by band-pass filter FL4001 (9).
In the receive mode, sum or difference frequencies entering if. attenuator module A4900 (8) from the
mixer are not attenuated. Only in homing mode of operation are the signals attenuated. The 11.5 MHz
if. from the mixer and if. attenuator is passed through band-pass filter FL4001 (9) and applied to first
and second if. amplifiers module A4100 (10) for amplification.
Amplified if. from module A4100 (10) is filtered by band-pass filter FL4002 (11) to eliminate noise
generated in the receiver and then applied, for further amplification, to third, fourth, and fifth if.
amplifiers in module A4200 (12).
1-7
TM 11-5820-670-30
1-13. RECEIVER SIGNAL FLOW. (CONT)
The 11.5 MHz if. output from the fifth if. amplifier is applied to limiter module A4200 (13). The limiter
clips the positive and negative peaks of the input signal to ensure an output of constant amplitude. If
the limiter output is not of constant amplitude, a distorted audio output occurs from the discriminator
in module A4200 (14).
The clipped if. modulated signal is applied to the discriminator from the limiter. The discriminator
demodulates the frequency modulated if. signal and applies the resultant audio signal to the receiver
audio and squelch preamplifier.
The receiver audio and squelch preamplifier module A4300 (15) is a three-stage, direct coupled,
class A amplifier which amplifies the audio signal and applies it to audio amplifier module A5400 (16).
The audio signal is amplified in the audio amplifier and applied to low-pass filter FL5501 (17) and
squelch amplifier module A5200 (18). Unfiltered audio signals from audio amplifier module A5400
(16) are applied through relay K5501 to activate receiver squelch amplifier A5200 (18) and squelch
filter A5300 (19).
The squelch amplifier, depending on the setting of the squelch switch on the control unit, applies or
removes power from the receiver audio amplifier to squelch or unsquelch the radio set.
The squelch function is covered in greater detail in paragraph 1-32.
Audio signals below 3000 Hz pass through filter FL5501 and then are reapplied to the audio amplifier
for further amplification. Audio signals are then coupled to the control unit and interphone amplifier
where the headset/microphone is connected.
1-14. LOCAL OSCILLATOR AFC/CRYSTAL REFERENCE SYSTEM.
Correct operation of the receiver depends on an accurately controlled local oscillator whose frequency
is maintained with minimal variation. At any frequency selected at the control unit, the Iocal oscillator
is held to a tolerance of ± 3.5 kHz by the action of the crs. Therefore, the crs functions as an
automatic frequency control (aft) loop.
Refer to the system block diagram (FO2) showing crs signal flow while reading the text in this paragraph.
The output of iocal oscillators (1) is applied to high-pass filter FL3002 (2) and then to balanced mixer
A3200 (3). At the same time, 12 frequencies (1 to 12 MHz) are applied to the crs balanced mixer from
crystal-controlled harmonic generator A3100 (4).
The inputs to balanced mixer A3200 are heterodyned, thereby producing 12 sum and difference
frequencies. Two frequencies closest to 53 MHz are passed by band-pass filter FL3003 (5), while the
other signals are attenuated. The two accepted frequencies are then applied to crs second mixer
A3300 (6), and heterodyned with the output of interpolation oscillator (7).
Ten crystals are within interpolation oscillator (crystal switch A2000). Each crystal corresponds to a
group of frequencies tunable at the control unit. When a frequency is selected, the radio’s gear train
also selects one of ten crystals, which precisely controls the frequency of the interpolation oscillator.
1-8
TM 11-5820-670-30
LOCAL OSCILLATOR AFC/CRYSTAL REFERENCE SYSTEM. (CONT)
The heterodyning process in crs second mixer A3300 (6) produces sum and difference frequencies.
Two of the difference frequencies are very close to 5.625 MHz. The frequency closest to 5.625 MHz is
coupled across a 5.625 MHz tuned tank within the second mixer, to first and second if. amplifiers
A3400 (8). Other frequencies are greatly attenuated by the resonant tank circuit.
After amplification, the if. signals are filtered by FL3004 (9), which is sufficiently selective to
attenuate any unwanted frequencies. The third if. amplifier and limiter A3500 (10) functions in a
manner similar to that described in paragraph 1-29, covering amplifier and limiter A4200 stages.
Output from amplifier and limiter A3500 (10) is applied to the phase discriminator and hunt generator
at the same time to coarse tune, then fine tune the Iocal oscillator.
COARSE TUNING THE LOCAL OSCILLATOR
The output from amplifier and limiter A3500 is applied to band-pass filter FL3005 (11) to attenuate any
unwanted frequencies which may have passed through the limiter. From the band-pass filter, the
signals are applied to the hunt discriminator A3600 (12).
The hunt discriminator contains a triple tuned travis-type discriminator similar to the one used in
module A4200 described in paragraph 1-29. Large deviations away from the discriminator’s 5.625
MHz center frequency cause the discriminator to output a plus or minus dc signal with an ac component riding on it.
Both dc and ac outputs are applied to damping network (13), where the ac component is damped or
attenuated. From the damping network, a positive or negative dc error signal is applied to local
oscillator (1). The error signal biases the local oscillator close to the correct frequency by a hunting
action. That is an initial large dc error signal followed by smaller error signal voltages until the
oscillator is close enough to its correct frequency for the phase discriminator to begin fine tuning.
The hunt discriminator can coarse tune the Iocal oscillator when its frequency error is within
±400 kHz.
FINE TUNING THE LOCAL OSCILLATOR
The hunt discriminator is sensitive to large errors in local frequency, while phase discriminator (14)
responds to small errors. The phase discriminator compares the fixed output of reference oscillator
(15) with the variable output of limiter (10). When two signals are of unequal frequency (due to
incorrect local oscillator frequency), the phase difference causes the phase discriminator to output a
dc error voltage which is applied to the local oscillator to bias it into correct frequency operation.
1-9
TM 11-5820-670-30
1-15. CRS BALANACED MIXER A3200.
The balanced mixer accepts inputs from the following two sources:
EL1AT090
Local oscillator through high-pass filter FL3002
Harmonic generator
Local oscillator signals are applied to the mixer through a buffer amplifier to prevent loading down the
local oscillator. Twelve frequencies, 1 to 12 MHz, are applied to the mixer with the local oscillator’s
output. The signals are heterodyned to produce four strong mixed output frequencies.
BALANCED MIXER OPERATING EXAMPLE
Assume the radio is tuned to 30 MHz, in which case the local oscillator runs to 41.50 MHz. The 41.50
MHz frequency is mixed with 12 signals generated by the harmonic generator, producing a mixed
output containing each of the 12 harmonics, local oscillator frequency, and sum and difference
frequencies listed below:
LOCAL OSCILLATOR
FREQUENCY
41.50 MHz
41.50 MHz
41.50 MHz
41.50 MHz
41.50 MHz
41.50 MHz
41.50 MHz
41.50 MHz
41.50 MHz
41.50 MHz
41.50 MHz
41.50 MHz
1-10
HARMONIC GENERATOR
FREQUENCY
1 MHz
2 MHz
3 MHz
4 MHz
5 MHz
6 MHz
7 MHz
8 MHz
9 MHz
10 MHz
11 MHz
12 MHZ
SUM
42.50
43.50
44.50
45.50
46.50
47.50
48.50
49.50
50.50
51.50
52.50
53.50
MHz
MHz
MHz
MHz
MHz
MHz
MHz
MHz
MHz
MHz
MHz
MHz
DIFFERENCE
40.50 MHz
39.50 MHz
38.50 MHz
37.50 MHz
36.50 MHz
35.50 MHz
34.50 MHz
33.50 MHz
32.50 MHz
31.50 MHz
30.50 MHz
29.50 MHz
TM 11-5820-670-30
1-15. CRS BALANCED MIXER A3200. (CONT)
Since the output of the balanced mixer is applied to a 53 MHz filter (FL3003), only two frequencies
listed are close enough to the filter’s band pass to reach the next crs module without substantial
attenuation. These two frequencies are 52.50 and 53.50 MHz, which are applied to the second mixer.
1-16. CRS SECOND MIXER A3300 AND CRYSTAL SWITCH A2000.
1-11
TM 11-5820-670-30
1-16. CRS SECOND MIXER A3300 AND CRYSTAL SWITCH A2000. (CONT)
SECOND MIXER A3300
The second mixer performs a signal heterodyning function, mixing the output of the 53 MHz filter with a
frequency from the interpolation oscillator.
Within the mixer module is a tuned tank circuit which couples the mixer’s output to first and second if.
amplifiers A3400. The tank circuit is tuned to resonate at 5.625 MHz so that frequencies near 5.625
MHz are coupled, while frequencies below and above tank’s half-power points are severely
attenuated.
CRYSTAL SWITCH A2000
Crystal switch A2000 contains two crystal-controlled oscillators, the interpolation oscillator and
reference oscillator. The reference oscillator is discussed in paragraph 1-18.
The interpolation oscillator’s output frequency is controlled by one of 10 possible crystals which are
selected by a switch through the action of the radio’s gear train. Each crystal corresponds to two
positions of the radio’s tuning controls out of 20 possible 50 kHz increments that can be selected
between whole-number frequencies. For example, in tuning from 30 to 31 MHz, the tuning controls
select frequencies of 30.05, 30.10, 30.15, 30.20, 30.25, etc. The first two steps (30.05 and
30.10) correspond to a particular crystal in the crystal switch. The next two steps (30.15 and 30.20)
have a different corresponding crystal. This pattern repeats itself until all 10 crystals have been
individually selected. When the frequency selection controls reach 31.00 MHz, the same crystal is
selected as was used for 30.00 MHz.
The following table lists 10 pairs of radio dial frequencies between each whole-number setting, the
number of corresponding crystal, and the interpolation oscillator’s frequency when that particular
crystal is selected.
RADIO DIAL DECIMAL (kHz)
FREQUENCY
0.05 or 0.10
0.15 or 0.20
0.25 or 0.30
0.35 or 0.40
0.45 or 0.50
0.55 or 0.60
0.65 or 0.70
0.75 or 0.80
0.85 or 0.90
0.95 or 0.00
1-12
CRYSTAL
NUMBER
OSCILLATOR
FREQUENCY
Y2007
Y2008
Y2009
Y2010
Y2005
Y2004
Y2003
Y2002
Y2001
Y2006
46.950
47.050
47.150
47.250
47.350
47.450
47.550
47.650
47.750
46.850
MHz
MHz
MHz
MHz
MHz
MHz
MHz
MHz
MHz
MHz
TM 11-5820-670-30
1-16. CRS SECOND MIXER A3300 AND CRYSTAL SWITCH A2000. (CONT)
SECOND MIXER AND CRYSTAL SWITCH OPERATING EXAMPLE – Radio Frequency Selector Switches
Set to 30.00 MHz
EL1AT092
Two strong frequencies enter the second mixer from the 53 MHz filter, 53.50 and 52.50 MHz. These
signals are heterodyned with the output from the interpolation oscillator.
With the radio tuned to 30 MHz, crystal Y2006 is selected. This crystal sets the interpolation
oscillator’s output at 46.850 MHz. When 46.850 MHz is mixed with 53.50 and 52.50 MHz, several
strong frequencies are produced. However, difference frequencies are closest to the 5.625 MHz
resonant frequency of A3300 tank circuit.
The two difference frequencies are produced as follows:
53.500
-46.850
6.650
52.500
-46.850
5.650
Of the two difference frequencies, 5.650 MHz is coupled across the tank to the next module. The other
frequency, 6.650, is beyond the tank’s bandwidth and, therefore, is attenuated.
The example presented assumes the local oscillator is running exactly at its correct frequency. In this
case, exactly 5.65 MHz is passed by the second mixer’s tank circuit. However, if the local oscillator is
running above or below 41.5 MHz when the radio is tuned to 30.00 MHz, heterodyning occurring in
mixer A3200 and in second mixer A3300 causes the second mixer to output a signal that differs from
5.65 MHz by the amount the local oscillator differs from 41.5 MHz. When the second mixer’s output is
not exactly 5.65 MHz, an error signal is generated to correct the local oscillator.
1-13
TM 11-5820-670-30
1-17. CRS FIRST AND SECOND IF. AMPLIFIER A3400/CRS THIRD IF. AMPLIFIER AND LIMITER
A3500.
EL1AT093
An intermediate frequency from the second mixer is applied to the first if. amplifier. The intermediate
frequency is approximately 5.65 MHz for all front panel decimal control settings which are even, such
as 30.00, 30.10, 30.20, etc. An if. of approximately 5.60 MHz is applied to the first if. amplifier for
all odd decimal control settings, such as 30.05, 30.15, 30.25, etc. if. inputs are given as approximations because they vary in response to the local oscillator’s frequency error.
Further amplification is provided by the second if. amplifier after which the signal is passed through
filter FL3004. The filter’s band pass is narrow and therefore causes attenuation of any frequencies
other than the if. which might pass through first and second if. amplifier A3400.
1-14
TM 11-5820-670-30
1-17. CRS FIRST AND SECOND IF. AMPLIFIER A3400/CRS THIRD IF. AMPLIFIER AND LIMITER
A3500. (CONT)
The third if. amplifier increases the signal strength sufficiently to drive the limiter. The limiter clips the
upper and lower peaks of the if. to maintain a constant amplitude required by the travis-type discriminator in hunt discriminator A3600. Filter FL3005 provides additional attenuation of all signals other
than the if. input.
1-18. CRS HUNT DISCRIMINATOR A3600, CRS PHASE DISCRIMINATOR A3700, AND REFERENCE
OSCILLATOR A2000.
EL1AT094
HUNT DISCRIMINATOR A3600
If. signals with a frequency of approximately 5.6 or 5.65 MHz are applied to buffer amplifier A3600,
which prevents loading down the limiter. The buffer amplifier’s output is then fed to the travis-type hunt
discriminator.
1-15
TM 11-5820-670-30
1-18. CRS HUNT DISCRIMINATOR A3600, CRS PHASE DISCRIMINATOR A3700, AND REFERENCE
OSCILLATOR A2000. (CONT)
The hunt discriminator is tuned to a 5.625 MHz center frequency. It will therefore generate output
signals when its if. input is substantially under or over 5.625 MHz, which condition corresponds to a
large local oscillator error.
The hunt discriminator generates two kinds of signals, one of which is applied to the local oscillator
through the damping network to coarse tune the oscillator. When the local oscillator is far off frequency (eg, -250 kHz), as it could be when changing channels, the hunt discriminator outputs a
negative dc voltage. This voltage can be measured at TP3003 with a dc voltmeter. When changing
channels, the local oscillator could be off frequency by some positive number of cycles, in which case
a positive voltage could be measured at TP3003. The plus or minus dc signal is applied to the local
oscillator as an error voltage, which corrects the local oscillator’s frequency. Therefore, the dc
voltage at TP3003 is only momentary; that is, it disappears when the local oscillator approaches the
correct frequency.
Besides the dc error voltage, the hunt discriminator outputs an ac signal riding on the dc level. This
occurs because the local oscillator can drift around its steady state tuned frequency. The rate of drift
produces an ac signal from the hunt discriminator at the oscillator’s drift rate. However, this ac component is almost completely attenuated in the phase discriminator’s damping network, and therefore
has no effect on the local oscillator.
The hunt discriminator is capable of outputting an error signal as great as ± 2.6 vdc measured at
TP3001 when a ground is applied to TP3701 (shorting the phase discriminator’s output) and the local
oscillator is running ± 350 kHz off frequency. Strong dc output from the hunt discriminator rapidly
biases the local oscillator to within approximately 100 kHz of its correct frequency. Once the Iocal
oscillator is running ± 100 kHz from center frequency, the hunt discriminator is not sensitive enough
to fine tune the oscillator further. At this point, the phase discriminator begins to take control.
CRS PHASE DISCRIMINATOR A3700
Phase discriminator A3700 contains a ring modulator similar to that found in transmitter phase
discriminator A8200. It compares the phase of the signals from buffer and driver amplifiers A3700,
and outputs a dc error voltage when a phase difference exists. An ac component will ride the dc Ievel
due to oscillator drift, but the ac component is attenuated in the damping network and, therefore, is
not measurable at TP3001.
Once the hunt discriminator forces the local oscillator close to its correct frequency, the phase
discriminator maintains a ±3.5 kHz oscillator tolerance. Because of its sensitivity to small errors in
the oscillator frequency, the phase discriminator performs a fine tuning function.
REFERENCE OSCILLATOR A2000
The output of reference oscillator A2000 is controlled by one of two crystals: a 5.60 MHz crystal and
another at 5.65 MHz. The crystals are selected by a switch through the action of the radio’s gear train.
The switch contains contacts that correspond to 20 possible 50 kHz increments that can be selected
between whole-number frequencies. All frequencies whose decimal digits end in zero utilize the 5.65
MHz crystal. For example, the rotary switch selects 5.65 MHz crystal for 30.00, 30.10, 30.20, 30.30
MHz, etc. Decimal frequencies ending in five use 5.80 MHz crystal such as 30.05, 30.15, 30.25 MHz.
1-16
TM 11-5820-670-30
1-18. CRS HUNT DISCRIMINATOR A3600, CRS PHASE DISCRIMINATOR A3700, AND REFERENCE
OSCILLATOR A2000. (CONT)
HUNT DISCRIMINATOR, PHASE DISCRIMINATOR; REFERENCE OSCILLATOR – WORKING EXAMPLE –
LOCAL OSCILLATOR AT CORRECT FREQUENCY
EL1AT095
If the radio is set to 30.00 MHz, the local oscillator runs at 41.50 MHz, assuming that it is properly
alined. In this case, the limiter output is 5.65 MHz.
When 5.65 MHz is applied to the hunt discriminator through the buffer amplifier, no dc signal is fed
from the hunt discriminator to the damping network. Therefore, no dc voltage will be present at
TP3001 due to hunt discriminator action.
The same 5.65 MHz signal applied to the hunt discriminator is fed to the driver amplifier in the phase
discriminator module. This frequency is compared with the output of the reference oscillator which is
applied to buffer amplifier A3700.
1-17
TM 11-5820-670-30
1-18. CRS HUNT DISCRIMINATOR A3600, CRS PHASE DISCRIMINATOR A3700, AND REFERENCE
OSCILLATOR A2000. (CONT)
With the radio set to 30.00 MHz, the 5.65 MHz crystal is selected, causing the reference oscillator to
output a 5.65 MHz fixed frequency. Since the reference oscillator and limiter output frequencies are
the same, the phase discriminator does not output a dc voltage to the damping network. Therefore,
no dc voltage will be present at TP3001 due to the phase discriminator action.
In actual operation even with the local oscillator almost perfectly alined, a slight plus or minus dc
voltage is present at TP3001. Its presence is due to normal imbalances in the hunt discriminator and
phase discriminator circuits.
HUNT DISCRIMINATOR, PHASE DISCRIMINATOR; REFERENCE OSCILLATOR-WORKING EXAMPLE –
LOCAL OSCILLATOR RUNNING TOO HIGH
E L 1AT096
Assume the radio is set to 30.00 MHz and the local oscillator is misalined, thereby causing it to
operate at 41.550 MHz. The output of the limiter, 5.70 MHz, is 50 kHz higher than it would be if the
oscillator were exactly on frequency.
1-18
TM 11-5820-670-30
1-18. CRS HUNT DISCRIMINATOR A3600, CRS PHASE DISCRIMINATOR A3700, AND REFERENCE
OSCILLATOR A2000. (CONT)
The two signals entering the phase discriminator are 5.65 MHz from the reference oscillator and 5.70
MHz from limiter A3500. Because of the difference in frequencies, the phase discriminator outputs a
dc voltage. This positive dc voltage is measurable at TP3001.
1-19. TIME DELAY CIRCUIT P/O MODULE A2100.
EL1AT124
Voltage regulator assembly A2100 contains the time delay circuit which operates relay K3001 in the crs
when the 16 vdc supply is turned on. As power is applied, current flows through Q2103 and the coil of
relay K3001. Relay K3001 energizes, sending the error signal from the crs phase discriminator to
ground, while Q2103 charges the charging network. When the charging network is fully charged,
Q2103 is biased off, deenergizing K3001, which then allows the error signal from the phase discriminator to correct the frequency of the local oscillator.
When the radio set is tuning, by rotating the tuning dials, gearbox assembly A9700 supplies a ground
signal to the charging network. The ground signal discharges the network and causes relay K3001 to
energize. When K3001 is energized, the error signal from the phase discriminator flows to ground,
allowing the local oscillator to change frequency.
If power is removed momentarily and then reapplied, components in the charging network will allow
the time delay circuit to operate.
1-19
TM 11-5820-670-30
1-20. GEARBOX ASSEMBLY A9700.
Refer to FO-3 in the back of this manual while reading the text in this paragraph.
The electrical portion of gearbox assembly A9700 contains a standard Iedex stepping solenoid having
20 positions of 18 degrees rotation per step, a 24-position switch driven by a dc motor, and a dc motor
to control band switching.
The ledex drive is used to select the last two digits of the frequency selected and positions S2001 in rf
oscillator assembly A2000 which contains reference oscillator Q2001 and interpolation oscillator
Q2002. The 24-position switch (S9705) is driven by dc motor B9703 and provides an accurate
mechanical output to the vhf tuner, oscillator buffer, and rf amplifier assemblies.
The gearbox assembly automatically tunes the radio set to the frequency selected at the control unit.
The tuning control signals are applied to 0.05 MHz select lines in various combinations according to
the frequency selected. Assuming the operating frequency chosen is 30.00 MHz, ground signals are
applied to control lines A and E of both 0.05 MHz select and MHz select circuits.
The ground signals are applied to one side of both code comparators and are connected to contacts 3
and 7 of Iedex switch S9703 and contacts 5 and 6 of switch S9705.
The network consisting of diodes CR9702 through CR9706 and transistors Q9701 and Q9702 detects
mispositioning of switch S9703 for any frequency selected at the control unit. Mispositioning is defined
as that position of the switch rotor which causes either a short or an open condition to exist at both ends
of a particular control line. In normal operation, when a ground signal is applied to one end of the
control unit, the other end should be open at the switch rotor in the gearbox assembly. Those control
lines not grounded at the control unit should be shorted at the switch rotor in the gearbox.
The network of diodes CR9714 through CR9718 with transistors Q9703 and Q9704 perform the same
function for switch S9705. For discussion purposes, only the circuit of switch S9705 will be considered
since the operation of switch S9703 and associated diode transistor network are identical. After tuning
to the desired operating frequency, in this case 30.00 MHz, switches S9703 and S9705 are positioned
as shown in FO-3. This action causes the base and emitter of transistor Q9703 to be connected
together through the rotor of S9705, causing Q9703 to be turned off.
When the radio set is tuning, the ground signal applied to emitters of Q9701 through Q9704 is sensed
by diodes CR9711 and CR9723 and is applied through pin 14 of connector J9701 to the control coil of
relay K9605 (not shown) in the receiver-transmitter. Relay K9605 energizes and applies + 16 vdc to
the 800 Hz relaxation oscillator in receiver-audio amplifier assembly A5400. The 800 Hz tone is
applied to the audio output line and operator’s headset during the tuning process.
1-20
TM 11-5820-670-30
1-21. RF CONTROL ASSEMBLY P/O MODULE A4500 (RECEIVE MODE).
EL1AT097
Frequency modulated rf from the communications antenna is applied through the primary of transformer T4501 to the sidetone gate detector. Very low levels of rf are coupled-to the secondary of
transformer T4501 and then applied to the diode circuits. The diode circuits will not produce-an output
unless the rf level is 0.6 watt or greater. In receive mode, the rf level entering the diode circuits is well
below 0.6 watt; therefore, the reflectometer will not operate.
Low level rf entering the sidetone gate detector from the primary of transformer T4501 is applied to
both transmit/receive relay K4501 and transistor Q4501. In receive mode, rf modulated signals
entering relay K4501 are applied to homing relay K4502 and then to antenna tuning and protection
circuits module A1100.
Rf signals applied to transistors Q4501 and Q4502 must be 0.6 watt or greater to bias the transistors.
In receive mode, the rf signal is well below 0.6 watt, therefore, both Q4501 and Q4502 are not biased.
When Q4501 and Q4502 are not biased, the sidetone gate detector will not operate and no sidetone
gate signal is generated.
The reflectometer and sidetone gate detector will operate in transmit mode and are discussed in
paragraph 1-49.
1-21
TM 11-5820-670-30
1-22. ANTENNA TUNING AND PROTECTION MODULE A1100.
Frequency modulated rf signals from transmit/receive relay K4501 are fed through homer relay K4502
to the A1100 tuning circuits which consist of tuned tank circuits. The tuning circuits consist of an
band, 30 MHz through 52.95 MHz, and a
band, 53 MHz through 75.95 MHz. The gear train
selects band
or
, depending on the setting of tuning dials at the control unit. The resonant
frequencies of the tank circuits are varied by rotating the tuning dials, which alter the inductance and
change the overall LC ratio in the
and
frequency range.
The bandwidths of the resonant tank circuits allow passage of signals of the selected frequency while
unwanted frequencies are rejected.
The protection circuit has a neon lamp which shunts excess rf signal strength to ground. From the
protection circuit, rf signals are applied to tuning circuits in the first rf amplifier.
1-23. FIRST RF AMPLIFIER MODULE A1200.
Rf signals are amplified by the first rf amplifier, which consists of vacuum tube V1201. The amplified
signals are then fed to tuning circuits which function similarly to those described in the previous
paragraph.
1-22
TM 11-5820-670-30
1-23. FIRST RF AMPLIFIER MODULE A1200. (CONT)
The A1200 tuning circuits provide additional attenuation of unwanted frequencies by the action of their
narrow band pass resonant tanks.
1-24. SECOND RF AMPLIFIER MODULE A1300.
EL1AT100
Signals from the first rf amplifier are further amplified by the second rf amplifier which contains
vacuum tube V1301. The tuning circuits function similarly to those in module A1200.
1-25. MIXER AND BUFFER AMPLIFIER A1400 (RECEIVE MODE).
1-23
TM 11-5820-670-30
1-15. MIXER AND BUFFER AMPLIFIER A1400 (RECEIVE MODE). (CONT)
Mixer V1401 is the last of three vacuum tubes in the receiver section. During the receive operation it
accepts the following inputs:
Amplified frequency-modulated rf from module A1300
A frequency from the local oscillator which is, in the
11.5 MHz below the frequency of module A1300.
band, 11.5 MHz above or in
band
The two signals applied to the mixer are heterodyned (mixed) to produce an if. which carries audio
intelligence. The 11.5 MHz if. output from the mixer is applied to the following:
If. Attenuator Module A4900
Buffer Amp Q1401
Buffer amp Q1401 does not operate in the receive mode; therefore, no signal is present at its output.
In the receive mode, transistor Q1401 cannot conduct because there is no dc voltage to bias it. In the
transmit mode of operation only, 16 vdc biases buffer amp Q1401.
For a discussion of the mixer and buffer amplifier operating in transmit mode, see paragraph 1-43.
1-26. LOCAL OSCILLATOR MODULE A1500.
EL1AT102
1-24
TM 11-5820-670-30
1-26. LOCAL OSCILLATOR MODULE A1500. (CONT)
TUNING CIRCUITS
The tuning circuits control the frequency of the oscillator. They contain resonant tank circuits with a
mechanical linkage from a variable inductor to the gear train which enables the radio set to tune to the
frequency set by the control unit automatically.
A dc error signal from the crs is applied to a varactor (variable capacitance diode) in the tuning
circuits to alter the tank capacitance, thereby changing the resonant frequency and operating
frequency of the oscillator. The dc error voltage from the crs keeps the oscillator running to within
± 3.5 kHz of the frequency selected on the tuning dials.
LOCAL OSCILLATOR Q1501
Q1501 is a pnp transistor designed into a modified colpitts configuration. Frequency tuning by the
tuning circuits enables the oscillator to operate within a range of 41.50 MHz through 64.45 MHz. The
oscillator applies the frequency to mixer module A1400.
For all frequency settings on the control unit in
band range, the local oscillator o crates 11.5
MHz above the selected frequency. For all frequency settings on the control unit in B band range,
the local oscillator operates 11.5 MHz below the selected frequency. For some examples, see the
following table.
CHANNEL SELECTED
BY TUNING DIALS
SELECTED FREQUENCY
BAND
30-52.95 MHz
RANGE
53-75.95 MHz
LOCAL OSC.
OUTPUT TO
MIXER
30.00 MHz
41.50 MHz
40.55 MHz
52.05 MHz
52.95 MHz
64.45 MHz
53.00 MHz
41.50 MHz
65.00 MHz
53.50 MHz
75.95 MHz
64.45 MHz
BUFFER AMPLIFIER Q1502
Buffer amplifier Q1502 provides amplification, isolation, and impedance matching for the local
oscillator signal being applied to mixer V1401.
BUFFER AMPLIFIER Q1503
Buffer amplifier Q1503 provides amplification, isolation, and impedance matching for the Iocal
oscillator signal being applied to the crs. The Iocal oscillator applies a signal to the crs through buffer
amp Q1503 for the purpose of having a dc error voltage applied back to the local oscillator.
1-25
TM 11-5820-670-30
1-27. IF. ATTENUATOR MODULE A4900 (RECEIVE MODE).
EL1AT103
In receive mode, if. attenuator module A4900 allows if. signals from the mixer to pass through the
diode circuitry with minimum attenuation.
Constant 16 vdc from homer relay K4502 is applied to a zener diode in the if. attenuator module. This
causes the zener diode to apply an increased level of voltage to the diode circuitry, fully biasing the
diodes. When the diodes in the diode circuitry are fully biased, a direct unattenuated path is available
for the if. from the mixer to flow to first and second if. amplifier module A4100.
The if. attenuator functions in transmit mode exactly as it does in receive mode. For a discussion of
the if. attenuator operation in homing mode, see paragraph 1-52.
1-28. FIRST AND SECOND IF AMPLIFIER A4100.
The 11.5 MHz if. carrying audio intelligence from the if. attenuator is applied through band-pass filter
FL4001 to Q4101, which performs the first stage of amplification. Second if. amp Q4102 provides a
second stage of amplification.
Amplified 11.5 MHz if. from the second if. amplifier is applied through filter FL4002 to module A4200.
1-26
TM 11-5820-670-30
1-29. THIRD, FOURTH, AND FIFTH IF. AMPLIFIER, LIMITER AND DISCRIMINATOR A4200.
THIRD, FOURTH, AND FIFTH IF. AMPLIFIERS
EL1AT105
The third, fourth, and fifth if. amplifiers provide additional gain necessary to drive the limiter.
LIMITER AND DISCRIMINATOR
The limiter receives if. from the fifth if. amplifier. The positive and negative peaks of the if. waveform
are clipped by the limiter to provide a constant amplitude signal to the discriminator.
The discriminator is a travis-type containing tuned resonant tanks. When properly alined, the output
is the modulating intelligence with no dc offset. Any residual if. is shunted to ground by an rf trap.
Audio intelligence from the discriminator is applied to audio and squelch preamplifier module A4300.
1-27
TM 11-5820-670-30
1-30. AUDIO AND SQUELCH PREAMPLIFIER MODULE A4300.
The discriminator in module A4200 demodulates both the audio intelligence and the 150 Hz squelch
tone signal. The 150 Hz squelch tone signal will be present in the receiver circuits only if the operator
of a nearby transmitter is transmitting rf. Audio and squelch preamplifier A4300 subjects both these
frequencies to preliminary stages of amplification, then applies the signal(s) to audio amp A5400.
1-31. AUDIO AMPLIFIER MODULE A5400 (RECEIVE MODE).
To follow the signal path through audio amplifier module A5400, see FO-4 while reading the text in this
paragraph.
The audio signal and 150 Hz tone signal from the audio and squelch preamplifier are applied to
amplifier Q5401 (1) in audio amplifier module A5400. See the following table.
NEARBY TRANSMllTER
SQUELCH SWITCH SET TO
TONE
CARR
DIS (disable)
SIGNALS APPLIED
TO AUDIO AMP
audio intelligence and 150 Hz
audio intelligence and noise components
audio intelligence and noise
The amplified output from Q5401 (1) is applied through:
B3 and B2 of relay K5501
Low-pass filter FL5501 (2)
Signals flowing through B3 and B2 of relay K5501 will be used to unsquelch the audio amplifier. The
same signals are also applied to low-pass filter FL5501 (2) in order to filter out noise above 3000 Hz.
The audio intelligence is applied from the filter through potentiometer R5405 (3) to amplifier Q5403
(4) for amplification. Potentiometer R5405 provides adjustment of the standard audio output level of
2.8 volts.
1-28
TM 11-5820-670-30
1-31. AUDIO AMPLIFIER MODULE A5400 (RECEIVE MODE). (CONT)
The 150 Hz signal from output of amplifier Q5401 (1) operates relay K5501, which in turn, operates A2
and A1 of relay K5502, sending + 16 vdc to amplifier Q5403 (4). The 16 vdc from relay K5502 biases
amplifiers Q5403 (4), Q5404 (5), and Q5405 (6), which will allow amplified audio intelligence to flow
to transformer T5401 (7).
Amplified audio signals are coupled from transformer T5401 to the interphone amplifier to be heard in
the headset.
800 HZ TONE OSCILLATOR Q5402
The audio amplifier provides an 800 Hz tone signal heard in the headset when the radio set is tuning.
Selection of an operating frequency at the control unit causes the radio set to tune, which, in turn,
causes gearbox assembly A9700 (8) to supply a ground signal to relay K9605 (9). When relay K9605
energizes, + 16 vdc is applied to 800 Hz tone oscillator Q5402 (10) and the audio amplifier. This
causes the audio amp to unsquelch (bias the amplifiers) and allows the oscillator to oscillate.
The output of the 800 Hz oscillator is applied to amplifier Q5403 (4). The signal then flows through
Q5404 (5), Q5405 (6), and transformer T5401 (7) to be heard in the headset.
1-32. RECEIVER SQUELCH AMPLIFIER MODULE A5200 AND SQUELCH FILTER MODULE A5300
(RECEIVE MODE).
To follow the signal path through the squelch amplifier and filter, see FO-4 while reading the text in this
paragraph.
The receiver-squelch amplifier passes or blocks the output audio signal of the audio amplifier by
allowing or not allowing + 16 vdc to enter the audio amplifiers. See the following table.
+16VDC
FROM RELAY
K5502
Q5403 (4), Q5404 (5)
Q5405 (6), BIASED
ON OR OFF
RECEIVER
SQUELCHED OR
UNSQUELCHED
AUDIO HEARD OR
NOT HEARD IN
HEADSET
HEARD
ENTERS AUDIO
AMP A5400
ON
UNSQUELCHED
DOES NOT ENTER
AUDIO AMP
OFF
SQUELCHED
NOT HEARD
Receiver-squelch amplifier A5200 controls the application of +16 vdc to audio amp A5400 in either one
of two modes: TONE OR CARR. When the squelch switch is set to DIS, the squelch amplifier is
bypassed and +16 vdc is applied to the audio amp for the duration of the DIS mode setting.
1-29
TM 11-5820-670-30
1-32. RECEIVER SQUELCH AMPLIFIER MODULE A5200 AND SQUELCH FILTER MODULE
A5300 (RECEIVE MODE). (CONT)
TONE (SQUELCH MODE)
The received 150 Hz signal at the output of amplifier Q5401 (1) in the audio amplifier is applied
through B3 and B2 of relay K5501 to amplifier Q5201 (11) in the squelch amplifier. The signal is
amplified and applied to amplifiers Q5203 (12) and Q5204 (13) for further amplification.
The 150 Hz signal at the output of amplifier Q5204 is applied through B2 and B1 of tone mode relay
K5503 to tone frequency adjust and capacitor coupling (14) in squelch filter module A5300. In the
TONE mode of squelch operation, the signal is applied through parallel twin T-circuit (15), which
attenuates the 150 Hz tone. Potentiometer R5301 (14) is adjusted to provide maximum attenuation of
the 150 Hz squelch tone signal. All other frequencies are fed back to amplifier Q5202 (16), which
completes the feedback loop. The ac amplifiers are completely degenerative for all frequencies except
150 Hz, and provide maximum gain at 150 Hz.
The 150 Hz signal at maximum gain from Q5204 (13) and from squelch filter (15) is applied to tone
rectifier CR5202 (17) for rectification. The rectified signal from CR5202 causes the current in Q5206
(18) to increase. Increased current flowing through B2 and B1 of energized relay K5505 is amplified in
amplifier Q5207 (19).
The output of amplifier Q5207 is applied through A3 and A2 of relay K5501, which energizes relay
K5502. Energizing K5502 causes A1 and A2 to make contact, sending +16 vdc to the audio amplifier to
cause unsquelching.
CARR (SQUELCH MODE)
In carrier squelch mode, audio signals and noise components at the output of Q5401 (1) in the audio
amplifier are applied through B3 and B2 of relay K5501 to ac amplifier Q5201 (11) in squelch
amplifier. Q5201 (11), Q5203 (12), and Q5204 (13) provide amplification of the signals. Once
amplified, the signals are applied from Q5204 through B2 and B3 of deenergized relay K5503 to
squelch filter (14). In the CARR mode of squelch operation, the signal is applied through the twin Tcircuit (20) which attenuates noise components centered around 7300 Hz. Potentiometer R5301 (14)
is adjusted to provide maximum attenuation of 7300 Hz signals. All other frequencies are fed back to
amplifier Q5202 (16) which completes the feedback loop. The ac amplifiers are completely degenerative for all frequencies except 7300 Hz, and provide maximum gain at 7300 Hz.
The 7300 Hz noise component at maximum gain and an audio signal enter carrier rectifier CR5201
(21) from amplifier Q5204 (13) and squelch filter (20). When an audio signal is present, the carrier
rectifier rectifies the noise component which causes current in Q5205 (22) to reduce. The reduced
current level through B3 and B2 of deenergized relay K5505 causes amplifier Q5207 (19) to conduct.
The output of amplifier Q5207 (19) is applied through A3 and A2 of relay K5501, which energizes relay
K5502. Energizing K5502 causes A1 and A2 to make contact, sending +16 vdc to the audio amplifier
causing unsquelching.
When an audio signal is not present, receiver noise alone is present in the receiver. The rectified
noise from carrier rectifier CR5201 (21) causes the voltage in Q5205 (22) to increase. Increased
voltage is applied through B3 and B2 of deenergized relay K5505 to amplifier Q5207 (19) which causes
it to turn off. When Q5207 is turned off, relay K5502 does not become energized and + 16 vdc does not
enter the audio amplifier, causing squelching.
1-30
TM 11-5820-670-30
1-32. RECEIVER SQUELCH AMPLIFIER MODULE A5200 AND SQUELCH FILTER MODULE
A5300 (RECEIVE MODE). (CONT)
DIS (SQUELCH MODE)
When the squelch switch is set to DIS position, receiver squelch amplifier A5200 is bypassed since a
squelch disable ground signal is applied through A3 and A2 of relay K5501 to relay K5502. A ground
signal at K5502 causes + 16 vdc to flow through A1 and A2 to audio amplifier A5400 causing
unsquelching.
For a discussion of the squelch amplifier module A5200 and squelch filter operating in transmit mode,
see paragraph 1-46.
1-33. TRANSMITTER SIGNAL FLOW.
A system block diagram showing transmitter signal flow can be found on FO-5 in the back of this
manual. See the foldout while reading the text in this paragraph.
Voice signals from microphone (1) are applied through interphone amplifier (2) and control unit (3)
to K9606 dummy relay (4). Squelch amplifier A5200 (29) and squelch filter A5300 (30) generate a
150 Hz tone signal which is applied through K9606 to audio mixer A8600 (5). The 150 Hz tone signal is
always generated when the radio is in the transmit mode. The audio signal from K9606 is filtered in
3 kHz low-pass filter FL8701 and combined with the 150 Hz tone signal in audio mixer A8600 (5).
The combined 150 Hz tone and audio signal is used to frequency modulate transmitter 11.5 MHz
modulator A8100 (6). The output of the transmitter 11.5 MHz modulator is fed to transmitter phase
discriminator A8200 (7) which also receives the 11.5 MHz if. signal from mixer A1400 (19) through
transmitter first and second if. amplifiers A8300 (20).
Transmitter phase discriminator A8200 compares the two incoming signals and outputs an audio
signal and a dc correction voltage. The audio signal is coupled through transmitter hunt generator
A8400 (8) to frequency modulate the frequency of master oscillator A6300 (9). The frequency of the
master oscillator is determined by setting the tuning dials at the control unit.
The dc correction voltage from the phase discriminator is applied through the hunt generator to the
master oscillator. If the master oscillator changes frequency (drifts), a dc correction voltage will
bring the frequency to that of the frequency settings on the tuning dials. The dc correction voltage acts
as a fine tuning control for the master oscillator.
When the master oscillator frequency is beyond the correcting range of the phase discriminator,
transmitter hunt generator (8) will apply a signal to the oscillator and reduce the change in frequency
to within the correcting range of the phase discriminator. The hunt generator acts as a coarse tuning
control for the master oscillator. The audio modulated output of master oscillator A6300 is amplified by
buffer amplifier A6400 (10) and applied to rf drivers A6500 (11). The buffer amplifier isolates the
master oscillator from loading effects of the rf drivers. For a detailed discussion of the master
oscillator frequency control, see paragraph 1-34.
1-31
TM 11-5820-670-30
1-33. TRANSMllTER SIGNAL FLOW. (CONT)
Buffer amplifier A6400 also applies audio modulated signals to isolation amplifier A6600 (18) and then
to mixer A1400 (19). The isolation amplifier assures that buffer amplifier (10) output signals are
injected into the mixer, but local oscillator signals are not injected back into the buffer amplifier to
cause spurious outputs.
Master oscillator signals originating in A6300 (9) are combined in mixer A1400 (19) with those
originating in local oscillator A1500 (22) which is kept at correct frequency by crs (21). The mixing
process produces an 11.5 MHz signal which is amplified by first and second if. amplifiers A8300 (20)
and then applied to the phase discriminator (7) to be compared with the 11.5 MHz signal from
modulator A8100 (6). The phase discriminator then produces a correction voltage that is applied to
master oscillator A6300.
The audio modulated signal from buffer amplifier A6400 (10) is applied to rf drivers (11) and rf
amplifiers (12) for amplification, then fed to rf detector (13). The rf detector is a directional coupler
circuit which samples the forward and reflected power components of the rf output signal. The
rectified output of the detector is applied to agc amplifier (14). The agc amplifier controls the gain of
the transmitted power by increasing or decreasing the signal to rf drivers (11). Increasing the gain
from the agc amplifier causes less power radiated through the antenna. Decreased gain from the agc
amplifier causes higher power radiated through the antenna. The agc amplifier controls the gain in the
one to ten watt range. Fm rf power from rf detector A6500 is applied through relay K4504 to band-pass
filter FL4501 (15A) or (15 B). Pressing the push to talk button energizes relay K4501 which puts the
radio set in the transmit mode. Band-pass filter FL4501 attenuates harmonics in either the
band,
30 MHz – 52.95 MHz, or the
band, 53 MHz – 75.95 MHz, depending on the frequency of the
transmitted power.
Transmitted power is applied from filter FL4501 through relay K4501 to side tone gate detector A4500
(16). The sidetone gate detector outputs a ground signal which energizes relay K5502 for the purpose
of activating audio amplifier A5400 (27). A ground signal from the sidetone gate detector will not be
produced to unsquelch the audio amplifier until the power level being transmitted is 0.6 watt or
greater. The rf modulated power is also coupled to reflectometer A4500 (17).
When transmitted power reaches at least 0.6 watt, two diode circuits in the reflectometer are
activated. One circuit detects forward power and the other detects reflected power. When the test
switch on the radio set is in the forward position, current flows through the forward detector and into
the TEST METER. When the switch is in the reflected position, current flows through the reflected
detector and into the TEST METER to be monitored. Most of the rf power entering the reflectometer is
coupled to the antenna to be radiated.
In order for the radio set operator to hear what he is transmitting, the transmitted audio is applied to
the receive circuits. The audio modulated 11.5 MHz if. from mixer A1400 (19) is applied through if.
attenuator (23) (no attenuation occurs) to first and second if. amplifiers A4100 (24) for
amplification. If. is again amplified in third and fourth if. amplifiers of A4200 (25). The hunt cutoff
detector located in A4200 is used to rectify the signal and supply a dc bias voltage to hunt generator
A8400 (8).
Unmodulated audio intelligence from discriminator A4200 (25) is applied to audio squelch preamp
A4300 (26) for initial amplification. The audio from A4300 is applied to audio amplifier A5400 (27) for
further amplification. The sidetone gate signal from A4500 (16) allows application of the +16 vdc to
the audio amplifier for unsquelching. When unsquelched, the audio intelligence is amplified in the
audio amplifier and coupled to interphone amplifier (2) to be heard in earphone (1).
1-32
TM 11-5820-670-30
1-34. MASTER OSCILLATOR FREQUENCY CONTROL LOOP.
For proper radio transmitter operation, the fm output of the master oscillator must be within ± 3.5 kHz
of the selected channel frequency. To prevent master oscillator frequency drift beyond these limits, a
frequency control loop is built into the radio. The electronic modules that comprise the frequency control loop (automatic frequency control) are shown in FO-6.
Correction of master oscillator frequency drift is accomplished in two ways. Slight frequency drift is
fine tuned to proper frequency by a dc correction voltage from the phase discriminator. Extreme
frequency drift is coarse tuned to proper frequency by a sawtooth voltage from the hunt generator.
Fine tuning and coarse tuning of the master oscillator are done as follows.
FINE TUNING
Master Oscillator
Master oscillator (1) outputs rf signals at a frequency corresponding to the channel indicated by the
radio’s tuning dials. For this discussion it is assumed that the channel selected is 30.00 MHz. Due to
master oscillator drift, its rf output is not precisely 30 MHz. This signal is applied to mixer (4) through
buffer amplifier (2) and isolation amplifier (3) which prevents excessive loading of the master
oscillator.
Mixer
Receiver mixer (4) is used by both the receiver and transmitter for the purpose of heterodyning rf
signals. During transmission, the receiver-mixer heterodynes the 30 MHz master oscillator output,
which is not necessarily 30 MHz, with the 41.5 MHz output from receiver local oscillator (5). Sum and
difference frequencies are generated by the mixer. The difference frequency, which approximates
11.5 MHz, is applied to first and second if. amplifiers (6). The other frequencies are filtered.
Local Oscillator
The local oscillator performs an identical function during reception and transmission. During transmission, when the radio is set to 30.00 MHz, the local oscillator outputs a precise 41.5 MHz signal.
Since the local oscillator is prevented from drifting by the crs, the oscillator’s output is extremely
accurate. The 41.5 MHz signal is applied to the receiver-mixer and heterodyned with the master
oscillator’s 30 MHz signal to produce an if. signal which varies around 11.5 MHz.
First and Second IF. Amplifiers
First and second if. amplifiers (6) increase the amplitude of the 11.5 MHz intermediate frequency to
make the signal strong enough for processing by phase discriminator (8).
11.5 MHz Modulator
The 11.5 MHz modulator (7) provides the fixed 11.5 MHz audio modulated input to the phase
discriminator.
1-33
TM 11-5820-670-30
1-34. MASTER OSCILLATOR FREQUENCY CONTROL LOOP. (CONT)
Phase Discriminator
The phase discriminator performs the following four functions:
Phase comparison
Correction voltage generation
Demodulation
Filtering
Two rf signals are applied to phase discriminator (8) for comparison. One is the 11.5 MHz signal from
first and second if. amplifiers (6). This frequency may not be exactly 11.5 MHz. The other input is an
11.5 MHz signal from 11.5 MHz modulator (7). This signal contains audio intelligence and is precisely controlled at 11.5 MHz by a crystal-controlled oscillator.
A difference in frequencies of rf signals applied to the phase discriminator causes it to generate a dc
correction voltage which is applied to the master oscillator circuitry. The dc signal forces the master
oscillator back to exactly 30 MHz. At that instant, the difference frequency produced by mixer (4)
becomes almost 11.5 MHz, and the phase discriminator no longer outputs a correction voltage.
In actual operating conditions, master oscillator drift causes a constant plus or minus dc correction
signal to be generated by the phase discriminator.
The audio intelligence is demodulated by the phase discriminator and rides on the dc correction
voltage. This audio signal is applied to the master oscillator to modulate its rf output.
The 11.5 MHz rf signals applied to the phase discriminator are shunted to ground by a series resonant
rf trap circuit.
COARSE TUNING
The coarse tuning process is initially identical to the fine tuning process and follows the same signal
path up to mixer. However, at the mixer, a different chain of events begins to occur.
Mixer
The 11.5 MHz output of the mixer is applied to receiver if. amplifiers (10).
Receiver IF. Amplifiers
Receiver if. amplifier module A4000 is used during reception and transmission. Two 11.5 MHz filters
wired in series with the if. amplifiers attenuate rf signals other than 11.5 MHz. Therefore, the if,
amplifiers produce highest amplitude signal from an 11.5 MHz input. As the input varies above or
below 11.5 MHz, the if. amplifiers’ output drops in amplitude.
When the master oscillator is running almost exactly on proper frequency, the mixer’s difference
frequency is very close to 11.5 MHz. This signal, applied to if. amplifiers (10), results in minimum
attenuation by the filters and maximum amplifier gain. The high amplitude output of the receiver’s
fourth if amplifier is applied in parallel to hunt the cutoff detector within module A4200.
1-34
TM 11-5820-670-30
1-34. MASTER OSCILLATOR FREQUENCY CONTROL LOOP. (CONT)
The hunt cutoff detector is basically a diode clipper and a filter, which clips off the negative half of the
rf sine wave, filters it, and outputs a constant positive dc level. This dc level is applied to the hunt
generator where it biases off the sawtooth generator. Consequently, no sawtooth voltage is applied to
the master oscillator.
When the master oscillator drifts off frequency, the mixer’s difference frequency moves further away
from 11.5 MHz. Consequently, the if. filters attenuate the signal, causing reduced amplification by
the receiver if. amplifiers. If the master oscillator is far enough off frequency (± 400 kHz or more),
the positive half of the rf sine wave clipped by the hunt cutoff detector is very low in amplitude, resulting
in a reduced dc level applied to hunt generator (9).
The reduced dc signal is not strong enough to bias the sawtooth generator off, so it begins to output a
sawtooth voltage.
Hunt Generator
The sawtooth generator in the hunt detector applies a sawtooth voltage to the master oscillator when its
frequency varies from the mechanically selected frequency by more than ± 400 kHz. The sawtooth
voltage brings the master oscillator close enough to the correct frequency for the phase discriminator
to fine tune it.
Output from the hunt generator occurs primarily when the tuning dials are switched to another frequency. Once the phase discriminator takes over master oscillator frequency control, the sawtooth
generator is once again biased off.
1-35
TM 11-5820-670-30
1-35. AUDIO MIXER MODULE A8600.
EL1AT108
Audio signals from the interphone amplifier are applied through low-pass filter FL8701 whose main
function is to attenuate signals above 3000 Hz. The 150 Hz signal generated in squelch amplifier
A5200 is applied to the resistor network and combined with the filtered audio.
The 150 Hz tone signal from squelch amplifier A5200 is always generated in transmit mode. The
combined signals are applied to module A8100.
1-36. 11.5 MHZ MODULATOR MODULE A8100.
1-36
TM 11-5820-670-30
1-36. 11.5 MHz MODULATOR MODULE A8100. (CONT)
The combined signal from the audio mixer is applied to the capacitance diodes which causes the frequency of oscillator Q8101 to deviate. Fm 11.5 MHz output from Q8101 is applied to buffer amps Q8102
and Q8103 for amplification, and then applied to phase discriminator A8200.
The 11.5 MHz fm signal from buffer amplifier Q8103 is also applied to the crystal discriminator. The
crystal discriminator compares 11.5 MHz fm with 11.5 MHz from crystal Y8101.
If oscillator Q8101 drifts above or below 11.5 MHz, the crystal discriminator will apply a positive or
negative dc voltage to the capacitance diodes, correcting the 11.5 MHz frequency.
1-37. FIRST AND SECOND IF. AMPLIFIERS MODULE A8300.
EL1AT11O
11.5 MHz if. from mixer A1400 is applied to the first and second if. amplifiers for amplification.
Unmodulated 11.5 MHz if. is applied from the second if. amp to phase discriminator module A8200.
1-37
TM 11-5820-670-30
1-38. PHASE DISCRIMINATOR MODULE A8200.
EL1AT111
Ring modulator in A8200 accepts two different signals.
11.5 MHz audio modulated signal from 11.5 MHz modulator A8100.
11.5 MHz unmodulated if. signal from mixer A1400 through A8300.
Two 11.5 MHz signals are amplified by the drivers and applied to the ring modulator. The ring modulator produces both an audio output, determined by the modulation, and a dc voltage, determined by
the difference between the two radio frequencies. The audiofrequency and dc voltage is applied from
the rf trap through a low-pass filter in hunt generator A8400 to the master oscillator.
The 11.5 MHz rf carrier is shunted to ground by the series tuned rf trap.
The function of phase discriminator module A8200 is explained in detail in paragraph 1-34.
1-38
TM 11-5820-670-30
1-39. HUNT GENERATOR MODULE A8400.
EL1AT112
The manner in which the hunt generator controls master oscillator frequency drift is discussed in
paragraph 1-34. The following information covers operation of its subassemblies.
When the master oscillator frequency shifts beyond the correcting range of the phase discriminator,
the bias voltage from the hunt cutoff detector in module A4200 is removed, causing the sawtooth gate
to stop conducting.
When sawtooth gate Q8403 stops conducting, the voltages applied to sawtooth generator Q8402
increase causing the 100 Hz sawtooth voltage to be generated.
The 100 Hz voltage is applied through isolation amplifier Q8401 and the low-pass filter to the master
oscillator for frequency correction. Once the master oscillator frequency is brought into the correcting
range of the phase discriminator, the hunt cutoff bias voltage from A4200 is then reapplied, turning on
Q8403. When Q8403 is on, no sawtooth voltage in Q8402 is generated.
Isolation amplifier Q8401 isolates the sawtooth generator from the phase discriminator. The low-pass
filter attenuates frequencies above 11.5 MHz and prevents generation of spurious signals in the
frequency control loop.
1-39
TM 11-5820-670-30
1-40. MASTER OSCILLATOR MODULE A6300.
EL1AT113
The capacitance diodes in the A6300 module accept four signals.
1. 100 Hz sawtooth voltage from hunt generator A8400
2. ± dc correction voltage from the phase discriminator A8200
3. Voice signals riding on the ± dc correction voltage
4. 150 Hz tone signal generated in the squelch amplifier A5200
BUFFER CONTROL VOLTAGE
The buffer control voltage consists of 100 Hz sawtooth voltage and ± dc correction voltage. This
voltage, applied to the capacitance diodes, corrects the frequency of the master oscillator.
TUNING CIRCUITS
The tuning circuits are separated into two bands, an
band, 30 MHz – 52.95 MHz, and a
band, 53 MHz – 75.95 MHz. The band switch in gearbox assembly A9700 mechanically selects either
band, depending on the operator selected frequency. Resonant circuits comprised of inductors and
capacitors allow the master oscillator to generate the selected frequency. When the operator rotates
the tuning dials for a different channel, the gear train in A9700 mechanically alters the inductance of
resonant circuits causing the master oscillator to change its frequency.
1-40
TM 11-5820-670-30
1-40. MASTER OSCILLATOR A6300. (CONT)
CAPACITANCE DIODES
The capacitance diodes are reverse-biased at 6.3 vdc. Any change in bias causes the effective capacitance of the diodes to change. The correcting voltages applied to the diodes alter the capacitance
which changes the effective capacitance in the tuning circuits. This change in the tuning circuits
changes the master oscillator operating frequency.
The diodes also accept voice signals and 150 Hz tone signals. These signals alter the capacitance of
the diodes and tuning circuits, producing frequency modulation of the master oscillator frequency.
MASTER OSCILLATOR
The master oscillator is a pnp transistor designed into a modified colpitts configuration. Its operating
frequency range, 30 MHz - 75.95 MHz, is the receiver-transmitter operating frequency range.
Fm signals from the master oscillator are applied to buffer amp A6400.
1-41. BUFFER AMPLIFIER MODULE A6400 AND REGULATOR ASSEMBLY.
EL1AT114
1-41
TM 11-5820-670-30
1-41. BUFFER AMPLIFIER MODULE A6400 AND REGULATOR ASSEMBLY. (CONT)
BUFFER AMPLIFIER
The output of master oscillator A6300 is applied to isolation amplifier Q6401 which isolates the master
oscillator to maintain frequency stability. Amplified signals from Q6401 are developed in the two
secondary windings of transformer T6401.
One secondary winding couples the signal to isolation amplifier module A6600 and the other winding
applies the same signal to buffer amplifier Q6402 in module A6400.
Buffer amp Q6402 amplifies the signal and applies it through the tuning circuits to the rf drivers in
module A6500.
The mechanically tuned circuits function identical to those contained in the master oscillator module.
BUFFER VOLTAGE REGULATOR ASSEMBLY
The buffer voltage regulator assembly provides 10.3 and 6.3 vdc to the master oscillator and isolation
amplifier stages. An input voltage of + 16 vdc is supplied to the regulator through relay K9603 when the
radio set transmission section is activated.
Zener diodes contained in the regulator assembly provide regulated 10.3 and 6.3 voltages to the
master oscillator and isolation amplifier when + 16 vdc is supplied.
The 10.3 and 6.3 vdc are used for the purpose of biasing the stages.
1-42. ISOLATION AMPLIFIER MODULE A6600.
EL1AT115
Frequency modulated signals from buffer amp A6400 are applied to isolation amplifier Q6601 for
amplification and applied to mixer module A1400. Q6601 also prevents undesired signals from local
oscillator A1500 mixed in A1400 from feeding back into buffer amp A6400, causing spurious outputs.
1-42
TM 11-5820-670-30
1-43. MIXER AND BUFFER AMPLIFIER A1400 (TRANSMIT MODE).
In transmit mode, mixer V1401 receives two signals:
Frequency modulated signals from isolation amplifier A6600.
The signal from local oscillator module A1500.
The mixer heterodynes the two signals and applies a modulated 11.5 MHz if. signal to if. attenuator
A4900 and first and second if. amplifier A8300 through buffer amp Q1401.
Buffer amp Q1401 operates only in the transmit mode. During transmission, +16 vdc is applied, for
biasing, to the buffer amp through relay K9603. The amplifier provides sufficient amplification to drive
first and second if. amplifier A8300.
The signals applied from mixer A1400 to A8300 are discussed in the master oscillator frequency
control loop in paragraph 1-34.
The mixer applies a modulated 11.5 MHz if. signal through the receiver circuits for the purpose of
allowing the radio set operator to hear what he is transmitting. This signal is applied from the mixer
through A4900 and A4100 to module A4200.
1-43
TM 11-5820-670-30
1-44. HUNT CUTOFF DETECTOR P/O MODULE A4200.
EL1AT117
Frequency modulated 11.5 MHz if. from module A4100 enters the hunt cutoff detector from the fourth
if. amp. The hunt cutoff detector rectifies the signal and applies a dc bias voltage to hunt generator
A8400. 11.5 MHz if. is also coupled to the fifth if. amp and then proceeds through the receiver
circuitry.
The dc bias voltage is applied to the hunt generator only if 11.5 MHz if. is present at the fourth if. amp
output. If the master oscillator shifts frequency substantially, the if. signal at the hunt cutoff detector
will be lost and the dc bias voltage supplied to the hunt generator will be removed. Removal of the dc
bias voltage activates the hunt generator which supplies an error voltage to the oscillator circuits to
correct the operating frequency. Presence of the 11.5 MHz if. signal causes the hunt cutoff detector
to bias off the hunt generator. For a discussion of the master oscillator frequency control loop, see
paragraph 1-34.
The hunt cutoff detector operates in transmit and homing modes. For a discussion of the detector
operating in homing mode, see paragraph 1-50.
1-44
TM 11-5820-670-30
1-45. AUDIO AMPLIFIER MODULE A5400 (TRANSMIT MODE).
Refer to FO-4 while reading the text in this paragraph.
Amplified audio signals from squelch preamplifier A4300 are applied to amplifier Q5401 (1) in the
audio amplifier for amplification.
In transmit mode, a transmit ground signal is applied to X2 of relay K5501, causing B2 and B1, and A2
and A1, to make contact.
When B1 and B2 make contact, the amplified output of Q5401 is applied to low-pass audio filter FL5501
(2) only. The filter passes frequencies below 3 kHz and applies the filtered audio through potentiometer R5405 (3) to amplifier Q5403 (4).
The sidetone gate signal from the sidetone gate detector is applied through A1 and A2 of relay K5501 to
X2 of relay K5502. Relay K5502 becomes energized causing A1 and A2 to make contact. +16 vdc is
then applied to the amplifiers to unsquelch the receiver and allow the audio signals to be amplified.
Once amplified, the audio is coupled through transformer (7) and interphone amp and heard in the
headset.
1-46. SQUELCH AMPLIFIER MODULE A5200 (TRANSMIT MODE).
Refer to FO-4 while reading the text in this paragraph.
The squelch amplifier’s function in the transmit mode is to generate a 150 Hz tone signal that can be
transmitted to an unsquelch receiver.
The 150 Hz tone signal is generated using four transistors in the squelch amplifier and a phase shift
network in the audio amplifier. The tone oscillator consists of Q5201 (11), Q5202 (16), Q5203 (12),
Q5204 (13), and a phase shift network (23). All of these components are connected in a feedback
loop that oscillates at 150 Hz.
When the radio set is in transmit mode, B2 and B1 of relay K5501 make contact, applying the output of
phase shift network (23) from Q5204 (13), to Q5201 (11): The 150 Hz tone is applied from B1 of relay
K5501 to audio mixer A8600, where it is combined with the audio signals to modulate the 11.5 MHz
modulator frequency.
1-47. AUTOMATIC GAIN CONTROL (AGC).
The agc amplifiers in module A6500 insure that a constant level of rf output power is being transmitted.
Agc action will keep the level of audio being heard in a distant receiver constant, even though varying
levels of voice signals from the transmitter operator are entering the microphone.
1-45
TM 11-5820-670-30
1-48. RF AMPLIFIER ASSEMBLY MODULE A6500.
RF AMPLIFIERS
EL1AT118
Frequency modulated signals from the master oscillator are applied through buffer amp A6400 to
module A6500. Signals entering A6500 are applied to Q6501 and Q6502 for amplification. The tuning
circuits, adjusted mechanically by the gear train, tune rf driver Q6502 for maximum gain which
provides driving power for the final rf amp stages.
Amplified fm from the push-pull network of Q6503 and Q6504 is coupled through transformer T6505
and applied to module A4500 and the rf detector in module A6500.
RF DETECTOR
1-46
TM 11-5820-670-30
1-48. RF AMPLIFIER ASSEMBLY MODULE A6500. (CONT)
The rf detector is a directional coupler circuit that samples the forward and reflected power components of the rf output signal. The voltages from the final rf amp stage are rectified by diodes CR6501
and CR6502 and applied to the agc amplifiers.
AGC AMPLIFIERS
EL1AT120
The rf and agc amplifiers form a feedback loop which ensure a constant level of rf output to module
A4500. The power output level desired for a specific application may be selected at the receivertransmitter front panel by setting XMTR HI-LO power switch S9604 to either of two positions. In the LO
position, the output level to A4500 is held to 1 watt. In the HI position, agc action is held to a minimum
and the output power is increased to 10 watts.
With switch S9604 in LO position, a larger signal is applied from the rf detector agc amplifiers. A
larger signal entering the agc amplifiers causes a decreased current level entering rf preamp Q6501.
Having a decreased current level, conduction of Q6501 decreases, holding the rf output to A4500 at 1
watt.
With switch S9604 in HI position, a reduced signal is applied to the agc amplifiers. A reduced signal
entering the agc amplifiers causes an increased current level to Q6501. Increased current causes
conduction of Q6501 to increase, bringing the rf output power to 10 watts.
1-47
TM 11-5820-670-30
1-49. RF CONTROL ASSEMBLY P/O MODULE A4500 (TRANSMIT MODE).
Band-pass filter FL4501A filters out harmonics of all transmitted signals in the frequency range of
30.00 MHz to 52.95 MHz. Band-pass filter FL4501 B attenuates harmonics of all transmitted signals in
the frequency range of 53.00 MHz – 75.95 MHz. The overall function of the filter is to attenuate all
harmonics of the passband frequencies (30 MHz – 75.95 MHz) while offering minimum loss to the
passband frequencies.
Frequency modulated rf power from A6500 flows through relay K4504 to, depending on the transmitted
frequency, FL4501A or FL4501 B. The filtered power then flows through relay K4503 to the sidetone
gate detector.
SIDETONE GATE DETECTOR
EL1AT122
1-48
TM 11-5820-670-30
1-49. RF CONTROL ASSEMBLY P/O MODULE A4500 (TRANSMIT MODE). (CONT)
When the push-to-talk button is pressed, transmit/receive relay K4501 is energized, allowing
transmitted rf to flow to the sidetone gate detector and reflectometer from band-pass filter FL4501.
Rf signals entering the detector are rectified by diode CR4514 and applied to amplifier Q4501.
Amplifiers Q4501 and Q4502 will not conduct until 0.6 watt biases diode CR4514. When transmitted
power reaches 0.6 watt or higher, Q4501 and Q4502 conduct sending a ground signal (sidetone gate
signal) to relay K5501, energizing it. Energizing K5501 causes relay K5502 to apply the + 16 vdc to
audio amplifier A5400 for unsquelching.
REFLECTOMETER
EL1AT123
Rf signals being applied to the sidetone gate detector are also applied to transformer T4501 in the
reflectometer. Rf is coupled through the primary of T4501 to the communications antenna and is
radiated.
The secondary of transformer T4501 couples a portion of the output power to diodes CR4513 and
CR4512. CR4513 detects reflected power and CR4512 detects forward power. In order for power to
reach the test meter from either diode, power being coupled from transformer T4501 to the diodes
must be at least 0.6 watt.
1-49
TM 11-5820-670-30
1-50. HOMING SIGNAL FLOW.
Homing operation is available on any of 920 channels in the frequency range of 30.00 to 75.95 MHz.
The homing circuit provides information to the aircraft homing indicator concerning the aircraft
heading with respect to a transmitting station. To follow the homing circuits signal path, see FO-7
while reading the text in this paragraph.
When the control unit mode selector switch is set to HOME, + 27.5 vdc is connected through the
control unit causing relay K4502 in rf control assembly A4500 to energize. Relay K4502 in turn applies
+ 16 vdc to energize the homing circuits.
Input signals from left and right homing antennas (1) are applied through diode switch (2) to rf
attenuator (3). 100 Hz oscillator (4) alternately injects the two signals from the antennas into the rf
attenuator circuit at a 100 Hz rate. The rf attenuator, controlled by a voltage from homer rf agc
amplifier (14), attenuates strong received signals that may damage the receiver circuitry. Output
signals from the rf attenuator are applied through homing relay K4502 to antenna tuning and protection
circuits (5).
Gearbox assembly A9700 (6) tunes the circuits for the received signal which are applied to first rf amp
(7) for amplification. Amplified rf is amplified further in second rf amplifier (8) and then applied to
mixer (9) to be heterodyned with the frequency of local oscillator (10).
The 11.5 MHz if. output of mixer A1400 is applied to if. attenuator (11) which reduces the signal
level in the homing mode. The if. attenuation prevents overloading under the strongest operating
conditions. The output of the if. attenuator is coupled through band-pass filter FL4001 (12) and the
signal is processed through the remaining portion of the receiver as indicated in paragraph 1-13,
except that the am components of the if. signal (if.-am signal) is detected in the fourth if. amp by the
hunt cutoff detector p/o module A4200 (13).
The if. am signal from the hunt cutoff detector is applied to rf agc amp (14), if. agc amp (15), and
off-course signal amp (16). The homer rf agc amplifier supplies agc voltage to rf attenuator circuit
(3) which controls the gain of the received signal. Homer if. agc amp (15) supplies agc voltage to if.
attenuator (11) which controls the gain of the 11.5 MHz if. signal.
Off-course signal amplifier (16) amplifies the if.-am signal and applies it to synchronous detector
(17). The synchronous detector compares the if.-am signal with the 100 Hz square wave produced by
100 Hz oscillator (4) and applies a dc signal to the homing indicator vertical needle.
1-50
TM 11-5820-670-30
1-50. HOMING SIGNAL FLOW. (CONT)
The application of the dc signal to the vertical needle of the homing indicator provides the pilot with
information to fly left or right.
The if. signal in the if. agc amplifier (15) is applied to the homer signal strength amplifier (18) which supplies
a dc signal to the homing indicator horizontal needle.
The homing indicator horizontal needle provides a visual indication of relative signal strength which,
in turn, allows the pilot to determine if the aircraft is heading toward or away from the transmitting
station.
In the homing mode of operation, audio heard in the operator’s headset contains some background
noise and does not have the same quality as in the receive operating mode. However, the voice
signals are intelligible and distortion is not noticeable unless the signals are of a very low level.
The radio set is capable of transmitting audio signals while the control unit mode selector switch is set
at HOME. If the push-to-talk button is pressed while the radio set is operating in the homing mode,
relay K4502 deenergizes and removes the output of the homing antennas from the input of the antenna
tuning and protection circuits of module A1100. Simultaneously, relay K4501 (not shown) becomes
energized and connects the communications antenna to the receiver-transmitter. Upon termination of
the transmit command, the receiver-transmitter will automatically return to the homing mode.
Squelch amplifier A5200 (19) supplies a flag alarm ground signal to the homing indicator. When the
received signal is of sufficient strength, the squelch amplifier supplies a ground to relay K5502 (not
shown), energizing it. When energized, this relay applies a ground signal to the homing indicator to
drop the flags. When the relay is deenergized, the alarm flags raise, indicating that the homing signal
is too weak to provide proper homing information to the homing indicator.
1-51
TM 11-5820-670-30
1-51. RF CONTROL ASSEMBLY P/O MODULE A4500 (HOMING MODE).
DIODE SWITCH
EL1AT125
Rf signals entering the left and right homing antennas are alternately switched through the diode
switch to the rf attenuator circuit at a 100 Hz rate. The 100 Hz square wave from the 100 Hz oscillator is
used to bias the diodes in the diode switch. When the square-wave bias voltage is positive(+), rf
signals from the left homing antenna are coupled through the diode switch to the rf attenuator circuit.
When the wave becomes negative (-), rf signals from the right homing antenna are coupled to the rf
attenuator.
RF Attenuator
EL1AT126
1-52
TM 11-5820-670-30
1-51. RF CONTROL ASSEMBLY P/O MODULE A4500 (HOMING MODE). (CONT)
The rf attenuator circuit operates only in homing mode and is controlled by agc voltage from the homer
rf agc amplifier.
When low level homing signals are applied from the diode switch to the rf attenuator, agc voltage from
the agc amplifier increases, allowing signals to pass with no attenuation. As the homing signal level
increases, agc voltage decreases causing the attenuator output level to decrease.
The rf attenuator has a signal loss approaching 40 db with low agc input voltage. The 40 db attenuation
of the homing signal is sufficient to prevent overload under the strongest signal operating conditions.
Rf signals from the rf attenuator circuit are applied through energized relay K4502 to the antenna
tuning and protection circuits.
1-52. IF. ATTENUATOR MODULE A4900 (HOMING MODE).
EL1AT127
The if. attenuator attenuates signals only in homing mode and is controlled by agc voltage from the
homer if. agc amplifier.
When low level homing signals are applied from the mixer to the if. attenuator, if. agc voltage
increases to approximately 10 volts which causes the if. homing signals to pass with minimum attenuation. As the homing signal level increases, the agc voltage decreases, causing the attenuator output
level to decrease. With low agc voltage applied to the attenuator circuit, the attenuator has a signal
loss of approximately 40 db.
11.5 MHz if. homing signals from the if. attenuator are applied to filter FL4001.
1-53
TM 11-5820-670-30
1-53. HOMER-DETECTOR AMPLIFIER ASSEMBLY A4800.
100 Hz OSCILLATOR
EL1AT128
Transistors Q4801 and Q4802 form a common base square-wave oscillator having an output frequency
of 100 Hz.
Transformer T4801 couples the 100 Hz square wave to the synchronous detector and homer diode
switch.
RF AGC AMPLIFIER
EL1AT129
1-54
TM 11-5820-670-30
1-53. HOMER-DETECTOR AMPLIFIER ASSEMBLY A4800. (CONT)
The homer if. signal from the hunt cutoff detector in the fourth if. amplifier is applied to rf agc amplifier
Q4807. With weak received signals, conduction of transistor Q4807 is slight which causes Q4808 to
conduct heavily and supply approximately 10 volts agc voltage to the rf attenuator (P/O module
A4500).
As the homer if. signal level increases, Q4807 starts to conduct harder and causes the conduction of
Q4808 to decrease. As the conduction of Q4808 decreases, agc output voltage also decreases.
Agc output voltage from the rf agc amplifier is the control voltage used to attenuate homing signals
flowing through the rf attenuator circuit in module A4500.
IF. AGC AMPLIFIER
EL1AT130
The homer if. signal from the hunt cutoff detector is applied to if. agc amplifier Q4805. With weak received signals, conduction of transistor Q4805 is slight which causes Q4806 to conduct heavily and
supply approximately 10 volts agc voltage to if. attenuator A4900.
As the homer if. signal level increases, Q4805 starts to conduct harder and causes the conduction of
Q4806 to decrease. As the conduction of Q4806 decreases, agc output voltage also decreases.
Agc output voltage is the control voltage used to attenuate the homing signals flowing through if.
attenuator module A4900.
The agc voltage is also applied to the signal strength and sensitivity amplifiers located in module
A4800.
1-55
TM 11-5820-670-30
1-53. HOMER-DETECTOR AMPLIFIER ASSEMBLY A4600. (CONT)
OFF COURSE SIGNAL AMPLIFIER
EL1AT131
The homer if.-am signal, isolated by transistor Q4809, is applied to sensitivity amp Q4810. The bias
level of Q4810 is established by if. agc voltage from the if. agc amp.
When the received homing signal is of a low level, if. agc voltage causes transistor Q4810 to conduct
harder allowing more of the homing signal to be applied to the synchronous detector.
SYNCHRONOUS DETECTOR
EL1AT132
1-56
TM 11-5820-670-30
1-53. HOMER-DETECTOR AMPLIFIER ASSEMBLY A4800. (CONT)
The output if.-am signal from amplifier Q4810 is applied to transistors Q4803 and Q4804 which form
the synchronous detector. The synchronous detector circuit is also driven by the 100 Hz oscillator
used to alternately switch the homing signals from the left and right antennas into the circuit.
When the positive and negative half cycles of the homer if.-am signal have equal strength, the outputs
of Q4803 and Q4804 are equal in amplitude and opposite in phase which causes the homing indicator
vertical needle to be centered.
When there is unequal signal strength between the positive and negative half cycles, the vertical
needle indicates an average output between the two signals.
The homing indicator vertical needle allows the pilot to determine if the aircraft is off course left or off
course right. When the vertical needle is centered, the aircraft is perfectly alined with the transmitting
station.
EL1AT133
The signal strength amplifier controls the deflection of the homing indicator horizontal needle. With no
signal input, if. agc voltage is maximum and transistor Q4811 conducts, causing the horizontal
indicator deflection to be maximum.
As the level of the received signal increases, if. agc voltage decreases, which reduces conduction of
Q4811 and causes less deflection of the horizontal needle. Minimum deflection of the indicator
(needle centered) occurs at maximum received signal level.
1-57
TM 11-5820-670-30
1-54. RETRANSMIT OPERATION.
NOTE
This paragraph contains a discussion of retransmit operation. Not to duplicate other
areas of the manual, the received and transmitted signals are not traced through the
receiver-transmitter circuitry. Detailed interconnection of the radio sets and associated
equipment operating in the retransmit mode is shown on FO-8.
To follow the simplified interconnection of two radio sets operating in retransmit mode, see FO-9 while
reading this paragraph.
Two AN/ARC-131 Radio Sets, tuned to different frequencies, maybe interconnected and operated as
an unattended two-way relay station. The first radio set receiving a signal keys the transmit circuits of
the second radio set and couples the received signal into the second transmitter for retransmission.
The relay station maybe operated in either carrier squelch or tone squelch mode.
NOTE
SQUELCH disable mode (DIS) cannot be used for retransmit operation.
The radio set transmitter control circuits are interlocked by squelch relay K5502 to ensure that the two
radio sets will not transmit simultaneously. FO-9 is a simplified block diagram showing the squelch
relays in their deenergized condition. When the relays are deenergized, both radio sets are in receive
node with no signal received.
RETRANSMIT CIRCUIT, STATIC CONDITION
The radio sets are in the static condition when no signals are being received or transmitted. Both
squelch relays (K5502) are deenergized since no carrier or tone signal is present in either radio set.
With these relays deenergized, retransmit control groundpaths are open and both transmitters are
deactivated.
RETRANSMIT CIRCUIT, DYNAMIC CONDITION
When a signal is received by radio set no. 1, the signal Ievel in the radio set causes squelch dc
amplifier Q5207 to conduct, thereby energizing squelch relay K5502.
1-58
TM 11-5820-670-30
1-54. RETRANSMIT OPERATION. (CONT)
With K5502 energized, the retransmit control ground, which originates in the receiver-transmitter
during the receive condition, is applied through contacts 5 and 6 of K5502 and then through the control units to transmitter key relay K9602 in radio set no. 2.
Simultaneously, the received audio signal is coupled from radio set no. 1 through the control units to
the transmitter circuits of radio set no. 2 for transmission.
The retransmit control ground, placed on radio set no. 2, simultaneously keys the transmitter circuits
and removes the ground applied to squelch relay K5502 when radio set no. 2 is in the receive
condition.
When radio set no. 2 is in the transmit condition, the sidetone gate circuits (not shown) operate relay
K5502. Breaking the groundpath applied to relay K5502 in radio set no. 2 prevents radio set no. 2 from
energizing the transmit circuits of radio set no. 1. After retransmission has ceased, radio set no. 2
will return to the receive condition.
With both radio sets in the receive condition, either radio set can receive a signal and transmit it to the
other radio set. The radio set that receives the signal first is tuned to the frequency being transmitted
to the relay station.
1-55. VHF TUNER POWER SUPPLY MODULE A1600.
EL1AT134
Vhf tuner power supply A1600 supplies biasing voltages to vacuum tubes located in modules A1200,
A1300, and A1400. The power oscillator outputs a 1000 Hz square wave when +24 vdc biases the
stage. The 1000 Hz square wave is rectified in the full wave bridge rectifier where an output of
approximately 110 vdc at 100 mA is applied to the vhf tuner.
1-59
TM 11-5820-670-30
1-56. VOLTAGE REGULATOR ASSEMBLY A2100.
Voltage regulator assembly A2100 provides a regulated output of +16 vdc for circuits in the receivertransmitter. The regulator maintains + 16 vdc output over a wide range of current demands.
Potentiometer R2106 adjusts biasing levels and the regulated output of +16 vdc, while +24 vdc biases
voltage regulators Q2102 and Q2101.
Voltage regulator assembly A2100 includes a time delay circuit which is discussed in paragraph 1-19.
1-57. POWER SUPPLY ASSEMBLY A9500.
See FO-10 while reading this paragraph.
Power supply assembly A9500 provides +24 vdc for radio set operation and provides 400 Hz voltage for
cooling fan motor operation during transmit mode. An unregulated 27.5 vdc output is also supplied by
the assembly.
COOLING FAN OPERATION
The cooling fan turns on when the radio set is operated in the transmit mode. The +24 vdc from the
series regulator is converted to 400 Hz by the dc-ac converter which is used to power the cooling fan.
When the push-to-talk button is pressed, a transmitter ground signal is applied to the dc-ac converter
causing the stage to oscillate at 400 Hz. The 400 Hz power level is coupled through transformer T9501
to motor B9501, which causes it to turn on.
1-60
TM 11-5820-670-30
1-57. POWER SUPPLY ASSEMBLY A9500. (CONT)
REGULATOR OPERATION
The series regulators, connected in parallel, increase the current capabilities of the power supply and
maintain +24 vdc at a constant level.
If the required 24 vdc level increases above 24 volts, conduction of the voltage sensors decreases,
causing conduction of the regulator driver to decrease. Decreased conduction of Q9507 causes
decreased conduction of the series regulators, which then decreases the required voltage level to 24
volts.
If the required 24 vdc level decreases below 24 volts, conduction of the voltage sensors and regulator
driver increases. This action causes conduction of the series regulators to increase, thereby
increasing the required voltage to 24 vdc. Potentiometer R9511 controls the output voltage level.
1-58. RECEIVER-TRANSMlTTER INTRAUNIT CIRCUIT FUNCTIONING.
This paragraph will explain distribution of primary power, dc operating power, and the metering
circuit. All are contained in the receiver-transmitter and are explained here to clarify intercircuit
relationships that were not evident in the module signal flow analysis. See FO-11 while reading this
paragraph.
DISTRIBUTION OF PRIMARY POWER
Unregulated +27.5 vdc primary power is supplied to the receiver-transmitter at pins 18,34, and 36 of
main power connector P9601. Pin 16 of P9601 does not receive + 27.5 vdc until the radio set is
switched to homing operation.
Primary power is connected through pins 1,2, and 9 of connector P9501 to activate the receivertransmitter power supply. The power supply couples unregulated +27.5 vdc through P9501, pin 13 to
the control coils of relays K9601, K9602, K9603, K9604, and K9606. Unregulated + 27.5 vdc is also
fed to the receiver-audio amplifier through pin 9 of connector P5501, rf control module through
P4501, pin 2, and to the gearbox assembly through pin 25 of connector P9701.
Regulated +24 vdc is coupled through P9501, pin 8 and P5501, pin 29 to receiver audio amplifier. It is
also applied to vhf tuner A1000, test switch S9601, P2101 pin 4 of voltage regulator A2100, and P9701
pin 23 of gearbox assembly A9700.
Regulated +24 vdc is also applied through pin 7 of connector P9501 to the control coil of relay K9605
and to contacts 2 and 6 of relay K9601.
1-61
TM 11-5820-670-30
1-58. RECEIVER-TRANSMITTER INTRAUNIT CIRCUIT FUNCTIONING. (CONT)
In transmit operation, relay K9601 couples regulated +24 vdc through contacts 2 and 6 and contacts 1
and 5 to the rf control modules and rf amplifier. Application of +24 vdc to the rf control through
connector P4501 pin 4, causes the communications antenna to be removed from the receiver input
and connected to the output of band
and band
harmonic filters. Regulated +24 vdc applied to
the rf amplifier activates the amplifier during transmit operation.
DISTRIBUTION OF +16 VDC
Voltage regulator assembly A2100 supplies +16 vdc to the receiver-transmitter. The voltage is
supplied through connector P2101, pin 6 to P3001 pin c on crs A3000, contact 2 on if attenuator
A4900, P5501 pin 7 on receiver-audio amplifier A5500, and to P4501 pin 15 on rf control module
A4500. The +16 vdc is also applied to TEST SWITCH S9601 on the main chassis for metering and to rf
oscillator module A2000 through connector P2001. The vhf tuner receives + 16 vdc through contact 4.
When the radio set is in receive condition, relays K9601, K9603, and K9605 are deenergized, relay
K9605 applies + 16 vdc through contacts 2 and 4 to connector P4001, pin H to activate the circuits in if.
amplifier assembly A4000. Relay K9605 becomes energized only when the radio set is tuning and then
applies + 16 vdc through contacts 5 and 2 to connector P5501 pin 19 on receiver-audio amplifier
assembly A5500. This action turns on the 800 Hz oscillator within the receiver audio amplifier. The 800
Hz tuning tone is applied to the audio line and operator’s headset.
During the tuning operation, the voltage regulator assembly applies +16 vdc through connector
P2101, pin 8 to P3001, pin F of crs A3000. This action disables the crs error signal and prevents it
from being applied to receiver local oscillator A1500 when the radio set is tuning.
In transmit operation, relays K9601 and K9603 are energized. Relay K9603 connects +16 vdc output of
voltage regulator assembly A2100 through contacts 5 and 2 to amplifier modulator A8700, oscillatorbuffer A6000, isolation amplifier A6600, and vhf tuner A1000. The power oscillator circuit within the
vhf tuner supplies higher level dc voltages that are used by the tuner.
During homing operation, + 27.5 vdc is applied from the control unit through pin 16 of main power connector P9601 to pin 12 of P4501 on rf control assembly A4500. The + 27.5 vdc homer operate voltage
energizes relay K4502 in the rf control assembly which, in turn, applies + 16 vdc through P4501 pin 6 to
homer amplifier detector assembly A4800 through pin 6 of connector P4801. This voltage activates the
homer detector amplifier.
1-62
TM 11-5820-670-30
1-58. RECEIVER-TRANSMITTER INTRAUNIT CIRCUIT FUNCTIONING (CONT)
METERING CIRCUIT
See FO-12, receiver-transmitter, Radio RT-823/ARC-131, while reading this section.
Test Switch S9601 on the receiver-transmitter front panel selects various operating voltages and
outputs and applies them through series resistances when necessary to TEST METER M9601. The test
meter displays these voltages to provide a quick check of radio set performance. TEST SWITCH S9601
positions are marked with numbers 1 through 6.
With TEST SWITCH S9601 in position 1, +24 volts are applied to the meter. The meter requires 100
microampere for full scale deflection, therefore +24 volts applied across R9606 (470 K
produces half-scale deflection.
In position 2, +16 volts are applied across R9605 (300 K
mately half-scale deflection.
) where a normal reading is approxi-
In position 3, a portion of agc voltage is applied to the meter through R9604. Resistor R9604 limits the
meter current to provide approximately half-scale deflection for normal agc levels.
In position 4, a portion of rf forward power is applied to the meter. Normal forward power provides
approximately half-scale deflection.
In position 5, a portion of rf reflected power is applied to the meter. Normal reflected power must not
exceed quarter-scale deflection.
1-59. CONTROL, RADIO SET C-7088/ARC-131 FUNCTIONING.
All radio set operator controls are located on Control, Radio Set C-7088/ARC-131. The controls
include the following:
Mode control switch S9105
Squelch control switch S9106
Volume control R9103
Frequency select controls S9101, S9102, S9103, S9104.
For an explanation on operation of these controls, see FO-13 while reading this paragraph.
MODE CONTROL SWITCH S9105
The mode of operation is determined by the mode control switch. The switch also controls the
application of primary power to the radio set. Mode control switch S9105 is a four position rotary switch
with six sections (front and rear). Operating power is applied to the receiver-transmitter when S9105
is set to any position except OFF.
In transmit-receive (T/R) position, the radio set operates in normal communication mode and automatically switches from transmit to receive condition or vice versa when the microphone push-to-talk
button is pressed or released.
1-63
TM 11-5820-670-30
1-59. CONTROL, RADIO SET C-7088/ARC-131 FUNCTIONING. (CONT)
When mode control switch S9105 is set to T/R position, + 27.5 vdc from the aircraft electrical system is
applied to connector J9101 pins C, D, E, through the front and rear wafers of switch S9105D, and is
distributed to the receiver-transmitter through connector J9101 pins e, f, and F. The front wafer of
S9105C provides a path for the audio input in receive mode. The audio input signal is applied to
connector J9101 pin JJ and is fed through the front wafer of S9105C to connector J9101 pin N. The
audio output at J9101 pin N is applied to the aircraft interphone amplifier through the interconnecting
cable.
The receiver-transmitter automatically switches from receive mode to transmit operating mode when
the push-to-talk button is pressed. Pressing the push-to-talk button causes a ground signal to be
applied at connector J9101 pin q. The ground is connected through the front wafer of switch S9105A
and applied to the control coil of relay K9602 in the receiver-transmitter.
The audio signal from the operator’s microphone is applied at connector J9101 pin y, connected
through the rear wafer of S9105C, and fed to the amplifier modulator assembly through connector
J9101 pin x. The audio common, in both receive and transmit mode, is connected through the front
and rear wafers of switch S9105C to the aircraft interphone amplifier.
In retransmit (RETRAN) position, the radio set operates as an automatic two-way relay which provides
communications between two other stations which are separated from each other by more than lineof-sight range. Retransmission operation requires that two AN/ARC-131 Radio Sets or an AN/ARC131 and another radio set having similar capabilities, be connected back-to-back.
NOTE
In retransmit operation, the SQUELCH control must be set to either CARR or TONE position. Retransmit operation will not function with the squelch control set to DIS.
When the mode control switch is set to RETRAN position, a ground signal is supplied by the squelch
relay in audiofrequency amplifier assembly A5500 of the receiving radio set to the control units of the
two radio sets. The ground signal is applied to connector J9101 pin Y and connected through the front
wafer of SQUELCH switch S9106 to the rear wafer of S9105B. Switch S9105B in turn applies the ground
to pin HH of connector J9101.
Through the interconnecting of the two control units, the ground at J9101 pin HH is fed to pin u of
connector J9101 on the control unit of the transmitting radio set and is connected to J9101 pin v,
through the front wafer of switch S9105A. This ground is used to key the transmitting radio set. By
using the squelch relay of the receiving radio set, a ground is not provided to the transmitting set until
a signal is received at the receiving radio set. When the transmitting set is keyed, the ground to its
squelch relay is broken, and prevents lockup of both radio sets in transmit mode.
In retransmit mode, received audio signals are applied to the control unit of the receiving radio set at
connector J9101 pin JJ and passed through the front wafer of switch S9105C to pins N and A of J9101.
The audio at pin N is sent to the aircraft interphone amplifier and can be monitored by the operator.
The audio at pin A is applied to connector J9101 pin c in the control unit of the transmitting radio set.
The rear wafer of switch S9105C connects the audio for retransmission to the amplifier modulator
assembly through pin x of J9101.
1-64
TM 11-5820-670-30
1-59. CONTROL, RADIO SET C-7088/ARC-131 FUNCTIONING. (CONT)
Resistor R9102 serves as a dropping resistor to establish the proper signal level for the transmit audio
input. The audio common in retransmit mode is connected through the front and rear wafers of switch
S9105C to the aircraft interphone amplifier.
In HOME position, the radio set provides an fm or cw homing facility which allows the pilot to home on a
signal transmitted within a frequency range of 30.00 MHz to 75.95 MHz.
When the mode control is set to HOME position, the radio set provides the operator with a visual
homing capability. Primary + 27.5 vdc power is applied the same as in the T/R mode except that + 27.5
vdc is also applied to the homer assembly to operate the homing circuits.
The homer operate voltage is coupled from contacts 9, 10, 11, and 12, of S9105D to contact 8 on the
front wafer of S9105A. in the HOME mode, contact 8 is connected to contact 7. From contact 7 of
S9105A front, the homer operate voltage is connected through pin DD of control unit connector J9101
and through the interconnecting wiring to the rf control assembly to operate communications homing
relay K4502 and other homing circuits.
When S9106 is set to CARR, the radio set receiver circuits are gated on only when the received signal
is of sufficient strength as determined by the setting of the squelch adjust (SQ ADJ) potentiometer on
the receiver-transmitter front panel.
When S9106 is set to TONE, the radio set receiver circuits are gated on only when the received signal
is modulated by a 150 Hz tone.
When SQUELCH switch S9106 is set to DIS, the ground at contact 7 is connected through S9106 to
contact 5 and then to pin V on control unit connector J9101. The ground is then connected through
interconnecting wiring and is used to energize squelch relay K5502 (not shown) in audiofrequency
amplifier assembly A5500. The squelch relay will remain energized as long as S9106 is in the DIS
position; therefore the receiver-audio amplifier will remain on and pass all audio signals.
When squelch switch S9106 is set to CARR, the ground is disconnected at contact 5 from contact 7,
and the ground applied at pin V of connector J9101 is removed. The removal of the ground deenergizes squelch relay K5502 in the audiofrequency amplifier assembly. This action allows the receiversquelch amplifier to take control of squelch relay K5502.
The noise, which is of significant amplitude in the absence of the received carrier signal, is used to
control the receiver-squelch amplifier which, in turn, operates squelch relay K5502. When a carrier
of sufficient strength is received, the noise decreases in amplitude and the receiver-squelch amplifier
energizes K5502 which, in turn, unsquelches the receiver-audio amplifier and allows the audio to
pass.
The squelch circuit can be disabled by pressing the SQ DIS button located on the receiver-transmitter
front panel. This has the same effect as switching the SQUELCH switch on the control unit to the DIS
position.
1-65
TM 11-5820-670-30
1-59. CONTROL, RADIO SET C-7088/ARC-131 FUNCTIONING. (CONT)
When SQUELCH switch S9106 is set to TONE, the ground at contact 7 is connected through contact 8
to contact 9 on the rear wafer of S9105A. This ground is applied to pin X of connector J9101 only when
the mode control switch is set to T/R or RETRAN position. From pin X, the squelch tone ground is
connected through the interconnecting wiring and is used to operate the tone mode relays in the
audiofrequency amplifier assembly.
Tone mode relays K5503, K5504, and K5505 (not shown) perform the required switching for the
squelch filter and receiver-squelch amplifier. When the received signal is modulated by a 150 Hz
tone, the receiver-squelch amplifier tone rectifier circuit will unsquelch the receiver-audio amplifier.
Homer operate voltage is also applied from contact 7 of S9105A front through current limiter R9101, to
pin GG of connector J9101. This voltage is used to operate the homing indicator flags. Operation of
the flags depends on the ground return. This ground return is provided by the squelch relay in the
audiofrequency amplifier when sufficient signal is received to cause unsquelching. The ground is
connected, as in RETRAN operation, from the audiofrequency amplifier, through interconnecting
wiring to pin Y of control unit connector J9101.
As in RETRAN operation, SQUELCH switch S9106 must be set to either CARR or TONE position. From
J9101 pin Y, ground is connected to contacts 11 and 12 of S9106. With switch S9106 positioned to
CARR or TONE, contacts 11 and 12 are connected to contact 1 which is connected to contact 9 on the
rear wafer of S9105B. In HOME position, contacts 9 and 10 are connected and the ground is applied to
pin FF of connector J9101 of the control unit and then to the homing indicator to operate the flags.
The homing indicator horizontal (signal strength) needle is controlled by the signal voltage from the
homer assembly. The signal strength voltage is coupled from the receiver-transmitter unit to pin MM
of control unit connector J9101. From pin MM, the signal strength voltage is connected to contact 6 on
the rear wafer of S9105B.
In HOME mode, contact 6 connects to contact 5. From contact 5, the signal strength voltage is
coupled through pin NN of J9101 to the homing indicator. The homing indicator horizontal needle
negative terminal is returned to the homer assembly in the receiver-transmitter.
1-66
TM 11-5820-670-30
1-59. CONTROL, RADIO SET C-7088/ARC-131 FUNCTIONING. (CONT)
The homing indicator vertical (course) needle is controlled by the homer course voltage from the
homer assembly. The homer course voltage is coupled from the receiver-transmitter to pin t of
connector J9101. From pin t, the course voltage is connected through contacts 1 and 2 on the rear
wafer of S9105B. From contact 1, the homer course voltage is connected through pin (s) of
connector J9101 to the homing indicator vertical needle ( + ) input. The vertical needle (-) input is
returned directly to the homer assembly in the receiver-transmitter.
SQUELCH SWITCH S9106
The radio set has three squelch modes, squelch disable (DIS), carrier squelch (CARR), or tone
squelch (TONE). Squelch mode is selected by SQUELCH switch S9106 on the control unit. When
S9106 is set to DIS, the radio set will receive all fm signals within its frequency band regardless of
signal strength or the presence or absence of tone modulation.
VOL CONTROL R9103
VOL control R9103 is a 250 ohm potentiometer, wired in series with the received audio signal to control
the audio volume.
The received audio signals from contact 1 of S9105C front are coupled through the wiper arm of R9103
to the aircraft interphone amplifier.
Resistor R9104 prevents the audio output from being reduced to zero when VOL control is turned
maximum counterclockwise.
FREQUENCY SELECTOR CONTROLS S9101, S9102, S9103, and S9104
The radio set is tuned through a frequency range of 30.00 MHz to 75.95 MHz in 0.05 MHz steps.
Tens MHz selector S9101 – changes frequency of radio set in 10 MHz steps.
Units MHz selector S9102 – changes frequency in 1 MHz steps.
Tenths MHz selector S9103 – changes frequency in 0.1 MHz steps.
Hundredths MHz selector S9104 – changes frequency in 0.05 MHz steps.
The frequency selector switches in the control unit develop a frequency selection code which controls
the operation of tuning circuits in gearbox assembly of the receiver-transmitter and tuning circuits of
the antenna coupler. These switches are part of a five-wire, open-seeking, reentrant system that
controls motors in gearbox assembly A9700.
1-67
TM 11-5820-670-30
1-60. RADIO SET AN/ARC-131 INTERUNIT CIRCUIT DETAILS.
Interunit functioning is presented to provide an understanding of the interrelations of several units in
various operations of the radio set. Such an understanding will help maintenance personnel, when
troubleshooting, to sectionalize to a defective module or unit.
This paragraph explains interunit functioning of the following sections:
Power distribution and control circuits
Push-to-talk circuits (transmitter keying)
Audio circuits
Squelch control circuits
INTERUNIT POWER DISTRIBUTION
EL1AT136
1-68
TM 11-5820-670-30
1-60. RADIO SET AN/ARC-131 INTERUNIT CIRCUIT DETAILS. (CONT)
The + 27.5 vdc primary power is supplied to the radio set from the aircraft electrical system. Primary
power is applied at pins C, D, and E of control unit electrical connector J9101. From pins C, D, and
E, power is applied to contacts 1,2,3, and 5 of wafer D of mode control S9105. Control S9105 is
shown in OFF position. In this position, no power is applied through the switch. When the switch is
rotated to T/R position, contacts 1, 2, and 5 are shorted to the switch segment, applying power
through contacts 9, 10, 11, and 12 to pins e, f, and F of J9101.
The primary power at pins e, f, and F of the control unit receptacle is connected through the aircraft
harness, to pins 18, 34, and 36 of the receiver-transmitter electrical connector P9601. From P9601,
power is coupled directly to the power supply through connectors P9501 and J9501 pins 1, 2, and 9.
The power supply converts primary power into regulated +24 vdc operating voltage. In addition, +27.5
vdc primary power is coupled through fuse F9502 and diode CR9504 to operate relays on the receivertransmitter chassis. Diode CR9504 protects the radio set from reverse voltage.
When mode control switch is rotated to RETRAN or HOME position, primary power is applied the same
way, except that it is shorted through S9105 at contacts 1, 2, and 3 instead of 1, 2, and 5. In HOME
position, primary power is also applied through diode CR9101. Diode CR9101 provides a reverse voltage protection for relays K4501 and K4502.
This homer primary power is coupled through the aircraft harness to pin 16 of receiver-transmitter unit
electrical connector P9601. From P9601, power is applied through P4501 and J4501, pin 12 to coils
of relays K4501 and K4502 on the rf control assembly.
Application of homer operate voltage energizes K4501 and K4502; relay K4501 disconnects the communications antenna from the radio set, and relay K4502 switches the power to operate the homer circuits in the homer assembly.
See paragraph 1-58 for primary power distribution within the receiver-transmitter.
TRANSMITTER KEYING CIRCUITS
See FO-14 while reading this section.
Switching operations are initiated when the transmitter system is keyed. This transfers the radio set
from receive mode to transmit mode of operation. Switching operations are performed by relays in the
receiver-transmitter and within the rf control and audiofrequency amplifier assemblies. FO-14 shows
the radio set in transmit mode with the push-to-talk button pressed.
When the radio set is switched to transmit operation, the transmitter section is connected to the communications antenna through the rf control assembly. The sidetone gate signal output to the rf control
assembly is supplied to the audio amplifier. The radio set audio section supplies all audio output
signals to the aircraft interphone amplifier and is also used by the transmitting system when the system
is keyed.
1-69
TM 11-5820-670-30
1-60. RADIO SET AN/ARC-131 INTERUNIT CIRCUIT DETAILS. (CONT)
In transmit operation, the control unit control switch is placed in T/R position as shown in FO-14.
Input voltage, +27.5 vdc, is supplied by the aircraft electrical system and is applied to the radio set
through connectors J9101 pin D, S9105 C, J9101 pin F, main connector P9801 pin 36, and connector
P9501 pin 9 to the power supply.
Application of +27.5 vdc activates the power supply. Upon being activated, the power supply applies
+24 vdc to the vhf tuner, gearbox, audio amplifier, voltage regulator, and relay K9605. It also supplies
+ 27.5 vdc to relays K9601, K9602, K9803, K9604, and K9606.
The transmit command (ground signal) from the push-to-talk button is applied through connector
J9101 pin q, switch S9105A, back through connector J9101 pin v of the control unit, to main connector P9601 pin 41 and K9602 pin 3. Upon receipt of the transmit command, K9602 energizes and
removes the receive mode ground from contact 8 and applies a ground through contacts 2 and 5 to the
power supply. The application of the ground starts the power supply blower motor used for cooling
during transmit mode.
The transmit mode ground is also applied through contacts 6 and 1 of K9602 to the rf control assembly,
audio amplifier, and relays K9601 contact 3, K9603 contact 3, and K9604 contact 3. The transmit
mode ground is obtained through contacts B2 and B3 of K9605. Relay K9605 energizes only when the
radio set is tuning. Application of the transmit ground causes relays K9601, K9603, and K9604 to
energize simultaneously.
When K9601 is energized, +24 vdc from the power supply is connected through contacts 2, 5, and 6,
1, of K9601 to activate the rf amplifier.
When K9603 is energized, + 105 vdc plate voltage for the vhf tuner is removed and contacts 1 and 6
apply a ground to the plate circuit. The voltage regulator assembly applies + 16 vdc through contacts
2 and 5 of K9603 and through connector P8701 pin 10 to turn on the amplifier modulator assembly,
transmit section of the vhf tuner, oscillator and buffer amplifier, and the isolation amplifier.
When K9604 is energized, connectors P2101 pin 2 and P2101 pin 3 of the voltage regulator are tied
together through contacts 5 and 2 of the relay. This action enables the squelch delay circuit by discharging C2101 through contacts 2 and 5.
The transmitter dc control voltage from the if. amplifier hunt cutoff detector is applied through contacts 1 and 6, R9601 and CR9606 to the amplifier modulator assembly. The transmitter dc control
voltage is used to disable the hunt generator when the master oscillator has reached the correct frequency. In receive mode of operation, the transmitter dc control voltage is disconnected and one end
of R9601 is grounded through contacts 6 and 8 of K9604, discharging C9601.
During transmit mode operation, the audiofrequency amplifier supplies a 150 Hz tone signal. The tone
is applied through connector P5501 pin 1, contacts 6 and 8 of dummy relay K9606, and connector
P8701 pin 8 to the amplifier modulator. The transmitter audio input from the aircraft interphone amplifier is applied to the amplifier-modulator through contacts 2 and 4 of K9606. In wide band operation,
the tone signal is also interrupted by the wideband mode ground applied through diode CR9603.
1-70
TM 11-5820-670-30
1-60. RADIO SET AN/ARC-131 INTERUNIT CIRCUIT DETAILS. (CONT)
AUDIO CIRCUITS
See FO-15 while reading this section.
Audio signals from the microphone are coupled through the interphone amplifier to pins y (high) and
kk (low) of control unit connector J9101. The 110 ohm and 43 ohm resistors form an impedance
matching pad.
The audio signal is then coupled through mode control switch S9105. The audio high line is coupled
through contacts 10 and 11 of S9105C rear and the audio common is coupled through contacts 4 and 5
of S9105C rear. The transmit audio signal is then coupled out of the control unit through pins x (high)
and d (low) and through the aircraft electrical harness to the receiver-transmitter.
The signal is coupled into the receiver-transmitter electrical connector P9601 at pins 6 (high) and 5
(low). The signal is then coupled through contacts 2 and 4 of dummy relay K9606 to pins 7 (high) and
11 (low) of connector J8701 on the amplifier modulator assembly. From pins 7 and 11 of J8701, the
signal is coupled to the audio mixer.
Received audio is coupled from the output of the receiver-audio amplifier, in the audiofrequency amplifier, through pins 2 (high) and 8 (low) of J5501 and P5501 to the receiver-transmitter electrical
connector. The signal is coupled through pins 14 (low) and 13 (high) of P9601 to the aircraft electrical harness, which couples the signal to pins B (low) and JJ (high) of control unit electrical
connector K9101. From pins B and JJ, the signal is coupled through contacts 1 and 2 (high) and 7
and 8 (low) of mode control S9105C front.
Received audio (low) is coupled direct from contact 8 of S9105C front to pin KK of control unit electrical connector J9101. Received audio (high) is coupled to pin N of J9101 through VOL control R9103.
Resistor R9104 prevents the audio level from going to zero when VOL control is adjusted maximum
counterclockwise. From pins KK and N of the control unit electrical connector, the received audio signal is amplified by the interphone set and then coupled to the operator’s headset.
MODE CONTROL CIRCUITS
Radio Set AN/ARC-131 has three modes of operation, transmit/receive (T/R), retransmission
(RETRAN), and homing (HOME). Mode control switch S9105 on the control unit selects the operating
mode. The mode control switch also has an OFF position which removes primary power from the
receiver-transmitter.
See FO-16 while reading the text in this section.
Transmit-Receive Mode (T/R)
When mode control switch S9105 is set to T/R, the radio set operates as a two-way fm receivertransmitter. The radio set is placed in transmit condition by pressing the transmit button and returns to
receive condition when the transmit button is released.
1-71
TM 11-5820-670-30
1-60. RADIO SET AN/ARC-131 INTERUNIT CIRCUIT DETAILS. (CONT)
In T/R mode, primary + 27.5 vdc power is applied from pins C, D, and E of control unit connector
J9101 to contacts 1,2,3, and 5 of S9105D front. Primary power is connected through the switch to
contacts 9, 10, 11, and 12 to pins F, e, and f of control unit connector J9101. Primary power is then
coupled through the aircraft wiring, to receiver-transmitter connector P9801, where it is connected
through pins 18, 34, and 36 to pins 1, 2, and 9 of connector P9501.
Primary power is applied through fuses F9502 and F9501 to the regulator circuits which provide
+24 vdc necessary to operate the radio set. Power is also applied through reverse-voltage protection
diode CR9504 to all receiver-transmitter relays for relay operate power.
In T/R mode, transmit audio signals originate at the microphone and are coupled through the aircraft
interphone set and interconnecting cabling to pin y of control unit connector J9101. The audio is then
coupled through S9105C rear from contact 11 to contact 10 and out of the control unit through pin X.
The audio common is connected through the control unit from pin kk to S9105C rear contact 5, from
contact 5 to contact 4, and then out pin d of the control unit connector.
Transmit audio (high) is coupled from pin X of the control unit connector to pin 6 of receivertransmitter connector P9601. The audio common is coupled from pin d of the control unit connector to
pin 5 of receiver-transmitter connector P9601. The audio signal at pins 6 (high) and 5 (low) is
coupled into the amplifier modulator through relay K9606 contacts 2 and 4 and P8701 pins 7 (high)
and 11 (low) to the audio mixer. The amplifier-modulator modulates the carrier with the audio signal
for transmission.
Received audio is coupled from the audio output transformer in the audio frequency amplifier, through
pins 2 (high) and 8 (low) of P5501, to pins 13 (high) and 14 (low) of receiver-transmitter unit connector J9601. The received audio (high) is then coupled to control unit connector J9101 pin JJ while
the received audio (low) is coupled into the control unit through J9101 pin B.
Received audio (high) is connected through S9505C front from contact 1 to contact 2 then through
VOL control R9103. The signal is coupled from the wiper arm of R9103 to pin N of control unit connector J9101. The received audio (low) is coupled through S9105C front from contact 7 to contact 8
and then to the audio common line at pin KK of control unit connector J9101. The received audio (high
and low) is then coupled through the aircraft interphone set to the headset.
In T/R mode, the receiver-transmitter is in receive condition, except when the transmit button is
pressed. When the transmit button is pressed, a ground is supplied through the aircraft interphone set
to pin g of control unit connector J9101. The ground is then connected through S9105A front from
contact 3 to contact 2. From contact 2, the ground is connected to pin v of control unit connector
J9101 and then to pin 41 of receiver-transmitter connector P9601. From pin 41, the ground is applied
to the coil of relay K9602 causing it to energize. Relay K9602, in turn, activates the transmit mode
relays in the receiver-transmitter.
1-72
TM 11-5820-670-30
1-60. RADIO SET AN/ARC-131 INTERUNIT CIRCUIT DETAILS. (CONT)
Retransmit Mode (RETRAN)
In RETRAN mode, + 27.5 vdc primary power is applied through S9105D front to the receivertransmitter as indicated in the T/R position except that contact 3 is used instead of contact 5.
Received audio signals are coupled from the receiver-transmitter into control unit connector J9101 at
pins JJ (high) and B (low). The received audio (high) is connected from pin JJ through S9105C front
from contact 1 to contact 3. From contact 3, the received audio (high) is connected to pin A of control
unit connector J9101 then through the interconnecting cabling to radio set no. 2 for retransmission.
Received audio (low) is connected from pin B through S9105C front from contact 7 to contact 9. From
contact 9, the received audio (low) is connected to pin PP of control unit connector J9101 then
through interconnecting cabling to radio set no. 2. At the control unit of radio set no. 2 these signals
become the retransmit audio and are coupled into the radio set at pins c (high) and w (low) of control
unit connector J9101.
To complete the audio path, consider radio set no. 1 (FO-18) to be in transmit condition. Transmit
audio is coupled through pins c (high) and w (low) of control unit connector J9101 to S9105C rear to
contacts 12 (high) and 6 (low). Resistor R9102 reduces the signal level for proper input to the companion radio set.
Contact 12 connects to contact 10 and contact 6 connects to contact 4. From contacts 10 and 4, the
audio signal is connected through pins x (high) and d (low) of control unit connector J9101 and then
through interconnecting cabling to pins 6 (high) and 5 (low) of receiver-transmitter connector
P9601. Audio is then coupled through relay K9606, contacts 2 and 4, to pins 7 (high) and 11 (low) 0.
the amplifier-modulator for transmission.
In retransmit operation, SQUELCH control S9106 must be set to either CARR or TONE position. The
retransmit control ground, originating in the audiofrequency amplifier when a received signal causes
relay K5502 (not shown) to energize, is applied to the transmitter keying circuits of radio set no. 2
to energize the transmitter for retransmission. This ground is coupled from the audiofrequency
amplifier through pin 5 of connector P5501. The ground is then connected through pin 10 of receivertransmitter connector P9601, and then through the interconnecting wiring to pin Y of control unit
connector J9101.
The ground is then coupled through to SQUELCH control S9106 to contact 9 of S9105B rear. Contact 9
is connected to contact 8 in RETRAN mode, therefore, the ground is coupled out of the control unit
through pin HH of J9101. The retransmit control ground is coupled into radio set no. 2 control box at
pin u of J9101.
Assume that FO-16 now represents radio set no. 2, and that the ground is coupled through S9105A
front from contact 1 to contact 2. From contact 2, the ground is coupled out of the control unit through
pin v of J9101. The ground is then connected through interconnecting wiring to pin 41 of receivertransmitter connector P9601. From pin 41 of P9601, the ground is connected to the coil of relay K9602
causing it to energize which, in turn, activates the transmit circuits of radio set no. 2.
1-73
TM 11-5820-670-30
1-60. RADIO SET AN/ARC-131 INTERUNIT CIRCUIT DETAILS. (CONT)
Homing Mode (HOME)
In homing mode, +27.5 vdc primary power is applied as indicated in T/R mode, except that
+ 27.5 vdc is also supplied to the rf control to operate the homing circuits. The homer operate voltage
is coupled from contacts 9, 10, 11, and 12 of S9105D front to contact 8 of S9105A front.
In HOME mode, contact 8 is connected to contact 7. From contact 7 of S9105A front, the homer operate voltage is connected through pin DD of control unit connector J9101 and through interconnecting
wiring to pin 16 of receiver-transmitter connector P9601. From there, the homer operate voltage is
connected to pin 12 of the rf control to operate homing relay K4502 which, in turn, activates other
homing circuits.
The homer operate voltage is also applied from contact 7 of S9105A front through R9101, a current
limiter, to pin GG of control unit connector J9101. This voltage is used to operate the homing indicator
flags.
Operation of the flags depends on the ground return. This ground return originates in the receivertransmitter and is connected through the audiofrequency amplifier when sufficient signal is received to
cause unsquelching.
The ground is connected, as in RETRAN operation, through pin 5 of the audiofrequency amplifier connector, through pin 10 of receiver-transmitter connector P9601, pin Y of the control unit connector,
and contacts 11 and 12 of S9106 to contact 1 of S9106. From contact 1 of S9106, the ground is connected to contact 9 of S9105B rear, which connects to contact 10. From contact 10 of S9105B, the
ground return is connected to pin FF of control unit connector J9101 and then to the homing indicator
to operate the flags.
The homing indicator horizontal needle is controlled by the signal strength voltage from the homer
assembly. Signal strength voltage is coupled from the receiver-transmitter to pin MM of control unit
connector J9101. From pin MM, signal-strength voltage is connected to contact 6 of S9105B rear.
In HOME mode, contact 6 connects to contact 5. From contact 5, signal strength voltage is coupled
through pin NN of control unit connector J9101 to the homing indicator. The homing indicator
horizontal needle negative terminal is returned to the receiver-transmitter.
The homing indicator vertical needle is controlled by the homer course voltage from the homer assembly. The homer course voltage is coupled from the receiver-transmitter to pin t of control unit connector J9101. From pint, it is connected through S9105B rear from contact 2 to contact 1.
From contact 1, homer course voltage is connected through pin s of control unit connector J9101 to
the homing indicator vertical needle (+) input. The vertical needle (-) is returned directly to the
receiver-transmitter.
1-74
TM 11-5820-670-30
1-60. RADIO SET AN/ARC-131 INTERUNIT CIRCUIT DETAILS. (CONT)
SQUELCH CONTROL CIRCUITS
See FO-17 while reading this section.
Squelch Disable Mode (DIS)
When SQUELCH control S9106 is set to DIS, the ground at contact 7 is connected through S9106 from
contact 5 and then to pin V of control unit connector J9101. The ground is then connected through
interconnecting wiring to pin 12 of receiver-transmitter connector P9601.
The ground at pin 12 (squelch disable ground) is connected to pin 25 of audiofrequency amplifier
connector P5501, and then through contacts A3 and A2 of relay K5501 to the coil of relay K5502. The
ground is used to energize relay K5502 which, in turn, couples +16 vdc through contacts A1 and A2 to
activate the output stage of the receiver audio amplifier.
Relay K5502 remains energized and the audio stages remain activated as long as the SQUELCH control
is in DIS position, and all audio signals are passed and amplified by the receiver-audio amplifier. The
audio signals are then coupled through pins 2 and 8 of connector P5501 and pins 13 and 14 of
receiver-transmitter connector P9601 to the control unit.
Carrier Squelch Mode (CARR)
When SQUELCH control S9106 is set to CARR, the ground at contact 7 is disconnected from contact 5,
and the ground applied at pin V of control unit connector J9101 is removed. Removal of the ground at
pin V causes relay K5502 in the audiofrequency amplifier to reenergize. This action removes +16 vdc
coupled to the audio output stages through contacts Al and A2 of relay K5502 and turns off the receiver
audio amplifier.
The noise, which is of significant amplitude in the absence of a received carrier signal, is coupled
from the receiver-audio amplifier through contacts 63 and 62 of relay K5501 to ac amplifier Q5201.
The noise is amplified by Q5201 and applied to dc amplifiers Q5203 and Q5204. Emitter follower Q5202
provides proper operating bias for ac amplifier Q5201. A portion of the amplified output dc amplifier
Q5204 is applied to the squelch filter.
With the SQUELCH control set to CARR, relays K5503 and K5504 are deenergized and the squelch filter
circuit is connected to attenuate the 7300 Hz noise components. All other frequencies are fed back to
Q5202 through the squelch filter. In this condition, the amplifiers are completely degenerative for all
frequencies except 7300 Hz and provide maximum gain at 7300 Hz.
The amplified noise components are coupled from dc amplifier Q5204 to noise rectifier CR5201 which
provides a filtered output to dc amplifier Q5205.
When receiver noise alone is present, the rectified noise signal from CR5201 causes Q5205 to conduct. When Q5205 conducts, the collector voltage applied through contacts 63 and 62 of relay K5505
to dc amplifier Q5207 causes Q5207 to turn off. Since S5207 controls the energizing current for relay
K5502, the relay is kept from energizing and +16 vdc is not applied to the output stage of the receiveraudio amplifier, and the audio signals are prevented from passing.
1-75
TM 11-5820-670-30
RADIO SET AN/ARC-131 INTERUNIT CIRCUIT DETAILS. (CONT)
SQ ADJ potentiometer R9602 allows front panel adjustment of the carrier squelch signal. Normal setting of the SQ ADJ potentiometer is at a point just above the level where noise breaks squelch. The
squelch circuits can be disabled by pressing the SQ DIS switch S9602 on the receiver-transmitter.
This has the same effect as switching the SQUELCH control on the control unit to DIS position.
When an incoming signal is present, the level of rectified noise component applied to dc amplifier
Q5205, from noise rectifier CR5201, causes Q5205 to turn off, which in turn causes dc amplifier
Q5207 to turn on. When Q5207 turns on, the emitter current applied through contacts A2 and A3 of
relay K5501 energizes relay K5502 and +16 vdc is applied through contacts A1 and A2 of relay K5502 to
the receiver-audio amplifier output stage. This action causes the receiver-audio amplifier to unsquelch and pass audio signals.
Tone Squelch Mode (TONE)
When SQUELCH control S9106 is set to TONE, the ground at contact 7 is connected through contact 8
and then to contact 9 on S9105A rear. From contact 9 through contact 10 of S9105A rear, the ground
is connected to pin X of control unit connector J9101 (this ground is applied to pin X only when the
mode control switch is set to T/R or RETRAN) and then through interconnecting wiring to pin 9 of
receiver-transmitter connector P9601.
From pin 9, the ground (squelch tone ground) is connected to pin 31 of audiofrequency amplifier
connector J5501. The ground is used to energize tone mode relays K5503, K5504, and K5505. Relays
K5503 and K5504 connect the squelch filter circuit so that it attenuates the 150 Hz tone. All other frequencies are fed back to emitter follower Q5202 through the squelch filter. In this condition, the amplifiers are completely degenerative for all frequencies except 150 Hz and provide maximum gain at
150 Hz.
The 150 Hz tone signal is amplified as described for CARR squelch operation and is applied to tone
rectifier CR5202. The filter output of CR5202 is applied to dc amplifier Q5206 and causes Q5206 to
turn on. Relay K5505 is energized in TONE squelch operation and direct couples Q5206 and Q5207
through contacts B1 and B2. When Q5206 turns on, Q5207 also turns on which causes relay K5502 to
energize, and apply + 16 vdc through contacts A1 and A2 to the receiver-audio amplifier output stage.
This activates the audio stages and allows the audio signals to pass.
In the absence of a 150 Hz tone, Q5206 and Q5207 remain off and relay K5502 is not energized to unsquelch the receiver-audio amplifier, and audio is prevented from passing. Amplified audio signals
are coupled through pins 2 and 8 of audiofrequency amplifier connector P5501, through pins 13 and
14 of receiver-transmitter unit connector P9601, and applied through interconnecting wiring to the
control unit.
1-76
TM 11-5820-670-30
1-61. TUNING SYSTEM RADIO SET AN/ARC-131.
Receiver-Transmitter Radio RT-823/ARC-131 operates on any of 920 channels within range from
30 to 75.95 MHz, in 0.05 MHz increments. The operating frequency is selected at Control, Radio Set
C-7088/ARC-131 and the actual tuning takes place in receiver-transmitter, Radio RT-823/ARC-131
and the antenna coupler. The control unit provides whole and decimal MHz control information to the
gearbox in the receiver-transmitter.
The gearbox is a motor-driven electromechanical device which simultaneously tunes the tank circuits
in the rf amplifier, oscillator buffer, vhf tuner, and inserts proper crystals in the reference and interpolation oscillators of the crs as the operator selects the frequencies at the control unit.
The gearbox consists of two autopositioner circuits and their drive motors, a differential, several gear
trains, and a positioning cam. A third motor within the gearbox drives the A band and B band selection
linkage. The autopositioner circuit is a motor-driven rotary positioning mechanism which provides
automatic and precise selection of any one of a number of fixed positions, each of which is determined
by the switch positions at the control unit. One autopositioner circuit tunes the receiver-transmitter in
1 MHz increments; the other autopositioner circuit tunes the receiver-transmitter in 0.05 MHz
increments.
FREQUENCY SELECTION CODE
Frequency selector switches in the control unit develop the frequency selection code which controls
tuning circuit operation in the gearbox of the receiver-transmitter and the antenna coupler tuning
circuits.
The selection code for each of 920 available channels is developed by grounding specific combina
tions of 19 frequency control lines. Multiwafer rotary switches S9101, S9102, S9103, and S9104
determine combinations of frequency control lines which are grounded. The frequency selection
codes applied to switch S9705 in the gearbox are determined by the front and rear wafers of S9101A,
S9102E, S9102H; the rear wafer of S9101 B and front wafer of S9102G.
The selection codes for determining the proper band selection in the receiver-transmitter are developed by the front wafer of S9101 B and rear wafer of S9102G. The band selection codes are connected
through pins G and J of control unit connector J9101 and are applied to motor 69701 in the gearbox
through either switch S9701 or S9702.
Tenths selector switch S9103 and hundredths MHz selector S9104 determine last two digits of the
selected frequency. The front and rear wafers of S9103 and S9104 determine the combination of frequency control lines grounded. The grounds are applied at pins P, R, S, T, and U of control unit
connector J9101 and fed through interconnecting wiring to switch S9703 to the Iedex assembly (autopositioner circuit) in the gearbox.
The Iedex assembly is mechanically connected to the crystal switch of the rf oscillator assembly. The
crystal switch selects the correct combination of crystals to determine the last two digits of the selected
frequency.
Tens MHz selector switch S9101 and units MHz selector S9102 also develop frequency selection codes
used to tune the antenna coupler. The frequency selection codes applied to the coupler are determined by the front and rear wafers of S9101C, S9101D, S9102A, S9102B, S9102C, and S9102D.
1-77
TM 11-5820-670-30
1-61. TUNING SYSTEM RADIO SET AN/ARC-131. (CONT)
Correct ground combinations are applied to pins j, K, M, Z, and AA of control unit connector J9101.
The selection code for determining proper band selection in the antenna coupler is developed by the
front wafer of S9101D. The band selection code is connected through pins g and H of connector
J9101. All frequency selection codes applied to the antenna coupler are used to drive the automatic
positioning circuits similar to those used in the gearbox.
Table
on FO-18 lists the receiver-transmitter coding combinations for tens and units MHz selectors; table
lists the receiver-transmitter coding combinations for tenths and hundredths MHz
selectors; and table
lists the antenna coupler coding combinations for tens and units MHz
selectors.
WHOLE AND DECIMAL MHZ TUNING CIRCUITS
See FO-19 while reading this section.
The tuning system automatically tunes the radio set and antenna coupler to the frequency selected at
the control unit. Each of the four decimal digits defining one of 920 channels between 30.00 and
75.95 MHz is independently selected at the control unit. The control converts four decimal digits into a
12 wire code consisting of grounds and opens. This information is decoded in the receiver-transmitter
and is used to operate tuning motors which correctly position the induct tuner shafts of the rf amplifier,
oscillator buffer, vhf tuner, and rf oscillator. The control unit also converts the two decimal digits defining one of 46 channels between 30 and 75 MHz into a seven-wire code for tuning the antenna
coupler.
The 30 to 70-MHz and 0 to 9-MHz frequency selector knobs on the control unit rotate two switches,
S9101 and S9102, which are electrically interconnected. When rotated through their 46 different
combinations (30 to 75 MHz), 14 wire codes representing those frequencies are generated. The 14
wire codes consist of five control lines plug two band lines for the receiver-transmitter and five control
lines plus two band lines for the antenna coupler. Tenths MHz and hundredths MHz frequency selector
knobs rotate two switches, S9103 and S9104, which are electrically interconnected. When rotated
through their 20 combinations (0.05 to 0.95), a five-wire codes, used only for the receivertransmitter unit, is generated which represents those frequencies.
Band
and band
information is used primarily to control the band switch motor in the gearbox
which drives the band switch arms on the oscillator buffer, vhf tuner, and rf amplifier. The band
ground signal is also used to energize relays in the rf control assembly which the switch from band
to band
antenna filters. Band
and
information is also provided to the antenna coupler.
The procedures below describe tuning system operation for the operating frequency of 30.00 MHz.
The circuit operation for all remaining frequencies is identical with that for 30.00 MHz except that
different tuning control signals are originated at the control unit. For simplicity, only those control
lines grounded during 30.00 MHz operation are shown on the simplified diagram of FO-19.
For each receiver-transmitter and antenna coupler frequency selected, there are 19 tuning control
lines used as follows:
Five control lines for receiver-transmitter first and second digits
Five control lines for receiver-transmitter third and fourth digits
Two band selection control lines for the receiver-transmitter
Five control lines for antenna coupler first and second digits
Two band selection control lines for the antenna coupler.
1-78
TM 11-5820-670-30
1-61. TUNING SYSTEM RADIO SET AN/ARC-131. (CONT)
These lines are grounded in various combinations at the control unit to provide required tuning for the
particular frequency.
When the manual frequency selector switches are positioned to 30.00 MHz, as shown in FO-19,
grounds are applied to tuning control lines MHz select A, MHz select E, 0.05 MHz select A, 0.05 MHz
select E, and band
lines for the receiver-transmitter and antenna coupler.
Tuning control line select B, MHz select C, select D, and band
selection lines are not grounded in
30.00 MHz position. Tuning control line MHz select A receives a ground through the front wafer of
S9102E and rear wafer of S9101A. The ground is applied through pin k of connector J9101, pin 26 of
P9601, and pin 6 of P9701 to pin 6 on the rear wafer of S9705 in the gearbox.
If the radio set were tuned to some frequency other than 30.00 MHz, pin 6 may be making contact with
the switch wiper. Pin 4 will always remain in contact with the wiper. The ground signal would then be
applied through pins 6 and 4 of S9705 (rear wafer) to the emitters of Q9703 and Q9704.
Tuning control line MHz select E also receives a ground through the front wafer of S9101A in the control unit. The ground is applied to pin 5 on the front wafer of S9705 in the gearbox through connectors
J9101 pin CC, P9601 pin 24, and P9701 pin 4. This ground signal is also received at pin 4 on the rear
wafer of S9705 since two rotors are electrically connected. The application of the ground signal to the
emitter of Q9704 causes the transistor to conduct; both transistors are necessary to ensure that S9705
will be positioned correctly for the frequency selected.
When relay K9702 energizes, either a ground or + 27.5 vdc will be connected through contacts 1 and 6
to motor B9703. The signal applied through the contacts is determined by the condition of motor reversing relay K9703. Application of + 27.5 vdc causes motor B9703 to run and in turn rotate S9705 by
means of the gear train until its rotor is disconnected from pins 5 and 6 of S9705 as shown in FO-19.
With an ungrounded emitter, Q9704 stops conducting, K9702 deenergizes, and + 27.5 vdc is removed
from B9703.
Concurrent with grounding of the tuning control lines MHz select A and MHz select E, the tuning control lines 0.05 MHz select A and 0.05 MHz select E receive ground signals. Both control lines are
grounded through the front and rear wafers of S9103A and S9104A of the control unit. The ground for
0.05 MHz select A tuning control line is applied through connectors J9101 pin P, P9601 pin 28, and
P9701 pin 8 to contact 7 on switch S9703 in the gearbox. The ground received by 0.05 MHz select E
tuning control line is applied through connectors J9101 pin U, P9601 pin 27, and P9701 pin 7 to contact 3 of switch S9703. Tuning control lines 0.05 MHz select B and 0.05 MHz select D are not
grounded at the control unit in the 30.00 MHz position.
Considering again that the radio is tuned to some frequency other than 30.00 MHz, either contact 3 or
7 of switch S9703 will make contact with the switch rotor. The ground signal is applied through contact
8 to the emitter of Q9702.
Motor B9702 and switches S9703 and S9704 comprise the Iedex assembly. Application of the ground
signal to the emitter of Q9702 causes Q9701 and Q9702 to conduct; both transistors are necessary to
ensure switch S9703 will be positioned correctly for the frequency selected.
1-79
TM 11-5820-670-30
1-61. TUNING SYSTEM RADIO SET AN/ARC-131. (CONT)
Conduction of Q9702 simultaneously applies a ground signal to the control coil of K9701 and through
diode CR9711. Contacts 4 and 6 of relay K9701 connects + 27.5 vdc to motor 69702 when K9701 energizes. Motor 69702 momentarily operates switch S9704 causing relay K9701 to momentarily energize
and reenergize. This action causes +27.5 vdc to be applied and removed from motor 69702 in
synchronism with switch S9704. Switch S9703 will step one position at a time and select the proper
crystals in the rf oscillator as motor 69702 stops and starts. The ground signal applied through
CR9711 energizes relay K9605.
Tuning control signals are also applied to the antenna coupler simultaneously with those to the gearbox. The antenna coupler tuning control line MHz select A receives a ground signal through the front
wafer of switch S9102A and the rear wafer of switch S9101C. This signal is applied through connectors
J101 pin M and J101 pin E to the antenna coupler. Tuning control line MHz select E of the antenna
coupler receives a ground through the front wafer of switch S9102B and rear wafer of switch S9101 D.
The ground is applied to the antenna coupler through connectors J9101 pin AA and J101 pin A.
Proper band selection is accomplished by applying a ground signal to the appropriate band control
tuning line. In the case of 30.00 MHz, grounds are applied to band
tuning control lines for the
receiver-transmitter and antenna coupler. The receiver-transmitter band
tuning control line
receives a ground signal through the front wafer of switch S9101B. The signal is applied to one side of
motor 69701 through connectors J9101 pin G, P9601 pin 23, P9701 pin 3, and switch S9701.
The application of the ground causes motor 69701 to run until the mechanical linkage that operates
switches S9701 and S9702 reaches the proper position for band
selection. At this time, switch
S9701 will open and the motor will stop. The ground signal is also applied through diode CR9701 to
operate relay K9605. The antenna coupler band
tuning control line receives a ground through the
front wafer of switch S9101D. The signal is applied through connectors J9101 pin H and J101 pin F to
the antenna coupler.
GEARBOX MECHANICAL TUNING ASSEMBLY
See FO-20 while reading this section.
The gearbox train rotates four mechanical output tuning shafts to specific angular positions for each
frequency selected at the control unit. Motors 69702 and 69703 drive the tuning shafts and also rotate
open-seeking switches S9705 and S9703 which control 1 MHz and 0.05 MHz tuning circuits. In turn,
the open-seeking switches control the operation of the dc motors.
1 MHz TUNING
Motor 69703 drives tuning shafts on vhf tuner A1000, oscillator buffer A6000, and rf amplifier A6500
circuits and positions switch S9705. Input from motor 69703 drives a geneva gear assembly through a
speed-reduction gear train and slip clutch. The slip clutch acts as a safety device if the gear trains
bind. The geneva gear assembly consists of a drive shaft and spur gear and a slotted drive wheel. The
drive shaft spur gear is driven by a slip clutch through a speed-reduction ratio of approximately 4 to 1.
The drive shaft of the geneva assembly drives the slotted wheel. Each time the drive shaft rotates 360
degrees, the slotted wheel rotates 90 degrees. The geneva assembly output is used as one input to the
differential.
1-80
TM 11-5820-670-30
1-61. TUNING SYSTEM RADIO SET AN/ARC-131. (CONT)
The geneva assembly also drives open-seeking switch S9705 through a 6 to 1 speed-reducing gear
train. Each time the slotted wheel on the geneva assembly is engaged and rotated 90 degrees, switch
S9705 is rotated through 15 degrees which corresponds to a 1 MHz change in frequency.
Operation of the differential is based on the principle that both 1 and 0.05 MHz tuning inputs produce
an output, but neither input affects the other. As the receiver-transmitter is tuned in 1 MHz increments, rotational motion of the geneva assembly is transmitted to the differential. The differential
drives the vhf tuner tuning shafts, oscillator buffer, and rf amplifier. The vhf tuner tuning shaft and
oscillator buffer tuning shaft are synchronized through a gear train which provides a 1 to 1 coupling
ratio.
The output shafts to the vhf tuner and oscillator buffer rotate 66 degrees for each 1 MHz increment of
frequency. When the receiver-transmitter is tuned across its frequency range, the vhf tuner and
oscillator buffer tuning shafts rotate approximately 1,512 degrees.
0.05 MHz TUNING
Motor B9702 (part of Iedex assembly) drives 0.05 MHz Iedex switch S9703 and positions crystal selector switch S2001 in the rf oscillator. The Iedex assembly, driven by motor B9702, is coupled directly to
the 0.05 MHz tuning cam which rotates 18 degrees for each 0.05 MHz increment of frequency. The
0.05 MHz tuning mechanism turns in one direction through 360 degrees in 20 steps. When the
receiver-transmitter is tuned from XX.00 to XX.95 MHz, the 0.05 MHz cam rotates through 342
degrees in 19 steps. The 20th step completes 360 degrees of rotation, which returns the cam to its
original position.
As the cam rotates, the cam follower transmits angular motion of the cam by means of a selector gear
coupled to a spur gear through a 5 to 1 step-up ratio, to the differential. The spur gear drives the
differential through a 1 to 1 ratio. As the 0.05 MHz cam rotates through 18 degrees for each 0.05 MHz
increment, the differential rotates the vhf tuner, oscillator buffer, and rf amplifier tuning shafts
through approximately 3 degrees. Switch S9703 is coupled directly to the shaft of motor B9702. Crystal
selector switch S2001 is coupled to the shaft of the 0.05 MHz cam.
VHF TUNER MECHANICAL TUNING
The output of the gearbox differential rotates the tuning shaft of the vhf tuner spiral inductor to the position corresponding to the frequency selected at the control unit. For each 1 MHz change in frequency,
the tuning shaft turns through 66 degrees. Each complete revolution (360 degrees) of the tuning shaft
results in a frequency change of 5.5 MHz.
As the receiver-transmitter is tuned through its complete frequency range, the vhf tuning shaft completes approximately 4.2 revolutions of 1,512 degrees. Frequency changes of 0.05 MHz are also
transmitted to the vhf tuner tuning shaft through the differential. For each 0.05 MHz increment of frequency, the tuning shaft rotates through 3 degrees.
1-81
TM 11-5820-670-30
1-61. TUNING SYSTEM RADIO SET AN/ARC-131. (CONT)
RF OSCILLATOR ASSEMBLY MECHANICAL TUNING
The shaft of the 0.05 MHz cam is mechanically coupled to the rotor of crystal selector switch S2001.
The camshaft rotates the switch through 360 degrees in 20 18-degree steps. At each switch position,
the rotor of switch S2001A connects 1 of 10 crystals into the collector circuit of interpolation oscillator
Q2001 within the rf oscillator assembly.
Each crystal remains in the interpolation oscillator collector circuit for two positions of the switch
rotor. The rotor of switch S2001B alternately connects two crystals into the collector circuit of reference oscillator Q2002 which is also part of the rf oscillator assembly. The crystals control the operating frequencies of the reference and interpolation oscillators. The switch rotor turns only in one
direction. After 360 degrees rotation, the rotor is again at the original position.
OSCILLATOR BUFFER AND RF AMPLIFIER MECHANICAL TUNER
The oscillator buffer and rf amplifier tuning shafts are rotated by the output of the gearbox differential
the same way as described for the vhf tuner. The rf amplifier tuning shaft is mechanically coupled to
the oscillator buffer tuning shaft. Tuning of the vhf tuner, oscillator buffer, and rf amplifier is synchronized since the oscillator buffer tuning shaft is coupled off the vhf tuner tuning shaft through a 1 to 1
gear ratio in the gearbox.
CHANNEL TONE AND CRS DELAY CONTROL CIRCUITS
See FO-19 while reading the text in this section.
During tuning operations, an 800 Hz tone is supplied to the receiver-transmitter audio output circuits
to indicate to the radio set operator that the tuning system is selecting a new channel. While either
drive motor B9703 or B9702 is running, a ground is supplied by transistors Q9703 and Q9704 or Q9701
and Q9702 through diode CR9711 or CR9723.
This ground causes relay K9605 in the receiver-transmitter to energize. Contacts 5 and 2 of K9605
connect + 16 vdc through pin 19 of connector P5501 on the audio-frequency amplifier. Application of
+ 16 vdc activates the 800 Hz oscillator in the receiver-audio amplifier. The 800 Hz tone is connected
through pin 2 of P5501 to the audio line where it is applied to the aircraft interphone set.
The ground used to energize relay K9605 is also sensed by diode CR9605. This ground activates timedelay circuits in the voltage regulator, which in turn energizes relay K3001 in the crs.
When relay K3001 energizes, the crs control voltage normally fed to the receiver local oscillator is momentarily grounded. This prevents the receiver local oscillator from locking on the incorrect frequency. The energizing of relay K9605 also prevents the receiver-transmitter from being keyed during the
tuning cycle.
In normal transmit operation, K9605 is deenergized and supplies a ground to the receiver-transmitter
transmit-receive relays through contacts 6 and 8.
1-82
TM 11-5820-670-30
CHAPTER 2
MAINTENANCE
Subject
Section
Page
I
II
Ill
IV
V
2-1
2-2
2-50
2-126
2-150
Repair Parts, Special Tools, and TMDE . . . . . . . . . . . . . . . . . . . . . . . . . . . . . . . . . . . . . . . . . . . . . . . .
Performance Tests . . . . . . . . . . . . . . . . . . . . . . . . . . . . . . . . . . . . . . . . . . . . . . . . . . . . . . . . . . . . . . . . . . . . . . . . .
Troubleshooting . . . . . . . . . . . . . . . . . . . . . . . . . . . . . . . . . . . . . . . . . . . . . . . . . . . . . . . . . . . . . . . . . . . . . . . . . . . . .
Alinement and Adjustment Procedures . . . . . . . . . . . . . . . . . . . . . . . . . . . . . . . . . . . . . . . . . . . . . . . . . . .
Repair and Replacement Procedures . . . . . . . . . . . . . . . . . . . . . . . . . . . . . . . . . . . . . . . . . . . . . . . . . . . .
OVERVIEW
This chapter contains direct support maintenance procedures for Radio Set AN/ARC-131. Reference
is made to those publications listing repair parts, tools, and TMDE. Performance testing, troubleshooting, and alinement and adjustment procedures are generally performed with the use of Maintenance Kit MK-1035/ARC-131. The description of this manual’s approach to troubleshooting explains
how to use the troubleshooting charts. Repair and replacement procedures cover disassembly,
assembly, and replacement.
Section I REPAIR PARTS, SPECIAL TOOLS, AND TMDE
Subject
Para
Repair Parts and Tools . . . . . . . . . . . . . . . . . . . . . . . . . . . . . . . . . . . . . . . . . . . . . . . . . . . . . . . . . . . . . . . . . . . . . . . . . . 2-1
Special Tools and TMDE . . . . . . . . . . . . . . . . . . . . . . . . . . . . . . . . . . . . . . . . . . . . . . . . . . . . . . . . . . . . . . . . . . . . 2-2
Page
2-1
2-1
2-1. REPAIR PARTS AND TOOLS.
For repair parts and tools required for direct support maintenance, refer to TM 11-5820-670-34P.
2-2. SPECIAL TOOLS AND TM DE.
For special tools and TM DE, refer to Maintenance Allocation Chart (MAC) in TM 11-5820-670-12.
For operation of Maintenance Kit MK-1035/ARC-131, refer to TM 11-6625-1610-12.
2-1
TM 11-5820-670-30
Section II PERFORMANCE TESTS
Subject
Para
Page
General . . . . . . . . . . . . . . . . . . . . . . . . . . . . . . . . . . . . . . . . . . . . . . . . . . . . . . . . . . . . . . . . . . . . . . . . . . . . . . . . . . . . . . . . . . . . 2-3
2-3
VOLTAGE DISTRIBUTION
Test Meter Tests . . . . . . . . . . . . . . . . . . . . . . . . . . . . . . . . . . . . . . . . . . . . . . . . . . . . . . . . . . . . . . . . . . . . . . . . . . . .
2-4
2-4
RECEIVE MODE
Audio Power Output and Distortion Test . . . . . . . . . . . . . . . . . . . . . . . . . . . . . . . . . . . . . . . . . . . . . . . . . .
Audiofrequency Response and Front Panel Meter Test . . . . . . . . . . . . . . . . . . . . . . . . . . .
Receiver Sensitivity, Quieting, and Limiting Test . . . . . . . . . . . . . . . . . . . . . . . . . . . . . . . . . .
Maximum Signal Plus Noise-to-Noise Ratio Test . . . . . . . . . . . . . . . . . . . . . . . . . . . . . . . . . . . . . .
Receiver Carrier Squelch Sensitivity Test . . . . . . . . . . . . . . . . . . . . . . . . . . . . . . . . . . . . . . . . . . . . . . . . . .
Receiver Tone Squelch Sensitivity Test . . . . . . . . . . . . . . . . . . . . . . . . . . . . . . . . . . . . . . . . . . . . . . . . . . . .
2-5
2-6
2-7
2-8
2-9
2-10
2-6
2-8
2-11
2-14
2-16
2-19
2-11
2-12
2-13
2-14
2-15
2-16
2-22
2-24
2-26
2-28
2-30
2-32
2-17
2-18
2-34
2-35
HOMING MODE
Homing Sensitivity Test . . . . . . . . . . . . . . . . . . . . . . . . . . . . . . . . . . . . . . . . . . . . . . . . . . . . . . . . . . . . . . . . . . . . . . 2-19
2-38
CONTROL, RADIO SET C-7088/ARC-131
Mode Switch Selection and Front Panel Illumination Test . . . . . . . . . . . . . . . . . . . . . . . . . .
Squelch Switch and Frequency Selection Test . . . . . . . . . . . . . . . . . . . . . . . . . . . . . . . . . . . . . . . . . .
Retransmit Receive Test . . . . . . . . . . . . . . . . . . . . . . . . . . . . . . . . . . . . . . . . . . . . . . . . . . . . . . . . . . . . . . . . . . . .
Retransmit Transmit Test . . . . . . . . . . . . . . . . . . . . . . . . . . . . . . . . . . . . . . . . . . .. . . . . . . . . . . . . . . . . . . . . .
2-41
2-43
2-46
2-48
TRANSMIT MODE
Transmitter Power Output Test . . . . . . . . . . . . . . . . . . . . . . . . . . . . . . . . . . . . . . . . . . . . . . . . . . . . . . . . . . . . .
Transmitter Tone Modulation Test . . . . . . . . . . . . . . . . . . . . . . . . . . . . . . . . . . . . . . . . . . . . . . . . . . . . . . . . .
Transmitter Deviation Narrow Band Test . . . . . . . . . . . . . . . . . . . . . . . . . . . . . . . . . . . . . . . . . . . . . . . . . .
Transmitter Distortion Narrow Band Test . . . . . . . . . . . . . . . . . . . . . . . . . . . . . . . . . . . . . . . . . . . . . . . . .
Transmitter Signal Plus Noise-to-Noise Ratio Test . . . . . . . . . . . . . . . . . . . . . . . . . . . . . . . . . . . . .
Transmitter Frequency Stability Test . . . . . . . . . . . . . . . . . . . . . . . . . . . . . . . . . . . . . . . . . . . . . . . . . . . . . . .
Transmitter Automatic Frequency Selection and Channel Changing
Tone Test . . . . . . . . . . . . . . . . . . . . . . . . . . . . . . . . . . . . . . . . . . . . . . . . . . . . . . . . . . . . . . . . . . . . . . . . . . . . . . . . . . . . . . .
Transmitter Sidetone Test . . . . . . . . . . . . . . . . . . . . . . . . . . . . . . . . . . . . . . . . . . . . . . . . . . . . . . . . . . . . . . . . . . .
2-2
2-20
2-21
2-22
2-23
TM 11-5820-670-30
2-3. GENERAL.
This section contains performance test procedures for use with Maintenance Kit MK-1035/ARC-131
and discrete test equipment (TMDE). They will enable you to determine whether or not an rt is
operating acceptably. Each test procedure checks specific functions of the receiver-transmitter to
help you find and isolate faults.
Each test is complete and maybe performed individually. Therefore, you may choose an appropriate
test to verify a known gross equipment failure or performance degradation of specific stages. However, this maintenance approach is not recommended. It is best to perform all the tests in sequence.
This systematic maintenance approach will ensure that all faults are found and corrected.
Faults in the rt are evidenced by failure of the unit to meet the performance standards found within the
test procedures in bold type. When an rt fails to meet a performance standard, discontinue the test
and turn to the troubleshooting chart referred to in the procedure.
2-3
TM 11-5820-670-30
2-4. TEST METER TESTS.
PURPOSE
The test meter tests provide an overall performance check of the radio set. Test switch S9801 selects
various operating voltages in the receiver-transmitter and applies them to test meter M9601.
TEST EQUIPMENT AND MATERIALS
Power Supply PP-2953/U
Maintenance Kit MK-1035/ARC-131
All cables ore part of MK-1035/ARC
TEST SETUP
Connect equipment as shown in test setup diagram. Turn on all equipment and allow at least 5 minutes
for warmup.
EL1AT140
INITIAL EQUIPMENT CONTROL SETTINGS
Set equipment controls as indicated in the following table.
CONTROL AND SWITCH SETTINGS
EQUIPMENT
RT-8231ARC-131
CONTROL OR SWITCH
POSITION/SETTING
TEST SWITCH
Set as instructed in
procedures.
HI
XMTR HI-LO
2-4
TM 11-5820-670-30
2-4. TEST METER TESTS. (CONT)
EQUIPMENT
CONTROL OR SWITCH
POSITION/SETTING
TS-25751ARC-131
FREQ sel
SQUELCH
MODE SWITCH
TRANSMIT SWITCH
WIDEBAND-NAR BAND
ON-AGC
HI-LO
+28 VDC
30 MHz
DIS
TIR
ON
NAR BAND
ON
HI
ON
TEST PROCEDURE
1. On the RT-823/ARC-131, successively set TEST SWITCH for each position (1 through 6) and
observe indication on TEST METER. See the following table.
PERFORMANCE STANDARD
TEST SWITCH
POSITION
TEST METER
INDICATION
1
2
3
4
5
6
50 ± 30
50 ± 30
not less than 70
50 ± 20
not more than 10
0
IF OUT OF TOLERANCE,
SEE TROUBLESHOOTING
CHART
2-1 (page 2-56)
2-1, sheet 4 (page 2-59)
2-6 (Page 2-80)
2-13 (page 2-91)
2-1 (page 2-56)
2-1 (Page 2-56)
2. Set TRANSMIT switch on TS-2575/ARC-131 to OFF position.
3. Disconnect cable CG-3370/U (W6) from input J1 13 and turn TEST SWITCH of RT-823/ARC-131
to position 5.
STANDARD. TEST METER should indicate not more than 30.
4. Momentarily press XMTR TEST switch on RT-823/ARC-131.
5. Turn TEST SWITCH to position 6.
STANDARD. TEST METER should indicate zero.
2-5
TM 11-5820-670-30
2-5. AUDIO POWER OUTPUT AND DISTORTION TEST.
PURPOSE
This test checks the receiver section of the radio set. Two signal generators simulate a frequency
modulated signal. The rt demodulates the signal and outputs audio power containing a percentage of
distortion, which is measured by a spectrum analyzer.
TEST EQUIPMENT AND MATERIALS
Maintenance Kit MK-1035/ARC-131
Signal Generator AN/URM-103
Signal Generator AN/URM-127
Spectrum Analyzer TS-723A/U
Power Supply PP-2953/U
Fuseholder MX-1730/U
All cables are part of MK-1035/ARC
TEST SETUP
Connect equipment as shown in test setup diagram. Place the +28 VDC ON-OFF switch on
TS-2575/ARC-131 to ON and allow all equipment 5 minutes for warmup.
EL1AT141
2-6
TM 11-5820-670-30
2-5. AUDIO POWER OUTPUT AND DISTORTION TEST. (CONT)
INITIAL EQUIPMENT CONTROL SETTINGS
Set equipment controls as indicated in the following table.
CONTROL AND SWITCH SETTINGS
EQUIPMENT
CONTROL OR SWITCH
POSITION/SETTING
TS-25751ARC-131
MODE SWITCH
VOL
SQUELCH
FREQ sel
T/R
Maximum (clockwise)
DIS
60.05 MHz
AN/URM-127
Freq dial
FREQ RANGE MULTIPLIER
OUTPUT CONTROL
10
X 100
As required in test
procedures.
TS-723A/U
FUNCTION switch
AF-RF switch
Meter RANGE
Freq RANGE
Coarse FREQUENCY
METER
AF
10
X 10
100
AN/URM-103
BAND SWITCH and RF TUNING CONTROL
FUNCTION switch
RF OUTPUT switch
LO-HI RF SET to LINE control
and LO RF UV
Adjust to 60.05 MHz.
EXT MOD
LO 0-10 KUV
DEVIATION RANGE KHZ switch
DEVIATION control
Adjust for 10 microvolt
output.
10
Midrange position
NOTE
With mode switch in T/R position, external power is applied to the receiver-transmitter.
The receiver-transmitter requires a 1-minute warmup before measurements are made.
TEST PROCEDURE
1.
Set FUNCTION switch on signal generator AN/URM-103 to EXT MOD and adjust frequency for a
60.05 MHz, 10 microvolt output.
2. Adjust AN/URM-127 for 8 kHz deviation as indicated on AN/URM-103 DEVIATION KHZ meter.
3. Determine that RECEIVER AUDIO OUTPUT J107 HI-LO are connected to METER terminals of
spectrum analyzer TS-723A/U.
2-7
TM 11-5820-670-30
2-5. AUDIO POWER OUTPUT AND DISTORTION TEST. (CONT)
4. Tune signal generator AN/URM-103 to 60.05 MHz as indicated by maximum indication on
TS-723/U meter.
STANDARD. 2.17 to 3.45 vrms (5 mw ± 2 db)
5. If TS-723A/U meter does not indicate between specified limits, see troubleshooting
chart 2-6.
6. Disconnect jumper between AF INPUT and METER terminals on TS-723A/U. Read audio distortion in percentage.
NOTE
Tune the AN/URM-103 slightly for minimum distortion as indicated on the TS-723A/U.
STANDARD. Maximum 8 percent
7. If indication on TS-723A/U meter reads above 8 percent, see troubleshooting chart 2-7.
2-6. AUDIOFREQUENCY RESPONSE AND FRONT PANEL METER TEST.
PURPOSE
This test checks the frequency response of the radio set in the 300 Hz to 10 kHz range. The flatness of
the band in this frequency range should be within 2 db.
TEST EQUIPMENT AND MATERIALS
Maintenance Kit MK-1035/ARC-131
Signal Generator AN/URM-103
Signal Generator AN/URM-127
Spectrum Analyzer TS-723A/U
Fuseholder MX-1730/U
Power Supply PP-2953/U
All cables are part of MK-1035/ARC
TEST SETUP
Connect equipment as shown in test setup diagram. Turn on all test equipment and allow at least
5 minutes for warmup.
2-8
TM 11-5820-670-30
2-6. AUDIOFREQUENCY RESPONSE AND FRONT PANEL METER TEST. (CONT)
EL1AT141
INITIAL EQUIPMENT CONTROL SETTINGS
Set equipment controls as indicated in the following table.
CONTROL AND SWITCH SETTINGS
EQUIPMENT
CONTROL OR SWITCH
POSITION/SEITING
TS-2575/ARC-131
MODE SWITCH
VOL
SQUELCH
FREQ sel
T/R
Maximum (clockwise)
DIS
60.05 MHz
AN/URM-103
BAND SWITCH and RF TUNING CONTROL
FUNCTION switch
RF OUTPUT switch
Adjust to 60.05 MHz.
EXT MOD
LO 0-10 KUV
2-9
TM 11-5820-670-30
2-6. AUDIOFREQUENCY RESPONSE AND FRONT PANEL METER TEST. (CONT)
CONTROL AND SWITCH SETTINGS (CONT)
EQUIPMENT
CONTROL OR SWITCH
LO-HI RF SET to LINE CONTROL and LO
RF UV
DEVIATION RANGE KHZ switch
DEVIATION control
AN/URM-127
TS-723A/U
Freq dial
FREQ RANGE MULTIPLIER
OUTPUT CONTROL
POSITION/SETTING
Adjust for 10 microvolt.
10
Midrange position
10
X 1K
Adjust as indicated in test
procedure.
Adjust as indicated in test
procedure.
TEST PROCEDURE
1.
2.
3.
4.
Determine that RECEIVER AUDIO OUTPUTS J107 HI-LO on test set is connected to AF INPUT
terminals of TS-723A/U.
Set TS-723A/U function switch to SET LEVEL position and adjust input sensitivity control to provide a 0 db reference.
Change output frequency of AN/URM-127 to 500 Hz, and adjust output for 8 kHz deviation as
indicated on AN/URM-103 modulation meter.
Observe audio output change in db from the 1000 Hz reference (step 2).
STANDARD. ± 2 db
5. If audio output change is not within ± 2 db, see troubleshooting chart 2-8.
6. Repeat procedures 2,3, and 4 using audiofrequencies of 2000, 3000, 300, 5000, and
10,000 Hz.
STANDARD. ± 2 db
7. If audio output change is not within ± 2 db, see troubleshooting chart 2-8.
8. Disconnect cable CG-3371/U (W7) from NORMAL J107 and reconnect to WIDEBAND J108 on
test set.
9. Repeat procedures 2 through 5.
2-10
TM 11-5820-670-30
2-6. AUDIOFREQUENCY RESPONSE AND FRONT PANEL METER TEST. (CONT)
10. Observe audio output change in db from the 1000 Hz reference (step 2).
STANDARD. + 2 db -3 db
11. If audio output change is not within + 2 db to -3 db, see troubleshooting chart 2-8.
12. Disconnect cable CG-3371/U (W7) from WIDEBAND J108 and reconnect to NORMAL J107 on
test set.
13. Repeat steps 1 and 2.
14. Rotate TEST switch on front panel of RT-823/ARC-131 and verify the following TEST METER
indications.
PERFORMANCE STANDARD
TEST SWITCH
POSITION
1
2
3
4
5
6
TEST METER
INDICATION
50 ± 20
50 ± 20
not less than 70
0
0
0
2-7. RECEIVER SENSITIVITY, QUIETING, AND LIMITING TEST.
PURPOSE
This test checks the ability of the rt to detect low level rf signals at several frequencies. Low level rf
contains noise and distortion which make hearing the audio signal difficult.
TEST EQUIPMENT AND MATERIALS
Maintenance Kit MK-1035/ARC-131
Signal Generator AN/URM-103
Signal Generator AN/URM-127
Spectrum Analyzer TS-723A/U
Fuseholder MX-1730/U
Power Supply PP-2953/U
All cables are part of MK-1035/ARC
2-11
TM 11-5820-670-30
2-7. RECEIVER SENSITIVITY, QUIETING, AND LIMITING TEST. (CONT)
TEST SETUP
Connect equipment as shown in test setup diagram. Turn on all test equipment and allow at least
5 minutes for warmup.
EL1AT141
INITIAL EQUIPMENT CONTROL SETTINGS.
Set equipment controls as indicated in the following table.
CONTROL AND SWITCH SETTINGS
EQUIPMENT
TS-2575/ARC-131
2-12
CONTROL OR SWITCH
POSITION/SETTING
MODE SWITCH
VOL
SQUELCH
FREQ sel
T/R
Maximum (clockwise)
DIS
30.00 MHz
TM 11-5820-670-30
2-7. RECEIVER SENSITIVITY, QUIETING, AND LIMITING TEST. (CONT)
CONTROL OR SWITCH
POSlTION/SETTING
BAND SWITCH and RF TUNING CONTROL
Adjust as required in test
procedures.
EXT MOD
LO 0-10 KUV
EQUIPMENT
AN/URM-103
FUNCTION switch
RF OUTPUT switch
LO-HI RF SET to LINE control and LO
RF UV
DEVIATION RANGE KHZ switch
DEVIATION control
Adjust for 10 microvolt.
10
Midrange position
TS-723 A/U
FUNCTION switch
Meter RANGE
AF-RF switch
RANGE
SET LEVEL
+20 db
AF
X 10
AN/URM-127
Freq dial
FREQ RANGE MULTIPLIER
OUTPUT CONTROL
10
X 100
Adjust as required to produce
8 kHz deviation on
AN/URM-103.
TEST PROCEDURE
1. Adjust AN/URM-103 signal generator output to 30.00 MHz (indicated by maximum audio on
TS-723A/U meter) 0.5 microvolt, 8 kHz deviation.
2. Adjust the signal INPUT control on TS-723A/U for a 0 db reference indicated on meter.
3. Set TS-723A/U function switch to DISTORTION position and adjust coarse and fine FREQUENCY
controls along with BALANCE control for a minimum meter indication.
4. Observe TS-723A/U meter indication in db. Compare the indication in db below the reference
set in step 2.
STANDARD. 10 db minimum
5. If meter indication is not at Ieast 10 db below the reference, see troubleshooting chart 2-9.
6. Repeat steps 1 through 5, adjusting TS-2575/ARC-131 test set for each of the following
frequencies: 41.00 MHz, 52.00 MHz, 53.00 MHz, 65.00 MHz, and 75.95 MHz.
2-13
TM 11-5820-670-30
2-8. MAXIMUM SIGNAL PLUS NOISE-TO-NOISE RATlO TEST.
PURPOSE
This test checks the ratio of received audio signal power and noise power when rt is in receive mode.
TEST EQUIPMENT AND MATERIALS
Maintenance Kit MK-1035/ARC-131
Signal Generator AN/URM-103
Signal Generator AN/URM-127
Spectrum Analyzer TS-723A/U
Fuseholder MX-1730/U
Power Supply PP-2953/U
All cables are part of MK-1035/ARC
TEST SETUP
Connect equipment as shown in test setup diagram. Turn on all equipment and allow at least 5 minutes
for warmup.
2-14
TM 11-5820-670-30
2-8. MAXIMUM SIGNAL PLUS NOISE-TO-NOISE RATlO TEST. (CONT)
INITIAL EQUIPMENT CONTROL SETTlNGS
Set equipment controls as indicated in the following table.
CONTROL AND SWITCH SETTINGS
EQUIPMENT
CONTROL OR SWITCH
POSITION/SETTING
TS-2575/ARC-131
MODE SWITCH
VOL
SQUELCH
FREQ set
T/R
Maximum (clockwise)
DIS
30.00 MHz
TS-723A/U
FUNCTION switch
Meter RANGE
AF-RF switch
RANGE
SET LEVEL
+20
AF
X 10
AN/URM-103
BAND SWITCH and RF TUNING CONTROL
FUNCTION switch
LO-HI RF SET to LINE control and LO
RF UV
DEVIATION RANGE KHZ switch
DEVIATION control
Adjust to 30 MHz.
LO 0-10 KUV
Freq dial
FREQ RANGE MULTIPLIER
OUTPUT CONTROL
10
X 100
As required to produce 8 kHz
deviation on AN/URM-103.
AN/URM-127
Adjust for 100 microvolt.
10
Midrange position
TEST PROCEDURE
1. Adjust AN/URM-127 output level for 8 kHz deviation as indicated on AN/URM-103 modulation
meter.
2. Adjust AN/URM-103 output for a 30.00 MHz, 200 microvolt signal.
3. Adjust input sensitivity control on TS-723A/U Spectrum Analyzer for a 0 db reference in meter.
4. Remove modulation from AN/URM-103 by disconnecting AN/URM-127 output.
5. Observe TS-723A/U indication in db below reference level established in step 3.
STANDARD. 45 db minimum
6. If spectrum analyzer does not indicate a minimum of 45 db, see troubleshooting chart 2-10.
7. Repeat steps 1 through 6, adjusting TS-2575/ARC-131 for each of the following frequencies:
41.00 MHz, 52.00 MHz, 53.00 MHz, 65.00 MHz, and 75.95 MHz.
2-15
TM 11-5820-670-30
2-9. RECEIVER CARRIER SQUELCH SENSITIVITY TEST.
PURPOSE
This test checks the squelch capability when carrier squelch is selected on the control unit. Squelching and unsquelching in the CARR mode occur at specified voltage levels.
TEST EQUIPMENT AND MATERIALS
Maintenance Kit MK-1035/ARC-131
Signal Generator AN/URM-103
Signal Generator AN/URM-127
Spectrum Analyzer TS-723A/U
Power Supply PP-2953/U
All cables are part of MK-1035/ARC
Connect equipment as shown in test setup diagram. Turn on all equipment and allow at least 5 minutes
for warmup.
EL1AT141
2-16
TM 11-5820-670-30
2.9. RECEIVER CARRIER SQUELCH SENSITIVITY TEST. (CONT)
INITIAL EQUIPMENT CONTROL SETTINGS
Set equipment controls as indicated in the following table.
CONTROL AND SWITCH SETTlNGS
CONTROL OR SWITCH
EQUIPMENT
POSITION/SETTING
TS-2575/ARC-131
MODE SWITCH
VOL
SQUELCH
FREQ sel
T/R
Maximum (clockwise)
CARR
30.00 MHz
TS-723A/U
FUNCTION switch
RANGE
AF-RF switch
METER
X 10
AF
AN/URM-103
BAND SWITCH and RF TUNING
CONTROL
FUNCTION switch
RF OUTPUT switch
LO-HI RF SET to LINE control
and LO RF UV
DEVIATION RANGE KHZ switch
DEVIATION control
AN/URM-127
Freq dial
FREQ RANGE MULTIPLIER
OUTPUT CONTROL
Adjust to 30.00 MHz.
EXT MOD
LO 0-10 KUV
Adjust for 10 microvolt.
10
Midrange position
10
X 100
As required to produce 8 kHz
deviation on AN/URM-103.
TEST PROCEDURE
1. Adjust AN/URM-127 output level for 8 kHz deviation as indicated on AN/URM-103 modulation
meter.
2. Adjust AN/URM-103 for an output of 10 microvolt at 30.00 MHz.
3. Determine that RECEIVER AUDIO OUTPUTS J107 HI - LO on test set is connected to METER
INPUT terminals of the TS-723A/U.
4. Reduce AN/URM-103 output to minimum. Observe audio output on TS-723A/U meter.
STANDARD. No audio present.
5. If audio is present on the spectrum analyzer, see troubleshooting chart 2-11.
6. Increase AN/URM-103 output until an audio output signal is observed on TS-723A/U meter.
2-17
TM 11-5820-670-30
2-9. RECEIVER CARRIER SQUELCH SENSITIVITY TEST. (CONT)
STANDARD. Audio is present.
7. If audio is not present, see troubleshooting chart 2-11.
8. Observe AN/URM-103 output level (squelch pull-in).
STANDARD. 0.7 microvolt maximum
9. If AN/URM-103 output level is more than 0.7 microvolt, see troubleshooting chart 2-11.
10. Reduce AN/URM-103 output level until audio output indication disappears. Observe AN/URM103 output level (squelch dropout).
STANDARD. 0.55 microvolt maximum
11. If AN/URM-103 output level is more than 0.55 microvolt, see troubleshooting chart 2-11.
12. Press SQ DIS switch on front panel of RT-823/ARC-131.
STANDARD. Audio is present.
13. If audio is not present, see troubleshooting chart 2-11.
14. Repeat steps 1 through 13, adjusting TS-2575/ARC-131 for each of the following frequencies:
41.00 MHz, 52.00 MHz, 65.00 MHz, and 75.00 MHz.
15. Set mode switch on TS-2575/ARC-131 to RETRAN.
16. Set SQUELCH switch on TS-2575/ARC-131 to CARR.
17. Set VOL control on TS-2575/ARC-131 to midrange.
18. Set C-1611 D/AIC VOL control to midrange.
19. Disconnect cable CG-3371/U (W7) from NORMAL J107 and reconnect to REXMIT J109 on test
set.
20. Repeat steps 1 through 14 and observe the following conditions.
CONDITION
STANDARD
IF STANDARD IS
NOT VERIFIED, SEE
TROUBLESHOOTING
CHART
With RETRANSMIT RCVR lamp
illuminated
1000 Hz tone is present
in speaker and headset,
2-11
Voltmeter reading on TS-723A/U
2.17 to 3.45
2-11
RETRANSMIT RCVR lamp not
illuminated
No audio signal present.
2-11
2-18
TM 11-5820-670-30
2-10. RECEIVER TONE SQUELCH SENSITIVITY TEST.
PURPOSE
This test checks the squelch capability when tone squelch is selected on the control unit. Squelching
and unsquelching in the TONE mode occur at various voltage levels.
TEST EQUIPMENT AND MATERIALS
Maintenance Kit MK-1035/ARC-131
Signal Generator AN/URM-103
Signal Generator AN/URM-127 (2 units required)
Spectrum Analyzer TS-723A/U
Electronic Counter Digital Readout AN/USM-207
Fuseholder MX-1730/U
Power Supply PP-2953/U
All cables are part of MK-1035/ARC
NOTE
When two AN/URM-127 units are tied together, they must have enough output to deviate
the fm signal generator at least 8 kHz.
Control Unit C-7088/ARC-131 installed in Test Set TS-2575/ARC-131 must contain a
jumper wire between E3 and E4 on switch rear mount marked TONE to perform tone
squelch sensitivity check.
2-19
TM 11-5820-670-30
2-10. RECEIVER TONE SQUELCH SENSITIVITY TEST. (CONT)
TEST SETUP
Connect equipment as shown in test setup diagram. Turn on both AN/URM-127 units and set their
amplitude controls for a zero output. Turn on all equipment and allow at least 5 minutes for warmup.
EL1AT146
INITIAL EQUIPMENT CONTROL SETTINGS
Set equipment controls as indicated in the following table.
2-20
TM 11-5820-670-30
2-10. RECEIVER TONE SQUELCH SENSITIVITY TEST. (CONT)
CONTROL AND SWITCH SETTINGS
CONTROL OR SWITCH
EQUIPMENT
POSITION/SETTING
TS-2575/ARC-131
MODE SWITCH
VOL
SQUELCH
FREQ set
T/R
Maximum (clockwise)
CARR
30.00 MHz
TS-723A/U
FUNCTION switch
RANGE
AF-RF switch
DISTORTION
X 10
AF
AN/URM-103
BAND SWITCH and RF TUNING CONTROL
FUNCTION switch
RF OUTPUT switch
LO-HI RF SET to LINE CONTROL
and LO RF UV
Adjust to 30.00 MHz.
EXT MOD
LO 0-10 KUV
DEVIATION RANGE KHZ switch
DEVIATION CONTROL
Adjust as required in
procedures.
10
Midrange position
TEST PROCEDURE
1. Adjust AN/URM-103 for 30.00 MHz as indicated by minimum distortion on TS-723A/U.
2. Set the SQUELCH switch on TS-2575/ARC-131 to TONE.
3. Adjust AN/URM-127 (no. 2) output frequency to 150 Hz as indicated on AN/USM-207 readout.
4. Adjust output level of AN/URM-127 (no. 2) to produce 1 kHz deviation as indicated on
AN/URM-103 meter.
5. Adjust AN/URM-127 (no. 1) output frequency to 1000 Hz.
6. Adjust output level of AN/URM-127 (no. 2) to produce 8 kHz deviation as indicated on
AN/URM-103 meter.
7. Reduce AN/URM-103 output to minimum. Monitor audio output on the TS-723A/U meter.
8. Increase AN/URM-103 output until an audio output indication is observed.
STANDARD. Audio is present.
9. If audio is not present, see troubleshooting chart 2-12.
10. Observe AN/URM-103 output level (squelch pull-in).
STANDARD. 0.5 microvolt maximum
11. If AN/URM-103 output level is more than 0.5 microvolt, see troubleshooting chart 2-12.
2-21
TM 11-5820-670-30
2-10. RECEIVER TONE SQUELCH SENSITIVITY TEST. (CONT)
12. Reduce AN/URM-103 output level until audio output indication disappears, and observe
AN/URM-103 output level (squelch dropout).
STANDARD. 0.4 microvolt
13. If AN/URM-103 output level does not indicate 0.4 microvolt, see troubleshooting chart 2-12.
14. Repeat steps 1 through 14, adjusting the TS-2575/ARC-131 for each of the following
frequencies: 41.00 MHz, 52.00 MHz, 53.00 MHz, 65.00 MHz, and 75.00 MHz.
2-11. TRANSMITTER POWER OUTPUT TEST.
PURPOSE
This test checks the rt’s ability to transmit a modulated rf carrier with sufficient power. Radio is keyed,
and power output is measured with a wattmeter.
TEST EQUIPMENT AND MATERIALS
Maintenance Kit MK-1035/ARC-131
Radio Frequency Power Test Set TS-2609/U
Power Supply PP-2953/U
All cables are part of MK-1035/ARC
TEST SETUP
Connect equipment as shown in test setup diagram. Turn on ail equipment and allow at least 5 minutes
for warmup.
2-22
TM 11-5820-670-30
2-11. TRANSMITTER POWER OUTPUT TEST. (CONT)
INITIAL EQUIPMENT CONTROL SETTINGS
Set equipment controls as indicated in the following table.
CONTROL AND SWITCH SETTINGS
CONTROL OR SWITCH
EQUIPMENT
POSITION/SETTING
TS-2575/ARC-131
MODE SWITCH
VOL
SQUELCH
FREQ sel
HI-LO switch
TRANSMIT switch
T/R
Maximum (clockwise)
DIS
30.00 MHz
HI
OFF
TS-2609/U
Selector switch
FWD 100
C-1611 D/AIC
Transmit-lnterphone selector
RECEIVER 1 switch
1
ON
TEST PROCEDURE
CAUTION
To avoid damage to wattmeter, ensure selector switch is at FWD 100 when receivertransmitter HI-LO switch is in the Hi position.
1. Set test set TRANSMIT switch to ON. Observe wattmeter indication.
STANDARD. 10 watts minimum
2. If wattmeter indicates less than 10 watts, see troubleshooting chart 2-13.
3. Repeat steps 1 and 2, adjusting TS-2575/ARC-131 for each of the following frequencies:
42.00 MHz, 52.95 MHz, 53.00 MHz, 65.00 MHz, and 75.95 MHz.
4. Set test set TRANSMIT switch to OFF.
5. Set wattmeter selector switch to FWD 10.
6. Set receiver-transmitter XMTR HI-LO switch to LO.
7. Set TRANSMIT switch on test set to ON. Observe wattmeter indication.
STANDARD. 0.5 watts minimum
8. If wattmeter indication is less than 0.5 watts, see troubleshooting chart 2-14.
9. Repeat steps 4 through 8, adjusting TS-2575/ARC-131 for each of the following frequencies:
42.00 MHz, 52.95 MHz, 53.00 MHz, 65.00 MHz, and 75.95 MHz.
2-23
TM 11-5820-670-30
2-12. TRANSMITTER TONE MODULATION TEST.
PURPOSE
This test checks the frequency and deviation of the 150 Hz tone signal generated in the rt when the
mode switch is set at T/R.
TEST EQUIPMENT AND MATERIALS
Maintenance Kit MK-1035/ARC-131
Electronic Counter Digital Readout AN/USM-207
Modulation Meter ME-57/U
Power Supply PP-2953/U
All cables are port of MK-1035/ARC
TEST SETUP
Connect equipment as shown in test setup diagram. Turn on all equipment and allow at least 5 minutes
for warmup.
EL1AT148
Set equipment controls as indicated in the following table.
2-24
TM 11-5820-670-30
2-12. TRANSMITTER TONE MODULATION TEST. (CONT)
CONTROL AND SWITCH SETTlNGS
EQUIPMENT
CONTROL OR SWITCH
POSITION/SETTING
TS-2575/ARC-131
MODE SWITCH
VOL
SQUELCH
FREQ sel
TRANSMIT switch
T/R
Maximum (clockwise)
DIS
75.95 MHz
OFF
ME-57/U
TUNING
DEVIATION RANGE – KC
FREQUENCY RANGE – MC
Selector switch
75.95 MHz
20
55-120
TUNE
C-1611 D/AlC
Transmit-lnterphone selector
RECEIVER 1 switch
1
ON
TEST PROCEDURE
1. Set test set TRANSMIT switch to ON and measure frequency and deviation of 150 Hz transmitter
tone signal.
STANDARD. frequen - 148 HZ to 152 HZ
deviation – 2.5 kHz to 3.5 kHz
2. If frequency and deviation are not within tolerances of the standard, see troubleshooting
chart 2-15.
3. Set test set SQUELCH switch to CARR.
STANDARD. frequen – 148 Hz to 152 Hz
deviation – 2.5 kHz to 3.5 kHz
4. If frequency and deviation are not within the tolerances of the standard, see troubleshooting
chart 2-15.
5. Set test set SQUELCH switch to TONE and measure the frequency and deviation of the 150 Hz
transmitter tone signal.
STANDARD. frequen – 148 kHz to 152 HZ
deviation – 2.5 kHz to 3.5 kHz
6. If frequency and deviation are not within tolerances of the standard, see troubleshooting
chart 2-15.
2-25
TM 11-5820-670-30
2-13. TRANSMlllER DEVIATION NARROW BAND TEST.
PURPOSE
This test checks the transmitter deviation when the rt is transmitting rf signals. Deviation occurs as a
result of transmitting harmonic and beat frequencies.
TEST EQUIPMENT AND MATERIALS
Maintenance Kit MK-1035/ARC-131
Signal Generator AN/URM-127
Electronic Voltmeter ME-30(E)/U
Modulation Meter ME-57/U
Power Supply PP-2953/U
All cables are part of MK-1035/ARC
TEST SETUP
Connect equipment as shown in test setup diagram. Turn on all test equipment and allow at least
5 minutes for warmup.
EL1AT149
2-26
TM 11-5820-670-30
2-13. TRANSMITTER DEVIATION NARROW BAND TEST. (CONT)
INITIAL EQUIPMENT CONTROL SETTINGS
Set equipment controls as indicated in the following table.
CONTROL AND SWITCH SETTINGS
EQUIPMENT
CONTROL OR SWITCH
POSITION/SETTING
TS-2575/ARC-131
MODE SWITCH
VOL
SQUELCH
FREQ sel
TRANSMIT switch
HI-LO switch
T/R
Maximum (clockwise)
DIS
30.00 MHz
OFF
LO
AN/URM-127
Freq dial
FREQ RANGE MULTIPLIER
OUTPUT CONTROL
10
X 100
As specified in procedure.
ME-30(E)/U
RANGE
1 volt
ME-57/U
TUNING
DEVIATION RANGE – KC
FREQUENCY RANGE – MC
Selector switch
30.00 MHz
20
20-55
TUNE
C-1611 D/AIC
Transmit-lnterphone selector
RECEIVER 1 switch
1
ON
TEST PROCEDURE
1. Disable the 150 Hz tone generator by placing test set WIDEBAND – NAR BAND switch to
WIDEBAND.
2. Adjust AN/URM-127 OUTPUT CONTROL for 0.39 volt output as indicated on ME-30(E)/U.
3. Place test set TRANSMIT switch to ON and observe transmitter deviation.
STANDARD. 6 kHz to 10 kHz
4. If transmitter deviation is not within the limits of the standard, see troubleshooting
chart 2-16.
5. Repeat steps 1 through 4, adjusting TS-2575/ARC-131 for each of the following frequencies:
52.00 MHz, 54.00 MHz, and 75.00 MHz.
2-27
TM 11-5820-670-30
2-14. TRANSMITTER DISTORTION NARROW BAND TEST.
PURPOSE
Distortion will ruin the quality of an audio signal and must, therefore, be kept at the lowest possible
level. This test measures the percentage of distortion in the signal transmitted by the rt.
TEST EQUIPMENT AND MATERIALS
Maintenance Kit MK-1035/ARC-131
Signal Generator AN/URM-127
Spectrum Analyzer TS-723A/U
Modulation Meter ME-57/U
Electronic Voltmeter ME-30(E)/U
Power Supply PP-2953/U
All cables are part of MK-1035/ARC
TEST SETUP
Connect equipment as shown in test setup diagram. Turn on all equipment and allow at least 5 minutes
for warmup.
EL1AT150
2-26
TM 11-5820-670-30
2-14. TRANSMllTER DISTORTION NARROW BAND TEST. (CONT)
INITIAL EQUIPMENT CONTROL SETTlNGS
Set equipment controls as indicated in the following table.
CONTROL AND SWITCH SETTINGS
CONTROL OR SWITCH
EQUIPMENT
POSITION/SETTING
TS-2575/ARC-131
MODE SWITCH
VOL
SQUELCH
FREQ sel
TRANSMIT switch
HI-LO switch
T/R
Maximum (clockwise)
DIS
30.00 MHz
OFF
LO
AN/URM-127
Freq dial
FREQ RANGE MULTIPLIER
OUTPUT CONTROL
10
X 100
As specified in test
procedure.
ME-57/U
TUNING
DEVIATION RANGE – KC
FREQUENCY RANGE – MC
Selector switch
30 MHz
20
20.55 MHz
TUNE
TS-723A/U
FUNCTION switch
RANGE
AF-RF switch
DISTORTION
X 10
AF
C-1611 D/AIC
Transmit-lnterphone selector
RECEIVER 1 switch
1
ON
TEST PROCEDURE
1. Adjust AN/URM-27 OUTPUT CONTROL for a 0.39 volt output level as indicated on ME-30(E)/U
voltmeter.
2. Place test set TRANSMIT switch to ON.
3. Measure transmitter distortion at the output of ME-57/U.
STANDARD. 10 percent maximum
4.
5.
6.
7.
If reading on modulation meter is above 10 percent, see troubleshooting chart 2-17.
Set test set TRANSMIT switch to OFF.
Set test set FREQ sel to 75.95 MHz.
Repeat steps 1 through 5.
2-29
TM 11-5820-670-30
2-15. TRANSMITTER SIGNAL PLUS NOISE-TO-NOISE RATIO TEST.
PURPOSE
This test checks the transmitted power to noise ratio. Transmitted noise must be 35 db below transmitted power.
TEST EQUIPMENT AND MATERIALS
Maintenance Kit MK-1035/ARC-131
Modulation Meter ME-57/U
Spectrum Analyzer TS-723A/U
Signal Generator AN/URM-127
Electronic Voltmeter ME-30(E)/U
Power Supply PP-2953/U
All cobles are part of MK-1035/ARC
TEST SETUP
Connect equipment as shown in test setup diagram. Turn on all equipment and allow at least 5 minutes
for warmup.
EL1AT150
2-30
TM 11-5820-670-30
2-15. TRANSMITTER SIGNAL PLUS NOISE-TO-NOISE RATlO TEST. (CONT)
INITIAL EQUIPMENT CONTROL SETTINGS
Set equipment controls as indicated in the following table.
CONTROL AND SWITCH SETTINGS
EQUIPMENT
CONTROL OR SWITCH
POSITION/SETTING
RT-823/ARC-131
XMTR HI-LO
LO
TS-2575/ARC-131
MODE SWITCH
VOL
SQUELCH
FREQ sel
HI-LO switch
TRANSMIT switch
T/R
Maximum (clockwise)
DIS
30.00 MHz
LO
OFF
AN/URM-127
Freq dial
FREQ RANGE MULTIPLIER
OUTPUT CONTROL
10
X 1000
As specified in procedure.
ME-30(E)/U
TUNING
DEVIATION RANGE – KC
FREQUENCY RANGE – MC
Selector switch
30.00 MHz
20
20-55 MHz
TUNE
TS-723A/U
FUNCTION switch
RANGE
AF-RF SWITCH
SET LEVEL
X 10
AF
C-1611 D/AIC
Transmit-lnterphone selector
RECEIVER 1 switch
1
ON
PROCEDURE
1. Adjust AN/URM-127 OUTPUT CONTROL for a 0.39 volt output level as indicated on
ME-30(E)/U.
2. Place test set TRANSMIT switch to ON.
3. Adjust TS-723A/U signal INPUT control for 0 db reference on meter.
4. Remove the modification from the receiver/transmitter by disconnecting AN/URM-127 from test
set J104 HI-LO terminals.
5. Observe difference in TS-723A/U meter indication from the 0 db reference established in
step 3.
STANDARD. 35 db difference
6. If meter indication on spectrum analyzer does not indicate 35 db, see troubleshooting
chart 2-18.
2-31
TM 11-5820-670-30
2-16. TRANSMITTER FREQUENCY STABILITY TEST.
PURPOSE
This test checks the frequency of the transmitter power at several points on the rt’s bandwidth.
TEST EQUIPMENT AND MATERIALS
Maintenance Kit MK-1035/ARC-131
Electronic Counter Digital Readout AN/USM-207
Power Supply PP-2953/U
All cables are part of MK-1035/ARC
TEST SETUP
Connect equipment as shown in test setup diagram. Turn on all equipment and allow at least 5 minutes
for warmup.
EL1AT151
2-32
TM 11-5820-670-30
2-16. TRANSMITTER FREQUENCY STABILITY TEST. (CONT)
INITIAL EQUIPMENT CONTROL SETTINGS
Set equipment controls as indicated in the following table.
CONTROL AND SWITCH SETTINGS
EQUIPMENT
CONTROL OR SWITCH
POSITION/SETTlNG
RT-823/ARC-131
XMTR HI-LO
LO
TS-2575/ARC-131
MODE SWITCH
SQUELCH
FREQ sel
TRANSMIT switch
HI-LO switch
T/R
CARR
75.05 MHz
OFF
LO
C-1611 D/AIC
Transmit-lnterphone selector
RECEIVER 1 switch
1
ON
AN/USM-207
GATE TIME (see - 1)
FUNCTION switch
POWER switch
104
FREQ
TRACK
TEST PROCEDURE
1. Place test set TRANSMIT switch to ON and observe the output frequency as indicated on
AN/USM-207 readout.
STANDARD. 75.05 ± 3.5 kHz
2. If reading on Frequency Counter AN/URM-207 is not within limits of the standard, see troubleshooting chart 2-19.
3. Place test set TRANSMIT switch to OFF position.
4. Repeat steps 1 through 3 adjusting the FREQ sel on TS-2575/ARC-131 for each of the following
frequencies: 30.00 MHz, 52.00 MHz, 53.00 MHz, 75.00 MHz, 75.10 MHz, 75.20 MHz,
75.30 MHz, 75.40 MHz, 75.50 MHz, 75.60 MHz, 75.70 MHz, 75.80 MHz, and 75.90 MHz.
NOTE
The standard for the frequencies selected in step 4 is the frequency selected ±3.5 kHz.
2-33
TM 11-5820-670-30
2-17. TRANSMlTTER AUTOMATIC FREQUENCY SELECTION AND CHANNEL CHANGING TONE TEST.
PURPOSE
This test checks the rt’s ability to tune to a selected frequency automatically in a specified period of
time. This test also checks the 800 Hz tone generated when the rt is transmitting.
TEST EQUIPMENT AND MATERIALS
Maintenance Kit MK-1035/ARC-131
Power Supply PP-2953/U
Stopwatch
All cables are part of MK-1035/ARC
Connect equipment as shown in test setup diagram. Turn on all equipment and allow at least 5 minutes
for warmup.
EL1AT152
INITIAL EQUIPMENT CONTROL SETTINGS
Set equipment controls as indicated in the following table.
CONTROL AND SWITCH SETTINGS
EQUIPMENT
TS-2575/ARC-131
2-34
CONTROL OR SWITCH
MODE SWITCH
SQUELCH
FREQ sel
VOL
POSITION/SETTING
T/R
DIS
30.00 MHz
Maximum (clockwise)
TM 11-5820-670-30
2-17. TRANSMITTER AUTOMATIC FREQUENCY SELECTION AND CHANNEL CHANGING TONE
TEST. (CONT)
TEST PROCEDURE
1. Set frequency selectors to 30.00 MHz and allow radio set to tune; then set MODE SWITCH to
OFF.
2. Change frequency selectors to 75.00 MHz and set MODE SWITCH to T/R.
3. Using a stopwatch, measure time required for tuning.
STANDARD. 7 seconds maximum
4. If radio set takes longer than 7 seconds to tune, see troubleshooting chart 2-20.
5. Monitor test set speaker for 800 Hz tone during tuning process.
STANDARD. Tone present
6. If no tone was present during tuning process, see troubleshooting chart 2-20.
7. Repeat steps 1 through 6 adjusting the frequency selector switches on test set for the following
frequencies.
INITIAL TEST SET
FREQUENCY
-
75.00 MHz
45.00 MHz
46.00 MHz
50.00 MHz
50.95 MHz
30.00 MHz
31.00 MHz
WITH MODE SWITCH OFF,
CHANGE TO:
30.00
46.00
45.00
50.95
50.00
31.00
30.00
MHz
MHz
MHz
MHz
MHz
MHz
MHz
2-18. TRANSMITTER SIDETONE TEST.
PURPOSE
This test checks the power level of the sidetone signal generated in the rt when fm rf is transmitted.
TEST EQUIPMENT AND MATERIALS
Maintenance Kit MK-1035/ARC-131
Signal Generator AN/URM-103
Signal Generator AN/URM-127
Spectrum Analyzer TS-723A/U
All cables are part of MK-1035/ARC
Fuseholder MX-1730/U
Power Supply PP-2953/U
2-35
TM 11-5820-670-30
2-18. TRANSMlTTER SIDETONE TEST. (CONT)
TEST SETUP
Connect equipment as shown in test setup diagram. Turn on all equipment and allow at least 5 minutes
for warmup.
EL1AT153
INITIAL EQUIPMENT CONTROL SETTINGS
Set equipment controls as indicated in the following table.
2-38
TM 11-5820-670-30
2-18. TRANSMITTER SIDETONE TEST. (CONT)
CONTROL AND SWITCH SETTINGS
EQUIPMENT
POSITION/SETTING
CONTROL OR SWITCH
TS-2575/ARC-131
MODE SWITCH
SQUELCH
VOL
FREQ sel
T/R
DIS
Maximum (clockwise)
31.00 MHz
C-1611 D/AIC
Transmit-lnterphone selector
1
AN/URM-127
Freq dial
FREQ RANGE MULTIPLIER
OUTPUT CONTROL
100
X 10
As specified in procedure.
TS-723A/U
FUNCTION switch
RANGE
AF-RF switch
Meter RANGE
SET LEVEL
X 10
AF
+ 20 db
AN/URM-103
BAND SWITCH and RF TUNING CONTROL
FUNCTION switch
RF OUTPUT switch
LO-HI RF SET to LINE control and
LO RFUV
Adjust to 31.00 MHz.
1000 Hz
LO 0-10 KUV
DEVIATION RANGE KH7 switch
DEVIATION control
Adjust for 10 microvolt
output.
10
Adjust for 8 kHz deviation.
TEST PROCEDURE
1. Adjust AN/URM-127 OUTPUT CONTROL for 0.39 volts output.
2. With TS-723A/U function switch at SET LEVEL, adjust signal INPUT control for a 0 db indication
on the meter
3. Place test set WIDEBAND-NAR BAND switch to WIDEBAND.
4. Disconnect CG-3370/U (W8) from fuseholder MX-1730/U and connector J112 on test set.
5. Connect CG-3370/U (W6) to J112 and J113 on the test set.
6. Place test set TRANSMIT switch to ON.
7. Measure db level change on TS-723A/U meter output with reference to step 2.
STANDARD. With a 0 db reference, change in db should be 6 + _2db.
8. If reading on spectrum analyzer is not within limits of the standard, see troubleshooting
chart 2-21.
9. Place test set TRANSMIT switch to OFF and reinstall CG-3370/U (W8) from J112 to fuseholder
MX-1730/U
10. Repeat steps 2 through 9 adjusting frequency selectors of test set for frequencies of 51.50 MHz
and 6895 MHz
2-37
TM 11-5820-670-30
2-19. HOMING SENSITIVITY TEST.
PURPOSE
This test checks homing signals that operate vertical and horizontal needles of homing indicator.
TEST EQUIPMENT AND MATERIALS
Maintenance Kit MK-1035/ARC-131
Signal Generator AN/URM-103
Fuseholder MX-1730/U
Power Supply PP-2953/U
All cables are part of MK-1035/ARC
TEST SETUP
Connect equipment as shown in test setup diagram. Turn on all equipment and allow at least 5 minutes
for warmup.
EL1AT154
INITIAL EQUIPMENT CONTROL SETTINGS
Set equipment controls as indicated in the following table.
2-38
TM 11-5820-670-30
2-19. HOMING SENSITIVITY TEST. (CONT)
CONTROL AND SWITCH SETTINGS
POSITION/SETTING
EQUIPMENT
CONTROL OR SWITCH
TS-2575/ARC-131
MODE SWITCH
SQUELCH
FREQ sel
LEFT and RIGHT HOMER ATTEN
HOME
CARR
31.00 MHz
0
AN/URM-103
BAND SWITCH and RF TUNING control
FUNCTION switch
RF OUTPUT switch
LO-HI RF SET to LINE control and
LO RF UV
Adjust to 31.00 MHz.
MOD OFF
LO 0-10 KUV
Adjust as required in
procedure.
TEST PROCEDURE
1. Increase AN/URM-103 output by adjusting LO RF UV control until flags on homing Indicator
lD-48A/ARN disappear.
2. Divide by two the AN/URM-103 dial indication observed in step 1.
STANDARD. 1.2 microvolt maximum
3. If quotient is more than 1.2 microvolt, see troubleshooting chart 2-22.
4. Repeat steps 1 through 3 adjusting test set for frequencies of 50.50 MHz and
68.95 MHz.
5. Set test set LEFT HOMER ATTEN control to 3 db and RIGHT HOMER ATTEN to 6 db.
6. Adjust AN/URM-103 Attenuator control for a 12 microvolt output signal.
7. Set frequency selectors to 31.00 MHz and tune AN/URM-103 to receiver frequency. Observe and record deflection of lD-48/ARN vertical needle.
STANDARD. Left length of wing minimum
8. If deflection of vertical needle does not meet requirement of the standard, see troubleshooting chart 2-23.
9. Reverse db settings of RIGHT and LEFT HOMER ATTEN. Record needle deflection.
STANDARD. Right length of wing minimum
10. If deflection of needle does not meet requirement of the standard, see troubleshooting
chart 2-23.
11. Repeat steps 5 through 10 adjusting frequency selectors of test set for frequencies of
50.50 MHz and 68.95 MHz.
2-39
TM 11-5820-670-30
2-19. HOMING SENSITIVITY TEST. (CONT)
TEST PROCEDURE (CONT)
12. Adjust AN/URM-103 for zero input to the radio set.
STANDARD. Horizontal needle should be near bottom of homing indicator lD-48/ARN.
13. If horizontal needle is not near bottom of indicator, see troubleshooting chart 2-23.
14. Set test set FREQ sel for 31.00 MHz and LEFT and RIGHT HOMER ATTEN controls to 0.
15. Set AN/URM-103 DEVIATION RANGE KHZ switch to 10 and adjust DEVIATION control for 8 kHz
deviation.
16. Adjust AN/URM-103 ATTENUATOR control for a 300 microvolt output signal.
STANDARD. Horizontal needle should be on first dot below center of homing indicator.
17. If horizontal needle is not as described in standard, see troubleshooting chart 2-23.
18. Adjust AN/URM-103 ATTENUATOR control for a 20,000 microvolt output signal.
STANDARD. Horizontal needle should be on first dot below center of homing indicator.
19. If horizontal needle is not as described in standard, see troubleshooting chart 2-23.
20. Repeat steps 16 through 19 adjusting the frequency selectors of the test set for frequencies of
50.50 MHz and 68.95 MHz.
2-20. C-7066/ARC-131 MODE SWITCH SELECTION AND FRONT PANEL ILLUMINATION TEST.
PURPOSE
This test checks for proper operation of the control unit mode switch and front panel lamp indicators.
TEST EQUIPMENT AND MATERIALS
Maintenance Kit MK-1035/ARC-131
Receiver-Transmitter, Radio RT-823/ARC-131
Multimeter ME-26D/U
Power Supply PP-2953/U
All cables are part of MK-1035/ARC
2-40
TM 11-5820-670-30
2-20. C-7088/ARC-131 MODE SWITCH SELECTION AND FRONT PANEL ILLUMINATION TEST.
(CONT)
TEST SETUP
Connect equipment as shown in test setup diagram. Remove receiver-transmitter case (para 2-39).
Replace control unit in test set with control unit under test. Turn on all equipment and allow at least
5 minutes for warmup.
EL1AT155
INITIAL EQUIPMENT CONTROL SETTINGS
Set equipment controls as indicated in the following table.
CONTROL AND SWITCH SETTlNGS
EQUIPMENT
CONTROL OR SWITCH
POSITION/SETTING
TS-2575/ARC-131
+28 VDC ON-OFF switch
WIDEBAND-NAR BAND
TRANSMIT switch
PILOT-ON
SPEAKER VOL
OFF
NAR BAND
OFF
PILOT
Maximum (clockwise)
RT-823/ARC-131
TEST SWITCH
1
2-41
TM 11-5820-670-30
2-20. C-7088/ARC-131 MODE SWITCH SELECTION AND FRONT PANEL ILLUMINATION TEST.
(CONT)
TEST PROCEDURE
Set C-7088/ARC-131 MODE SWITCH to OFF and SQUELCH switch to DIS.
Set frequency selectors on C-7088/ARC-131 for 30.95 MHz.
Swing open amplifier modulator assembly on receiver-transmitter to permit viewing of MHz indicator on gearbox assembly.
Swing open if. amplifier assembly on receiver-transmitter to permit viewing kHz indicator on
gearbox assembly.
Place test set +28 VDC ON-OFF switch to ON.
Adjust variable power source for + 27.5 VDC as indicated on INPUT VOLTAGE meter.
Place test set PILOT-ON switch to ON.
STANDARD. Control panel lamps illuminate.
8. If control panel lamps do not illuminate, see troubleshooting chart 2-24, item 1.
9. Set C-7088/ARC-131 MODE SWITCH to T/R.
10. Observe TEST METER indication on receiver-transmitter.
STANDARD. Midscale indication on TEST METER.
11. If TEST METER indication is not at midscale, see troubleshooting chart 2-24, item 2.
12. Set C-1611 D/AIC Transmit-lnterphone selector to 1.
13. Set C-1611 D/AIC RECEIVER 1 to ON and adjust VOL fully clockwise.
14. Set test set TRANSMIT switch to MOM.
STANDARD. Receiver-transmitter power supply blower motor should run.
15. If blower motor is not operating, see troubleshooting chart 2-24, item 3.
16. Set test set TRANSMIT switch to OFF.
17. Set ME-26 D/U FUNCTION switch to + and set RANGE for 30 V.
18. Set C-7088/ARC-131 MODE SWITCH to HOME.
19. Connect test probe from the ME-26 D/U to TP4504 located on rf control assembly of receivertransmitter.
STANDARD. + 27.5 VDC at TP4504.
20. If the voltage level at TP4504 is not 27.5 vdc, see troubleshooting chart 2-24, item 4.
2-42
TM 11-5820-670-30
2-21. SQUELCH SWITCH AND FREQUENCY SELECTION TEST.
PURPOSE
This test checks for proper operation of the control unit’s squelch functions. The test also includes a
check of the calibration between the control unit frequency selectors and gearbox assembly
indicators.
TEST EQUIPMENT AND MATERIALS
Maintenance Kit MK-1035/ARC-131
Receiver-Transmitter, Radio RT-823/ARC-131
Antenna Coupler Simulator SM-499/ARC-131
Power Supply PP-2953/U
All cables ore part of MK-1035/ARC
TEST SETUP
Connect equipment as shown in test setup diagram. Replace control unit in test set with control unit
under test. Turn on all equipment and allow at least 5 minutes for warmup.
EL1AT156
INITIAL EQUIPMENT CONTROL SETTINGS
Set equipment controls as indicated in the following table.
CONTROL AND SWITCH SETTINGS
POSITION/SETTING
EQUIPMENT
CONTROL OR SWITCH
TS-2575/ARC-131
+28 VDC ON-OFF switch
TRANSMIT switch
ON
OFF
C-7088/ARC-131
MODE SWITCH
FREQ sel
T/R
30.95 MHz
2-43
TM 11-5820-670-30
2-21. SQUELCH SWITCH AND FREQUENCY SELECTION TEST. (CONT)
TEST PROCEDURE
1. Set control unit SQUELCH switch under test to CARR.
2. Rotate receiver-transmitter SQ ADJ control fully counterclockwise.
STANDARD. Presence of noise in speaker.
3. If no noise is present, see troubleshooting chart 2-24, item 5.
4. Rotate SQ ADJ fully clockwise.
STANDARD. Absence of noise in speaker.
5. If noise is present in speaker, see troubleshooting chart 2-24, item 5.
6. Set control unit SQUELCH switch under test to DIS.
STANDARD. Presence of noise in speaker.
7. If noise is not present, see troubleshooting chart 2-24, item 6.
8. Rotate SQ ADJ control fully counterclockwise.
STANDARD. Presence of noise in speaker.
9. If noise is not present, see troubleshooting chart 2-24, item 6.
10. Set control unit SQUELCH switch under test fully clockwise (TONE).
STANDARD. Absence of noise in speaker.
11. If noise is present in speaker, see troubleshooting chart 2-24, item 5.
NOTE
Reset SQ ADJ control by placing SQUELCH switch on the control unit to CARR and rotating SQ ADJ clockwise from a fully counterclockwise position to a point just beyond the
point where squelch-break occurs.
12. Set control unit SQUELCH switch under test to DIS.
13. Decrease frequency setting of control unit from 30.95 MHz to 30.00 MHz in 0.05 MHz steps.
STANDARD. The kHz indicator on gearbox assembly should correspond to last two digits of selected
frequency. Antenna coupler simulator should not run.
2-44
TM 11-5820-670-30
2-21. SQUELCH SWITCH AND FREQUENCY SELECTION TEST. (CONT)
14. If kHz indicator on gearbox assembly does not correspond to last two digits of selected frequency, see troubleshooting chart 2-24, item 7.
15. Increase frequency setting of control unit from 30.00 MHz to 52.00 MHz in 1 MHz steps.
STANDARD. The MHz indicator on gearbox assembly should correspond to frequency selected at
control unit. Antenna coupler simulator should also indicate the tens and units digits
selected.
16. If the performance of step 15 does not meet the standard, see troubleshooting chart 2-24,
item 8.
NOTE
The lamp on antenna coupler simulator should light for frequencies between 30 MHz and
40 MHz (BAND A). At 49 MHz (BAND B), the green lamp should light and remain lit. If
trouble occurs, see troubleshooting chart 2-24, item 8.
17. Set control unit frequency selectors to 53.00 MHz.
STANDARD. Band switch on gearbox assembly operates, MHz indicator at 53.00 MHz, antenna
coupler simulator indicates 53.00 MHz.
18. If trouble exists, see troubleshooting chart 2-24, items 9 and 10.
19. Set control unit MODE SWITCH to OFF.
20. Set control unit frequency selectors to 70.00 MHz.
21. Set control unit MODE SWITCH to T/R.
22. Increase the frequency setting of control unit from 70.00 MHz to 75.00 MHz in 1 MHz steps.
STANDARD. The MHz indicator on box corresponds to selected frequency. Antenna coupler simulator
does not run.
23. If the performance of step 21 does not meet the standard, see troubleshooting chart 2-24,
item 8.
2-45
TM 11-5820-670-30
2-22. RETRANSMIT RECEIVE TEST.
PURPOSE
This test checks the rt and control unit when the radio set is receiving rf in the retransmit mode.
TEST EQUIPMENT AND MATERIALS
Maintenance Kit MK-1035/ARC-131
Signal Generator AN/URM-103
Receiver-Transmitter, Radio RT-823/ARC-131
Headset/Microphone H-78/AIC
Electronic Voltmeter ME-30E/U
All cables are part of MK-1035/ARC
TEST SETUP
Fuseholder MX-1730/U
Power Supply PP-2953/U
Connect equipment as shown in test setup diagram. Turn on all equipment and allow at least 5 minutes
for warmup.
EL1AT157
2-46
TM 11-5820-670-30
2-22. RETRANSMIT RECEIVE TEST. (CONT)
INITIAL EQUIPMENT CONTROL SETTINGS
Set equipment controls as indicated in the following table.
CONTROL AND SWITCH SETTINGS
CONTROL OR SWITCH
EQUIPMENT
POSITION/SETTING
TS-2575/ARC-131
+28 VDC ON-OFF
WIDEBAND-NAR BAND
TRANSMIT switch
ON
NAR BAND
OFF
C-1611 D/AIC
VOL
Midrange position
ME-30E/U
Selector switch
RANGE
AC
3V
C-7088/ARC-131
MODE SWITCH
FREQ sel
SQUELCH
VOL
RETRAN
40.50 MHz
CARR
Midrange position
AN/URM-103
BAND SWITCH and RF TUNING control
FUNCTION switch
RF OUTPUT switch
LO-HI RF SET to LINE control and
LO RF UV control
DEVIATION RANGE KHZ switch
DEVIATION control
Adjust to 40.50 MHz.
1000 Hz
LO 0-10 KUV
Adjust for 0.8 microvolt out.
10
Adjust for 8 kHz deviation.
TEST PROCEDURE
1. Observe that test set RETRANSMIT RCVR lamp is on when AN/URM-103 is adjusted for 0.8
microvolt output.
STANDARD. RETRANSMIT RCVR lamp is on.
2. If lamp is not on, refer radio set to higher level of maintenance.
3. Adjust the LO RF UV control on the AN/URM-103 for minimum output signal.
STANDARD. RETRANSMIT RCVR lamp is off.
4. If lamp is on, refer radio set to higher level of maintenance.
5. Adjust the AN/URM-103 output for 0.8 microvolt.
STANDARD. RETRANSMIT RCVR lamp is on. ME-30E/U indicates 2.8 vrms output at J109 on the test
set and a 1000 Hz tone should be heard in headset.
6. If performance of step 5 does not meet the standard, refer radio set to higher level of
maintenance.
2-47
TM 11-5820-670-30
2-23. RETRANSMIT TRANSMIT TEST.
PURPOSE
This test checks the rt and control unit when the radio set is transmitting rf in the retransmit mode.
TEST EQUIPMENT AND MATERIALS
Maintenance Kit MK-1035/ARC-131
Modulation Meter ME-57/U
Electronic Voltmeter ME-30E/U
Signal Generator AN/URM-127
Headset/Microphone H-78/AIC
All cables are part of MK-1035/ARC
TEST SETUP
Connect equipment as shown in test setup diagram. Turn on equipment and allow at least 5 minutes for
warmup.
EL1AT158
2-48
TM 11-5820-670-30
2-23. RETRANSMIT TRANSMIT TEST. (CONT)
INITIAL EQUIPMENT CONTROL SETTINGS
Set equipment controls as indicated in the following table.
CONTROL AND SWITCH SETTINGS
POSITION/SETTING
EQUIPMENT
CONTROL OR SWITCH
TS-2575/ARC-131
+28 VDC ON-OFF
WIDEBAND-NAR BAND
TRANSMIT switch
HI-LO switch
ON
NAR BAND
OFF
LO
C-1611 D/AIC
VOL
Midrange position
ME-30E/U
Selector switch
RANGE
AC
3V
ME-57/U
TUNING
DEVIATION RANGE - KC
FREQUENCY RANGE – MC
Selector switch
60.50 MHz
KC 20
55 – 120
TUNE
AN/URM-127
Freq dial
FREQ RANGE MULTIPLIER
OUTPUT CONTROL
10
X 100
Adjust as instructed in
procedure.
TEST PROCEDURE
1. Adjust output of AN/U RM-127 for 2.8 vrms as indicated on ME-30E/U meter.
2. Press test set RETRANSMIT SIMULATE switch.
STANDARD. ME-57/U deviation meter should indicate 8 kHz deviation and a 1000 Hz sidetone
signal should be audible in headset.
3. If performance of step 2 does not meet the standard, refer radio set to higher level of
maintenance.
2-49
TM 11-5820-670-30
Section Ill TROUBLESHOOTING
Subject
Para
Page
General . . . . . . . . . . . . . . . . . . . . . . . . . . . . . . . . . . . . . . . . . . . . . . . . . . . . . . . . . . . . . . . . . . . . . . . . . . . . . . . . . . . . . . . . . . . . 2-24
How to Use the Troubleshooting Charts . . . . . . . . . . . . . . . . . . . . . . . . . . . . . . . . . . . . . . . . . . . . . . . . . . . . . 2-25
Troubleshooting Charts . . . . . . . . . . . . . . . . . . . . . . . . . . . . . . . . . . . . . . . . . . . . . . . . . . . . . . . . . . . . . . . . . . . . . . . . .
2-26
2-50
2-53
2-54
Receiver-Transmitter Inoperative:
Voltage Distribution Troubleshooting . . . . . . . . . . . . . . . . . . . . . . . . . . . . . . . . . . . . . . . . . . . . . . . . . . . . . . 2-26
+ 27.5 VDC Circuit Troubleshooting . . . . . . . . . . . . . . . . . . . . . . . . . . . . . . . . . . . . . . . . . . . . . . . . . . . . . . . . 2-26
+ 24 VDC Regulated Circuit Troubleshooting . . . . . . . . . . . . . . . . . . . . . . . . . . . . . . . . . . . . . . . . . . . 2-26
+ 16 VDC Circuit Troubleshooting . . . . . . . . . . . . . . . . . . . . . . . . . . . . . . . . . . . . . . . . . . . . . . . . . . . . . . . . . 2-26
2-56
2-61
2-64
2-68
Receive Mode:
No Audio Output Troubleshooting . . . . . . . . . . . . . . . . . . . . . . . . . . . . . . . . . . . . . . . . . . . . . . . . . . . . . . . . . . .
Audio Power Troubleshooting . . . . . . . . . . . . . . . . . . . . . . . . . . . . . . . . . . . . . . . . . . . . . . . . . . . . . . . . . . . . . . .
Audio Distortion Troubleshooting . . . . . . . . . . . . . . . . . . . . . . . . . . . . . . . . . . . . . . . . . . . . . . . . . . . . . . . . . . .
Poor Audio Response Troubleshooting . . . . . . . . . . . . . . . . . . . . . . . . . . . . . . . . . . . . . . . . . . . . . . . . . . . .
Poor Sensitivity Troubleshooting . . . . . . . . . . . . . . . . . . . . . . . . . . . . . . . . . . . . . . . . . . . . . . . . . . . . . . . . . . . . . .
Maximum Signal Plus Noise-to-Noise Ratio Troubleshooting . . . . . . . . . . . . . . . . . . . . . . . . . .
Carrier Squelch Sensitivity Troubleshooting . . . . . . . . . . . . . . . . . . . . . . . . . . . . . . . . . . . . . . . . . . . . . .
Tone Squelch Sensitivity Troubleshooting . . . . . . . . . . . . . . . . . . . . . . . . . . . . . . . . . . . . . . . . . . . . . . . . .
2-72
2-80
2-81
2-83
2-85
2-87
2-88
2-89
2-26
2-26
2-26
2-26
2-26
2-26
2-26
2-26
Transmit Mode:
Transmitter Power Output (Hi) Troubleshooting . . . . . . . . . . . . . . . . . . . . . . . . . . . . . . . . . . . . . . . . . . 2-26
Transmitter Power Output (LO) Troubleshooting . . . . . . . . . . . . . . . . . . . . . . . . . . . . . . . . . . . . . . . . 2-26
Transmitter Tone Modulation Troubleshooting . . . . . . . . . . . . . . . . . . . . . . . . . . . . . . . . . . . . . . . . . . . . 2-26
Transmitter Deviation Narrow Band Troubleshooting . . . . . . . . . . . . . . . . . . . . . . . . . . . . . . . . . . . . . 2-26
Transmitter Distortion Narrow Band Troubleshooting . . . . . . . . . . . . . . . . . . . . . . . . . . . . . . . . . . . 2-26
Maximum Signal Plus Noise-to-Noise Ratio Troubleshooting . . . . . . . . . . . . . . . . . . . . . . . . . . 2-26
Transmitter Frequency Stability Troubleshooting . . . . . . . . . . . . . . . . . . . . . . . . . . . . . . . . . . . . . . . . 2-26
Automatic Frequency Selection and Channel Changing Tone
Troubleshooting . . . . . . . . . . . . . . . . . . . . . . . . . . . . . . . . . . . . . . . . . . . . . . . . . . . . . . . . . . . . . . . . . . . . . . . . . . .
2-26
Transmitter Sidetone Troubleshooting . . . . . . . . . . . . . . . . . . . . . . . . . . . . . . . . . . . . . . . . . . . . . . . . . . . . . . 2-26
2-108
2-109
Homing Mode:
Homing Flag Indication Troubleshooting . . . . . . . . . . . . . . . . . . . . . . . . . . . . . . . . . . . . . . . . . . . . . . . . .
Homing Needle Indication Troubleshooting . . . . . . . . . . . . . . . . . . . . . . . . . . . . . . . . . . . . . . . . . . . . . . .
2-26
2-26
2-110
2-111
Control Unit Troubleshooting . . . . . . . . . . . . . . . . . . . . . . . . . . . . . . . . . . . . . . . . . . . . . . . . . . . . . . . . . . . . . . . . . . . 2-26
2-114
2-91
2-94
2-97
2-99
2-101
2-103
2-24. GENERAL.
This section contains troubleshooting charts which will help you diagnose failures in the radio set. The
troubleshooting charts are designed to isolate faults in response to specific performance problems
noted during performance testing in section II of this chapter.
There are two basic kinds of troubleshooting provided: total failure due to interruption of supplied
voltages or a primary power short circuit, and performance degradation or failure to perform a specific
function in a selected mode of operation.
2-50
TM 11-5820-670-30
2-24. GENERAL. (CONT)
OVERALL TROUBLESHOOTING APPROACH
When a radio set fails to meet a designated standard during a performance test, a reference is made
in the test procedure to a specific troubleshooting chart which can then be used to locate the cause of
the nonperformance. The results of in-aircraft tests may accompany the radio set when it is forwarded
by AVUM maintenance to the AVIM unit and can be used to select an appropriate troubleshooting
procedure in the event that saving time is essential. If trouble symptoms are unkown, begin with voltage distribution troubleshooting and proceed until symptoms are known. See applicable mode of
operation troubleshooting chart.
Troubleshooting procedures are based on the following assumptions:
1. Only one malfunction exists which is causing the symptom detected.
2. The troubleshooting charts do not isolate every possible defect.
3. Failure to locate a defect using the charts suggests a wiring-related problem which can be isolated using the schematics in the back of this manual.
4. Troubleshooting procedures for germanium and silicon versions of the modules in the rt are
the same.
TOTAL FAILURE TROUBLESHOOTING
The rt will be completely inoperative if voltage distribution is interrupted by an open or a short in the rt
chassis wiring. The voltage distribution and primary power circuit troubleshooting charts will aid in
determining if there is a wiring problem or if power supply has been interrupted by a faulty power supply
assembly or its fuse, a faulty voltage regulator, or a defect in the control unit. Perform appropriate
repair or replacement as instructed and repeat the performance test after repair is made.
PERFORMANCE FAILURE TROUBLESHOOTING
If the rt is operational, but does not meet a performance standard, performance troubleshooting
charts will aid in determining the specific module or component that is malfunctioning. Performance
troubleshooting isolates problems when the radio components are functioning in the receive mode,
the transmit mode, or its homing mode. In each case, the first chart covers a gross failure; for
example, a complete failure to transmit. Subsequent charts cover performance degradation where the
rt may transmit, for example, but at low power or with excess distortion. The troubleshooting charts
isolate the problem to a module or component that is faulty. A faulty module may have failed completely
or partially, may be operating at less than standard performance due to damage or age, or may itself
contain an open or short. Repair or replacement instructions for a specific module or component is
given. After repair or replacement, aline unit if required, then repeat performance test.
2-51
TM 11-5820-670-30
2-24. GENERAL. (CONT)
Troubleshooting procedures in this section make use of TMDE and Maintenance Kit, Electronic
Equipment MK-1035/ARC-131. Specific test arrangements are given for each procedure. A preliminary status condition for the maintenance kit is set up and then changed as required to perform
troubleshooting procedures.
Complete descriptive data and instructions for operating the maintenance kit are given in TM 11-66251610-12. Instructions for operating the radio set control unit are given in TM 11-5820-670-12.
The function of the transmit button (usually part of the aircraft wiring or of the headset-microphone) is
performed by the TRANSMIT switch on the test set (set to MOM or ON position to transmit). An audio
amplifier is built into the maintenance kit so that test audio signals may be monitored when a headset is
plugged into J111 on the kit. The radio antenna is simulated in the maintenance kit by a dummy load
which is connected to the rt output by means of a jumper cable (CG-3370/U (W6)) connected
between J112 and J113 on the kit.
Troubleshooting is performed with equipment covers removed and some modules swung open. In
some procedures, modules, components, or internal connections are removed. See section V of this
chapter for detailed removal and replacement procedures for covers, modules, and chassis-mounted
components.
WARNING
Most procedures are performed with power applied to the equipment. To safeguard
against electrical shock and possible damage to equipment, remove all jewelry.
Measurements of resistance between a test point and ground are used to locate shorts in primary
power circuits. This is done with power off and the rt completely disconnected from any other
equipment. The rt modules are transistorized. Exercise care when taking resistance measurements.
When troubleshooting the rt in the receive mode, it is sometimes necessary to test the response of the
rt on a specific module under operational conditions. This can be done on the test bench by generating a simulated received signal and substituting this signal for an actual signal and injecting it at a
particular connector pin on test point. When applicable, reference is made to the signal substitution
procedure and signal strength and frequency, point of injection, monitor point, and typical indication
are given.
NOTE
Make certain to understand how to use the flow charts before attempting to troubleshoot
radio set (para 2-25).
2-52
TM 11-5820-670-30
2-25. HOW TO USE THE TROUBLESHOOTING CHARTS.
NOTE
1. The following measurement checks distortion
at 1020 Hz.
The preceding illustration is an example of a logic flow chart. Refer to the illustration while reading the
following information.
START
Each chart has a start segment, indicating the start of the troubleshooting procedure.
TEST PROCEDURE INSTRUCTIONS
Test procedure instructions appear in a rectangular box. These instructions usually contain specific
test points to be probed.
DECISION DIAMOND
As a result of a particular test point probe, some electrical value should be observed, such as a
voltage indication on a piece of test equipment. The decision diamond defines what value should be
observed and permits a YES or NO decision in response to what is observed.
TROUBLESHOOTING FLOW LINE
Troubleshooting flow lines provide direction to successive steps in the logic chart. An arrow at the end
of each flow line indicates the next step in the troubleshooting chain.
2-53
TM 11-5820-670-30
2-25. HOW TO USE THE TROUBLESHOOTING CHARTS. (CONT)
CORRECTIVE ACTION OR ADDITIONAL INSTRUCTION
A corrective action box or additional instruction box always follows a decision diamond. If a radio set
response does not meet the standard set in the decision diamond, the appropriately marked flow line
from the decision diamond will usually be followed to a corrective action box. If the radio set response
meets the standard, the flow line will be followed to an additional instruction box, which will either
continue the troubleshooting procedure or refer to the next test in the sequence.
INTERNAL CONNECTOR IDENTIFIER
There are two sizes of circular identifiers used in the troubleshooting charts. The smaller of the two is
the internal connector identifier. The internal connector identifier indicates a continuation of the procedure to another sheet in the same troubleshooting chart. The sheet on which the procedure is continued contains a corresponding identifier; that is, a small circle in which the same number is printed.
The number in the circle indicates on which sheet the test procedure continues. In the sample chart,
for example, the NO branch of the decision diamond flows to an identifier containing a 2. This means
that the procedure is continued on sheet 2, at the small circle containing 2. If there is more than one
connector on a sheet, a letter will be added to the sheet number such as 1A.
EXTERNAL CONNECTOR IDENTIFIER
The external connector is a large circle which references a paragraph outside the troubleshooting
chart. In the sample illustration, the large circle contains para 2-x. This paragraph reference identifies the location of the A5 assembly replacement procedure, referred to in the preceding corrective
action rectangle. This replacement procedure is not found within the troubleshooting chart. Thus, a
large circle always references some information external to the flow chart.
NOTES
The third column on each troubleshooting sheet may contain notes used to clarify information
contained in the troubleshooting chart.
2-26. TROUBLESHOOTING CHARTS.
Prepare to perform troubleshooting by placing the rt on a test bench and removing the cover (para
2-39). The control unit cover must also be removed when troubleshooting that component (para
2-77, step 1).
When symptoms reported from operational tests indicate possible primary power troubles or symptoms
of trouble are unknown, check the primary power circuits for short circuits. When fault is found, repair
the trouble before applying power to the unit.
If symptoms are known as a result of performance tests or by report from AVUM maintenance, perform
troubleshooting to locate fault.
Perform preliminary procedure to adjust primary power supply. Then select troubleshooting chart
covering trouble symptom indicated by performance tests or by AVUM maintenance and change
preliminary procedure equipment setup as required. Then perform troubleshooting. If troubleshooting does not locate cause of malfunction, refer component to next higher level of maintenance.
2-54
TM 11-5820-670-30
2-26. TROUBLESHOOTING CHARTS. (CONT)
PRELIMINARY PROCEDURE. Set up equipment as shown in diagram.
NOTE:
INDICATES EQUIPMENT MARKING
EL1AT159
NOTE
Red covered battery clip on test set power cable connects to + 27.5 vdc power supply
outlet. Black covered battery clip connects to ground.
1. Adjust power supply for an output of + 27.5 vdc.
2. Set test set controls as indicated in the following table.
CONTROL AND SWITCH SETTINGS
CONTROL OR SWITCH
TRANSMIT switch
PILOT-ON
WIDEBAND – NAR BAND
RF-AMP ALINE switches
ON-AGC
HI-LO switch
SQUELCH
MODE SWITCH
Transmit-lnterphone selector
RECEIVER 1
+28 VDC
POSITION/SETTING
OFF
ON
NAR BAND
ON
LO
DIS
T/R
1
ON
ON
3. Proceed to Troubleshooting Chart 2-1 or to other troubleshooting charts as directed by performance tests.
2-55
TM 11-5820-670-30
2-26. TROUBLESHOOTING CHARTS. (CONT)
CHART 2-1
Voltage Distribution Troubleshooting
(Sheet 1 of 5)
NOTES
1. See FO-11 for primary power distribution.
2. If open circuits are found, refer rt to a higher
level of maintenance.
CHECK DISTRIBUTION OF
+24 VDC TO RT ASSEMBLIES
FOR POSSIBLE OPEN
CIRCUITS. SEE CHART 2-3.
CHECK FOR POSSIBLE
SHORT CIRCUIT. PERFORM
TROUBLESHOOTING CHART
. .
2-2.
PERFORM RT TEST METER
TEST (PARA 2-4).
PERFORM TROUBLESHOOTING CHART 2-3.
PERFORM RT TEST METER
TEST (PARA 2-4).
2-56
TM 11-5820-670-30
2-26. TROUBLESHOOTING CHARTS. (CONT)
CHART 2-1
Voltage Distribution Troubleshooting
(Sheet 2 of 5)
PERFORMTROUBLESHOOTING CHART 2-4.
MEASURE VDC TO GROUND
AT TP9501 ON A9500 ASSEMBLY. SEE ILLUSTRATION,
SH 5.
MEASURE BDC TO GROUND
AT P9502 ON A9500 ASSEMBLY. SEE ILLUSTRATION,
SH 5.
PER FORM RT TEST METER
TEST (PARA 2-4).
PERFORM RT TEST METER
TEST (PARA 2-4).
2-57
TM 11-5820-670-30
2-26 TROUBLESHOOTING CHARTS. (CONT)
CHART 2-1
Voltage Distribution Troubleshooting
(Sheet 3 of 5)
NOTES
3. R9511 is located on underside of circuit card
on A9500.
MEASURE VDC TO GROUND
AT TP9504 ON A9500 ASSEMBLY. SEE ILLUSTRATION,
SH 5.
EL1AT175
CAUTION
Be careful not to short out the cord to nearby components while power is applied to
A9500.
PERFORM RT TEST METER
TEST (PARA 2-4).
REPLACE A9500 ASSEMBLY
(PARA 2-42).
PERFORM RT TEST METER
TEST (PARA 2-4).
2-58
TM 11-5820-670-30
2-26. TROUBLESHOOTING CHARTS. (CONT)
CHART 2-1
Voltage Distribution Troubleshooting
(Sheet 4 of 5)
NOTES
4. A2100 Terminal board.
CHECK DISTRIBUTION OF
+16 VDC. SEE CHART 2-4.
Connect positive (+) lead of meter to pin 6 and
negative (–) lead to pin 9.
PERFORM RT TEST METER
TEST (PARA 2-4).
REPLACE VOLTAGE REGULATOR ASSEMBLY A2100
(PARA 2-50).
PER FORM RT TEST METER
TEST (PARA 2-4).
2-59
TM 11-5820-670-30
2-26. TROUBLESHOOTING CHARTS. (CONT)
CHART 2-1
Voltage Distribution Troubleshooting
(Sheet 5 of 5)
2-60
TM 11-5820-670-30
2-26. TROUBLESHOOTING CHARTS. (CONT)
CHART 2-2
+ 27.5 vdc Circuit Troubleshooting
(Sheet 1 of 3)
NOTES
1. P9501 pin locations.
EL1AT161
REPLACE POWER SUPPLY
ASSEMBLY A9500 (PARA
2-42).
UNPLUG P5501 FROM J5501.
SEE ILLUSTRATION, SH 2.
1
CH 2-1
UNPLUG P4501 FROM J4501
SEE ILLUSTRATION, SH 2.
REPLACE A4500 ASSEMBLY
(PARA 2-49).
REPLACE A5500 ASSEMBLY
(PARA 2-44).
1
CH 2-1
2-61
TM 11-5820-670-30
2-26. TROUBLESHOOTING CHARTS. (CONT)
CHART 2-2
+27.5 vdc Circuit Troubleshooting
(Sheet 2 of 3)
NOTES
2. Remove relays and replace in this order:
K9601, K9602, K9603, K9604, and K9606.
See sh 3 for relay locations.
3. See FO-11 for primary power distribution
circuits.
REPLACE A9700 ASSEMBLY
(PARA 2-71). ALINE (PARA
2-29).
1
CH 2-1
1
CH 2-1
1
CH 2-1
EL1AT163
EL1AT162
2-62
TM 11-5820-670-30
2-26. TROUBLESHOOTING CHARTS. (CONT)
CHART 2-2
+27.5 vdc Circuit Troubleshooting
(Sheet 3 of 3)
EL1AT204
2-63
TM 11-5820-670-30
2-26. TROUBLESHOOTING CHARTS. (CONT)
CHART 2-3
+24 vdc Regulated Circuit Troubleshooting
(Sheet 1 of 4)
NOTES
1. P9501 pin locations.
EL1AT161
REPLACE POWER SUPPLY
ASSEMBLY A9500. (PARA
2-42).
2-64
2. Remove relay and replace in this order: K9601
and K9605. See sh 4 for relay location.
3. See FO-11 for primary power distribution
circuits.
TM 11-5820-670-30
2-26. TROUBLESHOOTING CHARTS. (CONT)
CHART 2-3
+24 vdc Regulated Circuit Troubleshooting
(Sheet 2 of 4)
EL1AT164
REPLACE POWER SUPPLY
ASSEMBLY A9500. (PARA
2-42).
3
CH 2-1
REPLACE A5500 ASSEMBLY
(PARA 2-44).
REPLACE A2100 ASSEMBLY
(PARA 2-50).
2-65
TM 11-5820-670-30
2-26. TROUBLESHOOTING CHARTS. (CONT)
CHART 2-3
+24 vdc Regulated Circuit Troubleshooting
(Sheet 3 of 4)
REPLACE A9700 ASSEMBLY
PARA 2-71). ALINE (PARA
2-29).
3
CH 2-1
REPLACE A1000 ASSEMBLY
(PARA 2-68). ALINE (PARA
2-35).
3
CH 2-1
EL1AT166
2-66
TM 11-5820-670-30
2-26. TROUBLESHOOTING CHARTS. (CONT)
CHART 2-3
+24 vdc Regulated Circuit Troubleshooting
(Sheet 4 of 4)
EL1AT205
2-67
TM 11-5820-670-30
2-26. TROUBLESHOOTING CHARTS. (CONT)
CHART 2-4
+ 16 vdc Circuit Troubleshooting
(Sheet 1 of 4)
NOTES
1. A2100 terminal board.
REPLACE A2100 ASSEMBLY
(PARA 2-50).
EL1AT167
DISCONNECT P4902 FROM
J4902 ON ASSEMBLY A4900.
SEE ILLUSTRATION, SH 4.
4
CH 2-1
DISCONNECT P3001 FROM
ASSEMBLY A3000. SEE
ILLUSTRATION, SH 4.
REPLACE A4900 ASSEMBLY
(PARA 2-61).
4
CH 2-1
2-68
REPLACE A3000 ASSEMBLY
(PARA 2-43).
TM 11-5820-670-30
2-26. TROUBLESHOOTING CHARTS. (CONT)
CHART 2-4
+ 16 vdc Circuit Troubleshooting
(Sheet 2 of 4)
EL1AT163
DISCONNECT P2001
FROM J2001.
SEE ILLUSTRATION, SH 4.
REPLACE A5500 ASSEMBLY
(PARA 2-44).
4
CH 2-1
REPLACE A4500 ASSEMBLY
(PARA 2-49).
REPLACE A2000 ASSEMBLY
(PARA 2-70).
4
CH 2-1
EL1BAT162
2-69
TM 11-5820-670-30
2-26. TROUBLESHOOTING CHARTS. (CONT)
CHART 2-4
+ 16 vdc Circuit Troubleshooting
(Sheet 3 of 4)
NOTES
2. See FO-11 for power distribution wiring.
DISCONNECT P4001 FROM
PINS ON A4000 ASSEMBLY.
SEE ILLUSTRATION.
REPLACE A1000 ASSEMBLY
(PARA 2-68). ALINE (PARA
2-35).
4
CH 2-1
REPLACE A4000 ASSEMBLY
(PARA 2-41).
4
CH 2-1
2-70
4
CH 2-1
TM 11-5820-670-30
2-26. TROUBLESHOOTING CHARTS. (CONT)
CHART 2-4
+16 vdc Circuit Troubleshooting
(Sheet 4 of 4)
2-71
TM 11-5820-670-30
2-26. TROUBLESHOOTING CHARTS. (CONT)
CHART 2-5
No Audio Output Troubleshooting
(Sheet 1 of 8)
CONNECT EQUIPMENT AS
SHOWN IN AUDIO POWER
OUTPUT PERFORMANCE
TEST (PARA 2-5).
EL1AT199
WITH APPROXIMATELY
2.5V INPUT SIGNAL, CHECK
FOR APPROXIMATE LY0.15
VAC OUTPUT AT TP4003.
SEE ILLUSTRATION, SH 7.
PERFORM AUDIO POWER
OUTPUT AND DISTORTION
PERFORMANCE TEST
(PARA 2-5).
REPLACE IF. AMPLIFIER
LIMITER AND DISCRIMINATOR MODULE A4200
(PARA 2-41).
CHECK VOLTAGE AT TP4007
ON IF. AMPLIFIER ASSEMBLY. SEE ILLUSTRATION,
SH 7.
2-72
TM 11-5820-670-30
2-26. TROUBLESHOOTING CHARTS. (CONT)
CHART 2-5
No Audio Output Troubleshooting
(Sheet 2 of 8)
CHECK AC VOLTAGE AT
TP5513 ON THE RECEIVER
AUDIO AMPLIFIER ASSEMBLY. SEE ILLUSTRATION,
SH 7.
REPLACE AUDIO AMPLIFIER
MODULE A5400 (PARA 2-44).
ADJUST (PARA 2-30).
CHECK AC VOLTAGE AT
TP5509. SEE ILLUSTRA.
TION, SH 7.
REPEAT AUDIO POWER
OUTPUT AND DISTORTION
PERFORMANCE TEST (PARA
2-5).
REPLACE AUDIO FILTER
FL5501 (PARA 2-44).
CHECK AC VOLTAGE AT
TP5504. SEE ILLUSTRATION, SH 7.
PERFORM CARRIER
SQUELCH ADJUSTMENT
(PARA 2-31).
CHECK DC VOLTAGE AT
TP5510. SEE ILLUSTRATION, SH 7.
2-73
TM 11-5820-670-30
2-26. TROUBLESHOOTING CHARTS. (CONT)
CHART 2-5
No Audio Output Troubleshooting
(Sheet 3 of 8)
CHECK CONTINUITY OF
RELAY K4502. IF DEFECTIVE REPLACE (PARA 2-65).
REPEAT AUDIO POWER
OUTPUT AND DISTORTION
PERFORMANCE TEST (PARA
2-5).
CHECK CONTINUITY OF
RELAY K4501. IF DEFECTIVE REPLACE (PARA 2-65).
REPLACE REFLECTOMETER
AND SIDETONE GATE DETECTOR (PARA 2-63).
DISCONNECT P4505 FROM
J4505 AND CONNECT THE
AN/URM-1030 OUTPUT TO
J4505. SEE ILLUSTRATION,
SH 8.
2-74
TM 11-5820-670-30
2-26. TROUBLESHOOTING CHARTS. (CONT)
CHART 2-5
No Audio Output Troubleshooting
(Sheet 4 of 8)
REPLACE MODULES A1100
THRU A1500 (PARA 2-52).
REMOVE A4200 AND INJECT
0.15 VOLTS, 1000 Hz, AT
TP4003. SEE ILLUSTRATION, SH 7.
DISCONNECT P4902 FROM
J4902 ON IF. ATTENUATOR
AND APPLY AN/U RM-103
OUTPUT TO P4902. SEE
ILLUSTRATION, SH 8.
ALINE A1000 ASSEMBLY
(PARA 2-35).
ADJUST AN/URM-103 FOR
100 MILLIVOLTS OUTPUT
AND CHECK FOR ABOUT
0.1 VAC AT TP4009 ON IF.
AMPLIFIER ASSEMBLY.
SEE ILLUSTRATION, SH 7.
REPLACE IF. ATTENUATOR
A4900 (PARA 2-61).
CHECK A1600 FOR 110 VDC
OUTPUT AT PIN 5 ON VHF
TUNER. SEE ILLUSTRATION, SH 6.
REPEAT AUDIO POWER OUTPUT AND DISTORTION
PERFORMANCE TEST (PARA
2-5).
ADJUST AN/URM-103 FOR
3 MILLIVOLTS OUTPUT AND
CHECK AC VOLTAGE AT
TP4005. SEE ILLUSTRATION, SH 7.
REPLACE FL4001 0N A4000
ASSEMBLY (PARA 2-41).
2-75
TM 11-5820-670-30
2-26. TROUBLESHOOTING CHARTS. (CONT)
CHART 2-5
No Audio Output Troubleshooting
(Sheet 5 of 8)
REPLACE 1ST AND 2ND IF.
AMPLIFIER MODULE A4100
(PARA 2-41).
CHECK AC VOLTAGE AT
TP4004 ON IF. AMPLIFIER
ASSEMBLY. SEE lLLUSTRATION, SH 7.
REPLACE FIRST AND
SECOND IF. AMPLIFIER
MODULE A4100 (PARA 2-41).
REPEAT AUDIO POWER OUTPUT AND DISTORTION PERFORMANCE TEST (PARA 2-5).
REPLACE 11.5 MHz CRYSTAL FILTER FL4002 (PARA
2-41).
REPLACE LIMITER AND
DISCRIMINATOR MODULE
A4200 (PARA 2-41).
REPLACE A1600 ASSEMBLY
(PARA 2-73).
REPLACE RECEIVER AUDIO
AND SQUELCH PREAMPLIFIER MODULE A4300
(PARA 2-41).
2-76
TM 11-5820-670-30
2-26. TROUBLESHOOTING CHARTS. (CONT)
CHART 2-5
No Audio Output Troubleshooting
(Sheet 6 of 8)
REPLACE RECEIVER
SQUELCH AMPLIFIER
MODULE A5200
(PARA 2-44).
PREFORM CARRIER
SQUELCH ADJUSTMENT
(PARA 2-31).
REPLACE RELAY K5502
(PARA 2-44). PERFORM
CARRIER SQUELCH ADJUSTMENT (PARA 2-31).
REPLACE SQUELCH FILTER
MODULE A5300 (PARA 2-44).
PERFORM CARRIER
SQUELCH ADJUSTMENT
(PARA 2-31).
PERFORM AUDIO POWER
OUTPUT AND DISTORTION
TEST (PARA 2-5).
2-77
TM 11-5820-670-30
2-26. TROUBLESHOOTING CHARTS. (CONT)
CHART 2-5
No Audio Output Troubleshooting
2-78
TM 11-5820-670-30
2-26. TROUBLESHOOTING CHARTS. (CONT)
CHART 2-5
No Audio Output Troubleshooting
(Sheet 8 of 8)
2-79
TM 11-5820-670-30
2-26. TROUBLESHOOTING CHARTS. (CONT)
CHART 2-6
Audio Power Troubleshooting
CONNECT EQUIPMENT AS
SHOWN IN AUDIO POWER
OUTPUT PERFORMANCE
TEST (PARA 2-5).
PERFORM AUDIO LEVEL
ADJUSTMENT (PARA 2-30).
PERFORM AUDIO POWER
OUTPUT AND DISTORTION
PERFORMANCE TEST
(PARA 2-5).
SEE TROUBLESHOOTING
CHART 2-5.
2-80
TM 11-5820-670-30
2-26. TROUBLESHOOTING CHARTS. (CONT)
CHART 2-7
Audio Distortion Troubleshooting
(Sheet 1 of 2)
PERFORM AUDIO LEVEL
ADJUSTMENT (PARA 2-30).
THEN PERFORM AUDIO
POWER OUTPUT PERFORMANCE TEST (PARA 2-5).
CHECK DISTORTION AT
TP4007 ON IF. AMPLIFIER
ASSEMBLY. SEE ILLUSTRATION, SH 2.
REPLACE AUDIO AMPLIFIER
MODULE A5400 (PARA 2-44).
ADJUST (PARA 2-30).
REPLACE AUDIO AND
SQUELCH PREAMPLIFIER
MODULE A4300 (PARA 2-41).
PER FORM AUDIO POWER
OUTPUT AND DISTORTION
PERFORMANCE TEST (PARA
7-5).
REPLACE LIMITER AND
DISCRIMINATOR MODULE
A4200 (PARA 2-41).
2-81
TM 11-5820-670-30
2-26. TROUBLESHOOTING CHARTS. (CONT)
CHART 2-7
Audio Distortion Troubleshooting
(Sheet 2 of 2)
EL1AT206
2-82
TM 11-5820-670-30
2-26. TROUBLESHOOTING CHARTS. (CONT)
CHART 2-8
Poor Audio Response Troubleshooting
(Sheet 1 of 2)
CONNECT EQUIPMENT AS
SHOWN IN AUDIO-FREQUENCY RESPONSE
PERFORMANCE TEST (PARA
2-6).
REPLACE AUDIO AND
SQUELCH PREAMPLIFIER
MODULE A4300 (PARA 2-41).
CONNECT THE TS-723B/U TO
TEST POINT TP4007 ON IF.
AMPLIFIER ASSEMBLY
A4000. SEE ILLUSTRATION,
SH 2.
PERFORM AUDIOFREQUENCY RESPONSE AND
FRONT PANEL METER
PERFORMANCE TEST
(PARA 2-6).
REPLACE AUDIO AMPLIFIER
MODULE A5400 (PARA 2-44).
ALINE (PARA 2-30).
CHECK AUDIO RESPONSE AT
TP5513 0N ASSEMBLY A5500.
SEE ILLUSTRATION, SH 2.
CHECK AUDIO RESPONSE
AT TP5509 0N A5500. SEE
ILLUSTRATION, SH 2.
REPLACE LOW PASS FILTER
FL5001 (PARA 2-44).
2-83
TM 11-5820-670-30
2-26. TROUBLESHOOTING CHARTS. (CONT)
CHART 2-8
Poor Audio Response Troubleshooting
(Sheet 2 of 2)
EL1AT206
EL1AT197
2-84
TM 11-5820-670-30
2-26. TROUBLESHOOTING CHARTS. (CONT)
CHART 2-9
Poor Sensitivity Troubleshooting
(Sheet 1 of 2)
PERFORM RECEIVER
SENSITIVITY ADJUSTMENT
(PARA 2-35).
DISCONNECT P4901 FROM
J4901 ON IF. ATTENUATOR
A4900. CONNECT THE AN/
URM-103 OUTPUT TO J4901.
SEE ILLUSTRATION, SH 2.
REPEAT RECEIVER SENSITIVITY, QUIETING AND
LIMITING PERFORMANCE
TEST (PARA 2-7).
ALINE VHF TUNER
ASSEMBLY A1000 (PARA
2-35).
DISCONNECT P4902 FROM
J4902 ON IF. ATTENUATOR
WITH AN/URM-103 SET TO
11.5 MHz, 0.8 µV, 8 KHz
DEVIATION, CONNECT
OUTPUT TO P4902. SEE
ILLUSTRATION, SH 2.
REPLACE IF. ATTENUATOR
A4900 (PARA 2-61).
REPLACE VHF TUNER
ASSEMBLY A1000 MODULES
A1100 THRU A1500 (PARA
2-52).
SEE TROUBLESHOOTING
CHART 2-5.
2-85
TM 11-5820-670-30
2-26. TROUBLESHOOTING CHARTS. (CONT)
CHART 2-9
Poor Sensitivity Troubleshooting
(Sheet 2 of 2)
2-86
I
I
TM 11-5820-670-30
2-26. TROUBLESHOOTING CHARTS. (CONT)
CHART 2-10
Maximum Signal Plus Noise-to-Noise Ratio Troubleshooting
CONNECT EQUIPMENT AS
SHOWN IN MAXIMUM SIGNAL PERFORMANCE TEST
(PARA 2-8).
REMOVE AUDIO AND
SQUELCH PREAMPLIFIER
MODULE A4300 (PARA 2-41).
INSTALL A NEW MODULE
A4300 (PARA 2-41).
REMOVE SQUELCH AMPLIFIER MODULE A5200 (PARA
2-44).
PERFORM MAXIMUM SIGNAL PLUS NOISE-TO-NOISE
RATlO PERFORMANCE TEST
(PARA 2-8).
PERFORM ALINIMENTS
(PARA 2-31 AND 2-33).
REPLACE RECEIVER AUDIO
AMPLIFIER MODULE A5400
(PARA 2-44).
INSTALL ANEW SQUELCH
AMPLIFIER MODULE
A5200 (PARA 2-44).
ALINE MODULE A5400
(PARA 2-30).
2-87
TM 11-5820-670-30
2-26. TROUBLESHOOTING CHARTS. (CONT)
CHART 2-11
Carrier Squelch Sensitivity Troubleshooting
PERFORM CARRIER
SQUELCH ADJUSTMENT
(PARA 2-31).
PERFORM CARRIER
SQUELCH SENSITIVITY
PERFORMANCE TEST
(PARA 2-9).
REPLACE RECEIVER
SQUELCH AMPLIFIER
MODULE
A5200 (PARA 2-44)
REPLACE RELAY K5502
(PARA 2-44) AND ADJUST
(PARA 2-31).
PERFORM CARRIER
SQUELCH ADJUSTMENT
(PARA 2-31).
PERFORM CARRIER
SQUELCH SENSITIVITY PERFORMANCE TEST (PARA 2-9).
2-88
REPLACE SQUELCH FILTER
MODULE A5300 (PARA 2-44)
TM 11-5820-670-30
2-26. TROUBLESHOOTING CHARTS. (CONT)
CHART 2-12
Tone Squelch Sensitivity Troubleshooting
(Sheet 1 of 2)
NOTES
1. After replacing each unit, perform Tone
Squelch Sensitivity Test (para 2-10) and if
trouble is not corrected, replace units in sequence listed in flow chart.
2. If replacing module A5200, adjust in accordance with paragraph 2-33, then do Performance
Test (para 2-10).
PER FORM TONE SQUELCH
ADJUSTMENT (PARA 2-33).
CHECK FOR CONTINUITY
BETWEEN PINS A1 AND A2
OF RELAY K5505. SEE
ILLUSTRATION, SH 2.
PERFORM TONE SQUELCH
SENSITIVITY PERFORMANCE TEST (PARA 2-10).
REPLACE RELAYS K5501
AND K5505 (PARA 2-44).
2-89
TM 11-5820-670-30
2-26. TROUBLESHOOTING CHARTS. (CONT)
CHART 2-12
Tone Squelch Sensitivity Troubleshooting
(Sheet 2 of 2)
EL1AT207
2-90
TM 11-5820-670-30
2-26. TROUBLESHOOTING CHARTS. (CONT)
CHART 2-13
Transmitter Power Output (HI) Troubleshooting
(Sheet 1 of 3)
NOTES
Frequency should be within ± 350 KHz of the
control unit setting from 30.00 to 52.95 MHz
and within ± 450 KHz for frequencies at 53.00
to 75.95 MHz.
CONNECT EQUIPMENT AS
SHOWN IN TRANSMITTER
POWER OUTPUT PERFORMANCE TEST (PARA 2-11).
EL1AT208
REPLACE MODULE A6300
ON A6000 ASSEMBLY
(PARA 2-48).
PERFORM TRANSMITTER
POWER OUTPUT PERFORMANCE TEST (PARA 2-11).
2-91
TM 11-5820-670-30
2-26. TROUBLESHOOTING CHARTS. (CONT)
CHART 2-13
Transmitter Power Output (HI) Troubleshooting
(Sheet 2 of 3)
REPLACE MODULE A6400
ON A6000 ASSEMBLY (PARA
248).
PERFORM TRANSMITTER
POWER OUTPUT PERFORMANCE TEST (PARA 2-11).
EL1AT209
LOCATE OPEN CIRCUIT
AND REPAIR, SEE FO-12.
IF HI-LO SWITCH IS DEFECTIVE, REPLACE (PARA
2-57).
PERFORM TRANSMITTER
POWER OUTPUT PERFORMANCE TEST (PARA 2-11).
2-92
PERFORM TRANSMITTER
POWER OUTPUT PERFORMANCE TEST (PARA 2-11).
TM 11-5820-670-30
2-26. TROUBLESHOOTING CHARTS. (CONT)
CHART 2-13
Transmitter Power Output (HI) Troubleshooting
(Sheet 3 of 3)
ALINE A6500 (PARA 2-28).
REPLACE RF AMPLIFIER
ASSEMBLY A6500 (PARA
2-58).
PERFORM TRANSMITTER
POWER OUTPUT PERFORMANCE TEST (PARA 2-11).
ALINE MODULE A6500
(PARA 2-28).
2-93
TM 11-5820-670-30
2-26. TROUBLESHOOTING CHARTS. (CONT)
CHART 2-14
Transmitter Power Output (LO) Troubleshooting
CONNECT EQUIPMENT AS
SHOWN IN TRANSMITTER
POWER OUTPUT PERFORMANCE TEST (PARA 2-117).
EL1AT209
LOCATE DEFECTIVE CIRCUIT AND REPAIR. SEE FO12. IF HI-LO SWITCH IS
DEFECTIVE, REPLACE
(PARA 2-57).
2-94
PERFORM TRANSMITTER
POWER OUTPUT PER FORMANCE TEST (PARA 2-11).
TM 11-5820-670-30
2-26. TROUBLESHOOTING CHARTS. (CONT)
CHART 2-15
Transmitter Tone Modulation Troubleshooting
(Sheet 1 of 2)
CONNECT EQUIPMENT AS
SHOWN IN TRANSMITTER
TONE MODULATION PERFORMANCE TEST (PARA
2-12).
PER FORM TEST PROCEDURE OF TRANSMITTER
DEVIATION NARROW BAND
PERFORMANCE TEST.
(PARA 2-13).
PLACE TRANSMIT SWITCH
ON TEST SET TO ON. CHECK
DC VOLTAGE AT TP8706.
SEE ILLUSTRATION, SH 2.
PERFORM 150 Hz TONE
MODULATION FREQUENCY
AND DEVIATION ADJUSTMENT (PARA 2-32).
PERFORM TRANSMITTER
TONE MODULATION PERFORMANCE TEST (PARA
2-12).
SET TRANSMIT SWITCH ON
TEST SET TO ON. CHECK
AC VOLTAGE AT TP8707.
SEE ILLUSTRATION, SH 2.
PERFORM TONE SQUELCH
SENSITIVITY TEST (PARA
2-10).
REPLACE AUDIO MIXER
MOOULE A8600 (PARA 2-45).
REFER TO TROUBLESHOOTING CHART 2-12.
PERFORM TRANSMITTER
TONE MODULATION PERFORMANCE TEST (PARA
2-12).
REPLACE RELAY K5501
(PARA 2-44).
2-95
TM 11-5820-670-30
2-26. TROUBLESHOOTING CHARTS. (CONT)
CHART 2-15
Transmitter Tone Modulation Troubleshooting
(Sheet 2 of 2)
REPLACE 11.5 MHz MODULATOR MODULE A8100
(PARA 2-45).
PERFORM TRANSMITTER
TONE MODULATION PERFORMANCE TEST (PARA
2-12).
2-96
CHECK +16 VDC DISTRIBUTION AND REPAIR SEE
FO-11.
REPLACE AUDIO MIXER
A8600 (PARA 2-45).
TM 11-5820-670-30
2-26. TROUBLESHOOTING CHARTS. (CONT)
CHART 2-16
Transmitter Deviation Narrow Band Troubleshooting
(Sheet 1 of 2)
CONNECT EQUIPMENT AS
SHOWN IN TRANSMITTER
DEVIATION NARROW BAND
PERFORMANCE TEST (PARA
2-13).
PERFORM TRANSMITTER
TONE MODULATION PERFORMANCE TEST (PARA
2-12).
PERFORM NARROW BAND
DEVIATION ADJUSTMENT
(PARA 2-34).
PERFORM DEVIATION
NARROW BAND PERFORMANCE TEST (PARA 2-13).
REFER TO TROUBLESHOOTING CHART 2-15.
CHECK FOR CONTINUITY
BETWEEN CONNECTOR
P8701, PIN 7, AND PB601,
PIN 6. SEE ILLUSTRATION,
SH 2.
REPAIR FAULTY WIRE OR
REPLACE RELAY K9601
(PARA 2-66).
CHECK AC VOLTAGE AT
TP8704. SEE ILLUSTRATION, SH 2.
REPLACE 11.5 MHz MODULATOR MODULE A8100
(PARA 245).
PERFORM DEVIATION
NARROW BAND PERFORMANCE TEST (PARA 2-13).
REPLACE AUDIO MIXER
MODULE A8600 (PARA 2-45).
2-97
TM 11-5820-670-30
2-26. TROUBLESHOOTING CHARTS. (CONT)
CHART 2-16
Transmitter Deviation Narrow Band Troubleshooting
(Sheet 2 of 2)
2-98
TM 11-5820-670-30
2-26. TROUBLESHOOTING CHARTS. (CONT)
CHART 2-17
Transmitter Distortion Narrow Band Troubleshooting
(Sheet 1 of 2)
CONNECT EQUIPMENT
AS SHOWN IN DISTORTION
NARROW BAND PER FORMANCE TEST (PARA 2-14).
CHECK DC VOLTAGE AT
TP8701. SEE ILLUSTRATION,
SH 2.
CHECK DC VOLTAGE AT
TP8706 ON AMPLIFIER
MODULATOR ASSEMBLY
A8700. SEE ILLUSTRATION,
SH 2.
REPLACE AUDIO MIXER
MODULE A8600 (PARA 2-14).
CHECK +16 VDC DISTRIBU
TION AND REPAIR. SEE
FO-11.
USING AN/URM-145, CHECK
AC VOLTAGE AT TP8704 ON
MODULE A8700. SEE
ILLUSTRATION, SH 2.
PERFORM TRANSMITTER
DISTORTION NARROW
BAND PERFORMANCE TEST
(PARA 2-14).
REPLACE AUDIO MIXER
MODULE A8600 (PARA 2-45)
REPLACE 11.5 MHzMODULATOR MODULE A8100
(PARA 2-45).
2-99
TM 11-5820-670-30
2-26. TROUBLESHOOTING CHARTS. (CONT)
CHART 2-17
Transmitter Distortion Narrow Band Troubleshooting
(Sheet 2 of 2)
2-100
TM 11-5820-670-30
2-26. TROUBLESHOOTING CHARTS. (CONT)
CHART 2-18
Maximum Signal Plus Noise-to-Noise Ratio Troubleshooting
(Sheet 1 of 2)
CONNECT EQUIPMENT AS
SHOWN IN TRANSMITTER
SIGNAL PLUS NOISE-TONOISE RATIO PERFORMANCE TEST (PARA 2-15).
REPLACE 11.5 MHz MODULATOR MODULE A8100
(PARA 2-45).
PERFORM TRANSMITTER
SIGNAL PLUS NOISE-TONOISE RATIO PERFORMANCE TEST (PARA 2-15).
SHORT PIN 6 0F J8701 TO
GROUND. SEE lLLUSTRATION, SH 2.
2-101
TM 11-5820-670-30
2-26. TROUBLESHOOTING CHARTS. (CONT)
CHART 2-18
Maximum Signal Plus Noise-to-Noise Ratio Troubleshooting
(Sheet 2 of 2)
CHECK WIRE BETWEEN
J8701, PIN 6, AND TB9601
PIN 10. IF DEFECTIVE,
REPAIR. SEE ILLUSTRATION AND FO-12.
CHECK WIRING BETWEEN
TB9601, PIN 5, (SEE ILLUSTRATION) AND RELAY
K9606, PIN 5, IF DEFECTIVE,
REPAIR, SEE FO-12.
PERFORM TRANSMITTER
SIGNAL PLUS NOISE-TONOISE RATIO PERFORMANCE TEST (PARA 2-15).
EL1AT217
2-102
TM 11-5820-670-30
2-26. TROUBLESHOOTING CHARTS. (CONT)
CHART 2-19
Transmitter Frequency Stability Troubleshooting
(Sheet 1 of 5)
NOTES
1. Set control unit to frequencies used in Frequency Stability Performance Test (para 2-16).
2. Does the total frequency error at P3301 and
P3701 exceed 3.5 KHz?
CONNECT EQUIPMENT AS
SHOWN IN TRANSMITTER
FREQUENCY STABILITY
PERFORMANCE TEST (PARA
2-16).
3. Is measured frequency more than ± 3.5 KHz
from designated frequency?
SWING OPEN A3000 ASSEMBLY AND DISCONNECT
P3301 FROM J3301. SEE
ILLUSTRATION, SH 4.
CONNECT VOLTMETER AN/
URM-145 TO P701 AND
MEASURE VOLTAGE. SEE
ILLUSTRATION, SH 4.
REPLACE MODULE A2000
(PARA 2-67).
PERFORM TRANSMITTER
FREQUENCY STABILITY
PERFORMANCE TEST (PARA
2-16).
2-103
TM 11-5820-670-30
2-26. TROUBLESHOOTING CHARTS. (CONT)
CHART 2-19
Transmitter Frequency Stability Troubleshooting
(Sheet 2 of 5)
DISCONNECT P3002 FROM
J3002 AND APPLY A
GROUND TO PIN 2 ON THE
VHF TUNER. SEE ILLUSTRATIONS ON SH 4 AND
SH 5.
REPLACE VHF TUNER
OSCILLATOR BOARD
ASSEMBLY A1500 (PARA
2-52).
ALINE MODULE A1500
(PARA 2-36).
PERFORM TRANSMITTER
FREQUENCY STABILITY
PERFORMANCE TEST (PARA
2-16).
CHECK RESISTANCE TO
GROUND AT TP3001. SEE
ILLUSTRATION, SH 5.
2-104
CHECK RELAY K3001 AND
WIRING. SEE F0-12
REPLACE IF DEFECTIVE.
TM 11-5820-670-30
2-26. TROUBLESHOOTING CHARTS. (CONT)
CHART 2-19
Transmitter Frequency Stability Troubleshooting
(Sheet 3 of 5)
REPLACE CRYSTAL REFERENCE SYSTEM ASSEMBLY
A3000 (PARA 2-43).
PEFORM TRANSMITTER
FREQUENCY STABILITY
PEFORMANCE TEST
(PARA 2-16).
INJECT THE FREQUENCIES
LISTED IN TABLE A AT A
250 MILLIVOLT LEVEL.
MEASURE OUTPUT AT
TP3001. SEE ILLUSTRATION
SH 5.
IF DC VOLTAGES ARE NOT
OBTAINED AS SHOWN IN
TABE A, REPLACE ASSEMBLY A3000 (PARA 2-43).
TABLE A
FREQUENCY
(MHz)
42.050
42.250
42.350
42.450
41.500
41.600
41.700
41.900
OUTPUT
VDC
-2.4 TO - .4
-2.5 TO -2.0
-1.8 TO 1.2
-0.70 TO - .40
-0.15 TO + 0.15
+0.95 TO 1.45
+1.5 TO 2.5
+1.4 TO 2.4
2-105
TM 11-5820-670-30
2-26. TROUBLESHOOTING CHARTS. (CONT)
CHART 2-19
Transmitter Frequency Stability Troubleshooting
(Sheet 4 of 5)
TABLE B
Last two
digits of
freq sel
00
05
10
15
20
25
30
35
40
45
50
55
60
65
70
75
80
85
90
95
2-106
Interpolation osc
Xtal
Y2006
Y2007
Y2007
Y2008
Y2008
Y2009
Y2009
Y2010
Y2010
Y2005
Y2005
Y2004
Y2004
Y2003
Y2003
Y2002
Y2002
Y2001
Y2001
Y2006
Freq (MHz)
46.850
46.950
46.950
47.050
47.050
47.150
47.150
47.250
47.250
47.350
47.350
47.450
47.450
47.550
47.550
47.650
47.650
47.750
47.750
46.850
Reference osc
Xtal
Y2012
Y2011
Y2012
Y2011
Y2012
Y2011
Y2012
Y2011
Y2012
Y2011
Y2012
Y2011
Y2012
Y2011
Y2012
Y2011
Y2012
Y2011
Y2012
Y2012
Freq (MHz)
5.65
5.60
5.65
5.60
5.65
5.60
5.65
5.60
5.65
5.60
5.65
5.60
5.65
5.60
5.65
5.60
5.65
5.60
5.65
5.65
TM 11-5820-670-30
2-26. TROUBLESHOOTING CHARTS. (CONT)
CHART 2-19
Transmitter Frequency Stability Troubleshooting
(Sheet 5 of 5)
EL1AT221
2-107
TM 11-5820-670-30
2-26. TROUBLESHOOTING CHARTS. (CONT)
CHART 2-20
Automatic Frequency Selection and Channel Changing Tone Troubleshooting
CONNECT EQUIPMENT AS
SHOWN IN PERFORMANCE
TEST IN PARA 2-17.
CHECK RELAY K9605 AND
WIRING. SEE FO-12.
REPLACE GEARBOX
ASSEMBLY A9700 (PARA
2-71).
DO PERFORMANCE TEST
IN PARA 2-17.
2-108
ALINE A9700 (PARA 2-29).
REPLACE MODULE A5400
(PARA 2-44).
TM 11-5820-670-30
2-26. TROUBLESHOOTING CHARTS. (CONT)
CHART 2-21
Transmitter Sidetone Troubleshooting
CONNECT EQUIPMENT AS
SHOWN IN TRANSMITTER
SIDETONE PERFORMANCE
TEST (PARA 2-18).
PERFORM TRANSMITTER
POWER OUTPUT PERFORMANCE TEST (PARA 2-11).
CHECK WIRING BETWEEN
REFLECTOMETER AND
SIDETONE DETECTOR Z4502,
PIN 4, CONNECTOR P5501,
PIN 17, AND RELAY K5501,
PIN A1. SEE FO-12.
REPAIR WIRING OR, IF
DEFECTIVE REPLACE
RELAY K5501 (PARA 2-44).
REPLACE K5501, REFLECTOMETER, AND SIDETONE
DETECTOR (PARA 2-63) ONE
AT A TIME UNTILL TROUBLE
IS CORRECTED.
PERFORM SIDETONE PERFORMANCE TEST (PARA
2-18).
2-109
TM 11-5820-670-30
2-26. TROUBLESHOOTING CHARTS. (CONT)
CHART 2-22
Homing Flag Indication Troubleshooting
CONNECT EQUIPMENT AS
SHOWN IN HOMING SENSITIVITY PERFORMANCE
TEST (PARA 2-19).
REPLACE SQUELCH RELAY
K5502 (PARA 2-44).
REPLACE SQUELCH AMPLlFIER MODULE A5200 (PARA
2-44).
CHECK FOR CONTINUITY
BETWEEN PINS 5 AND 6 OF
CONNECTOR P5501. SEE
ILLUSTRATION OF P5501,
AND SEE FO-12 FOR PIN
LOCATION.
PERFORM STEPS 1 AND 2 OF
HOMING SENSITIVITY PERFORMANCE TEST (PARA
2-19).
PERFORM HOMING SENSITIVITY PERFORMANCE
TEST (PARA 2-19).
PER FORM STEPS 1 AND 2
OF HOMING SENSITIVITY
TEST (PARA 2-19).
CONTINUE PERFORMANCE
TEST (PARA 2-19).
EL1AT224
2-110
TM 11-5820-670-30
2-26. TROUBLESHOOTING CHARTS. (CONT)
CHART 2-23
Homing Needle Indication Troubleshooting
(Sheet 1 of 3)
CONNECT EQUIPMENT AS
SHOWN IN HOMING SENSITIVITY PERFORMANCE
TEST (PARA 2-19).
CONNECT OSCILLOSCOPE
AN/USM-281A TO TP4809
AND CHECK FOR 1.0 VOLTS
PEAK-TO-PEAK AT 100 Hz.
SEE ILLUSTRATION, SH 3.
CHECK DC VOLTAGE AT
TP4803. SEE ILLUSTRATION,
SH 3.
PERFORM HOMING ADJUSTMENT (PARA 2-37).
CONNECT OSCILLOSCOPE
AN/USM-281A TO TP4501
AND CHECK FOR 1.0 VOLTS
PEAK-TO-PEAK AT 100 Hz.
SEE ILLUSTRATION, SH 3.
REPLACE ASSEMBLY A4800
(PARA 2-40) AND ADJUST
(PARA 2-37).
PERFORM HOMING SENSITIVITY PERFORMANCE
TEST (PARA 2-19).
CHECK AC SIGNAL AT
TP4801. SEE ILLUSTRATION,
SH 3.
REPLACE HOMER-DETECTOR ASSEMBLY A4800
(PARA 2-40) AND ALINE
(PARA 2-37).
REPLACE RF ATTENUATOR
AND DIODE SWITCH Z4501
(PARA 2-62).
2-111
TM 11-5820-670-30
2-26. TROUBLESHOOTING CHARTS. (CONT)
CHART 2-23
Homing Needle Indication Troubleshooting
(Sheet 2 of 3)
CHECK FOR CONTINUITY
BETWEEN TP4809 AND
PIN 9 OF CONNECTOR P4801,
SEE ILLUSTRATION, SH 3
AND FO-12 FOR PIN
LOCATION.
CHECK FOR CONTINUITY
BETWEEN PIN 9 OF
CONNECTOR P4801 AND
TP4501. SEE ILLUSTRATION,
SH 3 AND F0-12.
2-112
ADJUST R2106 FOR A
READING OF +16 VDC. SEE
ILLUSTRATION. IF ADJUSTMENT IS NOT POSSIBLE,
REPLACE A2100 (PARA 2-50).
TM 11-5820-670-30
2-26. TROUBLESHOOTING CHARTS. (CONT)
CHART 2-23
Homing Needle Indication Troubleshooting
(Sheet 3 of 3)
EL1AT225
EL1AT226
2-113
TM 11-5820-670-30
2-26. TROUBLESHOOTING CHARTS. (CONT)
CHART 2-24
Control Unit Troubleshooting
(Sheet 1 of 12)
NOTE
Use the troubleshooting table to isolate and correct faults in the control unit. The
troubleshooting table is used in the following manner.
1. Go to malfunction item number referred to in performance test.
2. Perform test or inspection.
3. If corrective action is taken, repeat performance test.
4. If no corrective action is taken, go to next step.
5. Repeat test procedure. Do all steps in sequence.
MALFUNCTION
TEST OR INSPECTION
CORRECTIVE ACTION
1. Control panel lamps do not light.
No test.
Replace panel light assembly (para 2-76).
2. Wrong indication on test meter ( + 27.5 vdc applied),
Check continuity between main connector J9101 pins E, D, and C and J9101 pins e, f,
and F. (See FO-13.)
Repair wiring or replace MODE SWITCH S9105 (para 2-81).
3. Blower motor does not run.
Check continuity between main connector J9101 pins q and v. (See FO-13.)
Repair wiring or replace MODE SWITCH S9105 (para 2-81).
4. Absence of 27.5 vdc at TP4504.
Check continuity between pins C, D, E, and DD of main connector J9101. (See FO-13.)
Repair wiring or replace MODE SWITCH S9105 (para 2-81).
2-114
TM 11-5820-670-30
2-26. TROUBLESHOOTING CHARTS. (CONT)
CHART 2-24
Control Unit Troubleshooting
(Sheet 2 of 12)
MALFUNCTION
TEST OR INSPECTION
CORRECTIVE ACTION
5. Speaker noise present/not present (SQUELCH switch at CARR).
Check for short circuit between main connector J9101 pin V and ground. (See FO-13.)
Replace switch S9106 (para 2-78).
6. Speaker noise not present (SQUELCH switch at DIS).
Check for infinite resistance between main connector J9101 pin V and ground. (See
FO-13.)
Repair wiring or replace S9105 (para 2-81) or squelch switch S9106
(para 2-78).
7. Gearbox kHz indicator does not track with frequency selected.
Check continuity of the kHz tuning control lines to ground. (See table
and FO-21.) Also see resistance tables sh 4.
on sh 9, FO-13
Repair wiring or replace frequency selector switches S9103 (para 2-80)
or S9104 (para 2-80).
8. Gearbox MHz indicator does not track with frequency selected.
Check continuity of the MHz tuning control lines to ground. (See table
and FO-21.) Also see resistance tables sh 4.
on sh 11, FO-13
Repair wiring or replace frequency selector switches S9101 (para 2-83)
or S9104 (para 2-80).
9. Antenna coupler simulator test failure.
Check continuity of the MHz tuning control lines to ground. (See table
FO-13 and FO-21.) Also see resistance tables sh 4.
on sh 10,
Repair wiring or replace frequency selector switches S9101 (para 2-83)
or S9102 (para 2-84).
2-115
TM 11-5820-670-30
2-26. TROUBLESHOOTING CHARTS. (CONT)
CHART 2-24
Control Unit Troubleshooting
(Sheet 3 of 12)
MALFUNCTION
TEST OR INSPECTION
Corrective ACTION
10. Gearbox BAND SWITCH does not activate at 53 MHz.
Check continuity between main connector J9101 pin J and ground. (See FO-13.)
Repair wiring or replace frequency selector switches S9101 (para 2-83)
or S9102 (para 2-64).
2-116
TM 11-5820-670-30
2-26. TROUBLESHOOTING CHARTS. (CONT)
CHART 2-24
Control Unit Troubleshooting
(Sheet 4 of 12)
CONTROL UNIT RESISTANCE TABLES
The charts in this section list resistance readings that should be observed at each pin of J9101 for each
control position. All measurements are made with the ME-26D/U. Resistances are in ohms. VOL
control R9103 is set fully clockwise; all other switches are set as indicated.
MODE SWITCH at OFF, SQUELCH switch at DIS, and frequency selectors at 30.00.
FROM PIN
TO PIN
m,BB,LL,J,j,L,z,g,R,S,T,X,
FF,HH,MM,NN,t,s,q,v,u,JJ,
PP,y,x,w,d,c,B,A,a,Y,E,D,C
GG
KK
e
f
b
b
V,k,cc,G,M,AA,H,P,U
All other pins
DD
N
f
F
Ground
Z
Ground
RESISTANCE
Inf
27 k
163 (VOL fully clockwise)
0
0
0
0
0
MODE SWITCH at OFF and SQUELCH switch at CARR or TONE.
FROM PIN
V
Z,b
Y,C,D,E,a,A,B,C,d,w,x,y,
PP,JJ,u,v,q,s,t,NN,MM,
HH,FF,X
GG
KK
e
f
TO PIN
RESISTANCE
Ground
Ground
Inf
0
All other pins
DD
N
f
F
Inf
27 k
163 (VOL fully clockwise)
0
0
2-117
TM 11-5820-670-30
2-26. TROUBLESHOOTING CHARTS. (CONT)
CHART 2-24
Control Unit Troubleshooting
(Sheet 5 of 12)
MODE SWITCH at T/R, SEQUELCH switch at DIS.
FROM PIN
X,FF,HH,MM,NN,t,s,u,
PP,w,C,a,A,Y
GG
q
JJ
y
d
e,f,F
b,Z,V
RESISTANCE
TO PIN
All other pins
DD
v
N
x
KK,B
E,D,C
Ground
Inf
27 k
0
0 (VOL fully clockwise)
0
0
0
0
MODE SWITCH at T/R, SQUELCH switch at CARR.
FROM PIN
V
Y,X,FF,HH,MM,NN,t,s,
u,PP,w,c,A,b,Z
b,Z
GG
q
JJ
y
d
e,f,F
TO PIN
RESISTANCE
Ground
Inf
All other plns
Ground
DD
v
N
x
KK,B
E,D,C
Inf
0
27 k
0
0 (VOL fully clockwise)
0
0
0
MODE SWITCH at T/R, SQUELCH switch at TONE.
FROM PIN
X
GG
FF,HH,MM,NN,t,s,PP,
w,c,A,a,Y,V
q
JJ
y
d
e,f,F
b,Z
2-118
TO PIN
RESISTANCE
Ground
DD
0
27 k
All other pins
v
N
x
KK,B
E,D,C
Ground
Inf
0
0 (VOL fully clockwise)
0
0
0
0
TM 11-5820-670-30
2-26. TROUBLESHOOTING CHARTS. (CONT)
CHART 2-24
Control Unit Troubleshooting
(Sheet 6 of 12)
MODE SWITCH at RETRAN, SQUELCH switch at DIS.
FROM PIN
X,FF,HH,MM,NN,t,s,a,Y
GG
q
v
JJ
PP
KK
w
KK
y
x
JJ
e,f,F
b,Z,v
TO PIN
All other pins
DD
v
u
N
KK
B
KK
d
x
c
A
E,D,C
Ground
RESISTANCE
Inf
27 k
0
0
0 (VOL fully clockwise)
0
0
0
0
0
510
0
0
0
MODE SWITCH at RETRAN, SQUELCH switch at CARR.
FROM PIN
X,FF,MM,NN,t,s,V
KK
GG
HH
q
v
JJ
PP
y
x
w
KK
PP
JJ
e,f,F
b,z
TO PIN
All other pins
N
DD
Y
v
u
N
KK
x
c
KK
d
B
A
E,D,C
Ground
RESISTANCE
Inf
163 (VOL fully clockwise)
27 k
0
0
0
0 (VOL fully clockwise)
0
0
510
0
0
0
0
0
0
2-119
TM 11-5820-670-30
2-26. TROUBLESHOOTING CHARTS. (CONT)
CHART 2-24
Control Unit Troubleshooting
(Sheet 7 of 12)
MODE SWITCH at RETRAN, SQUELCH switch at TONE.
FROM PIN
x
GG
FF,MM,NN,t,s,a,V
HH
q
v
JJ
PP
y
w
e,f,F
x
b,Z
TO PIN
Ground
DD
All other pins
Y
v
u
N
KK,B
x
KK,d
E,D,C
c
Ground
RESISTANCE
0
27 k
Inf
0
0
0
0 (VOL fully clockwise)
0
0
0
0
510
0
MODE SWITCH at HOME, SQUELCH switch at DIS.
FROM PIN
X,FF,HH,u,PP,w,c,Y
GG
DD
e,f,F
MM
t
q
JJ
JJ
JJ
y
d
b,Z,v
2-120
TO PIN
All other pins
DD
e,f,F
DD,E,D,C
NN
s
47v
N
A
KK
x
KK,B
Ground
RESISTANCE
Inf
27 k
Inf
0
0
0
0
0 (VOL fully clockwise)
0
163 (VOL fully clockwise)
0
0
0
TM 11-5820-670-30
2-26. TROUBLESHOOTING CHARTS. (CONT)
CHART 2-24
Control Unit Troubleshooting
(Sheet 8 of 12)
MODE SWITCH at HOME, SQUELCH switch at CARR.
FROM PIN
X,HH,PP,U,A,w,a,V,c
GG
DD
e,f,F
FF
MM
t
q
JJ
y
d
b,Z
TO PIN
All other pins
DD
e,f,F
DD,E,D,C
Y
NN
s
v
N
x
KK,B
Ground
RESISTANCE
Inf
27 k
Inf
0
0
0
0
0
0 (VOL fully clockwise)
0
0
0
MODE SWITCH at HOME, SQUELCH switch at TONE.
FROM PIN
HH,U,PP,w,c,A,V,a
GG
FF
MM
t
q
JJ
JJ
y
d
DD
e,f,F
b,Z,x
TO PIN
All other pins
DD
Y
NN
s
v
N
KK
x
KK,B
e,f,F
DD,E,C
Ground
RESISTANCE
Inf
27 k
0
0
0
0
0 (VOL fully clockwise)
163 (VOL fully clockwise)
0
0
Inf
0
0
2-121
TM 11-5820-670-30
2-26. TROUBLESHOOTING CHARTS. (CONT)
CHART 2-24
Control Unit Troubleshooting
(Sheet 9 of 12)
FREQUENCY SELECTION CODE TABLES
The tables in this section indicate the pins of J9101 that are grounded and the pins that are not
grounded for each setting of the frequency selector switches. The grounded pins are indicated by zero
resistance in the tables, and the ungrounded pins by INF (infinite) resistance. Pin G is grounded for
all frequency settings from 30.00 to 52.00 MHz, pin J is grounded for all settings from 53.00 to 75.00
MHz, pin H is grounded for all settings from 30.00 to 49.00 MHz, and pin g is grounded for all settings
from 50.00 to 75.00 MHz.
TABLE
Resistance Measurements for KC Tuning Control Lines
RESISTANCE TO GROUND FOR
CONNECTOR J9101 PIN N NUMBER
LAST TWO DIGITS OF
FREQUENCY SELECTED
00
05
10
15
20
25
30
35
40
45
50
55
60
65
70
75
80
85
90
95
2-122
P
R
S
T
U
0
INF
INF
INF
INF
0
0
INF
INF
0
0
0
INF
0
0
0
0
INF
INF
INF
INF
0
INF
INF
INF
INF
0
0
INF
INF
0
0
0
INF
0
0
0
0
INF
INF
INF
INF
0
INF
INF
INF
INF
0
0
INF
INF
0
0
0
INF
0
0
0
0
INF
INF
INF
INF
0
INF
INF
INF
INF
0
0
INF
INF
0
0
0
INF
0
0
0
0
0
INF
INF
INF
0
INF
INF
INF
INF
0
0
INF
INF
0
0
0
INF
0
0
0
TM 11-5820-670-30
2-26. TROUBLESHOOTING CHARTS. (CONT)
CHART 2-24
Control Unit Troubleshooting
(Sheet 10 of 12)
TABLE
Resistance Measurements for Antenna Coupler MC Tuning Control Lines
RESISTANCE TO GROUND FOR CONNECTOR
J9101 PIN NUMBER
FREQUENCY
SELECTED
(MHz)
30
31
32
33
34
35
36
37
38
39
40
41
42
43
44
45
46
47
48
49
50
51
52
53
54
55
56
57
58
59
60
M
L
j
z
AA
H
g
0
INF
INF
INF
INF
0
0
INF
INF
0
0
0
INF
0
0
0
0
INF
INF
INF
0
INF
INF
INF
INF
0
0
INF
INF
0
0
INF
0
INF
INF
INF
INF
0
0
INF
INF
0
0
0
INF
0
0
0
0
INF
INF
INF
0
INF
INF
INF
INF
0
0
INF
INF
0
INF
INF
0
INF
INF
INF
INF
0
0
INF
INF
0
0
0
INF
0
0
0
0
INF
INF
INF
0
INF
INF
INF
INF
0
0
INF
INF
INF
INF
INF
0
INF
INF
INF
INF
0
0
INF
INF
0
0
0
INF
0
0
0
0
INF
INF
INF
0
INF
INF
INF
INF
0
0
INF
0
INF
INF
INF
0
INF
INF
INF
INF
0
0
INF
INF
0
0
0
INF
0
0
0
0
INF
INF
INF
0
INF
INF
INF
INF
0
0
0
0
0
0
0
0
0
0
0
0
0
0
0
0
0
0
0
0
0
0
INF
INF
INF
INF
INF
INF
INF
INF
INF
INF
INF
INF
INF
INF
INF
INF
INF
INF
INF
INF
INF
INF
INF
INF
INF
INF
INF
INF
INF
INF
INF
0
0
0
0
0
0
0
0
0
0
0
2-123
TM 11-5820-670-30
2-26. TROUBLESHOOTING CHARTS. (CONT)
CHART 2-24
Control Unit Troubleshooting
(Sheet 11 of 12)
TABLE
(CONT)
RESISTANCE TO GROUND FOR CONNECTOR
J9101 PIN NUMBER
FREQUENCY
SELECTED
(MHz)
61
62
63
64
65
66
67
66
69
70
71
72
73
74
75
M
L
j
z
AA
H
g
0
INF
0
0
0
0
INF
INF
INF
INF
INF
INF
INF
INF
INF
0
0
INF
0
0
0
0
INF
INF
INF
INF
INF
INF
INF
INF
0
0
0
INF
0
0
0
0
INF
INF
INF
INF
INF
INF
INF
INF
0
0
0
INF
0
0
0
0
0
0
0
0
0
0
INF
INF
0
0
0
INF
0
0
0
0
0
0
0
0
0
INF
INF
INF
INF
INF
INF
INF
INF
INF
INF
INF
INF
INF
INF
INF
0
0
0
0
0
0
0
0
0
0
0
0
0
0
0
TABLE
Resistance Measurements for MC Tuning Control Lines
RESISTANCE TO GROUND FOR CONNECTOR
J9101 PIN NUMBER
FREQUENCY
SELECTED
(MHz)
30
31
32
33
34
35
36
37
36
39
2-124
k
m
BB
LL
CC
G
J
0
INF
INF
0
0
INF
0
0
0
INF
INF
0
INF
INF
0
0
INF
0
0
0
INF
INF
0
INF
INF
0
0
INF
0
0
INF
INF
INF
0
INF
INF
0
0
INF
0
0
INF
0
0
0
0
0
0
0
0
0
0
0
0
0
0
0
0
0
0
INF
INF
INF
INF
INF
INF
INF
INF
INF
INF
TM 11-5820-670-30
2-26. TROUBLESHOOTING CHARTS. (CONT)
CHART 2-24
Control Unit Troubleshooting
(Sheet 12 of 12)
RESISTANCE TO GROUND FOR CONNECTOR
J9101 PIN NUMBER
FREQUENCY
SELECTED
(MHz)
40
41
42
43
44
45
46
47
48
49
50
51
52
53
54
55
56
57
58
59
60
61
62
63
64
65
66
67
68
69
70
71
72
73
74
75
k
m
BB
LL
CC
G
J
INF
INF
0
INF
INF
0
0
INF
0
0
0
INF
INF
0
INF
INF
0
0
INF
0
0
0
INF
INF
INF
0
INF
INF
0
0
INF
0
0
0
INF
INF
INF
INF
INF
0
INF
INF
0
0
INF
0
0
0
INF
INF
0
INF
INF
0
0
INF
0
0
0
INF
INF
INF
0
INF
INF
0
0
INF
0
0
0
INF
0
INF
INF
INF
0
INF
INF
0
0
INF
0
0
0
INF
INF
0
INF
INF
0
0
INF
0
0
0
INF
INF
INF
0
INF
INF
0
0
INF
0
0
0
0
0
INF
INF
INF
0
INF
INF
0
0
INF
0
0
INF
INF
INF
0
INF
INF
0
0
INF
0
0
0
INF
INF
INF
0
INF
INF
0
0
INF
0
0
0
0
INF
INF
INF
INF
INF
INF
INF
INF
INF
INF
INF
0
0
0
0
0
0
0
0
0
0
0
0
INF
INF
INF
INF
INF
INF
INF
INF
INF
INF
INF
0
0
0
0
0
0
0
0
0
0
0
0
0
INF
INF
INF
INF
INF
INF
INF
INF
INF
INF
INF
INF
INF
INF
INF
INF
INF
INF
INF
INF
INF
INF
INF
INF
INF
INF
INF
INF
INF
INF
INF
INF
INF
INF
INF
INF
0
0
0
0
0
0
0
0
0
0
0
0
0
0
0
0
0
0
0
0
0
0
0
2-125
TM 11-5820-670-30
Section IV ALINEMENT AND ADJUSTMENT PROCEDURES
Subject
General . . . . . . . . . . . . . . . . . . . . . . . . . . . . . . . . . . . . . . . . . . . . . . . . . . . . . . . . . . . . . . . . . . . . . . . . . . . . . . . . . . . . . . . . . . . . .
Rf Amplifier Assembly A6500 Alinement . . . . . . . . . . . . . . . . . . . . . . . . . . . . . . . . . . . . . . . . . . . . . . . . .
Gearbox Assembly A9700 Alinement . . . . . . . . . . . . . . . . . . . . . . . . . . . . . . . . . . . . . . . . . . . . . . . . . . . . . . . . .
Audio Level Adjustment . . . . . . . . . . . . . . . . . . . . . . . . . . . . . . . . . . . . . . . . . . . . . . . . . . . . . . . . . . . . . . . . . . . . . . . .
Carrier Squelch Adjustment . . . . . . . . . . . . . . . . . . . . . . . . . . . . . . . . . . . . . . . . . . . . . . . . . . . . . . . . . . . . . . . . . . . .
150 Hz Tone Modulation Frequency and Deviation Adjustment . . . . . . . . . . . . . . . . . . . . . . . .
Tone Squelch Adjustment . . . . . . . . . . . . . . . . . . . . . . . . . . . . . . . . . . . . . . . . . . . . . . . . . . . . . . . . . . . . . . . . . . . . .
Narrow Band Deviation Adjustment . . . . . . . . . . . . . . . . . . . . . . . . . . . . . . . . . . . . . . . . . . . . . . . . . . . . . . . . . .
Receiver Sensitivity Adjustments . . . . . . . . . . . . . . . . . . . . . . . . . . . . . . . . . . . . . . . . . . . . . . . . . . . . . . . . . . . . .
Local Oscillator Alinement . . . . . . . . . . . . . . . . . . . . . . . . . . . . . . . . . . . . . . . . . . . . . . . . . . . . . . . . . . . . . . . . . . . . . . .
Homing Adjustment . . . . . . . . . . . . . . . . . . . . . . . . . . . . . . . . . . . . . . . . . . . . . . . . . . . . . . . . . . . . . . . . . . . . . . . . . . . . . .
Para
Page
2-27
2-28
2-29
2-30
2-31
2-32
2-33
2-34
2-35
2-36
2-37
2-126
2-127
2-130
2-132
2-134
2-136
2-138
2-140
2-142
2-146
2-148
2-27. GENERAL.
This section contains alinement instructions for use with Maintenance Kit MK-1035/ARC-131 and
TMDE (discrete test equipment). The instructions are presented in individual procedures which apply
to a specific stage of the rt receiver or transmitter section.
Each procedure is self-contained; that is, all necessary instructions are provided without reference to
any previously performed alinement. Therefore, it is possible to use the procedures in this section to
aline an individual module without doing any work on other stages in the radio.
However, this maintenance approach is not recommended. It is best to perform a complete realinement of all modules after replacing an individual module. This should be done even if the radio has
undergone its annual realinement less than one year prior to the repair.
Careful performance of all the instructions contained in the alinement procedures ensures that the
radio will meet all performance standards outlined in section I of this chapter. Although the radio may
seem to work satisfactorily if other quick-fix methods are used, there is no guarantee that such
methods will result in proper performance when the radio is used along with secure equipment, or for
other than voice communication.
2-126
TM 11-5820-670-30
2-28. RF AMPLIFIER ASSEMBLY A6500 ALINEMENT.
TEST EQUIPMENT AND MATERIALS
Maintenance Kit MK-1035/ARC-131
Multimeter AN/USM-223
Power Supply PP-2953/U
Receiver-Transmitter AN/ARC-131 (known to be operating properly)
Wattmeter AN/URM-120
All cables are part of MK-1035/ARC
TEST SETUP
Connect equipment as shown in test setup diagram. Turn on all equipment and allow at least 5 minutes
for warmup.
NOTE
Install rf amplifier assembly to be alined in a known good receiver-transmitter.
EL1AT228
2-127
TM 11-5820-670-30
2-28. RF AMPLIFIER ASSEMBLY A6500 ALINEMENT. (CONT)
INITIAL EQUIPMENT CONTROL SETTINGS
Set equipment controls as indicated in the following table.
CONTROL AND SWITCH SETTINGS
EQUIPMENT
CONTROL OR SWITCH
POSITION/SETTING
CONTROL UNIT
Mode Selector
SQUELCH
FREQ sel
T/R
DIS
65.00 MHz
TS-2575/ARC-131
HI/LO
AGC switch
HI
OFF
ALINEMENT PROCEDURE
NOTE
During alinement, maintain at least 12 to 15 watts output power. Rf amplifier is activated
by switching TRANSMIT switch on test set to ON.
EL1AT229
2-128
TM 11-5820-670-30
2-28. RF AMPLIFIER ASSEMBLY A6500 ALINEMENT. (CONT)
1. Place the TRANSMIT switch on test set to ON position.
2. Adjust C6512 for minimum dc current as monitored at TP101 (+) and TP102 (-) on test set.
3. Adjust C6504 for maximum power output.
CAUTION
When adjusting the variable inductors in the following steps, be careful not to overadjust
as small tuning cores may drop through bottom of inductor.
4. Set frequency selectors on control unit to 53.00 MHz.
5. Adjust L6510 for minimum dc currents as monitored at TP101 (+) and TP102 (-) on test set.
6. Adjust L6503 for maximum power output.
7. Set frequency selectors on control unit to 75.90 MHz.
8. Adjust L6511 for minimum dc current as monitored on power supply current meter.
9. Adjust L6505 for maximum power output.
10. Check to ensure following output levels can be obtained at specified frequencies.
FREQUENCY
OUTPUT
75.90 MHz
65.00 MHz
53.00 MHz
15 watts
18 watts
18 watts
11.
Observe that dc input current does not exceed 2.5 amperes for 15 watts output at 53,65,
and 75.90 MHz.
12. Set frequency selectors on control unit to 42.00 MHz.
13. Adjust variable capacitor C6514 for minimum dc current as monitored on power supply current
meter.
14. Adjust variable capacitor C6511 for maximum power output.
15. Set frequency selectors on control unit to 30.00 MHz.
16. Adjust variable capacitor C6514 for minimum dc current as monitored on power supply current
meter.
17. Set frequency selectors on control unit to 52.90 MHz.
18. Adjust variable capacitor C6514 for minimum dc current as monitored on power supply current
meter.
19. Set frequency selectors on control unit to 52.90 MHz.
20. Adjust L6512 for minimum dc current as monitored on power supply current meter.
21. Adjust L6508 for maximum power output.
22. Check to ensure following output levels can be obtained at the specified frequencies.
FREQUENCY
OUTPUT
52.90 MHz
42.00 MHz
30.00 MHz
18 watts
18 watts
16 watts
2-129
TM 11-5820-670-30
2-29. GEARBOX ASSEMBLY A9700 ALINEMENT.
TEST EQUIPMENT AND MATERIALS
Maintenance Kit MK-1035/ARC-131
Power Supply PP-2953/U
TEST SETUP
Connect equipment as shown in test setup diagram. Turn on equipment and allow 5 minutes for
warmup.
ALINEMENT PROCEDURE
1. Place test set +28 vdc ON-OFF switch to ON, and adjust power supply output for +27.5 vdc.
2. Place test set +28 vdc ON-OFF switch to OFF, and power supply power switch to OFF.
3. Remove vhf tuner A1000 (para 2-68), oscillator buffer A6000 (para 2-89), and rf oscillator
assembly A2000 (para 2-70) from gearbox.
4. Place test set +28 vdc ON-OFF switch to ON, and power supply power switch to ON.
5. Set control unit frequency selectors to 53.00 MHz and allow gearbox to cycle.
6. Place test set +28 VDC ON-OFF switch to OFF.
2-130
TM 11-5820-670-30
2-29. GEARBOX ASSEMBLY A9700 ALINEMENT. (CONT)
7. Using hex wrench, loosen setscrews on all three coupling collars.
8. Install coupler alinement tool, TL-758/ARC-131 on all couplers.
9. Move couplers to allow coupler alinement tool to drop into coupler slot.
10. Using hex wrench, tighten all setscrews.
11. Remove coupler alinement tool.
12. Install modules removed in step 3.
2-131
TM 11-5820-670-30
2-30. AUDIO LEVEL ADJUSTMENT.
TEST EQUIPMENT AND MATERIALS
Maintenance Kit MK-1035/ARC-131
Signal Generator AN/URM-103
Signal Generator AN/URM-127
Spectrum Analyzer TS-723 A/U
Fuseholder MX-1730/U
Power Supply PP-2953/U
All cables are part of MK-1035/ARC
TEST SETUP
Connect equipment as shown in test setup diagram. Turn on all equipment and allow at least 5 minutes
for warmup.
EL1AT141
INITIAL EQUIPMENT CONTROL SETTINGS
Set equipment controls as indicated in the following table.
2-132
TM 11-5820-670-30
2-30. AUDIO LEVEL ADJUSTMENT. (CONT)
CONTROL AND SWITCH SETTINGS
EQUIPMENT
CONTROL OR SWITCH
POSITION/SETTING
TS-2575/ARC-131
Mode Switch
VOL
SQUELCH
FREQ sel
T/R
fully clockwise
DIS
60.05
AN/URM-127
amplitude control
output frequency
0
1000 Hz
AN/URM-103
Function selector
output
EXT MOD
10 microvolt
ADJUSTMENT PROCEDURE
1.
2.
3.
4.
Adjust AN/URM-127 for 8 kHz deviation as indicated on AN/URM-103 modulation meter.
Set TS-723A/U function switch to METER.
Tune AN/URM-103 frequency to 60.05 MHz as indicated on TS-723 A/U meter.
On the A4000 assembly, using screwdriver, remove screw on module A4300 cover and remove
cover.
EL1AT238
5.
6.
7.
Monitor voltage at TP5512 on audiofrequency amplifier assembly using multimeter ME-26B/U,
while adjusting R4304 on A4300 module to provide a 0.775 volt indication.
Install cover on module A4300.
On A5500 assembly, adjust potentiometer R5405 on module A5400 for a reading of 2.8 volts
on TS-723A/U meter connected at Hl-LO jack J107 on TS-2575/ARC-131.
2-133
TM 11-5820-670-30
2-31. CARRIER SQUELCH ADJUSTMENT.
TEST EQUIPMENT AND MATERIALS
Maintenance Kit MK-1035/ARC-131
Signal Generator AN/URM-103
Signal Generator AN/URM-127
Fuseholder MX-1730/U
Power Supply PP-2953/U
Spectrum Analyzer TS-723A/U
All cables are part of MK-1035/ARC
TEST SETUP
Connect equipment as shown in test setup diagram. Turn on all equipment and allow at least 5 minutes
for warmup.
EL1AT141
2-134
TM 11-5820-670-30
2-31. CARRIER SQUELCH ADJUSTMENT. (CONT)
ADJUSTMENT PROCEDURE
1. On TS-2575/ARC-131, place the +28 VDC ON – OFF switch to ON.
EL1AT239
2.
3.
4.
5.
6.
7.
8.
9.
10.
11.
12.
13.
Set carrier squelch potentiometer R5216 on A5500 assembly fully clockwise.
Set RT-823/ARC-131 SQ ADJ control fully clockwise.
Set control unit mode switch to T/R. VOL control fully clockwise, SQUELCH switch to DIS,
and frequency selectors to 60.05 MHz.
Set AN/URM-127 amplitude control to 0 and adjust output frequency to 1000 Hz.
Set AN/URM-103 FUNCTION selector switch to EXT MOD and adjust output for 10 microvolt.
Adjust AN/URM-127 for 8 kHz deviation as indicated on AN/URM-103 meter.
Set TS-723A/U function switch to METER and tune AN/URM-103 frequency to 60.05 MHz as
indicated by maximum indication on TS-723A/U meter.
Set control unit SQUELCH switch to CARR.
Reduce AN/URM-103 rf output to minimum, then slowly increase output to a point where
squelch just breaks.
If receiver-transmitter breaks squelch at an input of more than 0.7 microvolt, rotate
R5216 on A5500 assembly counterclockwise so that squelch breaks at 0.55 microvolt.
Remove AN/URM-103 input to receiver-transmitter, rotate SQ ADJ control fully counterclockwise, and ensure unit is unsquelched.
Rotate SQ ADJ control clockwise until receiver-transmitter just squelches.
2-135
TM 11-5820-670-30
2-32. 150 Hz TONE MODULATION FREQUENCY AND DEVIATION ADJUSTMENT.
TEST EQUIPMENT AND MATERIALS
Maintenance Kit MK-1035/ARC-131
Electronic Counter Digital Readout AN/USM-207
Modulation Meter ME-57/U
Power Supply PP-2953/U
All cables are part of MK-1035/ARC
TEST SETUP
Connect equipment as shown in test setup diagram. Turn on all equipment and allow at least 5 minutes
for warmup.
EL1AT148
ADJUSTMENT PROCEDURE
1. Place +28 VDC ON-OFF switch on TS-2575/ARC-131 to ON.
2. Place XMTR HI-LO switch on receiver-transmitter to LO.
3. Set WIDE BAND - NARROW BAND switch on TS-2575/ARC-131 to NARROW BAND.
4. Set control unit mode switch to T/R, VOL control fully clockwise, SQUELCH switch to
TONE, and frequency selectors to 80.05 MHz.
5. Set RF AMP ALIGN HI-LO switch on TS-2575/ARC-131 to LO.
2-136
TM 11-5820-670-30
2-32. 150 Hz TONE MODULATION FREQUENCY AND DEVIATION ADJUSTMENT. (CONT)
EL1AT242
6. Adjust potentiometer R8609 on module A8600 fully clockwise.
7. Place TRANSMIT switch on test set to ON.
EL1AT239
8. Adjust R5301 on A5500 assembly for 150 ± 2 Hz indication on frequency meter
AN/USM-207.
9. Adjust potentiometer R8609 on module A8600 for 3 kHz deviation as indicated on deviation
meter.
2-137
TM 11-5820-670-30
2-33. TONE SQUELCH ADJUSTMENT.
TEST EQUIPMENT AND MATERIALS
Maintenance Kit MK-1035/ARC-131
Signal Generator AN/URM-103
Signal Generator AN/URM-127
Power Supply PP-2953/U
Fuseholder MX-1730/U
All cables are part of MK-1035/ARC
TEST SETUP
Connect equipment as shown in test setup diagram. Turn on all equipment and allow at least 5 minutes
warmup.
NOTE
Ensure control unit C-7088/ARC-131 installed in test set has a jumper wire connected
between E3 and E4 of switch rear mounting bracket marked TONE, before performing
TONE squelch adjustments.
EL1AT240
2-138
TM 11-5820-670-30
2-33. TONE SQUELCH ADJUSTMENT. (CONT)
ADJUSTMENT PROCEDURE
Place +28 VDC ON-OFF switch on test set to ON.
Set control unit mode switch to T/R, VOL control fully clockwise, SQUELCH switch to TONE,
and frequency selectors to 60.05 MHz.
3. Set Signal Generator AN/URM-127 amplitude control to 0, and adjust output frequency to
150 Hz.
Set
Signal Generator AN/URM-103 FUNCTION selector switch to EXT MOD, and adjust for a 10
4.
microvolt output at 60.05 MHz.
5. Adjust Signal Generator AN/URM-127 for 3 kHz deviation as indicated on AN/URM-103 modulation meter.
1.
2.
EL1AT239
6. Adjust potentiometer R5217, on A5500 assembly, so receiver-transmitter just unsquelches.
2-139
TM 11-5820-670-30
2-34. NARROW BAND DEVIATION ADJUSTMENT.
TEST EQUIPMENT AND MATERIALS
Maintenance Kit MK-1035/ARC-131
Modulation Meter ME-57/U
Signal Generator AN/URM-127
Voltmeter ME-30E/U
Power Supply PP-2953/U
All cables are part of MK-1035/ARC
TEST SETUP
Connect equipment as shown in test setup diagram. Turn on all equipment and allow at least 5 minutes
for warmup.
EL1AT241
2-140
TM 11-5820-670-30
2-34. NARROW BAND DEVIATION ADJUSTMENT. (CONT)
INITIAL EQUIPMENT CONTROL SETTINGS
Set equipment controls as indicated in the following table.
CONTROL AND SWITCH SETTINGS
POSITION/SETTING
EQUIPMENT
CONTROL OR SWITCH
TS-2575/ARC-131
MODE SWITCH
VOL
SQUELCH switch
FREQ sel
WIDE BAND-NAR BAND
TRANSMIT switch
T/R
fully clockwise
DIS
60.05 MHz
WIDE BAND
OFF
AN/URM-127
OUTPUT FREQUENCY
AMPLITUDE CONTROL
1000 Hz
0.39 volt as observed on
ME-30E/U
ADJUSTMENT PROCEDURE
1. Set TS-2575/ARC-131 TRANSMIT switch to ON.
EL1AT242
2. Adjust potentiometer R8605, on module A8600, to provide 8 kHz deviation as indicated on
deviation meter.
2-141
TM 11-5820-670-30
RECEIVER SENSITIVITY ADJUSTMENTS.
TEST EQUIPMENT AND MATERIALS
Maintenance Kit MK-1035/ARC-131
Signal Generator AN/URM-103
Oscilloscope AN/USM-281A
Power Supply PP-2953/U
Fuseholder MX-1730/U
Spectrum Analyzer TS-723A/U.
All cables are part of MK-103/ARC
TEST SETUP
Connect equipment as shown in test setup diagram. Turn on all equipment and allow at least 5 minutes
for warmup.
EL1AT243
ADJUSTMENT PROCEDURE
1. Set control unit C-7088/ARC-131 mode switch on test set to OFF.
2. Remove cover from A1000 VHF TUNER (para 2-68).
3. Set control unit SQUELCH switch to DIS, mode switch to T/R, and frequency selectors to
30.00 MHz.
4. Set signal generator AN/URM-103 to 30.00 MHz with 8 kHz deviation and 1000 Hz modulation.
5. Lower rf attenuator of signal generator until signal drops off. If sine wave on oscilloscope
and audio voltage on distortion analyzer drop off with considerable static before 0.5 microvolt,
perform steps 6, 7, and 8.
2-142
TM 11-5820-670-30
2-35. RECEIVER SENSITIVITY ADJUSTMENTS. (CONT)
EL1AT244
6. Using board extractor, remove A1100 module from its mount. Inspect A-B board switch for a
broken post. If post is broken, replace module. Clean contacts by rubbing with a pencil
eraser. Ensure grounding posts are in direct contact with A1000 can.
CAUTION
If post on A-B board switch does not fit in fork, the post will be broken the first time band
switch actuator changes position, and receiver will not work.
7. Position band switch so post will fit into fork on band switch actuator, then reinstall
module.
8. Repeat steps 6 and 7 for A1200 module, then A1300 module, taking care to insert post into
fork in band switch actuator when reinstalling each module.
2-143
TM 11-5820-670-30
2-35. RECEIVER SENSITIVITY ADJUSTMENTS. (CONT)
ADJUSTMENT PROCEDURE (CONT)
9. Repeat step 5, and if signal still drops off, run signal generator up and down band to
determine if local oscillator is off frequency. This can be determined by hearing an audio
signal at a frequency other than 30 MHz. If this proves to be the case, perform local oscillator alinement (para 2-36), then repeat step 5. If signal drops off prior to 0.5 microvolt,
perform steps 10 through 14.
EL1AT245
10. With a small jeweler’s screwdriver, adjust the 30 MHz variable capacitors on the A1100,
A1200, and A1300 modules for a peak in either sine wave or audio signal spectrum analyzer.
When a clear or maximum signal is obtained, lower rf attenuator of signal generator and
continue adjusting until no further improvement can be made.
11. Change frequency to 53.00 MHz and repeat step 10, tuning 53.00 MHz coils with a nonmetallic
alinement tool.
12. Change frequency to 52.00 MHz and repeat step 10, tuning 42.00 and 52.00 MHz coils with a
nonmetallic alinement tool.
2-144
TM 11-5820-670-30
2-35. RECEIVER SENSITIVITY ADJUSTMENTS. (CONT)
13. Change frequency to 75.00 MHz and repeat step 10, tuning 65.00 and 75.00 MHz coils using
a nonmetallic alinement tool.
14. With frequency at 75.00 MHz, repeat step 10, tuning the 65.00 and 75.00 MHz capacitors
using a small jeweler’s screwdriver.
15. If tests are still unsuccessful, substitute boards as necessary and repeat alinement procedures,
or refer radio to higher level of maintenance.
EL1AT246
16. If a distorted signal is observed, perform steps 17 through 23.
17. Attach CG-3376/U from J107 on test set to INPUT of oscilloscope.
18. Connect test set to RT-823/ARC-131 with J117.
19. Use CG-3370/U to connect Signal Generator AN/URM-103 (LO-RF) to test set at J112.
20. Set control unit and signal generator to corresponding frequencies.
21. Set control unit mode switch to T/R.
22. Using screwdriver, unscrew if. amplifier board A4000 and lift up to gain access to two variable
coils on the side.
23. With a nonmetallic alinement tool, adjust the two coils while observing signal on oscilloscope. Adjust slowly and observe signal to adjust its symmetry.
2-145
TM 11-5820-670-30
2-36. LOCAL OSCILLATOR ALINEMENT.
TEST EQUIPMENT AND MATERIALS
Maintenance Kit MK-1035/ARC-131
Power Supply PP-2953/U
Frequency Meter AN/USM-207
T-Connector
All cables are part of MK-1035/ARC
TEST SETUP
Connect equipment as shown in test setup diagram. Turn on all equipment and allow at least 5 minutes
for warmup.
EL1AT247
ALINEMENT PROCEDURE
1. Set control unit mode switch to T/R.
2. When RT-823/ARC-131 is on a frequency range of 30.00 to 52.95 MHz, frequency counter will
read that frequency plus 11.5 MHz. When RT-823/ARC-131 is on a frequency range from 53.00
to 75.95 MHz, the frequency counter will read that frequency minus 11.5 MHz. See the following
table.
2-146
TM 11-5820-670-30
2-36. LOCAL OSCILLATOR ALINEMENT. (CONT)
CONTROL UNIT
FREQUENCY (MHz)
A BAND
B BAND
30.00
42.00
52.00
53.00
65.00
75.00
FREQUENCY COUNTER
READOUT (MHz)
41.50 ± 0.002
53.50 ± 0.002
63.50 ± 0.002
3. If frequency reading is not within tolerances of table, perform the following adjustments.
4. Remove J1004 from- P1004 on receiver-transmitter. This removes lock-in.
5. At 30.00 MHz, adjust L1502 until reading on frequency counter is 41.50 ± 0.002 MHz.
Switch to 42.00 MHz and adjust C1501 until frequency counter reading is 53.50 ± 0.002
MHz. Switch to 52.00 and adjust L1501 until frequency counter reading is 63.50 ± 0.002 MHz.
6. Replace J1004 and check frequencies. It maybe necessary to repeat step 5 a few times since
components affect each other.
2-147
TM 11-5820-670-30
2-37. HOMING ADJUSTMENT.
TEST EQUIPMENT AND MATERIALS
Maintenance Kit MK-1035/ARC-131
Signal Generator AN/URM-103
Power Signal PP-2953/U
Fuseholder MX-1730/U
All cables are part of MK-1035/ARC
TEST SETUP
Connect equipment as shown in test setup diagram. Turn on all equipment and allow at least 5 minutes
for warmup.
ADJUSTMENT PROCEDURE
1. Set control unit mode switch to HOME, SQUELCH switch to CARR, and frequency selectors to
31.00 MHz.
2. Set test set LEFT and RIGHT HOMER ATTEN to 0 db.
3. Tune signal generator to 31.00 MHz and adjust LO-HI RF SET TO LINE control for minimum
output.
2-148
TM 11-5820-670-30
2-37. HOMING ADJUSTMENT. (CONT)
EL1AT249
4.
Adjust vertical needle adjust potentiometer R4805, located on homer-detector amplifier
assembly for a center-scale indication on homing indicator.
5. Vary signal generator output from minimum signal to 10 microvolt. Flags on homing indicator
should disappear when signal generator output is 1.2 microvolt or less; vertical needle
should stay centered ( ± 1/8 inch).
6. Set signal generator output to 35 microvolt and adjust horizontal needle potentiometer R4830,
located on homer-detector amplifier assembly, so homing indicator horizontal needle is
1/8 inch below center of indicator.
7. Adjust signal generator output for 10 microvolt. Set test set LEFT HOMER ATTEN to 3 db, and
adjust center course sensitivity potentiometer R4826 so homing indicator vertical needle
deflects right of center one-half of full scale.
8. Set RIGHT HOMER ATTEN to 3 db and LEFT HOMER ATTEN to 0 db. Repeat step 7 and ensure
homing indicator vertical needle deflects left of center one-half of full scale.
2-149
TM 11-5820-670-30
Section V REPAIR AND REPLACEMENT PROCEDURES
Subject
Para
Page
General . . . . . . . . . . . . . . . . . . . . . . . . . . . . . . . . . . . . . . . . . . . . . . . . . . . . . . . . . . . . . . . . . . . . . . . . . . . . . . . . . . . . . . . . . . . . 2-38
2-151
Receiver-Transmitter, RT-823/ARC-131
RT Case Replacement . . . . . . . . . . . . . . . . . . . . . . . . . . . . . . . . . . . . . . . . . . . . . . . . . . . . . . . . . . . . . . . . . . . . . . . . .
Homing Module A4800 Replacement . . . . . . . . . . . . . . . . . . . . . . . . . . . . . . . . . . . . . . . . . . . . . . . . . . . . . .
A4000 Modules and Assembly Replacement . . . . . . . . . . . . . . . . . . . . . . . . . . . . . . . . . . . . . . . . . . . . .
A9500 Assembly Replacement . . . . . . . . . . . . . . . . . . . . . . . . . . . . . . . . . . . . . . . . . . . . . . . . . . . . . . . . . . . .
A3000 Modules and Assembly Replacement . . . . . . . . . . . . . . . . . . . . . . . . . . . . . . . . . . . . . . . . . . .
A5500 Modules and Assembly Replacement . . . . . . . . . . . . . . . . . . . . . . . . . . . . . . . . . . . . . . . . . .
A8700 Modules and Assembly Replacement . . . . . . . . . . . . . . . . . . . . . . . . . . . . . . . . . . . . . . . . . .
A6600 Assembly Replacement . . . . . . . . . . . . . . . . . . . . . . . . . . . . . . . . . . . . . . . . . . . . . . . . . . . . . . . . . . . . . .
Power Supply Circuit Card Replacement . . . . . . . . . . . . . . . . . . . . . . . . . . . . . . . . . . . . . . . . . . . . . . .
A6300 and A6400 Module Replacement . . . . . . . . . . . . . . . . . . . . . . . . . . . . . . . . . . . . . . . . . . . . . . . . . . . .
A4500 Assembly Replacement . . . . . . . . . . . . . . . . . . . . . . . . . . . . . . . . . . . . . . . . . . . . . . . . . . . . . . . . . . . . . .
A2100 Assembly Replacement . . . . . . . . . . . . . . . . . . . . . . . . . . . . . . . . . . . . . . . . . . . . . . . . . . . . . . . . . . . . .
Front Panel Replacement . . . . . . . . . . . . . . . . . . . . . . . . . . . . . . . . . . . . . . . . . . . . . . . . . . . . . . . . . . . . . . . . . . . .
A1100 Through A1500 Module Replacement . . . . . . . . . . . . . . . . . . . . . . . . . . . . . . . . . . . . . . . . . . . . . .
TEST METER M9601 Replacement . . . . . . . . . . . . . . . . . . . . . . . . . . . . . . . . . . . . . . . . . . . . . . . . . . . . . . . .
SQ DIS Switch S9802 and XMTR TEST Switch S9803 Replacement . . . . . . . . . . . . . . . . . . . .
TEST SWITCH S9801 Replacement . . . . . . . . . . . . . . . . . . . . . . . . . . . . . . . . . . . . . . . . . . . . . . . . . . . . . . .
SQ ADJ Switch R9802 Replacement . . . . . . . . . . . . . . . . . . . . . . . . . . . . . . . . . . . . . . . . . . . . . . .
XMTR HI-LO Switch S9604 Replacement . . . . . . . . . . . . . . . . . . . . . . . . . . . . . . . . . . . . . . . . . . . . . . . . .
A6500 Assembly Replacement . . . . . . . . . . . . . . . . . . . . . . . . . . . . . . . . . . . . . . . . . . . . . . . . . . . . . . . . . . . . . .
Radio Interference Filter FL9601 Replacement . . . . . . . . . . . . . . . . . . . . . . . . . . . . . . . . . . . . . . . . . .
Transistor Q9801 Replacement . . . . . . . . . . . . . . . . . . . . . . . . . . . . . . . . . . . . . . . . . . . . . . . . . . . . . . . . . . . .
A4900 Assembly Replacement . . . . . . . . . . . . . . . . . . . . . . . . . . . . . . . . . . . . . . . . . . . . . . . . . . . . . . . . . . . . .
RF Attenuator and Diode Switch Z4501 Replacement . . . . . . . . . . . . . . . . . . . . . . . . . . . . . . . . . .
Reflectometer and Sidetone Detector Z4502 Replacement . . . . . . . . . . . . . . . . . . . . . . . .
Low-Pass Filter FL4501 Replacement . . . . . . . . . . . . . . . . . . . . . . . . . . . . . . . . . . . . . . . . . . . . . . . . . . . . .
Relays K4501 Through K4504 Replacement . . . . . . . . . . . . . . . . . . . . . . . . . . . . . . . . . . . . . . . . . . . .
Relays K9601 Through K9808 Replacement . . . . . . . . . . . . . . . . . . . . . . . . . . . . . . . . . . . . . . . . . . . . .
A1000, A2000, A8000, and A9700 Assembly Replacement . . . . . . . . . . . . . . . . . . . . . . . . . . . . . .
A1000 Assembly Replacement . . . . . . . . . . . . . . . . . . . . . . . . . . . . . . . . . . . . . . . . . . . . . . . . . . . . . . . . . . . . .
A6000 Assembly Replacement . . . . . . . . . . . . . . . . . . . . . . . . . . . . . . . . . . . . . . . . . . . . . . . . . . . . . . . . . . . . .
A2000 Assembly Replacement . . . . . . . . . . . . . . . . . . . . . . . . . . . . . . . . . . . . . . . . . . . . . . . . . . . . . . . . . . . . . . .
A9700 Assembly Replacement . . . . . . . . . . . . . . . . . . . . . . . . . . . . . . . . . . . . . . . . . . . . . . . . . . . . . . . . . . .
Relay K3001 Replacement . . . . . . . . . . . . . . . . . . . . . . . . . . . . . . . . . . . . . . . . . . . . . . . . . . . . . . . . . . . . . . . . .
A1800 Assembly Replacement . . . . . . . . . . . . . . . . . . . . . . . . . . . . . . . . . . . . . . . . . . . . . . . . . . . . . . . . . . . . .
2-152
2-153
2-154
2-159
2-160
2-186
2-172
2-177
2-178
2-180
2-182
2-184
2-185
2-186
2-189
2-190
2-192
2-194
2-195
2-198
2-198
2-200
2-202
2-203
2-204
2-205
2-206
2-207
2-208
2-214
2-216
2-218
2-219
2-220
2-221
2-150
2-39
2-40
2-41
2-42
2-43
2-44
2-45
2-46
2-47
2-48
2-49
2-50
2-51
2-52
2-53
2-54
2-55
2-56
2-57
2-58
2-59
2-60
2-61
2-62
2-63
2-64
2-65
2-66
2-67
2-68
2-69
2-70
2-71
2-72
2-73
TM 11-5820-670-30
Subject
Control Unit C-7088/ARC-131
Front Panel Knobs Replacement . . . . . . . . . . . . . . . . . . . . . . . . . . . . . . . . . . . . . . . . . . . . . . . . . . . . . . . . .
Front Panel Dial Mask Replacement . . . . . . . . . . . . . . . . . . . . . . . . . . . . . . . . . . . . . . . . . . . . . . . . . . . . . . .
Light Panel Replacement . . . . . . . . . . . . . . . . . . . . . . . . . . . . . . . . . . . . . . . . . . . . . . . . . . . . . . . . . . . . . . . . . . .
Switch and Wiring Assembly Replacement . . . . . . . . . . . . . . . . . . . . . . . . . . . . . . . . . . . . . . . . . . . . . .
Squelch Switch S9106 Replacement . . . . . . . . . . . . . . . . . . . . . . . . . . . . . . . . . . . . . . . . . . . . . . . . . . . . . . . .
Volume Control Switch R9103 Replacement . . . . . . . . . . . . . . . . . . . . . . . . . . . . . . . . . . . . . . . . . . . . .
Tenths Frequency Selector switch S9103 and/or Hundreths
Frequency Selector Switch S9104 Replacement . . . . . . . . . . . . . . . . . . . . . . . . . . . . . . . . . . . .
Mode Switch S9105 Replacement . . . . . . . . . . . . . . . . . . . . . . . . . . . . . . . . . . . . . . . . . . . . . . . . . . . . . . . . . .
Electrical Connector J9101 Replacement . . . . . . . . . . . . . . . . . . . . . . . . . . . . . . . . . . . . . . . . . . . . . . . . .
Tens Frequency Selector Switch S9101 Replacement . . . . . . . . . . . . . . . . . . . . . . . . . . . . . . . .
Units Frequency Selector Switch S9102 Replacement . . . . . . . . . . . . . . . . . . . . . . . . . . . . . . . . . . .
Para
Page
2-74
2-75
2-76
2-77
2-78
2-79
2-222
2-224
2-225
2-226
2-228
2-230
2-80
2-81
2-82
2-83
2-84
2-232
2-234
2-238
2-240
2-244
2-38. GENERAL.
This section provides instructions for general support maintenance of Radio Set AN/ARC-131 and its
components. The following initial setup information applies to all procedures.
Resources required are not listed unless they apply to the particular procedure.
Personnel are listed only if task requires more than one technician.
Normal standard equipment condition to start a maintenance task is power off and disconnected from
power source. Equipment condition is not listed unless some other condition is required.
All soldering will be in accordance with TB SIG 222.
All soldering must be done quickly and where wiring permits, use heat sink pliers to dissipate excessive heat. Use an isolating transfer when only an ac operated soldering iron is available. Do not use a
soldering gun. Do not use a soldering iron rated at over 40 watts because excessive heat may damage
components.
Observe all WARNINGS, CAUTIONS, and NOTES to prevent injury to personnel and damage to
equipment.
Use Tool Kit, Electronic Equipment TK-100/G and Tool Kit, Electronic Equipment TK-105/G for all
procedures unless otherwise specified.
2-151
TM 11-5820-670-30
2-39. RT CASE REPLACEMENT.
MATERIALS/PARTS: Case, receiver-transmitter (P/N SMD619940)
REMOVAL
1. Using screwdriver, loosen two turn-lock fasteners (1).
2. Carefully pull case (2) off chassis.
INSTALLATION
CAUTION
Care must be taken when performing next step to prevent pinching or breaking wires.
1. Install case (2) on chassis.
2. Using screwdriver, tighten two turn-lock fasteners (1).
2-152
TM 11-5820-670-30
2-40. HOMING MODULE A4600 REPLACEMENT.
MATERIALS/PARTS: Module, homing, A4800 (P/N SMD619582)
PRELIMINARY PROCEDURE: Remove case (para 2-39).
EL1AT002
REMOVAL
1. Using screwdriver, loosen two captive screws (1) and lower module (2).
2. Using screwdriver, loosen screw (3) and remove ground strap (4).
3. Using screwdriver, loosen two captive screws (5) and pull P4801 connector (6) free from
J4801 connector (7).
4. Remove C-clip (8) from hinge pin (9), and remove hinge pin from hinge (10).
5. Remove module (2).
INSTALLATION
1. Position module (2) on hinge (10) and install hinge pin (9) and C-clip (8).
2. Install P4801 connector (6) on J4801 connector (7), and tighten two captive screws (5).
3. Position ground strap (4) under screw (3), and using screwdriver, tighten screw (3).
4. Raise module (2) and tighten two captive screws (1).
FOLLOW-ON MAINTENANCE: Install case (para 2-39).
2-153
TM 11-5820-670-30
2-41. A4000 MODULES AND ASSEMBLY REPLACEMENT.
MATERIALS/PARTS: Amplifier assembly, if. A4100 (P/N SMC413726)
Amplifier assembly, if. A4000 (P/N SME619985)
Amplifier, frequency, audio, A4300 (P/N SMB413785)
Discriminator, frequency, electrical, A4200 (P/N SMC413753)
Filter, band-pass, FL4001 (P/N SMD413720)
Filter, band-pass, FL4002 (P/N SMD413719)
PRELIMINARY PROCEDURE: Remove case (para 2-39).
REMOVAL
1. Using screwdriver, loosen two captive screws (1) and swing out assembly (2).
NOTE
Assembly can be removed with or without first removing modules. If assembly is to be
removed without removing modules, proceed to step 6.
Modules A4100 through A4300 are secured with captive screws. Steps 2 and 3 are
typical for all modules.
2. Using screwdriver, loosen captive screws (3).
3. Carefully pull module (4) off board to release from pins. Do not twist from side to side.
CAUTION
Care must be taken when performing next step to prevent damaging test points on printed
circuit board.
2-154
TM 11-5820-670-30
2-41. A4000 MODULES AND ASSEMBLY REPLACEMENT. (CONT)
NOTE
Modules FL4001 and FL4002 are secured with locknuts. Steps 4 and 5 are typical for both
modules.
Note position of FL4002 module for 50 kHz or WIDE BAND operation mode.
4. Using wrench, remove locknuts (5) and IT Iockwashers (6).
5. Carefully pull module (7) off board.
6. Using screwdriver, loosen two captive screws (8).
7. Carefully lift P4001 (9) off pins (10).
8. Disconnect blue wire (P4902) (11) from J4902.
9. Remove C-clip (12) from hinge pin (13) and remove hinge pin.
10. Remove assembly (2).
INSTALLATION
CAUTION
Before installing assembly, ensure pins (1) are not bent. Straighten any bent pins.
Extreme care must be taken not to damage pins.
1. Position assembly (2) in hinge and install hinge pin (13).
2. Install C-clip (12) on hinge pin (13).
NOTE
If modules were not removed from assembly, proceed to step 7 for installation of
assembly.
2-155
TM 11-5820-670-30
2-41. A4000 MODULES AND ASSEMBLY REPLACEMENT. (CONT)
INSTALLATION (CONT)
NOTE
Before installing FL4002 filter, establish whether a 50 kHz or WIDE BAND operation mode
will be used. The position of FL4002 filter will depend on operation mode selected. See
detail A for 50 KC operation mode and detail B for WIDE BAND operation mode.
NOTE
Modules FL4001 and FL4002 are secured with locknuts. Steps 3 and 4 are typical for both
modules.
Module location is stamped on board.
2-156
TM 11-5820-670-30
2-41. A4000 MODULES AND ASSEMBLY REPLACEMENT. (CONT)
3. Position module (1) on board and install IT Iockwashers (2) and locknuts (3) on studs (4).
CAUTION
Care must be taken when performing next step to prevent damaging printed circuit
board. Do not overtighten.
4. Using wrench, tighten locknuts (3).
CAUTION
Before installing modules, ensure pins are not bent. Straighten any bent pins. Extreme
care must be taken not to damage pins.
NOTE
Modules A4100 through A4300 are secured with captive screws. Steps 5 and 6 are
typical for all modules.
Module location is stamped on board.
5. Position module (5) on pins (6) and push into place.
6. Using screwdriver, tighten captive screws (7).
2-157
TM 11-5820-670-30
2-41. A4000 MODULES AND ASSEMBLY REPLACEMENT. (CONT)
INSTALLATION (CONT)
7. Connect blue wire (P4902) (1) to J4902.
CAUTION
Care must be taken when performing next step to prevent damaging pins on assembly.
8. Position P4001 (2) on pins (3) and push into place.
9. Using screwdriver, tighten two captive screws (4).
10. Swing assembly (5) into position.
11. Using screwdriver, tighten two captive screws (6).
FOLLOW-ON MAINTENANCE: Install case (para 2-39).
2-158
TM 11-5820-670-30
2-42. A9500 ASSEMBLY REPLACEMENT.
MATERIALS/PARTS: Power supply assembly A9500 (P/N SME619765)
PRELIMINARY PROCEDURE: Remove case (para 2-39).
REMOVAL
1. Using screwdriver, remove three shouldered screws (1) and swing open assembly (2).
2. Using screwdriver, loosen two captive screws (3) and pull P9501 (4) free from J9501 (5).
3. Remove C-clip (6) from hinge pin (7).
4. Remove hinge pin (7) from hinge (8) and remove assembly (2).
INSTALLATION
1. Position assembly (2) in hinge (8) and install hinge pin (7).
2. Install C-clip (6) on hinge pin (7).
3. Position P9501 (4) on J9501 (5) and push into place.
4. Using screwdriver, tighten two captive screws (3).
5. Close assembly (2) and install three shouldered screws (1).
6. Using screwdriver, tighten three shouldered screws (1).
FOLLOW-ON MAINTENANCE: Install case (para 2-39).
2-159
TM 11-5820-670-30
2-43. A3000 MODULES AND ASSEMBLY REPLACEMENT.
MATERIALS/PARTS: Amplifier, interfrequency A3400 (P/N SMB413634)
Crystal REF system assembly A3000 (P/N SMD619578)
Discriminator assembly, phase A3700 (P/N SMB413699)
Discriminator, elect. frequency A3600 (P/N SMB413670)
Filter, band-pass FL3003 (P/N SMD413524)
Filter, band-pass FL3004 and FL3005 (P/N SMD413523)
Filter, high-pass FL3002 (P/N SMD413521)
Filter, low-pass FL3001 (P/N SMD413522)
Generator assembly, harmonic A3100 (P/N SMB413559)
Limiter, amplifier A3500 (P/N SMB413650)
Mixer assembly, amplifier A3200 (P/N SMB413592)
Mixer assembly, second A3300 (P/N SMB413611)
PRELIMINARY PROCEDURE: Remove case (para 2-39).
EL1AT010
REMOVAL
NOTE
Position rt upside down on workbench.
1. Using screwdriver, loosen one captive screw (1).
2. Raise assembly (2).
NOTE
Assembly can be removed with or without first removing modules. If assembly is to be
removed without removing modules, proceed to step 10.
2-160
TM 11-5820-670-30
2-43. A3000 MODULES AND ASSEMBLY REPLACEMENT. (CONT)
NOTE
Modules A3100 through A3700 are secured with captive screws. Steps 3, 4, and 5 are
typical for all modules.
3. Disconnect black wire (P3301) (3) from A3300 and red wire (P3701) from A3700 (4).
4. Using screwdriver, loosen captive screws (5).
CAUTION
To prevent damaging pins, do not twist module from side to side.
5. Carefully pull module (6) off board to release from pins.
NOTE
Modules FL3001 through FL3005 are secured with locknuts and are soldered to printed
circuit board. Steps 6 through 9 are typical for all modules.
6. Disconnect green wire (P3002) (7) from FL3002 (8).
7. Using wrench, remove locknuts (9).
Care must be taken when performing next step to prevent damaging printed circuit
board.
8. Using soldering iron, unsolder pins (10) from printed circuit board.
9. Carefully pull module (11) off board.
2-161
TM 11-5820-670-30
2-43. A3000 MODULES AND ASSEMBLY REPLACEMENT. (CONT)
REMOVAL (CONT)
EL1AT012
10. Using screwdriver, loosen two captive screws (1).
11. Carefully pull P3001 (2) off pins (3).
Wires referenced in step 12 are located under assembly.
12. Disconnect black wire (P3301) from A3300 (4), red wire (P3701) from A3700 (5), green wire
(P3002) from FL3002 (6), and all wires from wire clips.
13. Remove hinge pin (7) from hinge (8).
14. Remove assembly (9).
INSTALLATION
CAUTION
Before installing assembly, ensure pins are not bent. Straighten any bent pins. Extreme
care must be taken not to damage pins.
1. Position assembly (9) in hinge (8) and install hinge pin (7).
NOTE
If modules were not removed from assembly, proceed to step 7 for installation of
assembly.
2-162
TM 11-5820-670-30
2-43. A3000 MODULES AND ASSEMBLY REPLACEMENT. (CONT)
NOTE
Modules FL3001 through FL3005 are secured with locknuts and are soldered to printed
circuit board. Steps 2, 3, and 4 are typical for all modules.
Module location is stamped on board.
2. Position module (10) on board and install locknuts (11).
3. Using wrench, tighten locknuts (11).
CAUTION
Care must be taken when performing next step to prevent damaging printed circuit
board.
4. Using soldering iron, solder pins (12) of module to printed circuit board.
2-163
TM 11-5820-670-30
2-43. A3000 MODULES AND ASSEMBLY REPLACEMENT. (CONT)
INSTALLATION (CONT)
CAUTION
Before installing modules, ensure pins are not bent. Straighten any bent pins. Extreme
care must be taken not to damage pins.
Modules A3100 through A3700 are secured with captive screws. Steps 5 and 6 are typical for all modules.
Module location is stamped on board.
5. Carefully position module (1) on pins (2) and push into place.
6. Using screwdriver, tighten captive screws (3).
7. Connect black wire (P3301) (4) to A3300 (5), red wire (P3701) to A3700 (6), green wire
(P3002) (7) to FL3002 (8), and all wires to wire clips.
2-164
TM 11-5820-670-30
2-43. A3000 MODULES AND ASSEMBLY REPLACEMENT. (CONT)
EL1AT015
CAUTION
Extreme care must be taken when performing next step to prevent damaging pins on
assembly.
8.
9.
10.
11.
Carefully position P3001 (9) on pins (10) and push into place.
Using screwdriver, tighten two captive screws (11).
Lower assembly (12) into chassis.
Using screwdriver, tighten one captive screw (13).
FOLLOW-ON MAINTENANCE: Install case (para 2-39).
2-165
TM 11-5820-670-30
2-44. A5500 MODULES AND ASSEMBLY REPLACEMENT.
MATERIALS/PARTS: Amplifier, assembly, radio frequency, A5500 (P/N SMD619527)
Amplifier, assembly, squelch, A5200 (P/N SMC413849)
Filter, assembly, squelch, A5300 (P/N SMB413660)
Filter, audiofrequency, FL5501 (P/N SMC413828)
Receiver, assembly, audio amplifier, A5400 (P/N 715980-801)
Relay, armature, K5501, K5503 through K5505 (P/N SMC413824)
Relay, armature, K5502 (P/N SMC413823)
PRELIMINARY PROCEDURE: Remove case (para 2-39).
REMOVAL
1. Using screwdriver, loosen two captive screws (1) and swing out assembly (2).
2. Using screwdriver, loosen two captive screws (3) and remove P5501 (4).
NOTE
Assembly can be removed with or without first removing modules. If assembly is to be
removed without removing modules, proceed to step 10.
2-166
TM 11-5820-670-30
2-44. A5500 MODULES AND ASSEMBLY REPLACE. (CONT)
EL1AT017
NOTE
Modules A5200 through A5400 are secured with captive screws. Steps 3 and 4 are typical for all modules.
3.
Using screwdriver, loosen captive screws (5).
To prevent damaging pins, do not twist module from side to side.
4.
Carefully pull module (6) off board to release from pins.
NOTE
Filter module FL5001 is secured with locknuts and is solder to printed circuit board.
5.
Using wrench, remove locknuts (7).
CAUTION
Care must be taken when performing next step to prevent damaging printed circuit
board.
6.
7.
Using soldering iron, unsolder pins (8) of module (9) from printed circuit board.
Carefully pull module (9) off board.
2-167
TM 11-5820-670-30
2-44. A5500 MODULES AND ASSEMBLY REPLACEMENT. (CONT)
EL1AT018
EL1AT019
NOTE
Relays K5501 through K5505 are held into sockets by a holddown clamp. Steps 8 and 9
are typical for all relays.
8. Using screwdriver, remove screw (1), Iockwasher (2), and holddown clamp (3).
9. Pull relay (4) out of socket (5).
10. Remove C-clip (6) from hinge pin (7).
11. Remove hinge pin (7) from hinge (8).
12. Remove assembly (9).
2-168
TM 11-5820-670-30
2-44. A5500 MODULES AND ASSEMBLY REPLACEMENT. (CONT)
INSTALLATION
1. Position assembly (9) in hinge (8).
2. Install hinge pin (7) in hinge (8) from bottom.
3. Install C-clip (6) in hinge pin (7).
NOTE
If modules were not removed from assembly, proceed to step 12 for installation of
assembly.
Relays K5501 through K5505 are held into sockets by a holddown clamp. Steps 4, 5, and 6 are typical
for all relays.
Relay K5502 is P/N SMC413823 while all other relays are P/N SMC413824.
4. Aline pins on relay (4) with holes in socket (5) and push into place.
5. Position holddown clamp (3) over relays and install screw (1) and Iockwasher (2).
6. Using screwdriver, tighten screw (1).
EL1AT020
NOTE
Filter module is secured with locknuts and is soldered to printed circuit board.
7. Position module (10) on board and install locknuts (11).
8. Using wrench, tighten locknuts (11).
CAUTION
Care must be taken when performing next step to prevent damaging printed circuit
board.
9. Using soldering iron, solder pins (12) on module (10) to printed circuit board.
2-169
TM 11-5820-670-30
2-44. A5500 MODULES AND ASSEMBLY REPLACEMENT. (CONT)
INSTALLATION (CONT)
EL1AT021
CAUTION
Before installing modules, ensure pins on assembly are not bent. Straighten any bent
pins. Extreme care must be taken not to damage pins.
Modules A5200 through A5400 are secured with captive screws. Steps 10 and 11 are
typical for all modules.
10. Carefully position module (1) on pins (2) and push into place.
11. Using screwdriver, tighten captive screws (3).
2-170
TM 11-5820-670-30
2-44. A5500 MODULES AND ASSEMBLY REPLACEMENT. (CONT)
12.
13.
14.
15.
Position P5501 (4) on pins and push into place.
Using screwdriver, tighten two captive screws (5).
Swing assembly (6) to closed position.
Using screwdriver, tighten two captive screws (7).
FOLLOW-ON MAINTENANCE: Install case (para 2-39).
2-171
TM 11-5820-670-30
2-45. A8700 MODULES AND ASSEMBLY REPLACEMENT.
MATERIALS/PARTS: Amplifier, intermediate frequency, A8300 (P/N SMB414197)
Amplifier modulator assembly, A8700 (P/N SMC819555)
Filter, low-pass (P/N SM-C414172)
Frequency generator, A8400 (P/N SMB374983)
Mixer, audiofrequency, A8800 (P/N SM-C819588)
Modulator assembly, A8100 (P/N SMD414176)
Phase discriminator assembly, A8200 (P/N SMB414215)
PRELIMINARY PROCEDURE: Remove case (para 2-39).
REMOVAL
1. Using screwdriver, loosen two captive screws (1) and raise assembly (2).
2. Disconnect violet wire connector (3) from A8300 assembly (4).
Assembly can be removed with or without first removing modules. If assembly is to be
removed without removing modules, proceed to step 8.
2-172
TM 11-5820-670-30
2-45. A8700 MODULES AND ASSEMBLY REPLACEMENT. (CONT)
Modules A8100 through A8400 and A8600 are secured with captive screws. Steps 3 and
4 are typical for all modules.
3. Using screwdriver, loosen captive screws (5).
CAUTION
To prevent damage to pins, do not twist module from side to side.
4. Carefully pull module (6) off board to release from pins.
NOTE
Filter module is secured with locknuts and is soldered to printed circuit board.
5. Using wrench, remove locknuts (7).
CAUTION
Care must be taken when performing next step to prevent damaging printed circuit
board.
6. Using soldering iron, unsolder pins (8) of module (9) from printed circuit board.
7. Carefully pull module (9) off board.
2-173
TM 11-5820-670-30
2-45. A8700 MODULES AND ASSEMBLY REPLACEMENT. (CONT)
REMOVAL (CONT)
EL1AT025
8. Remove two C-clips (1) from hinge pins (2).
9. Remove two hinge pins (2) from hinges (3).
10. Using screwdriver, loosen two captive screws (4).
11. Carefully lift P8701 (5) off pins (6).
12. Remove assembly (7).
INSTALLATION
CAUTION
Before installing assembly, ensure pins (6) are not bent. Straighten any bent pins.
Extreme care must be taken not to damage pins.
1. Position P8701 (5) on pins (6) and push into place.
2. Using screwdriver, tighten two captive screws (4).
3. Position assembly (7) in hinges (3).
4. Install two hinge pins (2) in hinges (3).
5. Install two C-clips (1) on hinge pins (2).
NOTE
If modules were not removed from assembly, proceed to step 11 for installation of
assembly.
2-174
TM 11-5820-670-30
2-45. A8700 MODULES AND ASSEMBLY REPLACEMENT. (CONT)
NOTE
Filter module is secured with locknuts and is soldered to printed circuit board.
Module location is stamped on board.
6.
7.
Position module (8) on board and install locknuts (9).
Using wrench, tighten locknuts (9).
CAUTION
Care must be taken when performing next step to prevent damaging printed circuit
board.
8.
Using soldering iron, solder pins (10) of module (8) to printed circuit board.
CAUTION
Before installing modules, ensure pins on assembly are not bent. Straighten any bent
pins. Extreme care must be taken not to damage pins.
NOTE
Modules A8100 through A8400 and A8600 are secured with captive screws. Steps 9 and
10 are typical for all modules.
Module location is stamped on board.
9.
10.
Carefully position module (11) on pins (12) and push into place.
Using screwdriver, tighten captive screws (13).
2-175
TM 11-5820-670-30
2-45. A8700 MODULES AND ASSEMBLY REPLACEMENT. (CONT)
INSTALLATION (CONT)
11. Connect violet wire connector (1) to A8300 assembly (2).
12. Lower assembly (3) into chassis.
13. Using screwdriver, tighten two captive screws (4).
NOTE
Ensure handles on hinge pins (5) are down in a horizontal position so case can be
installed.
FOLLOW-ON MAINTENANCE: Install case (para 2-39).
2-176
TM 11-5820-670-30
2-46. A6600 ASSEMBLY REPLACEMENT.
MATERIALS/PARTS: Amplifier assembly, isolation, A6000 (P/N SMD619913)
PRELIMINARY PROCEDURE: Remove case (para 2-39).
REMOVAL
1. Disconnect yellow wire (P6601) (1) from J6601 (2).
2. Using two wrenches, disconnect yellow wire (P6003) (3) from screw connector (4).
3. Using screwdriver, remove two screws (5).
4. Disconnect black wire connector (6) from color-coded plug.
5. Disconnect orange wire connector (7) from color-coded plug.
6. Remove A6600 assembly (8).
INSTALLATION
1. Connect orange wire connector (7) to color-coded plug.
2. Connect black wire connector (6) to color-coded plug.
3. Position A6600 assembly (8) under bracket and install two screws (5).
4. Using screwdriver, tighten two screws (5).
5. Connect yellow wire (P6003) (3) to screw connector (4).
6. Using two wrenches, tighten yellow wire (P6003) (3) and connector (4).
7. Connect yellow wire (P6601) (1) to J6601 (2).
FOLLOW-ON MAINTENANCE: Install case (para 2-39).
2-177
TM 11-5820-670-30
2-47. POWER SUPPLY CIRCUIT CARD REPLACEMENT.
MATERIALS/PARTS: Circuit card assembly (P/N SMD619800)
PRELIMINARY PROCEDURE: Remove case (para 2-39).
REMOVAL
1. Using screwdriver, remove three shouldered screws (1) and swing open assembly (2).
2. Using wrench, remove four locknuts (3) and remove circuit card (4) from studs.
3. Turn circuit card (4) to gain access to wires on rear.
EL1AT030
2-178
TM 11-5820-670-30
2-47. POWER SUPPLY CIRCUIT CARD REPLACEMENT. (CONT)
4. Using soldering iron, unsolder wires as shown in circuit card wiring table below.
CIRCUIT CARD WIRING TABLE
WIRE COLOR
INDEX NO.
WHT/ORG
WHT/RED
BLK
WHT/BLU
WHT
RED
WHT/GRN
5
6
7
8
9
10
11
5. Remove circuit card (4).
INSTALLATION
CAUTION
Care must be taken when performing next step to prevent damaging printed circuit
board.
1. Using soldering iron, solder wires as shown in circuit card wiring table above.
2. Position circuit card (4) on studs and install four locknuts (3).
3. Using wrench, tighten four locknuts (3).
4. Close assembly (2) and install three shouldered screws (1).
5. Using screwdriver, tighten three shouldered screws (1).
FOLLOW-ON MAINTENANCE: Install case (para 2-39).
2-179
TM 11-5820-670-30
2-48. A6300 AND A6400 MODULE REPLACEMENT.
MATERIALS/PARTS: Circuit card assembly, A6300 (P/N SMD374993)
Circuit card assembly, A6400 (P/N SMD374996)
PRELIMINARY PROCEDURE: Remove case (para 2-39).
EL1AT031
NOTE
Modules A6300 and A6400 are housed within the A6000 assembly.
REMOVAL
1. Disconnect gray wire (1) from J6001, brown wire (2) from J6002, and yellow wire (3)
from J6003.
2. Using screwdriver, loosen two captive screws (4) and remove A6000 assembly cover (5).
NOTE
A6000 assembly cover doubles as module puller to remove both modules.
3. Using module puller, carefully remove modules (6).
2-180
TM 11-5820-670-30
2-48. A6300 AND A64Q0 MODULE REPLACEMENT. (CONT)
INSTALLATION
CAUTION
Before installing modules A1100 through A1300, ensure band switch pin (7) on module
(8) is positioned to mate with band switch actuating pawl (9) on A8000 assembly (10).
1. Carefully push modules (11) into place.
NOTE
Ensure spring contacts on modules make contact with partitions between modules.
2. Install A8000 assembly cover (12) on A6000 assembly.
3. Using screwdriver, tighten two captive screws (13).
4. Connect yellow wire (14) to J6003, brown wire (15) to J6002, and gray wire (16) to J6001.
FOLLOW-ON MAINTENANCE: Install case (para 2-39).
2-181
TM 11-5820-670-30
2-49. A4500 ASSEMBLY REPLACEMENT.
MATERIALS/PARTS: Control, radio frequency, A4500 (P/N SMC619709)
PRELIMINARY PROCEDURE: Remove case (para 2-39).
2-182
TM 11-5820-670-30
2-49. A4500 ASSEMBLY REPLACEMENT. (CONT)
REMOVAL
1. Disconnect white wire (P1001) (1) from J1001, violet wire (P1003) (2) from J1003, and green
wire (P1004) (3) from J1004 on A1000 assembly (4).
2. Disconnect orange wire (P4505) (5) from J4505 (6), violet wire (P4503) (7) from J4503 (8),
and brown wire (9) from J4502 (10), on A4500 assembly (11).
3. Remove C-clip (12) from hinge pin (13).
4. Using screwdriver, loosen two captive screws (14) and lower A4500 assembly (11).
NOTE
When performing next step, slide hinge pin back only enough to allow removal of A4500
assembly from hinge.
5. Slide hinge pin back and remove A4500 assembly from hinge.
NOTE
Push hinge pin back into position to prevent it from falling out.
6. Disconnect white wire (P6502) (15) from J6502 (16).
7. Using screwdriver, loosen two captive screws (17) and unplug P4501 (18) from J4501 (19).
8. Remove A4500 assembly (11).
INSTALLATION
1.
2.
3.
4.
5.
6.
7.
8.
9.
Position A4500 assembly (11) near hinge and plug P4501 (18) into J4501 (19).
Using screwdriver, tighten two captive screws (17).
Connect white wire (P6502) (15) to J6502 (16).
Slide hinge pin (13) back just enough to allow installation of A4500 assembly (11).
Install A4500 assembly (11) in hinge and slide hinge pin (13) into place.
Install C-clip (12) and raise A4500 assembly (11) into position.
Using screwdriver, tighten two captive screws (14).
Connect brown wire (9) to J4502 (10), violet wire (P4503) (7) to J4503 (8), and orange wire
(P4505) (5) to J4505 (6) on A4500 assembly.
Connect green wire (P1004) (3) to J1004, violet wire (P1003) (2) to J1003, and white wire
(P1001) (1) to J1001 on A1000 assembly (4).
FOLLOW-ON MAINTENANCE: Install case (para 2-39).
2-183
TM 11-5820-670-30
2-50. A2100 ASSEMBLY REPLACEMENT.
MATERIALS/PARTS: Regulator assembly, voltage, A2100 (P/N SMD41457)
PRELIMINARY PROCEDURE: Remove case (para 2-39).
REMOVAL
1. Using screwdriver, loosen two captive screws (1) and lower A4600 assembly (2).
2. Disconnect nine wire connectors from A2100 assembly (3).
3. Using screwdriver, remove three screws (4) and remove A2100 assembly (3).
INSTALLATION
1. Position A2100 assembly (3) on chassis and install three screws (4).
2. Using screwdriver, tighten three screws (4).
3. Connect nine wire connectors as shown in table below.
POSITION ON
ASSEMBLY
1
2
3
4
5
WIRE COLOR
GRN
WHT/BLU
WHT/GRN
WHT/RED
YEL
INDEX NO.
5
6
7
8
9
4. Raise A6400 assembly (2) into position.
5. Using screwdriver, tighten two captive screws (1).
FOLLOW-ON MAINTENANCE: Install case (para 2-39).
2-164
POSITION ON
ASSEMBLY
6
7
8
9
WIRE COLOR
ORG
WHIT/VIO
WHT/GRY
BLK & BLK
(2 wires)
INDEX NO.
10
11
12
13
TM 11-5820-670-30
2-51. FRONT PANEL REPLACEMENT.
MATERIALS/PARTS: Panel, front
PRELIMINARY PROCEDURE: Remove TEST METER, M9601 (para 2-53).
Remove SQ DIS switch S9602 and XMTR TEST switch S9603
(para 2-54).
REMOVAL
1. Using hex wrench, loosen setscrew (1) and remove TEST SWITCH knob (2).
2. Using wrench, remove two screw fasteners (3), Iockwashers (4), and flat washers (5), and
move J4801 (6) out of way.
3. Remove front paneI (7).
INSTALLATION
1. Position front panel (7) near chassis.
2. Position J4801 (6) on standoffs and install two screw fasteners (3), Iockwashers (4), and flat
washers (5).
3. Using wrench, tighten two screw fasteners (3).
4. Install TEST SWITCH knob (2) and, using hex wrench, tighten setscrew (1).
FOLLOW-ON MAINTENANCE: Install SQ DIS switch, S9602 and XMTR TEST switch, S9603
(para 2-54). Install TEST METER, M9601 (para 2-53).
2-185
TM 11-5820-670-30
2-52. A1100 THROUGH A1500 MODULE REPLACEMENT.
MATERIALS/PARTS: Circuit card assembly, A1100 (P/N SMD 374983)
Circuit card assembly, A1200 (P/N SMD 416370)
Circuit card assembly, A1300 (P/N SMD 374990)
Circuit card assembly, A1400 (P/N SMD 374986)
Circuit card assembly, A1500 (P/N SMD 416384)
PRELIMINARY PROCEDURE: Remove case (para 2-39).
EL1AT038
REMOVAL
NOTE
Modules A1100 through A1500 are housed within the A1000 assembly.
1. Using screwdriver, loosen four captive screws (1) and remove A1000 assembly cover (2).
2-186
TM 11-5820-670-30
2-52. A1100 THROUGH A1500 MODULE REPLACEMENT. (CONT)
NOTE
A 1000 assembly cover is also used as a module puller to remove all modules.
EL1AT040
2. Before removing A1100 module, disconnect white wire (3) from J1001; before removing A1400
module, disconnect violet wire (4) from J1003; before removing A1500 module, disconnect
green wire (5) from J1004.
3. Using module puller, carefully remove modules (6).
INSTALLATION
CAUTION
Before installing modules A1100 through A1300, ensure band switch pin (1) on module
(2) is positioned to mate with band switch actuating pawl (3) on A1000 assembly (4).
2-187
TM 11-5820-670-30
2-52. A1100 THROUGH A1500 MODULE REPLACEMENT. (CONT)
INSTALLATION - CONTINUED
EL1AT042
1.
Carefully push
NOTE
Ensure spring contacts on modules make contact with partitions between modules.
2. If modules A1100, A1400, or A1500 were removed, reconnect white wire (2) to J1001, violet
wire (3) to J1003, or green wire (4) to J1004.
EL1AT043
3. Install A1000 assembly cover (5) on A1000 assembly.
4. Using screwdriver, tighten four captive screws (6).
FOLLOW-ON MAINTENANCE: Install case (para 2-39).
2-108
TM 11-5820-670-30
2-53. TEST METER M9601 REPLACEMENT.
MATERIALS/PARTS: Meter, electrical indicating, dc, M9601 (P/N MS90212-24)
PRELIMINARY PROCEDURE: Remove A8700 assembly (para 2-45).
REMOVAL
1. Using screwdriver, remove two screws (1).
2. Using screwdriver and wrench, remove two screws (2), flat washers (3), and nuts (4).
3. Using hex wrench, loosen setscrew (5) and remove TEST SWITCH knob (6).
NOTE
Pull front panel away from chassis slightly to gain access to rear.
4. Using wrench, remove screw (7) and white wire lug (8), and screw (9) and black wire
lug (10).
5. Remove knurled nut (11) and gasket (12), and push meter (13) and gasket (14) out of front
panel (15).
INSTALLATION
1. Install meter (13) and gasket (14) into front panel (15).
2. Install gasket (12) and knurled nut (11). Hand tighten securely.
3. Install black wire lug (10) and screw (9), and white wire lug (8) and screw (7).
4. Using wrench, tighten screws (7 and 9).
5. Position front panel (15) on chassis and install two screws (1), two screws (2), flat washers
(3), and nuts (4).
6. Using screwdriver and wrench, tighten screws (1 and 2) and nuts (4).
7. Install TEST SWITCH knob (6) on switch.
8. Using hex wrench, tighten setscrew (5).
FOLLOW-ON MAINTENANCE: Install A8700 assembly (para 2-45).
2-189
TM 11-5820-670-30
2-54. SQ DIS SWITCH S9602 AND XMTR TEST SWITCH S9603 REPLACEMENT.
MATERIALS/PARTS: Switch, push, S9602 and S9603 (P/N SMC 619497)
PRELIMINARY PROCEDURE: Remove A8700 assembly (para 2-45).
REMOVAL
1. Using screwdriver, remove two screws (1).
2. Using screwdriver and wrench, remove two screws (2), flat washers (3), and nuts (4).
3. Using hex wrench, loosen setscrew (5) and remove TEST SWITCH knob (6).
NOTE
Pull front panel away from chassis slightly to gain access to rear.
For SQ DIS switch, do step 4. Note difference in color of wire (7).
For XMTR TEST switch, do step 5. Note difference in color of wire (7).
4. Using soldering iron, unsolder WHT/YEL wire (7) and black wire (8).
5. Using soldering iron, unsolder WHT/ORG wire (7) and black wire (8).
6. Using socket wrench, remove nut (9) and remove switch (10) from front panel (11).
2-190
TM 11-5820-670-30
2-54. SQ DIS SWITCH S9602 AND XMTR TEST SWITCH S9603 REPLACEMENT. (CONT)
INSTALLATION
1.
2.
Position switch (10) in front panel (11) and install nut (9).
Using socket wrench, tighten nut (9).
CAUTION
When performing steps 3 and 4, use extreme care to prevent damaging switches.
Due to close proximity of switch terminals, use extreme care not to flow solder across
switch terminals.
NOTE
For XMTR TEST switch, do step 3. Note wire color of item 7.
For SQ DIS switch, do step 4. Note wire color of item 7.
3.
4.
5.
Using soldering iron, solder black wire (8) and WHT/ORG wire (7).
Using soldering iron, solder black wire (8) and WHT/YEL wire (7).
Position front panel (11) on chassis and install two screws (1), two screws (2), flat washers
(3), and nuts (4).
6. Using screwdriver and wrench, tighten screws (1 and 2) and nuts (4).
7. Install TEST SWITCH knob (6) on switch.
8. Using hex wrench, tighten setscrew (5).
FOLLOW-ON MAINTENANCE: Install A8700 assembly (para 2-45).
2-191
TM 11-5820-670-30
2-55. TEST SWITCH S9601 REPLACEMENT.
MATERIALS/PARTS: Switch, rotary, S9601 (P/N SMC619495-1)
PRELIMINARY PROCEDURE: Remove A8700 assembly (para 2-45).
EL1AT048
REMOVAL
1. Using screwdriver, remove two screws (1).
2. Using screwdriver and wrench, remove two screws (2), flat washers (3), and nuts (4).
3. Using hex wrench, loosen setscrew (5) and remove TEST SWITCH knob (6).
2-192
TM 11-5820-670-30
2-55. TEST SWITCH S9801 REPLACEMENT. (CONT)
NOTE
Place chassis in upright position.
Pull front panel away from chassis slightly and move out of way.
4. Loosen captive screw (7) on A3000 assembly (8).
5. Remove hinge pin (9) and lower A3000 assembly (8) from hinge (10).
6. Using wrench, remove nut (11) and lockwasher (12).
7. Push rubber grommet (13) out of hole and bend hinge (10) slightly downward to allow removal
of switch (14) from mount (15).
8. Using soldering iron, unsolder seven wires from switch (14).
9. Remove switch (14).
INSTALLATION
CAUTION
Use care when performing next step to prevent damaging switch.
NOTE
Terminal numbers are marked on switch as shown.
1.
2.
3.
4.
5.
6.
7.
8.
9.
10.
Using soldering iron, solder seven wires to switch as shown above.
Push switch (14) into mount (15) and install lockwasher (12) and nut (11).
Using wrench, tighten nut (11).
Push rubber grommet (13) back into hole and carefully bend hinge (10) to its original position.
Position A3000 assembly (8) in hinge (10) and install hinge pin (9).
Using screwdriver, tighten captive screw (7).
Position front panel (16) on chassis and install two screws (1), two screws (2), fiat washers
(3), and nuts (4).
Using screwdriver and wrench, tighten screws (1 and 2) and nuts (4).
install TEST SWITCH knob (6) on switch.
Using hex wrench, tighten setscrew (5).
FOLLOW-ON MAINTENANCE: Install A8700 assembly (para 2-45).
2-193
TM 11-5820-670-30
2-56. SQ ADJ SWITCH R9602 REPLACEMENT.
MATERIALS/PARTS: Switch, rotary, R9602 (P/N SMC619495-2)
PRELIMINARY PROCEDURE: Remove A8700 assembly (para 2-45).
REMOVAL
1. Using screwdriver, remove two screws (1).
2. Using screwdriver and wrench, remove two screws (2), flat washers (3), and nuts (4).
3. Using hex wrench, loosen setscrew (5) and remove TEST SWITCH knob (6).
NOTE
Place chassis in upright position.
Pull front panel away from chassis slightly and move out of way.
4. Using wrench, remove nut (7) and Iockwasher (8).
5. Carefully remove switch (9) from mount (10).
6. Using soldering iron, carefully remove and resolder three wires (11) from defective switch
to replacement switch one at a time.
INSTALLATION
1. Position switch (9) in mount (10) and install Iockwasher (8) and nut (7).
2. Using wrench, tighten nut (7).
3. Position front panel (12) on chassis and install two screws (1), two screws (2), flat washers
(3), and nuts (4).
4. Using screwdriver and wrench, tighten screws (1 and 2) and nuts (4).
5. Install TEST SWITCH knob (6) on switch.
6. Using hex wrench, tighten setscrew (5).
FOLLOW-ON MAINTENANCE: Install A8700 assembly (para 2-45).
2-194
TM 11-5820-670-30
2-57. XMTR HI-LO SWITCH S9604 REPLACEMENT.
MATERIALS/PARTS: Resistor, variable, S9604 (P/N RV6NAYSL253A)
PRELIMINARY PROCEDURE: Remove A8700 assembly (para 2-45).
REMOVAL
1. Using screwdriver, remove two screws (1).
2. Using screwdriver and wrench, remove two screws (2), flat washers (3), and nuts (4).
3. Using hex wrench, loosen setscrew (5) and remove TEST SWITCH knob (6).
NOTE
Place chassis in upright position.
Pull front panel away from chassis slightly and move out of way.
4. Using wrench, remove nut (7) and Iockwasher (8).
5. Carefully remove switch (9) from mount (10).
6. Using soldering iron, remove and resolder three wires (11) from defective switch to replacement switch one at a time.
INSTALLATION
1. Position switch (9) in mount (10) and install Iockwasher (8) and nut (7).
2. Using wrench, tighten nut (7).
3. Position front panel (12) on chassis and install two screws (1), two screws (2), flat washers
(3), and nuts (4).
4. Using screwdriver and wrench, tighten screws (1 and 2) and nuts (4).
5. Install TEST SWITCH knob (6) on switch.
6. Using hex wrench, tighten setscrew (5).
FOLLOW-ON MAINTENANCE: Install A8700 assembly (para 2-45).
2-195
TM 11-5820-670-30
2-58. A6500 ASSEMBLY REPLACEMENT.
MATERIALS/PARTS: Amplifier, radio frequency, A6500 (P/N SME619596)
PRELIMINARY PROCEDURE: Remove case (para 2-39).
2-196
TM 11-5820-670-30
2-58. A6500 ASSEMBLY REPLACEMENT. (CONT)
REMOVAL
1.
2.
3.
4.
Using screwdriver, loosen two captive screws (1) and lower A4500 assembly (2).
Disconnect white wire (P6502) (3) from J6502.
Disconnect gray wire (P6001) (4) from J6001.
Using screwdriver, loosen two captive screws (5) and unplug connector P6503 (6) from
J6503 (7).
5. Using screwdriver, remove screw (8) from chassis.
6. Using screwdriver, remove three shouldered screws (9) and swing out A9500 assembly (10).
7. Using screwdriver, remove screw (11) from chassis.
8. Using screwdriver, remove two screws (12) from upper support.
9. Pull A6500 assembly straight back to disconnect from mechanical linkage as shown in detailed
view.
INSTALLATION
NOTE
Use care when performing next step so as not to disturb positioning of mechanical linkage couplers.
1. Install A6500 assembly, alining couplers as shown in detailed view.
2. Install two screws (12) and, using screwdriver, tighten.
3. Install screw (11) and, using screwdriver, tighten.
4. Swing A9500 assembly (10) closed and install three shouldered screws (9).
5. Using screwdriver, tighten three shouldered screws (9).
6. Install screw (8) and, using screwdriver, tighten.
7. Plug connector P6503 (6) into J6503 (7).
8. Using screwdriver, tighten two captive screws (5).
9. Connect gray wire (P6001) (4) to J6001.
10. Connect white wire (P6502) (3) to J6502.
11. Raise A4500 assembly (2).
12. Using screwdriver, tighten two captive screws (1).
FOLLOW-ON MAINTENANCE: Install case (para 2-39).
2-197
TM 11-5820-670-30
RADIO INTERFERENCE FILTER FL9601 REPLACEMENT.
MATERIALS/PARTS: Filter, radio interference, FL9601 (P/N SMD619508)
PRELIMINARY PROCEDURE: Remove case (para 2-39).
TOOLS: Electrical Contact Extractor, TL-711A/ARM-79
EL1AT053
REMOVAL
1. Using screwdriver, remove four screws (1) and Iockwashers (2).
NOTE
To gain access to rear of filter, A3000 assembly must first be raised.
2-198
TM 11-5820-670-30
2-59. RADIO INTERFERENCE FILTER FL9601 REPLACEMENT. (CONT)
2. Using screwdriver, loosen one captive screw (3) and raise A3000 assembly (4).
3. Using screwdriver, remove screw (5) and ground strap (6).
4. Raise filter (7) and, using electrical contact extractor, remove brown rf cable (8), violet rf
cable (9), and orange rf cable (10) from filter (7).
5. Remove filter (7).
INSTALLATION
1.
2.
3.
4.
5.
6.
Connect orange rf cable (10), violet rf cable (9), and brown rf cable (8).
Position filter (7) in chassis and couple to connector J9601 (11).
Install ground strap (6) and screw (5) and, using screwdriver, tighten.
Lower A3000 assembly (4) into position.
Using screwdriver, tighten one captive screw (3).
Install four screws (1) and Iockwashers (2) and, using screwdriver, tighten.
FOLLOW-ON MAINTENANCE: Install case (para 2-39).
2-199
TM 11-5820-670-30
2-60. TRANSISTOR Q9601 REPLACEMENT.
MATERIALS/PARTS: Transistor, Q9601 (P/N JAN 2N1479)
Compound, heat sink, Dow Corning, DC-340 (item 1, appendix B)
PRELIMINARY PROCEDURE: Remove A8700 assembly (para 2-45).
REMOVAL
1. Using soldering iron, unsolder yellow wire (1) from pin (2) and jumper wire (3) from pin (4).
2. Using socket wrench and screwdriver, remove nut (5), bushing (6), wire lug (7), and
screw (8).
NOTE
Use care when performing next step so as not to push screw from hole.
3. Using socket wrench and screwdriver, remove nut (9) and wire lug (10) from screw (11).
2-200
TM 11-5820-670-30
2-60. TRANSISTOR Q9601 REPLACEMENT. (CONT)
NOTE
Due to inaccessible location of screw, it is advised that it not be removed.
4. Remove transistor (12) and insulator (13).
INSTALLATION
1. Coat both sides of insulator (13) with heat sink compound.
NOTE
Be careful not to push screw from hole.
2. While holding screw (11) against mount, position insulator (13) and transistor (12) on mount
alining pins on transistor with holes in mount.
3. Install wire lug (10) and nut (9).
4. Using socket wrench and screwdriver, tighten nut (9) and screw (11).
5. Install screw (8), wire lug (7), bushing (6), and nut (5).
6. Using socket wrench and screwdriver, tighten nut (5) and screw (8).
7. Using soldering iron, solder jumper wire (3) to pin (4) and yellow wire (1) to pin (2).
FOLLOW-ON MAINTENANCE: Install A8700 assembly (para 2-45).
2-201
TM 11-5820-670-30
2-61. A4900 ASSEMBLY REPLACEMENT.
MATERIALS/PARTS: Attenuator, variable, A4900 (P/N SME619695)
PRELIMINARY PROCEDURE: Remove case (para 2-39).
REMOVAL
1. Using screwdriver, loosen two captive screws (1) and swing out A4000 assembly (2).
2. Disconnect blue wire (P4902) (3) from J4902 (4).
3. Using screwdriver, loosen two captive screws (5) and move A4900 assembly (6) away from
chassis.
4. Disconnect blue wire (P4901) (7) from J4901 (8).
5. Disconnect three color-coded wire plugs (9).
6. Remove A4900 assembly (6).
INSTALLATION
1. Connect three color-coded wire plugs (9).
2. Connect blue wire (P4901) (7) to J4901 (8).
3. Position A4900 assembly (6) in chassis and, using screwdriver, tighten two captive
screws (5).
4. Connect blue wire (P4902) (3) to J4902 (4).
5. Close A4000 assembly (2) and, using screwdriver, tighten two captive screws (1).
FOLLOW-ON MAINTENANCE: Install case (para 2-39).
2-202
TM 11-5820-670-30
2-62. RF ATTENUATOR AND DIODE SWITCH 24501 REPLACEMENT.
MATERIALS/PARTS: Attenuator and switch assembly, Z4501 (P/N SMD619719)
PRELIMINARY PROCEDURE: Remove case (para 2-39).
REMOVAL
1. Disconnect violet wire (P4503) (1) from J4503 (2) and brown wire (3) from J4502 (4).
2. Using screwdriver, loosen two captive screws (5).
3. Pull Z4501 assembly (6) straight out to remove.
INSTALLATION
1. Position pins on Z4501 assembly (6) on board and push into place.
2. Using screwdriver, tighten two captive screws (5).
3. Connect brown wire (3) to J4502 (4) and violet wire (P4503) (1) on J4503 (2).
FOLLOW-ON MAINTENANCE: Install case (para 2-39).
2-203
TM 11-5820-670-30
2-63. REFLECTOMETER AND SIDETONE DETECTOR 24502 REPLACEMENT.
MATERIALS/PARTS: Control assembly, Z4502 (P/N SMD619733)
PRELIMINARY PROCEDURE: Remove case (para 2-39).
REMOVAL
1. Disconnect orange wire (P4505) (1) from J4505 (2).
2. Using screwdriver, loosen two captive screws (3).
3. Pull Z4502 assembly (4) straight out to remove.
INSTALLATION
1. Position pins on Z4502 assembly (4) on board and push into place.
2. Using screwdriver, tighten two captive screws (3).
3. Connect orange wire (P4505) (1) to J4505 (2).
FOLLOW-ON MAINTENANCE: Install case (para 2-39).
2-204
TM 11-5820-670-30
2-64. LOW-PASS FILTER FL4501 REPLACEMENT.
MATERIALS/PARTS: Filter, low-pass, FL4501 (P/N SMD619747)
PRELIMINARY PROCEDURE: Remove case (para 2-39).
REMOVAL
1. Using screwdriver, loosen two captive screws (1).
2. Pull FL4501 assembly (2) straight out to remove.
INSTALLATION
1. Position FL4501 assembly (2) on four jacks (3) and push into place.
2. Using screwdriver, tighten two captive screws (1).
FOLLOW-ON MAINTENANCE: Install case (para 2-39).
2-205
TM 11-5820-670-30
2-65. RELAYS K4501 THROUGH K4504 REPLACEMENT.
MATERIALS/PARTS: Relay, armature, K4501 (P/N SMD6201 14)
Relay, armature, K4502 (P/N SMD6201 16)
Relay, armature, K4503 (P/N SMD6201 18)
Relay, armature, K4504 (P/N SMD620120)
PRELIMINARY PROCEDURE: Remove case (para 2-39).
REMOVAL
NOTE
For removal of relays K4501 or K4503, first remove rf attenuator and diode switch Z4501
(para 2-62).
For removal of relays K4502 or K4504, first remove reflectometer and sidetone detector
Z4502 (para 2-63) and low-pass filter FL4501 (para 2-64).
Steps given are typical for all relays.
1. Using screwdriver and wrench, remove two screws (1) and nuts (2) from relay (3).
2. Using soldering iron, unsolder wires (4) one at a time and resolder to replacement relay (3).
INSTALLATION
1. Position relay (3) on assembly and install two screws (1) and nuts (2).
2. Using screwdriver and wrench, tighten two screws (1) and nuts (2).
3. Install applicable components as noted above.
2-206
TM 11-5820-670-30
2-66. RELAYS K9601 THROUGH K9606 REPLACEMENT.
MAERIALS PARTS: Relay, armature, K9601 through K9605 (P/N SMC41433)
Relay, dummy, K9606 (P/N SMC620064)
PRELIMINARY PROCEDURE: Remove case (para 2-39).
REMOVAL
NOTE
Steps given are typical for all relays.
1. Using screwdriver, loosen two captive screws (1).
2. Pull relay (2) from socket (3).
INSTALLATION
1. Position relay (2) in socket (3) and push into place.
2. Using screwdriver, tighten two captive screws (11).
FOLLOW-ON MAINTENANCE: Install case (para 2-39).
2-207
TM 11-5820-670-30
2-67. A1000, A2000, A6000, AND A9700 ASSEMBLY REPLACEMENT.
PRELIMINARY PROCEDURE: Remove
Remove
Remove
Remove
Remove
Remove
Remove
A4000
A4500
A4800
A5500
A6500
A8700
A9500
assembly
assembly
assembly
assembly
assembly
assembly
assembly
(para
(para
(para
(para
(para
(para
(para
2-41).
2-49).
2-40).
2-44).
2-58).
2-45).
2-42).
REMOVAL
1.
Disconnect orange color-coded wire plug (1) and black color-coded wire plug (2) from A6000
assembly (3).
2. Disconnect black wire (P2002) (4) from J2002 (5) and orange wire (P2001) (6) from J2001
(7) on A2000 assembly (8).
3. Disconnect wires (4 and 6) from wire clip on A2000 assembly (8).
4. Using screwdriver, loosen two captive screws (9) and unplug connector P9701 (10) from
J9701 (11).
5. Using screwdriver, remove two screws (12) and ground lug (13).
6. Using screwdriver, remove three screws (14).
2-208
TM 11-5820-670-30
2-67. A1000, A2000, A6000, AND A9700 ASSEMBLY REPLACEMENT. (CONT)
Using screwdriver, loosen one captive screw (15) and swing open A3000 assembly (16).
Disconnect red wire (P2003) (17) from J2003 (18) on A2000 assembly (19).
Disconnect blue wire (P1005) (20) from J1005 (21) and yellow wire (P1002) (22) from J1002
(23) on A1000 assembly (24).
10. Disconnect seven color-coded wire plugs from A1000 assembly (24) as shown in table below.
7.
8.
9.
TERMINAL NO.
COLOR
1
2
3
4
5
6
7
BLK
WHT
YEL
ORG
VIO
RED
BRN
INDEX NO.
25
26
27
28
29
30
31
11. Using screwdriver, loosen screw (32) and remove ground strap (33).
12. Using screwdriver, remove four screws (34) and ground strap (35).
2-209
TM 11-5820-670-30
A1000, A2000, A6000, AND A9700 ASSEMBLY REPLACEMENT. (CONT)
REMOVAL (CONT)
13. Disconnect brown wire (P6002) (1) from J6002 (2) and yellow wire (P6003) (3) from J6003
(4) on A6000 assembly (5).
14. Disconnect violet wire (P1003) (6) from J1003 (7) and green wire (P1004) (8) from J1004 (9)
on A1000 assembly (10).
2-210
TM 11-5820-670-30
2-67. A1000, A2000, A6000, AND A9700 ASSEMBLY REPLACEMENT. (CONT)
15. Using screwdriver, loosen two screws (11) on wire clips (12) and remove brown wire (P6002)
16. Using screwdriver, remove one screw (13), one screw (14), and Iockwasher (15).
17. Using screwdriver, remove two screws (16) and bracket (17).
18. Using screwdriver, remove two screws (18).
19. Using screwdriver, remove three screws (19) and Iockwashers (20).
20. Remove A1000 assembly bracket (21).
21. Carefully raise assembly off chassis and remove.
INSTALLATION
NOTE
Before installing assembly, ensure seven color-coded wire plugs are pushed under
chassis.
Before installing assembly, ensure green wire (P1004), violet wire (P1003), and brown
wire (P6002) are hanging outside of chassis.
1.
2.
3.
4.
5.
6.
7.
8.
9.
Position assembly in chassis and install two screws (18).
Position bracket (17) on front panel and gearbox and install two screws (16), one screw (13),
one screw (14), and Iockwasher (15).
Using screwdriver, tighten screws (13, 14,16, and 18).
Position A1000 assembly bracket (21) on A1000 assembly (10) and install three screws (19)
and Iockwashers (20).
Using screwdriver, tighten three screws (19).
Connect green wire (P1004) (8) to J1004 (9) and violet wire (P1003) (6) to J1003 (7) on
A1000 assembly (10).
Connect yellow wire (P6003) (3) to J6003 (4) and brown wire (P6002) (1) to J6002 (2) on
A6000 assembly (5).
Using screwdriver, loosen two screws (11) on wire clips (12) and install browon wire (P6002)
(1) in wire clips (12).
Using screwdriver, tighten two screws (11).
2-211
TM 11-5820-670-30
2-67. A1000, A2000, A6000, AND A9700 ASSEMBLY REPLACEMENT. (CONT)
INSTALLATION (CONT)
10.
11.
12.
13.
14.
15.
16.
Install four screws (1) and ground strap (2).
Using screwdriver, tighten four screws (1).
Position ground strap (3) under screw (4).
Using screwdriver, tighten screw (4).
Connect yellow wire (P1002) (5) to J1002 (6) and blue wire (P1005) (7) to J 1005 (8) on A1000
assembly (9).
Connect red wire (P2003) (10) to J2003 (11) on A2000 assembly (12).
Connect seven color-coded wire plugs to A1000 assembly (9) as shown in following table.
TERMINAL NO.
1
2
3
4
5
6
7
17.
18.
2-212
COLOR
INDEX NO.
BLK
WHT
YEL
ORG
VlO
RED
BRN
13
14
15
16
17
18
19
Swing A3000 assembly (20) closed.
Using screwdriver, tighten one captive screw (21).
TM 11-5820-670-30
2-67. A1000, A2000, A6000, AND A9700 ASSEMBLY REPLACEMENT. (CONT)
19. Install two screws (22) and ground strap (23).
20. Install three screws (24).
21. Using screwdriver, tighten screws (22 and 24).
22. Plug connector P9701 (25) into J9701 (26).
23. Using screwdriver, tighten two captive screws (27).
24. Connect orange wire (P2001) (28) to J2001 (29) and black wire (P2002) (30) to J2002 (31).
25. Connect wires (28 and 30) to wire clip on A2000 assembly (32).
26. Connect black color-coded wire plug (33) and orange color-coded wire plug (34) to A6000
assembly (35).
FOLLOW-ON MAINTENANCE: Install
Install
Install
Install
Install
Install
Install
A9500
A8700
A6500
A5500
A4800
A4500
A4000
assembly
assembly
assembly
assembly
assembly
assembly
assembly
(para
(para
(para
(para
(para
(para
(para
2-42).
2-45).
2-58).
2-44).
2-40).
2-49).
2-41).
2-213
TM 11-5820-670-30
2-68. A1000 ASSEMBLY REPLACEMENT.
MATERIALS/PARTS: Tuner assembly, vhf, A1000 (P/N SMD416345)
PRELIMINARY PROCEDURE: Remove A1000, A2000, A6000, and A9700 assembly (para 2-67).
2-214
TM 11-5820-670-30
2-68. A1000 ASSEMBLY REPLACEMENT. (CONT)
REMOVAL
1. Using wrench, loosen three captive nuts (1).
2. Remove A1000 assembly (2).
INSTALLATION
1. Turn dial (3) counterclockwise to position .00 setting as shown in view A.
2. Turn coupler (4) counterclockwise to stop (5) (view B).
3. Turn coupler (4) clockwise to position shown in view C.
4. Check pointer (6) on assembly which indicates band position of gearbox (7) (view D).
5. Move linkage arm (8) to band A or band B position as indicated by pointer (6).
6. Position A1000 assembly (2) on captive nut towers and aline couplers (4 and 9), and linkage
arm (8) and band switch cam (10).
NOTE
Coupler (4) may have to be turned slightly to mate with coupler (9).
7. Using wrench, tighten three captive nuts (1).
FOLLOW-ON MAINTENANCE: Install A1000, A2000, A6000, and A9700 assembly (para 2-67).
2-215
TM 11-5820-670-30
2-69. A6000 ASSEMBLY REPLACEMENT.
MATERIALS/PARTS: Oscillator buffer assembly, A6000 (P/N SMC619909)
PRELIMINARY PROCEDURE: Remove A1000, A2000, A6000, and A9700 assembly (para 2-67).
2-216
TM 11-5820-670-30
2-69. A6000 ASSEMBLY REPLACEMENT. (CONT)
REMOVAL
1. Using wrench, loosen three captive nuts (1).
2. Remove A6000 assembly (2).
INSTALLATION
1. Turn dial (3) counterclockwise to position .00 setting as shown in view A.
2. Turn coupler (4) counterclockwise to stop (5) (view B).
3. Turn coupler (4) clockwise to position shown in view C.
4. Check pointer (6) on assembly which indicates band position of gearbox (7) (view D).
5. Move linkage arm (8) to band A or band B position indicated by pointer (6).
6. Position A6000 assembly (2) on captive nut towers and aline couplers (4 and 9), and linkage
arm (8) and band switch cam (10).
NOTE
Coupler (4) may have to be turned slightly to mate with coupler (9).
7. Using wrench, tighten three captive nuts (1).
FOLLOW-ON MAINTENANCE: Install A1000, A2000, A6000, and A9700 assembly (para 2-67).
2-217
TM 11-5820-670-30
2-70. A2000 ASSEMBLY REPLACEMENT.
MATERIALS/PARTS: Oscillator, radio frequency, A2000 (P/N SMD414430)
PRELIMINARY PROCEDURE: Remove A1000, A2000, A6000, and A9700 assembly (para 2-67).
REMOVAL
Using screwdriver, loosen two captive screws (1) and remove A2000 assembly (2).
INSTALLATION
1. Turn dial (3) counterclockwise to .00 setting as shown in detailed view.
2. Aline coupler (4) with scribe mark (5).
3. Install A2000 assembly (2) with J2003 terminal (6) facing away from A6000 assembly (7).
4. Aline coupler (4) with mating coupler (8). Coupler (4) may have to be raised or turned slightly
to mate with coupler (8).
5. Using screwdriver, tighten two captive screws (1).
FOLLOW-ON MAINTENANCE: Install A1000, A2000, A6000, and A9700 assembly (para 2-67).
2-218
TM 11-5820-670-30
2-71. A9700 ASSEMBLY REPLACEMENT.
MATERIALS/PARTS: Gearbox, A9700 (P/N SME619807)
PRELIMINARY PROCEDURE: Remove A1000, A2000, A6000, and A9700 assembly (para 2-67).
REMOVAL
NOTE
Gearbox A9700 is the end product when assemblies A1000, A2000, and A6000 are
removed. See appropriate paragraphs for the removal of these assemblies.
INSTALLATION
NOTE
Install assemblies A1000, A2000, and A6000 to gearbox A9700. See appropriate
paragraphs for the installation of these assemblies.
FOLLOW-ON MAINTENANCE: Install A1000, A2000, A6000, and A9700 assembly (para 2-67).
2-219
TM 11-5820-670-30
2-72. RELAY K3001 REPLACEMENT.
MATERIALS/PARTS: Relay, K3001 (P/N SMD413526)
PRELIMINARY PROCEDURE: Remove case (para 2-39).
REMOVAL
1. Using screwdriver, loosen captive screw (1).
2. Remove retaining plate (2).
3. Pull relay (3) straight up from socket (4).
INSTALLATION
1. Position relay (3) in socket (4) and push into place.
2. Position retaining plate (2) under captive screw (1).
3. Using screwdriver, tighten captive screw (1).
FOLLOW-ON MAINTENANCE: Install case (para 2-39).
2-220
TM 11-5820-670-30
2-73. A1600 ASSEMBLY REPLACEMENT.
MATERIALS/PARTS: Power supply assembly, A1600 (P/N SMC416316)
PRELIMINARY PROCEDURE: Remove A6500 assembly (para 2-58).
REMOVAL
NOTE
A1600 assembly is located on top of A1000 assembly.
1.
2.
3.
Disconnect three color-coded wire plugs (1).
Unfasten retaining clip (2) by moving clip to right.
Lift front of assembly (3) and pull forward to remove from bracket (4).
INSTALLATION
1. Place assembly (3) in bracket (4) and push into place.
2. Push front of assembly (3) down and secure by moving retaining clip (2) to left.
3. Connect three color-coded wire plugs (1).
FOLLOW-ON MAINTENANCE: Install A6500 assembly (para 2-58).
2-221
TM 11-5820-670-30
2-74. FRONT PANEL KNOBS REPLACEMENT.
MATERIALS/PARTS:
Knob, frequency selector (P/N SMB620191)
Knob, squelch mode and mode control (P/N SMC620189)
Knob, volume control (P/N FNA1836-126-440)
REMOVAL
Step given is typical for the removal of all knobs.
Using hex wrench, loosen two setscrews and remove knob.
2-222
TM 11-5820-670-30
2-74. FRONT PANEL KNOBS REPLACEMENT. (CONT)
INSTALLATION
For frequency selector knobs, do steps 1 and 2. For volume control knobs, do step 3.
For squelch mode and mode control knobs, do steps 4 and 5.
1. Position knob (1) on switch shaft (2) and aline one of two setscrews (3) with flat (4) on
switch shaft as shown in detailed view.
2. Using hex wrench, tighten two setscrews (3).
3. Position knob (5) on switch shaft (6) and, using hex wrench, tighten two setscrews (7).
4. Position knob (8) on switch shaft (9) and aline side setscrews (10) with flat (11) on switch
shaft.
5. Using hex wrench, tighten side setscrew (10) and bottom setscrew (12).
2-223
TM 11-5820-670-30
2-75. FRONT PANEL DIAL MASK REPLACEMENT.
MATERIALS/PARTS: Mask, dial (P/N SMC620195)
PRELIMINARY PROCEDURE: Remove frequency selector knobs (para 2-74).
REMOVAL
Using screwdriver, remove six screws (1) and remove dial mask (2).
NOTE
Some control units may use a masking plate (3) to cover the squelch switch TONE
display. Remove if used.
INSTALLATION
NOTE
Some control units may use a masking plate (3) to cover the squelch switch TONE
display. Install behind dials if used as shown in detailed view.
1. Position dial mask (2) on control unit and install six screws (1).
2. Using screwdriver, tighten six screws (1).
FOLLOW-ON MAINTENANCE: Install frequency selector knobs (para 2-74).
2-224
TM 11-5820-670-30
2-76. LIGHT PANEL REPLACEMENT.
MATERIALS/PARTS: Panel, light (P/N SMD620232)
PRELIMINARY PROCEDURE: Remove dial mask (para 2-75).
REMOVAL
1. Remove four roll pins (1) from four frequency selector switch shafts (2) as shown in detail A.
2. Remove four shaft dials (3).
3. Using screwdriver, remove five panel mounting nuts (4) and remove light panel (5).
INSTALLATION
1. Position light panel (5) on control panel (6) and install five panel mounting nuts (4) and,
using screwdriver, tighten nuts (4).
2. Install four shaft dials (3).
3. Aline shaft dial notch (7) with flat (8) on frequency selector switch shafts (2) as shown in
detail B.
4. Install four roll pins (1) in four frequency selector switch shafts (2).
FOLLOW-ON MAINTENANCE: Install dial mask (para 2-75).
2-225
TM 11-5820-670-30
2-77. SWITCH AND WIRING ASSEMBLY REPLACEMENT.
PRELIMINARY PROCEDURE: Remove light panel (para 2-76).
REMOVAL
1. Using screwdriver, loosen two turn-lock fasteners (1) and remove cover (2).
NOTE
Some models may use two plastic insulator sheets to cover internal parts. Remove if
used.
2. Using screwdriver, remove eight screws (3) from control panel (4).
3. Remove control panel (4).
4. Using wrench, remove two nuts (5) from end of switch S9102.
2-226
TM 11-5820-670-30
2-77. SWITCH AND WIRING ASSEMBLY REPLACEMENT. (CONT)
5. Using screwdriver and wrench, remove two screws (6), flat washers (7), Iockwashers (8),
and nuts (9).
6. Move bracket (10) out of the way.
7. Using screwdriver, remove four screws (11) from end plate (12).
8. Using wrench, remove nut (13) and IT Iockwasher (14) from volume switch (15).
9. Using wrench, remove nut (16) and IT Iockwasher (17) from mode switch (18).
10. Using wrench, remove nut (19) and IT Iockwasher (20) from squelch switch (21).
11. Unsolder red wire (22) from electrical connector (23).
12. Using wrench, remove nut (24), IT Iockwasher (25), and ground lug (26).
13. Reinstall IT Iockwasher (25) and nut (24) on electrical connector (23) to prevent loss.
14. Remove switch and wiring assembly from U bracket (27).
INSTALLATION
1.
2.
Remove nut (24) and IT Iockwasher (25) from electrical connector (23).
Position U bracket (27) on switch and wiring assembly.
NOTE
Ensure tab on electrical connector is positioned in hole on U bracket as shown in
detailed view.
3.
4.
Install ground lug (26), IT Iockwasher (25), and nut (24) and, using wrench, tighten
nut (24).
Solder red wire (22) to center of electrical connector (23).
NOTE
When performing steps 4,5, and 6, ensure switch locating tab or tabs are in locating
holes in U bracket.
5.
6.
7.
8.
9.
10.
11.
Position squelch switch (21) in U bracket (27) and install IT Iockwasher (20) and nut (19) and,
using wrench, tighten nut (19).
Position mode switch (18) in U bracket (27) and install IT Iockwasher (17) and nut (16) and,
using wrench, tighten nut (16).
Position volume control switch (15) in U bracket (27) and install IT Iockwasher (14) and nut
(13) and, using wrench, tighten nut (13).
Position bracket (10) on switch S9102 and install nuts (5) and, using wrench, tighten nuts (5).
Install two screws (6), flat washers (7), lockwashers (8), and nuts (9) through bracket (10)
and side of U bracket (27) and, using screwdriver and wrench, tighten screws (6) and
nuts (9).
Position end plate (12) on U bracket (27) and install four screws (11) and, using screwdriver,
tighten screws (11).
Position control panel (4) on U bracket (27) and install eight screws (3) and, using screwdriver, tighten screws (3).
NOTE
Replace two plastic insulator sheets if used.
12.
Install cover (2) and, using screwdriver, tighten two turn-lock fasteners (1).
FOLLOW-ON MAINTENANCE: Install light panel (para 2-76).
2-227
TM 11-5820-670-30
2-78. SQUELCH SWITCH S9106 REPLACEMENT
MATERIALS/PARTS: Switch, rotary, S9106 (P/N SMC 620158)
PRELIMINARY PROCEDURE: Remove light panel (para 2-76).
REMOVAL
1. Using screwdriver, loosen two turn-lock fasteners (1) and remove cover (2).
2. Using wrench, remove nut (3) and IT Iockwasher (4) and push switch (5) out of control
panel (6).
3. Tag wires and unsolder from switch as shown in table below and as shown in detailed view.
2-228
TM 11-5820-670-30
2-78. SQUELCH SWITCH S9106 REPLACEMENT. (CONT)
INDEX NO.
WIRE COLOR
7
8
9
10
11
12
GRY
JUMPER
VlO
WHT/YEL
BLK
WHT/YEL
4. Remove switch (5).
INSTALLATION
1. Solder wires as shown in table above and detailed view and remove tags.
NOTE
When performing next step, ensure locating tab on switch is positioned in locating hole
behind control panel.
2. Position switch (5) in control panel (6) and install IT Iockwasher (4) and nut (3) and, using
wrench, tighten nuts (3).
3. Install cover (2) and, using screwdriver, tighten two turn-lock fasteners (1).
FOLLOW-ON MAINTENANCE: Install light panel (para 2-76).
2-229
TM 11-5820-670-30
2-79. VOLUME CONTROL SWITCH R9103 REPLACEMENT.
MATERIALS/PARTS: Resistor, fixed, composition (P/N RC07GF391J)
Resistor, variable, R9103 (P/N RV6NAYSD251C)
PRELIMINARY PROCEDURE: Remove light panel (para 2-76).
REMOVAL
1.
2.
Using screwdriver, loosen two turn-lock fasteners (1) and remove cover (2).
Using wrench, remove nut (3) and IT Iockwasher (4) and push switch (5) out of control
panel (6).
3. Unsolder one black wire (7), one white and brown wire (8), and one white and white wire (9)
and remove switch (5).
2-230
TM 11-5820-670-30
2-79. VOLUME CONTROL SWITCH R 9103 REPLACEMENT. (CONT)
NOTE
Discard attached resistor along with defective switch.
INSTALLATION
NOTE
Before attempting to install switch in control panel, a specified value resistor must be
soldered between terminals as shown in detail A.
Insulation must be installed on both wire leads of resistor prior to soldering (step 1).
1. Install insulation (10) on both wire leads of resistor (11) as shown in detail B.
2. Solder both wire leads of resistor (11) as shown in detail A.
3. Solder one white and white wire (9), one white and brown wire (8), and one black wire (7) to
switch (5).
NOTE
When performing next step ensure locating tab on switch is in locating hole behind
control panel.
4. Position switch (5) in control panel (6) and install IT Iockwasher (4) and nut (3) and, using
wrench, tighten nut (3).
5. Install cover (2) and, using screwdriver, tighten two turn-lock fasteners (1).
FOLLOW-ON MAINTENANCE: Install light panel (para 2-76).
2-231
TM 11-5820-670-30
2-80. TENTHS FREQUENCY SELECTOR SWITCH S9103 AND/OR HUNDREDTHS FREQUENCY
SELECTOR SWITCH S9104 REPLACEMENT.
MATERIALS/PARTS: Switch, rotary, S9103 (PIN SMC 620162)
Switch, rotary, S9104 (PIN SMC 620163)
PRELIMINARY PROCEDURE: Remove switch and wiring assembly (para 2-77).
2-232
TM 11-5820-670-30
2-80. TENTHS FREQUENCY SELECTOR SWlTCH S9103 AND/OR HUNDREDTHS FREQUENCY
SELECTOR SWITCH S9104 REPLACEMENT. (CONT)
SWITCH S9104
SWITCH S9103
WIRE COLOR
INDEX NO.
BLU
WHT/BLK/VIO
JUMPER
WHT
WHT/BRN
VlO
YEL
WHT/RED/VIO
WHT/BLU
RED
WHT/RED/GRY
BRN
5
6
7
8
9
10
11
12
13
14
15
16
WIRE COLOR
BLK
WHT
VlO
RED
YEL
BLU
BRN
INDEX NO.
17
18
19
20
21
22
23
REMOVAL
To gain access to switch wire terminals it is recommended that both switches be
removed from panel.
1.
Using wrench, remove two nuts (1) and IT Iockwashers (2) and carefully push both switches
(3) from panel (4).
NOTE
Tag all wires with index numbers for location and description.
2.
3.
Unsolder wires from selected switch (3) as shown in table and illustration.
Remove switch (3).
INSTALLATION
NOTE
Position selected switch locating tab as shown in illustration. See FO-21 for complete
wiring diagram.
1. Solder wires to selected switch (3) as shown in table and illustration.
NOTE
When performing next step, ensure switch locating tabs are in locating holes on panel.
2. Position switches (3) in panel (4) and install two IT Iockwashers (2) and nuts (1).
3. Using wrench, tighten nuts (1).
FOLLOW-ON MAINTENANCE: Install switch and wiring assembly (para 2-77).
2-233
TM 11-5820-670-30
2-81. MODE SWITCH S9105 REPLACEMENT.
MATERIALS/PARTS: Diode, semiconductor, device, CR9101 (P/N JANIN645)
Resistor, fixed, composition, R9101 (P/N RC07GF273J)
Resistor, fixed, composition, R9102 (P/N RC07GF511J)
Resistor, fixed, composition, R9104 (P/N RC07GF120J)
Switch, rotary, S9105 (P/N SMC620159)
PRELIMINARY PROCEDURE: Remove switch and wiring assembly (para 2-77).
WIRE COLOR
INDEX NO.
RED
RED
WHT/RED
WHT/RED
WHT/RED
RED
1
2
3
4
5
6
WIRE COLOR
INDEX NO.
WHT/RED
WHT/BRN
WHT/BRN
YEL
WHT
WHT/GRY
BLK
WHT/YEL
WHT/BLK
7
8
9
10
11
12
13
14
15
EL1AT074
2-234
TM 11-5820-670-30
2-81. MODE SWITCH S9105 REPLACEMENT. (CONT)
EL1AT075
REMOVAL
NOTE
View from rear of switch. Position switch locating tab as shown in illustrations. Tag all
wires with index numbers for location and description. Discard resistors and diode along
with defective switch.
1. Unsolder wires as shown in illustrations.
2. Remove switch.
2-235
TM 11-5820-670-30
2-81. MODE SWITCH S9105 REPLACEMENT. (CONT)
INSTALLATION
NOTE
View from rear of switch.
See FO-21 for complete wiring diagram.
Before soldering wires to switch, three resistors and one diode must first be soldered in
place.
1. Solder resistors and diode as shown in illustration above.
WIRE COLOR
INDEX NO.
RED
RED
WHT/RED
WHT/RED
WHT/RED
RED
1
2
3
4
5
6
EL1AT077
2-236
TM 11-5820-670-30
2-81. MODE SWITCH S9105 REPLACEMENT. (CONT)
WIRE COLOR
WHT/RED
WHT/BRN
WHT/BRN
YEL
WHT
WHT/GRY
BLK
WHT/YEL
WHT/BLK
INDEX NO.
7
8
9
10
11
12
13
14
15
WIRE COLOR
INDEX NO.
WHT/RED/GRY
WHT/RED/BLU
ORG
WHT/YEL/GRY
GRY
GRY
WHT/YEL/BRN
WHT/ORG/BRN
16
17
18
19
20
21
22
23
WIRE COLOR
INDEX NO.
WHT/BLU/GRY
WHT/ORG/YEL
WHT/BLK/BRN
WHT/VIO
WHT/BLU/BRN
WHT/YEL/VIO
WHT/ORG/BLK
BLK
24
25
26
27
28
29
30
31
EL1AT078
2. Solder wires as shown in illustration tables.
3. Remove all tags from wires.
FOLLOW-ON MAINTENANCE: Install switch and wiring assembly (para 2-77).
2-237
M 11-5820-670-30
2-82. ELECTRICAL CONNECTOR J910I REPLACEMENT.
MATERIALS/PARTS: Connector, receptacle, electrical (P/N MS3112E24-61P)
PRELIMINARY PROCEDURE: Remove switch and wiring assembly (para 2-77).
PIN NO.
WIRE COLOR
PIN NO.
WIRE COLOR
PIN NO.
WIRE COLOR
A*
B*
C
D
E
F
G
H
J
K
L
M
N*
P
R
S
T
U
V
W
X
Y
Z
WHT & WHT/RED
WHT & WHT/YEL
RED
RED
RED
WHT/RED
WHT/BLK/ORG
WHT/ORG
WHT/RED/GRN
NOT USED
WHT/GRN/BLU
WHT/RED/ORG
WHT/BLK
WHT/ORG/GRY
WHT/BLU
WHT/ORG/VIO
WHT/BLK/ORG
WHT/BRN/GRY
WHT/YEL
NOT USED
WHT/BRN/BLU
VlO
BLK
a
b
c*
d*
e
f
9
h
i
j
k
m
n
p
q
r
s
t
u
v
w*
x*
RED
BLK
WHT & ORG
WHT & WHT/BLK
WHT/RED
WHT/RED
WHT/ORG/GRN
NOT USED
NOT USED
WHT/BL K/G RN
WHT/BRN/VIO
WHT/ORG/BLU
NOT USED
NOT USED
WHT/BLU/GRY
NOT USED
WHT/RED/BLU
WHT/RED/GRY
WHT/BLK/BRN
WHT/ORG/YEL
WHT & GRY
WHT & WHT
WHT & YEL
WHT/BRN/GRN
AA
BB
CC
DD
EE
FF
GG
HH
JJ*
KK*
LL
MM
NN
PP*
WHT/GRN
WHT/BLK/GRY
WHT/BLK/RED
WHT/BLK/ORG
NOT USED
WHT/GRY/YEL
WHT/VIO
GRY
NHT & WHT/BRN
WHT & BLK
WHT/RED/VIO
WHT/YEL/BRN
WHT/ORG/BRN
WHT & WHT/GRY
y*
z
* TWO INDIVIDUAL WIRES OF
DIFFERENT GAGES ARE JOINED
TOGETHER AND COVERED WITH
BROWN HEAT SHRINK TUBING.
SOME MAY HAVE BLACK JUMPER
WIRES ATTACHED AT JOINT.
EL1AT079
2-238
TM 11-5820-670-30
2-82. ELECTRICAL CONNECTOR J9101 REPLACEMENT. (CONT)
REMOVAL
NOTE
Tag all wires with connector pin letters. See table to verify wire color with connector pin
letter.
1. Unsolder wires from connector.
2. Using screwdriver and wrench, remove four screws (1), Iockwashers (2), ground lug (3), and
nuts (4).
3. Remove connector (5) from bracket (6).
INSTALLATION
1. Position connector (5) in bracket (6) as shown in detailed view.
2. install four screws (1), Iockwashers (2), ground lug (3), and nuts (4).
3. Using screwdriver and wrench, tighten screws (1) and nuts (4).
NOTE
When performing next step, start from center of connector and work out. Use table to
verify wire color to connector pin letter. See FO-21 for complete wiring diagram.
4. Solder wires to connector.
5. Remove tags.
FOLLOW-ON MAINTENANCE: Install switch and wiring assembly (para 2-77).
2-239
TM 11-5820-670-30
2-83. TENS FREQUENCY SELECTOR SWITCH S910I REPLACEMENT.
MATERIALS/PARTS: Switch, rotary, S9101 (P/N SMC620160)
PRELIMINARY PROCEDURE: Remove switch and wiring assembly (para 2-77).
2-240
TM 11-5820-670-30
2-83. TENS FREQUENCY SELECTOR SWITCH S9101 REPLACEMENT. (CONT)
NOTE
View from rear of switch. Position switch locating tab as shown in illustrations. Tag all
wires with index numbers for location and description.
REMOVAL
1. Using screwdriver, remove two screws (1), retaining plate (2), cam stop (3), and cam stop
guide (4).
2. Remove roll pin (5) from cam (6) and slide cam off switch stem (7).
3. Using wrench, remove nut (8) and IT Iockwasher (9) and carefully push switch (10) away from
panel (11).
4. Starting from wafer D, unsolder all wires as shown in illustrations and tables.
5. Remove switch (10).
2-241
TM 11-5820-670-30
2-83. TENS FREQUENCY SELECTOR SWITCH S9101 REPLACEMENT. (CONT)
EL1AT083
2-242
TM 11-5820-670-30
2-83. TENS FREQUENCY SELECTOR SWITCH S9101 REPLACEMENT. (CONT)
INSTALLATION
1. Position switch (1) in panel (2) with switch locating tab in line with hole in panel.
NOTE
View from rear of switch. Position switch locating tab as shown in illustration. See FO-21
for complete wiring diagram.
2. Starting from wafer A and using tags for reference, solder wires as shown in illustrations.
3. Position switch locating tab in hole in panel (2) and install IT Iockwasher (3) and nut (4) and,
using wrench, tighten nut (4).
4. Position cam (5) on switch stem (6) as shown in illustration and install roll pin (7).
5. Position cam stop guide (8) with larger area of guide toward top and install cam stop (9), retaining plate (10), and two screws (11).
6. Using screwdriver, tighten screws (11).
FOLLOW-ON MAINTENANCE: Install switch and wiring assembly (para 2-77).
2-243
TM 11-5820-670-30
2-84. UNITS FREQUENCY SELECTOR SWITCH S9102 REPLACEMENT.
MATERIALS/PARTS: Switch, rotary, S9102 (P/N SMC-620161)
PRELIMINARY PROCEDURE: Remove switch and wiring assembly (para 2-77).
EL1AT085
2-244
TM 11-5820-670-30
2-84. UNITS FREQUENCY SELECTOR SWITCH S9102 REPLACEMENT. (CONT)
EL1AT086
NOTE
View from rear of switch. Position switch locating tab as shown in illustrations. Tag all
wires with index numbers for location and description.
1. Using screwdriver, remove two screws (1), retaining plate (2), cam stop (3), and cam stop
guide (4).
2. Remove roll pin (5) from cam (6) and slide cam off switch stem (7).
3. Using wrench, remove nut (8) and IT Iockwashers (9) and carefully push switch (10) away from
panel (11).
4. Starting from wafer H, unsolder wires as shown in illustrations through wafer D.
2-245
TM 11-5820-670-30
2-84. UNITS FREQUENCY SELECTOR SWITCH S9102 REPLACEMENT. (CONT)
REMOVAL (CONT)
E L1AT087
View from rear of switch. Position switch locating tab as shown in illustrations. Tag all
wires with index numbers for location and description.
5. Starting with wafer C, unsolder wires as shown in illustrations through wafer A.
6. Remove switch.
2-246
TM 11-5820-670-30
2-84.
UNITS SELECTOR SWITCH S9102 REPLACEMENT. (CONT)
INSTALLATION
EL1AT088
1. Position switch stem (1) in hole in panel (2) alining switch locating tab (3) with alinement
hole (4).
EL1AT089
NOTE
View from rear of switch. Position switch locating tab as shown in illustrations. See
FO-21 for complete wiring diagram.
2. Starting from wafer A and using tags for reference, solder wires as shown in illustrations
through wafer B.
2-247
TM 11-5820-670-30
2-84. UNITS FREQUENCY SELECTOR SWITCH S9102 REPLACEMENT. (CONT)
INSTALLATION (CONT)
EL1AT137
2-248
TM 11-5820-670-30
2-84. UNITS FREQUENCY SELECTOR SWITCH S9102 REPLACEMENT. (CONT)
NOTE
View from rear of switch. Position switch locating tab as shown in illustrations. See
FO-21 for complete wiring diagram.
3. Starting with wafer C using tags for reference, solder wires as shown in illustrations through
wafer H.
4. Remove all tags from wires.
2-249
TM 11-5820-670-30
2-84. UNITS FREQUENCY SELECTOR SWITCH S9102 REPLACEMENT. (CONT)
INSTALLATION (CONT)
EL1AT139
5. Position switch locating tab in hole in panel (1) and install IT Iockwasher (2) and nut (3) and,
using wrench, tighten nut (3).
6. Position cam (4) on switch stem (5) as shown in illustration and install roll pin (6).
7. Position cam stop guide (7) with larger area of guide toward top and install cam stop (8), retaining plate (9), and two screws (10).
8. Using screwdriver, tighten screws (10).
FOLLOW-ON MAINTENANCE: Install switch and wiring assembly (para 2-77).
2-250
TM 11-5820-670-30
APPENDIX A
REFERENCES
A-1. SCOPE.
This appendix lists all pamphlets, technical bulletins, technical manuals, and miscellaneous
publications referenced in or related to this manual.
A-2. MISCELLANEOUS PUBLICATIONS.
Reporting of Transportation Discrepancies in Shipments . . . . . . . . . . . . . . . . . . . . . . . . . AR 55-38
Reporting of Item and Packaging Discrepancies . . . . . . . . . . . . . . . . . . . . . . . . . . . . . . . . . . . . AR 735-11-2
Consolidated Index of Army Publications and Blank Forms . . . . . . . . . . . . . . . . . . . . . . DA PAM 310-1
The Army Maintenance Management System (TAMMS) . . . . . . . . . . . . . . . . . . . . . . . . . . . . . DA PAM 738-750
First Aid for Soldiers . . . . . . . . . . . . . . . . . . . . . . . . . . . . . . . . . . . . . . . . . . . . . . . . . . . . . . . . . . . . . . . . . . . . . . . FM 21-11
A-3. TECHNICAL BULLETINS.
Solder and Soldering . . . . . . . . . . . . . . . . . . . . . . . . . . . . . . . . . . . . . . . . . . . . . . . . . . . . . . . . . . . . . . . . . . . . .
Depot Inspection Standard for Repaired Signal Equipment . . . . . . . . . . . . . . . . . . . . . .
Depot Inspection Standard for Refinishing Repaired Signal
Equipment . . . . . . . . . . . . . . . . . . . . . . . . . . . . . . . . . . . . . . . . . . . . . . . . . . . . . . . . . . . . . . . . . . . . . . . . . . . . . . . .
Depot Inspection Standard for Moisture and Fungus Resistant
Treatment . . . . . . . . . . . . . . . . . . . . . . . . . . . . . . . . . . . . . . . . . . . . . . . . . . . . . . . . . . . . . . . . . . . . . . . . .
Field Instructions for Painting and Preserving Electronics Command
Equipment Including Camouflage Pattern Painting of Electrical
Equipment Shelters . . . . . . . . . . . . . . . . . . . . . . . . . . . . . . . . . . . . . . . . . . . . . . . . . . . . . . . . . . . . . . . . . . . . . . . .
TB SIG 222
TB SIG 355-1
TB SIG 355-2
TB SIG 355-3
TB 43-0118
A-4. TECHNICAL MANUALS.
Operator’s and Organizational Maintenance Manual: Radio Set
AN/ARC-131 (NSN 5821-00-937-4686) . . . . . . . . . . . . . . . . . . . . . . . . . . . . . . . . . . . . . . . . . . . . . . . . . .
Direct Support and General Support (Aviation Intermediate) Maintenance
Manual Radio Set AN/ARC-131 . . . . . . . . . . . . . . . . . . . . . . . . . . . . . . . . . . . . . . . . . . . . . . . . . . . . . . . . . .
Direct Support and General Support Maintenance Repair Parts and Special
Tools List (Including Depot Maintenance Repair Parts and Special Tools)
for Radio Set AN/ARC-131 (NSN 5821-00-937-4686) . . . . . . . . . . . . . . . . . . . . . . . . . . . . . . .
Operator’s Organizational, Direct Support, General Support, and Depot
Maintenance Manual: Multimeters ME-26A/U (NSN 6625-00-360-2493),
ME-26 B/U and ME-26C/U (NSN 6625-00-646-9409), and ME-26D/U
(NSN 6625-00-913-9781) . . . . . . . . . . . . . . . . . . . . . . . . . . . . . . . . . . . . . . . . . . . . . . . . . . . . . . . . . . .
Organizational, Direct Support, and General Support Maintenance Repair
Parts and Special Tools List (Including Depot Maintenance Repair
Parts and Special Tools List): Multimeter ME-26A/U (NSN 6625-00360-2493), ME-26 B/U and ME-26C/U (NSN 6625-00-646-9409), and
ME-26D/U (NSN 6625-00-913-9781) . . . . . . . . . . . . . . . . . . . . . . . . . . . . . . . . . . . . . . . . . . . . . . . . . . . .
Operator’s, Organizational, Direct Support, and General Support Maintenance Manual: Spectrum Analyzer TS-723A/U, TS-723B/U, TS-723C/U,
and TS-723D/U (NSN 6625-00-668-9418) . . . . . . . . . . . . . . . . . . . . . . . . . . . . . . . . . . . . . . . . . . . . . . . .
Operator’s and Organizational Maintenance Manual: Voltmeter, Meter
ME-30A/U and Voltmeters, Electronic, ME-30B/U, ME-30C/U, and
ME-30E/U . . . . . . . . . . . . . . . . . . . . . . . . . . . . . . . . . . . . . . . . . . . . . . . . . . . . . . . . . . . . . . . . . . . . . . . . . . .
TM 11-5820-670-12
FM 11-5820-670-34
TM 11-5820-670-34P
TM 11-6625-200-15
TM 11-6625-200-24P
TM 11-6625-255-14
TM 11-6625-320-12
A-1
TM 11-5820-670-30
A-4. TECHNICAL MANUALS. (CONT)
Organizational, Direct Support and General Support Repair Parts and
Special Tools List (Including Depot Maintenance Repair Parts and
Special Tools): Voltmeters, Electronic, ME-30A/U, ME-30B/U, and
ME-30C/U and ME-30E/U . . . . . . . . . . . . . . . . . . . . . . . . . . . . . . . . . . . . . . . . . . . . . . . . . . . . . . . . . . . . . . .
Direct Support, General Support, and Depot Maintenance Manual: Voltmeter, Meter ME-30A/U and Voltmeters, Electronic, ME-30B/U and
ME-30C/U . . . . . . . . . . . . . . . . . . . . . . . . . . . . . . . . . . . . . . . . . . . . . . . . . . . . . . . . . . . . . . . . . . . . . . . . . . . . . . . . . .
Operator’s, Organizational, Direct Support, General Support, and Depot
Maintenance Manual: Multimeter TS-352B/U (6625-00-553-0172) . . . . . . . . . . . . . . .
Organizational, Direct Support, and General Support Repair Parts
and Special Tools Lists (Including Depot Maintenance Repair
Parts and Special Tools) for Multimeter TS-352B/U
(NSN 6625-00-553-0142) . . . . . . . . . . . . . . . . . . . . . . . . . . . . . . . . . . . . . . . . . . . . . . . . . . . . . . . . . . . . . . . . . . .
Operator’s and Organizational Maintenance Manual: Stroboscopes
TS-805B/U, TS-805C/U (NSN 6625-00-752-7992) and TS-805D/U
(6625-00-196-2858) and TS-805E/U (6625-01-155-4538) . . . . . . . . . . . . . . . . . . . . . . . . . . . . . . .
Organizational Maintenance Repair Parts and Special Tools Lists for
Stroboscopes TS-805B/U, TS-805C/U (NSN 6625-00-752-7992) and
TS-805D/U (6625-00-223-5150) . . . . . . . . . . . . . . . . . . . . . . . . . . . . . . . . . . . . . . . . . . . . . . . . . . . . . . . . . . . .
Operator and Organizational Maintenance Manual: Meter, Modulation
ME-57/U (NSN 6625-00-647-3737) . . . . . . . . . . . . . . . . . . . . . . . . . . . . . . . . . . . . . . . . . . . . . . . . . . . . . . . .
Organizational Maintenance Repair Parts and Special Tools List: Meter,
Modulation ME-57/U (NSN 6625-00-647-3737) . . . . . . . . . . . . . . . . . . . . . . . . . . . . . . . . . . . . . .
Direct Support, General Support, and Depot Maintenance Manual: Meter,
Modulation ME-57/U (NSN 6625-00-647-3737) . . . . . . . . . . . . . . . . . . . . . . . . . . . . . . . . . . . . . . . .
Operator’s, Organizational Direct Support, General Support, and Depot
Maintenance Manual: Wattmeter AN/URM-120 . . . . . . . . . . . . . . . . . . . . . . . . . . . . . .
Organizational, Direct Support and General Support Maintenance Repair
Parts and Special Tools Lists (Including Depot Maintenance Repair Parts
and Special Tools for Test Set Radio Frequency, Power AN/URM-120
(NSN 6625-00-790-2746) . . . . . . . . . . . . . . . . . . . . . . . . . . . . . . . . . . . . . . . . . . . . . . . . . . . . . . . . . . . . . . . .
Operator’s and Organizational Maintenance Manual Including Repair Parts
and Special Tools List: Test Sets, Radio AN/VRM-1 and AN/VRM-1A
(NSN 6625-00-892-5542) . . . . . . . . . . . . . . . . . . . . . . . . . . . . . . . . . . . . . . . . . . . . . . . . . . . . . . . . . . . . . . . .
Operator’s Manual: Signal Generators AN/USM-44 (NSN 6625-00-6694031) and AN/USM-44A (NSN 6625-00-176-5708) . . . . . . . . . . . . . . . . . . . . . . . . . . . . . . . . . . .
Organizational, Field, and Depot Maintenance Manual: Signal Gene
raters AN/USM-44 (NSN 6625-00-669-4031) and AN/USM-44A
(NSN 6625-00-176-5708) . . . . . . . . . . . . . . . . . . . . . . . . . . . . . . . . . . . . . . . . . . . . . . . . . . . . . . . . .
Organizational, Direct Support and General Support Maintenance Repair
Parts and Special Tools Lists (Including Depot Maintenance Repair Parts
and Special Tools List) for Signal Generators AN/USM-44 (NSN 862500-669-4031) and AN/USM-44A (6625-00-176-5708) . . . . . . . . . . . . . . . . . . . . . . . . .
Operator, Organizational and Field Maintenance Manual: Voltmeter,
Electronic AN/URM-145 (NSN 6625-00-973-3986) . . . . . . . . . . . . . . . . . . . . . . . . . . . . . . . . . . .
Operator, Organizational, Direct Support, General Support and Depot
Maintenance Manual: Electronic Voltmeter AN/URM-145
(NSN 6625-00-973-3986) . . . . . . . . . . . . . . . . . . . . . . . . . . . . . . . . . . . . . . . . . . . . . . . . . . . . . . . . . . . . . . . .
Organizational, Direct Support, General Support, and Depot Maintenance
Repair Parts and Special Tools Lists (Including Depot Maintenance
Repair Parts and Special Tools) for Voltmeter, Electronic AN/URM-145
(NSN 6625-00-973-3986) . . . . . . . . . . . . . . . . . . . . . . . . . . . . . . . . . . . . . . . . . . . . . . . . . . . . . . . . . . . . . . .
A-2
TM 11-6625-320-24P
TM 11-6625-320-35
TM 11-6625-366-15
TM 11-6625-366-24P
TM 11-6625-396-12
TM 11-6625-396-20P
TM 11-6625-400-12
TM 11-6625-400-20P
TM 11-6625-400-35
TM 11-6625-446-15
TM 11-6625-446-24P
TM 11-6625-496-12
TM 11-6625-508-10
TM 11-6625-508-25
TM 11-6625-508-24P
TM 11-6625-524-14
TM 11-6625-524-15-1
TM 11-6625-524-24P-1
TM 11-5820-670-30
A-4. TECHNICAL MANUALS. (CONT)
Operator and Organizational Maintenance Manual (Including Repair Parts
and Special Tool Lists): Generator, Signal, AN/URM-103 . . . . . . . . . . . . . . . . . . . . . . . . .
Operator’s, Organizational, Direct Support, and General Support Maintenance Repair Parts and Special Tools List (Including Depot Maintenance Repair Parts and Special Tools List) for Multimeter
AN/USM-223 . . . . . . . . . . . . . . . . . . . . . . . . . . . . . . . . . . . . . . . . . . . . . . . . . . . . . . . . . . . . . . . . . . . . . . . . . . . . . .
Operator’s, Organizational, Direct Support and General Support, and
Depot Maintenance Manual for Signal Generator AN/URM-127
(NSN 6625-00-783-5965) . . . . . . . . . . . . . . . . . . . . . . . . . . . . . . . . . . . . . . . . . . . . . . . . . . . . . . . . . . . . . . . . .
Organizational, Direct Support and General Support Maintenance Repair
Parts and Special Tools Lists (Including Depot Maintenance Repair
Parts and Special Tools for Signal Generator AN/URM-127
(NSN 6625-00-738-5965) . . . . . . . . . . . . . . . . . . . . . . . . . . . . . . . . . . . . . . . . . . . . . . . . . . . . . . . . . . . . . . . .
Operator’s Manual: Digital Readout, Electronic Counter AN/USM-207
(NSN 6625-00-911-6368) . . . . . . . . . . . . . . . . . . . . . . . . . . . . . . . . . . . . . . . . . . . . . . . . . . . . . . . . . . . . . . . . . .
Organizational, Direct Support, General Support, and Depot Maintenance Manual: Digital Readout, Electronic Counter AN/USM-207
(NSN 6625-00-911-6368) . . . . . . . . . . . . . . . . . . . . . . . . . . . . . . . . . . . . . . . . . . . . . . . . . . . . . . . . . . . . . . . . .
Organizational, Direct Support, and General Support Maintenance Repair Parts and Special Tools Lists for Digital Readout Electronic
Counter AN/URM-207 (NSN 6625-00-911-6368) and AN/URM-207A
(6625-00-044-3228) . . . . . . . . . . . . . . . . . . . . . . . . . . . . . . . . . . . . . . . . . . . . . . . . . . . . . . . . . . . . . . . . .
Operator’s and Organizational Maintenance Manual: Maintenance Kit
MK-1035/ARC-131 (NSN 5821-00-935-0058) . . . . . . . . . . . . . . . . . . . . . . . . . . . . . . . . . . . . . . . . . .
Direct Support, General Support and Depot Maintenance Manual: Maintenance Kit MK-1035/ARC-131 (NSN 5821-00-935-0058) . . . . . . . . . . . . . . . . . . . . . . . . . . .
Operator’s, Organizational, Direct Support, General Support and
Depot Maintenance Manual: Oscilloscope AN/USM-281A
(NSN 6625-00-228-2201) . . . . . . . . . . . . . . . . . . . . . . . . . . . . . . . . . . . . . . . . . . . . . . . . . . . . . . . . . . . . . . . . .
Administrative Storage of Equipment . . . . . . . . . . . . . . . . . . . . . . . . . . . . . . . . . . . . . . . . . . . . . . . . . .
Procedures for Destruction of Electronics Materiel to Prevent Enemy
Use (Electronics Command) . . . . . . . . . . . . . . . . . . . . . . . . . . . . . . . . . . . . . . . . . . . . . . . . . . . . . . . . . .
TM 11-6625-586-12
TM 11-6625-654-14
TM 11-6625-683-14
TM 11-6625-683-24P
TM 11-6625-700-10
TM 11-6625-700-25
TM 11-6625-700-24P
TM 11-6625-1610-12
TM 11-6624-1610-35
TM 11-6625-1703-15
TM 740-90-1
TM 750-244-2
A-3/(A-4 blank)
TM 11-5820-670-30
APPENDIX B
EXPENDABLESUPPLIES AND MATERIALS LIST
B-1. SCOPE.
This appendix lists expendable supplies and materials you will need to maintain the AN/ARC-131.
B-2. EXPLANATION OF COLUMNS.
a. Column 1, Item Number. This number is assigned to the entry in the listing and is referenced in
the narrative instructions to identify the material.
b. Column 2, Level. This column identifies the lowest level of maintenance that requires the listed
item.
F – Direct Support Maintenance
H – General Support Maintenance
c. Column 3, National Stock Number. This is the National stock number assigned to the item; use
it to request or requisition the item.
d. Column 4, Description. Indicates the Federal item name and, if required, a description to
identify the item. The last line for each item indicates the Federal Supply Code for Manufacturer
(FSCM) in parentheses followed by the part number.
e. Column 5, Unit of Measure (U/M). Indicates the measure used in performing the actual
maintenance function. This measure is expressed by a two-character alphabetical abbreviation (eg,
ea, in., pr). If the unit of measure differs from the unit of issue, requisition the lowest unit of issue
that will satisfy your requirements.
EXPENDABLE SUPPLIES AND MATERIALS LIST
(1)
ITEM
NUMBER
1
(2)
LEVEL
F
(3)
NATIONAL STOCK
NUMBER
6850-00-281-4033
(4)
DESCRIPTION (FSCM)
Compound, Heat Sink, Dow
Corning, DC-340
(5)
U/M
oz
B-1/(B12 blank)
TM 11-5820-670-30
INDEX
Subject
Page
A
Administrative storage . . . . . . . . . . . . . . . . . . . . . . . . . . . . . . . . . . . . . . . . . . . . . . . . . . . . . . . . . . . . . . . . . . . . . . . . . . . . . . . . . . . . . . . .
Alinement and adjustment procedures
Audio level adjustment . . . . . . . . . . . . . . . . . . . . . . . . . . . . . . . . . . . . . . . . . . . . . . . . . . . . . . . . . . . . . . . . . . . . . . . . . . . . . . . . . . . . .
Carrier squelch adjustment . . . . . . . . . . . . . . . . . . . . . . . . . . . . . . . . . . . . . . . . . . . . . . . . . . . . . . . . . . . . . . . . . . . . . . . . . . . . . . . . . . .
Gearbox assembly A9700 alinement . . . . . . . . . . . . . . . . . . . . . . . . . . . . . . . . . . . . . . . . . . . . . . . . . . . . . . . . . . . . . . . . . . . . .
General . . . . . . . . . . . . . . . . . . . . . . . . . . . . . . . . . . . . . . . . . . . . . . . . . . . . . . . . . . . . . . . . . . . . . . . . . . . . . . . . . . . . . . . . . . . . . . . . . . . . . . .
Homing adjustment . . . . . . . . . . . . . . . . . . . . . . . . . . . . . . . . . . . . . . . . . . . . . . . . . . . . . . . . . . . . . . . . . . . . . . . . . . . . . . . . . . . . . . .
Local oscillator alinement . . . . . . . . . . . . . . . . . . . . . . . . . . . . . . . . . . . . . . . . . . . . . . . . . . . . . . . . . . . . . . . . . . . . . . . . . . . . . . . .
Narrow band deviation adjustments . . . . . . . . . . . . . . . . . . . . . . . . . . . . . . . . . . . . . . . . . . . . . . . . . . . . . . . . . . . . . . . . . . . . . . .
Receiver sensitivity adjustments . . . . . . . . . . . . . . . . . . . . . . . . . . . . . . . . . . . . . . . . . . . . . . . . . . . . . . . . . . . . . . . . . . . . . . . . .
Rf amplifier assembly A6500 alinement . . . . . . . . . . . . . . . . . . . . . . . . . . . . . . . . . . . . . . . . . . . . . . . . . . . . . . . . . . . . . . . . . . .
Tone modulation frequency and deviation adjustment, 150 Hz . . . . . . . . . . . . . . . . . . . . . . . . . . . . . . . . . . . . . . . .
Tone squelch adjustment . . . . . . . . . . . . . . . . . . . . . . . . . . . . . . . . . . . . . . . . . . . . . . . . . . . . . . . . . . . . . . . . . . . . . . . . . . . . . . . . . . . .
Antenna tuning and protection module A1100 . . . . . . . . . . . . . . . . . . . . . . . . . . . . . . . . . . . . . . . . . . . . . . . . . . . . . . . . . . . .
Assembly replacement, A1000 . . . . . . . . . . . . . . . . . . . . . . . . . . . . . . . . . . . . . . . . . . . . . . . . . . . . . . . . . . . . . . . . . . . . . . . . . . . . . .
Assemby replacement, A1000, A2000, A6000, and A9700 . . . . . . . . . . . . . . . . . . . . . . . . . . . . . . . . . . . . . . . . . . . .
Assembly replacement, A1600 . . . . . . . . . . . . . . . . . . . . . . . . . . . . . . . . . . . . . . . . . . . . . . . . . . . . . . . . . . . . . . . . . . . . . . . .
Assembly replacement, A2000 . . . . . . . . . . . . . . . . . . . . . . . . . . . . . . . . . . . . . . . . . . . . . . . . . . . . . . . . . . . . . . . . . . . . . . . . . . . . . . . .
Assembly replacement, A2100 . . . . . . . . . . . . . . . . . . . . . . . . . . . . . . . . . . . . . . . . . . . . . . . . . . . . . . . . . . . . . . . . . . . . . . . .
Assembly replacement, A4500 . . . . . . . . . . . . . . . . . . . . . . . . . . . . . . . . . . . . . . . . . . . . . . . . . . . . . . . . . . . . . . . . . . . . . . . . . . . . . . . . . . .
Assembly replacement, A4900 . . . . . . . . . . . . . . . . . . . . . . . . . . . . . . . . . . . . . . . . . . . . . . . . . . . . . . . . . . . . . . . . . . . . . . . . . . . . . . . . . . .
Assembly replacement, A6000 . . . . . . . . . . . . . . . . . . . . . . . . . . . . . . . . . . . . . . . . . . . . . . . . . . . . . . . . . . . . . . . . . . . . . . . . . . . . . . . . .
Assembly replacement, A6500 . . . . . . . . . . . . . . . . . . . . . . . . . . . . . . . . . . . . . . . . . . . . . . . . . . . . . . . . . . . . . . . . . . . . . . . .
Assembly replacement, A6600 . . . . . . . . . . . . . . . . . . . . . . . . . . . . . . . . . . . . . . . . . . . . . . . . . . . . . . . . . . . . . . . . . . . . . . . . . . .
Assembly replacement, A9500 . . . . . . . . . . . . . . . . . . . . . . . . . . . . . . . . . . . . . . . . . . . . . . . . . . . . . . . . . . . . . . . . . . . . . . . . . . . . . . . .
Assembly replacement, A9700 . . . . . . . . . . . . . . . . . . . . . . . . . . . . . . . . . . . . . . . . . . . . . . . . . . . . . . . . . . . . . . . . . . . . . . . . . . . . . . . . . .
Audio amplifier module A5400 (receive mode) . . . . . . . . . . . . . . . . . . . . . . . . . . . . . . . . . . . . . . . . . . . . . . . . . . . . . . . . . . . . . . .
Audio amplifier module A5400 (transmit mode) . . . . . . . . . . . . . . . . . . . . . . . . . . . . . . . . . . . . . . . . . . . . . . . . . . . . . . . . . . . . .
Audio and squelch preamplifier module A4300 . . . . . . . . . . . . . . . . . . . . . . . . . . . . . . . . . . . . . . . . . . . . . . . . . . . . . . . . . . . . . .
Audio distortion troubleshooting . . . . . . . . . . . . . . . . . . . . . . . . . . . . . . . . . . . . . . . . . . . . . . . . . . . . . . . . . . . . . . . . . . . . . . .
Audio frequency response and front panel meter test . . . . . . . . . . . . . . . . . . . . . . . . . . . . . . . . . . . . . . . . . . . . . . . . . . . . . . .
Audio level adjustment . . . . . . . . . . . . . . . . . . . . . . . . . . . . . . . . . . . . . . . . . . . . . . . . . . . . . . . . . . . . . . . . . . . . . . . . . . . . . . . . . . . . . . . . . . .
Audio mixer module A8600 . . . . . . . . . . . . . . . . . . . . . . . . . . . . . . . . . . . . . . . . . . . . . . . . . . . . . . . . . . . . . . . . . . . . . . . . . . . . . . . . . . .
Audio power output and distortion test . . . . . . . . . . . . . . . . . . . . . . . . . . . . . . . . . . . . . . . . . . . . . . . . . . . . . . . . . . . . . . . . . . . . . . . .
Audio power troubleshooting . . . . . . . . . . . . . . . . . . . . . . . . . . . . . . . . . . . . . . . . . . . . . . . . . . . . . . . . . . . . . . . . . . . . . . . . . . . . . . .
Automatic gain control (agc). . . . . . . . . . . . . . . . . . . . . . . . . . . . . . . . . . . . . . . . . . . . . . . . . . . . . . . . .
1-2
2-132
2-134
2-130
2-126
2-148
2-146
2-140
2-142
2-126
2-136
2-138
1-22
2-214
2-208
2-221
2-218
2-184
2-182
2-202
2-216
2-196
2-177
2-159
2-219
1-28
1-45
1-28
2-81
2-8
2-132
1-36
2-6
2-80
1-45
B
Buffer amplifier module A6400 and regulator assembly . . . . . . . . . . . . . . . . . . . . . . . . . . . . . . . . . . . . . . . . . . . . . . . . . .
1-41
C
Carrier squelch adjustment . . . . . . . . . . . . . . . . . . . . . . . . . . . . . . . . . . . . . . . . . . . . . . . . . . . . . . . . . . . . . . . . . . . . . . . . . . . . . . . . . . . . . .
Carrier squelch sensitivity troubleshooting . . . . . . . . . . . . . . . . . . . . . . . . . . . . . . . . . . . . . . . . . . . . . . . . . . . . . . . . . . . . . . . . . . .
Circuit troubleshooting, +16 vdc . . . . . . . . . . . . . . . . . . . . . . . . . . . . . . . . . . . . . . . . . . . . . . . . . . . . . . . . . . . . . . . . . . . . . . . . . . . . .
Circuit troubleshooting, + 27.5 vdc . . . . . . . . . . . . . . . . . . . . . . . . . . . . . . . . . . . . . . . . . . . . . . . . . . . . . . . . . . . . . . . . . . . . . . . . .
Consolidated index of Army publications and blank forms . . . . . . . . . . . . . . . . . . . . . . . . . . . . . . . . . . . . . . . .
2-134
2-88
2-68
2-61
1-2
Index 1
TM 11-5820-670-30
INDEX (CONT)
Page
Subject
C (CONT)
Control, radio set C-7088/ARC-131 functioning . . . . . . . . . . . . . . . . . . . . . . . . . . . . . . . . . . . . . . . . . . . . . . . . . . . . . . . . . 1-63
Control unit troubleshooting . . . . . . . . . . . . . . . . . . . . . . . . . . . . . . . . . . . . . . . . . . . . . . . . . . . . . . . . . . . . . . . . . . . . . . . . . . . . . . . . 2-114
Crs balanced mixer A3200 . . . . . . . . . . . . . . . . . . . . . . . . . . . . . . . . . . . . . . . . . . . . . . . . . . . . . . . . . . . . . . . . . . . . . . . . . . . . . 1-10
Crs first and second if. amplifier A3400/crs third if. amplifier and
1-14
limiter A3500 . . . . . . . . . . . . . . . . . . . . . . . . . . . . . . . . . . . . . . . . . . . . . . . . . . . . . . . . . . . . . . . . . . . . . . . . . . . . . . . . . . . . . . . . . . . . . . . . .
Crs hunt discriminator A3600, crs phase discriminator A3700, and reference
1-15
oscillator A2000 . . . . . . . . . . . . . . . . . . . . . . . . . . . . . . . . . . . . . . . . . . . . . . . . . . . . . . . . . . . . . . . . . . . . . . . . . . . . . . . . . . . . . . . . . . . . .. ..
1-11
.
.
.
.
.
.
.
.
.
.
.
.
.
.
.
.
.
.
.
.
.
.
.
.
.
.
.
.
.
.
.
.
.
.
.
.
.
.
.
.
.
.
.
.
.
.
.
.
.
Crs second mixer A3300 and crystal switch A2000
D
Destruction of Army electronics materiel to prevent enemy use . . . . . . . . . . . . . . . . . . . . . . . . . . . . . . . . . . . . . . . .
Differences between models/silicon versions . . . . . . . . . . . . . . . . . . . . . . . . . . . . . . . . . . . . . . . . . . . . . . . . . . . . . . . . . . .
Direct support maintenance procedures
Control unit C-7088/ARC-131
Electrical connector J9101 replacement . . . . . . . . . . . . . . . . . . . . . . . . . . . . . . . . . . . . . . . . . . . . . . . . . . . . . . . . . . . . . .
Front panel dial mask replacement . . . . . . . . . . . . . . . . . . . . . . . . . . . . . . . . . . . . . . . . . . . . . . . . . . . . . . . . . . . . . . . . . . . .
Front panel knobs replacement . . . . . . . . . . . . . . . . . . . . . . . . . . . . . . . . . . . . . . . . . . . . . . . . . . . . . . . . . . . . . . . . . . . .
Light panel replacement . . . . . . . . . . . . . . . . . . . . . . . . . . . . . . . . . . . . . . . . . . . . . . . . . . . . . . . . . . . . . . . . . . . . . . . . . . . . . . . . . . . .
Mode switch S9105 replacement . . . . . . . . . . . . . . . . . . . . . . . . . . . . . . . . . . . . . . . . . . . . . . . . . . . . . . . . . . . . . . . . . . . . . . . .
Squelch switch S9106 replacement . . . . . . . . . . . . . . . . . . . . . . . . . . . . . . . . . . . . . . . . . . . . . . . . . . . . . . . . . . . . . . . . . .
Switch and wiring assembly replacement . . . . . . . . . . . . . . . . . . . . . . . . . . . . . . . . . . . . . . . . . . . . . . . . . . . . . . .
Tens frequency selector switch S9101 replacement . . . . . . . . . . . . . . . . . . . . . . . . . . . . . . . . . . . . . . . . . . . . . . .
Tenths frequency selector switch S9103 and/or hundredths frequency selector
switch S9104 replacement . . . . . . . . . . . . . . . . . . . . . . . . . . . . . . . . . . . . . . . . . . . . . . . . . . . . . . . . . . . . . . . . . . . . . . . . . . . . . . .
Units frequency selector switch S9102 replacement . . . . . . . . . . . . . . . . . . . . . . . . . . . . . . . . . . . . . . . . . . . . . . . . . .
Units frequency selector switch S9102 replacement . . . . . . . . . . . . . . . . . . . . . . . . . . . . . . . . . . . . . . . . . . . . . . . .
Volume control switch R9103 replacement . . . . . . . . . . . . . . . . . . . . . . . . . . . . . . . . . . . . . . . . . . . . . . . . . . . . . . . . .
General
Receiver/transmitter, RT-823/ARC-131
Assembly replacement, A1000 . . . . . . . . . . . . . . . . . . . . . . . . . . . . . . . . . . . . . . . . . . . . . . . . . . . . . . . . . . . . . . . . . . . . . . . . . . .
Assembly replacement, A1000, A2000, A6000, and A9700 . . . . . . . . . . . . . . . . . . . . . . . . . . . . . . . . . . . . .
Assembly replacement, A1600 . . . . . . . . . . . . . . . . . . . . . . . . . . . . . . . . . . . . . . . . . . . . . . . . . . . . . . . . . . . . . . . . . . . . . . .
Assembly replacement, A2000 . . . . . . . . . . . . . . . . . . . . . . . . . . . . . . . . . . . . . . . . . . . . . . . . . . . . . . . . . . . . . . . . . . . . . . . . . .
Assembly replacement, A2100 . . . . . . . . . . . . . . . . . . . . . . . . . . . . . . . . . . . . . . . . . . . . . . . . . . . . . . . . . . . . . . . . . . . . . . . . . .
Assembly replacement, A4500 . . . . . . . . . . . . . . . . . . . . . . . . . . . . . . . . . . . . . . . . . . . . . . . . . . . . . . . . . . . . . . . . . . . . . . . . .
Assembly replacement, A4900 . . . . . . . . . . . . . . . . . . . . . . . . . . . . . . . . . . . . . . . . . . . . . . . . . . . . . . . . . . . . . . . . . . .
Assembly replacement, A6000 . . . . . . . . . . . . . . . . . . . . . . . . . . . . . . . . . . . . . . . . . . . . . . . . . . . . . . . . . . . . . . . . . . . . . . . . . . . .
Assembly replacement, A6500 . . . . . . . . . . . . . . . . . . . . . . . . . . . . . . . . . . . . . . . . . . . . . . . . . . . . . . . . . . . . . . . . . . . . . . . . . .
Assembly replacement, A6600 . . . . . . . . . . . . . . . . . . . . . . . . . . . . . . . . . . . . . . . . . . . . . . . . . . . . . . . . . . . . . . . . . . . . . . . . . .
Assembly replacement, A9500 . . . . . . . . . . . . . . . . . . . . . . . . . . . . . . . . . . . . . . . . . . . . . . . . . . . . . . . . . . . . . . . . . . . . . . . . . . .
Assembly replacement, A9700 . . . . . . . . . . . . . . . . . . . . . . . . . . . . . . . . . . . . . . . . . . . . . . . . . . . . . . . . . . . . . . . . . . . . . . . . . .
Front panel replacement . . . . . . . . . . . . . . . . . . . . . . . . . . . . . . . . . . . . . . . . . . . . . . . . . . . . . . . . . . . . . . . . . . . . . . . . . . . . . . . . . . .
Homing module A4800 replacement . . . . . . . . . . . . . . . . . . . . . . . . . . . . . . . . . . . . . . . . . . . . . . . . . . . . . . . . . . . . . . . . . . .
Low-pass filter FL4501 replacement . . . . . . . . . . . . . . . . . . . . . . . . . . . . . . . . . . . . . . . . . . . . . . . . . . . . . . . . . . . . . . . . . . . .
Modules and assembly replacement, A3000 . . . . . . . . . . . . . . . . . . . . . . . . . . . . . . . . . . . . . . . . . . . . . . . . . . . . . . . . .
Modules and assembly replacement, A4000 . . . . . . . . . . . . . . . . . . . . . . . . . . . . . . . . . . . . . . . . . . . . . . . . . . . . . . . . . . .
Modules and assembly replacement, A5500 . . . . . . . . . . . . . . . . . . . . . . . . . . . . . . . . . . . . . . . . . . . . . . . . . . . . . . . . . . .
Index 2
1-2
1-3
2-238
2-224
2-222
2-225
2-234
2-228
2-226
2-240
2-232
2-244
2-244
2-230
2-214
2-208
2-221
2-218
2-184
2-182
2-202
2-216
2-196
2-177
2-159
2-219
2-185
2-153
2-205
2-160
2-154
2-166
TM 11-5820-670-30
INDEX (CONT)
Page
Subject
D (CONT)
Modules and assembly replacement, A8700 . . . . . . . . . . . . . . . . . . . . . . . . . . . . . . . . . . . . . . . . . . . . . . . . . . . . . . . . .
Module replacement, A1100 through A1500 . . . . . . . . . . . . . . . . . . . . . . . . . . . . . . . . . . . . . . . . . . . . . . . . . . . . . . . .
Module replacement, A6300 and A6400 . . . . . . . . . . . . . . . . . . . . . . . . . . . . . . . . . . . . . . . . . . . . . . . . . . . . . . . .
Power supply circuit card replacement . . . . . . . . . . . . . . . . . . . . . . . . . . . . . . . . . . . . . . . . . . . . . . . . . . . . . . . . . . . .
Radio interference filter FL9601 replacement . . . . . . . . . . . . . . . . . . . . . . . . . . . . . . . . . . . . . . . . . . . . . . . . . . . . .
Reflectometer and sidetone detector Z4502 replacement . . . . . . . . . . . . . . . . . . . . . . . . . . . . . . . . .
Relay K3001 replacement . . . . . . . . . . . . . . . . . . . . . . . . . . . . . . . . . . . . . . . . . . . . . . . . . . . . . . . . . . . . . . . . . . . . . . . . . . .
Relays K4501 through K4504 replacement . . . . . . . . . . . . . . . . . . . . . . . . . . . . . . . . . . . . . . . . . . . . . . . . . . . . . .
Relays K9601 through K9606 replacement . . . . . . . . . . . . . . . . . . . . . . . . . . . . . . . . . . . . . . . . . . . . . . . . . . . .
RF attenuator and diode switch Z4501 replacement . . . . . . . . . . . . . . . . . . . . . . . . . . . . . . . . . . . . . . . . . . . .
RT case replacement . . . . . . . . . . . . . . . . . . . . . . . . . . . . . . . . . . . . . . . . . . . . . . . . . . . . . . . . . . . . . . . . . . . . . . . . . . . . . . . . . .
SQ ADJ switch R9602 replacement . . . . . . . . . . . . . . . . . . . . . . . . . . . . . . . . . . . . . . . . . . . . . . . . . . . . . . . . . . . . . . . . . . . .
SQ DIS switch S9602 and XMTR test switch S9603 replacement . . . . . . . . . . . . . . . . . . . . . . . . . .
Test meter M9601 replacement . . . . . . . . . . . . . . . . . . . . . . . . . . . . . . . . . . . . . . . . . . . . . . . . . . . . . . . . . . . . . . . . . . . . . .
Test switch S9601 replacement . . . . . . . . . . . . . . . . . . . . . . . . . . . . . . . . . . . . . . . . . . . . . . . . . . . . . . . . . . . . . . . . . . . . .
Transistor Q9601 replacement . . . . . . . . . . . . . . . . . . . . . . . . . . . . . . . . . . . . . . . . . . . . . . . . . . . . . . . . . . . . . . . . . . . . . . . .
XMTR HI-LO switch S9604 replacement . . . . . . . . . . . . . . . . . . . . . . . . . . . . . . . . . . . . . . . . . . . . . . . . . . . . . . . . . . . .
2-172
2-186
2-180
2-178
2-198
2-204
2-220
2-206
2-207
2-203
2-152
2-194
2-190
2-189
2-192
2-200
2-195
E
Electrical connector J9101 replacement . . . . . . . . . . . . . . . . . . . . . . . . . . . . . . . . . . . . . . . . . . . . . . . . . . . . . . . . . . . . . . . . . 2-238
Equipment characteristics, capabilities, and features . . . . . . . . . . . . . . . . . . . . . . . . . . . . . . . . . . . . . . . . . . . . . . . . . 1-3
Equipment description . . . . . . . . . . . . . . . . . . . . . . . . . . . . . . . . . . . . . . . . . . . . . . . . . . . . . . . . . . . . . . . . . . . . . . . . . . . . . . . . . . . 1-3
1-3
Differences between models/silicon versions . . . . . . . . . . . . . . . . . . . . . . . . . . . . . . . . . . . . . . . . . . . . . . . . . . . . . . . . . .
Equipment characteristics, capabilities, and features . . . . . . . . . . . . . . . . . . . . . . . . . . . . . . . . . . . . . . . . . . . . . . 1-3
F
First and second if. amplifier A4100 . . . . . . . . . . . . . . . . . . . . . . . . . . . . . . . . . . . . . . . . . . . . . . . . . . . . . . . . . . . . . . . . . . .
First and second if. amplifiers module A8300 . . . . . . . . . . . . . . . . . . . . . . . . . . . . . . . . . . . . . . . . . . . . . . . . . . . . . .
First RF amplifier module A1200. . . . . . . . . . . . . . . . . . . . . . . . . . . . . . . . . . . . . . . . . . . . . . . . . . . . . . . . . . . . . . . . . . . . . . . . . . .
Front panel dial mask replacement . . . . . . . . . . . . . . . . . . . . . . . . . . . . . . . . . . . . . . . . . . . . . . . . . . . . . . . . . . . . . . . . . . . . . . . .
Front panel knobs replacement . . . . . . . . . . . . . . . . . . . . . . . . . . . . . . . . . . . . . . . . . . . . . . . . . . . . . . . . . . . . . . . . . . . . . . . . . . .
Front panel replacement . . . . . . . . . . . . . . . . . . . . . . . . . . . . . . . . . . . . . . . . . . . . . . . . . . . . . . . . . . . . . . . . . . . . . . . . . . . . . . . . . . . .
1-26
1-37
1-22
2-222
2-185
G
Gearbox assembly A9700 . . . . . . . . . . . . . . . . . . . . . . . . . . . . . . . . . . . . . . . . . . . . . . . . . . . . . . . . . . . . . . . . . . . . . . . . . . . . . . . . . . . .
Gearbox assembly A9700 alinement . . . . . . . . . . . . . . . . . . . . . . . . . . . . . . . . . . . . . . . . . . . . . . . . . . . . . . . . . . . . . . . . .
General information . . . . . . . . . . . . . . . . . . . . . . . . . . . . . . . . . . . . . . . . . . . . . . . . . . . . . . . . . . . . . . . . . . . . . . . . . . . . . . . . . . . . . . . . . . .
Administrative storage . . . . . . . . . . . . . . . . . . . . . . . . . . . . . . . . . . . . . . . . . . . . . . . . . . . . . . . . . . . . . . . . . . . . . . . . . . . . . . . . . .
Consolidated index of Army publications and blank forms . . . . . . . . . . . . . . . . . . . . . . . . . . . . . . . . . .
Destruction of Army electronics materials to prevent enemy use . . . . . . . . . . . . . . . . . . . . . . . . . . . . . . . . .
Maintenance forms, records, and reports . . . . . . . . . . . . . . . . . . . . . . . . . . . . . . . . . . . . . . . . . . . . . . . . . . . . . . . . . . . . . .
Nomenclature cross-reference list . . . . . . . . . . . . . . . . . . . . . . . . . . . . . . . . . . . . . . . . . . . . . . . . . . . . . . . . . . . . . . . . . . . . . .
Reporting equipment improvement recommendations (eir) . . . . . . . . . . . . . . . . . . . . . . . . . . . . . . . . . . . . . . . . . .
Safety, care, and handling . . . . . . . . . . . . . . . . . . . . . . . . . . . . . . . . . . . . . . . . . . . . . . . . . . . . . . . . . . . . . . . . . . . . . . . . . . . . . . .
Scope . . . . . . . . . . . . . . . . . . . . . . . . . . . . . . . . . . . . . . . . . . . . . . . . . . . . . . . . . . . . . . . . . . . . . . . . . . . . . . . . . . . . . . . . . . . . . . . . . . . . .
1-20
2-130
1-1
1-2
1-2
1-2
1-1
1-2
1-2
1-3
1-1
Index 3
TM 11-5820-670-30
INDEX (CONT)
Page
Subject
H
Homer-detector amplifier assembly A4800 . . . . . . . . . . . . . . . . . . . . . . . . . . . . . . . . . . . . . . . . . . . . . . . . . . . . . . . . . . . . . . .
Homing adjustment . . . . . . . . . . . . . . . . . . . . . . . . . . . . . . . . . . . . . . . . . . . . . . . . . . . . . . . . . . . . . . . . . . . . . . . . . . . . . . . . . . . . . . . . . .
Homing flag indication troubleshooting . . . . . . . . . . . . . . . . . . . . . . . . . . . . . . . . . . . . . . . . . . . . . . . . . . . . . . . . . . . . . . . . . .
Homing module A4800 replacement . . . . . . . . . . . . . . . . . . . . . . . . . . . . . . . . . . . . . . . . . . . . . . . . . . . . . . . . . . . . . . . . . . . . . . . . .
Homing needle indication troubleshooting . . . . . . . . . . . . . . . . . . . . . . . . . . . . . . . . . . . . . . . . . . . . . . . . . . . . . . . . . . . . . . . . .
Homing sensitivity test . . . . . . . . . . . . . . . . . . . . . . . . . . . . . . . . . . . . . . . . . . . . . . . . . . . . . . . . . . . . . . . . . . . . . . . . . . . . . . . . . . . . . . . .
Homing signal flow . . . . . . . . . . . . . . . . . . . . . . . . . . . . . . . . . . . . . . . . . . . . . . . . . . . . . . . . . . . . . . . . . . . . . . . . . . . . . . . . . . . . . . . . . . .
How to use the troubleshooting charts . . . . . . . . . . . . . . . . . . . . . . . . . . . . . . . . . . . . . . . . . . . . . . . . . . . . . . . . . . . . . . . . . . . . .
Hunt cutoff detector p/o module A4200 . . . . . . . . . . . . . . . . . . . . . . . . . . . . . . . . . . . . . . . . . . . . . . . . . . . . . . . . . . . . . . . . . .
Hunt generator module A8400. . . . . . . . . . . . . . . . . . . . . . . . . . . . . . . . . . . . . . . . . . . . . . . . . . . . . . . . . . . . . . . . . . . . . . . . . . . . . . .
1-54
2-148
2-110
2-153
2-111
2-38
1-50
2-53
1-44
1-39
I
If. attenuator module A4900 (homing mode) . . . . . . . . . . . . . . . . . . . . . . . . . . . . . . . . . . . . . . . . . . . . . . . . . . . . . . . . . . . . . . .
If. attenuator module A4900 (receive mode) . . . . . . . . . . . . . . . . . . . . . . . . . . . . . . . . . . . . . . . . . . . . . . . . . . . . . . . . . . . .
Introduction
Equipment description . . . . . . . . . . . . . . . . . . . . . . . . . . . . . . . . . . . . . . . . . . . . . . . . . . . . . . . . . . . . . . . . . . . . . . . . . . . . . . . . . . .
General information . . . . . . . . . . . . . . . . . . . . . . . . . . . . . . . . . . . . . . . . . . . . . . . . . . . . . . . . . . . . . . . . . . . . . . . . . . . . . . . . . . . . . . . .
Principles of operation . . . . . . . . . . . . . . . . . . . . . . . . . . . . . . . . . . . . . . . . . . . . . . . . . . . . . . . . . . . . . . . . . . . . . . . . . . . . . . . . . . .
Isolation amplifier module A6600 . . . . . . . . . . . . . . . . . . . . . . . . . . . . . . . . . . . . . . . . . . . . . . . . . . . . . . . . . . . . . . . . . . . . . . . . . . .
1-53
1-26
1-3
1-1
1-4
1-42
L
Local oscillator aft/crystal reference system . . . . . . . . . . . . . . . . . . . . . . . . . . . . . . . . . . . . . . . . . . . . . . . . . . . .
Local oscillator alinement . . . . . . . . . . . . . . . . . . . . . . . . . . . . . . . . . . . . . . . . . . . . . . . . . . . . . . . . . . . . . . . . . . . . . . . . . . . . . . . . . . .
Local oscillator module A1500 . . . . . . . . . . . . . . . . . . . . . . . . . . . . . . . . . . . . . . . . . . . . . . . . . . . . . . . . . . . . . . . . . . . . . . . . . . . . . . .
Low-pass filter FL4501 replacement . . . . . . . . . . . . . . . . . . . . . . . . . . . . . . . . . . . . . . . . . . . . . . . . . . . . . . . . . . . . . . . . . . . . . . .
Light panel replacement . . . . . . . . . . . . . . . . . . . . . . . . . . . . . . . . . . . . . . . . . . . . . . . . . . . . . . . . . . . . . . . . . . . . . . . . . . . . . . . . . . . . . .
1-8
2-146
1-24
2-205
2-225
M
Maintenance
Alinement and adjustment procedures . . . . . . . . . . . . . . . . . . . . . . . . . . . . . . . . . . . . . . . . . . . . . . . . . . . . . . . . . . . . .
Performance tests . . . . . . . . . . . . . . . . . . . . . . . . . . . . . . . . . . . . . . . . . . . . . . . . . . . . . . . . . . . . . . . . . . . . . . . . . . . . . . . . . . . . . . . . .
Repair and replacement procedures . . . . . . . . . . . . . . . . . . . . . . . . . . . . . . . . . . . . . . . . . . . . . . . . . . . . . . . . . . . . . . . . . . . . .
Repair parts, special tools, and TMDE . . . . . . . . . . . . . . . . . . . . . . . . . . . . . . . . . . . . . . . . . . . . . . . . . . . . . . . . . . . . . . . . . . .
Troubleshooting . . . . . . . . . . . . . . . . . . . . . . . . . . . . . . . . . . . . . . . . . . . . . . . . . . . . . . . . . . . . . . . . . . . . . . . . . . . . . . . . . . . . . . . . . ..
Maintenance forms, records, and reports . . . . . . . . . . . . . . . . . . . . . . . . . . . . . . . . . . . . . . . . . . . . . . . . . . . . . . . . . . . . . . . . .
Master oscillator frequency control loop . . . . . . . . . . . . . . . . . . . . . . . . . . . . . . . . . . . . . . . . . . . . . . . . . . . . . . . . . . . . . . . . . . .
Master oscillator module A6300. . . . . . . . . . . . . . . . . . . . . . . . . . . . . . . . . . . . . . . . . . . . . . . . . . . . . . . . . . . . . . . . . . . . . . . . . . . . . .
Maximum signal plus noise-to-noise ratio test . . . . . . . . . . . . . . . . . . . . . . . . . . . . . . . . . . . . . . . . . . . . . . . . . . . . . . . . . . . .
Maximum signal plus noise-to-noise ratio troubleshooting . . . . . . . . . . . . . . . . . . . . . . . . . . . . . . . . . . . . . . . . . . . .
Mixer and buffer amplifier A1400 (receive mode) . . . . . . . . . . . . . . . . . . . . . . . . . . . . . . . . . . . . . . . . . . . . . . . . . . . . . . . .
Mixer and buffer amplifier A1400 (transmit mode) . . . . . . . . . . . . . . . . . . . . . . . . . . . . . . . . . . . . . . . . . . . . . . . . . .
Mode switch S905 replacement . . . . . . . . . . . . . . . . . . . . . . . . . . . . . . . . . . . . . . . . . . . . . . . . . . . . . . . . . . . . . . . . . . . . . . . . . . . . .
Mode switch selection and front panel illumination test . . . . . . . . . . . . . . . . . . . . . . . . . . . . . . . . . . . . . . . . . .
Index 4
2-126
2-2
2-150
2-1
2-50
1-1
1-33
1-40
2-14
2-87,
2-101
1-23
1-43
2-234
2-41
TM 11-5820-670-30
INDEX (CONT)
Subject
Page
M (CONT)
Modulator module A8100, 11.5 MHz . . . . . . . . . . . . . . . . . . . . . . . . . . . . . . . . . . . . . . . . . . . . . . . . . . . . . . . . . . . . . . . . . . . . . . . .
Module replacement, A1100 through A1500 . . . . . . . . . . . . . . . . . . . . . . . . . . . . . . . . . . . . . . . . . . . . . . . . . . . . . . . . . . . . . .
Module replacement, A6300 and A6400 . . . . . . . . . . . . . . . . . . . . . . . . . . . . . . . . . . . . . . . . . . . . . . . . . . . . . . . . . . . . . . . . . . . .
Modules and assembly replacement, A3000 . . . . . . . . . . . . . . . . . . . . . . . . . . . . . . . . . . . . . . . . . . . . . . . . . . . . . . . . . . . . .
Modules and assembly replacement, A4000 . . . . . . . . . . . . . . . . . . . . . . . . . . . . . . . . . . . . . . . . . . . . . . . . . . . . . . . . . . . . . . .
Modules and assembly replacement, A5500. . . . . . . . . . . . . . . . . . . . . . . . . . . . . . . . . . . . . . . . . . . . . . . . . . . . . . . . . . . .
Modules and assembly replacement, A8700 . . . . . . . . . . . . . . . . . . . . . . . . . . . . . . . . . . . . . . . . . . . . . . . . . . . . . . . . . . .
1-36
2-186
2-180
2-160
2-154
2-166
2-172
N
Narrow band deviation adjustment. . . . . . . . . . . . . . . . . . . . . . . . . . . . . . . . . . . . . . . . . . . . . . . . . . . . . . . . . . . . . . . . . . . . . . . .
No audio output troubleshooting . . . . . . . . . . . . . . . . . . . . . . . . . . . . . . . . . . . . . . . . . . . . . . . . . . . . . . . . . . . . . . . . . . . . . . . . . .
Nomenclature cross-reference list . . . . . . . . . . . . . . . . . . . . . . . . . . . . . . . . . . . . . . . . . . . . . . . . . . . . . . . . . . . . . . . . . . . . . . . .
2-140
2-72
1-2
P
Performance tests
Control, radio set C-7088/ARC-131
Mode switch selection and front panel illumination test . . . . . . . . . . . . . . . . . . . . . . . . . . . . . . . . . . . . . . .
Retransmit receive test . . . . . . . . . . . . . . . . . . . . . . . . . . . . . . . . . . . . . . . . . . . . . . . . . . . . . . . . . . . . . . . . . . . . . . . . . . . . . .
Retransmit transmit test . . . . . . . . . . . . . . . . . . . . . . . . . . . . . . . . . . . . . . . . . . . . . . . . . . . . . . . . . . . . . . . . . . . . . . . . . . . . . . . . .
Squelch switch and frequency selection test . . . . . . . . . . . . . . . . . . . . . . . . . . . . . . . . . . . . . . . . . . . . . . . . . . . . . . . .
Homing mode
Homing sensitivity test . . . . . . . . . . . . . . . . . . . . . . . . . . . . . . . . . . . . . . . . . . . . . . . . . . . . . . . . . . . . . . . . . . . . . . . . . . . . . .
Receive mode
Audiofrequency response and front panel meter test . . . . . . . . . . . . . . . . . . . . . . . . . . . . . . . . . . . . . . . . . . . . . .
Audio power output and distortion test . . . . . . . . . . . . . . . . . . . . . . . . . . . . . . . . . . . . . . . . . . . . . . . . . . . . . . . . . . . . . .
Maximum signal plus noise-to-noise ratio test . . . . . . . . . . . . . . . . . . . . . . . . . . . . . . . . . . . . . . . . . . . . . . . . . . . . . .
Receiver carrier squelch sensitivity test . . . . . . . . . . . . . . . . . . . . . . . . . . . . . . . . . . . . . . . . . . . . . . . . . . . . . . . . . . . . .
Receiver sensitivity, quieting, and limiting test . . . . . . . . . . . . . . . . . . . . . . . . . . . . . . . . . . . . . . . . . . . . . . . . . . . . . .
Receiver tone squelch sensitivity test . . . . . . . . . . . . . . . . . . . . . . . . . . . . . . . . . . . . . . . . . . . . . . . . . . . . . . . . . . . . . . . . .
Transmit mode
Transmitter automatic frequency selection and channel changing tone
test . . . . . . . . . . . . . . . . . . . . . . . . . . . . . . . . . . . . . . . . . . . . . . . . . . . . . . . . . . . . . . . . . . . . . . . . . . . . . . . . . . . . . . . . . . . . . . . . . . . . .
Transmitter deviation narrow band test . . . . . . . . . . . . . . . . . . . . . . . . . . . . . . . . . . . . . . . . . . . . . . . . . . . . . . . . . . . . . .
Transmitter distortion narrow band test . . . . . . . . . . . . . . . . . . . . . . . . . . . . . . . . . . . . . . . . . . . . . . . . . . . . . . . . . . . .
Transmitter frequency stability test . . . . . . . . . . . . . . . . . . . . . . . . . . . . . . . . . . . . . . . . . . . . . . . . . . . . . . . . . . . . . . . . . . .
Transmitter power output test . . . . . . . . . . . . . . . . . . . . . . . . . . . . . . . . . . . . . . . . . . . . . . . . . . . . . . . . . . . . . . . . . . . . . . .
Transmitter sidetone test . . . . . . . . . . . . . . . . . . . . . . . . . . . . . . . . . . . . . . . . . . . . . . . . . . . . . . . . . . . . . . . . . . . . . . . . . . . . . .
Transmitter signal plus noise-to-noise ratio test . . . . . . . . . . . . . . . . . . . . . . . . . . . . . . . . . . . . . . . . . . . . . . . . . .
Voltage distribution
Test meter tests . . . . . . . . . . . . . . . . . . . . . . . . . . . . . . . . . . . . . . . . . . . . . . . . . . . . . . . . . . . . . . . . . . . . . . . . . . . . . . . . . . . . .
Phase discriminator module A8200 . . . . . . . . . . . . . . . . . . . . . . . . . . . . . . . . . . . . . . . . . . . . . . . . . . . . . . . . . . . . . .
Poor audio response troubleshooting . . . . . . . . . . . . . . . . . . . . . . . . . . . . . . . . . . . . . . . . . . . . . . . . . . . . . . . . . . . . . . . . . . . . . .
Poor sensitivity troubleshooting . . . . . . . . . . . . . . . . . . . . . . . . . . . . . . . . . . . . . . . . . . . . . . . . . . . . . . . . . . . . . . . . . . . . . . . . . . . . .
Power supply assembly A9500 . . . . . . . . . . . . . . . . . . . . . . . . . . . . . . . . . . . . . . . . . . . . . . . . . . . . . . . . . . . . . . . . . . . . . . . . . . . . .
Power supply circuit card replacement . . . . . . . . . . . . . . . . . . . . . . . . . . . . . . . . . . . . . . . . . . . . . . . . . . . . . . . . . . . . . . . . . . .
2-41
2-46
2-48
2-43
2-38
2-8
2-6
2-14
2-16
2-11
2-19
2-34
2-26
2-28
2-32
2-22
2-35
2-30
2-3
1-38
2-83
2-85
1-60
2-178
Index 5
TM 11-5820-670-30
INDEX (CONT)
Page
Subject
P (CONT)
Principles of operation . . . . . . . . . . . . . . . . . . . . . . . . . . . . . . . . . . . . . . . . . . . . . . . . . . . . . . . . . . . . . . . . . . . . . . . . . . . . . . . . . . . . . . . . . . . .
Homing mode
Homer-detector amplifier assembly A4800 . . . . . . . . . . . . . . . . . . . . . . . . . . . . . . . . . . . . . . . . . . . . . . . . . . . . . . . . .
Homing signal flow . . . . . . . . . . . . . . . . . . . . . . . . . . . . . . . . . . . . . . . . . . . . . . . . . . . . . . . . . . . . . . . . . . . . . . . . . . . . . . . . . . . . . . . .
If. attenuator module A4900 (homing mode) . . . . . . . . . . . . . . . . . . . . . . . . . . . . . . . . . . . . . . . . . . . . . . . . . . . . . . . .
Rf control assembly p/o module A4500 (homing mode) . . . . . . . . . . . . . . . . . . . . . . . . . . . . . . . . . . . . . . . .
Power and control circuits
Control, radio set C-7088/ARC-131 functioning . . . . . . . . . . . . . . . . . . . . . . . . . . . . . . . . . . . . . . . . . . . . . . . . . . . . . . . .
Power supply assembly A9500 . . . . . . . . . . . . . . . . . . . . . . . . . . . . . . . . . . . . . . . . . . . . . . . . . . . . . . . . . . . . . . . . . . . . . . . . . . .
Radio set AN/ARC-131 interunit circuit details . . . . . . . . . . . . . . . . . . . . . . . . . . . . . . . . . . . . . . . . . . . . . . . . . . . . . . .
Receiver-transmitter intraunit circuit functioning . . . . . . . . . . . . . . . . . . . . . . . . . . . . . . . . . . . . . . . . . . . . . . . . . . .
Tuning system radio set AN/ARC-131 . . . . . . . . . . . . . . . . . . . . . . . . . . . . . . . . . . . . . . . . . . . . . . . . . . . . . . . . . . . . . . . . . .
Vhf tuner power supply module A1600 . . . . . . . . . . . . . . . . . . . . . . . . . . . . . . . . . . . . . . . . . . . . . . . . . . . . . . . . . . . . . . . . . . .
Voltage regulator assembly A2100 . . . . . . . . . . . . . . . . . . . . . . . . . . . . . . . . . . . . . . . . . . . . . . . . . . . . . . . . . . . . . . . . . . . . . . .
Receive mode
Antenna tuning and protection module A1100 . . . . . . . . . . . . . . . . . . . . . . . . . . . . . . . . . . . . . . . . . . . . . . . . . . . . . . .
Audio amplifier module A5400 (receive mode) . . . . . . . . . . . . . . . . . . . . . . . . . . . . . . . . . . . . . . . . . . . . . . . . . . . . . . . .
Audio and squelch preamplifier module A4300 . . . . . . . . . . . . . . . . . . . . . . . . . . . . . . . . . . . . . . . . . . . . . . . . . . . . .
Crs balanced mixer A3200 . . . . . . . . . . . . . . . . . . . . . . . . . . . . . . . . . . . . . . . . . . . . . . . . . . . . . . . . . . . . . . . . . . . . . . . . . . . . . . . .
Crs first and second if. amplifier A3400/CRS third if. amplifier and limiter
A3500 . . . . . . . . . . . . . . . . . . . . . . . . . . . . . . . . . . . . . . . . . . . . . . . . . . . . . . . . . . . . . . . . . . . . . . . . . . . . . . . . . . . . . . . . . . . . . . . . . . . . . . . . .
Crs hunt discriminator A3600, crs phase discriminator A3700, and reference
oscillator A2000 . . . . . . . . . . . . . . . . . . . . . . . . . . . . . . . . . . . . . . . . . . . . . . . . . . . . . . . . . . . . . . . . . . . . . . . . . . . . . . . . . . . . . . . . .
Crs second mixer A3300 and crystal switch A2000 . . . . . . . . . . . . . . . . . . . . . . . . . . . . . . . . . . . . . . . . . . . . . . . . .
First and second if. amplifier A4100 . . . . . . . . . . . . . . . . . . . . . . . . . . . . . . . . . . . . . . . . . . . . . . . . . . . . . . . . . . . . . . . . . . . . . .
First rf amplifier module A1200 . . . . . . . . . . . . . . . . . . . . . . . . . . . . . . . . . . . . . . . . . . . . . . . . . . . . . . . . . . . . . . . . . . . . . . . . . . .
Gearbox assembly A9700 . . . . . . . . . . . . . . . . . . . . . . . . . . . . . . . . . . . . . . . . . . . . . . . . . . . . . . . . . . . . . . . . . . . . . . . . . . . . . . . . .
If. attenuator module A4900 (receive mode) . . . . . . . . . . . . . . . . . . . . . . . . . . . . . . . . . . . . . . . . . . . . . . . . . . . . . . . . . . . . .
Local oscillator aft/crystal reference system . . . . . . . . . . . . . . . . . . . . . . . . . . . . . . . . . . . . . . . . . . . . . . . . . . . . . . . . . .
Local oscillator module A1500 . . . . . . . . . . . . . . . . . . . . . . . . . . . . . . . . . . . . . . . . . . . . . . . . . . . . . . . . . . . . . . . . . . . . . . . . .
Mixer and buffer amplifier A1400 (receive mode) . . . . . . . . . . . . . . . . . . . . . . . . . . . . . . . . . . . . . . . . . . . . . . . . . . . .
Receiver signal flow . . . . . . . . . . . . . . . . . . . . . . . . . . . . . . . . . . . . . . . . . . . . . . . . . . . . . . . . . . . . . . . . . . . . . . . . . . . . . . . . . . . . . .
Receiver squelch amplifier module A5200 and squelch filter module A5300
(receive mode) . . . . . . . . . . . . . . . . . . . . . . . . . . . . . . . . . . . . . . . . . . . . . . . . . . . . . . . . . . . . . . . . . . . . . . . . . . . . . . . . . . . . . . . . . . . . . .
Rf control assembly p/o module A4500 (receive mode) . . . . . . . . . . . . . . . . . . . . . . . . . . . . . . . . . . . . . . . . . . . .
Second rf amplifier module A1300 . . . . . . . . . . . . . . . . . . . . . . . . . . . . . . . . . . . . . . . . . . . . . . . . . . . . . . . . . . . . .
Third, fourth, and fifth if. amplifier, limiter and discriminator
A4200 . . . . . . . . . . . . . . . . . . . . . . . . . . . . . . . . . . . . . . . . . . . . . . . . . . . . . . . . . . . . . . . . . . . . . . . . . . . . . . . . . . . . . . . . . . . . . . . . . . . . . . .
Time delay circuit p/o module A2100 . . . . . . . . . . . . . . . . . . . . . . . . . . . . . . . . . . . . . . . . . . . . . . . . . . . . . . . . . . . . . . . . . . .
Retransmit mode
Retransmit operation . . . . . . . . . . . . . . . . . . . . . . . . . . . . . . . . . . . . . . . . . . . . . . . . . . . . . . . . . . . . . . . . . . . . . . . . . . . . . . . . . . . . . . .
Transmit mode
Audio amplifier module A5400 (transmit mode) . . . . . . . . . . . . . . . . . . . . . . . . . . . . . . . . . . . . . . . . . . . . . . . . . . . . . .
Audio mixer module A8600 . . . . . . . . . . . . . . . . . . . . . . . . . . . . . . . . . . . . . . . . . . . . . . . . . . . . . . . . . . . . . . . . . . . . . . . . . . . . . .
Automatic gain control (agc) . . . . . . . . . . . . . . . . . . . . . . . . . . . . . . . . . . . . . . . . . . . . . . . . . . . . . . . . . . . . . . . . . . . . . . . . . .
Buffer amplifier module A6400 and regulator assembly . . . . . . . . . . . . . . . . . . . . . . . . . . . . . . . . . . . . . . . . . .
First and second if. amplifiers module A8300 . . . . . . . . . . . . . . . . . . . . . . . . . . . . . . . . . . . . . . . . . . . . . . . . . . . . . .
Index 6
1-4
1-54
1-50
1-53
1-52
1-63
1-80
1-68
1-61
1-78
1-59
1-60
1-22
1-28
1-28
1-10
1-14
1-15
1-11
1-26
1-22
1-20
1-26
1-8
1-24
1-23
1-7
1-29
1-21
1-23
1-27
1-19
1-58
1-45
1-36
1-45
1-41
1-37
TM 11-5820-670-30
INDEX (CONT)
Subject
Page
P (CONT)
Hunt cutoff detector p/o module A4200 . . . . . . . . . . . . . . . . . . . . . . . . . . . . . . . . . . . . . . . . . . . . . . . . . . . . . . . . . . . . . . .
Hunt generator module A8400 . . . . . . . . . . . . . . . . . . . . . . . . . . . . . . . . . . . . . . . . . . . . . . . . . . . . . . . . . . . . . . . . . . .
Isolation amplifier module A6600 . . . . . . . . . . . . . . . . . . . . . . . . . . . . . . . . . . . . . . . . . . . . . . . . . . . . . . . . . . . . . . . . . . . . . . . . .
Master oscillator frequency control group . . . . . . . . . . . . . . . . . . . . . . . . . . . . . . . . . . . . . . . . . . . . . . . . . . . . . . . . . . . . . .
Master oscillator module A6300 . . . . . . . . . . . . . . . . . . . . . . . . . . . . . . . . . . . . . . . . . . . . . . . . . . . . . . . . . . . . . . . . . . . . . . . . . .
Mixer and buffer amplifier A1400 (transmit mode) . . . . . . . . . . . . . . . . . . . . . . . . . . . . . . . . . . . . . . . . . . . . . . . . . . . . .
Modulator module A8100, 11.5 MHz . . . . . . . . . . . . . . . . . . . . . . . . . . . . . . . . . . . . . . . . . . . . . . . . . . . . . . . . . . . . . . . . . . . . . .
Phase discriminator module A8200 . . . . . . . . . . . . . . . . . . . . . . . . . . . . . . . . . . . . . . . . . . . . . . . . . . . . . . . . . . . . . . . . . . . . . .
Rf amplifier assembly module A6500 . . . . . . . . . . . . . . . . . . . . . . . . . . . . . . . . . . . . . . . . . . . . . . . . . . . . . . . . . . . . . . . . . . . .
Rf control assembly p/o module A4500 (transmit mode) . . . . . . . . . . . . . . . . . . . . . . . . . . . . . . . . . . . . . . . . . . .
Squelch amplifier module A5200 (transmit mode) . . . . . . . . . . . . . . . . . . . . . . . . . . . . . . . . . . . . . . . . . . . . . . . . . . .
Transmitter signal flow . . . . . . . . . . . . . . . . . . . . . . . . . . . . . . . . . . . . . . . . . . . . . . . . . . . . . . . . . . . . . . . . . . . . . . . . . . . . . . . . . . . . .
1-44
1-39
1-42
1-33
1-40
1-43
1-36
1-38
1-46
1-48
1-45
1-31
R
Radio interference filter FL9601 replacement . . . . . . . . . . . . . . . . . . . . . . . . . . . . . . . . . . . . . . . . . . . . . . . . . . . . . . . . . . .
Radio set AN/ARC-131 interunit circuit details . . . . . . . . . . . . . . . . . . . . . . . . . . . . . . . . . . . . . . . . . . . . . . . . . . . . . . . . . .
Receiver carrier squelch sensitivity test . . . . . . . . . . . . . . . . . . . . . . . . . . . . . . . . . . . . . . . . . . . . . . . . . . . . . . . . . . . . . . . . . . . . . . .
Receiver sensitivity adjustments . . . . . . . . . . . . . . . . . . . . . . . . . . . . . . . . . . . . . . . . . . . . . . . . . . . . . . . . . . . . . . . . . . . . . . . . . . . . . .
Receiver sensitivity, quieting, and limiting test . . . . . . . . . . . . . . . . . . . . . . . . . . . . . . . . . . . . . . . . . . . . . . . . . . . . . . . . . . . .
Receiver signal flow . . . . . . . . . . . . . . . . . . . . . . . . . . . . . . . . . . . . . . . . . . . . . . . . . . . . . . . . . . . . . . . . . . . . . . . . . . . . . . . . . . . . . . . . . . . . . . .
Receiver squelch amplifier module A5200 and squelch filter module A5300 (receive
mode) . . . . . . . . . . . . . . . . . . . . . . . . . . . . . . . . . . . . . . . . . . . . . . . . . . . . . . . . . . . . . . . . . . . . . . . . . . . . . . . . . . . . . . . . . . . . . . . . . . . . . . . . . . . .
Receiver tone squelch sensitivity test . . . . . . . . . . . . . . . . . . . . . . . . . . . . . . . . . . . . . . . . . . . . . . . . . . . . . . . . . . . . . . . . . . . . . . . . .
Receiver-transmitter intraunit circuit functioning . . . . . . . . . . . . . . . . . . . . . . . . . . . . . . . . . . . . . . . . . . . . . . . . . . . . . . . . .
Reflectometer and sidetone detector Z4502 replacement . . . . . . . . . . . . . . . . . . . . . . . . . . . . . . . . . . . . . . . . . . . . . .
Regulated circuit troubleshooting, +24 vdc . . . . . . . . . . . . . . . . . . . . . . . . . . . . . . . . . . . . . . . . . . . . . . . . . . . . . . . . . . . . . . .
Relay K3001 replacement . . . . . . . . . . . . . . . . . . . . . . . . . . . . . . . . . . . . . . . . . . . . . . . . . . . . . . . . . . . . . . . . . . . . . . . . . . . . . . . . . . . . . .
Relays K4501 through K4504 replacement . . . . . . . . . . . . . . . . . . . . . . . . . . . . . . . . . . . . . . . . . . . . . . . . . . . . . . . . . . . . . . . . . . . . .
Relays K9601 through K9606 replacement . . . . . . . . . . . . . . . . . . . . . . . . . . . . . . . . . . . . . . . . . . . . . . . . . . . . . . . . . . . . . . . . . .
Repair parts and tools . . . . . . . . . . . . . . . . . . . . . . . . . . . . . . . . . . . . . . . . . . . . . . . . . . . . . . . . . . . . . . . . . . . . . . . . . . . . . . . . . . . . . . . . .
Repair parts, special tools, and TMDE
Repair parts and tools . . . . . . . . . . . . . . . . . . . . . . . . . . . . . . . . . . . . . . . . . . . . . . . . . . . . . . . . . . . . . . . . . . . . . . . . . . . . . . . . . . . . .
Special tools and TMDE . . . . . . . . . . . . . . . . . . . . . . . . . . . . . . . . . . . . . . . . . . . . . . . . . . . . . . . . . . . . . . . . . . . . . . . . . . . . . . . . . . . . . . .
Reporting equipment improvement recommendations (EIR) . . . . . . . . . . . . . . . . . . . . . . . . . . . . . . . . . . . . . . .
Retransmit operation . . . . . . . . . . . . . . . . . . . . . . . . . . . . . . . . . . . . . . . . . . . . . . . . . . . . . . . . . . . . . . . . . . . . . . . . . . . . . . . . . . . . . . . . .
Retransmit receive test . . . . . . . . . . . . . . . . . . . . . . . . . . . . . . . . . . . . . . . . . . . . . . . . . . . . . . . . . . . . . . . . . . . . . . . . . . . . . . . . . . . . . . . . . . .
Retransmit transmit test . . . . . . . . . . . . . . . . . . . . . . . . . . . . . . . . . . . . . . . . . . . . . . . . . . . . . . . . . . . . . . . . . . . . . . . . . . . . . . . . . . .
Rf amplifier assembly module A6500 . . . . . . . . . . . . . . . . . . . . . . . . . . . . . . . . . . . . . . . . . . . . . . . . . . . . . . . . . . . . . . . . . .
Rf amplifier assembly A6500 alinement . . . . . . . . . . . . . . . . . . . . . . . . . . . . . . . . . . . . . . . . . . . . . . . . . . . . . . . . . . . . . .
Rf attenuator and diode switch Z4501 replacement . . . . . . . . . . . . . . . . . . . . . . . . . . . . . . . . . . . . . . . . . . . . . . . . . . . . . . . .
Rf control assembly p/o module A4500 (homing mode) . . . . . . . . . . . . . . . . . . . . . . . . . . . . . . . . . . . . . . . . . . . . .
Rf control assembly p/o module A4500 (receive mode) . . . . . . . . . . . . . . . . . . . . . . . . . . . . . . . . . . . . . . . . . . . . . . . . . . . .
Rf control assembly p/o module A4500 (transmit mode) . . . . . . . . . . . . . . . . . . . . . . . . . . . . . . . . . . . . . . . . . . . . . . . . . .
Rt case replacement . . . . . . . . . . . . . . . . . . . . . . . . . . . . . . . . . . . . . . . . . . . . . . . . . . . . . . . . . . . . . . . . . . . . . . . . . . . . . . . . . . . . . . . . . . .
2-198
1-68
2-16
2-142
2-11
1-7
1-29
2-19
1-61
2-204
2-64
2-220
2-206
2-207
2-1
2-1
2-1
1-2
1-58
2-46
2-48
1-46
2-127
2-203
1-52
1-21
1-48
2-152
Index 7
TM 11-5820-670-30
INDEX (CONT)
Page
Subject
S
Safety, care, and handling . . . . . . . . . . . . . . . . . . . . . . . . . . . . . . . . . . . . . . . . . . . . . . . . . . . . . . . . . . . . . . . . . . . . . . . . . . . . . . . . . . . .
Scope . . . . . . . . . . . . . . . . . . . . . . . . . . . . . . . . . . . . . . . . . . . . . . . . . . . . . . . . . . . . . . . . . . . . . . . . . . . . . . . . . . . . . . . . . . . . . . . . . . . . . . . . . . . .
Second rf amplifier module A1300 . . . . . . . . . . . . . . . . . . . . . . . . . . . . . . . . . . . . . . . . . . . . . . . . . . . . . . . . . . . . . . . . . . . . . . . . . . . . . .
Special tools and TMDE . . . . . . . . . . . . . . . . . . . . . . . . . . . . . . . . . . . . . . . . . . . . . . . . . . . . . . . . . . . . . . . . . . . . . . . . . . . . . . . . . . . . . . . . . .
SQ ADJ switch R9602 replacement . . . . . . . . . . . . . . . . . . . . . . . . . . . . . . . . . . . . . . . . . . . . . . . . . . . . . . . . . . . . . . . . . . . . . . . .
SQ DIS switch S9802 and XMTR test switch S9603 replacement . . . . . . . . . . . . . . . . . . . . . . . . . . . . . . . . .
Squelch amplifier module A5200 (transmit mode) . . . . . . . . . . . . . . . . . . . . . . . . . . . . . . . . . . . . . . . . . . . . . . . . . . . . . . .
Squelch switch and frequency selection test . . . . . . . . . . . . . . . . . . . . . . . . . . . . . . . . . . . . . . . . . . . . . . . . . . . . . . . . . . . . . . .
Squelch switch S9106 replacement . . . . . . . . . . . . . . . . . . . . . . . . . . . . . . . . . . . . . . . . . . . . . . . . . . . . . . . . . . . . . . . . . . . . . . . . . .
Switch and wiring assembly replacement . . . . . . . . . . . . . . . . . . . . . . . . . . . . . . . . . . . . . . . . . . . . . . . . . . . . . . . . . . . . . . . . . . . . .
1-3
1-1
1-23
2-1
2-194
2-190
1-45
2-43
2-228
2-226
T
Tens frequency selector switch S9101 replacement . . . . . . . . . . . . . . . . . . . . . . . . . . . . . . . . . . . . . . . . . . . . . . . . . . . . .
Tenths frequency selector switch S9103 and/or hundredths frequency selector
switch S9104 replacement . . . . . . . . . . . . . . . . . . . . . . . . . . . . . . . . . . . . . . . . . . . . . . . . . . . . . . . . . . . . . . . . . . . . . . . . . . . . . . . . . . . . .
TEST METER M9601 replacement . . . . . . . . . . . . . . . . . . . . . . . . . . . . . . . . . . . . . . . . . . . . . . . . . . . . . . . . . . . . . . . . . . . . . . . .
Test meter tests . . . . . . . . . . . . . . . . . . . . . . . . . . . . . . . . . . . . . . . . . . . . . . . . . . . . . . . . . . . . . . . . . . . . . . . . . . . . . . . . . . . . . . . . . . . .
TEST SWITCH S9601 replacement . . . . . . . . . . . . . . . . . . . . . . . . . . . . . . . . . . . . . . . . . . . . . . . . . . . . . . . . . . . . . . . . . . . . . . . . . . . .
Third, fourth, and fifth if. amplifier limiter and discriminator A4200 . . . . . . . . . . . . . . . . . . . . . . . . . . . . . . . . . . . . . .
Time delay circuit p/o module A2100 . . . . . . . . . . . . . . . . . . . . . . . . . . . . . . . . . . . . . . . . . . . . . . . . . . . . . . . . . . . . . . . . . . . . . .
Tone modulation frequency and deviation adjustment, 150 Hz . . . . . . . . . . . . . . . . . . . . . . . . . . . . . . . . . . . . . . . . .
Tone squelch adjustment . . . . . . . . . . . . . . . . . . . . . . . . . . . . . . . . . . . . . . . . . . . . . . . . . . . . . . . . . . . . . . . . . . . . . . . . . . . . . . . . . . .
Tone squelch sensitivity troubleshooting . . . . . . . . . . . . . . . . . . . . . . . . . . . . . . . . . . . . . . . . . . . . . . . . . . . . . . . . . . . . . . . .
Transistor Q9601 replacement . . . . . . . . . . . . . . . . . . . . . . . . . . . . . . . . . . . . . . . . . . . . . . . . . . . . . . . . . . . . . . . . . . . . . . . . . . . . . . .
Transmitter automatic frequency selection and channel changing tone test . . . . . . . . . . . . . . . . . . . . . .
Transmitter deviation narrow band test . . . . . . . . . . . . . . . . . . . . . . . . . . . . . . . . . . . . . . . . . . . . . . . . . . . . . . . . . . . . . . . . . . . . . .
Transmitter deviation narrow band troubleshooting . . . . . . . . . . . . . . . . . . . . . . . . . . . . . . . . . . . . . . . . . . . . . . . . . . . . . .
Transmitter distortion narrow band test . . . . . . . . . . . . . . . . . . . . . . . . . . . . . . . . . . . . . . . . . . . . . . . . . . . . . . . . . . . . . . . . . .
Transmitter distortion narrow band troubleshooting . . . . . . . . . . . . . . . . . . . . . . . . . . . . . . . . . . . . . . . . . . . . . . . . . . . . . .
Transmitter frequency selection and channel changing tone troubleshooting . . . . . . . . . . . . . . . . . . .
Transmitter frequency stability test . . . . . . . . . . . . . . . . . . . . . . . . . . . . . . . . . . . . . . . . . . . . . . . . . . . . . . . . . . . . . . . . . . . . . . . . . . . . .
Transmitter power output (HI) troubleshooting . . . . . . . . . . . . . . . . . . . . . . . . . . . . . . . . . . . . . . . . . . . . . . . . . . . . . . . . . . . . . .
Transmitter power output (LO) troubleshooting . . . . . . . . . . . . . . . . . . . . . . . . . . . . . . . . . . . . . . . . . . . . . . . . . . . . . . . . . . . . .
Transmitter power output test . . . . . . . . . . . . . . . . . . . . . . . . . . . . . . . . . . . . . . . . . . . . . . . . . . . . . . . . . . . . . . . . . . . . . . . . . . . . . .
Transmitter sidetone test . . . . . . . . . . . . . . . . . . . . . . . . . . . . . . . . . . . . . . . . . . . . . . . . . . . . . . . . . . . . . . . . . . . . . . . . . . . . . . . . . . . . . . . .
Transmitter sidetone troubleshooting . . . . . . . . . . . . . . . . . . . . . . . . . . . . . . . . . . . . . . . . . . . . . . . . . . . . . . . . . . . . . . . . .
Transmitter signal flow . . . . . . . . . . . . . . . . . . . . . . . . . . . . . . . . . . . . . . . . . . . . . . . . . . . . . . . . . . . . . . . . . . . . . . . . . . . . . . . . . . . . . . . . . . .
Transmitter signal plus noise-to-noise ratio test . . . . . . . . . . . . . . . . . . . . . . . . . . . . . . . . . . . . . . . . . . . . . . . . . . . . . .
Transmitter tone modulation test . . . . . . . . . . . . . . . . . . . . . . . . . . . . . . . . . . . . . . . . . . . . . . . . . . . . . . . . . . . . . . . . . . . . . . . . .
Transmitter tone modulation troubleshooting . . . . . . . . . . . . . . . . . . . . . . . . . . . . . . . . . . . . . . . . . . . . . . . . . . . . . . . . . . . . . .
Troubleshooting
Control unit troubleshooting . . . . . . . . . . . . . . . . . . . . . . . . . . . . . . . . . . . . . . . . . . . . . . . . . . . . . . . . . . . . . . . . . . . . . . . . . . . . . . .
General
How to use the troubleshooting charts
Troubleshooting charts . . . . . . . . . . . . . . . . . . . . . . . . . . . . . . . . . . . . . . . . . . . . . . . . . . . . . . . . . . . . . . . . . . . . . . . . . . . . . . . . . . . . . . .
Index 8
2-240
2-232
2-189
2-3
2-192
1-27
1-19
2-136
2-138
2-89
2-200
2-34
2-26
2-97
2-28
2-99
2-108
2-32
2-91
2-94
2-22
2-35
2-109
1-31
2-30
2-24
2-95
2-114
2-53
TM 11-5820-670-30
INDEX (CONT)
Subject
Page
T (CONT)
Homing mode
Homing flag indication troubleshooting . . . . . . . . . . . . . . . . . . . . . . . . . . . . . . . . . . . . . . . . . . . . . . . . . . . . . . . . . . . .
Homing needle indication troubleshooting . . . . . . . . . . . . . . . . . . . . . . . . . . . . . . . . . . . . . . . . . . . . . . . . . . . . . . . . .
Receive mode
Audio distortion troubleshooting . . . . . . . . . . . . . . . . . . . . . . . . . . . . . . . . . . . . . . . . . . . . . . . . . . . . . . . . . . . . .
Audio power troubleshooting . . . . . . . . . . . . . . . . . . . . . . . . . . . . . . . . . . . . . . . . . . . . . . . . . . . . . . . . . . . . . . . . . . . . . . . . . . . .
Carrier squelch sensitivity troubleshooting . . . . . . . . . . . . . . . . . . . . . . . . . . . . . . . . . . . . . . . . . . . . . . . . . . . . . . .
Maximum signal plus noise-to-noise ratio troubleshooting . . . . . . . . . . . . . . . . . . . . . . . . . . . . . . . . . . . . . . .
No audio output troubleshooting . . . . . . . . . . . . . . . . . . . . . . . . . . . . . . . . . . . . . . . . . . . . . . . . . . . . . . . . . . . . . . . . . . . . . . . . . .
Poor audio response troubleshooting . . . . . . . . . . . . . . . . . . . . . . . . . . . . . . . . . . . . . . . . . . . . . . . . . . . . . . . . . . . . . . . . .
Poor sensitivity troubleshooting . . . . . . . . . . . . . . . . . . . . . . . . . . . . . . . . . . . . . . . . . . . . . . . . . . . . . . . . . . . . . . . . . . . . . . .
Tone squelch sensitivity troubleshooting . . . . . . . . . . . . . . . . . . . . . . . . . . . . . . . . . . . . . . . . . . . . . . . . . . . . . . . . . . . . . .
Receiver-transmitter inoperative
+ 16 vdc circuit troubleshooting . . . . . . . . . . . . . . . . . . . . . . . . . . . . . . . . . . . . . . . . . . . . . . . . . . . . . . . . . . . . . . . . . . . . . . . . . .
+27.5 vdc circuit troubleshooting . . . . . . . . . . . . . . . . . . . . . . . . . . . . . . . . . . . . . . . . . . . . . . . . . . . . . . . . . . . . . . . . . . . . . . .
+24 vdc regulated circuit troubleshooting . . . . . . . . . . . . . . . . . . . . . . . . . . . . . . . . . . . . . . . . . . . . . . . . . . . . . . . . . . .
Transmit mode
Automatic frequency selection and channel changing tone
troubleshooting . . . . . . . . . . . . . . . . . . . . . . . . . . . . . . . . . . . . . . . . . . . . . . . . . . . . . . . . . . . . . . . . . . . . . . . . . . . . . . . . . . . . . . . . . . . .
Maximum signal plus noise-to-noise ratio troubleshooting . . . . . . . . . . . . . . . . . . . . . . . . . . . . . . . . . . . . . . . . .
Transmitter deviation narrow band troubleshooting . . . . . . . . . . . . . . . . . . . . . . . . . . . . . . . . . . . . . . . . . . . . . . . . . . .
Transmitter distortion narrow band troubleshooting . . . . . . . . . . . . . . . . . . . . . . . . . . . . . . . . . . . . . . . . . . . . . . .
Transmitter frequency stability troubleshooting . . . . . . . . . . . . . . . . . . . . . . . . . . . . . . . . . . . . . . . . . . . . . . . . . . . . . . . .
Transmitter power output (HI) troubleshooting l . . . . . . . . . . . . . . . . . . . . . . . . . . . . . . . . . . . . . . . . . . . . . . . . . . . . . . . . .
Transmitter power output (LO) troubleshooting . . . . . . . . . . . . . . . . . . . . . . . . . . . . . . . . . . . . . . . . . . . . . . . . . . . . . . . . .
Transmitter sidetone troubleshooting . . . . . . . . . . . . . . . . . . . . . . . . . . . . . . . . . . . . . . . . . . . . . . . . . . . . . . . . . . . . . . . . . . . . .
Transmitter tone modulation troubleshooting . . . . . . . . . . . . . . . . . . . . . . . . . . . . . . . . . . . . . . . . . . . . . . . . . . . .
Troubleshooting charts . . . . . . . . . . . . . . . . . . . . . . . . . . . . . . . . . . . . . . . . . . . . . . . . . . . . . . . . . . . . . . . . . . . . . . . . . . . . . . . . . . . . .
Tuning system radio set AN/ARC-131 . . . . . . . . . . . . . . . . . . . . . . . . . . . . . . . . . . . . . . . . . . . . . . . . . . . . . . . . . . . . . . .
2-110
2-111
2-81
2-80
2-88
2-87
2-72
2-83
2-83
2-89
2-68
2-61
2-64
2-108
2-101
2-97
2-99
2-103
2-91
2-94
2-189
2-95
2-54
1-78
U
Units frequency selector switch S9102 replacement . . . . . . . . . . . . . . . . . . . . . . . . . . . . . . . . . . . . . . . . . . . . . . . . . . . . . .
2-244
V
Vhf tuner power supply module A1600 . . . . . . . . . . . . . . . . . . . . . . . . . . . . . . . . . . . . . . . . . . . . . . . . . . . . . . . . . . . . . . . . . . .
Volume control switch R9103 replacement . . . . . . . . . . . . . . . . . . . . . . . . . . . . . . . . . . . . . . . . . . . . . . . . . . . . . . . . . . . . . . . .
Voltage distribution troubleshooting . . . . . . . . . . . . . . . . . . . . . . . . . . . . . . . . . . . . . . . . . . . . . . . . . . . . . . . . . . . . . . . . . . . . . . . . . . . .
Voltage regulator assembly A2100 . . . . . . . . . . . . . . . . . . . . . . . . . . . . . . . . . . . . . . . . . . . . . . . . . . . . . . . . . . . . . . . . . . . . . . . .
1-59
2-230
2-56
1-60
X
XMTR HI-LO switch S9604 replacement . . . . . . . . . . . . . . . . . . . . . . . . . . . . . . . . . . . . . . . . . . . . . . . . . . . . . . . . . . . . . . . . . . . . . . . . .
2-195
Index 9/(Index 10 blank)
TM 11-5820-670-30
GLOSSARY
Section 1 ABBREVIATIONS
af
afc
agc
am
crs
fm
if.
kHz
MHz
rec
rf
rt
xmit
Audio frequency
Automatic frequency control
Automatic gain control
Amplitude modulation
Crystal reference system
Frequency modulation
Intermediate frequency
Kilohertz
Megahertz
Receive
Radio frequency
Radio-transmitter
Transmit
Section II DEFINITION OF UNUSUAL TERMS
Attenuate. To reduce signal strength.
Automatic frequency control (aft). A system that produces an error voltage which is proportional to
the amount of oscillator drift. The error voltage corrects this drift.
Automatic gain control (age). A system that automatically adjusts the gain of a signal so as to
produce a constant level of output power.
Drift. The action of an oscillator whose output frequency varies, even though circuit conditions remain
the same.
Limiting. Clipping those portions of a wave that exceed a specific amplitude.
Squelch. To quiet a receiver by cutting off its output when no signal is being received.
Glossary 1/(Glossary 2 blank)
By Order of the Secretary of the Army:
Official:
JOHN A. WICKHAM JR.
General, United States Army
Chief of Staff
DONALD J. DELANDRO
Brigadier General, United States Army
The Adjutant General
DISTRIBUTION:
To be distributed in accordance with DA Form 12-36 literature
requirements for AN/ARC-131.
U.S. GOVERNMENT PRINTING OFFICE : 1989 : 0 - 242-451 (5888)
PIN: 058533-000
This fine document...
Was brought to you by me:
Liberated Manuals -- free army and government manuals
Why do I do it? I am tired of sleazy CD-ROM sellers, who take publicly
available information, slap “watermarks” and other junk on it, and sell it.
Those masters of search engine manipulation make sure that their sites that
sell free information, come up first in search engines. They did not create it...
They did not even scan it... Why should they get your money? Why are not
letting you give those free manuals to your friends?
I am setting this document FREE. This document was made by the US
Government and is NOT protected by Copyright. Feel free to share,
republish, sell and so on.
I am not asking you for donations, fees or handouts. If you can, please
provide a link to liberatedmanuals.com, so that free manuals come up first in
search engines:
<A HREF=http://www.liberatedmanuals.com/>Free Military and Government Manuals</A>
– Sincerely
Igor Chudov
http://igor.chudov.com/