1
OPERATION MANUAL
Thank you very much for purchasing the ZOOM
.
Please read this manual carefully to learn about all the functions of the
so that you will
be able to use it fully for a long time.
Keep this manual in a convenient place for reference when necessary.
Contents
Usage and Safety Precautions........................ 2
Using Rhythms............................................. 24
Introduction.................................................... 3
Using the Looper.......................................... 26
Terms Used in this Manual............................. 3
Updating the Firmware................................. 30
Part Names..................................................... 4
to its factory
Restoring the
default settings......................................... 31
Turn the Power on and Play............................ 6
Adjusting Effects............................................ 8
Selecting Patches......................................... 10
Storing Patches............................................. 12
Setting Specific Patch Parameters................ 14
Changing Various Settings............................ 18
Using Audio Interface Functions........................ 32
Effect Types and Parameters........................ 33
Troubleshooting............................................ 50
Rhythm List.................................................. 50
Specifications............................................... 51
Using the Tuner............................................. 22
© ZOOM CORPORATION
Copying or reproduction of this document in whole or in part without permission is prohibited.
Usage and Safety Precautions
SAFETY PRECAUTIONS
In this manual, symbols are used to highlight warnings
and cautions that you must read to prevent accidents. The
meanings of these symbols are as follows:
Usage and Safety Precautions
Warning
Caution
Something that could cause serious injury
or death.
Something that could cause injury or
damage to the equipment.
Battery handling
Install the batteries with the correct +/- orientation.
Use a specified battery type. Do not mix new and old batteries or
different brands or types at the same time. When not using the unit
for an extended period of time, remove the batteries from the unit.
If a battery leak should occur, wipe the battery compartment and
the battery terminals carefully to remove all battery residue.
Connecting cables with input and output jacks
Always turn the power OFF for all equipment before connecting any
cables.
Always disconnect all connection cables and the AC adapter before
moving the unit.
Other symbols
Required (mandatory) actions
Volume
Do not use the product at a loud volume for a long time.
Prohibited actions
Warning
Operation using an AC adapter
Use only a ZOOM AD-16 AC adapter with this unit.
Do not use or do anything that could exceed the ratings of outlets and
other electrical wiring equipment. Before using the equipment in a
foreign country or other region where the electrical voltage differs from
that indicated on the AC adapter, always consult with a shop that carries
ZOOM products beforehand and use the appropriate AC adapter.
Operation using batteries
Use 4 conventional 1.5-volt AA batteries (alkaline or nickel-metal
hydride).
Read battery warning labels carefully.
Always close the battery compartment cover when using the unit.
Alterations
Usage Precautions
Interference with other electrical equipment
In consideration of safety, the
has been designed to
minimize the emission of electromagnetic radiation from the device
and to minimize external electromagnetic interference. However,
equipment that is very susceptible to interference or that emits
powerful electromagnetic waves could result in interference if
placed nearby. If this occurs, place the
and the other device
farther apart. With any type of electronic device that uses digital
control, including the
, electromagnetic interference could
cause malfunction, corrupt or destroy data and result in other
unexpected trouble. Always use caution.
Cleaning
Use a soft cloth to clean the panels of the unit if they become dirty.
If necessary, use a damp cloth that has been wrung out well. Never
Never open the case or attempt to modify the product.
use abrasive cleansers, wax or solvents, including alcohol, benzene
and paint thinner.
Precautions
Product handling
Do not drop, bump or apply excessive force to the unit.
Be careful not to allow foreign objects or liquids to enter the unit.
Operating environment
Do not use in extremely high or low temperatures.
Do not use near heaters, stoves and other heat sources.
Do not use in very high humidity or near splashing water.
Do not use in places with excessive vibrations.
Do not use in places with excessive dust or sand.
AC adapter handling
When disconnecting the AC adapter from an outlet, always pull the
body of the adapter itself.
During lightning storms or when not using the unit for a long time,
disconnect the power plug from the AC outlet.
Malfunction
If the unit becomes broken or malfunctions, immediately
disconnect the AC adapter, turn the power OFF and disconnect
other cables. Contact the store where you bought the unit or
ZOOM service with the following information: product model, serial
number and specific symptoms of failure or malfunction, along
with your name, address and telephone number.
Copyrights
• Windows® and Windows Vista® are trademarks or registered
trademarks of Microsoft®.
• Macintosh ® and Mac OS ® are trademarks or registered
trademarks of Apple Inc.
• All other trademarks, product names and company names
mentioned in this documentation are the property of their
respective owners.
Note: All trademarks and registered trademarks mentioned in this manual
are for identification purposes only and are not intended to infringe on the
copyrights of their respective owners.
2
Introduction
Feels just like using effect pedals
The three effects each have their own displays, parameter knobs and footswitches, allowing
Realistic amplifier modeling
With our new ZFX-4 DSP, we have magnificently recreated low-end thickness, pitch clarity
and loudness, which are elements that contribute to a natural playing feel. Models range
from famous historical amps to recent popular ones, covering a great variety of bass sounds.
Combine diverse effects as you like
You can freely combine the over 100 types of onboard effects, including preamps and stomp
boxes tuned for bass guitars.
Looper that can be synchronized with rhythms
The looper can be synchronized with rhythms and record phrases of up to 40 seconds.
Introduction / Terms Used in this Manual
you to control all of them intuitively.
Automatic saving
The auto save function reliably stores the changes you make.
Works with ZOOM Edit & Share software
The
can be used with Edit & Share software, which is a patch editor and librarian, on a
computer to back up patches and change the order of effects.
See the ZOOM website (http://www.zoom.co.jp/) for further information about Edit & Share.
Terms Used in this Manual
Patch
The ON/OFF status and the parameter settings of each effect are stored as "patches." Use
patches to recall and save effects. The
can store 100 patches.
Bank
A set of 10 patches is called a "bank." The
has 10 banks labeled A–J.
3
Part Names
Top Panel
RHYTHM [
] key
TOTAL key
TAP key
Part Names
PATCH SELECT keys
TYPE keys
Displays
Rear Panel
INPUT jack
Bass guitar
BALANCED OUT connector
Headphones
OUTPUT jacks
Bass amplifier
4
STORE/SWAP key
GLOBAL key
Part Names
PAGE keys
Parameter knobs 1-3
ACTIVE/PASSIVE switch
Use this switch to set the
INPUT impedance.
Set this to “ACTIVE” (pushed in) if you have an effect pedal
Foot switches 1-3
connected between your instrument and the
or you are
directly connecting a bass guitar with active pickups.
Set this to “PASSIVE” (not pushed in) if you are directly
connecting a bass guitar with passive pickups.
PRE/POST switch
Use this switch to set the point when
the signal is output from the BALANCED
POWER (eco) switch
OUT connector.
DC9V AC adapter jack
signal after the
Set it to “POST” (pushed in) to output the
effects. Set it to “PRE”
(not pushed in) to output the signal before
the
effects.
GROUND switch
ZOOM AC adapter (AD-16)
USB connector
Use this switch to connect or disconnect the
BALANCED OUT connector with the ground.
Set it to “LIFT” (pushed in) to separate the signal
path from the grounding pin. Set it to “CONNECT”
CONTROL IN jack
(not pushed in) to connect it to the grounding pin.
FP01/FP02
FS01
Computer
5
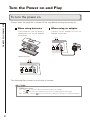
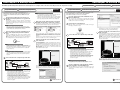
Turn the Power on and Play
To turn the power on
Turn the Power on and Play
Always lower the amplifier’s volume all the way before turning the power on.
When using batteries
When using an adapter
Insert batteries into the batter y
compartment and set the POWER
switch to ON.
Connect the AC adapter and set the
POWER switch to ON.
Bottom of the unit
Turn the amplifier’s power on and raise its volume.
HINT
• POWER switch options
6
is not used for about 25 minutes, it will be set to standby.
will not be set to standby as long as there is a signal input from a bass guitar.
eco: If the
The
OFF: When set to “OFF”, the
can be powered from a USB bus by connecting it to a computer’s USB port.
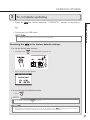
Display information
Graphic for selected effect
Turn the Power on and Play
Home Screens show the current patch
Virtual knob
HINT
• The positions of the virtual knobs change with the parameter values.
Edit Screens show parameters being edited
Page tabs
Parameter names
Parameter values
HINT
• If there are 4 or more parameters that can be adjusted, multiple page tabs will be shown.
7
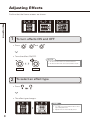
Adjusting Effects
Confirm that the Home screens are shown.
Adjusting Effects
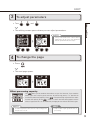
1
To turn effects ON and OFF
• Press , and .
• Turns the effect ON/OFF.
NOTE
• An effect is ON when its footswitch LED is lit.
• An effect is OFF when its footswitch LED is not lit.
OFF
2
ON
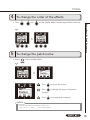
To select an effect type
• Press .
• The effect type changes.
HINT
• See page 33 for information about effect
types and parameters.
• Adjustments are automatically saved.
8
EDIT
3
To adjust parameters
• The editing screen opens where you can adjust parameters.
NOTE
• Time, rate and some other effect
parameters can be set in note durations
that are synchronized to the tempo.
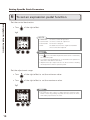
4
Adjusting Effects
• Turn , and .
To change the page
• Press .
• The next page opens.
Effect processing capacity
The
allows you to combine three effects as you like. However, if you combine
effect types that require great amounts of processing power, it is possible to
. If the processing required for the effect
exceed the processing capacity of the
, “THRU” is shown over the effect graphic and the
exceeds the capacity of the
effect is bypassed. This can be avoided by changing one or more of the effect types.
NOTE
HINT
• An effect requires the same amount of processing power
whether it is on or off.
• Amp models require great amounts of
processing.
9
Selecting Patches
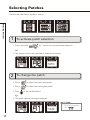
Confirm that the Home display is shown.
Selecting Patches
1
To activate patch selection
• Press and Hold for 1 second to activate patch selection.
• The screens show the patch bank, number and name.
2
To change the patch
• Press to select the next lower patch.
• Press to select the next higher patch.
• Turn of the middle effect.
• The patch number and name changes.
HINT
• You can also change patches
using
10
.
PATCH SELECT
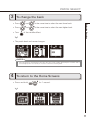
3
To change the bank
and
at the same time to select the next lower bank.
• Press
and
at the same time to select the next higher bank.
• Turn of the middle effect.
Selecting Patches
• Press
• The patch bank and name changes.
NOTE
• When pressing two footswitches at the same time, the sound could be affected by the footswitch that is
pressed slightly earlier. To avoid this, do not make sound when switching banks.
4
To return to the Home Screens
• Press and hold for 1 second.
11
Storing Patches
The
automatically saves settings when parameters are adjusted.
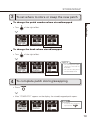
Storing Patches
1
To store a patch or swap with a different patch
• Press .
• blinks and the screens appear as below.
2
To select whether to store or swap the patch
• Turn of the left effect.
Store
12
Swap
STORE/SWAP
3
To set where to store or swap the new patch
Storing Patches
To change the patch number where stored/swapped
• Turn of the right effect.
Change the patch number
To change the bank where stored/swapped
• Turn of the right effect.
NOTE
• The currently active patch
cannot be selected as the
destination.
Change the bank
4
• The current setting values
are automatically saved.
To complete patch storing/swapping
• Press .
• After “COMPLETE!” appears on the display, the stored/swapped patch opens.
HINT
• To cancel this, press any
key instead of
.
13
Setting Specific Patch Parameters
1
To activate the TOTAL menu
Setting Specific Patch Parameters
• Press .
NOTE
• Settings made for total
p a r a m e t e r s a r e s ave d
separately for each patch.
PATCH
2
CHAIN/NAME
CTRL PDL/CTRL SW
To adjust the patch level
• Turn of the left effect.
NOTE
• The setting range is 0-120.
HINT
• To change the overall volume of all patches, adjust the master level
(see page 18).
3
To adjust the balance between original and effected sounds
• Turn of the left effect.
NOTE
• The setting range is 0-100. Set to 0 for only the original sound or 100
for only the effect sound.
14
TOTAL
4
To change the order of the effects
5
To change the patch name
Setting Specific Patch Parameters
• Turn , and of the middle effect to exchange effect locations.
• Press of the middle effect.
: Turn
to move the cursor.
: Turn
to change the type of character/
symbol.
: Turn
to change the character.
NOTE
• The following characters and symbols can be used.
! # $ % & ' () +, -. ; = @ [] ^ _ ` { } ~A-Z, a-z, 0-9, (space)
NEXT
15
Setting Specific Patch Parameters
6
To set an expression pedal function
Setting Specific Patch Parameters
Set the control destination.
• Turn of the right effect.
NOTE
• INPUT VOL:
Use this to control the input level.
• OUTPUT VOL: Use this to control the output level.
• NO ASSIGN:
No function is assigned.
• BAL:
The balance between the original sound and the effect sound can be adjusted.
HINT
• Turn to show the different parameters that can be controlled by
the expression pedal.
• See “Effect types and parameters” for details about the parameters
that can be controlled for each effect.
• Rhythm and looper output levels are not affected when controlling
the Output Volume with an expression pedal.
Set the adjustment range.
• Turn of the right effect to set the minimum value.
• Turn of the right effect to set the maximum value.
HINT
• The minimum value can be set higher than the maximum value.
When set this way, pushing the pedal down decreases the effect,
while letting it up increases the effect.
16
TOTAL
7
To set an optional footswitch function
Setting Specific Patch Parameters
• Press on the right effect.
• Turn of the right effect.
BYPASS/MUTE
Sets the effect to bypass or mute.
TAP TEMPO
Press the footswitch repeatedly at the desired tempo to set the
tempo used for rhythms, the looper and effects.
NO ASSIGN
No function is assigned to the footswitch.
NOTE
• When more than one function can be assigned, use
to select one.
HINT
• In order to use the function set, the corresponding effect must also be ON.
• See “Effect types and parameters” for details about the parameters that can be assigned for each effect.
8
To exit the TOTAL menu
• Press .
17
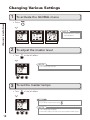
Changing Various Settings
1
To activate the GLOBAL menu
Changing Various Settings
• Press .
NOTE
• Global parameter settings
affect all patches.
MASTER/1-2-3
2
BATTERY/CONTRAST
USB AUDIO/VERSION
To adjust the master level
• Turn of the left effect.
NOTE
• The setting range is 0-120.
3
To set the master tempo
• Turn of the left effect.
HINT
• You can also set the tempo using .
NOTE
• The setting range is 40-250.
• This tempo setting is used by every effect, rhythms and the looper.
18
GLOBAL
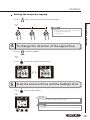
Setting the tempo by tapping
• Press two or more times at the desired tempo.
4
To change the direction of the signal flow
Changing Various Settings
HINT
• You can also set the tempo using an FS01
footswitch (sold separately).
(See page 17.)
• Press on the left effect.
• Turn to set the signal flow direction.
5
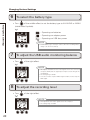
To set the amount of time until the backlight dims
• Turn of the middle effect.
NOTE
• The setting options are ON and 1–30 seconds.
HINT
• The amount of power consumed can be reduced by dimming the backlight.
NEXT
19
Changing Various Settings
6
To select the battery type
Changing Various Settings
• Turn of the middle effect to set the battery type to ALKALINE or Ni-MH
(nickel-metal hydride).
: Operating on batteries
: Operating on adapter power
: Operating on USB bus power
NOTE
• Set the battery type correctly in order to allow the remaining battery
charge to be shown accurately.
7
To adjust the USB audio monitoring balance
• Turn of the right effect.
NOTE
• This adjusts the balance between the signals sent from a connected
computer (DAW) and the signal input and processed through the
unit (DIRECT).
• The setting range is 0-100.
• Set to 0 to monitor only the DIRECT signal or 100 to monitor only the
DAW signal.
8
To adjust the recording level
• Turn of the right effect.
NOTE
• This adjusts the level of the signal sent to the computer.
• The setting range is ±6 dB.
20
GLOBAL
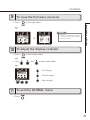
9
To view the firmware versions
HINT
• Check the ZOOM website (http://
www.zoom.co.jp) for the latest
firmware versions.
10
Changing Various Settings
• Press of the right effect.
To adjust the display contrast
• Press of the middle effect.
• Turn , and of the middle effect.
: Left display
: Center display
: Right display
11
To exit the GLOBAL menu
• Press .
21
Using the Tuner
1
To activate the tuner
Using the Tuner
• Press for 1 second.
NOTE
• Pressing
for 1 second
will bypass the effects.
• Pressing
for 2 seconds
will mute the output.
2
To change the tuner’s standard pitch
• Turn of the right effect.
NOTE
• The standard pitch for middle A can be adjusted to 435-445 Hz.
3
To select the tuner type
• Turn of the right effect.
CHROMATIC
The chromatic tuner shows the nearest pitch name (semitone) and
how far the input sound is from that pitch.
BASS
Depending on the selected type, the nearest string name and how
far the sound input is from that pitch are shown.
22
TUNER
4
To use a drop tuning
NOTE
• Drop tuning is not possible when the TYPE is set to CHROMATIC.
5
Using the Tuner
• Turn of the right effect.
Tune the bass guitar
• Play the open string that you want to tune and tune it.
CHROMATIC TUNER
BASS TUNER
The name of the nearest note and the pitch
accuracy are shown.
Flat
Correct pitch
Sharp
The number of the nearest string and the
pitch accuracy are shown.
Flat
Correct pitch
Sharp
HINT
• The keys above the displays
also light to show the pitch
accuracy.
6
Pitch too low
Pitch too high
Pitch correct
To end tuning
• Press , or .
23
Using Rhythms
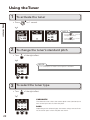
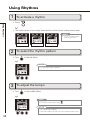
1
To activate a rhythm
Using Rhythms
• Press .
• The rhythm pattern starts to play automatically and the rhythm setting screens open.
HINT
• You can use a rhythm pattern
while using the looper.
RHYTHM PATTERN
2
TEMPO
LEVEL
To select the rhythm pattern
• Turn of the left effect.
NOTE
• See page 50 for types of patterns
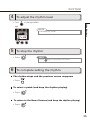
3
To adjust the tempo
• Turn of the middle effect.
HINT
• You can also set the tempo using .
NOTE
• The setting range is 40-250.
• This tempo setting is used by every effect, rhythms and the looper.
24
RHYTHM
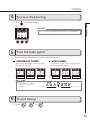
4
To adjust the rhythm level
NOTE
• The setting range is 0-100.
5
Using Rhythms
• Turn of the right effect.
To stop the rhythm
• Press .
HINT
• Press again to restart playback of the rhythm.
6
To complete setting the rhythm
The rhythm stops and the previous screen reappears
• Press .
To select a patch (and keep the rhythm playing)
• Press .
To return to the Home Screens (and keep the rhythm playing)
• Press .
25
Using the Looper
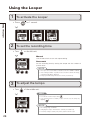
1
To activate the Looper
Using the Looper
• Press for 1 second.
2
To set the recording time
• Turn on the left unit.
Manual
Use the footswitch to start and stop recording.
Note mark
Set the recording time by setting the tempo and the number of
quarter notes.
NOTE
• The looper can record 1.5–40 seconds (20 seconds when UNDO is enabled).
• If the setting (number of quarter notes) would not fall in this range,
it will automatically be adjusted.
• Changing the TIME setting will erase the currently recorded loop.
3
To adjust the tempo
• Turn of the middle unit.
HINT
• You can also set the tempo using .
• If no loop has been recorded yet, you can also set the tempo by
tapping
.
NOTE
• The setting range is 40-250.
• Changing the tempo will erase the currently recorded loop.
• This tempo setting is used by every effect, rhythms and the looper.
26
LOOPER
4
To record a phrase and play it back
Recording
Playing
Using the Looper
• Press .
If set to “Manual”
• When
is pressed again or the maximum recording time (about 40 seconds) is
reached, loop playback starts (and “PLAY” appears on the display).
If set to a note mark
• Recording continues for the set time and then loop playback starts (and
“PLAY” appears on the display).
5
HINT
NOTE
• During recording, press to cancel recording.
• When using a rhythm, recording will start after the precount.
• When using a rhythm, the loop timing will be quantized, so
even if you stop the loop recording a little out of time, the
loop end point will be adjusted to match the tempo correctly.
To adjust the loop volume
• Turn of the right unit.
NOTE
• The setting range is 0-100.
NEXT
27
Using the Looper
6
To overdub a recorded loop
Using the Looper
To start overdubbing
• During loop playback, press .
Playing
Overdubbing
To end overdubbing
• Press again.
Overdubbing
7
Playing
To stop loop playback
• Press .
8
To erase the loop
• Press for 1 second.
• “CLEAR” appears on the display.
28
LOOPER
9
To return to the Home Screens
HINT
• You can return to the Home Screens while the loop is playing.
NOTE
• Returning to the Home Screens will not erase the loop.
• Turning the power OFF will erase the loop.
Using the Looper
• Press .
To change the Looper settings
• Press of the right unit.
• To activate the Undo function
NOTE
• When Undo is ON, the maximum loop recording time is
limited to 20 seconds.
Turn
of the right unit.
HINT
• When Undo is ON, you can cancel the last overdubbing by pressing for 1 second. After undoing, you can also redo by pressing
for 1 second again, restoring the last overdubbing.
• To select the STOP MODE
STOP MODE
STOP
Playback stops immediately
FINISH
Playback stops after the loop plays to its end
FADE OUT
Playback stops after fading out
Turn
of the right unit.
How loop playback stops
HINT
• Even when set to “FINISH” or “FADE OUT”, you can stop loop playback immediately by pressing and
holding down
.
• To adjust the RHYTHM LEVEL
Turn
of the right unit.
29
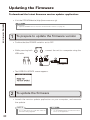
Updating the Firmware
To download the latest firmware version updater application:
• Visit the ZOOM Website (http://www.zoom.co.jp).
Updating the Firmware
HINT
• Open the GLOBAL menu to check the current firmware versions. (See page 21.)
1
To prepare to update the firmware version
• Confirm that the POWER switch is set to OFF.
• While pressing both , connect the unit to a computer using the
USB cable.
• The VERSION UPDATE screen appears.
2
To update the firmware
• Launch the version update application on your computer, and execute
the update.
30
NOTE
HINT
• Do not disconnect the USB cable while the
firmware is being upgraded.
• See the ZOOM website for instructions about
how to use the application.
VERSION UPDATE
3
To complete updating
has finished updating, “COMPLETE!” appears on the display.
• Disconnect the USB cable.
HINT
• Updating the firmware version will not erase saved patches.
Restoring the
to its factory default settings.
Updating the Firmware
• When the
1. To use the All Initialize function
• While pressing , set the POWER switch to ON.
• The All Initialize screen appears.
2. To execute the All Initialize function.
• Press .
NOTE
• Press any key other than to cancel.
HINT
• Executing the All Initialize function will restore all the settings of the
, including its patches, to factory
defaults. Do not use this function unless you are certain that you want to do this.
31
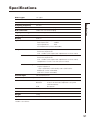
Using Audio Interface Functions
This unit can be used with computers running the following operating systems
Compatible OS
Windows
Using Audio Interface Functions
Windows® XP SP3 (32bit) or newer
Windows Vista® SP1 (32bit, 64bit) or newer
Windows® 7 (32bit, 64bit)
32bit: Intel® Pentium® 4 1.8GHz or faster, 1GB RAM or more
64bit: Intel® Pentium® DualCore 2.7GHz or faster, 2GB RAM or more
Intel Mac
OSX 10.5.8/10.6.5 or later
Intel® CoreDuo 1.83GHz or faster
1GB RAM or more
Quantization (bit-rate)
16-bit
Sampling frequency
44.1kHz
For details about recording, playback and other functions, please see the included
startup guide.
HINT
• You can adjust the balance between the signals from the
and the computer. (See page 20.)
• You can adjust the recording level. (See page 20.)
• When its POWER switch is set to OFF, the
can be connected to a computer by USB and powered by
its USB bus.
NOTE
• To monitor the signal of your connected bass guitar after it has passed through your DAW
software, set the USB AUDIO MONITOR balance to 100. (See page 20.)
At other settings, the signals from the computer and the
will be mixed, causing the output signal to
sound like a flanger effect is being used.
32
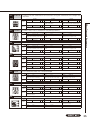
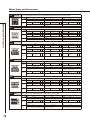
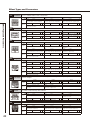
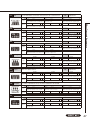
Effect Types and Parameters
Effect number
Parameter
Parameter range
Effect type
Footswitch function
This dynamic delay adjusts the volume of the effect sound
according to the input signal level.
Knob1
Time
Page01
Page02
Sense
1–2000
Adjusts the effect sensitivity.
F.B
Level
0–100
Adjusts the feedback amount.
InputMute
Knob3
-10–-1, 1–10
Sets the delay time.
Effect screen
FS
Knob2
Mix
0–100
P
Adjusts the amount of effected sound
that is mixed with the original sound.
0–150
Adjusts the output level.
Tempo synchronization possible icon
Pedal control possible icon
Parameter explanation
Effect Types and Parameters
088 DynaDelay
Effect explanation
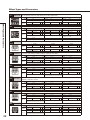
Effect Types and Parameters
001 OptComp This compressor is in the style of an APHEX Punch Factory.
Knob1
Drive
Page01
002 D Comp
0–100
Knob2
P Tone
Level
Adjusts the depth of the compression. Adjusts the tone.
0–150
Adjusts the output level.
This compressor in the style of the MXR Dyna Comp.
Knob1
Page01
Sense
Knob2
0–10
Tone
Adjusts the compressor sensitivity.
ATTCK
Page02
003 M Comp
Knob3
0–100
Knob3
0–10
Level
Adjusts the tone.
0–150
P
Adjusts the output level.
Slow, Fast
Sets compressor attack speed to
Fast or Slow.
This compressor provides a more natural sound.
Knob1
THRSH
Page01
Page02
0–50
Knob2
P Ratio
Knob3
1–10
Level
Sets the level that activates the
Adjusts the compression ratio.
compressor.
ATTCK
0–150
Adjusts the output level.
1–10
Adjusts the compressor attack rate.
004 DualComp This is a compressor which allows separate settings for the low frequency and high frequency range.
Knob1
Hi
Page01
Page02
005 160 Comp
0–50
Knob2
Lo
Knob3
0–50
Freq
300Hz– 1.5kHz
P
Adjusts the compression depth in Adjusts the compression depth in Adjusts the crossover point between the
high frequency and low frequency range.
the high frequency range.
the low frequency range.
Level
0–150
Adjusts the output level.
Tone
0–10
Adjusts the tonal quality of the sound.
This compressor is in the style of the dbx 160A.
Knob1
THRSH
Page01
Page02
-60–0
Knob2
Ratio
Knob3
1.0–10.0
Gain
Adjusts the threshold that determines
Adjusts the compression ratio.
when the effect is activated.
Knee
Hard, Soft
Sets the type of knee.
Level
0–150
0–20
Adjusts the gain after compression.
P
Adjusts the output level.
NEXT
33
Effect Types and Parameters
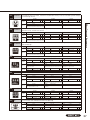
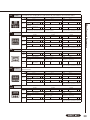
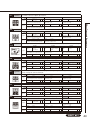
006 Limiter
This is a limiter that suppresses signal peaks above a certain reference level.
Knob1
THRSH
Page01
Knob2
P Ratio
1–10
Knob3
Level
0–150
Adjusts the reference signal level for Adjusts the compression ratio of the
Adjusts the output level.
the limiter action.
limiter.
Effect Types and Parameters
REL
Page02
0–50
1–10
Adjusts the delay between the point
where the signal level falls below the
threshold level and the limiter release.
007 SlowATTCK This effect slows the attack of each note, resulting in a violin-like performance.
Knob1
Time
Page01
008 ZNR
1–50
Knob2
P Curve
0–10
Knob3
Level
0–150
Set the curve of volume change during
Adjusts the output level.
attack.
Adjusts the attack time.
ZOOM's unique noise reduction cuts noise during pauses in playing without affecting the tone.
Knob1
THRSH
Page01
1–25
Knob2
P DETCT
Adjusts the effect sensitivity.
GtrIn, EfxIn
Sets control signal detected.
Knob3
Level
0–150
Adjusts the output level.
009 GraphicEQ This unit has a seven band equalizer.
Knob1
50Hz
Page01
120Hz
-12–12
800Hz
4.5kHz
-12–12
Adjusts the amount of boost/cut at
Adjusts the output level.
10 kHz.
-12–12
Level
0–150
This is a 2-band parametric equalizer.
Page02
Page03
Freq1
Knob2
20Hz–20kHz
Q1
0.5, 1, 2, 4, 8, 16
Adjusts center frequency of EQ1.
Adjusts EQ1 Q.
Freq2
Q2
20Hz–20kHz
Adjusts center frequency of EQ2.
Level
0.5, 1, 2, 4, 8, 16
Adjusts EQ2 Q.
Knob3
Gain1
-20–20
Adjusts EQ1 gain.
Gain2
-20–20
Adjusts EQ2 gain.
0–150
Adjusts the output level.
This effect divides the signal into two bands (high/low) and lets you freely adjust the mix
ratio of the two bands.
Knob1
Hi
Page01
Page02
Knob2
0–100
Lo
0–100
Knob3
Freq
80Hz–2.5kHz
Adjusts the mix ratio of the high Adjusts the mix ratio of the low Adjusts the crossover point between the
high frequency and low frequency band.
frequency band.
frequency band.
Level
0–150
P
Adjusts the output level.
Emphasizes the low and high frequencies.
Knob1
Bass
Page01
0–10
Knob2
P Trebl
0–10
Knob3
Level
0–150
Adjusts the amount of low-frequency Adjusts the amount of high-frequency
Adjusts the output level.
boost.
boost.
This exciter is in the style of the BBE Sonic Maximizer.
Knob1
Bass
Page01
34
-12–12
Page03
Knob1
013 Exciter
-12–12
Adjusts the amount of boost/cut at Adjusts the amount of boost/cut at Adjusts the amount of boost/cut at
500 Hz.
800 Hz.
4.5 kHz
Page01
012 Bottom B
Knob3
400Hz
Page02
10kHz
011 Splitter
-12–12
Adjusts the amount of boost/cut at 50 Adjusts the amount of boost/cut at Adjusts the amount of boost/cut at
Hz.
120 Hz.
400 Hz.
500Hz
010 ParaEQ
Knob2
-12–12
0–10
Knob2
P Trebl
0–10
Knob3
Level
0–150
Adjusts the amount of low-frequency Adjusts the amount of high-frequency
Adjusts the output level.
phase correction.
phase correction.
014 CombFLTR
This effect uses the comb filter that results from fixing the modulation of the flanger like
an equalizer.
Knob1
Freq
Page01
Knob2
P Reso
-10–0–10
Knob3
Mix
0–100
This sets the emphasized frequency.
Adjusts the intensity of the resonance Adjusts the amount of effected sound
sound of the effect.
that is mixed with the original sound.
HiDMP
Level
0–10
0–150
Adjusts the treble attenuation of the
Adjusts the output level.
effect sound.
015 AutoWah This effect varies wah in accordance with picking intensity.
Knob1
Sense
Page01
Page02
016 Z Tron
-10–-1, 1–10
Knob2
P Reso
Adjusts the sensitivity of the effect.
Level
Adjusts the intensity of the resonance
Adjusts level of original sound.
sound.
0–150
Knob1
Page02
-10–-1, 1–10
Knob2
P Reso
Adjusts the sensitivity of the effect.
Level
Knob3
Dry
0–100
Adjusts the intensity of the resonance
Adjusts level of original sound.
sound.
0–150
Adjusts the output level.
Knob1
Page01
Page02
Page03
0–100
Knob2
P Sense
0–10
Sets minimum frequency of envelope
Sets effect sensitivity.
filter.
Type
HPF, BPF, LPF
Chara
2Pole, 4Pole
Sets filter type.
Adjusts amount of filter applied.
Bal
Level
0–100
Knob3
Reso
0–10
Sets effect resonance.
VLCTY
Fast, Slow
Sets speed of filter action.
0–150
Adjusts the balance between original
Adjusts the output level.
and effect sounds.
This is a resonance filter with a sharp envelope.
Knob1
Sense
Page01
Page02
1–10
Knob2
P Peak
0–10
Adjusts the effect sensitivity.
Adjusts the Q value of the filter.
Dry
Level
0–100
Adjusts level of original sound.
Knob3
Mode
Up/Down
Selects whether the direction of
filter change is up or down.
0–150
Adjusts the output level.
This effect varies the sound like a talking modulator.
Knob1
Range
Page01
1–10
Knob2
Reso
0–10
Knob3
Sense
-10–-1, 1–10
P
Adjusts the frequency range processed Adjusts the intensity of the modulation
Adjusts the sensitivity of the effect.
by the effect.
resonance sound.
Bal
Page02
020 Step
0–10
This envelope filter with MOOG MF-101 low pass filter favor can be set in a wide range.
Freq
019 Cry
0–100
Adjusts the output level.
Sense
018 A-Filter
Knob3
Dry
This is like a Q-Tron Envelope Filter in LP mode.
Page01
017 M-Filter
0–10
Effect Types and Parameters
Page02
1–50
0–100
Level
0–150
Adjusts the balance between original
Adjusts the output level.
and effect sounds.
This special effect gives the sound a stepped quality.
Knob1
Depth
Page01
Page02
0–100
Sets the depth of the modulation.
Shape
0–10
Adjusts the effect envelope.
Knob2
Rate
0–50
Sets the speed of the modulation.
Level
Knob3
P Reso
0–10
Adjusts the intensity of the modulation
resonance sound.
0–150
Adjusts the output level.
NEXT
35
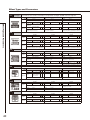
Effect Types and Parameters
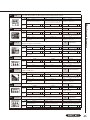
021 SEQ FLTR The sequence filter has the flavor of a Z.Vex Seek-Wah.
Knob1
Page01
Effect Types and Parameters
Page02
Step
Knob2
2–8
PTTRN
1–8
Knob3
Speed
1–50
Adjusts number of sequence steps.
Sets effect pattern.
Sets modulation speed.
Shape
Reso
Level
0–10
Sets effect sound envelope.
0–10
Sets effect resonance.
P
0–150
Adjusts the output level.
022 RNDM FLTR This filter effect changes character randomly.
Knob1
Page01
Page02
Page03
023 Booster
Speed
1–50
Knob2
P Range
0–100
Sets modulation speed.
Adjusts frequency range affected.
Type
Chara
HPF, BPF, LPF
Sets filter type.
Level
2Pole, 4Pole
Adjusts amount of filter applied.
Knob3
Reso
0–10
Sets effect resonance.
Bal
0–100
Adjusts the balance between original
and effect sounds.
0–150
Adjusts the output level.
This is a simulation of the Xotic EP Booster, which is warm and firm.
Knob1
Page01
Page02
Gain
0–100
Knob2
P Bass
Adjusts the gain.
Level
-10–10
Adjusts the low frequency level.
Knob3
Trebl
-10–10
Adjusts the high frequency level.
0–150
Adjusts the output level.
024 OverDrive Simulates the ODB-3 overdrive bass machine from Boss.
Knob1
Page01
Gain
Knob2
P Tone
Adjusts the gain.
Bal
Page02
0–100
0–100
Adjusts the tone.
Knob3
Level
0–150
Adjusts the output level.
0–100
Adjusts the balance between the
original sound and the effected sound.
025 Bass Muff This is a simulation of the Electro-Harmonix Bass Big Muff.
Knob1
Page01
Page02
026 T Scream
Gain
0–100
Knob2
P Tone
Adjusts the gain.
Adjusts the tone.
Mode
Bal
NORM, BsBST
Gain
0–100
Adjusts the output level.
0–100
Knob2
P Tone
Adjusts the gain.
Bal
Page02
0–100
Adjusts the tone.
Knob3
Level
0–150
Adjusts the output level.
0–100
Adjusts the balance between the
original sound and the effected sound.
Simulation of the Boss DS-1 distortion pedal, which has been a long-seller.
Knob1
Page01
Gain
Page02
0–100
Knob2
P Tone
Adjusts the gain.
Bal
0–100
Adjusts the tone.
Knob3
Level
0–150
Adjusts the output level.
0–100
Adjusts the balance between the
original sound and the effected sound.
Simulation of the popular Pro Co Rat famous for its edgy distortion sound.
Knob1
Page01
Gain
Page02
0–100
Knob2
P Tone
Adjusts the gain.
Bal
36
0–150
Adjusts the balance between the
original sound and the effected sound.
Selects the distortion mode.
Knob1
028 Squeak
Knob3
Level
Simulation of the Ibanez TS808, which is loved by many guitarists as a booster and has
inspired numerous clones.
Page01
027 Dist 1
0–100
0–100
Adjusts the balance between the
original sound and the effected sound.
0–100
Adjusts the tone.
Knob3
Level
0–150
Adjusts the output level.
029 FuzzSmile
Simulation of the Fuzz Face, which has made rock history with its humorous panel design
and smashing sound.
Knob1
Page01
Gain
Adjusts the tone.
Knob3
Level
0–150
Adjusts the output level.
0–100
Adjusts the balance between the
original sound and the effected sound.
Simulation of the Electro-Harmonix Big Muff, which is loved by famous artists around the
world for its fat, sweet fuzz sound.
Knob1
Page01
Gain
Page02
0–100
Knob2
P Tone
Adjusts the gain.
Bal
031 MetalWRLD
0–100
0–100
Adjusts the tone.
Knob3
Level
0–150
Adjusts the output level.
0–100
Adjusts the balance between the
original sound and the effected sound.
Simulation of the Boss Metal Zone, which is characterized by long sustain and a powerful
lower midrange.
Knob1
Page01
Gain
Knob2
P Tone
Adjusts the gain.
Bal
Page02
0–100
0–100
Adjusts the tone.
Knob3
Level
Effect Types and Parameters
030 GreatMuff
Knob2
P Tone
Adjusts the gain.
Bal
Page02
0–100
0–150
Adjusts the output level.
0–100
Adjusts the balance between the
original sound and the effected sound.
032 BassDrive Simulation of the Sansamp Bass Driver DI, highly popular among bass players.
Knob1
Page01
Bass
Page03
033 D.I Plus
Trebl
Adjusts the low frequency level.
Gain
Page02
Knob2
-10–10
0–100
Adjusts the high frequency level.
P Blend
Adjusts the super-high frequency level.
Level
0–150
-10–10
Adjusts the middle frequency level.
Knob1
Bass
Page02
Page03
-10–10
Adjusts the low frequency level.
Gain
0–100
Knob2
Trebl
-10–10
Adjusts the middle frequency level.
P Blend
0–100
Knob3
Prese
-10–10
Adjusts the high frequency level.
Level
0–150
Adjusts the gain.
Adjusts the balance between the
Adjusts the output level.
original sound and the effected sound.
Color
CHAN
On/Off
Turns preset EQ on or off.
CLN / DIST
Switches between clean and distortion
channels.
This is a simulation of the Xotic Bass BB Preamp, which has a tube-like, thick sound.
Knob1
Page01
Page02
035 DI5
-10–10
This is a simulation of the MXR Bass D.I.+, which has both clean and distortion channels.
Page01
034 Bass BB
0–100
Knob3
Prese
Adjusts the balance between the
Adjusts the output level.
original sound and the effected sound.
Adjusts the gain.
Mid
-10–10
Gain
0–100
Knob2
P Bass
-10–10
Adjusts the gain.
Adjusts the low frequency level.
Dry
Level
0–100
Adjusts level of original sound.
Knob3
Trebl
-10–10
Adjusts the high frequency level.
0–150
Adjusts the output level.
This simulates the AVALON DESIGN U5 preamp.
Knob1
Page01
Page02
Gain
0–100
Adjusts the gain.
HiCut
Knob2
Tone
Off, 1–6
Adjusts the tone.
Knob3
Level
0–150
P
Adjusts the output level.
On/Off
Cuts high frequencies when ON.
NEXT
37
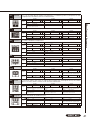
Effect Types and Parameters
036 Bass Pre
This is a preamp model with a semi-parametric equalizer for the mid-range.
Knob1
Page01
Bass
Adjusts the low frequency level.
Mid
Effect Types and Parameters
Page02
0–10
-10–10
Adjusts the middle frequency level.
Knob2
Trebl
Knob3
0–10
Level
Adjusts the high frequency level.
Freq
P
Adjusts the output level.
100Hz–4.5kHz
Adjusts the center frequency of the
mid-range.
037 AC Bs Pre This is a preamp model with a graphic equalizer.
Knob1
Page01
Page02
Page03
038 SVT
Gain
0–100
Adjusts the gain.
Bass
-10–10
Knob2
Depth
Knob3
0–10
Level
Adjusts the low frequency level.
L-Mid
-10–10
LM_F
Mid
H-Mid
-10–10
Adjusts the middle frequency level.
Bass
-10–10
Trebl
-10–10
Adjusts the high mid frequency level. Adjusts the high frequency level.
-10–10
Knob2
Mid
Knob3
-10–10
Trebl
Adjusts the low frequency level.
Adjusts the middle frequency level.
Mid_F
Gain
32Hz–6.3kHz
0–100
Off, Low, Hi,
Both, Cut
CAB
-10–10
Adjusts the high frequency level.
P Level
Adjusts the center frequency of the
Adjusts the gain.
mid-range.
Ultra
0–150
Adjusts the output level.
See Table 1
Mix
0–100
Adjusts the mix balance of the signal after
the pre-amp and the signal after the cabinet.
Emphasizes high and low frequencies. Selects the cabinet.
Simulation of the Fender Bassman 100.
Knob1
Page01
Page02
Page03
Bass
-10–10
Knob2
Mid
Knob3
-10–10
Trebl
Adjusts the low frequency level.
Adjusts the middle frequency level.
Mid_F
Gain
32Hz–6.3kHz
0–100
-10–10
Adjusts the high frequency level.
P Level
0–150
Adjusts the center frequency of the
Adjusts the gain.
mid-range.
Adjusts the output level.
Deep
Mix
On/Off
Adjusts the low-frequency character.
CAB
See Table 1
0–100
Adjusts the mix balance of the signal after
the pre-amp and the signal after the cabinet.
Selects the cabinet.
Simulation of the Hartke HA3500 famous for its aluminum cone.
Knob1
Page01
Page02
Bass
-10–10
Knob2
Mid
Knob3
-10–10
Trebl
Adjusts the low frequency level.
Adjusts the middle frequency level.
Mid_F
TUBE
32Hz–6.3kHz
0–100
-10–10
Adjusts the high frequency level.
P Level
0–150
Adjusts the center frequency of the Adjusts the mix of tube and transistor
Adjusts the output level.
type sounds.
mid-range.
Comp
Page03
041 SMR
32Hz–6.3kHz
Adjusts the low mid frequency level. Adjusts the L-Mid center frequency.
Page03
040 HRT3500
P
Adjusts the output level.
Adjusts the low frequency level.
Knob1
Page01
039 B-Man
0–150
Simulation of the ultimate rock bass amp, the Ampeg SVT.
Page02
Off,1–10
CAB
See Table 1
Mix
0–100
Adjusts the mix balance of the signal after
the pre-amp and the signal after the cabinet.
Adjusts the amount of compression. Selects the cabinet.
Simulation of the SWR SM-900, famous for its hi-fi sound.
Knob1
Page01
Page02
Page03
38
0–150
Bass
-10–10
Knob2
Mid
Knob3
-10–10
Trebl
Adjusts the low frequency level.
Adjusts the middle frequency level.
Mid_F
Gain
32Hz–6.3kHz
0–100
-10–10
Adjusts the high frequency level.
P Level
0–150
Adjusts the center frequency of the
Adjusts the gain.
mid-range.
Adjusts the output level.
ENHNC
Mix
0–10
CAB
See Table 1
This tone control changes the frequency
Selects the cabinet.
and level according to the knob position.
0–100
Adjusts the mix balance of the signal after
the pre-amp and the signal after the cabinet.
042 Flip Top
Simulation of the Ampeg B-15 made famous by the Motown sound of the 1960s.
Knob1
Page01
-10–10
Knob2
Mid
Knob3
-10–10
Trebl
Adjusts the low frequency level.
Adjusts the middle frequency level.
Mid_F
Gain
32Hz–6.3kHz
0–100
Ultra
Page03
Off, Low, Hi,
Both
CAB
See Table 1
Mix
0–100
Adjusts the mix balance of the signal after
the pre-amp and the signal after the cabinet.
Simulation of the Acoustic 360 well known for its gutsy midrange.
Knob1
Page01
044 Ag Amp
0–150
Adjusts the output level.
Emphasizes high and low frequencies. Selects the cabinet.
043 Acoustic
Adjusts the high frequency level.
P Level
Adjusts the center frequency of the
Adjusts the gain.
mid-range.
-10–10
Bass
-10–10
Knob2
Mid
Knob3
-10–10
Trebl
Adjusts the low frequency level.
Adjusts the middle frequency level.
Mid_F
Gain
32Hz–6.3kHz
0–100
-10–10
Adjusts the high frequency level.
P Level
0–150
Page02
Adjusts the center frequency of the
Adjusts the gain.
mid-range.
Adjusts the output level.
Bright
Mix
Page03
Emphasizes high frequencies when
Selects the cabinet.
ON.
On/Off
CAB
See Table 1
0–100
Adjusts the mix balance of the signal after
the pre-amp and the signal after the cabinet.
Effect Types and Parameters
Page02
Bass
Simulation of the Aguilar DB750 famous for its powerful sound.
Knob1
Page01
Page02
Bass
-10–10
Knob2
Mid
Knob3
-10–10
Trebl
Adjusts the low frequency level.
Adjusts the middle frequency level.
Mid_F
Gain
32Hz–6.3kHz
0–100
Char
Page03
Off, Deep,
Brght, Both
CAB
Adjusts the high frequency level.
P Level
Adjusts the center frequency of the
Adjusts the gain.
mid-range.
-10–10
0–150
Adjusts the output level.
See Table 1
Mix
0–100
Adjusts the mix balance of the signal after
the pre-amp and the signal after the cabinet.
Selects one of 4 types of preset tones. Selects the cabinet.
Simulation of the POLYTONE MINI-BRUTE III with its distinct midrange, often used by
045 Monotone
Jazz musicians.
Knob1
Page01
Page02
Page03
046 SuperB
Bass
-10–10
Knob2
Mid
Knob3
-10–10
Trebl
Adjusts the low frequency level.
Adjusts the middle frequency level.
Mid_F
Gain
32Hz–6.3kHz
0–100
-10–10
Adjusts the high frequency level.
P Level
0–150
Adjusts the center frequency of the
Adjusts the gain.
mid-range.
Adjusts the output level.
Char
Mix
Dark, Brght, Flat
CAB
See Table 1
0–100
Adjusts the mix balance of the signal after
the pre-amp and the signal after the cabinet.
Selects one of 3 types of preset tones. Selects the cabinet.
Simulation of the Marshall Super Bass that made rock history.
Knob1
Page01
Page02
Page03
Bass
-10–10
Knob2
Mid
Knob3
-10–10
Trebl
Adjusts the low frequency level.
Adjusts the middle frequency level.
Mid_F
Gain
32Hz–6.3kHz
0–100
-10–10
Adjusts the high frequency level.
P Level
0–150
Adjusts the center frequency of the
Adjusts the gain.
mid-range.
Adjusts the output level.
Prese
Mix
0–10
CAB
See Table 1
Adjusts the super-high frequency level. Selects the cabinet.
0–100
Adjusts the mix balance of the signal after
the pre-amp and the signal after the cabinet.
NEXT
39
Effect Types and Parameters
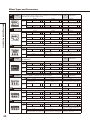
047 G-Krueger Simulation of the famous metal bass amp Gallien-Krueger 800RB from the eighties.
Knob1
Page01
Effect Types and Parameters
Page02
Bass
Knob2
-10–10
Mid
Adjusts the middle frequency level.
Mid_F
Gain
32Hz–6.3kHz
0–100
Off, Low, Mid,
Hi
CAB
Adjusts the preset tone.
0–150
Adjusts the output level.
See Table 1
Mix
0–100
Adjusts the mix balance of the signal after
the pre-amp and the signal after the cabinet.
Selects the cabinet.
This simulation of the Eden WT-800 can be used with a wide variety of playing styles.
Knob1
Page01
Page02
Page03
Bass
Knob2
-10–10
Mid
Knob3
-10–10
Trebl
Adjusts the low frequency level.
Adjusts the middle frequency level.
Mid_F
Gain
32Hz–6.3kHz
0–100
-10–10
Adjusts the high frequency level.
P Level
0–150
Adjusts the center frequency of the
Adjusts the gain.
mid-range.
Adjusts the output level.
ENHNC
Mix
0–10
CAB
See Table 1
This tone control changes the frequency
Selects the cabinet.
and level according to the knob position.
0–100
Adjusts the mix balance of the signal after
the pre-amp and the signal after the cabinet.
This simulates the Italian Markbass Little Mark III.
Knob1
Page01
Page02
Page03
050 Tremolo
-10–10
Adjusts the high frequency level.
P Level
Adjusts the center frequency of the
Adjusts the gain.
mid-range.
Color
049 Mark B
Trebl
Adjusts the low frequency level.
Page03
048 Heaven
Knob3
-10–10
Bass
Knob2
-10–10
Mid
Knob3
-10–10
Trebl
Adjusts the low frequency level.
Adjusts the middle frequency level.
Mid_F
Gain
32Hz–6.3kHz
0–100
-10–10
Adjusts the high frequency level.
P Level
0–150
Adjusts the center frequency of the
Adjusts the gain.
mid-range.
Adjusts the output level.
Color
Mix
0–6
CAB
Adjusts low and high frequencies.
See Table 1
Selects the cabinet.
0–100
Adjusts the mix balance of the signal after
the pre-amp and the signal after the cabinet.
This effect varies the volume at a regular rate.
Knob1
Page01
Page02
Depth
Knob2
0–100
Rate
Adjust the depth of the modulation.
Wave
0–50
Adjusts the rate of the modulation.
Knob3
P Level
0–150
Adjusts the output level.
UP 0–UP 9,
DWN 0–DWN 9,
TRI 0–TRI 9
Sets the modulation waveform.
051 Slicer
This effect creates a rhythmical sound by continuously slicing the input.
Knob1
PTTRN
Page01
Page02
052 4-Phaser
Knob2
1–20
Speed
Sets effect pattern.
THRSH
Sets modulation speed.
0–50
Level
Adjusts effect threshold.
Knob3
Bal
0–100
0–150
Adjusts the output level.
Knob1
Rate
Knob2
P Reso
Adjusts the modulation rate.
LoCut
Page02
0–50
Off–800Hz
Sets the cut frequency in the low
range of the effect sound.
-10–10
P
Adjusts the balance between original
and effect sounds.
This is a 4-stage phaser effect that produces a swooshing sound.
Page01
40
1–50
Knob3
Level
0–150
Adjusts the intensity of the effect character. Adjusts the output level.
053 8-Phaser
This is an 8-stage phaser effect that produces a swooshing sound. Compared to the
4-stage phaser, the effect sound is more detailed.
Knob1
Page01
Rate
-10–10
Knob3
Level
0–150
Adjusts the intensity of the effect character. Adjusts the output level.
Off–800Hz
Sets the cut frequency in the low
range of the effect sound.
This vibe sound features unique undulations.
Knob1
Page01
Page02
Speed
0–50
Knob2
P Depth
0–100
Knob3
Bias
0–100
Sets modulation speed.
Sets the depth of the modulation.
Adjusts bias of waveform modulation.
Wave
Mode
Level
0–100
Adjusts modulation waveform.
VIBRT, CHORS
Sets effect to vibrato or chorus.
0–150
Adjusts the output level.
055 DuoPhase This effect combines two phasers.
Knob1
Page01
RateA
1–50
Knob2
P RateB
1–50,
SyncA, RvrsA
Knob3
Level
0–150
Adjusts speed of LFO A modulation. Adjusts speed of LFO B modulation. Adjusts the output level.
Page02
Page03
ResoA
0–10
ResoB
0–10
Link
Effect Types and Parameters
054 The Vibe
Knob2
P Reso
Adjusts the modulation rate.
LoCut
Page02
0–50
Seri, Para, STR
Adjusts resonance of LFO A modulation. Adjusts resonance of LFO B modulation. Sets how two phasers are connected.
DPT_A
1–100
DPT_B
Adjusts depth of LFO A modulation.
1–100
Adjusts depth of LFO B modulation.
056 WarpPhase This phaser has a one way effect.
Knob1
Page01
Page02
057 Chorus
Speed
1–50
Sets modulation speed.
DRCTN
Knob2
P Reso
Sets effect resonance.
Knob3
Level
0–150
Adjusts the output level.
Go, Back
Sets direction of warping.
This effect mixes a shifted pitch with the original sound to add movement and thickness.
Knob1
Depth
Page01
Page02
058 Detune
0–10
0–100
Knob2
Rate
1–50
Knob3
Mix
0–100
P
Sets the depth of the modulation.
Sets the speed of the modulation.
Adjusts the amount of effected sound
that is mixed with the original sound.
LoCut
Level
PreD
Off–800Hz
0–150
Specifies the low-range cutoff point
Adjusts the output level.
for the effect sound.
On/Off
Turns pre-delay on or off.
By mixing an effect sound that is slightly pitch-shifted with the original sound, this effect
type has a chorus effect without much sense of modulation.
Knob1
Cent
Page01
Knob2
PreD
0–50
Knob3
Mix
0–100
P
Adjusts the detuning in cents, which Sets the pre-delay time of the effect Adjusts the amount of effected sound
are fine increments of 1/100-semitone. sound.
that is mixed with the original sound.
Tone
Page02
-50–50
0–10
Adjusts the tone.
Level
0–150
Adjusts the output level.
LoCut
Off–800Hz
Sets the cut frequency in the low
range of the effect sound.
059 VintageCE This is a simulation of the BOSS CE-1.
Knob1
Comp
Page01
Page02
0–9
Knob2
Rate
1–50
Sets the sensitivity of the compressor. Sets the speed of the modulation.
Level
Knob3
Mix
0–100
P
Adjusts the amount of effected sound
that is mixed with the original sound.
0–150
Adjusts the output level.
NEXT
41
Effect Types and Parameters
060 StereoCho This is a stereo chorus with a clear tone.
Knob1
Depth
Page01
Effect Types and Parameters
Page02
061 Ensemble
Knob2
0–100
Rate
Sets the depth of the modulation.
Sets the speed of the modulation.
LoCut
Level
Off–800Hz
Page01
Page02
Rate
Tone
Page02
0–10
Level
Adjusts the tone.
Mix
0–100
P
Adjusts the amount of effected sound
that is mixed with the original sound.
0–150
Adjusts the output level.
Knob2
0–100
Rate
0–50
Knob3
P Reso
-10–-1, 0,1–10
Sets the depth of the modulation.
Sets the speed of the modulation.
Adjusts the intensity of the modulation
resonance.
PreD
Mix
Level
0–50
Sets pre-delay time of effect sound.
LoCut
Page03
0–100
0–150
Adjusts the amount of effected sound
Adjusts the output level.
that is mixed with the original sound.
Off–800Hz
Sets the cut-off frequency in the low
range of the effect sound.
This is a jet sound like an ADA flanger.
Knob1
Depth
Page01
Page02
Knob2
0–100
Rate
0–50
Knob3
P Reso
-10–-1, 0,1–10
Sets the depth of the modulation.
Sets the speed of the modulation.
Adjusts the intensity of the modulation
resonance.
PreD
Mix
Level
0–50
Sets pre-delay time of effect sound.
LoCut
Page03
0–100
0–150
Adjusts the amount of effected sound
Adjusts the output level.
that is mixed with the original sound.
Off–800Hz
Sets the cut-off frequency in the low
range of the effect sound.
The volume of the effect sound changes according to the input signal level with this
dynamic flanger.
Knob1
Page01
Page02
Depth
0–100
Knob2
Rate
0–50
Sets the depth of the modulation.
Sets the speed of the modulation.
Reso
Level
-10–-1, 0, 1–10
Knob3
P Sense
-10–-1, 1–10
Adjusts the sensitivity of the effect.
0–150
Adjusts the intensity of the modulation
Adjusts the output level.
resonance.
This effect automatically adds vibrato.
Knob1
Depth
Page01
Page02
0–100
Sets the depth of the modulation.
Tone
0–10
Adjusts the tone.
Knob2
Rate
0–50
Knob3
P Bal
Sets the speed of the modulation.
Level
0–100
Adjusts the balance between original
and effect sounds.
0–150
Adjusts the output level.
This effect adds sound one octave below the original sound.
Knob1
Oct
Page01
Page02
42
Knob3
1–50
Sets the speed of the modulation.
Knob1
066 Octave
0–150
Knob2
0–100
Sets the depth of the modulation.
Depth
065 Vibrato
P
Adjusts the amount of effected sound
that is mixed with the original sound.
This analog flanger sound is similar to an MXR M-117R.
Page01
064 DynaFLNGR
0–100
This is a chorus ensemble that features three-dimensional movement.
Knob1
063 Flanger
Mix
Specifies the low-range cutoff point
Adjusts the output level.
for the effect sound.
Depth
062 VinFLNGR
Knob3
1–50
0–100
Knob2
P Dry
0–100
Knob3
Tone
0–10
Adjusts the tonal quality of the oneAdjusts the level of the one-octave
Adjusts the level of the original sound.
octave lower sound component.
lower sound component.
Low
0–10
Adjusts the low frequency level.
Mid
0–10
Adjusts the middle frequency level.
Level
0–150
Adjusts the output level.
067 PitchSHFT This effect shifts the pitch up or down.
Knob1
Shift
Page01
Tone
0–10
-25–-1, 0, 1–25
Level
Knob3
Bal
0–100
P
Adjusts the balance between original
and effect sounds.
0–150
Allows fine adjustment of pitch shift
Adjusts the output level.
amount in cent (1/100 semitone) steps.
068 MonoPitch This is a pitch shifter with little sound variance for monophonic (single note) playing.
Knob1
Shift
Page01
069 H.P.S
Tone
0–10
Adjusts the pitch shift amount in semitones.
Adjusts the tone.
Selecting "0" gives a detuning effect.
Fine
Page02
Knob2
-12–-1, 0,
1–12, 24
-25–-1, 0, 1–25
Level
Knob3
Bal
0–100
P
Adjusts the balance between original
and effect sounds.
0–150
Allows fine adjustment of pitch shift
Adjusts the output level.
amount in cent (1/100 semitone) steps.
This intelligent pitch shifter outputs the pitch-shifted sound according to scale and key settings.
Knob1
Scale
Page01
Knob2
-6, -5, -4, -3, -m, m,
3, 4, 5, 6
(See Table 2)
Key
C, C#, D, D#, E,
F, F#, G, G#, A,
A#, B
Knob3
Mix
0–100
Effect Types and Parameters
Adjusts the pitch shift amount in semitones.
Adjusts the tone.
Selecting "0" gives a detuning effect.
Fine
Page02
Knob2
-12–-1, 0,
1–12, 24
P
Sets the pitch of the pitch-shifted Sets the tonic (root) of the scale used Adjusts the amount of effected sound
sound added to the original sound.
for pitch shifting.
that is mixed with the original sound.
Page02
Tone
0–10
Level
Adjusts the tone.
0–150
Adjusts the output level.
070 BendCho This effect bends the pitch using the input signal as the trigger and processes each note separately.
Knob1
Depth
Page01
Page02
071 RingMod
Knob2
0–100
Time
0–100
Sets time before effect starts.
Adjusts the balance between original
and effect sounds.
Mode
Tone
Level
Up, Down
Sets direction of pitch bend.
0–10
Adjusts the tone.
0–150
Adjusts the output level.
This effect produces a metallic ringing sound. Adjusting the "Freq" parameter results in a
drastic change of sound character.
Knob1
Page01
Page02
1–50
Knob2
P Tone
Sets the frequency of the modulation.
Level
0–10
Adjusts the tone.
Knob3
Bal
0–100
Adjusts the balance between original
and effect sounds.
0–150
Adjusts the output level.
This effect creates a lo-fi sound.
Knob1
Bit
Page01
Page02
073 Bomber
Knob3
P Bal
Adjusts the effect depth.
Freq
072 BitCrush
0–50
4–16
Sets bit depth.
Tone
Knob2
SMPL
0–50
Sets sampling rate.
0–10
Adjusts the tone.
Level
Knob3
P Bal
Adjusts the balance between original
and effect sounds.
0–150
Adjusts the output level.
This effect produces an explosive sound when picking.
Knob1
PTTRN
Page01
Page02
Page03
HndGn, Arm,
Bomb, Thndr
Decay
1–100
Sets length of reverberations.
THRSH
Power
0–50
Level
FS
Knob2
Sets type of effect sound.
Adjusts effect threshold.
0–100
0–30
Trigger
Knob3
P Bal
0–100
Adjusts the balance between original
and effect sounds.
Tone
0–10
Adjusts strength of explosive sound. Adjusts the tone.
0–150
Adjusts the output level.
NEXT
43
Effect Types and Parameters
074 MonoSyn
This effect produces the sound of a monophonic (single-note playing) bass synthesizer that
detects the pitch of the input signal.
Knob1
Decay
Knob2
0–100
Wave
Effect Types and Parameters
Adjusts the rate of sound change.
075 StdSyn
Synth
0–100
Dry
Adjusts level of synthesizer sound.
Page01
Page02
Page02
Sound
0–100
Dry
Adjusts level of synthesizer sound.
Tone
0–100
0–10
Adjusts the tonal quality of the sound.
P Level
Adjusts level of original sound.
Decay
0–150
Adjusts the output level.
Knob2
0–100
Type
Adjusts the rate of sound change.
Selects a vowel variation.
Dry
0–100
Adjusts level of synthesizer sound.
Knob3
iA, UE, UA, oA
Synth
0–100
Tone
0–10
Adjusts the tonal quality of the sound.
P Level
Adjusts level of original sound.
0–150
Adjusts the output level.
This effect produces a vintage bass synthesizer sound.
Knob1
Page01
Page02
Knob2
0–100
Sense
Synth
Knob3
0–30
Range
-10–10
Adjusts the sensitivity for trigger
Adjusts the filter shift range.
detection.
Adjusts the rate of sound change.
0–100
Dry
Adjusts level of synthesizer sound.
0–100
P Level
Adjusts level of original sound.
0–150
Adjusts the output level.
This effect type adds synthesizer harmony components to single notes played on the
bass. The harmony components are determined by the Mode and Scale parameters.
Knob1
ATTCK
Page01
Page02
Knob2
0–10
Mode
Knob3
1–9
Scale
1, 2
Selects a harmony variation. Two
Adjusts the attack rate of the synthesizer Selects a harmony type from 1 - 9.
variations are available for each of
sound.
(See Table 4)
the 1-9 modes. (See Table 4)
Synth
0–100
Dry
Adjusts level of synthesizer sound.
0–100
P Level
Adjusts level of original sound.
0–150
Adjusts the output level.
This bass synthesizer sound adds analog synth fatness.
Knob1
Page01
Page02
Page03
Wave
Knob2
Saw, Sqr
Decay
0–100
Knob3
P Tone
0–10
Selects the waveform.
Adjusts the speed of tone modulation. Adjusts the tone.
Freq
Range
0–10
0–20
Reso
0–20
Sets the cut-off frequency of the low- Adjusts the amount of cut-off frequency Adjusts the intensity of the filter
pass filter.
modulation.
resonance.
Synth
0–100
Dry
Adjusts level of synthesizer sound.
0–100
Adjusts level of original sound.
Level
0–150
Adjusts the output level.
This effect simulates an organ sound.
Knob1
Page01
Page02
44
Knob3
1–4
Adjusts the sensitivity for trigger
Selects a synthesizer variation.
detection.
Synth
Decay
080 Z-Organ
0–150
Adjusts the output level.
Knob2
0–100
Knob1
079 Z-Syn
P Level
This effect produces a synthesizer sound similar to a talking modulator producing vowels.
Page01
078 4VoiceSyn
0–100
Adjusts level of original sound.
Knob1
077 V-Syn
0–10
ZOOM original bass synthesizer sound.
Sense
076 SynTlk
Reso
Sets the waveform type to "Saw"
(sawtooth), "Pulse" (square wave), Adjusts the intensity of the effect
or PWM (pulse width modulation character.
resulting in fatter sound).
Page01
Page02
Knob3
Saw, Pulse,
PWM
Upper
0–100
Knob2
P Lower
0–100
Knob3
Dry
0–100
Adjusts volume of high frequencies.
Adjusts volume of low frequencies.
Adjusts level of original sound.
HPF
LPF
Level
0–10
0–10
0–150
Adjusts high-pass filter cutoff frequency. Adjusts low-pass filter cutoff frequency. Adjusts the output level.
081 Defret
Turns the sound from any bass guitar into a fretless bass sound.
Knob1
Sense
Page01
082 Delay
Color
1–50
P
This long delay has a maximum length of 5000 mS.
Time
Page01
Page02
1–5000
FS
Knob2
F.B
0–100
Adjusts the amount of effected sound
that is mixed with the original sound.
HiDMP
P-P
Level
0–10
MONO, P-P
1–2000
P F.B
0–100
Sets the delay time.
Adjusts the feedback amount.
HiDMP
Level
0–10
FS
Knob2
Time
Knob3
Mix
1–2000
Sets the delay time.
Rate
1–50
Sets the speed of the modulation.
0–150
FS
Knob2
F.B
0–100
Adjusts the feedback amount.
P Level
0–150
Adjusts the output level.
Knob1
Time
Page02
1–5000
Adjusts the amount of effected sound
that is mixed with the original sound.
Depth
0–100
FS
Knob3
Mix
0–100
P
Adjusts the amount of effected sound
that is mixed with the original sound.
HiDMP
P-P
Level
0–10
MONO, P-P
0–150
Adjusts the treble attenuation of the Sets delay output to mono or pingAdjusts the output level.
delay sound.
pong.
10–2500
F.B
0–100
Sets the delay time.
Adjusts the feedback amount.
HiDMP
Level
0–10
FS
Knob2
Hold, InputMute
Knob3
Bal
0–100
P
Adjusts the balance between original
and effect sounds.
0–150
Adjusts the treble attenuation of the
Adjusts the output level.
delay sound.
087 MultiTapD This effect produces several delay sounds with different delay times.
Knob1
Time
Page02
Hold, InputMute
Adjusts the feedback amount.
Time
Page01
0–100
Sets the depth of the modulation.
Sets the delay time.
Knob1
Page02
0–100
Knob2
F.B
InputMute
Knob3
Mix
086 ReverseDL This reverse delay is a long delay with a maximum length of 2500 mS.
Page01
0–100
Adjusts the amount of effected sound
that is mixed with the original sound.
This analog delay simulation has a long delay with a maximum
length of 5000 mS.
Page01
InputMute
Adjusts the treble attenuation of the
Adjusts the output level.
delay sound.
Knob1
085 AnalogDly
0–150
Adjusts the treble attenuation of the Sets delay output to mono or pingAdjusts the output level.
delay sound.
pong.
084 ModDelay This delay effect allows the use of modulation.
Page02
P
Adjusts the feedback amount.
Time
Page01
0–100
Sets the delay time.
Knob1
Page02
Hold, InputMute
Knob3
Mix
This effect simulates a tape echo. Changing the "Time" parameter
changes the pitch of the echoes.
Page01
0–150
Adjusts the tonal quality of the sound.
Knob1
083 TapeEcho
Knob3
Level
Adjusts the harmonics contents of
the sound. Higher setting values Adjusts the output level.
result in stronger effect character.
Adjusts the effect sensitivity.
Tone
1–10
Effect Types and Parameters
Page02
Knob2
0–30
1–3000
Sets the delay time.
Tone
0–10
Adjusts the tone.
FS
Knob2
PTTRN
1–8
InputMute
Knob3
Mix
0–100
P
Sets the tap pattern, which varies from Adjusts the amount of effected sound
rhythmical to random patterns.
that is mixed with the original sound.
Level
0–150
Adjusts the output level.
NEXT
45
Effect Types and Parameters
088 DynaDelay
This dynamic delay adjusts the volume of the effect sound
according to the input signal level.
Knob1
Time
Page01
Effect Types and Parameters
Page02
089 FilterDly
Sense
1–2000
Sets the delay time.
F.B
0–100
Level
Adjusts the feedback amount.
Page01
Page03
0–150
FS
F.B
P Depth
Mix
0–100
Reso
0–150
Adjusts the output level.
Time
1–2000
Pitch
-12–12
0–100
Tone
Adjusts the feedback amount.
Knob3
P Mix
0–10
Adjusts the tone.
Knob1
TimeL
Page02
Page03
TimeR
1–2000
1–2000
FS
LchFB
Knob3
Mix
0–100
RchFB
0–100
Level
LchLv
0–100
RchLv
Adjusts delay output of left channel.
1–2000
Sets the delay time.
Rate
Time
1–50
FS
F.B
0–100
Adjusts the feedback amount.
P Color
4 STG, 8 STG,
inv 4, inv 8
Sets the tone of the effect type.
10–1000
Sets the delay time.
THRSH
0–30
Adjusts effect threshold.
Adjusts the amount of effected sound
that is mixed with the original sound.
Level
25–100
46
0–100
0–150
Adjusts the output level.
FS
InputMute
Knob3
Mix
0–100
P
Sets the time that the sample-and- Adjusts the amount of effected sound
that is mixed with the original sound.
hold sound is produced.
Level
0–150
Adjusts the output level.
FS
Knob1
Decay
0–100
Knob2
Duty
InputMute
Knob3
Mix
094 HD Reverb This is a high-definition reverb.
Page02
0–150
0–100
Knob2
Knob1
Page01
P
Adjusts delay output of right channel.
This delay samples and holds using picking as the trigger.
Page02
0–100
Adjusts delay feedback of left channel. Adjusts delay feedback of right channel. Adjusts the output level.
Sets the speed of the modulation.
Page01
InputMute
Adjusts delay time of left channel Adjusts delay time of right channel Adjusts the amount of effected sound
that is mixed with the original sound.
delay.
delay.
Time
093 TrgHldDly
0–150
Adjusts the output level.
Knob2
Knob1
Page02
0–100
Level
092 PhaseDly This effect applies a phaser to a delayed sound.
Page01
InputMute
Sets volume of pitch shift applied to Adjusts the amount of effected sound
that is mixed with the original sound.
delayed sound.
Sets the delay time.
F.B
FS
Knob2
This stereo delay allows the left and right delay times to be
set separately.
Page01
0–10
Adjusts the intensity of the modulation
resonance.
Sets the depth of the modulation.
Knob1
Page02
0–100
Adjusts the amount of effected sound
that is mixed with the original sound.
This effect applies pitch shift to a delayed sound.
Page01
InputMute
Knob3
0–100
Adjusts the feedback amount.
Sets the speed of the modulation.
Level
P
Adjusts the amount of effected sound
that is mixed with the original sound.
Knob2
1–2000
1–50
0–100
Adjusts the output level.
Sets the delay time.
Rate
Page02
091 StereoDly
Mix
This effect filters a delayed sound.
Time
InputMute
Knob3
-10–-1, 1–10
Adjusts the effect sensitivity.
Knob1
090 PitchDly
FS
Knob2
Knob2
Tone
0–10
InputMute
Knob3
Mix
0–100
P
Sets the duration of the reverberations. Adjusts the tone.
Adjusts the amount of effected sound
that is mixed with the original sound.
PreD
Level
1–200
HPF
0–10
0–150
Adjusts the delay between input of the
Adjusts high-pass filter cutoff frequency. Adjusts the output level.
original sound and start of the reverb sound.
095 Hall
This reverb effect simulates the acoustics of a concert hall.
Knob1
Decay
Page01
0–10
1–100
Level
Knob3
Mix
Decay
0–150
1–30
1–100
FS
Knob2
Tone
0–10
Sets the duration of the reverberations. Adjusts the tone.
PreD
Level
Decay
1–30
1–100
Tone
Decay
Level
1–30
FS
Knob2
Tone
1–100
Level
Knob1
0–10
InputMute
Knob3
Mix
0–100
P
Adjusts the amount of effected sound
that is mixed with the original sound.
0–150
1–30
1–100
FS
Knob2
Tone
0–10
Sets the duration of the reverberations. Adjusts the tone.
PreD
Page02
P
Adjusts the amount of effected sound
that is mixed with the original sound.
This reverb effect simulates the acoustics of a large enclosure
such as a sports arena.
Page01
0–100
Adjusts the delay between input of the
Adjusts the output level.
original sound and start of the reverb sound.
Decay
Level
InputMute
Knob3
Mix
0–100
P
Adjusts the amount of effected sound
that is mixed with the original sound.
0–150
Adjusts the delay between input of the
Adjusts the output level.
original sound and start of the reverb sound.
This effect reproduces only the early reflections of reverb.
Knob1
Decay
Page01
Page02
101 Air
Knob3
Mix
0–150
Sets the duration of the reverberations. Adjusts the tone.
PreD
Page02
100 EarlyRef
0–10
InputMute
Adjusts the delay between input of the
Adjusts the output level.
original sound and start of the reverb sound.
Knob1
099 Arena
FS
Knob2
This reverb effect simulates a spring reverb.
Page01
P
Adjusts the amount of effected sound
that is mixed with the original sound.
0–150
Sets the duration of the reverberations. Adjusts the tone.
PreD
098 Spring
0–100
Adjusts the delay between input of the
Adjusts the output level.
original sound and start of the reverb sound.
Knob1
Page02
InputMute
Knob3
Mix
097 TiledRoom This reverb effect simulates the acoustics of a tiled room.
Page01
P
Adjusts the delay between input of the
Adjusts the output level.
original sound and start of the reverb sound.
Knob1
Page02
0–100
Adjusts the amount of effected sound
that is mixed with the original sound.
This reverb effect simulates the acoustics of a room.
Page01
InputMute
Effect Types and Parameters
096 Room
Tone
Sets the duration of the reverberations. Adjusts the tone.
PreD
Page02
1–30
FS
Knob2
1–30
Adjusts the duration of the reverb.
Tone
0–10
Adjusts the tone.
Knob2
Shape
-10–10
Adjusts the effect envelope.
Level
Knob3
Mix
0–100
P
Adjusts the amount of effected sound
that is mixed with the original sound.
0–150
Adjusts the output level.
This effect reproduces the ambience of a room to create spatial depth.
Knob1
Size
Page01
Page02
1–100
Knob2
Tone
0–10
Sets the size of the space.
Adjusts the tone.
Ref
Level
0–10
Knob3
Mix
0–100
P
Adjusts the amount of effected sound
that is mixed with the original sound.
0–150
Adjusts the amount of reflection
Adjusts the output level.
from the wall.
NEXT
47
Effect Types and Parameters
102 Comp+Dist
This effect combines a compressor and distortion.
Knob1
Page01
Effect Types and Parameters
Page02
Page03
103 Oct+Dist
THRSH
Knob2
0–50
Gain
Knob3
P Level
0–150
Sets the level that activates the compressor. Adjusts the gain.
Adjusts the output level.
Dry
Ratio
0–100
Tone
Adjusts level of original sound.
ATTCK
0–100
Adjusts the tone.
1–10
Adjusts the compression ratio.
1–10
Adjusts the compressor attack rate.
This effect combines an octaver and distortion.
Knob1
Oct
Page01
Page02
104 Awah+Dist
0–100
0–100
Knob2
P Gain
Knob3
0–100
Level
0–150
Adjusts the volume of the effect sound
Adjusts the gain.
one octave down.
Adjusts the output level.
Dry
Chain
0–100
Tone
Adjusts level of original sound.
0–100
Adjusts the tone.
Befr/Aftr
Sets the distortion insertion point.
This effect combines auto-wah with distortion.
Knob1
Page01
Page02
Page03
Sense
Knob2
-10–-1, 1–10
Gain
0–100
Knob3
P Level
0–150
Adjusts the sensitivity of the effect.
Adjusts the gain.
Adjusts the output level.
Dry
Tone
Reso
0–100
Adjusts level of original sound.
Chain
0–100
0–10
Adjusts the intensity of the resonance sound.
Adjusts the tone.
Befr/Aftr
Sets the distortion insertion point.
105 Comp+AWah This effect combines compressor and auto-wah.
Knob1
Page01
Page02
Page03
106 PH+Dist
THRSH
Knob2
0–50
Sense
-10–-1, 1–10
Knob3
P Level
0–150
Sets the level that activates the compressor. Adjusts the sensitivity of the effect.
Adjusts the output level.
Dry
Ratio
0–100
Reso
1–10
Adjusts the intensity of the resonance sound. Adjusts the compression ratio.
Adjusts level of original sound.
ATTCK
0–10
1–10
Adjusts the compressor attack rate.
This effect combines a phaser and distortion in the style of the Roland JET PHASER.
Knob1
Page01
Page02
Gain
Knob2
0–100
Mode
Adjusts the gain.
Rate
0–50
1–4
Selects the jet sound mode.
P Tone
Adjusts the modulation rate.
0–10
Adjusts the tone.
Knob3
Reso
0–10
Adjusts the intensity of the effect character.
Level
0–150
Adjusts the output level.
107 PedalVox This simulates a vintage Vox wah pedal.
Knob1
Freq
Page01
108 PedalWah
1–50
Knob2
P DryMX
0–100
Knob3
Level
0–150
Adjusts the mix with the unaffected sound. Adjusts the output level.
Adjusts the emphasized frequency.
This is a pedal wah effect for bass guitar.
Knob1
Freq
Page01
1–50
Knob2
P DryMX
Adjusts the frequency that is emphasized.
0–100
Knob3
Level
0–150
Adjusts the mix with the unaffected
Adjusts the output level.
sound.
109 PDL Reso Pedal wah with a strong character.
Knob1
Freq
Page01
48
Knob2
P Reso
Adjusts the emphasized frequency.
DryMX
Page02
1–50
0–100
Adjusts the amount of original sound
in the mix.
0–10
Knob3
Level
0–150
Adjusts the intensity of the effect
Adjusts the output level.
character.
110 PDL Pitch Use an expression pedal to change the pitch in real time with this effect.
Knob1
Color
Page01
Bend
Up, Down
Level
0–100
P
Sets the amount of pitch shift.
0–150
Sets the direction of the pitch change
Adjusts the output level.
to Up or Down.
This is a pitch shifter specially for monophonic sound (single-note playing), which allows
the pitch to be shifted in real time with the expression pedal.
Knob1
Color
Page01
Knob2
1–9
(See Table 3)
P Tone
Knob3
0–10
Bend
Sets the type of pitch change control
Adjusts the tone.
with the expression pedal.
Mode
Page02
Up, Down
Level
0–100
P
Sets the amount of pitch shift.
0-150
Sets the direction of the pitch change
Adjusts the output level.
to Up or Down.
Table 1
Table 2
Type
Modeled cabinet and speakers
ORGN
The recommended cabinet will be selected.
8x10 AG
AMPEG 810E simulation
4x12 SB
MARSHALL 1935A simulation
4x12 BM
FENDER BASSMAN simulation
4x10 HA
HARTKE 4.5XL simulation
4x10 SWR
SWR GOLIATH simulation
4X10 AL
AGUILAR GS410 simulation
Setting
−6
−5
−4
−3
−m
m
3
4
5
6
Scale used
Interval
6th down
5th down
4th down
3rd down
3rd down
3rd up
3rd up
4th up
5th up
6th up
Major
Minor
Major
Table 3
Color
4x10 GK
GALLIEN KRUEGER 410RBH simulation
4x10 E
EDEN D410XLT simulation
1x18 AC
ACOUSTIC 301 simulation
1x15 PT
POLYTONE MINI BRUTE III combo amp cabinet
simulation
1x15 AG
AMPEG B-15 combo amp cabinet simulation
1x12 MB
Knob3
0–10
Effect Types and Parameters
111 PDL MnPit
Tone
Sets the type of pitch change control
Adjusts the tone.
with the expression pedal.
Mode
Page02
Knob2
1–9
(See Table 3)
Markbass 12-inch combo amp cabinet simulation
Pedal min
Pedal max
1
0 cents
+1 octave
2
0 cents
+2 octaves
3
0 cents
-100 cents
4
0 cents
-2 octaves
5
0 cents
−∞
6
-1 octave + original
+1 octave + original
7
-700 cents + original
+500 cents + original
8
Doubling
Detuned + original
9
-∞ (0 Hz) + original
+1 octave + original
Table 4
Note played on bass
Scale1
(Example : C)
Scale 2
Mode 1
Scale1
Scale 2
Mode 4
C
F on C
Cm
Mode 2
F on C
Mode 5
C 7 (omit 5)
C m7 (omit 5)
C MaJ7 (omit 5)
C m MaJ7 (omit 5)
Mode 3
Scale1
Scale 2
Mode 7
C7
F7
C MaJ7
F MaJ7
C sus4
C add9
Mode 8
C
C
Mode 6
Mode 9
C dim
E
dim
49
Troubleshooting
The unit will not turn ON
The sound distorts strangely/has an odd timbre
Troubleshooting / Rhythm List
•Confirm that the POWER switch is set to
"ON". When using bus power, confirm that
the switch is "OFF" before connecting the
USB cable.
•When using batteries, confirm that they are
still charged.
No sound or very low volume
•Check the connections (→P4–6).
•Set the Active/Passive switch according to
the type of bass guitar pickups or the device
.
connected directly to the
An effect is not working
If the effect processing capacity is exceeded,
"THRU" appears on the effect graphic. In this
case, the effect is bypassed.
The expression pedal is not working well
•Adjust the patch level (→P14).
Check the expression pedal settings (→P16).
•Adjust the master level (→P18).
•W h e n a d j u s t i n g t h e v o l u m e w i t h a n
expression pedal, make sure that a suitable
volume setting has been set with the pedal.
•C onfirm that unit is not in mute mode
(→P22).
•The unit might have switched to standby to
save power (→P6). In standby, audio input
and output are disabled.
There is a lot of noise
•Check the shielded cables that you are using
for defects.
The recorded level in a DAW is low
Check the recording level setting (→P20).
Batteries lose their charge quickly
•A r e y o u u s i n g m a n g a n e s e b a t te r i e s?
Alkaline batteries should provide 6 hours of
operation.
•Check the bat ter y set ting (→P 20 ). Set
the type of battery being used for a more
accurate display of the remaining charge.
•Use only a genuine ZOOM AC adapter.
Rhythm List
#
50
Tim Sig.
#
Tim Sig.
#
1
GUIDE
Pattern Name
4/4
15
DnB
Pattern Name
4/4
29
5Per4_1
Pattern Name
Tim Sig.
5/4
2
8Beat1
4/4
16
Funk1
4/4
30
5Per4_2
5/4
3
8Beat2
4/4
17
Funk2
4/4
31
Latin
4/4
4
8Beat3
4/4
18
Hiphop
4/4
32
Ballad1
4/4
5
8SHFFL
4/4
19
R'nR
4/4
33
Ballad2
3/4
6
16Beat1
4/4
20
Pop1
4/4
34
Blues1
4/4
3/4
7
16Beat2
4/4
21
Pop2
4/4
35
Blues2
8
16SHFFL
4/4
22
Pop3
4/4
36
Jazz1
4/4
9
Rock
4/4
23
Dance1
4/4
37
Jazz2
3/4
10
Hard
4/4
24
Dance2
4/4
38
Metro3
3/4
11
Metal1
4/4
25
Dance3
4/4
39
Metro4
4/4
5/4
12
Metal2
4/4
26
Dance4
4/4
40
Metro5
13
Thrash
4/4
27
3Per4
3/4
41
Metro
14
Punk
4/4
28
6Per8
3/4
Specifications
Effect types
111 types
Number of simultaneous effects 3
Number of user banks/patches 10 patches x 10 banks
44.1kHz
A/D conversion
24-bit with 128x oversampling
D/A conversion
24-bit with 128x oversampling
Signal processing
32-bit floating point & 32-bit fixed point
Frequency characteristics20-20 kHz +1 dB, -3 dB (10 kΩ load)
Display
LCD x 3
Input
Standard mono phone jack
Rated input level
-20dBm
Input impedance
1MΩ
ACTIVE/PASSIVE (switch selectable)
Output R
Standard mono phone jack
Maximum output level:
Line: +5 dBm (with output load impedance of 10 kΩ or more)
L/Mono/Phone
Standard stereo phone jack (line/headphones)
Maximum output level:
Line: +5 dBm (with output load impedance of 10 kΩ or more)
Headphones: 20 mW + 20 mW (into 32 Ω load)
Specifications
Sampling frequency
Balanced output XLR connector
Output impedance
100 Ω (HOT-GND, COLD-GND), 200 Ω (HOT-COLD)
PRE/POST (switch selectable)
GND LIFT (switch selectable)
Control input
For FP01/FP02/FS01
Noise floor (residual noise) -100dBm
Power
AC adapter
Batteries
USB
DC9V (center minus plug), 500 mA (ZOOM AD-16)
6 hours of continuous operation using 4 AA alkaline batteries
Bus power
Dimensions
170 (D) x 234 (W) x 54 (H) mm
USB
USB Audio
Weight
1.2kg
Options
FP01/FP02 expression pedal and FS01 foot switch
• 0dBm = 0.775Vrms
51
FCC regulation warning (for U.S.A.)
This equipment has been tested and found to comply with the limits for a Class B digital device,
pursuant to Part 15 of the FCC Rules. These limits are designed to provide reasonable protection
against harmful interference in a residential installation. This equipment generates, uses, and can
radiate radio frequency energy and, if not installed and used in accordance with the instructions, may
cause harmful interference to radio communications. However, there is no guarantee that interference
will not occur in a particular installation. If this equipment does cause harmful interference to radio
or television reception, which can be determined by turning the equipment off and on, the user is
encouraged to try to correct the interference by one or more of the following measures:
• Reorient or relocate the receiving antenna.
• Increase the separation between the equipment and receiver.
• Connect the equipment to an outlet on a circuit different from that to which the receiver is connected.
• Consult the dealer or an experienced radio/TV technician for help.
For EU Countries
Declaration of Conformity:
This product complies with the requirements of
EMC Directive 2004/108/EC,
Low Voltage Directive 2006/95/EC and
ErP Directive 2009/125/EC
Disposal of Old Electrical & Electronic Equipment
(Applicable in European countries with separate collection systems)
This symbol on the product or on its packaging indicates that this
product shall not be treated as household waste. Instead it shall
be handed over to the applicable collection point for the recycling
of electrical and electronic equipment. By ensuring this product
is disposed of correctly, you will help prevent potential negative
consequences for the environment and human health, which
could otherwise be caused by inappropriate waste handling of this
product. The recycling of materials will help to conserve natural
resources. For more detailed information about recycling of this
product, please contact your local city office, your household waste
disposal service or the shop where you purchased the product.
ZOOM CORPORATION
4-4-3 Surugadai, Kanda, Chiyoda-ku, Tokyo 101-0062 Japan
http://www.zoom.co.jp
B3-5000-1
This has the characteristic mid range of the Polytone MINI-BRUTE, which is popular among jazz players. Switch the EQ on for a tighter low end when using an amplifier.
2
SLAP WAH
This patch with additional auto-wah is useful for slapping solos.
3
bass tank
Less overdriven style into an SVT style amp modeler.
A Hartke HA3500 is combined with a 4.5XL cabinet with aluminum cone drivers. Switch the EQ on for tighter low end when using an amplifier.
Frank Bello
David Ellefson
Doug Wimbish
ARTIST
E
This reproduces the sound of that legendary master of the fretless bass. Explore the world of “Word of Mouth” with chorus and distortion!
1
Larry
This reproduction of that Jet Phaser sound favored by Larry Graham is a great enhancement to wild bass solos!
2
M Miller
This simulates the slapping sound of Marcus Miller using SWR amplifiers.
3
STANLEY
This simulates the bass sound of Stanley Clarke on “School Days” and is optimized for chord stroking and slapping.
4
Tim B
This reproduces the sounds of the wild guy of “Fudge” and “BBA.” Try to control the depth of distortion with your picking touch.
5
pino
Octaver into a Flip Top B-15 simulator, emulates the classic d'angelo pino p sound.
Hartke
5
SansCmp
A basic combination of SansAmp and Punch Factory, which are two favorite effects among bass players. Add EQ to your taste.
6
Jaco Jazz
Jaco Jazz Ah yes the famous Jaco and his sound this sound emulates a fretless bass very well.
6
BasicSet
This basic compressor, overdrive and preamp setup can be used like a chain of compact effect pedals.
The all-tube Ampeg SVT is combined with an 810E cabinet. Switch the EQ on for a tighter low end when using an amplifier.
7
RockSet
This “rock” setup of octave, booster and preamp effects can be used like a chain of compact pedals.
My basic beefed up octave sound, big lows and fat sine wave.
8
POPSet
An all-round “pop” setup of compressor, booster and exciter effects that can be used like a chain of compact effect pedals.
The AVALON U5 model contributes to this clear and crispy bass sound.
9
FusionSet
A setup of compressor, chorus and delay effects for fusion that can be used like a chain of compact effect pedals.
Very powerful Octave and Distortion sound.
7
SVT
8
tl octave
9
RecU5
0
W10 Big D
0
JumpSet
This set is stuffed with three wild weapons. Use any of these when you need to be “in-your-face”!
1 W10 Thumb1 Moog filter sound for thumb play style.
1
Z TRON
This auto-wah sound with a heavy bottom end is a combination of the Q-Tron-inspired Z Tron effect and a preamp.
2 W10 Thumb2 Q-Tron filter sound for thumb play style.
2
DblComp
This patch gives a hard compression sound using two compressors in a row and is good for cool slapping solos.
3 W10 StepUp
Long time delay sound with Hall reverb.
3
PHASER
This phaser sound is very effective in certain sections of songs.
4 W10 Up Top
Pitch shifter with delay for bass guitar solo.
5 W10 Bottom
Nice bottom sound with booster and Bottom B.
6 W10LesFret
Fretless sound with Hall reverb.
8 W10 DreamY Dreamy sound using Pitch Delay.
D
F
0 JP&360Amp
4
7 W10 DreamX Dreamy sound using Reverse Delay.
C
ARTIST
Polytone
G
CLEAN
B
This uses modeling of the all-around Markbass sound. Switch the graphic EQ on for a tighter low end when using an amplifier.
1
4 WahAttack
This adds an auto-wah sound to the natural dry sound of the bass.
5
This slapping sound cuts though with natural compression and low and high registers enhanced by an exciter.
SLAP
6 SLAP SOLO
This adds a short delay to a classic 80s slapping solo sound.
7
TAPPING
This patch is optimized for tapping. The signal is compressed fairly heavily and enhanced with EQ for a broader sound.
8
CHORD
This patch is optimized for chord work. Room and reverb effects add depth to the sound.
9 W10 BowTie
Slow attack sound with Hall reverb.
0
HintoCliff
This patch is a tribute dedicated to my friend Cliff Burton. I think of him when I hear it.
0 HARMONICS This patch is effective for harmonics. Chorus and reverb effects contribute to the floating sound.
1
GalePlus
9 PULL MELO
This patch is a kind of straight-ahead vibe plus a little more "stuff " I added to it…
1
Bassman
2 Smoothfun
This patch says to me that this bass sound is so smooth, I should have some fun with it.
2
Super Bass
3
WahTalkin
With this patch, I have this picture in my head of having a conversation with a wah pedal.
3
Aguilar
4
Horrorfuzz
This patch is my horror movie bass sound. To me it sounds like it’s from a horror movie soundtrack.
4
G-Kruger
5
Tremozep
When I’m playing with this patch, it sounds like it has a Led Zeppelin vibe to it. Tremolo all the way!
6
FollowMe
H
Use this patch for beautiful melodies played with a pull-off technique.
This is a simulation of the Fender Bassman 100 amp once used by Paul McCartney. Switch the graphic EQ on for tighter low end when using an amplifier.
This is a simulation of a Marshall 1992 Superbass with a 1935A cabinet. Switch the graphic EQ on for tighter low end when using an amplifier.
This models the powerful and clean sound of an Aguilar amp. Switch the graphic EQ on for tighter low end when using an amplifier.
This is a simulation of a Gallien-Krueger 800RB with a 410RBH cabinet. Switch the graphic EQ on for tighter low end when using an amplifier.
5 nice warm
Just a nice tube amp warm patch, good for any use.
This is just like the name suggests—a typical sound of British hard rock. Perfect with a pick.
When I hear this patch, it makes me feel like there is a sound following me every note I play.
6
7 LeStandard
With this patch, I just wanted to have a cool, straight ahead bass sound to jam to.
7 huge clean
Nice eq'd lo mid boosted sound sent into an SWR style amp.
8
Believe it
This patch has a journey-bass sound vibe to it. Big Chorus going on.
8 REC CLEAN
This clean sound is suitable for recording and has added fatness from Hartke HA3500 modeling.
9
Cureme
This simulation of an amp sound with punchy lows and highs is suitable for recording slapped basses.
BritHardRk
I think-This patch has a Cure-ish (the band) vibe to it. Fun with the Flanger!
9
REC SLAP
0 Crunch Fuz
FuzzSmile gives hard edge fuzz.
0
2COMP
1
Synth & OptComp creates a modern alt metal talk box type sound.
1 ReggaeNo.1
2 UR No Good
Derived from Van Halen II “You're No Good” bass intro. Classic Phaser and Compression. Great bass intro patch.
2 NORMAL DIS This standard distortion sound blends well with the mix. This sound is good for everything but ballads!
3
D.I Plus with the Vibe gives useful effect for blues or rock songs.
3
Amused
Wid Sprd
4 Nat Bg Wah
A natural bass wah created with Bottom B, Pedal Wah and Early Reflection.
5
Big Room
Oct Stomp, Reverb and Flip Top create an ambient hall setting with a lower octave added.
6
Space Driv
Exciter, Phaser, Fuzz. Good for solo bass and oddity pieces.
7
Bass Synth
Mono Synth creates outstanding effect for solos and special effects.
8
Lo Down
9
0
DISTORTION
A
0 MarkBoost
I
SOLO DIS
This patch simulates settings for recording using both studio and pedal compressors.
This popular reggae sound has a big bottom. Add the octaver if you like a more aggressive sound.
This distortion sound accompanied by a delay effect is suitable for soloing with fast passages.
4 LudditeSyn
This synth bass is simulated only with analog-type effects. Of course, the whole thing is still digitally simulated!
5
oct OD
Heavy fuzz and the bottom end give this patch a retro feel.
6
BigJet
7
MuffCmp
This jet sound has that characteristic wild swell.
This distortion sound uses the modeled Big Muff, which is a popular effect among many bass players. Switch on the exciter for a more contoured sound.
Octave creates lower octave while Random Filter adds mystic.
8 meshugger
Distorted, sounds amazing with bass tuned to low c with roundwound strings.
Spc Fusion
Vibrato with 4 Voice Synth provides fusion jazz voicing.
9
70fuzzoct
Retro fuzz and octave through a resonance filter.
cto Stomp
REC DIST
This natural distortion sound is suitable for recording.
A combination of Bottom B and Flip Top rounded out through the 160 COMP delivers a FAT SOLID SOUND.
0
1 Pump House
SVT Amp with a twist of Mono Pitch and 160 Comp creates controllable Sub Low with the expression pedal. PUMP IT!
1 BottomSyn
This fat bass synth sound with a pleasant attack is suitable for recording.
2
A Bass Drive merged with Trigger Hold then the 160 Comp evens it out. Expression Pedal makes it pulse.
2
Big Brass
This is another big brassy cool analogue sound very useful in synth sounds.
3
Fast Pick
This is a sound emulating you playing very fast 1/8 notes very accurate.
Propeller
With the Vibrato, Arena Reverb and Exciter, you create a Whirling Leslie Vibe.
SPECIAL FX
Victor Wooten
DEMO
Manufacturer names and product names mentioned in this patch list are trademarks or registered trademarks of their respective owners and do not
indicate any affiliation with ZOOM CORPORATION.
All product and artist names are intended only to illustrate sonic characteristics that were used as reference in the development of this product.
3
Swirl
4
Jaco Solo
Jaco Solo is a very dreamy sound thick with a nice reverb can be used for solo's or a main sound.
5
Earth W&F
This is a cool synth patch emulating the famous tune “Let's Groove Tonight” by Earth Wind & Fire.
6
Anthony J
This patch simulates Anthony Jackson’s trademark sound with a flanger. The swelling effect of the flanger fits nicely with tight rhythmic figures played with a pick.
6 Duck Wah B
No, this is not the sound of the Stax legend. This is a sonic imitation of a “real” duck!
7
Fat&Bright
Use this patch for a fat and bright slapping sound. Remember that funky guy who performed with Miles and the Stones?
7 Retro Game
This is a simulation of the sound of those 8-bit game machines that took the world by storm in the 80s.
8
Slplss Tny
This simulates the sound of that impressive intro played by that skinhead guy with a “disciplined” British prog group. Try slapping with this.
8
fairwarnin
Sub bass analog synth sound, most effective tracked slowly with long sustains.
9
Percy J
A set of the favorite effects used by the legendary fretless player of Brand X.
9
DistSeq
J
4 longambien
Reverse delay into a rich delay with mega feedback. Excellent ambience for looping.
5
This is a very cool impression of the Mini Moog synth very analogue.
Big Moog
This spacey sound combines Dist1, Seq Filter and Stereo Delay effects.
B3-PatchList-E-1
USB/Sequel LE Startup Guide
USB/Sequel LE Startup Guide
This USB/Sequel LE Startup Guide explains how to install Sequel LE on a computer, make connections and settings for this unit, and perform recording.
Sequel LE installation
Connections and preparation
To connect this unit to a computer running Windows 7 (or
Windows Vista, XP) and to enable audio input/output, proceed
as follows. The installation description uses Windows 7 as an
example.
Download the latest ASIO driver from the web site of
ZOOM Corporation (http://www.zoom.co.jp) and install
the driver.
The ASIO driver software is required to enable use of Sequel LE for
audio input and output with a computer. Refer to the read_me file
included in the download package for instructions on how to install
the driver correctly.
Use Sequel LE to record
Windows
HINT
• No special steps are necessary for canceling the USB connection.
Simply disconnect the USB cable from the computer.
Sequel LE installation
To bring up the "Sound" window, select "Control Panel" from the
Start menu and click "Hardware and Sound", then click "Sound".
Install Sequel LE on the Macintosh.
When the contents of the CD-ROM are shown, double-click "Sequel
LE 2.mpkg" to install the software.
If another item is selected, select the "ZOOM G Series"
After confirming the setting, quit Audio MIDI Setup.
Launch Sequel LE and set "ZOOM G Series" as the
Audio Connection.
In the "Sound" window, verify that "ZOOM G Series Audio" is listed
under the Play and Record devices and that the device is checked. (To
switch between Play and Record, click the tabs at the top of the
window.)
If the device is not checked, right-click on the icon for the device and
click "Set as Default Device" so that a check mark appears.
To start Sequel LE, double-click the Sequel LE shortcut icon that was
created on the desktop.
After Sequel LE starts, click the button in the bottom left corner of the
Multi Zone area of the Sequel window to open the settings page. Click
the Audio Connection item and select "ZOOM G series ASIO" from
the pop-up menu.
When you change the ASIO driver, a confirmation window will
appear. Click the "Switch" button.
Pilot Zone
NOTE
During the installation of Sequel LE, a screen asking about installation
of activation (software license authentication) management software
appears. Install this software, because it is required for registering
Sequel LE.
Arrange Zone
Connect this unit to the computer using a USB cable.
Connect this unit to the computer using a USB cable.
Guitar or other instrument
or
This unit
[OUTPUT] jack
Batteries
Guitar or other instrument
Computer
[INPUT] jack
or
This unit
[OUTPUT] jack
Batteries
Multi Zone
USB cable
Audio system or other
hi-fi playback equipment
Next, click the "Setup..." button to open a window where you can set
the latency of the ASIO driver. Set the latency as low as possible
without causing the sound to drop out during recording and playback.
To launch Sequel LE, click Sequel LE icon in the Applications folder.
After Sequel LE starts, click the button in the bottom left corner of the
Multi Zone area of the Sequel window to open the settings page. Click
the Audio Connection item and select "ZOOM G series" from the popup menu.
When you change the driver, a confirmation window will appear.
Click the "Switch" button.
Macintosh
[INPUT] jack
Pilot Zone
USB cable
Audio system or other
hi-fi playback equipment
Arrange Zone
NOTE
• If you monitor the audio signal during recording via the audio output
of the computer, there will be an audible delay. Be sure to use the
[OUTPUT] jack of this unit to monitor the signal.
• When this unit is operated on USB bus power via the USB cable,
insufficient power may result in unstable operation or error
indications appearing on the computer screen or unit display.
In such a case, power the device from an AC adapter.
• Use a high-quality USB cable and keep the connection as short as
possible. If USB bus power is supplied to this unit via a USB cable
that is more than 3 meters in length, the low voltage warning
indication may appear.
HINT
AC adapter
MacOS X
Bring up the "Sound" window from the Control Panel
and make the input device setting for the computer.
AC adapter
If nothing happens when you insert the CD-ROM, open the Start menu
and select "Computer" ("My Computer" in Windows XP). Then
double-click the "Sequel LE 2 for windows" CD-ROM icon to display
the contents of the CD-ROM, and double-click the executable file
"Setup" ("Setup.exe").
Use Sequel LE to record
The contents of the CD-ROM appear automatically. If nothing
happens when you insert the CD-ROM, double-click the "Sequel LE2
for Mac OS X" icon shown on the desktop.
Launch Sequel LE and select "ZOOM G Series ASIO"
as the ASIO driver.
HINT
Connections and preparation
Use Sequel LE to record
Insert the supplied "Sequel LE" CD-ROM into the CD
drive of the Macintosh.
• When you connect this unit for the first time to a computer running
Windows 7, a message saying "New Hardware Found" will appear.
Before proceeding, wait a while until this message disappears.
If the system software is an older version, the product may not be
recognized properly by the computer. It is therefore recommended to
always keep the system software updated to the latest version. The
system software can be downloaded from our web site.
Insert the CD-ROM. When the contents of the CD-ROM are shown,
double-click "Sequel LE2 for Windows" and then select "Setup.exe".
When the language selection screen appears, choose the language to
use.
After making the selection, follow the instructions on the screen.
Connections and preparation
To connect this unit to a computer running MacOS X and enable
audio input/output, proceed as follows. The installation
description uses Mac OS X v10.6 as an example.
NOTE
Insert the supplied "Sequel LE" CD-ROM into the CD
drive of the computer, and perform the installation
steps.
Sequel LE installation
Multi Zone
Next, click the "Setup..." button to open a window where you can set
the latency (buffer size) of the driver. Set the latency as low as possible
without causing the sound to drop out during recording and playback.
No special steps are necessary for canceling the USB connection.
Simply disconnect the USB cable from the computer.
Open the "Applications" folder and then the "Utilities"
folder, and double-click "Audio MIDI Setup".
The Audio MIDI Setup screen appears. Click "Audio Devices" and
check whether "USB Audio CODEC" is selected as default input/
default output.
NOTE
• If you monitor the audio signal during recording via the audio output
of the computer, there will be an audible delay. Be sure to use the
[OUTPUT] jack of this unit to monitor the signal.
• When this unit is operated on USB bus power via the USB cable,
insufficient power may result in unstable operation or error
indications appearing on the computer screen or unit display.
In such a case, power the device from an AC adapter.
• Use a high-quality USB cable and keep the connection as short as
possible. If USB bus power is supplied to this unit via a USB cable
that is more than 3 meters in length, the low voltage warning
indication may appear.
Continued overleaf
Continued overleaf
Sequel LE Starting Manual G-E-1
Continued from front
Sequel LE installation
Connections and preparation
Use Sequel LE to record
Windows
MacOS X
Select "New Project" from the "Project" menu.
Set the recording level.
Record to a track.
Check the recording.
This will close the currently open project and create a new empty
project file. If the currently open file has been changed, a message
appears asking if you want to save it or not.
Use the track "Volume" slider to adjust the input volume of the track
so that distortion does not occur during recording.
1. Press
◆Start playback
Menus on Windows version
File menu
to return to the beginning of the track before
starting recording.
You can start playback in Sequel using one of the following
methods.
Turn the "Record Ready" button on for the added track so that you can
hear the sound of the instrument input on that track.
The level meter to the right of the track setting area moves in response
to the input.
• Click the "Play" button.
Project menu
• Press the space key on the computer keyboard.
The space key can be used alternately to start and stop
playback.
Track volume
Edit menu
Track meter
2. At the right side of the Pilot Zone are several buttons used
for recording, playback and other controls. Among these,
the second one from the right is the "Cycle" button.
Confirm that this button is OFF (same color as other
buttons).
• Press the "Enter" key on the computer keyboard
(numerical keypad).
• Double-click the bottom half of the ruler at the top of the
Arrange Zone.
◆Stop playback
You can stop playback using one of the following methods.
In the Mac OS X version, the "File", "Project" and "Edit" menus
appear at the upper left corner of the screen.
• Click the "Play" button during playback.
HINT
• Press the space key on the computer keyboard.
In order to record with better sound quality, adjust the volume so that
it is as loud as possible without the signal distorting.
• Press the "0" key on the computer keyboard (numerical
keypad).
NOTE
NOTE
After installing Sequel LE, the first time you launch it, a demo project is
automatically opened. Even after creating a new project, you can open
this demo project again any time by using "Open Project..." from the
"Project" menu.
• While a track is record ready, the signal input to this audio interface
is output directly and the same signal is also output after it passes
through the computer once, resulting in a flanger-like sound. To
avoid this, set the USB level of the interface all the way to DAW.
3. Click the "Record" button to start recording. Recording
will start after a two-bar pre-count
• The meter above shows the signal level after processing with
Sequel LE. For this reason, after playing the guitar or other
instrument, a slight delay might occur before the level meter moves.
Add an audio track.
1. Click the "Add New Track" button at the top of the track
list.
For optimum enjoyment
While using Sequel LE, other applications may slow down drastically
or a message such as "Cannot synchronize with USB audio interface"
may appear. If this happens frequently, consider taking the following
steps to optimize the operation conditions for Sequel LE.
(1) Shut down other applications besides Sequel LE.
In particular, check for resident software and other utilities
4. After you are done performing, press the space key on the
computer keyboard to stop recording.
2. Click the "Audio" button at the top of the dialog shown.
3. Select "empty" at the top of the Name list and click the
"OK" button to add an audio track to the project.
(2) Reduce plug-ins (effects, instruments) used by Sequel LE.
When there is a high number of plug-ins, the computer's
processing power may not be able to keep up. Reducing
the number of tracks for simultaneous playback can also be
helpful.
(3) Power the unit from an AC adapter.
When a device designed to use USB power is powered via
the USB port, the current supply may sometimes fluctuate,
leading to problems. See if using an AC adapter improves
operation.
If applications still run very slowly or the computer itself does not
function properly, disconnect this unit from the computer and shut
down Sequel LE. Then reconnect the USB cable and start Sequel LE
again.
4. Double-click the track name if you want to edit it. Input
"Guitar" here for this example.