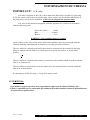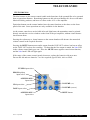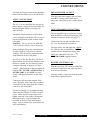
1
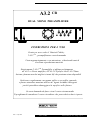
A3.2 CR
DUAL MONO PREAMPLIFIER
MUSICAL FIDELITY A3.2 CR
DUAL MONO PREAMPLIFIER
PHONO
TUNER
CD
AUX 2
AUX 1
MONITOR
TAPE
I.R.R.
POWER
INSTRUZIONI PER L 'USO
Grazie per aver scelto il Musical Fidelity
l' A3.2 CR , preamplificatore con telecomando.
Usato appropriatamente e con attenzione, vi darà molti anni di
eccellente riproduzione musicale
Esteticamente l' A3.2 CR Preamplifier si abbina perfettamente
all' A3.2 CR Power amplifier, all' A3.2 CD player ed all' A3.2 Tuner.
Insieme, formano uno dei migliori sistemi hifi che pensiamo siano disponibili
Spolverare regolarmente con panno soffice o con soffiec spazzola
e ponete attenzione massimo nell'uso di agenti lucidanti /detergenti
perchè potrebbero danneggiare la suprficie nelle finiture
Se avete domande da farse circa il vostro sistema audio
Vi preghiamo di consultare il vostro rivenditore che provvederà a darvi risposte.
Issue 1: April 2002
A3.2
CR
Pre
Instructions for Use Page 1 of 9
INFORMAZIONI SICUREZZA
IMPORTANT!
(U.K. only)
This unit is supplied in the U.K. with a mains lead fitted with a moulded 13 amp plug.
If, for any reason, you need to cut off this plug, please remove the fuse holder and dispose of
the plug safely, out of reach of children. It must not be plugged into a mains outlet.
The wires in the mains lead supplied with this appliance are coloured in accordance
with the following code:
Green and yellow..............Earth
Blue...............................Neutral
Brown................................Live
WARNING - This appliance must be earthed
As the colours of the wires of the mains lead of this appliance may not correspond with the
coloured markings identifying the terminals in your plug, proceed as follows:
The wire which is coloured green-and-yellow must be connected to the terminal in the plug
which is marked with the letter E or coloured green or green-and-yellow, or by the earth
symbol:
The wire which is coloured brown must be connected to the terminal which is marked with the
letter L or coloured red.
The wire which is coloured blue must be connected to the terminal which is marked with the
letter N or coloured black.
If connecting to a BS1363 plug, a 13 amp fuse must be used.
AVVERTENZA:
Ogni modifica a questo prodotto non espressamente approvata da Musical Fidelity che è
la party responsibile per la conformità agli standards potrebbe annullare l'autorità dell'utilizzatore
di operare/usare questa unità.
Issue 1: April 2002
A3.2
CR
Pre
Instructions for Use Page 2 of 9
CONSIGLI GENERALI
PRECAUZIONI ALL'INSTALLAZIONE ED INFORMAZIONI ALL'UTILIZZATORE
Il vostro nuovo A3.2 CR pre-amplifier è progettato e costruito per dare performances senza problemi, ma
come per tutte le unità elettroniche è necessario osservare alcune precauzioni:
Badate as tutte le avvertenza indicate e riportate dietro all'unità.
Collefare l'A3.2 CR pre-amplifier solamente a prese di rete che hanno la stessa tensione d'uso
riportata sul retro dell'unità.
Assicurarsi sempre che quando si collegana o scollegana i vostri apparecchi audio l'alimentazione
sia spenta e la spina staccata dalla presa.
Porre il cavo di alimentazione ed i cavi di inter / connessione dove non vengano schiacciati comminando
e/o intrappolati/schiacciati da oggetti posti loro sopra.
Non usare vicino ad acqua, o non porre contenitori d'acqua sull'unità, come per esempio,vasi di fiori
o vasi di piante e sottovasi. Se acqua dovesse entrare, immediatamente staccare l'interuttore generale
e la spina dalla presa a muro ed informate il vostro rivenditore, che dovrà controllare l'unità prima
di usarla nuovamente L'entrata di liquido all'interno è pericoloso, e può causare elettrico shock o
rischi di incendio.
Non porre l'unità vicino a sorgenti di calore qyuali ad es. caloriferi, raggi solari o altri apparecchi.
L'involucro di questo preamp e dei finali potrebbediventare/diventa caldo . Porre l'unità in un'area ben
ventilata e non toccar la porzioni coinvolte dal calore (quali ad es. alette di raffreddamento) .
Non rimuovere i coperchio o tentare di accedere all'interno. All'intenro non vi sono parti che debbono
essere raggiunte dall'utilizzatore. Se necessitate di assistenza rivolgetevi solo a centri pecializzati.
NOTA: L'apertura non autorizzata del prodotto invalida ogni richiesta di garanzia.
All'interno dell' A3.2 CR pre-amplifier vi sono fusibili. Se dovessere rendersi necessaria la sostituzione
portate l'unità al rivenditore. NON tentate di sostituire da soli il/i fusibile/i perchè questo fa decadere
la garanzia.
Pulire regolarmente cn un panno/spazzola morbidi, ma siate estremamente attenti nell'uso di agenti
di pulizia - questi potrebbero danneggiare la superficie.
L'elettronica in moderni equipaggiamenti hi-fi è complessa e può essere afflitta negativamente o danneggiata dai fulmini . Per proteggere il vostro sistema audio durante temporali con fulmini, rimuovere
la spina di rete e scollegare ogni cavo aeriale.
Se viene richiesta assistenza dopo-vendita, fornite al rivenditore il numero di matricola, lo scontrino
fiscale ed una descrizione del difetto.
RADIO FREQUENCY INTERFERENCE (R.F.I)
Questo prodotto è stato testato per assicurare che le sue operazioni non siano influenzate da normali
livelli di fondo di R.F.I., e che esso stesso non generei eccessivi ammontari di interferenza.
Se dovesse esistere e persistere un problema contattare il vsotro agente Musical Fidelity .
Issue 1: April 2002
A3.2
CR
Pre
Instructions for Use Page 3 of 9
CONNESSIONI E C
MUSICAL FIDELITY A3.2 CR
FACILITIES
DUAL MONO PREAMPLIFIER
PHONO
TUNER
CD
AUX 2
AUX 1
MONITOR
TAPE
I.R.R.
POWER
1
2
3
4
5
Disegno pannello frontale
1
2
3
4
5
6
7
8
9
10
11
12
14
15
16
17
PHONO
RIGHT
OUTPUT
MM
7
8
9
10
11
12
Disegno pannello posteriore
Indicatore accensione LED (red)
Tasto
acceso(spento
Indicatore di mute LED (blue)
Volume controllo
Infra Rosso Ricevitore
Tasto selezione ingres. PHONO e LED
Tasto selezione ngresso CD e LED
Tasto selezione TUNER e LED
Tasto selezione AUX 1 e LED
Tasto selezione AUX 2 input e LED
Tasto selezione ingresso TAPE e LED
TAPE MONITOR tasto e LED
13
6
CD
13
14
15
16
17
18
19
20
21
22
23
24
18
TUNER
19
AUX 1
Uscita destra RIGHT
Selettore MM/MC
Collegamento della terra Phono
Ingresso PHONO
Ingresso CD
Ingresso TUNER
Ingresso AUXILLIARY 1
Ingresso AUXILLIARY 2
Ingresso TAPE
Uscita TAPE RECORD
Uscita sinistra LEFT
Vaschetta cavo rete - IEC
20
AUX 2
21
TAPE
22
23
TAPE REC
24
LEFT
OUTPUT
L
MC
R
CAUTION
MOUNT UNIT ON SOLID SURFACE. DO NOT REMOVE SCREWS OR
COVERS UNDER ANY CIRCUMSTANCES. NO USER SERVICEABLE
COMPONENTS INSIDE. REFER SERVICING TO QUALIFIED ENGINEER.
SEE OWNERS MANUAL FER FURTHER INFORMATION.
MUSICAL FIDELITY
A3.2 DUAL MONO PREAMPLIFIER
MANUFACTURED IN ENGLAND BY MUSICAL FIDELITY
Issue 1: April 2002
THIS APPLIANCE
MUST BE
EARTHED
C R
A3.2
CR
Pre
50/60Hz
CC
POWER
CONSUMPTION
20W
IMPORTANT
Instructions for Use Page 4 of 9
TELECOMANDO
TELECOMANDO
The blue buttons on the remote control enable main functions of the preamplifier to be operated
from a convenient distance. Remaining buttons on this universal handset are for use with other
Musical Fidelity products, and have no effect on the A3.2 CR Pre-amplifier.
Equivalent buttons on the remote handset have the same functions as the those on the front
panel of the unit. Some operations are only available via the handset.
As the remote control uses an invisible infra-red light beam, the transmitter must be pointed
directly towards the receiver window on the front of the pre-amplifier, without visual obstruction between them.
Pressing the volume-up or -down buttons on the remote handset will advance the motorised
volume control in the required direction.
Pressing the MUTE button mutes audio output from the LINE-OUT sockets, but has no effect
on the TAPE OUT sockets for recording. To show that the line output is muted, the blue LED
in the volume control knob goes out. Press the MUTE button again to cancel mute function,
and the blue knob LED will light again.
If the range of the remote control greatly decreases, replace the batteries with new ones.
Do not mix old and new batteries - two are required, type SUM-4, AAA or LR03.
TUNER input select
PHONO pickup
input select
AUXILLIARY 1
input select
VOLUME (UP)
CD input select
VOLUME (DOWN )
TAPE input select
MUTE button
AUXILLIARY 2
input select
Issue 1: April 2002
A3.2
CR
Pre
Instructions for Use Page 5 of 9
CONNECTIONS
All input and output connections should be
made with the mains power switched OFF.
PRE-AMPLIFIER OUTPUT
Left and right audio outputs are provided
from RCA sockets on the back panel,
which are controlled by the volume adjustment.
INPUT CONNECTIONS
The A3.2 CR pre-amplifier has one pair of
phono inputs, which can be used either for
moving magnet (MM) or moving coil
(MC) pickups.
TAPE RECORDER CONNECTION
The pre-amplifier has a single tape circuit
with facilities for off-tape monitoring with
suitable 3-head tape decks (see page 7).
The phono input sensitivity requirement
can be changed from MM to MC by pressing the push-button switch located on the
rear panel.
Important - Do not operate the MM/MC
switch with the volume control turned up.
Connection of your tape recorder to the
A3.2 CR Pre should be as follows:
The tape deck's left and right line outputs
are routed to the pre-amplifier's TAPE
(input) sockets, and the tape deck's line
inputs are connected to the A3.2 CR's
TAPE RECORD (output) sockets.
Some turntable/pickup arm combinations
are fitted with an extra wire for chassis
earthing. This should be connected to the
earth terminal on the back panel.
The A3.2 CR Pre also has five “line level”
inputs which are electrically identical, and
therefore suitable for use with any source
component having an output of at least
300mV. Input sockets on the rear panel are
marked CD, TUNER, AUXILLIARY 1,
AUXILLIARY 2, and TAPE, to correspond with function buttons on the front
panel.
BEFORE SWITCHING ON . . . . .
Plug the accessory IEC mains lead into the
rear panel socket, then the other end into a
convenient wall outlet.
Turn the volume control on the front panel
to minimum (anticlockwise).
Connect the left and right outputs from
your CD player, tuner, tape deck or phono/
record deck to the appropriate RCA input
sockets on the back panel.
For the best results we recommend using
either Musical Fidelity X-LINX "no-nonsense" cables for this connection or the
highly rated Nu-Vista leads with integral
RFI suppression. Various lengths are
available in the Nu-Vista interconnect
range. Please contact your local dealer for
more information.
Issue 1: April 2002
A3.2
CR
Pre
Instructions for Use Page 6 of 9
OPERATION
STARTING . . . .
OFF TAPE MONITORING
Press the power button on the A3.2 CR preamplifier. The red power LED on the front
panel will light confirming that the unit is
ready for use. However, for the first five
seconds, sound from your speakers will be
muted, and the blue LED in the volume
control will not be lit. During this initial
period, the seven blue function LEDs will
flash in sequence.
In conjunction with a 3-head cassette deck,
off-tape monitoring allows the user to compare the recorded sound with the original
whilst a recording is being made. To do
this, first select the required source in the
normal way and start recording. The
TAPE MONITOR button on the front
panel can now be used to switch between
the source sound and its recorded version.
Unless using your pre-amplifier for off-tape
monitoring (see paragraph opposite )
ensure that the TAPE MONITOR button
has not been pressed accidently, as otherwise no sound will be heard through the
speakers.
The blue LED just above the tape monitor
button indicates that the tape monitor function is operating.
Note that the recorded sound is selected
when this LED is lit. On some 3-head tape
decks there is an additional 'tape/source'
switch which must be in the 'tape' position
for the above arrangement to work.
Select the required audio input source by
pressing an appropriate function button on
the front panel or remote control, and adjust
the volume control to obtain the preferred
sound level.
If in doubt, please refer to your tape deck
operating manual.
TAPE RECORDING
To record, simply select the required source
with the input selector button on the front
panel. This source will now be routed to
the A3.2 Pre’s TAPE RECORD output
sockets for recording by the external tape
deck.
You will also be able to hear the selected
source through the loudspeakers.
Note - adjustment of the volume control has
no effect on the recording level.
Issue 1: April 2002
A3.2
CR
Pre
Instructions for Use Page 7 of 9
TROUBLESHOOTING
Basic problem solving with a pre-amplifier is similar to troubleshooting any other electrical or
electronic equipment. Always check the most obvious possible causes first. To give you a few
ideas of what to look for, check the following:
Problem
Possible Cause
Remedy
No power when MAINS
POWER switch is operated
Mains plug not inserted
fully into the rear socket
Plug in securely
No sound
Tape monitor function has
been selected (see page 7)
Cancel tape monitor
function by pressing the
MONITOR button again
Mute function is selected
Press mute button on the
remote control
Wrong connections between
the A3.2 CR Pre and amplifier
Check audio lead interconnections between the
pre-amplifier and amplifier
POWER switch is set to OFF
Press POWER button
Batteries not inserted in remote
control unit
Insert batteries
Batteries are flat
Replace batteries - do not
mix old and new ones
Batteries are running out
Replace batteries - do not
mix old and new ones
Remote control unit does
not operate
Range of remote control has
greatly reduced
If none of these actions effect a cure, please contact your dealer, or an authorised Musical
Fidelity service agent. Remember, never open the case of the A3.2 CR Pre-amplifier yourself,
as this will invalidate the guarantee.
Issue 1: April 2002
A3.2
CR
Pre
Instructions for Use Page 8 of 9
SPECIFICATIONS
A3.2 CR
DUAL MONO PREAMPLIFIER
Inputs
5 pairs line level,
1 pair phono, moving magnet (MM), or
moving coil (MC) - switchable
Total harmonic distortion
< 0.005% 20Hz to 20kHz
Frequency response
10Hz to 100kHz ±1dB (line inputs)
Input sensitivity (for 1Volt RMS output
at maximum volume)
Line level 240mV, 200k ohms
Phono MM 2.5mV, 47k ohms
MC 400µV, 47k ohms
Signal / noise ratio (ref 1Volt RMS output)
Line > 90dB ‘A’-weighted
Phono, MM > 80dB ‘A’-weighted
Phono, MC > 65dB ‘A’-weighted
Power requirements
100 / 115 / 230V AC 50 / 60Hz
(factory preset)
Power consumption
20 Watts
Dimensions
440mm wide
100mm high including feet
390mm deep including volume knob
and rear panel terminals
Weight
12.5 kg unit only, un-boxed
14.5 kg in shipping carton
Standard accessories
IEC type mains lead
Remote control handset (universal)
2 x batteries (AAA, MN2400, LR03)
Musical Fidelity reserves the right to make improvements which may result in specification or feature changes without notice.
Issue 1: April 2002
A3.2
CR
Pre
Instructions for Use Page 9 of 9