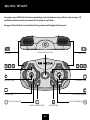
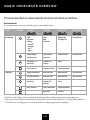
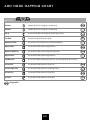
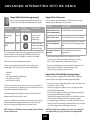
1
A Fusion of technology and Personality
User Manual
North America
Item No. 8061 | Ages 8+
CAUTION - ELECTRICAL TOY:
NOT RECOMMENDED FOR CHILDREN UNDER 4
YEARS OF AGE. AS WITH ALL ELECTRICAL PRODUCTS,
PRECAUTIONS SHOULD BE OBSERVED DURING
HANDLING AND USE TO PREVENT ELECTRICAL SHOCK.
INPUT: AC100-240V, 50/60HZ OUTPUT: DC 7.5V 3.1A
COPYRIGHT INFORMATION
RS Media™, Robosapien™, Robosapien™ V2,
Roboreptile™, Robopet™, and Roboraptor™
are copyright and trademarked by Wowwee Ltd.
Sun Microsystems and Java are registered
trademarks of Sun Microsystems, Inc.
All other copyrights are hereby acknowledged.
system requirements
Minimum system requirements for running
RS Media Editing Suite.
Microsoft® Windows® XP SP2 or higher (English Edition)
(Compatible with German, Spanish, French, and Italian
Windows® XP SP2 or higher)
PC with PIII 1.5GHz equivalent or higher processor
256 MB of system RAM
16 MB video card recommended
200 MB available hard disk space
CD-ROM drive
Supply of this product does not convey a license nor imply
any right to distribute content created with this product in
revenue-generating broadcast systems (terrestrial, satellite,
cable and/or other distribution channels), streaming
applications (via Internet, intranets and/or other networks),
other content distribution systems (pay-audio or audio-ondemand applications and the like) or on physical media
(compact discs, digital versatile discs, semiconductor chips,
hard drives, memory cards and the like). An independent
license for such use is required.
For details, please visit http://mp3licensing.com.
WELCOME
Congratulations on choosing RS Media™, the next generation of Robosapien
technology and personality.
RS Media is a complete multimedia robotic experience with the unique ability to be fully customized.
The perfect fusion of cutting-edge technology and personality modeling software, RS Media allows
you to take total control.
Before using this product, take a few moments to read this manual and retain it for future reference.
Package contents
This package contains:
1 x RS Media
1 x Controller
1 x USB Cable
1 x CD RS Media software
1 x AC/DC power adapter
contents
Welcome
3
Photo menu
29
Quick start
6-7
Photo controls chart
30
Power and Battery details
8-9
Video menu
31
RS Media overview
10
Video controls chart
32
LCD screen
11
Personality menu
33
Sensors overview
11
Personality controls chart
33
RS Media basics
11
Games menu
34
Sleep mode and power down
11
Games controls overview
34
Basic movements
12
Description of games
35
Basic arm movements
13
Ghost Force
35
Basic media mode functions
13
Vortex Racer
36
Remote controller overview
14
Bubble Soccer
36
Hand controls basics
15
Options menu
37
Introduction to RS Media’s modes
16
Media mode mapping chart
Description of Control mode
16
Sonic sensors
42
Control mode mapping chart
16-19
Tilt sensors
42
38-41
Description of Arm mode
20
Grip sensors
42
Arm mode mapping chart
20-23
Foot sensors
42
Description of Media mode
24
Infrared vision systems
43
Media mode functions overview
25
Flinch response
43
Hand controls
25
Long-range infrared vision
43
Media format compatibility
26
Close-range infrared vision
43
Descriptions of Media mode menus
27
Obstacle avoidance
44
Audio controls chart
28
Color recognition
44
contents
Identifying and tracking
44
Installing the software
51
Tracking timeout
44
Running the software
51
Object disappears
44
Software overview
51
Still objects
44
Help file
52
Color camera settings
45
Personality editor overview
52
Blinking
45
Macro editor overview
52
Blinking in Programming modes
45
BodyCon editor overview
53
Guard Mode
45
Media Organizer overview
53
RS Media™ / Robosapien™ V2 interaction
46
Onboard memory vs. expandable memory
54
Roboreptile™ interaction
46
Using the SD card
54
Roboraptor™ interaction
46
USB Connection
54
Robopet™ interaction
47
Playing audio from an external source
55
Advanced interaction with RS Media
47
Caring for your RS Media
Programming capability
47
Glossary
56
Directly programming RS Media
47
Warranty information
57
Puppet Mode (Positional programming)
48
FAQs
57
Puppet Mode: Foot sensors
48
Support
57
Puppet Mode: Left and Right side programming
48
Index
58
Main Program Mode
49
Subroutines
49
Sound and Vision subroutines
49
Positional subroutines
50
Guard subroutine
50
Introduction to the RS Media Editing Suite
51
55-56
QUICK START
To sample some of RS Media’s functions immediately, insert his batteries (see p.8-9) turn him on (see p.11)
and follow this brief overview of some of his functions in each Mode.
See page 14 for full details of controller button symbols used throughout this manual.
Left Shift
signal indicator light
right Shift
Play/Pause Pad
Stop PAD
camera Button
Select Button
stop Button
play / pause Button
right DIRECTION pad
LEFT DIRECTION pad
Mode Change Button
Demo Button
QUICK START
Mode selection. Press
to cycle through RS Media’s three modes.
CONTROL MODE CONTROLLER LEVEL 1
Arm MODE CONTROLLER LEVEL 2
media MODE CONTROLLER LEVEL 3
Stop
Right Arm
Menu Navigation
Dance Demo
Left Arm
Menu Select
Movement
Left/Right Arm Drop
/
Volume Up & Down
Head & Upper Body
Left/Right Arm Grab
/
Play / Pause Media
Change Personality
Left/Right Arm Throw
/
Previous Track
Free Roam Toggle
Left/Right Arm Chop
+
/
Next Track
Upper Body Only
+
Left/Right Arm Pick up
+
/
Take Photo
Personality Demo
+
Left/Right Arm Roll
+
/
Track & Photo Human
Lie/Sit/Get up
+
Left/Right Arm Place
+
/
Game Menu
Guard Mode
+
Left/Right Arm High Pick Up
+
/
Media Menu
+
Sleep/Power down
+
Left/Right Arm Push
+
/
Media Demo
+
Power and battery details
This section describes the battery and power requirements for RS Media.
RS Media tells you when his batteries are running low, after which he will
shut down. When he does this, you will need to replace all the batteries
in the robot.
Battery installation
If RS Media is not responding well to controller commands, you might
need to replace the batteries in the controller.
To install or change batteries in RS Media:
1.On RS Media, locate the battery compartments
(on the underside of each foot).
2. Using a Phillips screwdriver (not included), remove the battery
compartment covers.
3.Insert batteries into the RS Media battery compartments as illustrated in the diagram.
4. Replace the battery compartment covers and then replace the screws.
NOTE: Before installing or changing batteries, makes sure that RS
Media is turned off (switch is set to the OFF position).
RS Media
Battery requirements
Your RS Media is powered by 6 x “D” size batteries (not included) and 4 x
“AA” size batteries (not included). We recommend using only top-quality
alkaline batteries.
bottom view of the rs media
Power adapter
RS Media can be powered by an Output 7.5V AC/DC, 3.1 Amp,
center-positive adapter.
NOTE: Before operating RS Media using an adapter,
make sure that RS Media is turned off (button is set
to the OFF position).
To operate RS Media using an adapter:
1.Insert the jack of the adapter into the AC/DC socket in RS Media’s
right foot (see RS Media Overview p.10)
2.Plug the adapter into a wall socket.
3.Turn RS Media on by setting the power button to the ON position.
NOTE: RS Media will only perform upper body and media functions
(i.e. he will not perform any leg actions or bend at the waist) when
being powered by an adapter.
AC/DC adapter input
Important power adapter information
Examine the AC/DC adapter regularly for damage to the cord, plug, enclosure and other parts.
The AC/DC adapter is not a toy.
The toy must only be used with the recommended transformer.
If you wish to clean RS Media ensure that the power is disconnected first.
Wipe only with a soft dry cloth.
Power and battery details
RS Media remote controller
Important battery information
•
•
•
•
•
•
•
•
•
•
•
•
•
Battery requirements
Your RS Media remote controller is powered by 3 x “AA” size batteries
(not included). We recommend using only top-quality alkaline
batteries.
Battery installation
To install or change batteries in RS Media remote controller:
1. Locate the battery compartment on the underside of the
remote controller.
2. Using a Phillips screwdriver (not included), remove the battery compartment cover.
3. Insert batteries into the remote controller as illustrated in the
diagram.
4. Replace the battery compartment covers and then replace
the screw.
back view of the controller
Use only fresh batteries of the required size and recommended type.
Do not mix old and new batteries, different types of batteries
[standard (Carbon-Zinc), Alkaline or rechargeable] or rechargeable
batteries of different capacities.
Rechargeable batteries are only to be charged under adult supervision.
Respect the correct polarity, (+) and (-) as indicated.
Do not try to recharge non-rechargeable batteries.
Do not dispose of batteries in fire. Batteries might explode or leak.
Do not use different type/brand of batteries at the same time.
The supply terminals are not to be short-circuited.
Remove exhausted batteries from the toy.
Batteries should be replaced by adults.
Remove batteries if the toy is not going to be played with for
some time.
The packaging should be kept since it contains important information.
Rechargeable batteries are to be removed from RS Media and the controller before being charged.
RS Media overview
RS Media is equipped with a multitude of features that really makes him a multi-media experience contained in a robot.
Refer to the illustration for an overview of his features.
SD Card
Compartment
IR Vision Sensors and Camera Eyes
Eyes
Line In / USB
Compartment
Sonic Sensor
Woofer
LCD Screen
Right Hand
Speaker
On/Off
Button
Left Hand
Speaker
Hand Controls
Back foot
sensors
AC/DC Power Point
Front foot
sensors
10
RS media basics
LCD screen
Sleep mode and Power down
In addition to RS Media’s status, the LCD screen located on RS Media’s
chest is used to display media files such as photos, videos, and MP3
file information. Refer to page 56 for information on caring for the LCD
screen.
RS Media conserves power using Sleep mode and Power down.
Sleep mode. In Sleep mode, the backlight on RS Media’s LCD screen
will turn off after about 2 minutes of inactivity to conserve power. RS Media will wake up as soon as he receives a command from the
remote controller.
Sensors overview
•
RS Media is equipped with numerous types of sensors. He has sonic
sensors, infrared sensors, tilt sensors, grip sensors, and foot sensors. He
is also equipped with comprehensive vision systems. See the section RS
Media’s sensors on page 42.
• Power down. RS Media completely powers down after about 10
minutes of inactivity. You can turn him back on by toggling his power button (setting it to the OFF position, then turning him back on again).
NOTE: RS Media will not Power down if he is playing media or
being powered by the AC/DC adapter.
RS Media basics
Basic powering functions
This section describes the basic RS Media functions, such as power
functions and sleep functions.
NOTE: You can also manually put RS Media in Sleep mode or use the
Power down function. Refer to Enabling, Disabling, and Resetting RS
Media (page 17).
Powering ON/OFF
RS Media’s power button is located on his back, just below the woofer, as
illustrated. To turn RS Media on, press the power button to set it to the
ON position; to turn him off, press the power button to set it in the OFF
position.
NOTE: Wait 5 seconds after turning RS Media off before turning him
back on again.
During the boot up sequence, RS Media displays a Wowwee splash screen
on his LCD screen, which cannot be interrupted. Once powered on, the
robot goes into Control mode.
You can cycle through three different modes on RS Media using the remote controller’s Mode button.
The different modes are described in detail in the chapter
Interacting with RS Media.
11
basic movements overview
This section describes basic remote controller movement and functions on RS Media.
Basic movements
This section describes basic movements on RS Media using the remote controller functions.
Mode
Button
No shift
Left shift
Right shift
Both shifts
Control mode
Multi-
directional
walking:
- Forward*
- Backward
- Left**
- Right**
Upper
body
movement
Bulldozer and
Left/Right kick
Move both arms
Head and upper body movement
Hips and waist
movement
Head movement
Move both arms
Gait control ***/
Quick reset
Lie down/ Sit/
Stand up
Get up
Arm mode
Stop / Full reset
Sleep/Power down
Stop all movements
Right arm movement
Move both arms
Move both arms
Move both arms
Left arm movement
Move both arms
Move both arms
Move both arms
Quick reset
Lie down/ Sit/
Stand up
Get up
Sleep / Power down
Stop all movements
Right wave
Left wave
Stop / Full reset
* RS Media has two (2) walking speeds. Press forward on the directional pad while he is walking to toggle between the two walking speeds.
** When you press the left or right on the directional pad in Control mode, RS Media will turn on the spot, that is, he will not perform a walking turn.
*** RS Media has three (3) walking gaits. Press the Select button while he is walking to toggle between the walking gaits.
12
basic arm movements/
basic media mode functions
Basic arm movements
This section describes basic arm movements in Arm mode on RS Media using the remote controller.
Arm mode
Button
No shift
Left shift
Right shift
Right arm
Drop
Chop
Place
Grab
Low pick up
High pick up
Throw
Roll
Push
Left arm
Throw
Roll
Push
Grab
Low pick up
High pick up
Drop
Chop
Place
Basic Media mode functions
This section describes basic media functions on RS Media using the remote controller.
Mode
Button combination
Description
Control mode
+
Plays back a sound memo, if one is saved.
+
Records a short sound memo.
+
Records a short video memo.
+
Plays back a short video memo, if one is saved.
All modes
Plays or pauses audio or video file.
Hold this button for three (3) seconds
to stop media playback.
Takes a photo.
Records a video.
+
13
Remote controller overview
Left Shift
signal indicator light
right Shift
Play/Pause Pad
Stop PAD
camera Button
Select Button
stop Button
play / pause Button
right DIRECTION pad
LEFT DIRECTION pad
Mode Change Button
14
Demo Button
hand controls basics
Hand controls basics
Left Hand Controls
Right Hand Controls
You can use RS Media’s hand controls to navigate between modes by
pressing the outer buttons simultaneously. Press both outer buttons again
to toggle to the next mode.
NOTE: In Media Mode, you can use his hand controls to navigate
between functions in the on-screen menu or when playing media
files.
Left
Outer
Button
Left
inner
Button
right
inner
Button
Right
Outer
Button
hand control specifications - media mode only
Menu Function
Media Playback Function
Left Inner
Scroll Down
Scroll to previous media file
Right Inner
Scroll Up
Scroll to next media file
Left Outer
Back or Exit Menu
Back/exit/stop/play media file
(pause if playing)
Right Outer
Select Option
Play media file
(pause if playing)
Both Outer Buttons
Change Mode
Change Mode
NOTE: You can hold the UP or DOWN direction on the controller or inner hand controls to make the selection scroll faster.
NOTE: When you reach the last item in the menu, the menu will restart with the first item on the list.
15
Interacting with rs media/
control mode mapping chart
This chapter deals with different ways you can interact with RS Media.
For the function mapping chart for Media mode, refer to pages 25 to 34.
Introduction to RS Media’s modes
NOTE: The functions in the following function charts that can be
programmed are denoted with the Programmable
symbol.
Refer to the section Advanced interaction with RS Media for more
information on using RS Media’s programmable capabilities.
RS Media is equipped with three modes:
• Control mode. Allows you to control his full body movements and
functions.
• Arm mode. Allows you to control his arm movements and functions.
• Media mode. Allows you to access his media and connectivity
functions.
Description of Control mode
In Control mode, you can control RS Media’s body movements and
functions using the remote controller or directly on RS Media.
Refer to the function mapping charts for Control mode and Arm mode on
pages 16 to 23.
No Shift
Movement
Control RS Media’s multi-directional walking with the Left Control Pad.
Head & Upper Body
Control the basic upper body movement with the Right Control Pad.
Quick Reset
Press to return RS Media to his default standing position, when not walking.
Take Photo
Press twice to make RS Media take a photo.
Dance Demo
Press to make RS Media perform a dance routine.
Puppet Mode Enter
Press to enter puppet mode programming. Change Personality
Press to toggle to RS Media’s next personality, including those entered by user.
Hearing OFF/ON
Press once to disable RS Media’s hearing. Press again to enable RS Media’s hearing.
Stop / Full Reset
Press to stop RS Media from performing his current action.
Press and hold for about 3 seconds to perform a full reset to default body position.
Vision OFF/ON
Press once to disable RS Media’s vision. Press again to enable RS Media’s vision.
Free Roam Toggle
Put RS Media into Free Roam mode so he can explore his environment independently.
Puppet Mode Play
Press to play the main puppet mode program entered into RS Media.
Play / Pause Media
Press to play or pause the current MP3 or MPEG4.
= Programmable
16
control mode mapping chart
left Shift
Upper Body Only
Control the upper body with the Left Control Pad.
Hips and Waist
Control the hips and waist with the Right Control Pad.
Lie / Sit / Get up
With each press, RS Media will toggle through one step in this routine.
Video Record
Press twice to record a short video. (The second press can be without Left Shift)
Personality Demo
Press to make RS Media perform a Personality Demo.
Main Program Enter
Press to enter RS Media’s Main Program Mode.
Clear Entry
Press to clear the last entry made.
Sound Program Enter
Press to enter RS Media’s Sound Program Mode.
Sleep / Power Down
Press once to make RS Media enter Sleep Mode. Press when already in Sleep Mode and he will Power down.
Vision Program Enter
Press to enter RS Media’s Vision Program Mode.
Guard Mode
Press to put RS Media into Guard Mode.
Clear Program
Press to clear the selected Program.
Main Program Play
Press to play RS Media’s Main Program Mode.
= Programmable
17
control mode mapping chart
right Shift
Bulldozer & L/R Kicks
Press forwards or backwards and RS Media will Bulldozer in that direction.
Press left or right to make RS Media perform a kick with that foot.
Head Only
Move RS Media’s head around using the Right Control Pad.
Get up
Press to make RS Media stand straight up, whether lying or sitting.
Take Photo
Press twice to make RS Media take a photo.
Roboreptile Interaction
Press to initiate an interaction between RS Media and Roboreptile™.
Sound Memo Playback
Press to play back a Sound Memo track, if one is present.
Sound Memo Record
Press to record a short Sound Memo track.
Sound Program Play
Press to play RS Media’s Sound Program, if one is present.
Stop Movement
Press to stop RS Media from performing any movement. Any Media playing will not be affected.
Vision Program Play
Press to play back a Vision Program, if one is present.
Robot Voice Mute Toggle
Press to toggle between RS Media’s robot voice being ON or OFF.
Video Memo Record
Press to record a short Video Memo track.
Video Memo Playback
Press to play back a Video Memo track, if one is present.
= Programmable
18
control mode mapping chart
left & right Shift
Both Arms
Control RS Media’s left and right arms simultaneously
Both Arms
Control RS Media’s left and right arms simultaneously
User BodyCon 1
User BodyCon / Macro slot
User BodyCon 2
User BodyCon / Macro slot
Dance Routine
User BodyCon / Macro slot
User BodyCon 3
User BodyCon / Macro slot
User BodyCon 4
User BodyCon / Macro slot
User BodyCon 5
User BodyCon / Macro slot
User BodyCon 6
User BodyCon / Macro slot
User BodyCon 7
User BodyCon / Macro slot
User BodyCon 8
User BodyCon / Macro slot
User BodyCon 9
User BodyCon / Macro slot
User BodyCon 10
User BodyCon / Macro slot
Media Demo
User BodyCon / Macro slot
= Programmable
19
arm mode mapping chart
Description of Arm mode
In Arm mode, you can control RS Media’s arm movements using the remote controller. For instance, you can make him pick up or throw items.
No Shift
Right Arm
Control RS Media’s right arm independently
Left Arm
Control RS Media’s left arm independently
Quick Reset
Press to return RS Media to his default standing position., when not walking.
Take Photo
Press twice to make RS Media take a photo. RSV2 / RS Media Interaction
Press to initiate an interaction between RS Media and Robosapien™ V2, or another RS Media.
Right Arm Drop
Press to make RS Media perform a Right Arm Drop.
Right Arm Grab
Press to make RS Media perform a Right Arm Grab.
Right Arm Throw
Press to make RS Media perform a Right Arm Throw.
Stop / Full Reset
Press to stop RS Media from performing his current action. Press and hold for about 3 seconds to perform a full reset to default body position.
Left Arm Throw
Press to make RS Media perform a Left Arm Throw.
Left Arm Grab
Press to make RS Media perform a Left Arm Grab.
Left Arm Drop
Press to make RS Media perform a Left Arm Drop
Play / Pause Media
Press to play or pause the current MP3 or MPEG4.
= Programmable
20
arm mode mapping chart
left Shift
Both Arms
Control RS Media’s arms simultaneously.
Both Arms
Control RS Media’s arms simultaneously.
Lie / Sit / Get up
With each press, RS Media will toggle through one step in this routine.
Video Record
Press twice to make RS Media record a short video. (The second press can be without Left Shift)
Roboraptor Interaction
Press to initiate an interaction between RS Media and Roboraptor™.
Right Arm Chop
Press to make RS Media perform a Right Arm Chop.
Right Arm Low Pick Up
Press to make RS Media perform a Right Arm Low Pick up.
Right Arm Roll
Press to make RS Media perform a Right Arm Roll.
Sleep / Power Down
Press once to make RS Media enter Sleep Mode. Press when already in Sleep Mode and he will Power down.
Left Arm Roll
Press to make RS Media perform a Left Arm Roll.
Left Arm Low Pick Up
Press to make RS Media perform a Left Arm Low Pick up.
Left Arm Chop
Press to make RS Media perform a Left Arm Chop.
Right Wave
Press to make RS Media perform a Right Arm Wave.
= Programmable
21
arm mode mapping chart
Right Shift
Both Arms
Control RS Media’s left and right arms simultaneously.
Both Arms
Control RS Media’s left and right arms simultaneously.
Get up
Press to make RS Media stand straight up, whether lying or sitting.
Take Photo
Press twice to make RS Media take a photo.
Robopet Interaction
Press to initiate an interaction between RS Media and Robopet™.
Right Arm Place
Press to make RS Media perform a Right Arm Place.
Right Arm High Pick Up
Press to make RS Media perform a Right Arm High Pick Up.
Right Arm Push
Press to make RS Media perform a Right Arm Push.
Stop Movement
Press to stop RS Media performing any movement. Any media playing will not be affected.
Left Arm Push
Press to make RS Media perform a Left Arm Push.
Left Arm High Pick Up
Press to make RS Media perform a Left Arm High Pick Up.
Left Arm Place
Press to make RS Media perform a Left Arm Place.
Left Wave
Press to make RS Media perform a Left Arm Wave.
= Programmable
22
arm mode mapping chart
left and right Shift
Both Arms
Control RS Media’s left and right arms simultaneously
Both Arms
Control RS Media’s left and right arms simultaneously
User BodyCon 1
User BodyCon / Macro slot
User BodyCon 2
User BodyCon / Macro slot
Dance Routine
User BodyCon / Macro slot
User BodyCon 3
User BodyCon/ Macro slot
User BodyCon 4
User BodyCon / Macro slot
User BodyCon 5
User BodyCon / Macro slot
User BodyCon 6
User BodyCon / Macro slot
User BodyCon 7
User BodyCon / Macro slot
User BodyCon 8
User BodyCon / Macro slot
User BodyCon 9
User BodyCon / Macro slot
User BodyCon 10
User BodyCon / Macro slot
Media Demo
User BodyCon / Macro slot
= Programmable
23
description of media mode
In Media mode, you can take advantage of RS Media’s head-mounted
camera, color LCD screen on his chest, full speaker system embedded in
his armor, internal (built-in) memory and external memory card slot (SD
memory card not included). Refer to the section Memory expansion for
details.
In Media mode, you can access his media and PC connectivity functions
using the remote controller or his hand controls.
NOTE: Video and photo files will switch off if you change RS Media’s
modes while they are displayed on the LCD screen.
Audio files continue to play when you change RS Media’s modes unless
the audio file is pause, in which case, it will turn off the audio file
completely.
When audio is playing in Control mode or Arm mode, RS Media will make
no other sounds.
RS Media can play MP3 (.mp3) and MPEG4 (.avi) files, take and display
photos, and record and playback video files and audio clips. RS Media also
comes with 3 pre-installed challenging Java games.
The functions in Media mode are organized into submenus (folders).
The Media mode submenus are described in detail later on. They are as
follows:
Menu icon
Menu option
Description
Audio
Browse, delete or play back audio files.
Refer to page 27.
Photos
Browse, delete, display or take photos.
Refer to page 29.
Video
Browse, delete, record or play back video files.
Refer to page 31.
Personality
Browse, select and audition personalities.
Refer to page 33.
Games
Play Java games.
Refer to page 34.
Options
Enable USB and line-in connectivity; adjust volume levels, camera frequency, and white balance; adjust camera tracking settings; display RS Media information.
Refer to page 37.
24
Media mode functions overview/
hand controls
The following is an overview of some of the main functions in Media mode:
Function
Button combination
Description
Volume up/down
Press up or down to adjust RS Media’s volume.
Menu Navigation
Press up or down to navigate RS Media’s menu.
Media Demo
Enables the demonstration of Media mode functions.
+
Toggle personalities available on RS Media.
Return to main menu
+
Returns to the main menus in Media mode.
Select item in menu
Selects item in menu.
Return to previous menu
Navigates back up a step in the current menu.
Change personality
Hand controls
You can use RS Media’s hand controls in Media mode to navigate through the Media mode menu.
NOTE: You can only use the outer buttons on RS Media’s hand controls in Control mode and Arm mode to toggle through RS Media’s modes.
Function
Hand control Description
Navigate
Both outer buttons
Change modes.
Scroll up
Right inner button
(RS Media’s left arm)
Navigates to the previous item in the menu.
Scroll down
Select
Exit
Left inner button
(RS Media’s right arm)
Navigates to the following item in the menu.
Right outer button
(RS Media’s left arm)
Selects highlighted item.
Left outer button
(RS Media’s right arm)
Exits the current option.
+
25
Media format compatibility
RS Media supports only certain media files for playback and only certain
image formats. This means if you try to upload other types of files on
RS Media to the RS Editing Suite or directly onto RS Media, he will not
recognize the format and not be able to display it on his LCD screen.
Also, you can upload Java format games to RS Media. Refer to the section
on RS Media Editing Suite for more details.
The following chart outlines the media and image formats RS Media
supports.
Media
File File typetypeextension
Description
Video
MPEG4
*.avi
A standard format for compressing audio and video data files.
RS Media supports *.avi files with a resolution up to 320 x 240 pixels (QVGA).
NOTE: You need to have the required codecs on your computer to play back *.avi files properly.
Music
MP3
*.mp3
A standard format for compressing audio files.
In the RS Media Editing Suite, you can use *.mp3 files in your Personalities, Macros or
BodyCons. You can even upload *.mp3 files to RS Media to play as if he was a stereo system.
RS Media supports *.mp3 sampling bitrates up to 192 Kbps. Supported
frequencies: 16 kHz, 22.05 kHz, 32 kHz, and 44.1 kHz.
On RS Media, you should use *.mp3 files no larger than 10 MB.
NOTE: In the Personality editor, you can only use *.mp3 files up to 1024 kb (1 MB) in size.
WAVE
*.wav
A standard lossless format for audio files. These types of files are usually uncompressed,
therefore usually providing the best quality.
In the RS Media Editing Suite, you can use *.wav files in your Macros or BodyCons. You can even upload *.wav files to RS Media to play as if he was a stereo system.
On RS Media, you should use *.wav files no larger than 10 MB.
Image
JPEG
*.jpg or *.jpeg
A standard format for compressing still images, for instance, those used on digital still cameras.
RS Media supports *.jpeg files with a resolution up to 1024 x 768 pixels.
Games
Games programmed using Java, an object-oriented programming language developed by Sun
Microsystems.
JAVA
*.jar
(Java games)
26
Descriptions of Media mode menus
Audio menu
The Audio menu allows you to browse, select, adjust or delete audio features available on RS Media.
To select a function in the Audio menu, use the Left directional arrow on
the remote controller (or hand controls) to navigate to the function you
want, and then press the Select button.
Note that you can also play music from an external source through RS
Media. Refer to the section on Line-in option of the Options menu for
more information.
Menu item
Description
Browse
Allows you to look through the list of available audio files on RS Media.
Delete
Allows you to delete an audio file.
Record
Allows you to record an audio clip. Options include Start Recording and Set Record Volume (Under the Options menu).
Now Playing
Displays information on audio file currently playing.
If no audio file is playing when you select this menu item, nothing happens.
Allows you to select audio playback options. Options include Repeat Once, Repeat All, and Shuffle.
Options
- Repeat Once
- Repeat All
- Shuffle
Repeats each audio track once.
Repeats all audio tracks.
Randomizes audio file playback. Once a song begins to play, the Now Playing screen appears.
27
audio controls chart
no Shift
Record Audio
Press twice to start recording audio.
Previous Track
Press to select previous track.
Next Track
Press to select the next track.
Play / Pause Media
Press to play or pause the current MP3.
left Shift
Sound Memo Playback
Press to play back a Sound Memo, if one is present.
Rewind
Press to Rewind the audio file currently playing.
Fast Forward
Press to Fast Forward the audio file currently playing.
Camera Setting
Press to display RS Media’s camera settings.
right Shift
Audio Folder
Press to enter RS Media’s Audio menu.
Rewind X 2
Press to Rewind X 2 the audio file currently playing.
Fast Forward X 2
Press to Fast Forward X 2 the audio file currently playing.
28
Descriptions of Media mode menus
Photo menu
The Photo menu allows you to browse, delete, or take photos.
To select a function in the Photo menu, use the Left directional arrow on
the remote controller (or hand controls) to navigate to the function you
want, and then press the Select button.
In this menu, you can also set your photo display options including
slideshow and photo timer options.
Menu item
Description
Browse
Allows you to browse through the list of and display available photo files on RS Media.
Delete
Allows you to delete a photo file.
Take photo
Allows you to take a photo using RS Media’s camera and display the image on RS Media’s LCD screen.
Press the camera button to take a photo.
Options
Allows you to select slideshow and Photo Timer.
- Slideshow Timer
Displays images in a series.
Slideshow setting is disabled. Default setting.
Sets slideshow delay between images to 2 seconds.
Sets slideshow delay between images to 5 seconds.
Sets slideshow delay between images to 10 seconds.
- Off
- 2 Seconds
- 5 Seconds
- 10 Seconds
Sets the self-timer delay on RS Media before taking a photo.
- Photo Timer
- Off
- 2 Seconds
- 5 Seconds
- 10 Seconds
Photo timer is disabled. Default setting.
Sets photo timer delay before taking a photo to 2 seconds.
Sets photo timer delay before taking a photo to 5 seconds.
Sets photo timer delay before taking a photo to 10 seconds.
29
Photo controls chart
no Shift
Take Picture
Press twice to take a photo.
Previous Track
Press to select the previous photo.
Track & Photo Human
Track a human and take a photo.
Next Track
Press to select the next photo.
left Shift
Track & Photo Red
Press to make RS Media track the color Red and take a photo.
Camera Setting
Press to display RS Media’s camera settings.
right Shift
Photo Folder
Press to enter RS Media’s Photo folder.
Track & Photo Green
Press to make RS Media track the color Green and take a photo.
Track & Photo Blue
Press to make RS Media track the color Blue and take a photo.
30
Descriptions of Media mode menus
Video menu
The Video menu allows you to browse, delete, or take videos.
To select a function in the Video menu, use the Left directional arrow on
the remote controller (or hand controls) to navigate to the function you
want, and then press the Select button.
Note that video files can only be played in Media mode.
Menu item
Description
Browse
Allows you to browse through the list of and play back available video files on RS Media.
Delete
Allows you to delete a video file.
Take Video
Allows you to record a video clip using RS Media’s camera and display the video on RS Media’s LCD screen.
Press the camera button on the remote controller to record video.
31
video controls chart
no Shift
Play / Pause Media
Press to play or pause the current video.
left Shift
Video Record
Press twice to record a short video. (The second press can be without Left Shift)
NOTE: Each track is a maximum of approximately 8 minutes
Rewind
Press to Rewind the video currently playing.
Fast Forward
Press to Fast Forward the video currently playing.
Camera Setting
Press to display camera settings.
right Shift
Video Folder
Press to enter RS Media’s Video folder.
Video memo Playback
Press to play back a Video Memo track, if one is present.
Rewind X 2
Press to Rewind X 2 the video currently playing.
Fast Forward X 2
Press to Fast Forward X 2 the video currently playing.
32
Descriptions of Media mode menus/
personality controls chart
Personality menu
The Personality menu allows you to browse and select one of RS Media’s four built-in personalities, or one of your own customized personalities. You can upload your own customized RS Media personality to the robot using the RS Media Editing Suite. Refer to page 52-53 for more information.
To select a personality in the Personality menu, use the Left directional
arrow on the remote controller (or hand controls) to navigate to the
function you want, and then press the Select button.
Menu item
Description
Personality
Allows you to change the current personality and select a new personality.
Audition
Allows you to preview BodyCon files in the current personality
Personality controls chart
no Shift
Change Personality
Press to toggle through RS Media’s personalities, including those entered by the user.
left Shift
Personality Folder
Press to enter RS Media’s Personality folder.
33
Descriptions of Media mode menus/
game controls overview
Games menu
The Games menu allows you to browse and select one of
RS Media’s three preinstalled Java games. The three games included are:
• Bubble Soccer
• Ghost Force
• Vortex Racer
For a description of the game play and controls, refer to the next section,
Game controls overview below.
To select a game in the Games menu, use the Left directional arrow on
the remote controller (or hand controls) to navigate to the game you
want, and then press the Select button.
You can download more Java games and upload them to RS Media using
the RS Media Editing Suite.
Menu item
Description
Bubble Soccer
Selects the game Bubble Soccer.
Ghost Force
Selects the game Ghost Force.
Vortex Racer
Selects the game Vortex Racer.
Games controls overview
NOTE: When using the Games controls, you can only use the right
directional pad and right-side buttons on the remote controller.
buttonfunction
Description
Directional control
Controls the direction of the objects in the game.
Left soft key
Controls the left onscreen function.
Right soft key
Controls the right onscreen function.
Select action
Selects or confirms an item or action.
Quit game
Quits the game and returns to Media mode. To return to the game main menu, use the Quit command in the actual game menu, instead of the Stop button.
34
game controls overview /
Description of games
Game strategy
If you do upload new Java games to RS Media, refer to the gameplay
mapping of the keys for RS Media remote controller as follows:
Ghost Force is a shoot ‘em up in the best tradition of the golden age of
the greatest arcade games. Rediscover the mood of the games arcade
with this sublime first person shooter with its incredible technical features
and a gameplay that is synchronized like a watch. Are you ready for the
challenge?
Mobile phone key
RS Media remote
controller button
NUM1
SOFT1
SOFT2
Ghost Force game controls
NUM2
Button Function
Description
Directional control
Controls the direction of the
objects in the game.
Left soft key
Controls the left onscreen
function.
NUM7
Right soft key
Controls the right onscreen
function.
NUM8
Launches missiles.
NUM9
Exit game
NUM3
NUM4
NUM5
NUM6
Description of games
The following are descriptions of the pre-installed games on RS Media.
Ghost Force
Three law enforcers are sworn in to create the Ghost Force squad to go
and fight the flying army of Commander Boralo and free Doctor Larson
who has been kidnapped for his extraordinary scientific knowledge. They
are convinced that they will succeed. If they are successful, they will have
avoided the Commander’s dictatorship and Doctor Larson will have ended
pollution on our planet thanks to his work on non-toxic fuels.
35
Missile
Exits the game and returns to Media mode. To return to the game main menu, use the Quit command in the actual game menu, instead of the Stop button.
Description of games
Vortex Racer
Bubble Soccer
Doctor Geek has gathered the best pilots in the Galaxy in order to
determine who will be the first to use his brand new invention: a vessel
capable of travelling through the Vortexes.
This remake of an old classic arcade game, Bubble Soccer needs your
help!
Game strategy
Game strategy
Travel through planets with spectacular backgrounds, but be careful, you
don’t have time for tourist visits: you’re going to have to face merciless,
frighteningly intelligent opponents, at speeds that defy the imagination.
Superb graphics and impeccable technical production will get you hooked
on this futuristic racing game.
You must shoot away all the footballs that are lying on the soccer fields,
otherwise the big championship cannot take place! The increasing need
for speed and logic at each level makes it hard to finish the 50 levels! But
if you keep in mind that the next ball coming might change the order of
play, you might finish before the time runs out!
Bubble Soccer game controls
Vortex Racer game controls
Button Function
Description
Directional control
Controls the direction of the racer left or right.
Left soft key
Controls the left onscreen
function.
Right soft key
Controls the right onscreen
function.
Boost up
Boost your fuel.
Missile
Launches missiles.
Exit game
Exits the game and returns to Media mode. To return to the game main menu, use the Quit command in the actual game menu, instead of the Stop button.
36
Button Function
Description
Directional control
Controls the direction of the
soccer ball left or right.
Left soft key
Controls the left onscreen
function.
Right soft key
Controls the right onscreen
function.
Launches the soccer ball.
Kick
Exit game
Exits the game and returns to
Media mode. To return to the game main menu, use the Quit command in the actual game menu, instead of the Stop button.
Options menu
Options menu
The Options menu allows you to adjust RS Media’s system
settings (including volume level, camera, and display
configurations), control USB and line-in connectivity, and set RS Media tracking options.
MENU ITEM
To adjust any of the settings available in the options menu, select the
setting you want to change, then press the right directional pad arrows to
increase or decrease the levels of the setting accordingly.
Description
Allows you to connect your RS Media to your computer.
USB Mode
Volume
Allows you to adjust the audio levels.
- Volume level
Allows you to set the volume level on RS Media.
- Rec Level
Allows you to set the audio recording level on RS Media.
Allows you to set the equalizer levels for bass and treble frequencies on RS Media.
- Equalizer
Allows you to adjust the bass frequency levels.
- Bass
- Treble
Allows you to adjust the treble frequency levels.
Line In
Allows you to enable an external audio source to play through RS Media using the line-in jack.
- On
Enables an external audio source to play through RS Media.
NOTE: When the external audio source is enabled, RS Media will not play any internal sounds.
- Off
Disables any external audio source to play through RS Media.
Camera Freq
Allows you to adjust camera frequencies.
- Auto
Allow RS Media to automatically adjust camera frequency.
- 50 Hz
Set the camera frequency to 50 Hz.
- 60 Hz
Set the camera frequency to 60 Hz.
White Balance
Adjusts the color temperature settings on RS Media. This function compensates for different colors of light emitted by various light sources.
- Auto
Allows RS Media to automatically adjust the white balance settings.
- Indoor Yellow
Adjusts RS Media’s white balance settings to indoor incandescent lighting (i.e. standard lightbulbs)
- Indoor White
Adjusts RS Media’s white balance settings to indoor non-incandescent lighting (i.e. fluorescent lights).
- Sunlight
Adjusts RS Media’s white balance settings to sunlight.
NOTE: Avoid using RS Media in direct sunlight for extended periods of time.
Camera Tracking Allows you to enable camera tracking on RS Media.
Disables camera tracking.
- Off
- Human
Uses camera to track human objects.
- Red
Uses camera to track red objects.
- Green
Uses camera to track green objects.
- Blue
Uses camera to track blue objects.
USB Net
Connect RS Media to a network
- On
Enable network connection.
- Off
Disable network connection.
Java games will be listed in the “Game” option
Displays information about your RS Media
About
37
Media mode mapping chart
no Shift
Menu Navigation
Press up or down to navigate RS Media’s menu.
Volume Up & Down
Press up or down to adjust RS Media’s volume.
Menu Select
Press to select from RS Media’s menu.
Take Picture
Press twice to take a photo.
Game Menu
Press to select Game menu.
Previous Menu
Press to select the previous menu.
Change Personality
Press to toggle through RS Media’s personalities, including those entered by the user.
Record Audio
Press to start recording audio.
Stop / Full Reset
Press to stop RS Media from performing his current action.
Press and hold for about 3 seconds to perform a full reset to default.
Previous Track
Press to select the previous track. (Not available while playing video)
Track & Photo Human
Track a human and take a photo.
Next Track
Press to select the next track if media is playing. (Not available for video)
Play / Pause Media
Press to play or pause the current MP3 or MPEG4.
38
Media mode mapping chart
left Shift
Upper Body Only
Control upper body with the Left Control Pad.
Head Only
Control head with the Right Control Pad.
Menu Select
Press to select from RS Media’s menu.
Video Record
Press twice to record a short video. (The second press can be without Left Shift)
Media Demo
Press to perform his Media demo.
Media Menu
Press to enter RS Media’s Media Menu.
Personality Folder
Press to enter RS Media’s Personality folder.
Sound Memo Playback
Press to play back a Sound Memo track, if one is present.
Sleep / Power Down
Press once to make RS Media enter Sleep Mode. Press when already in Sleep Mode and he will Power down.
Rewind
Press to Rewind the video or song currently playing.
Track & Photo Red
Press to make RS Media track the color Red and take a photo.
Fast Forward
Press to Fast Forward the video or song currently playing.
Camera Setting
Press to display RS Media’s camera settings.
39
Media mode mapping chart
right Shift
Upper Body Only
Control upper body with the Left Control Pad.
Head Only
Control head with the Right Control Pad.
Menu Select
Press to select the currently highlighted menu option.
Photo Folder
Press to enter RS Media’s Photo folder.
Audio Folder
Press to enter RS Media’s Audio folder. Video Folder
Press to enter RS Media’s Video folder.
Video Memo Playback
Press to play back a Video Memo track, if one is present.
Stop Movement
Press to stop RS Media from performing any movement. Any media playing will not be affected.
Rewind
Press to Rewind X 2 the video or song currently playing.
Track & Photo Green
Press to make RS Media track the color Green and take a photo.
Fast Forward
Press to Fast Forward X 2 the video or song currently playing.
Track & Photo Blue
Press to make RS Media track the color Blue and take a photo.
40
Media mode mapping chart
left and right Shift
Both Arms
Control RS Media’s left and right arms simultaneously
Both Arms
Control RS Media’s left and right arms simultaneously
User BodyCon 1
User BodyCon / Macro slot
User BodyCon 2
User BodyCon / Macro slot
Dance Routine
User BodyCon / Macro slot
User BodyCon 3
User BodyCon / Macro slot
User BodyCon 4
User BodyCon / Macro slot
User BodyCon 5
User BodyCon / Macro slot
User BodyCon 6
User BodyCon / Macro slot
User BodyCon 7
User BodyCon / Macro slot
User BodyCon 8
User BodyCon / Macro slot
User BodyCon 9
User BodyCon / Macro slot
User BodyCon 10
User BodyCon / Macro slot
Media Demo
User BodyCon / Macro slot
41
RS Media’s sensors
Sonic sensors
Function
Tilt sensors
Mode
Button
Toggle
Control
hearing
On/Off
RS Media is equipped with tilt sensors that interrupt most functions to
prevent any damage if he is knocked over. If he is turned over face-down,
for instance, he will stop functioning. If RS Media falls on his back, he
will stop what he is doing. When trying to control RS Media, if he is not
standing, you will be informed by him that he cannot perform certain
commands or that he needs to be standing, and so will get up.
DESTRIPTION
Turn the sonic
sensor on or off
To make RS Media stand up from a sitting or lying position, use the
following command:
RS Media has stereo sonic sensors that can detect sharp, loud sounds
such as a handclap. He listens for sounds when he is stationary and/or
quiet; he will not be able to listen to sounds when he is lying down or
sitting.
Listening
When RS Media first hears a sound, he will turn his vision systems off and
listen for more sounds. If he hears too many sounds and is not able to
identify the direction from which they come, he will turn his sonic
sensors off. You can turn the sonic sensors back on using the remote
controller.
If he hears a sound to the side, he will turn towards the source; if he hears
a sound directly in front of him, he will acknowledge the source with a
voice file.
If empty handed
RS Media will walk towards the source (approximately 1 meter / 3 feet),
but you can stop him by putting your hand in front of his face.
If object in hand
RS Media will wait 4 seconds and then walk towards the source and drop
the object he is carrying. However, you can make him throw the object
by making a sound during the 4 second wait period.
Function
Mode
Stand up
Control Mode
Arm Mode
Button combination
+
Grip sensors
When you command RS Media to pick up or grab something, he will
check his grip sensors to see if the pick-up attempt was successful. If he
does not have anything in his hands he will automatically repeat the
action one more time.
Foot sensors
RS Media has two touch sensors on each foot, one at the front and one
at the back. They serve as detectors while he explores his environment,
enabling him to avoid obstacles. Sentence should now read “You can
trigger either of his back foot sensors for an emergency stop by touching
the back foot sensors directly while he is walking forward.
The foot sensors are also used for Puppet Mode (Positional
Programming). See p.48.
NOTE: If his upper body is twisted and he has to turn before walking
towards the sound, he will turn his vision off and not respond to a
hand in front of his face while he turns.
RS Media will not listen for sounds while he is performing any
movements, or if he is tracking anything with his vision systems.
RS Media assumes all sounds come from the direction he is facing (left,
right, or ahead).
42
Vision systems
RS Media is equipped with two sets of vision systems. One vision system
tracks movements and detects obstacles; the other system differentiates
between certain colors.
Infrared vision systems
Long-range infrared vision
RS Media’s long-range IR vision enables him to track objects within his
long-range IR vision. He will track the object using both his head and
upper body.
He will not make comments on objects tracked using long-range IR
vision.
RS Media’s infrared vision system allows him to respond to commands
from the remote controller.
Function Mode Button combination
Description
When he tracks long-range movement, his eyes flash at a slow rate.
(See Blinking on page 45).
Toggle vision Control
on/off
Turn the IR sensor
on or off
Close-range infrared vision
He will make comments about objects seen using the close-range IR
vision. When he tracks close-range movement, his eyes flash at a fast
rate. (See Blinking on page 45).
Flinch response
If RS Media is not already tracking something, and you place something
very close to his eyes, he will perform a flinch response.
He will turn his color camera ON when he does this. If the object remains
close and stationary for a few seconds he will try to identify the color.
(See Color Recognition, page 44).
If you do not hold the object stationary in front of his face, he will start
to track the movement with his IR vision.
NOTE: To make RS Media perform a flinch you must hold the object
close enough to his face to cover all sensors, as shown in the
diagram.
When tracking something at a close range, RS Media will follow it as far
as his head turns.
If an object that RS Media is tracking with his close-range IR vision
remains stationary for a few seconds, he might ask you to give it to him.
CAUTION: Be careful when offering RS Media an object; he will drop
anything he is already holding.
NOTE: If you make RS Media track an object with his close range
vision for too long he will get bored and stop tracking the object.
Cover the ear and mouth
sensors to flinch RS Media
43
Vision systems
Obstacle avoidance
RS Media uses his IR Vision System to avoid obstacles while walking.
While the camera is on (while checking the color or tracking it), his eyes
will flash at a medium rate (See Blinking on page 45).
CAUTION: RS Media is not able to detect the edge of tables. Make
sure he does not walk near stairs or steps.
Identifying and tracking
RS Media’s IR vision does not function while he is walking backwards or
turning, and may result in him bumping into things.
When RS Media identifies the color of an object, he will track the object’s
movements. While he tracks the object, RS Media will say that he is
tracking the object.
RS Media is sometimes too cautious and may refuse to walk
through openings that he is able to pass through. If this happens you
can turn off his Vision Systems. He will use his foot sensors to react to
obstacles when his Vision Systems are off (See foot Sensors on page 42).
RS Media’s infrared vision
system is based on reflection.
This means that he can see
highly reflective surfaces like
white walls or mirrors more
easily and at greater distances
than he can see matte or black
surfaces.
Color recognition
RS Media has a unique color vision
system. RS Media can identify pure
primary colors - red, green and blue.
He can also recognize skin tones based on the color of the palms of your
hands. The color camera is activated with a flinch (see page 43).
NOTE: For accurate color detection, you should adjust the white
balance setting for the lighting conditions in which you are using RS
Media. Refer to Color Camera Settings on p.45
When an object suddenly appears in front of him (and he was not
previously looking at something), RS Media will flinch and turn on his
color camera.
If the object stays stationary and within 1-inch (2.5 cm) of the camera,
he will try to identify the color of the object.
If the object does not stay close he will turn his color camera off.
Tracking timeout
RS Media will time out after tracking for about 30 seconds and exit color
camera mode.
Object disappears
If RS Media loses the object he is tracking, he will inform the user and
exit the color camera mode.
Still objects
If RS Media sees a red, green, or blue object held still in front of him, he
will perform a grab BodyCon. If the pick up isn’t successful the color
camera mode will end. If the pick up is successful, he will look for a
similar colored object.
If he cannot find a similar colored object, he will exit color camera mode.
If he finds a similar colored object, he will throw whatever is in his hand
at the object. This will end color camera mode.
44
Vision systems / Guard mode
Color camera settings
Medium blinking
(medium periods of eyes ON with short
periods of eyes OFF)
Medium reverse blinking (medium periods of eyes OFF
with short periods of
eyes ON)
Fast blinking
RS Media’s color camera might sometimes have problems identifying
certain colors, especially skin-tones and the color blue, under different
light conditions. You can change the white-balance setting manually by
choosing white balance under options in Media Mode.
Setting
Description
Auto
Balance
RS Media automatically determines the best color camera settings and adjusts them for the lighting in his current environment.
NOTE: If Photo or Video quality is poor,
changing the color camera settings might help improve the image.
This is the default setting.
Indoor
Yellow
Adjusts the color camera setting for artificial
tungsten lighting (i.e. common household light
bulbs) as the dominant light source.
Indoor
White
Adjusts the color camera setting for white-toned indoor lighting (i.e. fluorescent bulbs) as the
dominant light source.
Sunlight
Adjusts the color camera setting for natural
sunlight as the dominant light source.
Blinking
RS Media’s eyes blink to indicate the status of his vision or sound
systems.
Eyes Status
Eyes OFF
Eyes ON
(constant light)
Very slow blinking
Slow blinking
Possible status descriptions
RS Media is turned OFF.
RS Media in Sleep Mode.
No object detected, and vision is ON
and active.
RS Media in Guard Mode.
Distant object detected. Refer to page 43.
RS Media’s vision is shut down.
RS Media is listening to sounds.
Close object detected. Refer to page 43.
Blinking in Programming modes
RS Medias eyes blink very quickly when waiting for a visual cue, or blink
slowly when waiting for a sonic cue in a programming mode.
Guard Mode
NOTE: When RS Media tracks colored objects, he will respond to the
largest object of the correct color. If the colored object is in front of
a colorful background, this can interfere with his color tracking.
When it is too dark, RS Media will have trouble correctly identifying
colors, will give false readings, and will not be able to track objects using
his color camera.
Color checking and tracking.
Refer to page 44.
Function
Control Mode
Button combination
+
Put RS Media into Guard Mode and he will become stationary.
His infrared vision sensors and stereo sonic sensors will sound an alarm
or perform a program assigned to them when triggered by audio or visual
stimuli.
If there is no program stored in Vision or Sound then RS Media will perform
his default Guard Mode reaction.
RS Media will leave Guard Mode at the touch of ANY controller button
(except Left Shift & Right Shift buttons).
If he hears ten sounds in a row with no vision disturbances in between, he
will turn his sound sensors off. If he has 10 vision disturbances in a row
with no sound disturbances between them, he will turn his vision sensors
off. If both are turned OFF in this manner he will exit Guard Mode.
Caution
As RS Media will become animated during Guard Mode, Do not to
leave him near the edge of a table.
Note
Touch sensors do not function in Guard Mode. RS Media will go to
Sleep Mode after about 30 minutes in Guard Mode. Any disturbance
during Guard Mode will reset the 30 minutes time out.
45
robot interaction
Roboreptile™ interaction
RS Media can interact with any one of the following robotic
companions at a time: Roboreptile, Robosapien™ V2, RS Media™,
Roboraptor™, or Robopet™.
When you turn Roboreptile on, he goes through a brief wait state.
To have RS Media interact with his companions, align RS Media facing the
other robot, on a level surface with a clear line of sight. Turn RS Media’s
companion on and then press the associated button combination on the
remote controller to initiate the interaction.
NOTE: You should initiate the interaction routine before Roboreptile
enters Free Roam mode; otherwise, you will have to start the
process over. To keep Roboreptile from entering Free Roam mode,
press the stop button on Roboreptile’s remote controller.
Mode
RS Media™ / Robosapien™ V2 interaction
Button combination
Control mode
RS Media: To initiate the interaction between two RS Medias, you must
point the remote controller at only one RS Media.
+
Robosapien V2: To initiate the interaction between RS Media and
Robosapien V2, point the remote controller only at RS Media.
Distance: Around 24”
NOTE: RS Media’s remote controller can also operate Robosapien V2.
Mode
Button combination
Arm mode
Roboraptor™ interaction
When you turn Roboraptor on, he goes through a brief wait state.
Distance: Around 24”
NOTE: You should initiate the interaction routine before Roboraptor
enters Free Roam mode; otherwise, you will have to start the
process over. To keep Roboraptor from entering Free Roam mode,
press the stop button on Roboraptor’s remote controller.
Mode
Button combination
Arm mode
Distance:
Around 24”
46
+
robot interaction/
Advanced interaction with RS Media
Robopet™ interaction
Directly programming RS Media
Turn Robopet on, and then command him to sit down. Once he is sitting,
you should initiate the interaction routine within 10 seconds before he
enters Free Roam mode; otherwise, you will have to start the process
over.
You can directly program RS Media or program him using the remote
controller. You can program RS Media directly in one of five (5) ways.
NOTE: Robopet’s Edge Detect switch must be set to the OFF position
to perform this interaction.
Mode
Button combination
Arm mode
+
Distance: Around 24”
Advanced interaction with RS Media
This section describes advanced interactions you can have with your RS
Media. You can directly program RS Media (with or without the remote
controller) or take advantage of the RS Media Editing Suite software to
fully customize his features.
Programming Description
mode
Puppet mode
Allows you to directly
program a sequence of movements by manipulating RS Media directly.
Main Program
mode Allows you to program a
sequence of movements on RS Media by using commands from the remote controller.
Sound Program
mode Allows you to assign a
sequence of movements that are triggered by a sharp sound when RS Media is in Guard mode. Refer to page 28.
Vision Program
mode Allows you to assign a
sequence of movements that
are triggered by a close-range
movement detected by the IR
sensor when RS Media is in
Guard mode. Refer to page 28.
Editing Suite
Allows you to customize and create your own Macros,
BodyCons, and Personalities using the RS Media Editing Suite, and upload them to your robot. Use this software also
to manage files on RS Media.
Programming capability
Any function from the Control or Arm mode function charts that can be
programmed in all program modes (except Puppet mode) are denoted
with the following symbol:
Symbol
Description
Function is programmable.
NOTE: Media Mode functions cannot be programmed as a step in a
program.
NOTE: Program modes are disabled in Control Mode and Arm Mode
when audio is playing.
NOTE: All direct programming is stored on RS Media through Control
Mode and Arm Mode. Main Program, Sound Program and Vision
Program have two screens to indicate the mode in which you are
programming.
47
Advanced interaction with RS Media
Puppet Mode (Positional programming)
Puppet Mode: Foot sensors
Puppet mode is a method of programming a sequence of
movements into RS Media by manipulating him manually.
You can combine upper body movements with leg movements and
walking using the foot sensors in Puppet mode.
Function
Mode Button combination
Description
Enter Puppet
Control Mode Enters the main
puppet mode
programming.
Playback Puppet Control Mode Plays back the main
puppet mode program stored in RS Media.
The starting position for RS Media in this programming mode will be the
position his body is in when you begin. RS Media will return to the
starting position whenever the program is activated in this mode.
Move his arms and upper body around manually.
Each time you stop moving him, he will store the position and
acknowledge it with a speech file. You can move the following:
Action
Description
Both front foot sensors pressed simultaneously
RS Media will take several steps forward.
Both rear foot sensors
RS Media will take several steps backwards.
One front sensor + rear
sensor of the opposite
leg
RS Media will turn forwards in the direction of the foot sensor that was triggered on the front.
Front and back sensor of RS Media will kick forwards using the
same foot
triggered foot.
• Main Positional Program Mode has a maximum of 12 moves.
If you reach this maximum, the robot will tell you the memory
is full, exit the program mode, and play back the moves.
• To clear a positional program, enter the mode and do not move the robot for about 3 seconds. He will automatically exit the
mode and tell you that the memory is cleared.
• Shoulders
• Wrists
• Waist (lean backwards and forwards)
• Waist (lean side-to-side)
• Waist (twist left or right)
Puppet Mode: Left and Right side programming
You can assign different programs to the robot’s left and right foot
sensors using the left and right positional programming modes.
• To enter one of these programming modes, tap one of his foot sensor buttons twice within 1 second.
• You can then program the robot in the same way that you do for Main Positional Program Mode.
• You can clear the program by entering the programming mode and not moving the robot for about 3 seconds.
• To play back the program, single tap either one of his foot sensors on the same side of the body to which you assigned the program.
• Left and Right Puppet Modes have a maximum of 6 moves for each foot. If you reach this maximum, the robot will tell you the memory is full, exit the program mode, and play back the moves.
You can move more than one position at the same time. For instance,
you can move both arms up together or you can make him reach out in
front while bending him forward to the side.
If you stop programming for about 3 seconds RS Media will exit the
Program mode and then repeat the moves.
If you move RS Media into a position that is unsafe (for example, if you
lean him forward too far, or backwards so that he falls over), he will
adjust himself automatically when he plays the moves back.
NOTE: Do not force RS Media to move beyond his mechanical limits,
nor move him too fast.
NOTE: If RS Media detects anything in his vision or is tracking (his
eyes will be blinking. See p.45), he will not enter Puppet Mode.
48
Advanced interaction with RS Media
Main Program Mode
when you enter the Main Program mode, RS Media will tell you there is
no more room left.
Main Program mode allows you to program a
sequence of movements into RS Media by
entering commands from the remote controller.
RS Media will automatically exit Main Program Mode after waiting
for about 90 seconds. If steps have been entered, he will play back the
program.
Function
Mode Button
Description
combination
NOTE: All programming stays in the RS Media’s internal memory
even after the robot is turned off.
Enter Main
Control
+
Program mode
Enters the Main Program mode
Subroutines
Main Program Control
+
Playback
Plays back the Main Program mode routine.
RS Media can play back a stored sound, vision, or puppet program in Main
Program mode. These actions and movements can also be entered as a
step in a program; these steps are called subroutines.
Exit Main
Control
+
Program mode
Exits the programming mode.
RS Media will play back the program if one is stored.
Clear last Control
+
entry
Clears the last entry in the programming routine
Clear program Control
+
Clears the current
programming routine.
You can add subroutine programs into the Main Program mode to
increase the length of your stored programs.
Sound and Vision subroutines
In this programming mode, when you use the remote controller to enter
commands, RS Media will remember them in order.
For example, you can enter walking steps, arm and upper body
movements, demonstration routines and animations. Each one is a single
step in the program.
If you use single positional movements, such as an arm or waist
movements, the range of the movement is determined by the amount of
time you hold the controller button down. A full movement is reached
after 3 seconds of holding the button down.
If you enter a Stop command into a sequence, the robot will pause for
about 3 seconds during the program playback.
Main Program Mode has a maximum of 20 moves. If the memory is full,
When you add a sound or vision subroutine, it will be entered as a step in
the program. When the program is played back and reaches the
subroutine step, the preprogrammed sound or vision routine will be
performed.
If you add a sound or vision subroutine but there is nothing in the sound
or vision program memory, then the robot will wait about 90 seconds
before continuing with the programmed routine. If RS Media hears a
sharp sound or receives a close IR trigger before the 90 seconds timeout,
depending on which subroutine was added, he will immediately continue
with the programmed routine.
The following chart outlines the subroutine functions:
Function
Mode
Button
Description
combination
Enter Sound Control +
subroutine
Enters the Sound
subroutine in the Main Program mode.
Enter Vision Control
+
subroutine Enters the Vision
subroutine in the Main Program mode.
49
Advanced interaction with RS Media
Positional subroutines
Positional subroutines (puppet mode programs) can be added as a step
in your robot program. When the program is played back and reaches the
subroutine step, the preprogrammed positional routine will be performed.
Function
Mode Button
Description
combination
Enter Positional Control subroutine
Enters the Positional subroutine in the Main Program mode.
If RS Media reaches this step in his programming and does not have a
stored Puppet Mode (positional) program, he will immediately skip to the
next step in the programmed routine.
Guard subroutine
Guard subroutines can be added as a step in your robot program.
Function
Mode Button
Description
combination
Enter Guard
Control
+
mode
subroutine
Enters the Guard
subroutine in the Main Program mode.
• He will wait about 90 seconds for a sharp sound or close
IR trigger before continuing with the programmed
routine.
• If he gets a sound or vision trigger during this time he will
perform the relevant sound or vision subroutine, or the default Guard Mode reaction before continuing with the remaining
programmed routine.
50
Programming RS Media
using RS Media Editing Suite
Introduction to the RS Media Editing Suite
Running the software
The RS Media™ Editing Suite is the perfect software companion that
complements the multimedia robotic experience of RS Media. It allows
you to manage and customize data files, games and other programs
created on your RS Media or PC, giving you complete creative control of
content and reprogramming.
After installing the software, you can begin using it. To run the software:
1. From your Windows Start menu, locate the Programs folder, then the
Wowwee folder.
2. Select RS Media Editing Suite.
The RS Media Editing Suite softwareCD is packaged with RS Media.
The program will start up.
Visit www.wowweeesupport.com to download any updates to the RS
Media Editing Suite software.
NOTE: The program will automatically install any updates available from the internet using an automatic web installer.
NOTE: A shortcut to the RS Media Editing Suite software will be
created on your Windows desktop.
Installing the software
To install RS Media Editing Suite from the provided CD, do the following:
1. Insert the CD in the CD-ROM drive (or DVD-ROM if available).
Software overview
The RS Media Editing Suite welcome dialog appears.
The RS Media Editing Suite interface consists of four main components
that allow you to customize RS Media:
• Personality editor
• Macro editor
• BodyCon editor
• Media Organizer
Each component is represented by a tab in the RS Media Editing Suite
interface. To navigate between each component, click on its associated
tab in the interface.
NOTE: If the RS Media Editing Suite welcome dialogue does not
appear, locate the RSMediaSetup.msi file on the CD drive and
double-click on it to begin the installation process.
Follow the instructions that appear onscreen to install the software.
You can now use the RS Media Editing Suite to customize your RS Media.
51
Programming RS Media
using RS Media Editing Suite
Help file
You can play with the pre-installed personality files on RS Media, or you
can customize the pre-installed personality files by modifying or
substituting the existing audio files with ones of your choosing. Refer to
the Help file for more information.
The RS Media Editing Suite has a help file which contains general
instructions and tutorials on using the software interface on your
computer.
You can access the help file for the RS Media Editing Suite at any time
by clicking on the [?] button in the software interface. When you click
on the help button, the help file will open onto the page relevant to your
location in the software interface; this is called contextual help.
You can download an updated help file from the Wowwee support site
and install it in your Program Files\Wowwee\RS Media Editing Suite
directory.
Macro editor overview
The Macro editor allows you to create or edit macros or a sequence of
macros to create a larger macro function which you can then upload to
a Personality. In the RS Media Editing Suite, macros appear as building
blocks in the My Macros library, which you can drag and drop into the
macro workspace to create the macro function.
Personality editor overview
The Personality editor allows you to manage, customize and create
personality files for your RS Media. You can use the Personality editor
to manage multiple personalities on your computer that you can later
upload to your robot.
RS Media comes with four pre-installed personalities:
• RS Media (default personality)
• Service Bot 3000
• Billy Joe Sapien
• Space Bot
52
Programming RS Media
using RS Media Editing Suite
BodyCon editor overview
Media Organizer overview
The BodyCon editor allows you to create and customize your own RS
Media movements and routines. It also allows you to preview your
customized movements and routines in a 3D animation window of RS
Media.
The Media Organizer is the gateway between RS Media and your
computer. It allows you manage your media by allowing you to upload
and download video and audio files, personalities, Java games, and image
files between your computer and RS Media.
NOTE: When you want to transfer files to RS Media from your
computer, or vice versa, you must make sure RS Media is ON and
that USB mode is enabled.
For more information on the RS Media Editing Suite, refer to the
software’s Help file, which you can access through the software interface
You can create a sequence of movements, add voice and sound effects,
and save it as a BodyCon file (*.bcn). This file can be added to any
personality using the Personality Editor, or to a user-created Macro using
the Macro Editor. These personalities can then be uploaded to the robot
using the Media Organizer.
53
Memory expansion / USB Connection
RS Media has built in onboard memory on which you can store your
media files and personalities. You can expand the memory capacity on RS
Media using a SD card (sold separately) in the SD card slot.
Onboard memory vs. expandable memory
There are two types of memory available on RS Media:
• Onboard memory. Memory that is built-in on RS Media and cannot be removed. There is a total of 42 Mbytes of accessible memory space (about 22 Mbytes free space) in RS Media built-in onboard memory.
• Expandable memory. Memory that you can store on an SD card. You can increase RS Media’s memory space by using an SD card in the built-in SD card slot. The maximum size for the SD card is 1 GByte.
NOTE: When you use an SD card on RS Media, you will not be able to
access any data saved on his onboard memory.
Using the SD card
To insert the SD card into the SD card slot:
NOTE: You cannot directly transfer data between the SD card and
RS Media’s onboard memory. To transfer any data you have on the
SD card onto RS Media’s onboard memory, first copy the files you
want onto your PC and then remove the SD card from RS Media’s
SD card slot. Using RS Media Editing Suite, add the data into the RS
Media Editing Suite library, and then upload it to RS Media’s onboard
memory.
To remove the SD card from the SD card slot:
1.Make sure RS Media is turned off.
2.Push the SD card inwards. The SD card will eject from
the SD card slot.
3.Remove the SD card.
USB connection
You can transfer files from a PC to an SD memory card inserted in RS
Media using the USB cable provided. Note that files that can be played
are limited to those file formats supported by the system and the Editing
Suite software must be used for data transfer.
Connecting RS Media to a PC using the USB
cable
1.Make sure RS Media is turned off.
You can connect a USB cable to RS Media and a PC without
turning off the power.
1. Connect the USB cable to RS Media and your PC as shown.
2. Select ‘USB Mode’ from the Options
2.Insert the SD card into the slot as illustrated. Push the card into the slot until it is seated properly (the card will click).
3.Reboot RS Media after inserting the SD card.
menu on RS Media, and press the
Select button.
NOTE: Using an adapter when RS Media is transferring data in USB
mode is recommended as low battery levels could result in the loss
or corruption of data.
54
Playing audio from an external audio
source / Caring for your RS Media
Playing audio from an external
audio source
Observe all warnings, precautions, and instructions.
If the device functions in an abnormal manner, produces unusual sounds
or odors, or if it becomes hot to the touch, stop use, unplug the AC/DC
adapter (if used) from the electrical outlet, and disconnect any other
cables to the object immediately.
Using Line In to play Audio
You can play audio from an external audio source through RS Media, just
like a speaker system. You must connect an audio cable (not included)
from your audio source to the line-in connector, located in his USB
compartment. To do so:
Use and handling
1. Connect one end of an audio cable to the line-out or headphone
connector of your external audio source.
line-in connector, located in the USB compartment.
Options folder; select Line In, and then select the ON option.
will be played through RS Media’s speakers.
2. Connect the opposite end of the audio cable (Ø3.5 stereo jack) to the 3. Enable the Line In option in Media Mode, by navigating to the
4. Play your external audio from your external audio source. The audio NOTE: When you are not
using the external audio
option, disable the Line In
option by setting the option
to OFF (see p.37 for details).
If the Line In option is
enabled when you are not
using an external source,
RS Media will not play any
other audio.
Caring for your RS Media
This section outlines various precautions, instructions and warnings on
caring for your RS Media.
Precautions
Before using this product, read this manual and retain it for future
reference.
Safety
This product has been designed with the highest concern for safety.
However, note that any electrical device if used improperly has the
potential of causing fire, electrical shock or personal injury. To help ensure
accident-free operation, you should follow the guidelines outlined below:
55
• Use in a well-lit area and keep the screen a safe distance from
your face.
• Do not use RS Media near water.
• Do not immerse RS Media or any parts of him in water.
• Do not expose RS Media to high temperatures, high humidity, or direct sunlight.
• Do not expose RS Media to dust, smoke or steam.
• Do not allow liquid or small particles to get into RS Media.
• Do not place RS Media on surfaces that are tilted, unstable or
subject to vibrations.
• Do not throw or drop RS Media, or subject RS Media to strong
physical shock.
• Avoid carrying RS Media by his head. The head contains many
sensors and should be handled with care.
• Do not place RS Media close to items with a magnetic strip, such as a credit card.
• Do not give RS Media anything valuable or fragile to hold. He might throw or drop things unexpectedly.
• RS Media will walk best on smooth surface. If he is having difficulty walking on a surface, try changing his gait (the way he walks) for better performance. RS Media responds best to remote controller
commands when you are located in front of him. If the controller is behind him, he will not detect commands as well.
• RS Media will set himself in the correct body position for walking. If you try to move his arms with the controller, he will stop walking. If you manually move his arms or waist while he is walking, he will continue to walk but might lose his balance and fall over.
• When you first activate him (turn him on), RS Media will be sensitive to sound, vision and touch input; this is the default setting. This
becomes his default setting every time he is activated after a full power down.
• RS Media’s infrared vision system uses reflection. This means that he can see highly reflective surfaces such as white walls or mirrors more easily and at greater distances than he can see matte or black surfaces.
• Do not insert items into RS Media’s SD memory card slot that are not SD memory cards.
caring for your rs media /
Glossary
LCD screen
Red, blue or green spots (bright spots) or black spots (dark spots) may
appear in certain locations on the LCD screen. The appearance of such
spots is a normal occurrence associated with LCD screens and is not a
sign of a malfunction. LCD screens are made using highly precise
technology. However, a very small number of dark pixels or continuously
lit pixels exist on each screen. Also, a distorted image may remain on the
screen for several seconds after the system has been turned off.
Direct exposure to sunlight may damage the system’s LCD screen. Be
careful when using the system outdoors or near a window. When using the system in a cold environment, you may notice shadows on the
graphics or the screen may appear darker than usual. This is not a
malfunction, and the screen will return to normal when the temperature
goes up.
Do not leave still images displayed on the screen for an extended period
of time. This may cause a faint image to be left permanently on the
screen.
Cleaning
For safety reasons, unplug the power cord (if using - not included) from
the electrical outlet and remove the batteries from RS Media before
cleaning.
Cleaning the exterior surface
Wipe gently with a damp cloth, and then dry the surface. Do not use
solvents or other chemicals to clean the exterior of RS Media.
Cleaning the LCD screen
Wipe gently with a soft dry cloth.
Glossary
All RS Media documentation uses certain common terminology to
describe components of the RS Media Editing Suite. The following are a
few terms you might encounter throughout this manual and other RS
Media documentation:
•BodyCon. A term used to describe any motion or sequence of
motions associated with or without a specific audio file.
In the RS Media Editing Suite, you can create User BodyCons or
custom-made BodyCons that you can upload to a Personality or to your library of BodyCons.
•Gait. A term to describe a particular way of moving, especially on the ground, such as walking or running.
•Macro. A type of short computer program that takes a simple input
command and outputs a new set of commands or instructions. RS Media will play the macro back as if he was an actor reading a script.
• In the RS Media Editing Suite, you can create macros to create your
own sequence of RS Media movements which you can then save to your My Macros library or to a BodyCon slot in a Personality, and then upload the Personality to your RS Media.
Some macros contain conditions, which can allow more than one
possible outcome based upon feedback from the user or the
environment.
•Subroutine. In programming, a subroutine is a portion of a larger routine that performs a specific task.
56
Warranty information / FAQs / support
Your RS Media is warranted against defects for a period of 180 days.
Wowwee Ltd. warrants to the original consumer purchasers that RS
Media (“Product”) will be free from defects in material and/or
workmanship under normal use for a period of180 days from the date of
purchase. This Warranty is in lieu of all other express or implied
warranties which might arise with respect to this Product, including the
warranties of merchantability or fitness for a particular purpose. IN
ADDITION, INCIDENTAL AND CONSEQUENTIAL DAMAGES ARE HEREBY
EXCLUDED BOTH FOR PROPERTY AND TO THE EXTENT PERMITTED BY
LAW, FOR PERSONAL INJURY DAMAGE. Some states do not allow the
exclusion of limitation of incidental and consequential damages.
Should you experience any difficulty with your Product, please return it
to the place of purchase, along with an original proof of purchase, and
either the original box or the UPC Code label from the box. You will
receive a replacement for the Product, or be issued a refund for the
purchase of the Product in the event a replacement is not available at the
place of purchase. Note that this warranty is automatically void for any
hardware modifications (including tampering or disassembly), accidental
damage, damage outside what is considered normal use, or abuse.
This warranty does not cover any hardware, software or other add-on
components installed by the end-user.
Valid only in U.S.A.
FAQs
If you have questions or issues with your RS Media, take some time to go
through the following list of frequently asked questions.
Q.
A.
My RS Media sometimes does not respond to controls.
Low battery
If RS Media is not responding well to controller commands, you might need to replace the controller batteries (3 X “AA” size).
If you do not notice any improvement in response after changing the batteries in the controller, replace all the batteries in RS Media.
IR sensor on the controller must point directly to IR sensor on
RS Media’s head
RS Media’s Infrared vision does not function while he is walking
backwards or turning, and may result in him bumping into things. To make sure he responds to commands, point the controller towards the front of his head, where the sensor is located.
Q.
A.
When I plug my headphones into to RS Media, they do not seem
to work.
RS Media does not have an output jack
RS Media only supports a stereo input jack and not a headphone jack. This means that you can plug your RS Media to a computer or an MP3 player and use him as a stereo output (like speakers).
To do this, switch to Media Mode and select Options. Select the
Line-in option and set it to ON. Any audio media you play from the source will now be output through RS Media.
Q.
A.
I cannot install the CD that came with my robot.
Does not meet system requirements
Your PC must meet the minimum system requirements in order to install the CD. These minimum requirements are listed in the User Manual provided with your RS Media.
Q.
A.
My RS Media won’t take my picture and says “Flash memory full”.
SD Card full, might need to delete/transfer some data
RS Media will say “Flash memory full” when the SD Card inserted has no more memory capacity left. You must delete or transfer some
data such as audio, images or video off the SD Card. You can delete files while in Media Mode, or if you want to save your data, transfer the data to your PC using a USB connection. Furthermore, you can also power down your RS Media, remove the full SD Card and replace it with an empty one. Recommended size of SD Card is 1GByte.
Support
For an updated list of troubleshooting tips or frequently asked questions,
visit the RS Media support site at www.wowweesupport.com.
57
Index
—B—
—I—
batteries, 8
installing, 8
remote controller, 9
blinking, 45
BodyCon
definition, 56
BodyCon editor, 53
infrared vision, 43
close-range, 43
long-range, 43
—C—
—M—
camera, 43-45
camera settings
white balance, 45
color recognition, 44
features, 10
flinch, 43
foot sensors, 42
frequently asked questions, 57
macro
definition, 56
Macro editor, 52
media formats, 26
Media mode
Audio menu, 27
Games menu, 34
Options menu, 37
Personality menu, 33
Photo menu, 29
Video menu, 31
Media Organizer, 53
memory expansion, 54
—G—
—O—
gait
definition, 56
gaits
walking gaits, 12
games, 34-36
controls, 34
glossary, 56
grip sensors, 42
Guard mode, 45,50
objects
color tracking, 44
disappearing, 44
tracking, 44
obstacles, 44
—E—
external audio source, 55
—F—
—H—
hand controls, 15
handling RS Media, 55
help file, 52
slideshow, 29
timer, 29
power down, 11
powering RS Media, 11
precautions, 55
programming
using RS Media Editing Suite, 51
programming modes, 47
Main Program mode, 49
Puppet mode, 48
Sound, 49
Vision, 49
—L—
LCD screen, 11, 56
line-in, 55
—R—
remote controller
overview, 14
robot interaction, 46
Robopet, 47
Roboraptor, 46
Robosapien V2, 46
Roboreptile, 46
RS Media Editing Suite, 47, 51-53
—S—
safety, 55
SD card
inserting, 54
removing, 54
using, 54
sensors, 11
foot, 42
grip, 42
tilt, 42
Sleep mode, 11
software, 51
installing, 51
running, 51
subroutine
definition, 56
subroutines, 49
—P—
package contents, 3
personalities, 52
Personality editor, 52
photos, 29
browse, 29
delete, 29
take, 29
options, 29
58
guard, 50
positional, 50
sound, 49
vision, 49
support, 57
—T—
tilt sensors, 42
tracking
timeout, 44
—V—
videos, 31
browse, 31
delete, 31
take, 31
vision
toggle on/off, 43
—W—
warranty, 57
white balance, 44, 45
CAUTION
Changes or modifications not expressly approved by the party responsible for compliance could void the user’s
authority to operate the equipment.
NOTE
This equipment has been tested and found to comply with the limits for a class B digital device, pursuant to part 15 of
the FCC rules. These limits are designed to provide reasonable protection against harmful interference in a residential
installation. This equipment generates, uses and can radiate radio frequency energy and, if not installed and used in
accordance with the instructions, may cause harmful interference to radio communications.
However, there is no guarantee that interference will not occur in a particular Installation. If this equipment does cause
harmful interference to radio or television reception, which can be determined by turning the equipment off and on, the
user is encouraged to try to correct the interference by one or more of the following measures:
- Reorient or relocate the receiving antenna
- Increase the separation between the equipment and receiver
- Connect the equipment into an outlet on a circuit different from that to which the receiver is connected
- Consult the dealer or experienced radio/TV technician for help
This device complies with Part 15 of the FCC Rules. Operation is subject to the following two conditions : (1) this device
may not cause harmful interference, and (2) this device must accept any interference received, including interference
that may cause undesired operation.
WARNING! This equipment may experience difficulty and/or memory loss when subjected to any electrostatic
discharge, radio frequency interference, or sudden power surge/interruption . The user is encouraged to reset the
equipment should any of these occur.
Manufactured and distributed by © 2006 Wowwee Ltd. All Rights Reserved.
Wowwee Limited Asia Office - Unit 301A-C, 92 Granville Rd, T.S.T. East, Hong Kong
Wowwee Group North America Office - 6600 Decarie, Suite 200, Montreal, QC H3X 2K4, Canada
Consumer Hotline: 1-800-310-3033 Email: [email protected]
www.wowwee.com
www.rsmediaonline.com
8061US03FLA