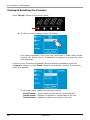
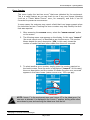
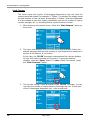
1
Operating Manual Contact: Customer Service – Service à la clientèle 800.567.2951 Technical Support – Soutiens technique 888.854.0207 VKI Publication # 100267-003 May 13, 2015 Eccellenza Express – Operating Manual 2 May 13, 2015 Eccellenza Express – Operating Manual Table of Contents Safety Information .............................................................................. 5 Specifications ...................................................................................... 7 Equipment Overview (Exterior) ........................................................... 8 Equipment Overview (Interior) ........................................................... 9 Unpacking ......................................................................................... 10 Plumbing the Machine ....................................................................... 11 Water Filter ....................................................................................... 13 Initial Coffee Water Level Adjustment .............................................. 14 Filling the Coffee Bean Hoppers ........................................................ 15 Filling the Powder Hoppers ............................................................... 17 Checking the Water Temperature ...................................................... 19 Emptying the Waste Bin .................................................................... 20 Viewing & Resetting the Counters ..................................................... 22 Error Counter ................................................................................. 23 Vend Counter ................................................................................. 24 Total Counter.................................................................................. 26 Clearing Message Counters ............................................................... 27 Programming .................................................................................... 28 Enter the Set-Up Menu Password ...................................................... 28 Set-Up Menu Structure .................................................................... 31 Set Coffee Menu.............................................................................. 32 Set Coffee Product ..................................................................... 32 Set Coffee Water ........................................................................ 32 Set Grinder Time ........................................................................ 32 Beverage Product and Water Settings ........................................... 33 Set Powder Menu ............................................................................ 36 Set Powder Product .................................................................... 36 Set Powder Water ...................................................................... 36 Set Powder Pulses ...................................................................... 36 Secondary Settings .................................................................... 37 Set Hot Water Menu ........................................................................ 37 Set Hot Water Times .................................................................. 37 Set Press & Hold Hot Water ......................................................... 37 Set Brewer Menu............................................................................. 38 Set Top Pause ............................................................................ 38 Set Bottom Pause....................................................................... 38 Set Pouring Time........................................................................ 38 Set Maximum Cups per Carafe ..................................................... 38 Brewer Settings ......................................................................... 39 Double Cup Setting .................................................................... 42 May 13, 2015 3 Eccellenza Express – Operating Manual Table of Contents Set Interface Menu .......................................................................... 43 Language Setting ....................................................................... 43 Interface Settings ...................................................................... 44 Enable/Disable Buttons ............................................................... 44 Setting the Buzzer Pitch/Volume .................................................. 47 Moving Cup Size Button Position .................................................. 48 Set Default Cup Size & Strength................................................... 50 Setting the Clock ........................................................................ 51 Set Message Menu .......................................................................... 52 Enable/Disable Messages ............................................................ 52 Setting Reminder Message Timers ................................................ 52 Message Settings ....................................................................... 52 Setting the Message Counters ...................................................... 54 Waste Container Message Settings if Using a Waste Chute .............. 56 Counters Menu................................................................................ 57 Error Counters ........................................................................... 57 Beverage Counters ..................................................................... 57 Cash Counters ........................................................................... 57 Resetting Counters ..................................................................... 57 Set Vending Menu ........................................................................... 58 Set Beverage Prices .................................................................... 58 Force Vending ............................................................................ 58 Money System Type ................................................................... 58 Bill Denomination Setting ............................................................ 58 Secondary Settings .................................................................... 59 Set Gram Throws Menu .................................................................... 60 Set Gram Throws – Coffee........................................................... 60 Set Gram Throws - Powder .......................................................... 60 Set Powersaving Mode ..................................................................... 63 Water Tank Temperature Setting ...................................................... 64 Empty Water Tank (to Valve Level) ................................................... 66 Rinse Cycles ...................................................................................... 68 Brewer Rinse Cycle .......................................................................... 68 Quick Brewer Rinse Cycle ................................................................. 69 Powder (Whipper) Rinse Cycle .......................................................... 70 Maintenance ...................................................................................... 71 Daily.............................................................................................. 71 Weekly .......................................................................................... 71 Monthly ......................................................................................... 72 Every 6-12 Months .......................................................................... 72 Sanitization – Milk System ............................................................... 73 Removing the Brewer ........................................................................ 74 Installing the Brewer ........................................................................ 76 Draining the Water Tank ................................................................... 78 Error Messages.................................................................................. 79 Information in this document is subject to change without notice. 4 May 13, 2015 Eccellenza Express – Operating Manual Safety Information Your safety is very important to us. It is imperative that you read and understand this safety information before proceeding with the installation and operation of this coffee maker. This equipment must be used specifically for the purpose for which it is designed. The manufacturer is not responsible for damage or injury resulting from improper use of this equipment. This coffee maker is designed for indoor use ONLY and must never be installed outdoors. The installation of this equipment must comply with all municipal, state/provincial, and federal electrical and plumbing codes. Installation and servicing of this equipment must only be performed by qualified personnel. Do not attempt to install or service this equipment if you are not qualified as it may result in personal injury. There are no user-serviceable parts inside the equipment. This equipment must be installed in a location temperature between 5°C-35°C (40°F-95°F). with an ambient The main water supply pressure must be between a minimum of 20psi and a maximum of 100psi. This equipment must be positioned so that the wall plug and the main power switch are both easily accessible. Do not connect the coffee maker to a voltage supply other than the voltage indicated on the serial number decal. Do not immerse this coffee maker or any part of this equipment in liquid. Do not install the equipment in an area where water spray is present. This coffee maker must be installed securely on a level surface. If it does not appear to be a stable location, select another installation location. Keep hands clear of the dispensing area at the front of the coffee maker. Liquids being dispensed are extremely hot and can cause severe burns. Never disconnect the coffee maker by pulling on the service cord, and never use the coffee maker if the service cord is damaged. If the service cord is damaged, it must be replaced with a new service cord that is available from your distributor or the manufacturer of this equipment. May 13, 2015 5 Eccellenza Express – Operating Manual Safety Information Never attempt to override the safety features incorporated into the equipment. They are there for your protection and should never be bypassed under any circumstances. Always switch the power off and disconnect the service cord when cleaning the interior of the coffee maker. Components inside the coffee maker can cause electrical shock resulting in personal injury. If the coffee maker is not working properly or appears to have a fault, switch off the power, disconnect the service cord and call an authorized technician immediately for service. Only qualified personnel should perform service on this equipment. Use caution when servicing the water heater or the outlet valves as they may be extremely hot and can cause severe burns. Use caution when working inside the coffee maker as there may be sharp edges on some components that can cause cuts. To prevent electrical shock, remove all jewelry (rings, watches, etc.) when servicing the coffee maker. Use only original manufacturer replacement parts in this coffee maker. Unapproved replacement parts can result in personal injury, fire and/or further damage to the equipment. Do not allow children to access this equipment. They are not aware of the potential dangers that exist. Never use ammonia based cleaners on machine surfaces as they will become discolored and/or damaged permanently. Use milder cleaning products, such as dish soap. Unauthorized modifications made to this coffee maker can result in serious personal injury and/or damage to the equipment, and voids all warranties and certifications. 6 May 13, 2015 Eccellenza Express – Operating Manual Specifications Voltage Rating 120 Volts AC @ 60hz (120 Volt Model) 240 Volts AC @ 50hz (240 Volt Model) Heater Wattage 1100 Watts Weight (empty) 76 lbs (34.5 kg) Coffee Bean Hopper Capacity (2) approximately 1.3 lbs (600 g) each Powder Capacity (2) approximately 1.1 lbs (500 g) each Cup Sizes Variable capacity Brewing Capacity 60 x 8.0 oz. (240ml) cups/hour Water Tank Capacity 0.79 gallons (3 liters) Waste Bin Capacity 1.9 lbs (860 grams) Temperature Control Electronic Probe Heating Time 15-20 minutes after installation Brew Temperature 198°F (92°C) Heater Protection Yes Overflow Protection Yes Circuit Protection Yes Certifications/Listings cCSAus, CE, NSF, NAMA Coffee Maker Dimensions Height: 28 3/8” (72.1 cm) Width: 15 1/2” (39.4 cm) Depth: 23 3/4 ” (60.3 cm) Minimum Installation Requirements Height: 32 5/8” (82.9 cm) Width: 15 1/2” (39.4 cm) Depth: 25 3/4” (65.4 cm) NOTE: Any references made in this manual to coffee blends and powder products are for example purposes only. The actual products used in the equipment may be different than the examples used in this manual. May 13, 2015 7 Eccellenza Express – Operating Manual Equipment Overview (Exterior) Coffee Bean Hoppers Bean Hopper Lock LCD Display and Selection Buttons (Touch Screen) Front Door Lock Cup Stand & Grill NOTE: The Eccellenza Express is equipped with a touch-screen LCD display. Scrolling through options and making selections is accomplished by touching the options or selections required on the front screen of the machine. 8 May 13, 2015 Eccellenza Express – Operating Manual Equipment Overview (Interior) Coffee Bean Hoppers Powder Hoppers Coffee Bean Grinder Brewer Whipper Grounds Tray Interior Buttons Cup Stand & Grill May 13, 2015 Waste Bin 9 Eccellenza Express – Operating Manual Unpacking NOTE: Prior to signing for the delivery, check the shipping carton for damage. Indicate any damage on the delivery slip and have the driver sign acknowledging it. Damages during shipping must be claimed with the carrier, and not with VKI Technologies. 1. Cut the two straps on the outside of the box. 2. Open the flaps on the top of the box and remove the foam bolster from the top of the machine. 3. Use the box flaps to lift the box up and off of the machine. 4. With the help of a colleague, lift and place the coffee maker onto a workbench or cabinet. WARNING: DO NOT lift the coffee maker by placing your hand underneath the front door. It is not designed to support the weight of the machine, and serious personal injury and/or damage to the unit may occur. 5. Remove the keys from the small envelope attached to the service cord. 6. Remove all the shipping tape from the outside and inside of the machine. 7. Remove the cup tray shipped inside the coffee maker and install it onto the front door. NOTE: Keep all packaging material in case the equipment must be transported or shipped. Also, when transporting the unit for installation, leave it on the base of the packaging to reduce the risk of damage to the levelers. 10 May 13, 2015 Eccellenza Express – Operating Manual Plumbing the Machine Installation of this equipment must comply with all local, state/provincial and federal plumbing codes. It is the responsibility of the installer (and not VKI Technologies) to research and to comply with all of these codes. NOTE: When installing the Eccellenza Café onto a cabinet or countertop, ensure that the machine is level. This is done by adjusting the levelers (legs) at the bottom of the machine. 1. Specifications and Limitations: The total overall length of installed section of water tubing should never exceed 25 feet (7.6 meters) per unit. In the event more than 25 feet (7.6 meters) of conduit tubing is required, as measured from the water supply connection (building plumbing) to the brewing equipment or cooler unit, the customer should be required to sign a waiver document thus releasing your company from any and all responsibility in the event damage is incurred as a result of a water leak from installed water tubing and/or fittings and/or equipment. 2. Water Supply & Tubing - Material Requirements (Conforms to NSF-51 & NSF-61): NOTE: The main water supply pressure must be between a minimum of 20 psi and a maximum of 100 psi. Water supply connection (building plumbing to water tubing conduit): ► PREFERENCE: 2” copper shunt & compression tee fitting (multi unit location) ► ALTERNATE: Self-piercing valve (single unit locations only) Water tubing (water supply to water filter – water filter to brewing equipment): ► NSF CERTIFIED: 3/8” I.D. Reinforced PVC Beverage grade hose tubing 3. Water Filter - Material Requirements (Conforms to NSF-42 & NSF-53): Water filter & filter head: ► NSF CERTIFIED: EVERPURE 4H, or 4K-Plus, or 2K-Plus, or OCS ► An Everpure QL3 head with integrated shut-off valve must be installed NOTE: Accessibility to shut-off valve(s) must be provided and explained to customer in the event water supply to brewing or cooler equipment must be shut off. NOTE: For multi-unit locations whereby the main water conduit is supplying water to more than one unit (including water coolers), a separate in-line shut off valve must be installed onto each individual equipment unit. May 13, 2015 11 Eccellenza Express – Operating Manual 4. Water Fittings & Valves - Material Requirements (Conforms to NSF-51 & NSF-61): Fittings & valves (water supply connection - water filter head - brewing equipment): ► NSF CONFORMING: BARB type fittings with OERTIKER clamps ► PREFERENCE: Custom nickel plated brass ► ALTERNATE: Stainless Steel (much more costly) Quick-connect type fittings are not approved for use with any VKI manufactured equipment. 12 May 13, 2015 Eccellenza Express – Operating Manual Water Filter To maintain the equipment warranty, VKI requires the use of a high quality water filter (such as Everpure™ Filters) which will eliminate most odors present in water, and reduce the amount of particles entering the water tank. The following are basic instructions for installing a cartridge type filter using a head bracket (Everpure™ type filter). 1. Assemble the retaining bracket to the filter head. 2. Insert the cartridge into the filter head and turn the cartridge clockwise. 3. Apply Teflon tape to the threaded portion of two 3/8" x 1/4" fittings and screw each into the filter head. 4. Mount the water filter at an easily accessible place for servicing, such as: (a) Under the sink against the back or side wall, (b) On the back of a utility cabinet, (c) On the back of the coffee maker, (d) Any location generally within 20 feet of the machine. NOTE: When the filter is installed or replaced, make sure to write the installation date in the provided area on the filter cartridge. Follow the manufacturer’s recommendations for filter replacement intervals. May 13, 2015 13 Eccellenza Express – Operating Manual Initial Coffee Water Level Adjustment When the Eccellenza Express is initially installed, you may be required to adjust the coffee water level in the cup. Instead of going into the set-up and changing multiple water settings, you can simply adjust the restrictor on the coffee valve to compensate. 1. Remove the right side panel. a) Remove the two screws securing the panel to the machine. 2. Adjust the restrictor on the coffee valve using an Allen key. a) Turn the restrictor clockwise to decrease the water flow. b) Turn the restrictor counter-clockwise to increase the water flow. Restrictor 3. Re-install the water tank valve cover. 14 May 13, 2015 Eccellenza Express – Operating Manual Filling the Coffee Bean Hoppers 1. Unlock the coffee bean hopper cover, lift it up to remove it, and set it aside. 2. Remove the individual hopper lids and set them aside. 3. Fill the hoppers with fresh coffee beans. a) Coffee blend 1* beans in the left hopper (labeled Coffee 1). b) Coffee blend 2* beans in the right hopper (labeled Coffee 2). * The milder of the two blends must always be used in the Coffee 1 hopper and the stronger in the Coffee 2 hopper. If configured for Decaf, the decaf beans are used in the Coffee 2 hopper. May 13, 2015 15 Eccellenza Express – Operating Manual 4. Replace the individual hopper lids. 5. Replace the coffee bean hopper cover and lock it in place. 6. Open the front door and press the “CYCLE BREWER” button. The brewer will cycle and stop, and the screen now displays the following: a) Press the “Clear Coffee 1” button to reset the “Refill” reminder message for the left bean hopper. b) Press the “Clear Coffee 2” button to reset the “Refill” reminder message for the right bean hopper. 7. Press the “CYCLE BREWER” button once more to cycle the brewer back to the home position and exit back into standby mode. 8. Close the front door and lock it. NOTE: Any references made in this manual to coffee blends and powder products are for example purposes only. The actual products used in the equipment may be different than the examples used in this manual. 16 May 13, 2015 Eccellenza Express – Operating Manual Filling the Powder Hoppers 1. Open the front door, remove the lid from the powder hopper to be refilled and set it aside. Powder 1 = Milk* Powder 2 = Hot Chocolate* * For reference purposes only. 2. Fill the hopper with powder product and re-install the hopper lid. 3. Repeat the same procedure for the other powder product hopper, if required. May 13, 2015 17 Eccellenza Express – Operating Manual 4. Press the “CYCLE BREWER” button. The brewer will cycle and stop, and the screen now displays the following: a) Press the “Clr Powder 1” button to reset the “Refill” reminder message for Milk. b) Press the “Clr Powder 2” button to reset the “Refill” reminder message for Chocolate. 5. Press the “CYCLE BREWER” button once more to cycle the brewer back to the home position and exit back into standby mode. 6. Perform a “Powder Rinse” cycle to flush any powder that fell into the whipper bowl [see “Rinse Cycles” on page 68]. 18 May 13, 2015 Eccellenza Express – Operating Manual Checking the Water Temperature The temperature of the water in the water tank can be checked at any time while the machine is in standby mode. To check the water temperature, press the “Language” button and keep it pressed for five seconds. The temperature is then displayed in the lower center of the screen. The remove the temperature reading from the screen, press the “Language” button and keep it pressed for five seconds. NOTE: When pressing the Language button to view the temperature, the language setting will change. Use the Language button to re-set the language back to its original setting. May 13, 2015 19 Eccellenza Express – Operating Manual Emptying the Waste Bin 1. Unlock and open the front door. 2. Lightly lift and swing open the powder hopper support. 3. Remove and empty the waste bin. 4. Re-install the waste bin and swing the powder hopper support back to its original position. 20 May 13, 2015 Eccellenza Express – Operating Manual 5. Press the “CYCLE BREWER” button. The brewer will cycle and stop, and the screen now displays the following: a) Press the “Clr Waste Bin Count” button to reset the “Empty” reminder message for the Waste bin. 6. Press the “CYCLE BREWER” button once more to cycle the brewer back to the home position and exit back into standby mode. 7. Close the front door and lock it. May 13, 2015 21 Eccellenza Express – Operating Manual Viewing & Resetting the Counters Press “Set-Up” button on the interior panel. ► The Set-Up menu displays on the LCD Screen. As a safety precaution, this is the only menu that is visible when initially entering the Set-Up menu. A password is required to access the more critical settings. As there is only one selection available without entering a password, press the “COUNTERS” selection (or the “ENTER” button) to access the counters. The following menu now appears; The Counters Menu contains the following options: Error Counter – gives a history of the last ten errors detected Vend Counter – displays the number of vends made by the unit Total Counter – displays the total vend history of the unit 22 May 13, 2015 Eccellenza Express – Operating Manual Error Counter This menu tracks the last ten errors 1 that were detected by the equipment. This is a useful feature as you can check to see if any error keeps repeating (such as a “Check Water Source” error, for example), and then it can be corrected to prevent a reoccurrence. In some cases, the customer may report a fault that is no longer present when the technician arrives. Checking the error counters may help identify the fault that was reported. 1. After accessing the COUNTER menu, select the “ERROR COUNTER” option on the screen. 2. The following menu now appears on the display. In this case, “ERROR 1” (the most recent error) is identified as an overflow error. The number shown beside the error description (124, in this case) shows the number of vends that have been made since the error occurred. 3. To select another error counter, simply press the counter required on the touch-screen. Once the error is highlighted (“ERROR 2” in this case), the error description and the number of vends since the error occurred appears in the lower boxes (water source error, 255 cups ago). NOTE: “ERROR 1” is the most recent error, and “ERROR 10” is the oldest error. If a new error is detected, it is displayed in the “ERROR 1” position, shifting all the other errors down by one, and removing the oldest error from the list. 1 See page 77 for a list of Error Messages May 13, 2015 23 Eccellenza Express – Operating Manual Vend Counter This menu tracks the number of beverages dispensed by the unit since the counters were last cleared. For example, if “Coffee 1” is selected, the display shows the total number of cups (all sizes, all strengths) of Coffee 1 that were dispensed. It is also possible to get more specific information, such as the number of cups by cup size, strength, etc., by accessing further into the product’s counter. 1. After accessing the counter menu, select the “VEND COUNTER” option on the screen. 2. The menu now displays a list of all the beverages available. Select the desired beverage and the total number of cups dispensed is displayed in the box at the bottom of the screen. In this case, the “50/50” beverage is selected and the counter displays 16 cups total (which includes all cup sizes). To get more detailed counters, press the “Enter” button. To clear (reset) this counter, press the “Clear Counters” button. 3. The cup size counter is now accessed for the “50/50” beverage. You can now view the number of cups brewed by beverage cup size. In this case, of the 16 beverages dispensed, only 1 was a small size. 24 May 13, 2015 Eccellenza Express – Operating Manual 4. To view how many medium cups were dispensed, select the “Medium Size” option until it is highlighted. In this case, of the 16 beverages dispensed, 15 were a medium size. 5. To view how many large cups were dispensed, select the “Large Size” option until it is highlighted. In this case, of the 16 beverages dispensed, none were of the large cup size. As you can see, by adding the counters of each cup size (1+15+0), we get the total that was indicated for the House Blend beverage counter (16). NOTE: Any references made in this manual to coffee blends and powder products are for example purposes only. The actual products used in the equipment may be different than the examples used in this manual. NOTE: To know your location when navigating the menu system, the menu path appears to the right of the settings box. In the case above, the path is COUNTER/VEND COUNTER/ 50/50. Pressing the “previous“ button moves you one level back in the menu system. May 13, 2015 25 Eccellenza Express – Operating Manual Total Counter 1. After accessing the counter menu, select the “TOTAL COUNTER” option on the screen. 2. The menu now displays the “Total Public” counter. This counter displays the total number of beverages distributed by the machine since it was put into service. NOTE: The “Total Private” counter (which is only visible after entering the “SetUp” password) acts as an ‘odometer’ for the Eccellenza Express and cannot be cleared (reset to zero). 26 May 13, 2015 Eccellenza Express – Operating Manual Clearing Message Counters 1. Open the front door and press the “CYCLE BREWER” button. The brewer will cycle and stop, and the screen now displays the following: a) Press the “Clr Hopper 1” button to reset the “Refill” reminder message for Colombian. b) Press the “Clr Hopper 2” button to reset the “Refill” reminder message for French Roast. c) Press the “Clr Powder 1” to reset the “Refill” reminder message for Milk. d) Press the “Clr Powder 2” to reset the “Refill” reminder message for Chocolate. e) Press the “Clr Waste Bin Count” to reset the “Empty” reminder message for the Waste Bin. f) To clear all of the counters at the same time, press the “Clear All Counters” button. May 13, 2015 27 Eccellenza Express – Operating Manual Programming This section of the manual guides you through the process of making changes to settings, and activating features/functions of the Eccellenza Express. As the procedure is similar for adjusting all of the settings in the equipment Set-Up mode (and there are dozens of possible settings), only a few examples will be detailed step-by-step. Refer to the flowcharts provided as a reference when navigating the equipment’s software. To access the Set-Up mode, press “SET-UP” button on the interior panel. ► The SET-UP menu displays on the LCD Screen. As a safety precaution, this is the only menu that is visible when initially entering the SET-UP menu. A password must be entered by the service technician to access the more critical settings. This password should not be given to the caretaker to eliminate the possibility of settings getting accidentally changed. Enter the Set-Up Menu Password 1. Press the button on the lower right side of the panel. 28 May 13, 2015 Eccellenza Express – Operating Manual 2. Enter the Access Code (password) using the selection panel buttons. a) The LCD will change to display numbers corresponding to the selection panel buttons. b) Enter the password* using the corresponding selection buttons. c) A small box becomes visible as the password is being entered. Once the password is entered, press the TEXT BOX at the top of the screen. Contact VKI for Password* d) If the correct password has been entered, a confirmation message appears. NOTE: Do not disclose this password to the customer/caretaker. This password is there to prevent unauthorized personnel from tampering with the machine settings, which can result in a needless service call. * contact VKI for the password @ 1-888-854-0207 May 13, 2015 29 Eccellenza Express – Operating Manual e) The screen then automatically changes after one second and the full set up menu appears. The Set-Up Main Menu contains the following options: SET PRODUCT Adjust product and water timings. Also used for adjusting grinding time, if this option is available. SET BREWER Adjust pause timings, carafe settings, double-cup settings and fine tuning of the brewer cycle. SET WATER TANK Set the water temperature and access the Empty Water Tank cycle. SET INTERFACE Enable buttons, set messages, buzzer options and default settings. TRANS SET FILE Accessed for transmitting and receiving data (Pocket PC to machine and viceversa) – mainly images, text and factory settings. COUNTERS View and reset product counters. Also displays error counters. SET VENDING* Set beverage pricing, type of money system used, and bill denominations accepted. *NOTE: This menu and its settings are only visible if the Eccellenza Express is set to “Coin” mode. 30 SET GRAM THROWS Adjust the gram throw for a coffee or powder product globally. SET POWERSAVE Program the machine to switch OFF power to the heating element during the pre-set time of the day. May 13, 2015 Eccellenza Express – Operating Manual Set-Up Menu Structure The following series of flowcharts outline the menu structure when accessing the Eccellenza Express set-up. Each arrow points to the next level in the set-up. Consequently, pressing the “Previous” button while navigating the menu returns you to the previous level. A menu that continues off the page ends with a large letter or number. The next level of the menu starts on a succeeding page, beginning with that same letter or number. For example, the “Set Coffee” menu below ends with a large letter “A”. To continue through this menu, go to the page identified and locate the next level(s), also identified by the large letter “A”, at the beginning. Page 32 Page 36 Page 37 Page 38 Page 43 Page 57 Page 58 Page 60 Page 63 May 13, 2015 31 Eccellenza Express – Operating Manual Set Coffee Menu Settings Accessed in this Menu Set Coffee Product Set Coffee Water Set Grinder Time While in Set-Up, use the “Up” or “Down” arrows to scroll through the available options, press the required option or press “Enter” to select and advance one level, or press “Previous” to go back one level. NOTE: To get the recommended gram throws for the coffee blend or powder type being used in the Eccellenza Express, you’ll need to contact your supplier. These settings are required for the machine to dispense the best tasting beverage possible. 32 May 13, 2015 Eccellenza Express – Operating Manual Beverage Product and Water Settings 1. To access the SET PRODUCT menu, press SET PRODUCT on the touchscreen. Please note that product timing and water timing can be adjusted while in this menu. 2. The display changes to show a list of products. The factory default SET PRODUCT Menu contains the following options: Coffee 1 (Light Med Roast) - coffee 50/50 (House Blend) – coffee Coffee 2 (Dark Roast) – coffee Cappuccino – coffee & milk Mochaccino – coffee, chocolate & milk Caffe Latte – coffee & milk Espresso - coffee Hot Cocoa – chocolate Hot Milk Choco – chocolate & milk Café Mocha – coffee & chocolate Hot Water – hot water for tea, etc. NOTE: To reserve a menu location for possible future products that the equipment may offer, the label “Not Used” may appear in certain menus. For clarity, these menus are not listed in the flowchart and can be ignored when in the set-up mode. May 13, 2015 33 Eccellenza Express – Operating Manual 3. Scroll to the selection that requires adjusting by pressing the UP or DOWN buttons at the left of the LCD screen. 4. Press the required selection on the screen to access the settings for that selection. In this example, CAPPUCCINO is used. 5. In this case, the options available are the following: 6. For this example, the coffee will be adjusted (should another option be required, simply select it on the touch-screen). Press SET COFFEE to access this option. 34 May 13, 2015 Eccellenza Express – Operating Manual 7. The screen now displays the following. Select whether to set the product, water or grinder timing – in this case, the product timing will be adjusted. 8. To set the product time for Coffee 2, select it on the touch-screen. The screen will display the following: 9. To set the timing for the small cup size, press the enter button (should another option be required, scroll to that option using the UP or DOWN buttons or select it on the screen). The screen will display the following: 10. Increase or decrease the product timing by using the up or down buttons. Increase Setting Decrease Setting Note that the all product settings increase or decrease by 1 gram increments. May 13, 2015 35 Eccellenza Express – Operating Manual Set Powder Menu Settings Accessed in this Menu Set Powder Product Set Powder Water Set Powder Pulses While in Set-Up, use the “Up” or “Down” arrows to scroll through the available options, press the required option or press “Enter” to select and advance one level, or press “Previous” to go back one level. Note that the all product settings increase or decrease by 1 gram increments. NOTE: To get the recommended gram throws for the coffee blend or powder type being used in the Eccellenza Express, you’ll need to contact your supplier. These settings are required for the machine to dispense the best tasting beverage possible. 36 May 13, 2015 Eccellenza Express – Operating Manual Secondary Settings Throughout the programming section of this manual, you may notice certain secondary functions or settings in the equipment Set-Up that are not described in detail in this manual. A table with a quick description of these functions and settings is included to provide you with an idea as to what they control. Description of Certain Functions or Settings # Pulse Powder x Sets the number of pulses (activations) that the powder outlet valve has during a cycle. Pulse x Time Sets the duration of each pulse for the powder outlet valve. Delay Slot x On mixed beverages, this sets a delay for powder dispensing portion of the cycle in relation to the brewer (or coffee dispensing portion of the cycle). NOTE: It is recommended that you do not alter these settings if you don’t fully understand their function. The factory settings provided by VKI have been thoroughly tested to provide the best results for products used in this equipment. Set Hot Water Menu Settings Accessed in this Menu Set Hot Water Times Set Press & Hold Hot Water While in Set-Up, use the “Up” or “Down” arrows to scroll through the available options, press the required option or press “Enter” to select and advance one level, or press “Previous” to go back one level. May 13, 2015 37 Eccellenza Express – Operating Manual Set Brewer Menu Settings Accessed in this Menu Set Top Pause Set Bottom Pause Set Pouring Time Set Maximum Cups per Carafe Set Double Cup While in Set-Up, use the “Up” or “Down” arrows to scroll through the available options, press the required option or press “Enter” to select and advance one level, or press “Previous” to go back one level. 38 May 13, 2015 Eccellenza Express – Operating Manual Brewer Settings 1. While in the Set-Up mode, select the SET BREWER option on the screen. 2. The screen will display the following: The SET BREWER menu contains the following options: Top Pause Time – adjust Top Pause timing Bottom Pause – adjust Bottom Pause timing Pouring Time – adjust Pouring Pause timing Set Max Carafe – set the maximum number of cups per carafe Set Double Cup – enables the double cup feature 3. As an example, to adjust the Bottom Pause timing, select the BOTTOM PAUSE option on the touch-screen to access this menu. May 13, 2015 39 Eccellenza Express – Operating Manual 4. The display will change to show a list of products. The factory default SET PRODUCT Menu contains the following options: Coffee 1 (Light Med Roast) – coffee 50/50 (House Blend) - coffee Coffee 2 (Dark Roast) - coffee Cappuccino – coffee & milk Mochaccino – coffee, chocolate & milk Caffe Latte – coffee & milk Espresso - coffee Hot Cocoa – chocolate Hot Milk Choco – chocolate & milk Café Mocha – coffee & chocolate Hot Water – hot water for tea, etc. 5. Scroll to the selection that requires adjusting by pressing the UP or DOWN button on the screen. 6. Select required beverage on the touch-screen. In this example, COFFEE 2 is used. 40 May 13, 2015 Eccellenza Express – Operating Manual 7. The screen changes to display the cup size options. Select the required cup size on the screen to access it. 8. At this point, select the strength required on the screen. 9. The pause timing is now displayed. Increase or decrease the pause timing by using the UP or DOWN buttons. NOTE: Any references made in this manual to coffee blends and powder products are for example purposes only. The actual products used in the equipment may be different than the examples used in this manual. May 13, 2015 41 Eccellenza Express – Operating Manual Double Cup Setting Any one of the three cup sizes can be programmed to dispense a double-cup (two consecutive cups) using this feature. For example, to brew a 24-oz. beverage, you can set the 12-oz. large cup to brew a double-cup. 1. While in the Set-Up mode, select the SET BREWER option to access this menu. 2. Scroll to the Set Double Cup menu, and select it. 3. Select the cup size to be double-cupped. 4. Activate or deactivate the Double Cup feature for this cup size by selecting the appropriate option. 42 May 13, 2015 Eccellenza Express – Operating Manual Set Interface Menu Settings Accessed in this Menu Enable/Disable Buttons Language Setting Set Buzzer Move Cup Size Button Position Set Default Cup Size & Strength Set Clock Page 52 While in Set-Up, use the “Up” or “Down” arrows to scroll through the available options, press the required option or press “Enter” to select and advance one level, or press “Previous” to go back one level. May 13, 2015 43 Eccellenza Express – Operating Manual Interface Settings 1. While in the Set-Up mode, select the SET INTERFACE option to access this menu. 2. The screen will display the following: This menu contains the following options: Buttons Enable – enable/disable buttons and features Language – set the default language Set Message – disable messages, or set them to passive/active Set Buzzer – adjust the volume/pitch of the buzzer Set Clock – set the time on the machine’s internal clock Enable/Disable Buttons 1. In this example, the FRENCH ROAST button (beverage) will be disabled. Select the BUTTONS ENABLE option on the screen to access it. 44 May 13, 2015 Eccellenza Express – Operating Manual 2. The following screen will be displayed. This menu contains the following options (factory default): Coffee Cappuccino Mochaccino Caffè Latte Café Mocha Espresso Hot Cocoa Hot Milk Choco Hot Water Coffee 1 50/50 Coffee 2 More Buttons* *More Buttons – enter this option to enable/disable the Cup Sizes and Strengths 3. Scroll to the selection that requires adjusting by pressing the DOWN button on the screen. Once the required selection is visible, select it on the touch-screen to access it. May 13, 2015 45 Eccellenza Express – Operating Manual 4. The screen will display the following: 5. Select the BUTTON DISABLE option on the screen. 6. The screen will now automatically revert to the list of beverages, in case another beverage needs to be disabled. NOTE: Any references made in this manual to coffee blends and powder products are for example purposes only. The actual products used in the equipment may be different than the examples used in this manual. 46 May 13, 2015 Eccellenza Express – Operating Manual Setting the Buzzer Pitch/Volume 1. While in the Set-Up mode, select the SET INTERFACE option on the screen. 2. Select the SET BUZZER option on the screen. 3. Three options appear for the buzzer setting: a. Activated – the buzzer is enabled b. Deactivated – the buzzer is turned OFF c. Set Tone – the pitch/volume adjustment of the buzzer Select the SET TONE option on the screen. 4. Using the UP or DOWN button, adjust the buzzer tone. a. UP – Increases the pitch, decreases the volume b. DOWN – Decreases the pitch, increases the volume May 13, 2015 47 Eccellenza Express – Operating Manual Moving Cup Size Button Position With the factory default settings, the Small Cup is in position 1, Medium Cup is in position 2 and Large Cup is in position 3 (these positions are the order in which the cups appear on the screen when selecting a beverage). This feature allows you to change the position of each of the cup sizes. 1. While in the Set-Up mode, select the SET INTERFACE option on the screen. 2. Select the BUTTONS ENABLE option. 3. Scroll to and select the MORE BUTTONS option. 4. Select the cup size that you want to move. In this example, the Medium Size will be used. 48 May 13, 2015 Eccellenza Express – Operating Manual 5. Select the “BUTTON POSITION” option. With the factory default settings, the Medium Cup size is set at position 2. 6. Press the DOWN button to change it to position 1. Conversely, you can press the UP button to change it to position 3. NOTE: Moving the Medium Cup size to position 1 causes the Small Cup size that previously occupied this position to assume position 2. Moving a cup size to another position causes it to swap positions with the one to which it is moved. 7. Once done, press the ENTER button to save your changes. NOTE: The default cup size is always the regular cup size (the cup size that is set for position 1). The only way to change this is to either adjust the settings for the regular cup size, or to move a different cup size into position 1. May 13, 2015 49 Eccellenza Express – Operating Manual Set Default Cup Size & Strength This feature allows you to set a default cup size and coffee strength for the machine. By setting these defaults, it you disable all of the cup sizes and/or strengths, the cup size and/or strength selection screens will be bypassed and will not appear during the user’s beverage selection process. To set the default cup size: The default cup size is always the regular cup size (the cup size that is set for position 1). The only way to change this is to either adjust the settings for the regular cup size, or to move a different cup size into position 1 (see “Moving Cup Size Button Position”). To set the default strength: 1. While in the Set-Up mode, select the SET INTERFACE option on the screen. 2. Select the BUTTONS ENABLE option. 3. Scroll to and select the MORE BUTTONS option. 50 May 13, 2015 Eccellenza Express – Operating Manual 4. Scroll to and select the strength that you want to set as your default. In this example, the Medium Strength setting will be used. 5. Select the Set Default option to set this strength as the default strength. 6. The screen then automatically reverts to the previous screen. 7. While in this menu, you must also disable all three of the cup sizes and/or strengths if you want to bypass the cup size and/or strength selection screens during the beverage selection process. Setting the Clock The Eccellenza Express is equipped with an internal clock that must be set if you are using the Powersaving feature, or if a printer module is to be installed. 1. Enter the “Set-Up” Mode. 2. Scroll to and select the “Set Interface” menu and press “Enter”. 3. Select the “Set Clock” option and press “Enter”. 4. Select “Set Day” and set the day, and press “Enter”. 5. Select “Set Month” and set the month and press “Enter”. 6. Select “Set Year” and set the year and press “Enter”. 7. Select “Set Hour” and set the hour and press “Enter”. 8. Select “Set Minutes” and set the minutes and press “Enter”. May 13, 2015 51 Eccellenza Express – Operating Manual Set Message Menu Settings Accessed in this Menu Enable/Disable Messages Setting Reminder Message Timers While in Set-Up, use the “Up” or “Down” arrows to scroll through the available options, press the required option or press “Enter” to select and advance one level, or press “Previous” to go back one level. Message Settings 1. While in the Set-Up mode, select the SET INTERFACE menu on the screen to access it. 2. Select the “SET MESSAGE” option on the screen. 52 May 13, 2015 Eccellenza Express – Operating Manual 3. Select the “MESSAGE ON/OFF” option on the screen. 4. Scroll to and select the message that needs to be adjusted. 5. Select one of the following options for the message: Message OFF – No message will appear. Message ON Passive – The message will be displayed, but the unit will continue to function normally. Message ON Active – The message will be displayed and the unit will function in a limited capacity (or not at all) until the message is cleared. May 13, 2015 53 Eccellenza Express – Operating Manual Setting the Message Counters The message counters tell the machine when to display a message reminding the user that certain maintenance is required (for example, refilling product dispensers, emptying the waste container, etc.). This menu allows you to charge the frequency (timing) at which these reminder messages are displayed. 1. While in the Set-Up mode, select the SET INTERFACE menu on the screen to access it. 2. Select the “SET MESSAGE” menu. 3. Select the “SET COUNTER” menu. 54 May 13, 2015 Eccellenza Express – Operating Manual 4. Select the message that needs to be adjusted - in this example, the “WASTE CONTAINER” message. 5. The time setting before this message appears is displayed in the white box. 6. Increase or decrease the timing using the “UP” or “DOWN” buttons. Increase Setting Decrease Setting NOTE: While in this menu, you can reset all of the message counters to their default settings by pressing the “DEFAULT COUNTERS” button. Keep in mind that doing this clears any settings that you may have previously entered. May 13, 2015 55 Eccellenza Express – Operating Manual Waste Container Message Settings if Using a Waste Chute The equipment comes factory set for use with the supplied waste container. Should a waste chute system (optional) be used with a different sized waste container, the timing for the waste container message counter must be set accordingly in the “SET INTERFACE ► SET MESSAGE ► SET COUNTER” menu. For example, if a 15 liter (4 gallon) waste container is used with the waste chute system, the reminder message timing must be set to 630 seconds (see table below). After 630 total seconds of coffee being dispensed (from all hoppers combined), a reminder message appears on the screen advising that the waste container needs to be emptied. Use this table as a reference for the waste container message timing. Size of Waste Container 2.6 liter 5 liter 7.5 liter 10 liter 12.5 liter 15 liter 17.5 liter 20 liter 22.5 liter 25 liter 27.5 liter 30 liter 32.5 liter 35 liter 37.5 liter 40 liter 42.5 liter 45 liter 47.5 liter 50 liter 56 (0.7 gal) (1.3 gal) (2 gal) (2.6 gal) (3.3 gal) (4 gal) (4.6 gal) (5.3 gal) (5.9 gal) (6.6 gal) (7.3 gal) (7.9 gal) (8.6 gal) (9.2 gal) (9.9 gal) (10.6 gal) (11.2 gal) (11.9 gal) (12.5 gal) (13.2 gal) Message Counter Setting (in seconds) 118 (standard container) 210 315 420 525 630 735 840 945 1050 1155 1260 1365 1470 1575 1680 1785 1890 1995 2100 May 13, 2015 Eccellenza Express – Operating Manual Counters Menu Settings Accessed in this Menu Error Counters Beverage Counters Cash Counters Resetting Counters *See page 22 for more detailed information about the counters. While in Set-Up, use the “Up” or “Down” arrows to scroll through the available options, press the required option or press “Enter” to select and advance one level, or press “Previous” to go back one level. NOTE: To reserve a menu location for possible future products that the equipment may offer, the label “Not Used” may appear in certain menus. For clarity, these menus are not listed in the flowchart and can be ignored when in the set-up mode. May 13, 2015 57 Eccellenza Express – Operating Manual Set Vending Menu Settings Accessed in this Menu Set Beverage Prices Force Vending Money System Type Bill Denomination Setting NOTE: This menu is only visible when the Eccellenza Café is set to “Coin” mode. It does not appear in “Free” mode. While in Set-Up, use the “Up” or “Down” arrows to scroll through the available options, press the required option or press “Enter” to select and advance one level, or press “Previous” to go back one level. NOTE: To reserve a menu location for possible future products that the equipment may offer, the label “Not Used” may appear in certain menus. For clarity, these menus are not listed in the flowchart and can be ignored when in the set-up mode. 58 May 13, 2015 Eccellenza Express – Operating Manual Secondary Settings Throughout the programming section of this manual, you may notice certain secondary functions or settings in the equipment Set-Up that are not described in detail in this manual. A table with a quick description of these functions and settings is included to provide you with an idea as to what they control. Description of Certain Functions or Settings Force Vending When enabled, this feature prevents people from using the Eccellenza Express as a ‘change maker’. This is usually done by inserting a $1 or $2 coin or paper bills, and then pressing the coin return button to have the machine dispense change in quarters. There are three different settings: Vending Device Bill Type • OFF - the force vend feature is disabled and the unit will function normally. • SMART - the coin return feature of the changer is disabled only when a $1 or $2 coin is inserted. • ON - the coin return feature of the changer is completely disabled, regardless of what coins are inserted. This setting allows you to activate or deactivate the specific type of money system to be used. There are two different settings, both of which can be activated at the same time, if required. • Coin Changer • Bill Acceptor • Printer Should a bill acceptor be used on the Eccellenza Express, this setting allows you to program the denomination of the bills that are accepted or rejected by the equipment. NOTE: In Vending Mode, any change that is owed to the customer will be dispensed after the beverage has been prepared. May 13, 2015 59 Eccellenza Express – Operating Manual Set Gram Throws Menu This menu allows you to set and test how many grams of a product (coffee or powder) are dispensed per second. Once the product ‘Grams per Second’ is set, the setting is applied globally for all beverages requiring this product (for all cup sizes and all strengths). NOTE: To get the recommended ‘Grams per Second’ setting for the coffee blend or powder type being used in the Eccellenza Express, you’ll need to contact your product supplier. Settings Accessed in this Menu Set Gram Throws – Coffee Set Gram Throws - Powder While in Set-Up, use the “Up” or “Down” arrows to scroll through the available options, press the required option or press “Enter” to select and advance one level, or press “Previous” to go back one level. To set the gram throw for a coffee or powder product, first make certain the coffee bean dispensers and powder dispensers are full of the blend/product to be used, and that each dispenser has been primed. Once done, you can proceed to set the product ‘Gram per Second’ settings. 1. Scroll to the SET GRAM THROWS option and select it. 60 May 13, 2015 Eccellenza Express – Operating Manual 2. Select the product for which the gram throw is to be adjusted. In this example, COFFEE 1 is used. 3. In this example, the ‘Grams per Second’ setting is at 4.90. This setting may not necessarily apply for the current blend used for COFFEE 1. 4. To determine the ‘Grams per Second’ setting for the current blend being used, you need to manually dispense weigh the amount of coffee that is dispensed in one second. Press the “Test Quantity” button and the machine will dispense and grind one seconds worth of COFFEE 1 product. 5. Weigh the coffee and write down how many grams were dispensed. 6. Repeat this process several more time (should be done at least five times) and write down how many grams were dispensed. 7. Take the average of the quantities dispensed, and use that number as you gram throw setting for COFFEE 1. For this example, we’ll assume that the average gram throw per second is 5.8 grams. May 13, 2015 61 Eccellenza Express – Operating Manual 8. Using the UP button, increase the gram throw setting for COFFEE 1 to 5.80. 9. Based on the ‘Grams per Second’ setting that you just entered, all of the beverages using COFFEE 1 will automatically be adjusted accordingly. 10. If necessary, repeat the process for the remaining products. NOTE: You can also increase or decrease each product setting individually in the “Set Product” menu. Note, however, that the settings in the “Set Product” menu are in grams (not seconds) and can only be increased or decreased in increments of 1 gram. 62 May 13, 2015 Eccellenza Express – Operating Manual Set Powersaving Mode This menu allows you to set the machine to deactivate the heating element for a predetermined time every day to reduce energy consumption. NOTE: To use the Powersaving feature, the machine’s internal clock must first be set (see page 51). To set this feature; 1. Enter the machine set-up, scroll to the “Set Powersaving” menu and select it. 2. Select the “Enable Powersave” option and then select “Activated” to enable it. 3. Select the “Sleep Time” option. The “Sleep Time” option allows you to set the time of the day when the machine will go into Powersaving mode. 4. Select “Set Hour” to set the hour (1-24) and press “Enter”. 5. Select “Set Minutes” to set the minutes (0-59) and press “Enter”. 6. Press the “Previous” button and select the “Wake Time” option. The “Wake Time” option allows you to set the time of the day when the machine will exit the Powersaving mode. 7. Select “Set Hour” to set the hour (1-24) and press “Enter”. 8. Select “Set Minutes” to set the minutes (0-59) and press “Enter”. NOTE: When the machine exits the Powersaving mode (Wake Time), it may require up to 30 minutes to reheat the water to proper brewing temperature. Allow for this reheating time when setting the “Wake Time” for this feature. Also note that due to the expansion of the water as it heats, the machine may display a “Clean Probes” message. NOTE: A message appears on the screen advising the user when the machine is in Powersaving mode. Should a selection then be initiated, the machine will exit the Powersaving mode and start heating the water. Once it has exited Powersaving mode, it does not automatically re-activate the Powersaving mode. May 13, 2015 63 Eccellenza Express – Operating Manual Water Tank Temperature Setting 1. While in the Set-Up mode, select the SET WATER TANK option to access this menu. 2. The screen will display the following: The SET WATER TANK menu contains the following options: Set Water Temp – adjust temperature of water tank Empty Wat Tank – empty the water tank to the valve level 3. Select the “Set Water Temp” option on the screen to access it. 64 May 13, 2015 Eccellenza Express – Operating Manual 4. The following screen will be displayed. Pressing °C or °F toggles the temperature between °C and °F. This menu contains the following options: Set Point – the preset temperature for the water tank Vend Enable – the minimum temperature at which the machine will brew a beverage. 5. Select the SET POINT option on the screen. 6. Once in this menu, increase or decrease the temperature by using the UP or DOWN buttons. May 13, 2015 65 Eccellenza Express – Operating Manual Empty Water Tank (to Valve Level) This feature allows you to drain the water tank to the valve level using the hot water outlet valve. This is a particularly useful feature should you need to replace an outlet valve as it is not necessary to completely drain the water tank, leaving most of the hot water in the tank. This greatly reduces the time required to reheat the water once the tank is refilled. 1. Turn off the water supply to the machine. 2. While in the Set-Up mode, select the SET WATER TANK option on the screen to access this menu. 3. Select the “Empty Water Tank” option. 4. The display will now prompt you to press “Start” to empty. 66 May 13, 2015 Eccellenza Express – Operating Manual 5. Press and hold the “Text Box” button to begin draining the tank. The hot water valve will open until the water has drained to the valve level. Make sure you have a leak-proof container under the spout into which the water will be dispensed. Once the water stops, release the “Text Box” button to shut the outlet valve. 6. The outlet valve can now be removed. Consult the Eccellenza Express Service Manual for detailed valve removal instructions. WARNING: Water being dispensed by the hot water valve or any residual water remaining behind a valve as it is removed may be extremely hot and can cause severe burns! May 13, 2015 67 Eccellenza Express – Operating Manual Rinse Cycles Brewer Rinse Cycle WARNING: Make sure the waste container is under the brewer spout to catch the water coming from the brewer (throughout the complete rinse cycle). 1. Add VKI approved brewer cleaner to the brew chamber. 2. Press the "RINSE CYCLE" button on the control panel inside the front door. To exit the rinse cycle if it was pressed accidentally, press the “PREVIOUS” button on the front display. 3. Select the type of rinse cycle required. For a brewer rinse, press the "Coffee Rinse" button on the front selection panel to begin the cycle. To cancel the rinse cycle if it was pressed accidentally, switch OFF the machine using the main power switch at the rear. a) The piston will move to the top of the cylinder, water will pour in, and the brewer will pause for about 5 minutes. During this time, the cleaner breaks down all the oils and stains that have accumulated in the brewer. b) After the 5 minutes have elapsed, the brewer will cycle, dumping the cleaner into the waste container in the process. The brewer will then automatically cycle water seven consecutive times to rinse the cleaner from the brewer. After the rinse cycle is completed, the brewer will stop and the coffee maker will automatically exit the rinse mode. c) After the rinse cycle is complete, brew a few cups of coffee to relubricate the brewer. 68 May 13, 2015 Eccellenza Express – Operating Manual Quick Brewer Rinse Cycle 1. Press the "RINSE CYCLE" button on the control panel inside the front door. 2. Select the type of rinse cycle required. For a quick brewer rinse, press the "Quick Cof. Rinse" button on the front selection panel to begin the cycle. a) The machine will now go through the same motions as preparing a coffee beverage, however, only hot water will be dispensed into the brewer (without coffee grounds). Repeat this process, if necessary. May 13, 2015 69 Eccellenza Express – Operating Manual Powder (Whipper) Rinse Cycle 1. Press the "RINSE CYCLE" button on the control panel inside the front door. 2. Select the type of rinse cycle required. For a whipper rinse, press the "Powder Rinse" button on the screen to begin the cycle. a) The machine will now dispense hot water through the whipper motor and tubing to rinse residual powder product that may have accumulated in the system. Repeat this process, if necessary. 70 May 13, 2015 Eccellenza Express – Operating Manual Maintenance To keep the Eccellenza Express running efficiently and at peak performance, the following maintenance procedures must be performed at their specified intervals. It is recommended that equipment maintenance be scheduled at a time that would be the least disruptive to your customers. Whenever possible, replace the components requiring maintenance with new or refurbished ones, and then refurbish the older components at your shop. WARNING: Never use ammonia based cleaners on any machine surface as the surface will become discolored and/or damaged permanently. Use only mild cleaning products, such as dish soap. Daily ► Empty the Drip Tray – empty the contents of the drip tray and rinse the tray and grill under clean running water. ► Empty the Waste Bin – empty the contents of the waste bin. ► Refill the Coffee Hoppers, Powder Hoppers – top off the coffee and powder hoppers, and reset the product counters. ► Perform a Whipper Rinse Cycle – this should be done immediately after refilling the powder hoppers to flush any product that may have fallen into the whipper. ► Wipe Exterior and Countertop – using the clean towel, wipe any coffee grounds and spills from the exterior of the machine and the countertop. Weekly ► Clean the Grounds Tray and Floor Liner – empty the and clean the grounds tray located below the brewer. Remove and clean the floor liner over the base of the machine. ► Wipe Interior Walls and Door - using the clean towel, wipe any coffee grounds and spills from the interior of the machine and the front door. ► Perform a Brewer Quick Rinse Cycle – for the weekly Brewer Quick Rinse cycle, it is not necessary to use any brewer cleaner. Simply flushing the system with the hot water will help to keep it clean. ► Clean the Brew Chamber – the brew chamber should be removed and thoroughly rinsed under warm running water. ► Clean the Grinder Spout – coffee grounds will accumulate in the grinder spout opening due to static electricity and moisture from the brewer. The grounds need to be removed or the grinder may jam. With the brew chamber removed, use a plastic stir stick to delicately remove any coffee accumulation from around the inner edge of the grinder spout. May 13, 2015 71 Eccellenza Express – Operating Manual Monthly ► Perform a Brewer Rinse Cycle – the full Brewer Rinse cycle requires the use of brewer cleaner to remove oils and stains from the brewer. ► Clean the Brewer Filter Screen – to minimize servicing time, replace the filter screen with one that has already been cleaned, then clean the stained filter screen at the shop and use it the next time a filter screen replacement is required. ► Clean the Whipper System – disassemble the whipper system and clean the components with hot water. • NOTE: When re-assembling the whipper components, always add some Lubrifilm lubricant to the base of the shaft in the area where the whipper base gasket is located. ► Clean Hoses and Spouts – clean the exterior of all the product hoses and spouts with a wet towel. ► Thoroughly Clean the Interior – clean the interior walls, base and components with a clean wet towel. Every 6-12 Months ► Clean the Coffee and Powder Hoppers – the hoppers should be emptied of product and given a thorough cleaning to remove stains and oils that may have accumulated inside them. ► Delime the Water Tank - to minimize servicing time, replace the water tank with a tank that has already been delimed, then clean the removed tank at the shop and use it the next time a tank replacement is required. ► Clean the Outlet Valves - to minimize servicing time, replace the outlet valves with valves that have already been cleaned, then clean the removed valves at the shop and use them the next time a valve replacement is required. ► Replace the Water Filter – the water filter should be replaced at least once a year, or when the water flow rate through the filter has decreased. This is an indication that the filter is starting to clog. 72 May 13, 2015 Eccellenza Express – Operating Manual Sanitization – Milk System Should the Eccellenza Express milk system require sanitization, all of the following components must be removed and soaked in a sanitizing solution for 30 minutes. • • • • • • • • • • • Drip tray & grill Brewer spout Spout Support Plate (complete assembly) – this includes the milk spout and hot water spout Coffee hose Milk hose Hot water hose Brew chamber assembly Brewer screen Brewer (with screen removed) Whipper hose Whipper parts NOTE: When ready for use, the end-use concentration of all quaternary chemicals in the solution is not to exceed 200ppm of active quaternary compound. To perform a sanitization of the machine components that have an impact on the milk system, a large leak-proof container, a spray bottle and SC Johnson J-512 sanitizer are required. 1. Fill the leak-proof container with a mixture of water and sanitizer – the mixture is 2ml of sanitizer per liter of water. 2. Remove the components identified above from the machine. 3. Place them inside the container with the sanitizing solution. Let them soak for 5 minutes. 4. While the components soak, fill a spray bottle with the sanitizing solution (2ml sanitizer per liter of water). 5. Lightly spray the solution to the exterior of the machine, the interior walls and interior of the front door, the whipper blade and base, and to the counter-top. Do not wipe away the solution – let it dry naturally. 6. After their 5 minute soak, remove the components from the leak-proof container and rinse them with clean warm water. 7. Re-install all of the components back into the machine. May 13, 2015 73 Eccellenza Express – Operating Manual Removing the Brewer 1. Open the front door of the machine, and remove the waste bin. 2. Disconnect the hose from the brewer, and disconnect the powder and hot water hoses from the spout support. 3. While lifting the front of the brewer slightly, press down on the top of the spout support plate and pull it towards the front until it clears the brewer spout and can be removed. 74 May 13, 2015 Eccellenza Express – Operating Manual 4. Press down on the brewer release latch and pull the top of the brewer forward to release it. You may need to lift it slightly to clear the two bottom brewer guides. 5. Remove the brewer. May 13, 2015 75 Eccellenza Express – Operating Manual Installing the Brewer 1. Make certain that the brewer pin is properly aligned with the brewer motor coupling. If it’s not aligned, use the optional brewer crank tool to adjust the brewer pin. 2. Sit the brewer onto the two lower guides. 3. Push the top of the brewer towards the rear, making certain the brewer pin engages properly into the brewer motor coupling. Once coupled, press down on the brewer release latch until the brewer moves into position, and then release the latch to lock the brewer in place. 76 May 13, 2015 Eccellenza Express – Operating Manual 4. Insert the bottom of the spout support bracket into the slit on the front of the base. 5. While lifting the brewer, tilt the spout bracket upwards and to the back until it clears the brewer spout. If done properly, the brewer spout will enter the hole on the spout support plate and secure it in place. 6. Reconnect the powder and hot water hoses to the spout support, and reconnect the brewer hose. May 13, 2015 77 Eccellenza Express – Operating Manual Draining the Water Tank 1. Remove the right side panel. 2. The end of the Eccellenza Express drain hose is equipped with a plastic valve. Remove the drain hose and valve fitting from the inner wall of the machine. It is secured in place by a large clip. 3. Remove the security plug from the end of the drain hose valve. 4. Place the hose inside a waterproof container and open the valve at the end of the hose. Water will start draining into the container. Use caution - the water may be extremely hot! 5. Once emptied, close the valve at the end of the hose, re-install the security plug into the valve, and re-install the drain hose onto the clip on the interior wall of the machine. 6. Re-install the right side panel onto the machine. 78 May 13, 2015 Eccellenza Express – Operating Manual Error Messages MESSAGE DISPLAYED CAUSE POSSIBLE REMEDIES • Verify the brewer motor wiring. Brewer Error An error has been detected with the brewer. • The brewer may be jammed. Repair or replace the brewer. • The brewer motor may be jammed. Repair or replace the brewer motor. • Press "START" (the TEXT BOX at the top of the screen) to cycle the brewer. • The home switch may be defective Brewer Home Error. The brewer is not in the Press Start to find home home or starting position. or needs to be re-adjusted or cleaned. • An electrical connection to the brewer home switch is faulty. • The brewer brake may not be working properly. Adjust the brake or replace the brewer motor. An error has been detected with one of the interior buttons. • An interior button may be stuck in Button Error Call Key Operator The cashbox in the changer unit is full (more than $220). • Empty the cashbox and reset the Can Communic. Error A communication error is present between the control board and expansion board. Change Printer Paper The paper roll is spent. the pressed position. Try to loosen the jammed button. Key Operator message. • Verify wiring connections to the expansion board, control board, LCD display and button boards. • The expansion board may need to be replaced. • Replace the paper roll. • Clean the water level probes. Check Water Level Probes The water tank is overfilling. • The water temperature may be too high – lower the temperature. • Inlet valve may be leaking – replace inlet valve. Cup Tray Overflow Error The cup tray on the front of the door has overfilled. • Remove and empty the contents of An error has been detected with the expansion board. • Verify the wiring connections to the Expansion Board Error Factory Data Error The Factory Settings file you are transferring is corrupt. May 13, 2015 the cup tray. expansion display. • Replace the expansion board. • Get an updated Factory Settings file. 79 Eccellenza Express – Operating Manual MESSAGE DISPLAYED Factory Settings Version Error CAUSE The version of Factory Settings is not compatible with the machine model. POSSIBLE REMEDIES • Load the proper version of Factory Settings. • Normal operating message and does Filling Water Tank The water tank is filling. Brewer is cycling to find the home (starting) position. • Normal operating message and does Finding Brewer Home Heating Water Water inside the hot water tank is heating. • Normal operating message and does LCD Error An error has been detected with the LCD display. not indicate an error. not indicate an error. not indicate an error. • Verify the wiring connections to the LCD display. • Replace the LCD display. • Verify the wiring connections at the Money System Error The coin changer is not being detected. control board and inside the changer unit. • Replace the defective coin changer. • Empty and dry the overflow/cup tray. • Verify the water level probe adjustment. They may be set too high allowing too much water into the tank. Overflow Error A water overflow has been detected. • Water level probes may need to be cleaned. • Inlet valve may be leaking, constantly allowing water to enter the tank. Replace the inlet valve. • Water in the tank may be boiling. Lower the water temperature setting. • Check the temperature settings in Overheat Error The water tank is overheating. the set-up. • The temperature probe may need to be replaced. 80 • The USB cable is not connected to PnB not Detected The control board is not being detected. Port J10 Not Detected • Reconnect the wiring harness to port Wiring harness is disconnected from port 10 10 on the control board. on the control board. Port J23 Not Detected • Reconnect the wiring harness to port Wiring harness is disconnected from port 23 23 on the control board. on the control board. Powersaving Mode – Press Start to Exit The machine is in Powersaving Mode. May 13, 2015 the control board or the expansion board. Verify the connections. • Press the Start button to exit Powersaving Mode. Eccellenza Express – Operating Manual MESSAGE DISPLAYED CAUSE POSSIBLE REMEDIES • Press "START" (the TEXT BOX at the top of the screen) to cycle the brewer. Press Start to Find Brewer Home The brewer is not in the home (starting) position. • If the brewer cannot detect the home Printer Error The printer wiring is not connected. • Connect the wiring to the printer Printer Offline The printer is connected but it is offline. • Press the ON/OFF line button SPI Eeprom Error No communication to the options board. position, check the brewer home switch & wiring, the brewer motor, and the brewer. module. (power) on the printer. • Check the wiring to the board. • Replace the options board. • Check the 15 amp fuse. Tank Not Heating Error The hot water tank is not heating. • Reset the thermal cut-off switch. • Verify wiring to heater element. • Check heater element. Temperature Probe Error The electronic temperature probe is not working properly. Verify Powder 1 Level Powder 1 dispenser is low and required refilling. Verify Powder 2 Level Powder 2 dispenser is low and required refilling. Verify Product Level 1 Coffee 1 dispenser is low and required refilling. Verify Product Level 2 Coffee 2 dispenser is low and required refilling. Verify Waste Bin Level Waste bin may be full. May 13, 2015 • Replace the temperature probe. • Refill the dispenser for powder 1. • Reset the “Refill” message for the Powder 1 dispenser. • Refill the dispenser for powder 2. • Reset the “Refill” message for the Powder 2 dispenser. • Refill the dispenser for coffee 1. • Reset the “Refill” message for the Coffee 1 dispenser. • Refill the dispenser for coffee 2. • Reset the “Refill” message for the Coffee 2 dispenser. • Empty the contents of the waste bin. • Reset the “Waste Bin” counter. 81 Eccellenza Express – Operating Manual MESSAGE DISPLAYED CAUSE POSSIBLE REMEDIES • At this point, the water tank is not full and this message has to be reset. To reset it, switch the power off and on. • If the problem persists, check all Water Source Error Indicates a problem with the main water supply not getting to the water tank. components on the water line (water filter, tubing, fittings, etc.). • Check inlet valve to make certain it is functioning properly. • In the case of a temporary disruption with the water supply, the coffee maker will reset itself after every hour. • The whipper motor may be jammed. Whipper Error An error has been detected with the whipper. Clean the whipper assembly. • Verify wiring to the whipper assembly. • The whipper motor assembly may need to be replaced. 82 May 13, 2015 Eccellenza Express – Operating Manual May 13, 2015 83 Eccellenza Express – Operating Manual 84 May 13, 2015