Download Muratec F-116 User guide

Transcript
F-116
F-116 User Guide
D E P L O Y. D U P L I C AT E . D I G I T I Z E . D E L I V E R .
Copyright
© 2010 Muratec America, Inc. All rights reserved.
This user’s guide is provided for information purposes only. All information included herein is subject to change without
notice.
Muratec America, Inc. is not responsible for any direct or indirect damages, arising from or related to use of this user’s
guide.
•
•
•
Muratec and the Muratec logo are trademarks of Murata Machinery Ltd.
JPEG License: This software is based in part on the work of the Independent JPEG Group.
All other brand or product names are trademarks of their respective companies or organizations.
Copyright_ 1
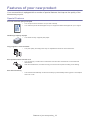
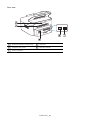
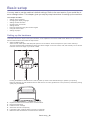
Contents
ABOUT THIS USER’S GUIDE
Convention . . . . . . . . . . . . . . . . . . . . . . . . . . . . . . . . . . . . . . . . . . . . . . . . . . . . . . . 15
Finding more information . . . . . . . . . . . . . . . . . . . . . . . . . . . . . . . . . . . . . . . . . . . 16
Features of your new product . . . . . . . . . . . . . . . . . . . . . . . . . . . . . . . . . . . . . . . 17
INTRODUCTION
Machine overview . . . . . . . . . . . . . . . . . . . . . . . . . . . . . . . . . . . . . . . . . . . . . . . . .
Front view . . . . . . . . . . . . . . . . . . . . . . . . . . . . . . . . . . . . . . . . . . . . . . . . . . . . .
Rear view . . . . . . . . . . . . . . . . . . . . . . . . . . . . . . . . . . . . . . . . . . . . . . . . . . . . . .
Control panel overview . . . . . . . . . . . . . . . . . . . . . . . . . . . . . . . . . . . . . . . . . . . . .
Understanding the Status LED . . . . . . . . . . . . . . . . . . . . . . . . . . . . . . . . . . . . . .
Power LED . . . . . . . . . . . . . . . . . . . . . . . . . . . . . . . . . . . . . . . . . . . . . . . . . . . . .
Introducing the useful button . . . . . . . . . . . . . . . . . . . . . . . . . . . . . . . . . . . . . . .
Menu button . . . . . . . . . . . . . . . . . . . . . . . . . . . . . . . . . . . . . . . . . . . . . . . . . . . .
Turning on the machine . . . . . . . . . . . . . . . . . . . . . . . . . . . . . . . . . . . . . . . . . . . .
18
18
19
20
21
21
21
21
21
BASIC SETUP
Setting up the hardware . . . . . . . . . . . . . . . . . . . . . . . . . . . . . . . . . . . . . . . . . . . .
Changing the display language . . . . . . . . . . . . . . . . . . . . . . . . . . . . . . . . . . . . . .
Setting the date and time . . . . . . . . . . . . . . . . . . . . . . . . . . . . . . . . . . . . . . . . . . .
Changing the clock mode . . . . . . . . . . . . . . . . . . . . . . . . . . . . . . . . . . . . . . . . . . .
Setting sounds . . . . . . . . . . . . . . . . . . . . . . . . . . . . . . . . . . . . . . . . . . . . . . . . . . .
Speaker, ringer, key sound, and alarm sound . . . . . . . . . . . . . . . . . . . . . . . . . .
Speaker volume . . . . . . . . . . . . . . . . . . . . . . . . . . . . . . . . . . . . . . . . . . . . . . . . .
Entering characters using the number keypad . . . . . . . . . . . . . . . . . . . . . . . . .
Entering alphanumeric characters . . . . . . . . . . . . . . . . . . . . . . . . . . . . . . . . . . .
Keypad letters and numbers . . . . . . . . . . . . . . . . . . . . . . . . . . . . . . . . . . . . . . .
Correcting numbers or names . . . . . . . . . . . . . . . . . . . . . . . . . . . . . . . . . . . . . .
Inserting a pause . . . . . . . . . . . . . . . . . . . . . . . . . . . . . . . . . . . . . . . . . . . . . . . .
Using the save modes . . . . . . . . . . . . . . . . . . . . . . . . . . . . . . . . . . . . . . . . . . . . .
Using toner saving feature . . . . . . . . . . . . . . . . . . . . . . . . . . . . . . . . . . . . . . . . .
Using power saving feature . . . . . . . . . . . . . . . . . . . . . . . . . . . . . . . . . . . . . . . .
Setting the paper . . . . . . . . . . . . . . . . . . . . . . . . . . . . . . . . . . . . . . . . . . . . . . . . . .
Setting the paper size . . . . . . . . . . . . . . . . . . . . . . . . . . . . . . . . . . . . . . . . . . . .
Setting the paper type . . . . . . . . . . . . . . . . . . . . . . . . . . . . . . . . . . . . . . . . . . . .
22
23
23
23
23
23
23
24
24
24
24
24
25
25
25
25
25
25
MEDIA AND TRAY
Preparing originals . . . . . . . . . . . . . . . . . . . . . . . . . . . . . . . . . . . . . . . . . . . . . . . .
Loading originals . . . . . . . . . . . . . . . . . . . . . . . . . . . . . . . . . . . . . . . . . . . . . . . . .
In the document feeder . . . . . . . . . . . . . . . . . . . . . . . . . . . . . . . . . . . . . . . . . . .
Selecting print media . . . . . . . . . . . . . . . . . . . . . . . . . . . . . . . . . . . . . . . . . . . . . .
Guidelines to select the print media . . . . . . . . . . . . . . . . . . . . . . . . . . . . . . . . . .
Media sizes supported in each mode . . . . . . . . . . . . . . . . . . . . . . . . . . . . . . . .
Changing the tray size . . . . . . . . . . . . . . . . . . . . . . . . . . . . . . . . . . . . . . . . . . . . .
Loading paper in the tray . . . . . . . . . . . . . . . . . . . . . . . . . . . . . . . . . . . . . . . . . . .
Tray 1 . . . . . . . . . . . . . . . . . . . . . . . . . . . . . . . . . . . . . . . . . . . . . . . . . . . . . . . . .
Letterhead/ Preprinted paper . . . . . . . . . . . . . . . . . . . . . . . . . . . . . . . . . . . . . . .
Setting the paper size and type . . . . . . . . . . . . . . . . . . . . . . . . . . . . . . . . . . . . . .
Setting the paper size . . . . . . . . . . . . . . . . . . . . . . . . . . . . . . . . . . . . . . . . . . . .
Setting the paper type . . . . . . . . . . . . . . . . . . . . . . . . . . . . . . . . . . . . . . . . . . . .
Using the output support . . . . . . . . . . . . . . . . . . . . . . . . . . . . . . . . . . . . . . . . . . .
Contents_ 2
26
26
26
27
27
28
28
29
29
30
30
30
30
30
COPYING
Basic copy . . . . . . . . . . . . . . . . . . . . . . . . . . . . . . . . . . . . . . . . . . . . . . . . . . . . . . .
Changing the settings for each copy . . . . . . . . . . . . . . . . . . . . . . . . . . . . . . . . .
Changing the darkness . . . . . . . . . . . . . . . . . . . . . . . . . . . . . . . . . . . . . . . . . . .
Selecting the type of originals . . . . . . . . . . . . . . . . . . . . . . . . . . . . . . . . . . . . . .
Reducing or enlarging copies . . . . . . . . . . . . . . . . . . . . . . . . . . . . . . . . . . . . . .
Changing the default copy settings . . . . . . . . . . . . . . . . . . . . . . . . . . . . . . . . . .
Setting copy timeout . . . . . . . . . . . . . . . . . . . . . . . . . . . . . . . . . . . . . . . . . . . . . . .
31
31
31
31
31
32
32
FAXING
Preparing to fax . . . . . . . . . . . . . . . . . . . . . . . . . . . . . . . . . . . . . . . . . . . . . . . . . . .
Sending a fax . . . . . . . . . . . . . . . . . . . . . . . . . . . . . . . . . . . . . . . . . . . . . . . . . . . . .
Setting the fax header . . . . . . . . . . . . . . . . . . . . . . . . . . . . . . . . . . . . . . . . . . . .
Sending a fax . . . . . . . . . . . . . . . . . . . . . . . . . . . . . . . . . . . . . . . . . . . . . . . . . .
Sending a fax manually . . . . . . . . . . . . . . . . . . . . . . . . . . . . . . . . . . . . . . . . . . .
Confirming a transmission . . . . . . . . . . . . . . . . . . . . . . . . . . . . . . . . . . . . . . . . .
Automatic redialing . . . . . . . . . . . . . . . . . . . . . . . . . . . . . . . . . . . . . . . . . . . . . .
Redialing the last number . . . . . . . . . . . . . . . . . . . . . . . . . . . . . . . . . . . . . . . . .
Sending a fax to multiple destinations . . . . . . . . . . . . . . . . . . . . . . . . . . . . . . . .
Delaying a fax transmission . . . . . . . . . . . . . . . . . . . . . . . . . . . . . . . . . . . . . . . .
Sending a priority fax . . . . . . . . . . . . . . . . . . . . . . . . . . . . . . . . . . . . . . . . . . . . .
Sending a fax in toll save time . . . . . . . . . . . . . . . . . . . . . . . . . . . . . . . . . . . . . .
Receiving a fax . . . . . . . . . . . . . . . . . . . . . . . . . . . . . . . . . . . . . . . . . . . . . . . . . . .
Changing the receive modes . . . . . . . . . . . . . . . . . . . . . . . . . . . . . . . . . . . . . . .
Receiving manually in Tel mode . . . . . . . . . . . . . . . . . . . . . . . . . . . . . . . . . . . .
Receiving automatically in Answering Machine/Fax mode . . . . . . . . . . . . . . . .
Receiving faxes manually using an extension telephone . . . . . . . . . . . . . . . . .
Receiving faxes using DRPD mode . . . . . . . . . . . . . . . . . . . . . . . . . . . . . . . . . .
Receiving in secure receiving mode . . . . . . . . . . . . . . . . . . . . . . . . . . . . . . . . .
Activating secure receiving mode . . . . . . . . . . . . . . . . . . . . . . . . . . . . . . . . . . .
Receiving faxes in memory . . . . . . . . . . . . . . . . . . . . . . . . . . . . . . . . . . . . . . . .
Adjusting the document settings . . . . . . . . . . . . . . . . . . . . . . . . . . . . . . . . . . . .
Resolution . . . . . . . . . . . . . . . . . . . . . . . . . . . . . . . . . . . . . . . . . . . . . . . . . . . . .
Darkness . . . . . . . . . . . . . . . . . . . . . . . . . . . . . . . . . . . . . . . . . . . . . . . . . . . . . .
Forwarding a fax to other destination . . . . . . . . . . . . . . . . . . . . . . . . . . . . . . . . .
Forwarding a sent fax to other destination by a fax . . . . . . . . . . . . . . . . . . . . . .
Forwarding a received fax to other destination by a fax . . . . . . . . . . . . . . . . . .
Setting up address book . . . . . . . . . . . . . . . . . . . . . . . . . . . . . . . . . . . . . . . . . . .
One-touch Dialing . . . . . . . . . . . . . . . . . . . . . . . . . . . . . . . . . . . . . . . . . . . . . . .
Speed dial numbers . . . . . . . . . . . . . . . . . . . . . . . . . . . . . . . . . . . . . . . . . . . . . .
Group dial numbers . . . . . . . . . . . . . . . . . . . . . . . . . . . . . . . . . . . . . . . . . . . . . .
Searching Address Book for an entry . . . . . . . . . . . . . . . . . . . . . . . . . . . . . . . .
Printing sent fax report automatically . . . . . . . . . . . . . . . . . . . . . . . . . . . . . . . . .
33
33
33
33
34
34
34
34
34
34
35
35
36
36
36
36
36
37
37
37
37
38
38
38
38
38
38
39
39
39
40
40
41
MACHINE STATUS AND ADVANCED FEATURE
Fax setup . . . . . . . . . . . . . . . . . . . . . . . . . . . . . . . . . . . . . . . . . . . . . . . . . . . . . . . .
Changing the fax setup options . . . . . . . . . . . . . . . . . . . . . . . . . . . . . . . . . . . . .
Available fax setup options . . . . . . . . . . . . . . . . . . . . . . . . . . . . . . . . . . . . . . . .
Using the advanced fax settings . . . . . . . . . . . . . . . . . . . . . . . . . . . . . . . . . . . .
Advanced fax setting options . . . . . . . . . . . . . . . . . . . . . . . . . . . . . . . . . . . . . . .
Copy setup . . . . . . . . . . . . . . . . . . . . . . . . . . . . . . . . . . . . . . . . . . . . . . . . . . . . . . .
Changing the copy setup options . . . . . . . . . . . . . . . . . . . . . . . . . . . . . . . . . . .
Change Default . . . . . . . . . . . . . . . . . . . . . . . . . . . . . . . . . . . . . . . . . . . . . . . . .
Printing a report . . . . . . . . . . . . . . . . . . . . . . . . . . . . . . . . . . . . . . . . . . . . . . . . . .
Clearing memory . . . . . . . . . . . . . . . . . . . . . . . . . . . . . . . . . . . . . . . . . . . . . . . . . .
Menu overview . . . . . . . . . . . . . . . . . . . . . . . . . . . . . . . . . . . . . . . . . . . . . . . . . . . .
42
42
42
43
43
44
44
44
44
44
46
MAINTENANCE
Cleaning a machine . . . . . . . . . . . . . . . . . . . . . . . . . . . . . . . . . . . . . . . . . . . . . . . .
Cleaning the outside . . . . . . . . . . . . . . . . . . . . . . . . . . . . . . . . . . . . . . . . . . . . .
Cleaning the inside . . . . . . . . . . . . . . . . . . . . . . . . . . . . . . . . . . . . . . . . . . . . . .
Cleaning the scan unit . . . . . . . . . . . . . . . . . . . . . . . . . . . . . . . . . . . . . . . . . . . .
Contents_ 3
48
48
48
49
Cleaning the drum . . . . . . . . . . . . . . . . . . . . . . . . . . . . . . . . . . . . . . . . . . . . . . .
Storing the Toner cartridge . . . . . . . . . . . . . . . . . . . . . . . . . . . . . . . . . . . . . . . . .
Handling instructions . . . . . . . . . . . . . . . . . . . . . . . . . . . . . . . . . . . . . . . . . . . . .
Use of non-Muratec and refilled toner cartridges . . . . . . . . . . . . . . . . . . . . . . .
Estimated cartridge life . . . . . . . . . . . . . . . . . . . . . . . . . . . . . . . . . . . . . . . . . . .
Tips for moving & storing your machine . . . . . . . . . . . . . . . . . . . . . . . . . . . . . .
51
51
51
51
51
52
TROUBLESHOOTING
Redistributing toner . . . . . . . . . . . . . . . . . . . . . . . . . . . . . . . . . . . . . . . . . . . . . . .
Clearing original document jams . . . . . . . . . . . . . . . . . . . . . . . . . . . . . . . . . . . . .
Input Misfeed . . . . . . . . . . . . . . . . . . . . . . . . . . . . . . . . . . . . . . . . . . . . . . . . . . .
Exit Misfeed . . . . . . . . . . . . . . . . . . . . . . . . . . . . . . . . . . . . . . . . . . . . . . . . . . . .
Tips for avoiding paper curls . . . . . . . . . . . . . . . . . . . . . . . . . . . . . . . . . . . . . . . .
Tips for avoiding paper jams . . . . . . . . . . . . . . . . . . . . . . . . . . . . . . . . . . . . . . . .
Clearing paper jams . . . . . . . . . . . . . . . . . . . . . . . . . . . . . . . . . . . . . . . . . . . . . . .
In tray 1 . . . . . . . . . . . . . . . . . . . . . . . . . . . . . . . . . . . . . . . . . . . . . . . . . . . . . . .
Inside the machine . . . . . . . . . . . . . . . . . . . . . . . . . . . . . . . . . . . . . . . . . . . . . . .
In exit area . . . . . . . . . . . . . . . . . . . . . . . . . . . . . . . . . . . . . . . . . . . . . . . . . . . . .
Understanding display messages . . . . . . . . . . . . . . . . . . . . . . . . . . . . . . . . . . . .
Checking display messages . . . . . . . . . . . . . . . . . . . . . . . . . . . . . . . . . . . . . . .
Solving other problems . . . . . . . . . . . . . . . . . . . . . . . . . . . . . . . . . . . . . . . . . . . .
Paper feeding problems . . . . . . . . . . . . . . . . . . . . . . . . . . . . . . . . . . . . . . . . . . .
Printing problems . . . . . . . . . . . . . . . . . . . . . . . . . . . . . . . . . . . . . . . . . . . . . . . .
Printing quality problems . . . . . . . . . . . . . . . . . . . . . . . . . . . . . . . . . . . . . . . . . .
Copying problems . . . . . . . . . . . . . . . . . . . . . . . . . . . . . . . . . . . . . . . . . . . . . . .
Fax problems . . . . . . . . . . . . . . . . . . . . . . . . . . . . . . . . . . . . . . . . . . . . . . . . . . .
53
54
54
55
55
56
56
56
57
57
59
59
61
61
61
61
65
66
SUPPLIES AND ACCESSORIES
How to purchase . . . . . . . . . . . . . . . . . . . . . . . . . . . . . . . . . . . . . . . . . . . . . . . . . .
Available supplies . . . . . . . . . . . . . . . . . . . . . . . . . . . . . . . . . . . . . . . . . . . . . . . . .
Available maintenance parts . . . . . . . . . . . . . . . . . . . . . . . . . . . . . . . . . . . . . . . .
Replacing the toner cartridge . . . . . . . . . . . . . . . . . . . . . . . . . . . . . . . . . . . . . . .
67
67
67
68
SPECIFICATIONS
Hardware specifications . . . . . . . . . . . . . . . . . . . . . . . . . . . . . . . . . . . . . . . . . . . .
Environmental specifications . . . . . . . . . . . . . . . . . . . . . . . . . . . . . . . . . . . . . . .
Electrical specifications . . . . . . . . . . . . . . . . . . . . . . . . . . . . . . . . . . . . . . . . . . . .
Print media specifications . . . . . . . . . . . . . . . . . . . . . . . . . . . . . . . . . . . . . . . . . .
Contents_ 4
70
70
70
71
Safety information
These warnings and precautions are included in order to prevent injury to you and others, as well
as preventing any potential damage to your machine. Be sure to read and understand all of these
instructions before using the machine.
Use common sense for operating any electrical appliance and whenever using your machine.
Also, follow all warnings and instructions marked on the machine and in the accompanying
literature. After reading this section, keep it in a safe place for future reference.
Important safety symbols
This section explains the meanings of all icons and signs in the user's guide. These safety symbols are in
order, according to the degree of danger.
Explanation of all icons and signs used in the user’s guide:
Warning
Hazards or unsafe practices that may result in severe personal injury or death.
Caution
Hazards or unsafe practices that may result in minor personal injury or property
damage.
Do not attempt.
Do not disassemble.
Do not touch.
Unplug the power cord from the wall socket.
Make sure the machine is grounded to prevent electric shock.
Call the service center for help.
Follow directions explicitly.
Operating environment
Warning
Do not use if the power cord is
damaged or if the electrical outlet is
not grounded.
► This could result in electric shock
or fire.
Do not place anything on top of the
machine (water, small metal or
heavy objects, candles, lit
cigarrettes, etc.).
► This could result in electric shock
or fire.
Safety information_ 5
Do not bend, or place heavy objects
on the power cord.
► Stepping on or allowing the power
cord to be crushed by a heavy object
could result in electric shock or fire.
Do not remove the plug by pulling on
the cord; do not handle the plug with
wet hands.
► This could result in electric shock
or fire.
If the machine gets overheated, it
releases smoke, makes strange
noises, or generates an odd odor,
immediately turn off the power switch
and unplug the machine.
► This could result in electric shock
or fire.
Caution
During an electrical storm or for a
period of non-operation, remove the
power plug from the electrical outlet.
► This could result in electric shock
or fire.
Be careful, the paper output area is hot.
► Burns could occur.
If the plug does not easily enter the electrical
outlet, do not attempt to force it in.
► Call an electrician to change the electrical
outlet, or this could result in electric shock.
Do not allow pets to chew on the AC power,
telephone or PC interface cords.
► This could result in electric shock or fire.
If the machine has been dropped, or if the
cabinet appears damaged, unplug the machine
from all interface connections and request
assistance from qualified service personnel.
► Otherwise, this could result in electric shock
or fire.
If the machine does not operate properly after
these instructions have been followed, unplug
the machine from all interface connections and
request assistance from qualified service
personnel.
► Otherwise, this could result in electric shock
or fire.
If the machine exhibits a sudden and distinct
change in performance, unplug the machine
from all interface connections and request
assistance from qualified service personnel.
► Otherwise, this could result in electric shock
or fire.
Operating method
Caution
Do not forcefully pull the paper out
during printing.
When printing large quantities, the
bottom part of the paper output area
may get hot. Do not allow children to
touch.
► It can cause damage to the
machine.
► You may be burned.
Be careful not to put your hand
between the machine and paper
tray.
When removing jammed paper, do
not use tweezers or sharp metal
objects.
► You may get injured.
► It can cause damage to the
machine.
Do not block or push objects into the ventilation
opening.
Do not allow too many papers to stack up in the
paper output tray.
► This could result in elevated component
temperatures which can cause damage or fire.
► It could cause damage to the machine.
Use care to avoid paper cuts when replacing
paper or removing jammed paper.
This machine's power interception device is the
power cord.
► You may get hurt.
► To switch off the power supply, remove the
power cord from the electrical outlet.
Safety information_ 6
Installation / Moving
Warning
Do not place the machine in an area
with dust, humidity or water leaks.
► This could result in electric shock
or fire.
Caution
When moving the machine, turn the
power off and disconnect all cords;
then lift the machine with at least two
people.
Do not put a cover over the machine or place it
in an airtight location, such as a closet.
► If the machine is not well-ventilated, this
could result in fire.
► The machine could fall, causing
human injury or machine damage.
Do not place the machine on an unstable
surface.
Make sure you plug the power cord into a
grounded electrical outlet.
► The machine could fall, causing human injury
or machine damage.
► Otherwise, this could result in electric shock
or fire.
The machine should be connected to
the power level which is specified on the label.
Do not overload wall outlets and extension
cords.
► If you are unsure and want to check the
power level you are using, contact the electrical
utility company.
► This can diminish performance, and could
result in electric shock or fire.
Use only No.26 AWGa or larger, telephone line
cord, if necessary.
Use the power cord supplied with your machine
for safe operation. If you are using a cord which
is longer than 2 meters (79”) with a 140V
machine, then the gauge should be 16 AWG or
larger.
► Otherwise, it can cause damage to the
machine.
► Otherwise, it can cause damage to the
machine, and could result in electric shock or
fire.
a. AWG: American Wire Gauge
Maintenance / Checking
Caution
Unplug this product from the wall
outlet before cleaning the inside of
the machine. Do not clean the
machine with benzene, paint thinner
or achol; do not spray water directly
into the machine.
Keep cleaning supplies away from
children.
► Children may get hurt.
► This could result in electric shock
or fire.
When you are working inside the
machine replacing supplies or
cleaning the inside, do not operate
the machine.
► You may get injured.
Safety information_ 7
Do not disassemble, repair or rebuild
the machine by yourself.
► It can cause damage to the
machine. Call a certified technician
when the machine needs repair.
Keep the power cable and the contact surface of
the plug clean from dust or water.
To clean and operate the machine, strictly follow
the user's guide provided with the machine.
► This could result in electric shock or fire.
► Otherwise, it can cause damage to the
machine.
Do not remove any covers or guards that are
fastened with screws.
► The machine should only be repaired by
Samsung service technician.
Supply usage
Caution
Do not disassemble the toner
cartridge.
When storing supplies such as toner
cartridges, keep them away from
children.
► Toner dust can be dangerous to
humans.
► Toner dust can be dangerous to
humans.
Do not burn any of the supplies such
as toner cartridge or fuser unit.
Using recycled supplies, such as toner, can
cause damage to the machine.
► It can cause an explosion or fire.
► In case of damage due to the use of recycled
supplies, a service fee will be charged.
When changing the toner cartridge or removing
jammed paper, be careful not to let toner dust
touch your body or clothes.
► Toner dust can be dangerous to humans.
Safety information_ 8
Regulatory information
This machine is designed for our sound environment and certified with several regulatory
statements.
Laser Safety Statement
The printer is certified in the U.S. to conform to the requirements of DHHS 21 CFR, chapter 1 Subchapter J for
Class I(1) laser products, and elsewhere is certified as a Class I laser product conforming to the requirements
of IEC 825.
Class I laser products are not considered to be hazardous. The laser system and printer are designed so there
is never any human access to laser radiation above a Class I level during normal operation, user maintenance
or prescribed service condition.
WARNING
Never operate or service the printer with the protective cover removed from Laser/Scanner assembly. The
reflected beam, although invisible, can damage your eyes.
When using this product, these basic safety precautions should always be followed to reduce risk of fire,
electric shock, and injury to persons:
Ozone Safety
During normal operation, this machine produces ozone. The ozone produced does not
present a hazard to the operator. However, it is advisable that the machine be operated
in a well ventilated area.
If you need additional information about ozone, request your nearest Samsung dealer.
PERCHLORATE WARNING
This Perchlorate warning applies only to primary CR (Manganese Dioxide) Lithium coin cells in the product
sold or distributed ONLY in California USA.
Perchlorate Material - special handling may apply.
See www.dtsc.ca.gov/hazardouswaste/perchlorate. (U.S.A. only)
Regulatory information_ 9
Recycling
Recycle or dispose of the packaging material for this product in an environmentally
responsible manner.
China only
Correct Disposal of This Product (Waste Electrical & Electronic Equipment)
(Applicable in the European Union and other European countries with separate
collection systems)
This marking on the product, accessories or literature indicates that the product and its
electronic accessories (e.g. charger, headset, USB cable) should not be disposed of
with other household waste at the end of their working life. To prevent possible harm to
the environment or human health from uncontrolled waste disposal, please separate
these items from other types of waste and recycle them responsibly to promote the
sustainable reuse of material resources.
Household users should contact either the retailer where they purchased this product,
or their local government office, for details of where and how they can take these items
for environmentally safe recycling.
Business users should contact their supplier and check the terms and conditions of the
purchase contract. This product and its electronic accessories should not be mixed with
other commercial wastes for disposal.
Correct disposal of batteries in this product
(Applicable in the European Union and other European countries with separate
battery return systems.)
This marking on the battery, manual or packaging indicates that the batteries in this
product should not be disposed with other household waste at the end of their working
life. Where marked, the chemical symbols Hg, Cd or Pb indicate that the battery
contains mercury, cadmium or lead above the reference levels in EC Directive 2006/66.
If batteries are not properly disposed of, these substances can cause harm to human
health or the environment.
To protect natural resources and to promote material reuse, please separate batteries
from other types of waste and recycle them through your local, free battery return
system.
Taiwan only
Regulatory information_ 10
Radio Frequency Emissions
FCC Information to the User
This device complies with Part 15 of the FCC Rules. Operation is subject to the following two conditions:
• This device may not cause harmful interference, and
• This device must accept any interference received, including interference that may cause undesired
operation.
This equipment has been tested and found to comply with the limits for a Class B digital device, pursuant to
Part 15 of the FCC Rules. These limits are designed to provide reasonable protection against harmful
interference in a residential installation. This equipment generates, uses and can radiate radio frequency
energy and, if not installed and used in accordance with the instructions, may cause harmful interference to
radio communications. However, there is no guarantee that interference will not occur in a particular
installation. If this equipment does cause harmful interference to radio or television reception, which can be
determined by turning the equipment off and on, the user is encouraged to try to correct the interference by
one or more of the following measures:
• Reorient or relocate the receiving antenna.
• Increase the separation between the equipment and receiver.
• Connect the equipment into an outlet on a circuit different from that to which the receiver is connected.
• Consult the dealer or experienced radio TV technician for help.
Change or modifications not expressly approved by the manufacturer responsible for compliance could
void the user's authority to operate the equipment.
Canadian Radio Interference Regulations
This digital apparatus does not exceed the Class B limits for radio noise emissions from digital apparatus as
set out in the interference-causing equipment standard entitled “Digital Apparatus”, ICES-003 of the Industry
and Science Canada.
Cet appareil numérique respecte les limites de bruits radioélectriques applicables aux appareils numériques
de Classe B prescrites dans la norme sur le matériel brouilleur: “Appareils Numériques”, ICES-003 édictée par
l’Industrie et Sciences Canada.
Russia only
AE95
Germany only
Fax Branding
The Telephone Consumer Protection Act of 1991 makes it unlawful for any person to use a computer or other
electronic device to send any message via a telephone facsimile machine unless such message clearly
contains in a margin at the top or bottom of each transmitted page or on the first page of the transmission the
following information:
1. the date and time of transmission
2. identification of either business, business entity or individual sending the message; and
3. telephone number of either the sending machine, business, business entity or individual.
Regulatory information_ 11
The Telephone Company may make changes in its communications facilities, equipment operations or
procedures where such action is reasonably required in the operation of its business and is not inconsistent
with the rules and regulations in FCC Part 68. If such changes can be reasonably expected to render any
customer terminal equipment incompatible with telephone company communications facilities, or require
modification or alteration of such terminal equipment, or otherwise materially affect its use or performance, the
customer shall be given adequate notice in writing, to allow the customer an opportunity to maintain
uninterrupted service
Ringer Equivalence Number
The Ringer Equivalence Number and FCC Registration Number for this machine may be found on the label
located on the bottom or rear of the machine. In some instances you may need to provide these numbers to
the telephone company.
The Ringer Equivalence Number (REN) is a measure of the electrical load placed on the telephone line, and is
useful for determining whether you have “overloaded” the line. Installing several types of equipment on the
same telephone line may result in problems making and receiving telephone calls, especially ringing when
your line is called. The sum of all Ringer Equivalence Numbers of the equipment on your telephone line should
be less than five in order to assure proper service from the telephone company. In some cases, a sum of five
may not be usable on your line. If any of your telephone equipment is not operating properly, you should
immediately remove it from your telephone line, as it may cause harm to the telephone network.
The equipment complies with Part 68 of the FCC rules and the requirements adopted by the ACTA. On the
rear of this equipment is a label that contains, among other information, a product identifier in the format
US:AAAEQ##TXXXX. If requested, this number must be provided to the telephone company.
FCC Regulations state that changes or modifications to this equipment not expressly approved by the
manufacturer could void the user’s authority to operate this equipment. In the event that terminal
equipment causes harm to the telephone network, the telephone company should notify the customer
that service may be stopped. However, where prior notice is impractical, the company may temporarily
cease service, providing that they:
a) promptly notify the customer.
b) give the customer an opportunity to correct the equipment problem.
c) inform the customer of the right to bring a complaint to the Federal Communication Commission
pursuant to procedures set out in FCC Rules and Regulations Subpart E of Part 68.
You should also know that:
•
•
Your machine is not designed to be connected to a digital PBX system.
If you intend to use a computer modem or fax modem on the same phone line as your machine, you may
experience transmission and reception problems with all the equipment. It is recommended that no other
equipment, except for a regular telephone, share the line with your machine.
• If your area experiences a high incidence of lightning or power surges, we recommend that you install
surge protectors for both the power and the telephone lines. Surge protectors can be purchased from your
dealer or telephone and electronic specialty stores.
• When programming emergency numbers and/or making test calls to emergency numbers, use a
non-emergency number to advise the emergency service dispatcher of your intentions. The dispatcher will
give you further instructions on how to actually test the emergency number.
• This machine may not be used on coin service or party lines.
• This machine provides magnetic coupling to hearing aids.
You may safely connect this equipment to the telephone network by means of a standard modular jack, USOC
RJ-11C.
Replacing the Fitted Plug (for UK Only)
Important
The mains lead for this machine is fitted with a standard (BS 1363) 13 amp plug and has a 13 amp fuse. When
you change or examine the fuse, you must re-fit the correct 13 amp fuse. You then need to replace the fuse
cover. If you have lost the fuse cover, do not use the plug until you have another fuse cover.
Contact the people from you purchased the machine.
The 13 amp plug is the most widely used type in the UK and should be suitable. However, some buildings
(mainly old ones) do not have normal 13 amp plug sockets. You need to buy a suitable plug adaptor. Do not
remove the moulded plug.
If you cut off the moulded plug, get rid of it straight away.
You cannot rewire the plug and you may receive an electric shock if you plug it into a socket.
Regulatory information_ 12
Important warning:
You must earth this machine.
The wires in the mains lead have the following color code:
• Green and Yellow : Earth
• Blue : Neutral
• Brown : Live
If the wires in the mains lead do not match the colors marked in your plug, do the following:
You must connect the green and yellow wire to the pin marked by the letter “E” or by the safety ‘Earth symbol’
or colored green and yellow or green.
You must connect the blue wire to the pin which is marked with the letter “N” or colored black.
You must connect the brown wire to the pin which is marked with the letter “L” or colored red.
You must have a 13 amp fuse in the plug, adaptor, or at the distribution board.
Declaration of Conformity (European Countries)
Regulatory information_ 13
China only
Regulatory information_ 14
About this user’s guide
1.
This user’s guide provides information about basic understanding of the machine as well as
detailed explanation on each step during actual usage. Valuable for both novice and professional
users can refer to this as a guide for installing and using the machine.
•
•
•
•
Read the safety information before using the machine.
If you have a problem using the machine, refer to the troubleshooting chapter (See "Troubleshooting" on
page 53).
Terms used in this user’s guide are explained in the glossary chapter (See "Glossary" on page 74).
All illustrations in this user’s guide may differ from your machine depending on its options or models.
Convention
Some terms in this guide are used interchangeably, as below:
• Document is synonymous with original.
• Paper is synonymous with media, or print media.
• Machine refers to printer or MFP.
The following table offers the conventions of this guide:
CONVENTIO
N
DESCRIPTION
EXAMPLE
Bold
For texts on the display or button names on the
machine.
Note
Provides additional information or detailed
specification of the machine function and feature.
The date format may differ from
country to country.
Caution
Gives users information to protect the machine from
possible mechanical damage or malfunction.
Do not touch the green underside of
the toner cartridge.
Footnote
Provides additional more detailed information on
certain words or a phrase.
a. pages per minute
(“Cross-refere
nce”)
Guides users to a reference page for the additional
detailed information.
(See Finding more information.)
Start
About this user’s guide_ 15
Finding more information
You can find information for setting up and using your machine from the following resources, either as a print-out or on
screen.
MATERIAL NAME
DESCRIPTION
Quick Install Guide
This guide provides information on setting up your machine and this requires that you follow
the instructions in the guide to prepare the machine.
Muratec website
If you have Internet access, you can get help, support, manuals, and order information from
the Muratec website, www.muratec.com
About this user’s guide_ 16
Features of your new product
Your new machine is equipped with a number of special features that improve the quality of the
documents you print.
Special Features
Print with excellent quality and speed
•
•
You can print with a resolution of up to 600 x 600 dpi.
Your machine prints A4-sized paper at up to 18 ppm and letter-sized paper at up to 19 ppm.
Handle high capacity of paper
•
The 250-sheet tray supports plain paper.
Copy originals in several formats
•
The print quality and image size may be adjusted and enhance at the same time.
Set a specific time to transmit a Fax
•
•
You can specify a certain time to transmit the fax and also send the fax to several stored
destinations.
After the transmission, the machine may print out the fax reports according to the setting.
Save time and money
•
This machine automatically conserves electricity by substantially reducing power consumption
when not in use.
Features of your new product_ 17
Introduction
1.
This chapter gives you an overview of your machine:
This chapter includes:
•
•
•
•
•
Machine overview
Control panel overview
Understanding the Status LED
Introducing the useful button
Turning on the machine
Machine overview
Front view
1
Document feeder
5
Front door
9
Document output tray
2
Document width guides
6
Tray 1
10
Handset
3
Control panel
7
Front door handle
11
Toner cartridge
4
Output tray
8
Output support
12
Document input tray
Introduction_ 18
Rear view
1
Extension telephone socket (EXT)
4
Rear door
2
Telephone line socket
5
Rear door handle
3
Power receptacle
Introduction_ 19
Control panel overview
1
One-touch dial
Stores frequently-dialed fax number (See "Storing a number for One-touch Dialing" on
page 39).
2
Reduce/Enlarge
Makes a copy smaller or larger than the original.
3
Delay Send
Allows you to send a fax at a later time when you will not be present (See "Delaying a
fax transmission" on page 34).
4
Multi Send
Allows you to send a fax to multiple destinations (See "Sending a fax to multiple
destinations" on page 34).
5
Receive Mode
Converts the fax receiving mode (See "Changing the receive modes" on page 36).
6
Resolution
Adjusts the resolution of the documents for the current fax job.
7
Display
Shows the current status and prompts during an operation.
Arrow
8
9
10
11
Scroll through the options available in the selected menu, and increase or decrease
values.
Confirms the selection on the screen.
OK
Menu
Status
12
Back
13
(Fax)
14
(Copy)
15
Numeric keypad
Enters Menu mode and scrolls through the available menus (See "Machine status and
advanced feature" on page 42).
Shows the status of your machine (See "Understanding the Status LED" on page 21).
Sends you back to the upper menu level.
Activates fax mode.
Activates copy mode.
Dials fax number, and enters the number value for document copies or other options.
16
Stop/Clear
Stops an operation at any time. The pop-up window appears on the screen showing
the current job that the user can stop or resume.
17
Start
Starts a job.
18
On Hook Dial
Performs same as you hold a handset under the telephone line is engaged.
19
Redial/Pause
In standby mode, redials the last number. Also in edit mode, inserts a pause into a fax
number.
20
Address Book
Allows you to store frequently used fax numbers or search for stored fax numbers.
21
(power)
Turns the machine on or off.
22
power LED
Shows whether the machine is turned on or off.
Introduction_ 20
Understanding the Status LED
The color of the status LED indicates the machine's current status.
STATUS
DESCRIPTION
•
•
Off
The machine is off-line.
The machine is in power saver mode. When data is received, or any button is pressed,
it switches to on-line automatically.
Green:
Online
(
)
Blinking
When the backlight blinks rapidly, the machine is printing data.
On
The machine is on-line and can be used.
Red:
Error
Blinking
•
(
•
)
On
•
•
•
•
•
A minor error has occurred and the machine is waiting for the error to be cleared. Check
the display message. When the problem is cleared, the machine resumes.
Small amount of toner is left in the cartridge. The estimated cartridge lifea of toner is
close. Prepare a new cartridge for replacement. You may temporarily increase the
printing quality by redistributing the toner (See "Redistributing toner" on page 53).
A toner cartridge has almost reached its estimated cartridge lifea. It is recommended to
replace the toner cartridge (See "Replacing the toner cartridge" on page 68).
A paper jam has occurred (See "Clearing paper jams" on page 56).
The cover is opened. Close the cover.
There is no paper in the tray. Load paper in the tray.
The machine has stopped due to a major error. Check the display message (See
"Understanding display messages" on page 59).
a. Estimated cartridge life means the expected or estimated toner cartridge life, which indicates the average capacity of
print-outs and is designed pursuant to ISO/IEC 19752. The number of pages may be affected by operating
environment, printing interval, media type, and media size. Some amount of toner may remain in the cartridge even
when End of life Replace new cart appears and the printer stops printing
Muratec does not recommend using non-genuine Muratec toner cartridges such as refilled or remanufactured.
Muratec cannot guarantee non-genuine Muratec toner cartridge's quality. Service or repair required as a result of
using non-genuine Muratec toner cartridges will not be covered under the machine warranty.
Check the message on the display. Follow the instructions in the message or refer to troubleshooting part (See
"Understanding display messages" on page 59). If the problem persists, call for service.
Power LED
The power LED indicates the machine's on or off.
STATUS
DESCRIPTION
Off
The machine is turned off.
On
•
•
The machine is in ready mode.
The machine is in power on.
Introducing the useful button
Menu button
When you want to know the machine status and set your machine to use an advanced feature, click Menu button
(See "Machine status and advanced feature" on page 42).
Turning on the machine
1. Plug in the power cord.
2. Press
(power) on the control panel.
If you want to turn the power off, press this button.
Introduction_ 21
Basic setup
2.
You may want to set the machine’s default settings. Refer to the next section if you would like to
set or change values. This chapter gives you step-by-step instructions for setting up the machine.
This chapter includes:
•
•
•
•
•
•
•
•
Setting up the hardware
Changing the display language
Setting the date and time
Changing the clock mode
Setting sounds
Entering characters using the number keypad
Using the save modes
Setting the paper
Setting up the hardware
This section shows the steps to set up the hardware, as is explained in the Quick Install Guide. Make sure you read the
Quick Install Guide first and follow the steps below:
1. Select a stable location.
Select a level, stable place with adequate space for air circulation. Allow extra space to open covers and trays.
The area should be well ventilated and away from direct sunlight or sources of heat, cold, and humidity. Do not set the
machine close to the edge of your desk or table.
Printing is suitable for altitudes under 1,000 m (3,281 ft). Refer to the altitude setting to optimize your printing.
Place the machine on a flat, stable surface so that there is no incline greater than 2 mm (0.08 inch). Otherwise, printing
quality may be affected.
2.
3.
4.
5.
6.
7.
Unpack the machine and check all the enclosed items.
Remove all the tapes.
Install the toner cartridge.
Attach the document output tray.
Load paper (See "Loading paper in the tray" on page 29).
Make sure that all cables are connected to the machine.
Basic setup_ 22
8. Turn the machine on.
This equipment will be inoperable when mains power fails.
Changing the display language
To change the language that appears on the display, follow the steps below:
1. Press Menu until Machine Setup appears.
2. Press the left/right arrow until Language appears and press OK.
3. Press the left/right arrow to display the language you want.
4. Press OK to save the selection.
5. Press Stop/Clear to return to ready mode.
Setting the date and time
When you set the time and date, they are used in delay fax and delay print. They are printed on reports. If, however, they
are not correct, you need to change it for the correct time being.
If the machine’s power is cut off, you need to reset the correct time and date once the power has been restored.
1. Press Menu until Machine Setup appears.
2. Press the left/right arrow until Date & Time appears and press OK.
3. Enter the correct time and date using left/right arrow or numeric keypad.
Month = 01 to 12,
Day = 01 to 31,
Year = requires four digits,
Hour = 01 to 12,
Minute = 00 to 59,
and you can also select AM or PM.
4. Press OK to save the selection.
5. Press Stop/Clear to return to ready mode.
Changing the clock mode
You can set your machine to display the current time using either a 12-hour or 24-hour format.
1. Press Menu until Machine Setup appears.
2. Press the left/right arrow until Clock Mode appears and press OK.
3. Press the left/right arrow to select the other mode and press OK.
4. Press Stop/Clear to return to ready mode.
Setting sounds
You can control the following sounds:
• Key sound: Turns the key sound On or Off. With this option set to On, a tone sounds each time a key is pressed.
• Alarm Sound: Turns the alarm sound On or Off. With this option set to On, an alarm tone sounds when an error
occurs or fax communication ends.
• Speaker: Turns On or Off the sounds from the telephone line through the speaker, such as a dial tone or a fax tone.
With this option set to Comm. which means “Common”, the speaker is on until the remote machine answers.
•
• You can adjust the volume level using On Hook Dial. You can adjust the volume level using the handset.
• This feature is supported only in North America.
Ringer: Adjusts the ringer volume. For the ringer volume, you can select Off, Low, Med, and High.
Speaker, ringer, key sound, and alarm sound
1.
2.
3.
4.
5.
Press Menu until Sound/Volume appears.
Press the left/right arrow until the sound option you want appears and press OK.
Press the left/right arrow until the desired status or volume for the sound you have selected appears and press OK.
If necessary, repeat steps 2 through 3 to set other sounds.
Press Stop/Clear to return to ready mode.
Speaker volume
To adjust the volume using On Hook Dial:
Basic setup_ 23
1. Press
(Fax) on the control panel.
2. Press On Hook Dial. A dial tone sounds from the speaker.
3. Press the left/right arrow until you hear the volume you want.
4. Press On Hook Dial to save the change and return to ready mode.
To adjust the volume using the handset:
1. Pick up the handset. A dial tone sounds from the earpiece.
2. Press the left/right arrow until you hear the volume you want.
3. Press OK to save the change and replace the handset.
You can adjust the speaker volume only when the telephone line is connected.
Entering characters using the number keypad
As you perform various tasks, you may need to enter names and numbers. For example, when you set up your machine,
you enter your name or your company’s name, and the fax number. When you store fax numbers in memory, you may also
enter the corresponding names.
Entering alphanumeric characters
1. When you are prompted to enter a letter, locate the button labeled with the character you want. Press the button until
the correct letter appears on the display.
For example, to enter the letter O, press 6, labeled with MNO.
Each time you press 6, the display shows a different letter, M, N, O and finally 6.
You can enter special characters, such as space, plus sign, and etc. For details, see the below section.
2. To enter additional letters, repeat step 1.
If the next letter is printed on the same button, move the cursor by pressing the left/right arrow button and then press
the button labeled with the letter you want. The cursor will move to the right and the next letter will appear on the
display.
You can enter a space by pressing 1 twice.
3. When you have finished entering letters, press OK.
Keypad letters and numbers
KEY
ASSIGNED NUMBERS, LETTERS, OR CHARACTERS
1
@/.‘1
2
ABC2
3
DEF3
4
GHI4
5
JKL5
6
MNO6
7
PQRS7
8
TUV8
9
WXYZ9
0
&+-,0
*
*
#
#
Correcting numbers or names
If you make a mistake while entering a number or name, press the left/right arrow button to delete the last digit or
character. Then enter the correct number or character.
Inserting a pause
With some telephone systems, you must dial an access code (9, for example) and listen for a second dial tone. In such
cases, you must insert a pause in the telephone number. You can insert a pause while you are setting up speed dial
numbers.
To insert a pause, press Redial/Pause at the appropriate place while entering the telephone number. A - appears on the
display at the corresponding location.
Basic setup_ 24
Using the save modes
Using toner saving feature
Toner save mode allows your machine to use less toner on each page. Activating this mode extends the life of the toner
cartridge beyond what one would experience in the normal mode, but it reduces print quality.
1. Press Menu until Machine Setup appears.
2. Press the left/right arrow until Toner Save appears and press OK.
3. Press the left/right arrow until On appears and press OK.
4. Press Stop/Clear to return to ready mode.
When PC-printing, you can also turn on or off toner save mode in the printer properties.
Using power saving feature
When you are not using the machine for a while, use this feature to save power.
1. Press Menu until Machine Setup appears.
2. Press the left/right arrow until Power Save appears and press OK.
3. Press the left/right arrow to select the time you want.
4. Press OK to save the selection.
5. Press Stop/Clear to return to ready mode.
Setting the paper
You can select the paper you would like to keep using for printing job.
Setting the paper size
1.
2.
3.
4.
5.
6.
Press Menu until Paper Setting appears.
Press the left/right arrow until Paper Size appears and press OK.
Press OK.
Press the left/right arrow to select the paper size you want.
Press OK to save the selection.
Press Stop/Clear to return to ready mode.
Setting the paper type
1.
2.
3.
4.
5.
Press Menu until Paper Setting appears.
Press the left/right arrow until Paper Type appears and press OK.
Press the left/right arrow to select the paper type you want.
Press OK to save the selection.
Press Stop/Clear to return to ready mode.
Basic setup_ 25
Media and tray
3.
This chapter provides information on how to load originals and print media into your machine.
This chapter includes:
•
•
•
•
•
•
•
Preparing originals
Loading originals
Selecting print media
Changing the tray size
Loading paper in the tray
Setting the paper size and type
Using the output support
Preparing originals
•
•
•
•
•
•
Do not load paper smaller than 148 x 148 mm (5.8 x 5.8 inches) or larger than 216 x 356 mm (8.5 x 14 inches).
Do not attempt to load the following types of paper, in order to prevent paper jam, low print quality and machine
damage.
- Carbon-paper or carbon-backed paper
- Coated paper
- Onion skin or thin paper
- Wrinkled or creased paper
- Curled or rolled paper
- Torn paper
Remove all staples and paper clips before loading.
Make sure any glue, ink, or correction fluid on the paper is completely dry before loading.
Do not load originals that include different sizes or weights of paper.
Do not load booklets, pamphlets, transparencies, or documents with other unusual characteristics.
Loading originals
You can use the automatic document feeder to load an original for copying and sending a fax.
In the document feeder
Using the document feeder, you can load up to 30 sheets of paper (75 g/m2, 20 lb bond) for one job.
1. Flex or fan the edge of the paper stack to separate the pages before loading originals.
2. Pull the document input tray or document output tray all the way out. Fold out the extender, if necessary.
Media and tray_ 26
3. Load the original face down into the document feeder. Make sure that the bottom of the original stack matches the
paper size marked on the document input tray.
4. Adjust the document width guides to the paper size.
Selecting print media
Always use print media that meet the guidelines for use with your machine.
Guidelines to select the print media
Print media that does not meet the guidelines outlined in this user’s guide may cause the following problems:
• Poor print quality
• Increased paper jams
• Premature wear on the machine.
Properties, such as weight, composition, grain, and moisture content, are important factors that affect the machine’s
performance and the output quality. When you choose print materials, consider the following:
• The type, size and weight of the print media for your machine are described in print media specifications (See "Print
media specifications" on page 71).
• Desired outcome: The print media you choose should be appropriate for your project.
• Brightness: Some print media are whiter than others and produce sharper, more vibrant images.
• Surface smoothness: The smoothness of the print media affects how crisp the printing looks on the paper.
•
•
Some print media may meet all of the guidelines in this section and still not produce satisfactory results. This
may be the result of improper handling, unacceptable temperature and humidity levels, or other variables over
which cannot be controlled.
Before purchasing large quantities of print media, ensure that it meets the requirements specified in this user’s
guide.
Using print media that does not meet these specifications may cause problems, requiring repairs. Such repairs are
not covered by the warranty or service agreements.
Media and tray_ 27
The amount of paper put into the tray may differ according to media type used (See "Print media specifications" on
page 71).
Media sizes supported in each mode
MODE
SIZE
SOURCE
Copy mode
Letter, A4, Legal, Folio, Executive, JIS B5,
A5
tray 1
Fax mode
Letter, A4, Legal
tray 1
Changing the tray size
The tray is preset to Letter or A4 size, depending on your country. To change the size, you need to adjust the paper
guides.
1
2
3
4
Support guide
Paper length guide
Guide lock
Paper width guide
1. With one hand press and hold the guide lock, and with the other hand, hold the paper length guide and support guide
together. Slide the paper length guide and support guide to locate them in the correct paper size slot.
2. Flex or fan the edge of the paper stack to separate the pages before loading papers. Insert the paper into the tray.
3. After inserting paper into the tray, adjust the support guide so that it lightly touches the paper stack.
Media and tray_ 28
4. Squeeze the paper width guides and slide them to the desired paper size marked at the bottom of the tray.
•
•
Do not push the paper width guide too far causing the media to warp.
If you do not adjust the paper width guide, it may cause paper jams.
•
Do not use a paper with more than 6 mm curl.
Loading paper in the tray
Tray 1
1. Pull out the paper tray. And adjust the tray size to the media size you are loading (See "Changing the tray size" on
page 28).
2. Flex or fan the edge of the paper stack to separate the pages before loading paper.
3.
And place paper with the side you want to print facing down.
4. Set the paper type and size for the tray 1 (See "Setting the paper" on page 25).
If you experience problems with paper feeding, check whether the paper meets the media specification (See
"Print media specifications" on page 71).
Media and tray_ 29
Letterhead/ Preprinted paper
SINGLE-SIDED
Tray1
•
•
•
•
Face down
DOUBLE-SIDED
Face up
Letterhead/ Preprinted paper must be printed with heat-resistant ink that will not melt, vaporize, or release hazardous
emissions when subjected to the machine’s fusing temperature for 0.1 second. Check your machine’s specification to
view the fusing temperature (about 170°C (338 °F)).
Letterhead/ Preprinted paper ink must be non-flammable and should not adversely affect machine rollers.
Forms and letterhead should be sealed in a moisture-proof wrapping to prevent changes during storage.
Before you load letterhead/preprinted paper, verify that the ink on the paper is dry. During the fusing process, wet ink
can come off preprinted paper, reducing print quality.
Setting the paper size and type
After loading paper in the paper tray, set the paper size and type using the control panel. These settings will apply to copy
and fax modes.
Setting the paper size
1.
2.
3.
4.
5.
6.
Press Menu until Paper Setting appears.
Press the left/right arrow until Paper Size appears and press OK.
Press OK.
Press the left/right arrow to select the paper size you want.
Press OK to save the selection.
Press Stop/Clear to return to ready mode.
Setting the paper type
1.
2.
3.
4.
5.
Press Menu until Paper Setting appears.
Press the left/right arrow until Paper Type appears and press OK.
Press the left/right arrow to select the paper type you want.
Press OK to save the selection.
Press Stop/Clear to return to ready mode.
Using the output support
The surface of the output tray may become hot if you print a large number of pages at once. Make sure that you do
not touch the surface, and do not allow children near it.
The printed pages stack on the output support, and the output support will help the printed pages to align. The printer
sends output to the output tray by default. To use the output tray, make sure that the rear cover is closed.
If you are using A5 paper, fold the output tray. Otherwise, printed pages might be mis-alligned or jammed.
Media and tray_ 30
Copying
4.
This chapter gives you step-by-step instructions for copying documents.
This chapter includes:
•
•
•
•
Basic copy
Changing the settings for each copy
Changing the default copy settings
Setting copy timeout
Basic copy
This is the normal and usual procedure for copying your originals.
1. Press
(Copy) on the control panel.
2. Load originals face down into the document feeder (See "In the document feeder" on page 26).
3. If necessary, adjust the settings for each copy such as Reduce/Enlarge, Darkness, Original Type and more (See
"Changing the settings for each copy" on page 31).
4. Enter the number of copies using the arrow or number keypad, if necessary.
5. Press Start on the control panel to begin copying.
To cancel the current copy job, press Stop/Clear on the control panel.
Changing the settings for each copy
Your machine provides default settings for copying so that you can quickly and easily make a copy. However, if you want
to change the options for each copy, use the copy function buttons on the control panel.
If you press Stop/Clear while setting the copy options, all of the options you have set for the current copy job will be
canceled and return to their default status after the machine completes the copy in progress.
Changing the darkness
If you have an original containing faint marking and dark images, you can adjust the brightness to make a copy that is
easier to read.
1. Press
(Copy) on the control panel.
2. Press Menu until Copy Setup appears.
3. Press the left/right arrow until Darkness appears and press OK.
4. Press the left/right arrow until the contrast mode you want appears and press OK.
• Light: Works well with dark print.
• Normal: Works well with standard typed or printed originals.
• Dark: Works well with light print.
5. Press Stop/Clear to return to ready mode.
Selecting the type of originals
The original type setting is used to improve the copy quality by selecting the document type for the current copy job.
1. Press
(Copy) on the control panel.
2. Press Menu until Copy Setup appears.
3. Press the left/right arrow until Original Type appears and press OK.
4. Press the left/right arrow until the image mode you want appears and press OK.
• Text: Use for originals containing mostly text.
• Text/Photo: Use for originals with mixed text and photographs.
• Photo: Use when the originals are photographs.
5. Press Stop/Clear to return to ready mode.
Reducing or enlarging copies
You can reduce or enlarge the size of a copied image from 50% to 200% from the document feeder.
To select from the predefined copy sizes:
1. Press
(Copy) on the control panel.
2. Press Menu until Copy Setup appears.
3. Press the left/right arrow until Default-Change appears and press OK.
4. Press the left/right arrow until Reduce/Enlarge appears and press OK.
Copying_ 31
5. Press the left/right arrow until the size setting you want appears and press OK.
6. Press Stop/Clear to return to ready mode.
To scale the copy by directly entering the scale rate:
1. Press
(Copy) on the control panel.
Press Menu until Copy Setup appears.
Press the left/right arrow until Default-Change appears and press OK.
Press the left/right arrow until Reduce/Enlarge appears and press OK.
Press the left/right arrow until Custom appears and press OK.
Press the left/right arrow or numeric keypad to enter the copy size you want. Pressing and holding the left/right
arrow allows you to quickly scroll to the number you want.
7. Press OK to save the selection.
8. Press Stop/Clear to return to ready mode.
2.
3.
4.
5.
6.
When you make a reduced copy, black lines may appear at the bottom of your copy.
Changing the default copy settings
The copy options, including darkness, original type, copy size, collation and number of copies, can be set to those most
frequently used. When you copy a document, the default settings are used unless they have been changed by using the
corresponding buttons on the control panel.
1. Press
2.
3.
4.
5.
6.
7.
(Copy) on the control panel.
Press Menu until Copy Setup appears.
Press the left/right arrow until Default-Change appears and press OK.
Press the left/right arrow until the setup option you want appears and press OK.
Press the left/right arrow until the setting you want appears and press OK.
Repeat steps 4 through 5, as needed.
Press Stop/Clear to return to ready mode.
While you are setting copy options, pressing Stop/Clear cancels the changed settings and restores the defaults.
Setting copy timeout
You can set the time the machine waits before it restores the default copy settings, if you do not start copying after
changing them on the control panel.
1. Press Menu until Copy Setup appears.
2. Press the left/right arrow until Timeout appears and press OK.
3. Press the left/right arrow until the time setting you want appears.
Selecting Off means that the machine does not restore the default settings until you press Start to begin copying, or
Stop/Clear to cancel.
4. Press OK to save the selection.
5. Press Stop/Clear to return to ready mode.
Copying_ 32
Faxing
5.
This chapter gives you information about using your machine as a fax machine.
This chapter includes:
•
•
•
•
•
•
•
Preparing to fax
Sending a fax
Receiving a fax
Adjusting the document settings
Forwarding a fax to other destination
Setting up address book
Printing sent fax report automatically
•
•
You cannot use this machine as a fax via the internet phone. For more information ask the internet service
provider.
We recommend you to use traditional analog phone services (PSTN: public switched telephone network) when
connecting telephone lines to use Fax. If you use other Internet services (DSL, ISDN, VolP), you can improve
the connection quality by using the Micro-filter. The Micro-filter eliminates unnecessary noise signals and
improves connection quality or Internet quality. Since the DSL Micro-filter is not provided with the machine,
contact your Internet Service provider for use on DSL Micro-filter.
1 Line port
2 Micro filter
3 DSL modem / Telephone line
Preparing to fax
Before you send or receive a fax, you need to connect the supplied line cord to the wall jack. Refer to the Quick Install
Guide how to make a connection. The method of making a telephone connection is varies from one country to another.
Sending a fax
This part explains how to send a fax and the special methods of transmission.
Setting the fax header
In some countries, you are required by law to indicate your fax number on any fax you send.
1. Press Menu until Machine Setup appears.
2. Press the left/right arrow until Machine ID appears and press OK.
3. Press the left/right arrow until Fax: appears and press OK.
4. Enter your fax number using the number keypad and press OK.
5. Press the left/right arrow until ID: appears and press OK.
6. Enter your name or the company name using the number keypad. You can enter alphanumeric characters using the
number keypad, and include special symbols by pressing the 1 button. For details on how to enter alphanumeric
characters, see "Entering characters using the number keypad" on page 24.
7. Press OK to save the ID.
8. Press Stop/Clear to return to ready mode.
Sending a fax
1. Press
(Fax) on the control panel.
2. Load originals face down into the document feeder (See "In the document feeder" on page 26).
3. Adjust the resolution and the darkness to suit your fax needs (See "Adjusting the document settings" on page 38).
4. Enter the receiving fax machine’s number.
You can use speed dial numbers, or group dial numbers. For details about storing and searching for a number, see
"Setting up address book" on page 39.
Faxing_ 33
5. Press Start on the control panel. The machine starts to scan and send a fax to destinations.
When you want to cancel a fax job, press Stop/Clear before the machine start transmission.
Sending a fax manually
This method is sending a fax using On Hook Dial on the control panel.
1. Press
2.
3.
4.
5.
6.
(Fax) on the control panel.
Load originals face down into the document feeder.
Adjust the resolution and the darkness to suit your fax needs (See "Adjusting the document settings" on page 38).
Press On Hook Dial on the control panel or lift the handset.
Enter a fax number using the number keypad on the control panel.
Press Start when you hear a high-pitched fax signal from the remote fax machine.
When you want to cancel a fax job, press Stop/Clear at any time while sending.
Confirming a transmission
When the last page of your original has been sent successfully, the machine beeps and returns to ready mode.
When something goes wrong while sending your fax, an error message appears on the display. For a list of error
messages and their meanings, see "Understanding display messages" on page 59. If you receive an error message, press
Stop/Clear to clear the message and try to send the fax again.
You can set your machine to print a confirmation report automatically each time sending a fax is completed. For further
details, see "Printing sent fax report automatically" on page 41.
Automatic redialing
When the number you have dialed is busy or there is no answer when you send a fax, the machine automatically redials
the number every three minutes, up to seven times according to the factory default settings.
When the display shows Retry Redial?, press OK to redial the number without waiting. To cancel the automatic redialing,
press Stop/Clear.
To change the time interval between redials and the number of redial attempts (See "Changing the fax setup options" on
page 42).
Redialing the last number
To redial the number you called last:
1. Press Redial/Pause on the control panel.
2. When an original is loaded in the document feeder, the machine automatically begins to send.
Sending a fax to multiple destinations
You can use the Multiple Send feature, which allows you to send a fax to multiple locations. Originals are automatically
stored in memory and sent to a remote station. After transmission, the originals are automatically erased from memory.
You cannot send a color fax using this feature.
1. Press
(Fax) on the control panel.
Load originals face down into the document feeder.
Adjust the resolution and the darkness to suit your fax needs (See "Adjusting the document settings" on page 38).
Press Multi Send on the control panel.
Enter the number of the first receiving fax machine and press OK.
You can press speed dial numbers or select group dial number using Address book button. For details, see "Setting
up address book" on page 39.
6. Enter the second fax number and press OK.
The display asks you to enter another fax number to send the document.
7. To enter more fax numbers, press OK when Yes appears and repeat steps 5 and 6. You can add up to 10
destinations.
8. Press OK to start storing the scanned original data into memory.
2.
3.
4.
5.
Once you entered a group dial number, you cannot enter another group dial numbers anymore.
9. When you have finished entering fax numbers, press the left/right arrow to select No at the Another No.? prompt and
press OK.
The machine begins sending the fax to the numbers you entered in the order in which you entered them.
Delaying a fax transmission
You can set your machine to send a fax at a later time when you will not be present. You cannot send a color fax using this
feature.
1. Press
2.
3.
4.
5.
(Fax) on the control panel.
Load originals face down into the document feeder.
Adjust the resolution and the darkness to suit your fax needs (See "Adjusting the document settings" on page 38).
Press Delay Send on the control panel.
Enter the number of the receiving fax machine and press OK.
Faxing_ 34
You can press speed dial numbers or select group dial number using Address book button. For details, see "Setting
up address book" on page 39.
6. The display asks you to enter another fax number to send the document.
7. To enter more fax numbers, press OK when Yes appears and repeat steps 5. You can add up to 10 destinations.
Once you entered a group dial number, you cannot enter another group dial numbers anymore.
8. When you have finished entering fax numbers, press the left/right arrow to select No at the Another No.? prompt and
press OK.
9. Enter the job name you want and press OK.
For details on how to enter alphanumeric characters, see "Entering characters using the number keypad" on page 24.
If you do not want to assign a name, skip this step.
10. Enter the time using the number keypad and press OK.
If you set a time earlier than the current time, the fax will be sent at that time on the following day.
The original is scanned into memory before transmission.
The machine returns to ready mode. The display reminds you that you are in ready mode and that a delayed fax is set.
Adding documents to a reserved delay fax job
You can add additional documents to the delayed fax job which is saved in memory.
1. Load the originals to be added and adjust document settings.
2. Press Menu until Fax Feature appears.
3. Press the left/right arrow until Add pages appears and press OK.
4. Press the left/right arrow until the fax job you want appears and press OK.
When you have finished, select No at the Another Page? prompt. The machine scans the original into memory.
5. Press Stop/Clear to return to ready mode.
Canceling a reserved delay fax job
You can cancel the delayed fax job which is saved in memory.
1. Press Menu until Fax Feature appears.
2. Press the left/right arrow until Cancel Job appears and press OK.
3. Press the left/right arrow until the fax job you want appears and press OK.
4. Press OK when Yes appears.
The selected fax is deleted from memory.
5. Press Stop/Clear to return to ready mode.
Sending a priority fax
This function is used when a high priority fax need to be sent ahead of reserved operations. The original is scanned into
memory and immediately transmitted when the current operation is finished. In addition, priority transmission will interrupt
a sending to multiple destinations between stations (example, when the transmission to station A ends, before
transmission to station B begins) or between redial attempts.
1. Press
(Fax) on the control panel.
Load originals face down into the document feeder.
Adjust the resolution and the darkness to suit your fax needs (See "Adjusting the document settings" on page 38).
Press Menu until Fax Feature appears.
Press the left/right arrow until Priority Fax appears and press OK.
Enter the number of the receiving fax machine and press OK.
You can press speed dial numbers or select group dial number using Address book button. For details, see "Setting
up address book" on page 39.
7. Enter the job name you want and press OK.
The original is scanned into memory before transmission.
The machine starts to scan and send a fax to destinations.
2.
3.
4.
5.
6.
Sending a fax in toll save time
You can set the machine to send a fax in toll save time to save a telephone fee. If you send a fax after setting this feature,
fax data will be stored in machine's memory and the machine will start to send fax in toll save time.
1. Press
2.
3.
4.
5.
6.
7.
8.
9.
(Fax) on the control panel.
Load originals face down into the document feeder.
Adjust the resolution and the darkness to suit your fax needs (See "Adjusting the document settings" on page 38).
Press Menu until Advanced Fax appears.
Press the left/right arrow until Toll Save appears and press OK.
Press the left/right arrow until On appears and press OK.
Enter the start time and press OK.
Enter the end time and press OK.
Press Stop/Clear to return to ready mode.
Faxing_ 35
Receiving a fax
This part explains how to receive a fax, and the special receiving methods available.
Changing the receive modes
Your machine is preset to Fax mode at the factory. When you receive a fax, the machine answers the call on a specified
number of rings and automatically receives the fax. But if you want to change the Fax mode to another mode, follow the
steps below:
(Fax) on the control panel.
1. Press
2. Press Receive Mode on the control panel.
3. Press the left/right arrow until the fax reception mode you want appears.
• Fax : Answers an incoming fax call and immediately goes into the fax reception mode.
• Tel : Receives a fax by pressing On Hook Dial and then Start. You can receive a fax by picking up the handset.
• Ans/Fax : Is for when an answering machine attached to your machine. Your machine answers an incoming call,
and the caller can leave a message on the answering machine. If the fax machine senses a fax tone on the line,
the machine automatically switches to Fax mode to receive the fax.
• DRPD : you can receive a call using the Distinctive Ring Pattern Detection (DRPD) feature. Distinctive Ring is a
telephone company service which enables an user to use a single telephone line to answer several different
telephone numbers. For further details, see "Receiving faxes using DRPD mode" on page 37.
4. Press OK to save your selection.
5. Press Stop/Clear to return to ready mode.
•
•
To use the Ans/Fax mode, attach an answering machine to the EXT socket on the back of your machine.
If you do not want other people to view your received documents, you can use secure receiving mode. In
this mode, all of the received faxes are stored in memory. For further details, see "Receiving in secure
receiving mode" on page 37.
Receiving manually in Tel mode
You can receive a fax call by pressing On Hook Dial and then pressing Start when you hear a fax tone from the remote
machine. The machine begins receiving a fax. If your machine has a handset, you can answer calls using the handset.
To change the number of rings, see "Changing the fax setup options" on page 42.
Receiving automatically in Answering Machine/Fax mode
To use this mode, you must attache an answering machine to the EXT socket on the back of your machine (See "Rear
view" on page 19).
If the caller leaves a message, the answering machine stores the message as it would normally. If your machine detects a
fax tone on the line, it automatically starts to receive the fax.
•
•
•
If you have set your machine to this mode and your answering machine is switched off, or no answering
machine is connected to EXT socket, your machine automatically goes into Fax mode after a predefined number
of rings.
If your answering machine has a user-selectable ring counter, set the machine to answer incoming calls within 1
ring.
If you are in Tel mode when the answering machine is connected to your machine, you must switch off the
answering machine. otherwise, the outgoing message from the answering machine will interrupt your phone
conversation.
Receiving faxes manually using an extension telephone
This feature works best when you are using an extension telephone connected to the EXT socket on the back of your
machine. You can receive a fax from someone you are talking to on the extension telephone, without going to the fax
machine.
When you receive a call on the extension phone and hear fax tones, press the keys *9* on the extension phone. The
machine receives the fax.
Press the buttons slowly in sequence. If you still hear the fax tone from the remote machine, try pressing *9* once again.
*9* is the remote receive code preset at the factory. The first and the last asterisks are fixed, but you can change the
middle number to whatever you wish. For details about changing the code, see "Changing the fax setup options" on
page 42
Faxing_ 36
Receiving faxes using DRPD mode
Distinctive Ring is a telephone company service which enables an user to use a single telephone line to answer several
different telephone numbers. The particular number someone uses to call you is identified by different ringing patterns,
which consist of various combinations of long and short ringing sounds. This feature is often used by answering services
who answer telephones for many different clients and need to know which number someone is calling in on to properly
answer the phone.
Using the Distinctive Ring Pattern Detection (DRPD) feature, your fax machine can learn the ring pattern you designate to
be answered by the fax machine. Unless you change it, this ringing pattern will continue to be recognized and answered as
a fax call, and all other ringing patterns will be forwarded to the extension telephone or answering machine plugged into the
EXT socket. You can easily suspend or change DRPD at any time.
Before using the DRPD option, Distinctive Ring service must be installed on your telephone line by the telephone
company. To set up DRPD, you will need another telephone line at your location, or someone available to dial your fax
number from outside.
To set up the DRPD mode:
(Fax) on the control panel.
1. Press
2. Press Menu until Fax Setup appears.
3. Press the left/right arrow until DRPD Mode appears and press OK.
Waiting Ring appears on the display.
4. Call your fax number from another telephone. It is not necessary to place the call from a fax machine.
5. When your machine begins to ring, do not answer the call. The machine requires several rings to learn the pattern.
When the machine completes learning, the display shows End DRPD [Setup]. If the DRPD setup fails, DRPD Ring
Error appears.
Press OK when DRPD appears and start over from step 3.
•
•
DRPD must be set up again if you re-assign your fax number, or connect the machine to another telephone
line.
After DRPD has been set up, call your fax number again to verify that the machine answers with a fax tone.
Then have a call placed to a different number assigned to that same line to be sure the call is forwarded to
the extension telephone or answering machine plugged into the EXT socket.
Receiving in secure receiving mode
You may need to prevent your received faxes from being accessed by unauthorized people. You can turn on secure
receiving mode to restrict printing of received faxes when the machine is unattended. In secure receiving mode, all
incoming faxes go into memory. When the mode is deactivated, any stored faxes are printed.
Activating secure receiving mode
1. Press
2.
3.
4.
5.
(Fax) on the control panel.
Press Menu until Advanced Fax appears.
Press the left/right arrow until Secure Receive appears and press OK.
Press the left/right arrow until On appears and press OK.
Enter a four-digit password you want to use and press OK.
You can activate secure receiving mode without setting a password, but cannot protect your faxes.
6. Re-enter the password to confirm it and press OK.
7. Press Stop/Clear to return to ready mode.
When a fax is received in secure receiving mode, your machine stores it in memory and shows Secure Receive to let you
know that there is a fax received.
Printing received faxes
1. Access the Secure Receive menu by following steps 1 through 3 in “Activating secure receiving mode.”
2. Press the left/right arrow until Print appears and press OK.
3. Enter the four-digit password and press OK.
The machine prints all of the faxes stored in memory.
Deactivating secure receiving mode
1. Access the Secure Receive menu by following steps 1 through 3 in “Activating secure receiving mode.”
2. Press the left/right arrow until Off appears and press OK.
3. Enter the four-digit password and press OK.
The mode is deactivated and the machine prints all faxes stored in memory.
4. Press Stop/Clear to return to ready mode.
Receiving faxes in memory
Since your machine is a multi-tasking device, it can receive faxes while you are making copies or printing. If you receive a
fax while you are copying or printing, your machine stores incoming faxes in its memory. Then, as soon as you finish
copying or printing, the machine automatically prints the fax.
Faxing_ 37
Adjusting the document settings
Before starting a fax, change the following settings according to your original’s status to get the best quality.
Resolution
The default document settings procedure good results when using typical text-based originals. However, if you send
originals that are of poor quality, or contain photographs, you can adjust the resolution to produce a higher quality fax.
1. Press
(Fax) on the control panel.
2. Press Resolution on the control panel.
3. Press the left/right arrow until the option you want appears and press OK.
4. Press Stop/Clear to return to ready mode.
Recommended resolution settings for different original document types are described in the table below:
MODE
RECOMMENDED FOR:
Standard
Originals with normal sized characters.
Fine
Originals containing small characters or thin lines or originals printed using a dot-matrix printer.
Super Fine
Originals containing extremely fine detail. Super Fine mode is enabled only if the machine with
which you are communicating also supports the Super Fine resolution.
•
•
Photo
For memory transmission, Super Fine mode is not available. The resolution setting is
automatically changed to Fine
When your machine is set to Super Fine resolution and the fax machine with which you
are communicating does not support Super Fine resolution, the machine transmits using
the highest resolution mode supported by the other fax machine.
Originals containing shades of gray or photographs.
The resolution setting is applied to the current fax job.
Darkness
You can select the degree of darkness of the original document.
1. Press
2.
3.
4.
5.
(Fax) on the control panel.
Press Menu until Fax Setup appears.
Press the left/right arrow until Darkness appears and press OK.
Press the left/right arrow until the option you want appears and press OK.
Press Stop/Clear to return to ready mode.
The darkness setting is applied to the current fax job.
Forwarding a fax to other destination
You can set the machine to forward the received or sent fax to other destination by a fax. If you are out of office but have to
receive the fax, this feature may be useful.
Forwarding a sent fax to other destination by a fax
You can set the machine to forward every fax you sent to other destination by faxing.
1. Press
2.
3.
4.
5.
6.
(Fax) on the control panel.
Press Menu until Advanced Fax appears.
Press the left/right arrow until Send Forward appears and press OK.
Press the left/right arrow until On appears and press OK.
Enter the number of the fax machine to which faxes are to be sent and press OK.
Press Stop/Clear to return to ready mode.
Subsequent sent faxes will be forwarded to the specified fax machine.
Forwarding a received fax to other destination by a fax
With this feature, you can forward every fax you received to other destination by faxing. When the machine receives a fax,
a fax is stored in the memory then, the machine sends it to the destination you have set.
1. Press
2.
3.
4.
5.
6.
(Fax) on the control panel.
Press Menu until Advanced Fax appears.
Press the left/right arrow until RCV Forward appears and press OK.
Press the left/right arrow until On appears and press OK.
Enter the number of the fax machine to which faxes are to be sent and press OK.
Enter the starting time using left/right arrow or numeric keypad and press OK.
Faxing_ 38
7. Enter the ending time using left/right arrow or numeric keypad and press OK.
8. Press Stop/Clear to return to ready mode.
Subsequent received faxes will be forwarded to the specified fax machine.
Setting up address book
You can set up Address Book with the fax numbers you use most frequently. Your machine provides you with the
following features for setting up Address Book:
Before beginning to store fax numbers, make sure that your machine is in Fax mode.
One-touch Dialing
The 20 one-touch buttons on the control panel lets you store frequently-used fax numbers and dial a number automatically
with a touch of a button.
Storing a number for One-touch Dialing
1. Press
(Fax) on the control panel.
2. Press and hold one of the one-touch dial buttons for about 2 seconds.
The display asks you to enter the fax number. “T” signifies that you are assigning a one-touch dial button.
If a number is already stored in the location you chose, the display shows the number to allow you to change it. To
start over with another one-touch button, press Stop/Clear.
3. Enter the number you want to store using the number keypad and press OK.
To insert a pause between numbers, press Redial/Pause. A symbol “-” appears on the display.
4. To assign a name to the number, enter the name you want.
If you do not want to assign a name, skip this step.
5. Press OK when the name appears correctly or without entering a name.
6. To store more numbers, press a one-touch button and repeat steps 2 through 5.
Or to return to Standby mode, press Stop/Clear.
Speed dial numbers
You can store up to 250 frequently-used fax numbers in speed dial numbers.
Registering a speed dial number
1. Press
(Fax) on the control panel.
Press Address Book on the control panel.
Press the left/right arrow until Stored & Edit appears and press OK.
Press the left/right arrow until Speed Dial appears and press OK.
Enter a speed dial number between 0 and 249 and press OK.
If an entry is already stored in the number you choose, the display shows the message to allow you to change it.
To start over with another speed dial number, press Back.
6. Enter the name you want and press OK.
For details on how to enter alphanumeric characters, see "Entering characters using the number keypad" on
page 24.
7. Enter the fax number you want and press OK.
8. Press Stop/Clear to return to ready mode.
2.
3.
4.
5.
Editing speed dial numbers
1. Press
2.
3.
4.
5.
6.
7.
8.
9.
(Fax) on the control panel.
Press Address Book on the control panel.
Press the left/right arrow until Stored & Edit appears and press OK.
Press the left/right arrow until Speed Dial appears and press OK.
Enter the speed dial number you want to edit and press OK.
Change the name and press OK.
Change the fax number and press OK.
Change the name and press OK.
Press Stop/Clear to return to ready mode.
Using speed dial numbers
When you are prompted to enter a destination number while sending a fax, enter the speed dial number at which you
stored the number you want.
• For a one-digit (0-9) speed dial number, press and hold the corresponding digit button on the number keypad.
• For a two- or three-digit speed dial number, press the first digit button(s) and then hold down the last digit button.
You can also search through memory for an entry by pressing Address Book (See "Searching Address Book for an
entry" on page 40).
Faxing_ 39
Group dial numbers
If you frequently send the same document to several destinations, you can group these destinations and set them under a
group dial number. You can then use a group dial number to send a document to all of the destinations within the group.
You can set up to 250 (0 through 249) group dial numbers using the destination’s existing speed dial numbers.
Registering a group dial number
1. Press
2.
3.
4.
5.
6.
7.
8.
9.
10.
11.
(Fax) on the control panel.
Press Address Book on the control panel.
Press the left/right arrow until Stored & Edit appears and press OK.
Press the left/right arrow until Group Dial appears and press OK.
Enter a group dial number between 0 and 249 and press OK.
If an entry is already stored in the number you choose, the display shows the message to allow you to change it.
Enter the name you want and press OK.
For details on how to enter alphanumeric characters, see "Entering characters using the number keypad" on
page 24.
Enter the first few letters of the speed dial’s name you want.
Press the left/right arrow until the name and number you want appears and press OK.
Press OK when Yes appears at the Another No.? prompt.
Repeat steps 7 and 8 to include other speed dial numbers into the group.
When you have finished, press the left/right arrow to select No at the Another No.? prompt and press OK.
Press Stop/Clear to return to ready mode.
Editing a group dial number
1. Press
2.
3.
4.
5.
6.
7.
8.
9.
10.
11.
12.
(Fax) on the control panel.
Press Address Book on the control panel.
Press the left/right arrow until Stored & Edit appears and press OK.
Press the left/right arrow until Group Dial appears and press OK.
Enter the group dial number you want to edit and press OK.
Enter the name you want to edit and press OK.
Enter the first few letters of the speed dial’s name you want to add or delete.
Press the left/right arrow until the name and number you want appears and press OK.
If you entered a new speed dial number, Add? appears.
If you enter a speed dial number stored in the group, Delete? appears.
Press OK to add or delete the number.
Press OK when Yes appears to add or delete more numbers and repeat steps 7 and 8.
When you have finished, press the left/right arrow to select No at the Another No.? and press OK.
Press Stop/Clear to return to ready mode.
Using group dial numbers
To use a group dial entry, you need to search for and select it from memory.
When you are prompted to enter a fax number while sending a fax, press Address Book. See below.
Searching Address Book for an entry
There are two ways to search for a number in memory. You can either scan from A to Z sequentially, or you can search by
entering the first letters of the name associated with the number.
Searching sequentially through the memory
1. Press
(Fax) on the control panel.
2. Press Address Book on the control panel.
3. Press the left/right arrow until Search & Dial appears and press OK.
4. Press the left/right arrow until the name and number you want appears. You can search upwards or downwards
through the entire memory in alphabetical order.
Searching with a particular first letter
1. Press
(Fax) on the control panel.
2. Press Address Book on the control panel.
3. Press the left/right arrow until Search & Dial appears and press OK.
4. Press the button labeled with the letter you want to search. A name beginning with the letter displays.
For example, if you want to find the name “MOBILE,” press the 6 button, which is labeled with “MNO.”
5. Press the left/right arrow until the name and number you want appears.
Printing Address Book
You can check your Address Book settings by printing a list.
Faxing_ 40
1. Press
(Fax) on the control panel.
2. Press Address Book on the control panel.
3. Press the left/right arrow until Print appears and press OK.
The machine begins printing.
Printing sent fax report automatically
You can set the machine to print a report with detailed information about the previous 50 communication operations,
including time and dates.
1. Press
2.
3.
4.
5.
(Fax) on the control panel.
Press Menu until Fax Setup appears.
Press the left/right arrow until Auto Report appears and press OK.
Press the left/right arrow until On appears and press OK.
Press Stop/Clear to return to ready mode.
Faxing_ 41
Machine status and advanced feature
6.
This chapter explains how to browse the current status of your machine, and the method of setting
for the advanced machine setup. Read this chapter carefully in order to use your machine's
diverse features.
This chapter includes:
•
•
•
•
•
Fax setup
Copy setup
Printing a report
Clearing memory
Menu overview
Fax setup
Changing the fax setup options
Your machine provides you with various user-selectable options for setting up the fax system. You can change the default
settings for your preferences and needs.
To change the fax setup options:
1. Press Fax.
2. Press Menu until Fax Setup appears.
3. Press the left/right arrow until the fax setup item you want appears and press OK.
4. Press the left/right arrow until the option you want appears and press OK.
5. Press the left/right arrow until the desired status appears or enter the value for the option you have selected, and press
OK.
6. If necessary, repeat steps 3 through 5.
7. Press Stop/Clear to return to ready mode.
Available fax setup options
OPTION
DESCRIPTION
Ring to Answer
You can specify the number of times the machine rings before answering an incoming call.
Darkness
You can select the default darkness mode to fax your documents lighter or darker.
• Light works well with dark print.
• Normal works well with standard typed or printed documents.
• Dark works well with light print or faint pencil markings.
Redial Term
Your machine can automatically redial a remote fax machine if it was busy. You can set an
interval between attempts.
Redials
You can specify the number of redial attempts. If you enter 0, the machine will not redial.
MSG Confirm
You can set your machine to print a report showing whether the transmission was
successful, how many pages were sent, and more. The available options are On, Off and
On-Err, which prints only when a transmission is not successful.
Image TCR
This function allows users to know what fax messages have been sent by showing sent
messages in the transmission report.
The first page of the message is turned into an image file than is printed on the
transmission report so the users can see what messages have been sent.
However, you can not use this function when sending fax without saving the data in the
memory.
Auto Report
You can set the machine to print a report with detailed information about the previous 50
communication operations, including time and dates. The available options are On or Off.
Auto Reduction
When receiving a fax containing pages as long as or longer than the paper loaded in the
paper tray, the machine can reduce the size of the original to fit the size of the paper
loaded in the machine.
Turn on this feature if you want to automatically reduce an incoming page.
With this feature set to Off, the machine cannot reduce the original to fit onto one page.
The original will be divided and printed in actual size on two or more pages.
Machine status and advanced feature_ 42
OPTION
DESCRIPTION
Discard Size
When receiving a fax containing pages as long as or longer than the paper in your
machine, you can set the machine to discard a specific length from the end of the received
fax. The machine will print the received fax on one or more sheets of paper, minus the data
that would have been on the specified discard segment.
When the received fax contains pages larger than the paper in your machine, and Auto
Reduction has been turned on, the machine will reduce the fax to fit on the existing paper,
and nothing will be discarded.
Receive Code
This code allows you to initiate fax reception from an extension phone plugged into the
EXT socket on the back of the machine. If you pick up the extension phone and hear fax
tones, enter the code. It is preset to *9* at the factory.
DRPD Mode
This mode enables a user to use a single telephone line to answer several different
telephone numbers. In this menu, you can set the machine to recognize which ring
patterns to answer. For details about this feature, see "Receiving faxes using DRPD mode"
on page 37.
Using the advanced fax settings
Your machine has various user-selectable setting options for sending or receiving faxes. These options are preset at the
factory, but you may need to change them.
1. Press Fax.
2. Press Menu until Advanced Fax appears.
3. Press the left/right arrow until the advanced fax item you want appears and press OK.
4. Press the left/right arrow until the option you want appears and press OK.
5. Press the left/right arrow until the desired status appears or enter the value for the option you have selected, and press
OK.
6. If necessary, repeat steps 3 through 5.
7. Press Stop/Clear to return to ready mode.
Advanced fax setting options
OPTION
DESCRIPTION
Send Forward
You can set the machine to always forward all of the outgoing faxes to a specified
destination, in addition to the fax numbers you entered.
Select Off to turn this feature off.
Select On to turn this feature on. You can set the number of the remote fax machine to
which faxes are forwarded.
RCV Forward
You can set your machine to forward incoming faxes to another fax number during a
specified period of time. When a fax arrives at your machine, it is stored in the memory.
Then, the machine dials the fax number that you have specified and sends the fax.
Select Off to turn this feature off.
Select On to turn this feature on. You can set the fax number to which faxes are forwarded.
Then, you can enter the starting time and/or the ending time. The Local Copy option
allows you to set the machine to print the fax, if fax forwarding is completed without any
error.
Toll Save
You can set your machine to store your faxes into the memory and send them at the
specified toll-saving time.
Select Off to turn this feature off.
Select On to turn this feature on. You can set the starting time and/or the ending time for
Toll Save mode.
Junk Fax Setup
This setting may not be available depending on your country. Using this feature, the
system will not accept faxes sent from remote stations whose numbers are stored in the
memory as junk fax numbers. This feature is useful for blocking any unwanted faxes.
When you turn on this feature, you can access the following options to set junk fax
numbers.
• On: Allows you to set up to 10 fax numbers.
• Off: Allows you to delete the desired junk fax number. If you select All Delete, you can
delete all junk fax numbers.
Secure Receive
You can keep your received faxes from being accessed by unauthorized people.
Prefix Dial
You can set a prefix of up to five digits. This number dials before any automatic dial
number is started. It is useful for accessing a PABX exchange.
Stamp RCV Name
This option allows the machine to automatically print the page number, and the date and
time of reception at the bottom of each page of a received fax.
Machine status and advanced feature_ 43
OPTION
ECM Mode
DESCRIPTION
This mode helps with poor line quality and makes sure any faxes you send are sent
smoothly to any other ECM-equipped fax machine. Sending a fax using ECM may take
more time.
Copy setup
Changing the copy setup options
For copy output, you can set up several options in advance.
1. Press Copy on the control panel.
2. Press Menu until Copy Setup appears.
3. Press the left/right arrow until Default-Change appears and press OK.
4. Press the left/right arrow until the copy setup item you want appears and press OK.
5. Press the left/right arrow until the setting you want appears and press OK.
6. Repeat steps 4 through 5, as needed.
7. Press Stop/Clear to return to ready mode.
Change Default
OPTION
DESCRIPTION
Darkness
Adjusts the brightness level to make a copy that is easier to read, when the original
contains faint markings and dark images.
Original Type
Improves the copy quality by selecting the document type for the current copy job.
Reduce/Enlarge
Reduces or enlarges the size of a copied image.
No. of Copies
You can enter the number of copies using the number keypad.
Printing a report
You can print a report on the machine's configuration or font list, etc.
1. Press Menu until Reports appears.
2. Press the left/right arrow until the report or list you want to print appears and press OK.
3. Press OK when Yes appears to confirm printing.
The selected information prints out.
OPTION
DESCRIPTION
Phone Book
This list shows all of the fax numbers currently stored in the machine’s memory.
Sent Report
This report shows information on the faxes you have recently sent.
You can set the machine to automatically print this report every 50 communications (See
"Available fax setup options" on page 42).
Fax RCV Report
This report shows information on the faxes you have recently received.
Configuration
This list shows the status of the user-selectable options. You may print this list to confirm
your changes after changing any settings.
Schedule Jobs
This list shows the documents currently stored for delayed faxes along with the starting
time and type of each operation.
Send Report
This report shows the fax number, the number of pages, the elapsed time of the job, the
communication mode, and the communication results.
You can set up your machine to automatically print the message confirmation report after
each fax job.
JunkFax Report
This list shows the fax numbers specified as junk fax numbers. To add or delete numbers
to or from this list, access the Junk Fax Setup menu (See "Advanced fax setting options"
on page 43).
Clearing memory
You can selectively clear information stored in your machine’s memory.
1. Press Menu until Maintenance appears.
2. Press the left/right arrow until Clear Memory appears and press OK.
Machine status and advanced feature_ 44
3.
4.
5.
6.
Press the left/right arrow until the item you want to clear appears and press OK.
Press OK when Yes appears to confirm clearing.
Repeat steps 3 through 4 to clear another item.
Press Stop/Clear to return to ready mode.
Some menus may not appear in the display depending on options or models. If so, it is not applicable to your
machine.
OPTION
DESCRIPTION
Clear All Mem.
Clears all of the data stored in memory and resets all of your settings to the factory default.
Paper setting
Restores all of the Paper Setting options to the factory default.
Copy Setup
Restores all of the copy options to the factory default.
Fax Setup
Restores all of the fax options to the factory default.
Fax Feature
Cancels all of the scheduled fax jobs in the machine’s memory.
Advanced Fax
Restores all of the Advanced Fax setting options to the factory default.
Sound/Volume
Resets the sound and volume settings to the factory default.
Machine Setup
Resets all of the system settings, such as the machine ID, date and time, display language
and save modes, to the factory default.
Sent Report
Clears all records of sent faxes.
RCV Report
Clears all records of received faxes.
Phone Book
Clears all of the fax numbers stored in memory.
Machine status and advanced feature_ 45
Menu overview
The control panel provides access to various menus to set up the machine or use the machine’s functions. These menus
can be accessed by pressing Menu.
Some menus may not appear in the display depending on options or models. If so, it is not applicable to your
machine.
ITEMS
OPTION
Paper Setting
Paper Type
Paper Size
Tray Paper
Copy Setup
Default-Change
Darkness
Original Type
Reduce/Enlarge
No. of Copies
Timeout
CopyCollated
Darkness
Original Type
Fax Setup
Ring To Answer
Darkness
Redial Term
Redials
MSG Confirm
Image TCR
Auto Report
Auto Reduction
Discard Size
Receive Code
DRPD Mode
Fax Feature
Delay Fax
Priority Fax
Add Page
Cancel Job
Delay Rx Poll
Advanced Fax
Send Forward
RCV Forward
Toll Save
Junk Fax Setup
Secure Receive
Prefix Dial
Stamp RCV Name
ECM Mode
Reports
Phone Book
Sent Report
Fax RCV Report
Configuration
Scheduled Jobs
Send Report
JunkFax Report
Sound/Volume
Speaker
Ringer
Key Sound
Alarm Sound
Machine status and advanced feature_ 46
ITEMS
OPTION
Machine Setup
Machine ID
Date & Time
Clock Mode
Dial Mode
Language
Toner Save
Power Save
Clear Toner
Maintenance
Clean Drum
Notify Toner
Clear Memory
Clear All Mem.
Paper setting
Copy Setup
Fax Setup
Fax Feature
Advanced Fax
Sound/Volume
Machine Setup
Sent Report
RCV Report
Phone Book
Adjust Shading
TonerLow Alert
Machine status and advanced feature_ 47
Maintenance
7.
This chapter provides information for maintaining your machine and the toner cartridge.
This chapter includes:
•
•
•
Cleaning a machine
Storing the Toner cartridge
Tips for moving & storing your machine
Cleaning a machine
If printing quality problems occur or if you use your machine in a dusty environment, you need to clean your machine
regularly to keep the best printing condition and use your machine longer.
•
•
Cleaning the cabinet of the machine with cleaning materials containing large amounts of alcohol, solvent, or
other strong substances can discolor or distort the cabinet.
If your machine or the surrounding area is contaminated with toner, we recommend you use cloth or tissue
dampened with water to clean it. If you use a vacuum cleaner, toner blows in the air and might be harmful to you.
Cleaning the outside
Clean the machine cabinet with a soft, lint-free cloth. Dampen the cloth slightly with water, but be careful not to let any
water drip onto or into the machine.
Cleaning the inside
During the printing process, paper, toner, and dust particles can accumulate inside the machine. This buildup can cause
print quality problems, such as toner specks or smearing. Cleaning the inside of the machine clears and reduces these
problems.
1. Turn the machine off and unplug the power cord. Wait for the machine to cool down.
2. Open the front door and pull the toner cartridge out. Set it on a clean flat surface
•
•
To prevent damage to the toner cartridge, do not expose it to light for more than a few minutes. Cover it with
a piece of paper, if necessary.
Do not touch the green surface underside of the toner cartridge. Use the handle on the cartridge to avoid
touching this area.
Maintenance_ 48
3. With a dry, lint-free cloth, wipe away any dust and spilled toner from the toner cartridge area.
While cleaning the inside of the machine, be careful not to damage the transfer roller or any other inside parts.
Do not use solvents such as benzene or thinner to clean. Printing quality problems can occur and cause
damage to the machine.
4. Locate the long strip of glass (LSU) inside the machine and gently swab the glass to see if dirt turns the white cotton
black.
5. Reinsert the toner cartridge and close the front door.
6. Plug in the power cord and turn the machine on.
Cleaning the scan unit
Keeping the scan unit clean helps ensure the best possible copies. We suggest that you clean the scan unit at the start of
each day and during the day, as needed
1. Slightly dampen a soft lint-free cloth or paper towel with water.
2. Open the control panel by gripping it on the bottom edge and pulling it upwards.
3. Disassemble the white roller as follows
Maintenance_ 49
The right end of the white roller has a plastic bush that is snapped shut with small tab on it. Pull the tab inward slightly
then lift the tab until the roller is released. Lift the roller upwards and to the right, releasing the left end of the roller, then
rotate the bushing until it reach a slot. Then pull the roller upward.
4. Wipe the roller surface with a soft cloth dampened with water.
5. Carefully wipe the scanning glass with a soft dry cloth.
If the glass is very dirty, first wipe it with a slightly dampened cloth, and then with a dry cloth. Be very careful not to
scratch the glass surface.
6. Replace the roller by inserting the left end first followed by the right end, then rotating the bushing until it locks into
place.
Maintenance_ 50
7. Reconnect the support and the control panel and then close the control panel firmly until it clicks into place.
Cleaning the drum
If there are streaks or spots on your machine, the OPC drum of the cartridge may require cleaning.
1. Before setting the cleaning procedure, make sure that paper is loaded in the machine.
2. Press Menu until Maintenance appears.
3. Press the left/right arrow until Clean Drum appears and press OK.
4. Press the left/right arrow until On appears and press OK.
The machine prints a cleaning page. Toner particles on the drum surface are affixed to the paper.
5. If the problem remains, repeat step 1 through 4.
Storing the Toner cartridge
Toner cartridges contain components that are sensitive to light, temperature, and humidity. Muratec suggests users
follow the recommendations to ensure the optimum performance, highest quality, and longest life from your new Muratec
toner cartridge.
Store this cartridge in the same environment as the printer it will be used in; this should be in controlled office temperature
and humidity conditions. The toner cartridge should remain in its original, unopened package until installation – If original
packaging is not available, cover the top opening of the cartridge with paper and store in a dark cabinet.
Opening the cartridge package prior to use dramatically shortens its useful shelf and operating life. Do not store on the
floor. If the toner cartridge is removed from the printer, always store the cartridge:
• Inside the protective bag from the original package.
• Store lying flat (not standing on end) with the same side facing up as if they were installed in the machine.
• Do not store consumable in;
- Temperature greater than 40°C (104°F).
- Humidity range less than 20% nor greater than 80%.
- An environment with extreme changes in humidity or temperature.
- Direct sunlight or room light.
- Dusty places.
- A car for a long period of time.
- An environment where corrosive gases are present.
- An environment with salty air.
Handling instructions
•
•
•
Do not touch the surface of the photosensitive drum in the cartridge.
Do not expose the cartridge to unnecessary vibrations or shock.
Never manually rotate the drum, especially in the reverse direction; this can cause internal damage and toner spillage.
Use of non-Muratec and refilled toner cartridge
Muratec does not recommend or approve the use of non-Muratec brand toner cartridges in your printer
including generic, store brand, refilled, or remanufactured toner cartridges.
Muratec's warranty does not cover damage to the machine caused by the use of a refilled, remanufactured,
or non-Muratec brand toner cartridge.
Estimated cartridge life
Estimated cartridge life (the life of the toner cartridge yield) depends on the amount of toner that print jobs require. The
actual print-out number may vary depending on the print density of the pages you print on, operating environment, printing
interval, media type, and/or media size. For example, if you print a lot of graphics, the consumption of the toner is high and
you may need to change the cartridge more often.
Maintenance_ 51
Tips for moving & storing your machine
•
When moving the machine, do not tilt or turn it upside down. Otherwise, the inside of the machine may be
contaminated by toner, which can cause damage to the machine or bad print quality.
Maintenance_ 52
8.
Troubleshooting
This chapter gives helpful information for what to do if you encounter an error.
This chapter includes:
•
•
•
•
•
•
•
Redistributing toner
Clearing original document jams
Tips for avoiding paper curls
Tips for avoiding paper jams
Clearing paper jams
Understanding display messages
Solving other problems
Redistributing toner
When the toner cartridge is near the end of its life:
• White streaks or light printing occurs.
• Prepare new cartridge appears on the display.
• The Status LED blinks red.
If this happens, you can temporarily improve print quality by redistributing the remaining toner in the cartridge. In some
cases, white streaks or light printing will still occur even after you have redistributed the toner.
1. Open the front door.
2. Pull the toner cartridge out.
3. Thoroughly roll the cartridge five or six times to distribute the toner evenly inside the cartridge.
If toner gets on your clothing, wipe it off with a dry cloth and wash clothing in cold water. Hot water sets toner into
fabric.
Do not touch the green underside of the toner cartridge. Use the handle on the cartridge to avoid touching this
area.
4. Hold the toner cartridge by the handle and slowly insert the cartridge into the opening in the machine.
Tabs on the sides of the cartridge and corresponding grooves within the machine will guide the cartridge into the
Troubleshooting_ 53
correct position until it locks into place completely.
5. Close the front door. Ensure that the cover is securely closed.
Clearing original document jams
When an original jams while passing through the document feeder, a warning message appears on the display screen.
To avoid tearing the document, remove the jammed document slowly and gently.
Input Misfeed
1. Remove any remaining pages from the document feeder.
2. Pull the jammed document gently out of the document feeder.
3. Load the documents back into the document feeder.
To prevent document jams, do not use thick, thin or mixed documents.
Troubleshooting_ 54
Exit Misfeed
1. Remove any remaining pages from the document feeder.
2. Open the control panel by gripping it on the bottom edge and pulling it.
3. Pull the document gently out of the document feeder.
4. Close the control panel. Then load the documents back into the document feeder.
Tips for avoiding paper curls
1. Open the rear door.
2. Pull down the pressure lever on each side.
1 Pressure lever
Keep the rear cover opened during printing.
Only use when the printout has more than 20 mm curl.
Troubleshooting_ 55
Tips for avoiding paper jams
By selecting the correct media types, most paper jams can be avoided. When a paper jam occurs, refer to the next
guidelines.
• Ensure that the adjustable guides are positioned correctly (See "Loading paper in the tray" on page 29).
• Do not overload the tray. Ensure that the paper level is below the paper capacity mark on the inside of the tray.
• Do not remove paper from the tray while your machine is printing.
• Flex, fan, and straighten paper before loading.
• Do not use creased, damp, or highly curled paper.
• Do not mix paper types in a tray.
• Use only recommended print media (See "Setting the paper size and type" on page 30).
• Ensure that the recommended side of the print media is facing down in the tray.
Clearing paper jams
When a paper jam occurs, a warning message appears on the display.
To resume printing after clearing paper jams, you must open and close the front door.
To avoid tearing the paper, pull the jammed paper out slowly and gently. Follow the instructions in the following
sections to clear the jam.
In tray 1
Click this link to open an animation about clearing a jam.
1. Open and close the front door. The jammed paper is automatically ejected from the machine.
If the paper does not exit, go to the next step.
2. Pull out tray 1 .
3. Remove the jammed paper by gently pulling it straight out.
If the paper does not move when you pull, or if you do not see the paper in this area, check the fuser area around the
toner cartridge (See "Inside the machine" on page 57).
4. Insert tray 1 back into the machine until it snaps into place. Printing automatically resumes.
Troubleshooting_ 56
Inside the machine
Click this link to open an animation about clearing a jam.
The fuser area is hot. Take care when removing paper from the machine.
1. Open the front door and pull the toner cartridge out, lightly pushing it down.
2. Remove the jammed paper by gently pulling it straight out.
3. Replace the toner cartridge and close the front door. Printing automatically resumes.
In exit area
Click this link to open an animation about clearing a jam.
1. Open and close the front door. The jammed paper is automatically ejected from the machine.
If you do not see the jammed paper, go to next step.
Troubleshooting_ 57
2. Gently pull the paper out of the output tray.
If you do not see the jammed paper or if there is any resistance when you pull, stop and go to the next step.
3. Open the rear door.
4. Pull the pressure levers down and remove the paper.
1 Pressure lever
If you do not see the jammed paper, go to next step.
5. Pull the fuser cover levers down and remove he paper.
Return the pressure levers to their original position.
The fuser area is hot. Take care when removing paper from the machine.
6. Close the rear door.
7. Open and close front door, printing automatically resumes.
Troubleshooting_ 58
Understanding display messages
Messages appear on the control panel display to indicate the machine’s status or errors. Refer to the tables below to
understand the messages’ and their meaning, and correct the problem, if necessary.
Checking display messages
•
•
•
If a message is not in the table, restart the machine and try the desired job again. If the problem persists, call for
service.
When you call for service, provide the service representative with the contents of display message.
Some messages may not appear in the display depending on options or models.
MESSAGE
MEANING
SUGGESTED SOLUTIONS
Cancel ?
1: Yes 2: No
Your machine’s memory has become full
while documents were being loaded into
memory.
To cancel the fax job, press the No 1 button
Yes. If you want to send the pages already
stored, press the No 2 button No. You
should send the remaining pages later when
the memory is available.
[Comm. Error]
The machine has a communication problem.
Ask the sender to try again.
Document Jam
The loaded document has jammed in the
document feeder.
Clear the document jam (See "Clearing
original document jams" on page 54).
[Door Open]
The front or rear cover is not securely
latched.
Close the cover until it locks into place.
Group Not Available
You have tried to select a group location
number where only a single location number
can be used, such as when adding locations
for a broadcasting operation.
Just use a one-touch or speed dial number
or dial a number manually using the number
keypad
[Incompatible]
The remote machine does not have the
requested feature, such as a delayed
transmission.
It also occurs if the remote machine does
not have enough memory space to complete
the operation you are attempting.
Reconfirm the remote machine’s features
Install Toner
The toner cartridge is installed improperly, or
not installed.
Reinstall the toner cartridge two or three
times to confirm it is seated properly. If the
problem persists, the toner cartridge is not
being detected. Contact the service
representatives.
Line Busy
The remote person did not answer or the
line is already engaged.
Try again after a few minutes.
[Line Error]
Your machine cannot connect with the
remote machine or has lost contact because
of a problem with the phone line.
Try again. If the problem persists, wait an
hour or so for the line to clear and try again.
Or, turn the ECM on (See "Advanced fax
setting options" on page 43).
Load Document
You have attempted to set up a copy or fax
operation with no document loaded.
Load a document and try again.
Memory Full
The memory is full.
Delete unnecessary documents, retransmit
after more memory becomes available or
split the transmission into more than one
operation.
[No Answer]
The remote fax machine has not answered
after several redial attempts.
Try again. Make sure that the remote
machine is operational.
NO. Not Assigned
The one-touch or speed dial location you
tried to use has no number assigned to it
Dial the number manually using the number
keypad or assign the number. For storing a
number (See "Setting up address book" on
page 39).
[No Paper]
Add Paper
The paper tray has run out of paper.
Load paper in the paper tray (See "Loading
paper in the tray" on page 29).
Not Compatible
Toner cartridge
The toner cartridge is not suitable for your
machine.
Install the corresponding toner cartridge with
a Muratec-genuine cartridge (See
"Replacing the toner cartridge" on page 68).
Troubleshooting_ 59
MESSAGE
MEANING
SUGGESTED SOLUTIONS
Operation Not
Assigned
You are doing in the Add/Cancel operation,
but there is no jobs waiting.
Check the display to see if there is any
scheduled job. The display should indicate
them in standby mode, for example, Delay
Fax.
[Paper Jam 0]
Open/Close Door
Paper has jammed in the feeding area of the
paper tray.
Clear the jam (See "In tray 1" on page 56).
[Paper Jam 1]
Open/Close Door
Paper has jammed in the paper exit area.
Clear the jam (See "Inside the machine" on
page 57).
[Paper Jam 2]
Check Inside
Paper has jammed in the fuser area.
Clear the jam (See "In exit area" on
page 57).
Power Failure
Power has turned off then on and the
machine’s memory has not been saved.
You need to start again the job which you
were trying to do before the power failure.
Replace Toner
The toner cartridge has almost reached its
estimated cartridge life.
You can choose between Stop or Continue
as shown on the control panel. If you select
Stop, the printer stops printing and you
cannot print any more without changing the
cartridge. If you select Continue, the printer
keeps printing but the printing quality cannot
be guaranteed.Replace the toner cartridge
for the best print quality when this message
appears. Using a cartridge beyond this
stage can result in printing quality issues
(See "Replacing the toner cartridge" on
page 68).
Muratec does not recommend using
non-genuine Muratec toner cartridges
such as refilled or remanufactured.
Muratec cannot guarantee
non-genuine Muratec toner
cartridge's quality. Service or repair
required as a result of using
non-genuine Muratec toner
cartridges will not be covered under
the machine warranty.
Retry Redial?
The machine is waiting for a specified time
interval to redial a previously busy station.
You can press OK to immediately redial, or
Stop/Clear to cancel the redial operation.
[Stop Pressed]
The Stop/Clear button is pressed during a
copy or fax operation.
Try again.
End of life
Replace new cart
The indicated toner cartridge has reached its
estimated cartridge life. The printer stops
printing.
Replace the toner cartridge (See "Replacing
the toner cartridge" on page 68).
Estimated cartridge life means the
expected or estimated toner cartridge
life, which indicates the average
capacity of print-outs and is designed
pursuant to ISO/IEC 19798 (See
"Available supplies" on page 67).
The number of pages may be affected
by operating environment, printing
interval, media type, and media size.
Some amount of toner may remain in
the cartridge even when End of life
Replace new cart appears and the
printer stops printing.
Prepare new cartridge
Small amount of toner is left in the cartridge.
The estimated cartridge life of toner is close.
Troubleshooting_ 60
Prepare a new cartridge for replacement.
You may temporarily increase the printing
quality by redistributing the toner (See
"Redistributing toner" on page 53).
Solving other problems
The following chart lists some conditions that may occur and the recommended solutions. Follow the suggested solutions
until the problem is corrected. If the problem persists, call for service.
Paper feeding problems
CONDITION
SUGGESTED SOLUTIONS
Paper jams during printing.
Clear the paper jam (See "Clearing paper jams" on page 56).
Paper sticks together.
•
•
•
•
Check the maximum paper capacity of the tray (See "Print media specifications" on
page 71).
Make sure that you are using the correct type of paper (See "Print media
specifications" on page 71).
Remove paper from the tray and flex or fan the paper.
Humid conditions may cause some paper to stick together.
Multiple sheets of paper do
not feed.
Different types of paper may be stacked in the tray. Load paper of only one type, size,
and weight.
Paper does not feed into
the machine.
•
•
•
•
•
The paper keeps jamming.
•
•
•
•
Remove any obstructions from inside the machine.
Paper has not been loaded correctly. Remove paper from the tray and reload it
correctly.
There is too much paper in the tray. Remove excess paper from the tray.
The paper is too thick. Use only paper that meets the specifications required by the
machine (See "Print media specifications" on page 71).
If an original does not feed into the machine, the document feeder rubber pad may
require to be replaced. Contact a service representative.
There is too much paper in the tray. Remove excess paper from the tray.
An incorrect type of paper is being used. Use only paper that meets the
specifications required by the machine (See "Print media specifications" on page 71).
There may be debris inside the machine. Open the front door and remove any
debris.
If an original does not feed into the machine, the document feeder rubber pad may
need to be replaced. Contact a service representative.
Printing problems
CONDITION
The machine does not
print.
POSSIBLE CAUSE
The machine is not receiving
power.
SUGGESTED SOLUTIONS
Check the power cord connections.
Check the machine for the following:
• The front door is not closed. Close the front door.
• Paper is jammed. Clear the paper jam (See "Clearing paper jams" on page 56).
• No paper is loaded. Load paper (See "Loading paper in the tray" on page 29).
• The toner cartridge is not installed. Install the toner cartridge.
If a system error occurs, contact your service representative.
Pages print, but they are
blank.
The machine is malfunctioning.
Check the display message on the control panel
to see if the machine is indicating a system error.
Contact a service representative.
The toner cartridge is defective or
out of toner.
Redistribute the toner, if necessary.
If necessary, replace the toner cartridge.
Some parts, such as the controller
or the board, may be defective.
Contact a service representative.
Printing quality problems
If the inside of the machine is dirty or paper has been loaded improperly, there might be a reduction in print quality. See the
table below to clear the problem.
Troubleshooting_ 61
CONDITION
Light or faded print
SUGGESTED SOLUTIONS
•
•
•
•
Toner specks
A aB bC c
A aB bC c
A aB bC c
A aB bC c
A aB bC c
Dropouts
A aBb C
A aBb C
A aBb C
A aBb C
A aBb C
•
•
•
If a vertical white streak or faded area appears on the page, the toner supply is low. You
may be able to temporarily extend the toner cartridge life (See "Redistributing toner" on
page 53). If this does not improve the print quality, install a new toner cartridge.
The paper may not meet paper specifications; for example, the paper may be too moist or
rough (See "Print media specifications" on page 71).
A combination of faded or smeared defects may indicate that the toner cartridge needs
cleaning (See "Cleaning the inside" on page 48).
The surface of the LSU part inside the machine may be dirty (See "Cleaning the inside" on
page 48).
The paper may not meet specifications; for example, the paper may be too moist or rough
(See "Print media specifications" on page 71).
The transfer roller may be dirty. Clean the inside of your machine. Contact a service
representative.
The paper path may need cleaning. Contact a service representative.
If faded areas, generally rounded, occur randomly on the page:
• A single sheet of paper may be defective. Try reprinting the job.
• The moisture content of the paper is uneven or the paper has moist spots on its surface.
Try a different brand of paper (See "Print media specifications" on page 71).
• The paper lot is bad. The manufacturing processes can cause some areas to reject toner.
Try a different kind or brand of paper.
• If these steps do not correct the problem, contact a service representative.
White Spots
If white spots appear on the page:
• The paper is too rough and a lot of dirt from a paper falls to the inner devices within the
machine, so the transfer roller may be dirty. Clean the inside of your machine (See
"Cleaning the inside" on page 48).
• The paper path may need cleaning (See "Cleaning the inside" on page 48).
Vertical lines
If black vertical streaks appear on the page:
• The surface (drum part) of the toner cartridge inside the machine has probably been
scratched. Remove the toner cartridge and install a new one (See "Replacing the toner
cartridge" on page 68).
If white vertical streaks appear on the page:
• The surface of the LSU part inside the machine may be dirty (See "Cleaning the inside" on
page 48).
Troubleshooting_ 62
CONDITION
SUGGESTED SOLUTIONS
Black background
If the amount of background shading becomes unacceptable:
• Change to a lighter weight paper (See "Print media specifications" on page 71).
• Check the environmental conditions: very dry conditions or a high level of humidity (higher
than 80% RH) can increase the amount of background shading.
• Remove the old toner cartridge and, install a new one (See "Replacing the toner cartridge"
on page 68).
Toner smear
If toner smears on the page:
• Clean the inside of the machine (See "Cleaning the inside" on page 48).
• Check the paper type and quality (See "Print media specifications" on page 71).
• Remove the toner cartridge and then, install a new one (See "Replacing the toner
cartridge" on page 68).
Vertical repetitive
defects
If marks repeatedly appear on the printed side of the page at even intervals:
• The toner cartridge may be damaged. If you still have the same problem, remove the
toner cartridge and, install a new one (See "Replacing the toner cartridge" on page 68).
• Parts of the machine may have toner on them. If the defects occur on the back of the
page, the problem will likely correct itself after a few more pages.
• The fusing assembly may be damaged. Contact a service representative.
Background scatter
Background scatter results from bits of toner randomly distributed on the printed page.
• The paper may be too damp. Try printing with a different batch of paper. Do not open
packages of paper until necessary so that the paper does not absorb too much moisture.
A
Misformed
characters
•
If characters are improperly formed and producing hollow images, the paper stock may be
too slick. Try different paper (See "Print media specifications" on page 71).
Troubleshooting_ 63
CONDITION
SUGGESTED SOLUTIONS
•
•
•
Ensure that the paper is loaded properly.
Check the paper type and quality (See "Print media specifications" on page 71).
Ensure that the guides are not too tight or too loose against the paper stack.
•
•
•
Ensure that the paper is loaded properly.
Check the paper type and quality. Both high temperature and humidity can cause paper
curl (See "Print media specifications" on page 71).
Turn the stack of paper over in the tray. Also try rotating the paper 180° in the tray.
Wrinkles or creases
•
•
•
Ensure that the paper is loaded properly.
Check the paper type and quality (See "Print media specifications" on page 71).
Turn the stack of paper over in the tray. Also try rotating the paper 180° in the tray.
Back of printouts are
dirty
Check for leaking toner. Clean the inside of the machine (See "Cleaning the inside" on
page 48).
Solid Color or Black
pages
•
•
Page skew
A aBb
A aBb C
A aBb C
A aBb C
A aBb C
Cc
Curl or wave
•
The toner cartridge may not be installed properly. Remove the cartridge and reinsert it.
The toner cartridge may be defective. Remove the toner cartridge and install a new one
(See "Replacing the toner cartridge" on page 68).
The machine may require repair. Contact a service representative.
A
Troubleshooting_ 64
CONDITION
Loose toner
SUGGESTED SOLUTIONS
•
•
•
•
Character Voids
A
Horizontal stripes
A aBb C
A aBb C
A aBb C
A aBb C
A aBb C
Clean the inside of the machine (See "Cleaning the inside" on page 48).
Check the paper type and quality (See "Print media specifications" on page 71).
Remove the toner cartridge and then, install a new one (See "Replacing the toner
cartridge" on page 68).
If the problem persists, the machine may require repair. Contact a service representative.
Character voids are white areas within parts of characters that should be solid black:
• You may be printing on the wrong surface of the paper. Remove the paper and turn it
around.
• The paper may not meet paper specifications (See "Print media specifications" on
page 71).
If horizontally aligned black streaks or smears appear:
• The toner cartridge may be installed improperly. Remove the cartridge and reinsert it.
• The toner cartridge may be defective. Remove the toner cartridge and install a new one
(See "Replacing the toner cartridge" on page 68).
• If the problem persists, the machine may require repair. Contact a service representative.
If the printed paper is curled or paper does not feed into the machine:
• Turn the stack of paper over in the tray. Also try rotating the paper 180° in the tray.
Curl
Copying problems
CONDITION
SUGGESTED SOLUTION
Copies are too light or too
dark
Use Darkness in Copy Setup to lighten or darken the backgrounds of copies (See
"Changing the darkness" on page 31).
Smears, lines, marks, or
spots appear on copies.
•
If the defects are on the original, use Darkness in Copy Setup to lighten the
background of your copies (See "Changing the darkness" on page 31).
Copy image is skewed.
•
•
Ensure that the original is face down in the document feeder.
Check that the copy paper is loaded correctly.
Blank copies print out.
Ensure that the original is face down in the document feeder.
Image rubs off the copy
easily.
•
•
Replace the paper in the tray with paper from a new package.
In high humidity areas, do not leave paper in the machine for extended periods of
time.
Troubleshooting_ 65
CONDITION
Frequent copy paper jams
occur.
SUGGESTED SOLUTION
•
•
•
Toner cartridge produces
fewer copies than
expected before running
out of toner.
•
•
Fan the stack of paper, then turn it over in the tray. Replace the paper in the tray with
a fresh supply. Check/adjust the paper guides, if necessary.
Ensure that the paper is the proper paper weight.
Check for copy paper or pieces of copy paper remaining in the machine after a paper
jam has been cleared.
Your originals may contain pictures, solids, or heavy lines. For example, your
originals may be forms, newsletters, books, or other documents that use more toner.
Turn the machine off and back on.
Fax problems
CONDITION
SUGGESTED SOLUTIONS
The machine is not
working, there is no
display, or the buttons are
not working.
•
•
Unplug the power cord and plug it in again.
Ensure that there is power being supplied to the electrical outlet.
No dial tone.
•
•
Check that the phone line is properly connected.
Check that the phone socket on the wall is working by plugging in another phone.
The numbers stored in
memory do not dial
correctly.
Make sure that the numbers are stored in memory correctly. Print a Phone Book list
(See "Setting up address book" on page 39).
The original does not feed
into the machine.
•
•
•
Make sure that the paper is not wrinkled and you are inserting it in correctly. Check
that the original is the right size, not too thick or thin.
Make sure that the document feeder is firmly closed.
The document feeder rubber pad may need to be replaced. Contact a service
representative.
Faxes are not received
automatically.
•
•
•
The receiving mode should be set to fax.
Make sure that there is paper in the tray.
Check to see if the display shows any error message. If it does, clear the problem
The machine does not
send.
•
•
Make sure that the original is loaded in the document feeder.
Check the fax machine you are sending to, to see if it can receive your fax.
The incoming fax has
blank spaces or is of
poor-quality.
•
•
•
•
The fax machine sending you the fax may be faulty.
A noisy phone line can cause line errors.
Check your machine by making a copy.
A toner cartridge has reached its estimated cartridge life. Replace the toner cartridge
(See "Replacing the toner cartridge" on page 68).
Some of the words on an
incoming fax are stretched.
The fax machine sending the fax had a temporary document jam.
The machine dials a
number, but the
connection with the other
fax machine fails.
The other fax machine may be turned off, out of paper, or cannot answer incoming
calls. Speak with the other machine operator and ask her/him to solve out the problem.
Faxes do not store in
memory.
There may not be enough memory space to store the fax. If the display indicating the
memory status shows, delete any faxes you no longer need from the memory, and then
try to store the fax again. Call for service.
Blank areas appear at the
bottom of each page or on
other pages, with a small
strip of text at the top
You may have chosen the wrong paper settings in the user option setting. For details
about paper settings (See "Setting the paper size and type" on page 30).
Troubleshooting_ 66
Supplies and accessories
9.
This chapter provides information on purchasing supplies, accessories and maintenance parts
available for your machine.
This chapter includes:
•
•
•
•
How to purchase
Available supplies
Available maintenance parts
Replacing the toner cartridge
Available accessories may differ from country to country. Contact your sales representatives to obtain the list of
available accessories.
How to purchase
To order Muratec supplies, accessories and maintenance parts, please contact your local Muratec dealer.
retailer where you purchased your machine. Yo
Available supplies
When supplies reach their lifespan, you can order the following types of supplies for your machine:
TYPE
Standard yield
AVERAGE YIELDa
Approx. 2,500 pages
PART NAME
•
DKT116
a. Declared yield value in accordance with ISO/IEC 19752.
To replace a toner cartridge see "Replacing the toner cartridge" on page 68.
Depending on the options and job mode used, the toner cartridge’s lifespan may differ.
You must purchase supplies, including toner cartridges, in the same country where you purchased your machine.
Otherwise, supplies will be incompatible with your machine since the system configuration of these vary from
country to country.
Available maintenance parts
To avoid print quality and paper feed problems resulting from worn parts and to maintain your machine in top working
condition, the following parts will need to be replaced after printing the specified number of pages or when the life span of
each item has expired.
Supplies and accessories_ 67
AVERAGE YIELDa
PARTS
Document feeder rubber pad
Approx. 10,000 pages
White roller
Approx. 50,000 pages
Fuser unit
Approx. 50,000 pages
Pickup roller
Approx. 50,000 pages
Cassette pad unit
Approx. 50,000 pages
PART NAME
a. It will be affected by media type, media size and job complexity.
To purchase maintenance parts, contact your local Muratec dealer.
Replacing maintenance parts can be performed only by an authorized Muratec dealer.
The warranty does not cover the replacement of any maintenance parts after their lifespan.
Replacing the toner cartridge
Click this link to open an animation about replacing a toner cartridge.
When a toner cartridge has reached its estimated cartridge life:
• End of life Replace new cart appears on the display.
• The machine stops printing. Incoming faxes are saved in memory.
At this stage, the toner cartridge needs to be replaced. Check the type of the toner cartridge for your machine (See
"Available supplies" on page 67).
1. Open the front door.
2. Pull the toner cartridge out.
3. Remove the new toner cartridge out of its package.
4. Remove the paper protecting the toner cartridge by pulling the packing tape.
Supplies and accessories_ 68
5. Locate the sealing tape at the end of the toner cartridge. Carefully pull the tape completely out of the cartridge and
discard it.
•
•
The sealing tape should be longer than 60 cm when correctly removed.
Holding the toner cartridge, pull the sealing tape straight to remove it from the cartridge. Be careful not to cut
the tape. If this happens, you cannot use the toner cartridge.
• Refer to the helpful pictures on the cartridge wrapping paper.
6. Slowly shake the cartridge five or six times to distribute the toner evenly inside the cartridge. It will assure maximum
copies per cartridge.
If toner gets on your clothing, wipe it off with a dry cloth and wash clothing in cold water. Hot water sets toner into
fabric.
Do not touch the green underside of the toner cartridge. Use the handle on the cartridge to avoid touching this
area.
7. Hold the toner cartridge by the handle and slowly insert the cartridge into the opening in the machine.
Tabs on the sides of the cartridge and corresponding grooves within the machine will guide the cartridge into the
correct position until it locks into place completely.
8. Close the front door. Make sure that the cover is securely closed.
Supplies and accessories_ 69
Specifications
10.
This chapter guides you about this machine’s specifications such as various features.
This chapter include:
•
•
•
•
Hardware specifications
Environmental specifications
Electrical specifications
Print media specifications
The specification values here are based on preliminary data.
Hardware specifications
ITEM
Dimension
DESCRIPTION
Height
293.7 mm (11.5 inches)
Depth
391.2 mm (15.4 inches)
Width
360 mm (14.1 inches)
Weight
Machine with consumables
8.9 Kg (19.62 lbs)
Package weight
Paper
1.5 Kg (3.36 lbs)
Plastic
0.4 Kg (0.91 lbs)
Environmental specifications
ITEM
DESCRIPTION
Noise Levela
Ready mode
Printing mode
50 dB(A)
Temperature
Operation
10 to 32 °C (50 to 90 °F)
Humidity
26 dB(A)
Storage
-20 to 40°C (-4 to 104°F)
Operation
10 to 80% RH
Storage
10 to 95% RH
a. Sound Pressure Level, ISO 7779. Configuration tested: machine basic installation, A4 paper, simplex printing.
Electrical specifications
Power requirements are based on the country/region where the device is sold. Do not convert operating voltages.
Doing so might damage the device and void the product warrenty.
ITEM
DESCRIPTION
Power ratinga
110 volt models
AC 110 - 127 V
220 volt models
AC 220 - 240 V
Power consumption
Average operating mode
Less than 380 W
Ready mode
Less than 65 W
Power save mode
Less than 8 W
Power off mode
Less than 1 W under
a. See the rating label on the machine for the correct voltage, frequency (hertz) and type of current for your machine.
Specifications_ 70
Print media specifications
TYPE
SIZE
DIMENSIONS
PRINT MEDIA WEIGHTa/
CAPACITYb
TRAY1
Plain paper
Letter
216 x 279 mm (8.50 x 11.00 inches)
Legal
216 x 356 mm (8.50 x 14.00 inches)
US Folio
216 x 330 mm (8.50 x 13.00 inches)
A4
210 x 297 mm (8.27 x 11.69 inches)
2
60 to 120 g/m (16 to 32 lb bond)
• 250 sheets of 80 g/m2 (20 lb bond)
Oficio
216 x 343 mm (8.50 x 13.50 inches)
JIS B5
182 x 257 mm (7.17 x 10.12 inches)
ISO B5
176 x 250 mm (6.93 x 9.84 inches)
Executive
184 x 267 mm (7.25 x 10.50 inches)
A5
148 x 210 mm (5.83 x 8.27 inches)
A6
105 x 148 mm (4.13 x 5.83 inches)
Thick paper
Refer to the
Plain paper
section
Refer to the Plain paper section
90 g/m2 (24 lb bond)
Thin paper
Refer to the
Plain paper
section
Refer to the Plain paper section
60 to 70 g/m2 (16 to 19 lb bond)
Minimum size (custom)
76 x 127 mm (3.00 x 5.00 inches)
60 to 163 g/m2 (16 to 43 lb bond)
Maximum size (custom)
216 x 356 mm (8.50 x 14.02 inches)
60 to 90 g/m2 (16 to 24 lb bond)
• 150 sheets of 80 g/m2 (20 lb bond)
a. If media weight is over 120 g/m2 (32 lb), load a paper into the tray one by one.
b. Maximum capacity may differ depending on media weight, thickness, and environmental conditions.
Specifications_ 71
Glossary
The following glossary helps you get familiar with the product by understanding the terminologies commonly used
with printing as well as mentioned in this user’s guide.
802.11
802.11 is a set of standards for wireless local area network (WLAN) communication, developed by the IEEE LAN/MAN
Standards Committee (IEEE 802).
802.11b/g
802.11b/g can share same hardware and use the 2.4 GHz band. 802.11b supports bandwidth up to 11 Mbps; 802.11g
up to 54 Mbps. 802.11b/g devices may occasionally suffer interference from microwave ovens, cordless telephones,
and Bluetooth devices.
Access point
Access Point or Wireless Access Point (AP or WAP) is a device that connects wireless communication devices
together on wireless local area networks (WLAN), and acts as a central transmitter and receiver of WLAN radio
signals.
ADF
An Automatic Document Feeder (ADF) is a mechanism that will automatically feed an original sheet of paper so that
the machine can scan some amount of the paper at once.
AppleTalk
AppleTalk is a proprietary suite of protocols developed by Apple, Inc for computer networking. It was included in the
original Macintosh (1984) and is now deprecated by Apple in favor of TCP/IP networking.
BIT Depth
A computer graphics term describing the number of bits used to represent the color of a single pixel in a bitmapped
image. Higher color depth gives a broader range of distinct colors. As the number of bits increases, the number of
possible colors becomes impractically large for a color map. 1-bit color is commonly called as monochrome or black
and white.
BMP
A bitmapped graphics format used internally by the Microsoft Windows graphics subsystem (GDI), and used commonly
as a simple graphics file format on that platform.
BOOTP
Bootstrap Protocol. A network protocol used by a network client to obtain its IP address automatically. This is usually
done in the bootstrap process of computers or operating systems running on them. The BOOTP servers assign the IP
address from a pool of addresses to each client. BOOTP enables 'diskless workstation' computers to obtain an IP
address prior to loading any advanced operating system.
CCD
Charge Coupled Device (CCD) is a hardware which enables the scan job. CCD Locking mechanism is also used to
hold the CCD module to prevent any damage when you move the machine.
Collation
Collation is a process of printing a multiple-copy job in sets. When collation is selected, the device prints an entire set
before printing additional copies.
Control Panel
A control panel is a flat, typically vertical, area where control or monitoring instruments are displayed. They are
typically found in front of the machine.
Coverage
It is the printing term used for a toner usage measurement on printing. For example, 5% coverage means that an A4
sided paper has about 5% image or text on it. So, if the paper or original has complicated images or lots of text on it,
the coverage will be higher and at the same time, a toner usage will be as much as the coverage.
Glossary_ 72
CSV
Comma Separated Values (CSV). A type of file format, CSV is used to exchange data between disparate applications.
The file format, as it is used in Microsoft Excel, has become a pseudo standard throughout the industry, even among
non-Microsoft platforms.
DADF
A Duplex Automatic Document Feeder (DADF) is a mechanism that will automatically feed and flip over an original
sheet of paper so that the machine can scan on both sides of the paper.
Default
The value or setting that is in effect when taking a printer out of its box state, reset, or initialized.
DHCP
A Dynamic Host Configuration Protocol (DHCP) is a client-server networking protocol. A DHCP server provides
configuration parameters specific to the DHCP client host requesting, generally, information required by the client host
to participate on an IP network. DHCP also provides a mechanism for allocation of IP addresses to client hosts.
DIMM
Dual Inline Memory Module (DIMM), a small circuit board that holds memory. DIMM stores all the data within the
machine like printing data, received fax data.
DNS
The Domain Name Server (DNS) is a system that stores information associated with domain names in a distributed
database on networks, such as the Internet.
Dot Matrix Printer
A dot matrix printer refers to a type of computer printer with a print head that runs back and forth on the page and prints
by impact, striking an ink-soaked cloth ribbon against the paper, much like a typewriter.
DPI
Dots Per Inch (DPI) is a measurement of resolution that is used for scanning and printing. Generally, higher DPI results
in a higher resolution, more visible detail in the image, and a larger file size.
DRPD
Distinctive Ring Pattern Detection. Distinctive Ring is a telephone company service which enables a user to use a
single telephone line to answer several different telephone numbers.
Duplex
A mechanism that will automatically flip over a sheet of paper so that the machine can print (or scan) on both sides of
the paper. A printer equipped with a Duplex can print double-sided of paper.
Duty Cycle
Duty cycle is the page quantity which does not affect printer performance for a month. Generally the printer has the
lifespan limitation such as pages per year. The lifespan means the average capacity of print-outs, usually within the
warranty period. For example, if the duty cycle is 48,000 pages per month assuming 20 working days, a printer limits
2,400 pages a day.
ECM
Error Correction Mode (ECM) is an optional transmission mode built into Class 1 fax machines or fax modems. It
automatically detects and corrects errors in the fax transmission process that are sometimes caused by telephone line
noise.
Emulation
Emulation is a technique of one machine obtaining the same results as another.
An emulator duplicates the functions of one system with a different system, so that the second system behaves like the
first system. Emulation focuses on exact reproduction of external behavior, which is in contrast to simulation, which
concerns an abstract model of the system being simulated, often considering its internal state.
Glossary_ 73
Ethernet
Ethernet is a frame-based computer networking technology for local area networks (LANs). It defines wiring and
signaling for the physical layer, and frame formats and protocols for the media access control (MAC)/data link layer of
the OSI model. Ethernet is mostly standardized as IEEE 802.3. It has become the most widespread LAN technology in
use during the 1990s to the present.
EtherTalk
A suite of protocols developed by Apple Computer for computer networking. It was included in the original Macintosh
(1984) and is now deprecated by Apple in favor of TCP/IP networking.
FDI
Foreign Device Interface (FDI) is a card installed inside the machine to allow a third party device such as a coin
operated device or a card reader. Those devices allow the pay-for-print service on your machine.
FTP
A File Transfer Protocol (FTP) is a commonly used protocol for exchanging files over any network that supports the
TCP/IP protocol (such as the Internet or an intranet).
Fuser Unit
The part of a laser printer that melts the toner onto the print media. It consists of a hot roller and a back-up roller. After
toner is transferred onto the paper, the fuser unit applies heat and pressure to ensure that the toner stays on the paper
permanently, which is why paper is warm when it comes out of a laser printer.
Gateway
A connection between computer networks, or between a computer network and a telephone line. It is very popular, as
it is a computer or a network that allows access to another computer or network.
Grayscale
A shades of gray that represent light and dark portions of an image when color images are converted to grayscale;
colors are represented by various shades of gray.
Halftone
An image type that simulates grayscale by varying the number of dots. Highly colored areas consist of a large number
of dots, while lighter areas consist of a smaller number of dots.
HDD
Hard Disk Drive (HDD), commonly referred to as a hard drive or hard disk, is a non-volatile storage device which stores
digitally-encoded data on rapidly rotating platters with magnetic surfaces.
IEEE
The Institute of Electrical and Electronics Engineers (IEEE) is an international non-profit, professional organization for
the advancement of technology related to electricity.
IEEE 1284
The 1284 parallel port standard was developed by the Institute of Electrical and Electronics Engineers (IEEE). The
term "1284-B" refers to a specific connector type on the end of the parallel cable that attaches to the peripheral (for
example, a printer).
Intranet
A private network that uses Internet Protocols, network connectivity, and possibly the public telecommunication system
to securely share part of an organization's information or operations with its employees. Sometimes the term refers
only to the most visible service, the internal website.
IP address
An Internet Protocol (IP) address is a unique number that devices use in order to identify and communicate with each
other on a network utilizing the Internet Protocol standard.
Glossary_ 74
IPM
The Images Per Minute (IPM) is a way of measuring the speed of a printer. An IPM rate indicates the number of
single-sided sheets a printer can complete within one minute.
IPP
The Internet Printing Protocol (IPP) defines a standard protocol for printing as well as managing print jobs, media size,
resolution, and so forth. IPP can be used locally or over the Internet to hundreds of printers, and also supports access
control, authentication, and encryption, making it a much more capable and secure printing solution than older ones.
IPX/SPX
IPX/SPX stands for Internet Packet Exchange/Sequenced Packet Exchange. It is a networking protocol used by the
Novell NetWare operating systems. IPX and SPX both provide connection services similar to TCP/IP, with the IPX
protocol having similarities to IP, and SPX having similarities to TCP. IPX/SPX was primarily designed for local area
networks (LANs), and is a very efficient protocol for this purpose (typically its performance exceeds that of TCP/IP on a
LAN).
ISO
The International Organization for Standardization (ISO) is an international standard-setting body composed of
representatives from national standards bodies. It produces world-wide industrial and commercial standards.
ITU-T
The International Telecommunication Union is an international organization established to standardize and regulate
international radio and telecommunications. Its main tasks include standardization, allocation of the radio spectrum,
and organizing interconnection arrangements between different countries to allow international phone calls. A -T out of
ITU-T indicates telecommunication.
ITU-T No. 1 chart
Standardized test chart published by ITU-T for document facsimile transmissions.
JBIG
Joint Bi-level Image Experts Group (JBIG) is an image compression standard with no loss of accuracy or quality, which
was designed for compression of binary images, particularly for faxes, but can also be used on other images.
JPEG
Joint Photographic Experts Group (JPEG) is a most commonly used standard method of lossy compression for
photographic images. It is the format used for storing and transmitting photographs on the World Wide Web.
LDAP
The Lightweight Directory Access Protocol (LDAP) is a networking protocol for querying and modifying directory
services running over TCP/IP.
LED
A Light-Emitting Diode (LED) is a semiconductor device that indicates the status of a machine.
MAC address
Media Access Control (MAC) address is a unique identifier associated with a network adapter. MAC address is a
unique 48-bit identifier usually written as 12 hexadecimal characters grouped in pairs (e. g., 00-00-0c-34-11-4e). This
address is usually hard-coded into a Network Interface Card (NIC) by its manufacturer, and used as an aid for routers
trying to locate machines on large networks.
MFP
Multi Function Peripheral (MFP) is an office machine that includes the following functionality in one physical body, so
as to have a printer, a copier, a fax, a scanner and etc.
MH
Modified Huffman (MH) is a compression method for decreasing the amount of data that needs to be transmitted
between the fax machines to transfer the image recommended by ITU-T T.4. MH is a codebook-based run-length
encoding scheme optimized to efficiently compress white space. As most faxes consist mostly of white space, this
minimizes the transmission time of most faxes.
Glossary_ 75
MMR
Modified Modified READ (MMR) is a compression method recommended by ITU-T T.6.
Modem
A device that modulates a carrier signal to encode digital information, and also demodulates such a carrier signal to
decode transmitted information.
MR
Modified Read (MR) is a compression method recommended by ITU-T T.4. MR encodes the first scanned line using
MH. The next line is compared to the first, the differences determined, and then the differences are encoded and
transmitted.
NetWare
A network operating system developed by Novell, Inc. It initially used cooperative multitasking to run various services
on a PC, and the network protocols were based on the archetypal Xerox XNS stack. Today NetWare supports TCP/IP
as well as IPX/SPX.
OPC
Organic Photo Conductor (OPC) is a mechanism that makes a virtual image for print using a laser beam emitted from
a laser printer, and it is usually green or gray colored and a cylinder shaped.
An exposing unit of a drum is slowly worn away by its usage of the printer, and it should be replaced appropriately
since it gets scratches from grits of a paper.
Originals
The first example of something, such as a document, photograph or text, etc, which is copied, reproduced or translated
to produce others, but which is not itself copied or derived from something else.
OSI
Open Systems Interconnection (OSI) is a model developed by the International Organization for Standardization (ISO)
for communications. OSI offers a standard, modular approach to network design that divides the required set of
complex functions into manageable, self-contained, functional layers. The layers are, from top to bottom, Application,
Presentation, Session, Transport, Network, Data Link and Physical.
PABX
A private automatic branch exchange (PABX) is an automatic telephone switching system within a private enterprise.
PCL
Printer Command Language (PCL) is a Page Description Language (PDL) developed by HP as a printer protocol and
has become an industry standard. Originally developed for early inkjet printers, PCL has been released in varying
levels for thermal, matrix printer, and page printers.
PDF
Portable Document Format (PDF) is a proprietary file format developed by Adobe Systems for representing two
dimensional documents in a device independent and resolution independent format.
PostScript
PostScript (PS) is a page description language and programming language used primarily in the electronic and
desktop publishing areas. - that is run in an interpreter to generate an image.
Printer Driver
A program used to send commands and transfer data from the computer to the printer.
Print Media
The media like paper, envelopes, labels, and transparencies which can be used on a printer, a scanner, a fax or, a
copier.
PPM
Pages Per Minute (PPM) is a method of measurement for determining how fast a printer works, meaning the number of
pages a printer can produce in one minute.
Glossary_ 76
PRN file
An interface for a device driver, this allows software to interact with the device driver using standard input/output
system calls, which simplifies many tasks.
Protocol
A convention or standard that controls or enables the connection, communication, and data transfer between two
computing endpoints.
PS
See PostScript.
PSTN
The Public-Switched Telephone Network (PSTN) is the network of the world's public circuit-switched telephone
networks which, on industrial premises, is usually routed through the switchboard.
RADIUS
Remote Authentication Dial In User Service (RADIUS) is a protocol for remote user authentication and accounting.
RADIUS enables centralized management of authentication data such as usernames and passwords using an AAA
(authentication, authorization, and accounting) concept to manage network access.
Resolution
The sharpness of an image, measured in Dots Per Inch (DPI). The higher the dpi, the greater the resolution.
SMB
Server Message Block (SMB) is a network protocol mainly applied to share files, printers, serial ports, and
miscellaneous communications between nodes on a network. It also provides an authenticated Inter-process
communication mechanism.
SMTP
Simple Mail Transfer Protocol (SMTP) is the standard for e-mail transmissions across the Internet. SMTP is a relatively
simple, text-based protocol, where one or more recipients of a message are specified, and then the message text is
transferred. It is a client-server protocol, where the client transmits an email message to the server.
SSID
Service Set Identifier (SSID) is a name of a wireless local area network (WLAN). All wireless devices in a WLAN use
the same SSID in order to communicate with each other. The SSIDs are case-sensitive and have a maximum length of
32 characters.
Subnet Mask
The subnet mask is used in conjunction with the network address to determine which part of the address is the network
address and which part is the host address.
TCP/IP
The Transmission Control Protocol (TCP) and the Internet Protocol (IP); the set of communications protocols that
implement the protocol stack on which the Internet and most commercial networks run.
TCR
Transmission Confirmation Report (TCR) provides details of each transmission such as job status, transmission result
and number of pages sent. This report can be set to print after each job or only after failed transmissions.
TIFF
Tagged Image File Format (TIFF) is a variable-resolution bitmapped image format. TIFF describes image data that
typically come from scanners. TIFF images make use of tags, keywords defining the characteristics of the image that is
included in the file. This flexible and platform-independent format can be used for pictures that have been made by
various image processing applications.
Glossary_ 77
Toner Cartridge
A kind of bottle within a machine like printer which contains toner. Toner is a powder used in laser printers and
photocopiers, which forms the text and images on the printed paper. Toner can be melted by the heat of the fuser,
causing it to bind to the fibers in the paper.
TWAIN
An industry standard for scanners and software. By using a TWAIN-compliant scanner with a TWAIN-compliant
program, a scan can be initiated from within the program.; an image capture API for Microsoft Windows and Apple
Macintosh operating systems.
UNC Path
Uniform Naming Convention (UNC) is a standard way to access network shares in Window NT and other Microsoft
products. The format of a UNC path is: \\<servername>\<sharename>\<Additional directory>
URL
Uniform Resource Locator (URL) is the global address of documents and resources on the Internet. The first part of the
address indicates what protocol to use, the second part specifies the IP address or the domain name where the
resource is located.
USB
Universal Serial Bus (USB) is a standard that was developed by the USB Implementers Forum, Inc., to connect
computers and peripherals. Unlike the parallel port, USB is designed to concurrently connect a single computer USB
port to multiple peripherals.
Watermark
A watermark is a recognizable image or pattern in paper that appears lighter when viewed by transmitted light.
Watermarks were first introduced in Bologna, Italy in 1282; they have been used by papermakers to identify their
product, and also on postage stamps, currency, and other government documents to discourage counterfeiting.
WEP
Wired Equivalent Privacy (WEP) is a security protocol specified in IEEE 802.11 to provide the same level of security as
that of a wired LAN. WEP provides security by encrypting data over radio so that it is protected as it is transmitted from
one end point to another.
WIA
Windows Imaging Architecture (WIA) is an imaging architecture that is originally introduced in Windows Me and
Windows XP. A scan can be initiated from within these operating systems by using a WIA-compliant scanner.
WPA
Wi-Fi Protected Access (WPA) is a class of systems to secure wireless (Wi-Fi) computer networks, which was created
to improve upon the security features of WEP.
WPA-PSK
WPA-PSK (WPA Pre-Shared Key) is special mode of WPA for small business or home users. A shared key, or
password, is configured in the wireless access point (WAP) and any wireless laptop or desktop devices. WPA-PSK
generates a unique key for each session between a wireless client and the associated WAP for more advanced
security.
Glossary_ 78
Index
delay sending 34
multi sending 34, 35
redialing the last number 34
sending a fax 33, 35
A
adjusting
tray size 25
answering machine/fax 36
fax setup 42
authentication
faxing
address book 39, 38
changing receiving mode 36,
42, 43
delaying a fax transmission
34
forwarding faxes 38
group dial 40
preparing to fax 33
receiving 36, 37, 36, 34
sending 33, 35, 33, 39
printing a report 44
C
cleaning
inside 48
outside 48, 51
cleaning a machine 48
control panel 20
features 17
machine features 42, 70
power saving feature 25, 71
convention 15
copy setup 44
front view 18
copy timeout setting 32
copying
adjusting darkness 31
basic copying 31
changing the copy setup 44
reducing or enlarging copies
31
selecting the size of originals
31
information 5
jam
default settings
setting a fax header 33
tray setting 30
clearing paper 56
tips for avoiding paper jams
55, 56
L
document feeder 26
language 23
original type
copying 31
output support 30
P
placing a machine
spacing 22
power saver
using power save mode 25
guidelines 27
letterhead paper 30
output support 71
preprinted paper 30
setting the default paper 25,
30
LED
error message 59
copying problems 65
paper feeding problems 61
R
rear view 19
regulatiory information 9
S
changing the display language 23
safety
machine status 21
understanding the status LED
21
scanner
loading
in the document feeder 26
paper in the tray1 29
F
problems
faxing 38
LCD display
fax receiving
activating secure receive 37
changing the receive mode
36
DRPD mode 37
extension telephone 36
in answering machine/fax 36,
37
secure receiving 37
clearing jam 54
loading
in the document feeder
26
resolution
display 20
extension telephone 36
original document
I
date setting 23
using the number keypad 24
hardware 20
glossary 74
J
Entering
on hook dial
print media
G
D
E
O
information 5
symbols 5
loading documents 26
service contact numbers 72
specifications
general 70
print media 71
M
start button 20
maintenance parts 67
stop button 20
memory
supplies
clearing memory 44
menu overview 46
fax sending
Index_ 79
available supplies 67
estimated toner cartridge life
51
ordering 67
replacing toner cartridge 68
T
time setting 23
toner cartridge
estimated life 51
handling instructions 51
non-Muratec and refilled 51
redistributing toner 53, 68
storing 51
toner save mode 25
tray
adjusting the width and length
28
changing the tray size 28
setting the paper size and
type 30
turning on the machine 21
Index_ 80