1
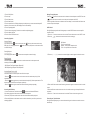
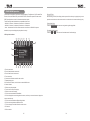
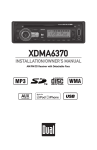
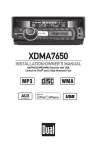
ITS-700W
Contents
Thank you for your choosing our product. We hope you will find the instructions in this user manual
clear and easy to follow. If you take a few minutes to look through it, you’ll learn how to use all the
features of your new ITS-700W for maximum enjoyment.
Preparation
Features
Tools and Supplies
WARNINGS
Disconnecting the Battery
Controls and Indicators
Button Operation
LCD Display / Indicators
The Key Areas of Touch Screen
Remote Control
Remote Control
TFT Monitor Operation
Open/Close TFT Monitor
TFT Monitor Auto Open
Monitor Tilt Angle Adjustment
Image Setting
Parking Brake Interlock
Monitor Movement Mechanism
Basic Operations
Power On / Off
Playing Source Selection
Volume Adjustment
Audio Control Menu
Four-Channel Audio Control
System Reset
Mute
System Setup Menu
MAIN Menu
Screen Setting
General Setup Menu
Language Setting
Video Setting
Rating Setting
Tuner Operation
Tuner Operation Display
Switch to Radio Tuner source
Select FM/AM Band
Auto Tuning
Manual Tuning
Using Preset Stations
1
1
1
1
2
3
3
4
5
6
6
8
8
8
8
8
9
9
10
10
10
10
10
11
11
11
12
12
12
13
15
15
16
17
17
17
18
18
18
18
Auto Store (AS)
Program Scan (PS)
Local Radio Stations Seeking (LOC)
DVD Player Operation
Opening/Closing the TFT Video Screen
Insert/Eject Disc
Reset the Loading Mechanism
Accessing DVD Mode
Using the Touch-Screen Controls
Controlling Playback
Accessing the DVD Menu
Moving Through Chapters
GOTO Search
Direct Chapter / Track Selection
Viewing an Alternate Picture Angle (DVD Only)
Multi-Language Discs (DVD Only)
Playback Information
General Disc Information
CD/MP3/WMA/JPEG Operation
CD Player User Interface
Troubleshooting
Specifications
Enclosed Accessories list
NOTE:
1. certain description in the book may differ from the actual unit.
2. Some pictures or icons in the book may differ from actual display.
3. Specifications subject to change without notice.
18
19
19
20
20
20
20
20
20
21
21
22
22
22
23
23
23
23
25
25
27
31
32
Preparation
Please read all of the instructions below before beginning your installation. We recommend that
you have your unit installed by a mobile video/navigation installer.
Features
• Single DIN size, all-in-one integrated entertainment system.
• Built-in DVD Player, Car specification slot-in mechanism..
• High resolution 7” (16:9) TFT color monitor, contrast and brightness adjustment.
• Built-in 40W X 4 output amplifier, 4 channel surround sound output.
• All functions can be operated by included Remote Controls.
• Powerful Graphic User Interface and software update ability.
Disconnecting the Battery
To prevent a short circuit, be sure to turn off the ignition and remove the negative (-) battery cable
prior to installation.
NOTE: If the unit is to be installed in a car equipped with an on-board drive or navigation computer,
do not disconnect the battery cable. If the cable is disconnected, the preset memory may be
erased. Under these conditions, use extra caution during installation to avoid causing a short
circuit.
NOTE: It is especially important that you read the WARNINGS and NOTES in this manual.
Tools and Supplies
You will need these tools and supplies to install the unit.
• Torx type, flat-head and Philips screwdrivers
• Wire cutters and strippers
• Tools to remove existing radio (screwdriver, socket wrench set or other tools)
• Electrical tape
• Crimping tool
• Multimeter
• Crimp connections
• 18 gauge wire for power connections
• 16 – 18 gauge speaker wire
• Heatshrink tubing
• Soldering iron and solder
WARNINGS
1. Only connect the unit to a 12-volt negative ground system.
2. Never install this unit where operation and viewing could interfere with safe driving conditions.
3. To reduce the risk of a traffic accident (except when using for rear view video camera) never use
the video display function while driving the vehicle. This is a violation of law.
4. To reduce the risk of a traffic accident, never driving with the sound at a level that prevents you
from hearing sounds outside around the vehicle.
5. Never disassemble or adjust the unit without the assistance of a professional. For details, please
consult your local car stereo specialty shop.
6. To prevent injury from shock or fire, never expose this unit to moisture or water.
7. Never use irregular discs.
8. To prevent damage to the mechanism inside this unit, avoid impact to the TFT monitor.
9. Do not change the fuse on the power wire without professional guidance. Using an improper fuse
may cause damage to the unit and result in a fire.
10. The monitor employs an automatic motorized mechanism. To prevent damage to the core
mechanism, please do not push, pull or swivel the monitor manually.
1
2
Controls and Indicators
Button Operation
17
13
16
15
14
12
1
2
3
4
5
6
21
7
8
9
10 11
19
18
20
22
23
1.POWER OFF/ VOL
Rotary encoder.
Press the encoder to turn on the unit, press and hold to turn off.
Rotate clockwise/counterclockwise to adjust the volume.
Press to enter the audio adjust menu when the unit is on.
2.MUTE
Press the button to mute the volume, and press the button again to restore the volume.
3.FAST REVERSE
4.FAST FORWARD
5.PLAY/PAUSE
6.STOP
7.PREVIOUS
8.NEXT
9.MODE
10.RESET
Use this button to restart the machine
11.SMART DIAL
Rotary encoder.
Press the encoder to access MAIN menu.
Rotate clockwise/counterclockwise to select a desired item and press to access or confirm.
3
12.EJECT
Press once to eject the disc.
Hold to reset loading mechanism.
13.DISK SLOT
14.INFO
Press to display playback information on the screen on DVD mode, if the TFT monitor is closed
DVD playback information will display on the LCD screen.
Press and hold to access the picture setup.
15.ANGLE+
Press the button to adjust the upward tilt angle of the screen one step at a time.
Press and hold this button to continuously adjust the upward tilt.
Press this button to adjust the picture settings in picture setup.
16.ANGLEPress the button to adjust the downward tilt angle of the screen one step at a time.
Press and hold this button to continuously adjust the downward tilt.
Press this button to adjust the picture settings in picture setup.
17.TFT DISPLAY
18.OPEN
Press the OPEN button to activate the motorized system and move the TFT monitor into viewing
position.
Press again to close the TFT.
19.DISP
Press to display system information on the front LCD screen when the main screen is closed
20.LCD DISPLAY
21.AS/PS (Auto store/program scan)
Press to auto store strong radio stations in the 12 preset channels in the current band
Press and hold to start to scan the preset radio station
22.BAND
Press to change among the following bands: FM1,FM2,FM3,AM
Press to change tuner mode while in other source
23.DISC INDICATOR LIGHT
It is blue when there is no disc in the unit
It is red when there is disc in the unit
LCD Display/Indicators
1. Main display area, displays the time, tuning frequency and other text information.
2. Local indicator, Indicates the local radio station seeking function is activated or not
4
Remote Control
3. Stereo broadcasting indicator, Indicates the radio is in stereo mode or not
Remote Control
4. Loudness indicator, Indicates the LOUD function is activated or not.
The key areas of touch screen
3
2
4
1
6
5
7
9
8
10
11
13
14
12
16
15
19
20
23
24
27
28
17
18
21
22
25
26
A — Return to MAIN MENU
B — Display playing information
C — Select previous chapter
D — Select next chapter
E — Display the on-screen controls, and different mode displays different menu.
F —On DVD/VCD mode, display the GOTO search menu on the screen directly.
Power
Open
Turn the power on/off
Mute
Toggle on/off audio output
SRC
Select playing mode
Numeric button
VOL up
VOL down
Information
GOTO search
Stop/Band
Select
Directly access certain chapter / track / preset
station in current band
Increase the volume
Decrease the volume
Display playing information
Position search function on VCD/DVD mode
Select FM/AM band on Tuner mode
Stop playback
Enter the audio settings
Menu
Exit the current menu
Enter the main menu of system
Picture
Adjust the picture settings
Repeat A—B
OK
Set start point A and end point B to repeat continually
Direction buttons
Up/down/left/right to select items for setting
ESC
5
Open/close the motorized screen
Start or pause playback, confirm the settings
6
TFT Monitor Operation
Title
Also can activate and disable SCAN mode while playing CD
Root
Enter the main menu of the disc
Turn on PBC while playing VCD
Repeat
Repeat playback for current chapter
Next
Select the next chapter/track for playback
Search an available radio station by increasing tuning
frequency on tuner mode
Previous
Select the previous chapter/track for playback
Search an available radio station by decreasing tuning
frequency on tuner mode
Fast Reverse
Fast reverse the disc content
Fast Forward
Fast forward the disc content
Audio
Change the audio language for disc playback
Zoom
Angle
Zooming in/out on an image
SUB Title
Language selection for subtitle
Play in different angle for a scene scene(if it is applicable)
Open/Close TFT Monitor
Press the (
) button on the front zone remote control or press the (OPEN) button on the front
panel to open/close the monitor.
TFT Monitor Auto Open
•If “TFT Auto Open” is “On”, when the unit is turned on, the monitor automatically open to the last
viewing position.
•If “TFT Auto Open” is ”Off” , when the unit is turned on, press the (
) button on the remote
control or press the (OPEN) button on the front panel to open the monitor into the desired viewing
position.
•If “TFT Auto Open” is ”Manual”,when the unit is turned on or turned off, the monitor has no
movement.
See “General setting” for more instructions.
Monitor Tilt Angle Adjustment
The monitor angle can be adjusted for optimum viewing using one of the following methods:
Press the (
) or (
) buttons on the front panel to adjust the tilt angle of the screen one step
at a time.
Press and hold the (
) or (
) buttons to continuously adjust the tilt angle.
Adjust the “Screen Tilt” in the “Screen setting” to adjust the tilt of the screen to the desired degree.
Image Setting
Video Output Format
The table below shows the video output format for each source.
Adjustable Parameters
While in RGB mode, the only parameter that can be adjusted is brightness (BRIGHT). To access
“PICTURE”,“COLOR”, “CONTRAST”, and “TINT” you must be in CVBS mode.
Parameter Adjustment Procedure
1. Enter Picture Quality Setting Mode:
Press the PIC button on the remote or press and hold the INFO button on the front panel of the unit.
2. Select Items to Set:
Press the ( / ) buttons on the remote or rotate the SMART DIAL button clockwise/anticlockwise
to select an item.
3. Set Parameters:
Rotate the“ VOL” on the front panel can also adjust the selected feature.
7
8
Basic Operations
4. Exit Picture Quality Setting Mode:
Press the PIC button on the remote or press and hold the INFO button on the unit.
NOTE: A video source must be connected to the AUX input and be playing to access the above
adjustments.
Parking Brake Interlock
1. When the “PARKING” lead is connected to the brake switch, the display on the TFT monitor will
display video only when the vehicle is stopped and the parking brake is applied.
2. When the “parking brake inhibit” is active, the front monitor displays a caution message with blue
background, preventing the driver from watching video while driving to reduce the risk of a traffic
accident.
Please see “INSTALLATION SECTION” for installation.
Monitor Movement Mechanism
If an obstruction occurs in the monitor path, the motion will stop automatically to prevent damage to
the mechanism or monitor.
Normal operation is resumed by pressing the (OPEN) button or disconnecting and reconnecting the
power.
Power On / Off
Press the POWER OFF /VOL button to turn the unit on. The buttons on the front of the unit are
illuminated and start up message is briefly displayed on the LCD screen, and then displays the
current mode status. You can also turn on the unit by pressing the POWER button (
) on the
remote control.
Press and hold the POWER OFF /VOL button on the front panel for more than 1 second or press the
POWER button (
) on the remote to power off the unit. The monitor is drawn back into the main
compartment and the LCD screen displays “BYE BYE”.
Playing Source Selection
Press the MODE button on the front panel or the (SRC) button on the remote to change among
available playing sources: TUNER, DVD, AUX IN. The playing mode is displayed on the TFT
display.
Volume Adjustment
To increase or decrease the volume level, turn the POWER OFF /VOL on the front panel or press
the (VOL+/ VOL-) buttons on the remote control. The volume ranges from “0” to “40”. The default
volume is “10” when the unit is powered on each time. Default volume memory setup: Rotate Power
Off/VOL knob on the front panel to select volume value and then press and hold the Power Off/VOL
button until you hear a single beep. When you hear the beep, setup is completed.
Audio Control Menu
The Audio Control feature allows you to easily adjust your audio system to meet the acoustical
characteristics of your vehicle, which vary depending on the type of vehicle and its measurements.
To get the best possible sound quality from your new system, be sure to adjust the settings for the
speakers as well. Proper setting of the Fader and Balance boosts the effects of the cabin equalizer.
9
10
System Setup Menu
MAIN Menu
There are three methods to access the MAIN menu.
•Press the MENU button on the remote control.
•Touch the A area on the touch-screen.
•Press the SMART DIAL button on the front pane
4
Off,On
NOTE: The Bass and Treble levels are only adjustable when EQ is on “User” mode.
The Loudness function compensates for deficiencies in sound ranges at low levels. Loudness
levels range from 1-4 or “off”. When the Loudness function is on, LOUD is displayed on the screen.
5
3
Exiting the Audio Control Menu
touch the return arrow on the top right of the display.
Press the (ESC) button on the remote control to exit the audio control menu.
2
1
Four-Channel Audio Control
4-Channel Audio Adjustments
Item
Master Volume
Front Left Channel Volume
Front Right Channel Volume
Center Channel Volume
00 to 40
-10 to +10
-10 to +10
-10 to +10
System Reset
To correct a system halt or other unusual operation, use the tip of a pen to press the RESET button
located on the front bottom-right corner of the unit. After a system reset, the unit restores the
settings before last power off.
1.Touch to access setup mode.
2.Touch to access Standby mode
3.Touch to access AUX IN mode.
4. Touch to access DVD mode.
5. Touch to access Radio mode.
Note: Touch screen operations and buttons on front panel are all useable to select menu and adjust
“SETTING”. The following instructions will show the different ways to access menus and
adjustments.
Screen Setting
Accessing the Screen Setup Menu
•Press the (MENU) button on the remote control to access MAIN menu.
•Select the
button on the bottom of the screen and select screen menu to access the Screen
setup.
Mute
Press the MUTE button on the front panel or the MUTE button (
) on the remote to mute the
volume from the unit.
NOTE: Press the MUTE button again to restore the volume.
Adjusting the volume or using any of the audio set-up features will cancel the mute function.
11
12
Adjusting a Feature
1. Enter the option field for the feature you want to adjust by pressing the (OK) button on the
remote. A submenu appears in a second row with the selected option.
2. Select a new value by pressing the direction button.
3. Confirm your selection by pressing (OK) button. The new value setup is complete.
1 to 5
Displays the software version of unit
General setup Menu
Accessing the General Setup Menu
•Press the (MENU) button on the remote control to access MAIN menu.
•Select the
button on the bottom of the screen and select General menu to access the
General setup.
Adjusting the Clock
1. Access the “Clock” setting under the General Setup menu.
2. Press the direction button on the remote to move the cursor to the “Hour” or “Min” position, and
press the (OK) button. You also can touch the “Hour” or “Min” position directly.
3. The numeric keypad will pop up.
4. Press the numeric button on the remote control or touch the numeric keypad on the screen to
adjust the hour or minutes.
5. Press the (OK) button on the remote control or on the keypad of the screen to confirm setup.
Return to normal playback
The system will automatically return the previous playback mode you were in before accessing the
setup menu after setting with no operation.
Video out
Disable
Enable
Select whether to video out
The monitor does not open or close when the unit is
turned on or turned off.
Clock Mode
Clock
Load Factory
12Hr
Clock displays 12 hour time using AM and PM.
24Hr
Clock displays 24 hour time up to 23:59
00:27
present time
No/Yes
Load all factory parameters to their original settling
Selecting a Feature for Adjustment
Press the direction buttons on the remote control or touch the option directly on the screen to select
the feature to be adjusted.
13
14
Language Setting
Accessing the Language Setup Menu
•Press the (MENU) button on the remote control to access MAIN menu.
•Select the
button on the bottom of the screen and select language menu to access the
Language setup.
Rating Setting
Accessing the Rating Setup Menu
•Press the (MENU) button on the remote control to access MAIN menu.
•Select the
button on the bottom of the screen and select rating menu to access the rating
setup.
English
Subtitle
French
Spanish
Select desired disc subtitle language
Auto
off
English
Audio
French
Spanish
English
Select desired disc audio language
DVD Menu
French
Spanish
Select desired disc menu language
Video Setting
Accessing the Viedo Setup Menu
•Press the (MENU) button on the remote control to access MAIN menu.
•Select the
button on the bottom of the screen and select viedo menu to access the viedo
setup.
Touch to display the numeric keypad on the screen, and
then you can use the numeric keypad to set password.
Set Password
1.Kid Safe
2.G
3.PG
Rating
TV Shape
View Mode
4:3
Auto Fit
Select desired view mode
6.R
16:9
Fill
Original
4.PG-13
5.PG-R
7.NC-17
8.Adult
Select desired view mode
Pan Scan
15
16
Tuner Operation
Tuner Operation Display
1
2
3
4
5
6
Select FM/AM Band
Touch the
button on the screen, or press the BAND button(
)on the remote control /on the
front panel to change among the following bands: FM-1,FM -2,FM-3,AM.
7
19
8
9
Auto Tuning
Press the button (
) on remote control or touch the
button on the screen to seek the next
available channel by increasing the tuning frequency. Press the button again to stop searching.
Press the button (
) on the remote control or touch the
button on the screen to seek the
next available channel by decreasing the tuning frequency. Press the button again to stop
searching.
10
Manual Tuning
Touch the
or
11
12
13
14
15
16
17
18
1.Touch to seek down.
2.Touch to tune down one step.
3.Touch to change among the following bands: FM-1,FM-2,FM-3,AM.
4.Touch to tune up one step.
5.Touch to seek up.
6.Current Radio Band Indicator
7.Radio Frequency Indicator.
8. Current Source information, touch this area to return to MAIN menu.
9. Volume Indicator.
10.Preset Radio Stations: Touch to recall preset stations or touch and hold to store a station. (Total
12 stations per Band you can preset.)
11. Display AS (Auto store).
12. Display PS (Program scan).
13.Touch to activate/deactivate Scan Mode.
14.Touch to access DVD mode.
15.Touch to access AUX IN mode.
16.Touch to display the numeric keypad on the screen, and then you can use the numeric keypad to
access a track directly.
17.Touch to active Local/DX function.
18.Touch to display Track title information on the screen
19.The current time
Switch to Radio Tuner source
Press the MODE button on the front panel or SRC button on the remote control to switch to the
Tuner source.
You can also access the tuner mode from the MAIN menu directly.
17
to increase or decrease the tuning frequency one step.
Using Preset Stations
12 numbered preset buttons store and recall stations for each band. 12 stored stations (P01-P12)
for the current band appear on the screen, touch the channel directly to select.
You can touch the arrow buttons
on the screen to select other stations.
Storing a Station
1. Select a band (if needed), then select a station.
2. Touch and hold an onscreen preset button (4) for three seconds. The preset number appears at
the top of the screen.
Recalling a Station
1. Select a band (if needed).
2. Touch an on-screen preset button (4) to select the corresponding stored station.
Auto Store (AS)
Press the AS/PS button on the panel or press the
button on the screen to automatic scan and
store strong radio stations in the 12 preset channels in the current band.
18
DVD Player Operation
Program Scan (PS)
1. Press and hold the AS/PS button on the panel or press the
button on the screen. Scan the
stations in the 12 preset channels in the current band.
2. Touch the
button on the screen to automatically scan all stations in current band to
preview stations.
3. Press any button to stop scanning and listen to the selected station.
Local Radio Stations Seeking (LOC)
When the Local function is on, only radio stations with a strong signal are tuned. When the Local
function is active, “LOC” appears on the screen and an indicator is illuminated.
To activate the Local function in AM/FM tuner mode, touch the
button on the screen.
Touch the
again to activate the DX function
NOTE: When properly installed, DVD video cannot be displayed on the main TFT screen
unless the parking brake is applied. If you attempt to play a DVD while the vehicle is moving,
the TFT screen displays caution information with a blue background. Rear video screens, if
applicable, will operate normally.
Opening/Closing the TFT Video Screen
Opening the TFT Screen
To open the TFT video screen, press the (OPEN) button on the unit or press the (
the remote control.
Closing the TFT Screen
Press the (OPEN) button on the unit or press the (
close the TFT screen.
) button on
) button on the remote control again to
Insert/Eject Disc
Inserting a Disc
When inserting a DVD disc, DVD mode is entered and disc play begins.
NOTE:You cannot insert a disc if there is already a disc in the unit or if the power is off.
NOTE: CD-R/RW, DVD-R/RW, DVD+R/RWs will not play unless the recording session is closed.
Ejecting a Disc
Press the button
the same time.
on the unit to eject the disc. The unit automatically reverts to Tuner mode at
Reset the Loading Mechanism
If the disc loads abnormally or does not play properly, press and hold the button
reset the loading mechanism. The disc is ejected and normal operation resumes.
on the unit to
Accessing DVD Mode
To switch to DVD mode when a disc is already inserted, press the button on the front panel or on the
remote control till DVD appears at the top of the screen.
Using the Touch-Screen Controls
19
20
1.Touch to Play/Pause
2.Touch to stop
3.Touch to fast reverse
4.Touch to fast forward
5.Touch to repeat from A to B. Select the repeat point A wherever you want to start and the point B
wherever you want to end, then, DVD displays from A to B continually.
6.Touch to repeat playback
7.Touch to choose a language, if the disc is recorded in multiple languages.
8.Touch to display Sub-title
9.Touch to return to DVD main menu
Controlling Playback
Stopping Playback
Touch the stop button
on the screen or press the (
) button on the remote control to stop
DVD play; touch the play/pause button
on the screen or the (OK) button on the remote control
to resume disk play.
Pausing Playback
Touch the play/pause button
on the screen to suspend or resume disc play.
Moving Through Chapters
Press the (
) button on the remote control to advance to the next chapter on the DVD. Press the
(
) button on the remote control to move to the previous chapter on the DVD.
Touch the right side of the screen to advance to the next chapter, or touch the left side of the screen
to move to the previous chapter.
GOTO Search
During DVD playback, perform the following steps to use the GOTO feature to access a specific
location on a disc:
1. Press the “-/--”button on remote control or touch the F Area on the screen to enter “GOTO” mode.
2. Press the (
/
) buttons on the remote control to select a category.
DVD Search
Title –Go to specific title
Chapter – Go to specific chapter in a title.
Time – Go to specific time in current title
3. Touch the ( -- : -- : -- )/ (---) area on the screen to display a numeric keypad on the touch screen.
Repeat Playback
Press the Repeat button
on the screen or on the remote control to alter repeat mode
according to the following:
• DVD: Repeat Title, Repeat Chapter, Repeat Off
• MP3: Repeat Single, Repeat Folder, Repeat Off
Sectional Repeat Function (A-B)
Use the A-B function to define a specific area of a disc to repeat.
• Press the
button on the screen or on the remote control to set the start point (A) of the
repeated section.
• Press the
button again once you reach the desired end point (B) of the repeated section. The
selected portion of the DVD will now repeat continuously.
• Press the
button again to cancel the A-B section setting and stop repeat play.
Accessing the DVD Menu
1.You can touch the area F, and then touch the
button to recall the main DVD menu.
2.Use the arrow buttons on the remote to select a title from the menu.
3.Press the (TITLE) button on the remote control to select a different title for playback.
4.Press the (OK) button on the remote control or touch the item directly to confirm your selection
and begin playback.
21
4. Enter a time/Track number into the field using the numeric keypad on the remote control or on the
screen.
5. Press the OK button on the remote control or on the touch screen to go to the specified location
on the disc.
6. Press the “-/--”button on the remote control or touch the F Area on the screen again to exit.
Direct Chapter / Track Selection
During DVD and CD playback, you can use the numeric keypad on the remote control to access a
track directly.
22
Viewing an Alternate Picture Angle (DVD Only)
Some DVDs contain scenes that have been shot simultaneously from different angles. For discs
recorded with multiple angles, press the (ANGLE) button on the remote control to toggle available
angles of the on-screen image.
Disc Symbols
Multi-Language Discs (DVD Only)
Changing Audio Language
If you are watching a disc recorded in multiple languages, press the (AUDIO) button on the remote
control to choose a language. You also can touch area E, and then touch the
button.
Changing Subtitle Language
If you are watching a disc recorded in multiple languages with subtitles, press the (SUBT) button on
the remote control to choose the language in which you would like the subtitles to appear. You also
can touch area E, and then touch the
button.
Playback Information
During DVD playback, press the (INFO) button on the remote control or touch area B to display
playback information on the screen, including the media playing and current playback time.
DVD Playback Information
The following information is displayed at the top of the screen during DVD playback:
DVD Viedo
Elapse time 05:24
Title
Remain time 02:05:39
Chapter 2/32
Audio
1/2
1/4-6 Ch Chi
Subtitle Off
Angle
1/1
General Disc Information
23
24
CD/MP3/WMA/Operation
Instructions for Insert/Eject, Play/Pause, Stopping Playback, Track Selection, Fast Forward/Fast
Reverse, Scan, and Random Play are the same for DVD, CD and MP3 operation. Please see the
DVD Player Operation section for information about these topics.
The file naming formats listed below are compatible with this unit:
• ISO 9660 – file name: 12 characters, file extension: 3 characters
• ISO 9660 – file name: 31 characters, file extension: 3 characters
• Joliet – 64 characters If the file or folder name does not conform to ISO 9660 file system
standards, it may not be displayed or played back correctly.
Playing CD Files
After inserting a CD disc, files will play in the sequence of the directory. In playing back, you can
press the numeric button on the remote control or touch a track on the onscreen directly to play.
Previous/Next Page
Touch the
or
on the screen to navigate through the pages/files.
Fast backward/fast forward
Touch the
or
on the screen to fast backward or fast forward play.
CD Player User Interface
1
2
3
4
5
6
7
19
8
9
18
10
11
12
13
14
15
16
17
1.Touch to seek down.
2.Touch to fast backward current track .
4.Touch to fast forward current track .
5. Touch to seek up.
6. Current track and total number of tracks on disc
7. Elapsed playing time.
8.Current source indicator, touch this area to access MAIN menu.
9. Volume indicator
10.Touch to stop disc playback
11.Touch to turn to the previous page.
12.Touch to turn to the next page.
13. Touch to activate/deactivate Scan Mode
14. Touch to display the numeric keypad on the screen, and then you can use the numeric keypad to
access a track directly.
15. Touch to activate/deactivate Repeat Single Mode
16. Touch to activate/deactivate Random Mode
17. Touch to display Track title information on the screen .
18. Track title
19.The curret time
25
26
Troubleshooting
Problem
Cause
Unit will not power on
Radio Fuse blown
Car battery fuse blown
Battery depleted
Battery installed incorrectly
Improper audio output
connection
Volume set too low
Speakers damaged
Heavily biased volume balance
Speaker wiring is in contact
with metal part of car
Poor sound quality
or distortion
Install new fuse with correct rating
Install new fuse with correct rating
Press the RESET button located in the
bottom right corner of the front panel
Replace battery with new one
Remove battery and install correctly
Check wiring and correct
Improper “MUTE” connection
No/low audio output
Unauthorized disc is in use
Speaker power rating not
compatible with unit
Speaker is shorted
Increase volume level
Review wiring diagram and check
“MUTE” connection
Replace speakers
Adjust the channel balance to the center
position
Use original copy
Connect proper speakers
Check speaker connections
Check that “MUTE” connection is not
grounded and that it’s properly insulated
“MUTE” wire is grounded
Unit resets itself
when engine is off
Incorrect connection between
yellow memory wire and
positive battery wire
Check wiring and correct
TFT Auto Open is turned off
Turn TFT Auto Open on
Incorrect connection to
parking brake wire
Check wiring and correct
PRK SW is activated and
parking brake is not engaged
Stop vehicle in safe place and apply
parking brake
No image
DVD is not compatible with
current TV system settings
Change setup to accommodate disc
Improper video signal
connections
Check wiring and correct
Prolonged image or
improper height/width
ratio display
Improper aspect ratio setup
Use correct aspect ratio setting
Monitor stops at
incorrect position
Moving path is blocked
Press OPEN key to restart monitor
movement
Flashing image or
interference appears
on screen
Corrective Action
Auto antenna is not fully
extended
Connect the auto antenna control cable
properly
Auto antenna not properly
connected
LOCAL function is activated
Connect the auto antenna control cable
properly
Disc already inside unit
Disc is warped or scratched
Disc is dirty or wet
Incompatible disc is used
Disc rating exceeds Parental
Lock rating limit
Eject current disc and insert new one
Use disc in good condition
Clean disc with soft cloth
Use compatible disc
Disc is inserted upside down
Insert disc with label side up
Disc region code is not
compatible with unit
Use disc with proper region cod
Image blurred,
distorted, or dark
Disc is illegally copied
Use original disc
PBC cannot be used
during VCD playback
PBC is not available on the
disc
No repeat or
searching while
playing VCD
PBC is on
Turn PBC off
Disc is dirty or scratched
File is damaged/bad recording
Message is longer than LCD
can display
Clean disc or replace
Recreate disc with good files
Weak station
searching
DISC
Cannot insert disc
Disc does not play
back
Insulate all speaker wiring connections
Tel-Mute malfunction
TFT MONITOR
Monitor does not
open automatically
Cause
TUNER
Illegal operation
Remote control does
not function
Problem
Corrective Action
GENERAL
MP3
Interruption occurred
during playback
Incorrect playback
message displayed
Change Parental Lock settings to lower
restriction
Error Messages
Message Displayed
Loading
No Disc
Bad Disc
Unknown disc
Region Error
Error
27
Turn LOCAL function off
Cause
Corrective Action
Disc is being read
Disc is dirty
Disc is upside down
Disc not present in loading
compartment
Disc is dirty
Disc is upside down
Clean disc with soft cloth
Insert disc with label side up
Insert disc
Clean disc with soft cloth
Insert disc with label side up
Disc format is not compatible
with this unit
DVD is not compatible with
region code of unit
illegal mechanism operation
28
Press EJECT key for 5 seconds to reset
loading mechanism
Remote control
Remote control does
not function
Battery is covered with
insulation tape
Battery depleted
Battery installed incorrectly
Pull out the insulation tape
Replace battery with new one
Remove battery and install correctly
1. When using the remote for the first time, you must pull out the insulation tape.
Insert the battery holder
2. Remove the battery if the remote control is not used for a month or longer.
Remove and dispose of the old battery immediately.
Do not store the battery with metallic materials.
3. Inserting/Replacing the Battery:
Remove the battery holder
NOTE: Use only one CR2025(3V) lithium battery.
Danger of explosion if battery is incorrectly replaced. Replace only with the same or equivalent
type.
Do not recharge, disassemble, heat or dispose of the battery in fire.
Keep batteries away from children to avoid the risk of accident.
Suggestions
1. Only use a piece of clean silicone cloth and neutral detergent to clean the front panel or monitor.
A rough cloth and non neutral detergent (such as alcohol) may result in scratching or discoloration.
2. Keep off water and other liquid things.
3. If the temperature inside the player gets too high, a protective circuit automatically stops playing
the disc. And then, please wait for the unit to cool down before operating the player again.
4. Never insert anything other than a 5” (12 cm) compact disc into the player as the mechanism can
be damaged by foreign objects.
5. Do not attempt to use a 3” (8 cm) CD-Single disc in this unit, either with or without an adaptor, as
it will damage the player and disc. Such damages are not covered by the Warranty on this product.
6.When the vehicle warms up during cold weather or under damp conditions, condensation may
appear on the LCD panel. If this occurs, the screen will not operate properly until the moisture has
evaporated.
7.We suggest that you should clean the discs used in this unit more frequently than used in your
home, because of the environmental conditions of the vehicle.
Remove the battery from the battery holder
Install the battery
29
30
Specifications
Enclosed Accessories list
Enclosed Accessories list:
DVD Player
Frequency response: 10Hz-20kHz
Channel separation @ 1kHz: >65dB
D/A converter: 24 Bit
No.
1
1
Power Harness
1
Extended Parking Wire
1
3.5mm to RCA interface cable
1
Main User Manual
1
6
Wiring Diagram
1
7
Trim frame
1
8
Clean Cloth
1
Rubber Cover
1
10
Iron Bar
1
11
Screws
2
12
Bolt
1
3
Cables and Wires
4
5
AM Tuner
Tuning range: 530kHz-1710kHz
Usable sensitivity: 22uV
Frequency response: 30Hz-2.2kHz
Monitor
Panel size: 7” (177.8 mm) diagonal measurement
View angle (up/down/left/right): 30/60/60/60
Resolution: 480 W x 234 H
Brightness (cd/m2): 350
Contrast ratio: 300:1
Elements: 336,960
9
Manuals
Others
General
Operating voltage: 11-16 VDC, negative ground
Speaker output impedance: 4~8 ohms
Line output voltage: 2 Volts
Line output impedance: 200 ohms
Chassis dimensions: 7" x 7" x 2"
(178 x 178 x 51 mm)
Design and specifications subject to change without notice.
CEA-2006 Power Standard Specifications
(reference: 14.4VDC +/- 0.2V, 20Hz~20kHz)
Power Output: 17 Watts RMS x 4 channels at 4 ohms and < 1% THD+N
Signal to Noise Ratio: 80dBA (reference: 1 watt into 4 ohms)
31
Quantity
Front Remote Control
Remote Control
2
FM Tuner
Tuning range: 87.5MHz-107.9MHz
Usable sensitivity: 8.5dBf
50dB quieting sensitivity: 10dBf
Stereo separation @ 1kHz: 40dB
Frequency response: 30Hz-13kHz
Description
Item
32